WooCommerce Product Countdown Timer
Overview
The Countdown Timer embed is a prominent on-page countdown — a Top Message, a Bottom Message, and large ticking digits — that you drop into the product page to create urgency around a limited-time offer.
Use this WooCommerce countdown timer plugin to add a WooCommerce product countdown timer, a fixed sale countdown timer, an evergreen countdown timer, or a targeted countdown timer on product page content.
How it works
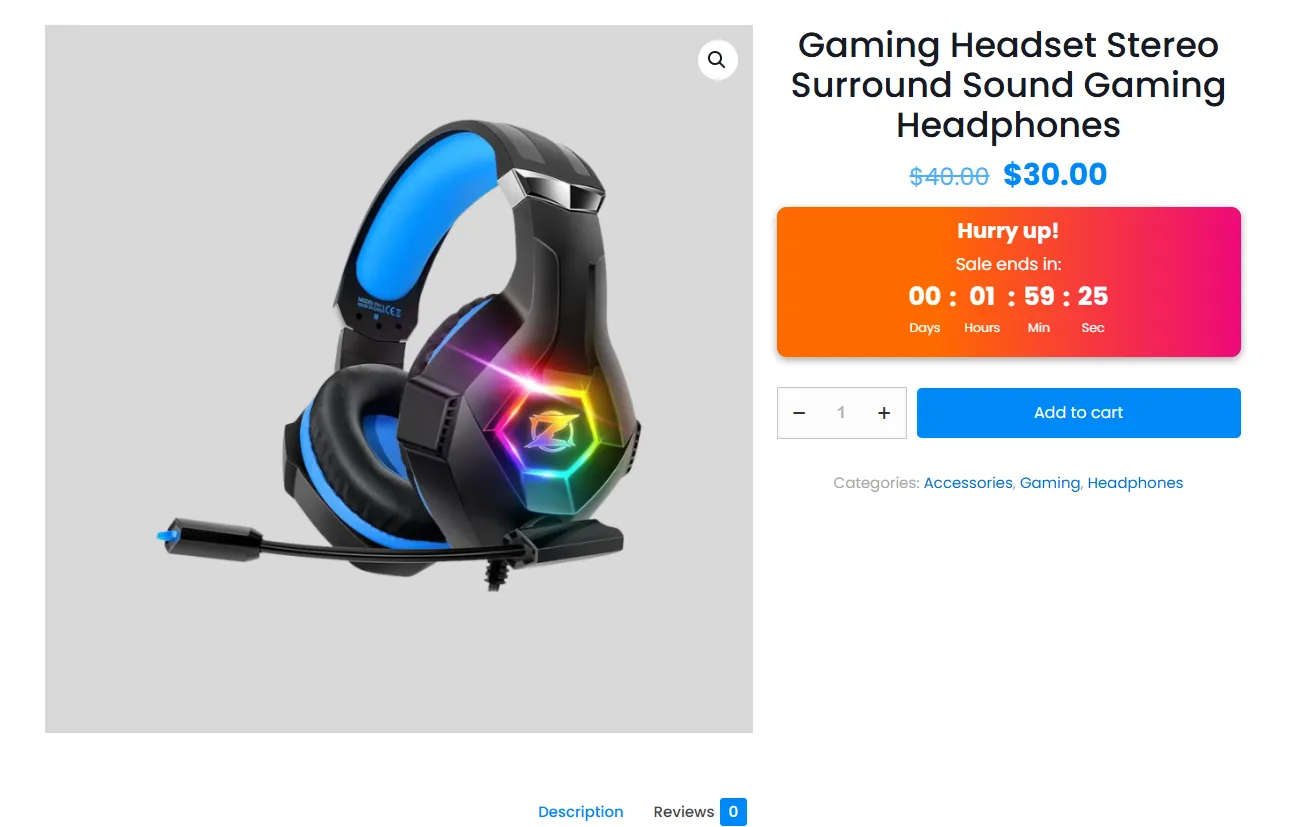
Your sale ends soon. You add a Countdown Timer embed just above the Add to Cart button reading "Hurry up! — Sale ends in:" with a live clock. As the deadline nears, shoppers feel the pressure and buy sooner.
Embeds are available in the Pro version.
Step-by-step setup
1. Pick the Countdown Timer type
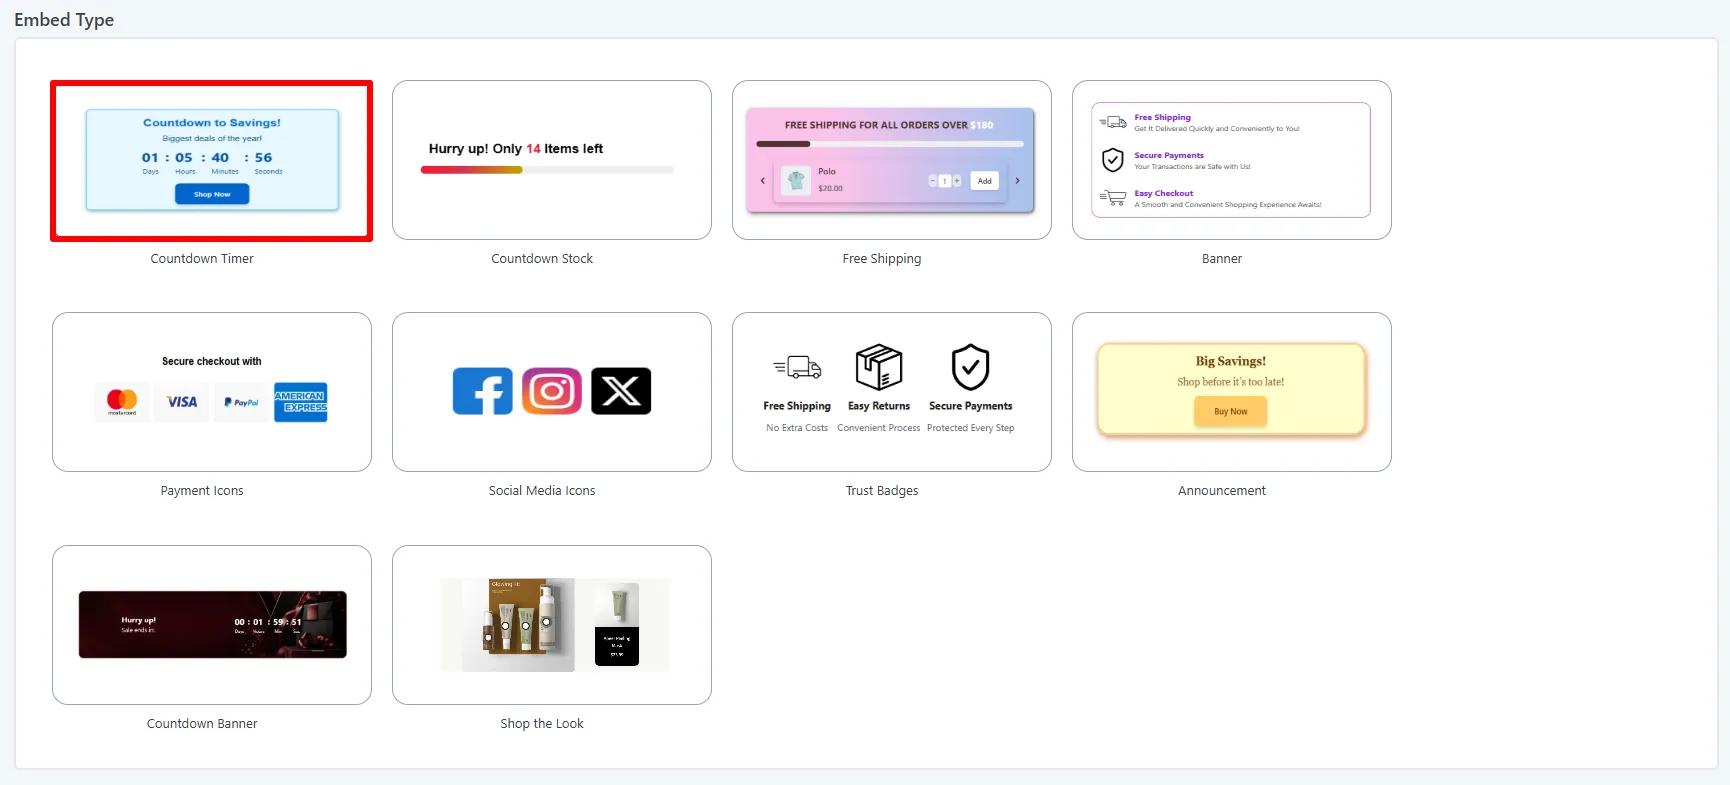
Open Sale Badges → Embeds → Add New, give the embed a Name, and turn Status on. Under Embed Type choose Countdown Timer.
2. Write your messages
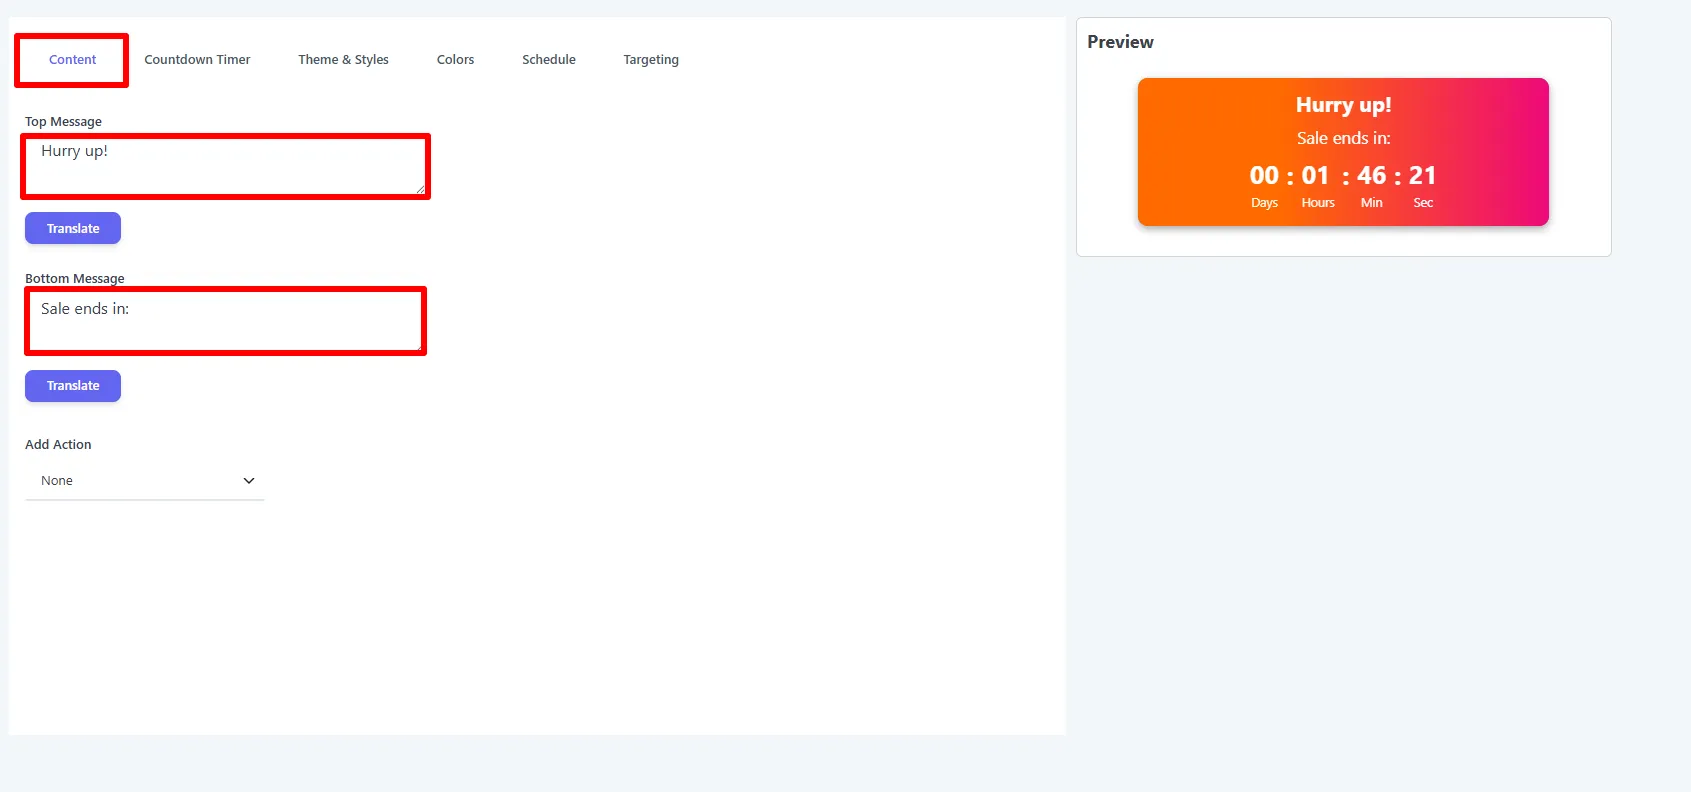
On the Content tab, set the two lines and (optionally) a call to action:
- Top Message — the headline, e.g.
Hurry up! - Bottom Message — the sub-line above the digits, e.g.
Sale ends in: - Add Action — None, Button (Button Text, Button URL, Open New Tab), or Coupon (Coupon Text + Border Style).
Each field has a Translate button for per-language values.
3. Set the timer
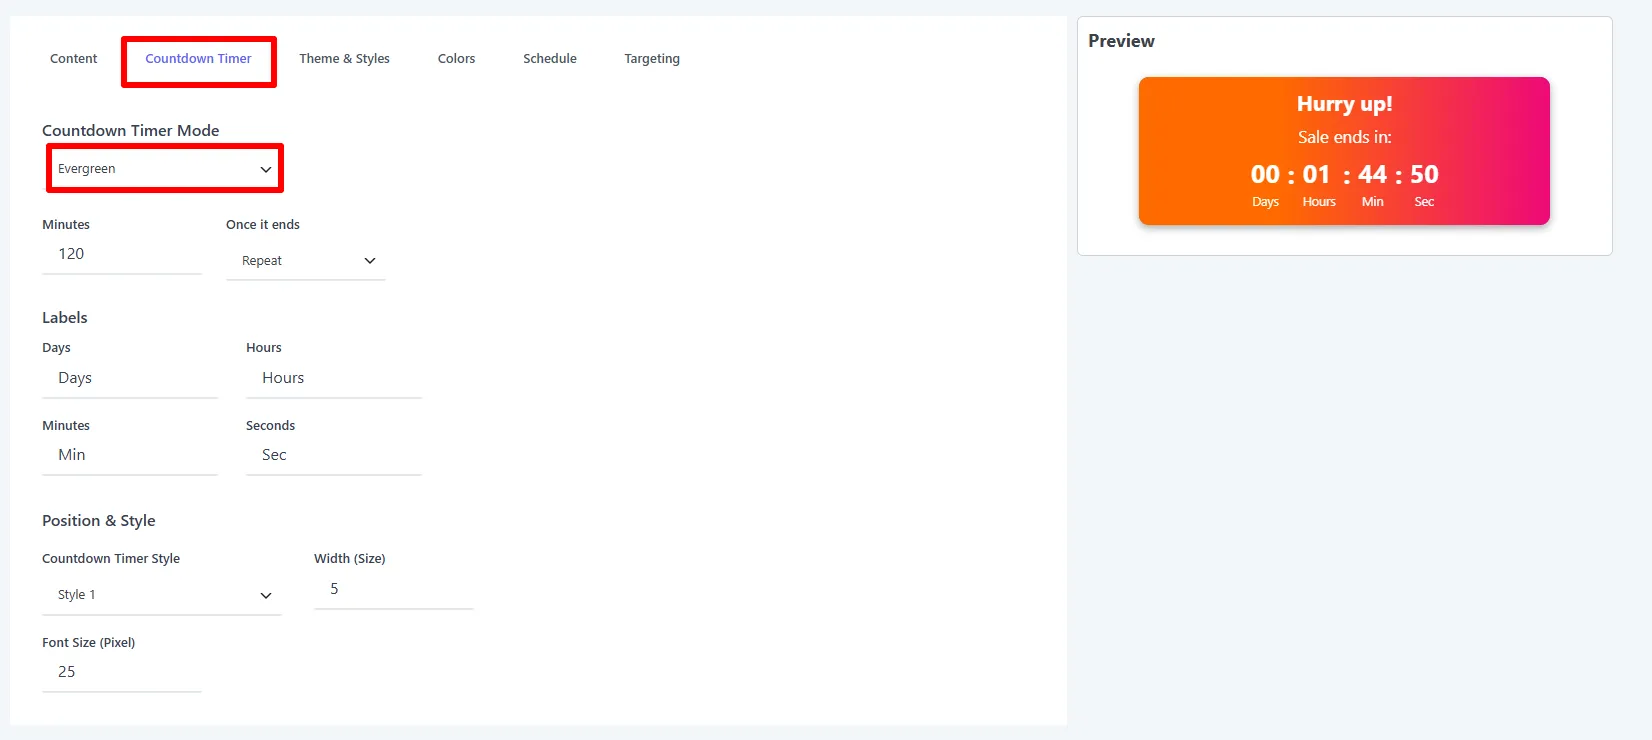
On the Countdown Timer tab:
- Countdown Timer Mode — Till End Date (a fixed deadline) or Evergreen (a per-visitor timer).
- Minutes / Once it ends (Evergreen) — the per-visitor duration (e.g.
120), then Repeat or Close the bar. - End Date / Time (Till End Date) — the moment it counts down to (the editor shows your store's server time).
- Labels — rename Days / Hours / Minutes / Seconds.
- Position & Style — Countdown Timer Style (Style 1–3), Width (Size), and Font Size.
4. Style it
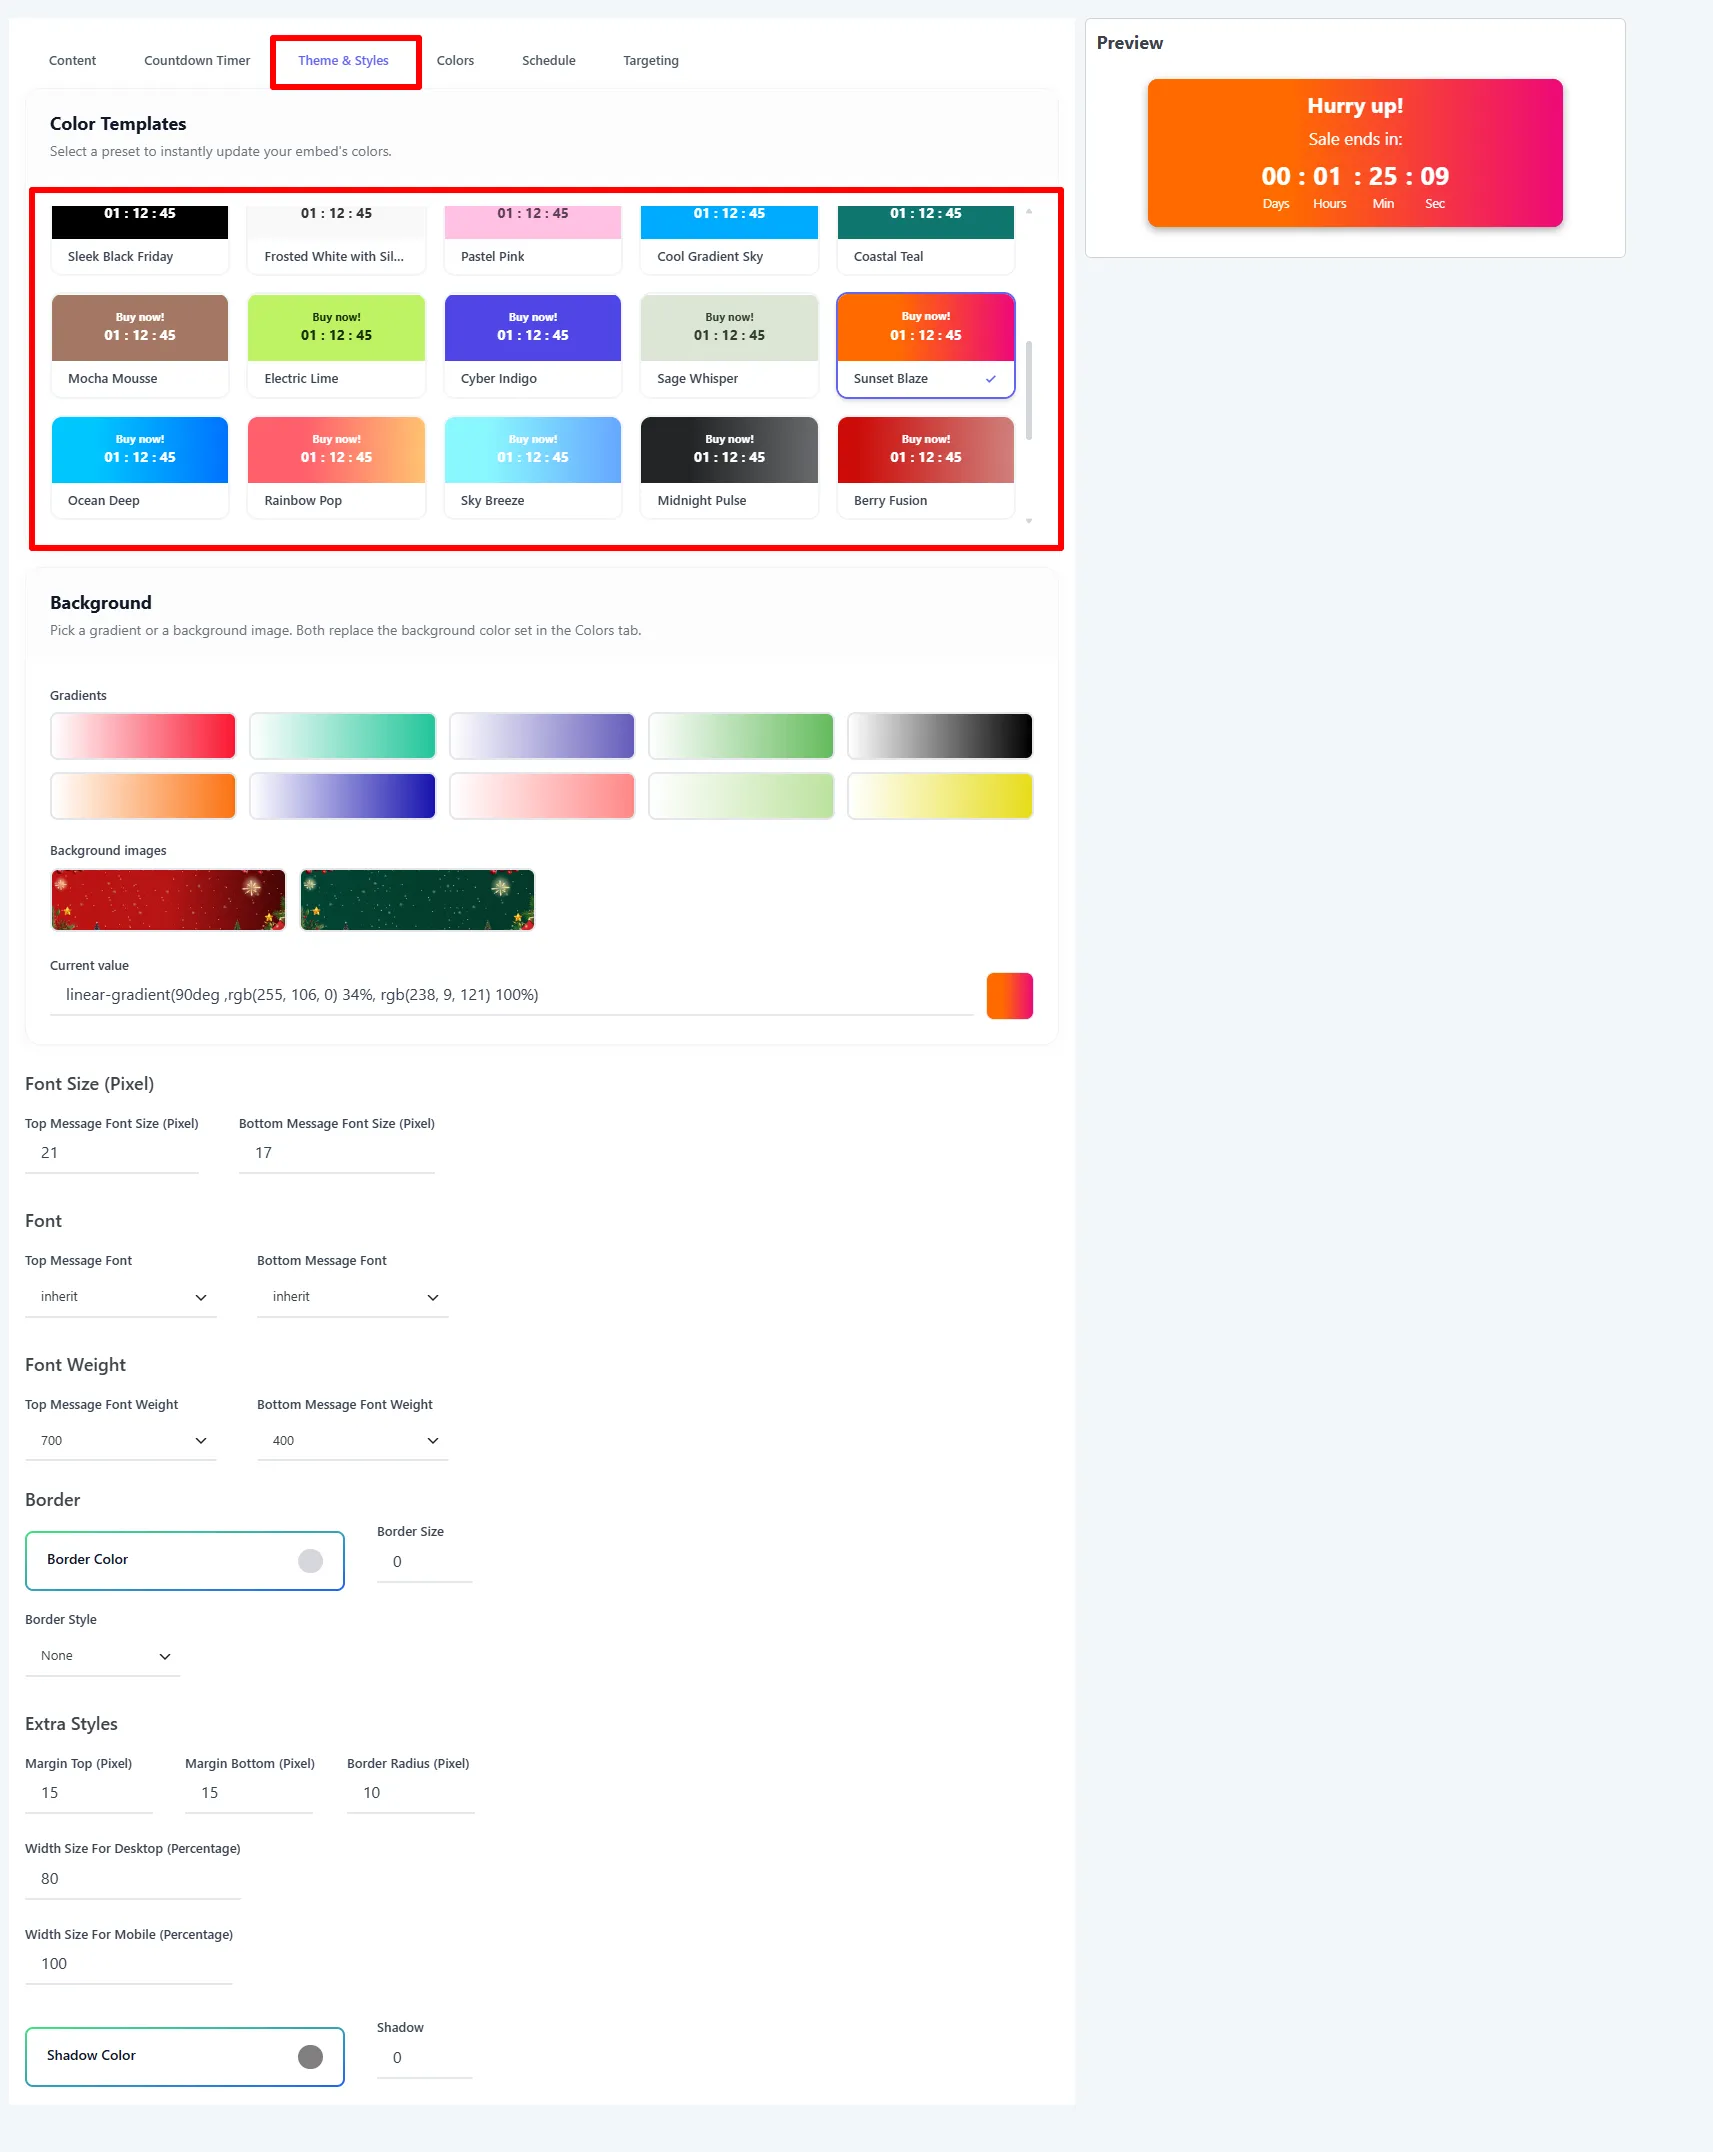
On the Theme & Styles tab, pick a Color Template (e.g. Sunset Blaze) to recolor the embed in one click, or set a Background gradient / image (which replaces the Colors-tab background). Then fine-tune Font Size / Font / Font Weight, Border, and Extra Styles — margins, Border Radius, and Width for desktop & mobile.
5. Place it, target, then Save
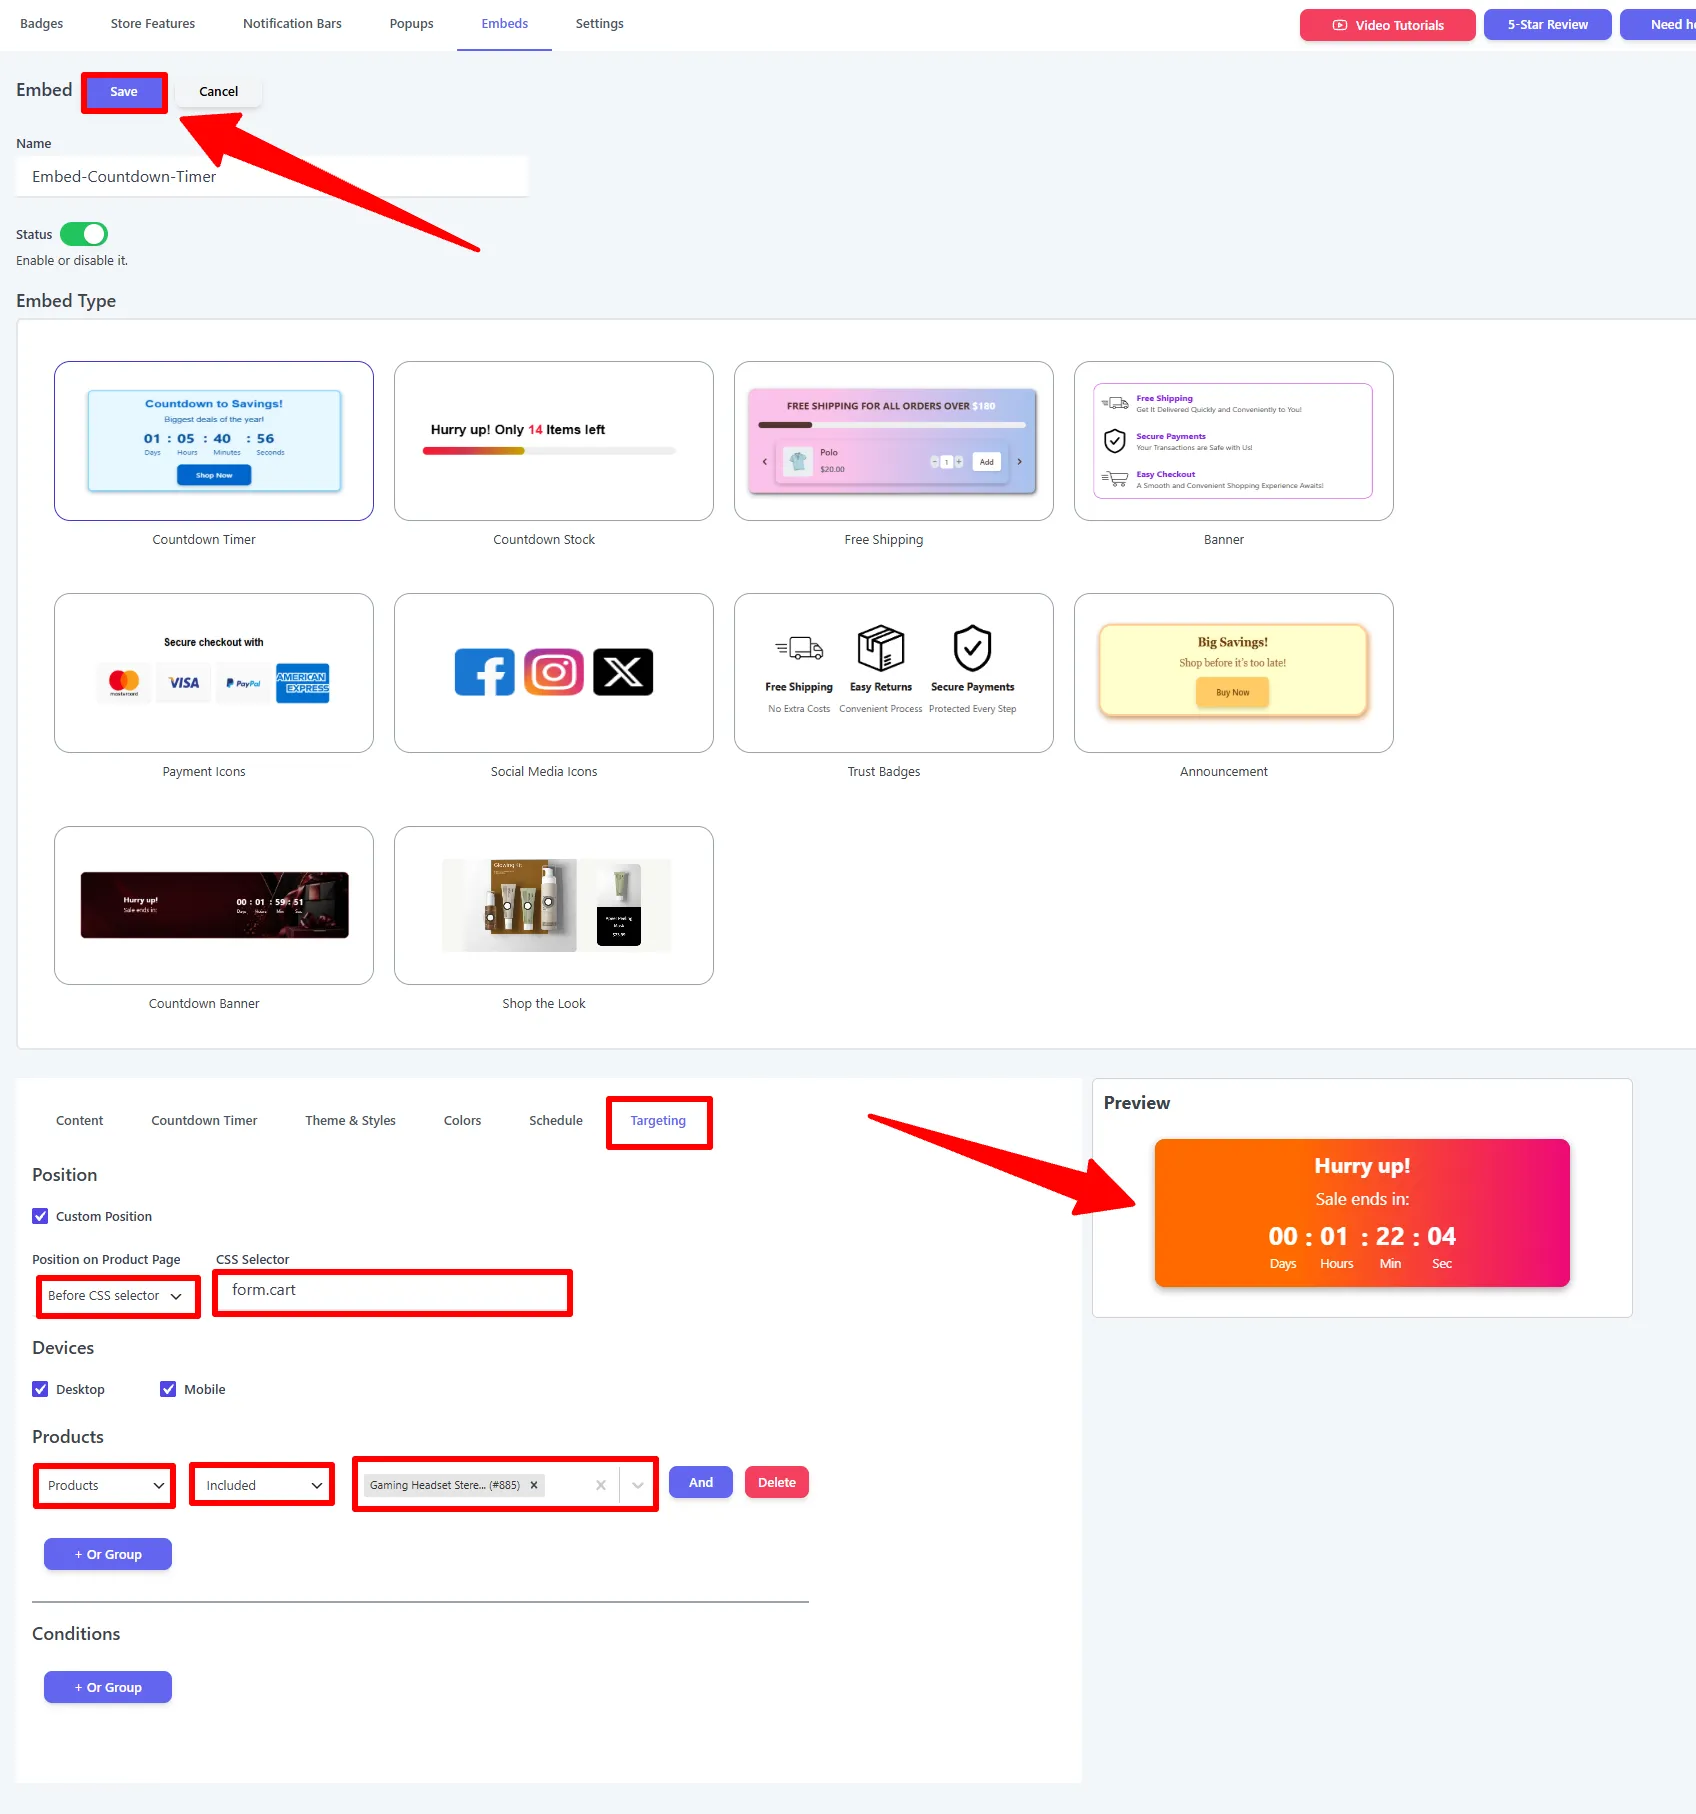
On the Targeting tab, tick Custom Position and set Position on Product Page (e.g. Before CSS selector) with a CSS Selector (default form.cart — this places the timer just above the Add to Cart form). Pick the Devices, add Products rules (Included / Excluded), then click Save.
Options explained
Content
| Setting | What it does | Example |
|---|---|---|
| Top Message | The headline line. | Hurry up! |
| Bottom Message | The sub-line above the digits. | Sale ends in: |
| Add Action → Button | Button Text, Button URL, Open New Tab. | Learn More |
| Add Action → Coupon | Coupon Text + Border Style (Solid / Dashed / Dotted). | BLACKFRIDAY30 |
Countdown Timer tab
| Setting | What it does |
|---|---|
| Countdown Timer Mode | Till End Date (fixed deadline) or Evergreen (per-visitor). |
| End Date / Time | (Till End Date) the target date/time. |
| Minutes / Once it ends | (Evergreen) duration, then Repeat or Close the bar. |
| Labels | Rename Days / Hours / Minutes / Seconds. |
| Countdown Timer Style | Style 1, 2, or 3. |
| Width (Size) / Font Size | Size of the timer digits. |
🧪 Example configuration
The timer shown in the screenshots:
| Setting | Value |
|---|---|
| Type | Countdown Timer |
| Top / Bottom Message | Hurry up! / Sale ends in: |
| Timer mode | Evergreen — 120 min, Repeat |
| Style | Style 1 |
| Color template | Sunset Blaze |
| Width (Desktop / Mobile) | 80% / 100% |
| Placement | Before form.cart |
| Targeting | Selected product(s) |
What customers see
The gradient countdown appears between the price and the Add to Cart button, ticking toward the deadline — a clear, hard-to-ignore nudge at the moment of decision.
Placement, targeting & schedule
For the full placement, product-rule, condition, and schedule reference, see the Embeds overview.
Next Steps
- Countdown Banner embed — a full-width banner version.
- Countdown Stock embed
- Embeds overview
Frequently Asked Questions
How do I add a countdown timer to a WooCommerce product page?
Go to Sale Badges → Embeds → Add New, choose Countdown Timer, add your messages, select Till End Date or Evergreen, configure the design and targeting, then save.
What is an evergreen countdown timer?
An evergreen countdown timer gives each visitor a timer based on the duration you set, such as 120 minutes. Choose what happens when it ends: Repeat or Close the bar.
Can I display a coupon with the sale countdown timer?
Yes. Set Add Action to Coupon, enter the coupon text, and choose a border style. You can also use a button with a custom URL.