WooCommerce Countdown Timer: Product Sale Setup
Overview
A WooCommerce countdown timer badge turns a normal badge into a live, ticking clock that counts down to the end of your offer. Sale Booster supports a fixed WooCommerce sale countdown for scheduled promotions and an evergreen countdown timer for visitor-based offers; the timer can sit on the product image or run as a full-width bar below it.
How it works
Your 48-hour flash sale is live. On each product a small timer ticks down "06d : 13h : 49m : 06s". Shoppers see time slipping away and buy now instead of "later". When the clock reaches zero, the timer hides itself automatically — and if you also set a Schedule, the whole badge removes itself.
Countdown Timer badges are part of the Pro version — 10+ timer templates, out-of-image bar styles, progress-bar timers, evergreen (per-visitor) timers, and an animated Product Image Highlight ring.
Step-by-step setup
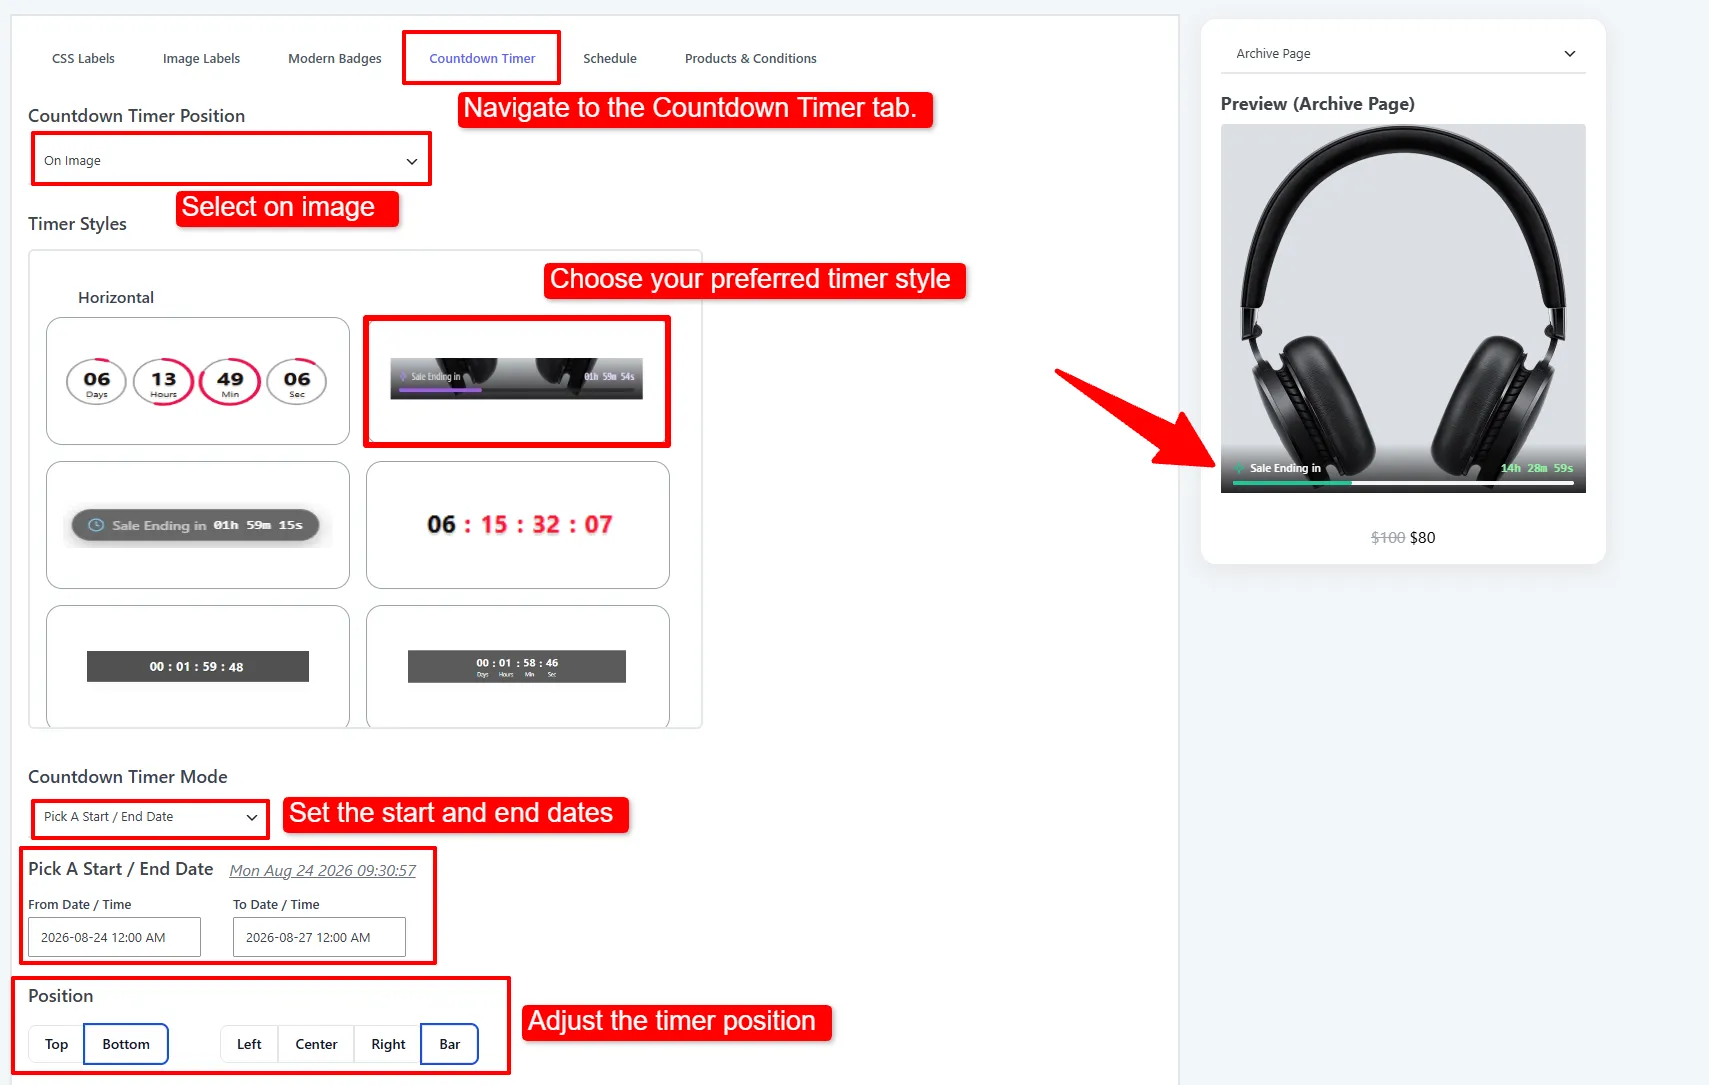
1. Choose the position, style, mode, and dates
Open the Countdown Timer tab and set it up top to bottom:
- Countdown Timer Position — On Image (overlaid on the product image) or Out of Image (below it).
- Timer Styles — pick a design from the gallery (circular, progress bar, digital, or dark bar).
- Countdown Timer Mode — Pick a Start / End Date (then set the From and To date/time), or Evergreen.
- Position — anchor the timer Top / Bottom and Left / Center / Right, or choose Bar for a full-width strip.
2. Customize the colors and effects
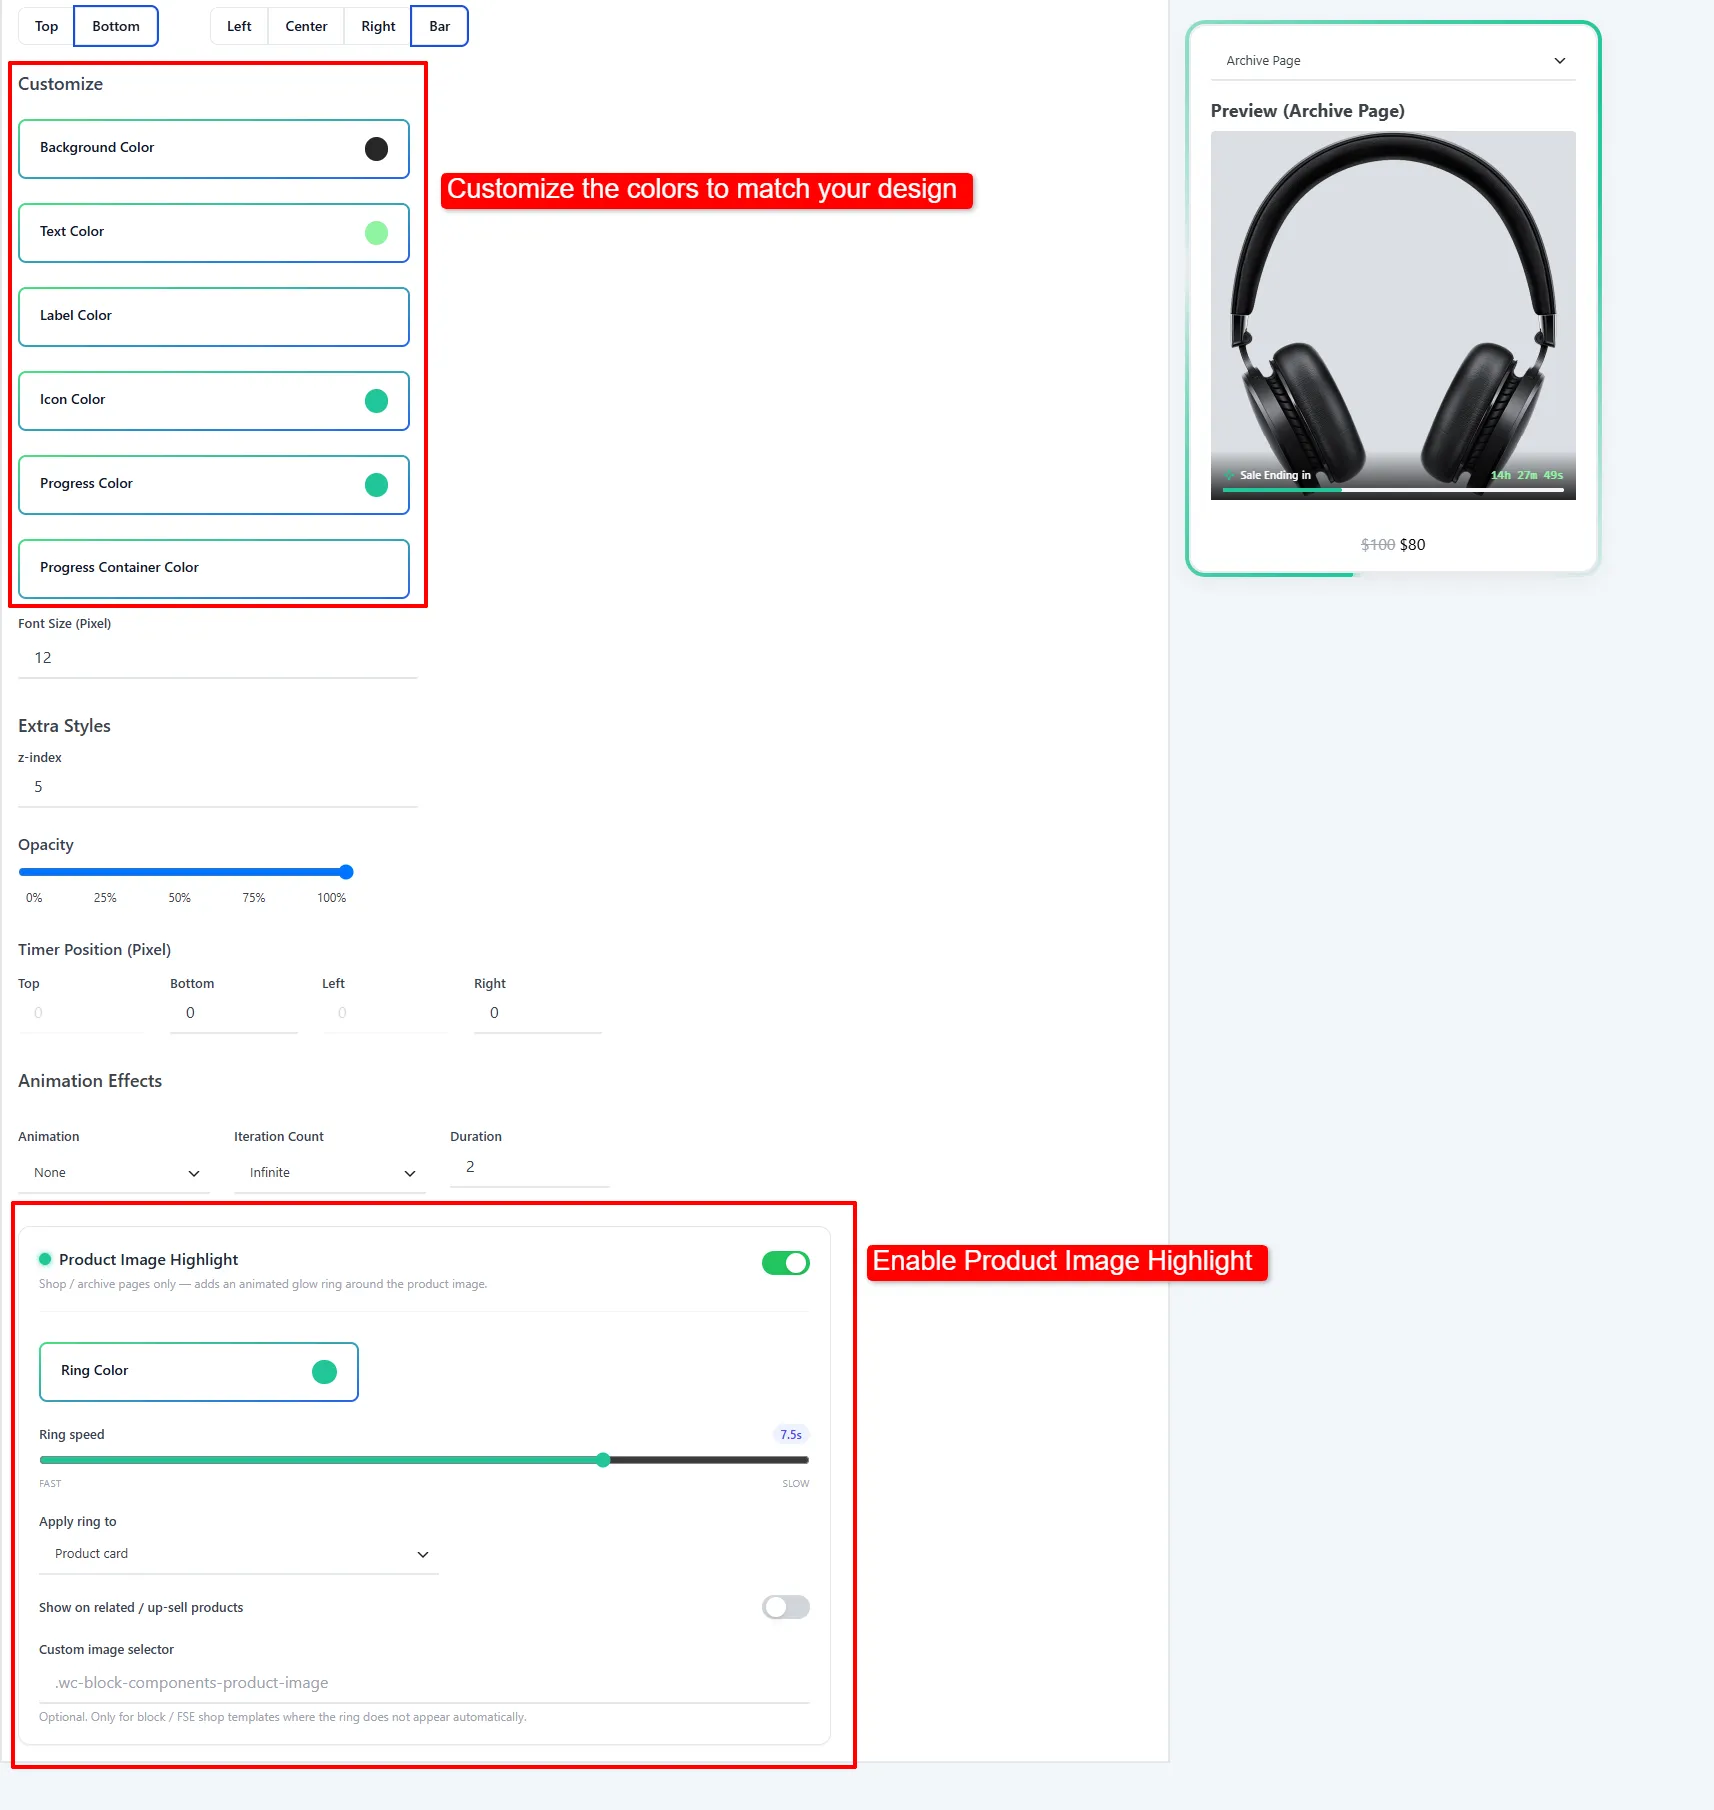
Scroll down to style the timer:
- Customize colors — Background, Text, Label, Icon, Progress, and Progress Container color.
- Extra styles — Font Size, z-index, Opacity, per-pixel Timer Position, and an Animation (effect, iteration count, duration).
- Product Image Highlight (shop/archive pages) — toggle on an animated glow ring around the product image; set the Ring Color, Ring speed (fast ↔ slow), where to apply the ring, and an optional custom image selector.
Then click Save.
Options explained
Timer mode — the most important choice
| Mode | How it behaves | When & why to use |
|---|---|---|
| Pick a Start / End Date | Counts down to a fixed deadline for every visitor. When it hits zero, the timer disappears. | Real, store-wide sales (Black Friday) where the offer truly ends at a set time. |
| Evergreen | Starts when each shopper first sees it and runs for a set number of minutes — stored per-visitor in their browser. When it ends you choose Repeat or Close the bar. | Always-on urgency on evergreen product pages — every visitor gets their own fresh countdown. |
Style, colors & placement
| Option | What it does | When & why to use |
|---|---|---|
| Countdown Timer Position | On Image vs Out of Image. | Use Out of Image for a prominent bar. |
| Timer Style | The visual template — circular, progress bar, digital, or dark bar. | Circular for corners; bar for product pages. |
| Background / Text / Label / Icon / Progress colors | The timer's colors. | Match your sale's accent color. |
| Font Size / z-index / Opacity | Typography, stacking order, and fade. | Raise z-index if the theme covers the timer. |
| Timer Position (pixels) | Fine-tune Top / Bottom / Left / Right offsets. | Nudge the timer to sit cleanly on the image. |
| Animation | Effect, iteration count, and duration. | Add subtle motion to draw the eye. |
Product Image Highlight
An optional animated glow ring drawn around the product image on shop/archive pages, to make timed products stand out in the grid.
| Setting | What it does |
|---|---|
| Ring Color | The color of the glow ring. |
| Ring speed | How fast the ring animates (fast ↔ slow). |
| Apply ring to | Which element the ring wraps (e.g. the product card). |
| Show on related / up-sell products | Also draw the ring in related/up-sell blocks. |
| Custom image selector | Target a specific element on block/FSE themes where the ring doesn't appear automatically. |
🧪 Example configuration
A 48-hour flash-sale timer:
| Setting | Value |
|---|---|
| Position | On Image |
| Style | Progress bar ("Sale Ending in") |
| Mode | Pick a Start / End Date |
| From → To | e.g. 2026-08-24 → 2026-08-27 |
| Placement | Bottom · Bar |
| Product Image Highlight | On (green ring) |
What customers see
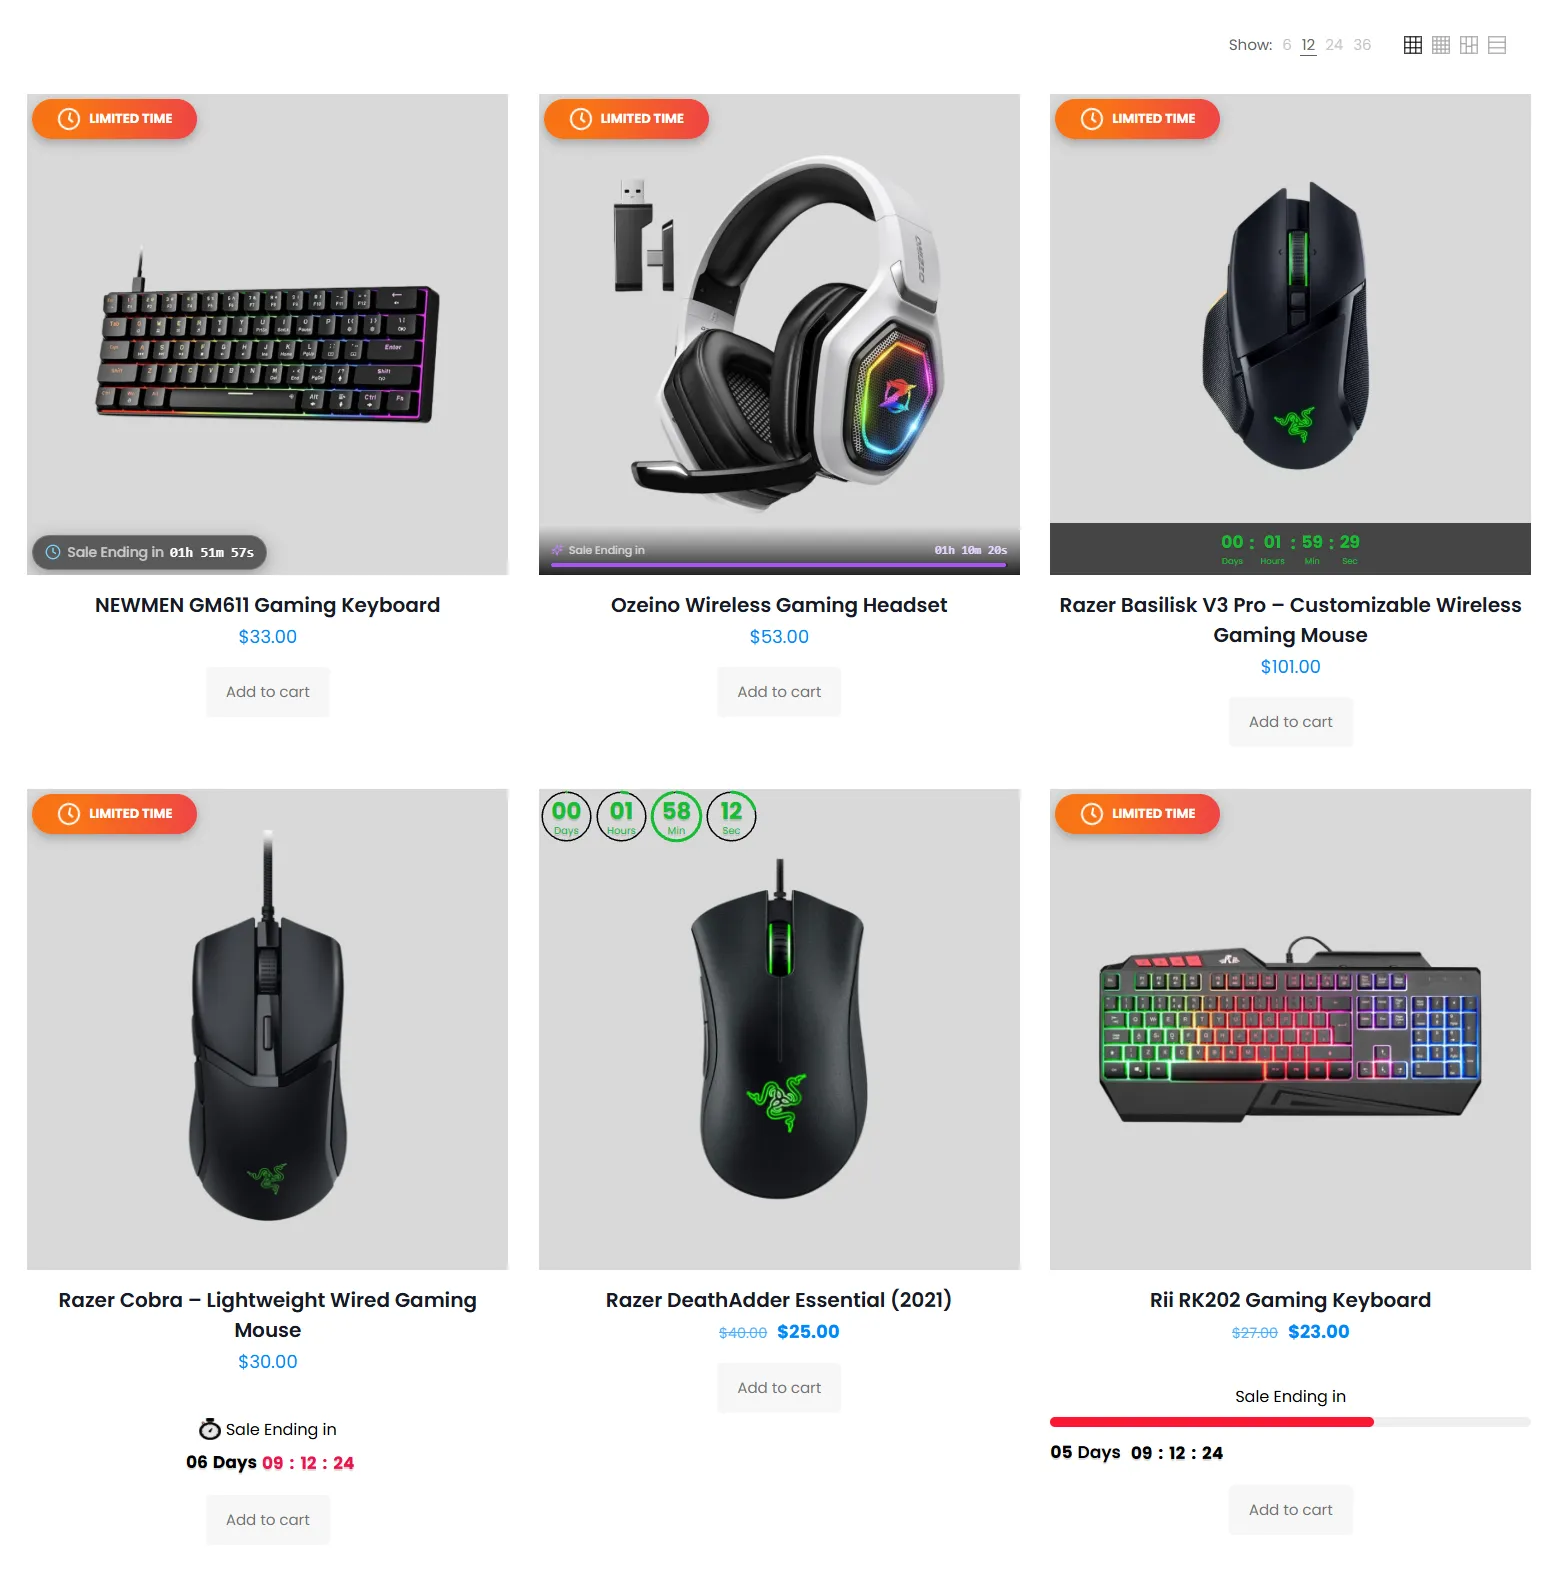
Each product shows a live countdown in your chosen style — circular, digital, or a progress bar — ticking toward the deadline. When it reaches zero it disappears on its own.
- Use a fixed end date for genuine sales, and evergreen for always-on product urgency — don't fake a fixed deadline that resets, as returning shoppers will notice.
- Keep the timer close to the price or Add to Cart for maximum impact.
- Pair a fixed-date timer with the Schedule tab so the whole badge disappears when the sale ends.
SEO, accuracy, and campaign QA
Use a product page countdown timer to explain a real promotion, not to replace the product’s normal price, availability, or description. A fixed timer should match the sale’s actual end date and the store’s server time. An evergreen timer should clearly represent a per-visitor duration; it should not imply that every shopper shares the same deadline. Keep offer and availability data synchronized with WooCommerce so search engines can interpret the product independently of the visual timer (Google Product structured data).
Before launch, test a product with a valid sale end date, a product with no sale price, a variable product, desktop and mobile archive pages, a single product page, and the zero-state after the timer ends. Confirm that the timer hides or closes as configured, the schedule removes the badge when required, the ring does not cover product links, and the displayed deadline matches the campaign terms. Track timer impressions, product clicks, add-to-cart events, checkout starts, completed orders, and conversion rate; keep the message short enough to scan beside the buying action.
Frequently Asked Questions
How do I add a WooCommerce countdown timer to a product?
Create or edit a badge under Sale Badges → Badges, open the Countdown Timer tab, choose the position and style, select a fixed start/end date or Evergreen mode, configure the design and targeting, then save.
What is the difference between a WooCommerce sale countdown and an evergreen countdown timer?
A WooCommerce sale countdown uses one fixed deadline for the campaign, so visitors see the same end time. An evergreen countdown timer starts for each visitor when they first see it and runs for the duration configured in the editor.
What happens when the countdown timer reaches zero?
The timer hides itself automatically. If the badge also has a Schedule, the schedule controls whether the complete badge remains active. Test the zero-state so no expired offer or stale call to action remains visible.
Can a WooCommerce flash sale timer appear on product archives?
Yes. Set Countdown Timer Position to On Image or Out of Image, enable the archive display location, and use targeting rules to limit the timer to the products, categories, sale status, devices, or campaign period that qualify.
Next Steps
- Scheduling Badges
- Notification Bar — run a countdown in a store-wide bar.
- Embeds — add a countdown or stock countdown on the product page.