Getting Started
Overview
RestockBeacon Preorder & Back in Stock for WooCommerce helps with products that are out of stock or not released yet. Shoppers can preorder upcoming products, or join a "Notify me" waitlist on out-of-stock items — and the plugin emails them when stock returns. WooCommerce's own backorder setting remains available separately.
Everything is configured from one screen using campaigns, so you never edit products one by one.
How it works
You sell a jacket that just sold out. Today that page is a dead end. With RestockBeacon you create one Back in Stock campaign targeting all products, and every out-of-stock item in your store immediately shows a Notify me button instead of a greyed-out buy button. When you restock the jacket, everyone who signed up gets an email within a minute — without you doing anything.
Preorder campaigns and back-in-stock waitlists are in the Free version. WooCommerce provides backorders independently. Pro adds Coming Soon campaigns, deposits & partial payments, preorder discounts, Early Bird pricing, countdown and progress widgets, extra email layouts, category & tag targeting, mixed-cart rules, order limits, B2B and region rules, automatic product tagging, preorder and waitlist analytics, and CSV export.
Requirements
| Requirement | Minimum |
|---|---|
| WordPress | 6.5 |
| WooCommerce | 8.5 |
| PHP | 7.4 |
Compatible with High-Performance Order Storage (HPOS), the Cart & Checkout Blocks (Store API), block themes, and simple + variable products.
Install the free plugin
1. Check WooCommerce is active
Go to Plugins → Installed Plugins and confirm WooCommerce is there and active. RestockBeacon depends on it and will refuse to activate without it.
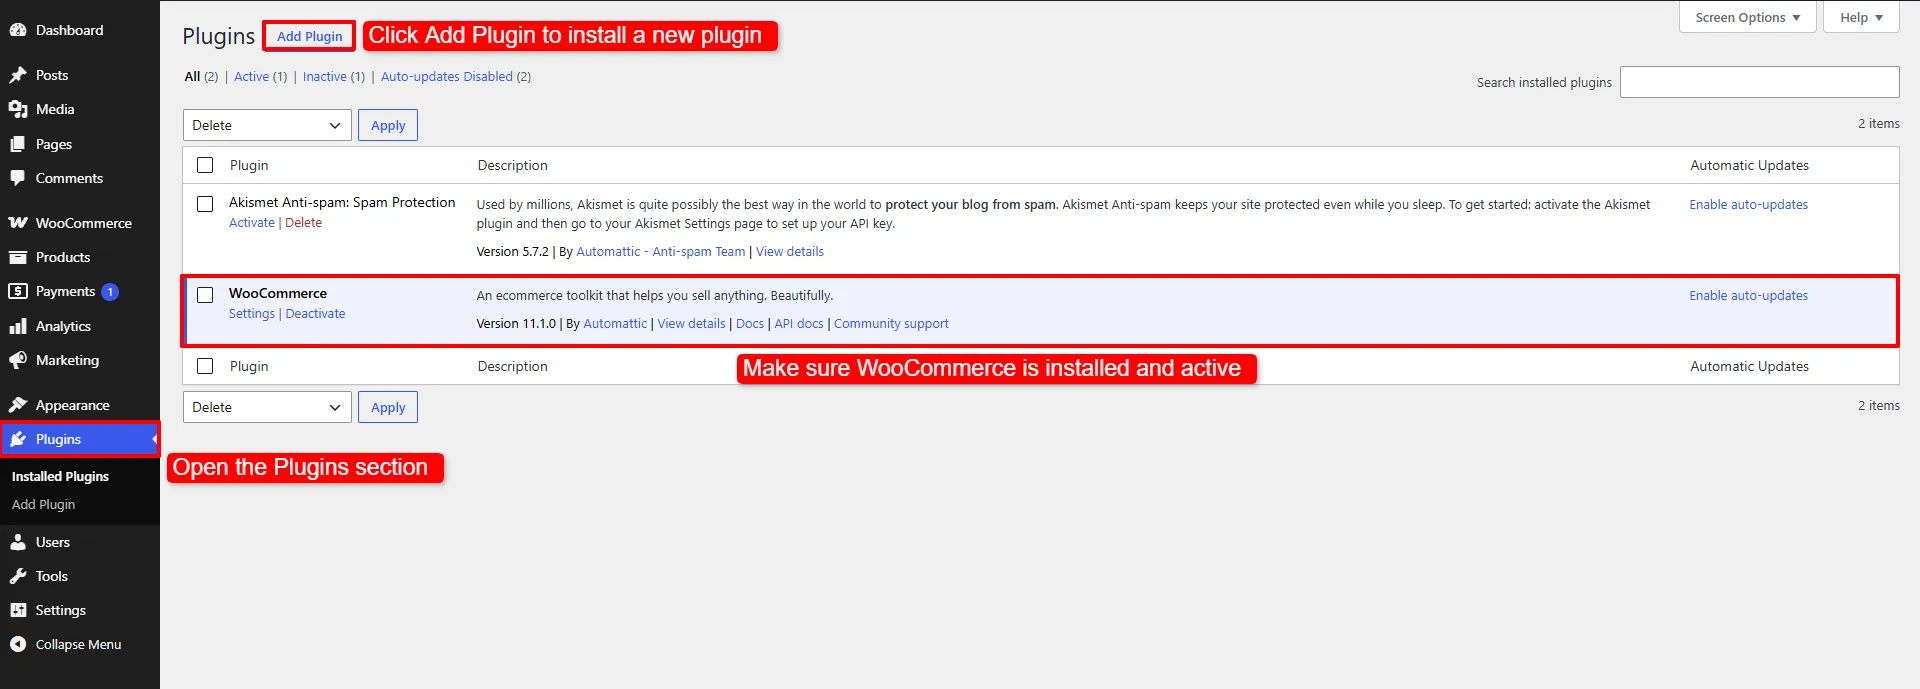
Confirm WooCommerce is active, then click Add Plugin.
2. Upload the zip
Click Upload Plugin, choose restockbeacon-preorder-back-in-stock-for-woocommerce.zip, and click Install Now.
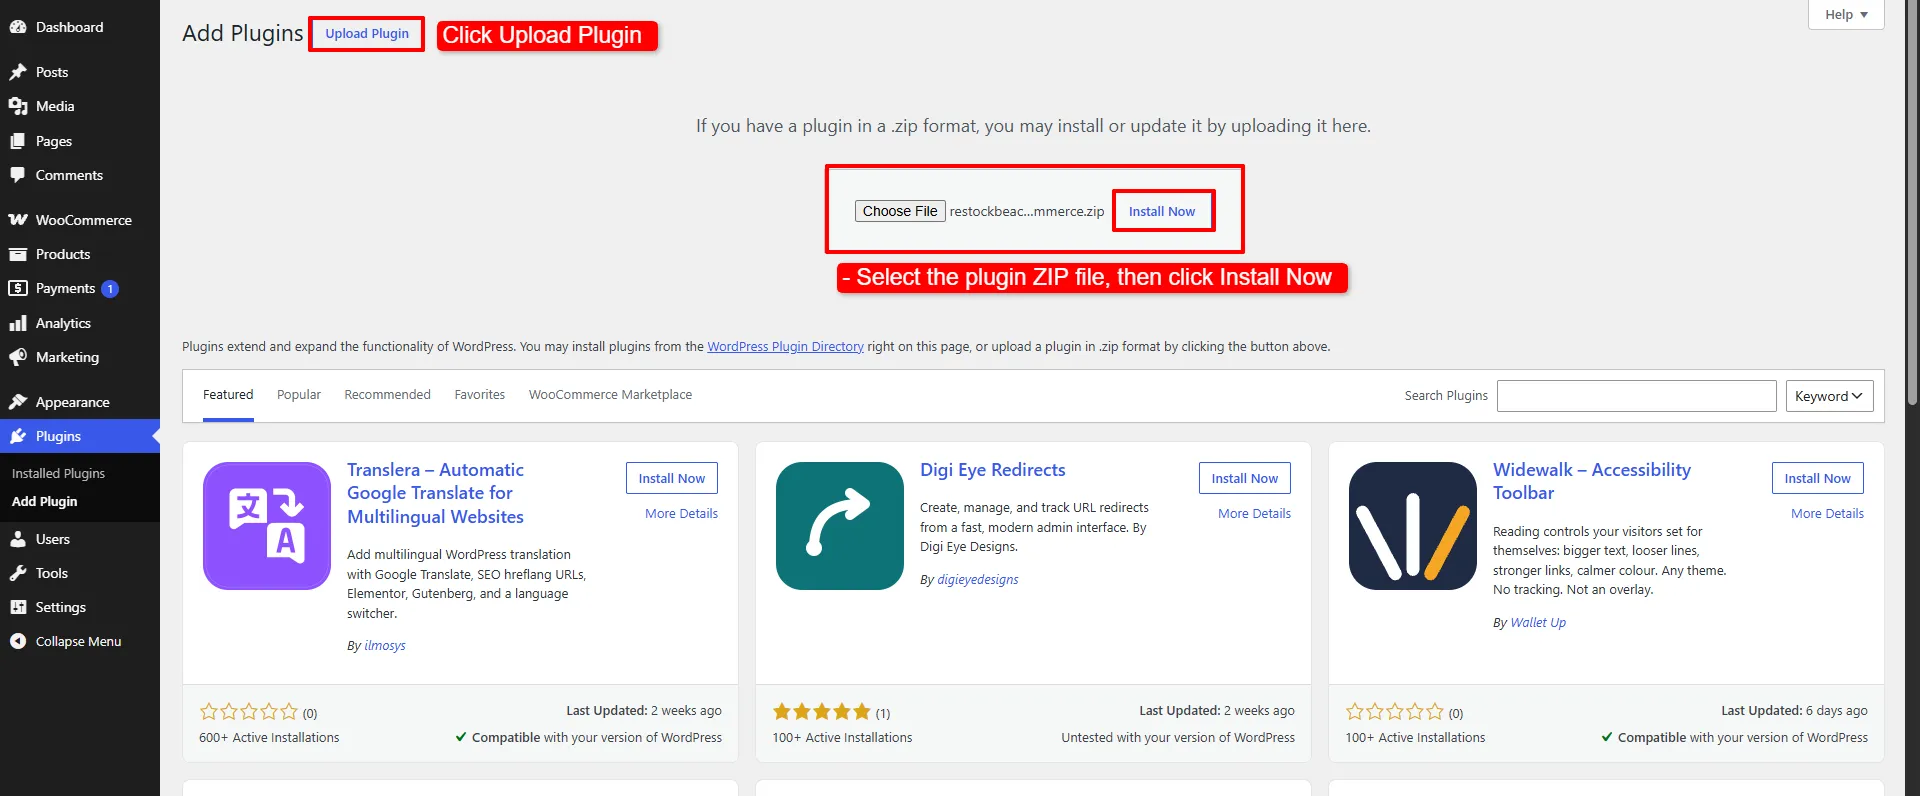
Select the zip, then Install Now.
3. Activate
Wait for "Plugin installed successfully", then click Activate Plugin.
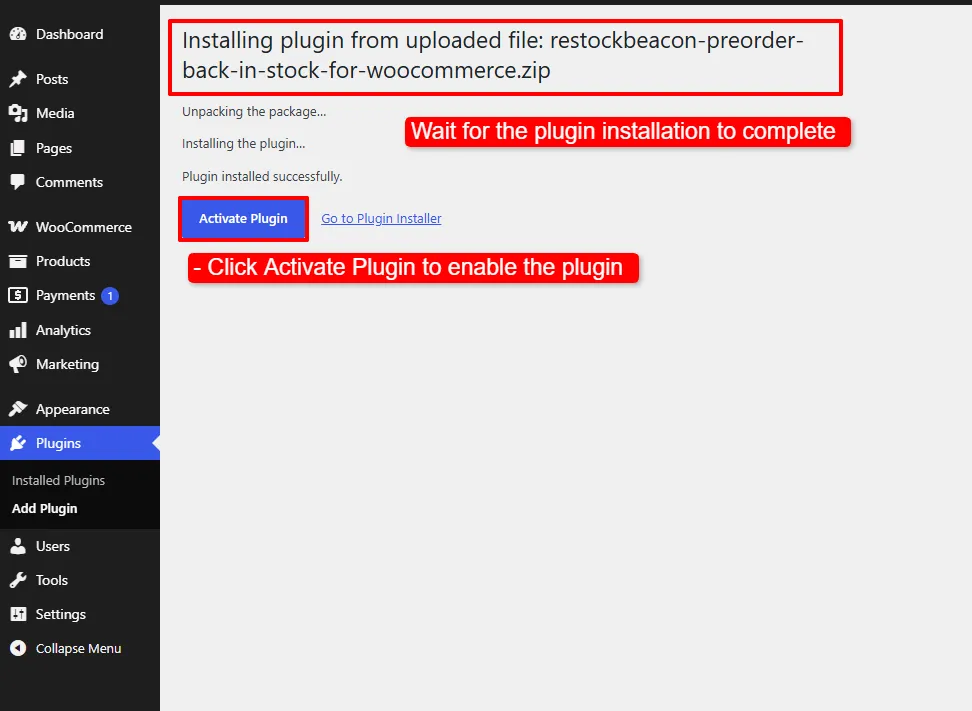
Click Activate Plugin once the upload finishes.
4. Confirm it is running
The plugin now appears in your list as active, and a new Preorder menu appears in the admin sidebar. That menu is your control centre for campaigns, the waitlist and settings.
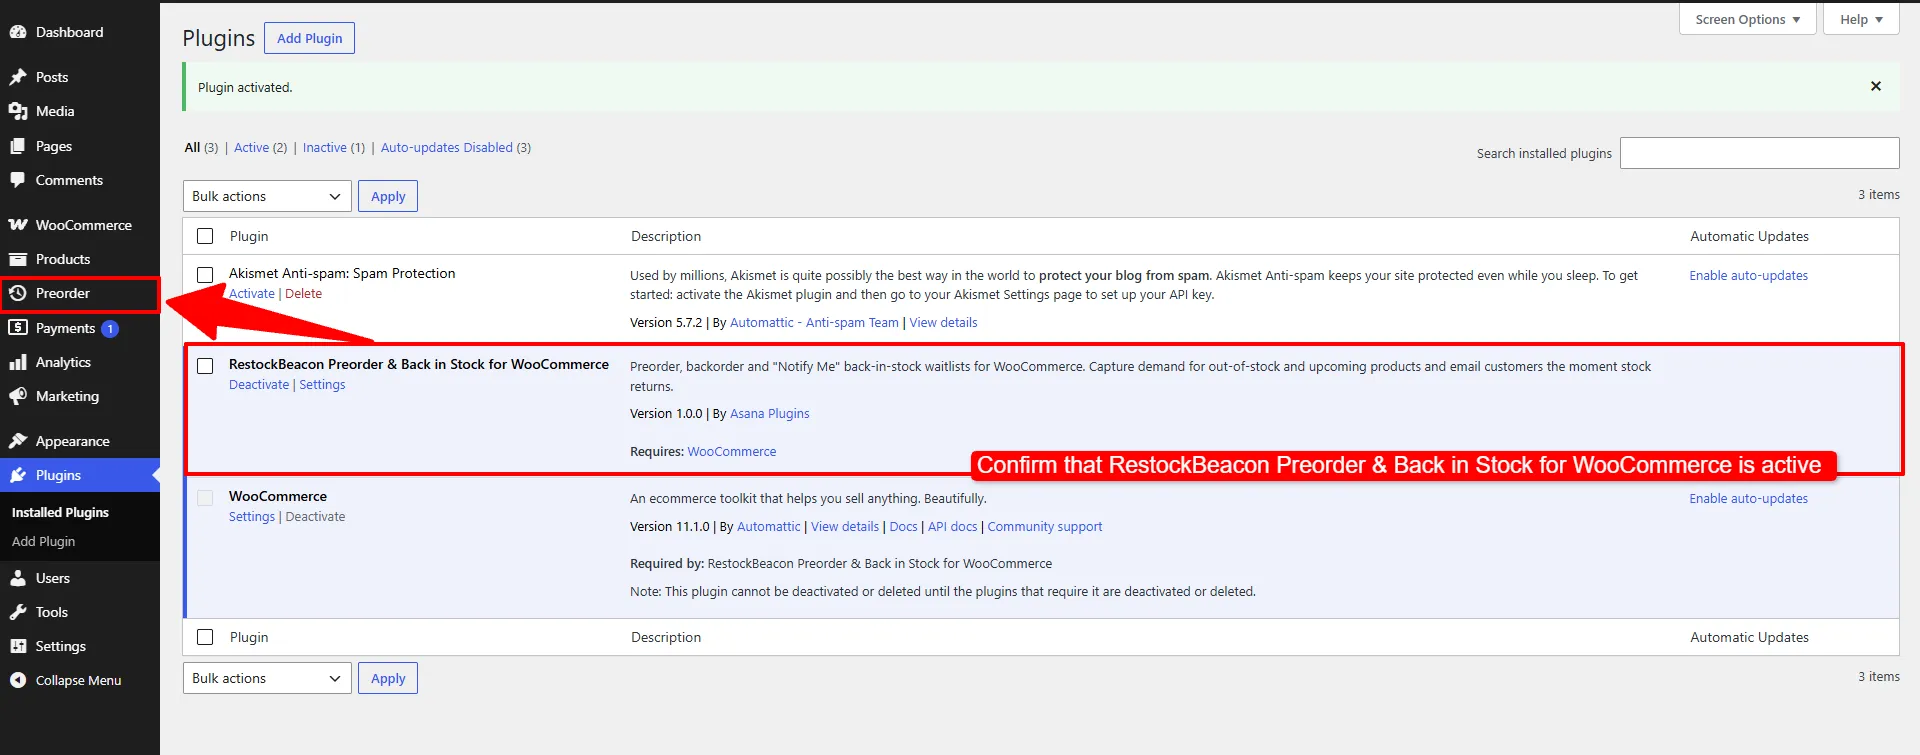
RestockBeacon is active, and the Preorder menu has appeared in the sidebar.
Add the Pro add-on (optional)
Pro is a separate plugin that installs alongside the free one — it does not replace it. Keep the free plugin active; Pro will not run without it.
1. Open the Plugins screen
With the free plugin already active, go to Plugins → Installed Plugins and click Add Plugin.
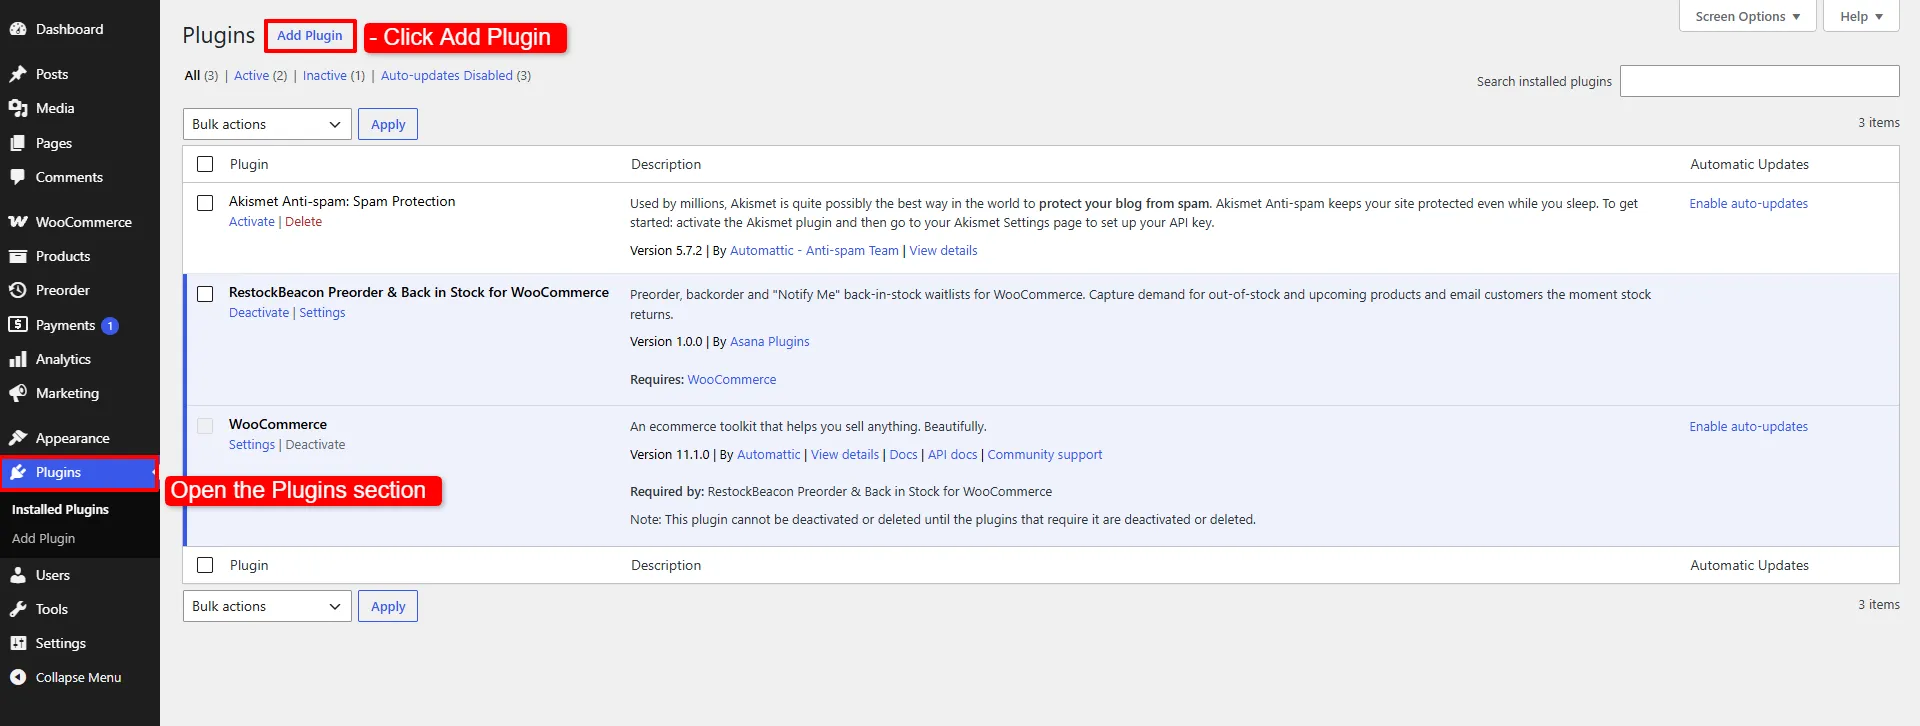
Start from the same place — the free plugin stays where it is.
2. Upload the Pro zip
Click Upload Plugin, choose restockbeacon-preorder-back-in-stock-for-woocommerce-pro.zip, and click Install Now.
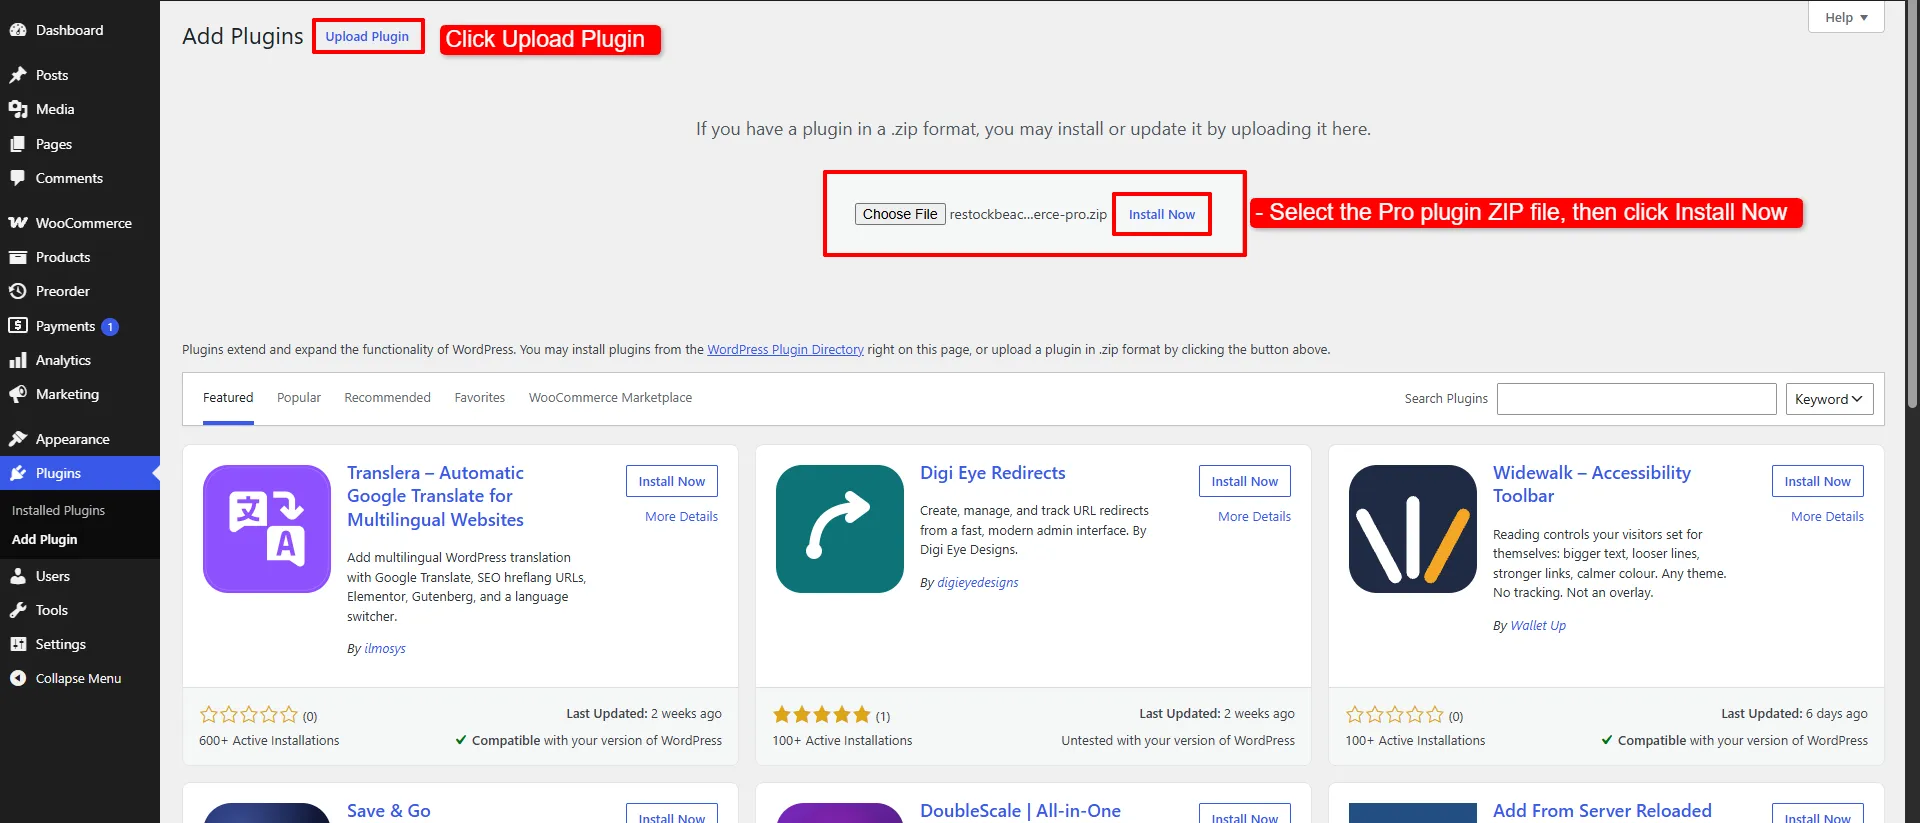
Select the Pro zip, then Install Now.
3. Activate Pro
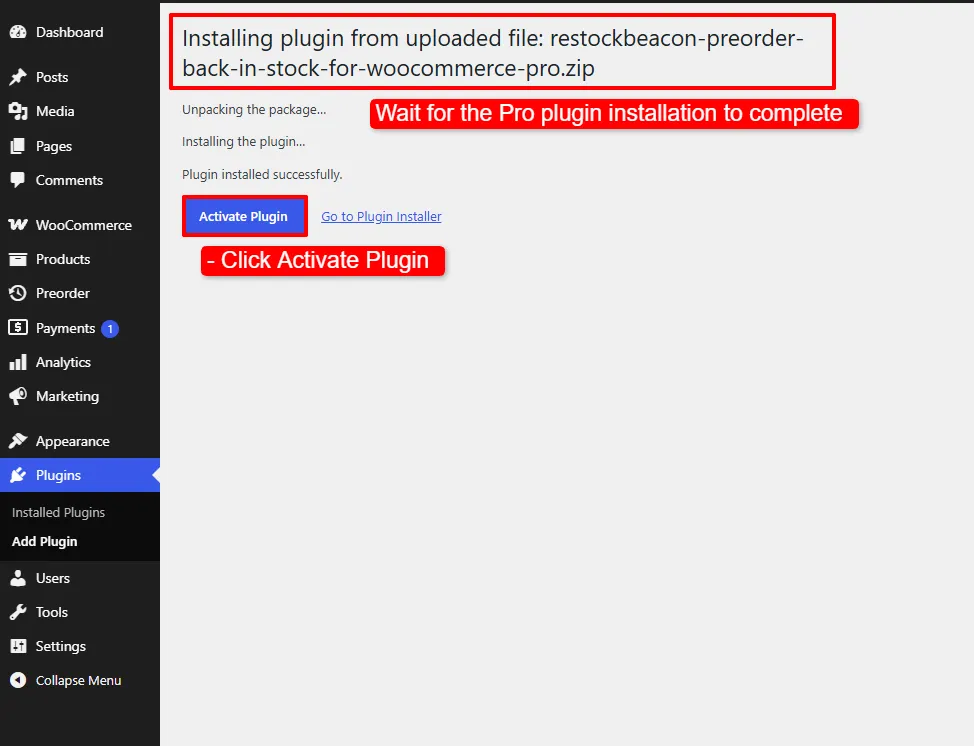
Click Activate Plugin.
4. Confirm both are active
You should now see four plugins: WooCommerce, the free plugin, Pro, and whatever else you had. The Pro row lists its requirements, and the free row gains a "Required by" note — WordPress will not let you deactivate the free plugin while Pro is running.
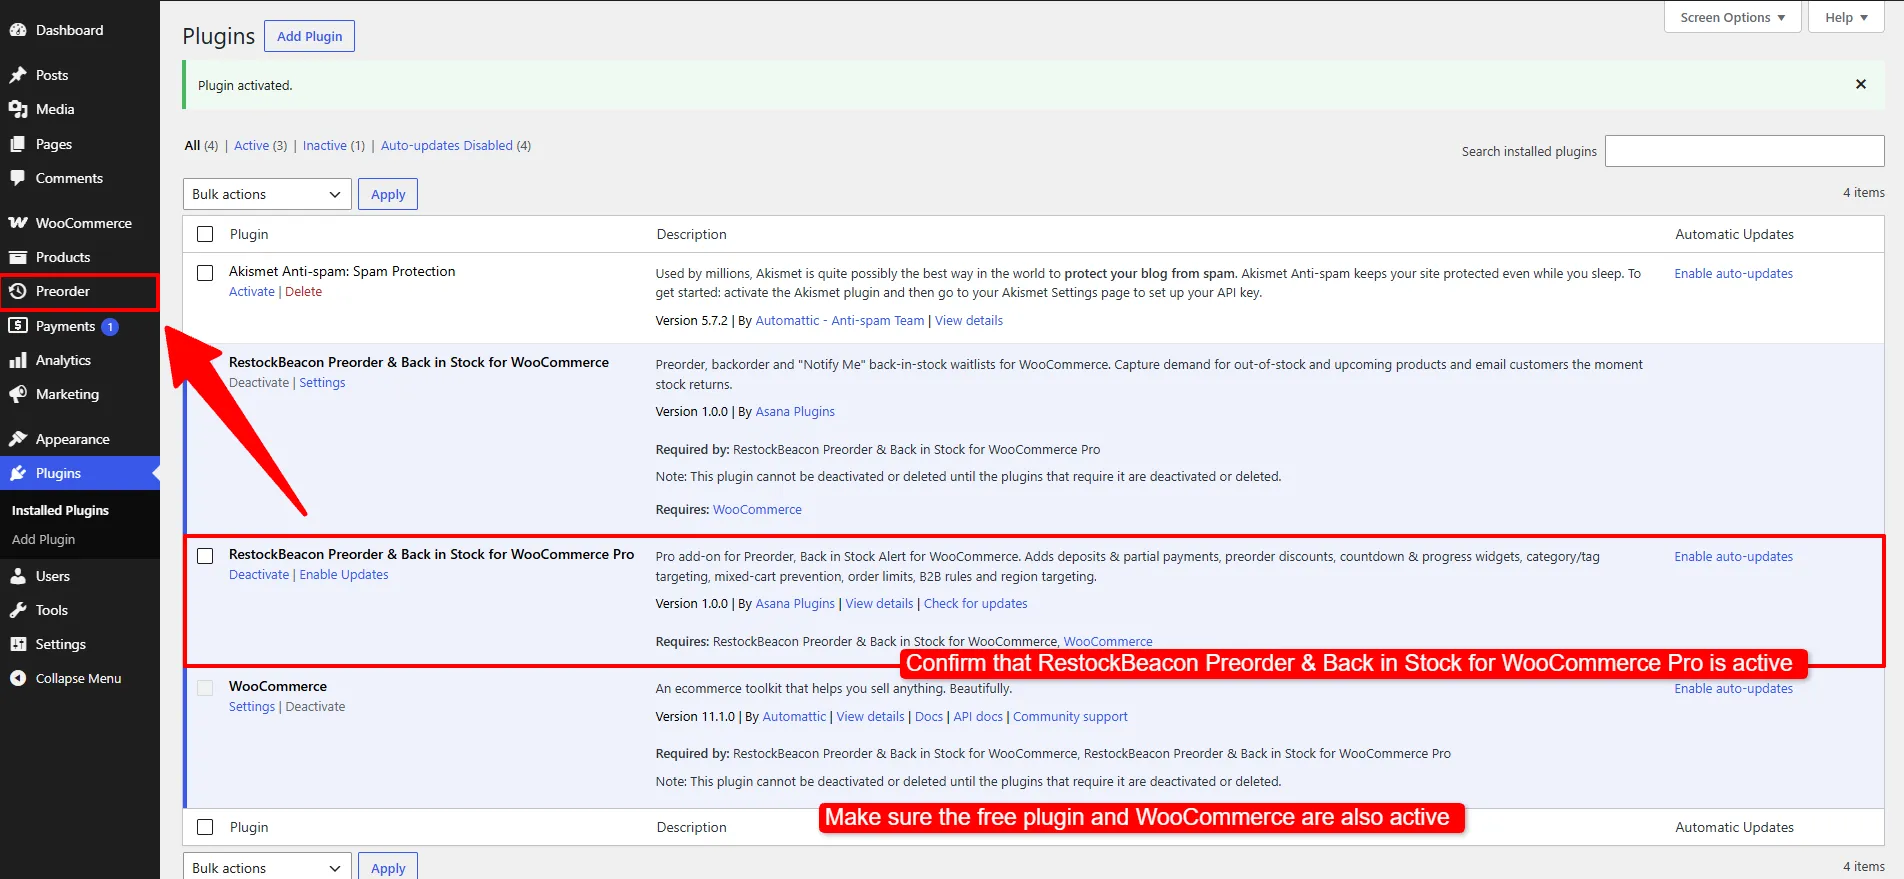
Both plugins active. Use Enable Updates on the Pro row to enter your licence key and receive automatic updates.
Pro depends on the free plugin. If you activate Pro on its own you will get a dependency notice instead of the Pro features. Install the free plugin first, keep it active, then add Pro.
Create your first campaign
- Open Preorders → Campaigns and click Add New.
- Choose a type — Preorder or Back in Stock.
- Work through the tabs: button text and content, then Targeting for which products it covers.
- Toggle the campaign Active and click Save Campaign.
Settings sit on the left and a live preview on the right updates as you type, so you can see the button or pop-up before you save. See Campaigns for the full tour.
Turn on the emails
The two customer emails are standard WooCommerce emails. Confirm they are enabled under WooCommerce → Settings → Emails:
- Back in Stock — sent automatically when a waitlisted product is restocked.
- Preorder Confirmation — sent when a customer places a preorder.
The plugin's own Settings → Emails tab links straight there. See Emails for the full walkthrough.
🧪 Example configuration
A first campaign that works on any store:
| Setting | Value |
|---|---|
| Type | Back in Stock |
| Targeting | All Products |
| Button text | Notify Me! |
| Schedule | Empty (always active) |
| Status | Active |
Save it, then open any out-of-stock product on your storefront. The buy button is now a Notify me button.
What customers see
An out-of-stock product that would normally be a dead end now invites a sign-up.
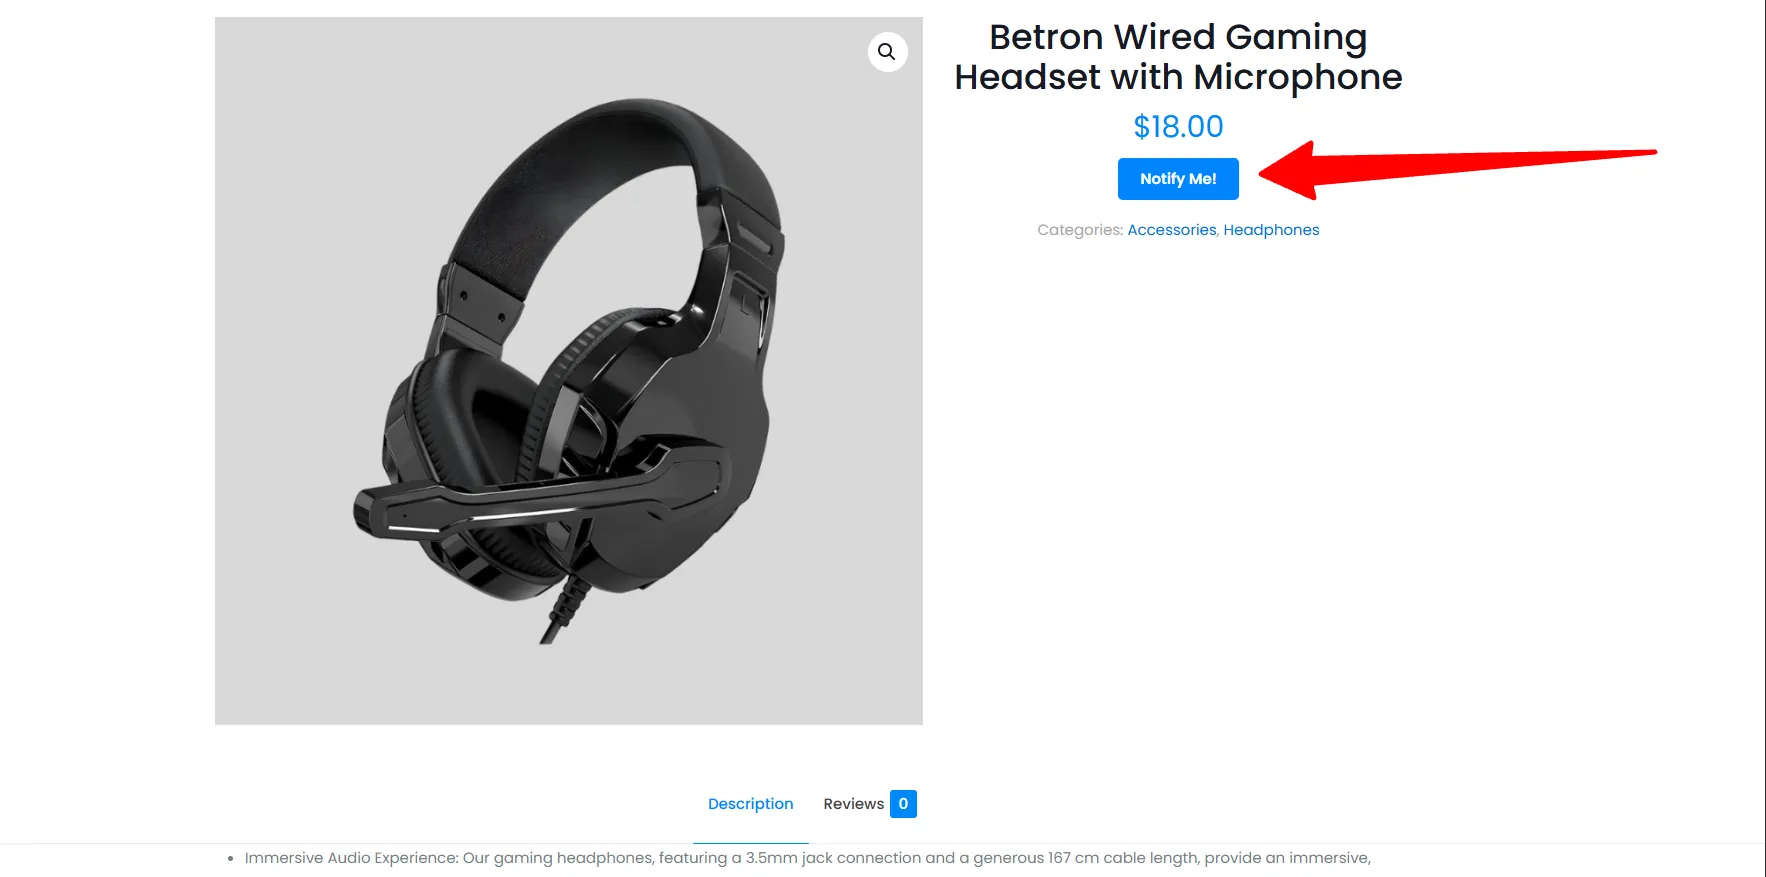
The storefront result of the example configuration above.
- Start with one broad campaign targeting all products, then add narrower campaigns later. The newest matching campaign of the same type wins.
- Test the email on a staging site before going live — see the SMTP note below.
- Leave the schedule empty unless you actually need a time window; an expired schedule silently disables the campaign.
On a local or staging site, plain PHP mail usually does not deliver. Use an SMTP plugin or a mail-catcher such as Mailpit to see the emails while testing. This is the single most common "it isn't working" report, and it is almost never the plugin.
Next Steps
- Campaigns — how the campaign system works.
- Preorders — sell products before release.
- Back in Stock — capture demand on out-of-stock items.
- Emails — customize the notification emails.
Frequently asked questions
Do I need to edit every product?
No. Everything is campaign-driven. You target products once — All Products, specific products, or (in Pro) categories and tags — and the plugin applies the behaviour automatically to everything that matches.
Do I need the free plugin if I bought Pro?
Yes. Pro is an add-on, not a standalone plugin. Both must be installed and active, and WordPress will block you from deactivating the free one while Pro is running.
Does it work with variable products?
Yes. Waitlist sign-ups are tracked per variation, so a customer waiting for "Blue / Large" is emailed when that exact variation is restocked, not when any variation comes back.
Will it work with my theme?
The preorder button, message, cart note and Notify Me popup render through standard WooCommerce hooks and work on classic and block themes. For themes or page builders that skip the standard hooks, the plugin also ships Notify Me and Preorder Message Gutenberg blocks and a shortcode so you can place the output manually.
Is it compatible with HPOS?
Yes. The plugin declares compatibility with High-Performance Order Storage and with the Cart & Checkout Blocks (Store API).