WooCommerce Black Friday Sale Badge with Countdown
This complete, follow-along tutorial builds a real Black Friday promotion from two badges that work together:
Use this WooCommerce Black Friday sale badge tutorial as a Black Friday countdown timer WooCommerce campaign. It also demonstrates a WooCommerce flash sale badge, a targeted Black Friday product promotion, and a reusable WooCommerce sale badge example for future seasonal campaigns.
- A discount label that shows each product's real percentage off (
{saved_percent} OFF→ "17% OFF", "39% OFF", …) on every on-sale product. - A countdown timer badge — a "Sale Ending in…" bar plus an animated glow ring around the product — on on-sale Gaming products.
It touches almost every part of the plugin — the label, styling, the countdown timer, the product-image highlight, and product targeting — so it's the fastest way to see how the pieces fit together.
- A
{saved_percent}OFF badge that fills in each product's real discount automatically. - A countdown bar ("Sale Ending in…") that counts down to your sale's end date.
- An animated glow ring around on-sale product cards on the shop page.
- Both shown only on on-sale products (the timer scoped to the Gaming category).
Part 1 — The discount label
Step 1 — Create the badge
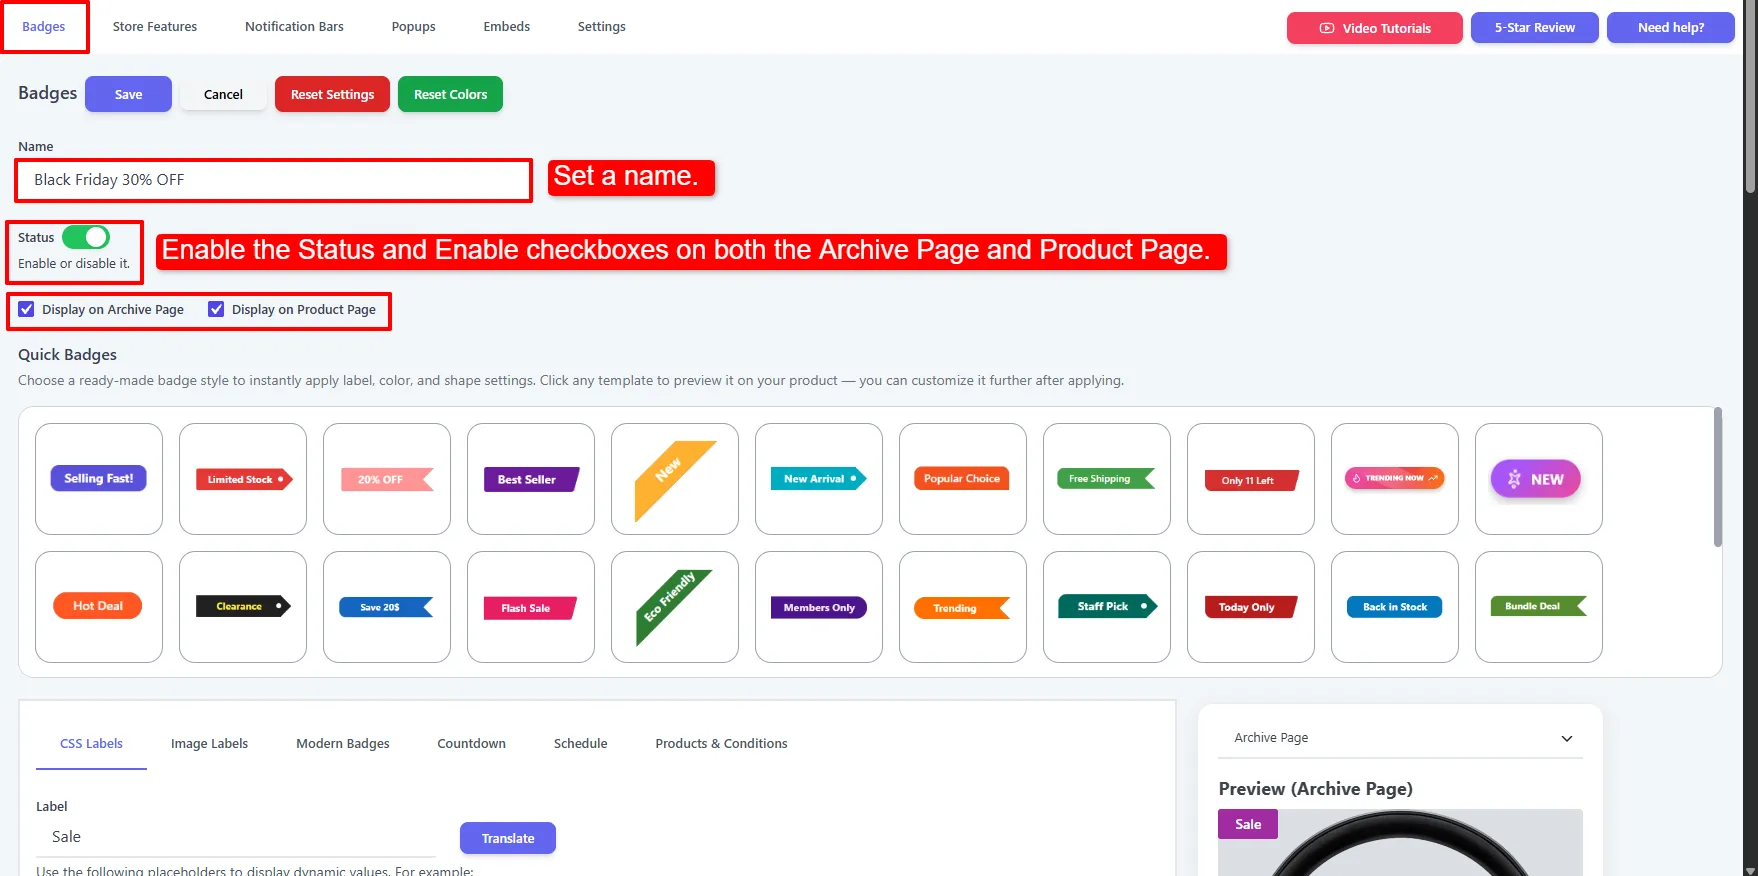
Go to Sale Badges → Badges and click Add New.
- Set the Name to
Black Friday 30% OFF. - Turn Status on.
- Tick Display on Archive Page and Display on Product Page so it shows on the shop and on each product page.
(Tip: the Quick Badges gallery below has ready-made styles — click one to start from it, then customize.)
Step 2 — Show the live discount
Open the CSS Labels tab.
- In the Label field, type
{saved_percent} OFF. The plugin replaces{saved_percent}with each product's real discount (e.g.20% OFF). - Leave CSS Label Position on On Image.
- (Alternative) tick Percentage Discount amount to show only the percentage.
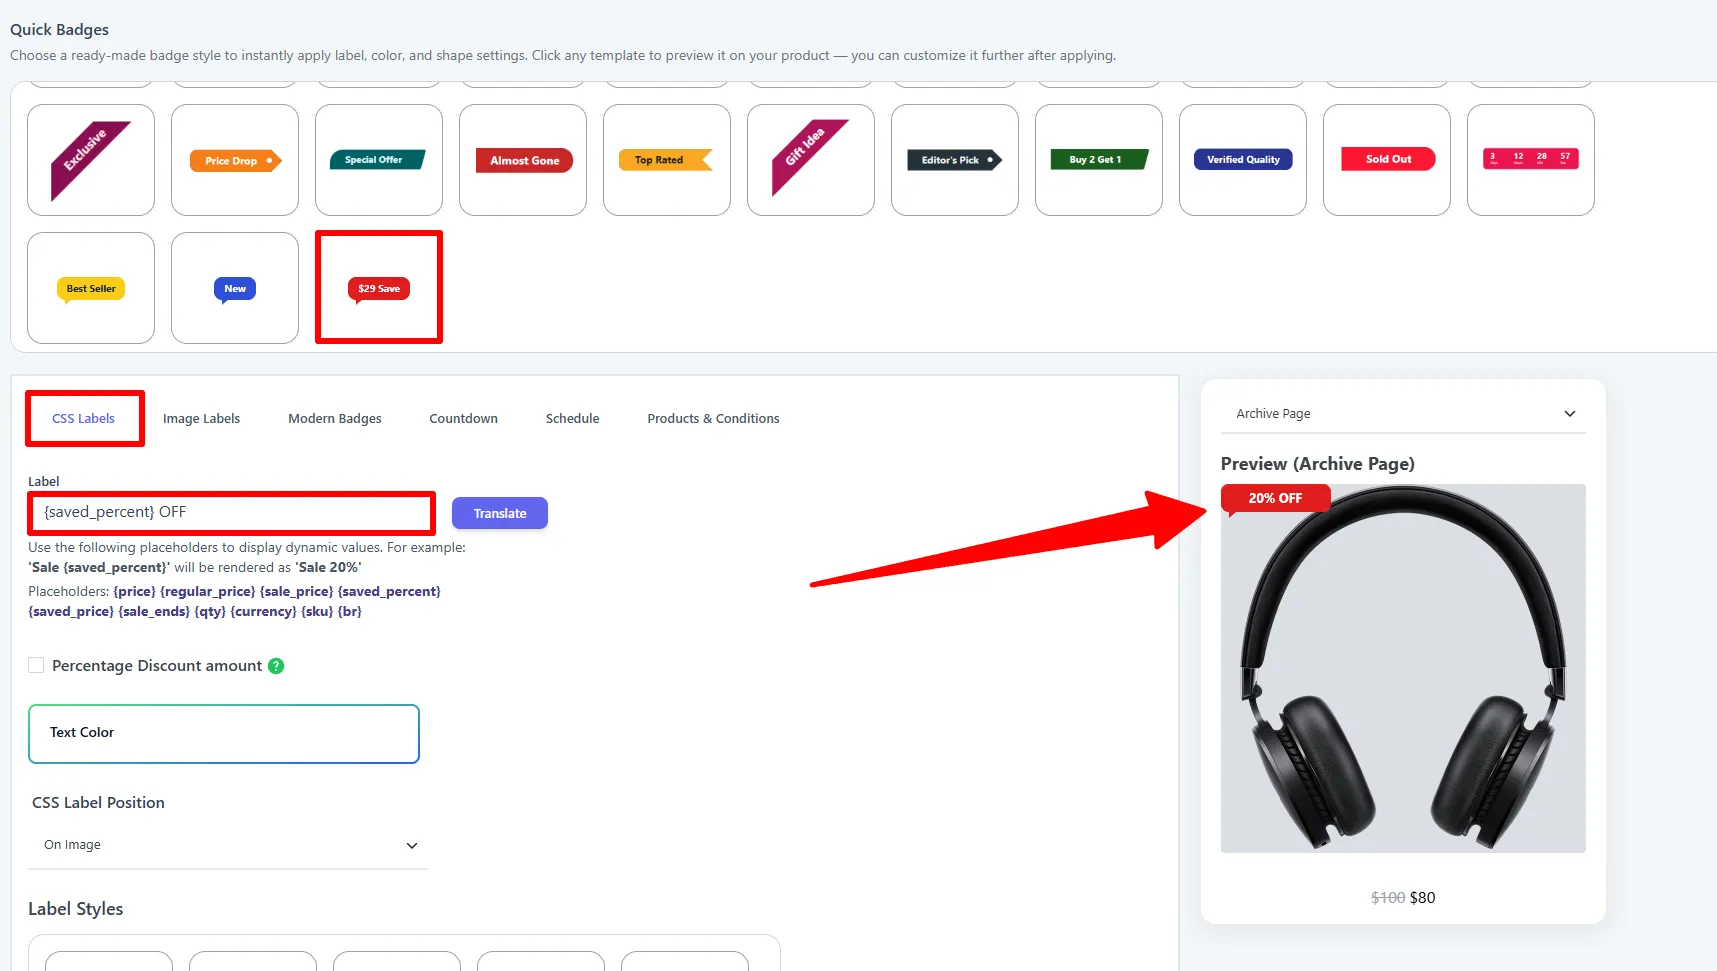
See the full list of dynamic values in Dynamic Placeholders.
Step 3 — Shape, color and size
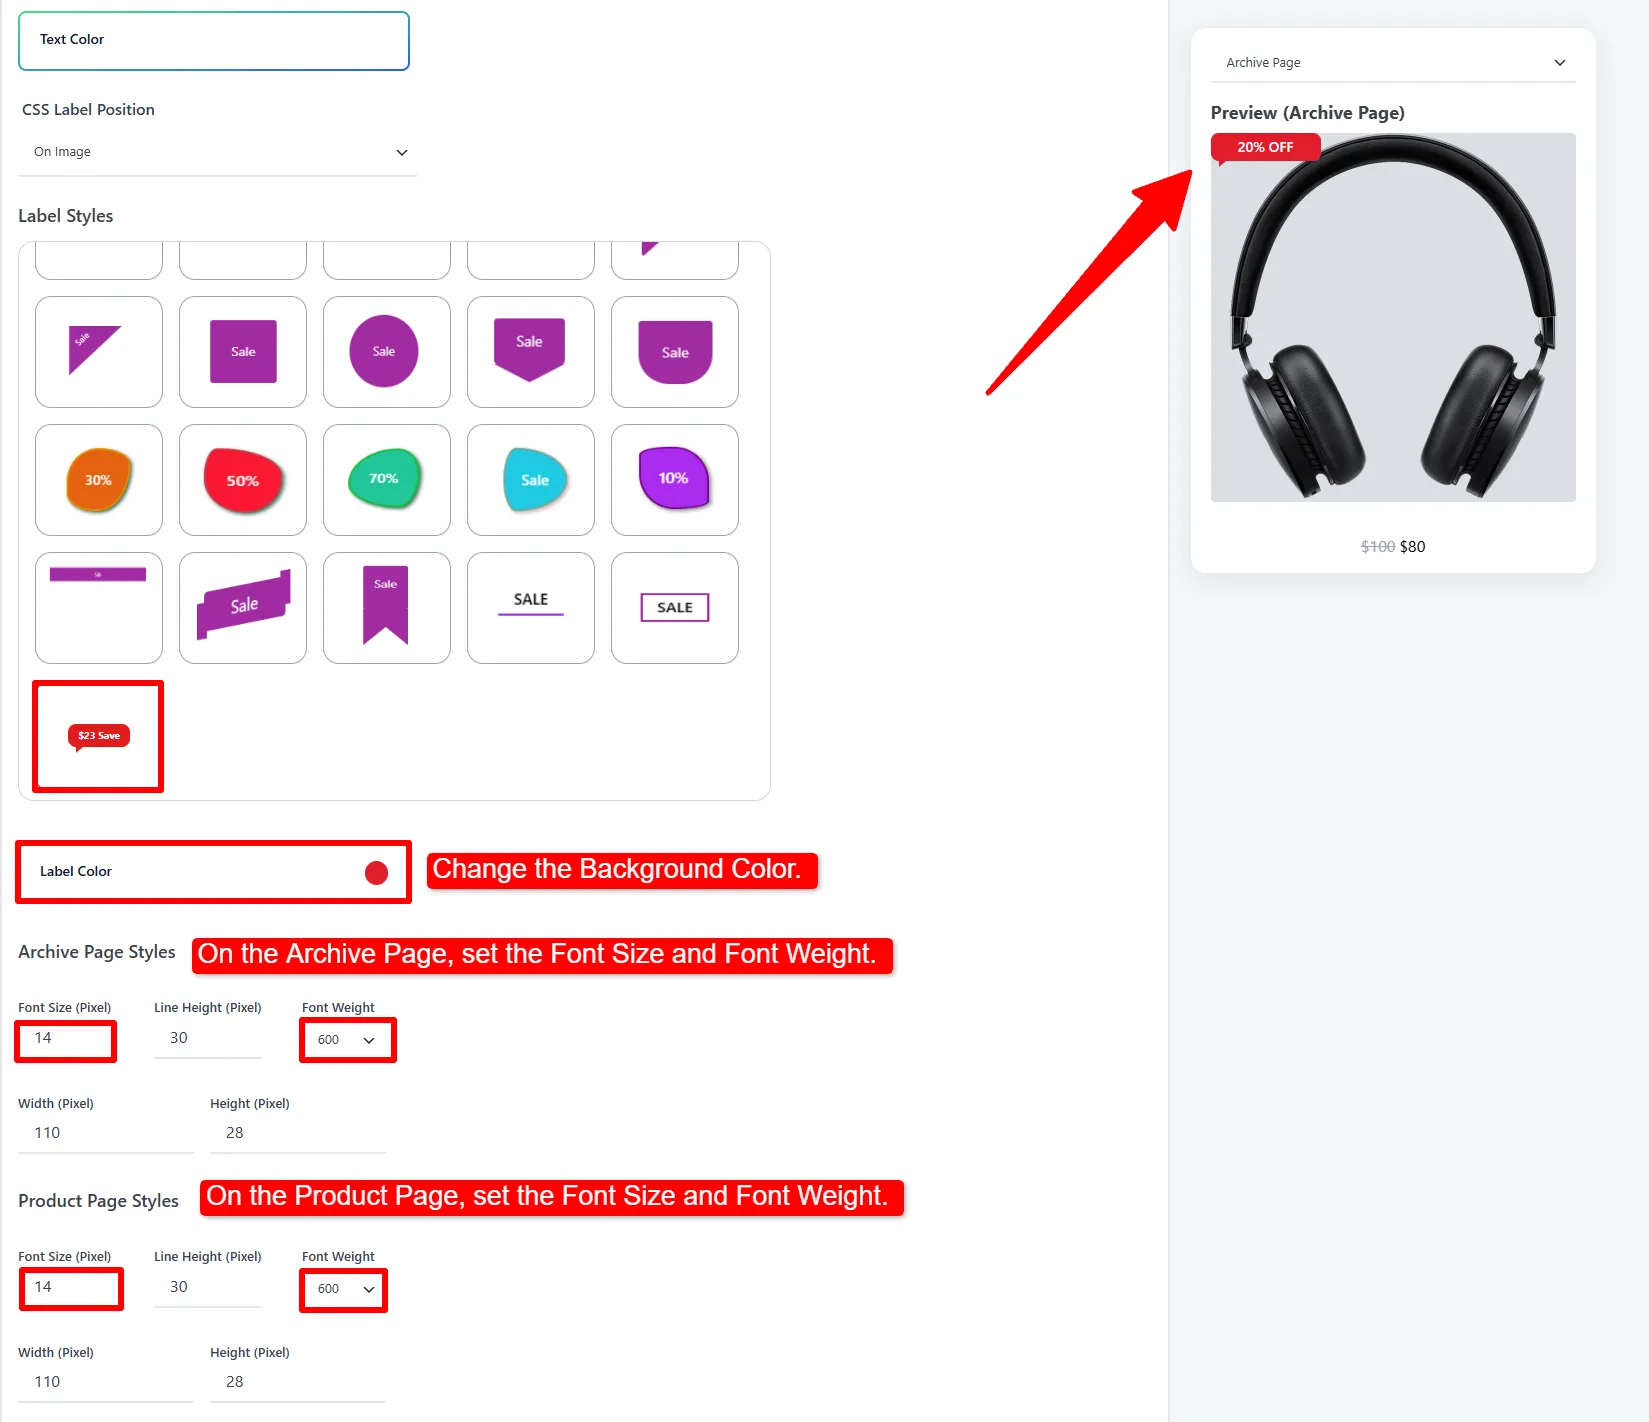
Still in the CSS Labels tab:
- Pick a bold shape from the Label Styles gallery (e.g. a red tag).
- Set the Label Color to red.
- Under Archive Page Styles and Product Page Styles, set Font Size
14and Font Weight600(the example uses Width110, Height28).
Step 4 — Target on-sale products, then Save
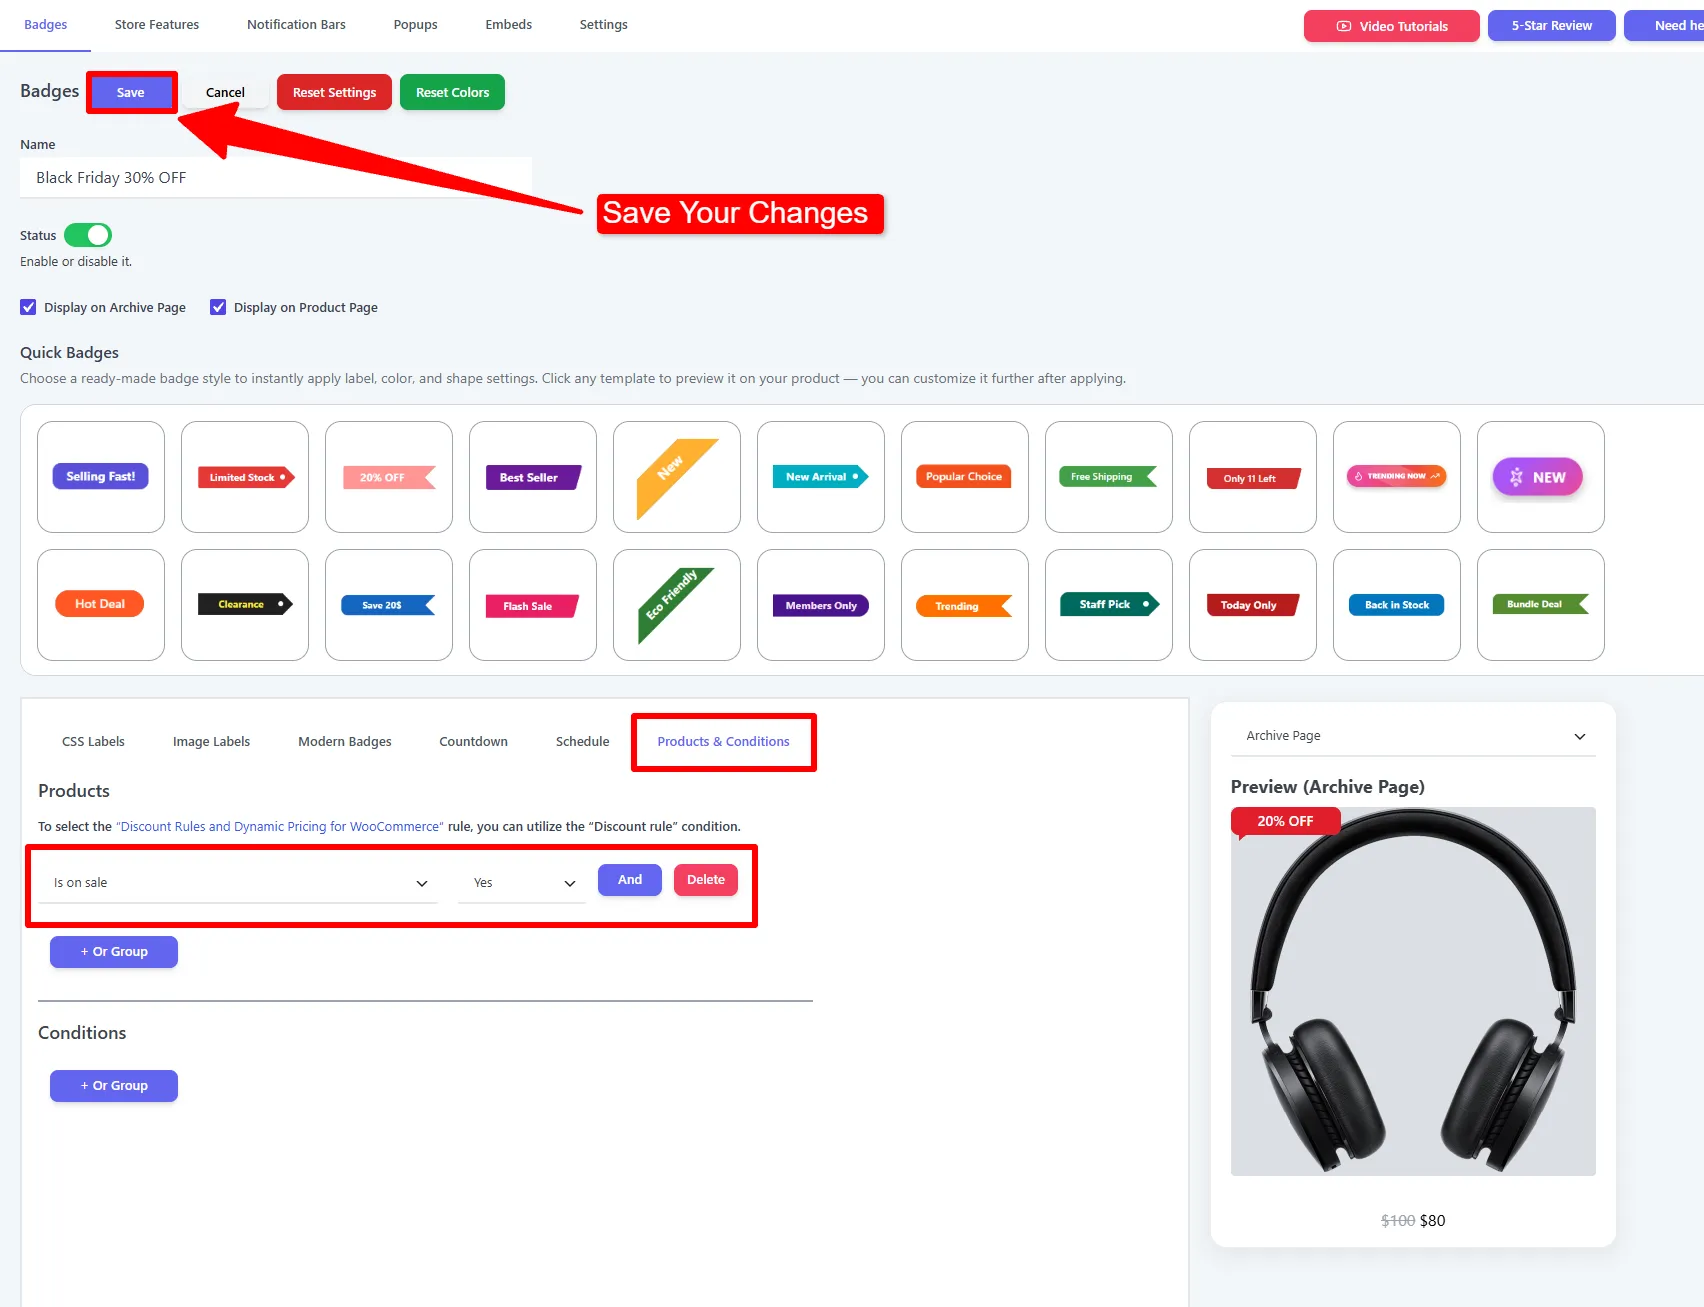
Open the Products & Conditions tab, add a product rule Is on sale → Yes, and click Save.
Part 2 — The countdown timer
Step 5 — Create the timer badge
Click Add New again, name it Countdown-Timer-BF, turn Status on, and keep both Display on… checkboxes ticked. Then open the Countdown tab:
- Set Countdown to Timer and Countdown Timer Position to On Image.
- Pick a bar style from Timer Styles (the "Sale Ending in…" progress bar).
- Set Countdown Timer Mode to Pick A Start / End Date and choose the From / To Date / Time (e.g.
To = 2026-11-30 12:00 AM). - Set Position to Bottom + Bar, then set the Customize colors (red to match).
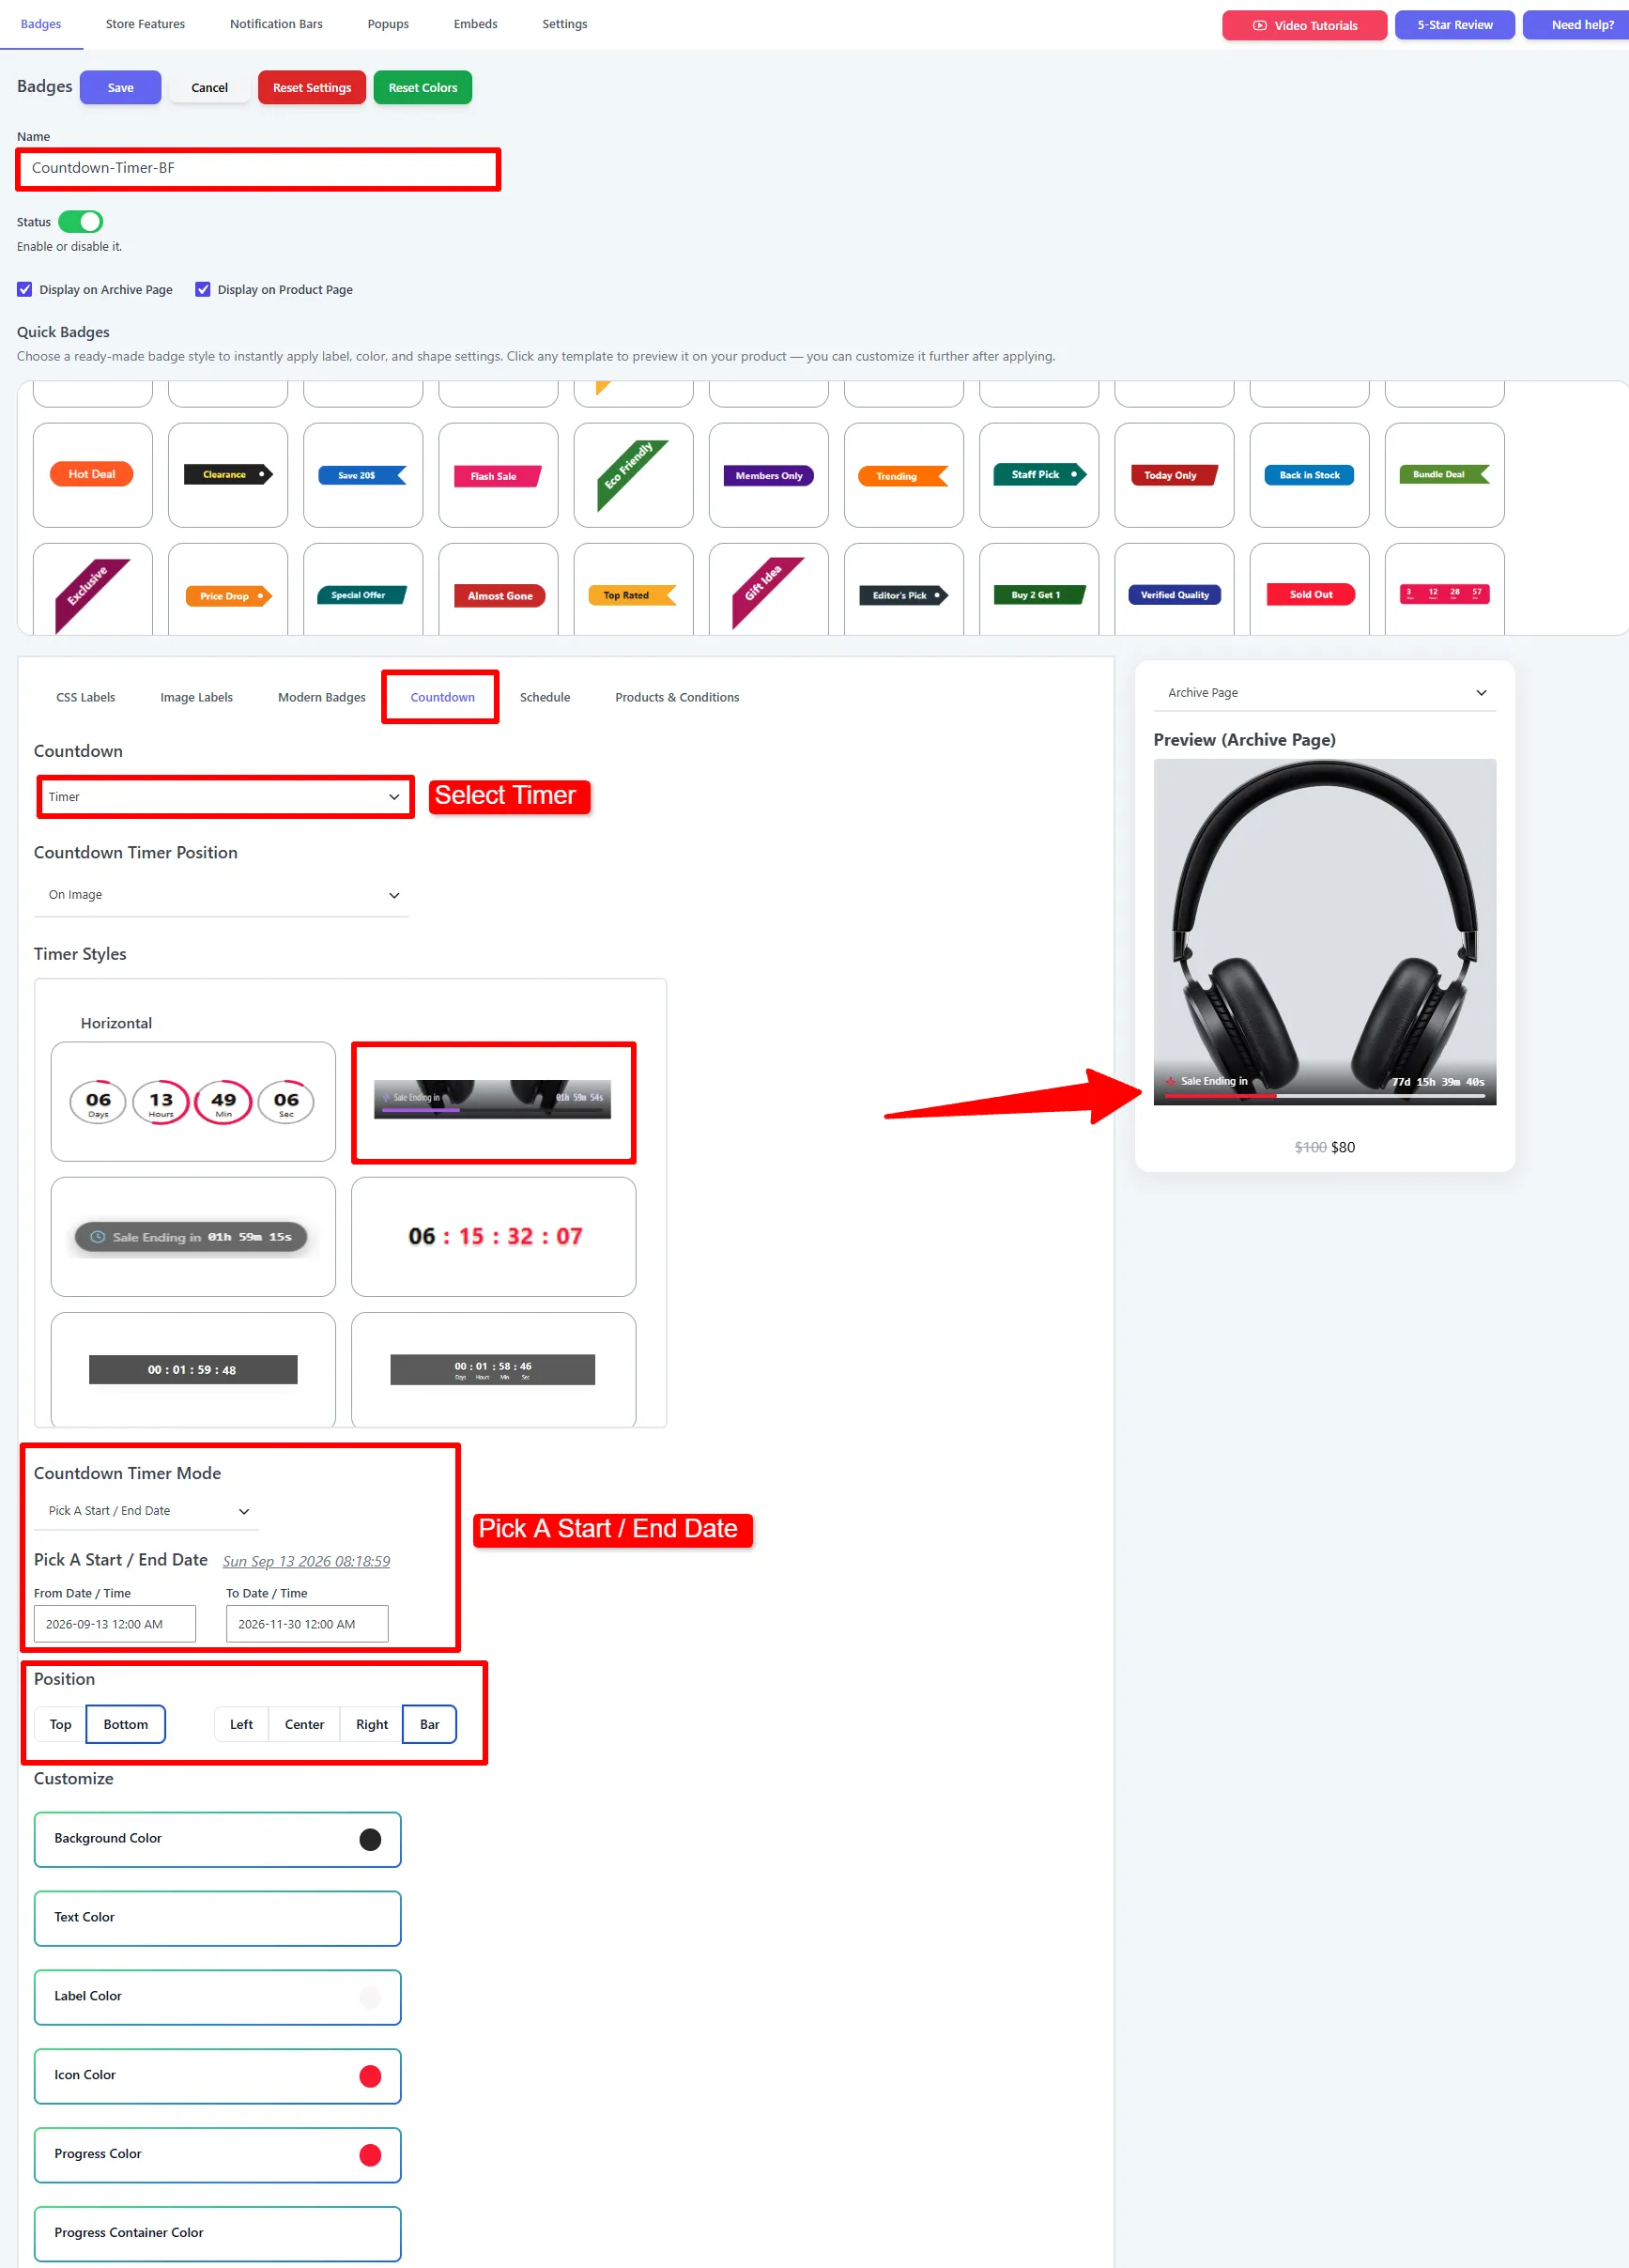
The editor shows your store's current server time next to the date fields — use it to double-check your deadline.
Step 6 — Add the product-image glow ring (optional)
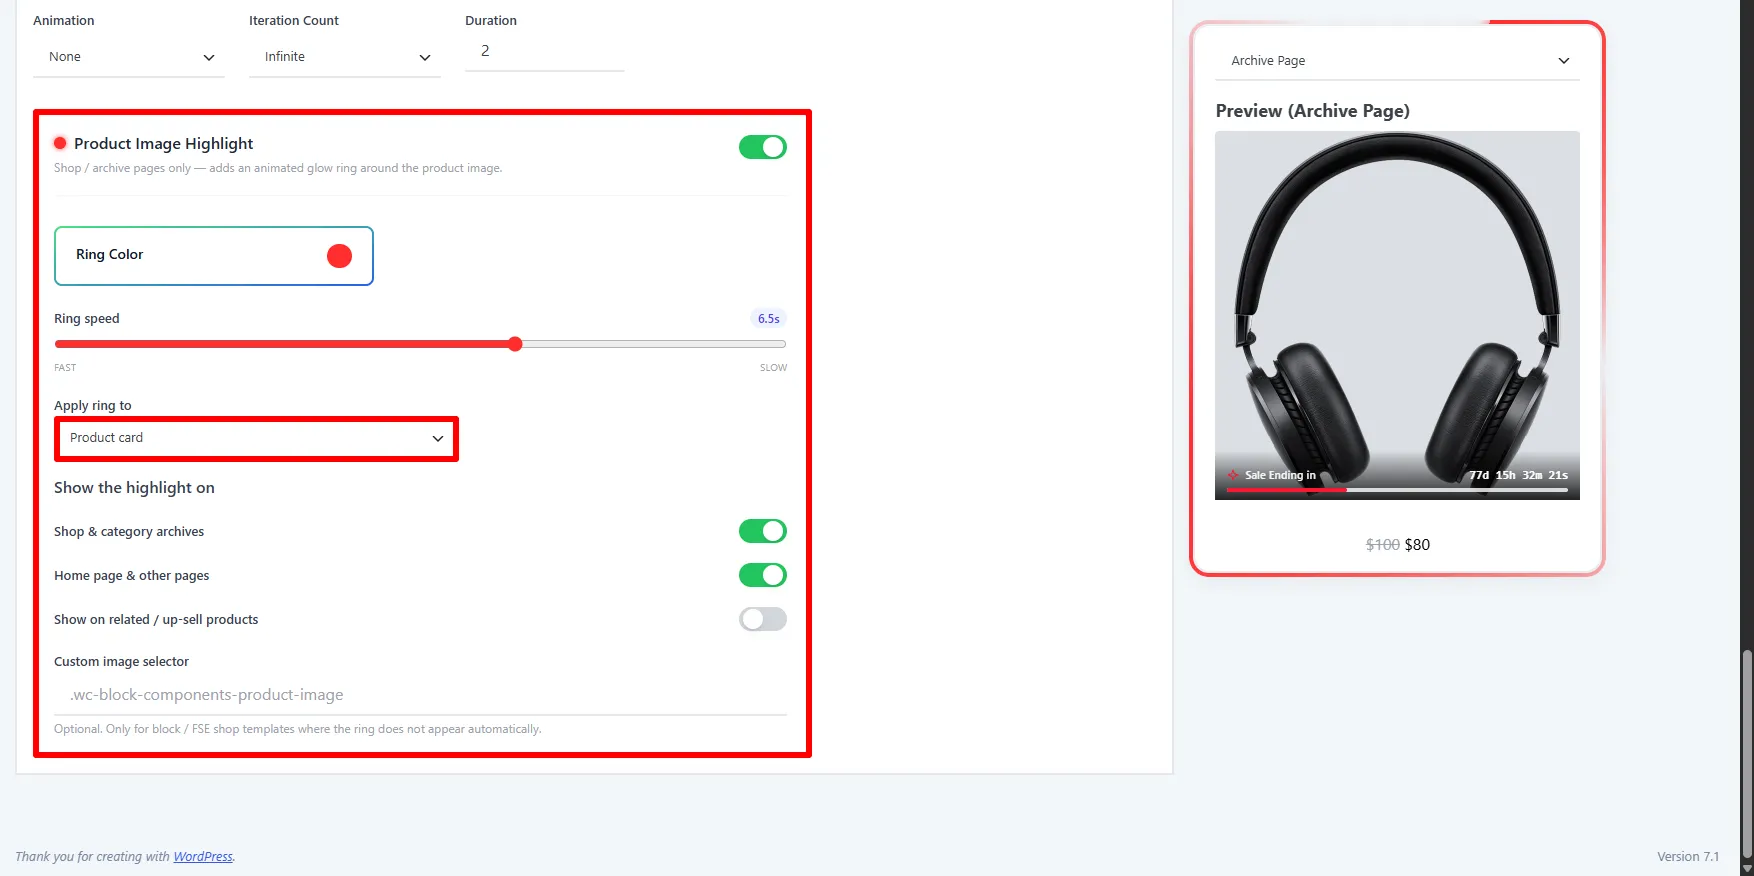
Lower on the Countdown tab, enable Product Image Highlight — an animated glow ring around the product on shop/archive pages.
- Set the Ring Color (red), the Ring speed, and Apply ring to (e.g. Product card).
- Under Show the highlight on, choose where it appears (Shop & category archives, Home page, related/up-sell).
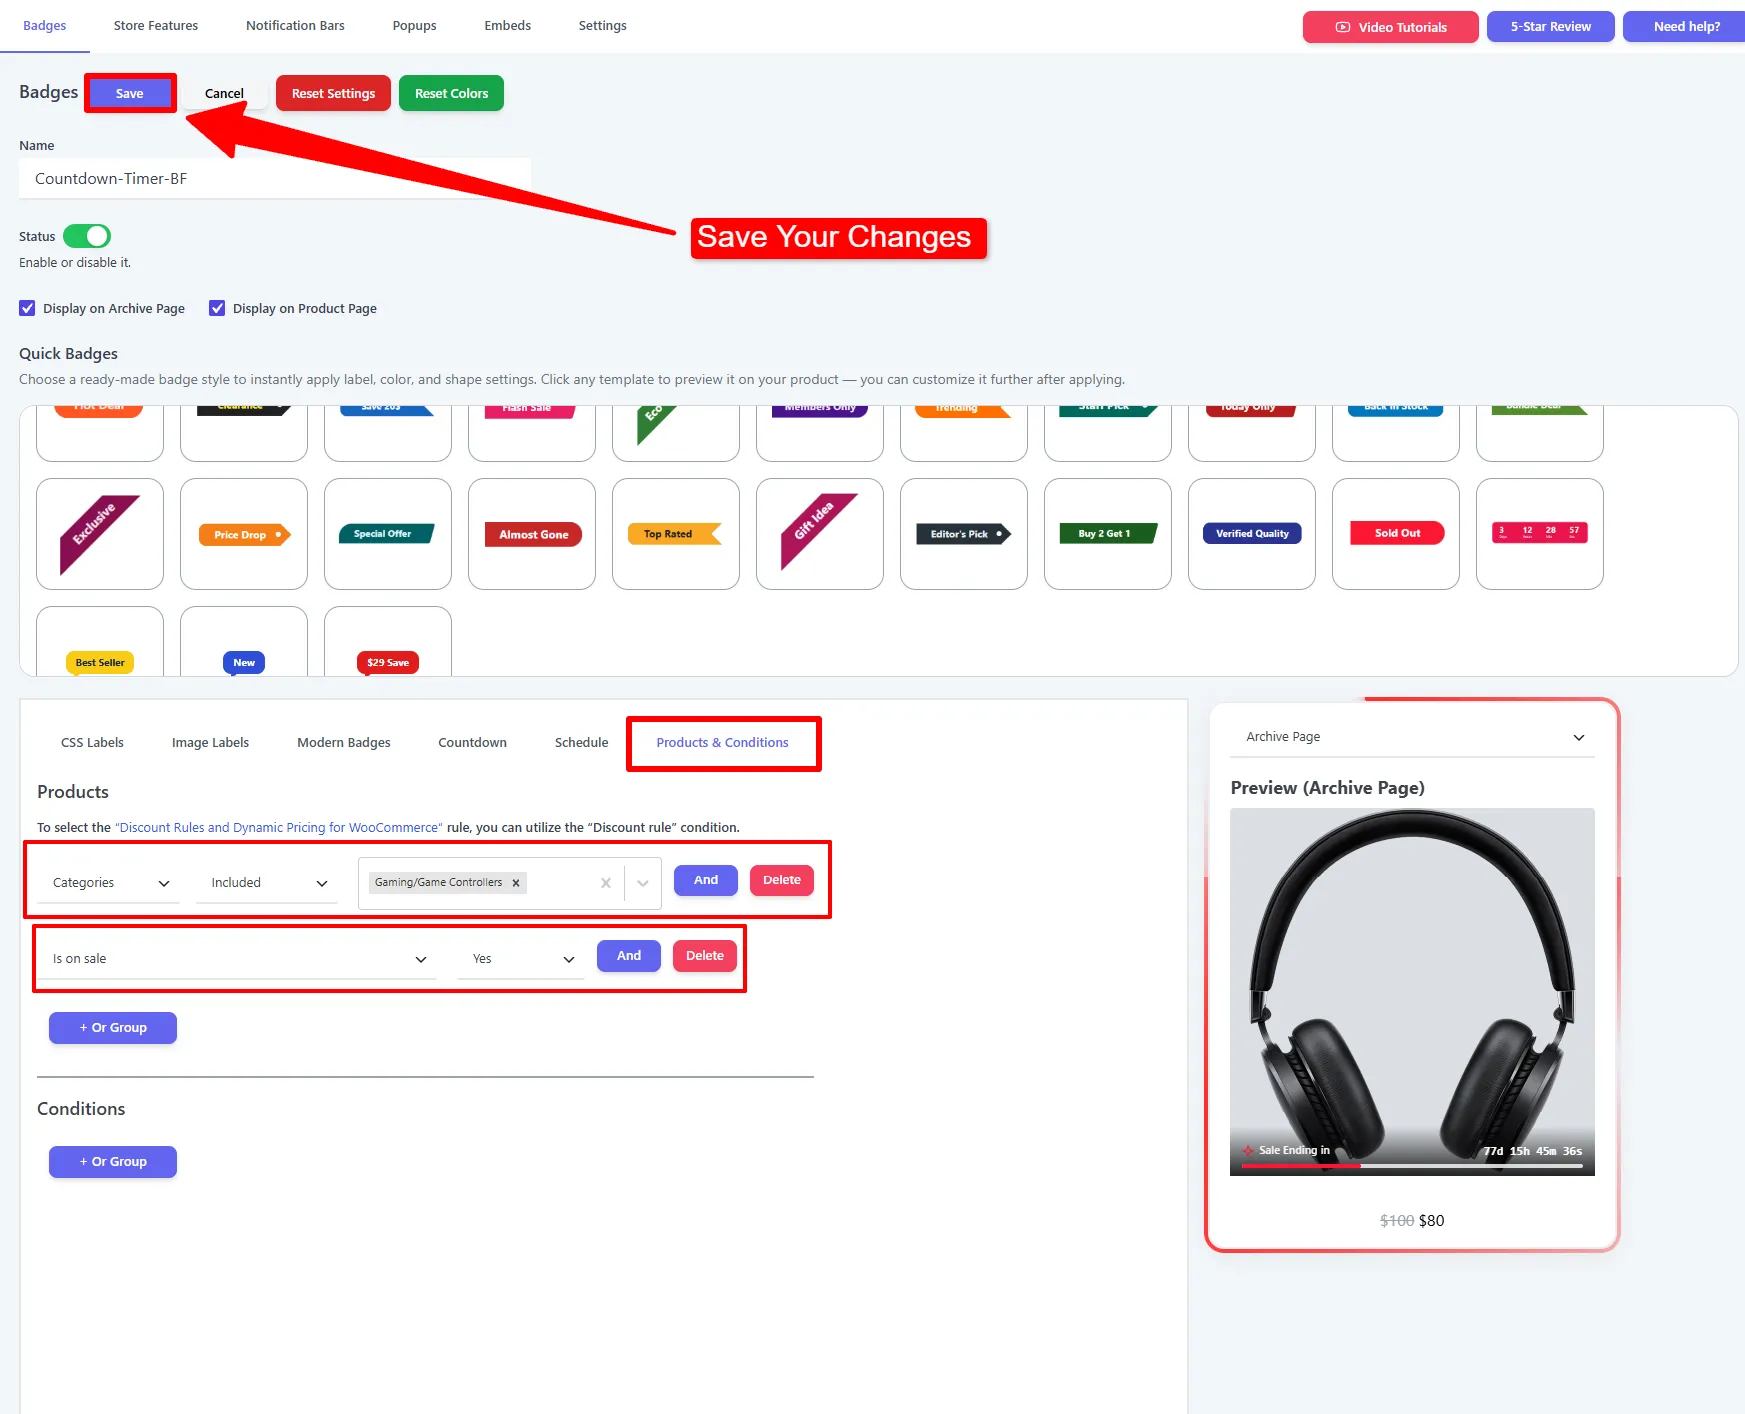
Step 7 — Target on-sale Gaming products, then Save
Open the Products & Conditions tab and add two rules combined with And:
- Categories → Included → Gaming / Game Controllers
- Is on sale → Yes
Then click Save.
Want it only for logged-in wholesale customers? Add a Conditions rule such as User Roles → Wholesale. See Products & Conditions.
The result
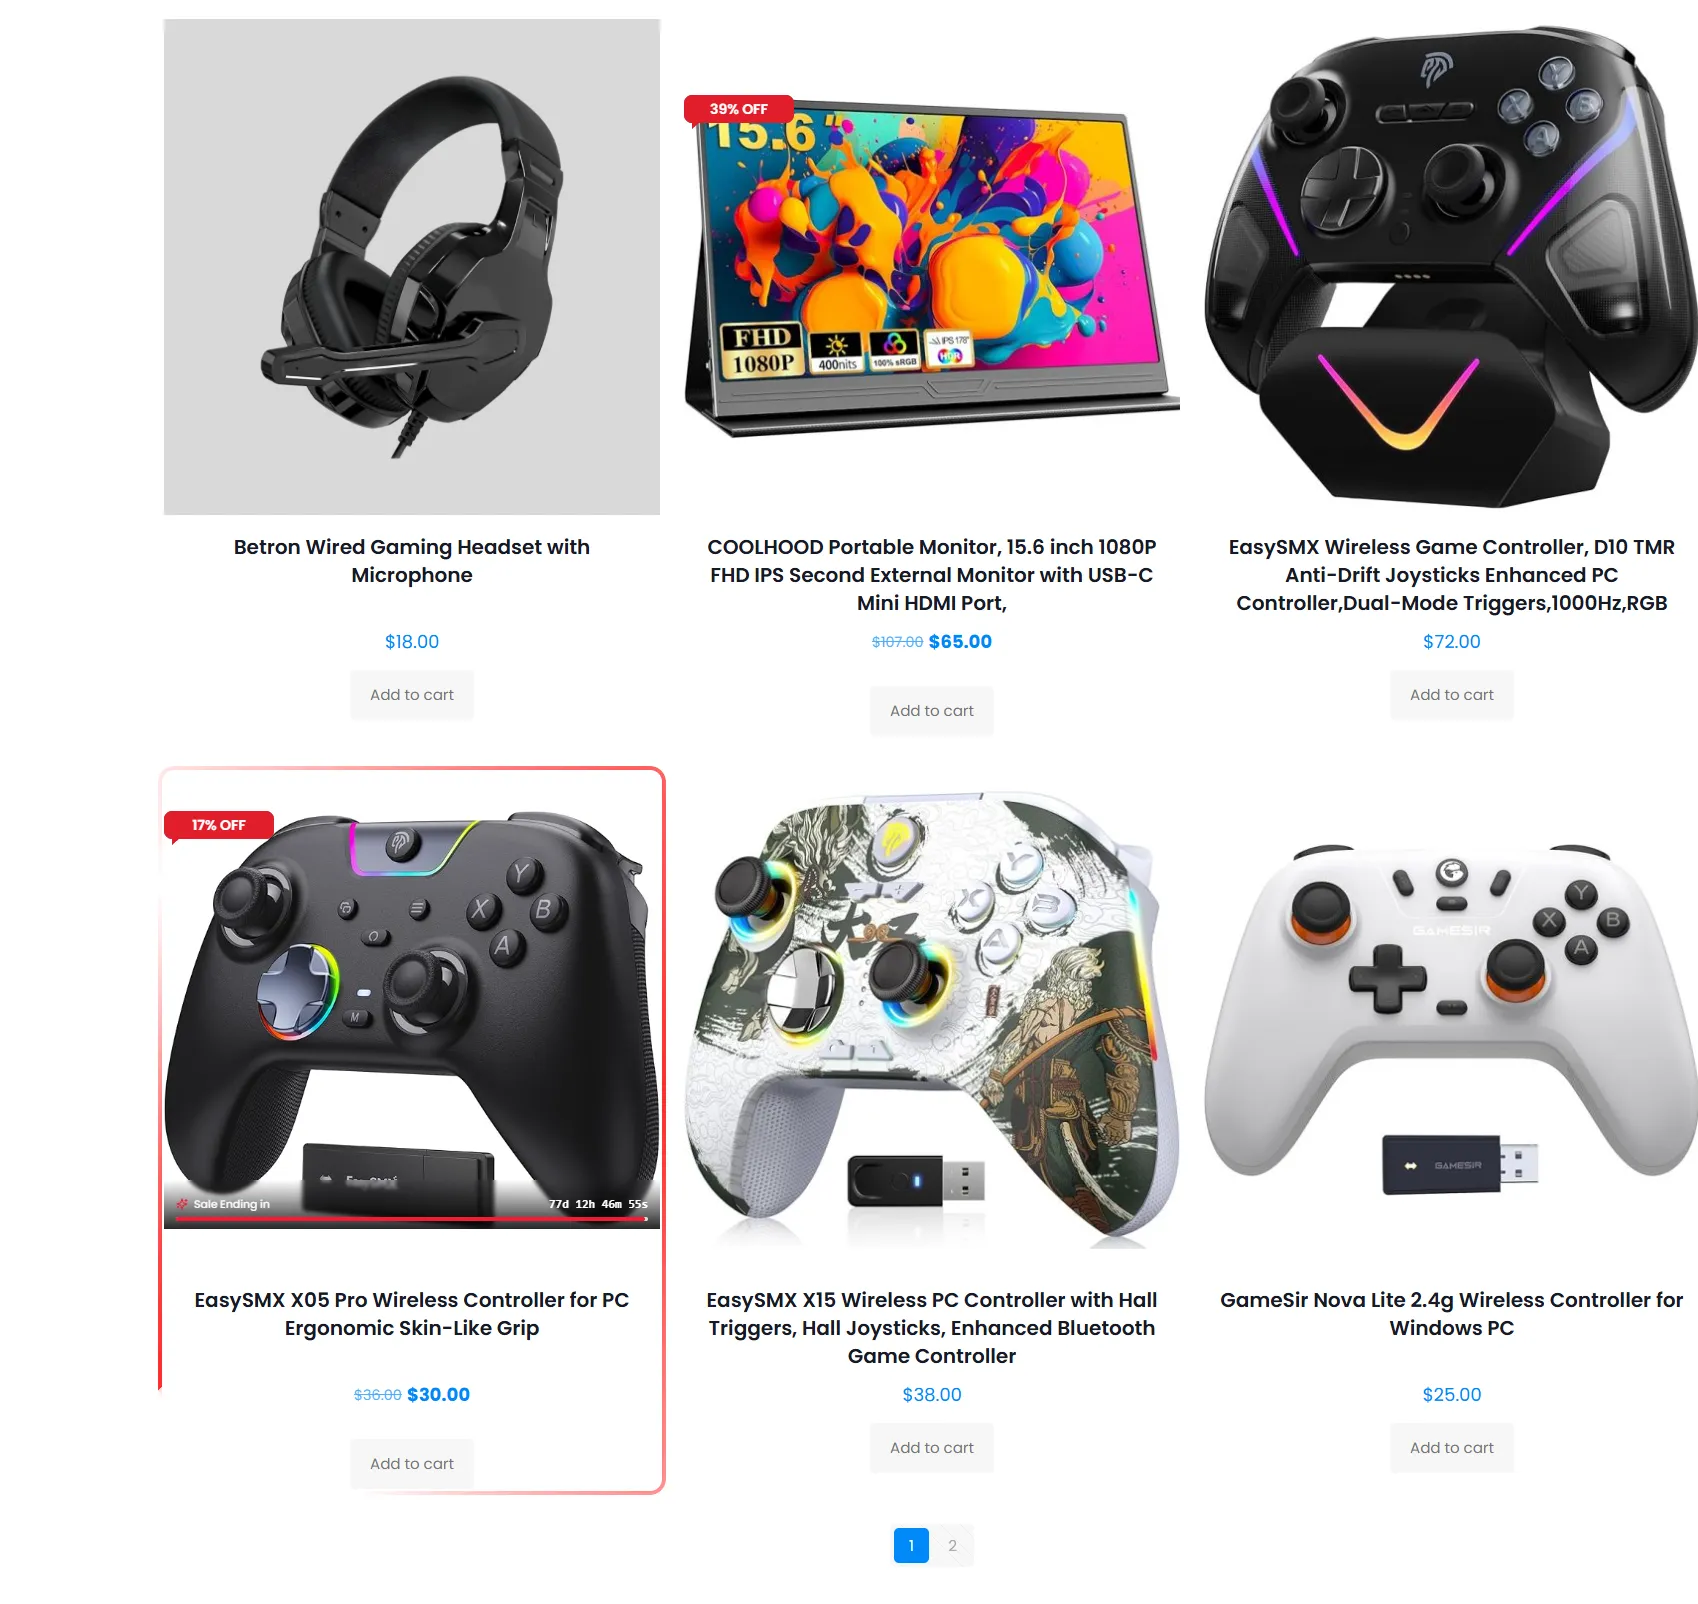
Visit the Gaming shop page during the sale. Each on-sale product shows all three pieces at once: the {saved_percent} OFF badge (e.g. "17% OFF"), the "Sale Ending in…" countdown bar, and an animated glow ring around the card.
SEO, conversion, and campaign QA
Keep the Black Friday campaign’s product titles, descriptions, prices, availability, and structured data accurate while the badges run. The badge text is a visual conversion aid; it should not be used to hide repeated keywords or replace the product’s normal SEO content. Product structured data should describe the active offer and availability so Google can interpret the product independently of the promotional overlay (Google Product structured data).
Use the schedule to start and stop both badges at the same campaign boundary. Before launch, test an on-sale Gaming product, an unsaleable product, a product outside the Gaming category, a variable product, the desktop archive, the mobile archive, and a single product page. Confirm that the discount percentage matches the current price, the timer uses the store’s server time, the glow ring does not cover product controls, and both badges disappear after the campaign ends.
Measure impressions, product-card clicks, add-to-cart events, checkout starts, completed orders, conversion rate, and revenue per session. Compare the percentage label with a saved-amount label in a controlled campaign when enough traffic is available. Keep the shortest message that communicates the offer clearly, and never show a countdown or discount claim that does not match the actual promotion.
Prefer to drop a badge in a specific spot in your theme? Copy its shortcode from the Badges list into any page, post, or template:
[asnp_badge id="12"]
Next Steps
- Managing Badges
- Countdown Timer
- Notification Bar — announce the same sale store-wide.
Frequently Asked Questions
How do I create a WooCommerce Black Friday sale badge?
Create a badge under Sale Booster → Badges, enable archive and product-page display, add {saved_percent} OFF in CSS Labels, and target products with an active sale. Add a separate Countdown Timer badge when the campaign needs a deadline.
Can I combine a Black Friday countdown timer with a sale badge?
Yes. Use one badge for the live discount percentage and another for the countdown. Apply matching schedule and targeting rules so both messages appear only during the same campaign window.
How do I target a WooCommerce flash sale badge to one category?
Open Products & Conditions, add a Categories rule for the selected category, add Is on sale → Yes, combine the rules with And, and save the badge.
Should the Black Friday promotion use a real countdown?
Yes. Set the timer to the actual campaign end date and time shown by the store’s server time. Avoid evergreen or misleading urgency when the offer does not have a genuine deadline.