How to Add a WooCommerce Notification Bar (Announcement, Promo & Free Shipping Bars)
Add a store-wide message bar in Sale Booster by opening Sale Booster → Notification Bar → Add New, choosing a template, configuring the content and display rules, and clicking Save. The Notification Bar module lets you publish an announcement, promotion, countdown, free-shipping progress message, rotating offer, or scrolling trust message across selected WooCommerce pages.
Sale Booster is a WordPress notification bar plugin for WooCommerce stores. Use it when you need a WooCommerce announcement bar, WooCommerce promo bar, WooCommerce countdown timer bar, or WooCommerce free shipping bar without editing your theme.
The Notification Bar module is available in the Sale Booster Pro version.
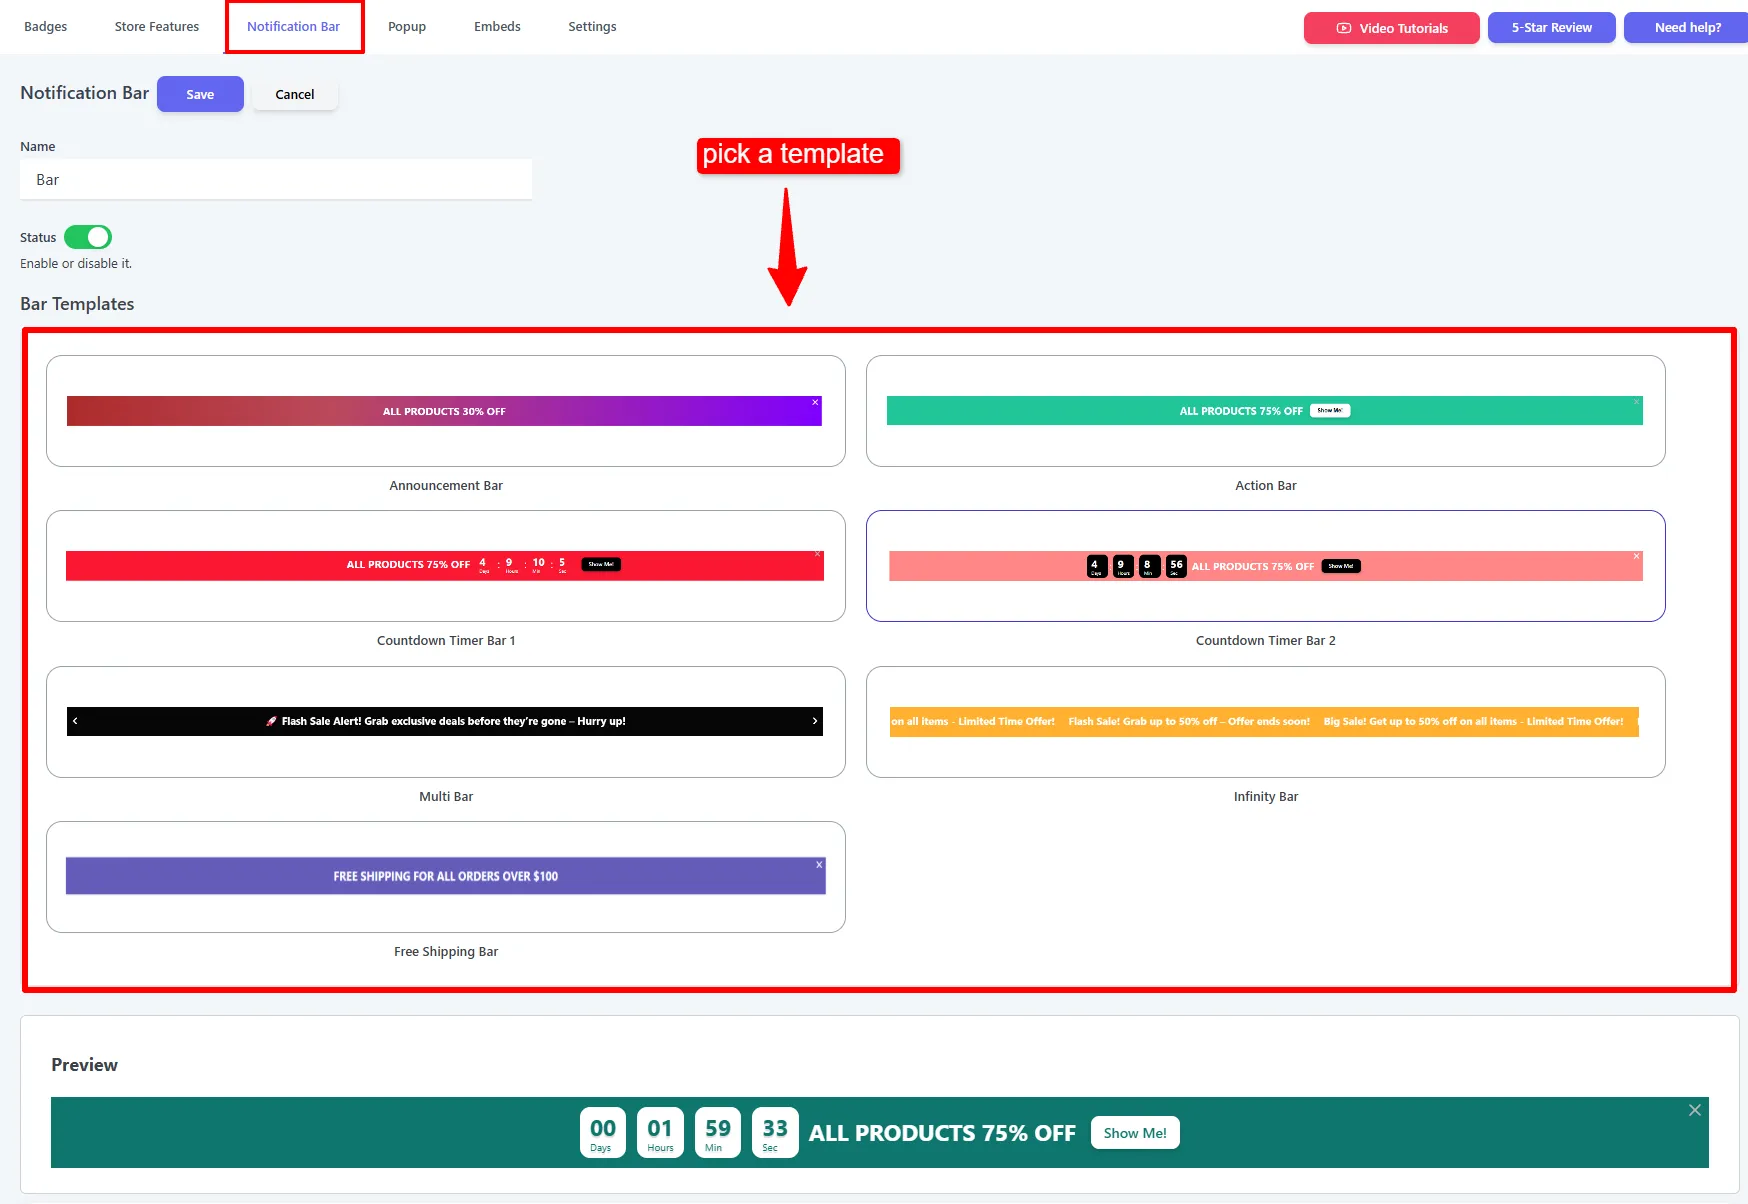
Choose the right WooCommerce notification bar
Each template matches a different searcher intent and merchandising goal. Use one short message for a sitewide announcement, a button when you need clicks, and a live progress or countdown element when the offer changes as the shopper browses.
| Goal | Recommended bar | Best for |
|---|---|---|
| Announce a sitewide sale, shipping cutoff, or store notice | Announcement Bar | One message with an optional close button |
| Send shoppers to a collection or sale page | Action Bar | A message with a call-to-action button |
| Create urgency around a real deadline | Countdown Timer Bar | A fixed-date or evergreen countdown |
| Encourage a larger cart | Free Shipping Bar | A live free shipping progress bar |
| Show several offers in one space | Multi Bar | Rotating messages with buttons or coupons |
| Repeat evergreen benefits across the store | Infinity Bar | A continuously scrolling marquee |
Set up a WooCommerce notification bar
The setup workflow is shared by every bar type. The selected template determines which content controls appear in the editor.
1. Open the Notification Bar editor
In the WordPress dashboard, go to Sale Booster → Notification Bar and click Add New. Enter an internal Name, leave Status enabled when the campaign is ready to publish, and review the live Preview while you edit.
The name is for admin organization; shoppers see the message configured in the bar content. Use descriptive names such as September free shipping - shop and cart or Black Friday countdown - all pages so scheduled campaigns are easy to find later.
2. Choose a bar template
In Bar Templates, select the format that matches the offer. The editor loads the relevant fields immediately, so an Announcement Bar shows message controls while a Countdown Timer Bar also adds timer settings.
3. Write the message and add an action
Open the Content tab and write a concise message that states the offer and the next step. Depending on the template, you can enable Action Button, add a coupon action, create multiple messages, or add the three cart-progress messages used by a Free Shipping Bar.
Use a specific destination for a call to action, such as a sale collection, product category, or shop page. Button labels should describe the result—Shop the sale, Unlock free shipping, or Use code SAVE10—instead of a generic label such as Click here.
4. Set position and visual design
Use the shared position controls to choose Top or Bottom, align the text Left, Center, or Right, and decide whether Banner Fixed should keep the bar visible while the customer scrolls. This setting turns the bar into a sticky notification bar. Check the preview at the same approximate width as your storefront, especially when the message includes a timer or button.
Use Theme & Styles for a ready-made color template, typography, height, border, background theme, animation, and shadow. Use Colors when the bar needs brand-specific background, text, button, close-icon, or progress-bar colors.
5. Target the right shoppers and pages
Open Targeting and choose Desktop, Mobile, or both under Devices. Add Pages & Products rules when an offer belongs on the shop, product, cart, or checkout experience rather than every page. Add visitor Conditions when the message is limited to a login state, user role, country, or another supported audience.
Targeting prevents a sitewide announcement bar from competing with a product-specific promotion. It also lets you use a shorter top bar on mobile if the full desktop message would wrap or cover navigation.
6. Schedule, translate, and publish
Use the Schedule tab for a start and end window, such as a Black Friday campaign. A fixed-date countdown controls the timer itself; a schedule controls when the bar is active. Use both when the bar should automatically appear and disappear around a campaign.
The Social Media tab adds optional social icons. The Translation controls let you provide localized bar text and button text when your store serves more than one language. Click Save, open the targeted storefront page in a private browser window, and test the close button, link, coupon action, mobile layout, and countdown before sending traffic to the campaign.
Shared settings explained
These settings apply to most WooCommerce promotion bars, regardless of the selected template.
| Setting | What it controls | Practical guidance |
|---|---|---|
| Banner Position | Places the bar at the top or bottom of the page. | Use the top for urgent campaigns and the bottom when your header already has a notice area. |
| Text Position | Aligns the message left, center, or right. | Center short messages; use left alignment when the bar includes a longer CTA. |
| Banner Fixed | Keeps the bar visible while scrolling. | Test sticky behavior on mobile so it does not cover navigation or checkout controls. |
| Z-Index | Controls the bar's stacking order. | Increase it only when another theme element appears above the bar. |
| Show bar again after closing | Sets how soon a dismissed bar can return. | Give shoppers a meaningful delay for campaign bars; use no delay only when the notice must return immediately. |
| Show Bar (Sec) | Delays the first appearance. | Keep the delay short for a promotion that should be visible on page entry. |
| Opacity | Makes the bar more or less transparent. | Use a solid background for important offer text and verify contrast. |
| Devices | Limits display to desktop, mobile, or both. | Preview both breakpoints before publishing. |
| Schedule | Limits the active campaign window. | Pair it with a fixed countdown when the offer has a real end time. |
Notification bar examples for WooCommerce stores
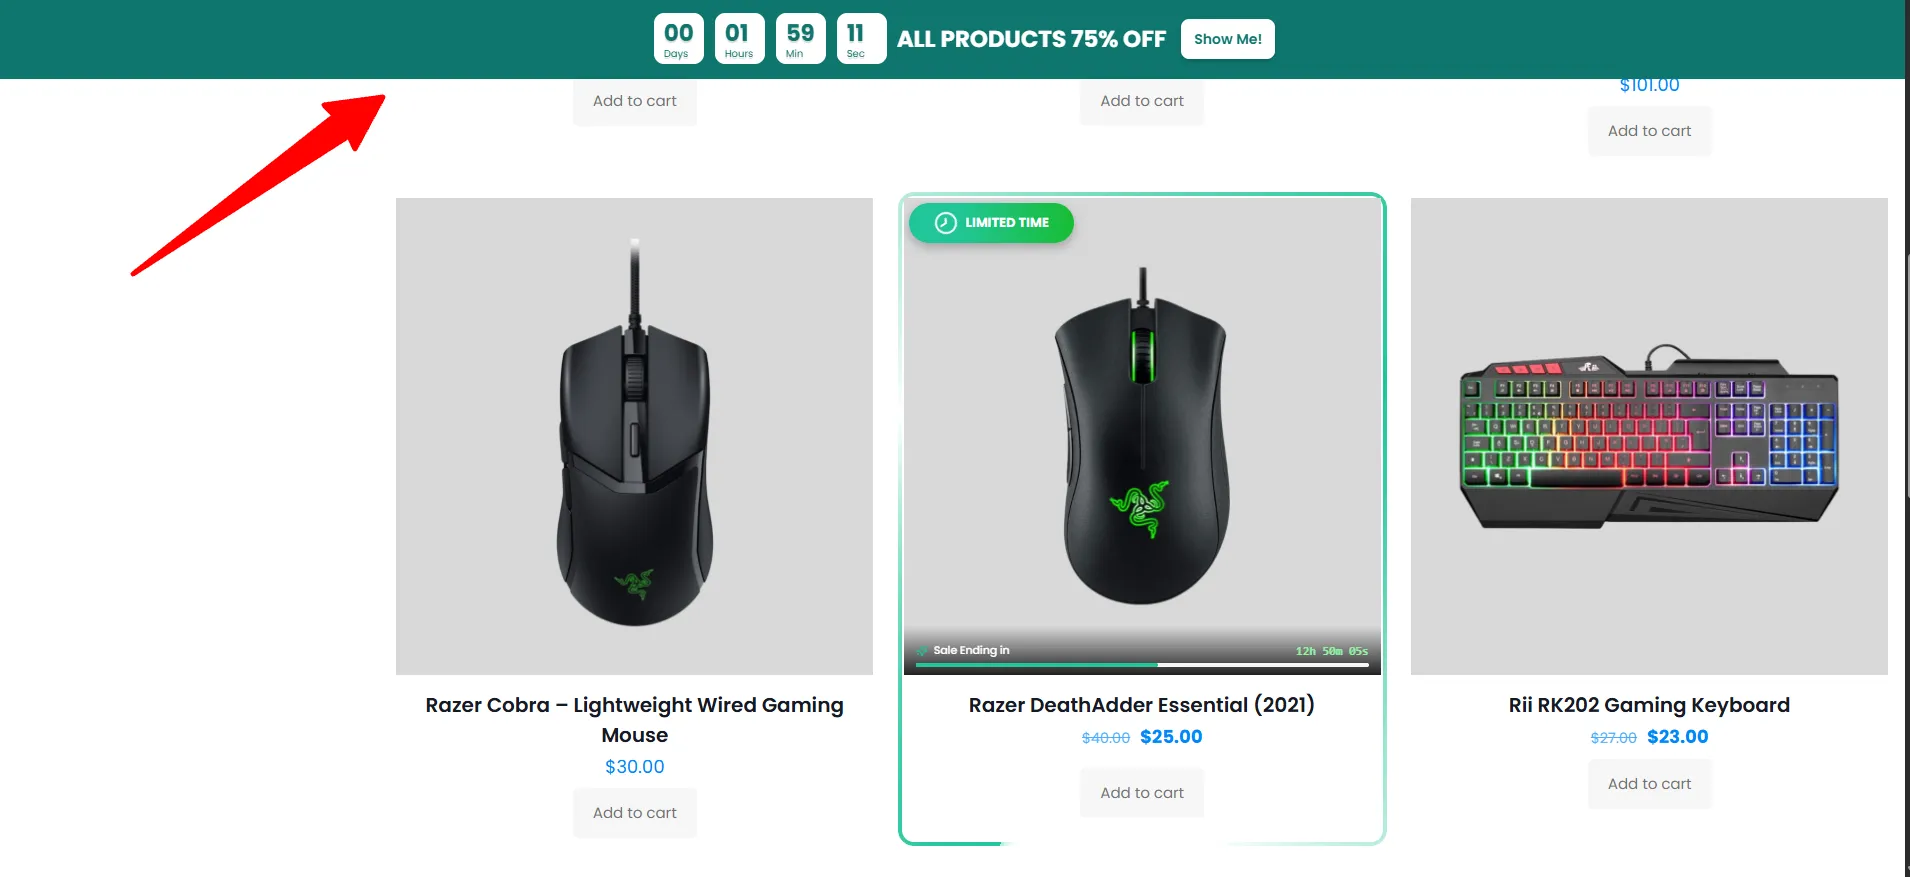
The storefront preview below shows the type of store-wide bar a shopper can see above the product grid. The message, countdown, and button are configured in the editor and can be limited through targeting rules.
Try these message patterns:
| Campaign | Example message | Recommended setup |
|---|---|---|
| Storewide sale | Summer sale: up to 30% off | Announcement Bar, top position, optional close button |
| Click-through promotion | New arrivals are here | Action Bar with a button linking to the collection |
| Limited-time sale | Sale ends in | Countdown Timer Bar with a real end date and Schedule |
| Minimum-spend incentive | Spend {currency}{remaining_amount} more to get free shipping | Free Shipping Bar on shop, product, cart, and checkout pages |
| Coupon campaign | Save 10% with code SAVE10 | Multi Bar with a Coupon action |
| Evergreen reassurance | Free shipping · Easy returns · Secure checkout | Infinity Bar with short scrolling messages |
Best practices for a high-converting notification bar
Write one clear promise before adding decorative copy. A shopper should understand the benefit, qualification, and next step without opening a menu or reading a second paragraph.
Keep a fixed bar short enough to fit on a phone. If the message wraps into multiple lines, reduce the copy, move the bar to the bottom, or show it only on the desktop breakpoint. Make the close control easy to find and give dismissed campaign bars a sensible re-show delay.
Use a countdown only for a genuine deadline. Choose Till End Date for a shared campaign deadline and Evergreen for a per-visitor timer. Do not use urgency wording that conflicts with the actual promotion schedule.
For a free shipping progress bar, configure the same threshold in WooCommerce shipping settings and in the Sale Booster bar. Keep the start, progress, and success messages distinct so shoppers know whether they are below the threshold, close to it, or already qualified.
Test the message on a product page, shop page, cart, and checkout when those locations are targeted. Also test a dismissed bar, a fresh private window, a logged-in and logged-out session, and a narrow mobile viewport.
Troubleshoot a WooCommerce notification bar that is not showing
If the bar is missing, check the following in order:
- Confirm the bar's Status is enabled and that the changes were saved.
- Check the Schedule tab for a future start date or an expired end date.
- Review Targeting rules, including Devices, Pages & Products, and visitor Conditions.
- Clear page-cache and optimization-plugin caches, then test in a private browser window.
- Check whether the theme header, cookie notice, or another sticky element is covering the bar. Adjust the Z-Index, position, or spacing after confirming the bar is present in the page.
- For a Free Shipping Bar, confirm the WooCommerce shipping zone has a matching free-shipping method and that the cart meets the conditions for the message being tested.
- For a Countdown Timer Bar, verify the timer mode and end date. A completed fixed-date countdown will not show remaining time.
Frequently asked questions
What is a WooCommerce notification bar?
A WooCommerce notification bar is a store-wide message strip that communicates a sale, shipping offer, coupon, deadline, or store notice at the top or bottom of selected pages. Sale Booster adds templates for announcements, CTAs, countdowns, free-shipping progress, rotating offers, and scrolling messages.
How do I add an announcement bar in WooCommerce?
Go to Sale Booster → Notification Bar → Add New, choose Announcement Bar, write the message on the Content tab, set the position and targeting rules, then click Save. Enable Banner Fixed when the notice should remain visible during scrolling.
Can I add a free shipping bar to WooCommerce?
Yes. Choose the Free Shipping Bar template, set the free-shipping amount, and write the start, progress, and success messages. Configure the matching free-shipping method in WooCommerce, then target the bar to the pages where shoppers need to see their cart progress.
Can I add a countdown timer to a WooCommerce promotion bar?
Yes. Choose a Countdown Timer Bar, select Till End Date for a shared deadline or Evergreen for a per-visitor timer, set the end date and time, and save the bar. Add a Schedule when the bar must also turn on and off automatically.
Can I show a notification bar only on mobile or selected pages?
Yes. Use Targeting → Devices to choose desktop or mobile, then add Pages & Products rules for the shop, product, cart, checkout, or other supported locations. Visitor conditions can further limit the audience.
Next steps
- Announcement Bar — publish one short storewide message.
- Action Bar — add a CTA button that sends shoppers to a sale page.
- Countdown Timer Bar — show a fixed-date or evergreen deadline.
- Free Shipping Bar — display live progress toward a cart threshold.
- Multi Bar — rotate offers with buttons or coupons.
- Infinity Bar — scroll evergreen benefits across the store.
- Schedule — control campaign start and end times.