Announcement Bar
Overview
The Announcement Bar is the simplest bar type: a single, store-wide message with an optional close button. Use it for a sale headline, a shipping notice, or any short announcement you want on every page.
How it works
You're running a spring sale. You create an Announcement Bar reading "SPRING SALE — 25% OFF EVERYTHING", pin it to the top of the site, and every visitor sees it until they dismiss it (or you switch it off).
The Notification Bar module is available in Sale Booster Pro.
Step-by-step setup
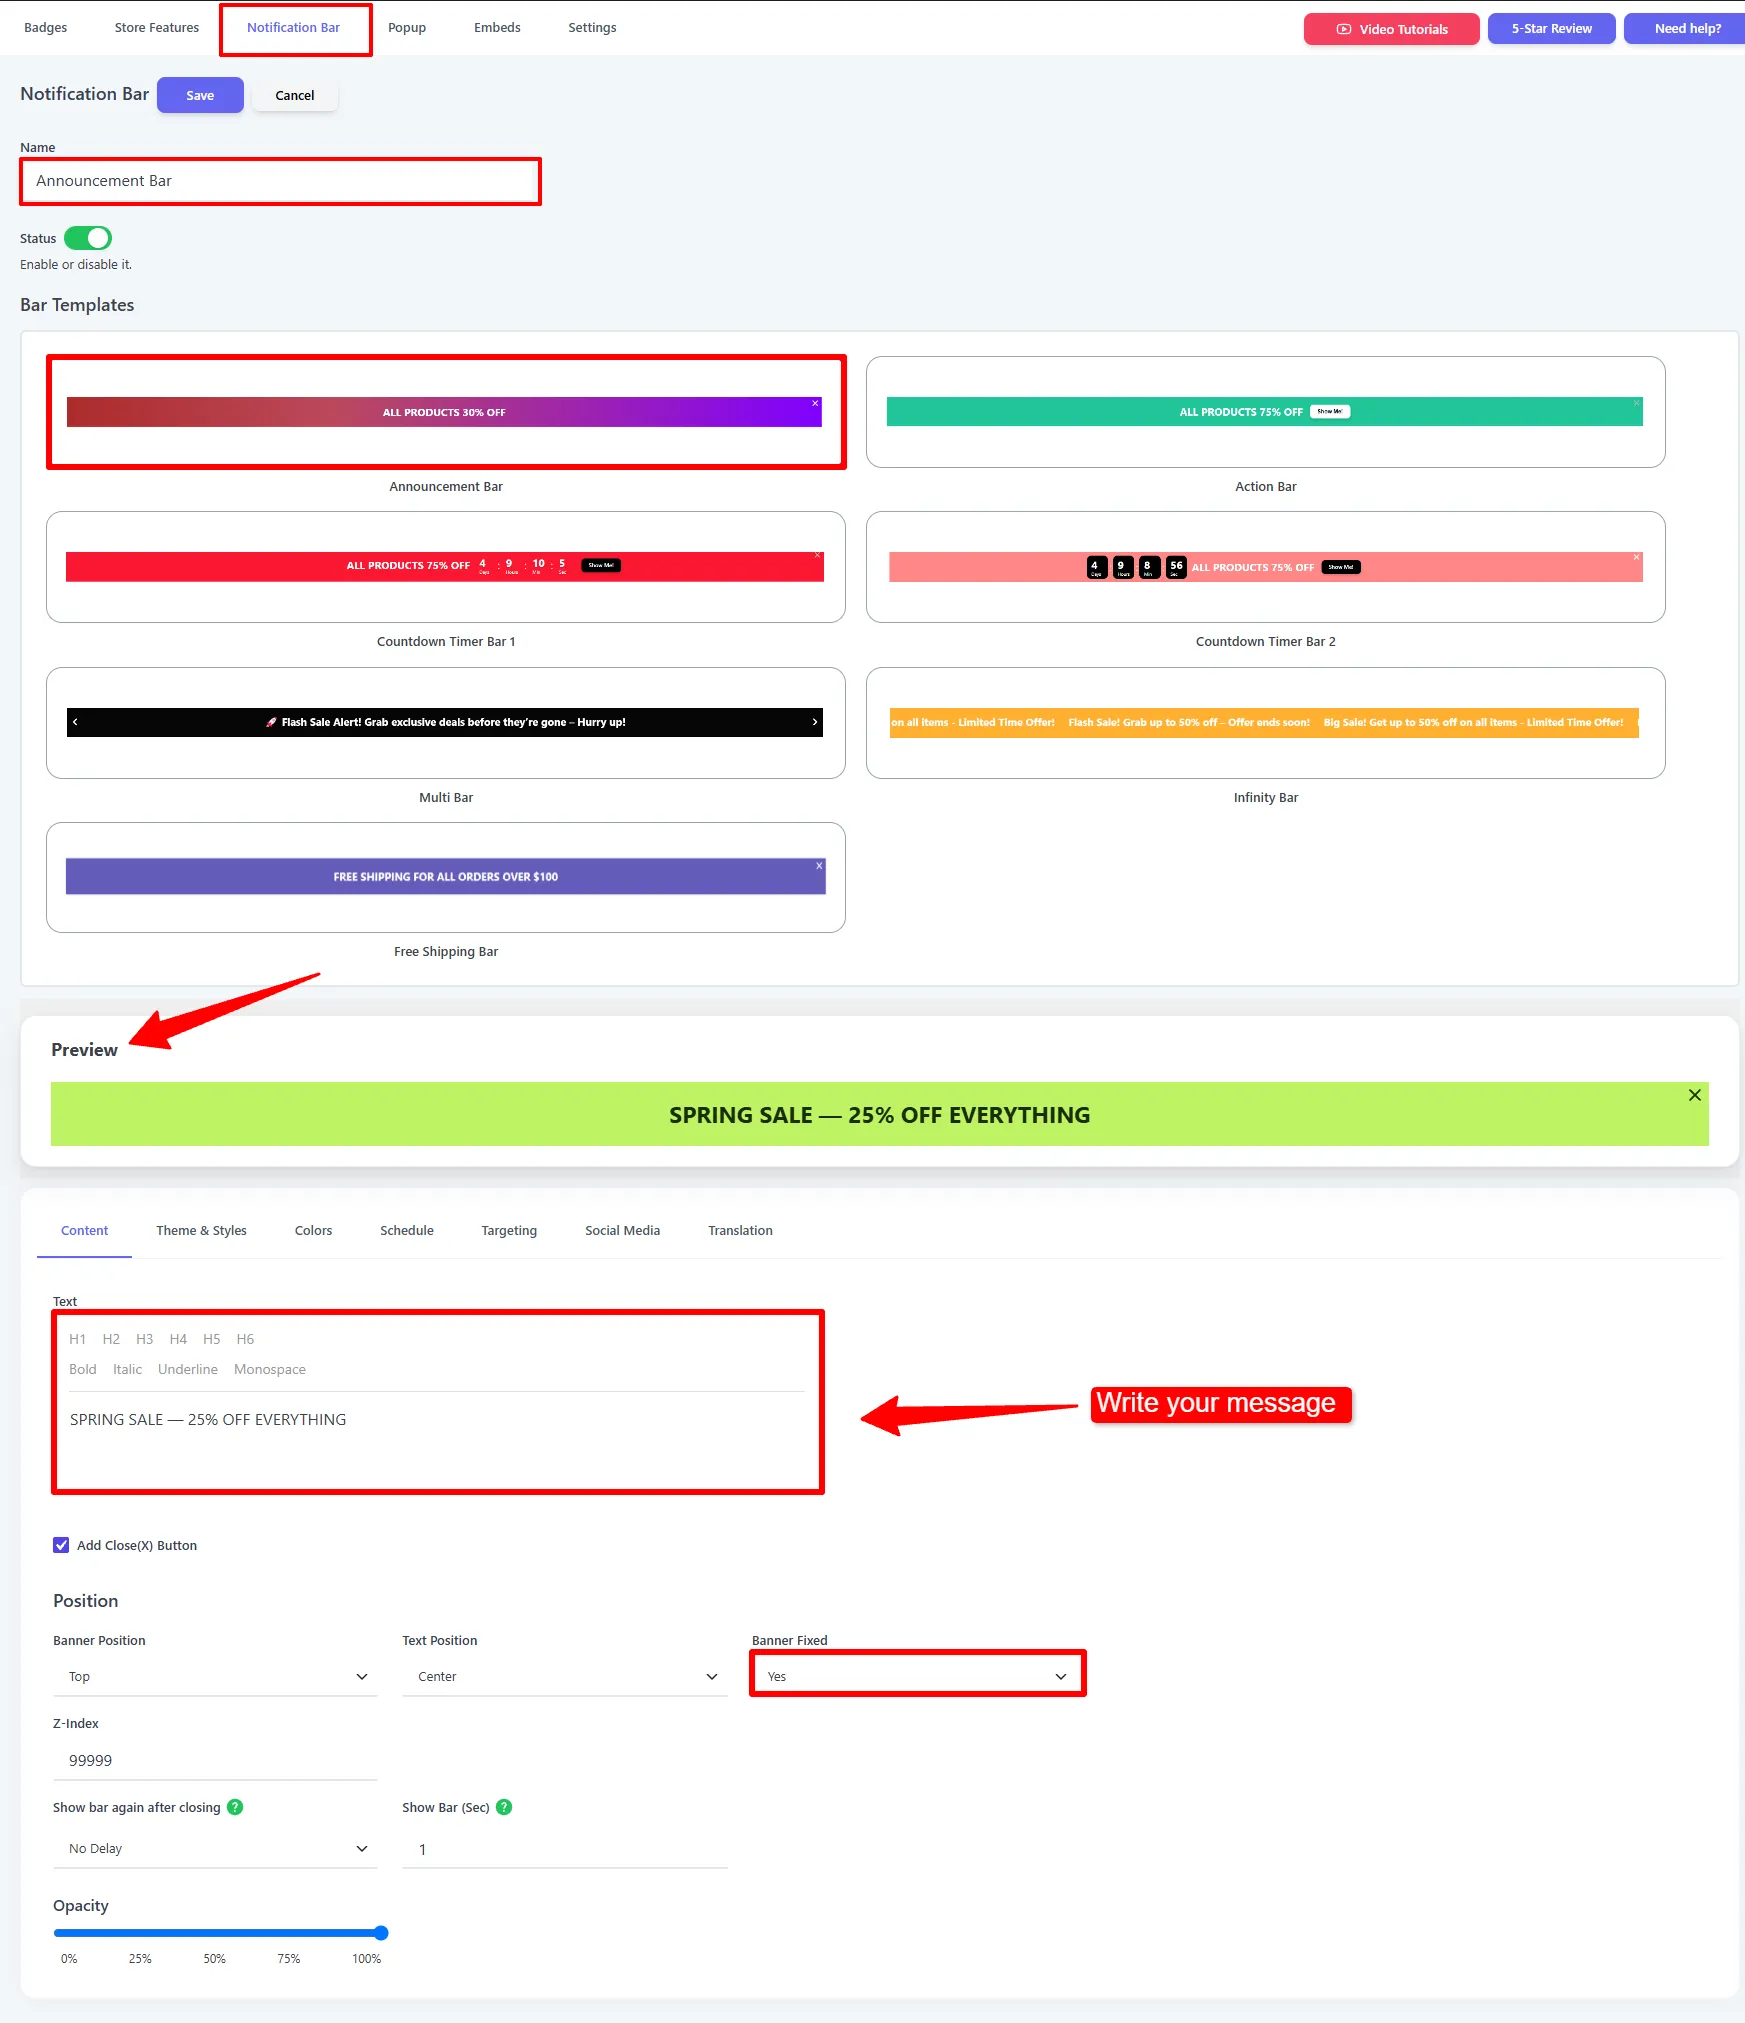
1. Pick the template and write your message
Open Sale Booster → Notification Bar → Add New, name the bar, and pick the Announcement Bar template. On the Content tab:
- Write your Text message (rich text — headings, bold, italic, underline).
- Optionally enable Close (X) Button. Older versions may display this control as Add Close (X) Button.
- Under Position, set Banner Position (Top / Bottom), Text Position (Center), and Banner Fixed (Yes to make it sticky). Adjust Z-Index, Show bar again after closing, Show Bar (Sec), and Opacity as needed.
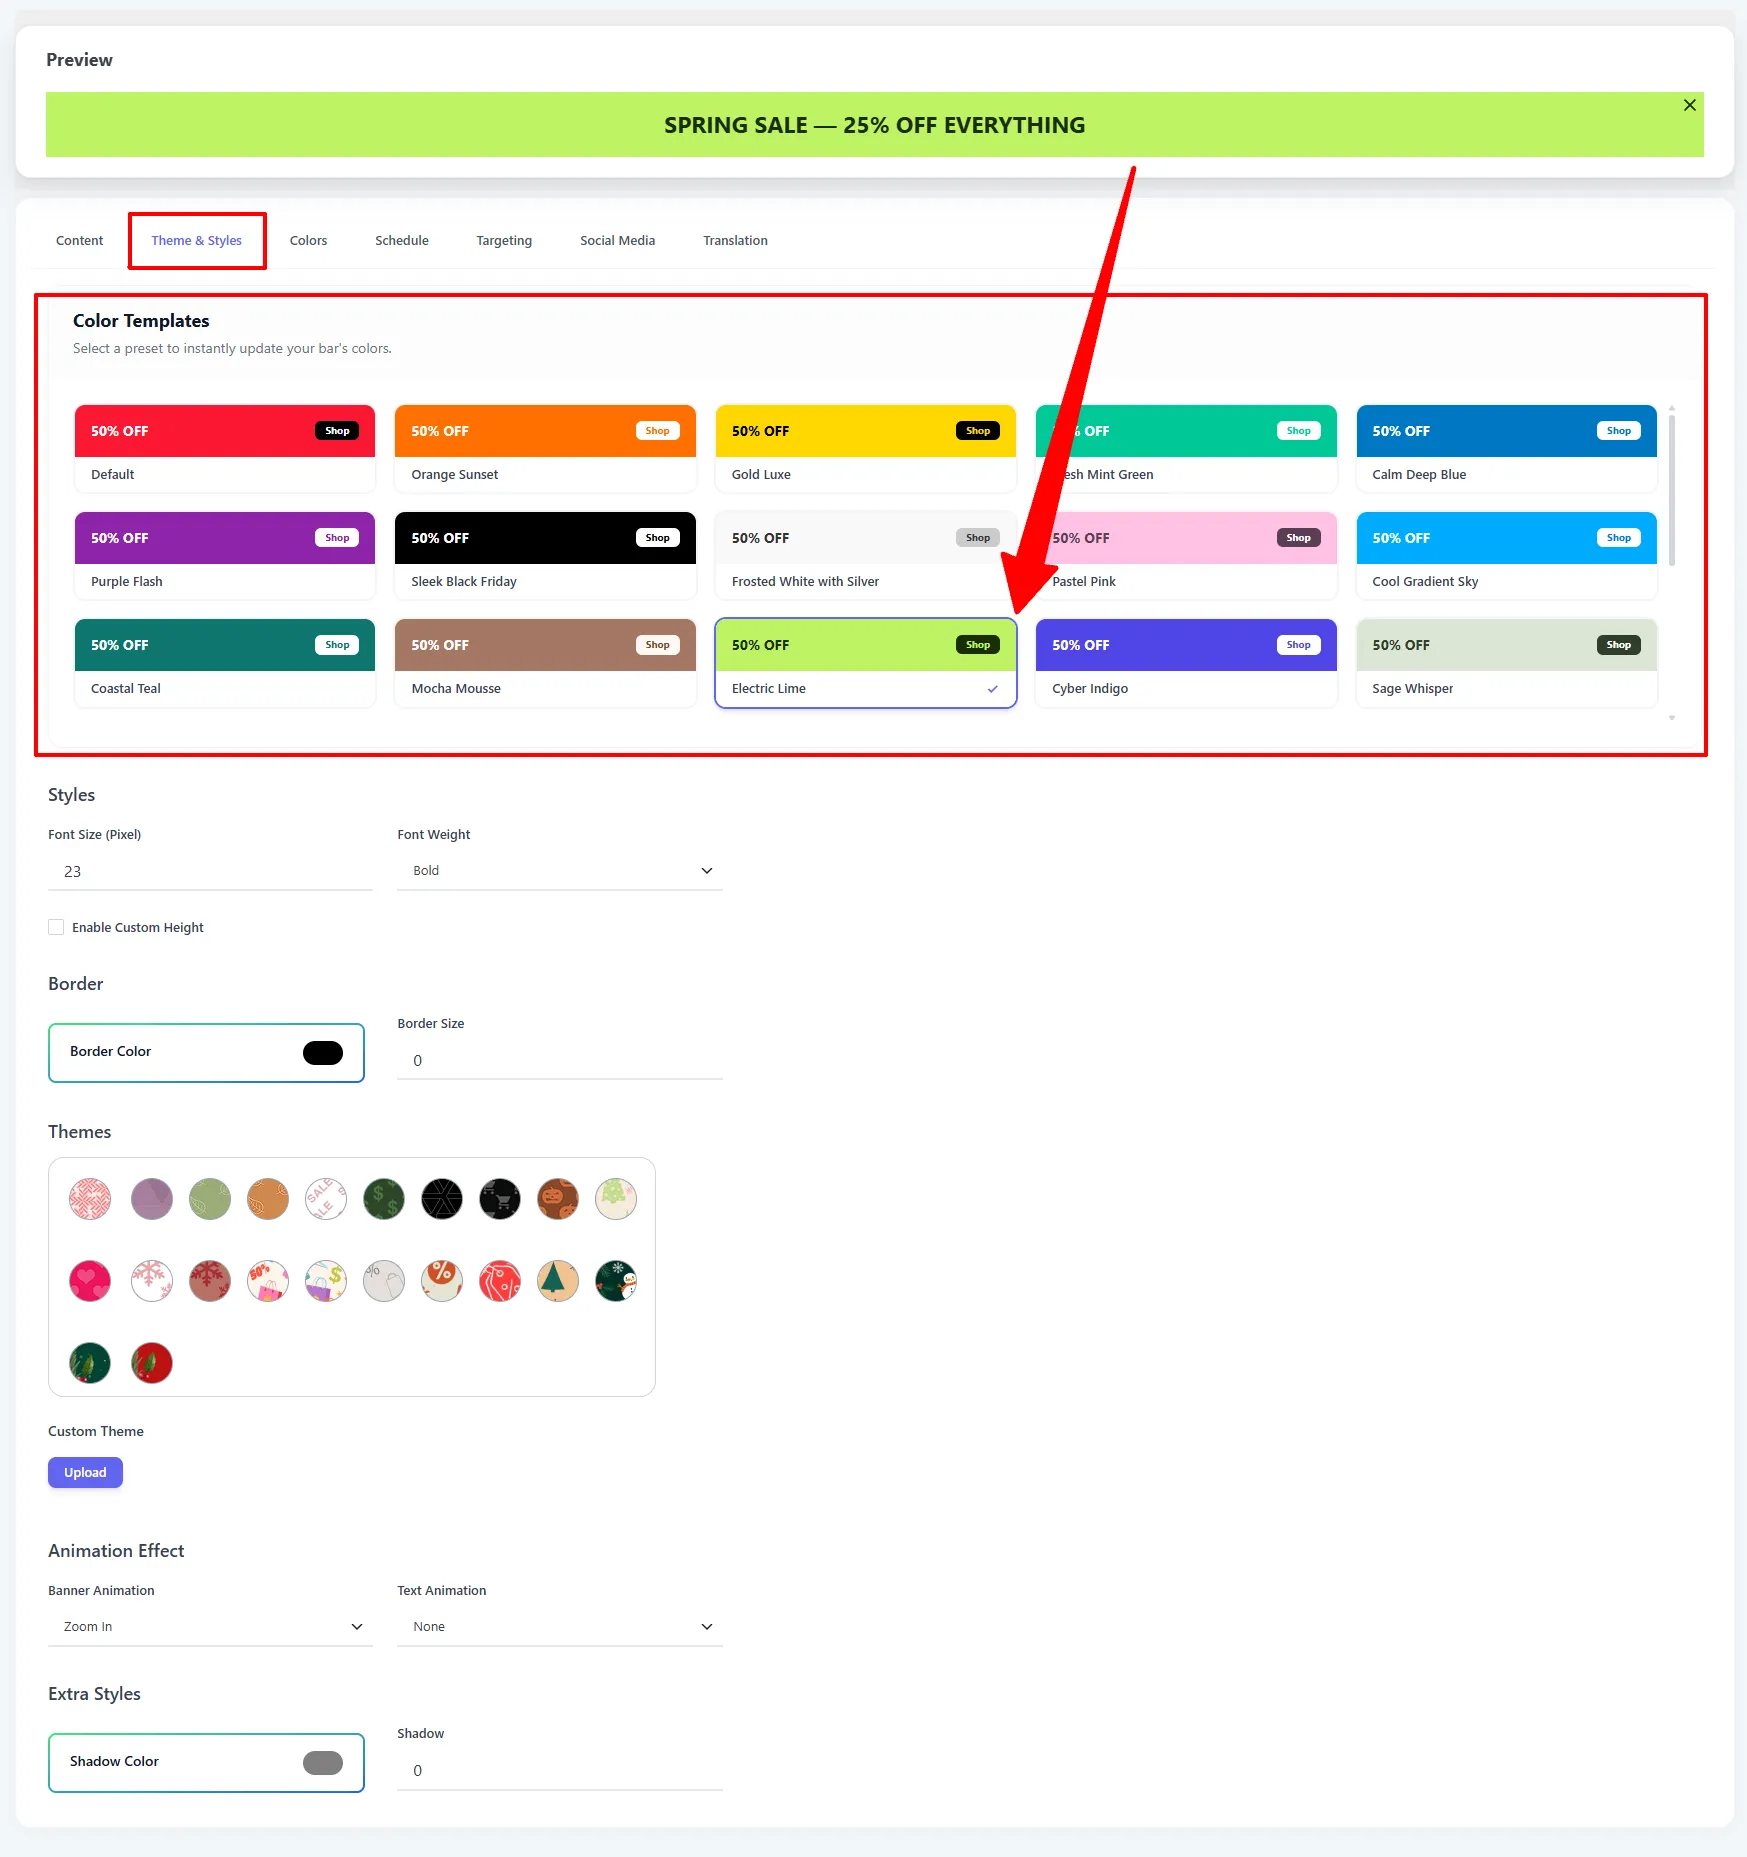
2. Style it with a Color Template
Switch to the Theme & Styles tab and click a Color Template to instantly recolor the whole bar (Default, Orange Sunset, Gold Luxe, Purple Flash, Sleek Black Friday, Electric Lime, and more). From here you can also set the Font Size / Weight, an optional Border, a background Theme image, the Banner / Text Animation, and a Shadow.
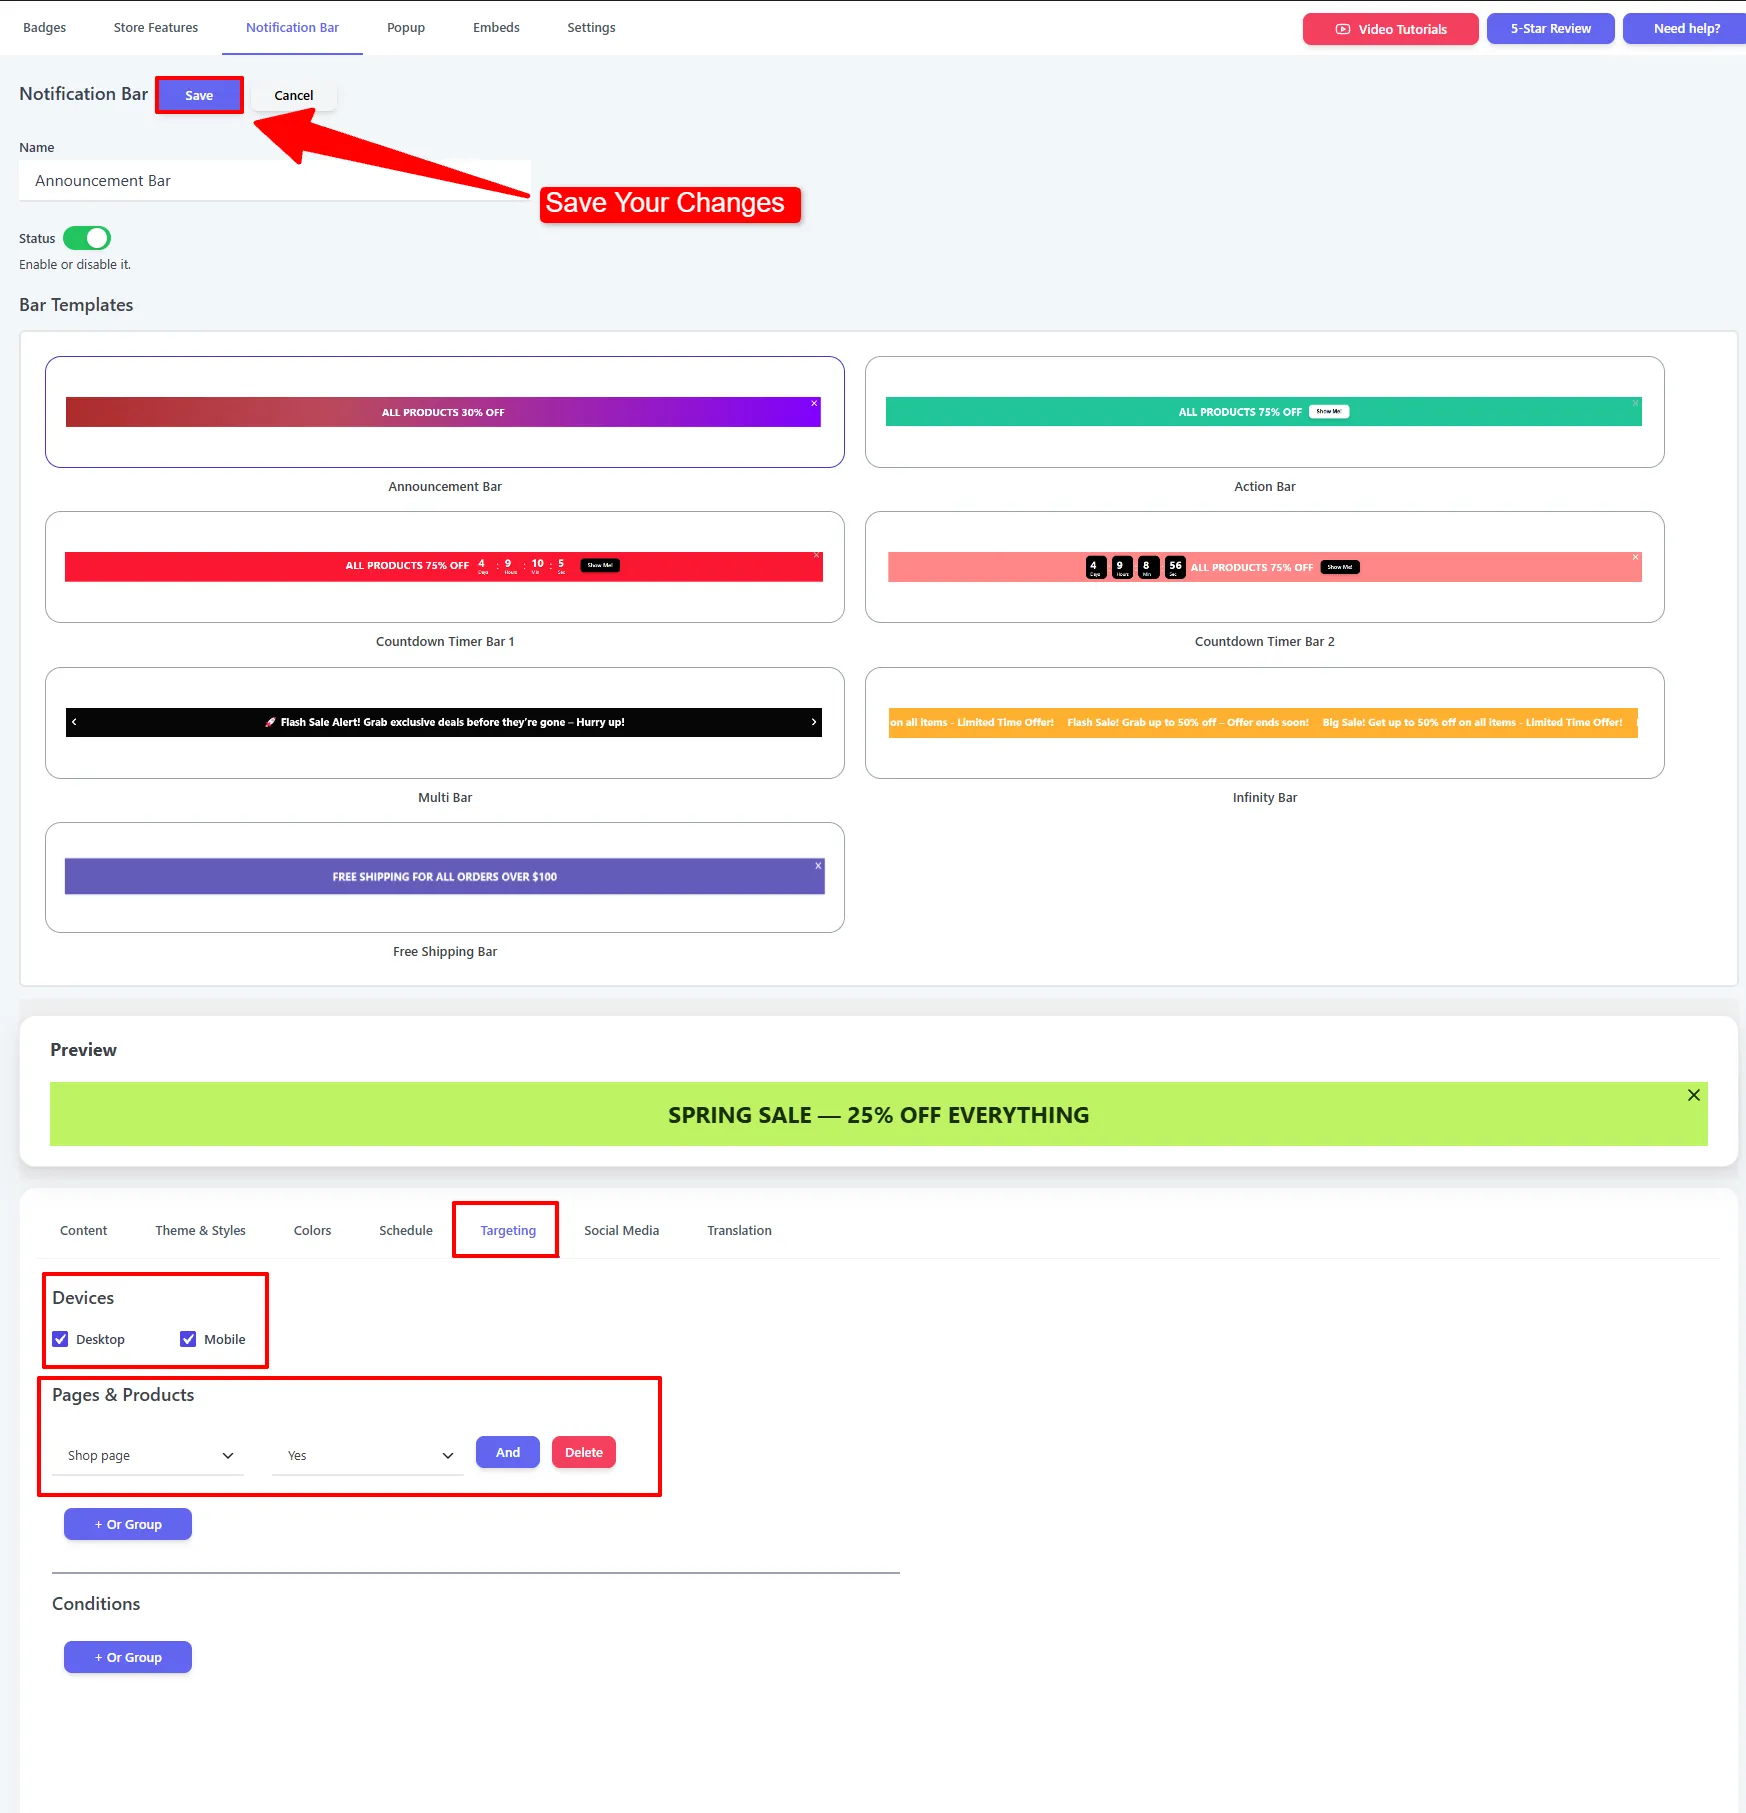
3. Choose where it shows, then Save
On the Targeting tab, pick the Devices (Desktop / Mobile) and add Pages & Products rules — for example show it on the Shop page. Add Conditions to limit it by visitor, then click Save.
Options explained
| Option | What it does |
|---|---|
| Text | The bar message (rich text). |
| Close (X) Button | Lets visitors dismiss the bar; control how long it stays hidden with Show bar again after closing. Older versions may display this as Add Close (X) Button. |
| Banner / Text Position | Top / Bottom placement and Left / Center / Right alignment. |
| Banner Fixed / Z-Index / Opacity | Sticky behavior, stacking order, and fade. |
| Color Template / Font / Border / Animation / Shadow | Full styling on the Theme & Styles and Colors tabs. |
| Devices / Pages & Products / Conditions | Where and to whom the bar appears (Targeting tab). |
🧪 Example configuration
| Setting | Value |
|---|---|
| Type | Announcement |
| Text | SPRING SALE — 25% OFF EVERYTHING |
| Color Template | Electric Lime |
| Text Position | Center |
| Banner Position | Top, fixed |
| Targeting | Devices: Desktop + Mobile · Shop page |
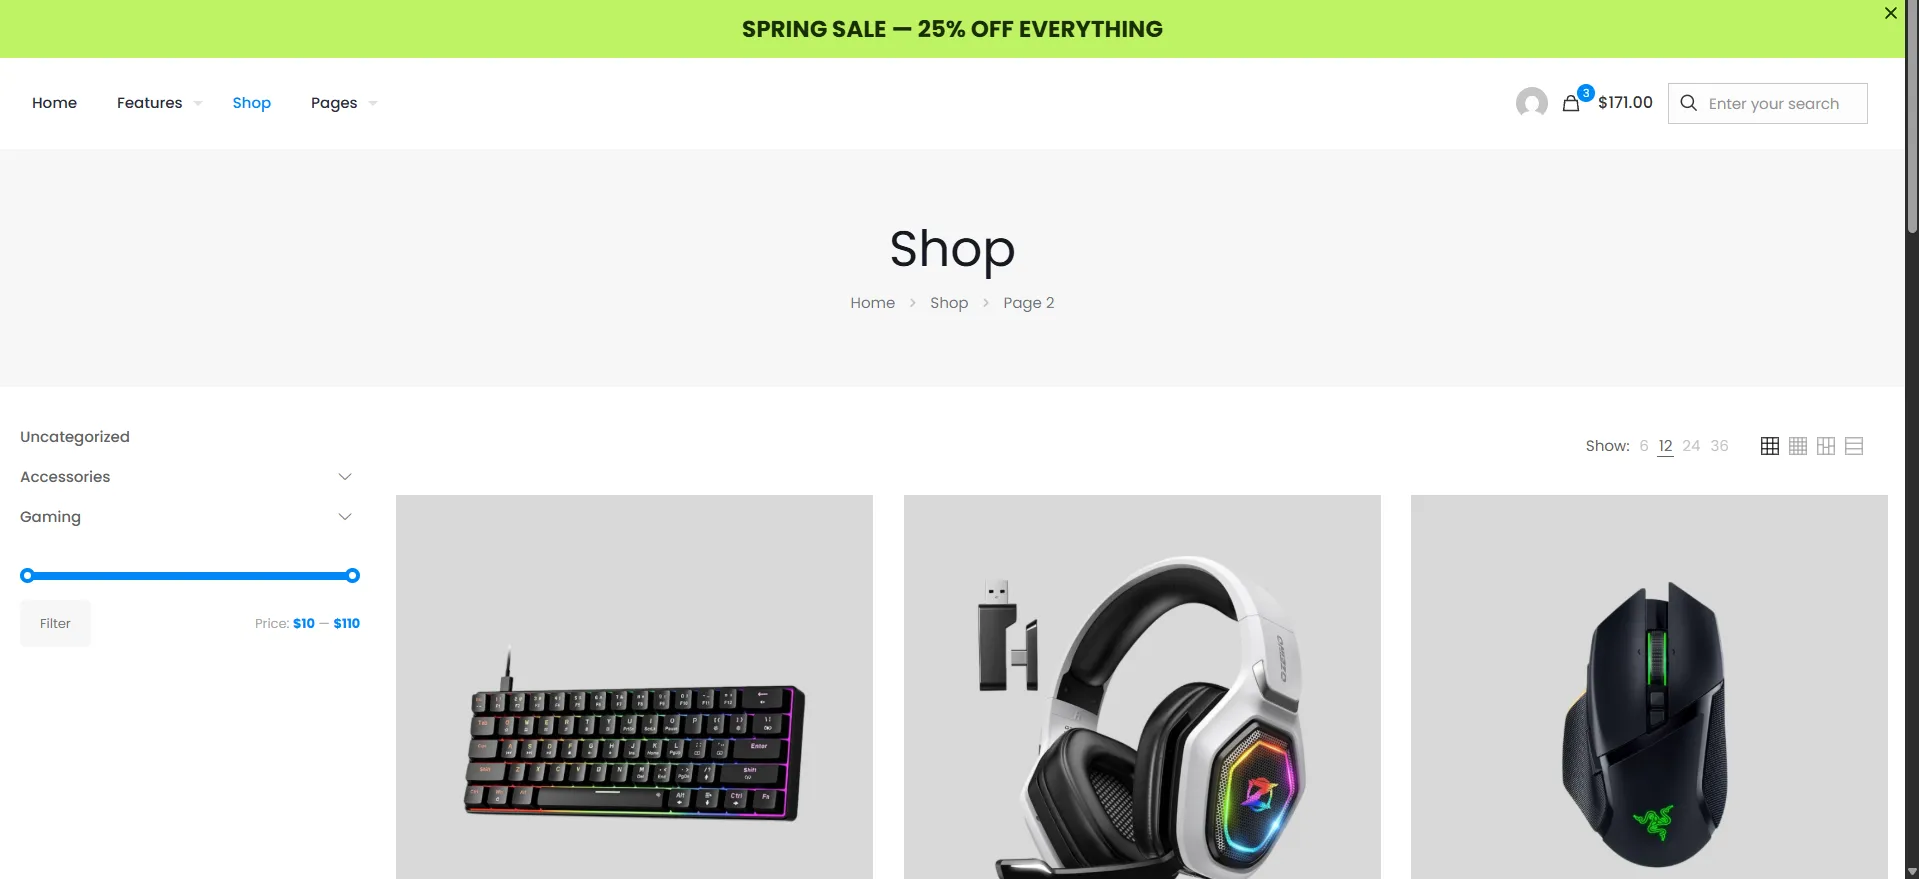
What customers see
A clean, sticky message bar across the top of the store — here the green "SPRING SALE — 25% OFF EVERYTHING" bar on the Shop page.
- Keep it to one short message — for several offers use a Multi Bar.
- Give the close button a sensible re-show delay so the bar isn't naggy.
- Use a Color Template for an instant on-brand look, then tweak individual colors on the Colors tab.
Next Steps
- Action Bar — add a call-to-action button.
- Countdown Timer Bar — add urgency with a countdown.
Frequently asked questions
What is a WooCommerce announcement bar?
A WooCommerce announcement bar is a store-wide message strip used to promote a sale, announce shipping information, share a store update, or highlight an important notice.
Can I make a WooCommerce announcement bar sticky?
Yes. Enable Banner Fixed in the position settings to keep the announcement bar visible while shoppers scroll. Test it on mobile to ensure it does not cover navigation or checkout controls.