How to Add a Countdown Timer for WooCommerce Sales
Learn how to add countdown timers for WooCommerce using multiple methods. This complete guide covers timers with the Discount Rules plugin, Sale Booster (Free & PRO), and evergreen timers. Create urgency and boost conversions on your product pages.
📋 Table of Contents
- Why Add a Countdown Timer?
- Method 1: Using the Discount Rules Plugin
- Method 2: Using the Sale Booster Plugin (Free)
- Method 3: Evergreen Countdown Timer (Sale Booster PRO)
- Troubleshooting
- Next Steps
🚀 Why Add a Countdown Timer?
A countdown timer for WooCommerce is one of the most effective tools to create urgency and drive conversions. By showing customers exactly how much time remains for a special offer, you can encourage faster purchasing decisions and reduce cart abandonment.
Benefits of Countdown Timers
- Create urgency — Customers act faster when they see time running out
- Boost conversion rates — Urgency triggers faster decision-making
- Reduce cart abandonment — Clear deadlines encourage checkout completion
- Increase average order value — Time-sensitive offers encourage larger purchases
Key Statistic: Countdown timers can significantly increase conversion rates by creating a fear of missing out (FOMO) and encouraging immediate action.
Method 1: Using the Discount Rules Plugin
The Discount Rules and Dynamic Pricing for WooCommerce plugin includes a built-in countdown timer feature that automatically displays when a pricing rule is scheduled. This is the recommended method as it's part of your discount plugin.
How It Works
The countdown timer automatically appears on product pages when:
- You have created a pricing rule with a scheduled end date
- The rule is currently active (within the scheduled time)
- The countdown timer is enabled in the plugin settings
- The product qualifies for the discount
Important: The countdown timer will only show if the pricing rule is scheduled and active. If the rule is out of the schedule time, the countdown timer won't display.
Step 1: Create a Scheduled Pricing Rule
- Go to Woo Pricing & Discounts in your WordPress admin
- Open the Pricing tab
- Create or edit a pricing rule (Simple, Bulk, BOGO, Tiered, etc.)
- Under the Date Time section, schedule your rule:
- Set a start date (when the discount begins)
- Set an end date (when the discount expires)

Note: The countdown timer requires an end date to display. Without an end date, no timer will appear.
For a deep dive into timezone setup, recurring schedules, and multi-tier scheduling logic, read our comprehensive Scheduling & Date-Time Guide.
Step 2: Configure Countdown Timer Settings
- Go to Woo Pricing & Discounts > Settings
- Navigate to the Promotion tab
- Locate the Countdown Timer section
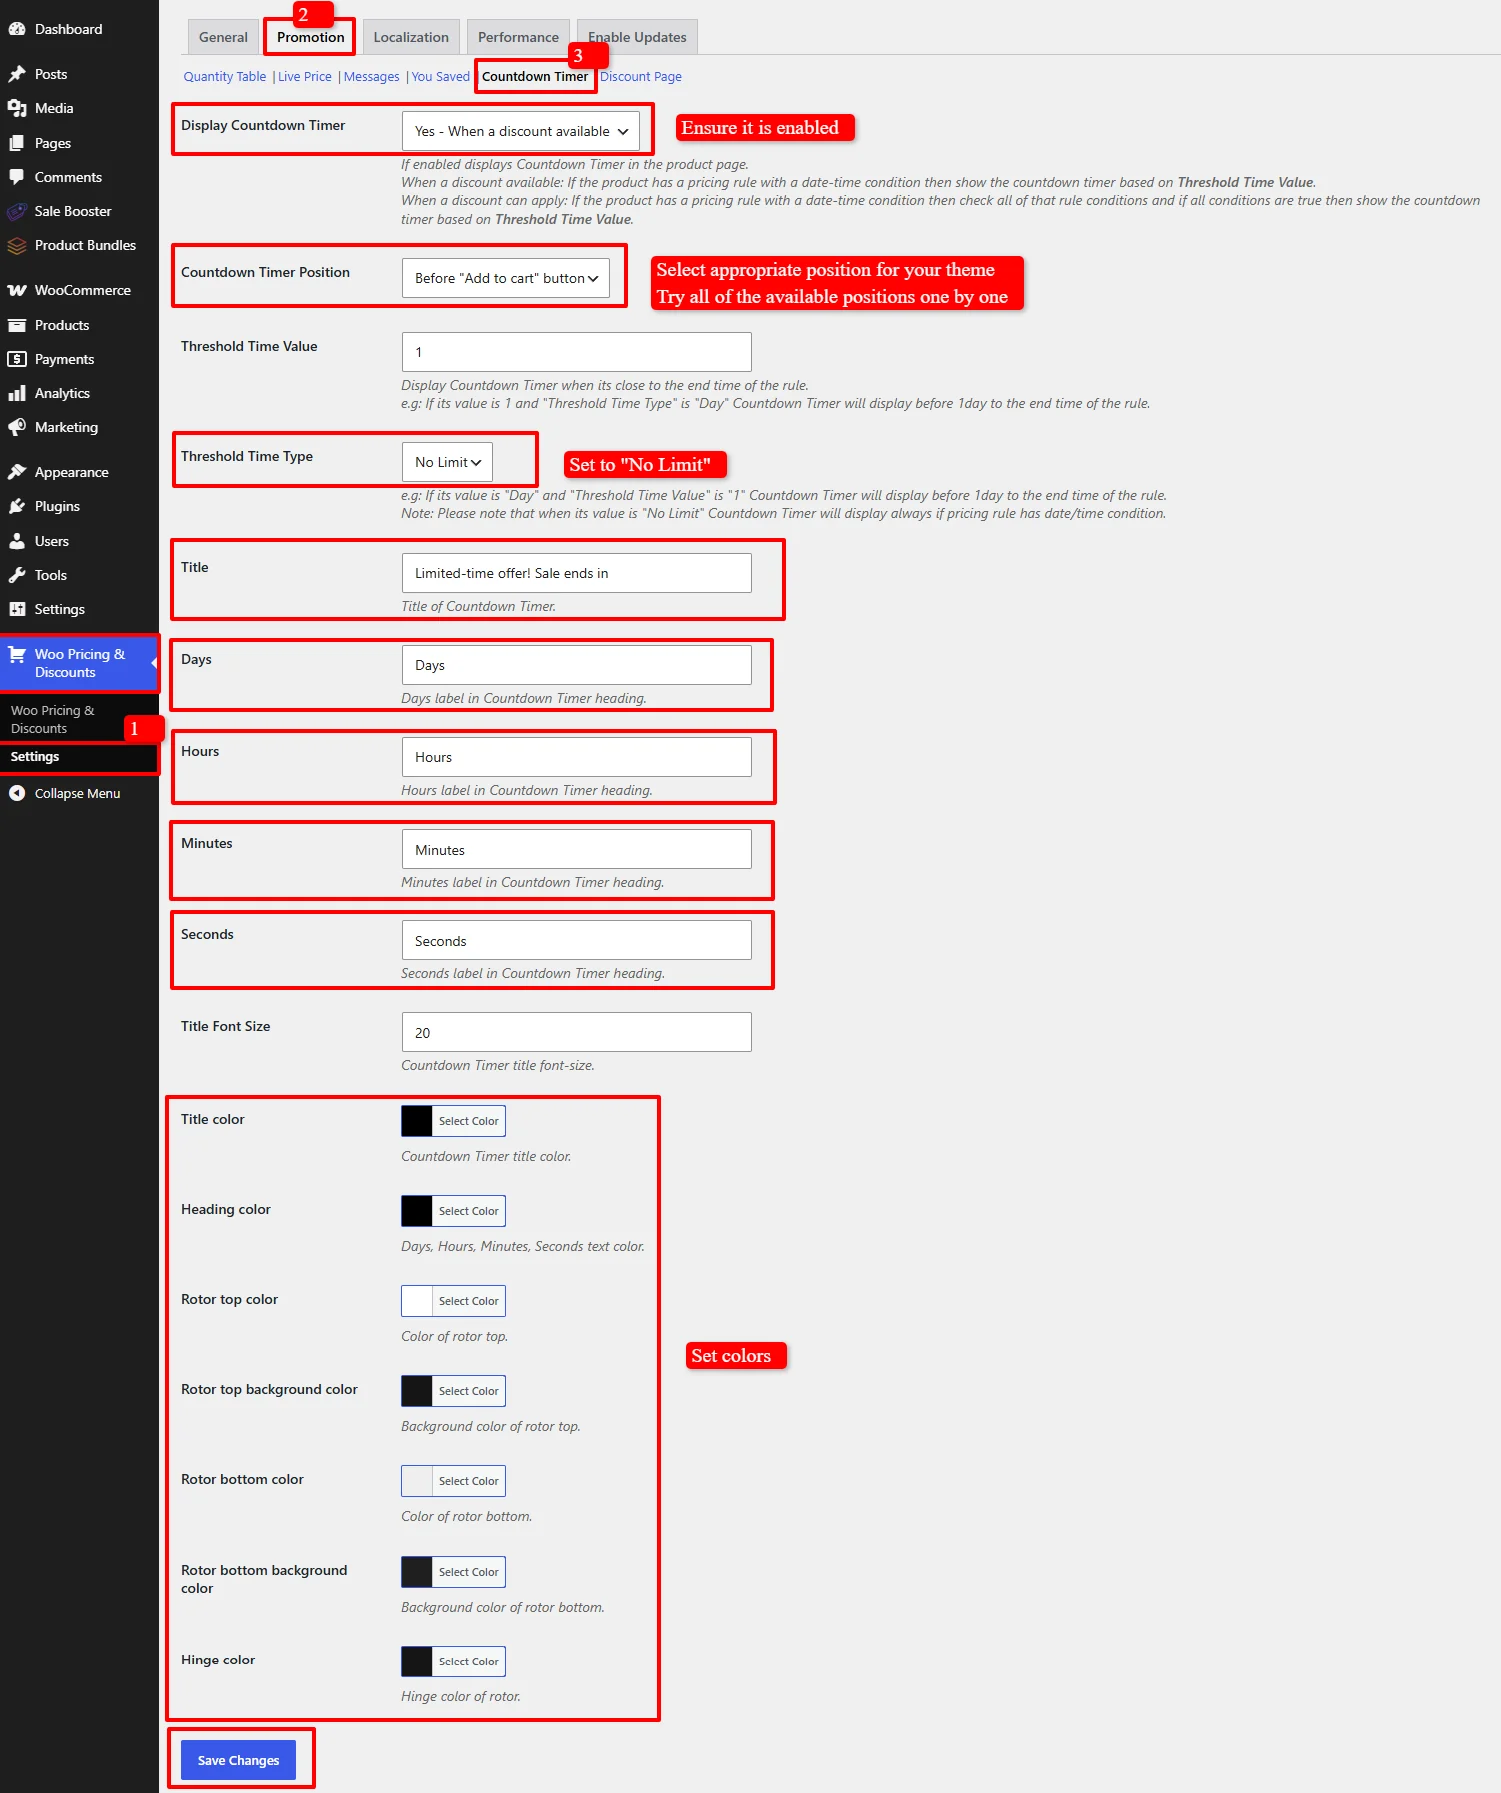
Step 3: Enable the Countdown Timer
Under the Countdown Timer settings:
- Display Countdown Timer — Set to:
- "Yes - When a discount available" — Shows the timer when a discount is active on a product
- "Yes - When a discount can apply" — Shows the timer when a discount can apply to the product
- "No" — Disables timer
Note: Ensure that you have selected one of the enabled options like "Yes - When a discount available".
- Threshold Time Value — Set the number of units (e.g.,
1) - Threshold Time Type — Choose when the timer should appear:
- No limit — Timer always displays
- Day — Timer appears X days before the sale ends
- Hour — Timer appears X hours before the sale ends
- Minute — Timer appears X minutes before the sale ends
Example:
- Threshold Time Value:
1 - Threshold Time Type:
Day - Result: Timer appears 1 day before the sale ends
Note: Set the Threshold Time Type to No limit then timer will be displayed always if it is applicable.
Step 4: Customize Timer Appearance
Customize how the countdown timer looks on your product pages:
- Title — Set the heading text (e.g., "Limited-time offer! Sale ends in")
- Days / Hours / Minutes / Seconds — Customize the labels for each unit
- Title Font Size — Set the font size for the title
- Heading Color — Choose the color for the title
- Rotor Colors — Customize the timer digits appearance
- Background Colors — Set rotor background colors
Step 5: Set Countdown Timer Position
Under Countdown Timer Position, choose where the timer appears on product pages:
- Before "Add to cart" button (Default)
- After "Add to cart" button
- Before "Add to cart" form
- After "Add to cart" form
- Before product excerpt
- After product excerpt
- After product meta
- None — Disables automatic placement
Step 6: Save Settings
- Click Save Changes at the bottom of the page
- Your countdown timer is now configured
Step 7: Test Your Countdown Timer
- Visit a product page that has an active scheduled discount
- The countdown timer should appear in the selected position
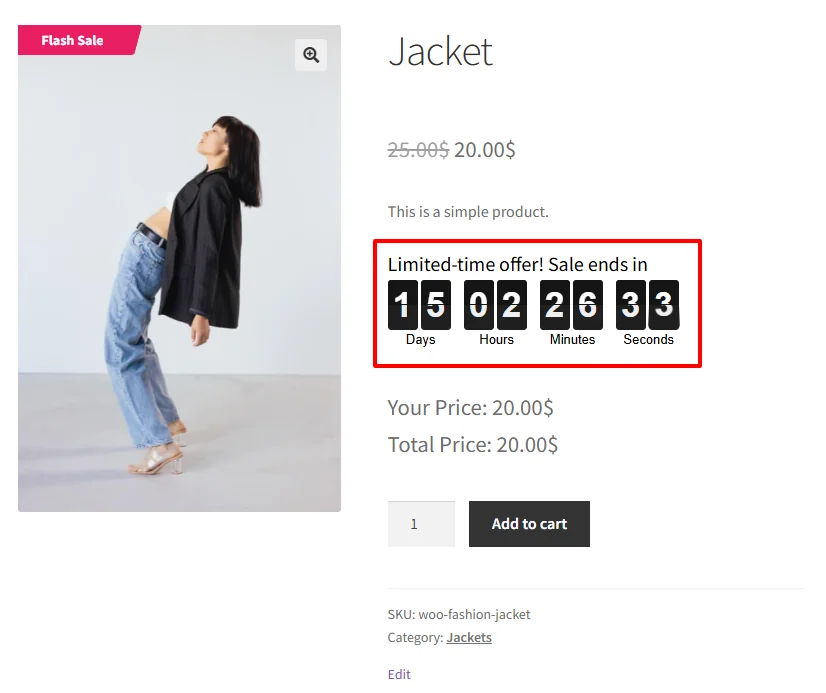
Shortcode Usage
If the timer doesn't appear in your theme's default positions, you can use the shortcode:
[wccs_countdown_timer]
Place this shortcode in your product page template or product description to display the countdown timer.
Method 2: Using the Sale Booster Plugin (Free)
You can also add countdown timers using the Sale Booster plugin (Product Badge, Label, Countdown Timer for WooCommerce). This method offers more visual customization options and separate timer creation.
How It Works
The Sale Booster plugin allows you to create standalone countdown timers that can be applied to specific products, categories, or discount rules.
Step 1: Install and Activate the Plugin
- Go to Plugins > Add New in your WordPress admin
- Search for "asanaplugins" or Product Badge, Label, Countdown Timer for WooCommerce – Sale Booster
- Find the plugin by asanaplugins in the search results
- Click Install Now and then Activate
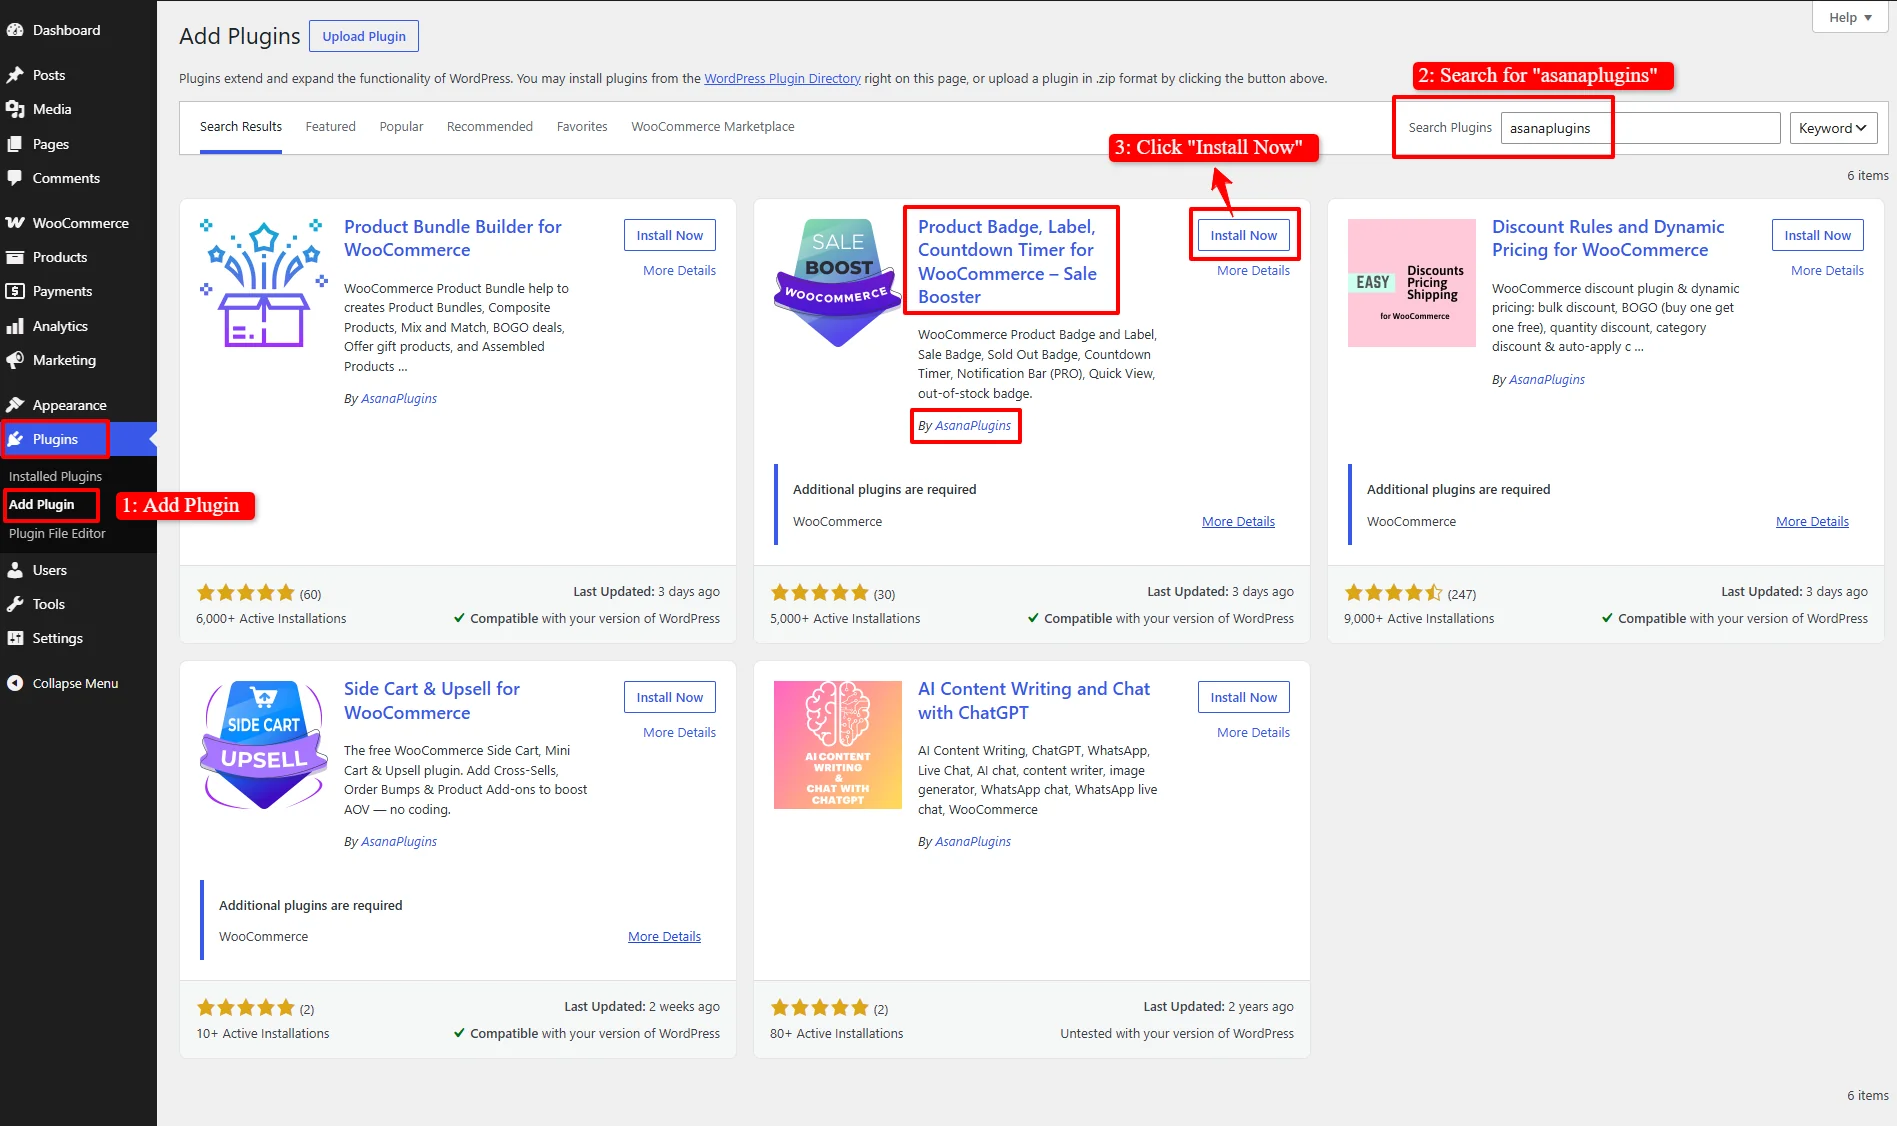
Step 2: Access the Badges Menu
- Go to Sale Booster > Badges in your WordPress admin
- Click Add New
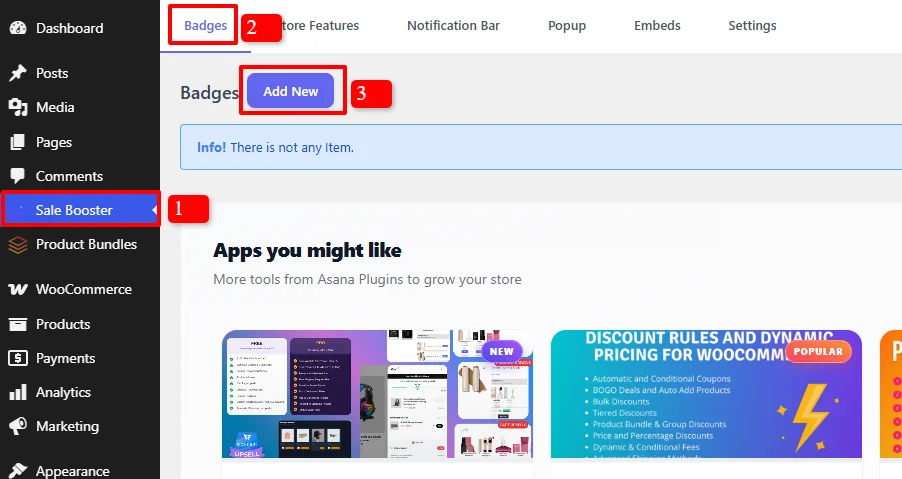
Step 3: Create a Countdown Timer
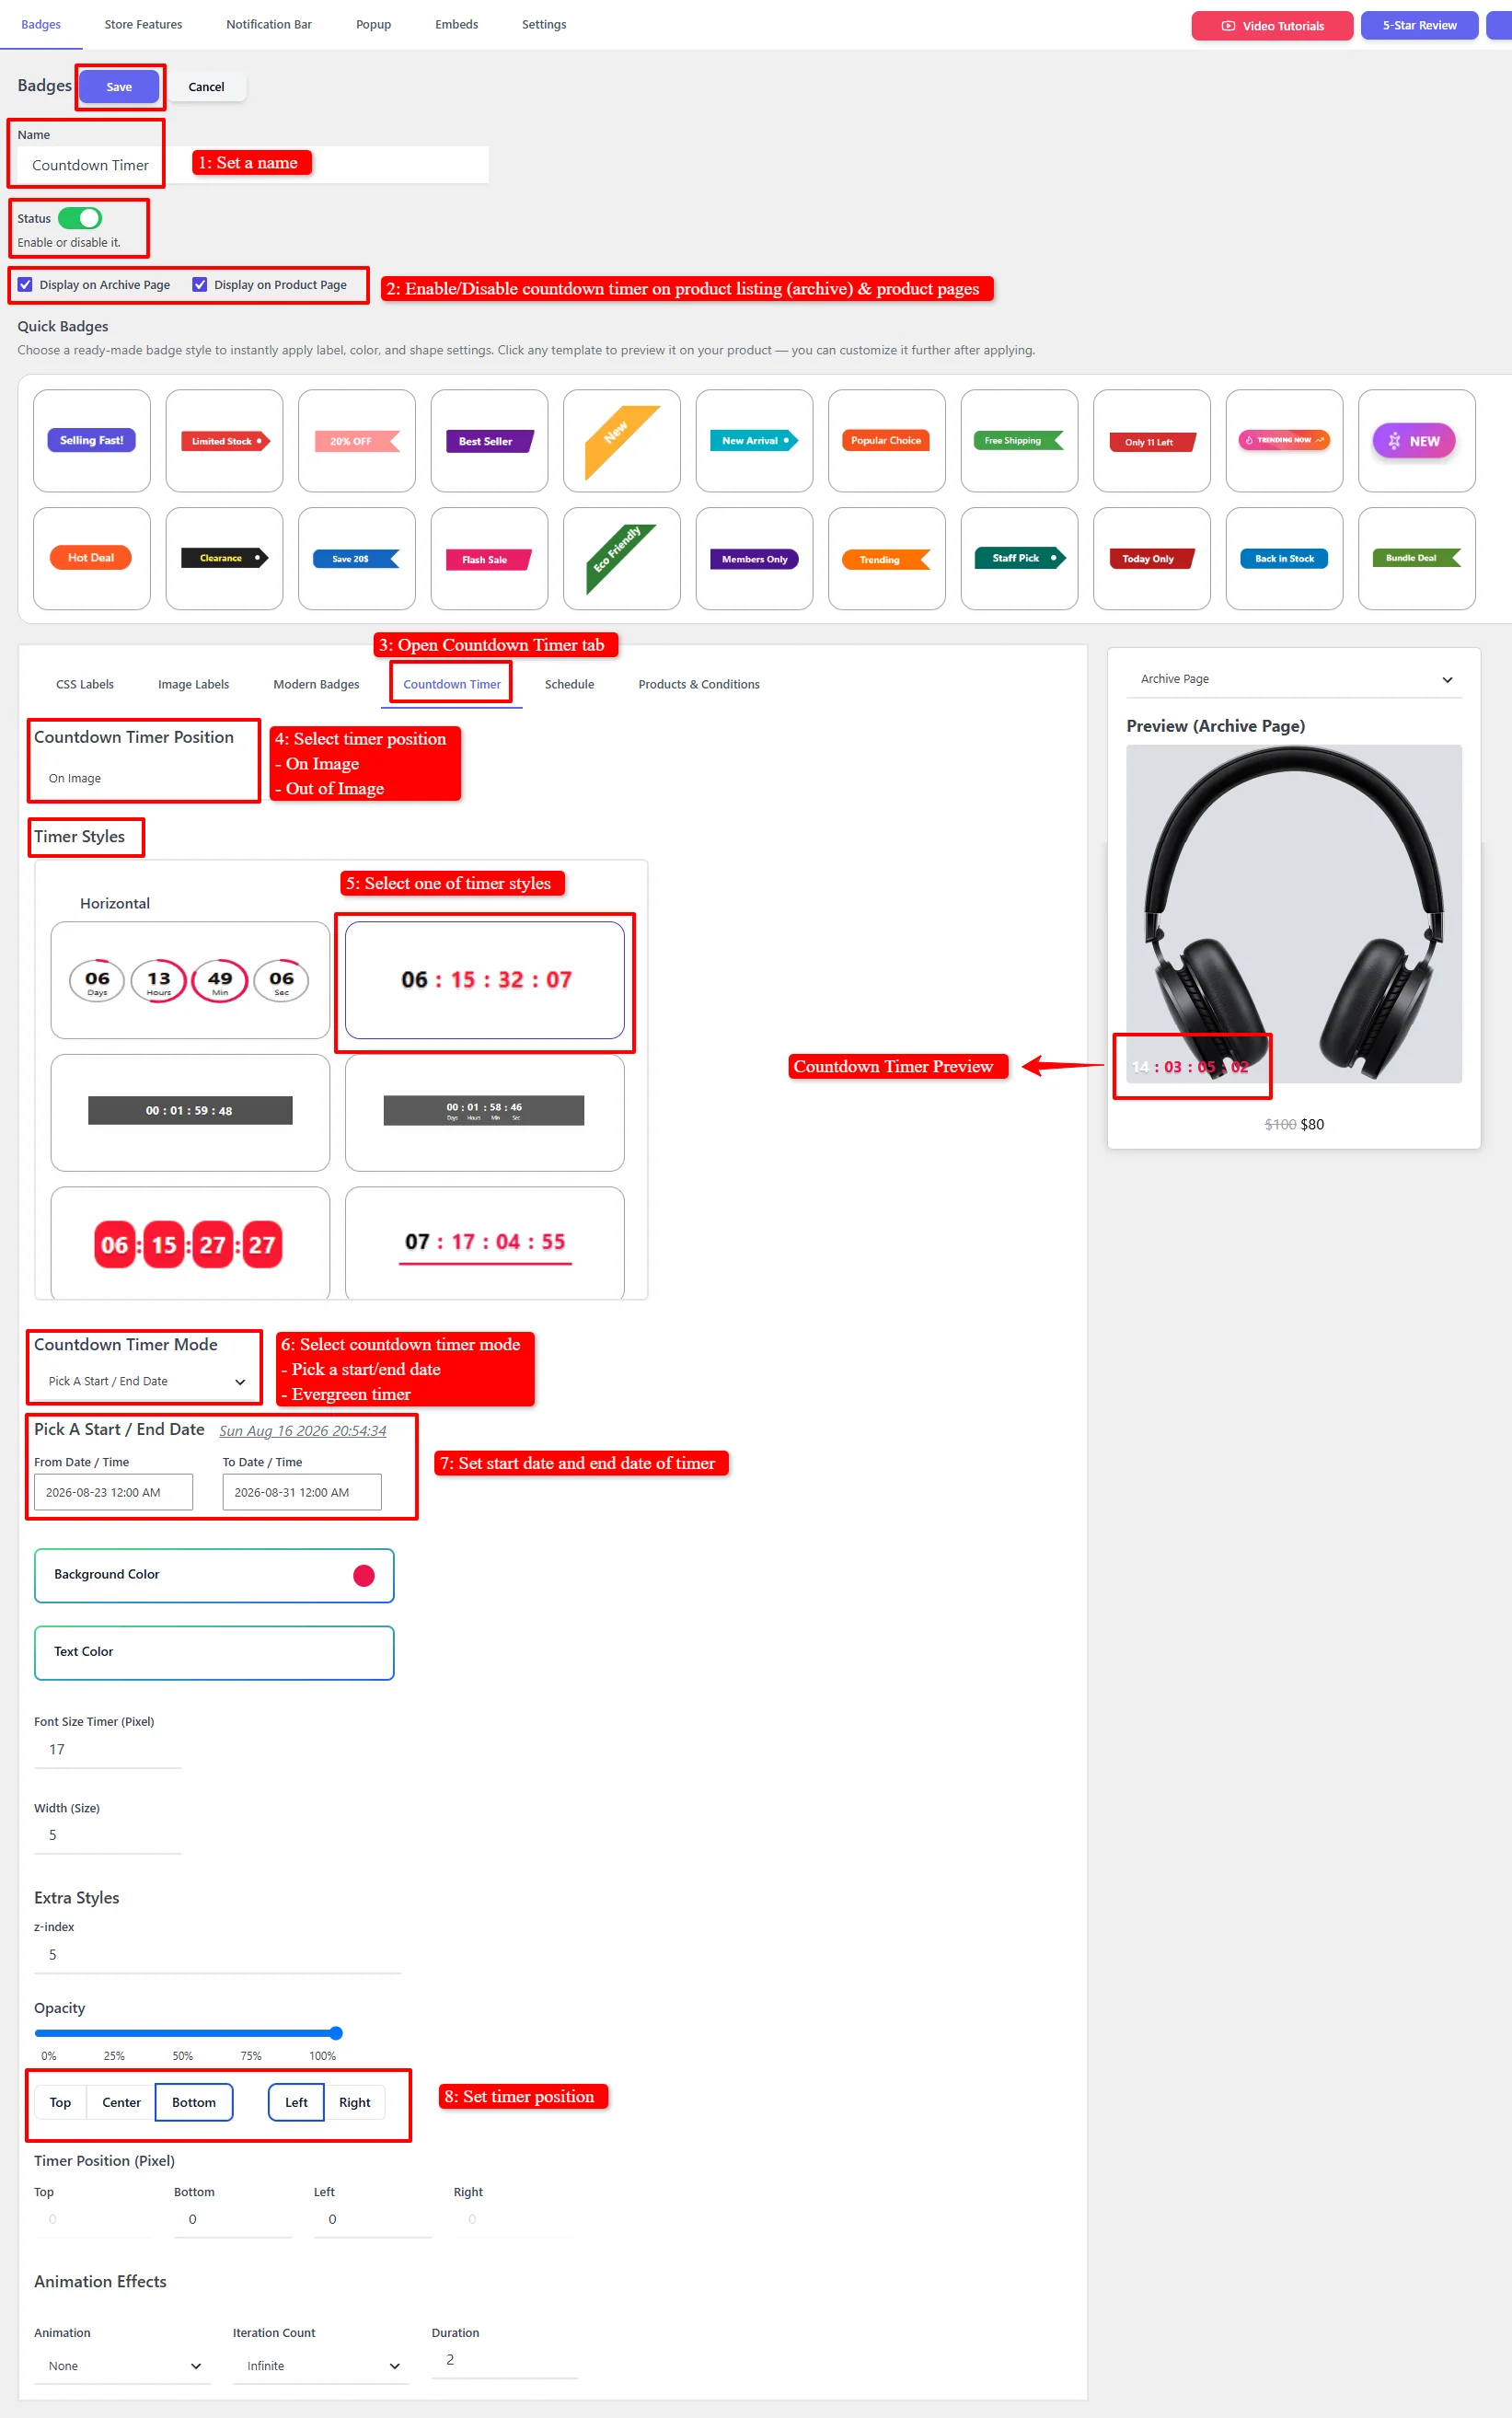
- Enter a Name for your timer (e.g., "Flash Sale Timer")
- Ensure Status is set to Enable
- Check Display on Archive Page and Display on Product Page
Step 4: Configure the Timer
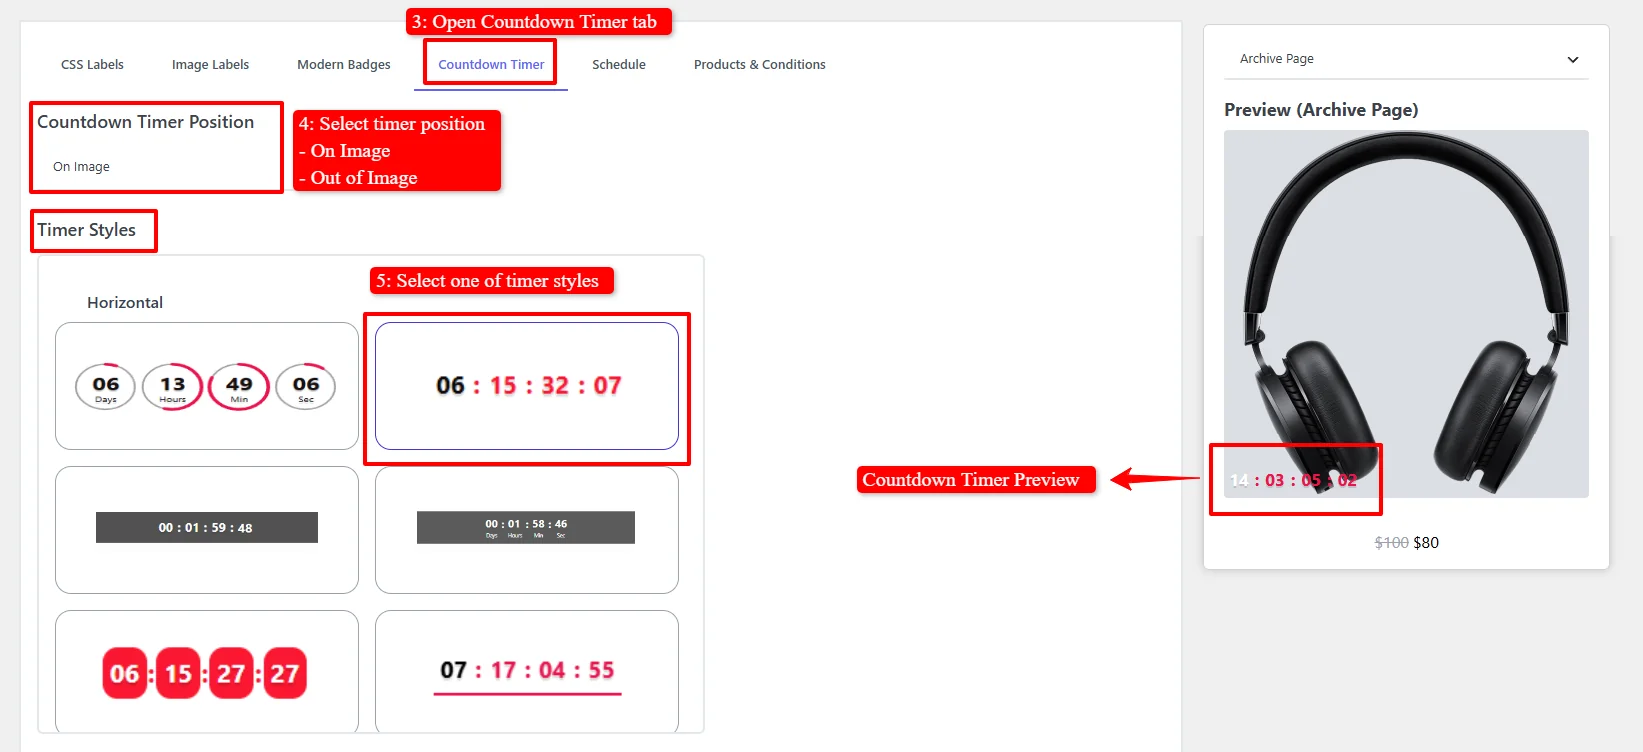
Switch to the Countdown Timer tab and customize:
- Countdown Timer Position — Choose "On Image" or "Out of Image"
- Timer Styles — Select from multiple pre-designed styles:
- Horizontal timer
- Compact timer
- Various color themes
Step 5: Set Timer Schedule
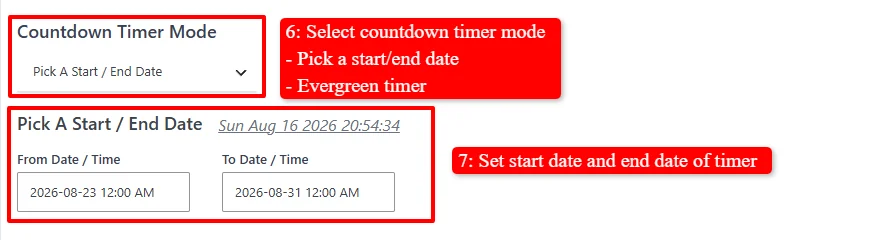
- Countdown Timer Mode — Select "Pick A Start / End Date"
- From Date / Time — Set when the timer should start
- To Date / Time — Set when the timer should end
Step 6: Customize Appearance
- Background Color — Set timer background color
- Text Color — Set timer text color
- Font Size Timer (Pixel) — Adjust the font size
- Extra Styles — Set z-index, opacity, and animation effects
Step 7: Set Display Conditions
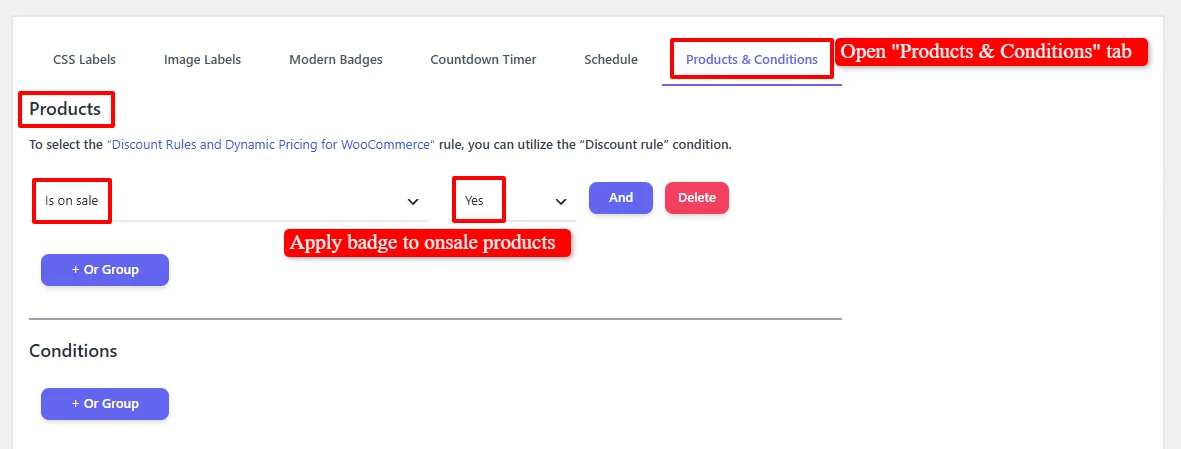
Switch to the Products & Conditions tab and choose how the timer should be displayed:
Option A: Apply to All Sale Products
Set condition: "Is on sale" → Yes. This displays the timer on all products that have a sale price.
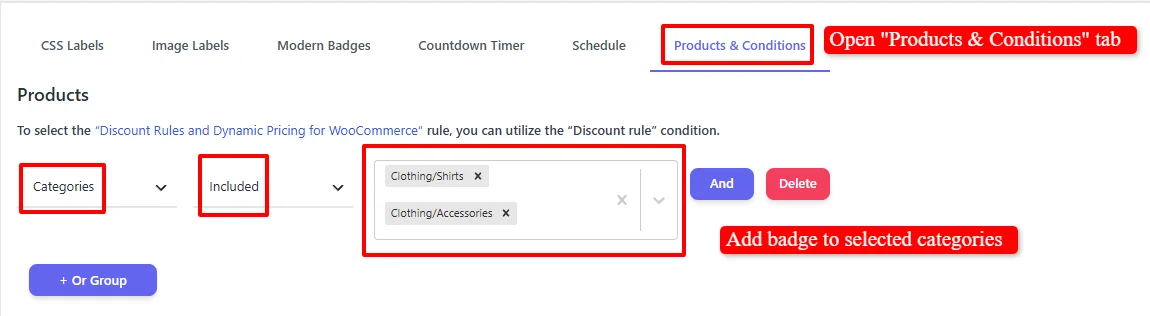
Option B: Apply to Specific Categories
Under Categories, select Included and search for your desired categories.
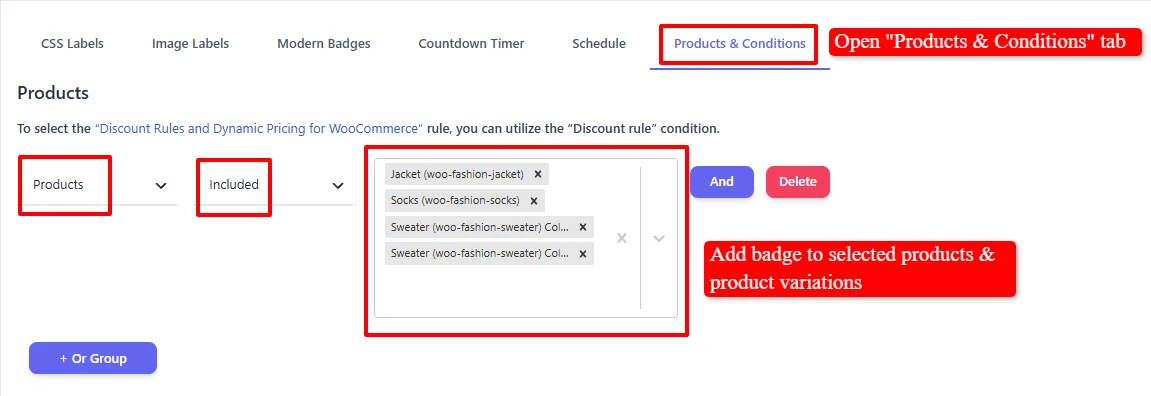
Option C: Apply to Specific Products
Under Products, select Included and search for your desired products or product variations.
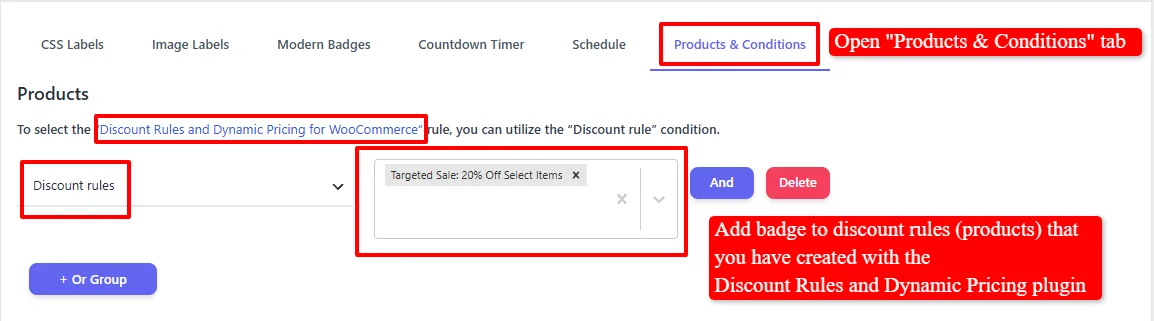
Option D: Apply to Discount Rules
Under Discount rules, select your created discount rules. This automatically displays the timer on products that have active discounts from the Discount Rules plugin.
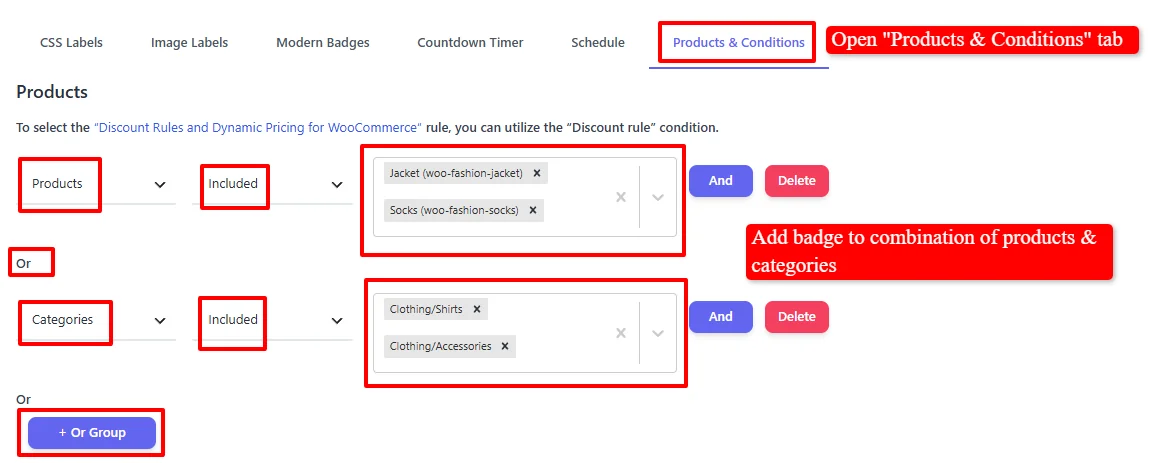
Option E: Combination of Conditions
Combine multiple conditions using "+ Or Group". Example: Apply timer to specific products OR specific categories.
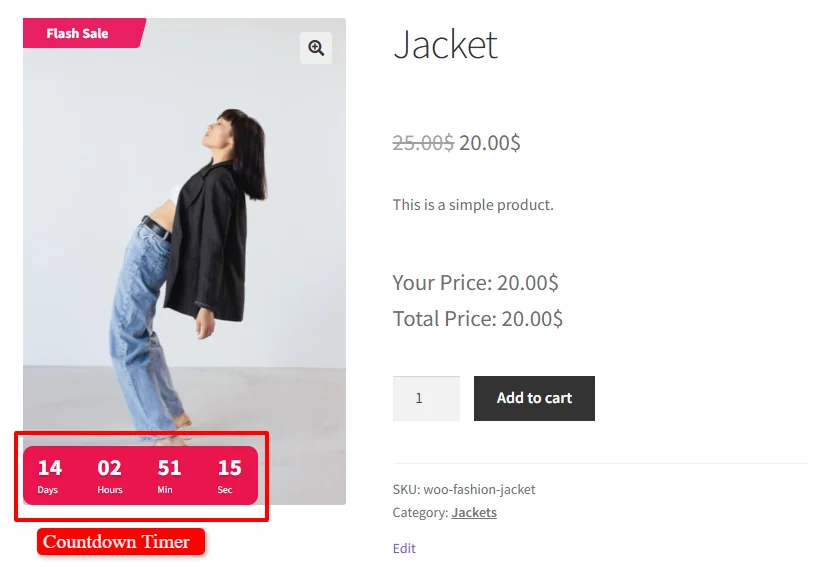
In this example we used "Is on sale" → Yes condition like the image below
Step 8: Save and Test
- Click Save to apply the timer
- Visit a product page to see the countdown timer in action
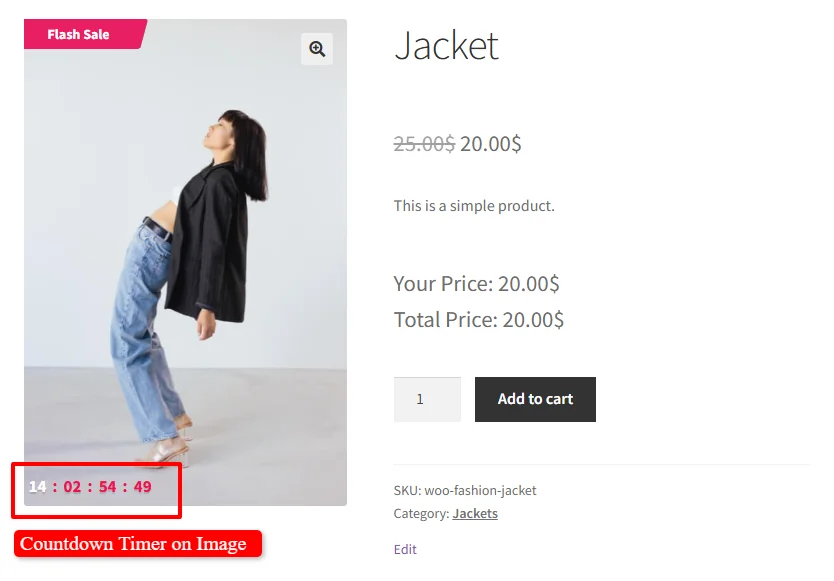
Countdown timer with a different style.
Method 3: Evergreen Countdown Timer (Sale Booster PRO)
The Sale Booster PRO plugin offers an evergreen countdown timer feature that automatically resets for each customer. This is perfect for creating ongoing urgency without fixed sale dates.
What is an Evergreen Countdown Timer?
An evergreen countdown timer is a reusable timer that starts counting down from the same duration for every visitor—regardless of when they visit. Each new customer sees a fresh, urgent countdown, creating continuous FOMO (fear of missing out) without requiring manual reset.
Benefits of Evergreen Timers
- Persistent urgency — Every customer sees a fresh timer
- Reusable campaigns — Use the same timer repeatedly
- No fixed dates required — Timer resets automatically for each visitor
- Higher conversion rates — Continuous urgency drives more sales
Note: The evergreen countdown timer is available exclusively in the PRO version of the Sale Booster plugin.
Step 1: Install and Activate Sale Booster PRO
- First ensure that Sale Booster free version is installed and activated on your website
- Purchase and download the Sale Booster PRO plugin from Asana Plugins
- Go to Plugins > Add New > Upload Plugin in your WordPress admin
- Upload the plugin ZIP file and click Install Now
- Click Activate to enable the PRO version
Step 2: Access the Badges Menu
- Go to Sale Booster > Badges in your WordPress admin
- Click Add New
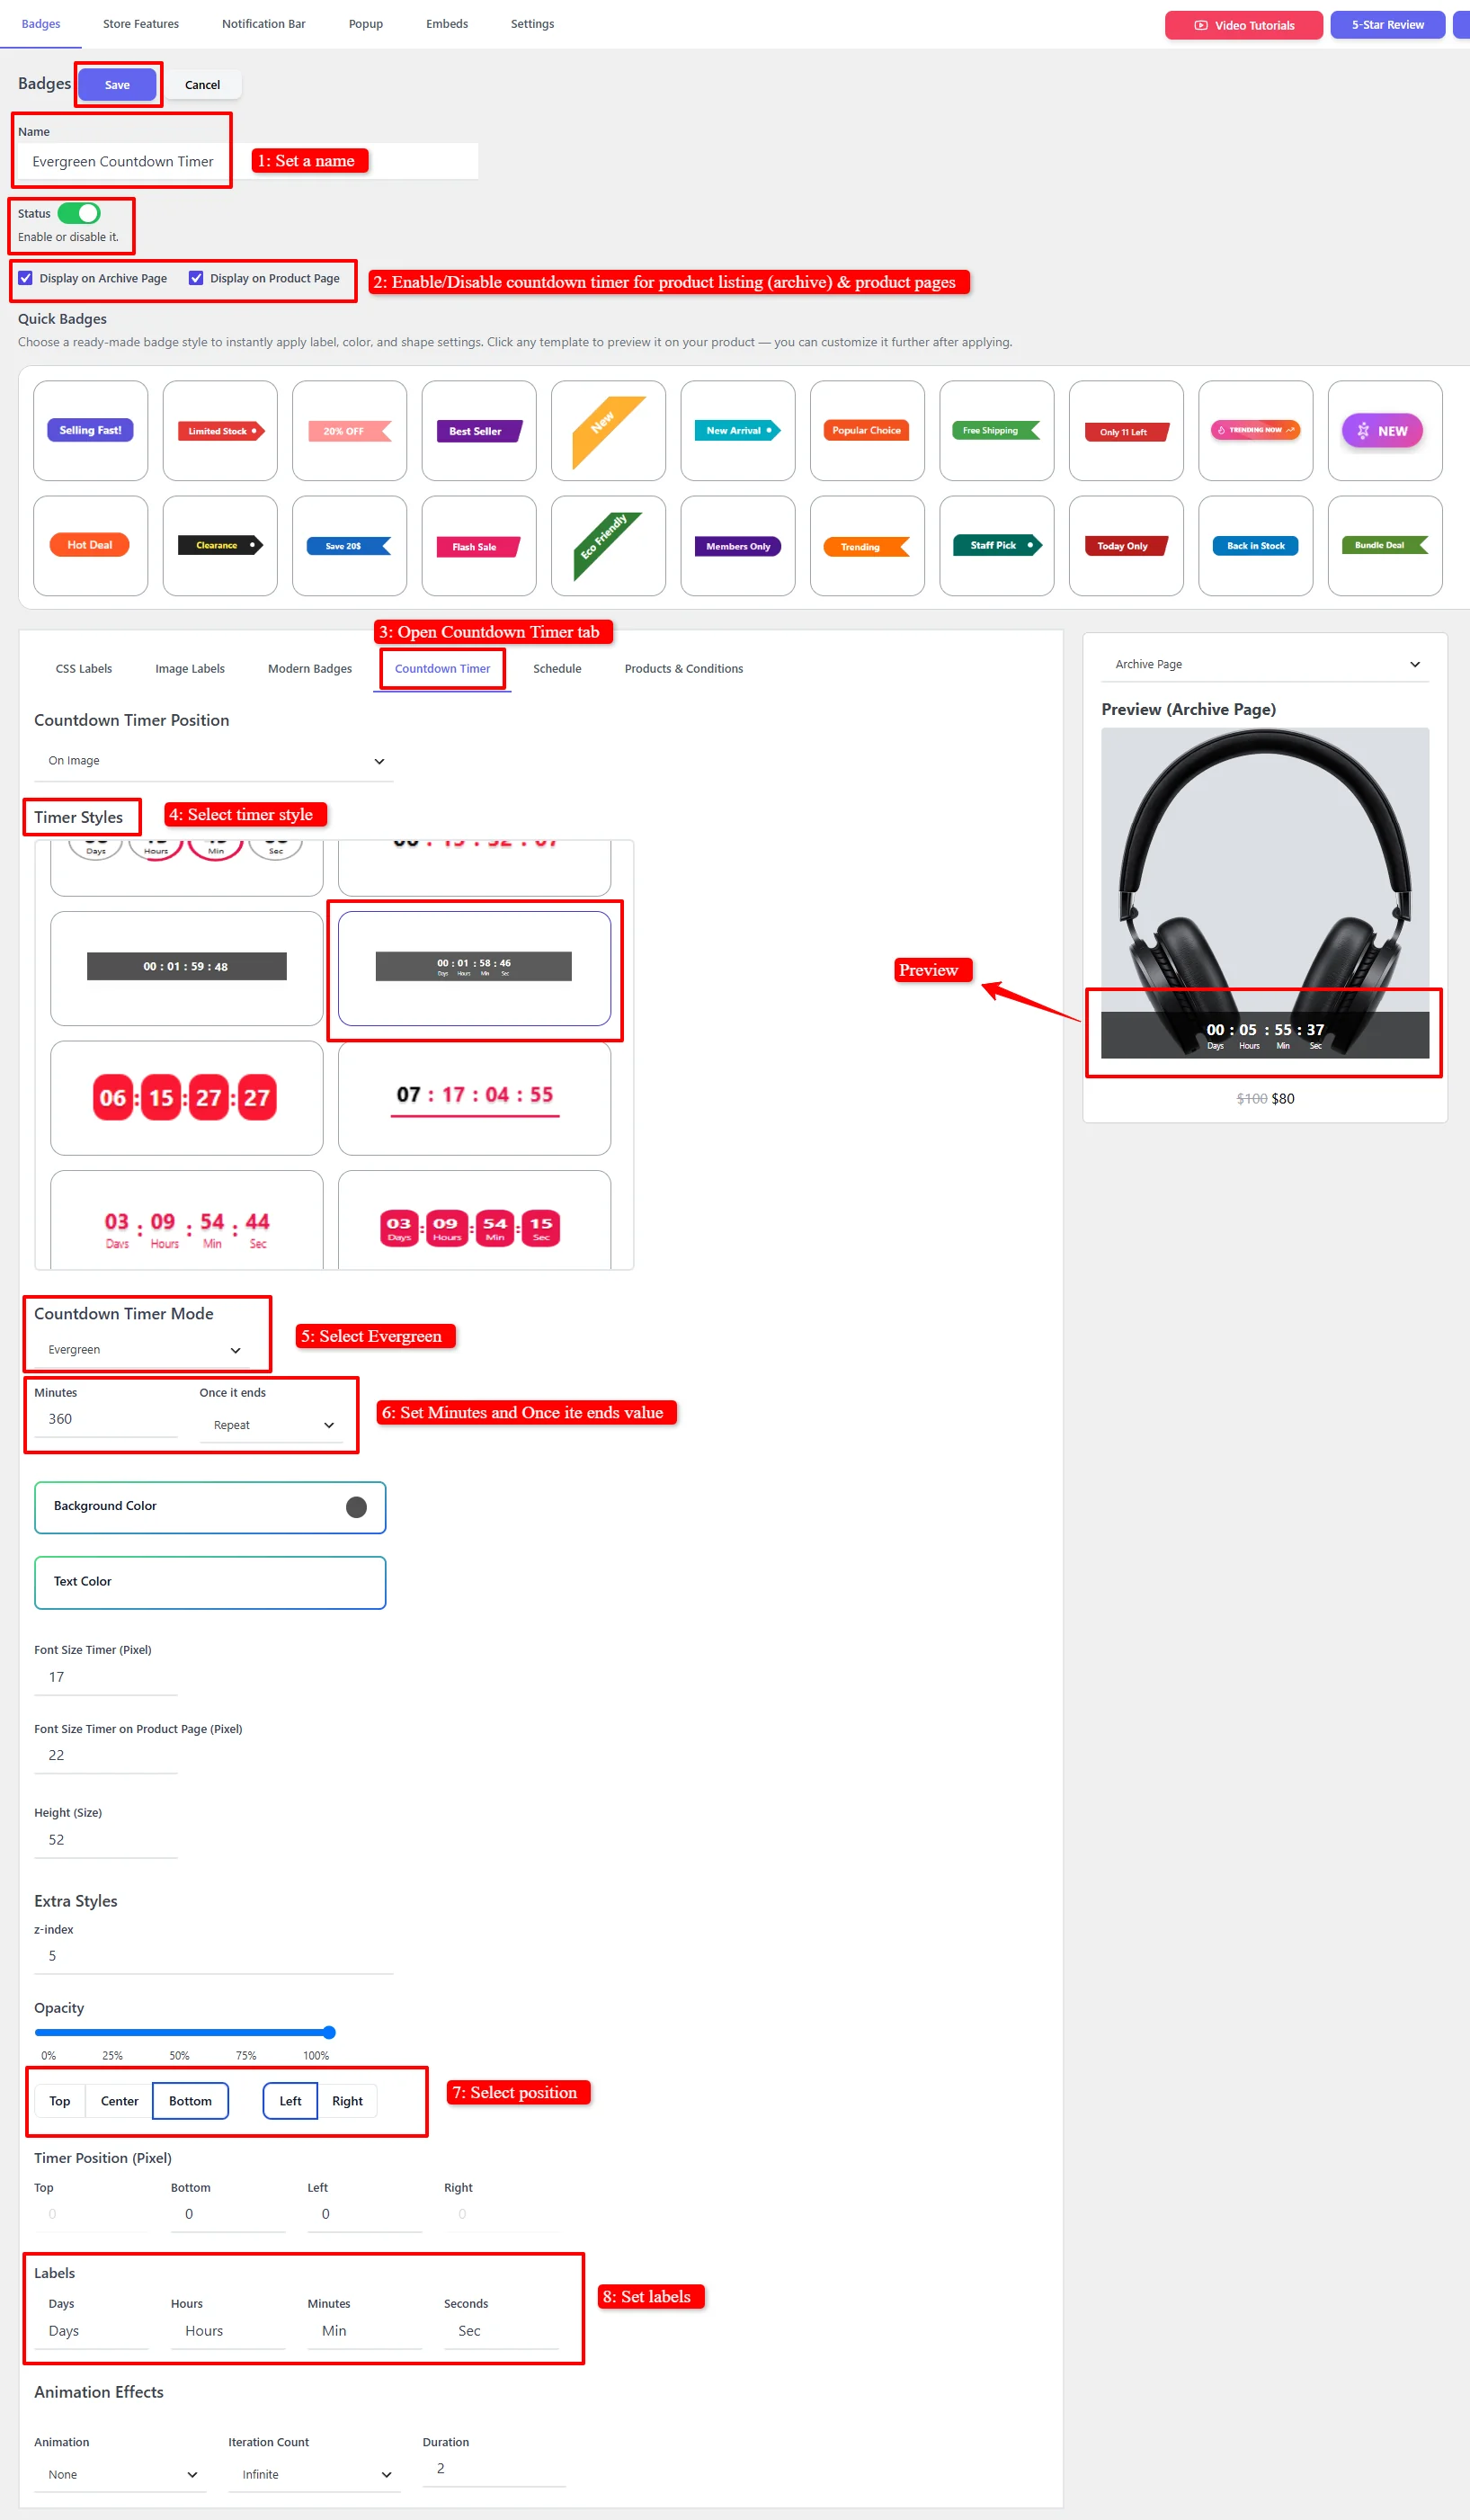
Step 3: Create a New Countdown Timer
- Enter a descriptive Name for your timer (e.g., "Evergreen Countdown Timer")
- Ensure Status is set to Enable
- Check Display on Archive Page and Display on Product Page to show the timer on both product listing and single product pages
Step 4: Configure the Timer
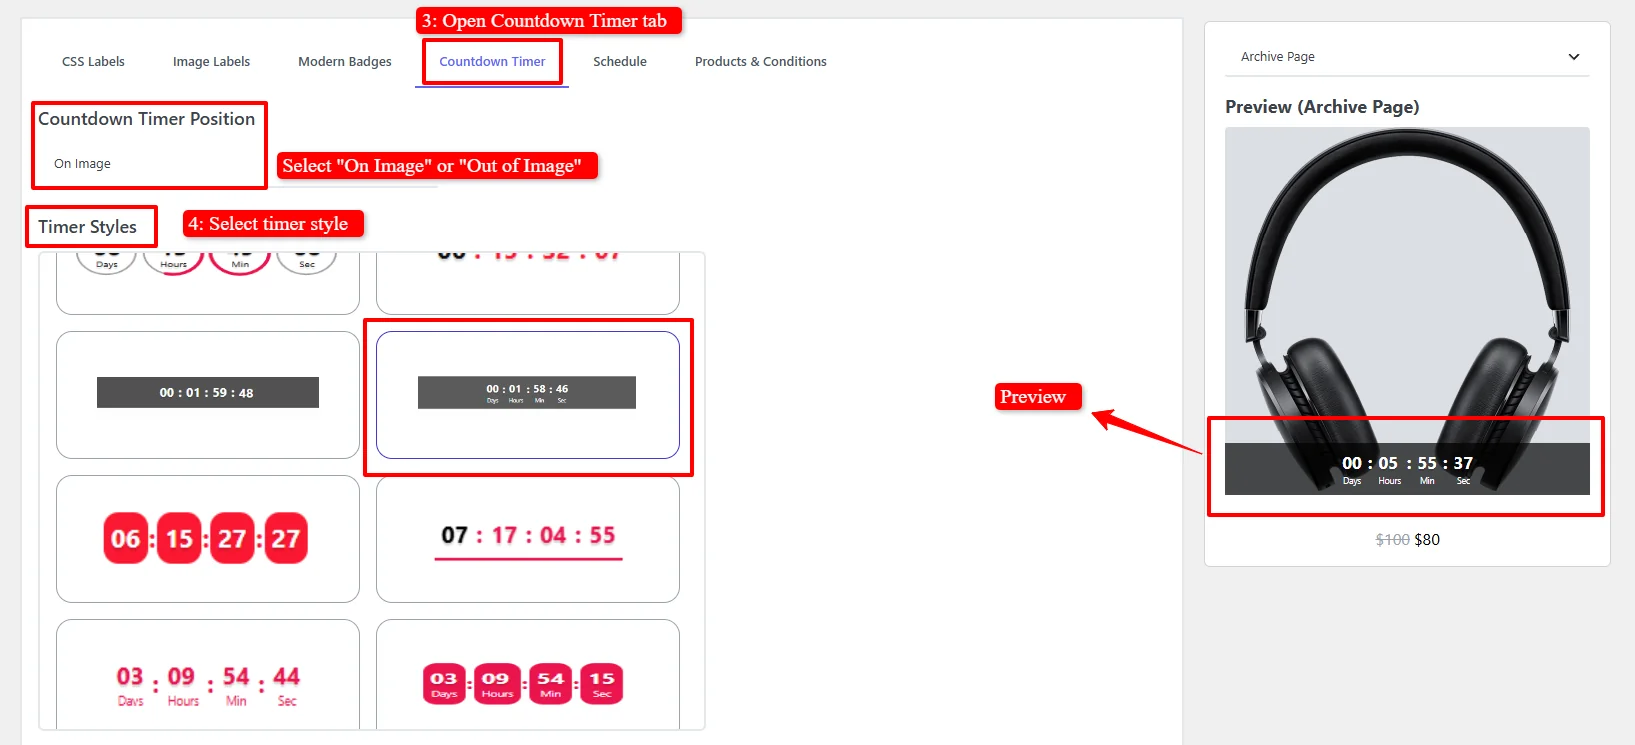
Switch to the Countdown Timer tab and customize:
- Countdown Timer Position — Choose "On Image" or "Out of Image"
- On Image — Timer overlays the product image
- Out of Image — Timer appears outside the product image area
- Timer Styles — Select from multiple pre-designed styles:
- Horizontal timer
- Compact timer
- Various color themes
Step 5: Enable Evergreen Mode
This is the crucial step that makes your timer "evergreen":
- Countdown Timer Mode — select "Evergreen" from the dropdown menu
- Minutes - Set evergreen timer value in minutes
- Once it ends value — Choose what happens when the timer reaches zero:
- Repeat
- Hide
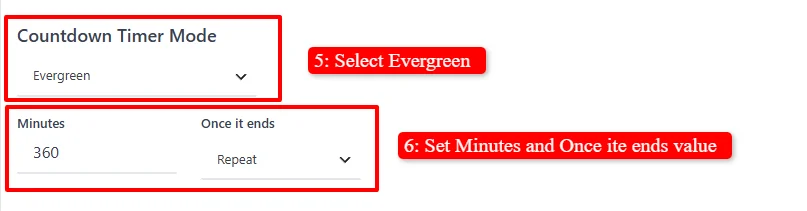
How It Works: When set to Evergreen mode, the timer starts counting down from the same duration for every customer—regardless of when they visit. Each new visitor sees a fresh countdown, creating continuous urgency.
Step 6: Customize Timer Appearance
- Background Color — Set timer background color
- Text Color — Set timer text color
- Font Size Timer (Pixel) — Adjust the font size
- Extra Styles — Set z-index, opacity, and animation effects
Step 7: Set Display Conditions
Switch to the Products & Conditions tab and choose how the timer should be displayed:
Option A: Apply to All Sale Products
Set condition: "Is on sale" → Yes. This displays the timer on all products that have a sale price.
Option B: Apply to Specific Categories
Under Categories, select Included and search for your desired categories.
Option C: Apply to Specific Products
Under Products, select Included and search for your desired products or product variations.
Option D: Apply to Discount Rules
Under Discount rules, select your created discount rules. This automatically displays the timer on products that have active discounts from the Discount Rules plugin.
Option E: Combination of Conditions
Combine multiple conditions using "+ Or Group". Example: Apply timer to specific products OR specific categories.
In this example we used "Is on sale" → Yes condition like the image below
Step 8: Save and Test
- Click Save to apply the evergreen timer
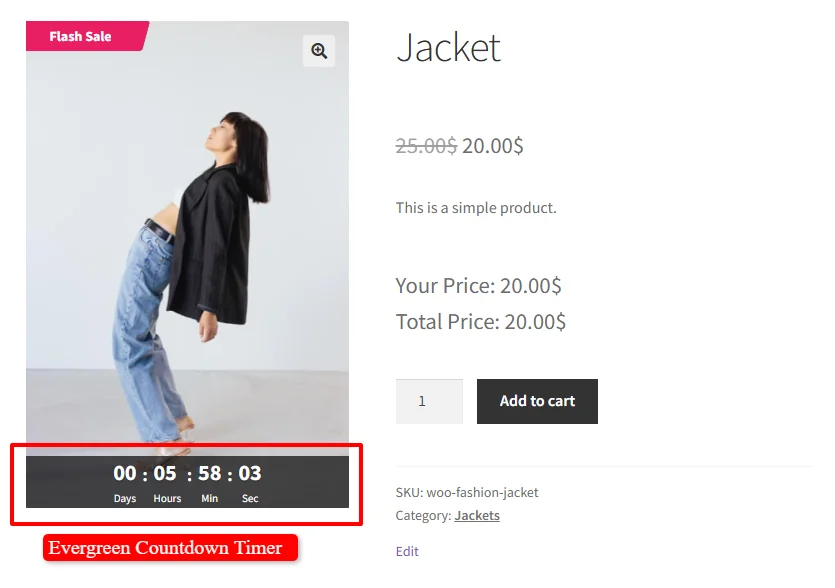
- Visit a product page to see the timer in action
- Each new visitor will see the timer reset
Result Example:
Shortcode Usage
The Sale Booster PRO plugin also supports shortcodes for custom placement:
[asnp_badge hide="1"]— Displays the evergreen timer on a product page[asnp_badge]— Displays the evergreen timer on archive/product listing pages[asnp_badge product_id="7" hide="1"]— Displays timer for a specific product ID
Troubleshooting
Timer Not Showing (Method 1: Discount Rules)
Step 1: Check Your Pricing Rule Schedule
- Verify that your pricing rule has a scheduled end date
- Ensure the rule is currently active (within the scheduled time range)
- The timer only shows when the discount is active and scheduled
Step 2: Verify Countdown Timer Settings
- Go to Woo Pricing & Discounts > Settings > Promotion > Countdown Timer
- Ensure "Display Countdown Timer" is set to "Yes - When a discount available"
- Check that Threshold Time Value and Threshold Time Type have valid values
Step 3: Test Timer Positions
- Go to Woo Pricing & Discounts > Settings > Promotion > Countdown Timer
- Find "Countdown Timer Position"
- Try each position one by one:
- Before "Add to cart" button
- After "Add to cart" button
- Before "Add to cart" form
- After "Add to cart" form
- Before product excerpt
- After product excerpt
- After product meta
Step 4: Check for Variable Products
If the product is variable (has variations):
- Ensure you have set a default variation
- The countdown timer will only show if the default variation has an active discount
- If no default variation is set, the timer appears when user selects a variation that has an active discount with a scheduled time
Step 5: Use the Shortcode
If none of the positions work with your theme:
- Set "Countdown Timer Position" to "None"
- Use the shortcode
[wccs_countdown_timer]in your theme templates or product descriptions
Step 6: Clear Cache
If you're using a caching plugin, clear your site cache to ensure the timer appears.
Timer Not Showing (Method 2 & 3: Sale Booster)
Step 1: Check Plugin Versions
Ensure both the free and pro plugins are updated to the latest and matching versions.
Step 2: Test Timer Positions
Go to Plugin Settings > General Tab and test the available positions one by one:
- For archive pages: Check all positions listed under the archive section
- For product pages: Check all positions listed under the product section
Remember: There are separate positions for "On image" and "Out of image" timers — make sure you're testing the correct one for your use case.
Step 3: Verify Evergreen Mode is Selected (Method 3)
- Go to Sale Booster > Badges > Edit Timer
- Switch to the Countdown Timer tab
- Ensure "Evergreen" is selected in the Edit Timer Style dropdown
Step 4: Use Custom Hooks
If none of the default positions work, enter custom hooks provided by your theme developer:
- Use the "Archive Loop Custom Hooks" field for archive pages
- Use the "Single Product Custom Hooks" field for product pages
Step 5: Check the Schedule
- Verify that the timer's start and end dates are set correctly
- Ensure the current date/time falls within the timer's schedule
Step 6: Clear Cache
If you're using a caching plugin (WP Rocket, Perfmatters, LiteSpeed Cache, etc.), clear your site cache to ensure the timer appears.
🎉 Success!
You've learned how to add countdown timers for WooCommerce sales using three methods:
- Method 1: Discount Rules Plugin — Best for automatic timer display on products with scheduled discounts
- Method 2: Sale Booster (Free) — Best for full customization and standalone timer creation
- Method 3: Sale Booster PRO (Evergreen) — Best for reusable timers that reset for each customer
All methods create urgency, encourage faster purchases, and can significantly boost your conversion rates.
Experience all discount rules and pricing strategies in action on our Live Demo Website.
Upgrade to Discount Rules and Dynamic Pricing for WooCommerce PRO to unlock advanced conditions, user role pricing, recurring schedules, tiered variations, and priority support.
📚 Next Steps
Now that you've mastered countdown timers, explore other promotional elements and sale campaigns:
- Add Sale Badges — Pair your countdown timer with custom sale badges on product thumbnails.
- Display Percentage Badges — Show shoppers exactly how much they save before time runs out.
- Create Black Friday Sale Prices — Configure scheduled seasonal pricing rules.
- Create Storewide Sale Prices — Launch storewide flash sales with scheduled start and end dates.
- Black Friday Cart Discounts — Apply automatic cart discounts during the countdown promotion.
🔍 SEO Keywords
Primary Keywords: countdown timer WooCommerce, sale countdown timer, WooCommerce countdown timer, urgency timer WooCommerce, evergreen countdown timer, product countdown timer
Secondary Keywords: WooCommerce countdown timer plugin, flash sale timer, sale timer WooCommerce, countdown timer for product pages, urgency marketing WooCommerce, limited time offer timer, discount timer WooCommerce, WooCommerce promotion timer, countdown shortcode WooCommerce, evergreen timer, perpetual countdown, Sale Booster PRO, Discount Rules and Dynamic Pricing plugin