How to Promote On-Sale Products in WooCommerce Cart and Checkout
Learn how to boost your Average Order Value (AOV) by promoting on-sale and discounted products directly in the WooCommerce cart and checkout pages. This comprehensive guide walks you through creating a dedicated Deals / Discount page using shortcodes, configuring dynamic cart notices with custom buttons, and filtering between WooCommerce sale prices and dynamic pricing rules.
📋 Table of Contents
- Why Promote On-Sale Products in Cart & Checkout?
- How the Promotion System Works
- Step 1: Create the Dedicated Deals / Discount Page
- Step 2: Enable & Configure the Cart & Checkout Notice
- Frontend Experience & Visual Examples
- High-Converting Notice Copy Templates
- Troubleshooting & FAQs
- Next Steps
🚀 Why Promote On-Sale Products in Cart & Checkout?
Shoppers in the cart and checkout funnel are at their highest intent to buy. Promoting special deals at this critical moment delivers powerful business results:
- Increases Average Order Value (AOV): Encourages customers to add one or two more discounted items to their basket before completing their order.
- Drives Traffic to Promotional Campaigns: Directs engaged buyers to your clearance section, flash deals, or seasonal promotional catalog.
- Enhances Shopping Experience: Informs customers about deals and bundle opportunities that they might have missed while browsing.
- Clears Overstocked Inventory: Effortlessly promotes sale items without cluttering the homepage or navigation menus.
⚙ How the Promotion System Works
The Discount Rules and Dynamic Pricing for WooCommerce plugin connects a dedicated deals catalog to an intelligent cart/checkout notice banner in two easy steps:
- Create the Discount Page: Create a WordPress page and insert the
[wccs_discounted_products]shortcode to automatically showcase all discounted products. - Link the Page in Settings: Go to Woo Pricing & Discounts > Settings > Promotion > Discount Page, choose your page, and customize your notice message and button text.
- Dynamic Notice Appears in Cart & Checkout: When eligible discounts exist, an attractive notice banner with a call-to-action button appears above the cart and checkout tables.
- Shoppers Discover More Deals: Customers click the button to browse your promotional catalog, adding more discounted items to their basket before completing checkout.
📄 Step 1: Create the Dedicated Deals / Discount Page
First, create the page where your discounted products will be displayed.
- In your WordPress Admin Dashboard, go to Pages > Add New.
- Title the page (e.g., On Sale Products, Special Deals, or Flash Sale).
- Add a Shortcode Block (or Shortcode widget in Elementor / Divi).
- Enter the shortcode:
[wccs_discounted_products] - Click Publish.

Shortcode Syntax & onsale_products Attribute
The [wccs_discounted_products] shortcode offers an optional parameter, onsale_products, which controls whether standard WooCommerce on-sale items are included:
| Shortcode Variant | Behavior |
|---|---|
[wccs_discounted_products] (Default) | Displays all discounted products, including products with active Dynamic Pricing Rules and standard WooCommerce regular/sale price discounts (onsale_products="1"). |
[wccs_discounted_products onsale_products="0"] | Excludes standard WooCommerce on-sale products and only displays products discounted through active Dynamic Pricing rules (Bulk, Tiered, BOGO, User Role, etc.). |
💡 Best Practice: Use
onsale_products="0"if you want your discount page to focus exclusively on advanced dynamic pricing campaigns (like wholesale or tiered bulk sales) rather than basic sale items.
🛠 Step 2: Enable & Configure the Cart & Checkout Notice
Once your deals page is published, configure the promotional notice that appears in the cart and checkout.
- Navigate to Woo Pricing & Discounts > Settings.
- Click on the Promotion tab.
- Select the Discount Page sub-tab.
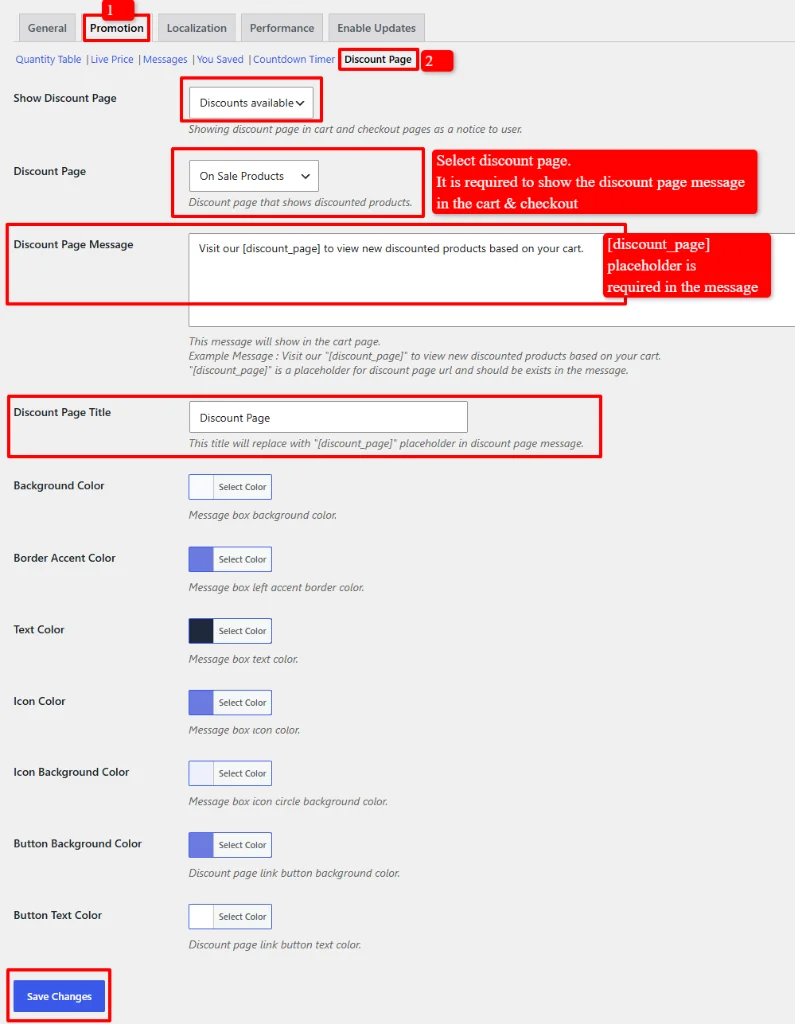
Settings Breakdown
Configure the following options:
- Show Discount Page:
Discounts available(Recommended): Displays the notice banner only when there are active discounted products available for the customer's cart context.Always: Always shows the discount notice in cart and checkout.
- Discount Page: Select the page you created in Step 1 (e.g.,
On Sale Products) from the dropdown list.⚠️ Important: Selecting a page here is required to display the notice in the cart & checkout.
- Discount Page Message: Enter the notification message to display in the cart.
- Example:
Visit our [discount_page] to view new discounted products based on your cart. - ⚠️ Required Placeholder: You must include
[discount_page]in your message. The plugin replaces this placeholder with the linked button.
- Example:
- Discount Page Title: Enter the text for the button/link that replaces
[discount_page](e.g.,Discount Page →,View Special Offers →, orDeals Hub →).
Customizing Colors & Button Styling
Match the notice box perfectly with your store branding using the built-in color controls:
| Color Setting | Description |
|---|---|
| Background Color | Background color of the notice container box. |
| Border Accent Color | Color of the stylish vertical accent bar on the left edge. |
| Text Color | Color of the primary text message. |
| Icon Color | Color of the discount tag icon inside the circle. |
| Icon Background Color | Circular background color surrounding the icon. |
| Button Background Color | Fill color for the call-to-action button. |
| Button Text Color | Text and arrow color inside the button. |
Click Save Changes to activate the promotional banner.
📸 Frontend Experience & Visual Examples
1. Cart & Checkout Notice Banner
When enabled, the discount notice displays prominently at the top of the Cart and Checkout pages:
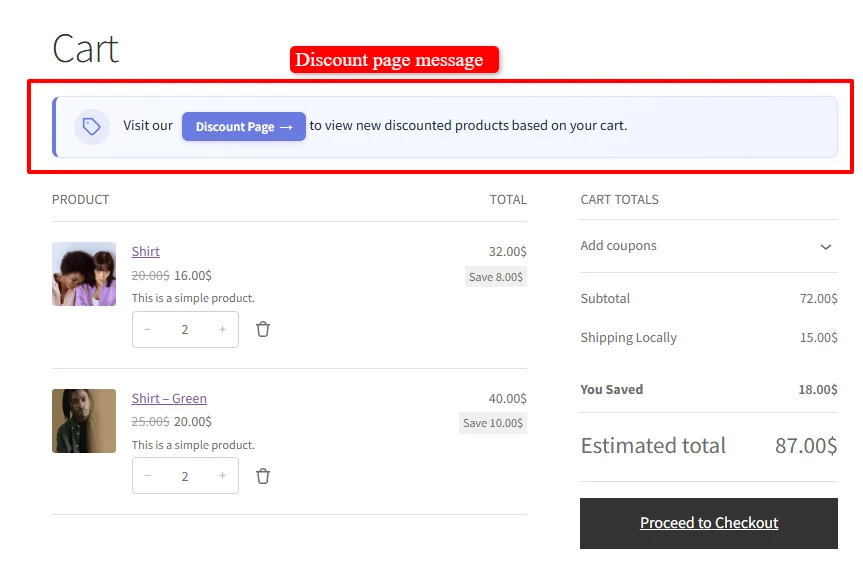
- Shoppers see the eye-catching notice:
Visit our [Discount Page →] to view new discounted products based on your cart. - Clicking the button leads directly to your curated promotions page.
2. Dedicated On-Sale Products Hub
When shoppers visit the discount page, they are presented with a clean grid showcasing all active promotional items:
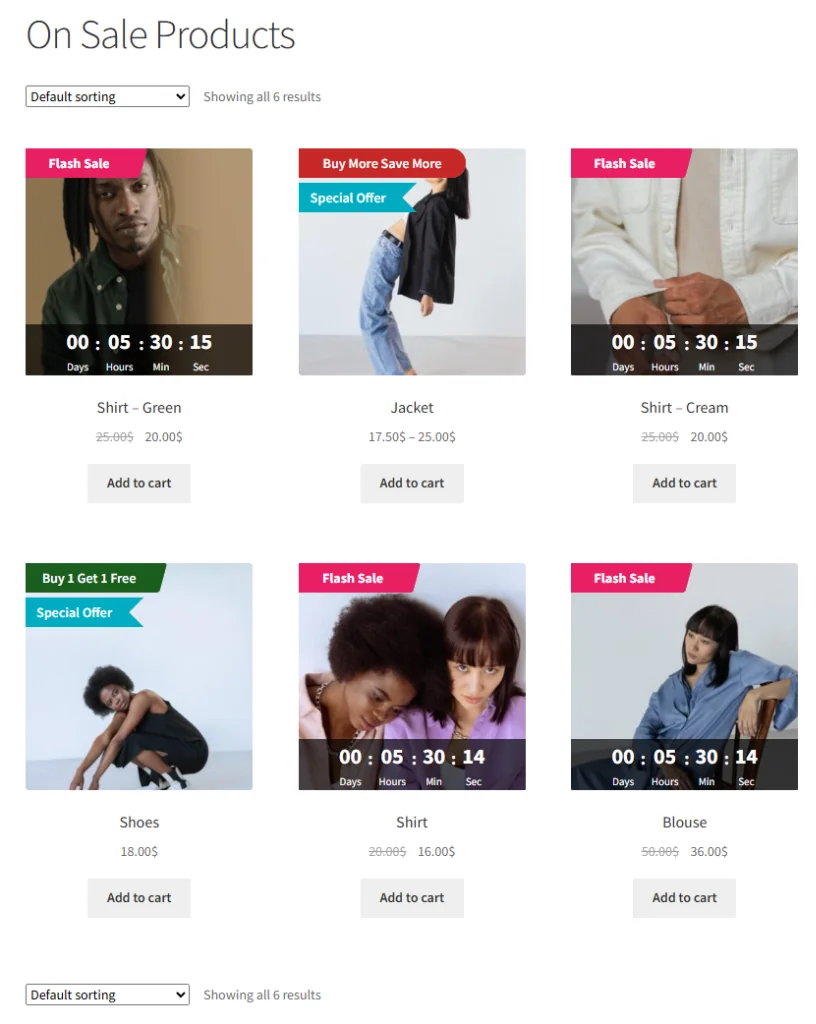
- Displays dynamic Sale Badges (e.g. Flash Sale, Buy More Save More, Special Offer, Buy 1 Get 1 Free).
- Shows live Countdown Timers for scheduled sales.
- Displays strikethrough regular prices and discounted prices with one-click Add to cart buttons.
💡 High-Converting Notice Copy Templates
Customize the Discount Page Message and Discount Page Title with these proven copywriting examples:
| Campaign Theme | Sample Message ([discount_page] included) | Button Title |
|---|---|---|
| General Deals | Visit our [discount_page] to view special discounted products based on your cart! | Special Offers → |
| Flash Sale / Urgency | 🔥 Don't checkout yet! Check our [discount_page] for limited-time flash deals. | Flash Deals Hub → |
| Cart Add-ons & Upsell | Add more to your order and save! Browse our [discount_page]. | View Discounted Items → |
| Seasonal / Holiday Sale | 🎉 Unlock holiday savings! Visit our [discount_page] for exclusive cart offers. | Holiday Deals → |
❓ Troubleshooting & FAQs
Why is the discount message not appearing in the cart?
- Discount Page Not Selected: Ensure you have selected a published page from the Discount Page dropdown under Woo Pricing & Discounts > Settings > Promotion > Discount Page.
- Missing
[discount_page]Placeholder: Verify that the Discount Page Message field contains the exact tag[discount_page]. Without this placeholder, the button cannot be generated. - Show Discount Page Setting: If set to
Discounts available, ensure your store has active pricing rules or on-sale products available.
What is the difference between [wccs_discounted_products] and [wccs_discounted_products onsale_products="0"]?
- By default (
onsale_products="1"), the shortcode displays products discounted by the plugin's dynamic pricing rules plus regular WooCommerce on-sale products. - Adding
onsale_products="0"filters out standard WooCommerce sale products and displays only products discounted via the plugin's dynamic pricing rules.
Does the discount page show variation discounts?
Discounts applied at the product level, category level, or standard rule level display automatically. Discounts configured strictly via specific variation attributes may have display restrictions in catalog queries.
🚀 Next Steps
Explore the full suite of promotional display features to maximize store revenue:
- How to Promote Discounts with Dynamic Messages
- How to Display Product Live Discounted Price
- How to Display "You Saved" Total Savings in Cart and Checkout
- WooCommerce Discount Rules Shortcodes Reference
- Display Quantity Tables for Bulk Discounts
- Add a Countdown Timer for Flash Sales
- Customize Sale Badges on WooCommerce Products
- Display Percentage Discount Badges