How to Display a Percentage Badge in WooCommerce
Learn how to display a "You Save" percentage badge on your WooCommerce products to increase conversions and highlight discounts. This complete guide covers two methods: using a dedicated badge plugin and using your discount rules plugin. Boost transparency, create urgency, and improve your store's conversion rates with dynamic savings badges.
📋 Table of Contents
- Why Display "You Save" Badges?
- Method 1: Using the Sale Booster Badge Plugin
- Method 2: Using the Discount Rules Plugin
- Next Steps
🚀 Why Display "You Save" Badges?
"You Save" badges are one of the most effective ways to communicate value to your customers. By clearly showing the discount percentage or amount, you can:
- Increase conversion rates by making discounts more visible and compelling
- Improve customer trust through transparent pricing
- Create urgency and encourage faster purchasing decisions
- Boost average order value by highlighting savings opportunities
Key Statistic: Displaying savings information can help increase conversion rates by making discounts more visible.
Method 1: Using the Sale Booster Badge Plugin
The easiest way to add "You Save" badges is with a dedicated badge plugin. We recommend the Product Badge, Label, Countdown Timer for WooCommerce – Sale Booster plugin, available for free on WordPress.org.
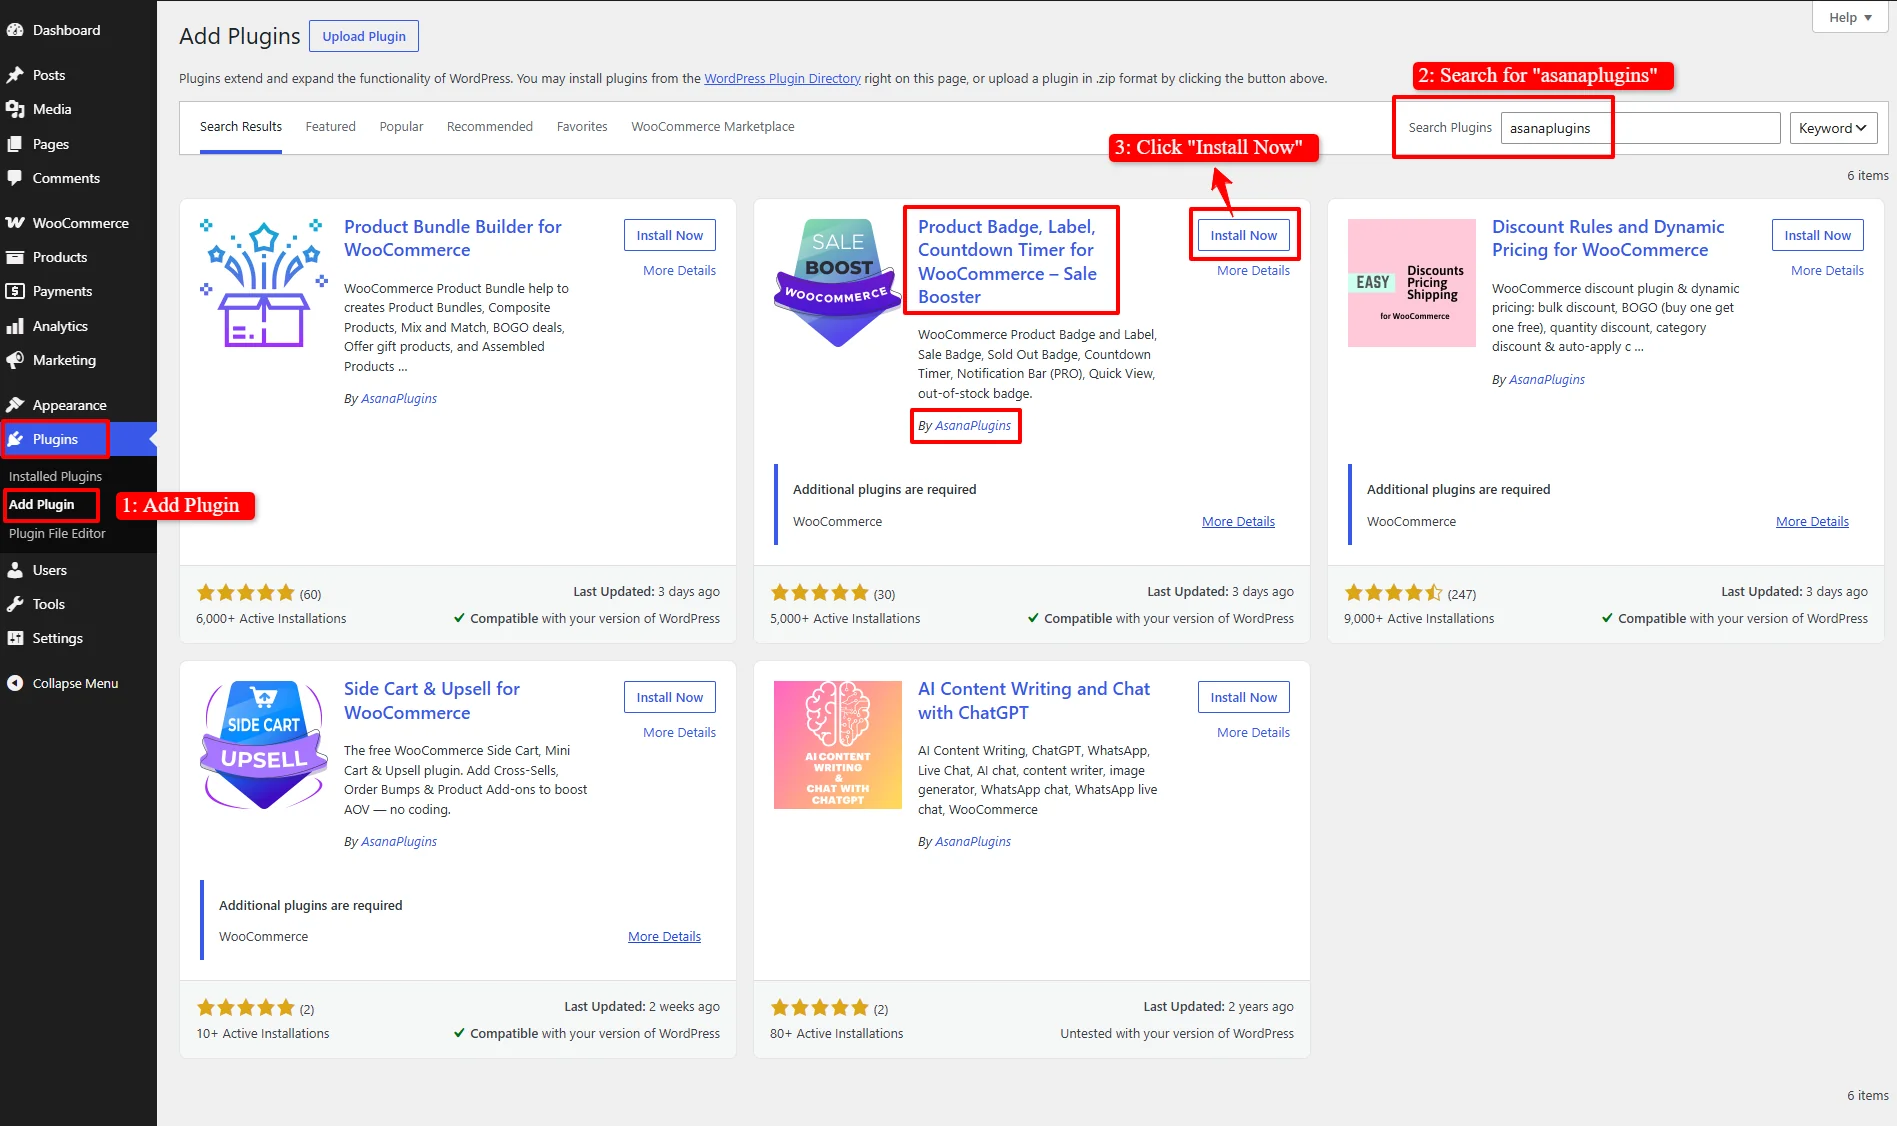
Step 1: Install and Activate the Plugin
- Go to Plugins > Add New in your WordPress admin
- Search for "asanaplugins" or Product Badge, Label, Countdown Timer for WooCommerce – Sale Booster
- Find the Product Badge, Label, Countdown Timer for WooCommerce – Sale Booster plugin by asanaplugins in the search results
- Click Install Now and then Activate
Step 2: Access the Badges Menu
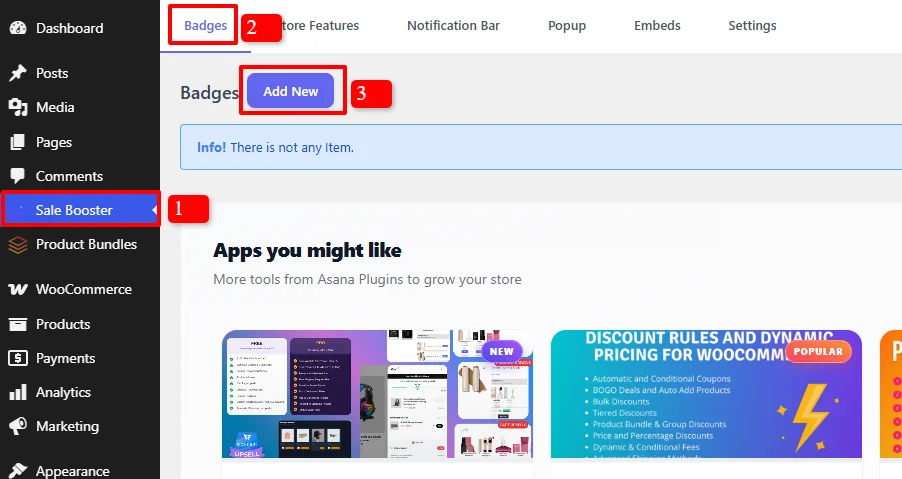
After activation, a new Sale Booster menu appears in your WordPress admin dashboard.
Step 3: Create a New Badge
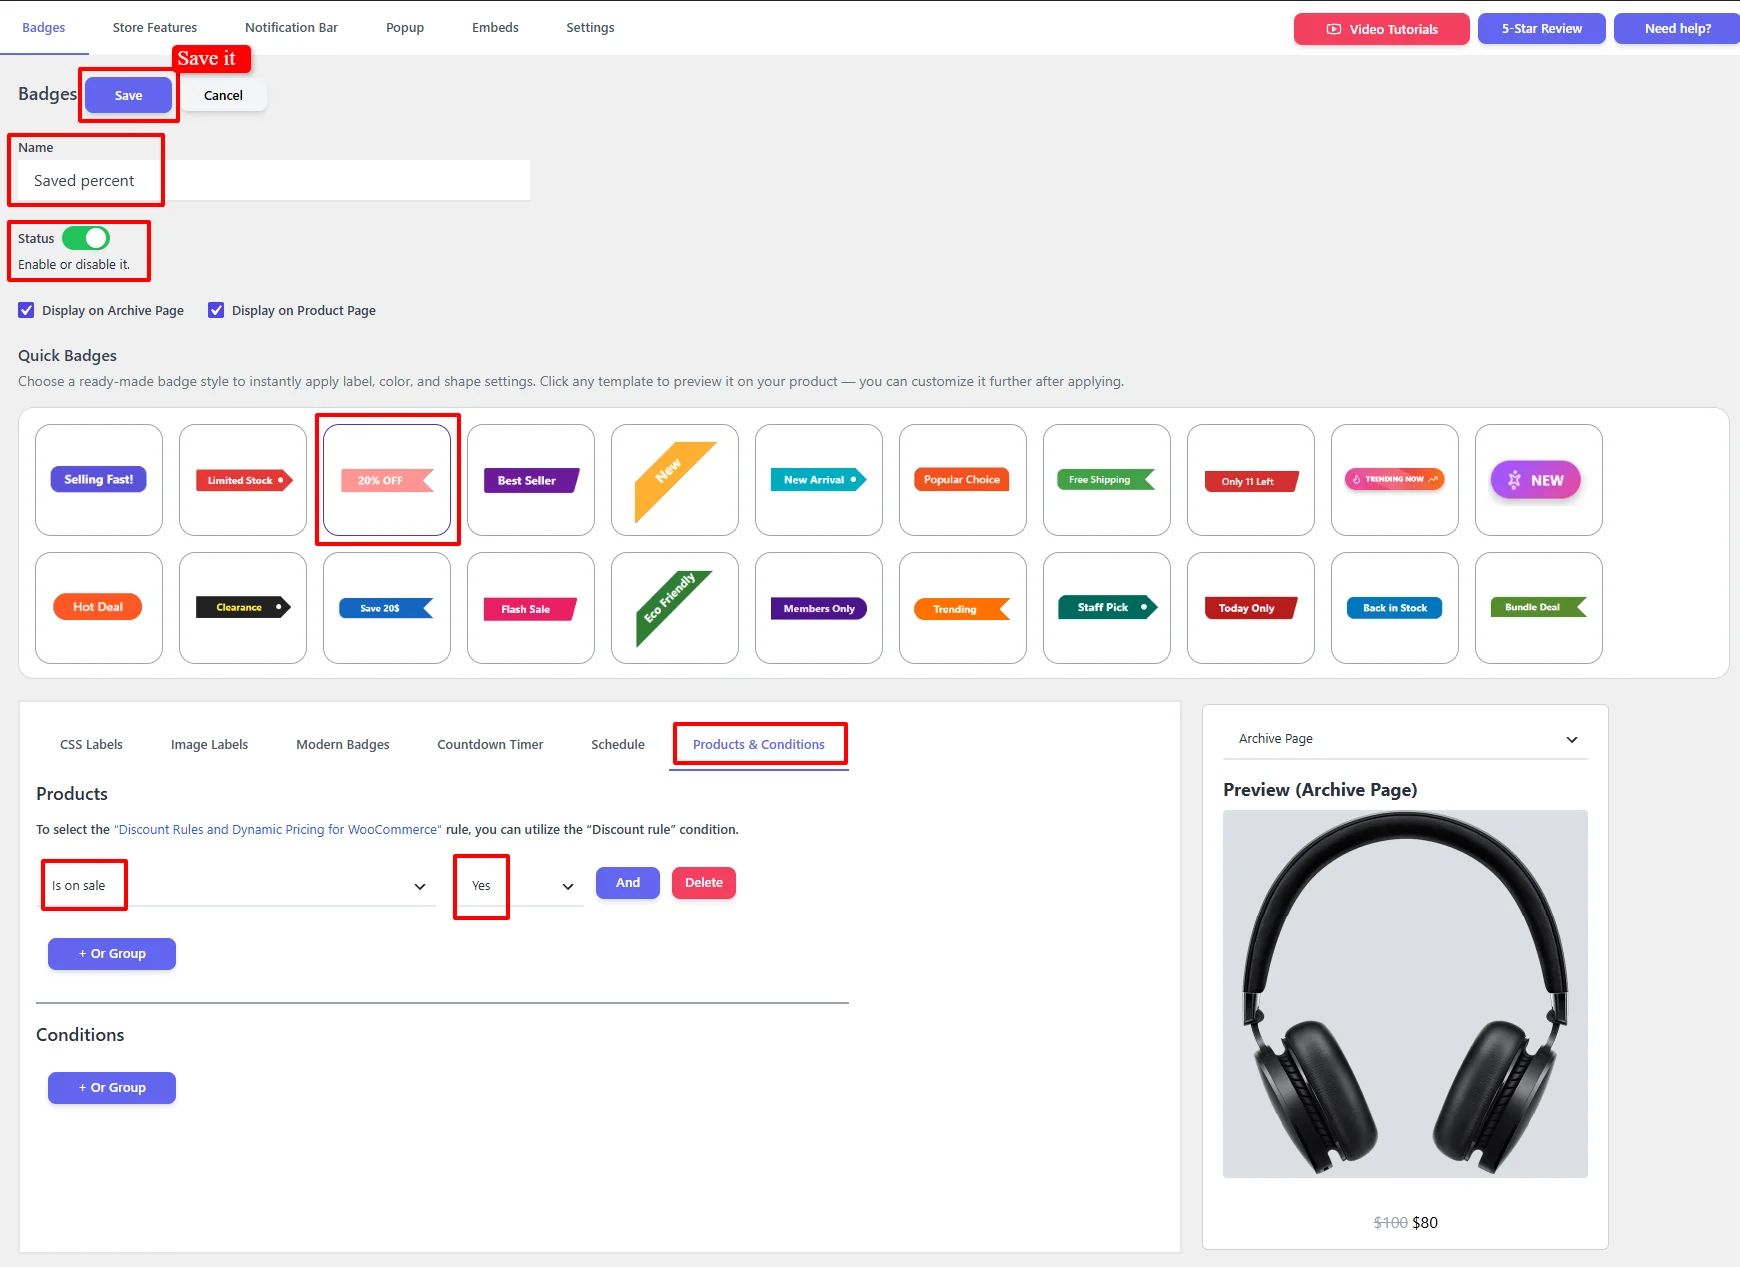
- Navigate to Badges > Add New
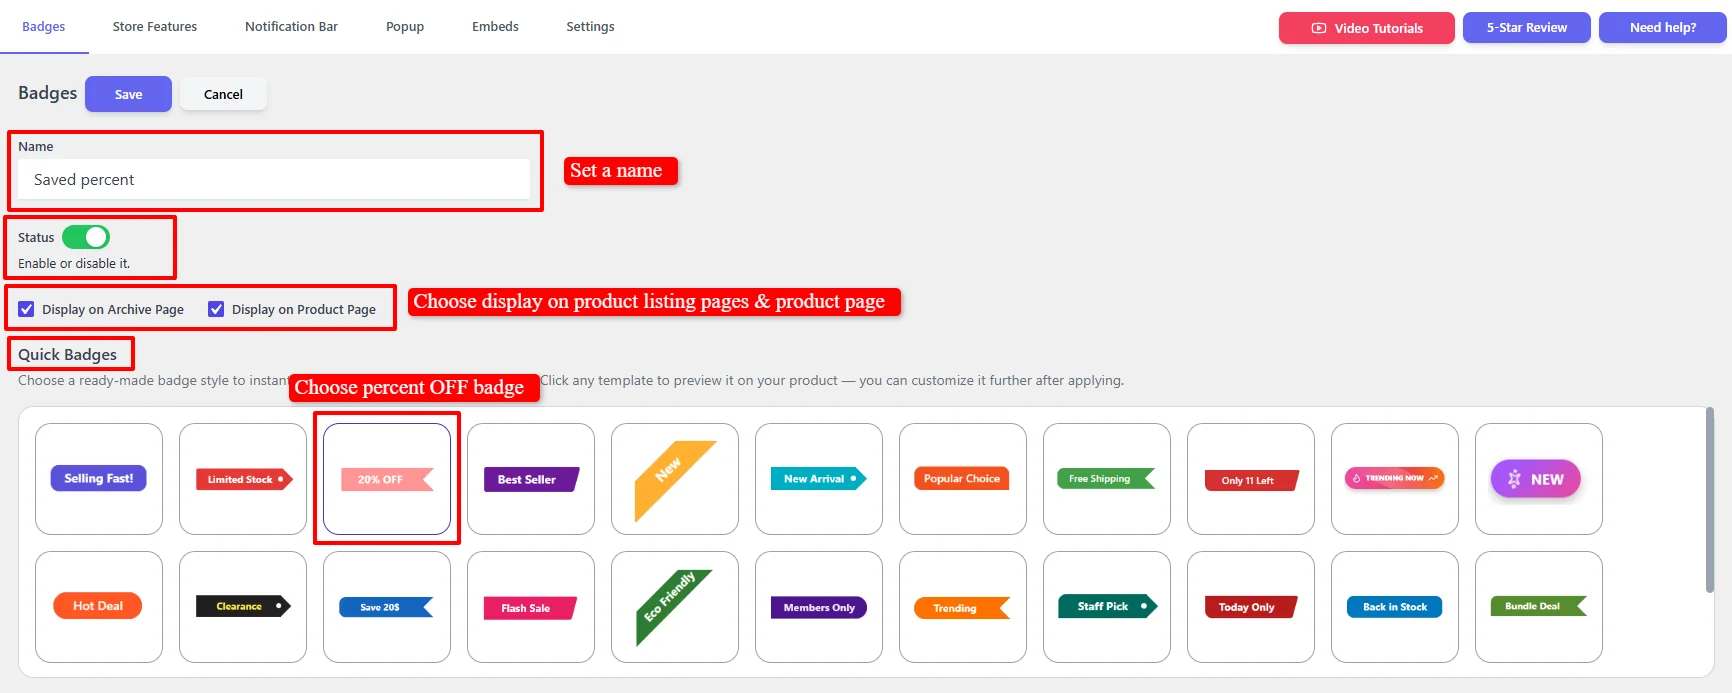
- Enter a descriptive Name for your badge (e.g., "Saved Percent")
- Ensure Status is set to Enable
- Check Display on Archive Page and Display on Product Page to show the badge on both product listing and single product pages
Step 4: Choose a Quick Badge Template
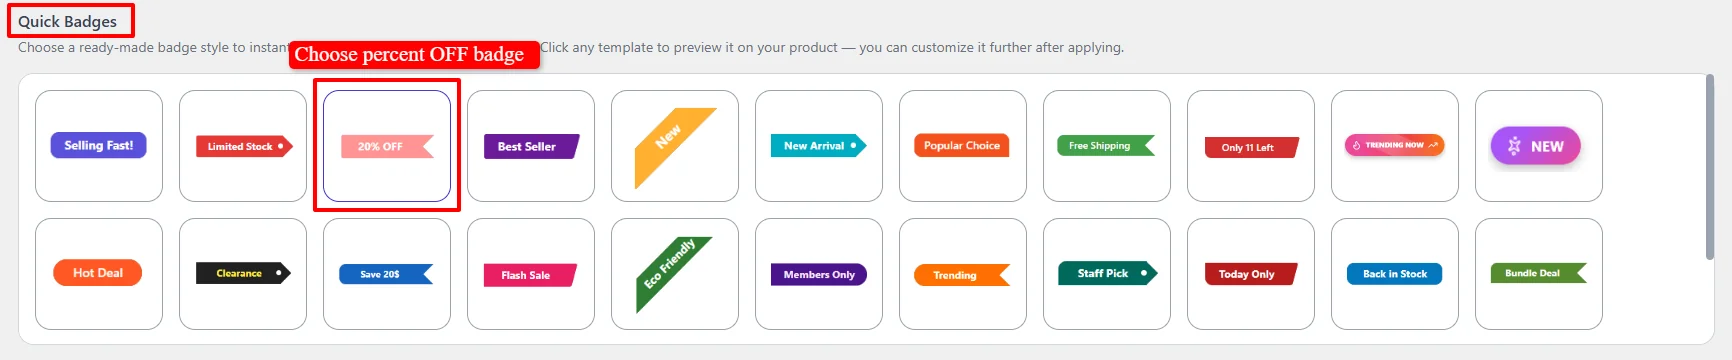
Under Quick Badges, select a ready-made badge style like "20% OFF" to instantly apply label, color, and shape settings. You can customize it further after applying.
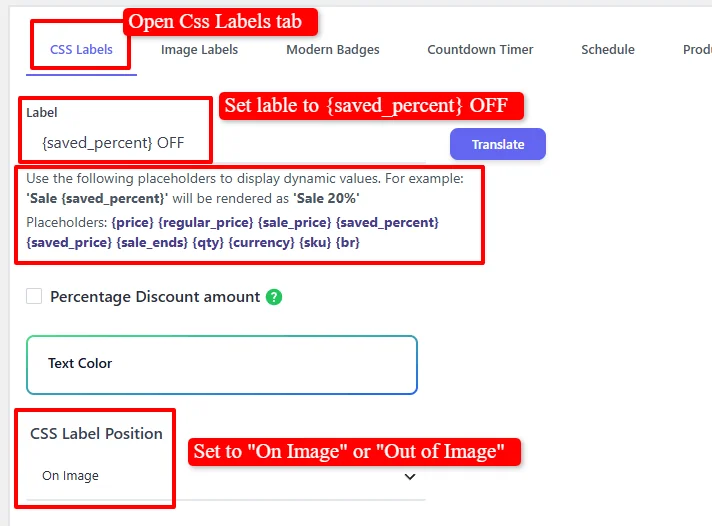
Step 5: Configure the CSS Label
Switch to the CSS Labels tab and customize your badge:
- Label Field: Enter your custom badge text using the dynamic placeholder
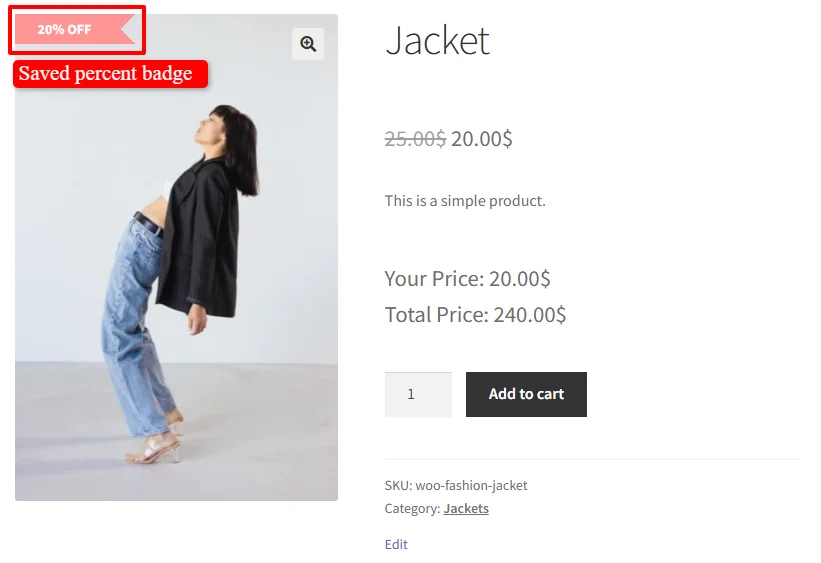
{saved_percent}to display the percentage discount. For example,{saved_percent} OFFwill be rendered as20% OFFon the product page. - CSS Label Position: Choose "On Image" or "Out of Image"
Available Dynamic Placeholders:
{price}— Regular price{sale_price}— Sale price{saved_percent}— Percentage saved{saved_price}— Amount saved in currency{sale_ends}— Sale end date{qty}— Product quantity{currency}— Store currency symbol{sku}— Product SKU{br}— Line break
Step 6: Customize Badge Appearance
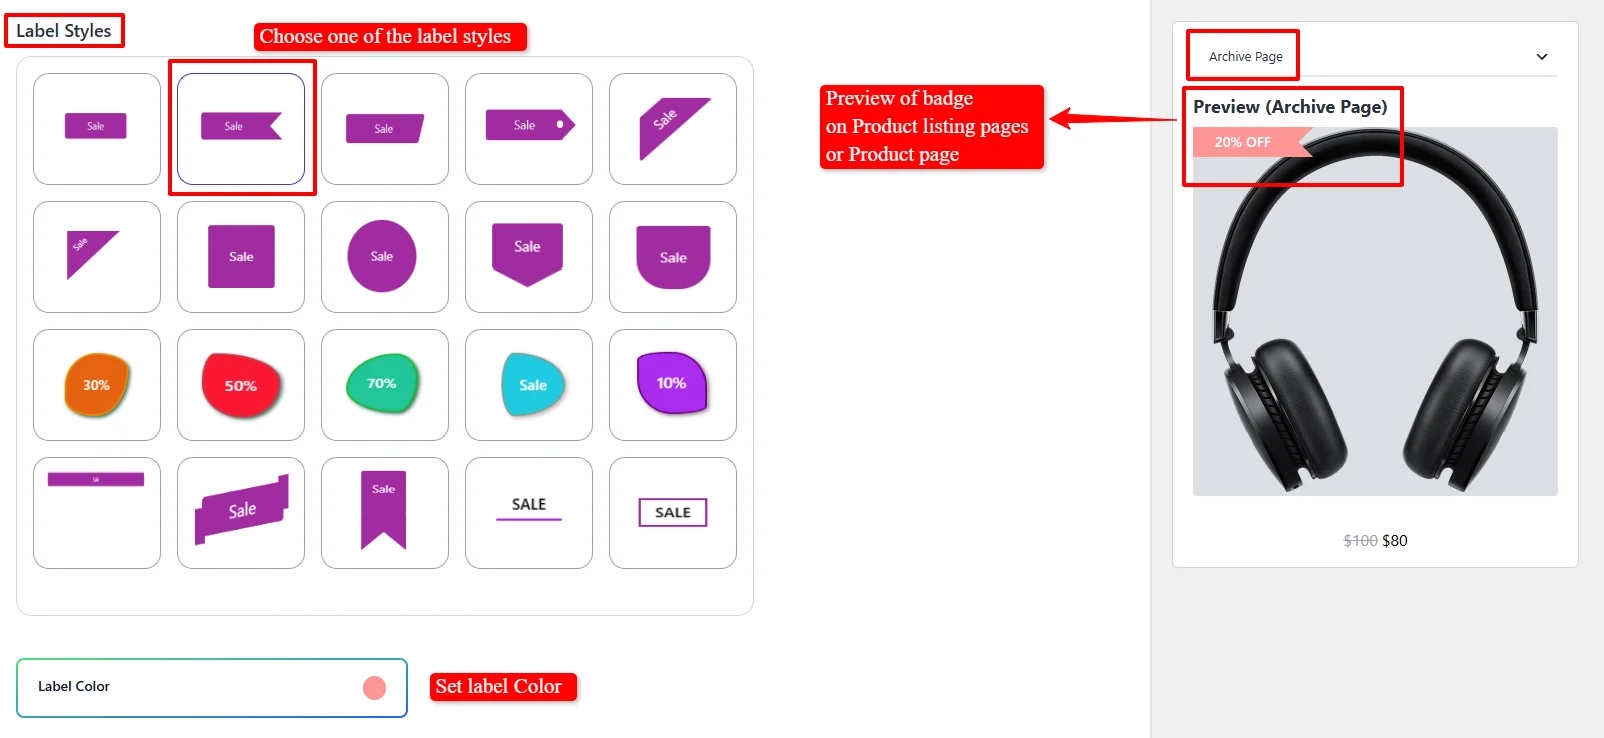
Label Styles: Choose from multiple pre-designed label styles in the style selector.
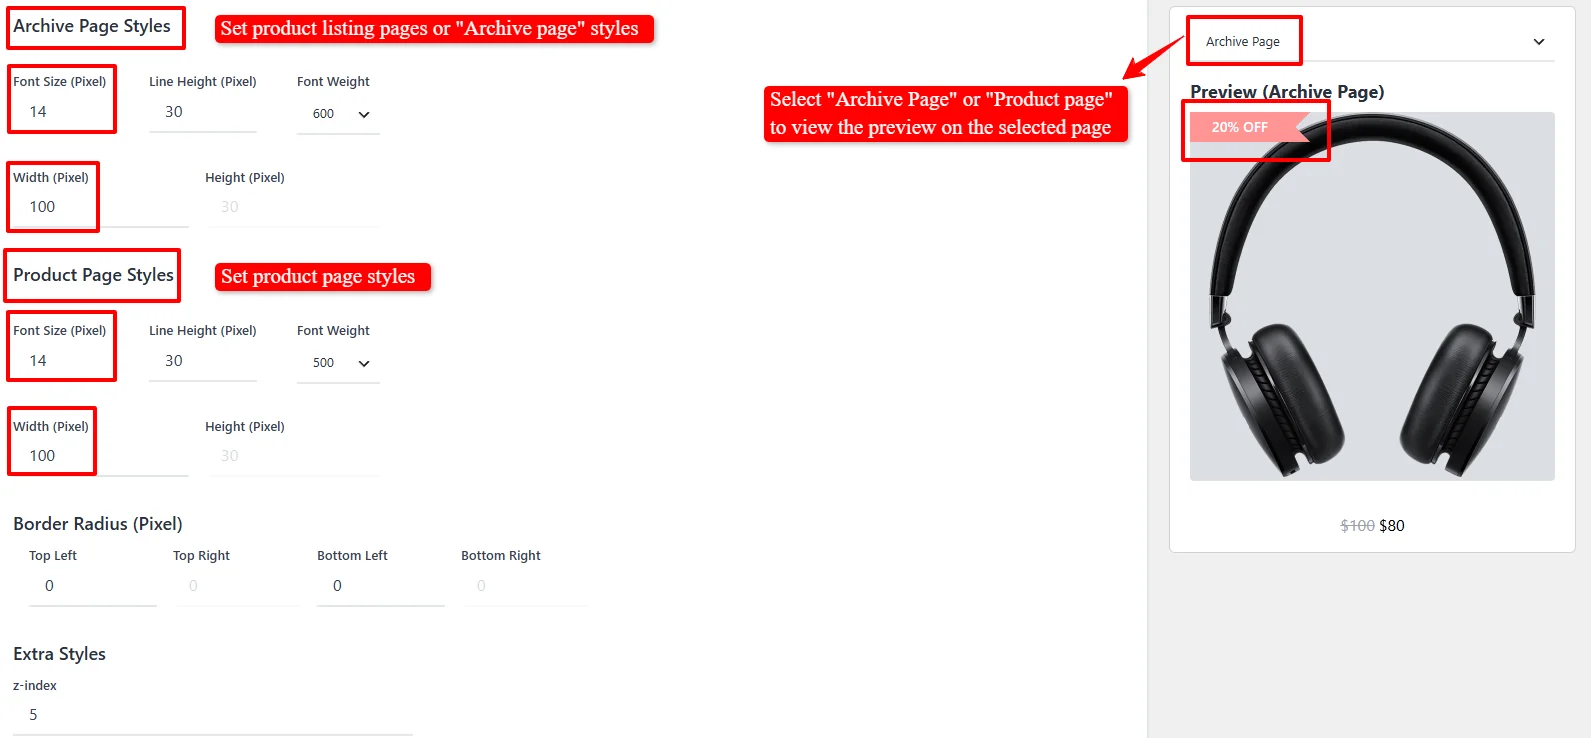
Customization Options:
- Label Color: Customize the background color
- Font Size: Set for archive and product pages separately
- Line Height: Adjust spacing for readability
- Font Weight: Choose light, normal, bold, etc.
- Width & Height: Set precise dimensions
Step 7: Advanced Customization Options
- Border Radius: Adjust corner rounding (0-100px)
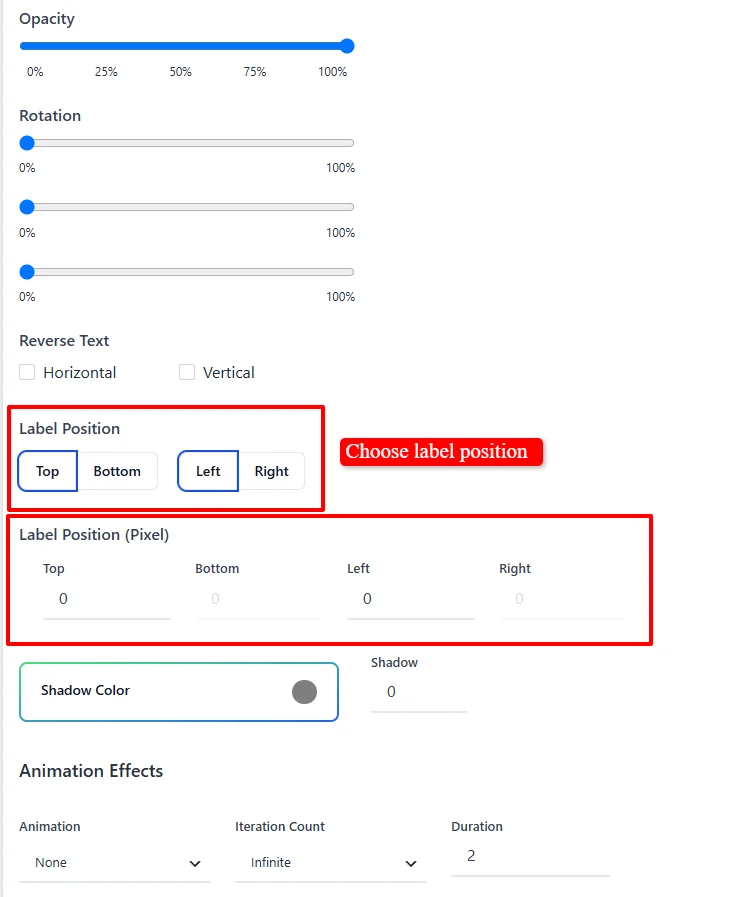
- Opacity: Set transparency level (0-100%)
- Rotation: Rotate the badge horizontally or vertically
- Reverse Text: Display text from right to left
- Label Position: Fine-tune positioning with pixel values (Top, Bottom, Left, Right)
- Shadow: Add a shadow effect with custom color
- Animation Effects: Apply animations with adjustable duration and iteration count
Step 8: Set Display Conditions
Switch to the Products & Conditions tab and choose how the badge should be displayed:
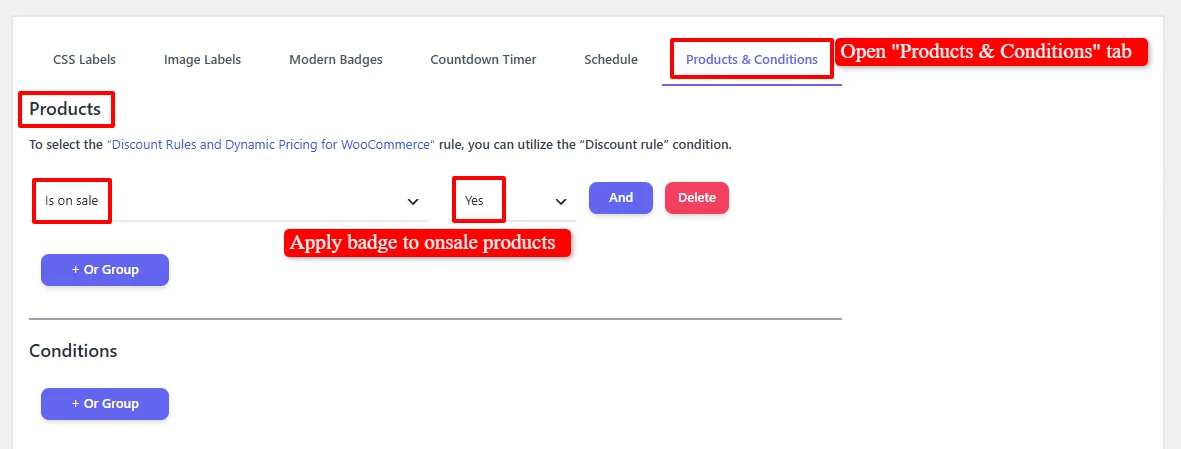
Option A: Apply to All Sale Products
Set condition: "Is on sale" → Yes. This displays the badge on all products that have a sale price.
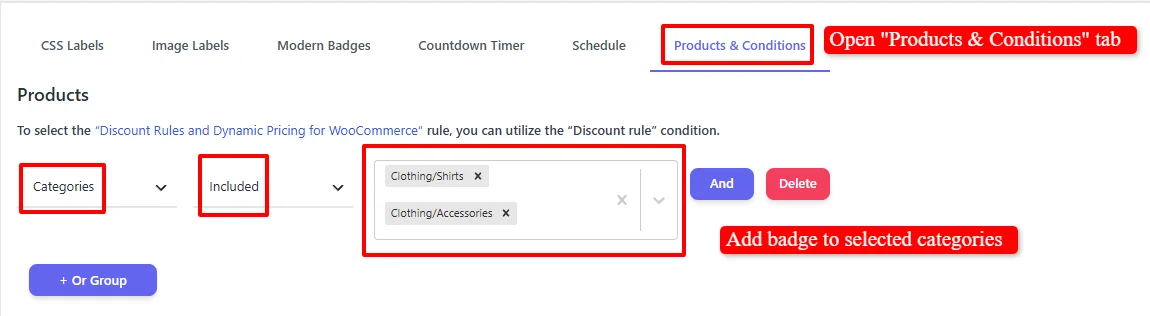
Option B: Apply to Specific Categories
Under Categories, select Included and search for your desired categories.
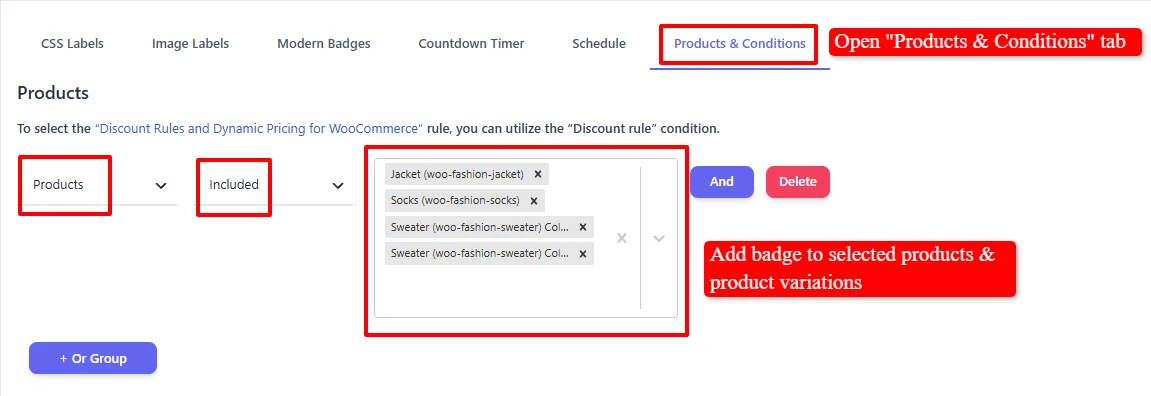
Option C: Apply to Specific Products
Under Products, select Included and search for your desired products or product variations.
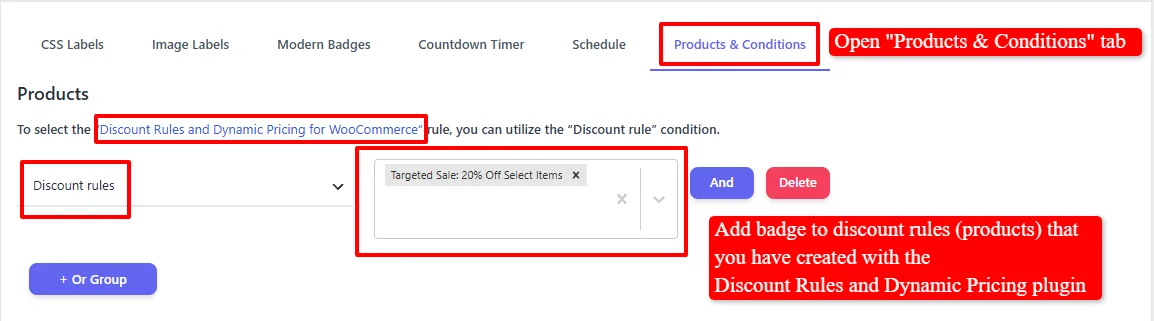
Option D: Apply to Discount Rules
Under Discount rules, select your created discount rules. This automatically displays the badge on products that have active discounts from the Discount Rules plugin.
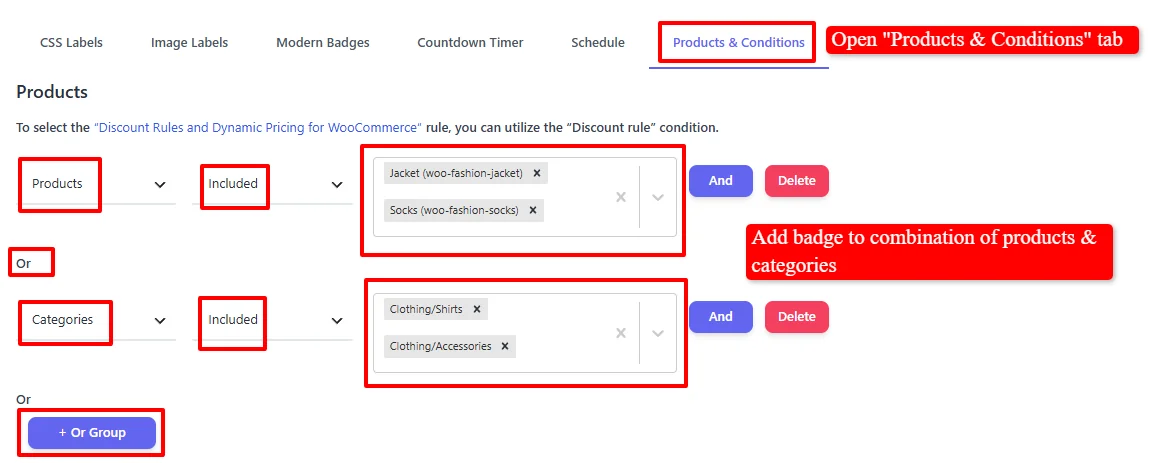
Option E: Combination of Conditions
Combine multiple conditions using "+ Or Group". Example: Apply badge to specific products OR specific categories.
In this example we used "Is on sale" → Yes condition like the image below
Step 9: Schedule the Badge (Optional)
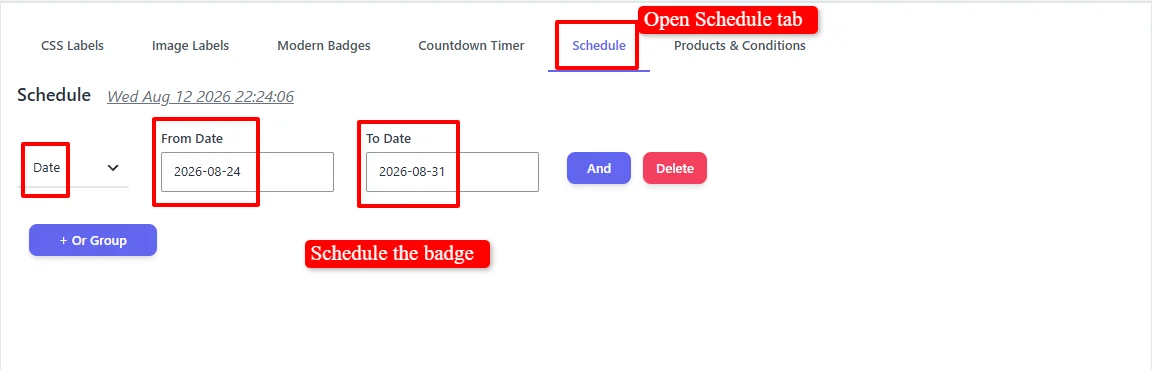
Switch to the Schedule tab:
- Leave empty for an unscheduled badge that runs immediately
- Set a start date and end date for the badge to appear

Step 10: Save and Test
- Click Save to apply the badge
- Visit a product page to see the "You Save" badge in action
Shortcode Usage
The plugin also provides shortcodes for custom badge placement:
[asnp_badge hide="1"]- Displays badge on a product page[asnp_badge hide="1" product_id="7"]- Displays badge for a specific product ID (e.g.,7)[asnp_badge]- Displays badge on product listing (archive) pages
Troubleshooting: Badge Not Showing?
If your "You Save" badge doesn't appear on your product pages, follow these steps:
Step 1: Check Plugin Versions
Ensure both the free and pro plugins are updated to the latest and matching versions. Outdated or mismatched versions can cause compatibility issues.
Step 2: Test Badge Positions
Go to Plugin Settings → General Tab and test the available positions one by one:
- For archive pages: Check all positions listed under the archive section
- For product pages: Check all positions listed under the product section
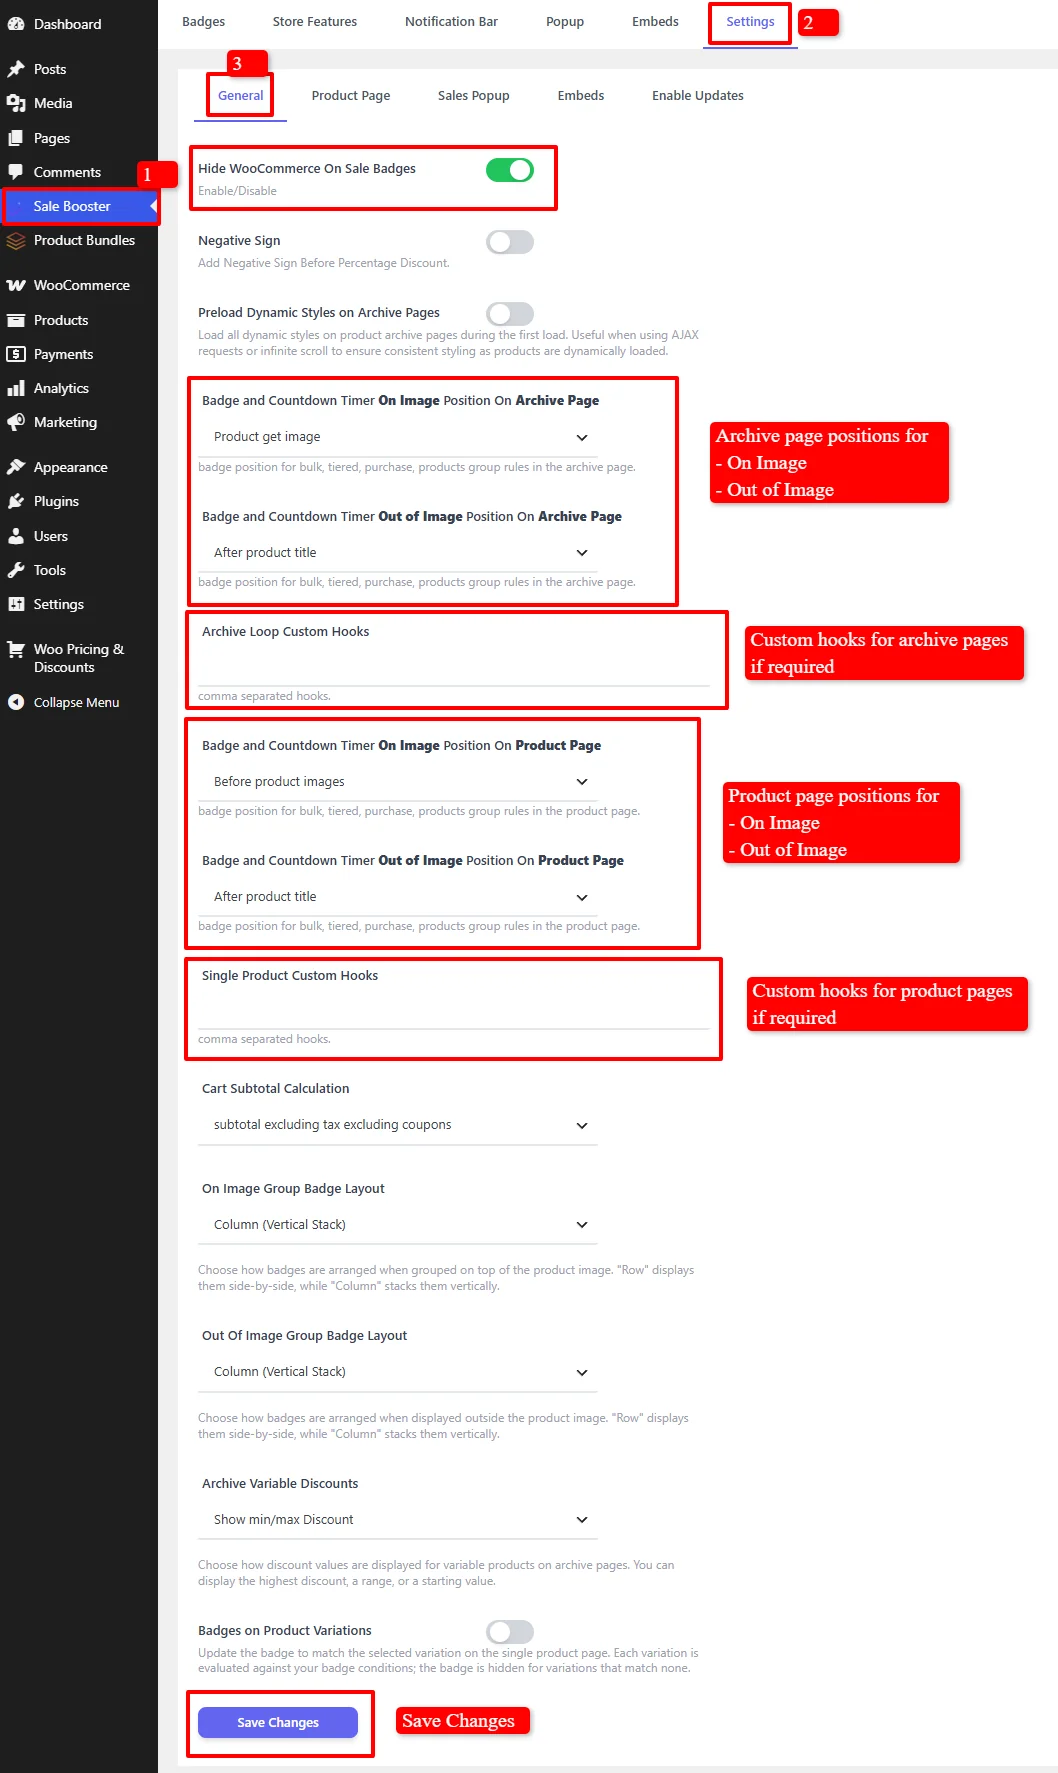
Remember: There are separate positions for "On image" and "Out of image" badges—make sure you're testing the correct one for your use case.
Step 3: Use Custom Hooks (If Positions Don't Work)
If none of the default positions work, you can enter custom hooks provided by your theme developer:
- Use the "Archive Loop Custom Hooks" field for archive pages
- Use the "Single Product Custom Hooks" field for product pages
Step 4: Try Shortcodes
As an alternative, you can use these shortcodes:
For product pages:
[asnp_badge hide="1"]
For archive/product listing pages:
[asnp_badge]
To target a specific product:
- Product page:
[asnp_badge product_id="7" hide="1"](replace 7 with your product ID) - Archive page:
[asnp_badge product_id="7"](replace 7 with your product ID)
Method 2: Using the Discount Rules Plugin
You can add sale badges with the Discount Rules and Dynamic Pricing for WooCommerce plugin for the pricing rules.
How It Works
The Discount Rules plugin automatically generates sale badges for products that have active discount rules. You can:
- Choose between showing "Sale" text or the actual discount percentage
- Set the badge position on archive and product pages
- The badge appears automatically on products with active discounts
Step 1: Access the WooCommerce Settings
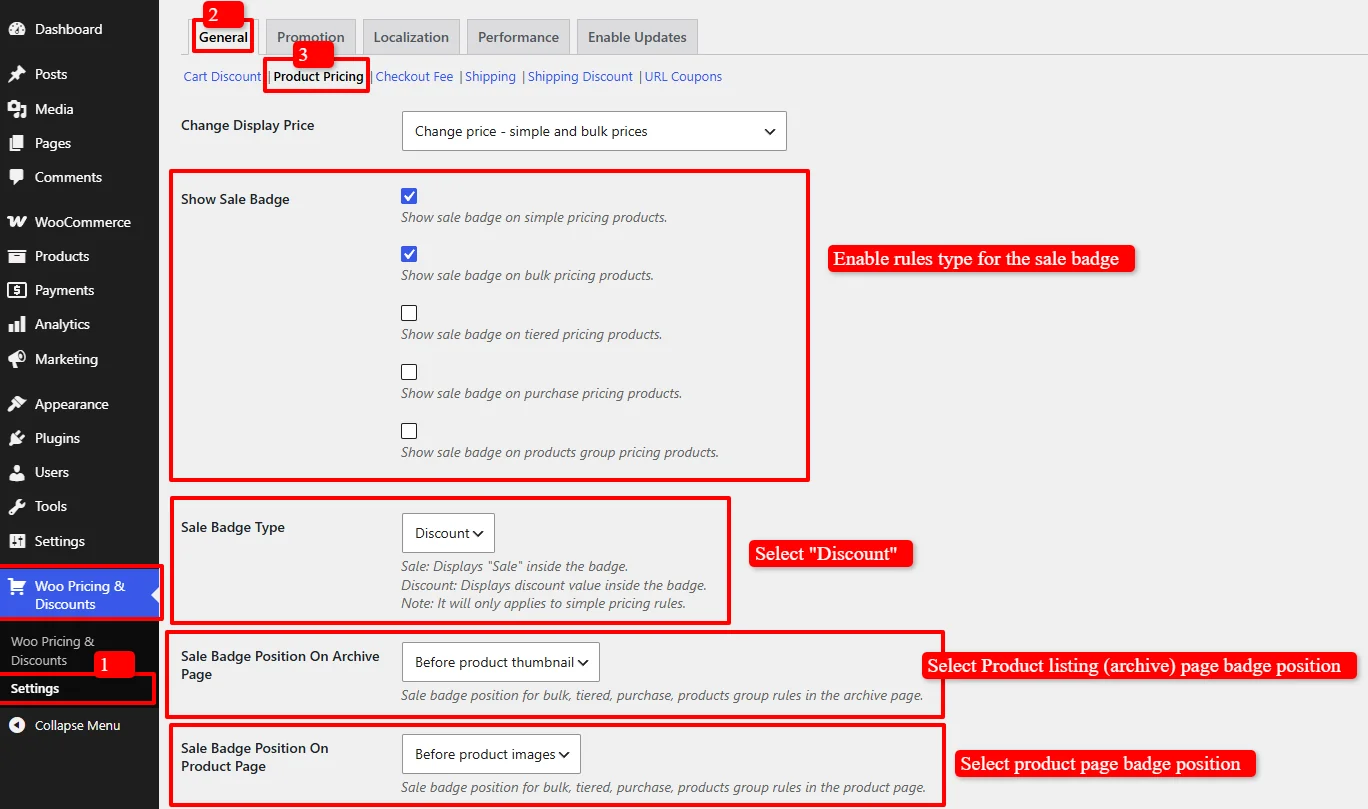
- Go to Woo Pricing & Discounts > Settings in your WordPress admin
- Navigate to the General > Product Pricing tab
- Ensure that Show Sale Badge enabled for the pricing rules that you would like to show sale badge on those campaign types
Step 2: Configure Sale Badge Type
Sale Badge Type option:
Set the Sale Badge Type to Discount to show percentage OFF on the products.
| Option | Description | Example |
|---|---|---|
| Sale | Displays "Sale" text inside the badge (same as WooCommerce default) | "Sale" |
| Discount | Displays the discount percentage value inside the badge for simple pricing rules | "20%" |
Note: The discount type only shows percentage discount for simple pricing rules and for other rules it just shows "Sale" badge.
Step 3: Configure Sale Badge Position on Archive Page
Under the Sale Badge Position On Archive Page option, choose where the badge appears on product listing pages (shop page, category pages, etc.):
Available Positions:
- Before product thumbnail (Default)
- After product thumbnail
- Before product title
- After product title
- Before product rating
- After product rating
- Before product price
- After product price
Step 4: Configure Sale Badge Position on Product Page
Under the Sale Badge Position On Product Page option, choose where the badge appears on individual product pages:
Available Positions:
- Before product images (Default)
- After product images
- Before product title
- After product title
- Before product price
- After product price
Step 5: Save Your Settings
- Click Save changes at the bottom of the page
- Your sale badge settings are now configured
Step 6: Ensure that you have created a pricing rule
- Go to Woo Pricing & Discounts
- Open the Pricing tab
- Ensure that you have created a pricing rule campaign
Step 7: Test Your Sale Badge
- Visit a product page or archive page that has active discounts
- The sale badge should appear on product image
Troubleshooting: Badge Not Showing?
If the sale badge doesn't appear on your product pages, follow these steps:
Step 1: Check Your Settings
- Make sure "Show Sale Badge" is enabled for your pricing rule type
Step 2: Try All Available Positions
The plugin uses WooCommerce hooks to display badges. Some themes don't support all hook positions.
For Archive Pages:
- Go to Woo Pricing & Discounts > Settings > General > Product Pricing
- Find "Sale Badge Position On Archive Page"
- Try each position one by one: Before product thumbnail, After product thumbnail, Before product title, After product title, Before product rating, After product rating, Before product price, After product price
For Product Pages:
- Find "Sale Badge Position On Product Page"
- Try each position one by one: Before product images, After product images, Before product title, After product title, Before product price, After product price
Step 3: Use the Shortcode
If none of the positions work with your theme:
- Set "Sale Badge Position On Archive Page" and "Sale Badge Position On Product Page" to "None"
- Use the shortcode
[wccs_sale_flash]in your theme templates to display the sale badge
Technical Note for Theme Developers
The plugin uses these WooCommerce hooks:
Archive Page Hooks:
woocommerce_before_shop_loop_item_titlewoocommerce_shop_loop_item_titlewoocommerce_after_shop_loop_item_title
Product Page Hooks:
woocommerce_before_single_product_summarywoocommerce_single_product_summary
If your theme uses custom hooks, you may need to adjust the badge position or use the shortcode method.
🎉 Success!
You've learned how to display "You Save" percentage badges in WooCommerce using the Sale Booster plugin. This powerful tool allows you to:
- Create dynamic "You Save" badges using placeholders like
{saved_percent} - Apply badges to specific products, categories, or discount rules
- Customize badge appearance with colors, fonts, animations, and positioning
- Schedule badges for limited-time promotions
- Display badges on both product pages and archive pages
Experience all discount rules and pricing strategies in action on our Live Demo Website.
Upgrade to Discount Rules and Dynamic Pricing for WooCommerce PRO to unlock advanced conditions, user role pricing, recurring schedules, tiered variations, and priority support.
📚 Next Steps
Now that you've mastered percentage badges, explore other promotional elements and discount rules:
- Add Custom Sale Badges — Create custom text and graphic sale badges.
- Add Countdown Timer — Combine percentage savings with a live countdown timer.
- Display Quantity Table — Show bulk percentage savings directly in a quantity table.
- Create Targeted Product Discounts — Set up dynamic product discount rules to power percentage badges.
- Create Bulk Quantity Discounts — Offer progressive percentage discounts for larger orders.
🔍 SEO Keywords
Primary Keywords: you save badge WooCommerce, percentage discount badge WooCommerce, WooCommerce sale badge, product label WooCommerce, dynamic discount badge, WooCommerce saved percent badge
Secondary Keywords: WooCommerce badge plugin, product badge free plugin, sale booster WooCommerce, CSS label WooCommerce, discount percentage display, WooCommerce savings badge, product label plugin, WooCommerce sale label, custom product badges, dynamic placeholders WooCommerce