
WooCommerce is a great e-commerce platform that enables you to sell your products online. One of the best ways to boost your sales is to offer discounts to your customers. By adding discounts in WooCommerce, you can attract more customers and increase your revenue. This article highlights 15 ways to add discount in WooCommerce and how to use them to drive sales.
Add Discount in WooCommerce to Boost Your Sales
Adding discounts in WooCommerce is a great way to boost your sales. Customers are always looking for a good deal, and discounts can be the deciding factor in whether they choose to buy from you or not. Offering discounts also help you to retain customers who may be considering switching to a competitor.
How to Increase Sales with WooCommerce Discounts
To increase sales with WooCommerce discounts, you need to use them strategically. For example, offering discounts during the holiday season can help you attract more customers and increase your revenue. You can also use discounts to encourage customers to buy more by offering free shipping for orders above a certain amount.
The Secret to More Sales: WooCommerce Discounts
The secret to more sales in WooCommerce is to offer discounts that are relevant to your customers. You need to understand your customer’s needs and preferences and offer discounts that align with them. Discounts should also be easy to redeem and not require customers to jump through hoops to get them.
Get More Customers with WooCommerce Discounts
Offering discounts in WooCommerce is a great way to get more customers. Discounts can be used to attract new customers who may not have considered buying from you before. Discounts can also encourage existing customers to refer their friends and family to your store.
Learn How to Add Discounts in WooCommerce
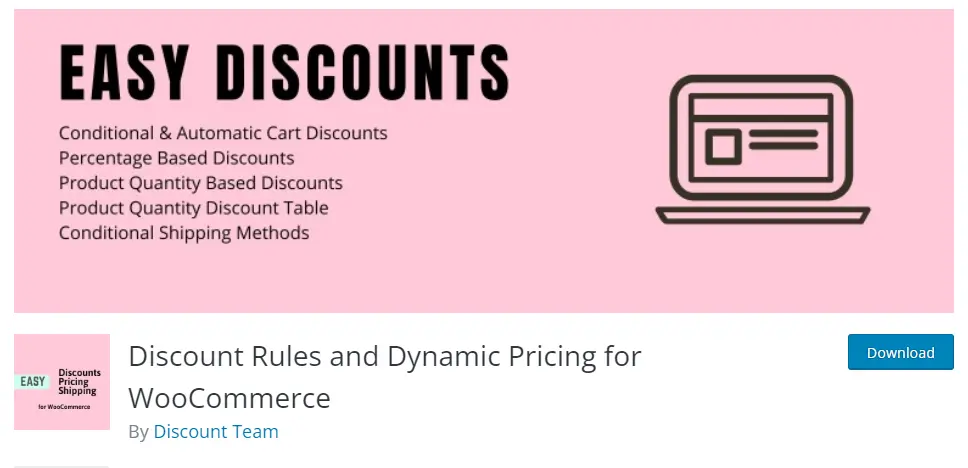
Learning how to add discounts in WooCommerce is easy. The platform has built-in features that allow you to apply discounts to your products. You can also use plugins to add more advanced discount options, such as bulk discounts and time-based discounts.
Learning how to add discounts in WooCommerce is easy. We will use Discount Rules and Dynamic Pricing for WooCommerce plugin that offers advanced discount deals like percentage discounts, bulk discounts, quantity discounts, tiered discounts, BOGO deals, time-based discounts, group discounts, and more.
The Ultimate Guide to Add Discount in WooCommerce
This article is the ultimate guide to adding discounts in WooCommerce. It provides you with 10 ways to add discounts and explains how to use them to increase sales. By following the tips in this guide, you can create effective discount strategies that help you attract and retain customers.
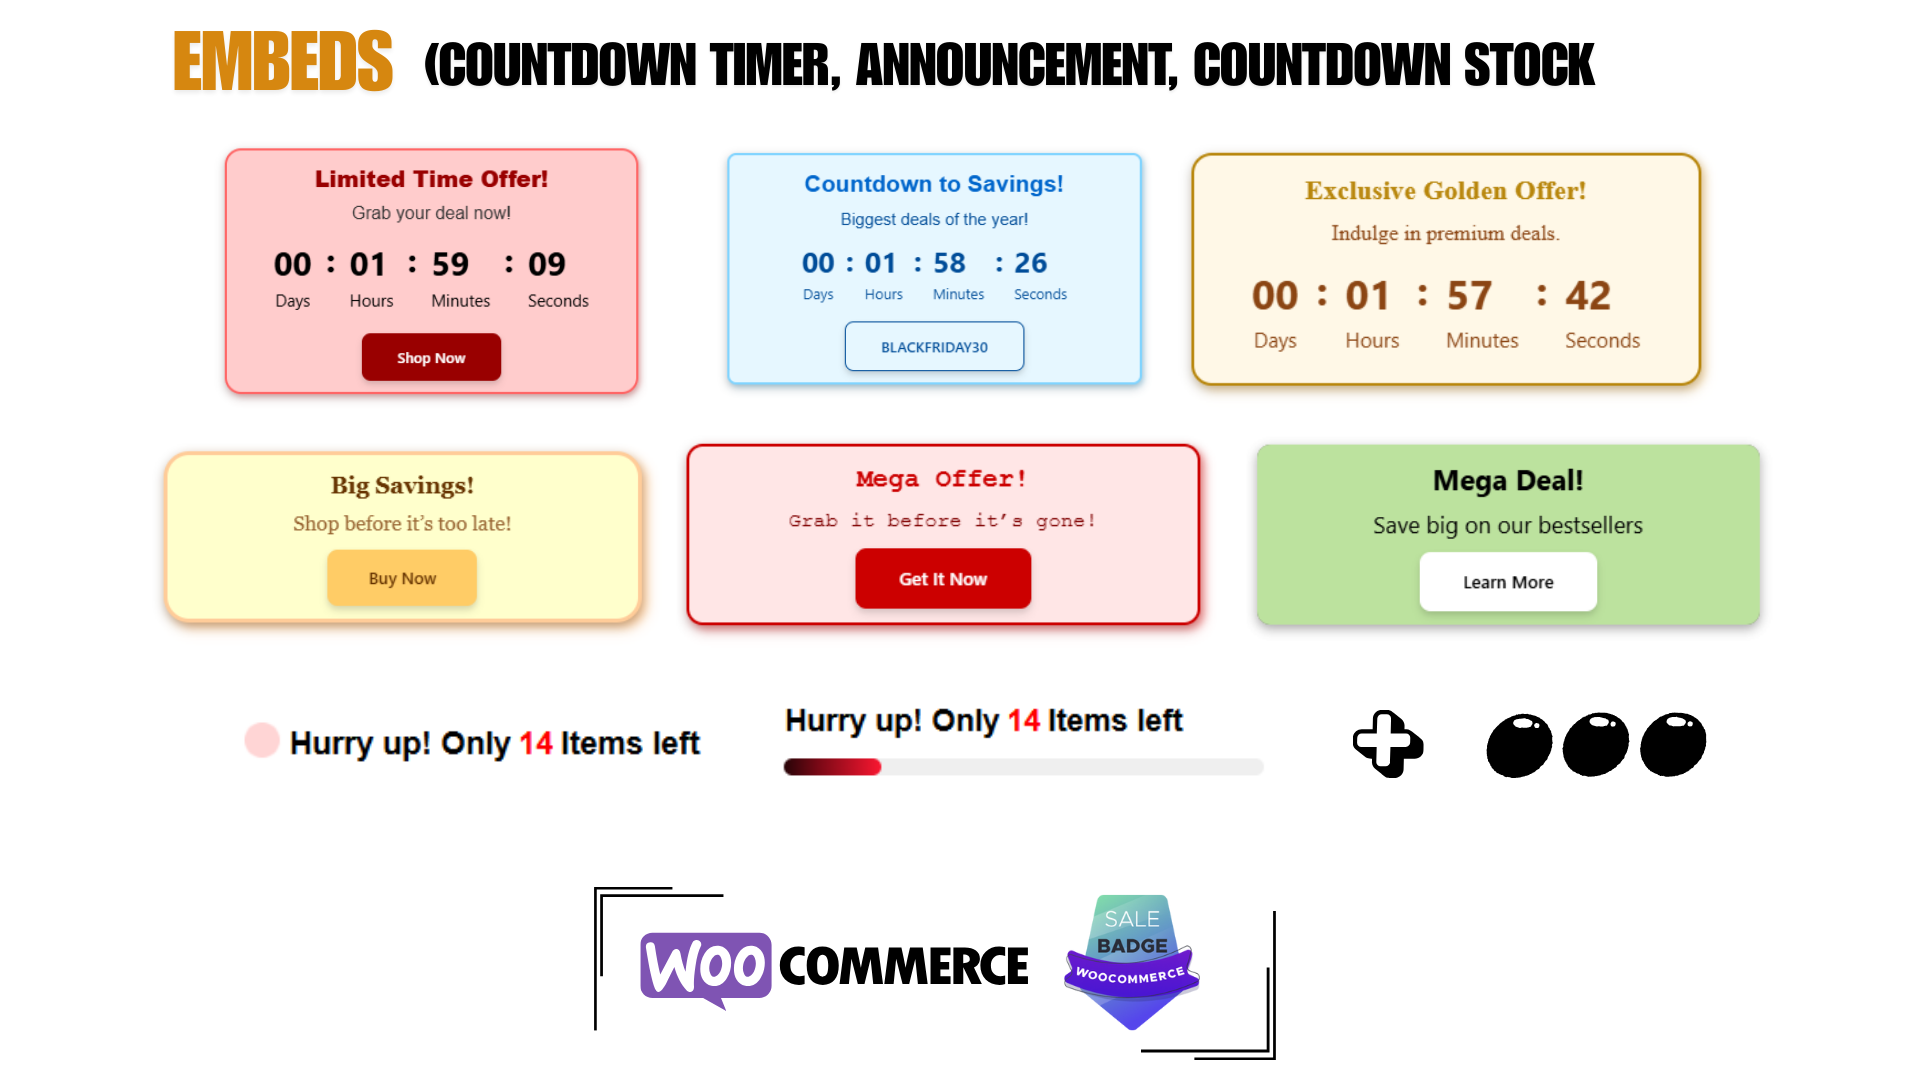
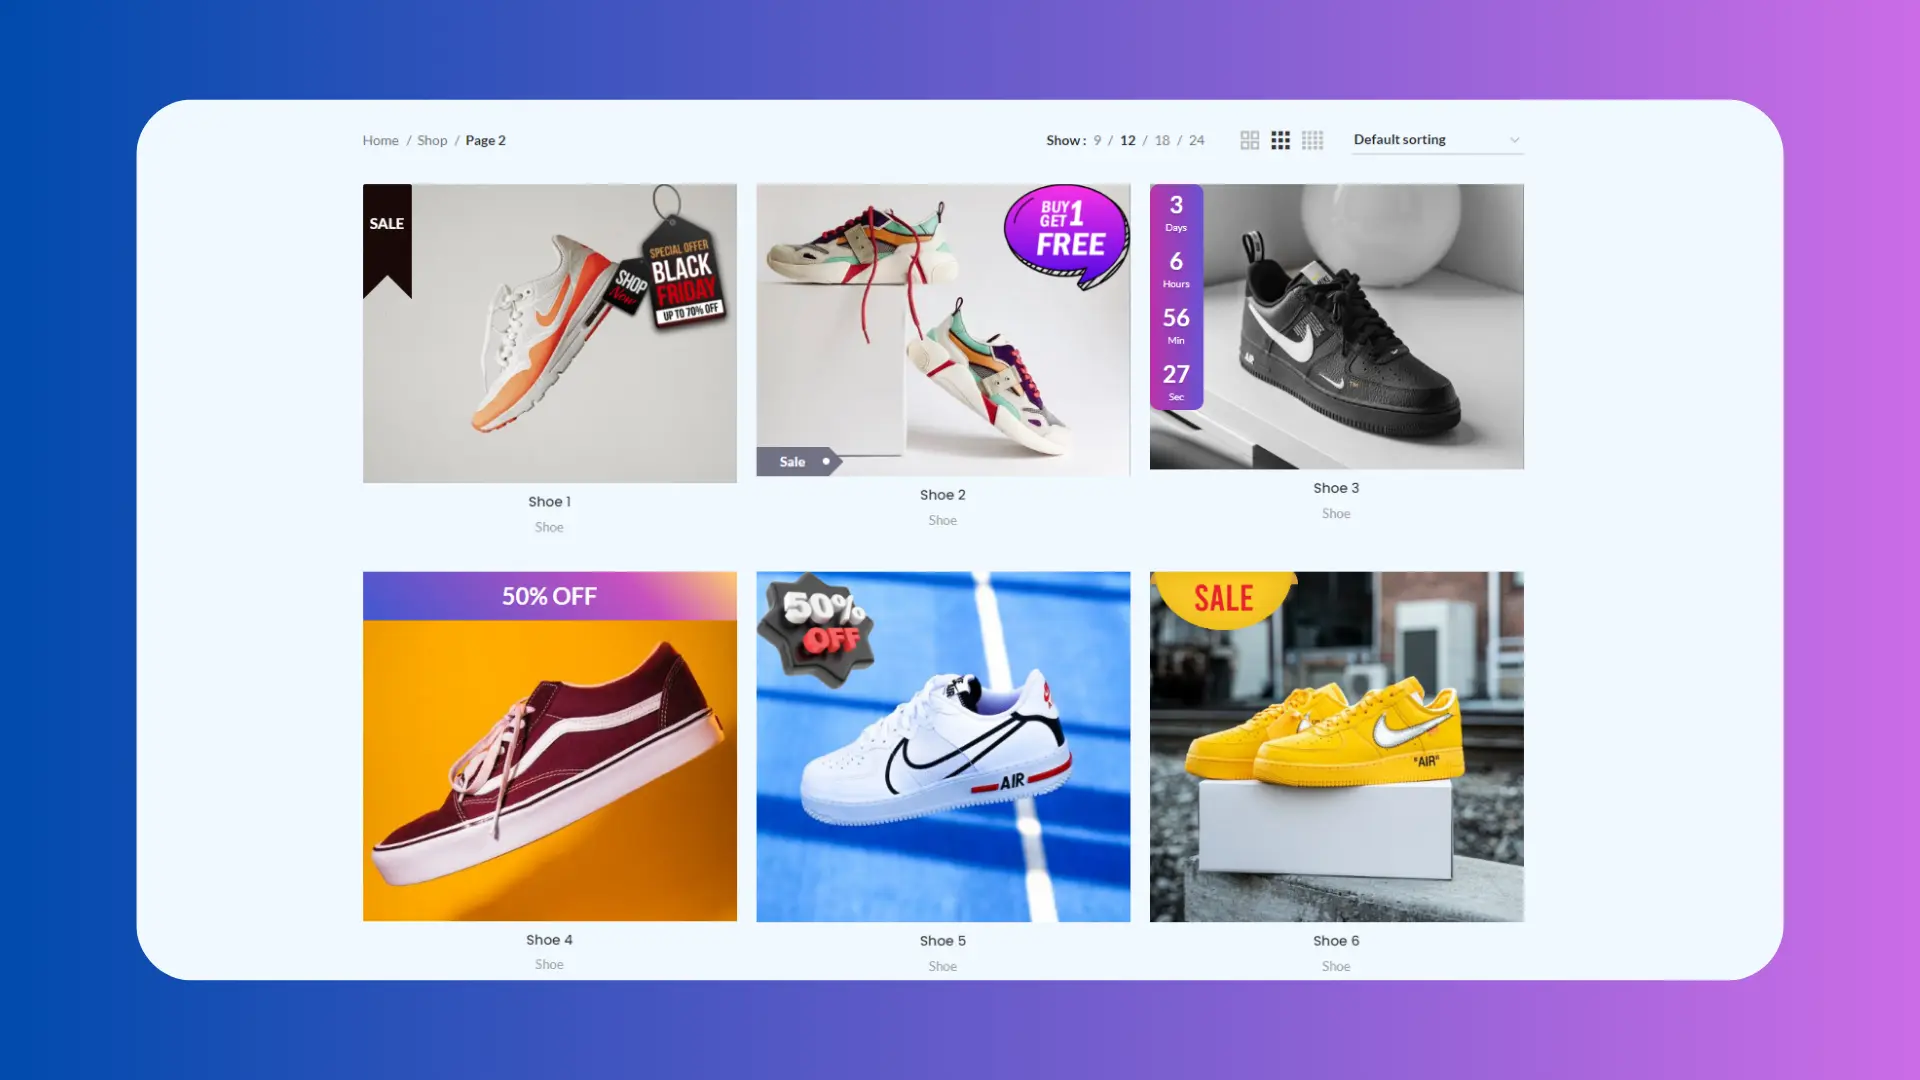
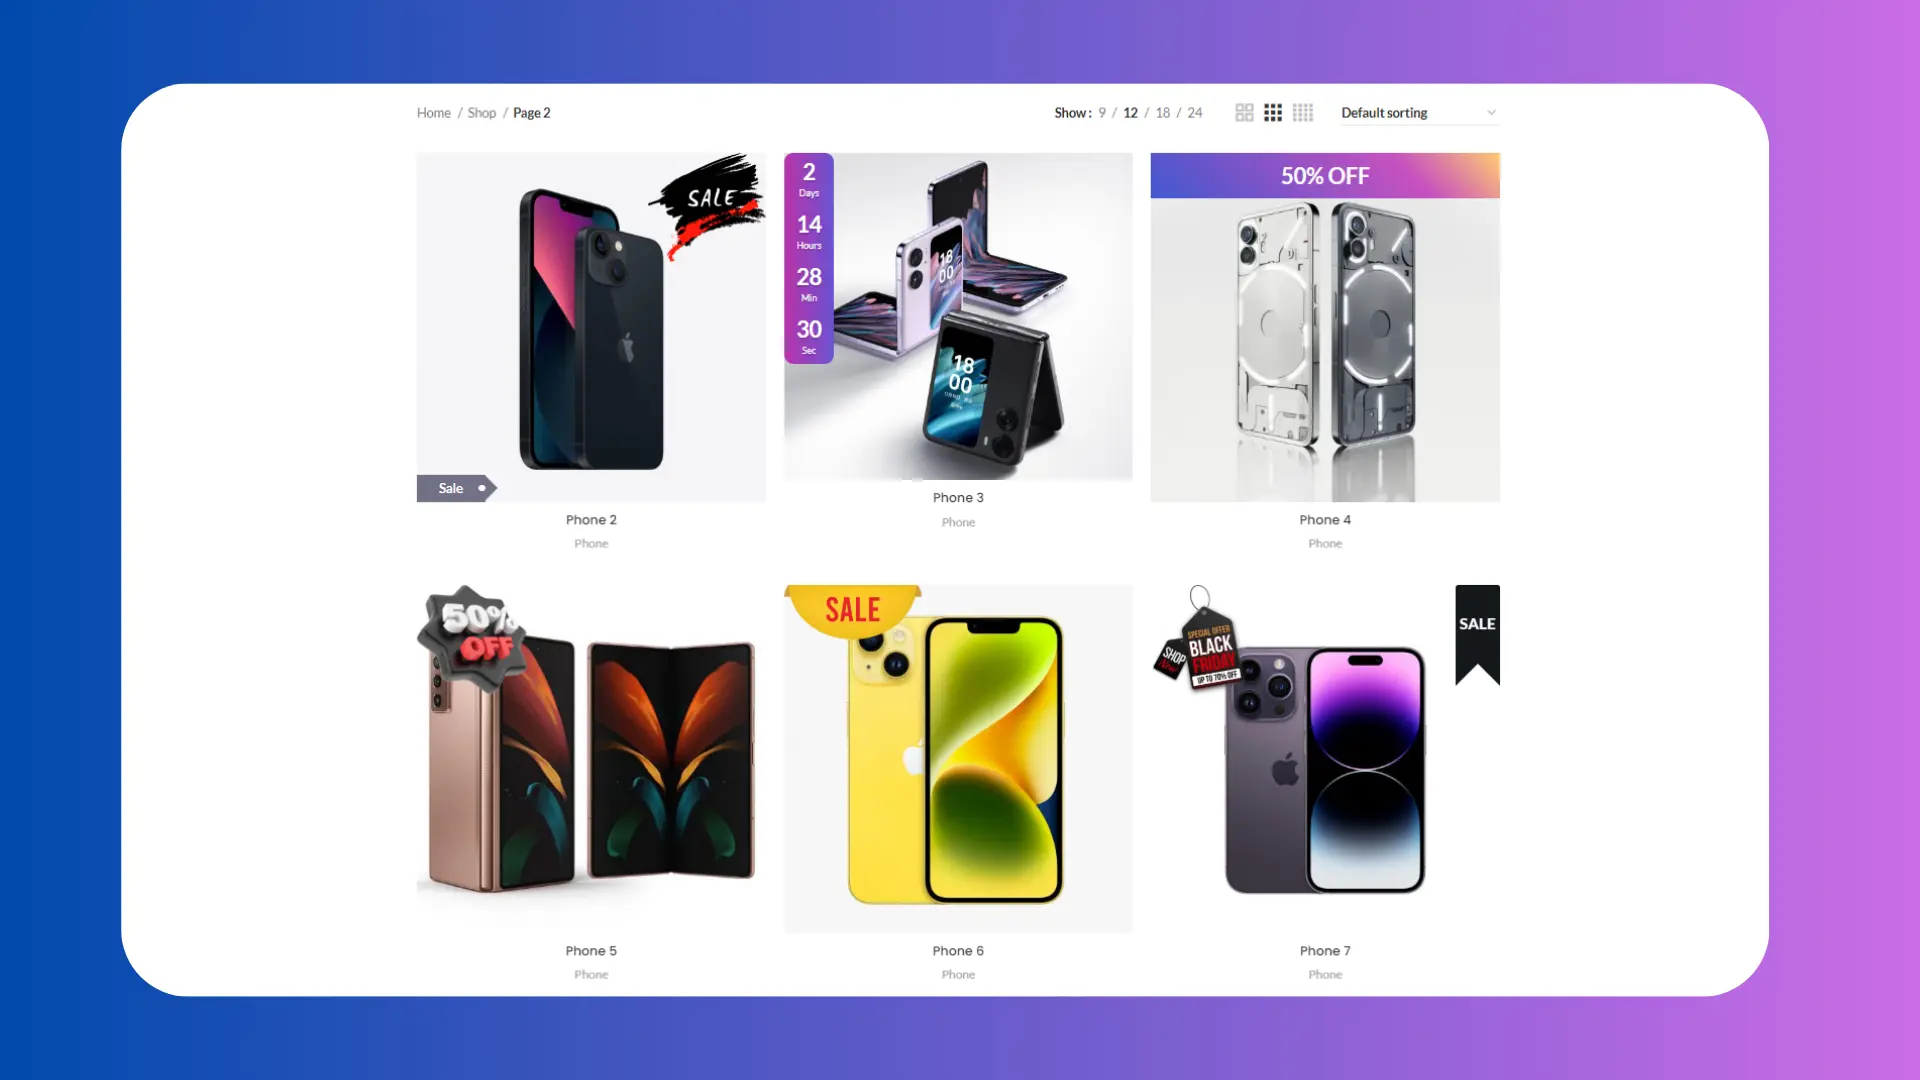
15 Ways to Add Discounts in WooCommerce
- Create auto-add coupons: Customers don’t need to search and enter coupon codes.
- First order discount: Offer discounts on first order or sign up discount.
- Percentage Discounts: Offer a percentage discount on the entire order or specific products.
- Category-based Discounts: Offer discounts on specific categories of products.
- Product Variation Discounts: Offer discounts on specific variations of a variable product.
- Product Attributes Discounts: Offer discounts on specific product attributes.
- Quantity-based Discounts: Offer discounts based on the quantity of products bought.
- Tiered Discounts: Offer different prices for each quantity range.
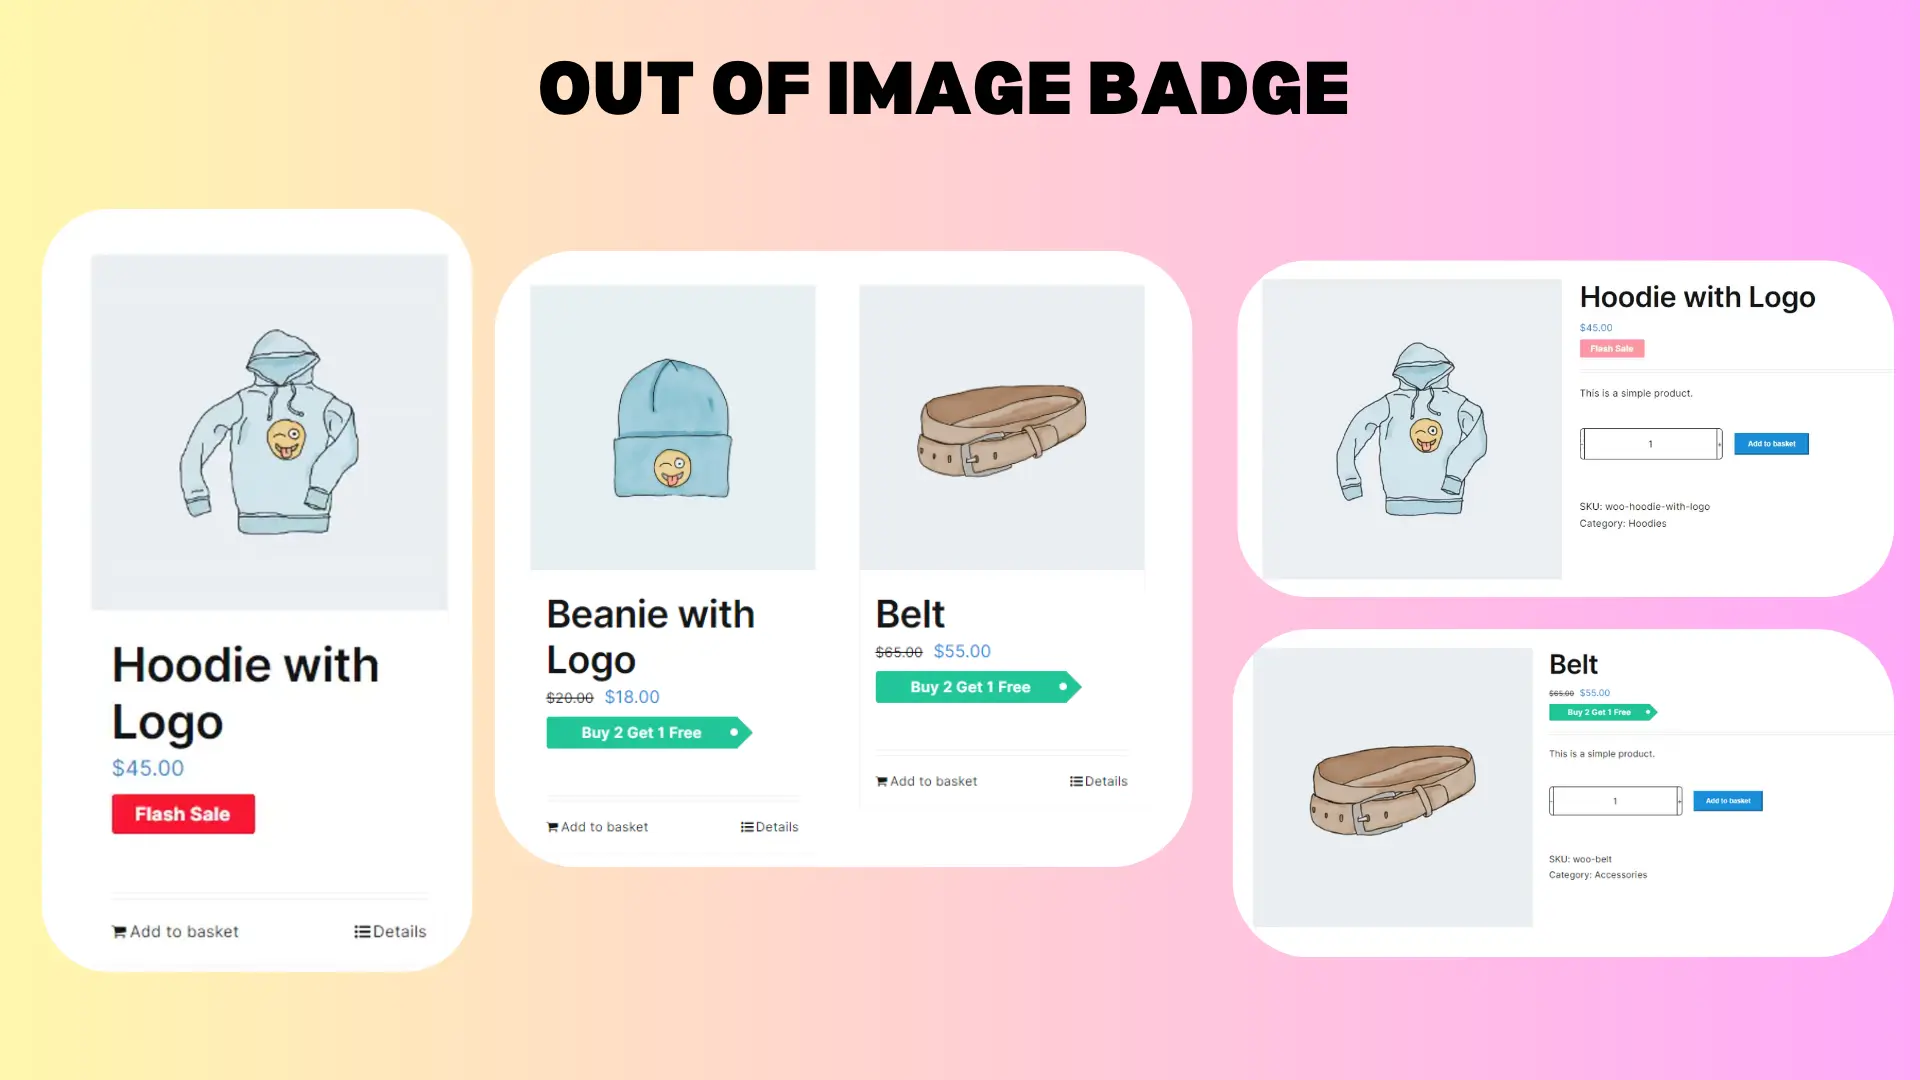
- Buy One Get One Free: Offer a free product for every purchase of a specific product.
- Buy 2 Get 1 Discounts: Offer buy two get one deals.
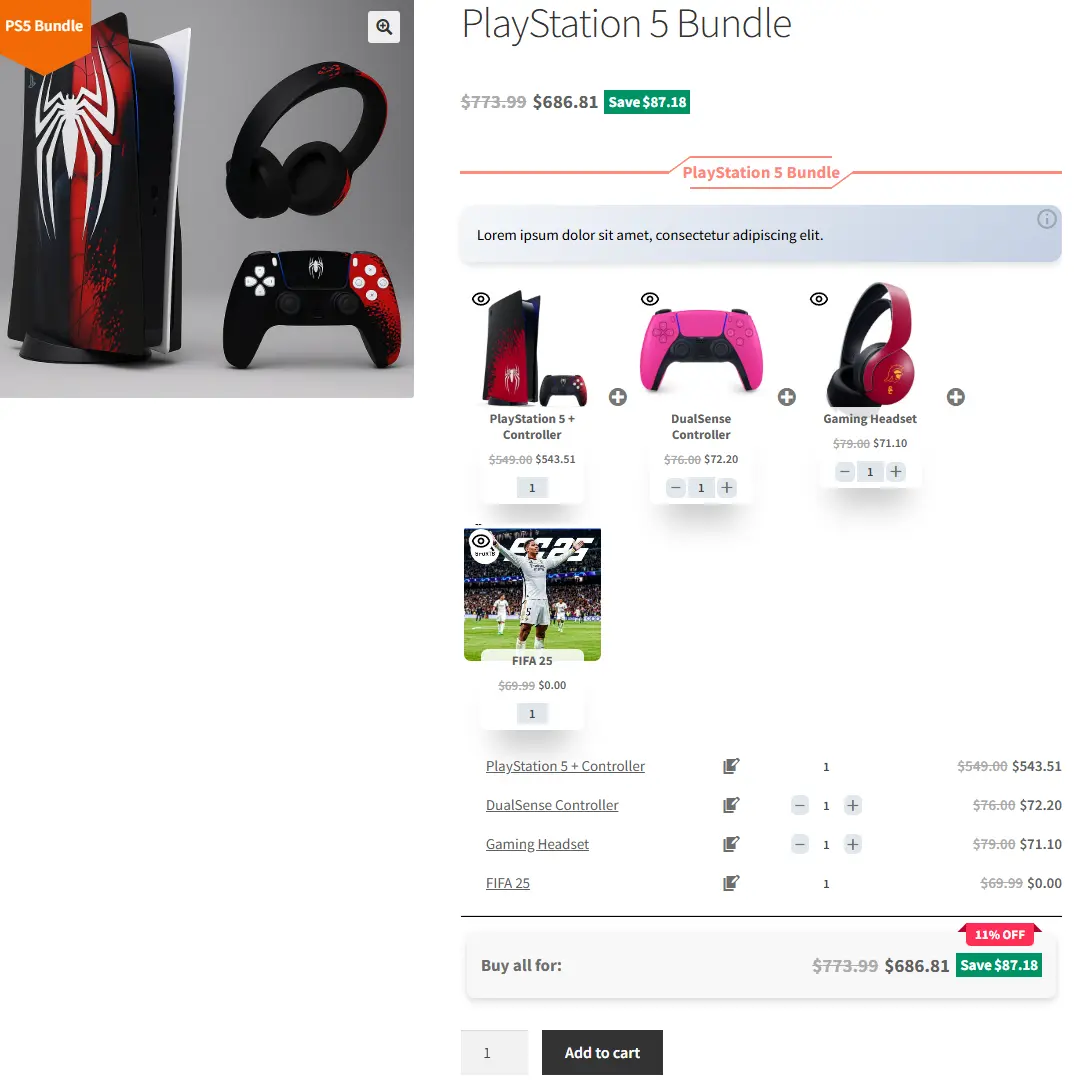
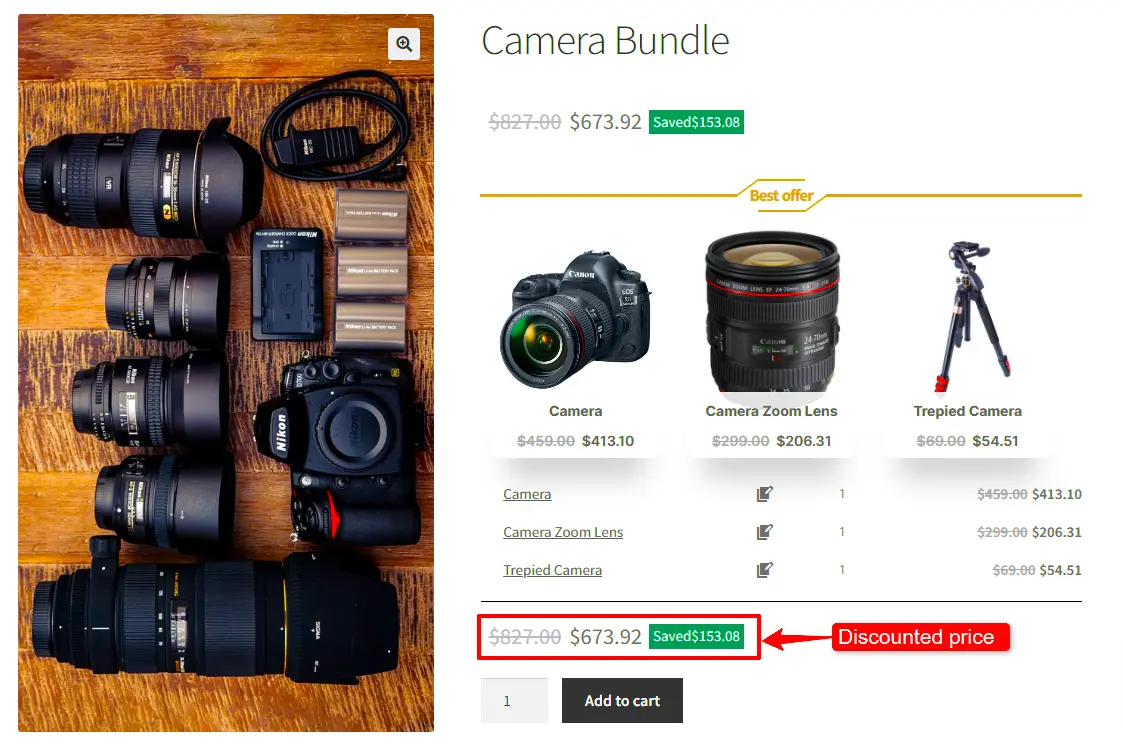
- Product Bundle Discounts: Offer discounts on product bundles or groups of products.
- Auto Add Products to Cart: Automatically add products to the cart with or without discounts.
- Offer Shipping Discounts: Apply a discount on shipping methods when meet specific criteria.
- URL Coupons: Create URL campaigns in WooCommerce and offer discounts or auto-add products to the cart.
- Free Shipping: Offer free shipping to customers who meet specific criteria.
Auto Add Coupons
Auto Add Coupons is a feature that is becoming increasingly popular among online shoppers. With this feature, customers can save money on their purchases without having to manually search for and enter coupon codes. Instead, the system automatically applies any relevant coupons or discounts at checkout, making the process fast and easy. This not only saves time and effort but also makes it more likely that shoppers will complete their purchases, as they don’t have to worry about missing out on potential savings. With Auto Add Coupons, online retailers can improve customer satisfaction and loyalty by offering a seamless shopping experience that rewards customers for their loyalty.
Read more about Auto Add Discounts.
First Order Discount
A first order discount is a special promotion offered by businesses to attract new customers. It is a discount given to a customer when they make their first purchase with the company. This discount is usually a percentage off the total cost of the purchase or a set amount off the price of a specific item. First-order discounts are intended to entice new customers to try a company’s products or services. They can help businesses build their customer base and establish brand loyalty. Customers are often more likely to try a new product or service if they know they can get a discounted rate on their first purchase. Overall, first-order discounts are a useful tool for businesses to attract new customers and grow their sales.
Read more about first order discounts.
Add Percentage Discount in WooCommerce
Adding a percentage discount in WooCommerce is a great way to attract more customers to your online store. By offering discounts, you can encourage customers to buy more products and improve your sales revenue. Discount Rules and Dynamic Pricing for WooCommerce plugin make it easy to set up percentage discounts for specific products or categories. You can set a discount percentage for a specific price range, product type, or customer group. You can also set up discounts for specific periods, such as holidays or special events. With Discount Rules and Dynamic Pricing for WooCommerce plugin, you can easily manage your discounts and track the impact on your sales revenue. By offering discounts, you can improve customer loyalty and increase your profits, making it a valuable tool for any online store owner.
We have a detailed article on how to add a percentage discount in WooCommerce.
Add Category Discount in WooCommerce
Category discounts are a popular marketing strategy used by retailers to drive sales and increase customer loyalty. They involve offering discounts or promotions on a specific category of products, such as clothing, electronics, or home goods. By doing so, retailers can attract customers who are searching for deals on those products and increase the likelihood that they will make a purchase. Category discounts can also help retailers clear out excess inventory or introduce new products to the market. Additionally, these discounts can be personalized based on a customer’s past purchase history, increasing the chances of a repeat sale. Ultimately, category discounts can be a win-win situation for both the retailer and the customer, providing savings and increased sales, respectively.
Learn how to create a category discount in WooCommerce.
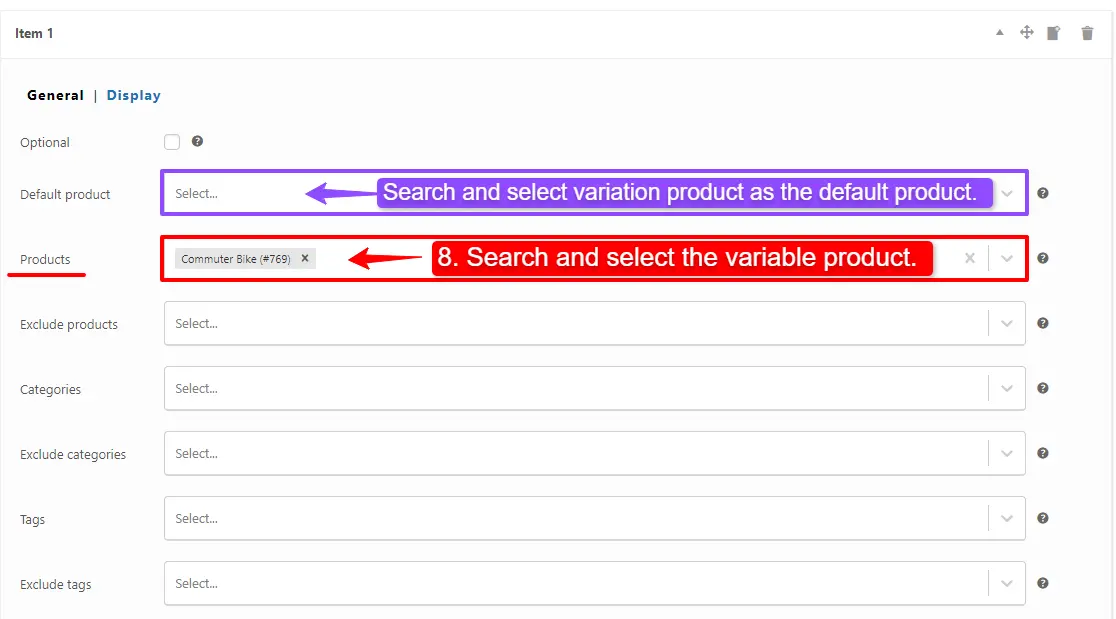
Product Variation Discount
Product variation discount is a pricing strategy in which businesses offer discounts on products with slight variations, such as different colors, sizes, or flavors. This strategy is used to encourage customers to purchase more than one variation of the same product. For instance, a clothing store may offer a discount on different colored t-shirts or a coffee shop may offer a discount on different flavors of coffee. This not only increases the sales of the business but also helps in clearing the stock of the less popular variations. It is an effective way to attract and retain customers by providing them with a more diverse shopping experience and offering them value for their money.
Read how to create a product variation discount in WooCommerce for more information.
Product Attributes Discount
A product attributes discount is a promotion strategy that applies a discount to specific features or characteristics of a product. For example, a clothing store might offer a discount on all black items or all items made from organic cotton. This type of discount can help increase sales of specific products and appeal to customers who are looking for particular features in their purchases. It can also help businesses differentiate themselves from competitors and highlight their unique offerings. However, it’s important to ensure that the discount doesn’t negatively impact profit margins and that the chosen product attributes are relevant and desirable to customers.
Learn more about product attributes discounts.
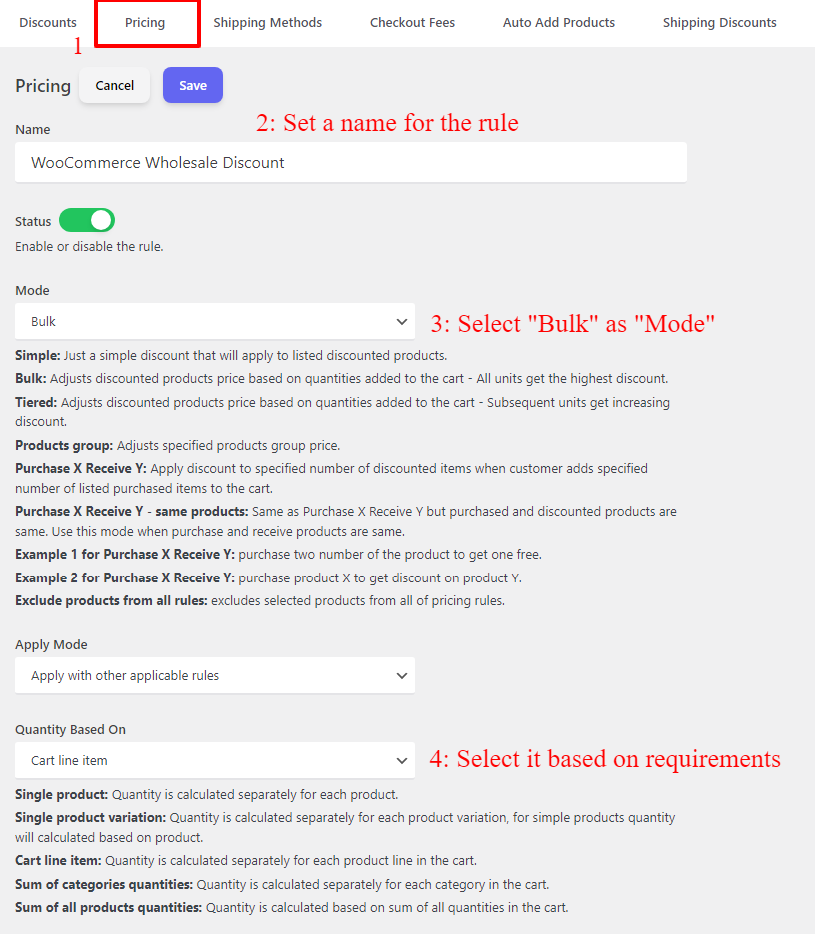
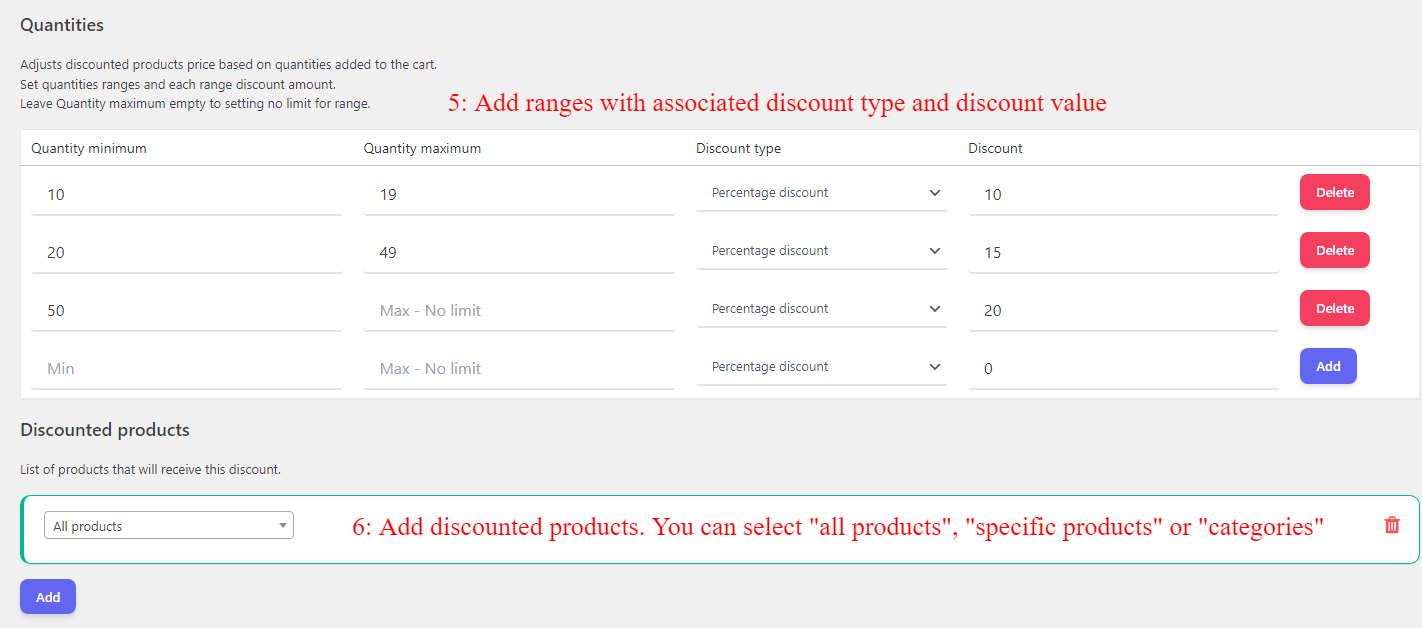
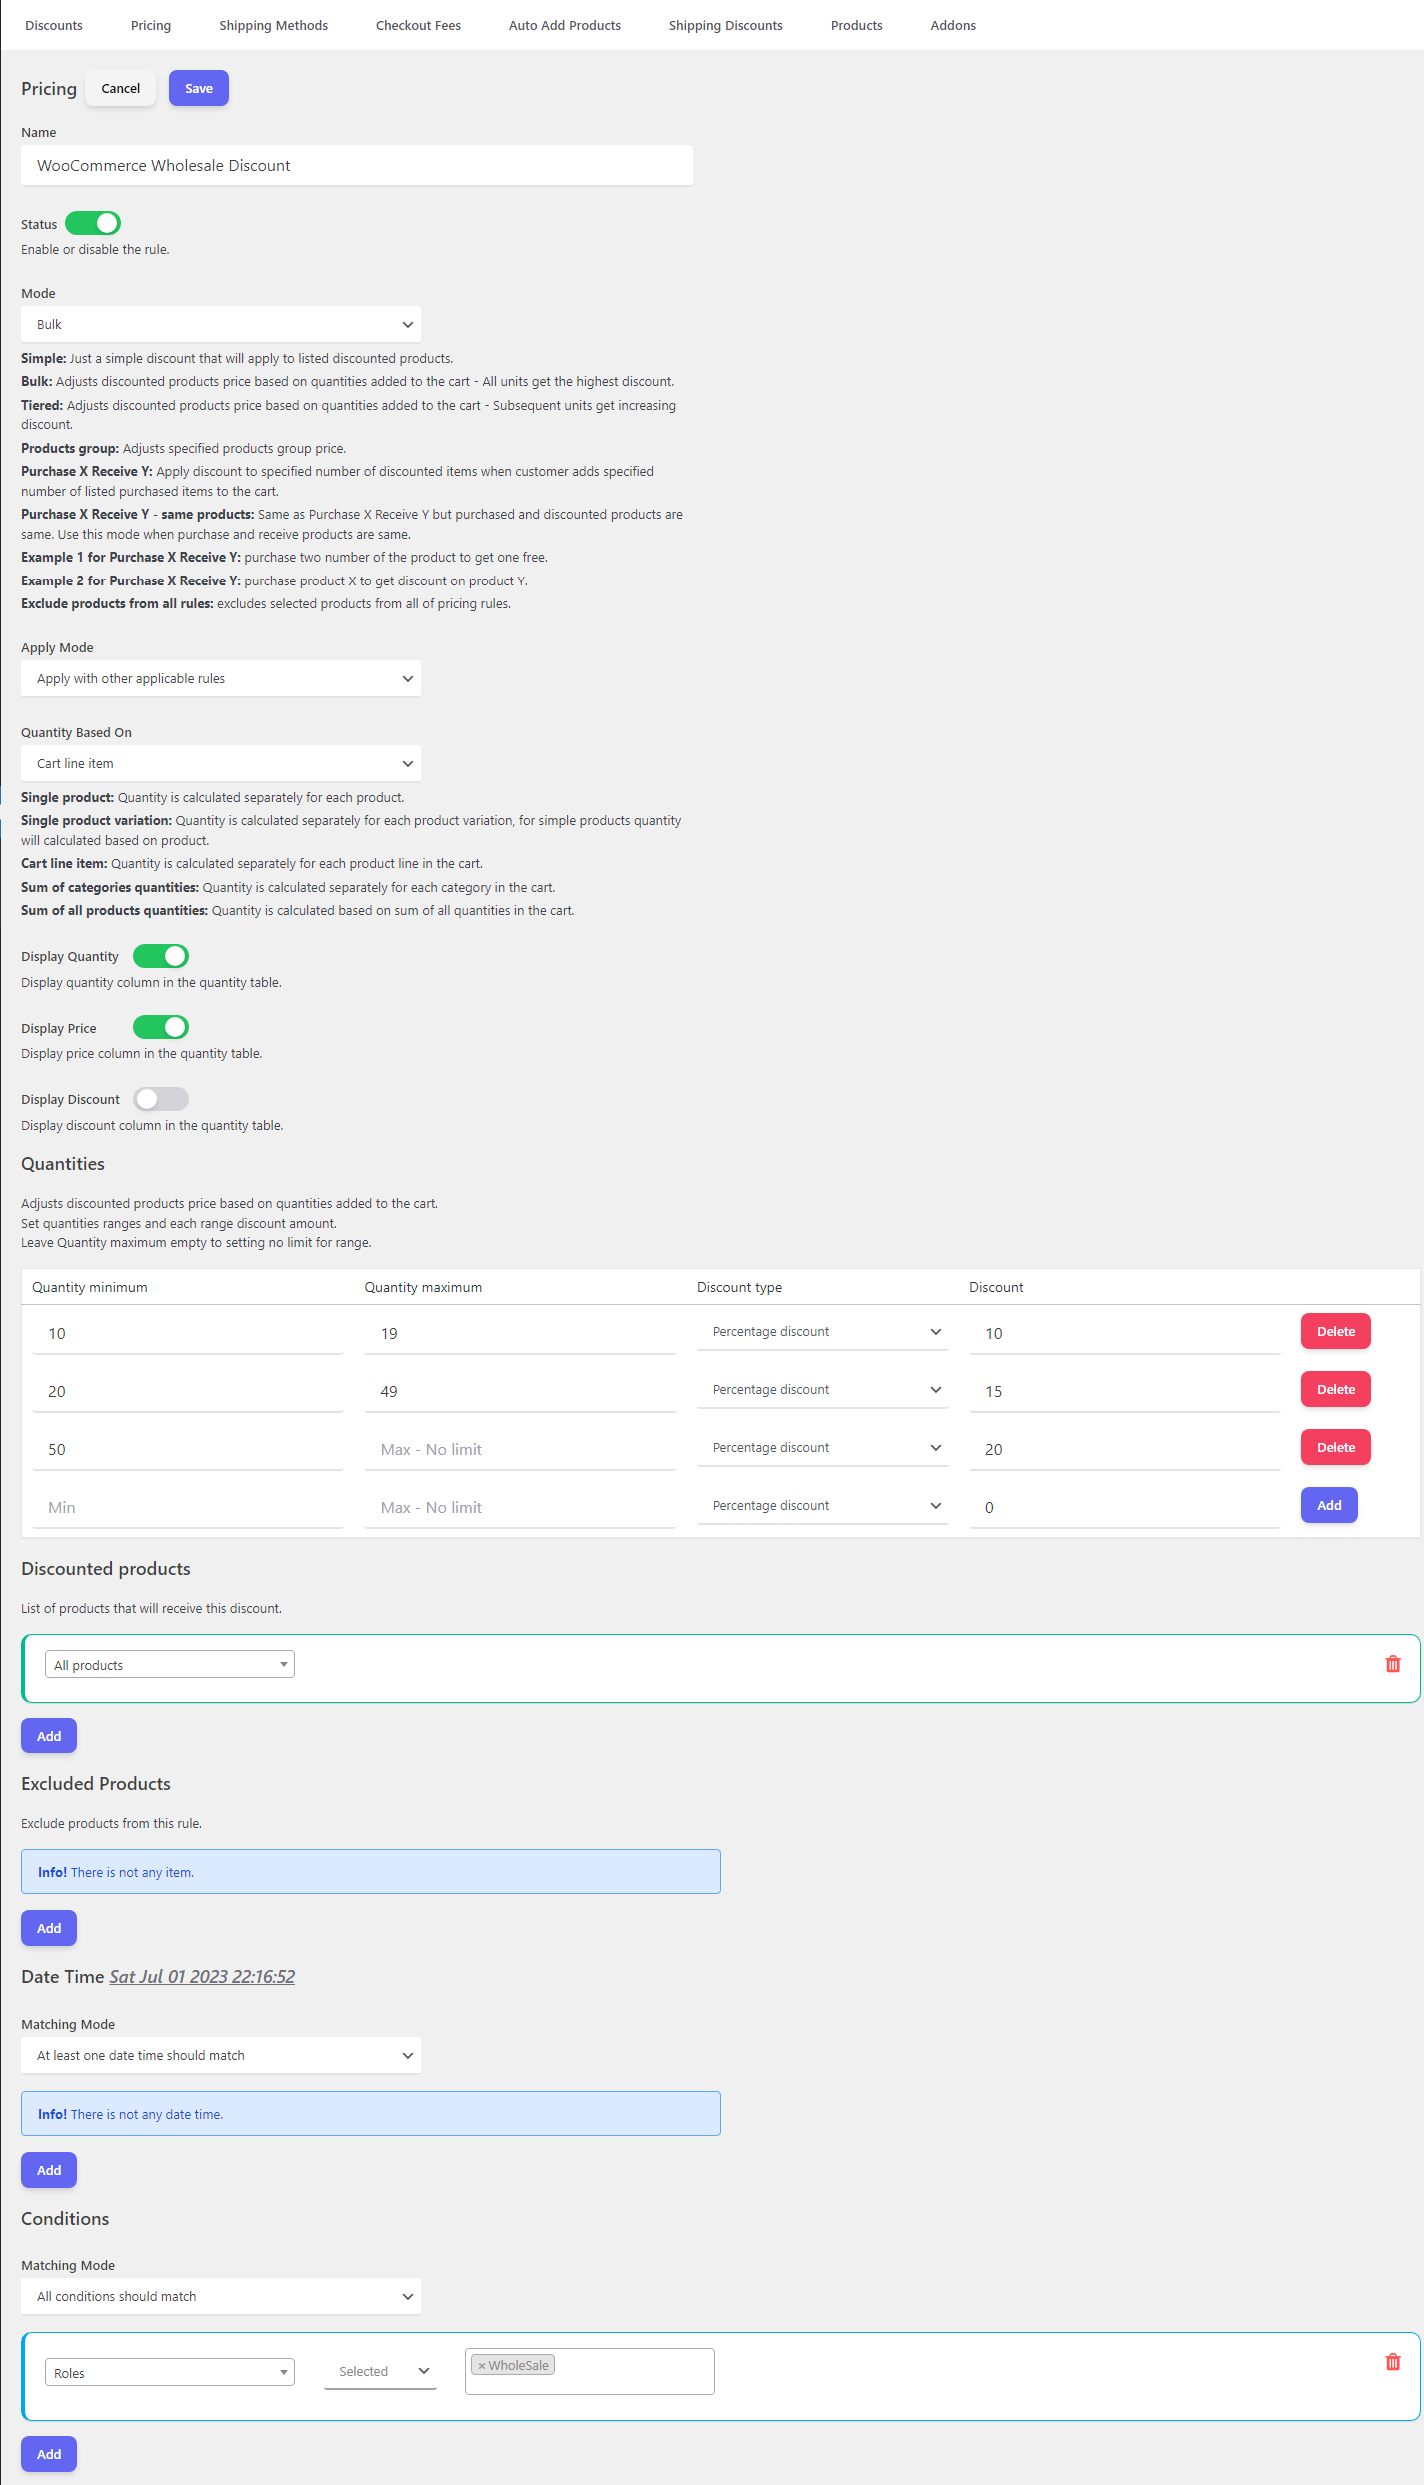
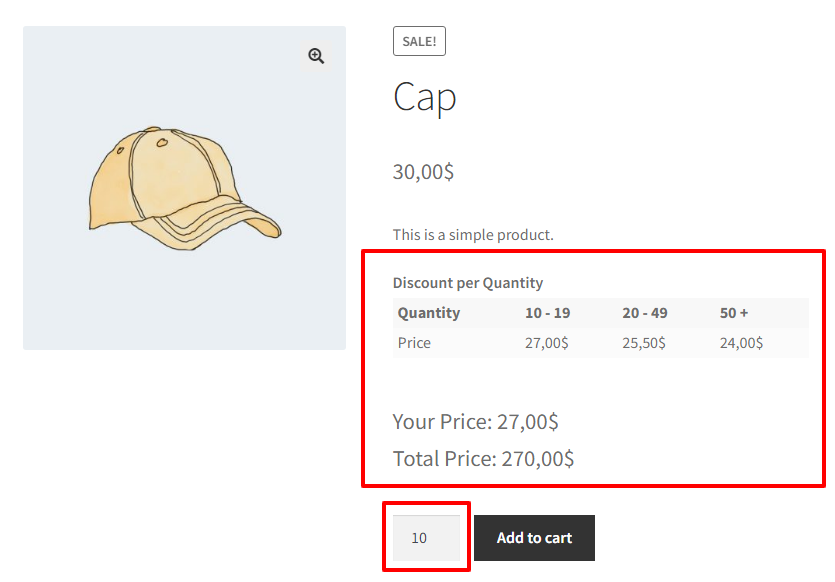
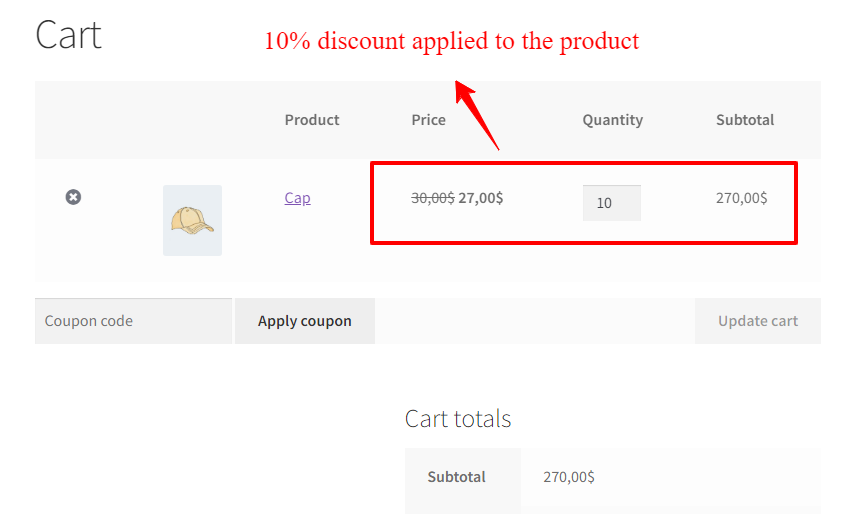
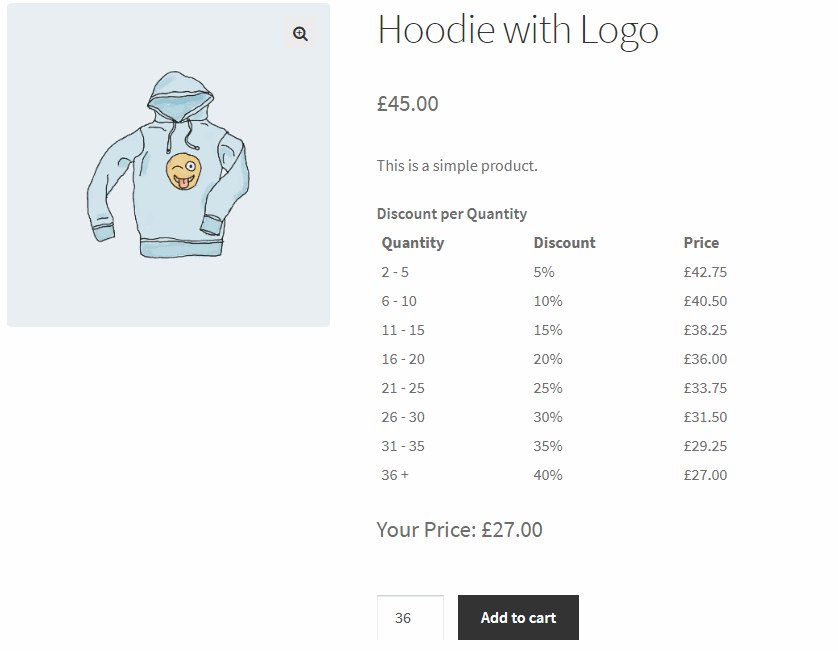
Add Quantity Based Discount (Bulk Discount)
Quantity based discounts are a great way to incentivize customers to purchase more of your products. By offering discounts for higher quantities, you can encourage customers to buy in bulk and increase your sales revenue. These discounts can be applied to individual products or entire orders and can be based on a variety of factors such as the total quantity of items purchased or the amount spent. Businesses can use quantity based discounts to drive customer loyalty and increase repeat business, as well as attract new customers through competitive pricing. Overall, quantity-based discounts are an effective strategy for boosting sales and improving customer engagement.
You can learn more about how to add quantity based discounts in WooCommerce here.
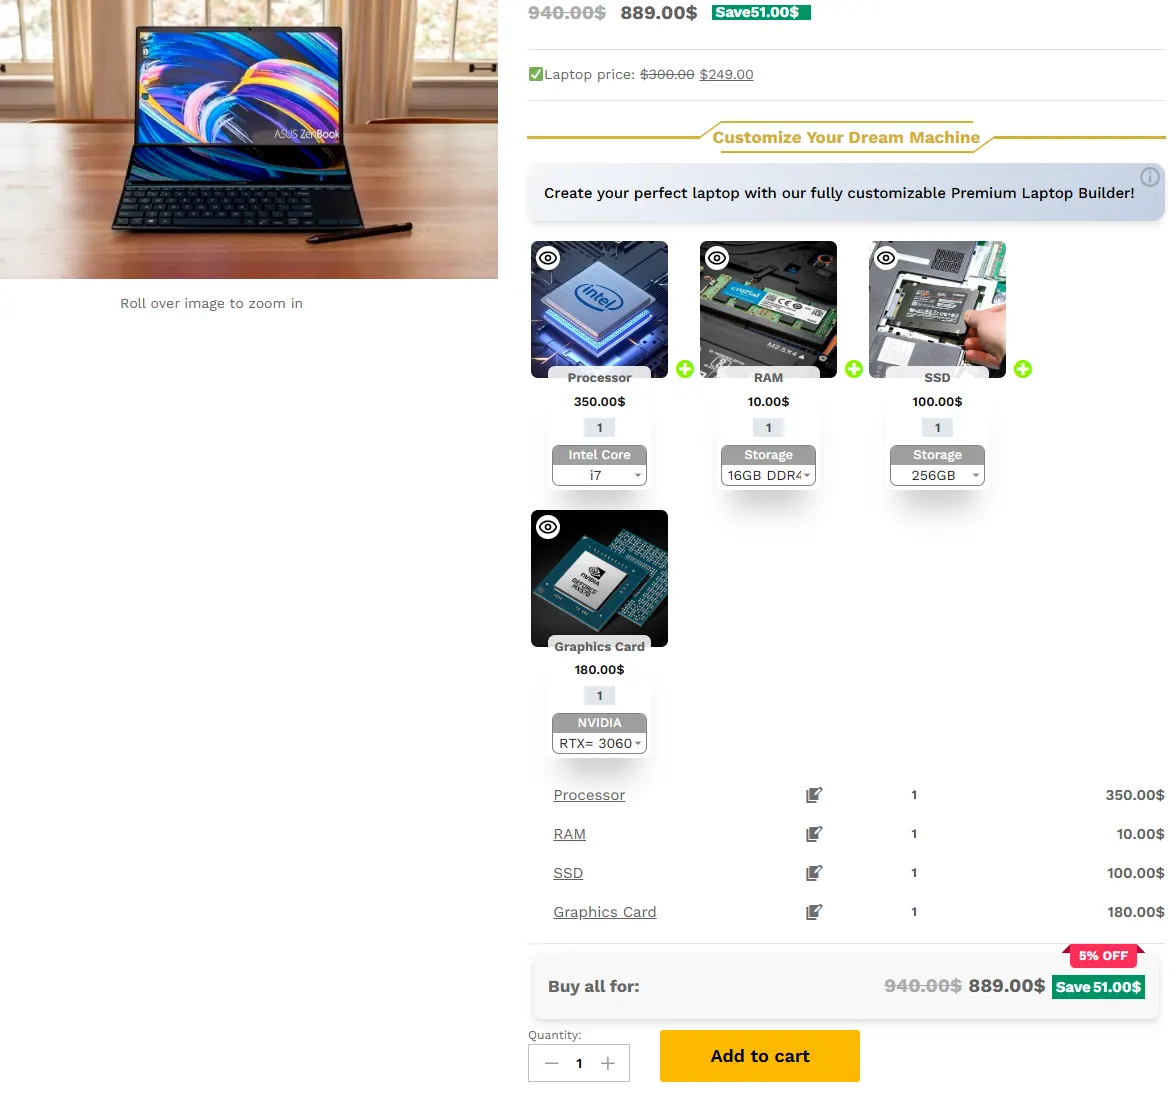
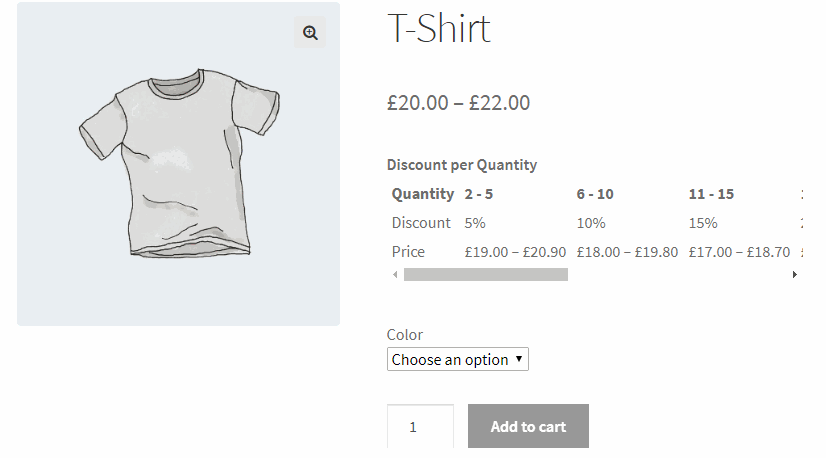
Tiered Discount
A tiered discount is a variation of quantity based discount but the difference is it calculates each range price separately and adds it to the total. With this pricing rule, you can set a different price for each range.
For instance, the product price is 30$ and a user wants to buy 4 quantities of it. We can set a different price for each range of quantities like the below example.
- 1 quantity is inside 1-1 range without a discount.
- 1 quantity is inside 2-2 range with a 4$ price discount.
- 1 quantity is inside the 3-3 range with a 7$ price discount.
- 1 quantity is inside the 4-4 range with a 30% discount.
(1 * 30$) + (1 * 25$) + (1* 23$) + (1*21$) = 99$
Read more about adding tiered discounts in WooCommerce.
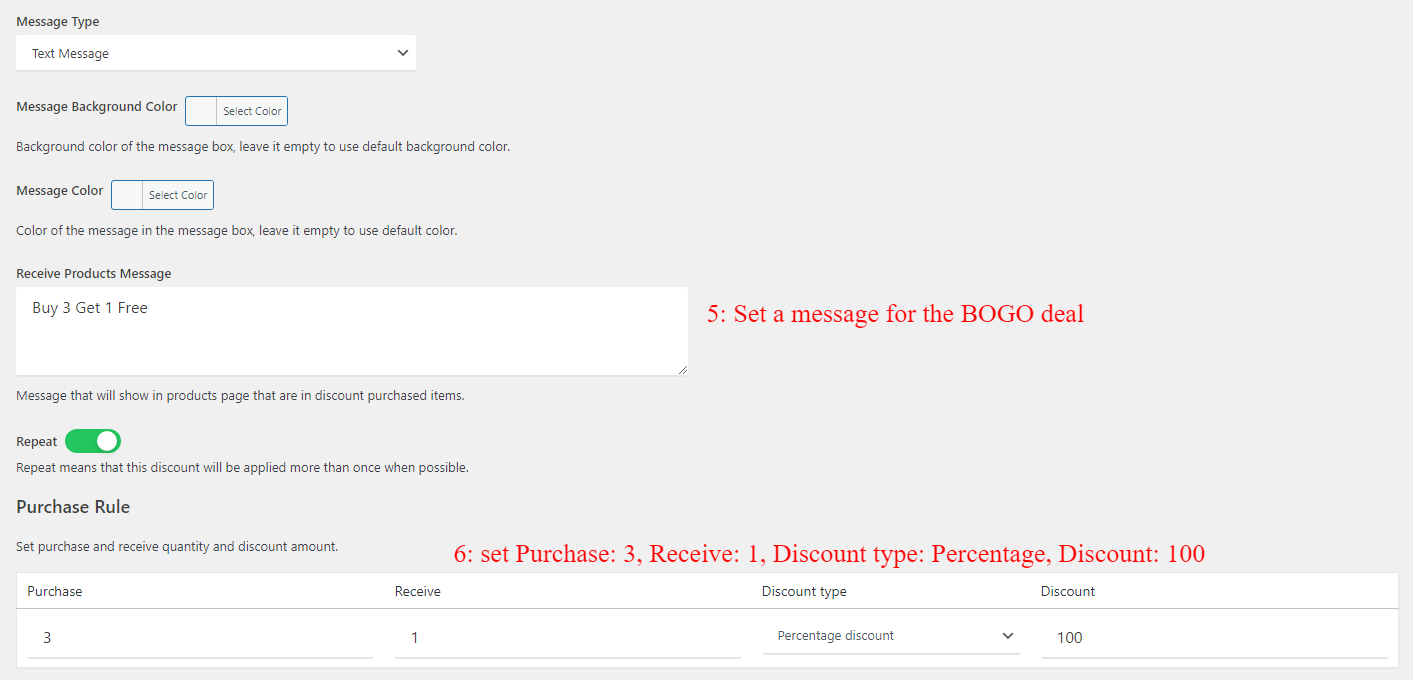
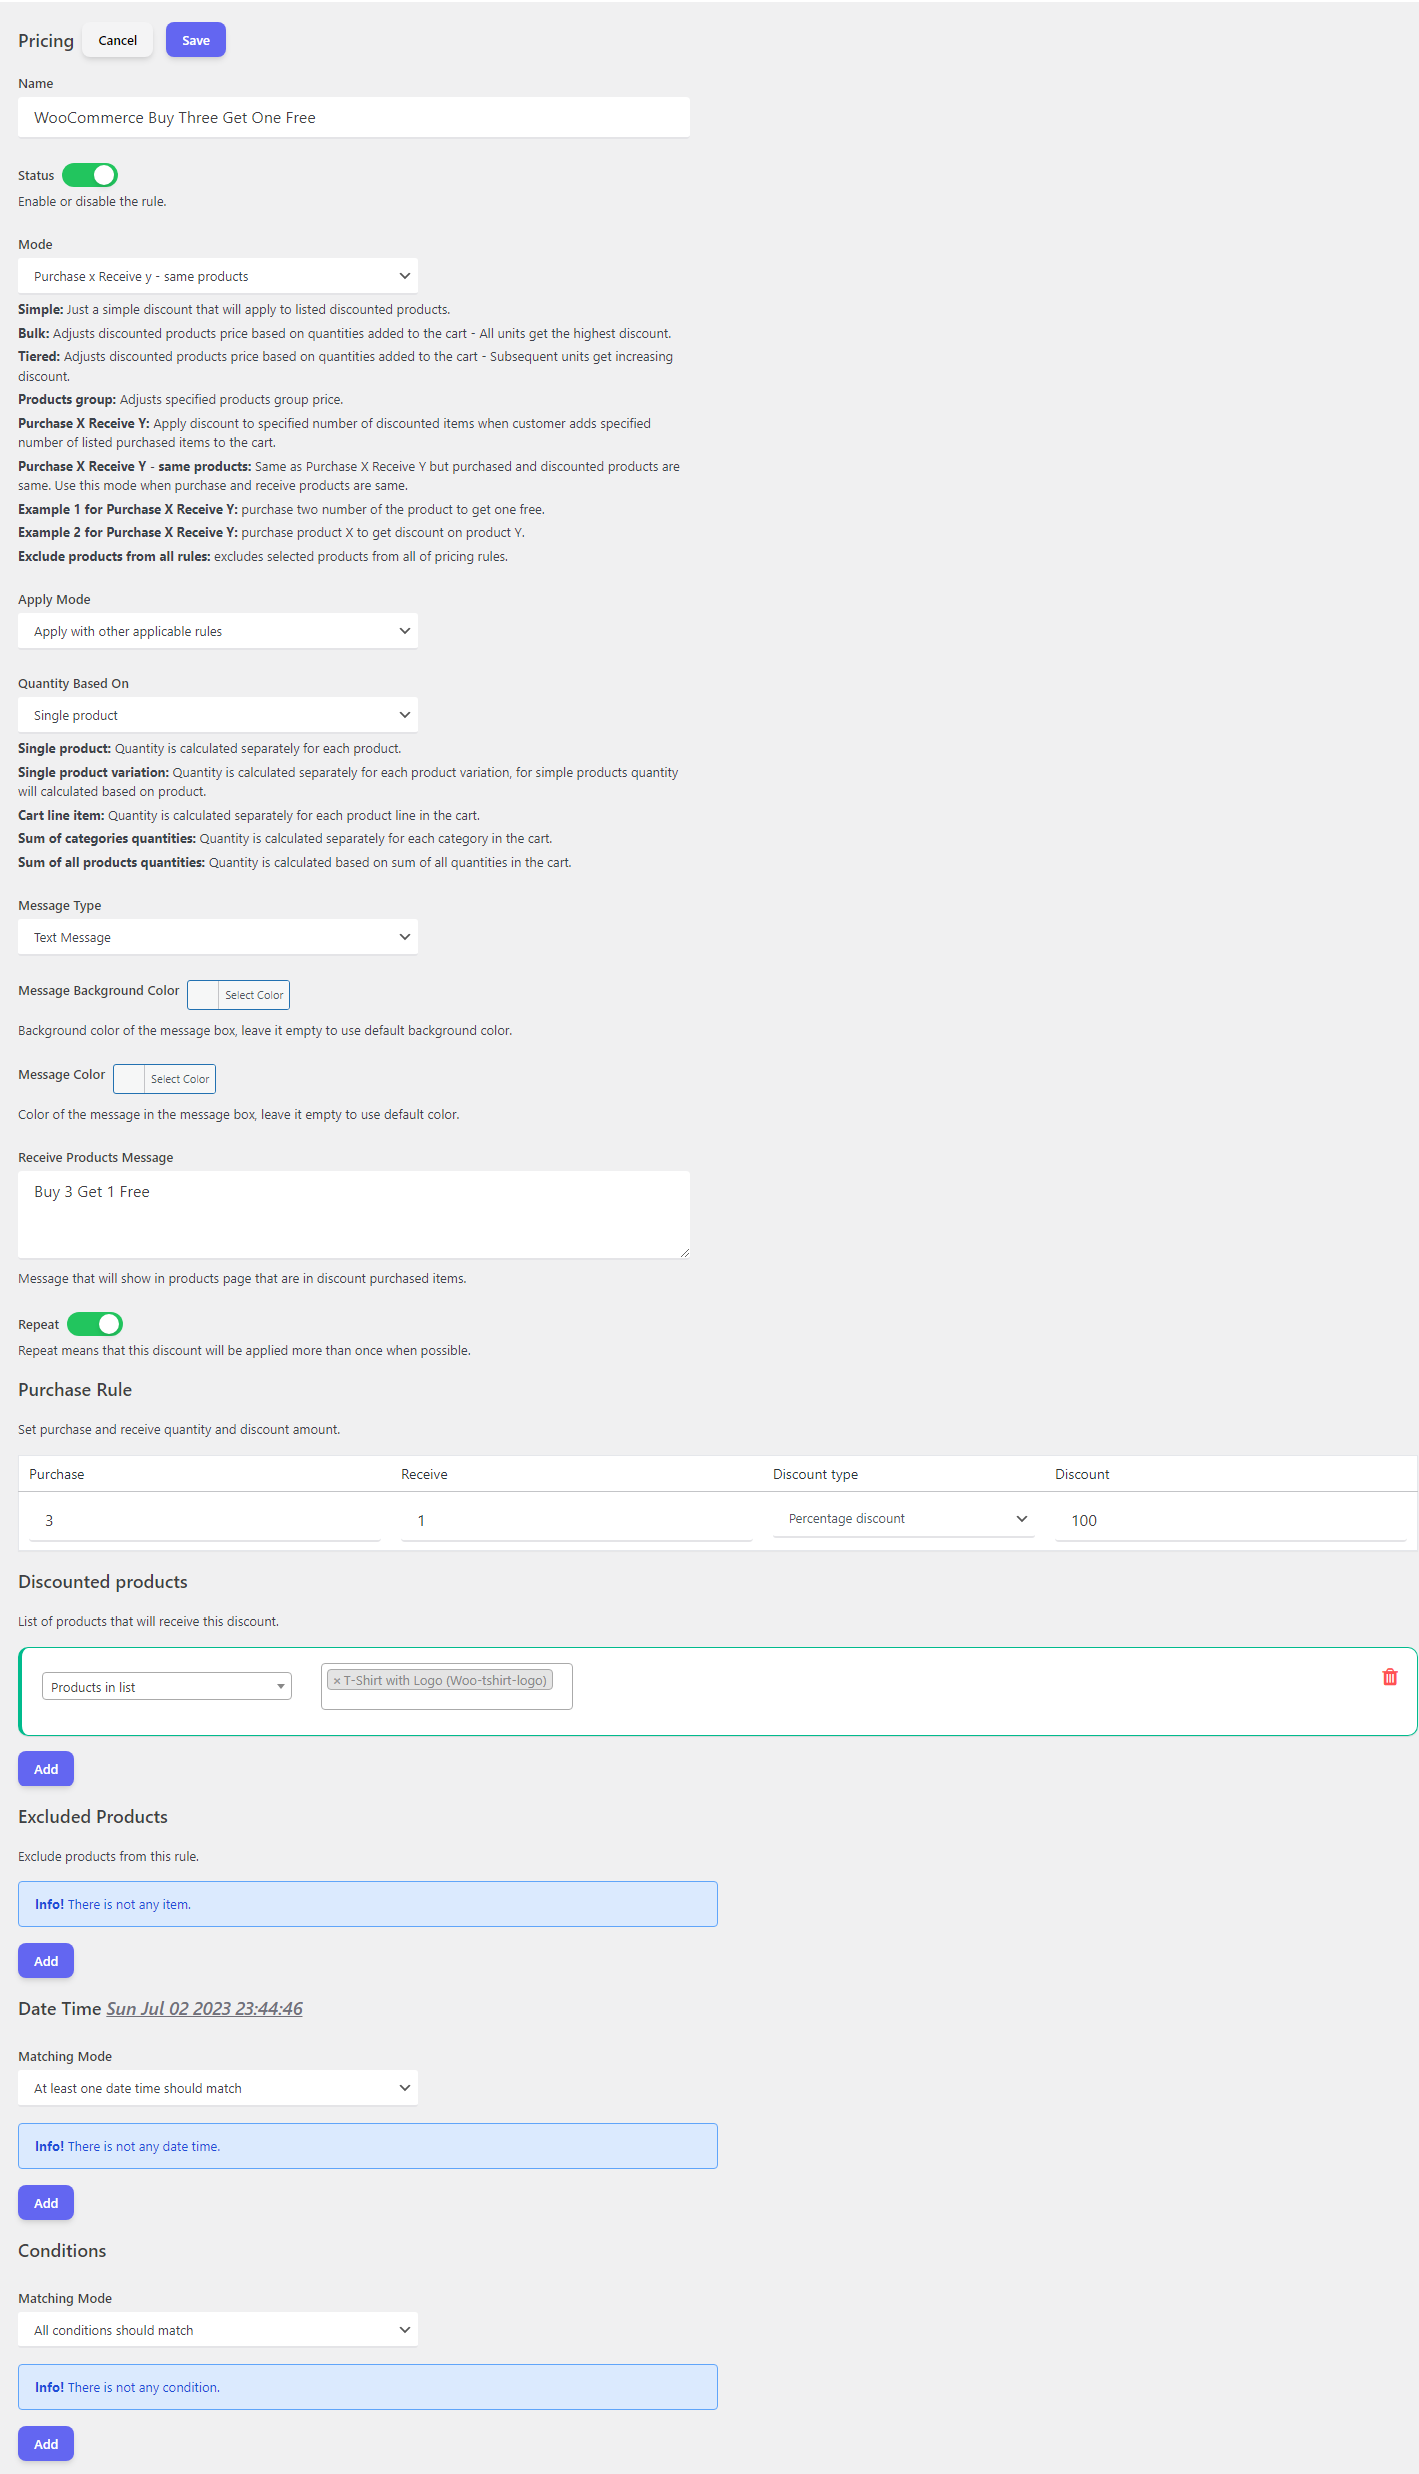
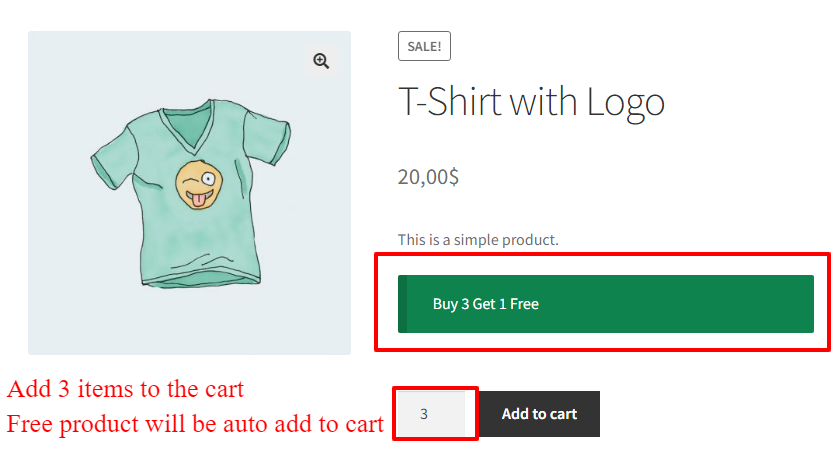
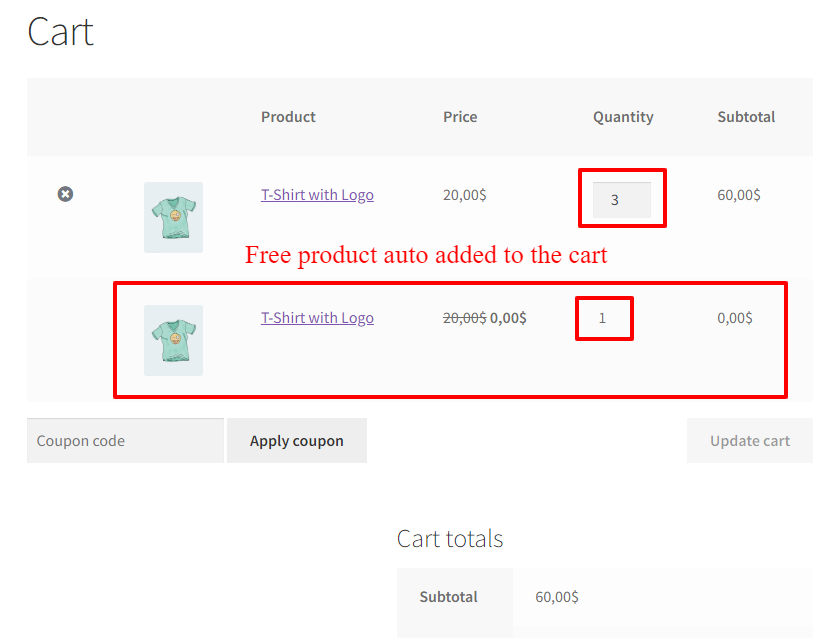
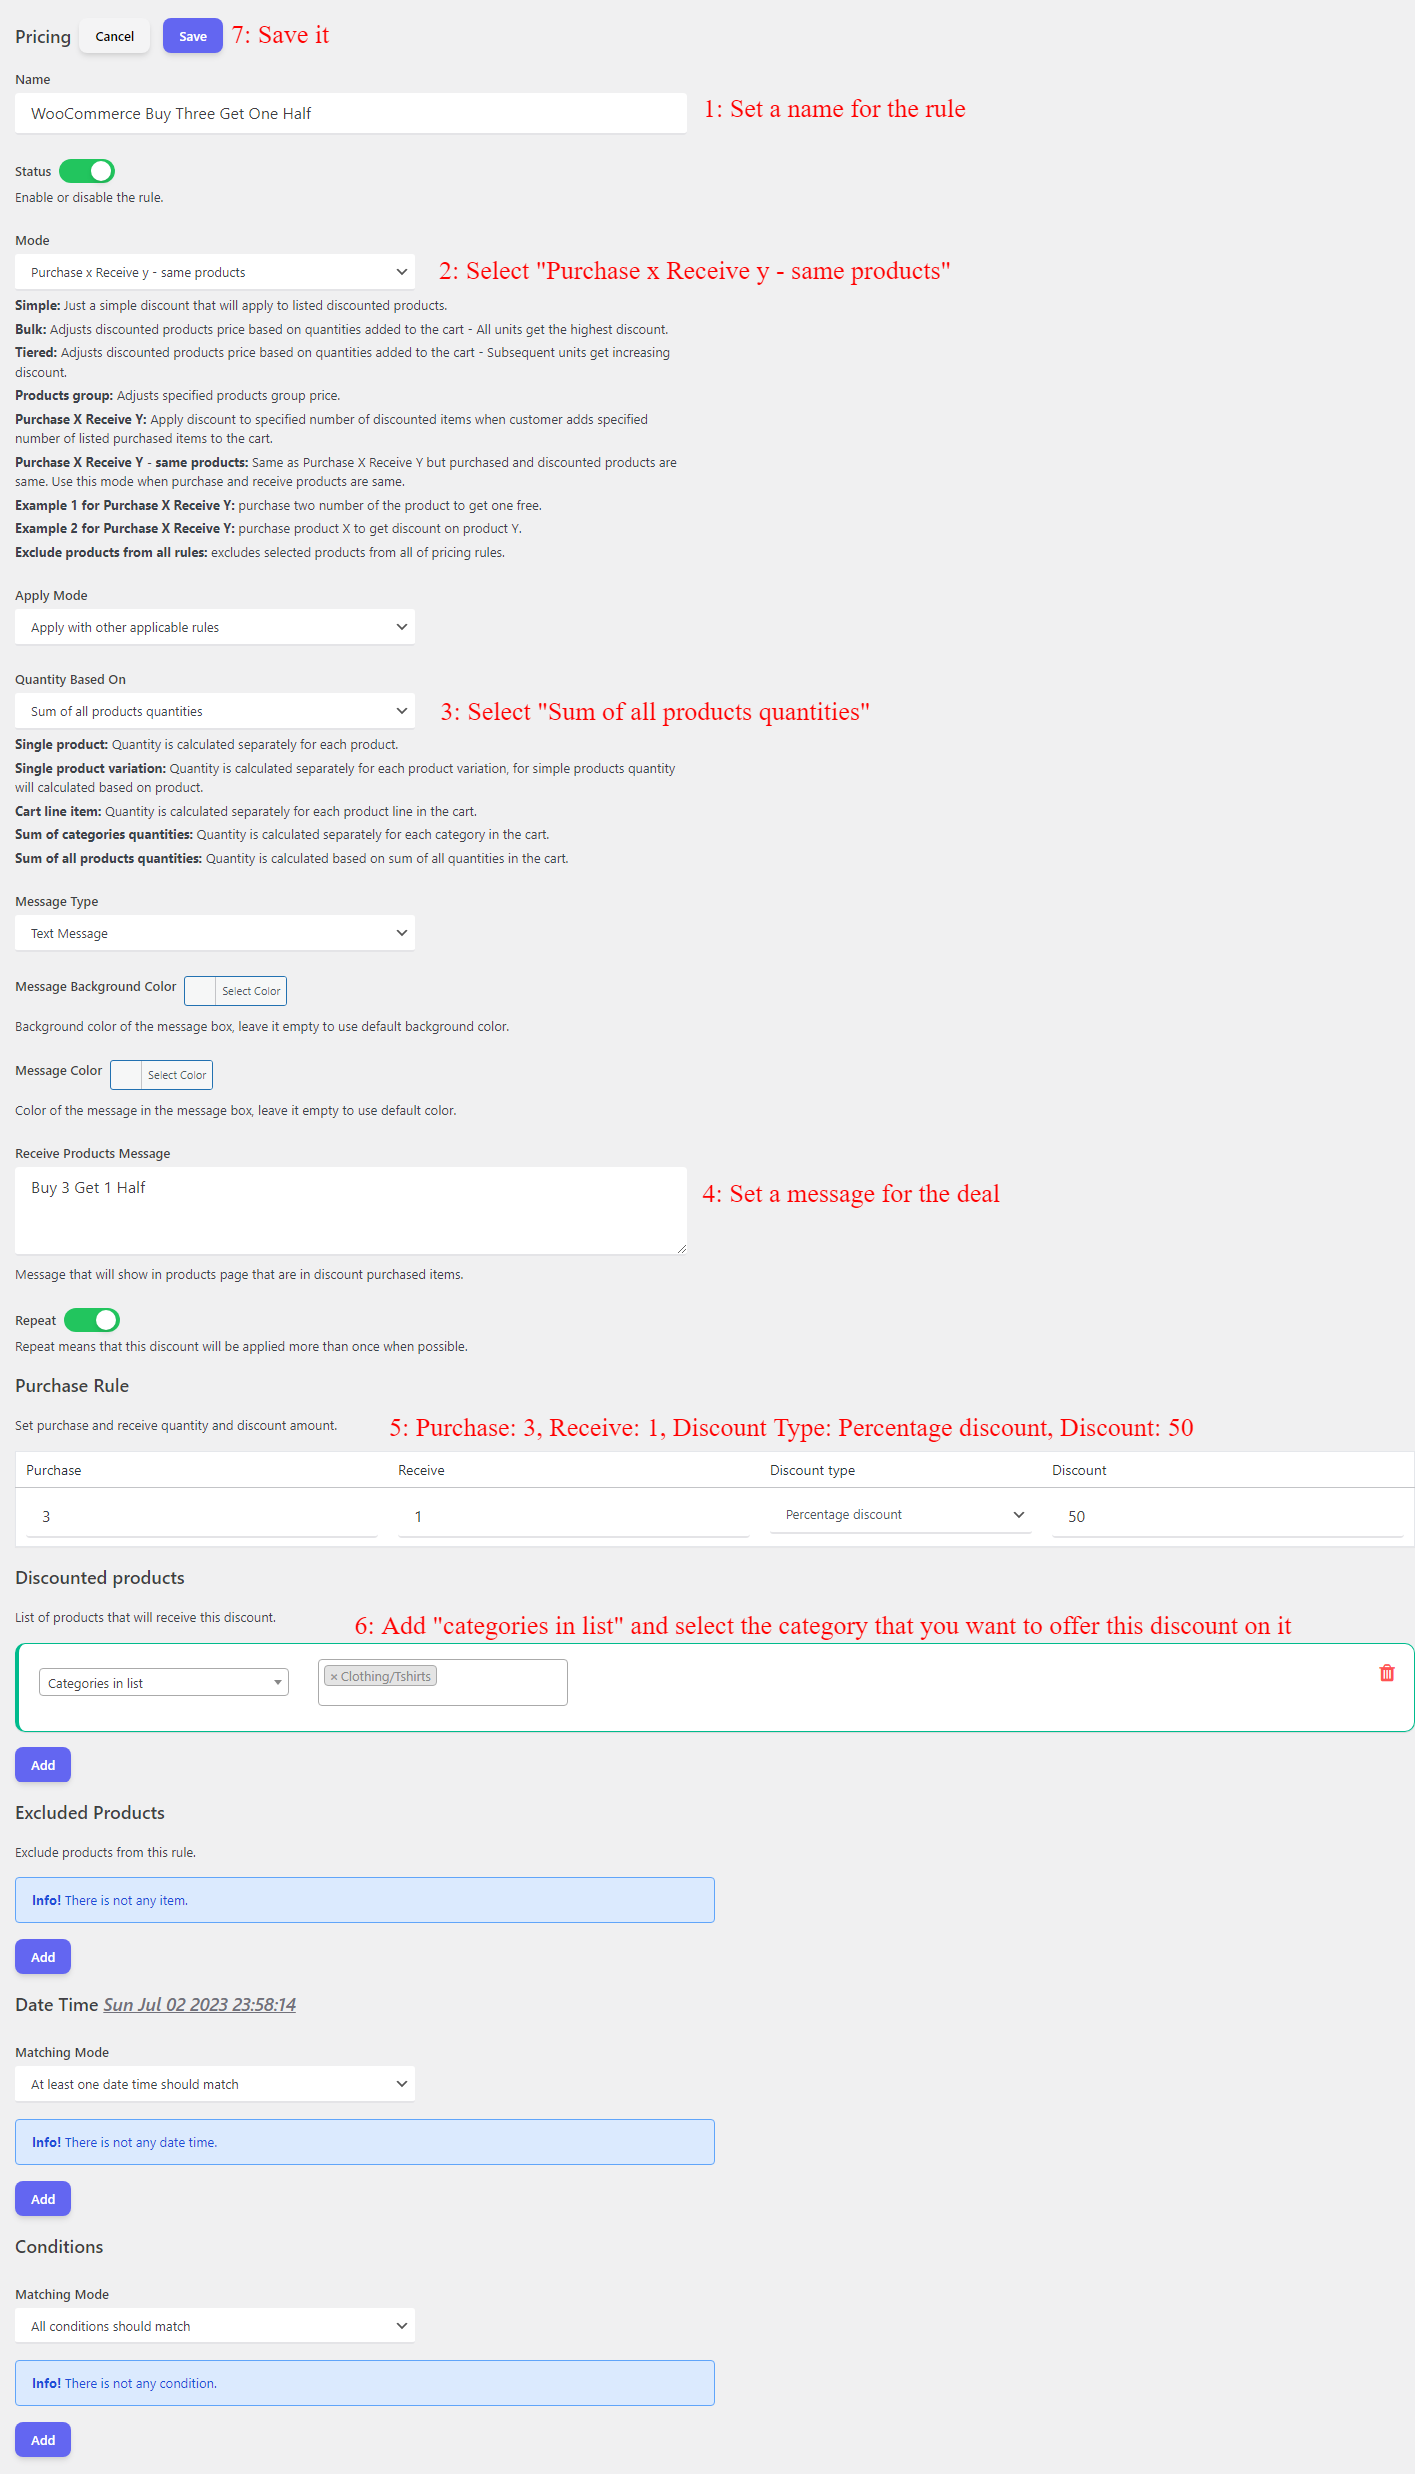
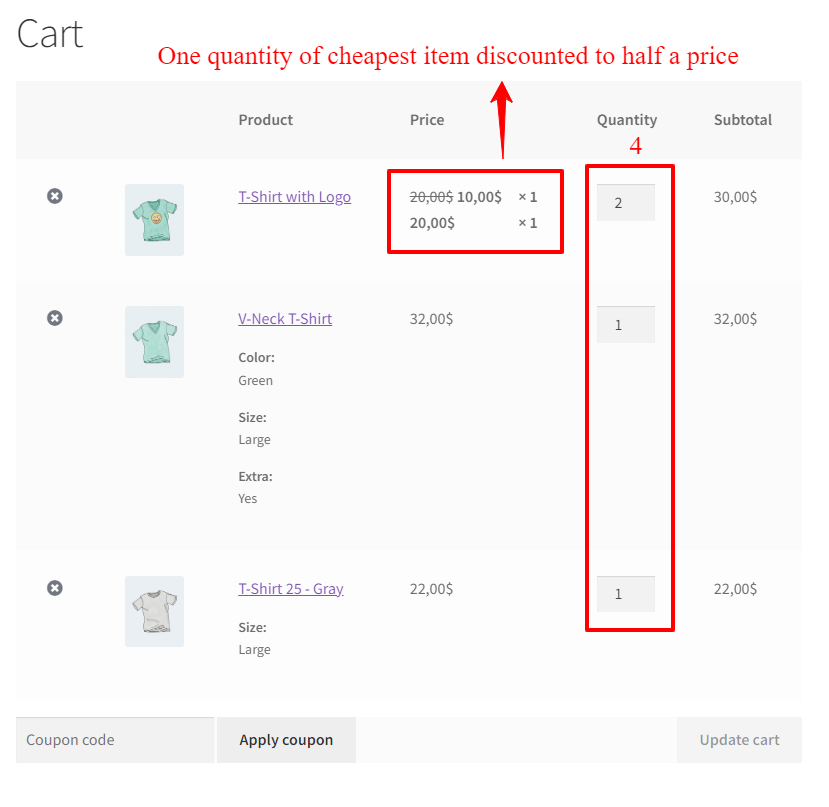
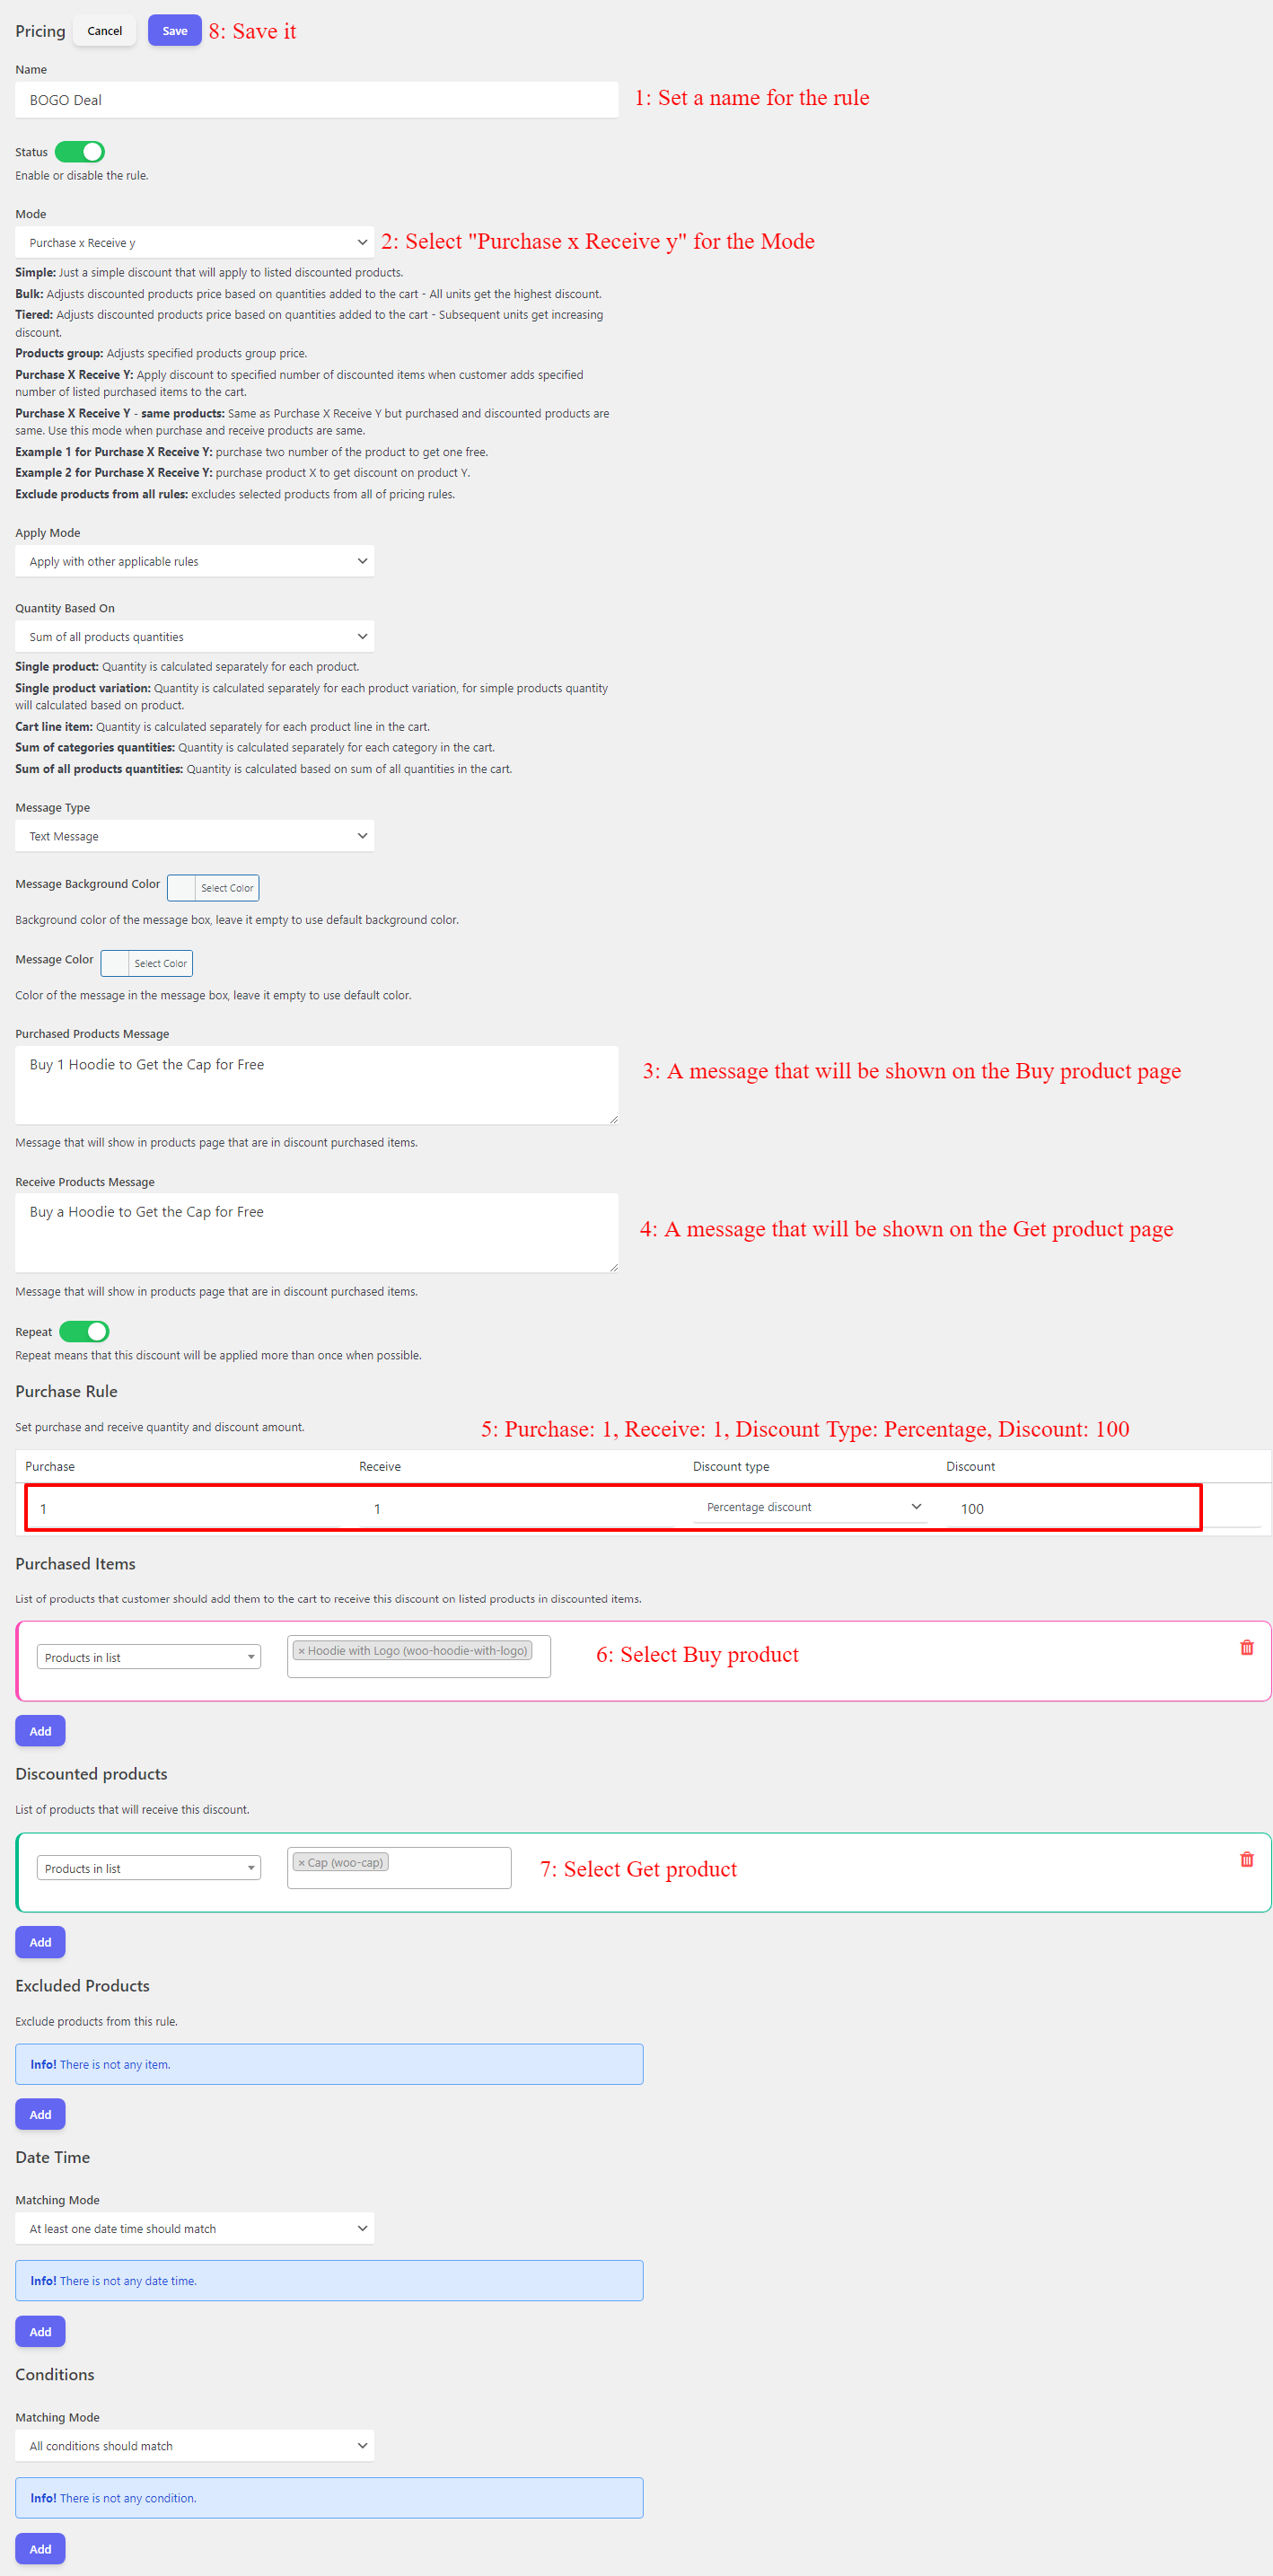
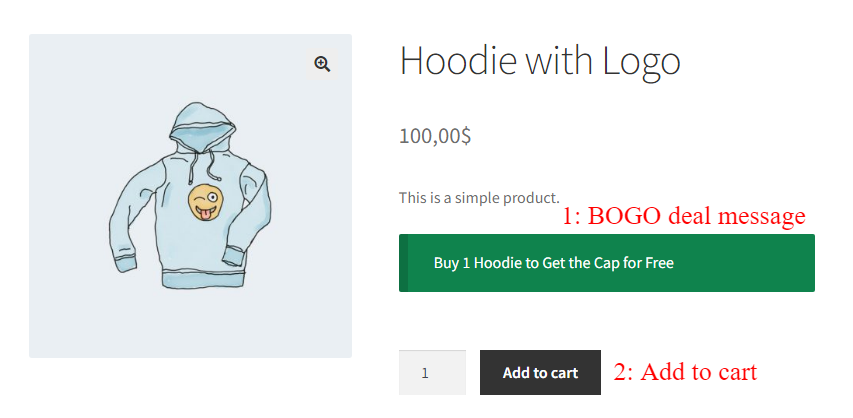
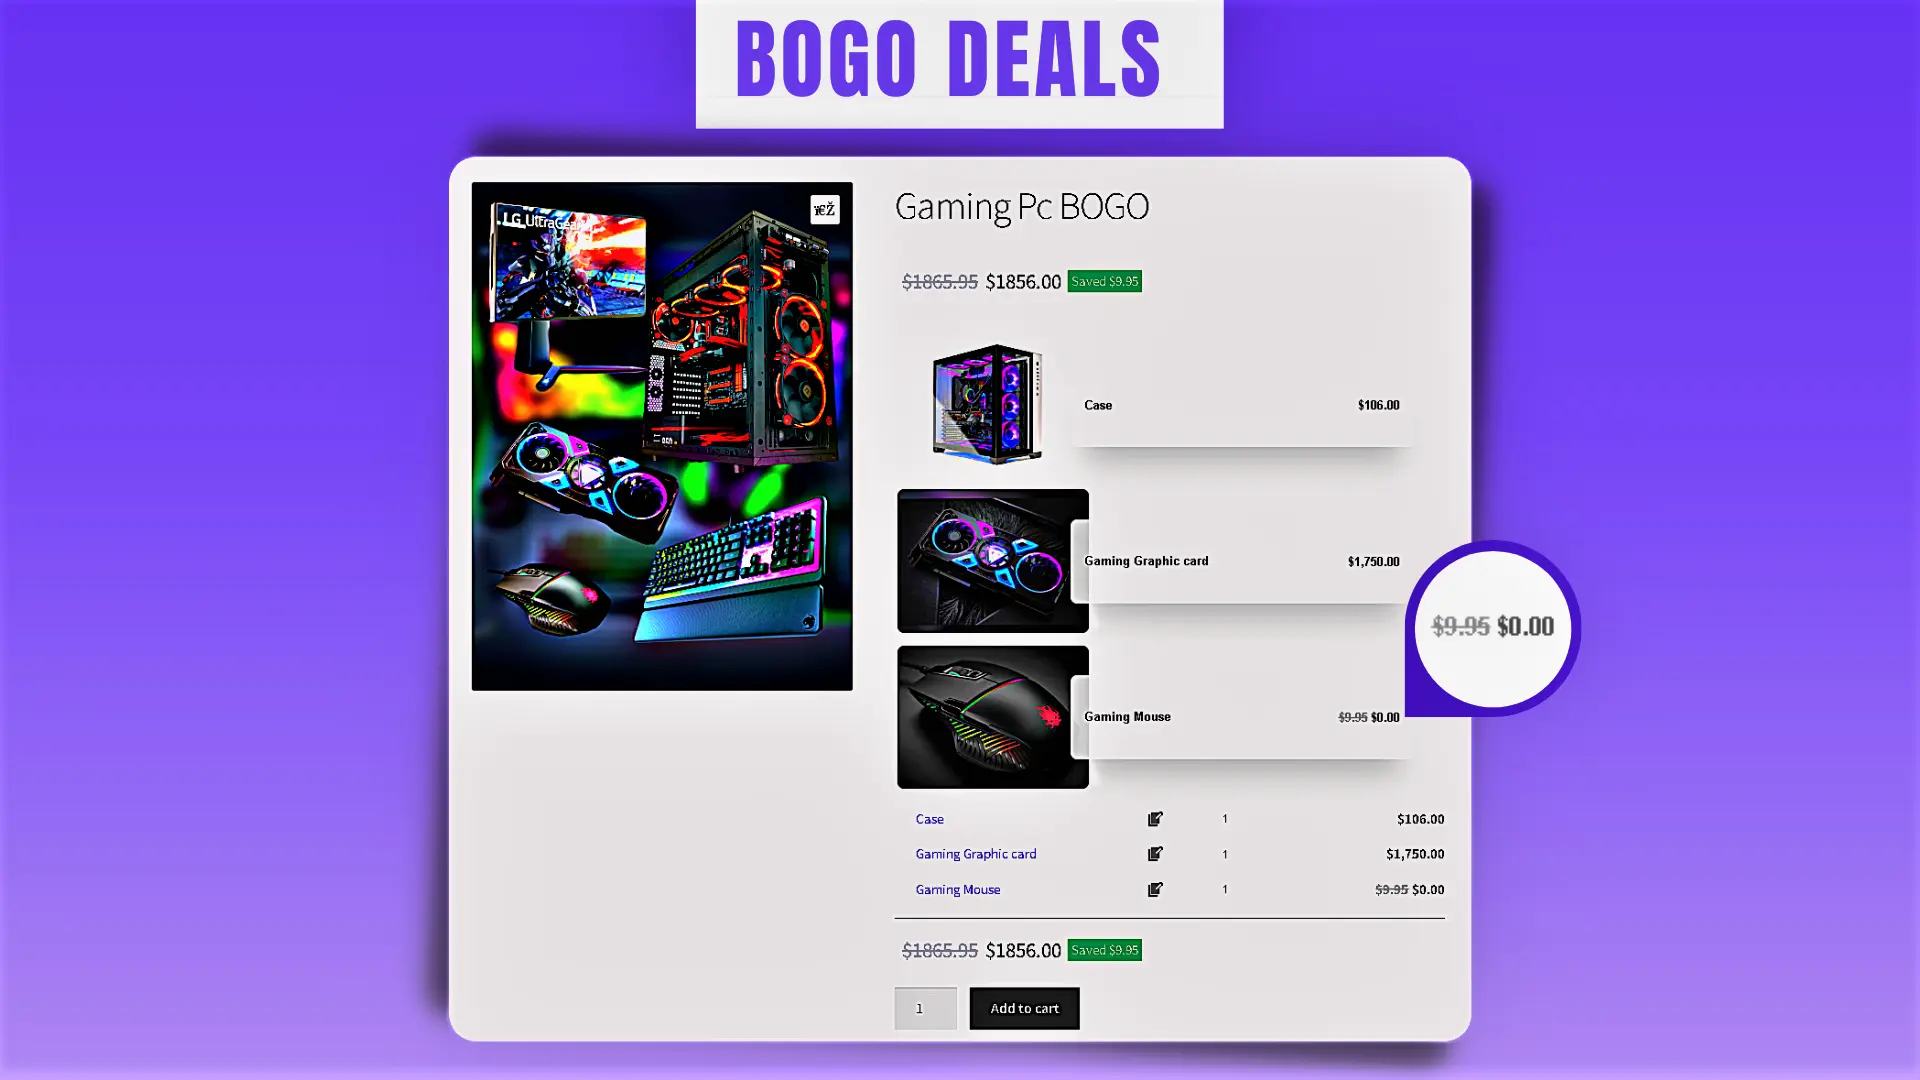
Add BOGO Deals in WooCommerce
BOGO deals, or “Buy One, Get One” deals, are a great way to engage customers and increase sales. In WooCommerce, adding BOGO deals is simple and can be done in just a few steps. By offering BOGO deals in WooCommerce, store owners can encourage customers to make larger purchases and boost their revenue.
The Discount Rules and Dynamic Pricing for WooCommerce can add free products to the cart automatically.
Learn how to create BOGO deals in WooCommerce.
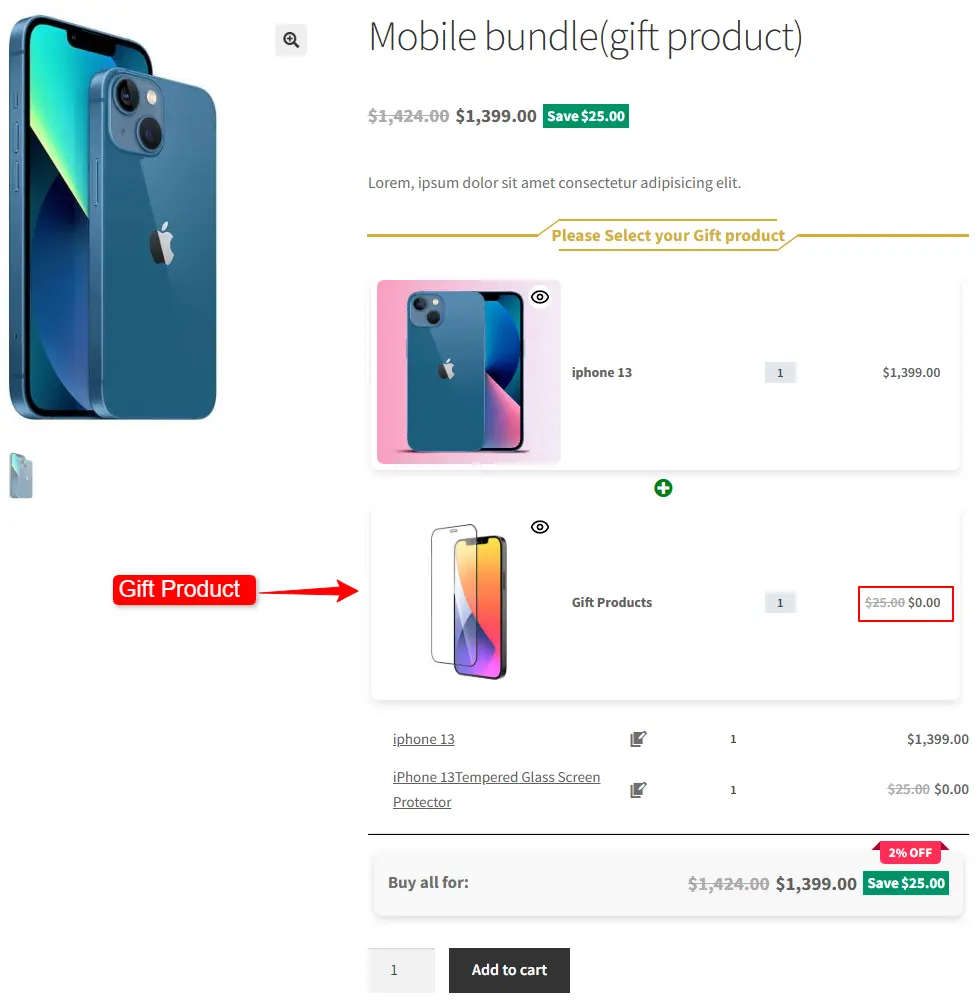
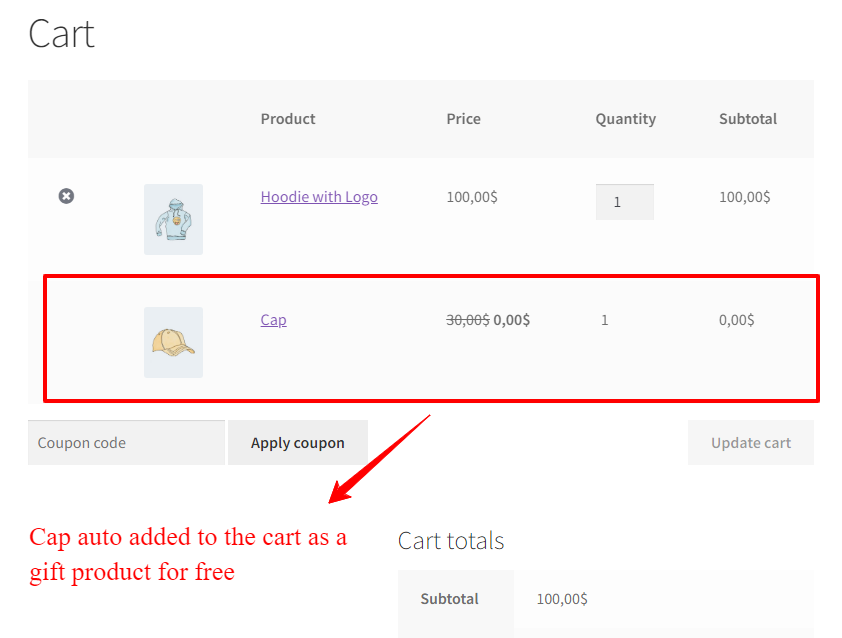
Add Buy 2 Get 1 Free Deal
Adding a buy 2 get 1 free deal is a great way to attract customers and boost sales. This type of deal not only incentivizes customers to purchase more products but also helps to clear out inventory. It is a win-win situation for both the business and the customers. Customers feel like they are getting a good deal and are more likely to come back for more purchases in the future. Additionally, this type of promotion can be easily advertised through social media and email marketing, further increasing its reach and impact. Overall, adding a buy 2 get 1 free deal is a smart marketing strategy that can benefit businesses in multiple ways.
The free product or gift product can be auto-added to the cart with Discount Rules and Dynamic Pricing for WooCommerce.
Learn how to create a buy 2 get 1 free deal in WooCommerce.
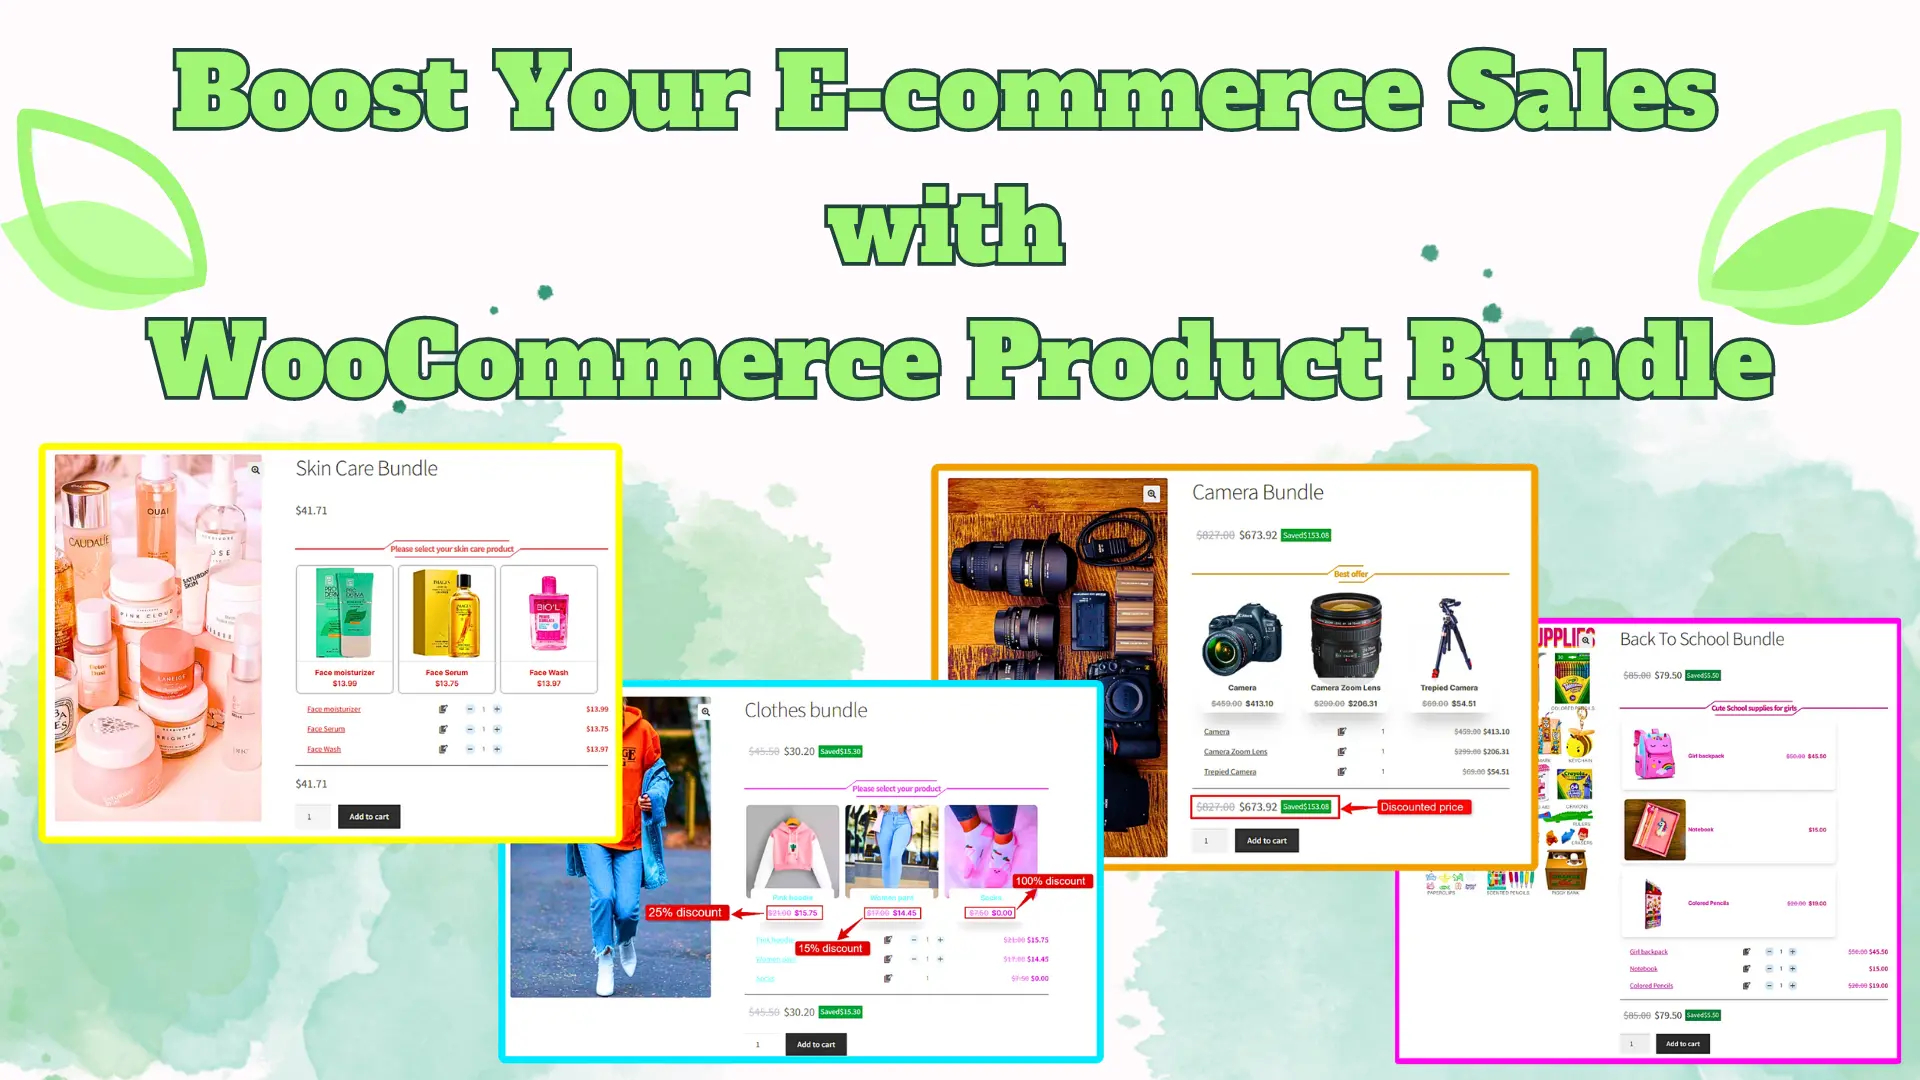
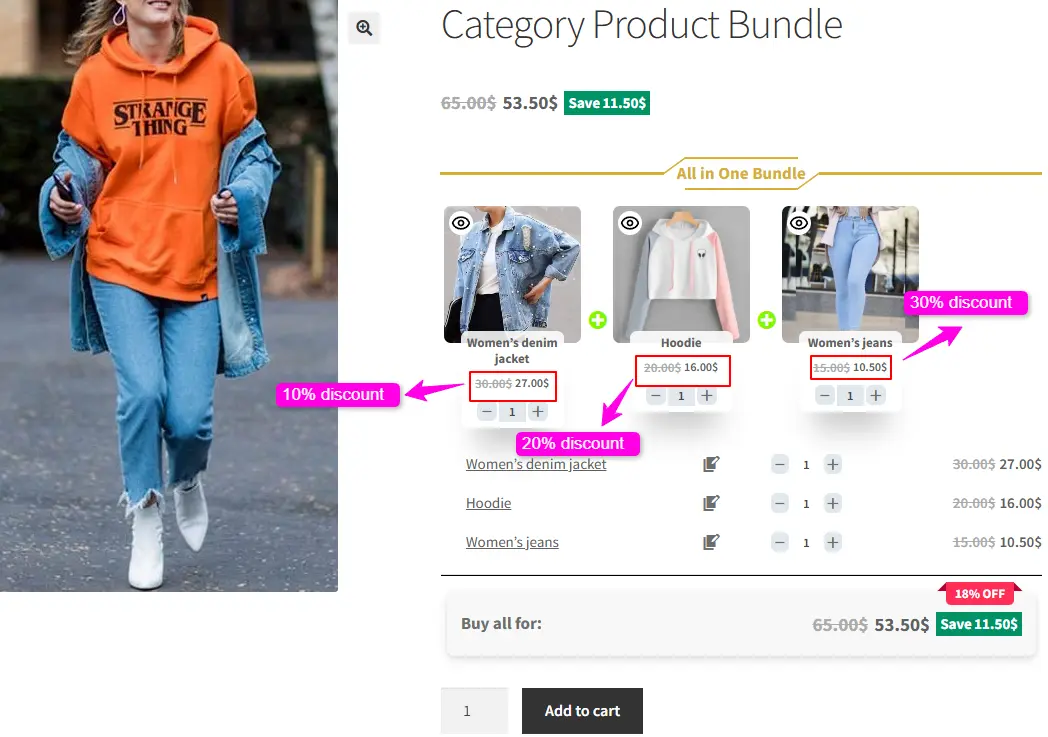
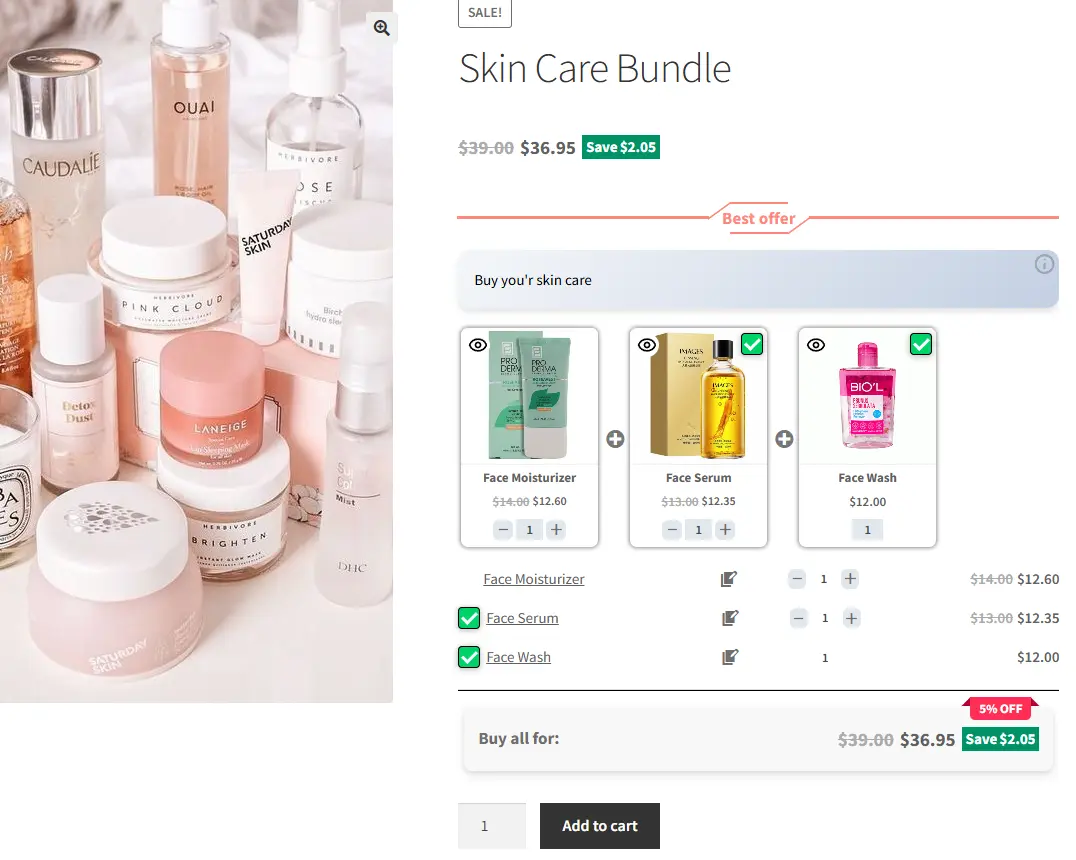
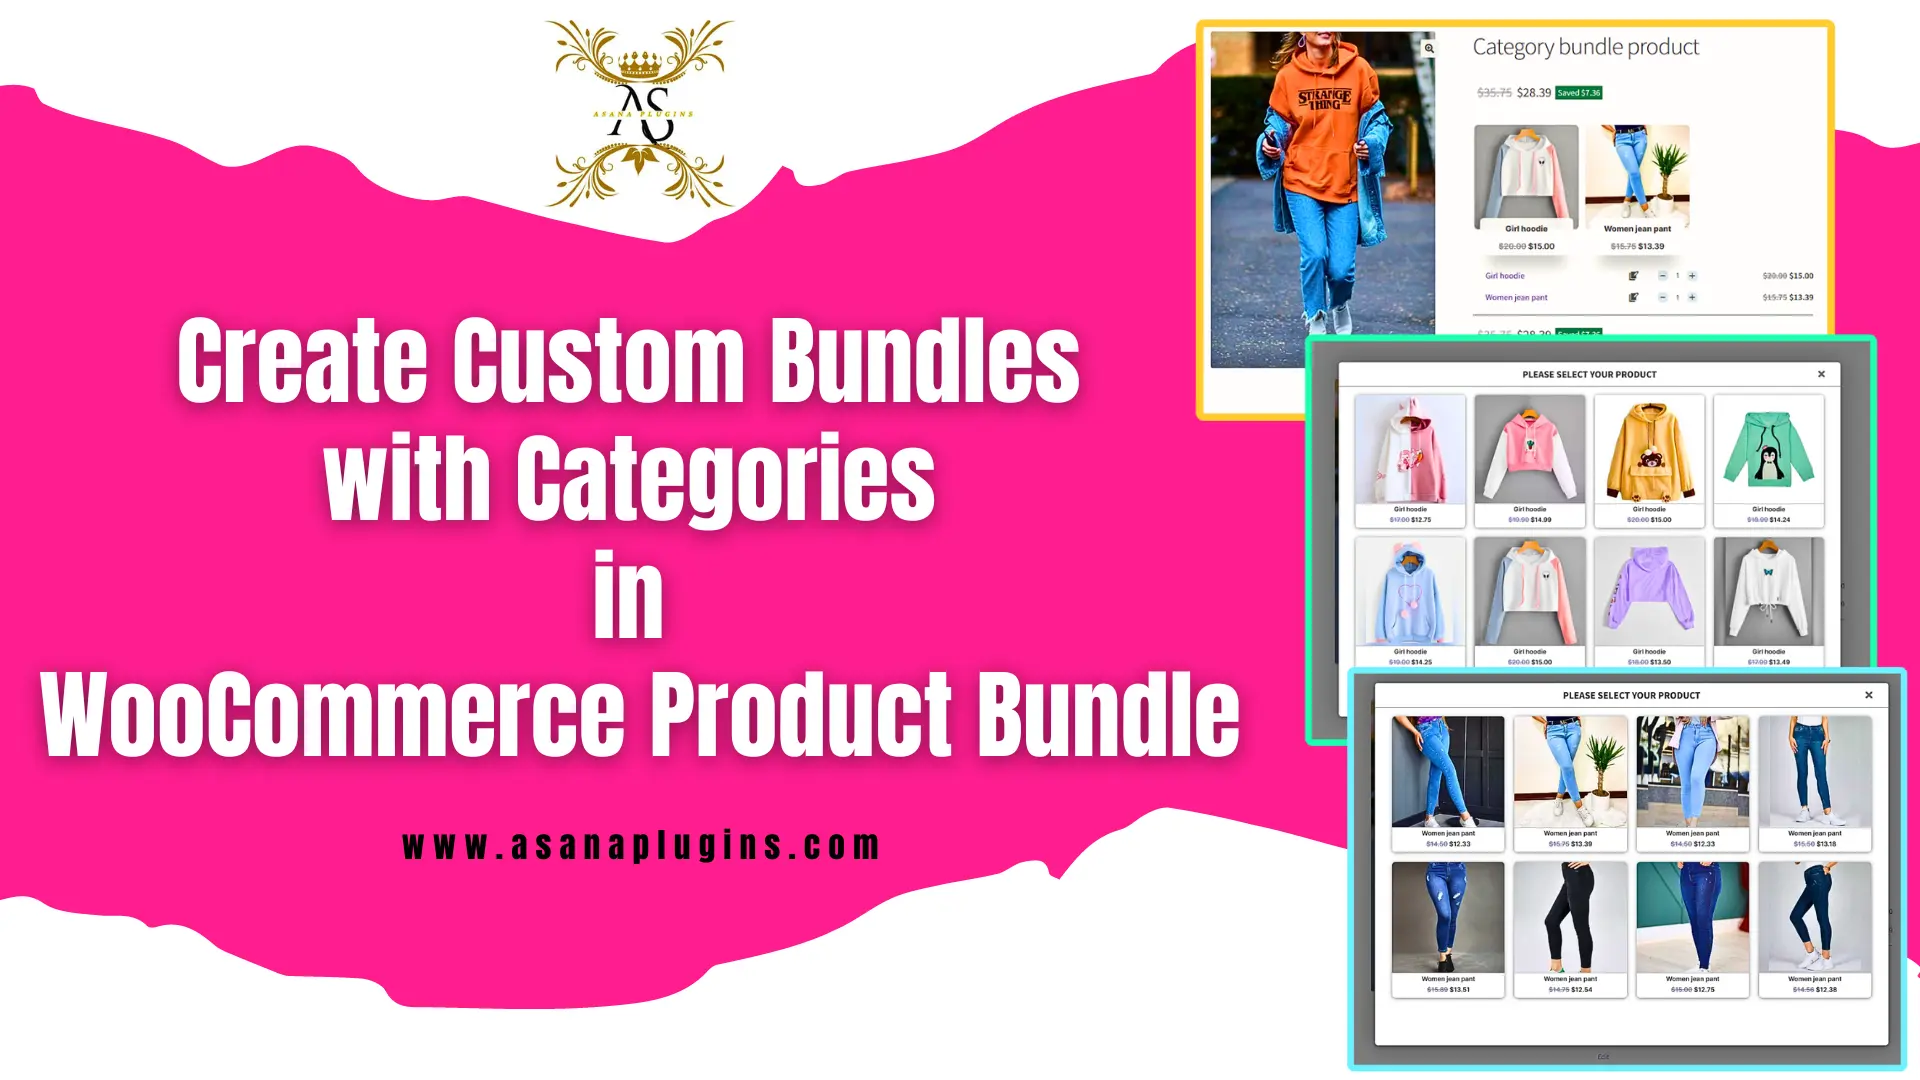
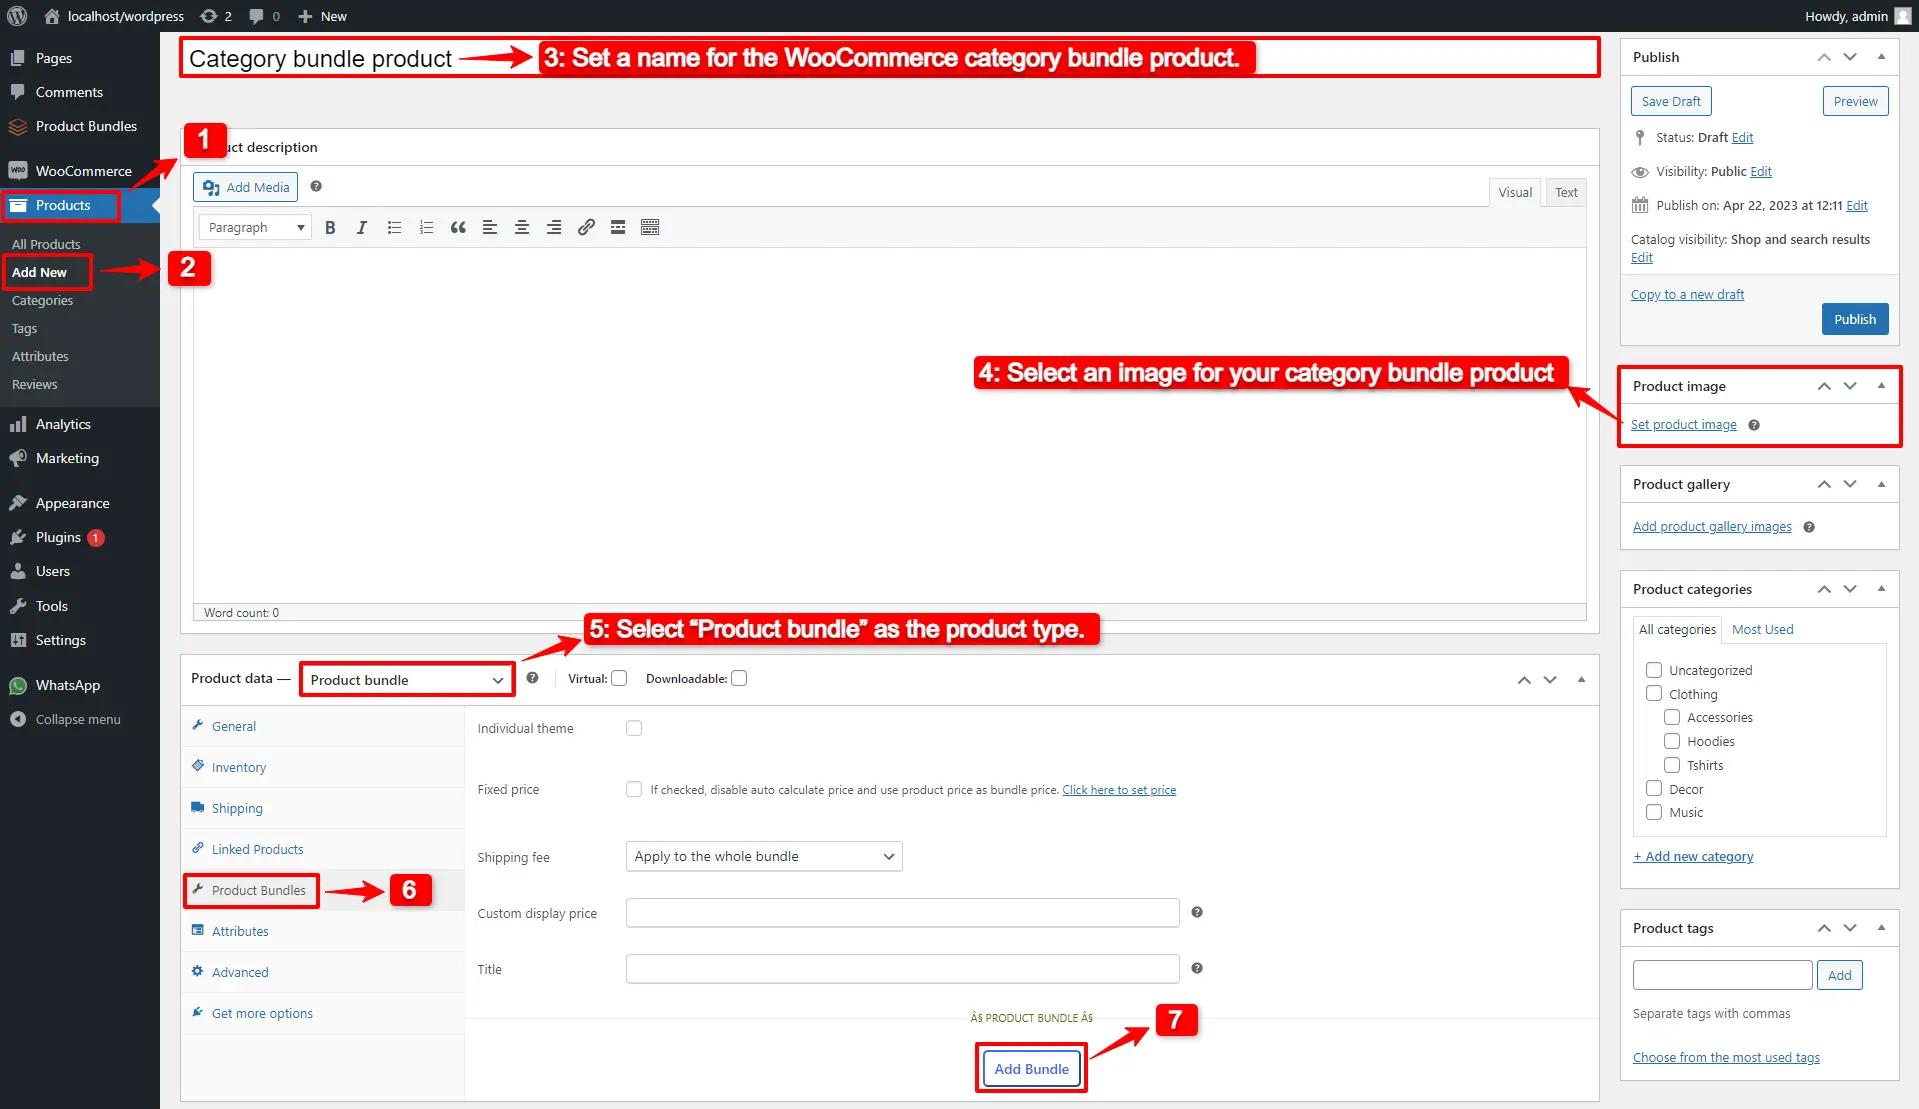
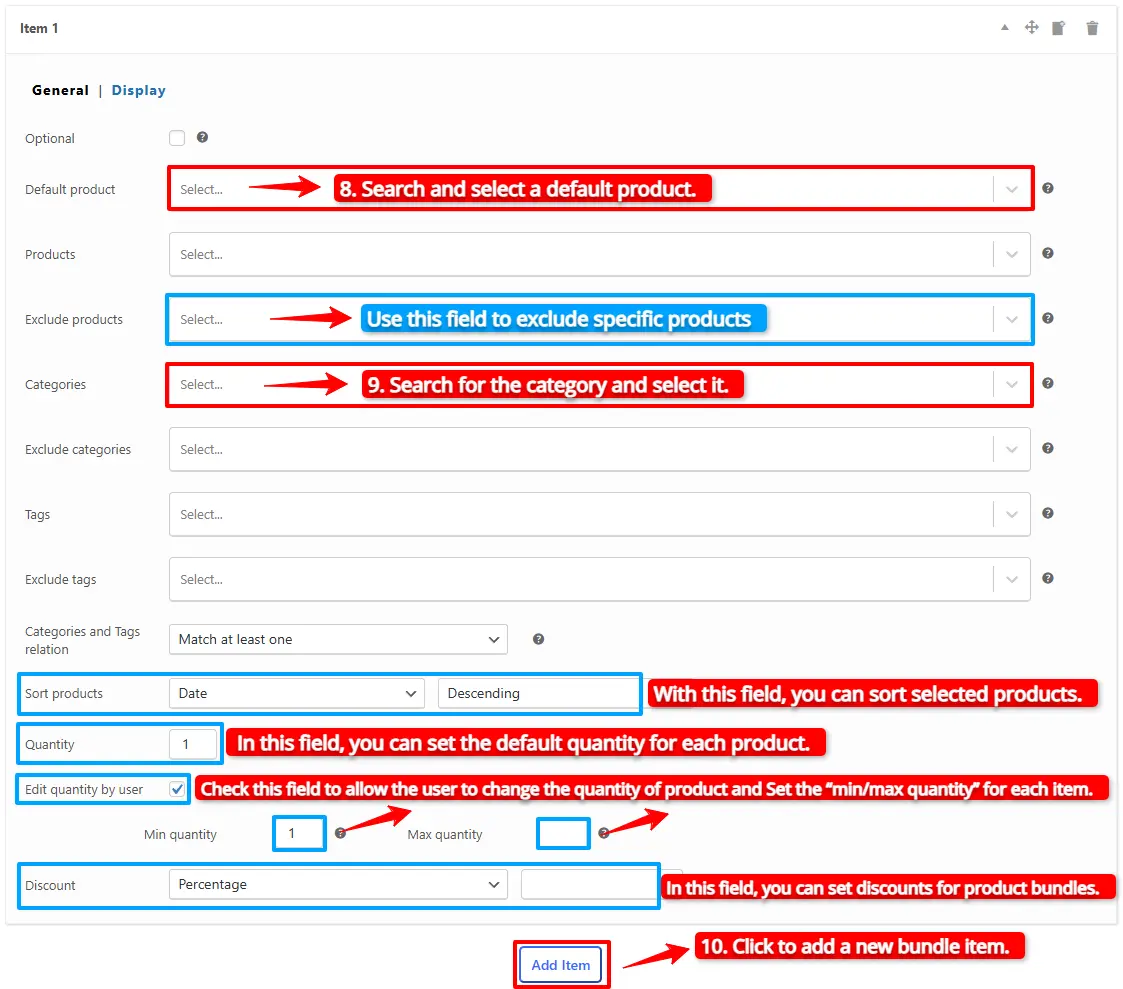
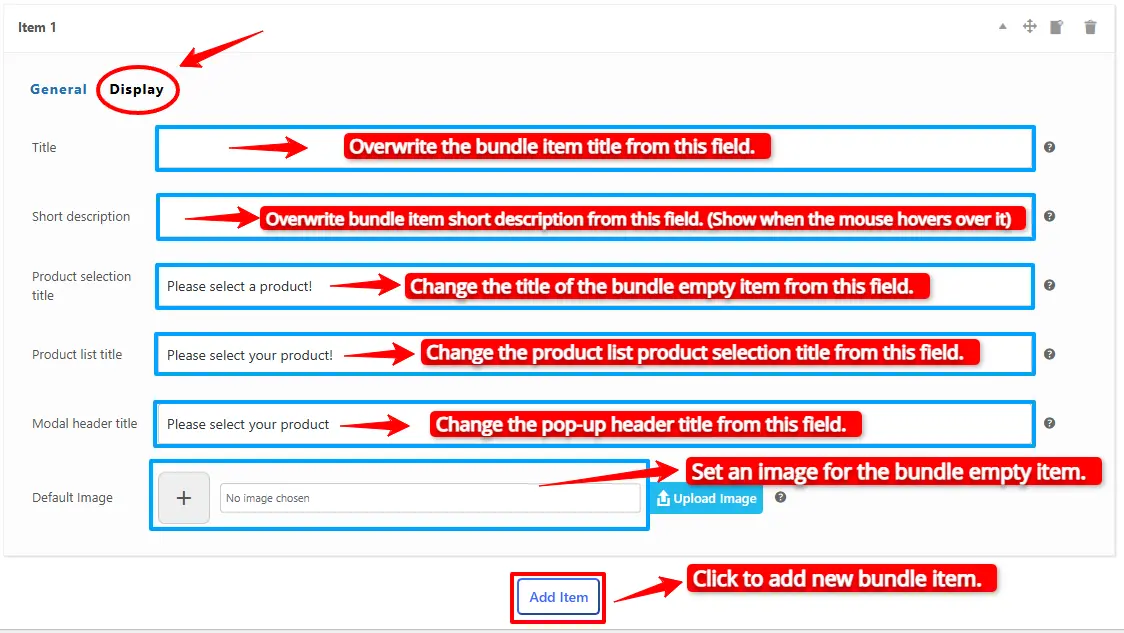
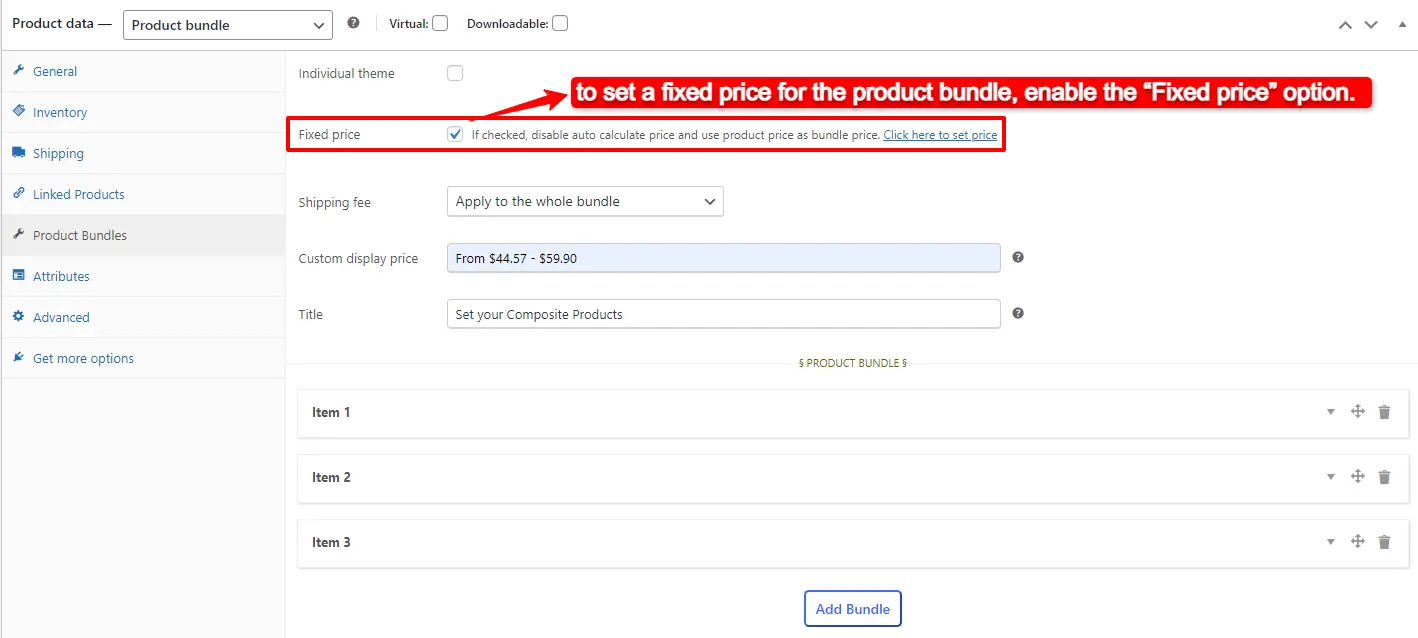
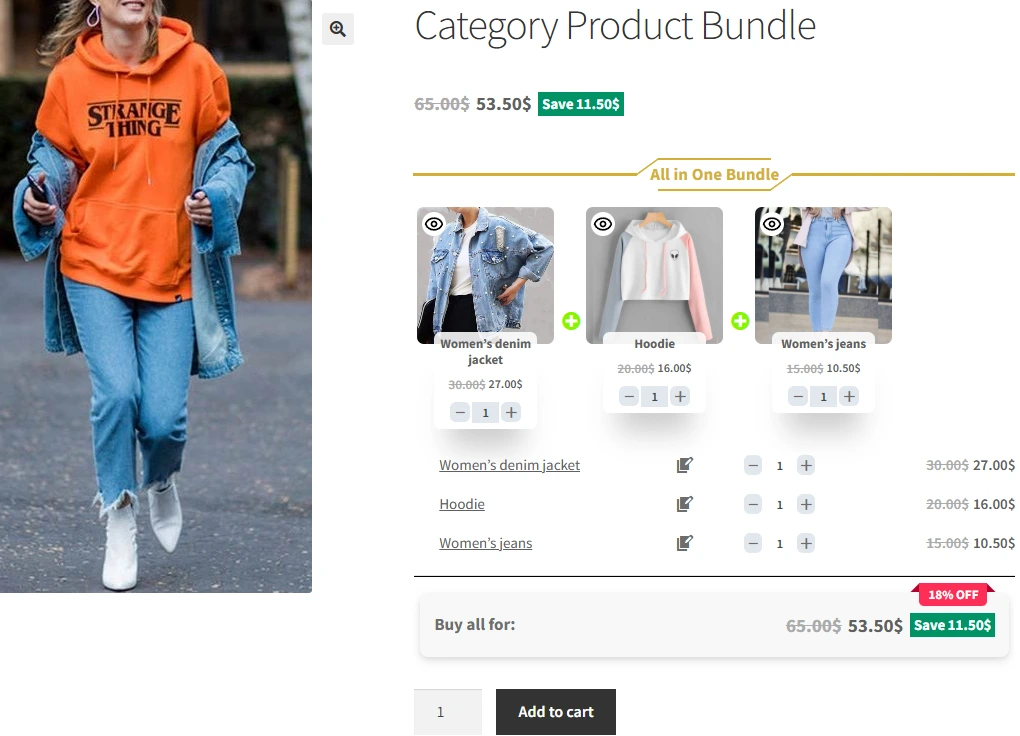
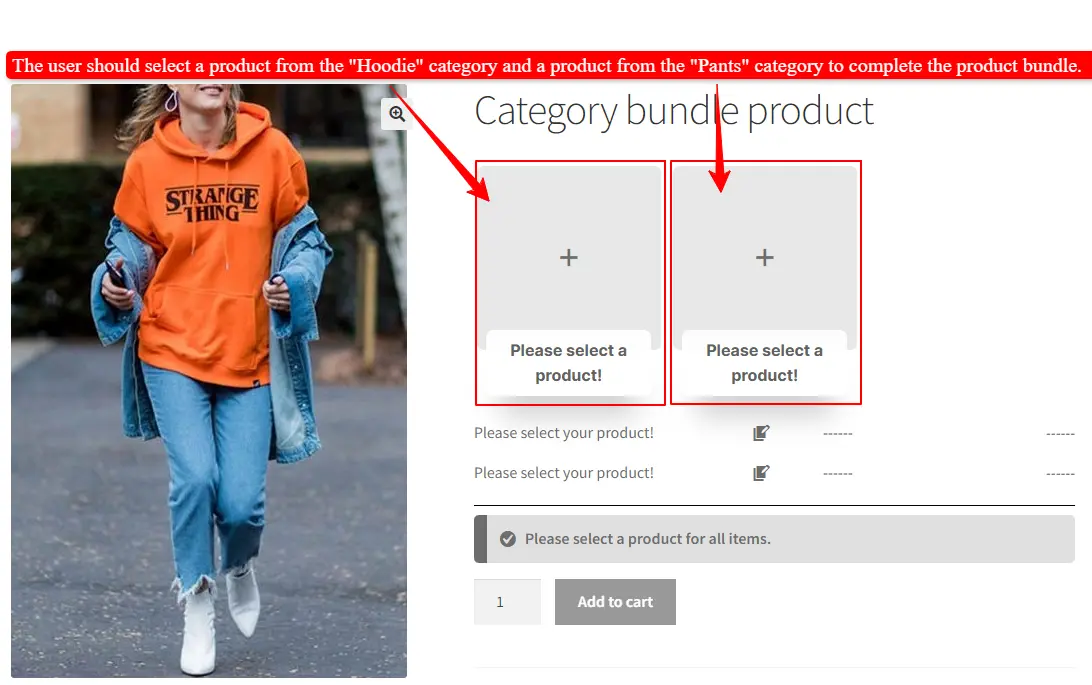
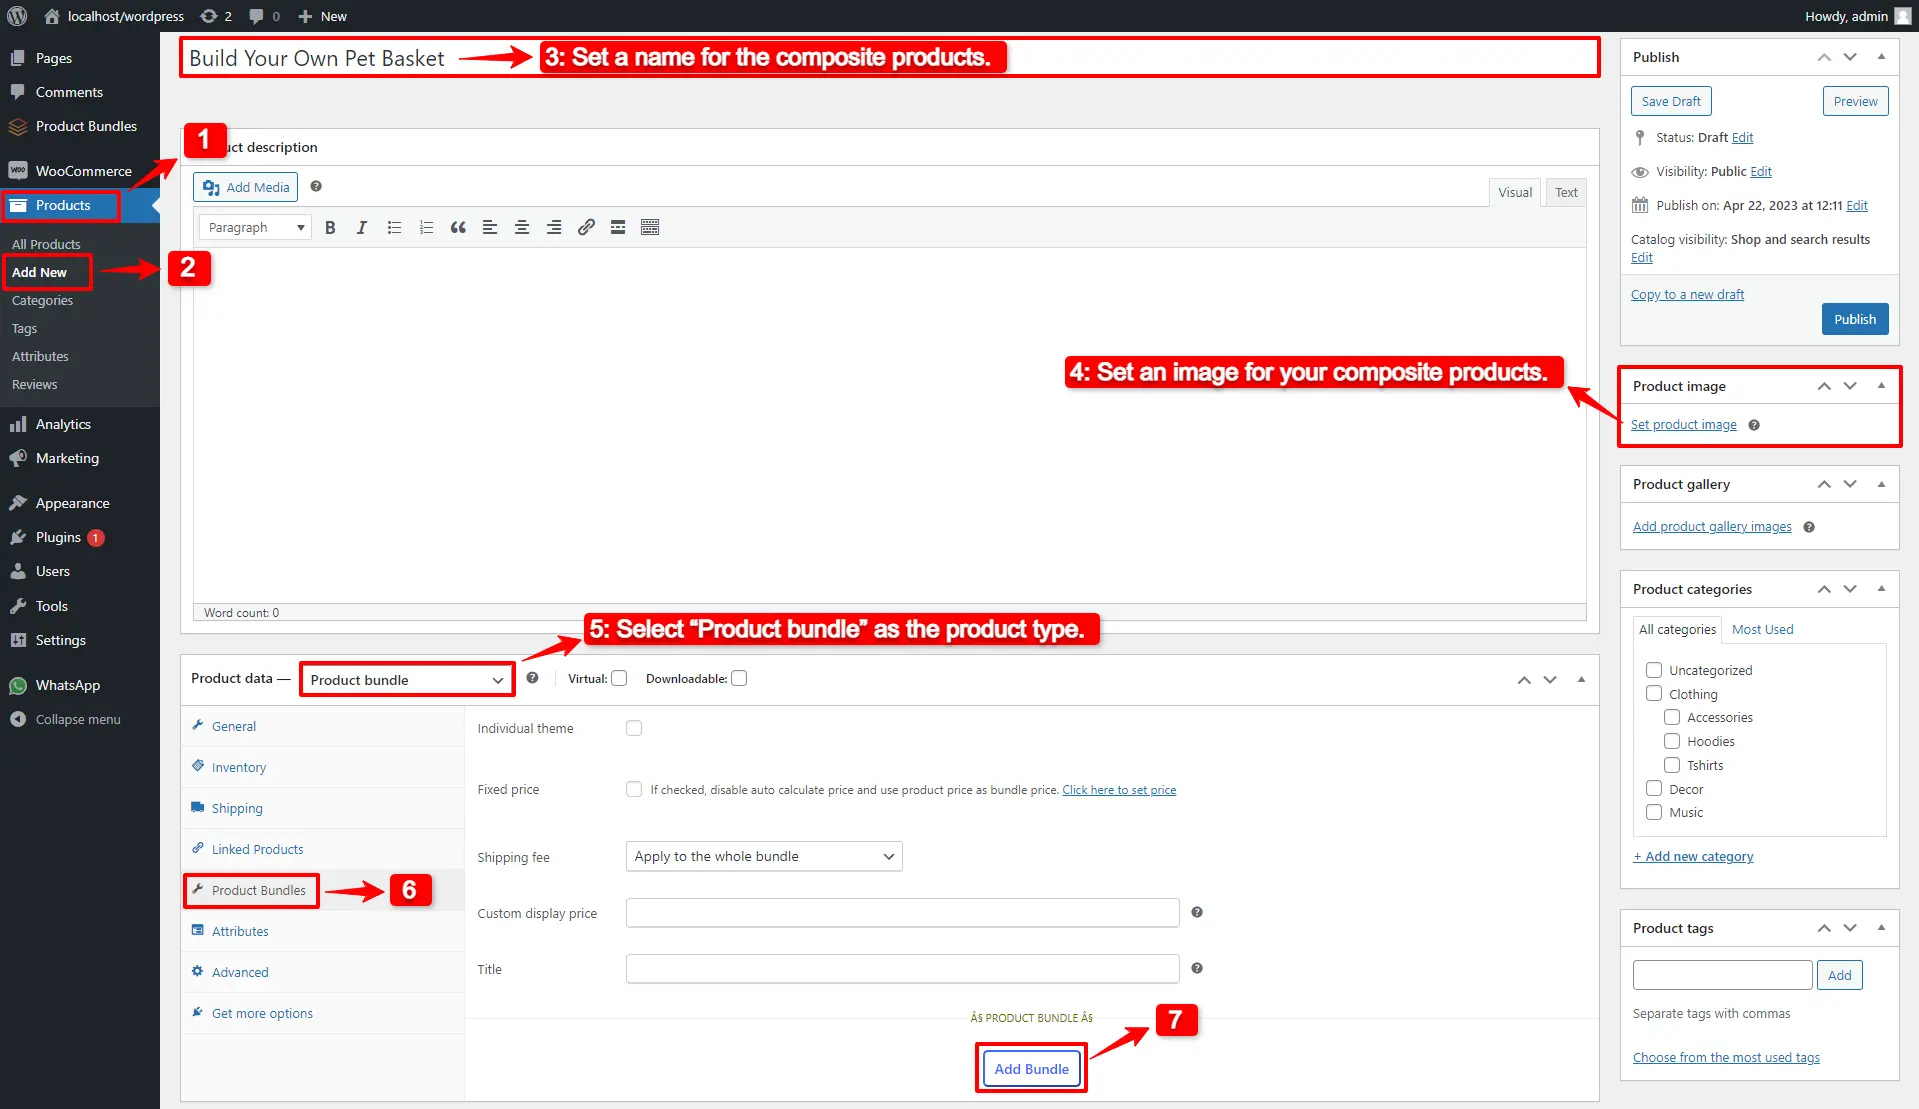
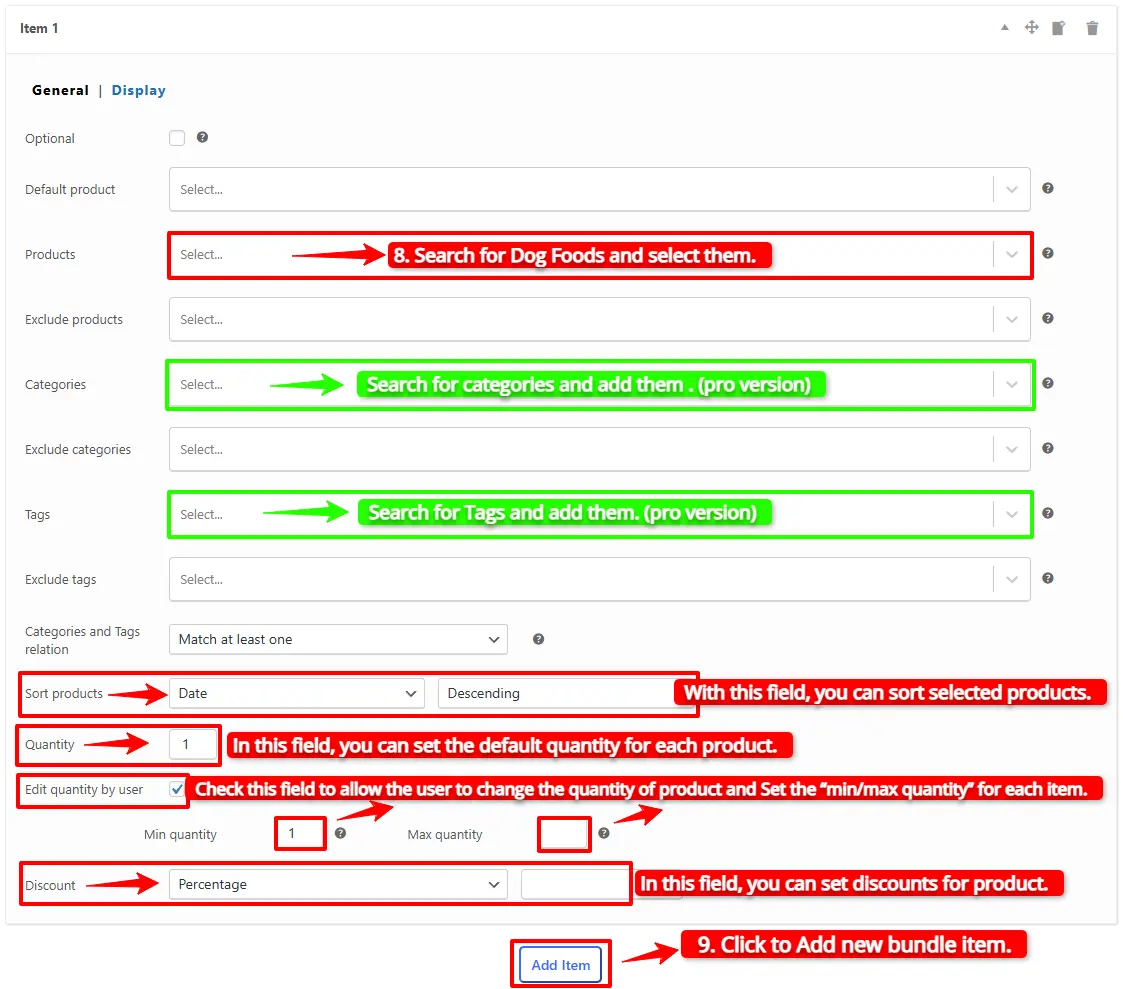
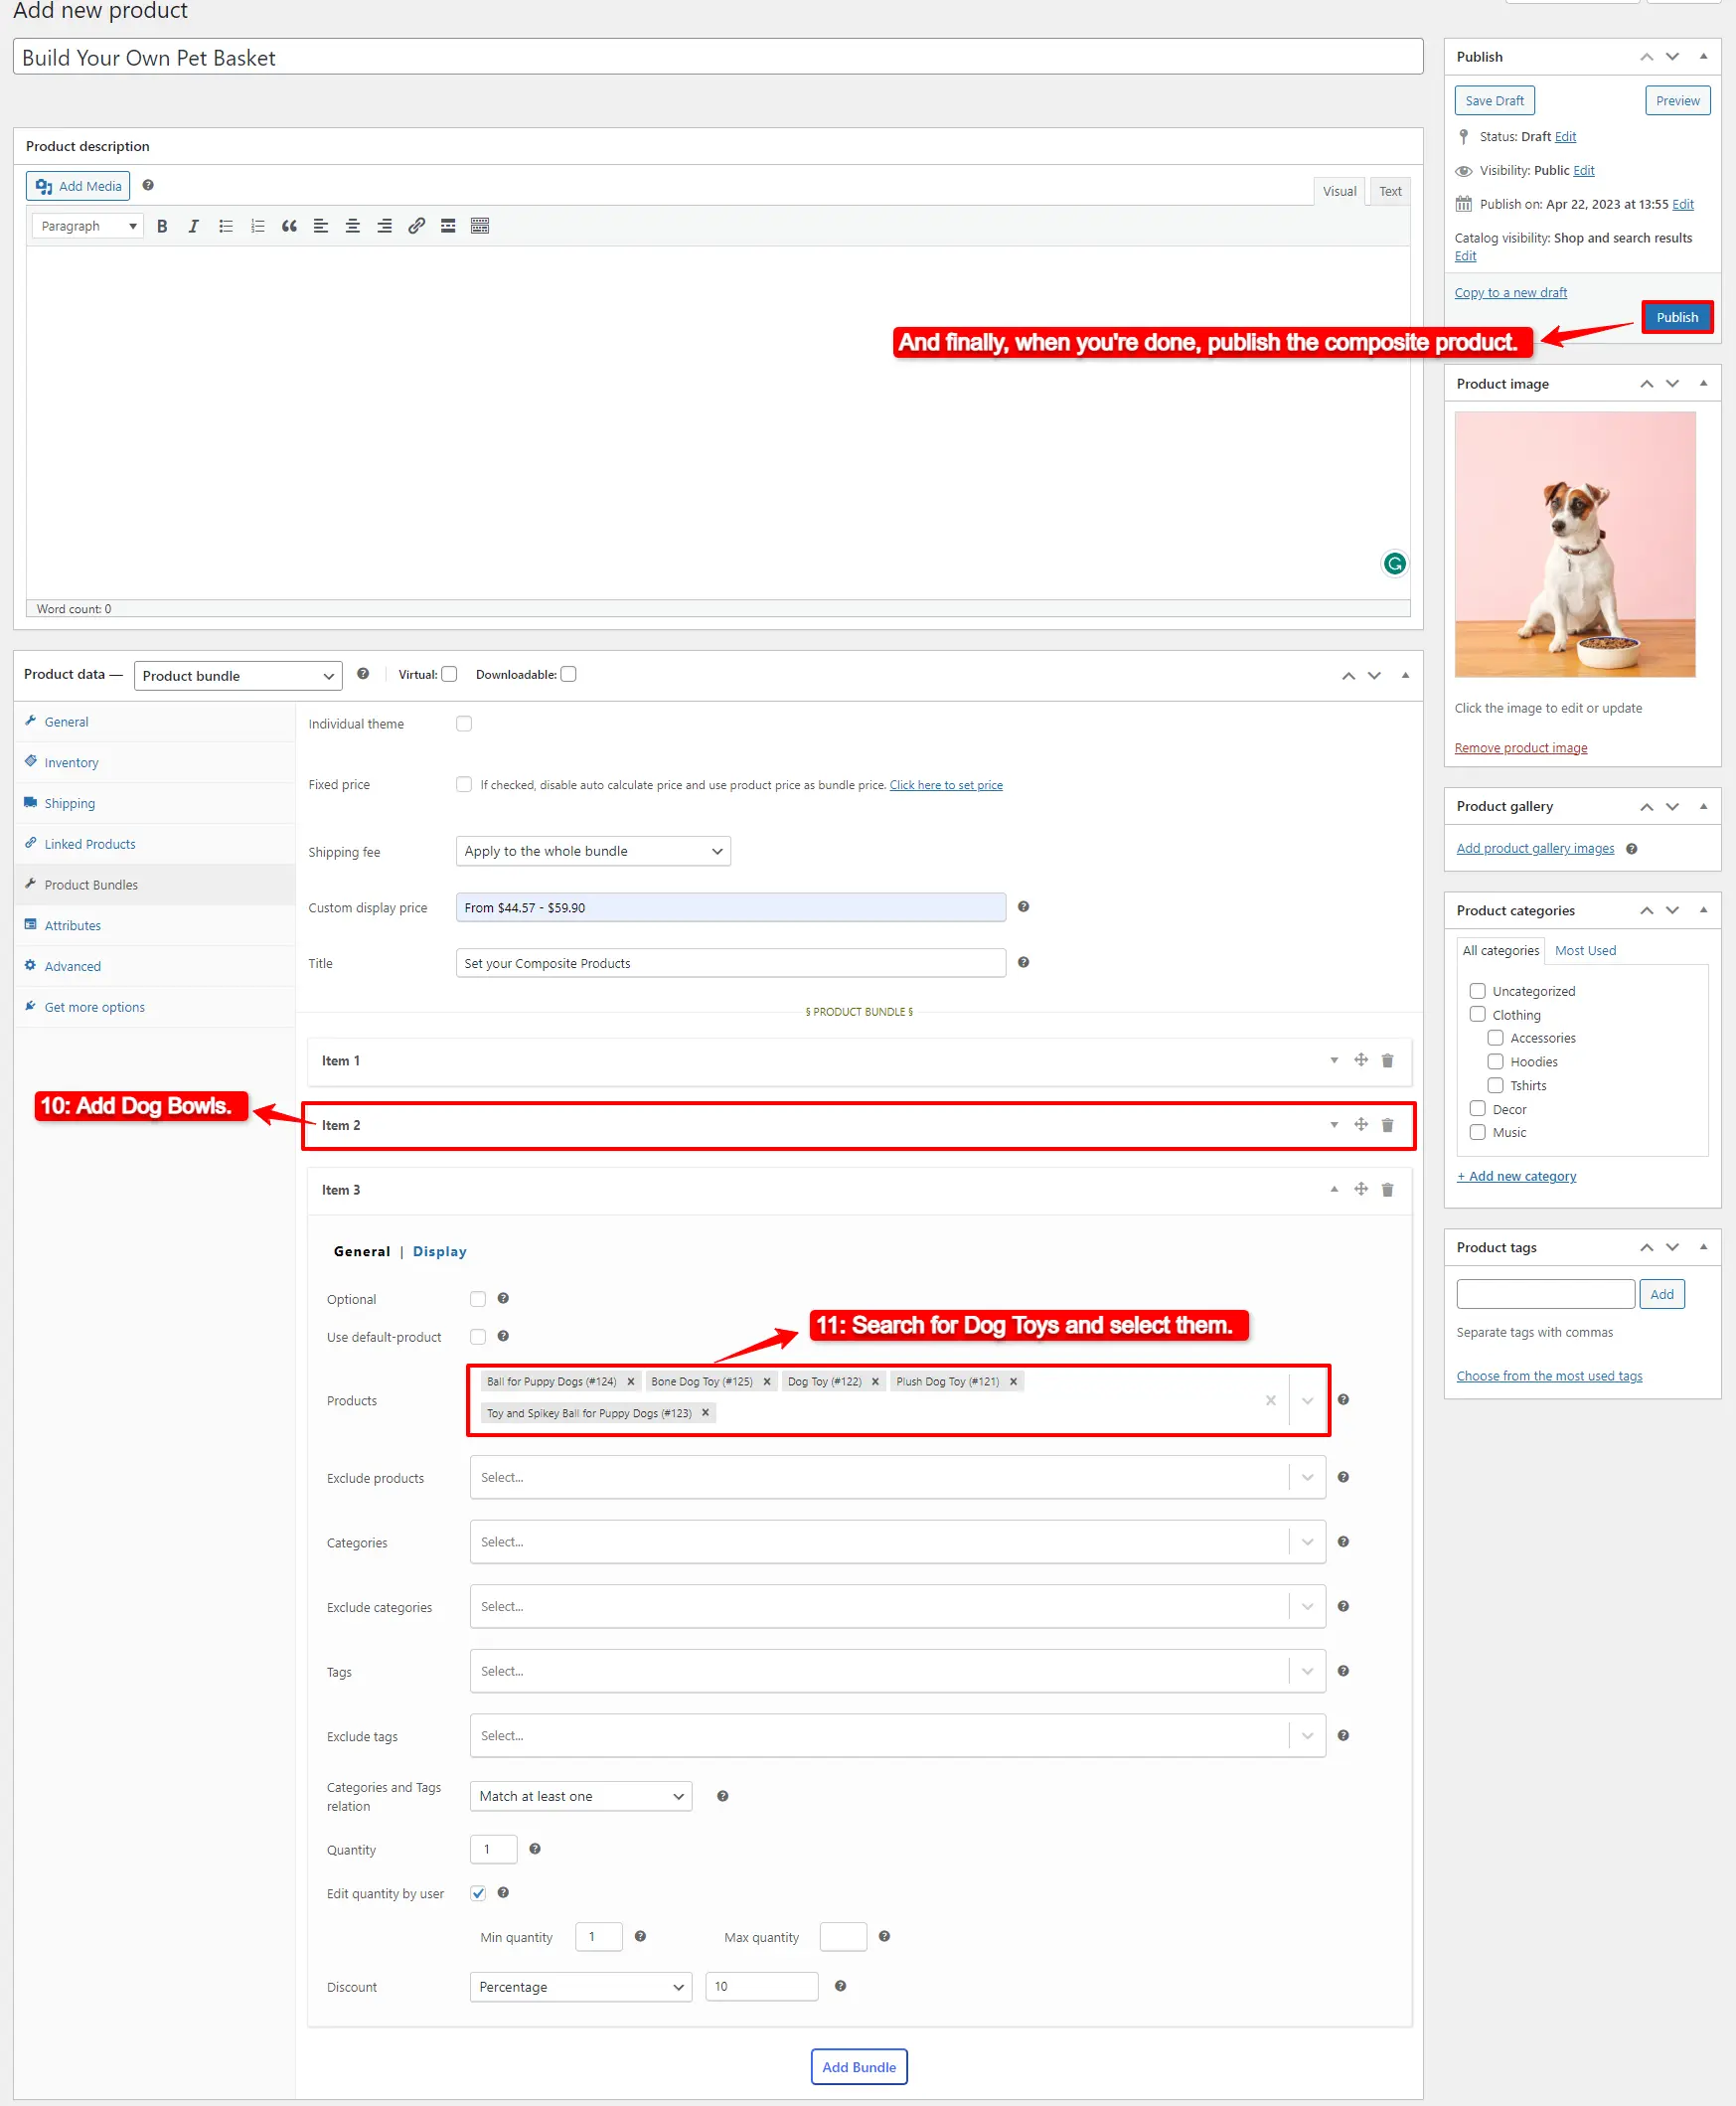
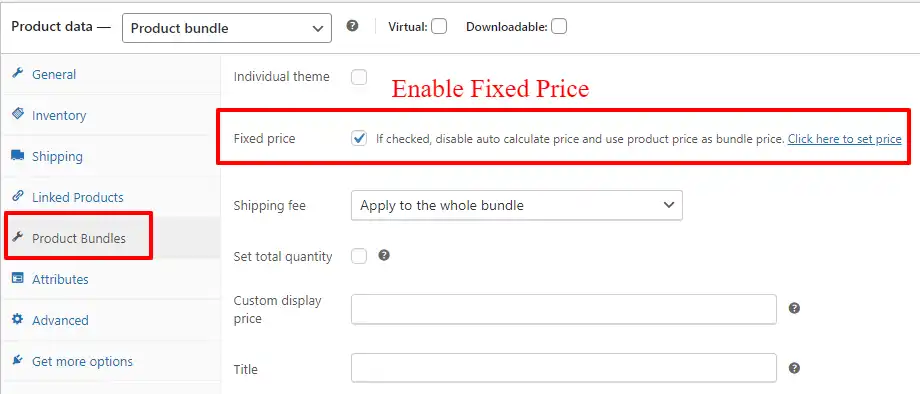
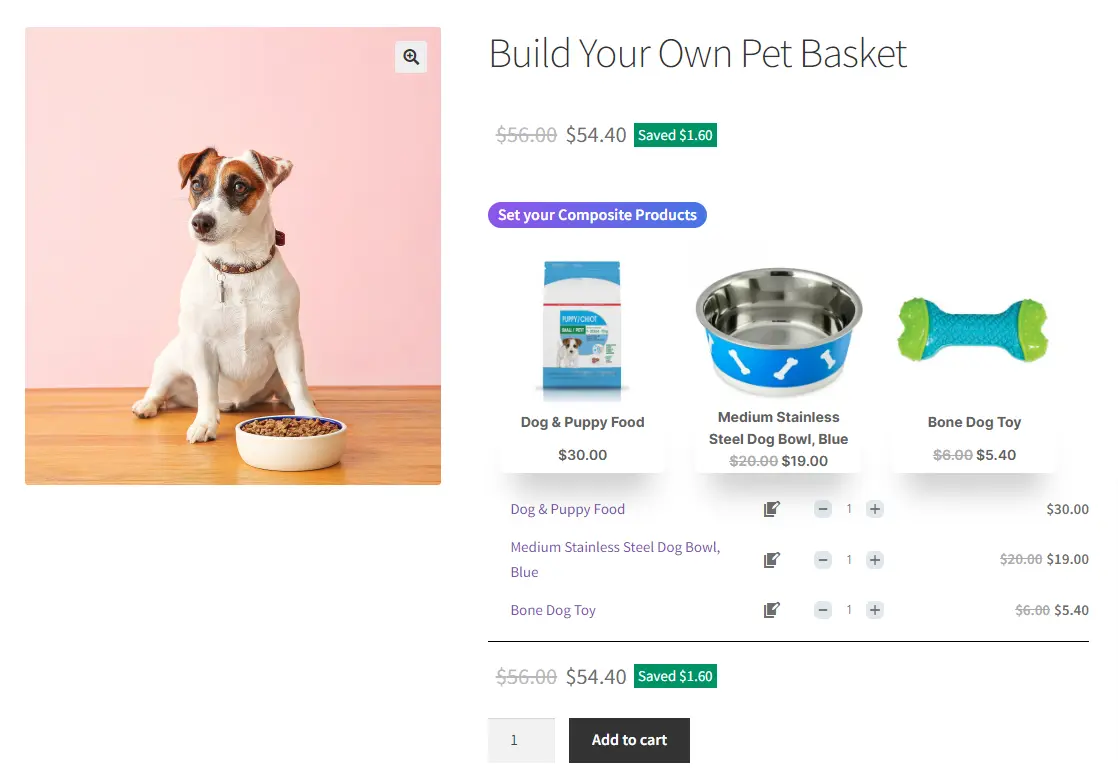
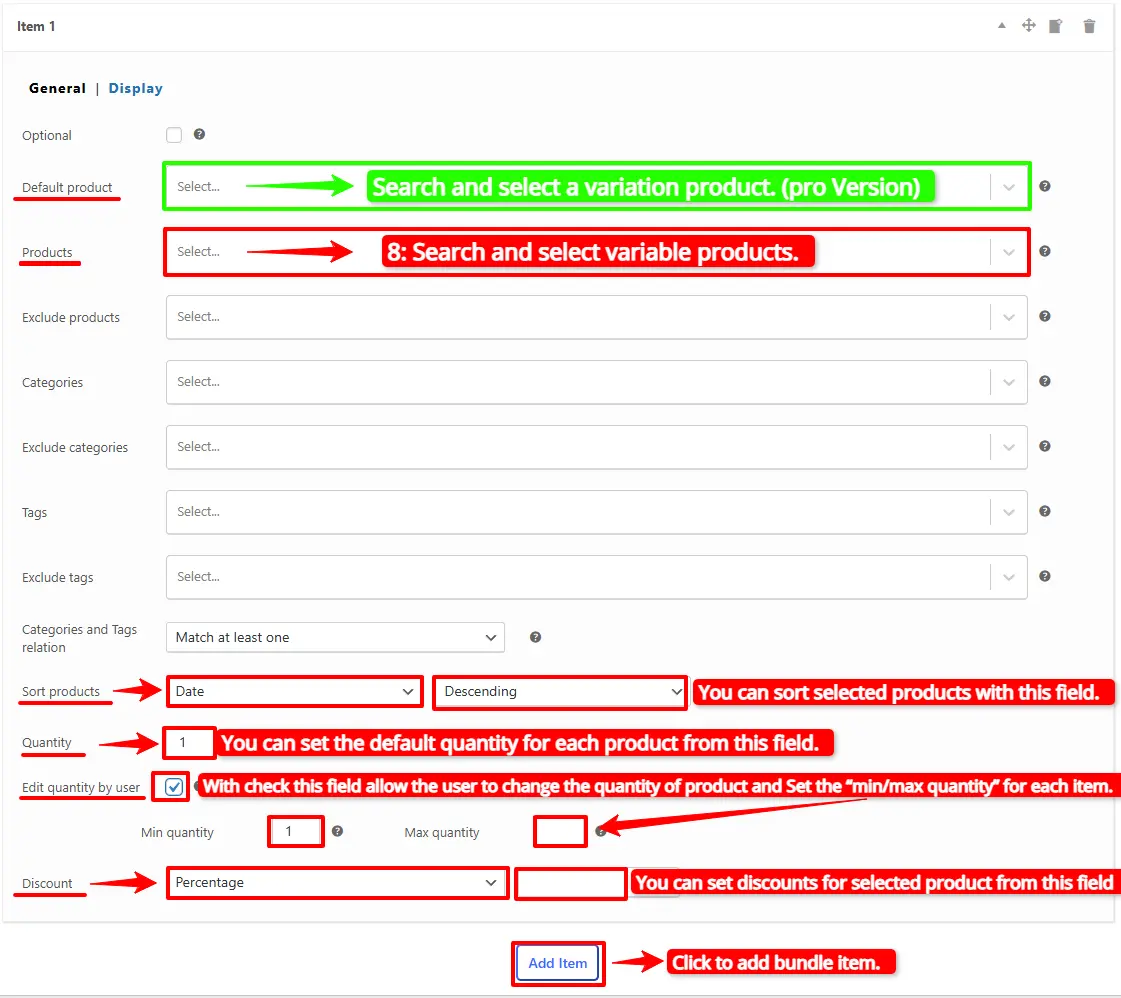
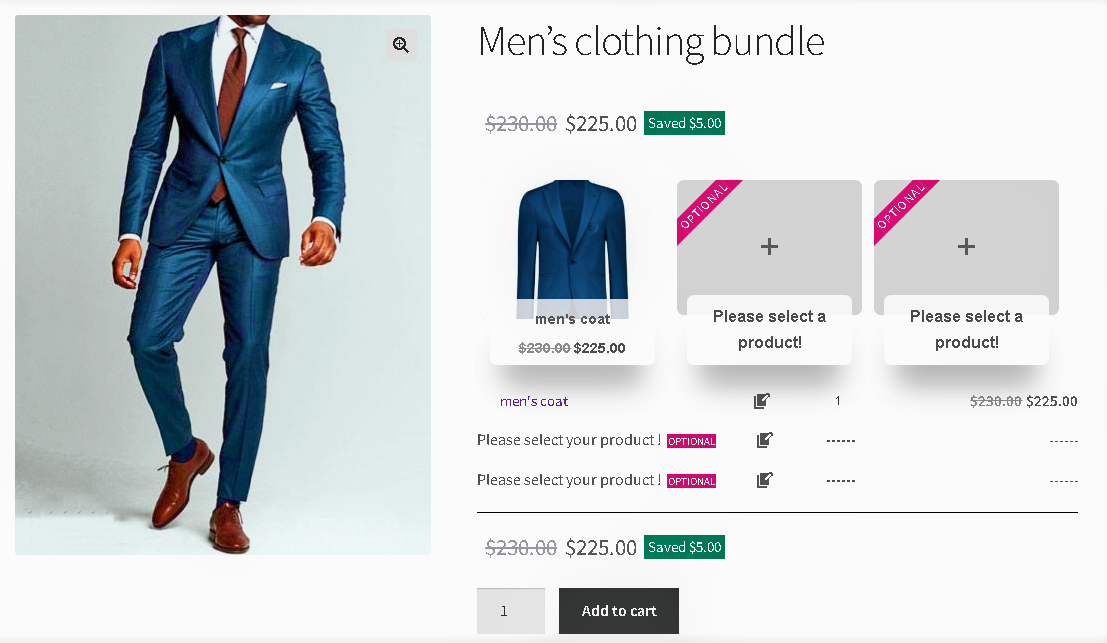
Add Product Bundle Discount in WooCommerce
A product bundle discount refers to a marketing strategy that involves offering multiple products at a discounted price. The idea behind this strategy is to incentivize customers to purchase more than one product by offering a price that is lower than what they would pay if they were to purchase the products individually. By bundling products together and offering a discount, companies can increase their sales and revenue while providing their customers with a perceived value that they would not receive if they purchased the items separately. Additionally, a product bundle discount can also help companies move inventory for products that may be slow sellers or less popular than others. Overall, a product bundle discount is an effective way for companies to increase sales, revenue, and customer satisfaction.
Read how to create product bundle discounts in WooCommerce for more information.
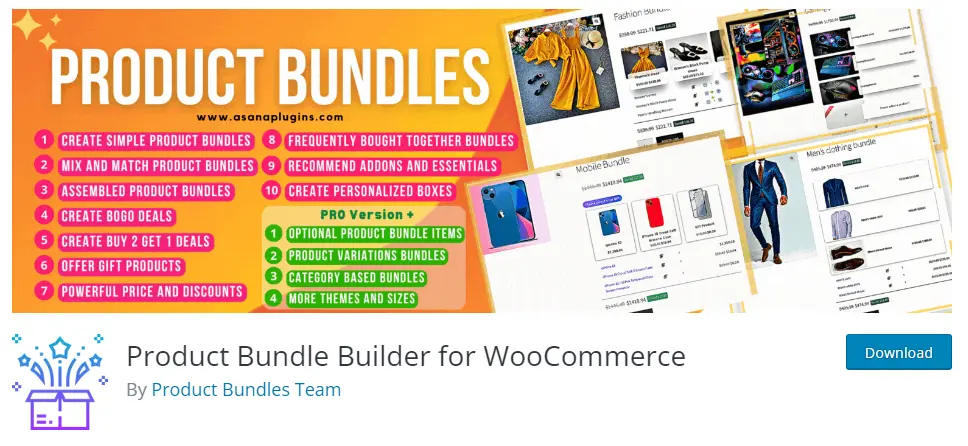
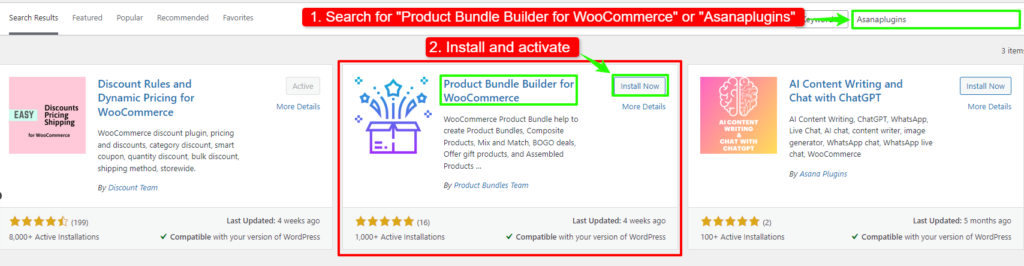
Also, you can check out the WooCommerce Product Bundle Builder plugin to create beautiful product bundles with or without a discount.
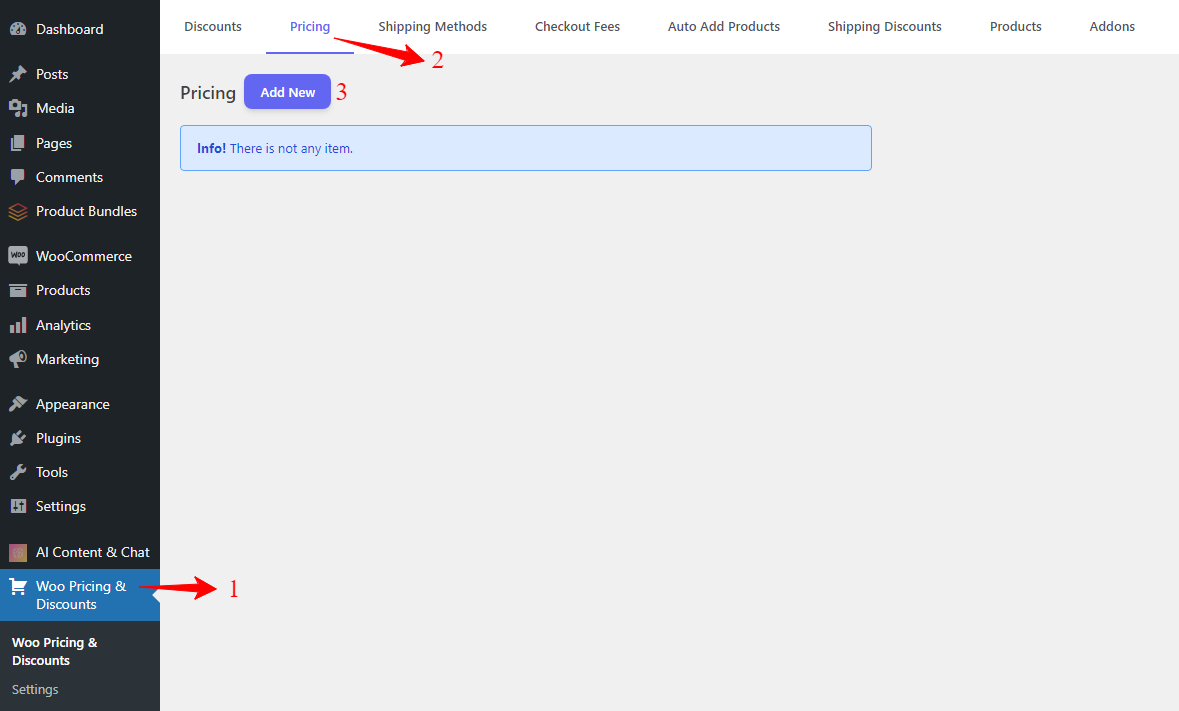
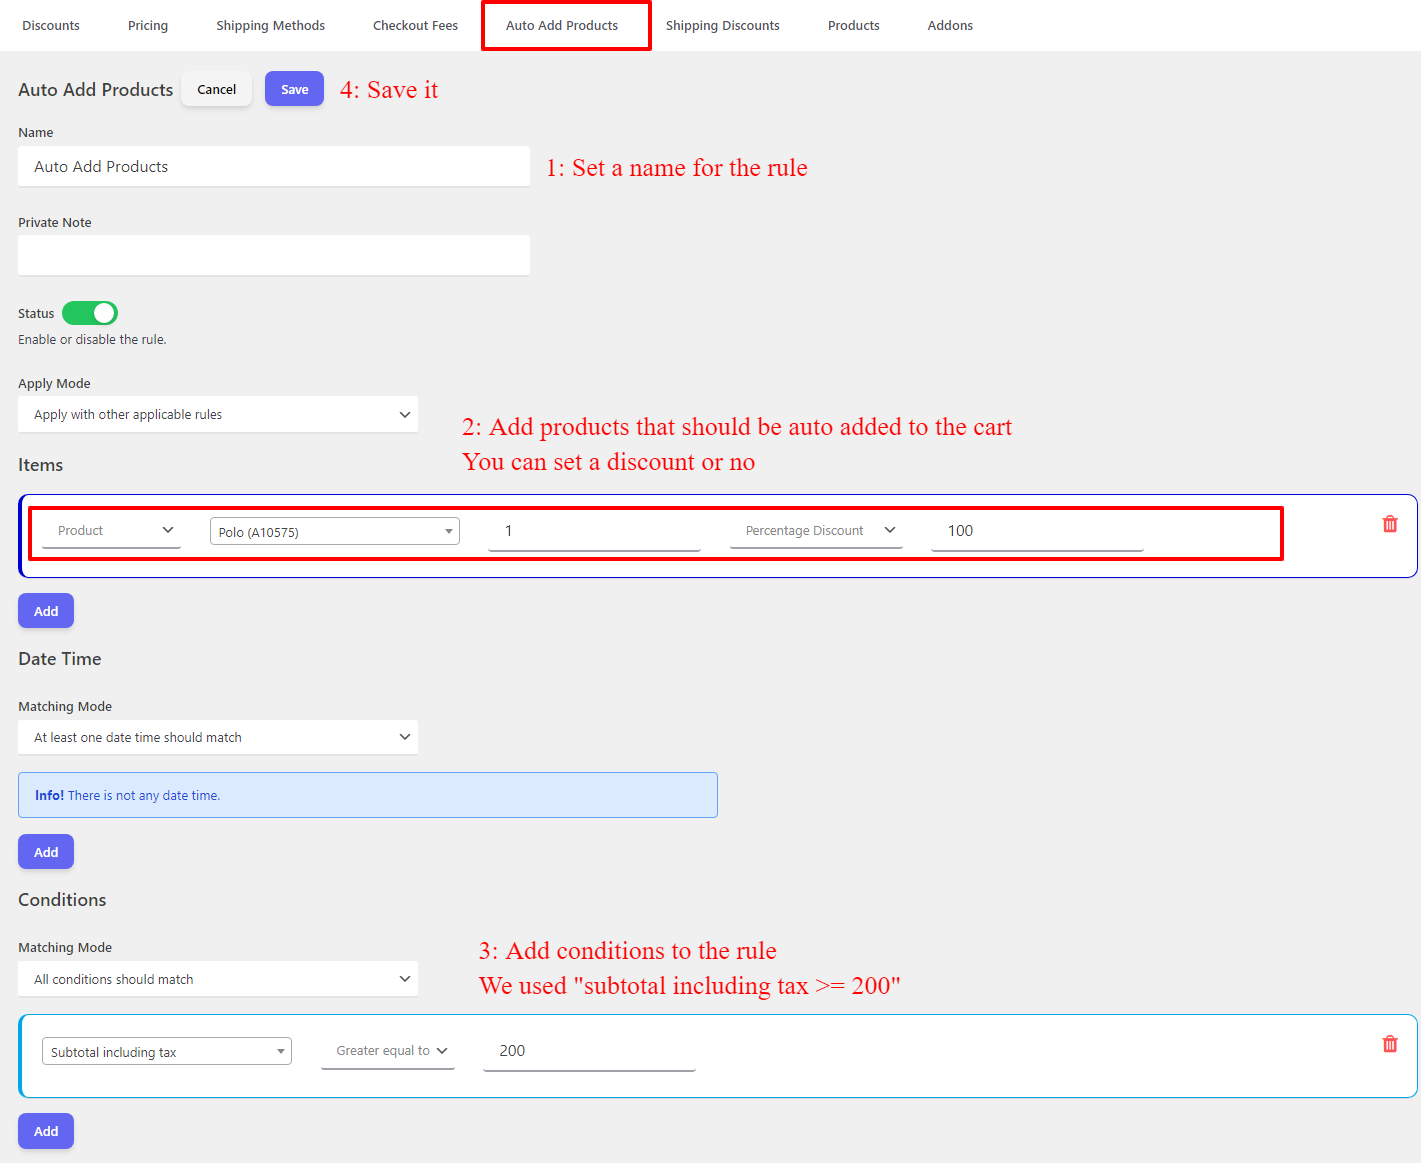
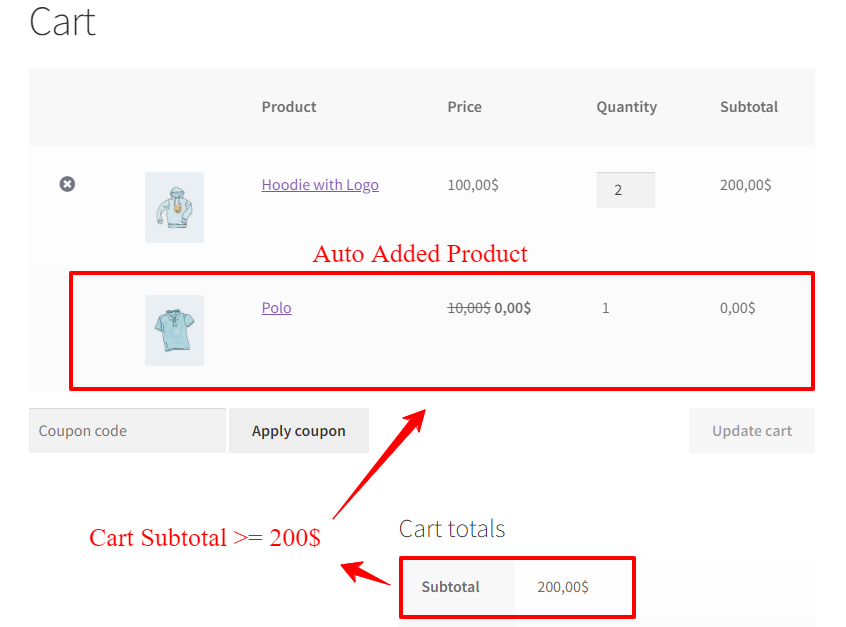
Auto Add Products to Cart by Conditions
Auto Add Products to Cart by Conditions is a feature that enables online stores to automatically add products to a customer’s cart based on specific conditions. This feature is particularly useful for stores that want to offer deals or promotions to their customers, as it allows them to add products to their cart without the need for customers to actively search for them. The conditions can be based on a range of factors, such as the customer’s location, their purchase history, or their shopping cart value. This feature helps to improve the customer experience by simplifying the purchasing process and making it more efficient. Auto Add Products to Cart by Conditions for WooComerce is an excellent tool for e-commerce stores looking to increase their sales and improve their customer satisfaction.
Read more about Auto Add Products to Cart in WooCommerce.
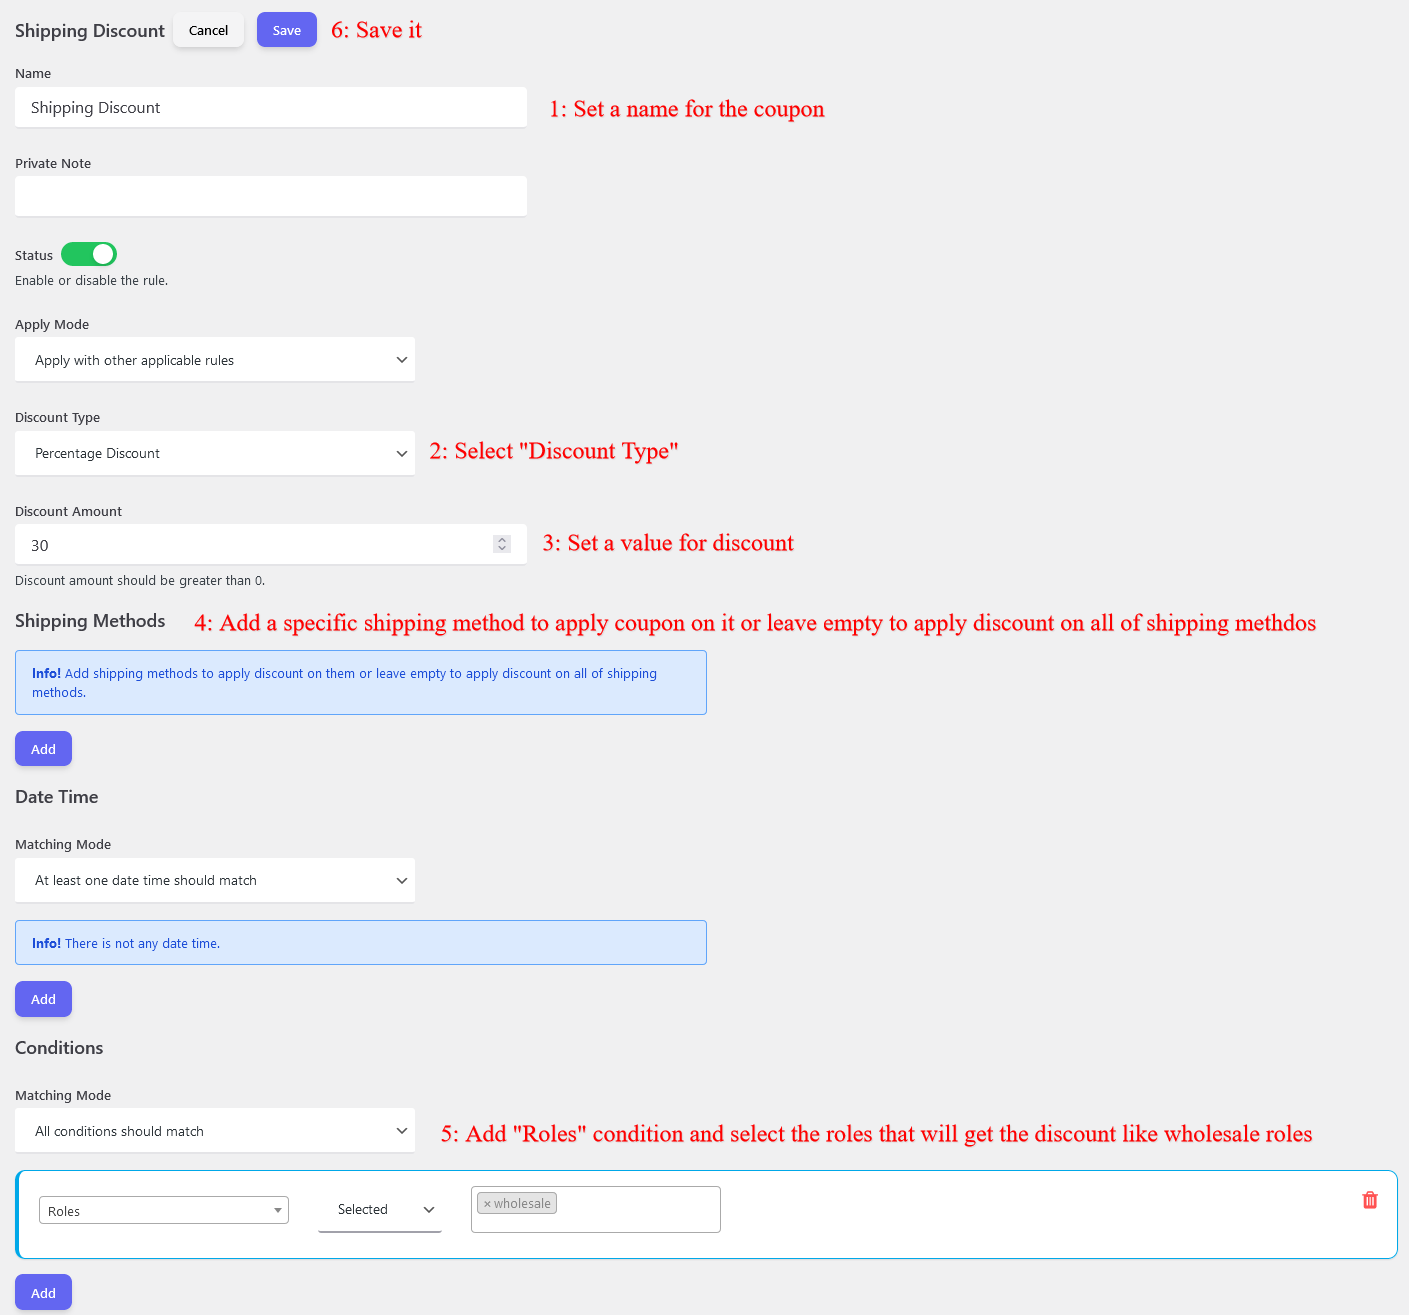
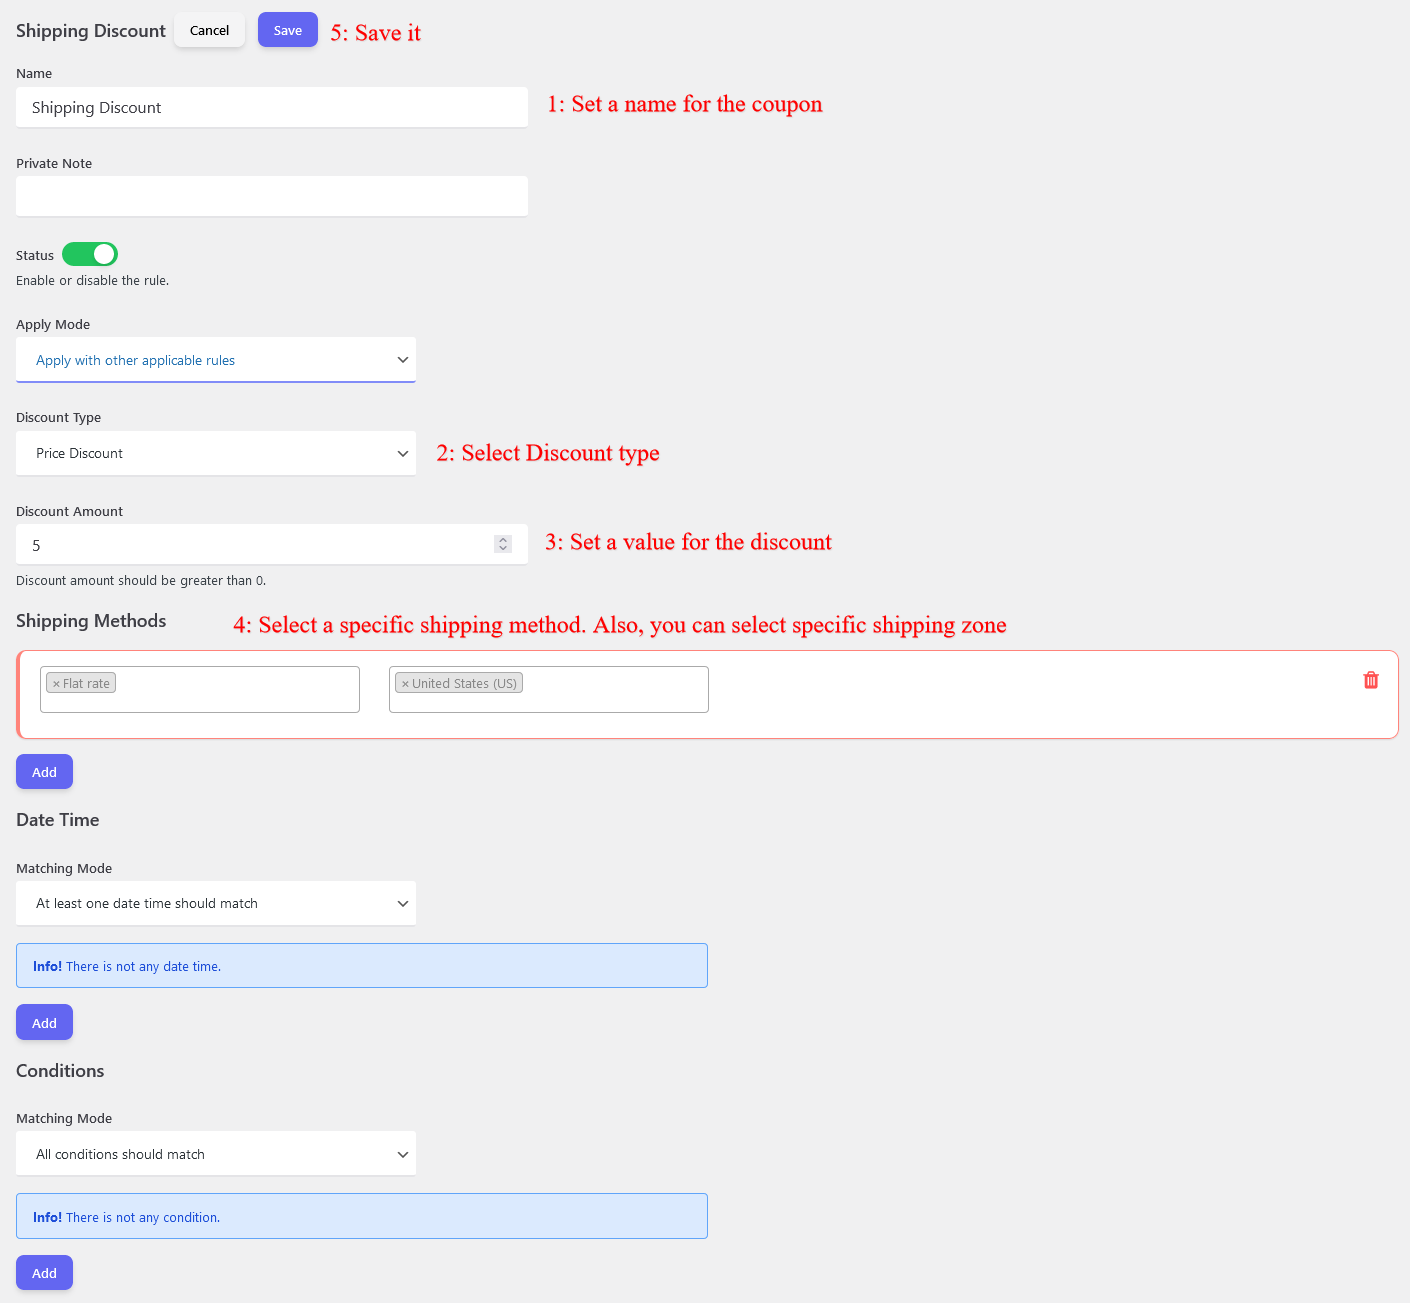
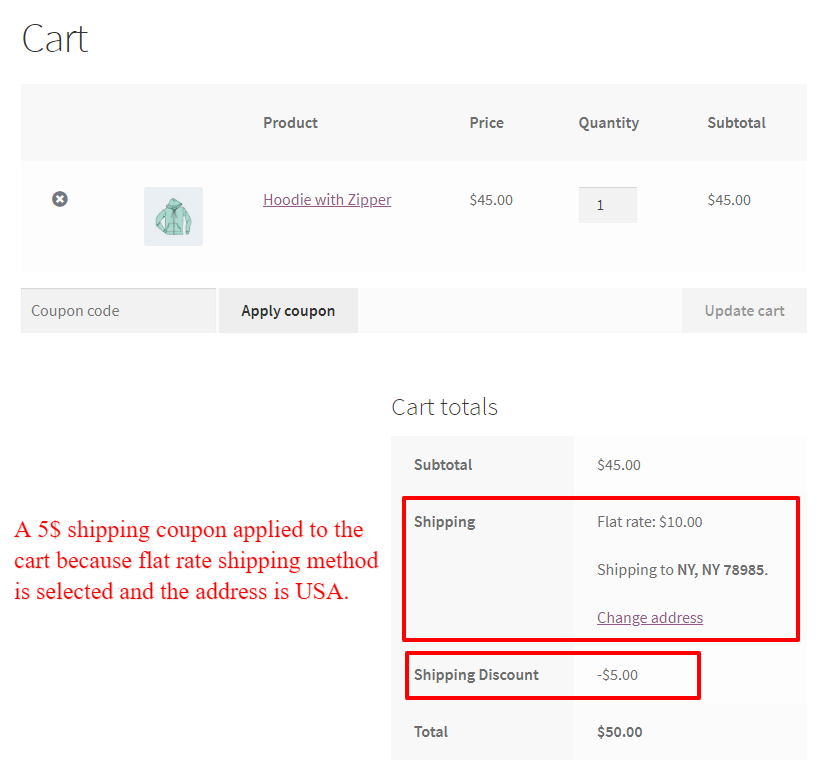
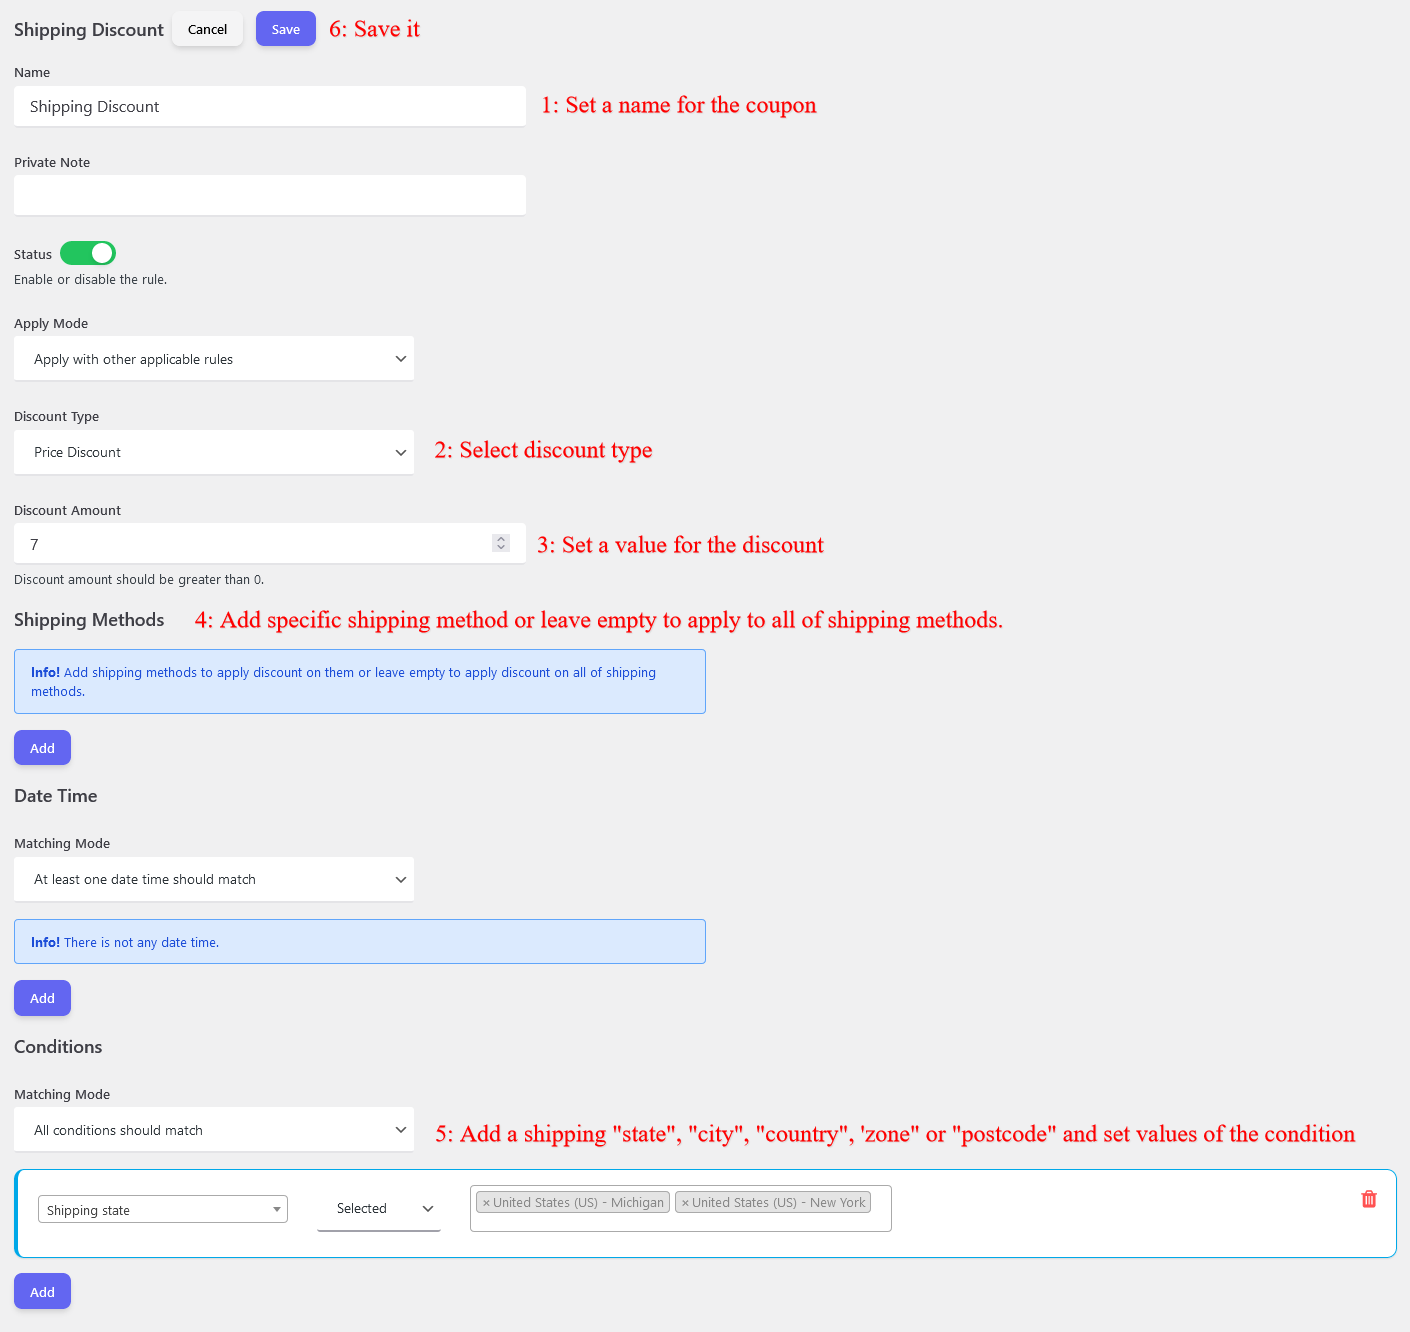
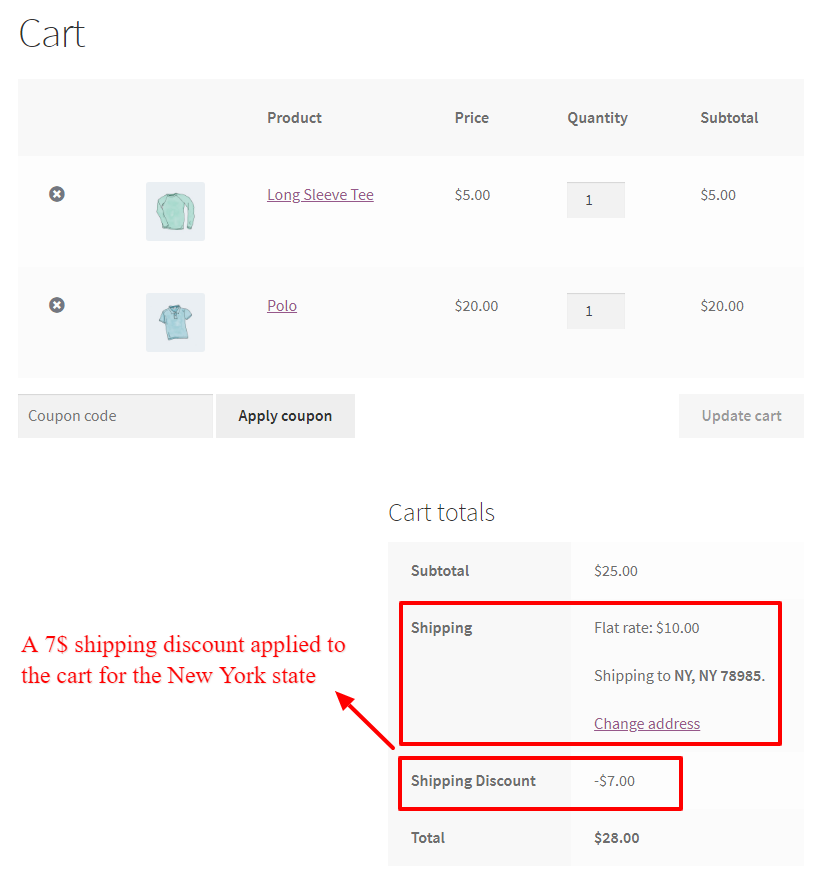
Add Shipping Discount in WooCommerce
Shipping discount refers to the reduction in the cost of shipping goods or products from one place to another. It is offered by businesses to encourage customers to make purchases from their online stores. Shipping costs can be a significant factor in a customer’s decision to purchase a product online, particularly for larger items. Offering a shipping discount can help businesses to attract and retain customers, increase sales, and improve customer satisfaction. In addition to benefiting customers, shipping discounts can also benefit businesses by reducing the cost of shipping and increasing profits. Overall, shipping discounts are a win-win for both customers and businesses.
Read how to create a shipping discount in WooCommerce for more information.
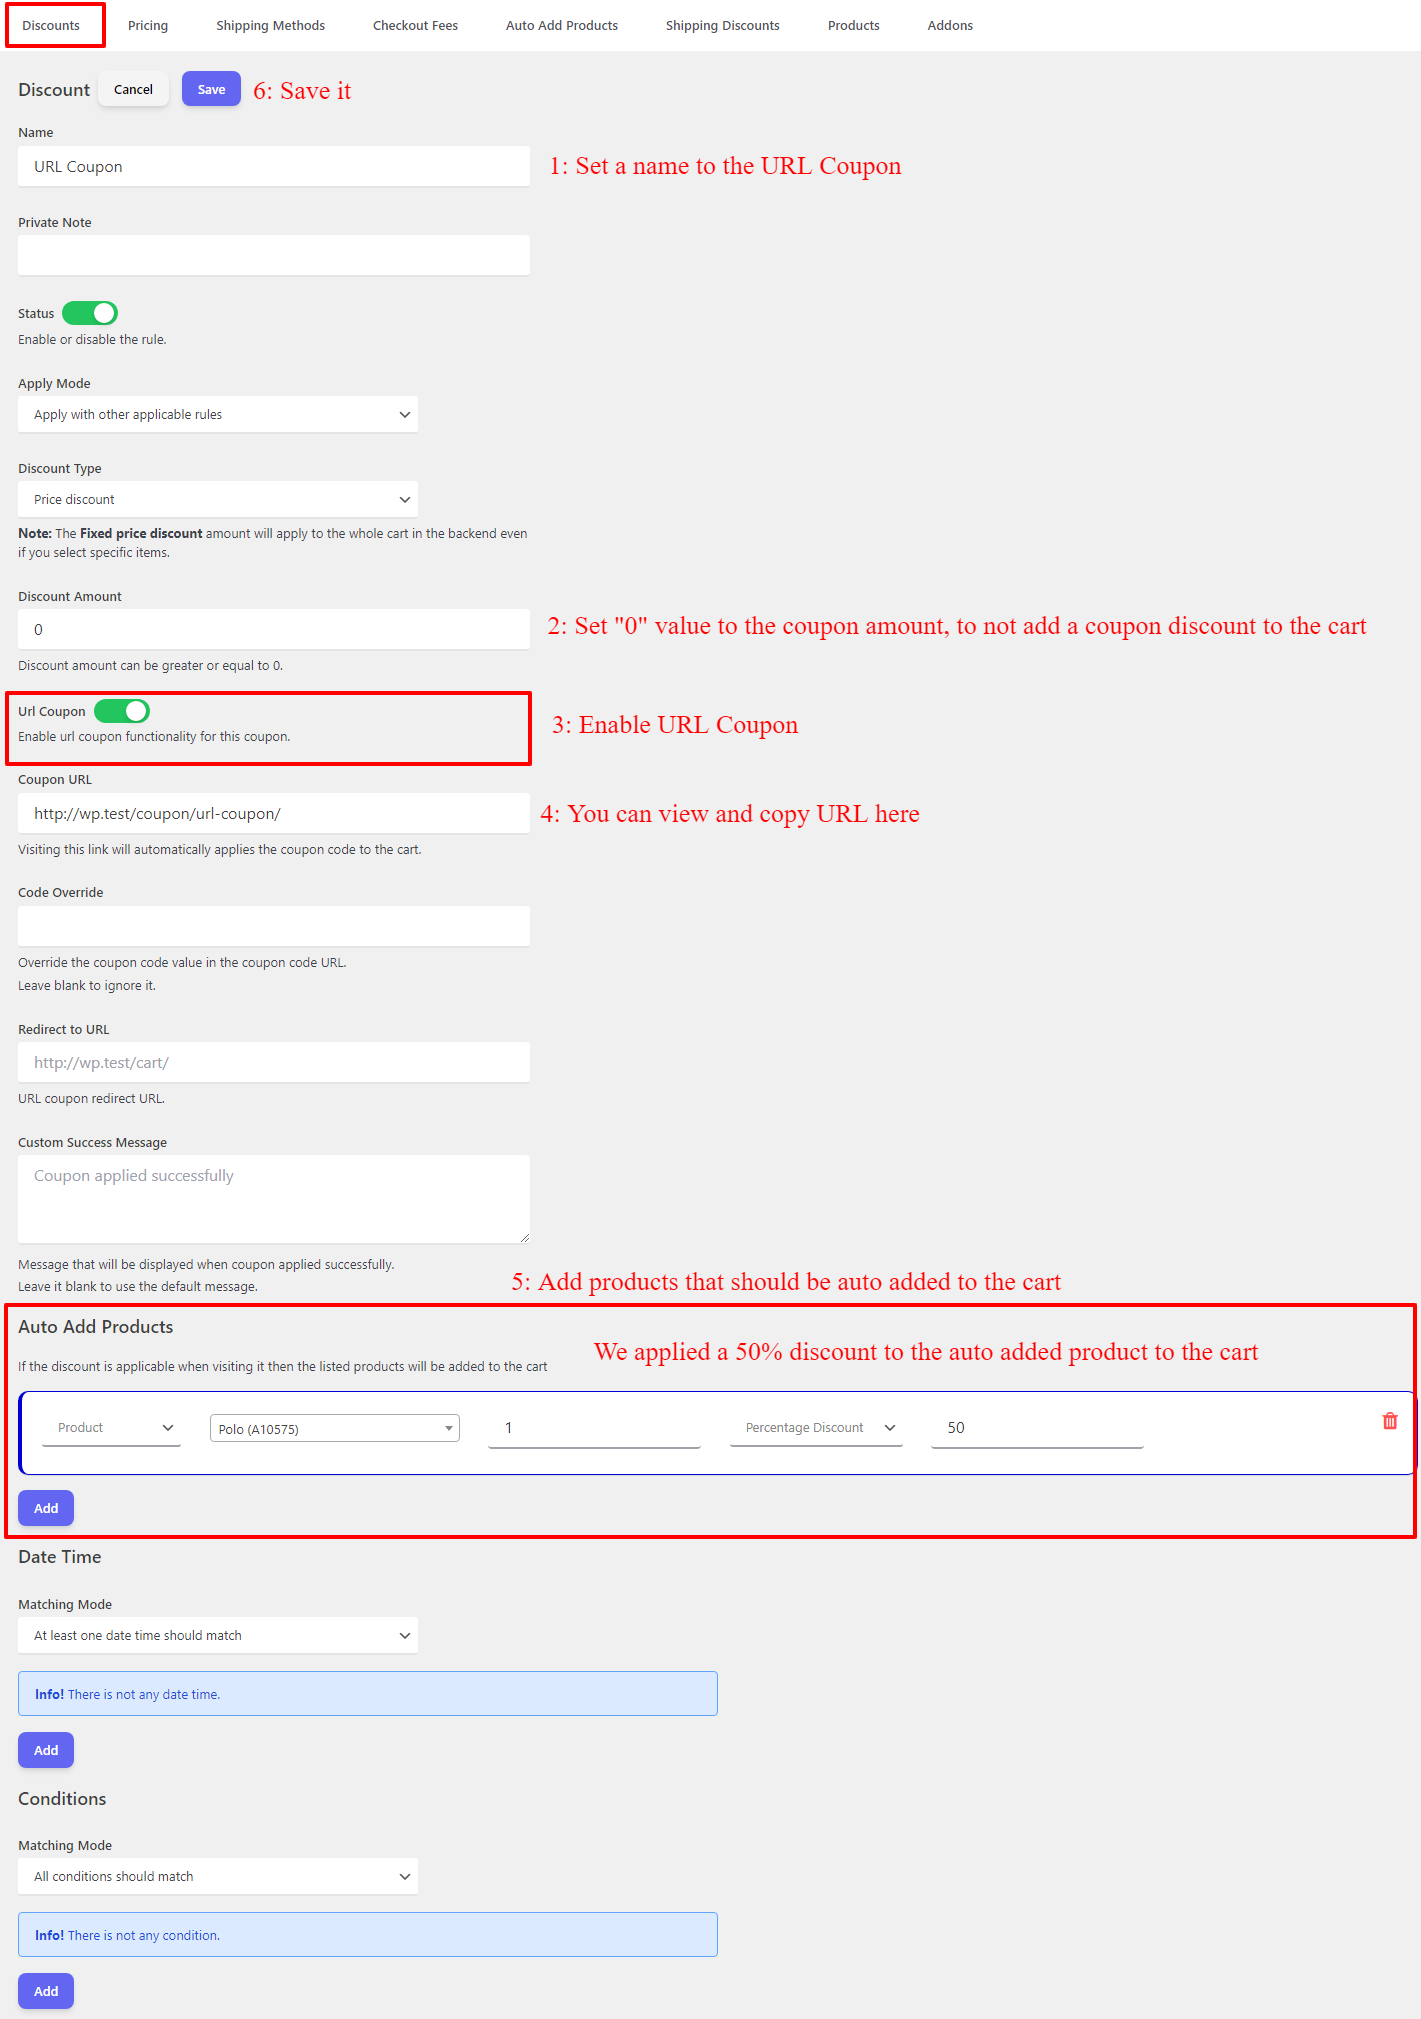
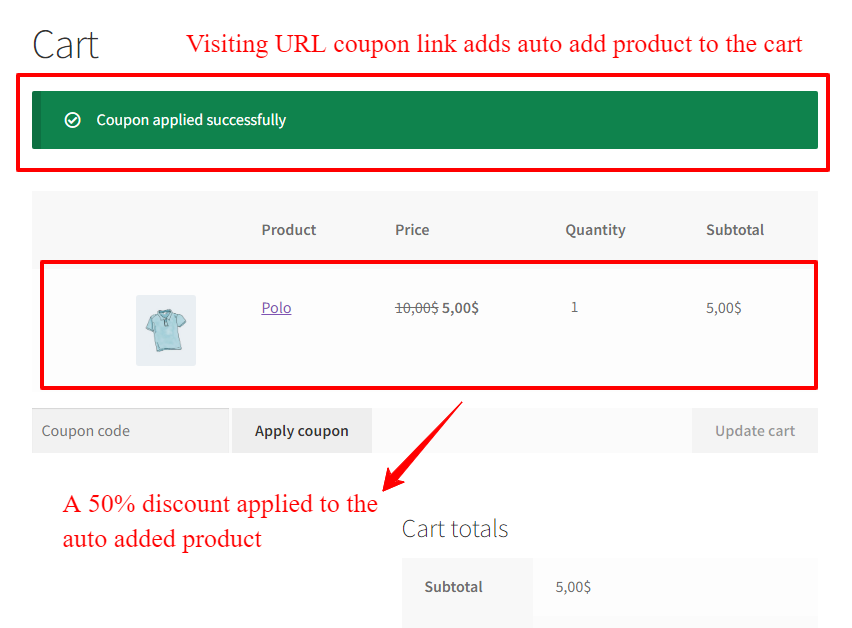
URL Coupons for WooCommerce
URL Coupons for WooCommerce is a plugin that allows online store owners to create unique discount codes that are linked to a specific URL. With this plugin, store owners can create and distribute coupons that are automatically applied when customers visit a specific page on their website. This can be a powerful tool for increasing sales and improving customer retention, as it allows store owners to create targeted promotions that are tailored to specific products or pages on their websites. With URL Coupons for WooCommerce, store owners can easily track the performance of their coupons and adjust their marketing strategies accordingly. Overall, this plugin is a valuable addition to any WooCommerce store that is looking to boost sales and improve customer engagement.
Offer Free Shipping
Offering free shipping to customers who meet specific criteria is a great way to incentivize purchases and increase customer loyalty. By setting a minimum purchase amount or certain product categories, businesses can reward their customers with a valuable perk that encourages them to shop more. Free shipping can also help businesses stand out from competitors and attract new customers who prioritize convenience and value. Ultimately, offering free shipping can lead to a boost in sales and customer satisfaction, while also supporting a company’s overall branding and marketing efforts.
Learn more about free shipping discounts.
Use WooCommerce Discounts to Skyrocket Sales
Use WooCommerce discounts to skyrocket your sales. Discounts are a powerful tool for increasing revenue, retaining customers, and staying competitive. By offering discounts that are relevant to your customers, you can attract more customers and encourage more purchases.
Adding discounts in WooCommerce is a great way to increase your sales and improve your bottom line. By using the tips in this article, you can create effective discount strategies that help you achieve your sales goals. Whether you’re a small business owner or a seasoned e-commerce professional, adding discounts in WooCommerce should be part of your marketing strategy.


