In this article, we aim to provide a thorough and detailed review of WooCommerce Grouped Products. Subsequently, we will follow up with a step-by-step tutorial on creating and implementing them in your online store.
Looking to enhance your online store with product bundles? This guide to WooCommerce Grouped Products provides a comprehensive review and tutorial for creating and managing grouped products. Moreover, it is perfect for both seasoned pros and beginners. By following the guide, you can streamline store management and boost sales, as it improves the shopping experience. Consequently, dive in to unlock your WooCommerce store’s full potential!
Table of Contents
- What are WooCommerce Grouped Products?
- Benefits of Using Grouped Products
- Examples of Grouped Products
- Video Tutorial
- Setting Up Grouped Products in WooCommerce
- Grouped Products With Variable Product in WooCommerce
- How to Create Flexible Optional Grouped Products
- Final Result
- The Best Way to Use WooCommerce Grouped Products
- Conclusion
- Articles
- FAQ
What are WooCommerce Grouped Products?
WooCommerce Grouped Products let store owners showcase multiple related items together. Unlike simple or variable products, which are individual items or items with variations, grouped products are standalone items that can be purchased together or separately. This feature is ideal for selling complementary items like books, accessories, or tools. Consequently, it provides a more organized and appealing presentation, thereby making it easier for customers to find and buy what they need.
Benefits of Using Grouped Products
- Cost Savings for Customers: Grouped products are attractive for customers buying related items together. Offering a discount on the group can increase appeal, providing value to customers and boosting sales.
- Increased Sales Opportunities: Presenting related products as a group promotes cross-selling and upselling, encouraging customers to buy complementary items. This can increase average order values and overall sales.
- Flexible Pricing and Promotions: Grouped products enable flexible pricing strategies. For instance, you can offer discounts or promotions to the entire group; alternatively, you can apply them to individual items. Consequently, this approach encourages customers to purchase more.
- Enhanced Customer Experience: Grouped products display related items together. As a result, customers can more easily find and buy complementary products. Consequently, this enhances satisfaction and boosts purchases.
- Improved SEO and Discoverability: Grouped products can boost your store’s SEO by adding more content and keywords. Consequently, this improves visibility in search results and makes it easier for customers to find your products.
- Consistent Branding and Theming: Grouped products enable consistent branding and thematic presentation. As a result, they enhance your store’s aesthetic, strengthening brand identity. Consequently, this appeals to customers seeking specific styles or collections.
- Enhanced Product Visibility: Grouped products can boost the visibility of less popular or new items by pairing them with best-sellers. Thus, this strategy helps introduce customers to products they might not have found otherwise.
Examples of Grouped Products
- Fitness Starter Pack: A selection of fitness equipment is grouped for beginners, offering a comprehensive set for home workouts. For example, it includes dumbbells, a yoga mat, resistance bands, and a jump rope. Consequently, this collection provides everything needed to start an effective fitness routine at home.
- Outdoor Adventure Gear: Key outdoor equipment is bundled together for camping enthusiasts, offering convenience for trip preparation. Specifically, it includes items such as a tent, sleeping bag, backpack, and camping stove. Consequently, this bundle simplifies the process of getting ready for a camping trip.
- Gardening Starter Kit: A collection of essential gardening tools is grouped for easy purchase, making it ideal for new gardeners. For instance, it includes a trowel, pruning shears, gloves, and a watering can. As a result, this setup simplifies the process of getting started with gardening.
- Kitchen Essentials Set: A grouped product of fundamental kitchen tools designed for cooking and baking. Specifically, it is perfect for new cooks or kitchen setups. Moreover, this collection provides essential items that facilitate a smoother cooking experience.
- Art Supplies Collection: A set of basic art supplies is available for artists, allowing customers to purchase all necessary items in one go. For instance, this set includes sketchpads, coloured pencils, brushes, and acrylic paints. As a result, it simplifies the process of acquiring essential art materials.
- Office Supplies Bundle: Essential office supplies are grouped together for easy restocking or setting up a new workspace. For instance, the collection includes notebooks, pens, a stapler, and a desk organizer. Consequently, this grouping streamlines the process of equipping an office efficiently.
Video Tutorial
Setting Up Grouped Products in WooCommerce
To set up a grouped product in WooCommerce, we use the free and powerful “ Product Bundle Builder for WooCommerce” plugin, one of the most popular WordPress plugins in 2025. This plugin is not only user-friendly but also offers numerous great tools for personalization.
Step 1: Installing Product Bundle Free Plugin
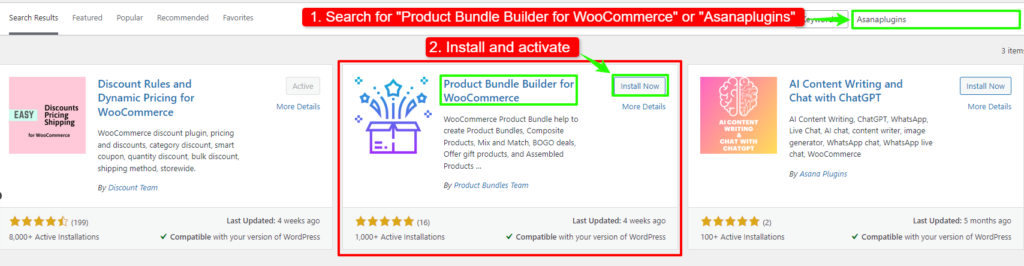
To install the Product Bundle Builder for the WooCommerce plugin, follow the below steps:
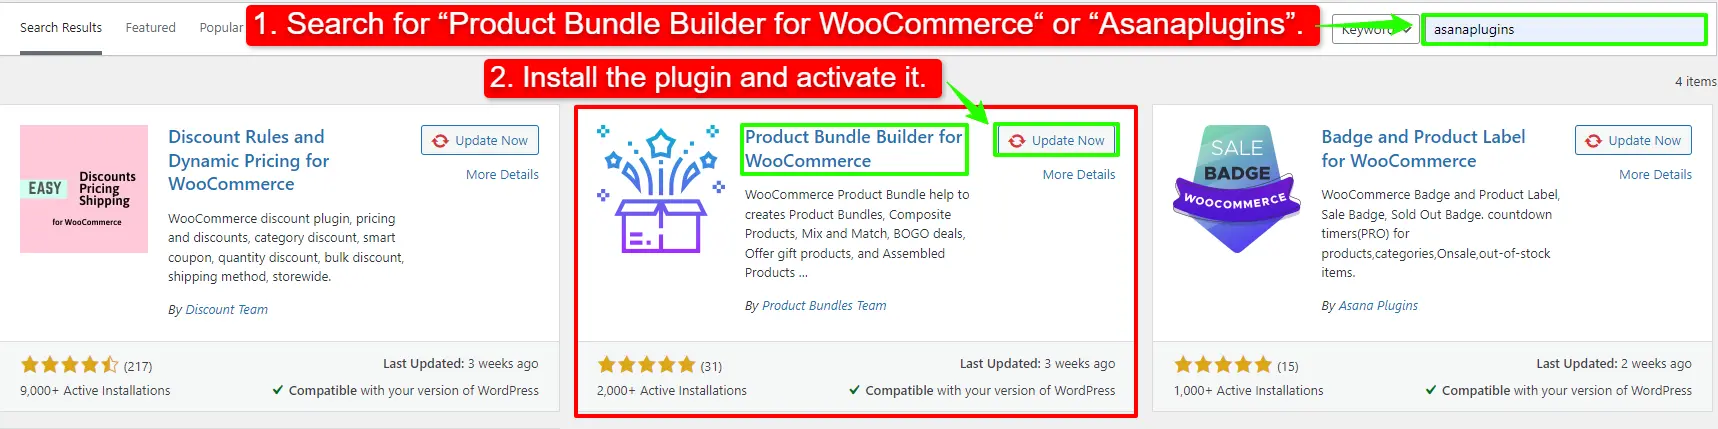
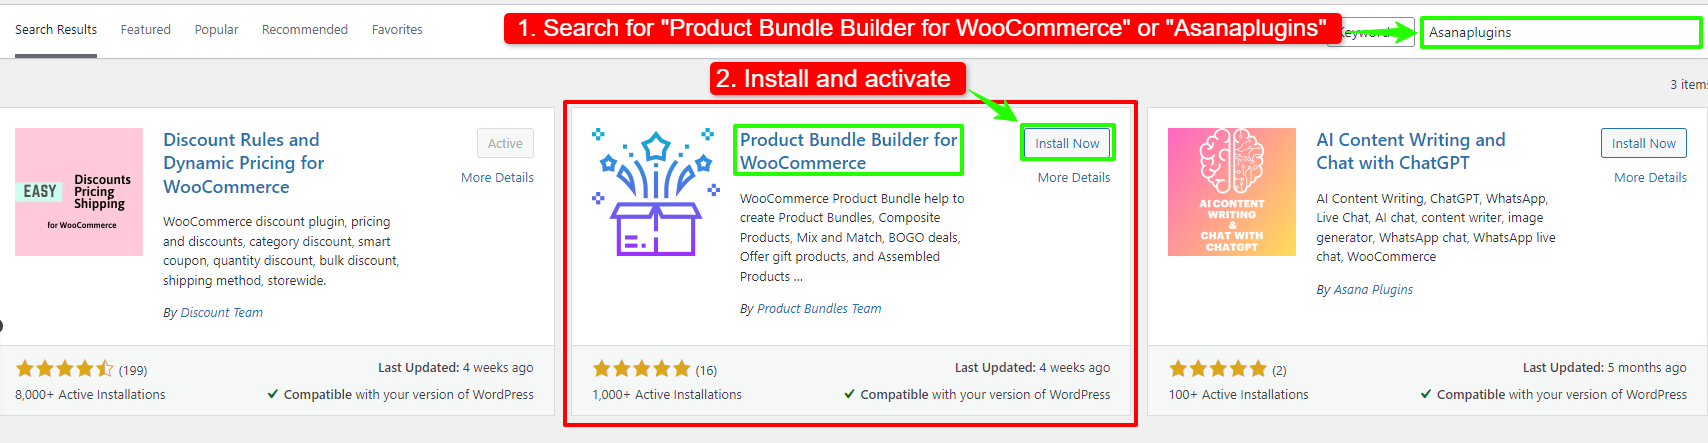
- Navigate to the Plugins >> Add New menu on your WordPress website
- Then search for “Product Bundle Builder for WooCommerce“ or “Asanaplugins”
- Find the “Product Bundle Builder for WooCommerce”
- Install the plugin and activate it.
Step 2: Create a Grouped Products
To create WooCommerce Grouped Products, follow the below steps:
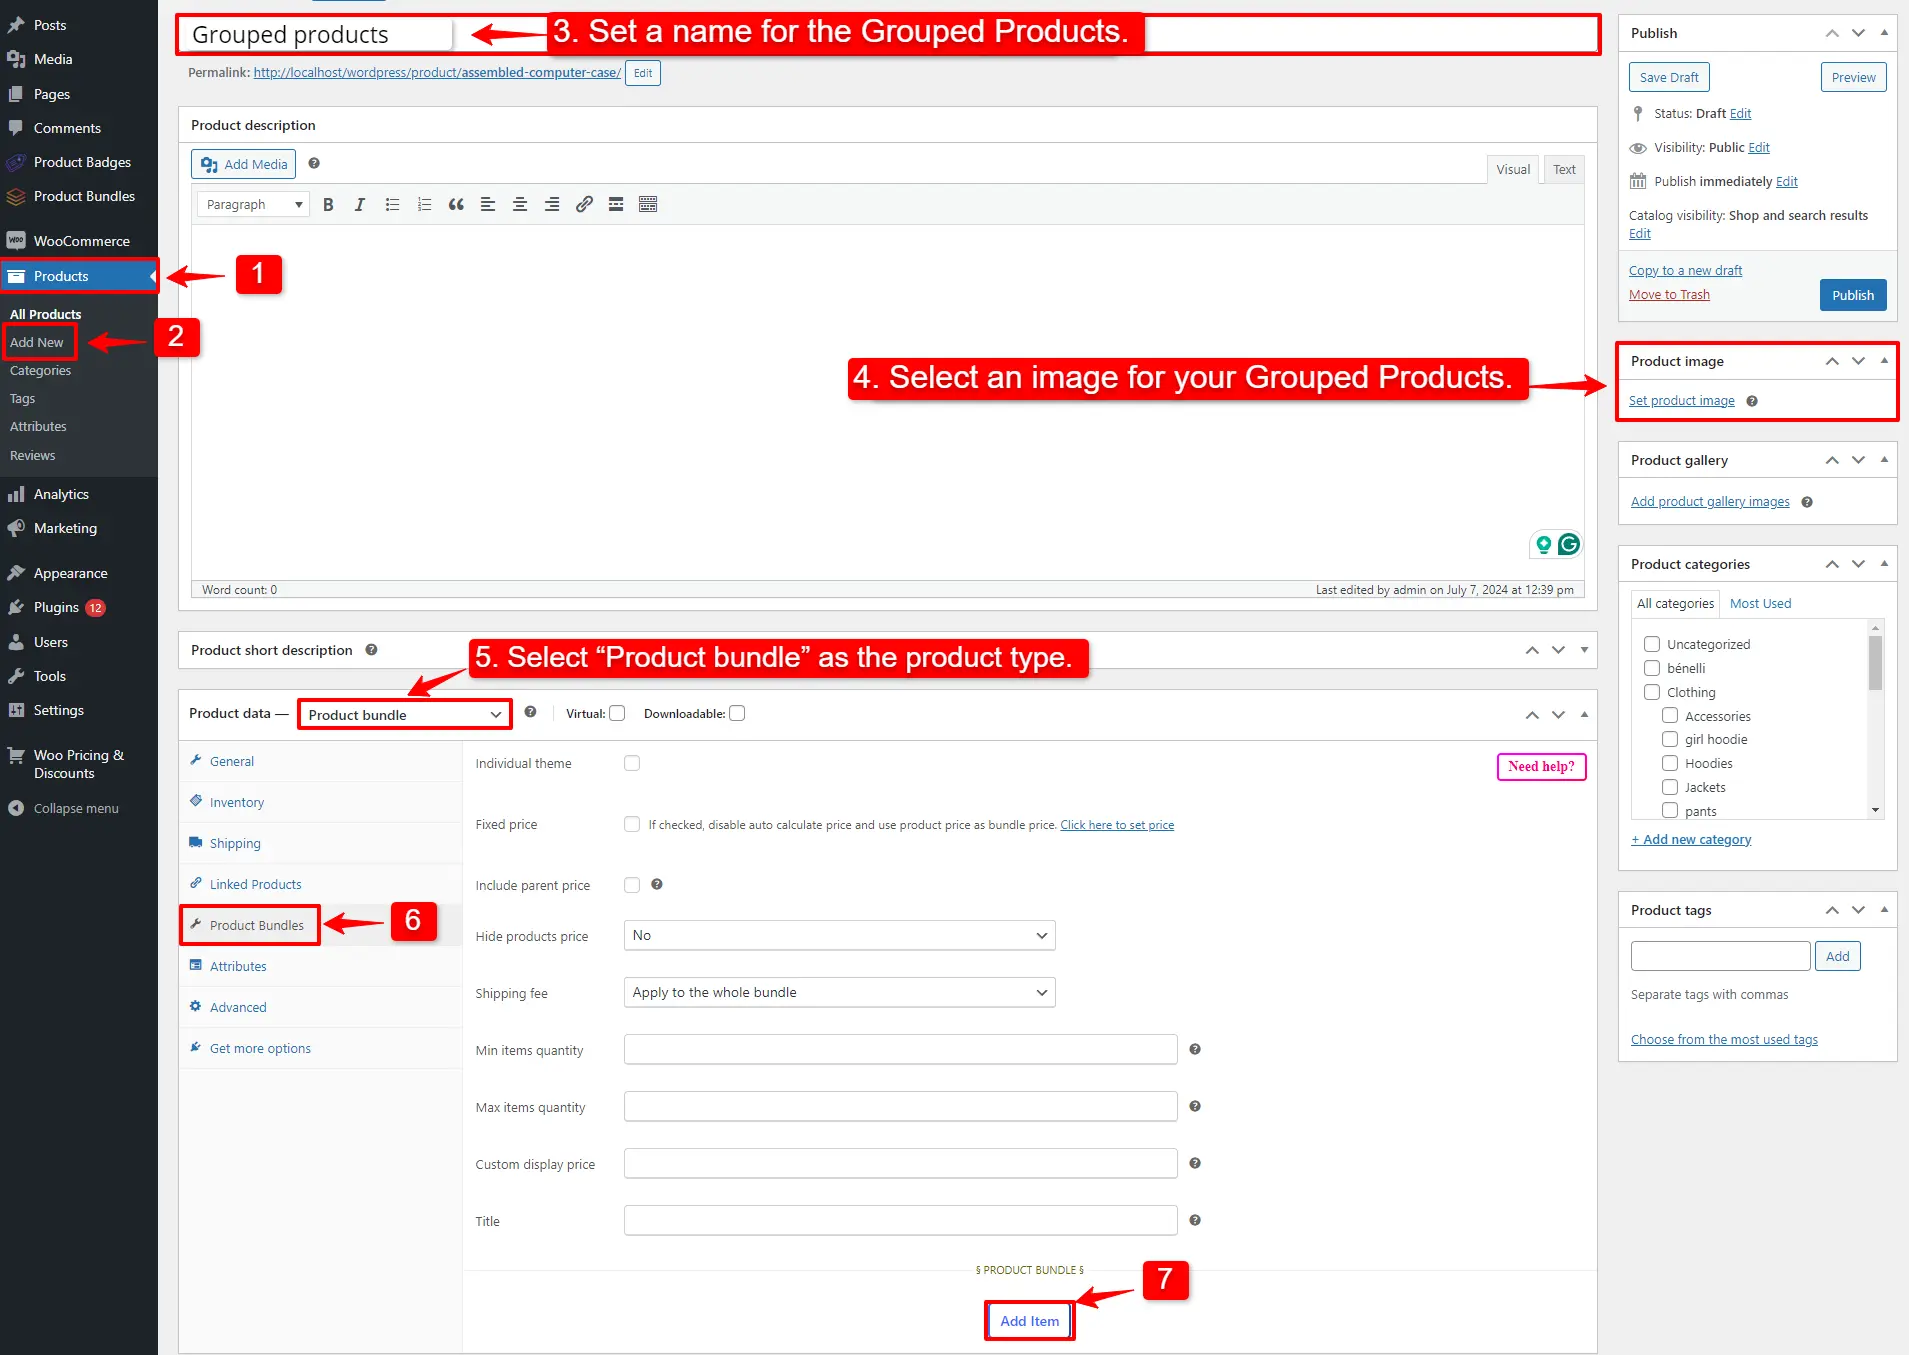
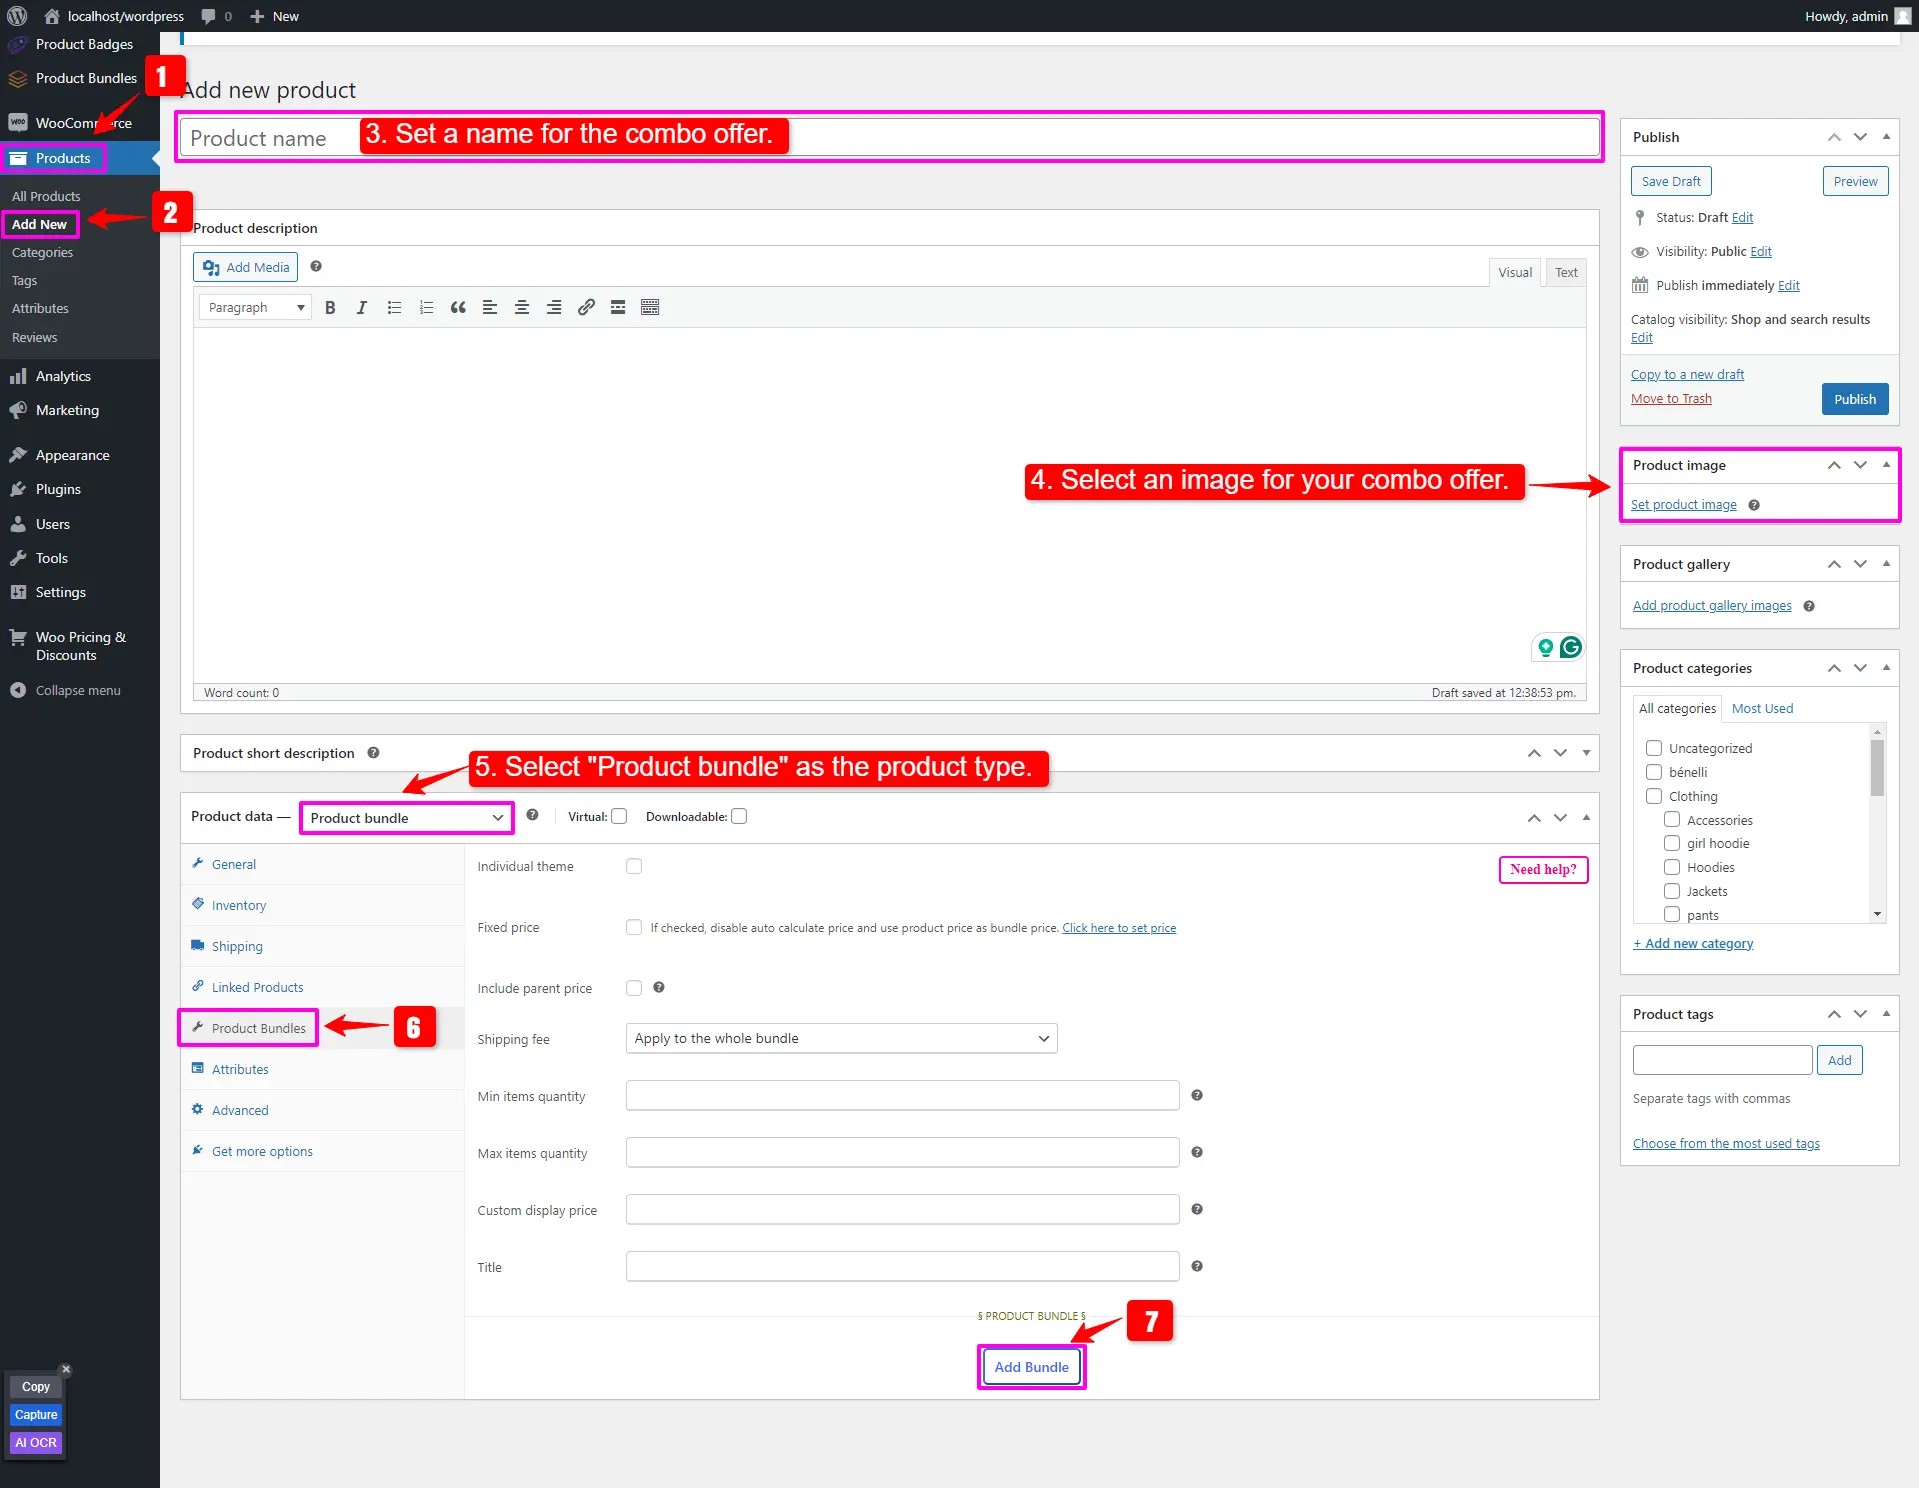
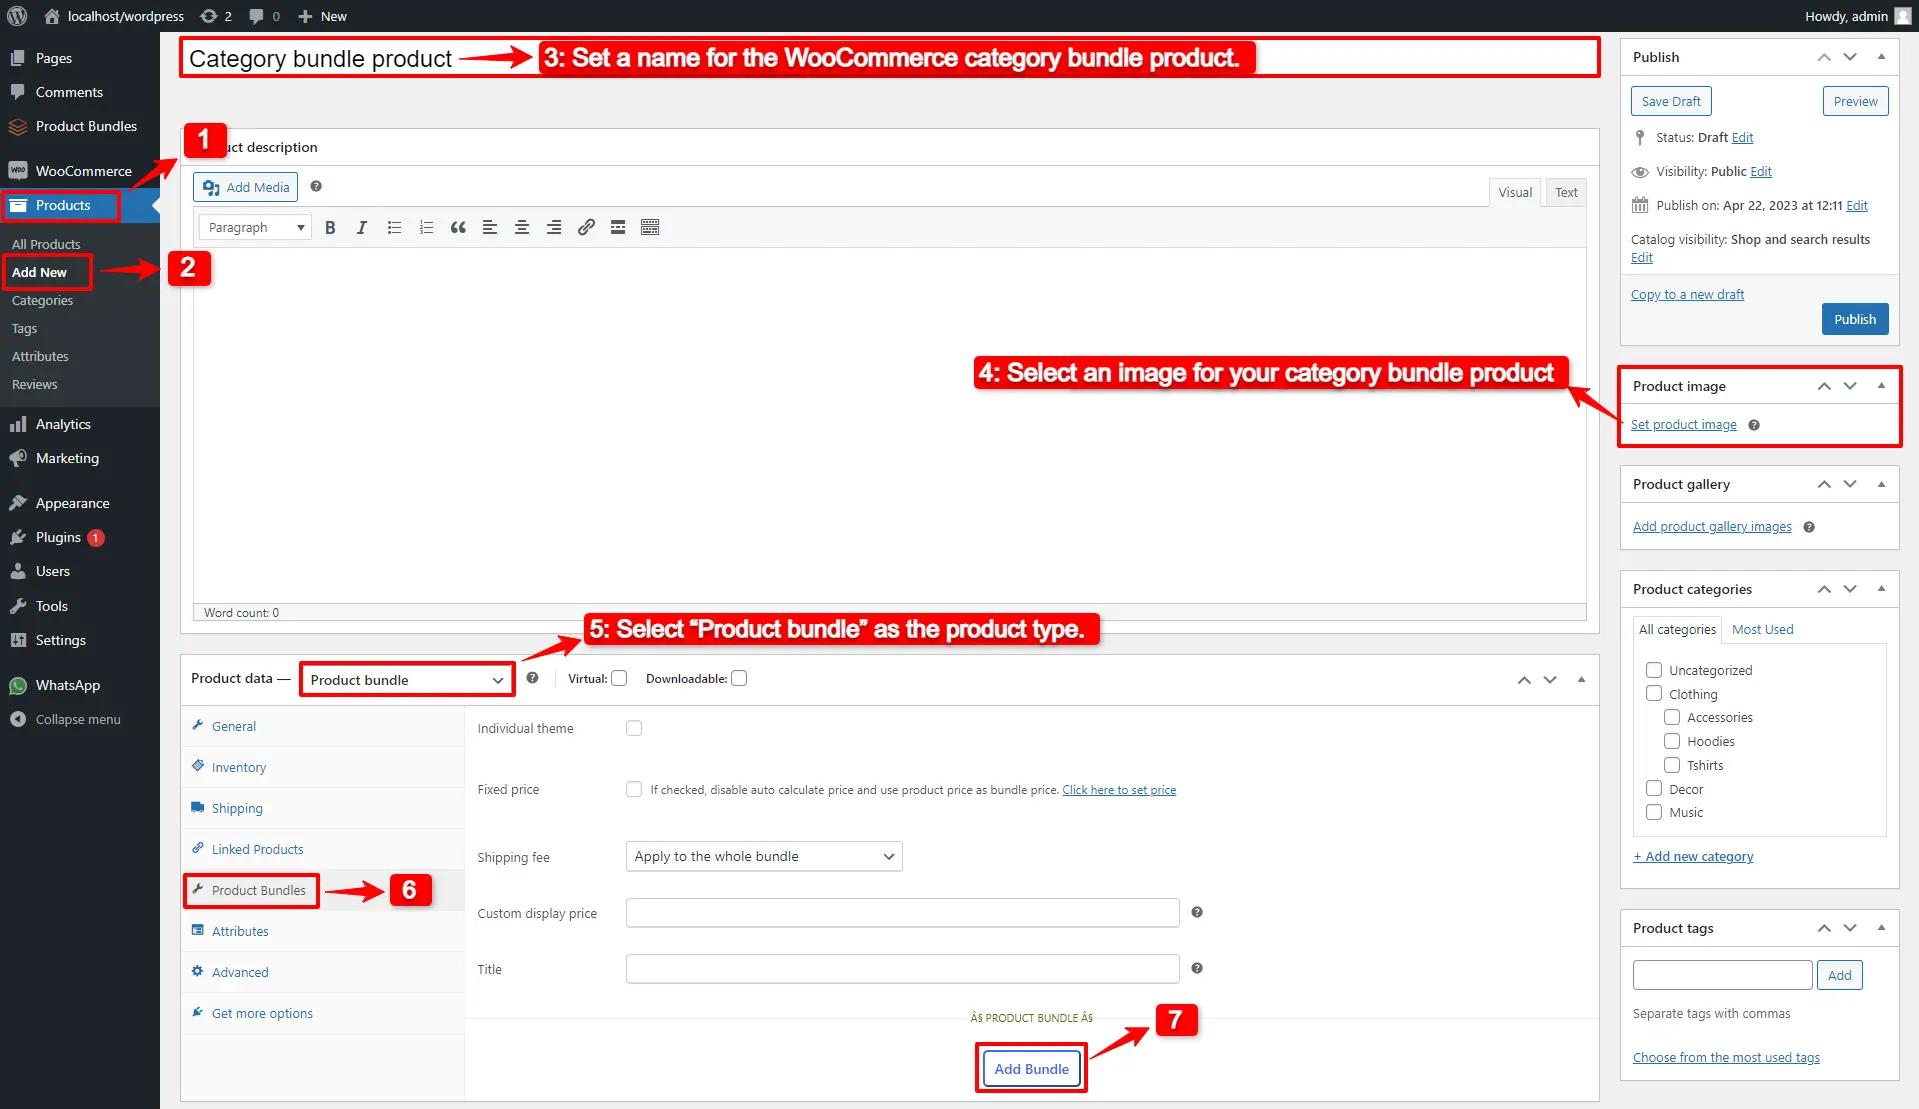
1. Go to WooCommerce “Products”.
2. Click on “Add New” to create a new product.
3. Set a name for the Grouped Products.
4. Click on “Set product image” from the right sidebar and select an image for your Grouped Products.
5. Now go to the Product data section, and select “Product bundle” as the product type from the dropdown menu.
6. After selecting “Product bundle” as the product type the “Product Bundles” tab will appear in the product data panel.
7. Go to the “Product Bundles” tab and click on the “Add Item” button to add a new bundle item.
Step 3: Add product to the Grouped Products
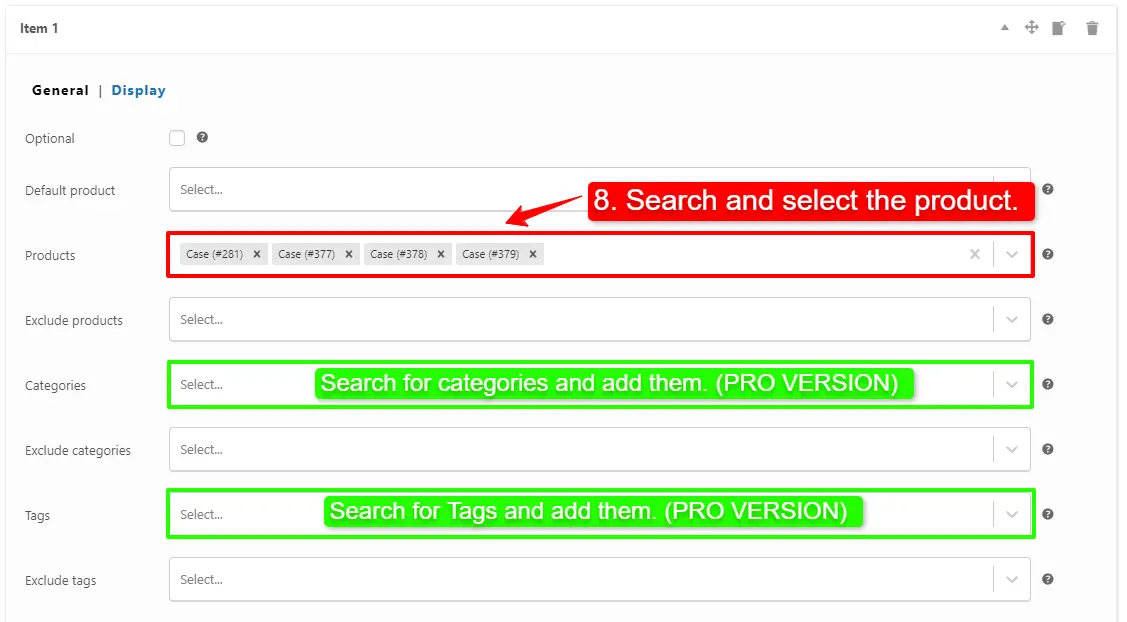
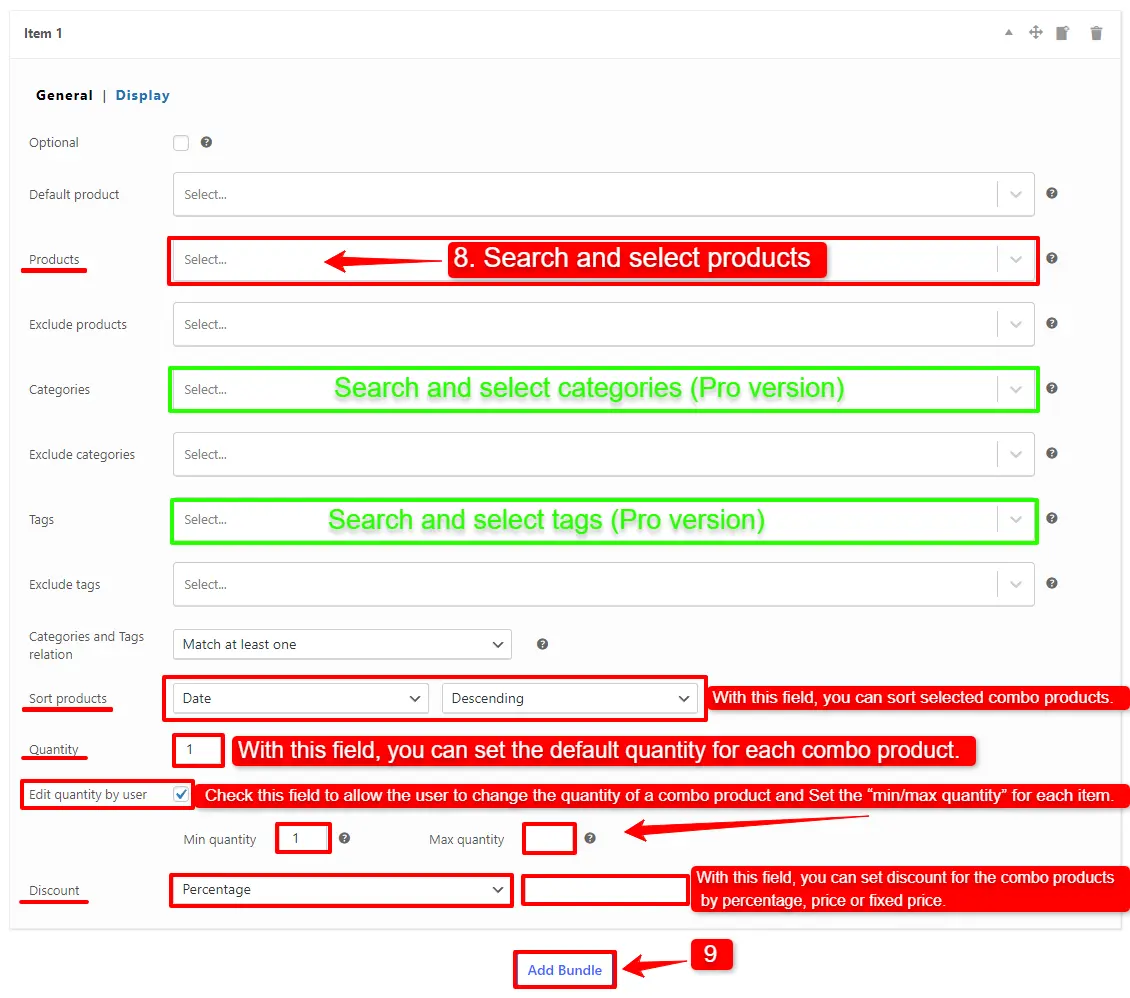
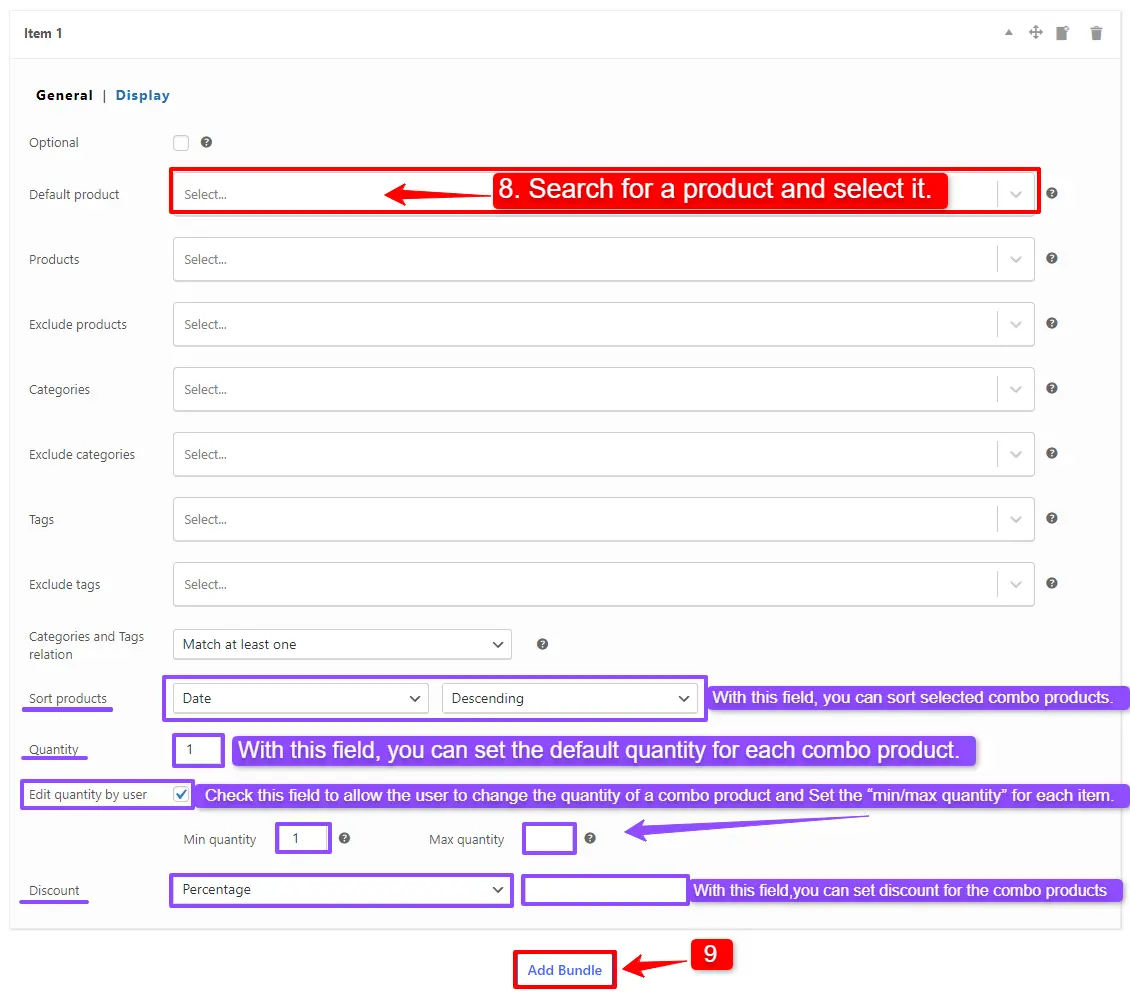
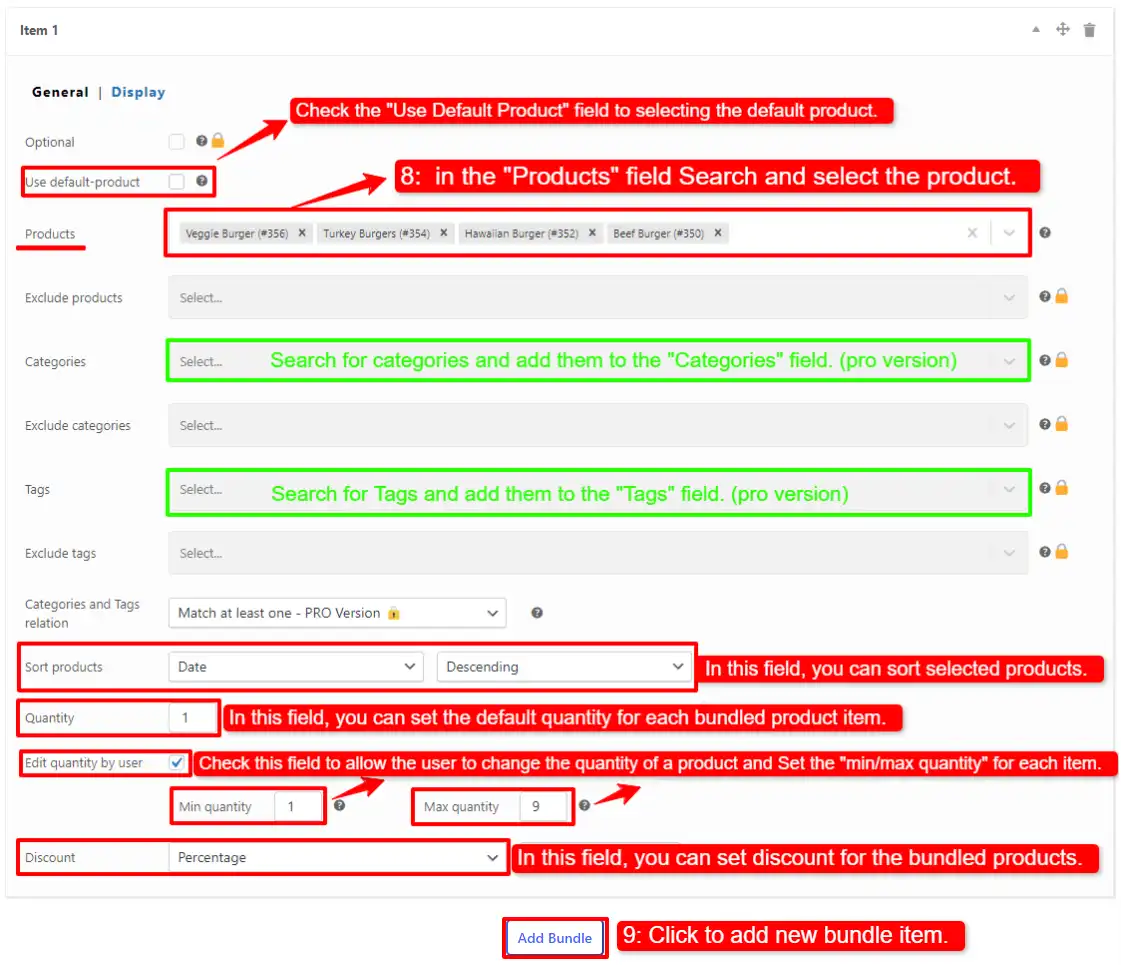
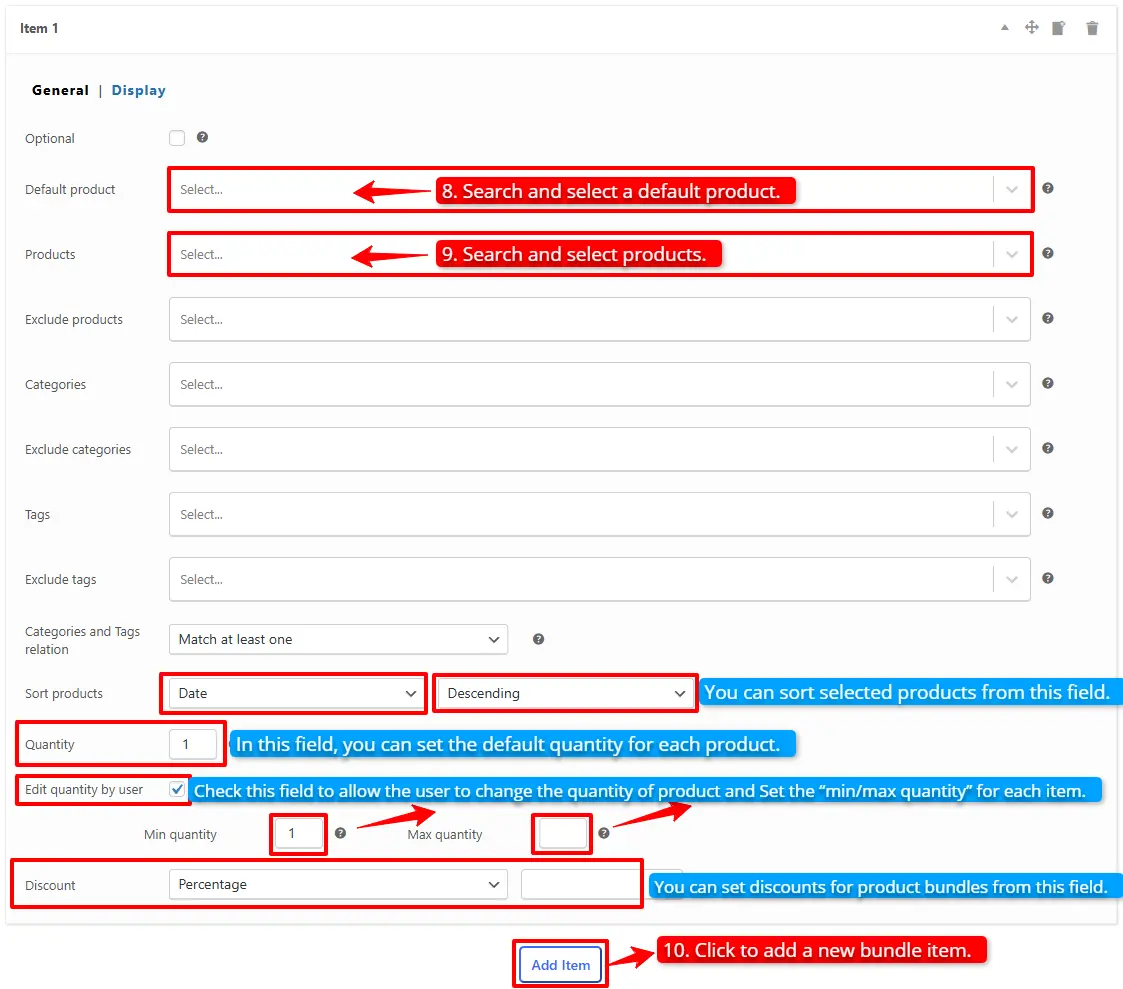
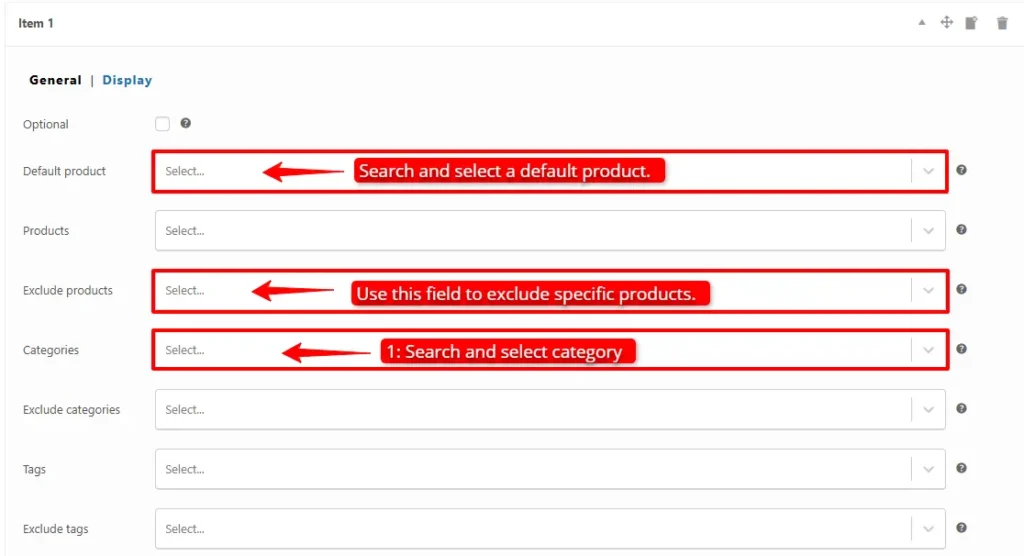
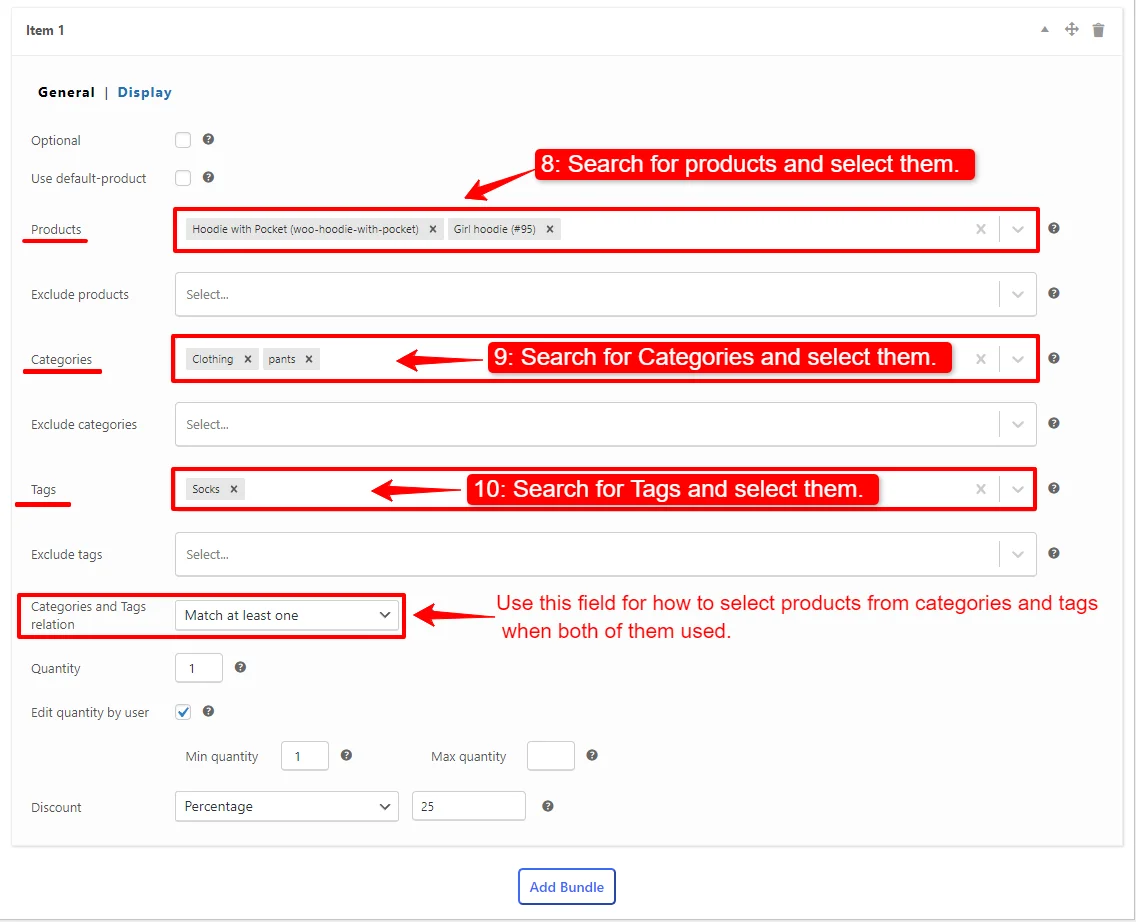
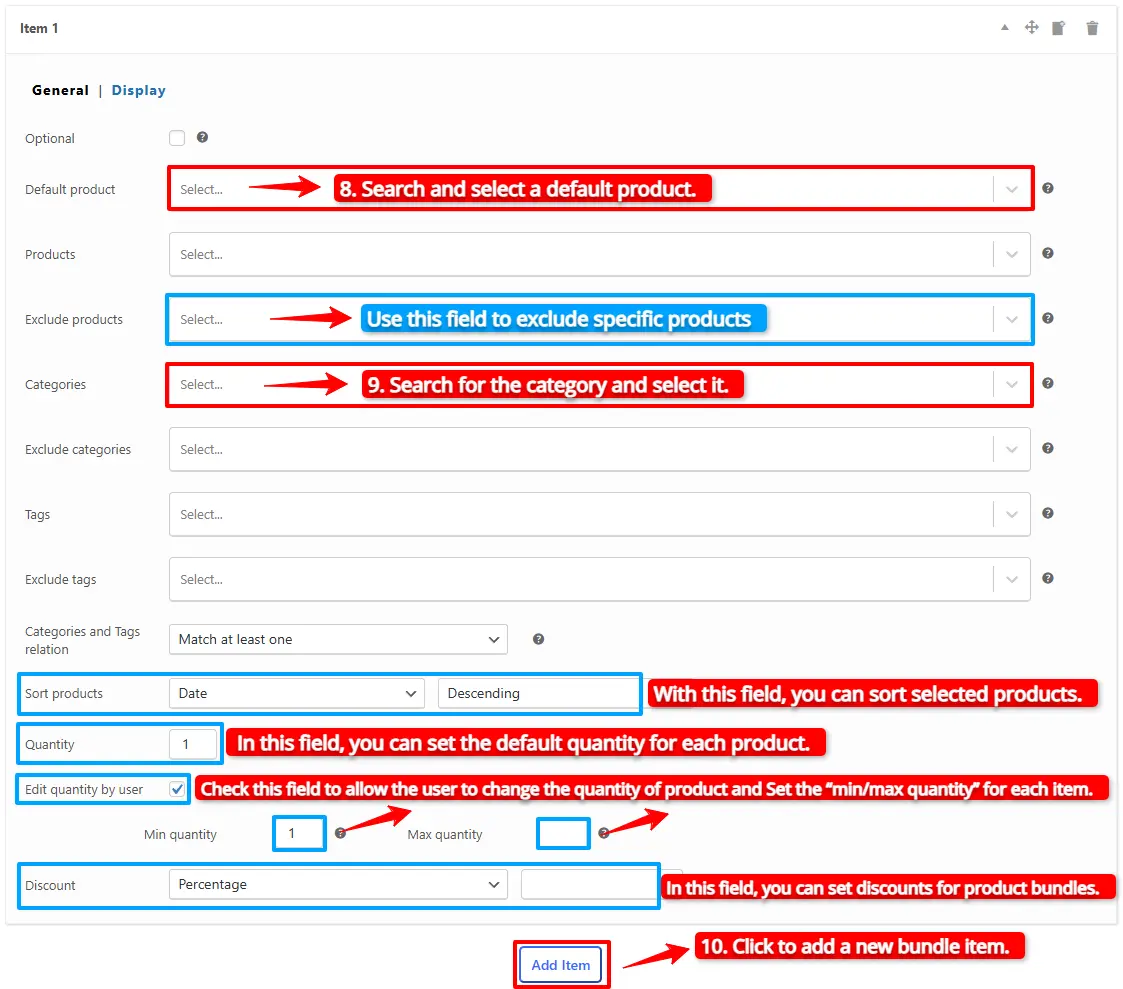
8. Now scroll down to the item field, and in the “Products” field of the item Search and select the product you want, you can also set the default product for this item in the default product field.
- Likewise, if you would like to include products from a category, you can do so with the “Categories” field of the item. therefore you can search for categories and add them. (PRO VERSION)
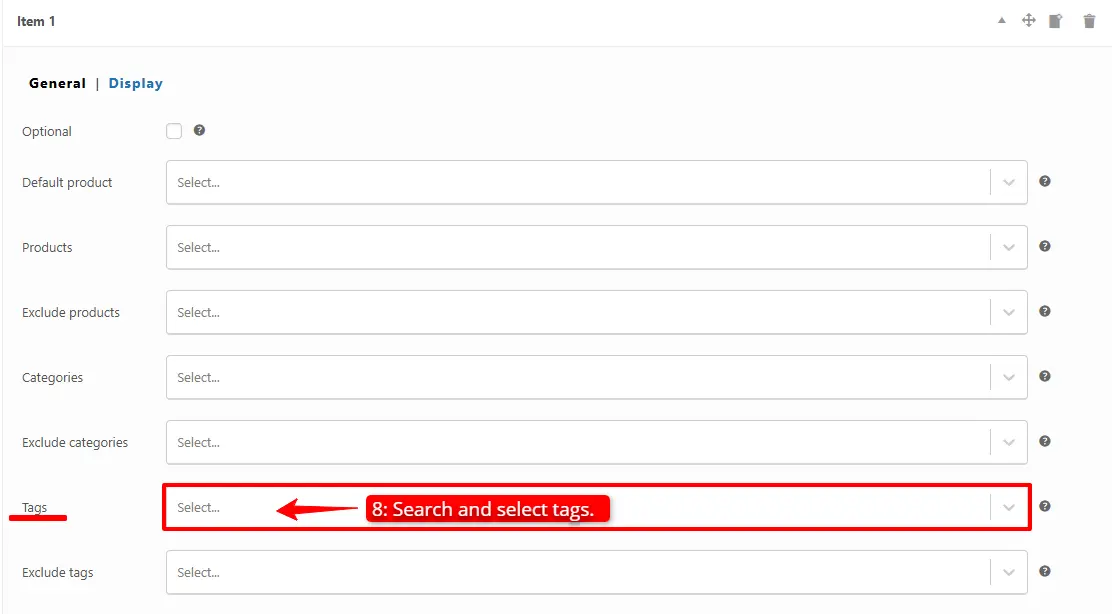
- in addition, you can do the same for the product tags and include them in the “Tags” field. (PRO VERSION)
Step 4: Customising the Grouped Products
You can also configure the below settings to your grouped products in the item field:
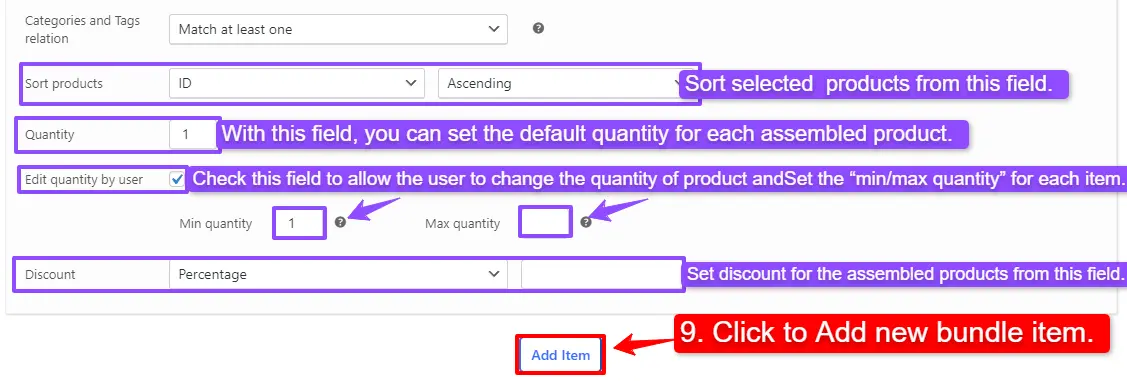
- Sort products: With this field, you can sort selected grouped products by “ID”, “Title”, “Menu order”,” Date”, “Price”, “popularity” and“Rating”.
- Quantity: In this field, you can set the default quantity for each grouped product.
- Edit quantity by user: Check this field to allow the user to change the quantity of product and Set the “min/max quantity” for each item.
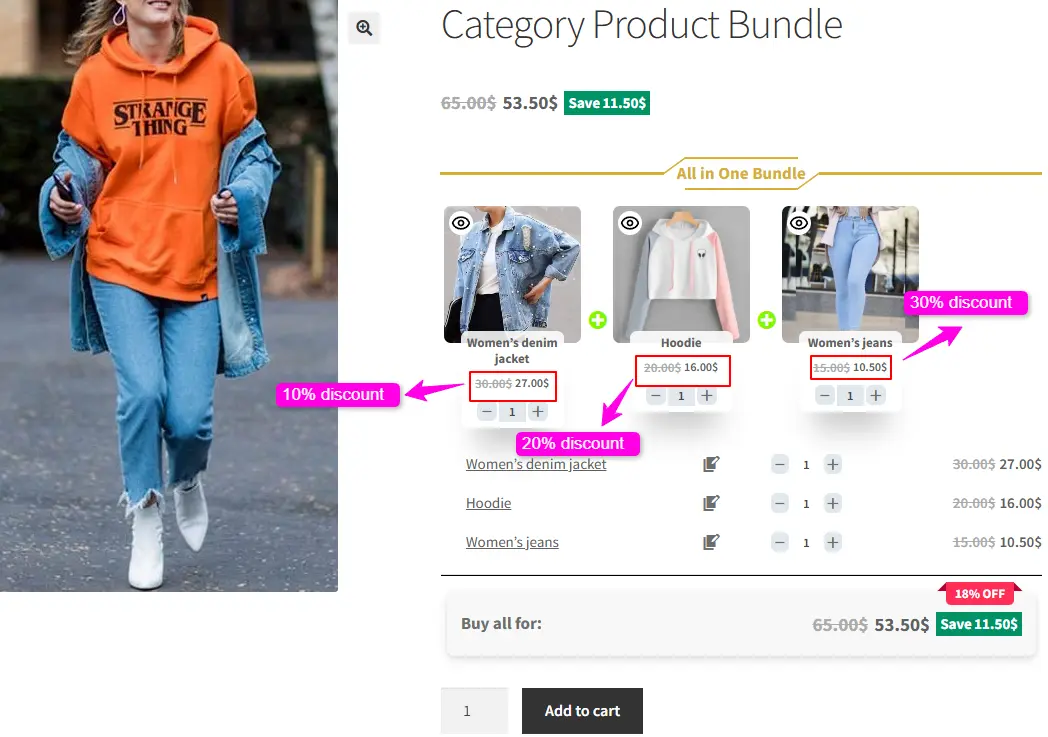
- Discount: In this field, you can set discounts for the grouped products by percentage, price or fixed price.
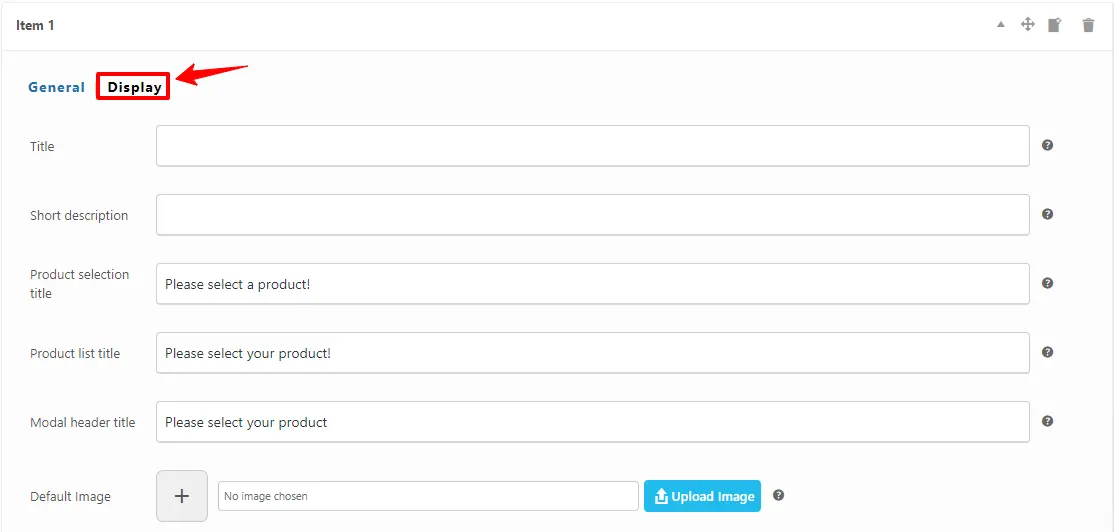
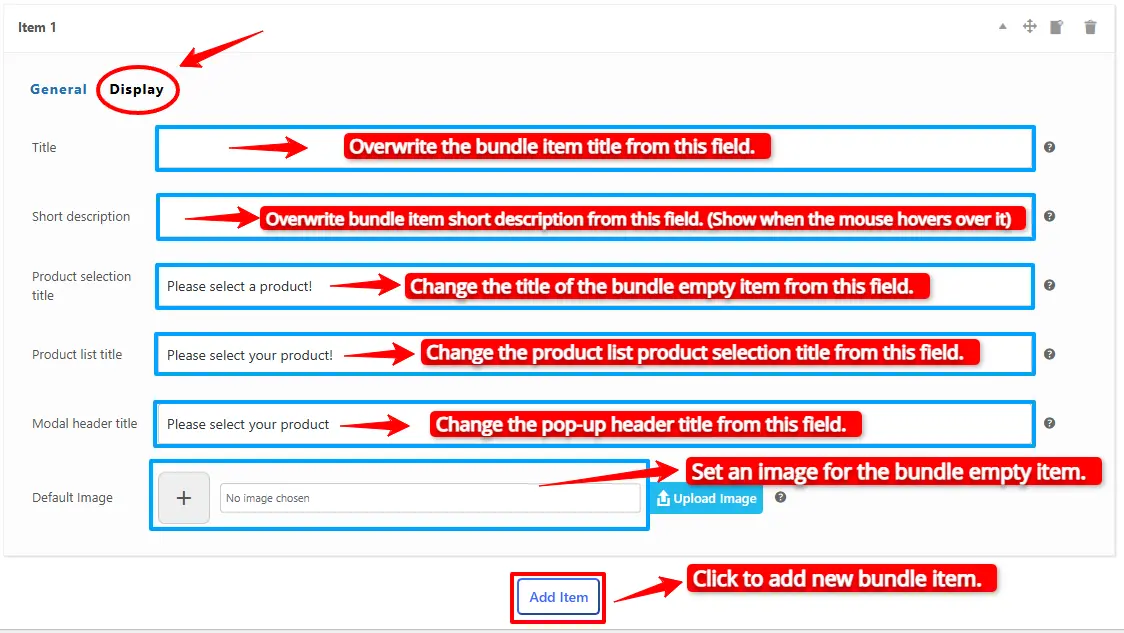
Now you can go to the “display” tab of the item and configure the below sections:
- Overwrite bundle item title.
- Overwrite bundle item short description. (Show when the mouse hovers over it)
- Change the title of the bundle empty item.
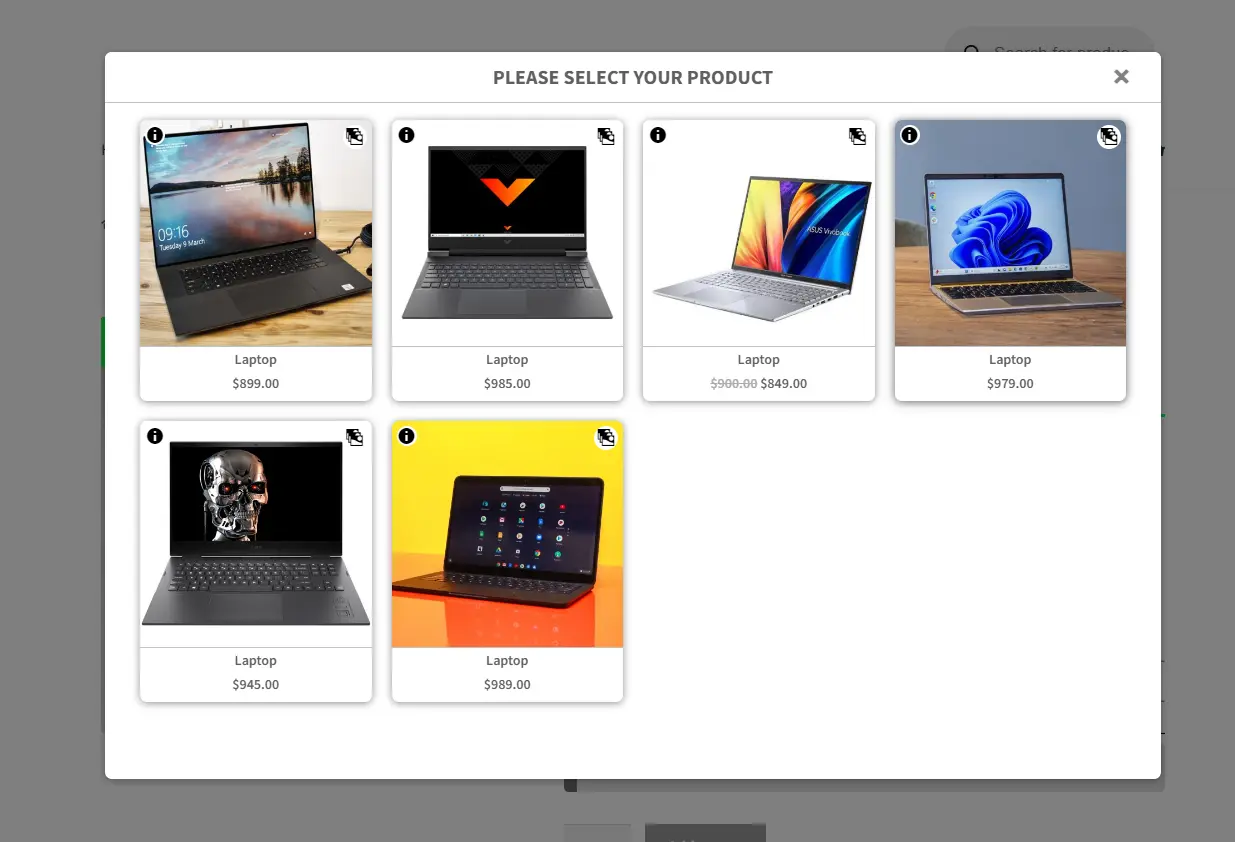
- Change the product list product selection title.
- Change the pop-up header title.
- Set an image for the empty item.
9. Then you can click on “Add Item” to add a new item to the grouped products and Configure it as in the previous steps. We have created 2 other bundle items.
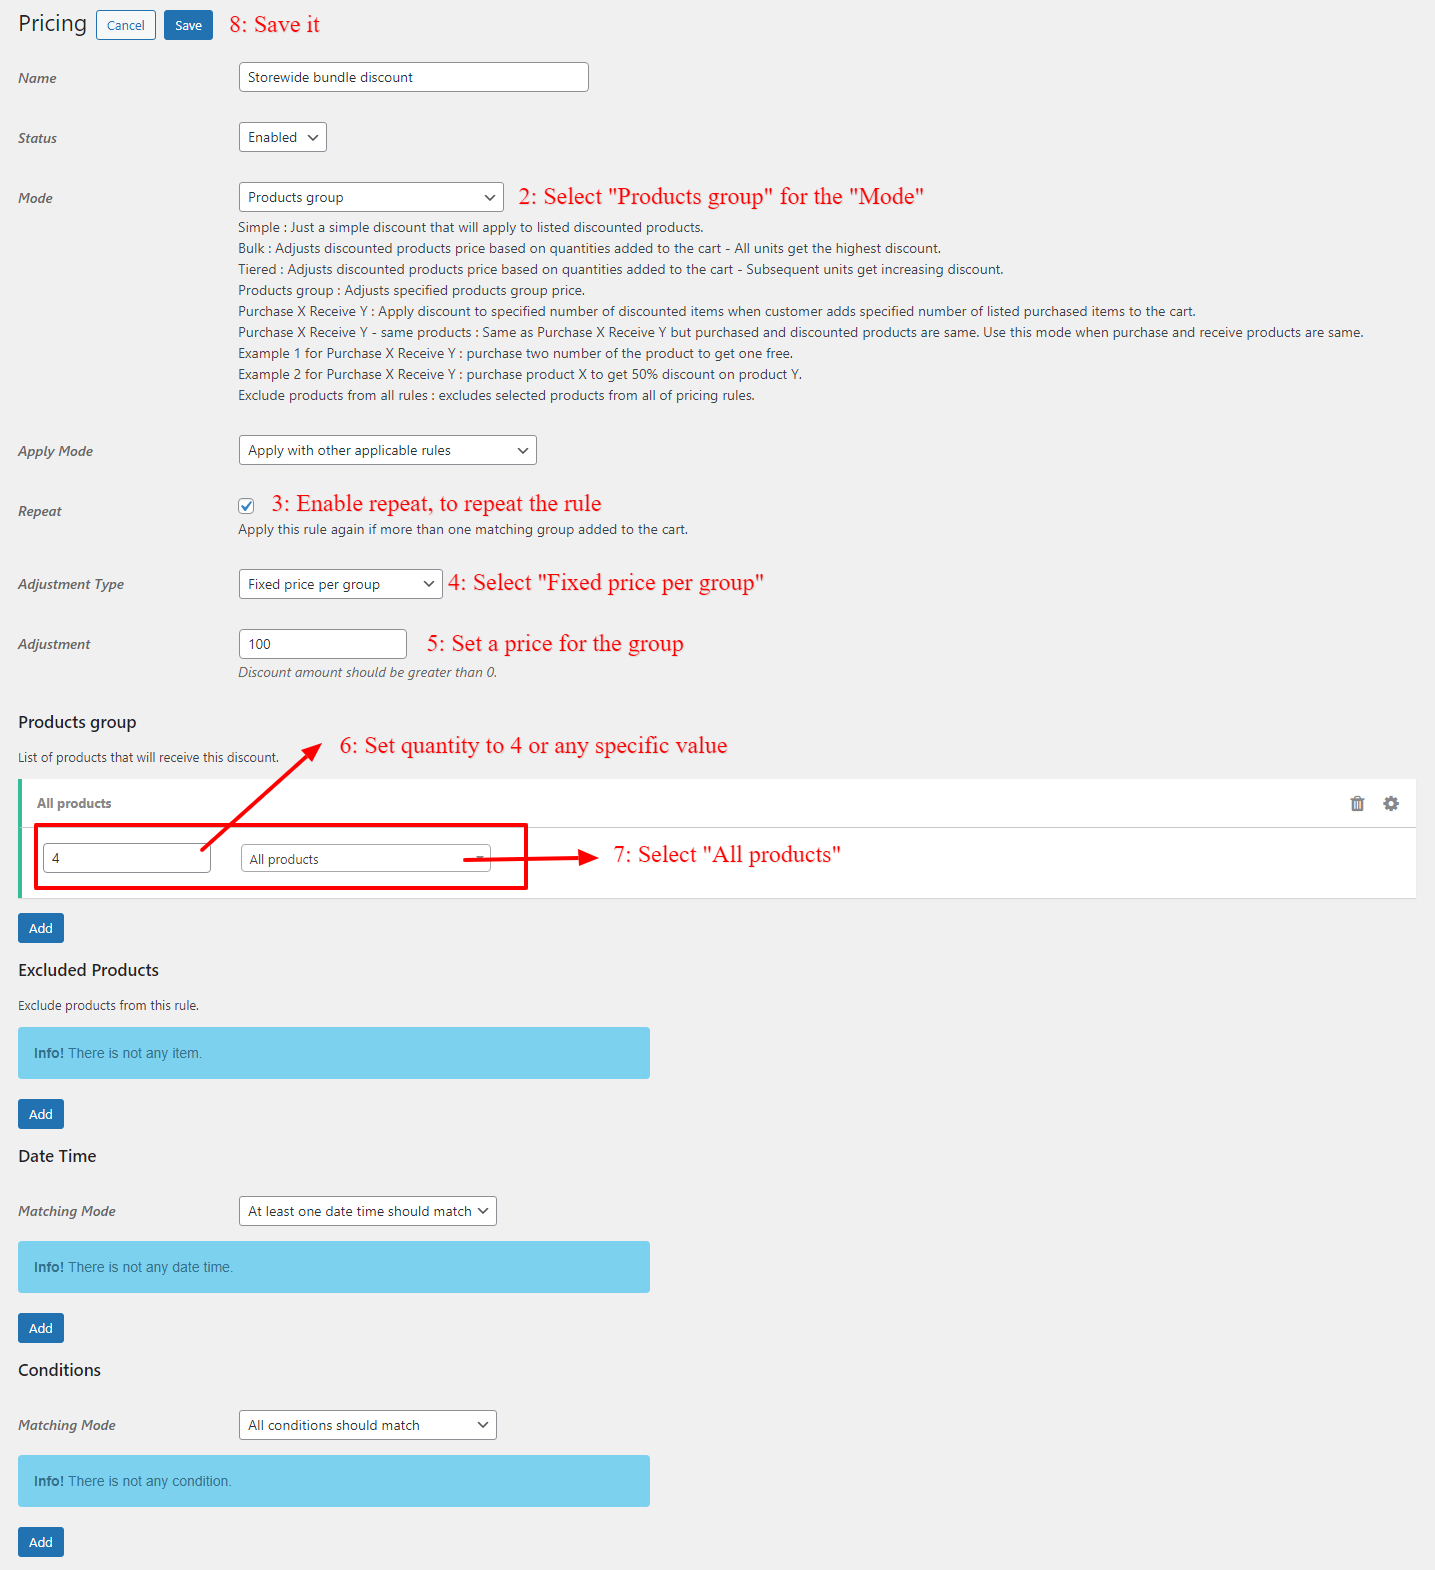
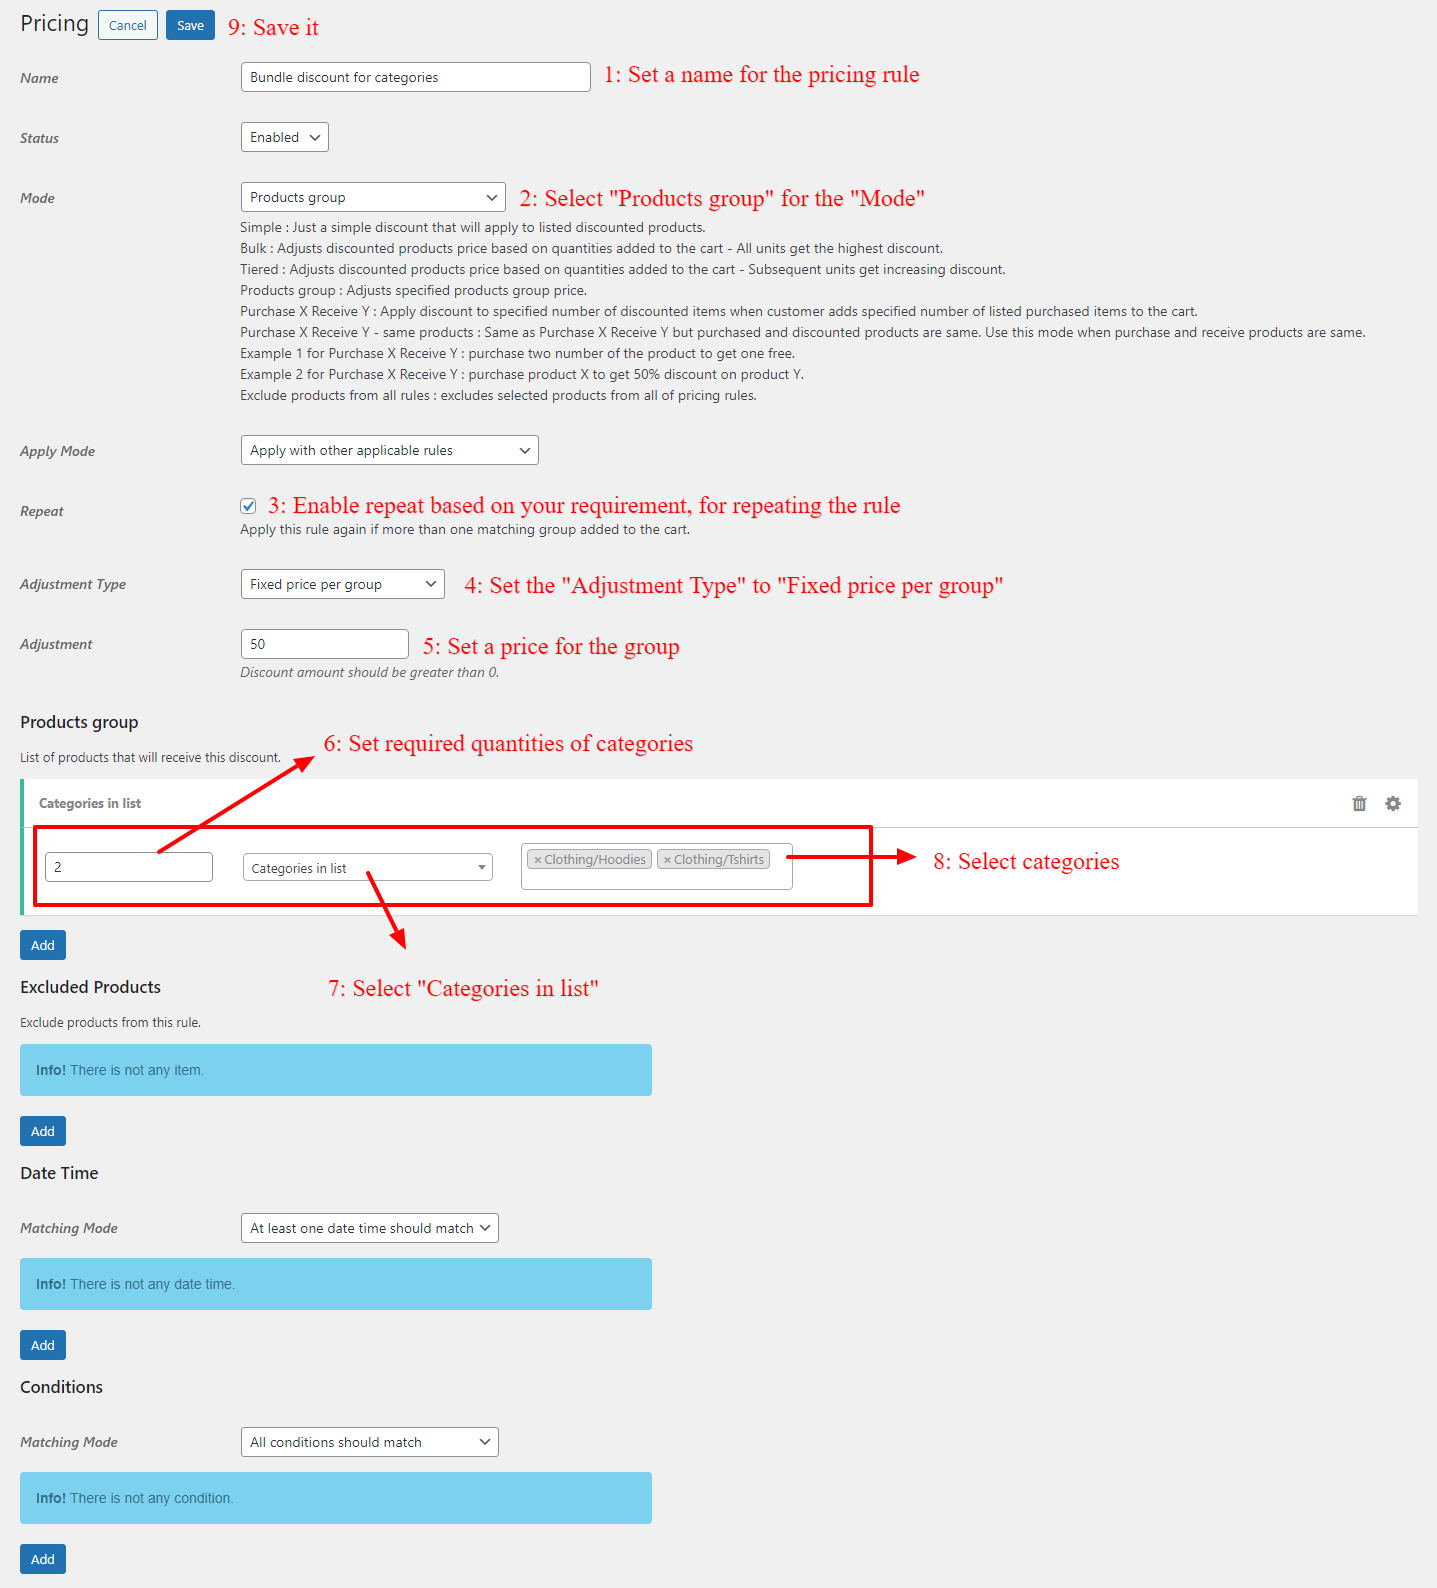
Step 5: Pricing for Grouped Products
After adding products and configuring settings for that you can choose how want to price your grouped products.
The Easy WooCommerce Product Bundles free plugin offers two pricing strategies:
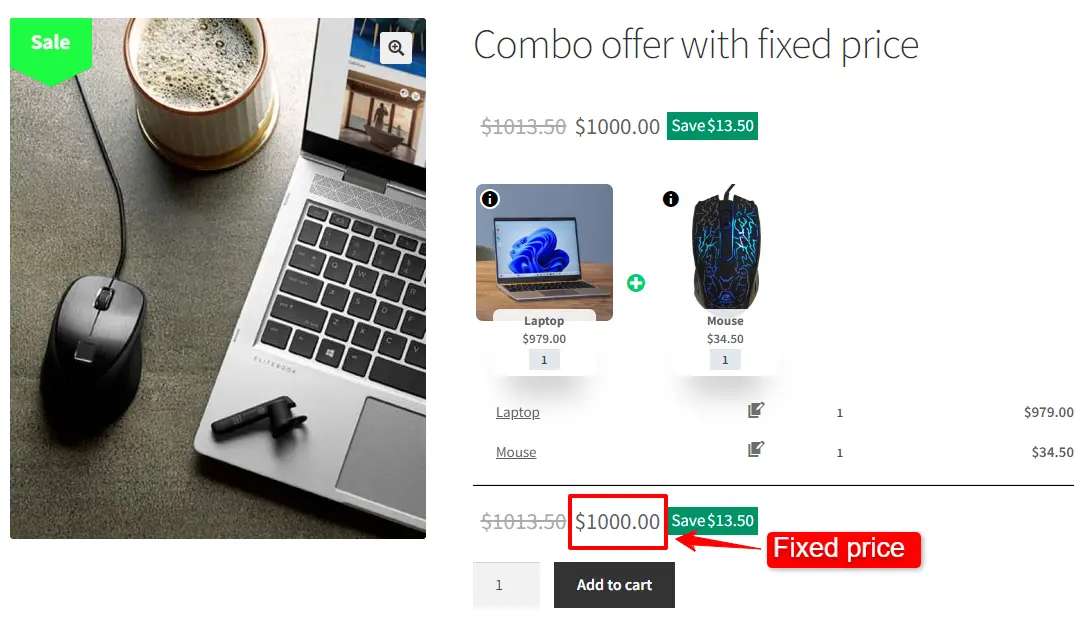
- Fixed Price: Sets a fixed price for the whole assembled products.
- Auto Calculate Bundle Price: Allow the plugin to calculate the grouped product price using the selected products for the bundle items.
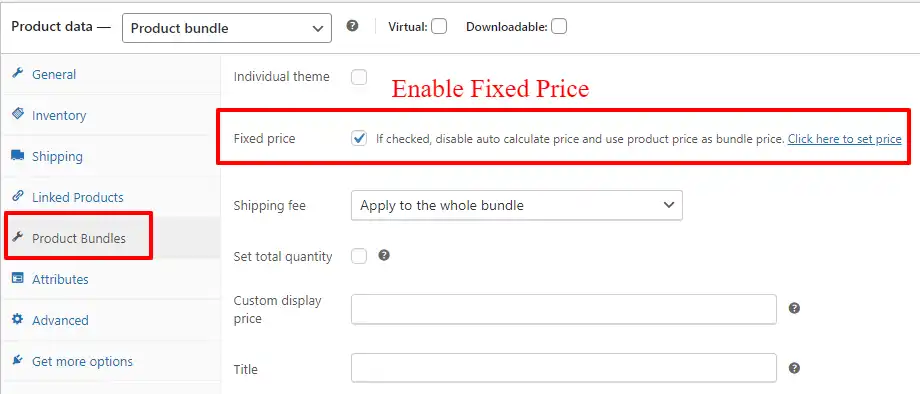
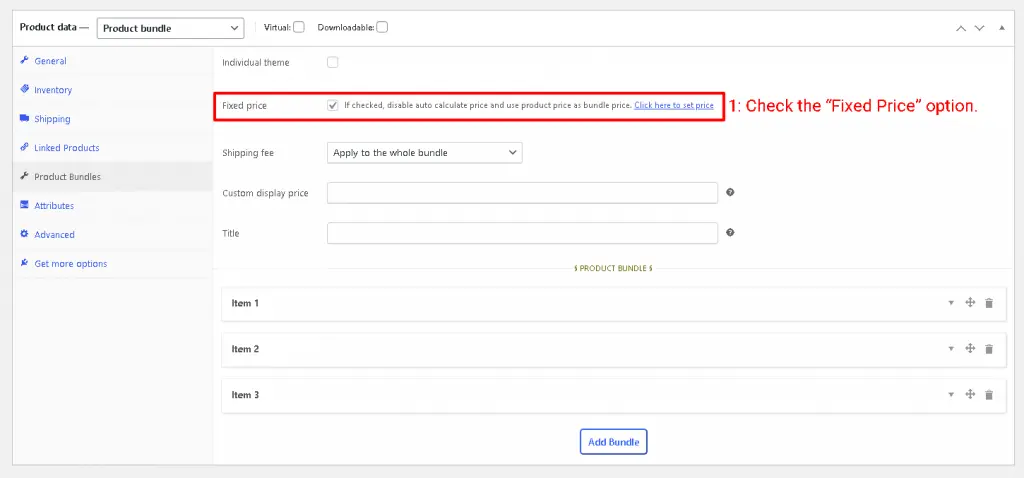
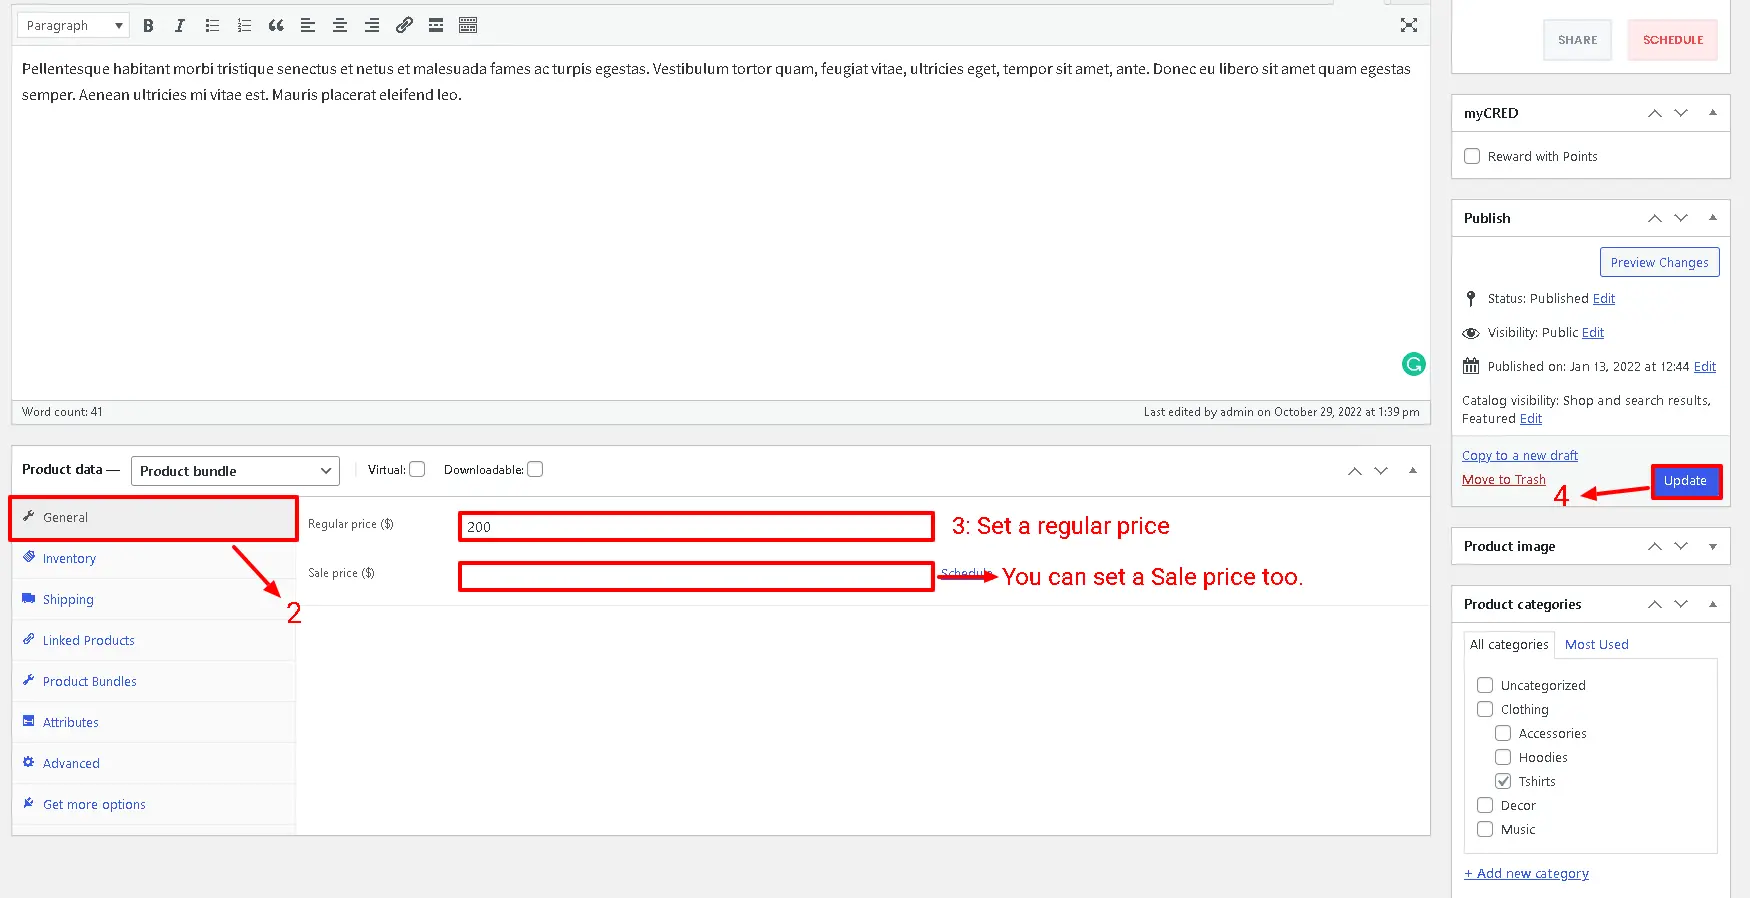
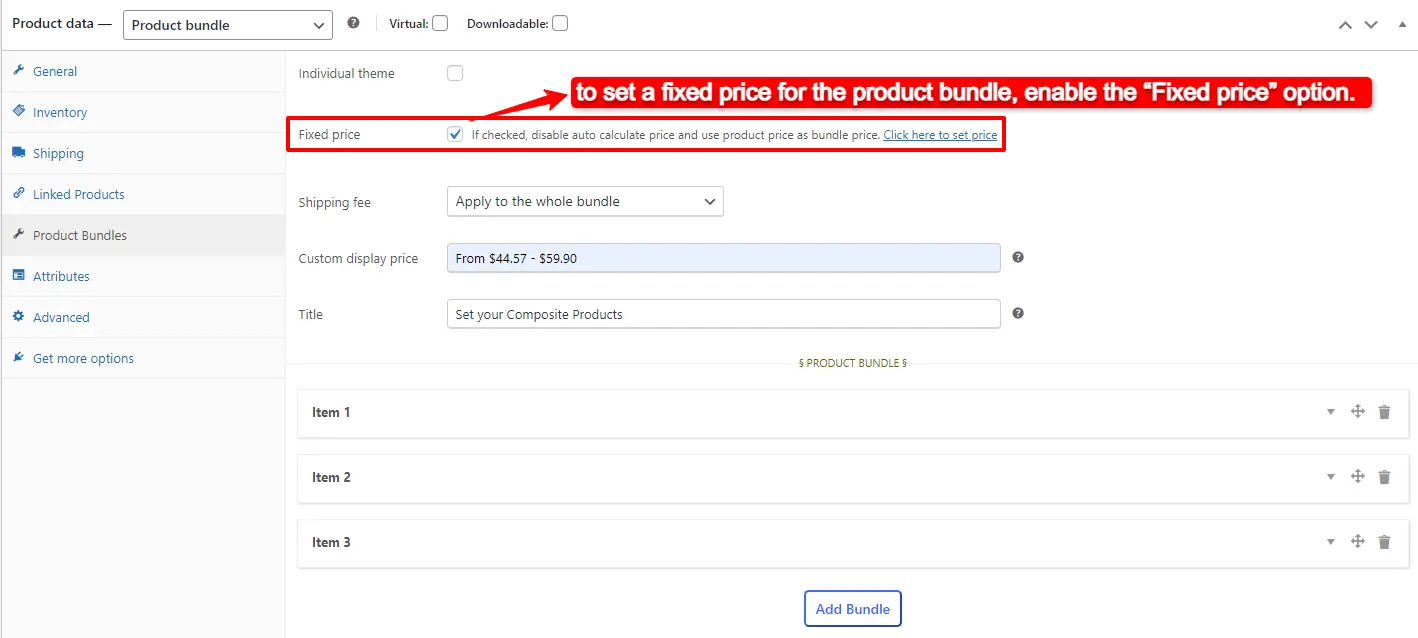
1. Fixed Price
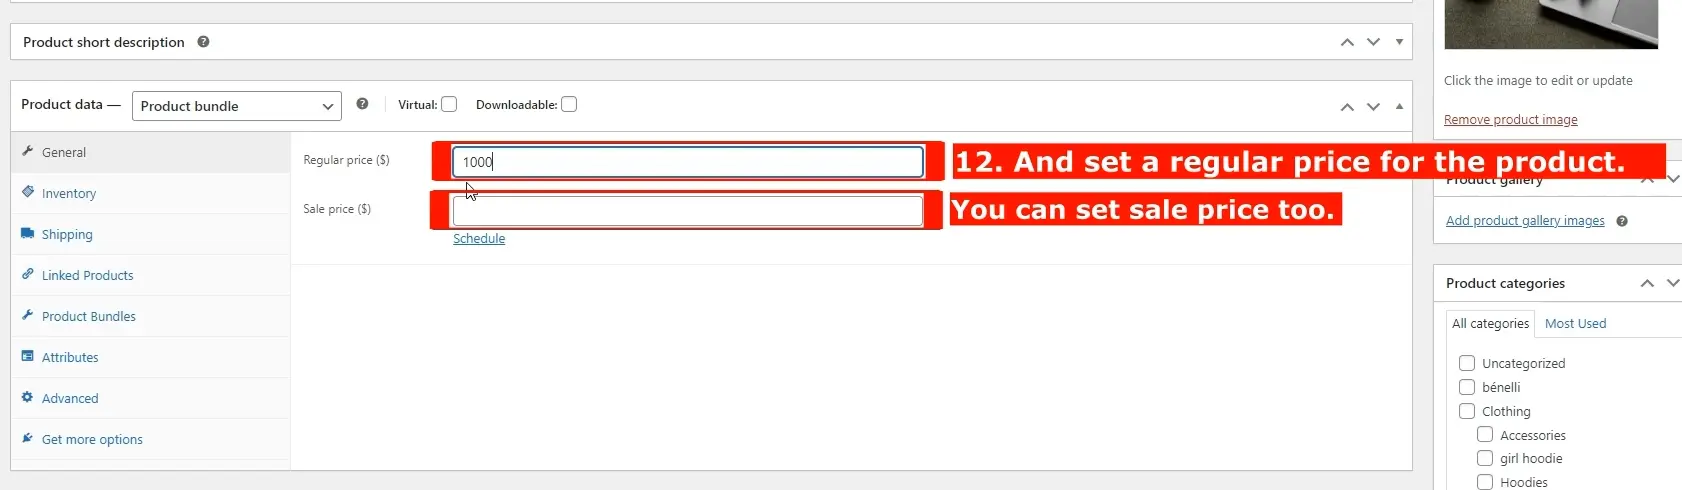
If you want to set a fixed price for the whole assembled products, check the “Fixed Price” option.
Navigate to the “General” tab and set a regular price for the grouped product. You can set a Sale price too.
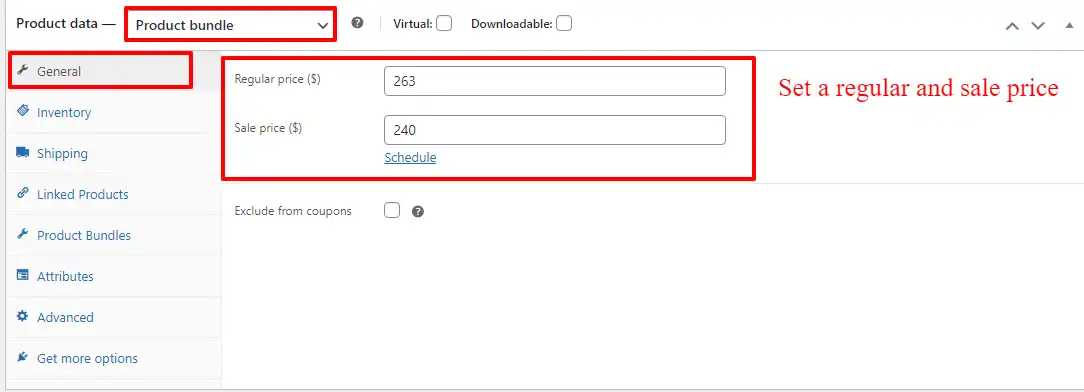
After setting a price, update the product
2. Auto Calculate Price
Auto calculates price helps to set a dynamic price for the grouped products on selected items for the bundle.
Therefore to use the auto-calculate price feature, uncheck the “Fixed Price” option and update the product.
10. At the end publish the grouped products.
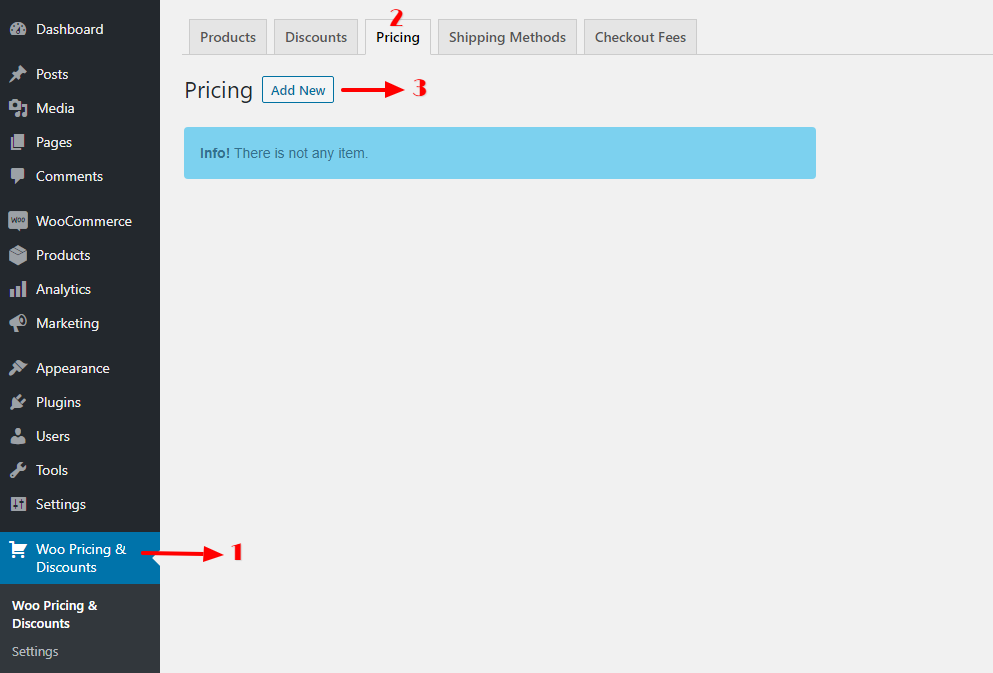
Step 6: Configure the Plugin Settings
All the plugin settings you need can be found on the “Product Bundles” tab in the WordPress dashboard.
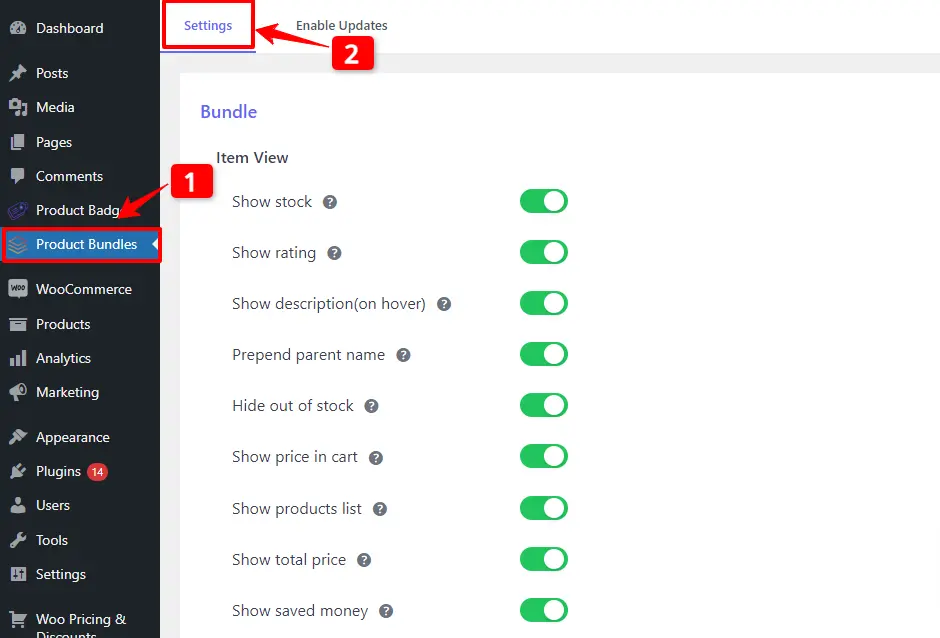
Settings and customization are available on this page:
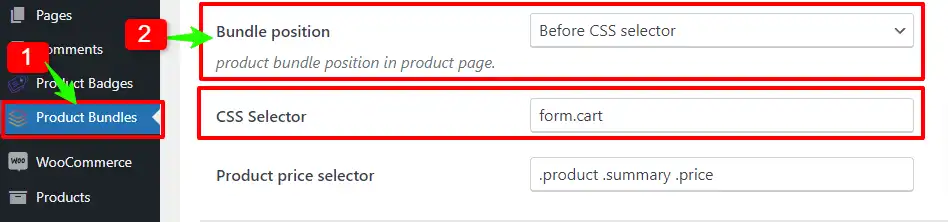
- Item View: In this section, you can configure various settings, such as displaying stock availability, showing product ratings and descriptions, enabling modal quick views, adding a quantity field on item pages, displaying a plus icon for items, setting the theme and size options, positioning product bundles on the product page, defining custom CSS selectors, specifying the product price selector, and many other customizable options.
- Change product model: In this section, you can configure the number of products per pop-up page.
- Styles: In this section, you can customize the colours of different parts of your bundle and set the product image object-fit CSS.
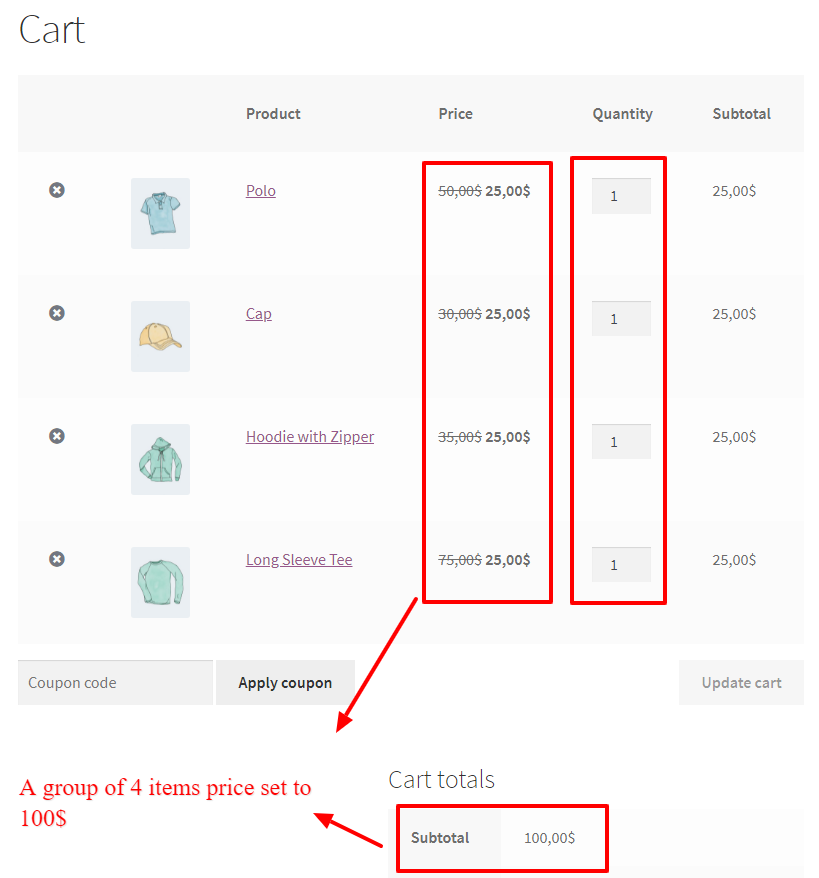
Final Result
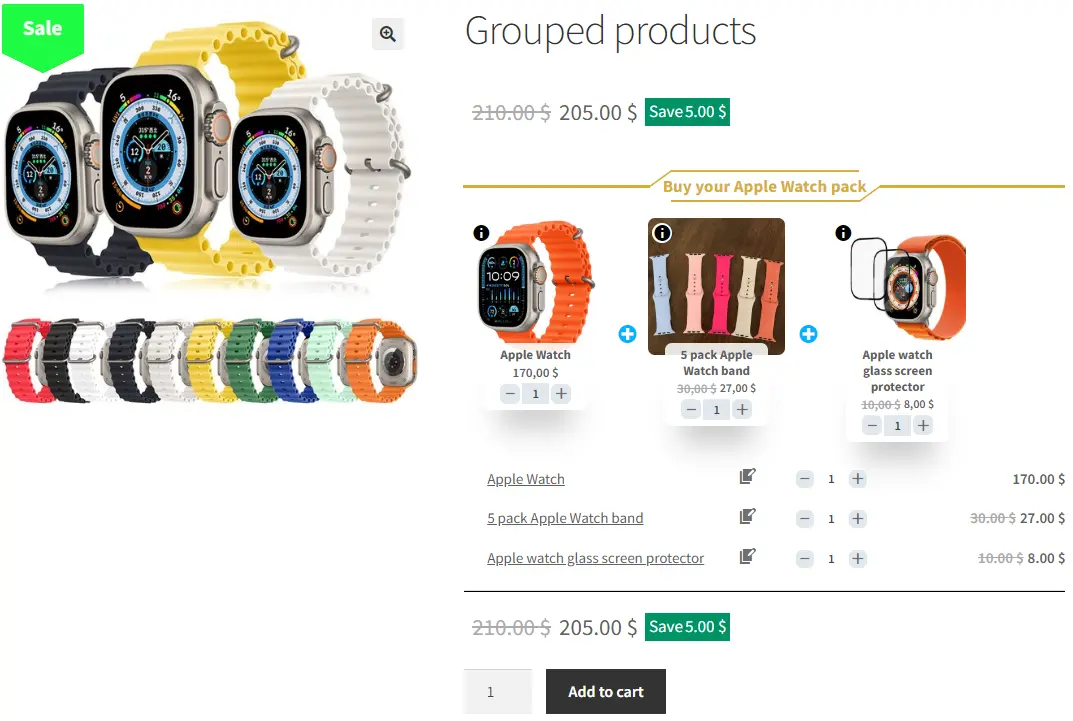
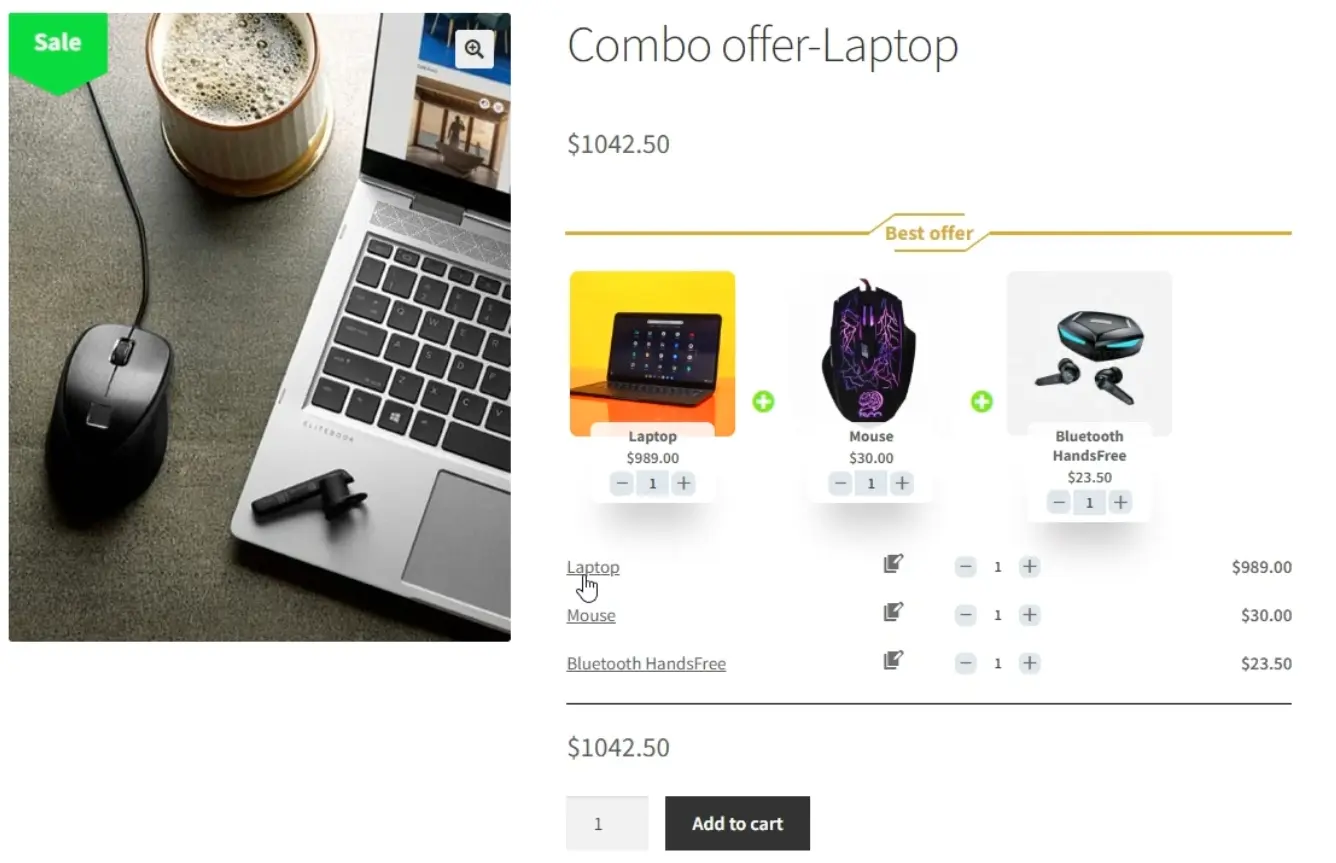
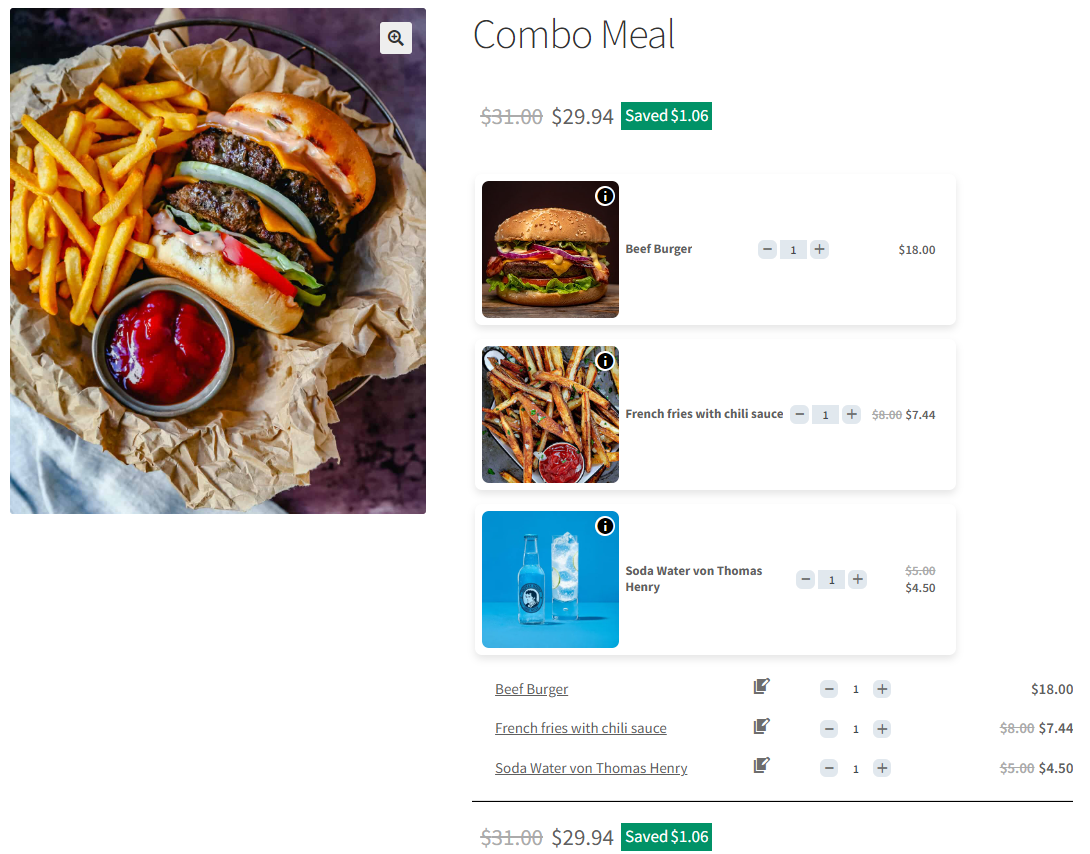
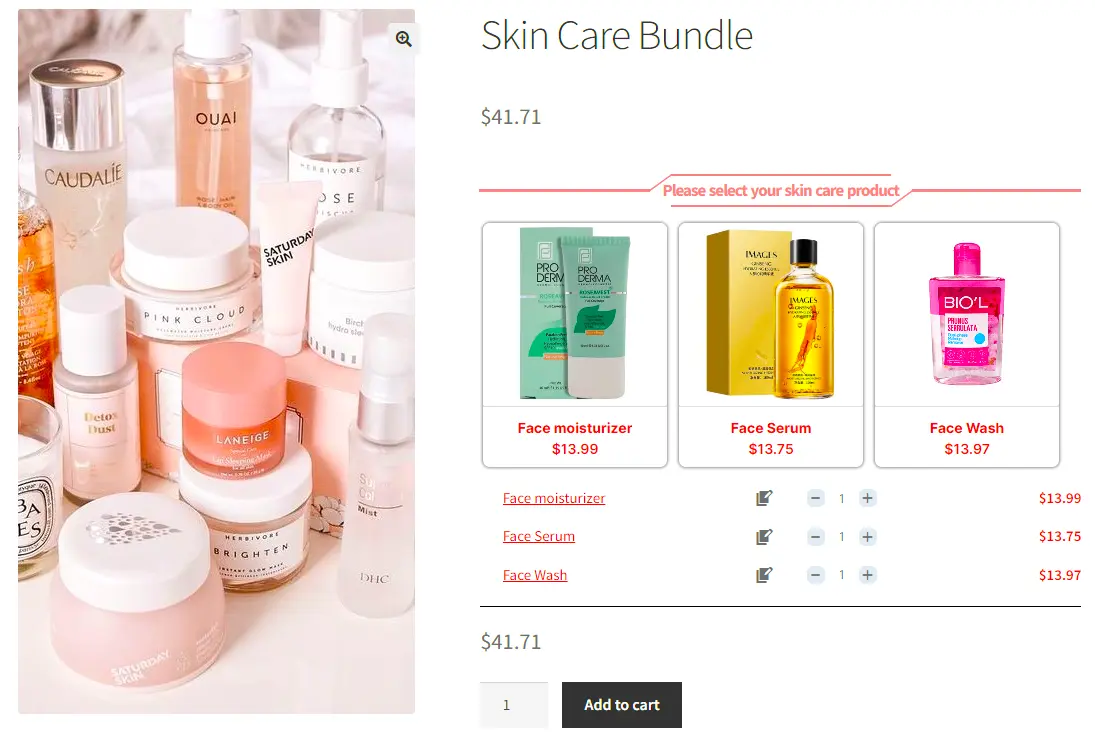
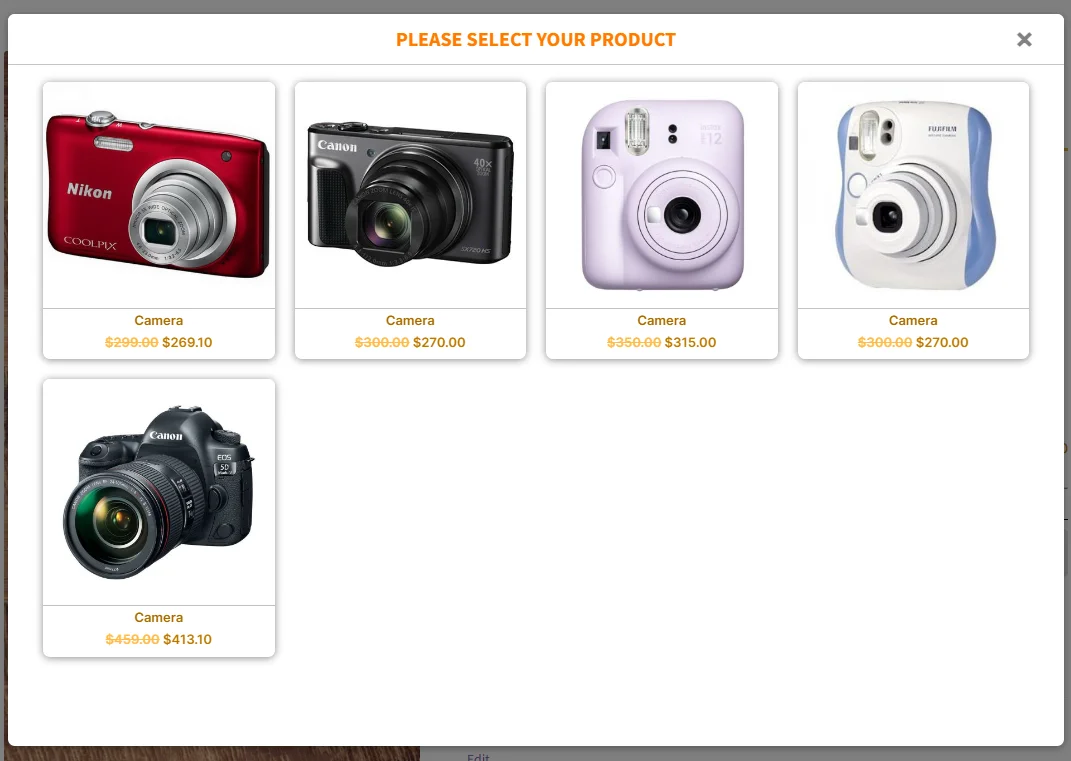
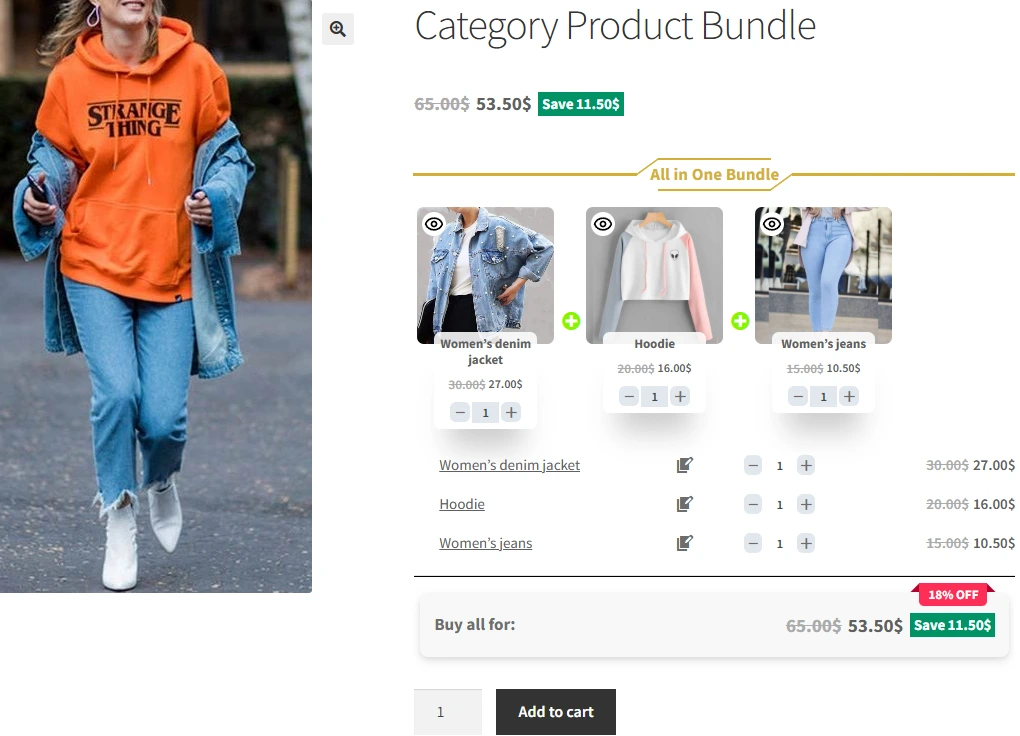
Now open the product page on the front end.
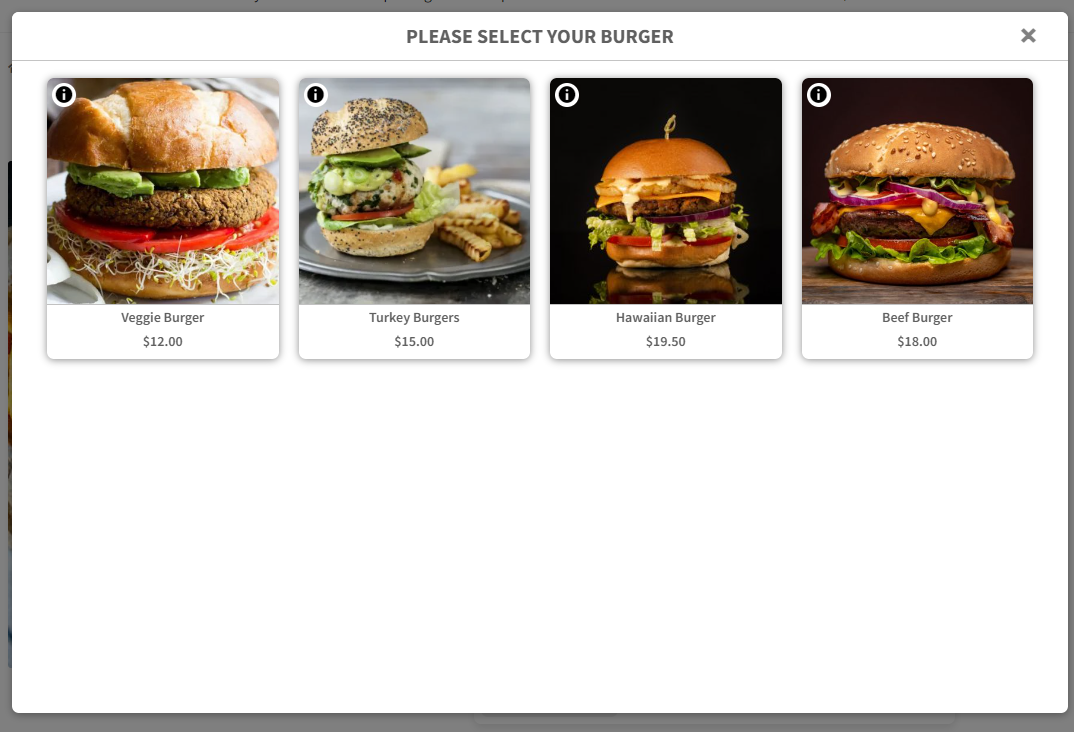
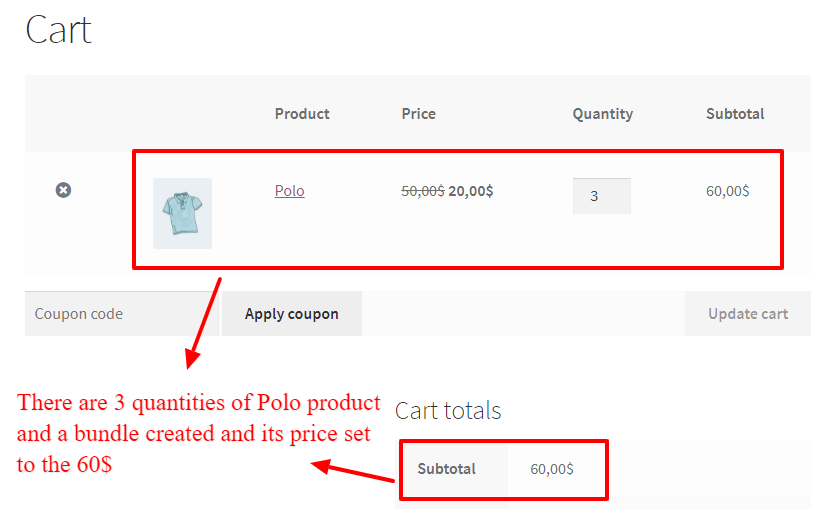
As a result, After selecting a product, for all of the bundle items, the WooCommerce grouped products will be shown as the image below.
Grouped Products With Variable Product in WooCommerce
Creating Grouped Products in WooCommerce allows you to showcase multiple related items together as a single offering. This feature can be particularly powerful, especially when combined with Variable Products, as it provides even more flexibility and options for customers. Here’s how you can effectively use WooCommerce Grouped Products with Variable Products:
Step 1: Create a Grouped Products
To create WooCommerce Grouped Products with Variable products, you can follow the steps below:
1. Go to WooCommerce “Products”.
2. Click on “Add New” to create a new product.
3. Set a name for the Grouped Products with Variable.
4. Click on “Set product image” from the right sidebar and select an image for your Grouped Products.
5. Go to the Product data section, and select “Product bundle” as the product type from the dropdown menu.
6. After selecting “Product bundle” as the product type the “Product Bundles” tab will appear in the product data panel.
7. Go to the “Product Bundles” tab and click on the “Add Item” button to add a new bundle item.
Step 2: Add Variable product to the Grouped Products
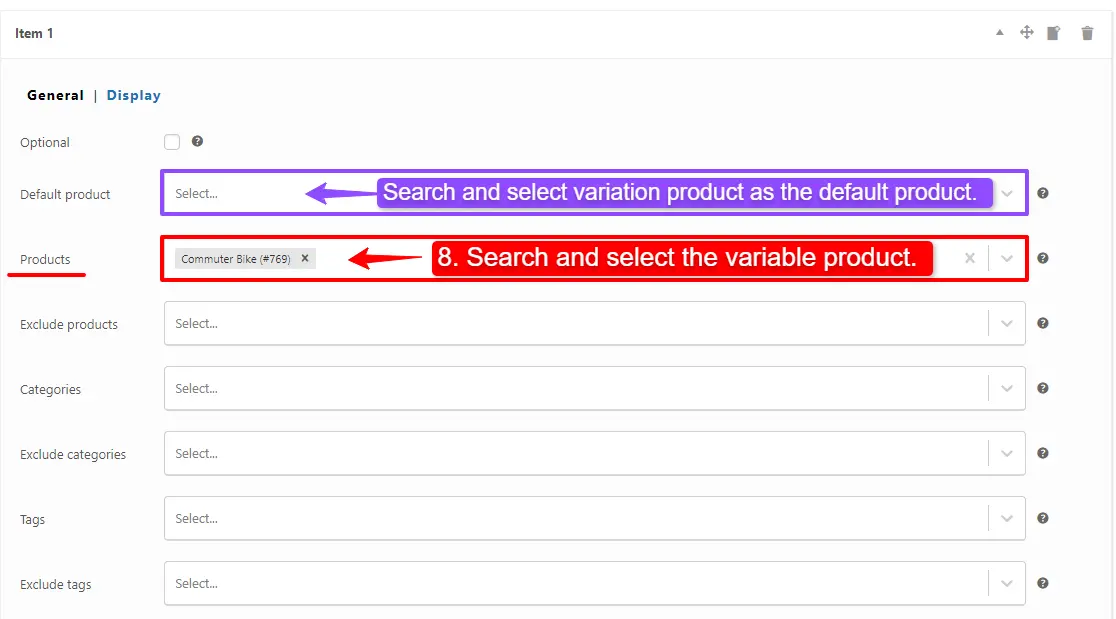
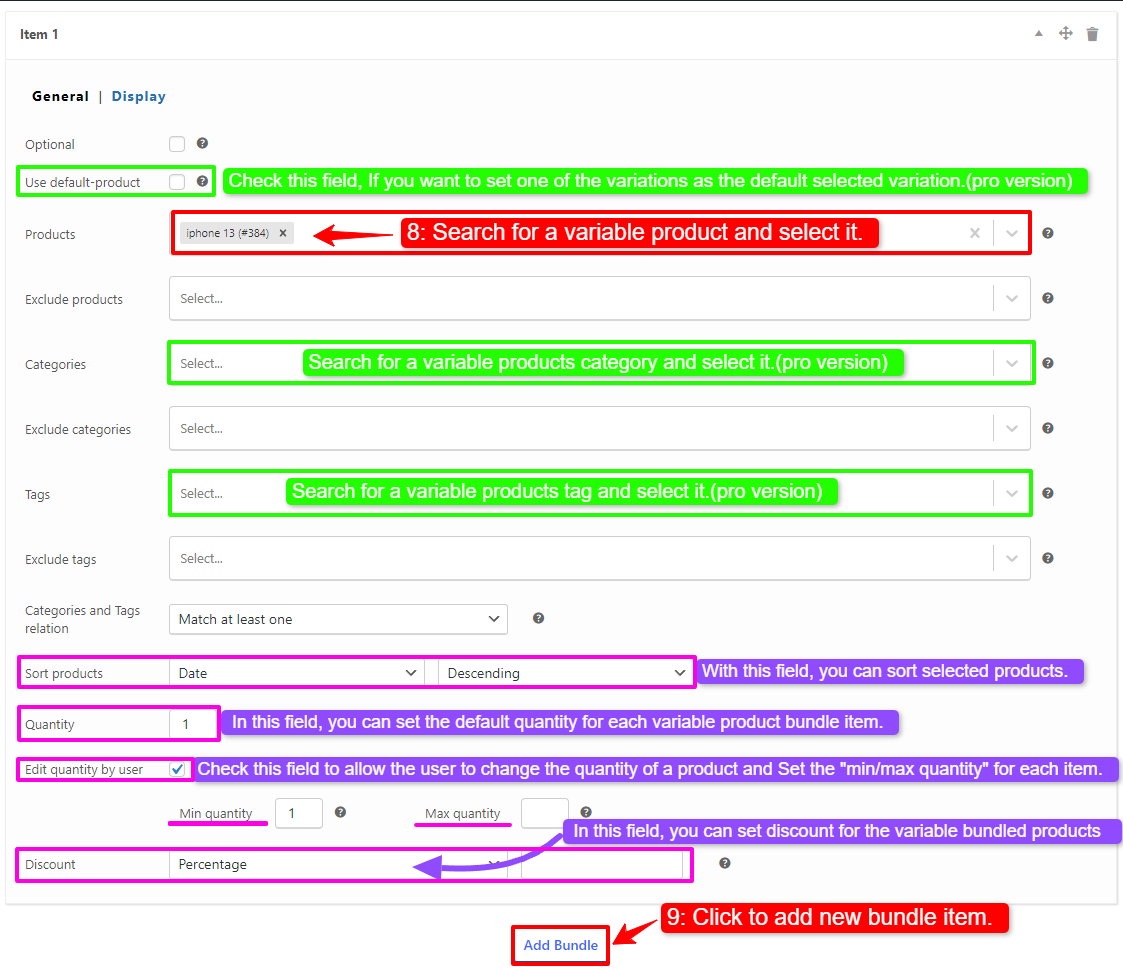
8. Now scroll down to the item field, and in the “Products” field of the item Search and select the Variable products you want.
you can also set the default variation product for this item in the default product field. (PRO VERSION)
- Likewise, if you would like to include Variable products from a category, you can do so with the “Categories” field of the item. therefore you can search for variable product categories and add them. (PRO VERSION)
- in addition, you can do the same for the variable product tags and include them in the “Tags” field. (PRO VERSION)
Step 3: Customising the Grouped Products
For customising the grouped products, therefore please Read this section of the article for more information.
9. Then you can click on “Add Item” to add a new item to the grouped products with Variable product and Configure it as in the previous steps. We have created 2 other bundle items.
Step 4: Pricing for Grouped Products with Variable Products
Now you should decide about the pricing of the Grouped Products with Variable Products. therefore You can use a fixed price for the whole bundle or use auto calculate price, to calculate the bundle price based on selected items.
Read this section of the article for more information.
Step 5: Configure the Plugin Settings
To configure the plugin settings, therefore please Read this section of the article for more information.
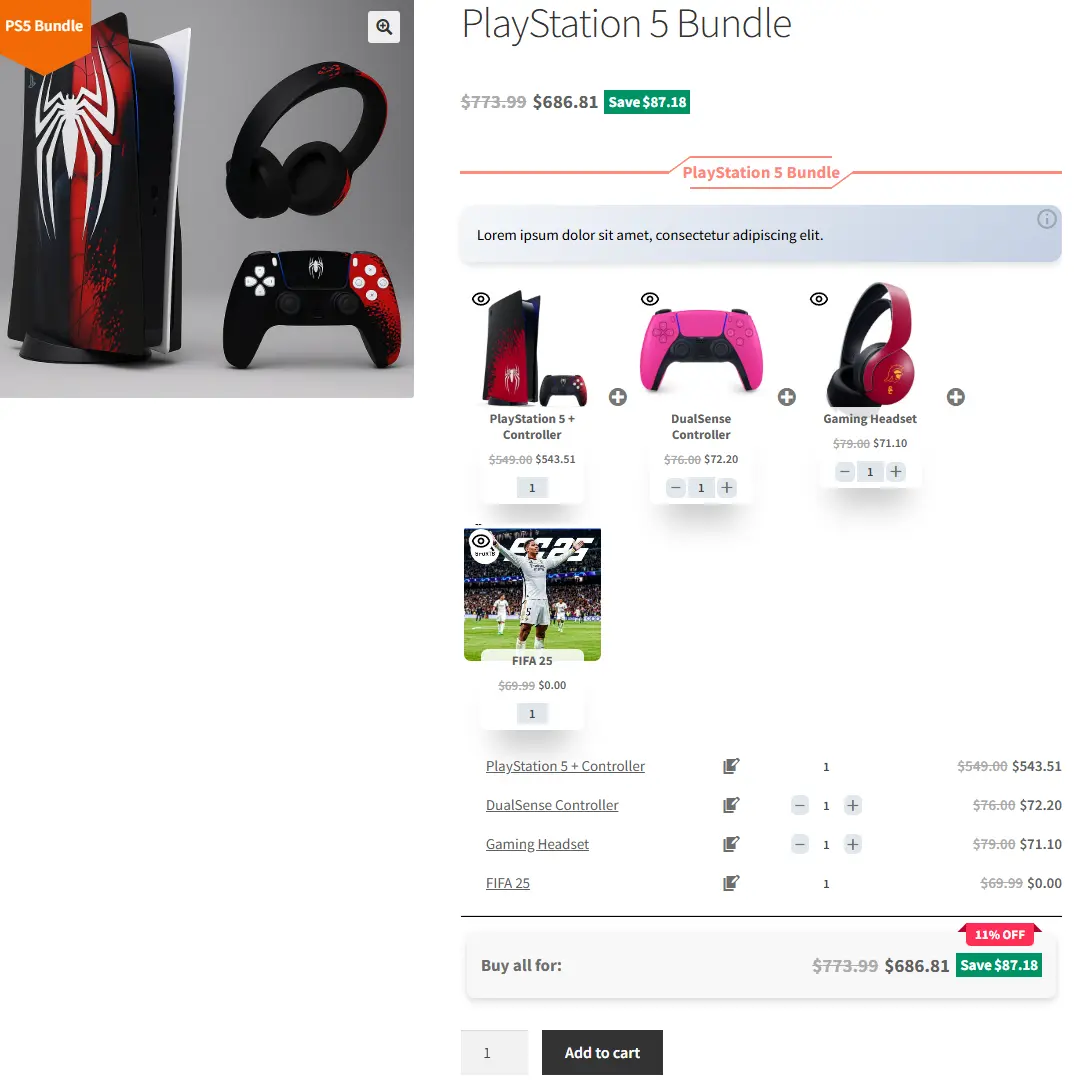
Final Result
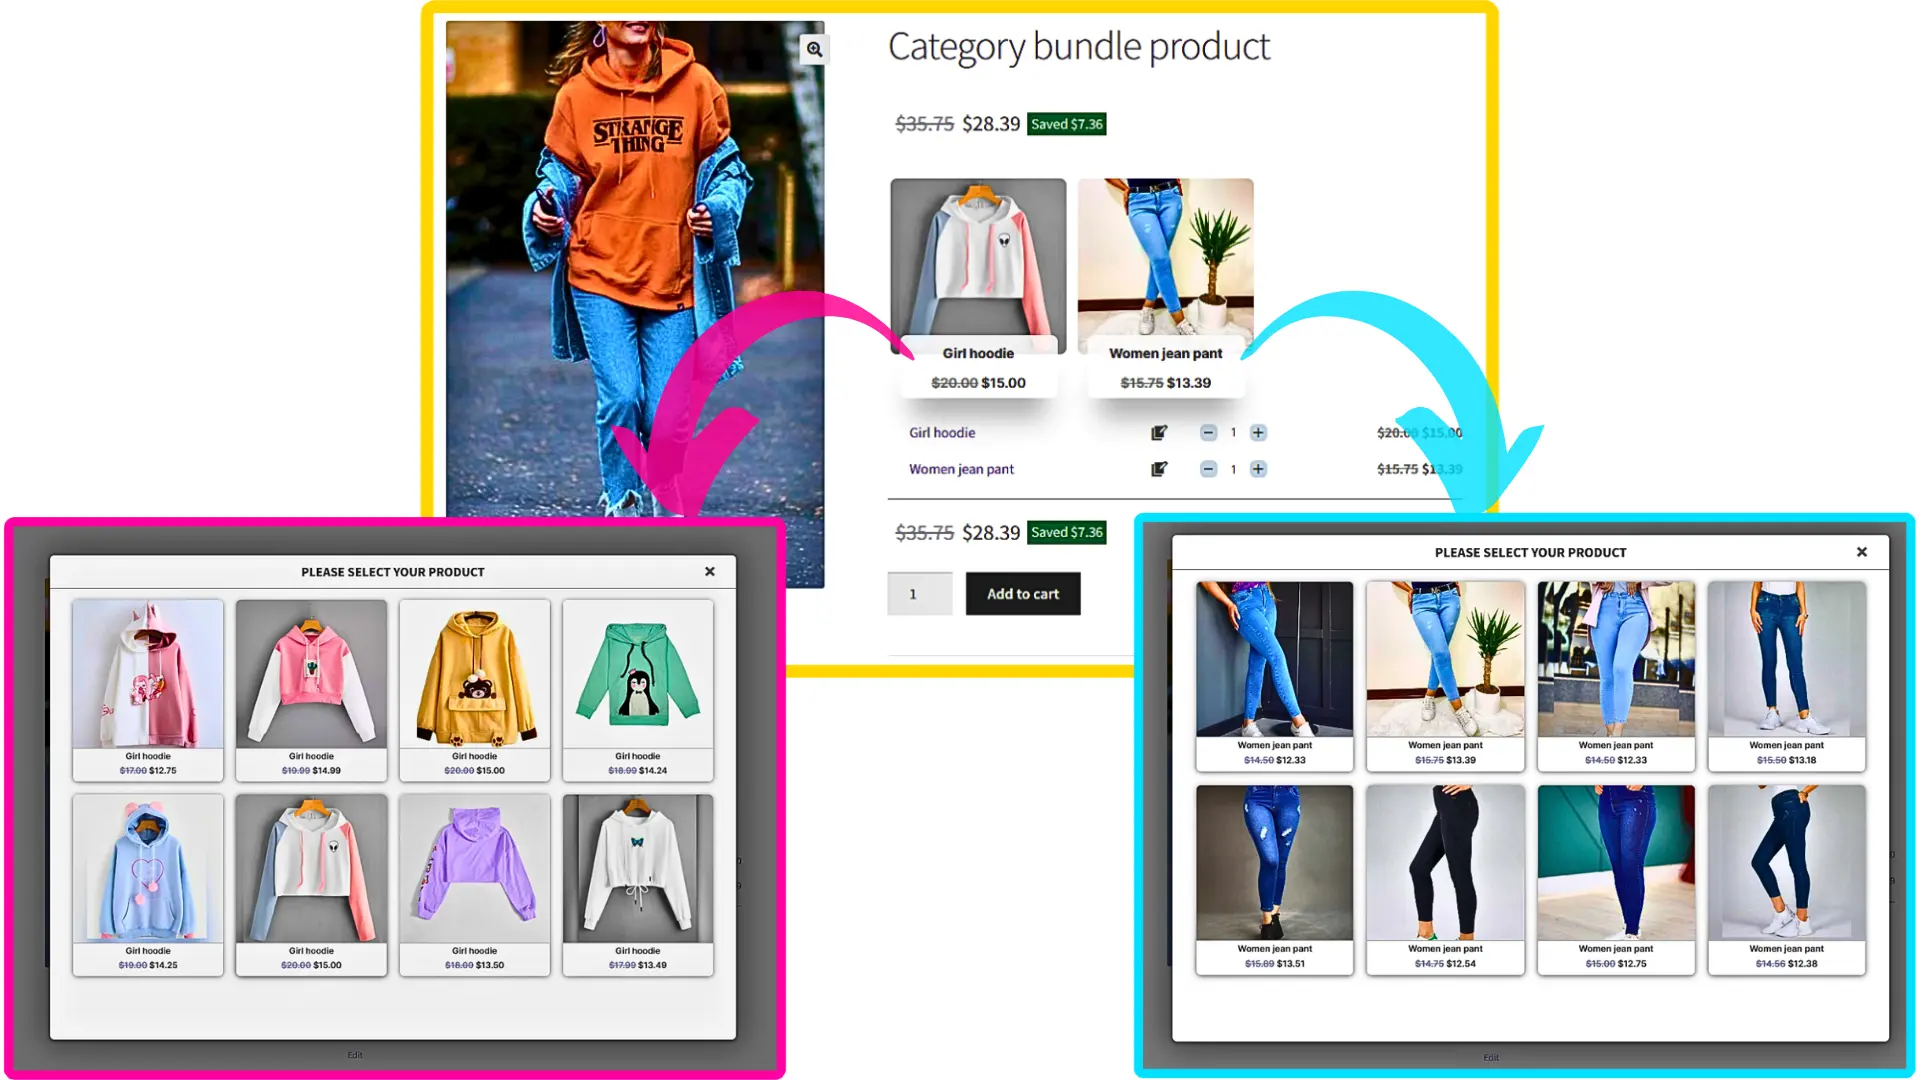
Now open the product page on the front end.
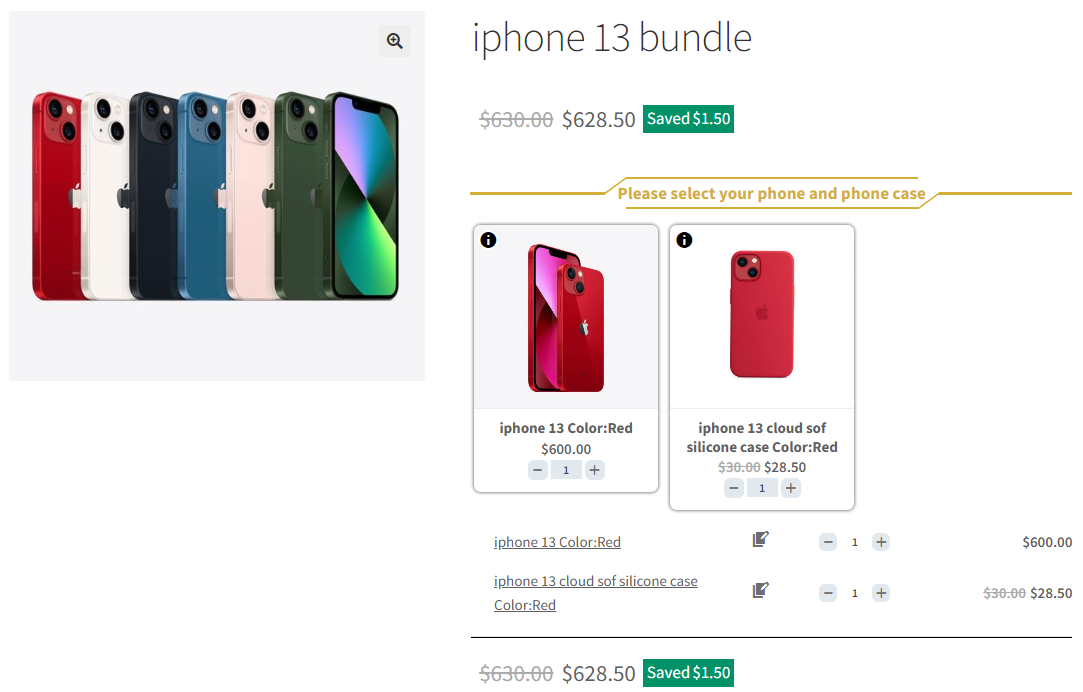
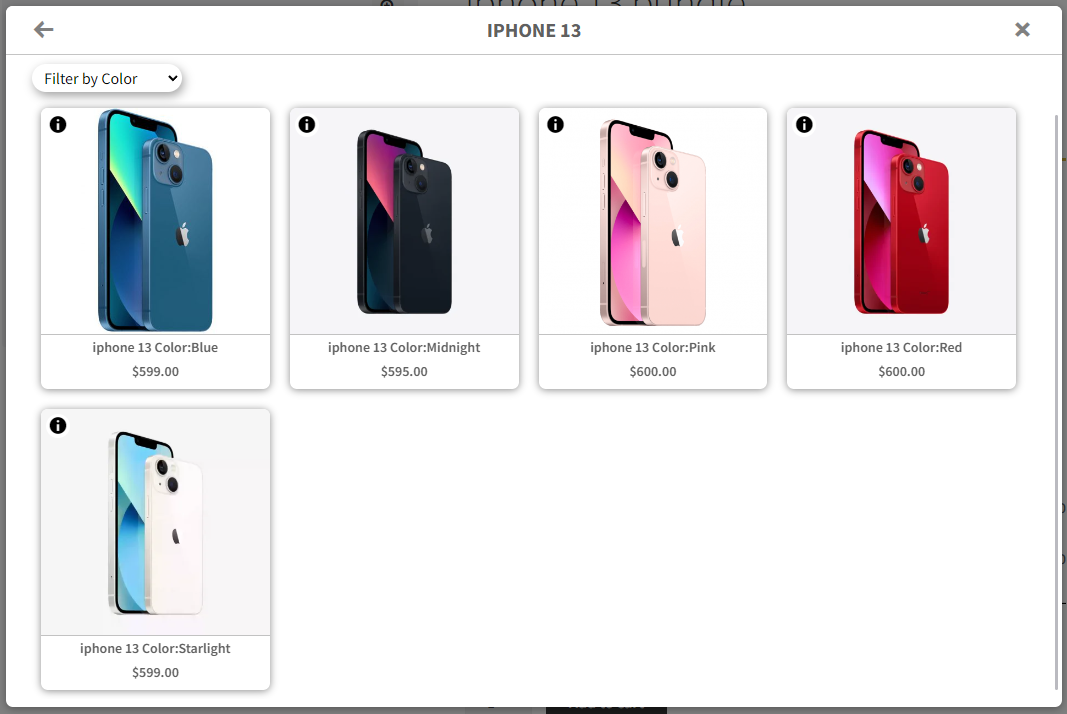
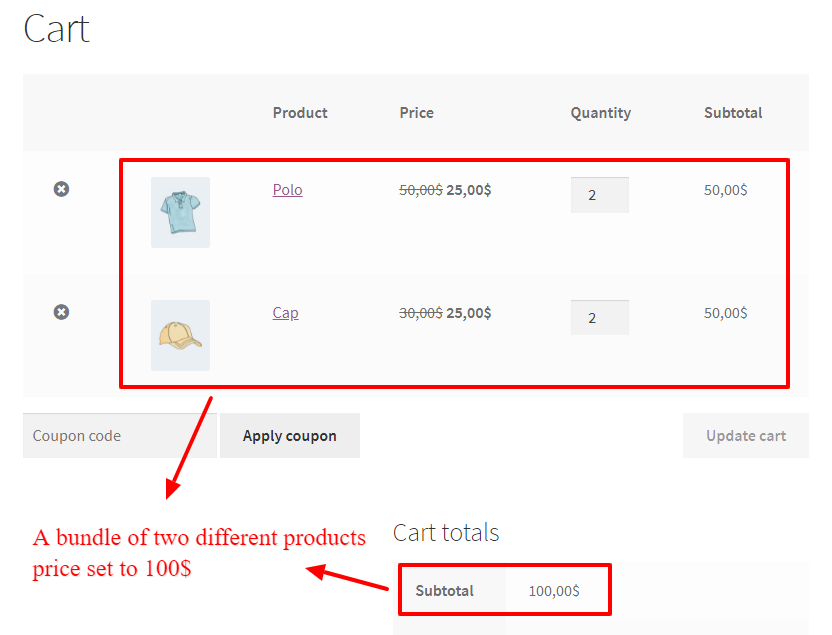
As a result, After selecting a variation product, for all of the bundle items, the WooCommerce grouped products with Variable will be shown as the image below.

How to Create Flexible Optional Grouped Products
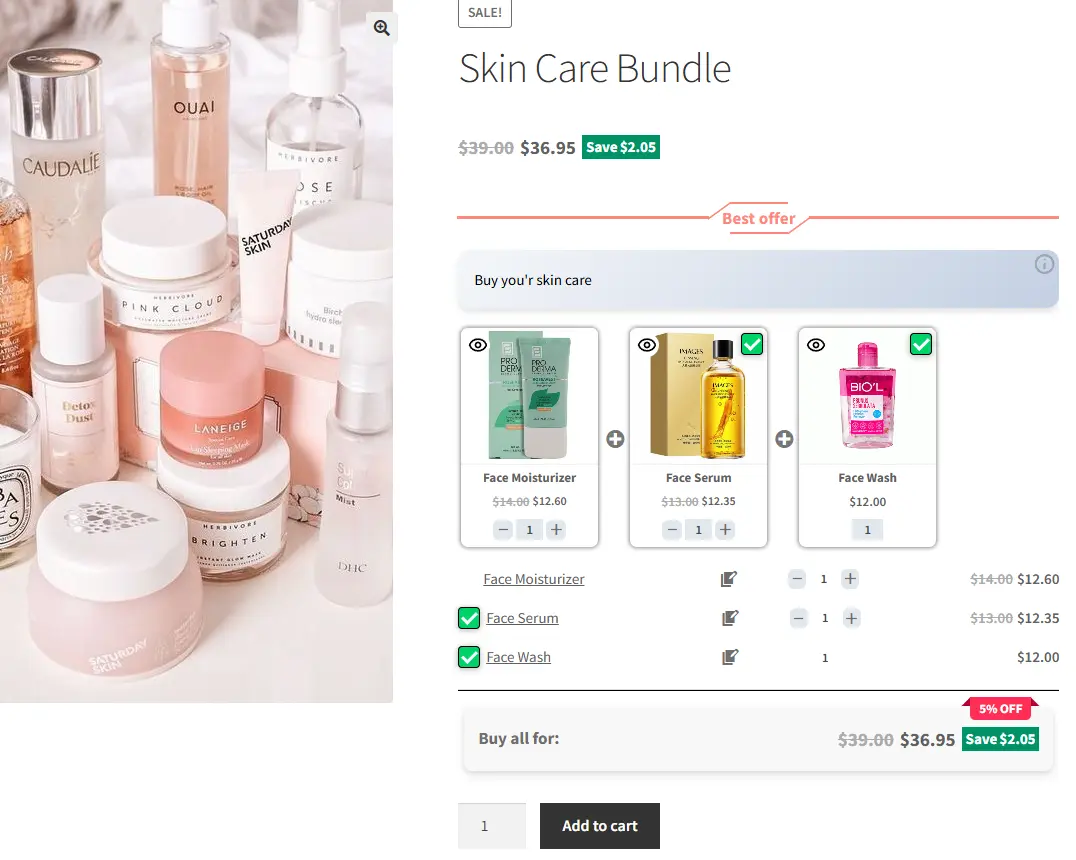
Flexible Optional Grouped Products offer a personalized shopping experience by allowing customers to customize combinations of products or services according to their preferences. This feature enables customers to choose whether or not to purchase additional products within the group, giving them full control over their shopping experience. As a result, this flexibility not only enhances customer satisfaction but also drives higher spending through cost savings and upselling opportunities. Businesses, in turn, benefit from increased revenue, improved customer loyalty, and a versatile marketing tool that adapts effectively to market trends.
If you are using the pro version of the Product Bundle Builder for WooCommerce To create flexible optional Product bundles, follow the below steps:
Step 1: Create Flexible Optional Grouped Products
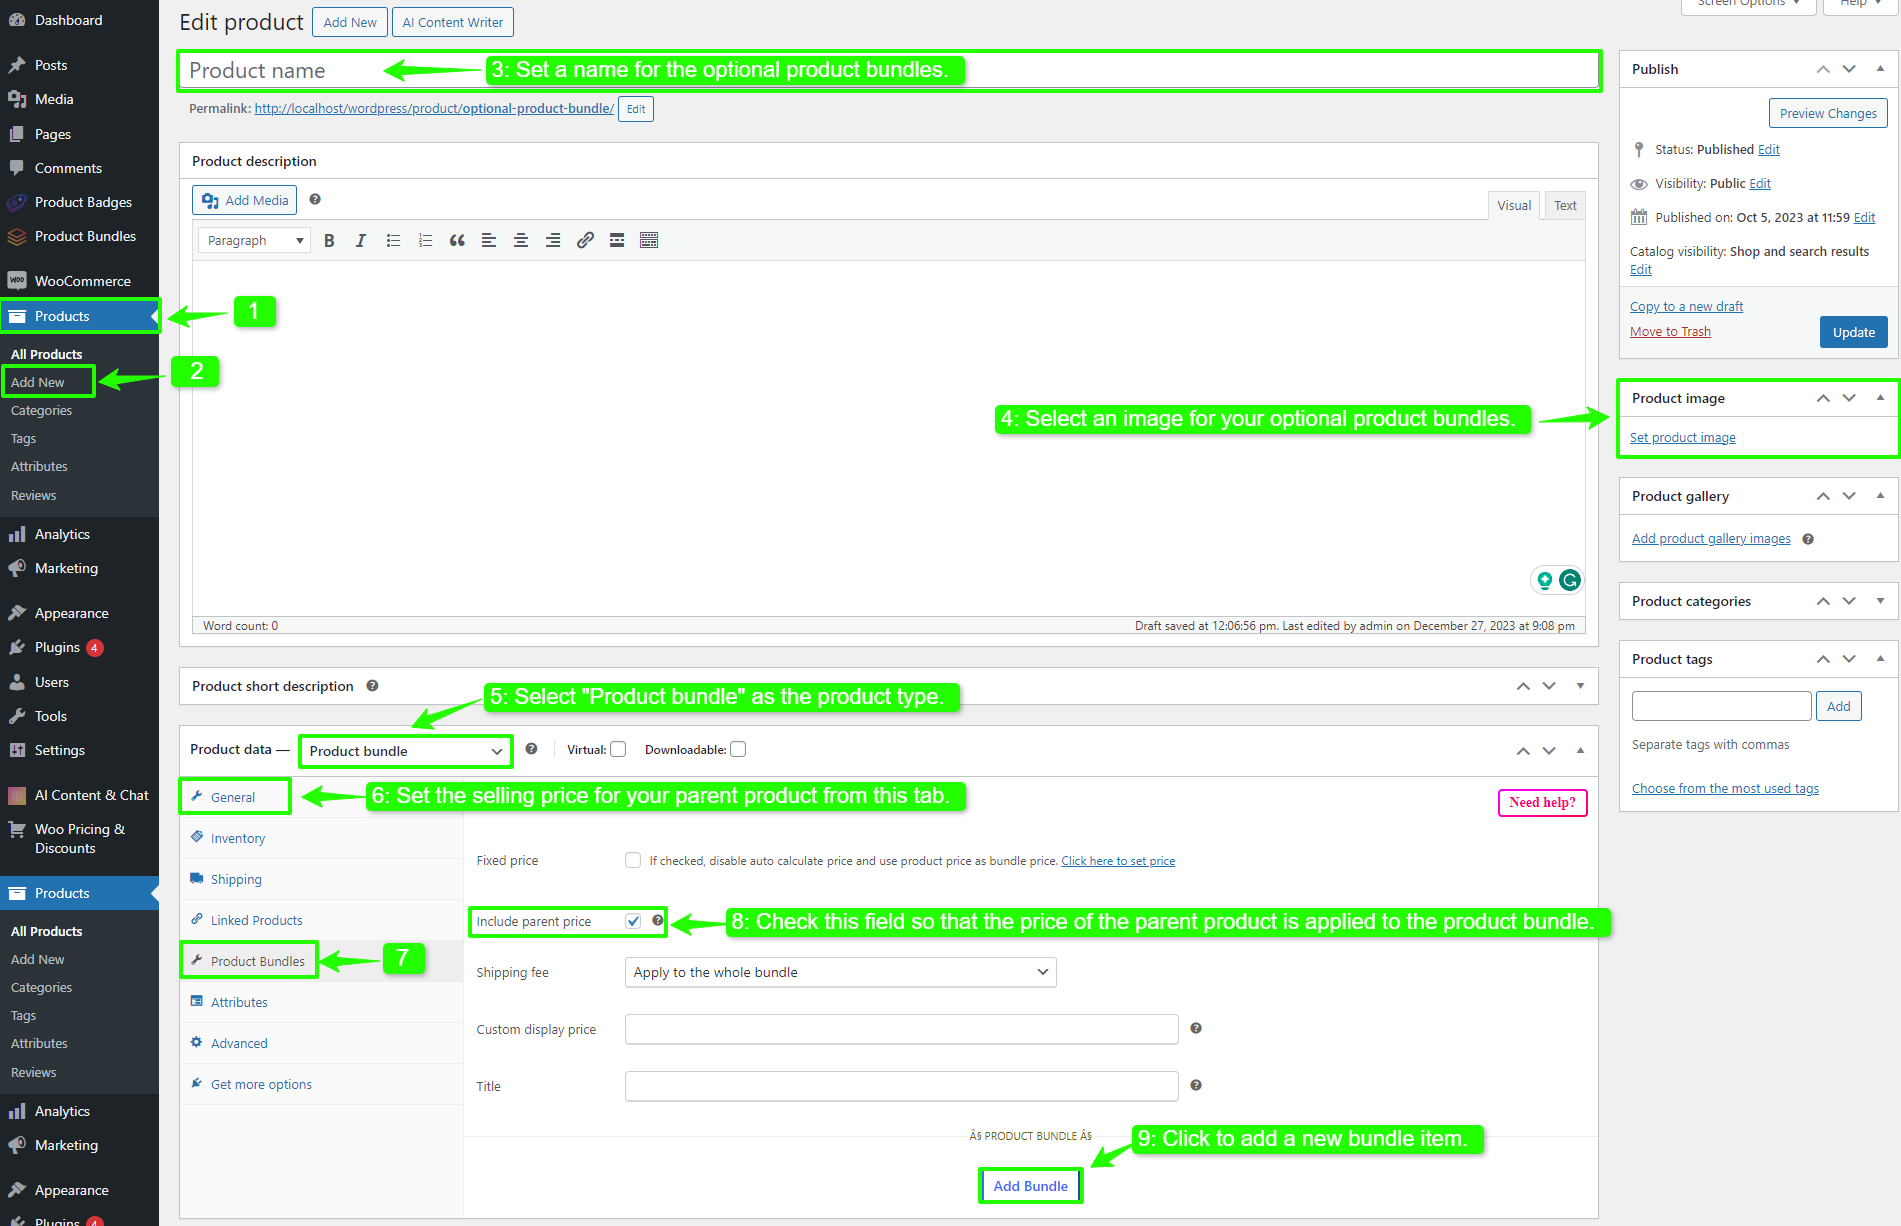
1. GO to the WooCommerce “Products”.
2. Click on “Add New” to create a new product.
3. Set a name for the optional Grouped Products.
4. Click on “Set product image” from the right sidebar and select an image for your optional Grouped Products.
5. Go to the Product data panel, and select “Product bundle” as the product type.
6. Set the selling price for your parent product.
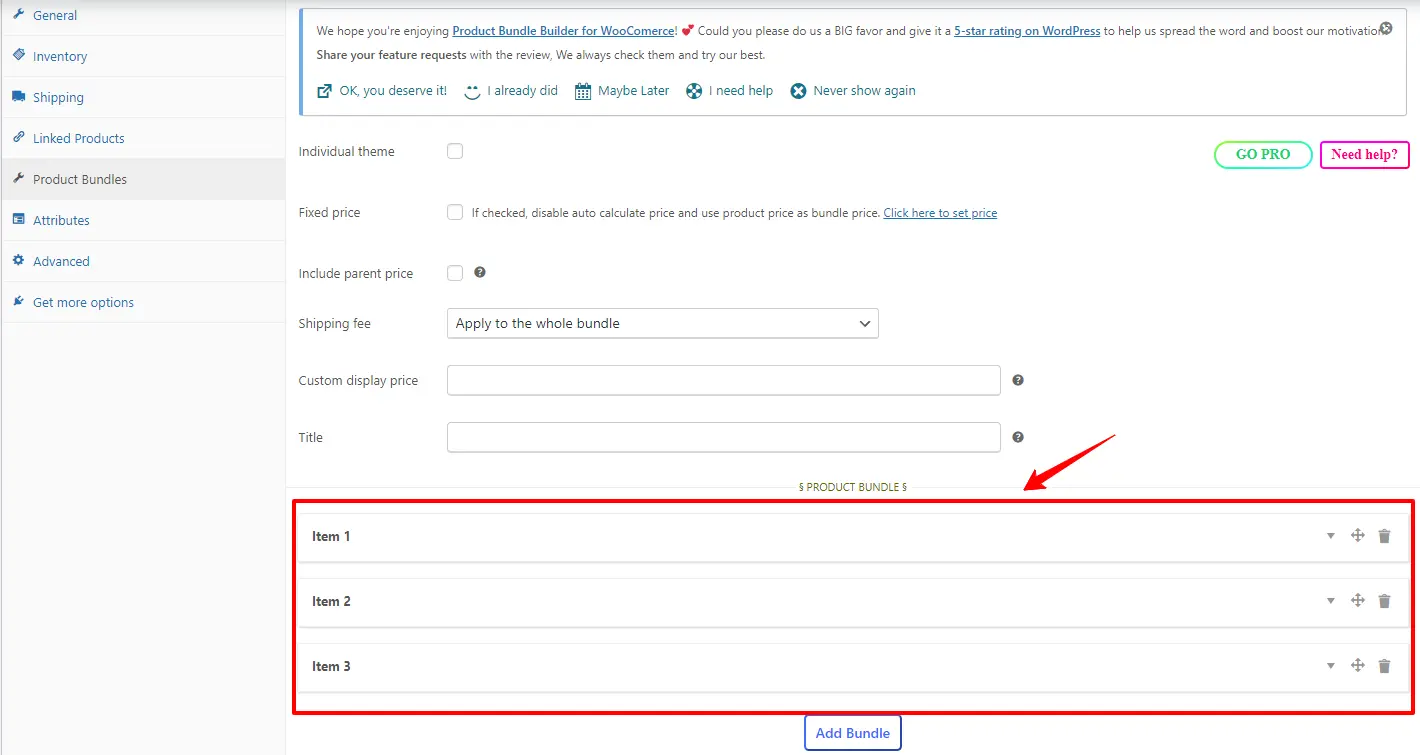
7. Now go to the “Product Bundles” tab.
8. Check “Include parent price” so that the price of the parent product is applied to the product bundle.
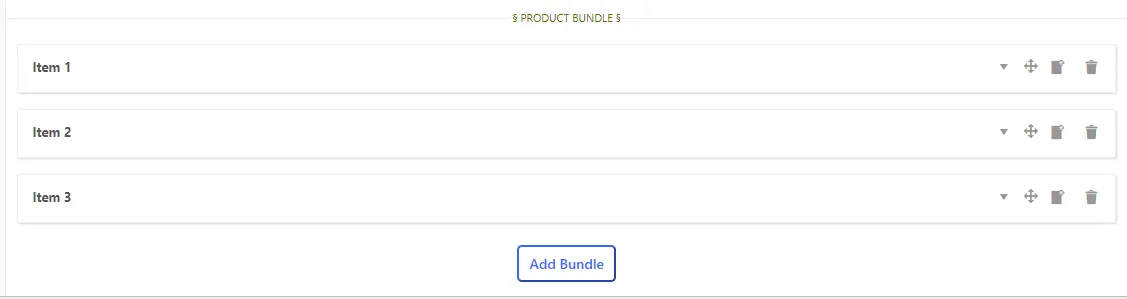
9. Click on the “Add Bundle” button to add a new bundle item.
Step 2: Add items to Flexible Optional Grouped Products
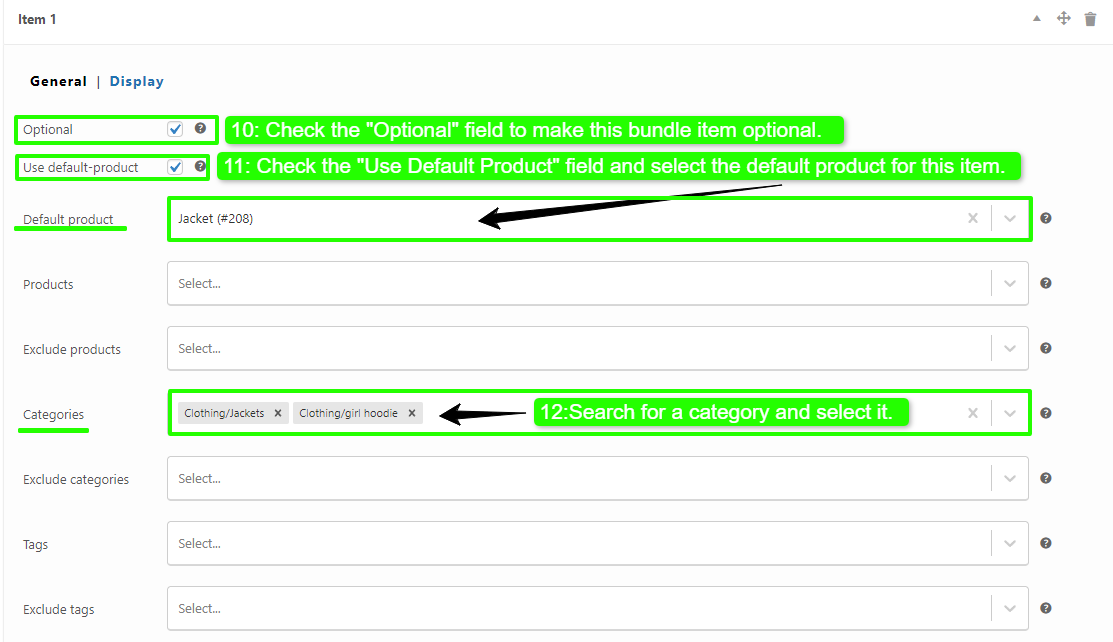
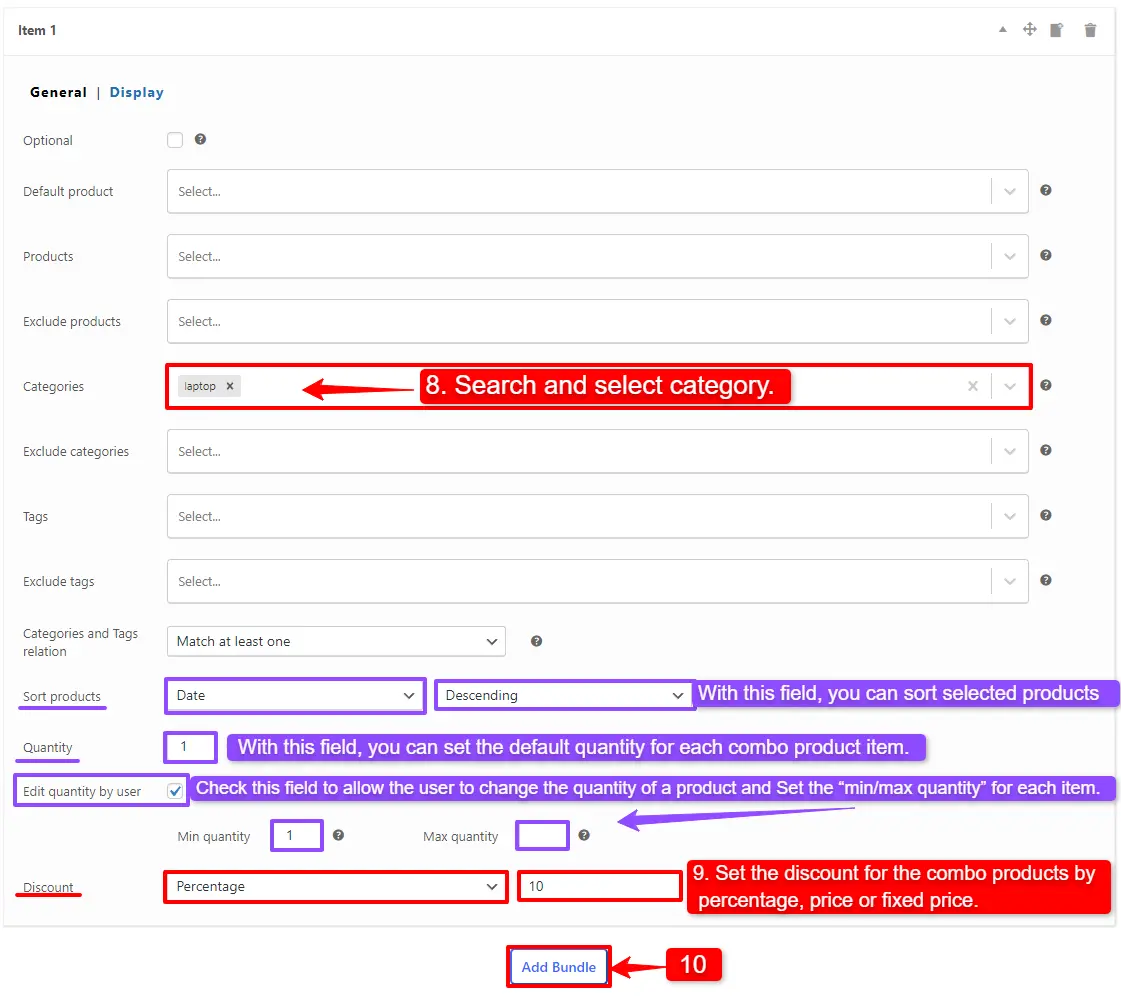
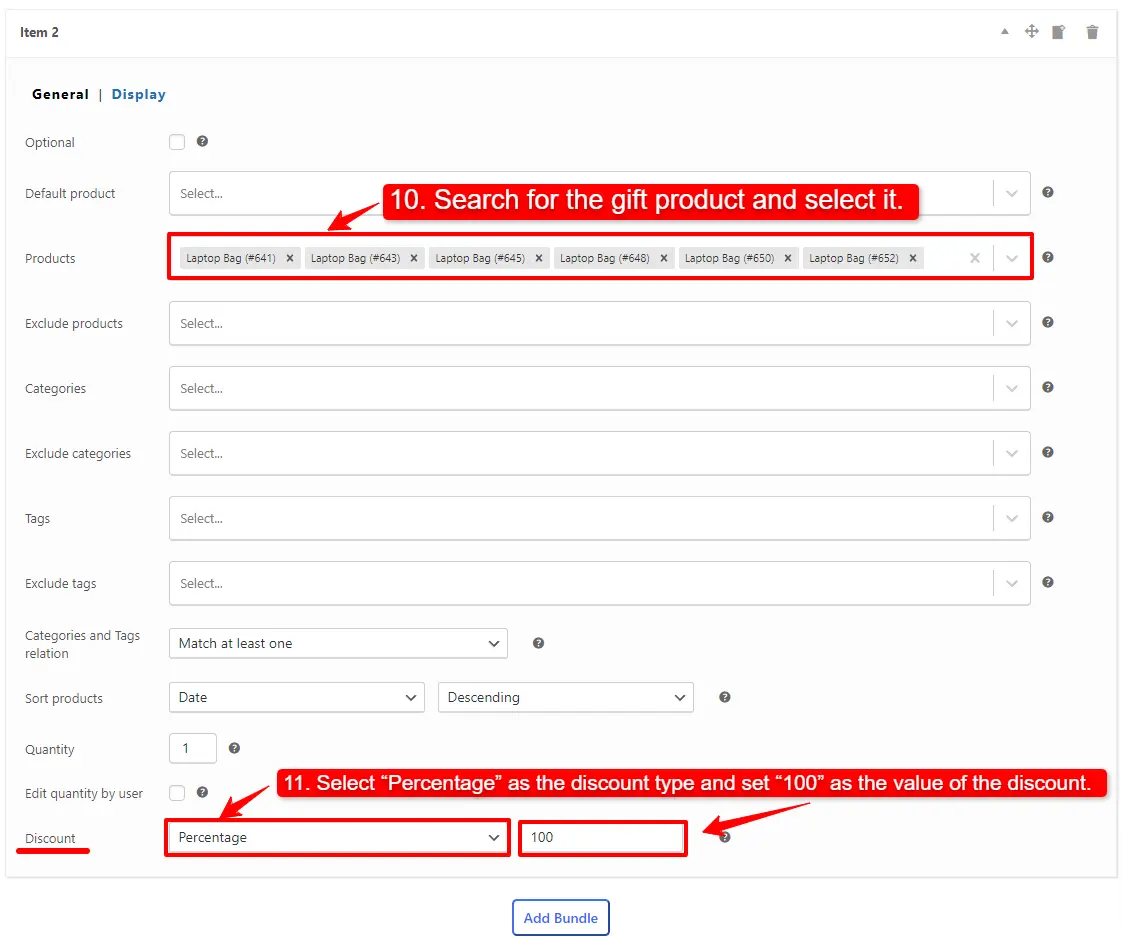
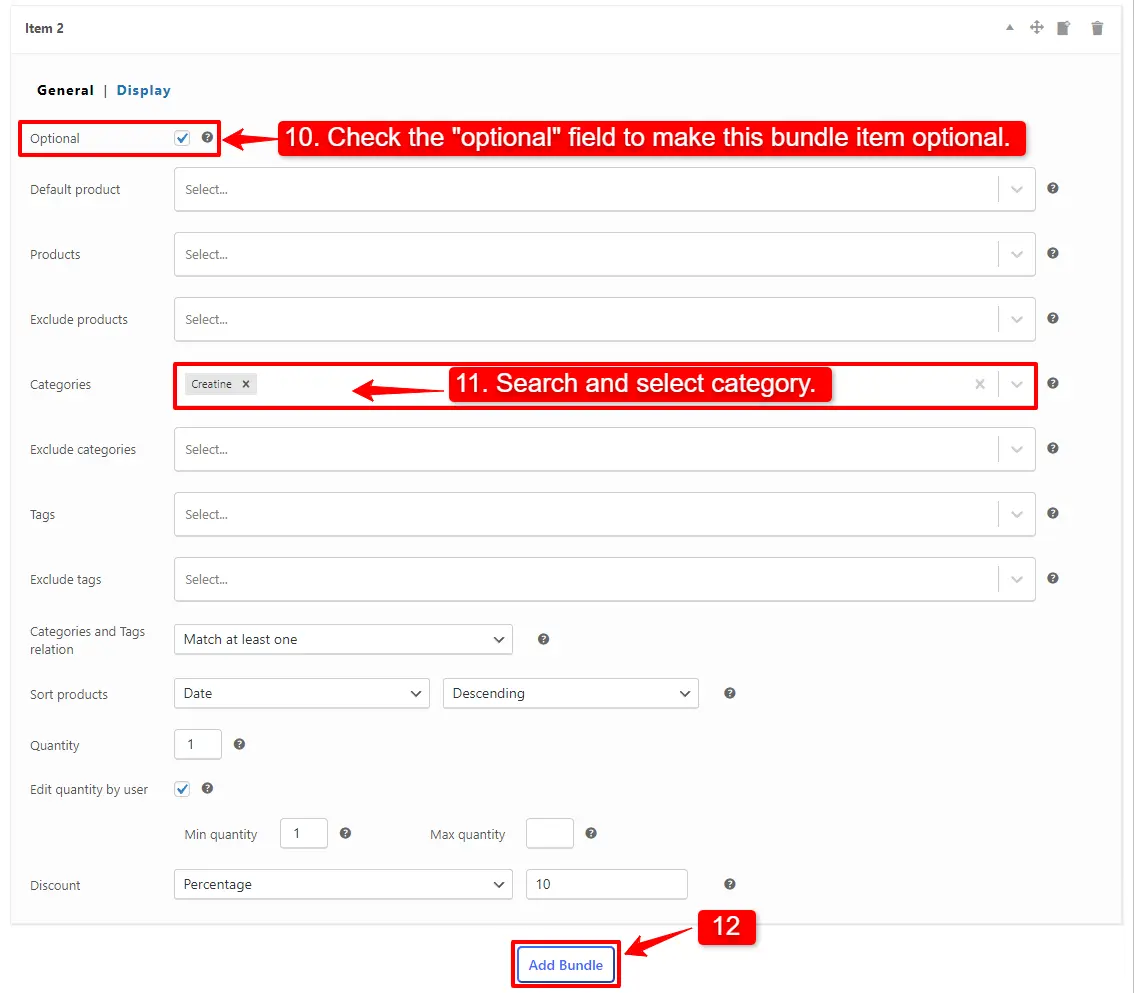
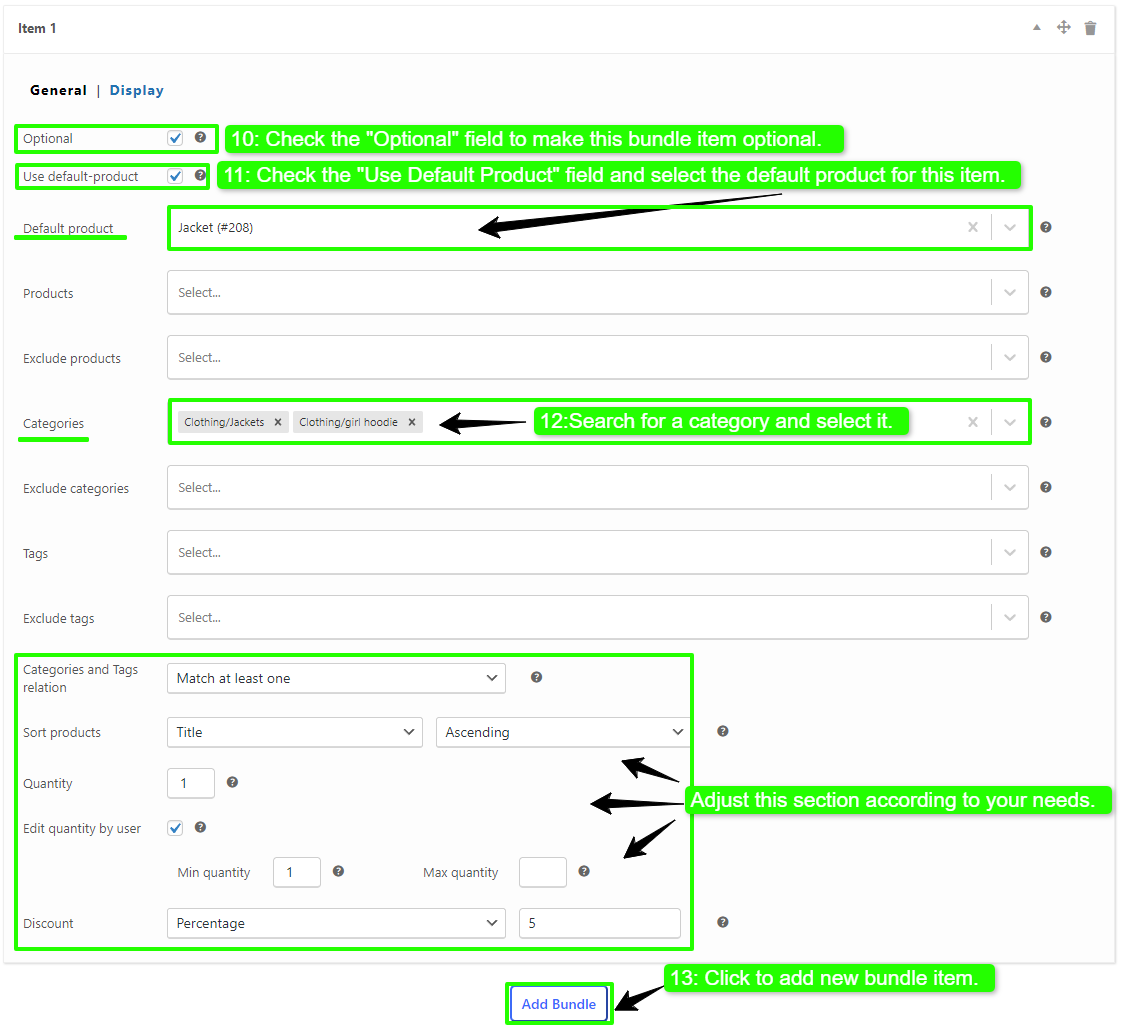
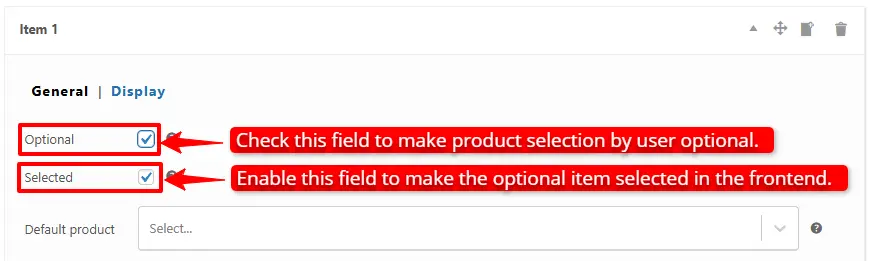
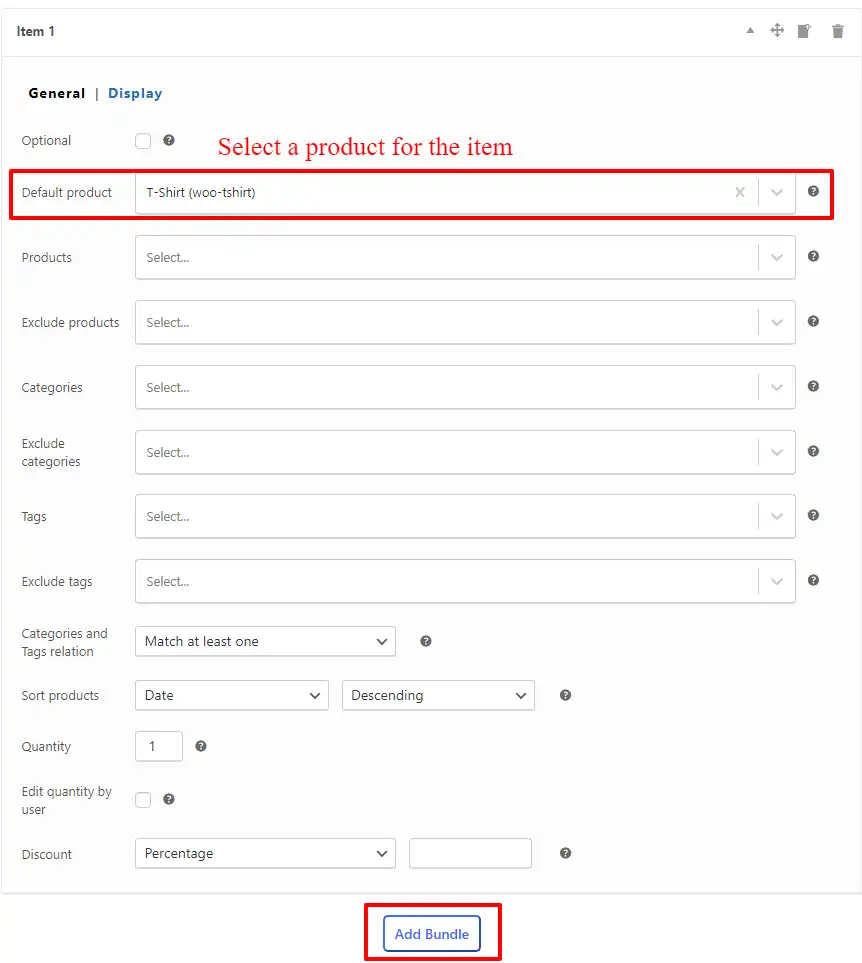
10. Now scroll down to the item field, and check the “Optional” field to make this bundle item optional.
11. Now select the default product for this item in the “Default Product” field.
12. In the “Categories” field search for a category and select it.
Step 3: Customising the Grouped Products
For customising the grouped products, therefore please Read this section of the article for more information.
13. Then you can click on “Add Bundle” to add a new item to the bundle and Configure it as in the previous steps. We created another bundle item.
Step 4: Pricing for Flexible Optional Grouped Products
Now you should decide about the pricing of the Flexible Optional Grouped Products. therefore You can use a fixed price for the whole bundle or use auto calculate price, to calculate the bundle price based on selected items.
Read this section of the article for more information.
Step 5: Configure the Plugin Settings
To configure the plugin settings, therefore please Read this section of the article for more information.
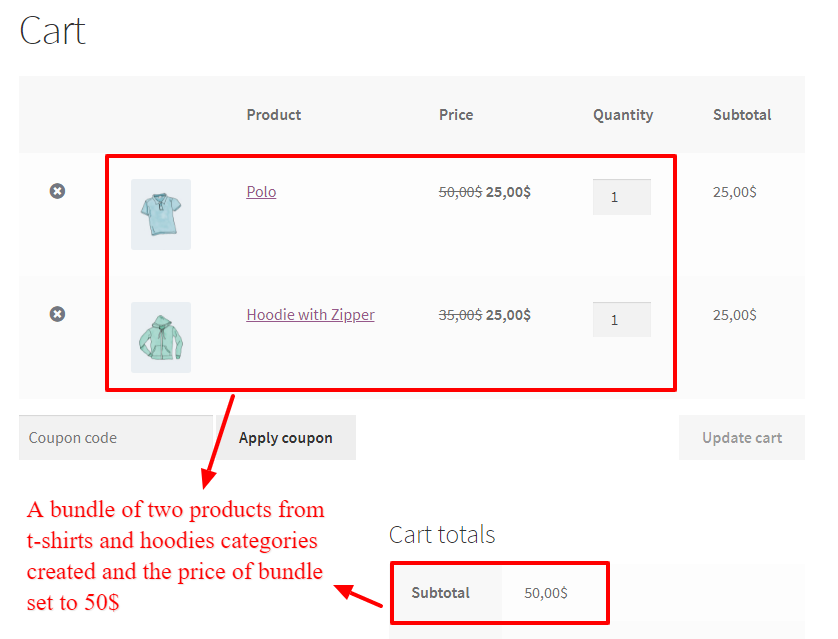
Final Result

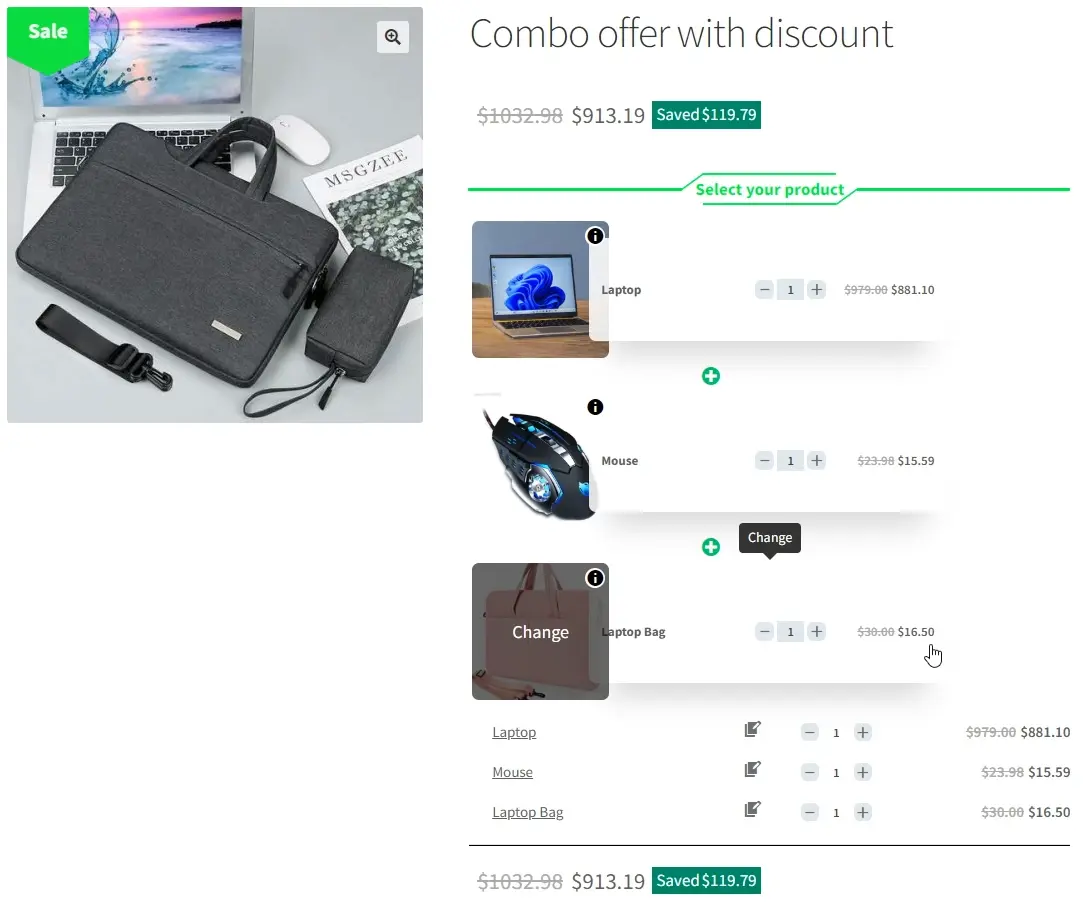
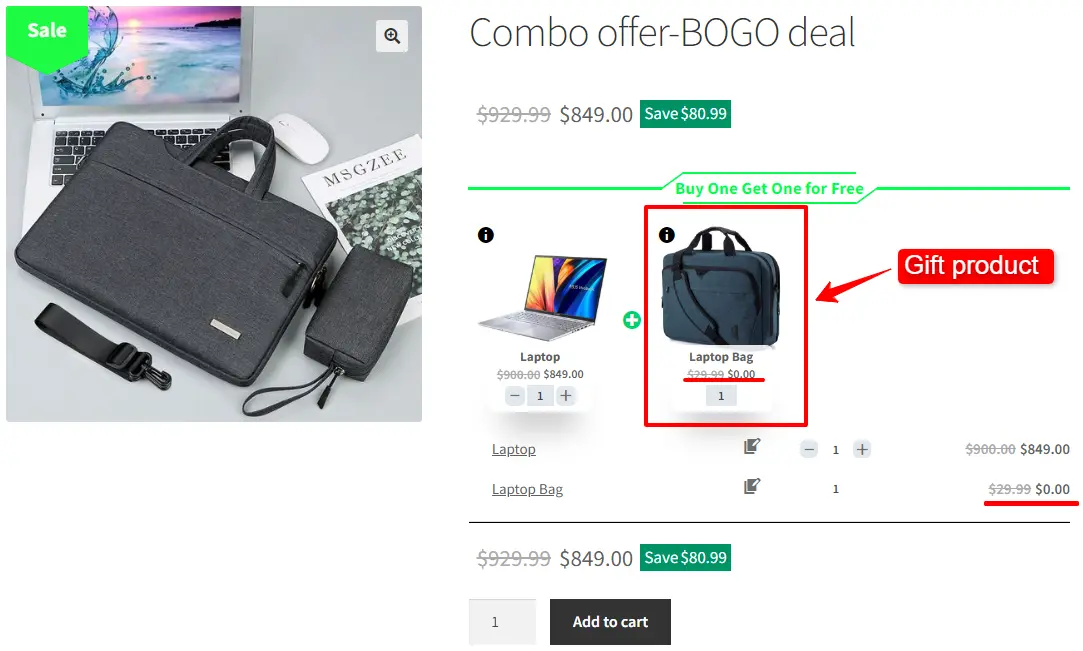
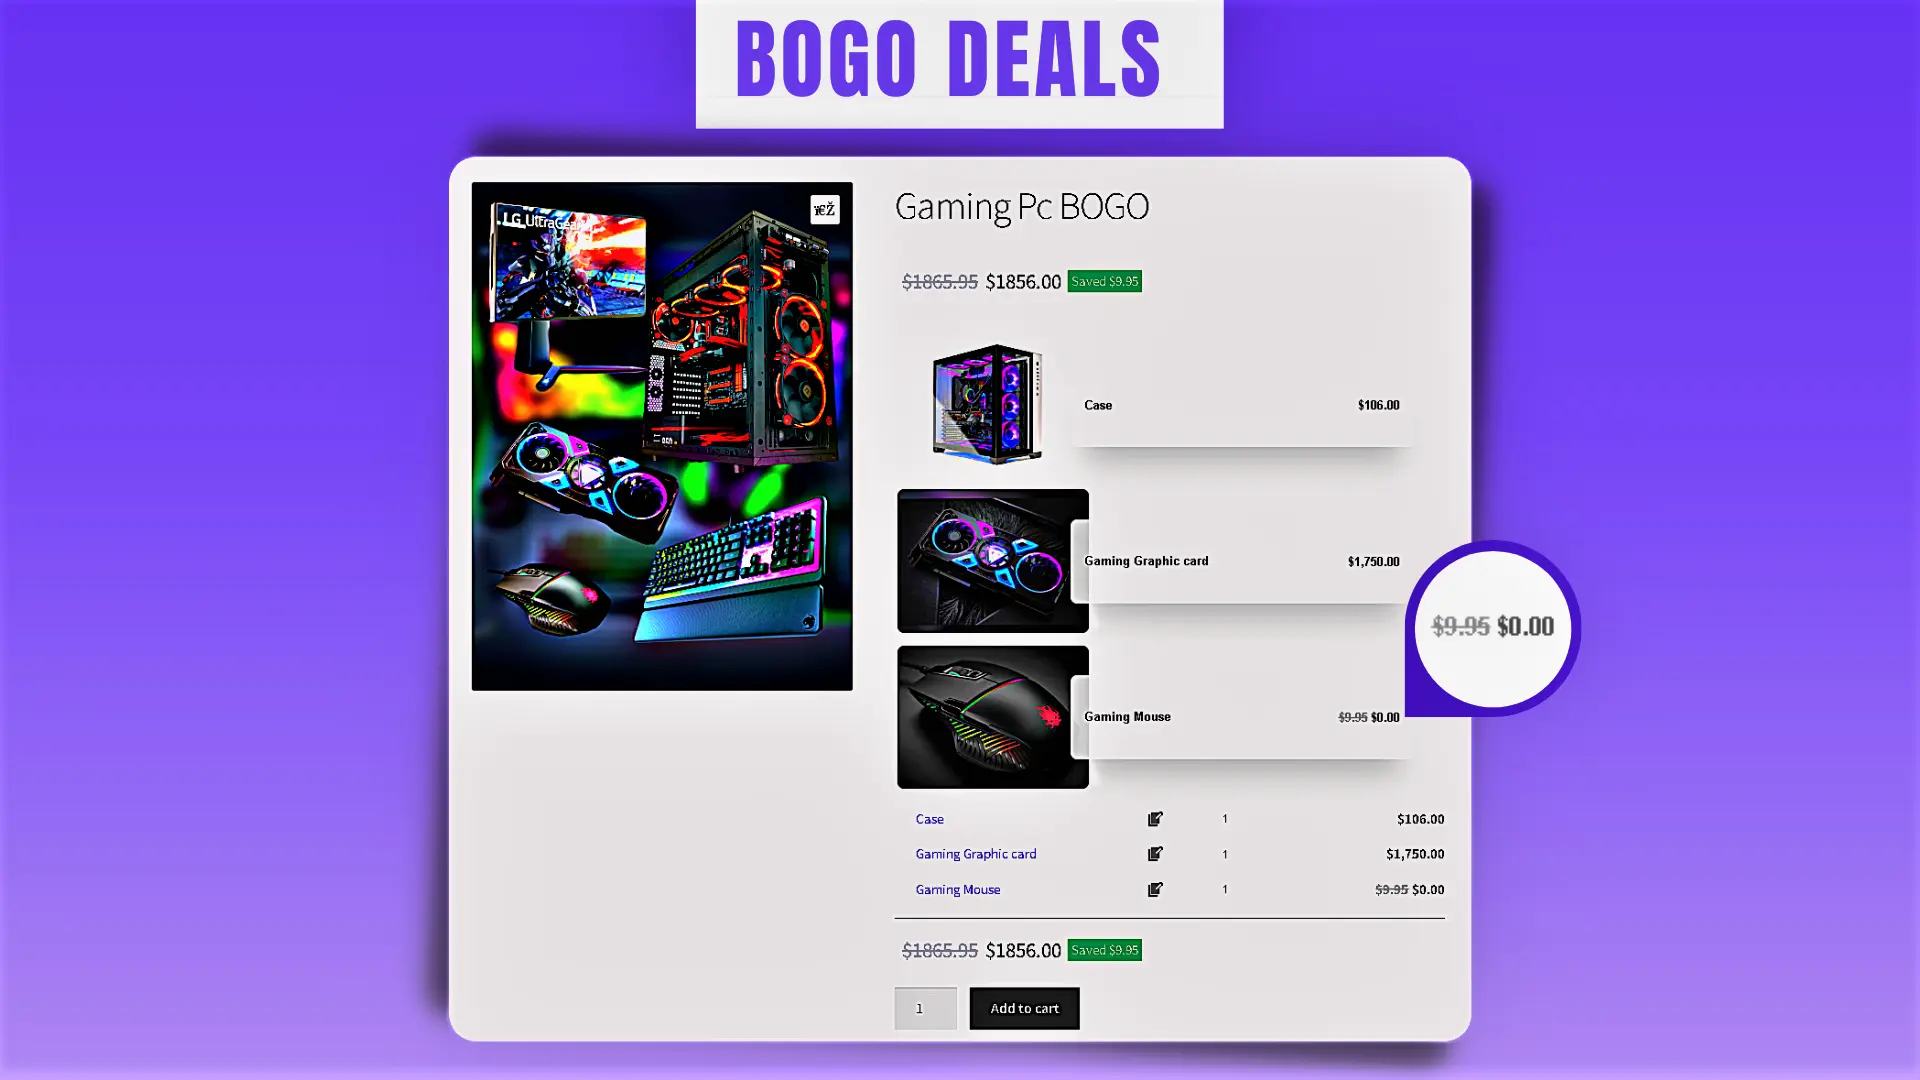
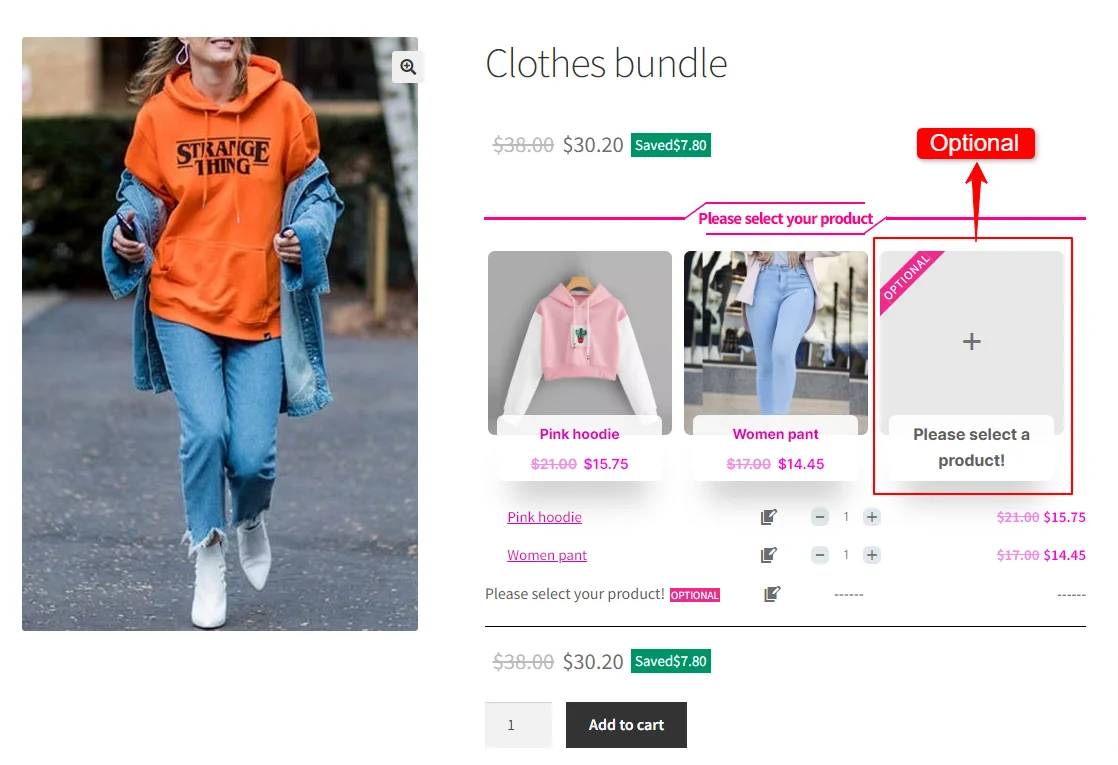
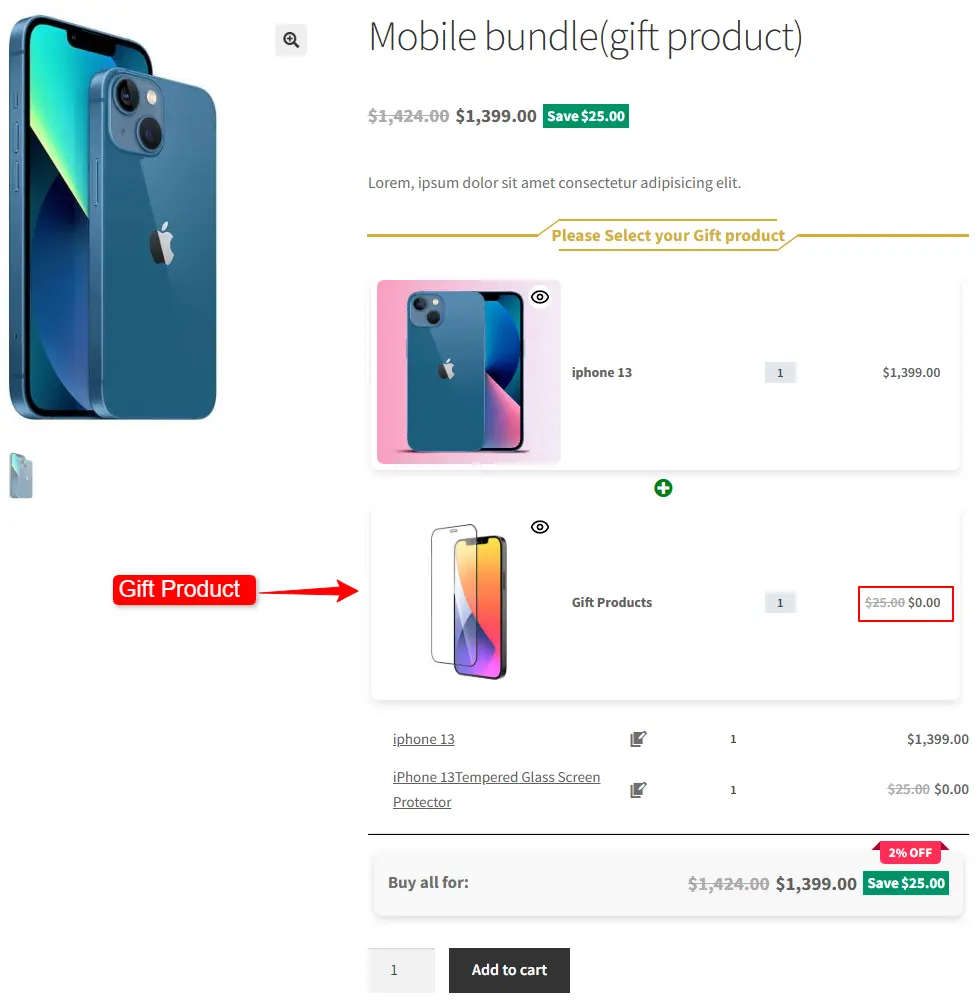
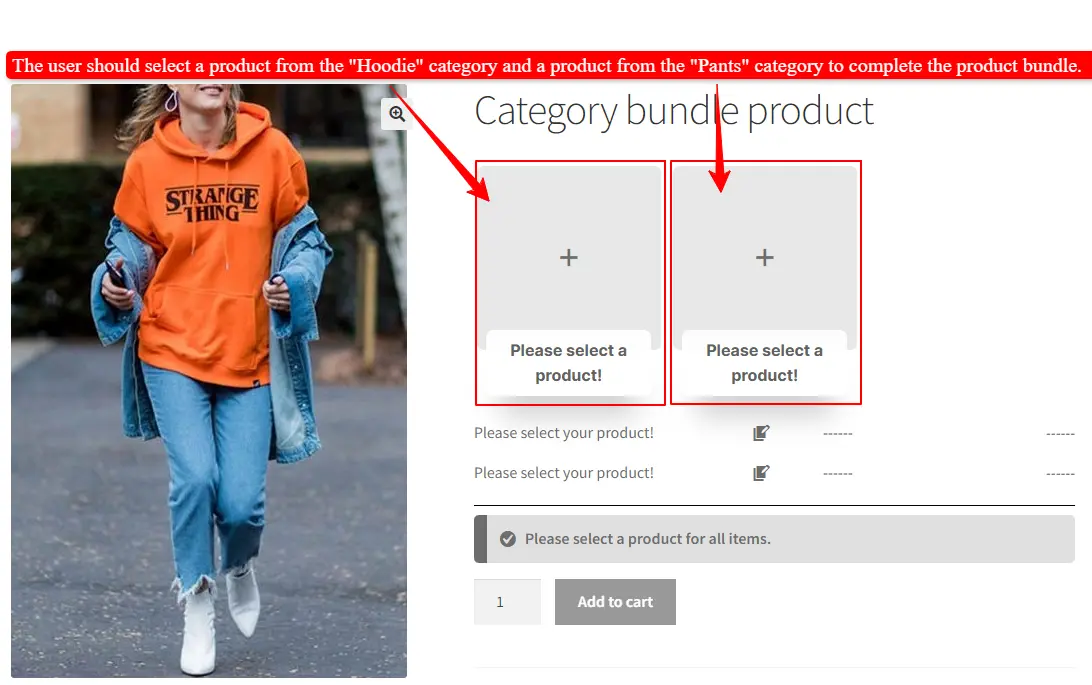
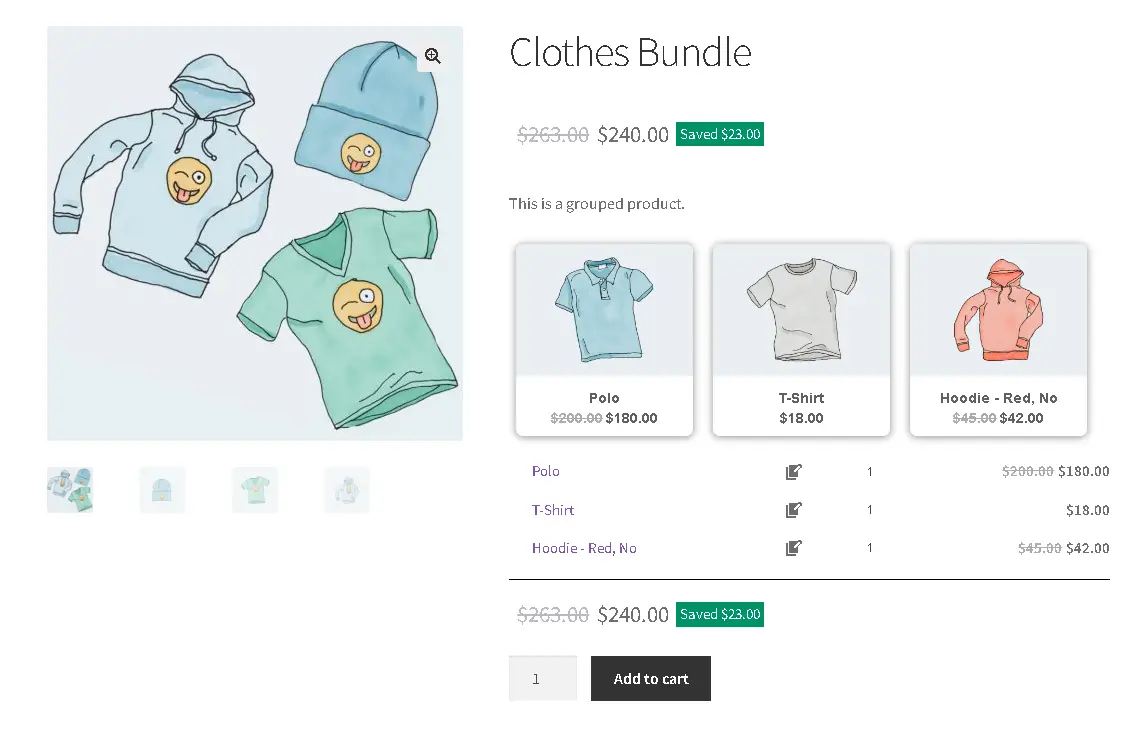
After creating and publishing the flexible optional grouped products, open the product page on the front end.
The WooCommerce Flexible Optional Grouped Products will be shown as the image below.
Note: By clicking on the add to cart, the customer adds 1 parent product + 2 or 1 selected product to the cart and when the customer removes the chosen products, she/he can buy only the parent product.
The Best Way to Use WooCommerce Grouped Products
The best way to use WooCommerce grouped products is to strategically bundle complementary items together, as a result enhancing the shopping experience and increasing sales. Here are some tips:
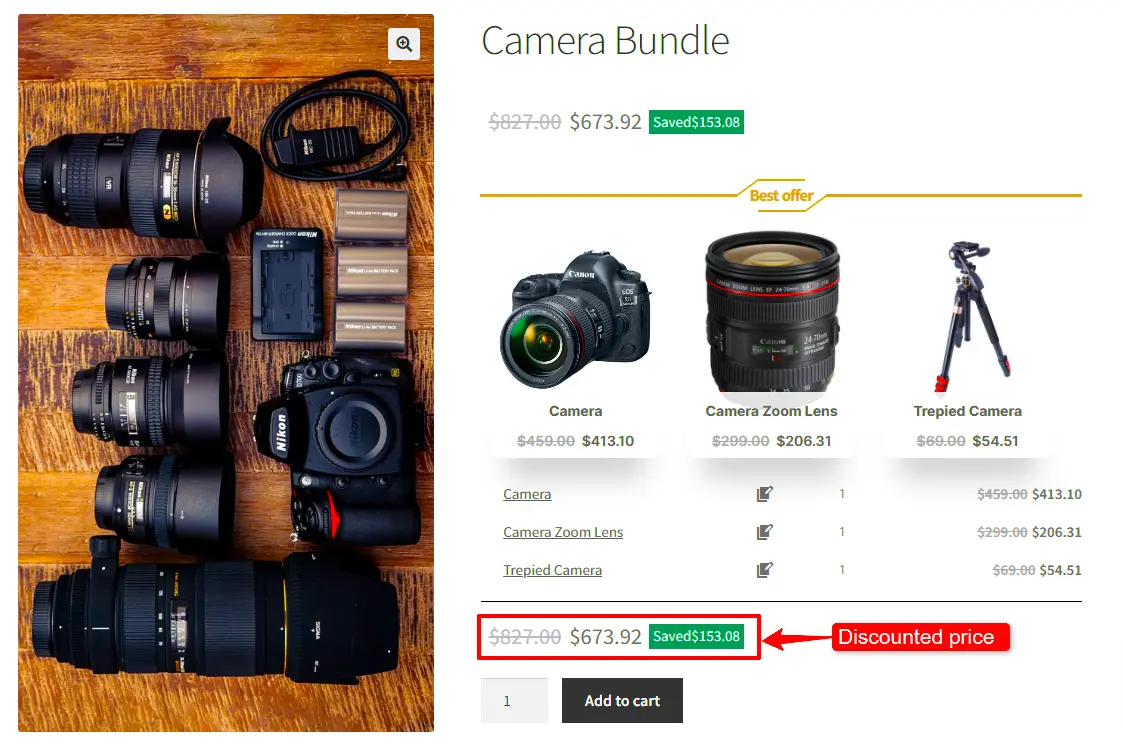
- Bundle Related Items: First and foremost, group products that naturally go together, such as a camera with a memory card and camera case. This makes it convenient for customers to purchase all necessary items at once.
- Offer Discounts: Additionally, provide a slight discount when customers purchase the entire group. This encourages them to buy more, thereby boosting your sales.
- Promote Visibility: Moreover, use grouped products to highlight less popular or new items by pairing them with best-sellers. This can help introduce customers to products they might not have discovered otherwise.
- Simplify Shopping: Make it easier for customers to find and buy complementary products by presenting them together, Consequently, this streamlined shopping experience can increase customer satisfaction and encourage more purchases.
- Enhance SEO: Consequently, grouped products can improve your store’s SEO by adding more content and keywords, making it easier for potential customers to find your products through search engines.
- Consistent Branding: Finally, use grouped products to present items with consistent branding or themes, thereby enhancing your store’s aesthetic and strengthening your brand identity.
By leveraging these strategies, you can effectively use WooCommerce grouped products to enhance your store’s functionality and appeal.
Conclusion
In conclusion, using grouped products in WooCommerce offers a strategic advantage for enhancing your online store. By grouping related items, you can provide a more organized and appealing shopping experience for customers, making it easier for them to find and purchase complementary products. This approach not only simplifies the purchasing process but also boosts sales by encouraging customers to buy multiple items at once. Additionally, the flexibility to include variable products within grouped offerings allows for greater customization and personalization, further improving customer satisfaction. Effectively leveraging grouped products can streamline store management, increase visibility for less popular items, and enhance your store’s overall functionality and appeal.
Articles
To delve deeper into the realm of Product Bundle plugin and their applications, we invite you to explore the array of informative resources we’ve compiled in the list below. These resources promise to expand your understanding and proficiency in leveraging the potential of this plugin to the fullest:
- WooCommerce Product Bundles Free Plugin
- Create Assembled Products in WooCommerce(2024)
- How to Create WooCommerce Combo Offers (2024)
- WooCommerce Product Bundle with Variations (Free Plugin)
- WooCommerce Mix and Match Free Plugin
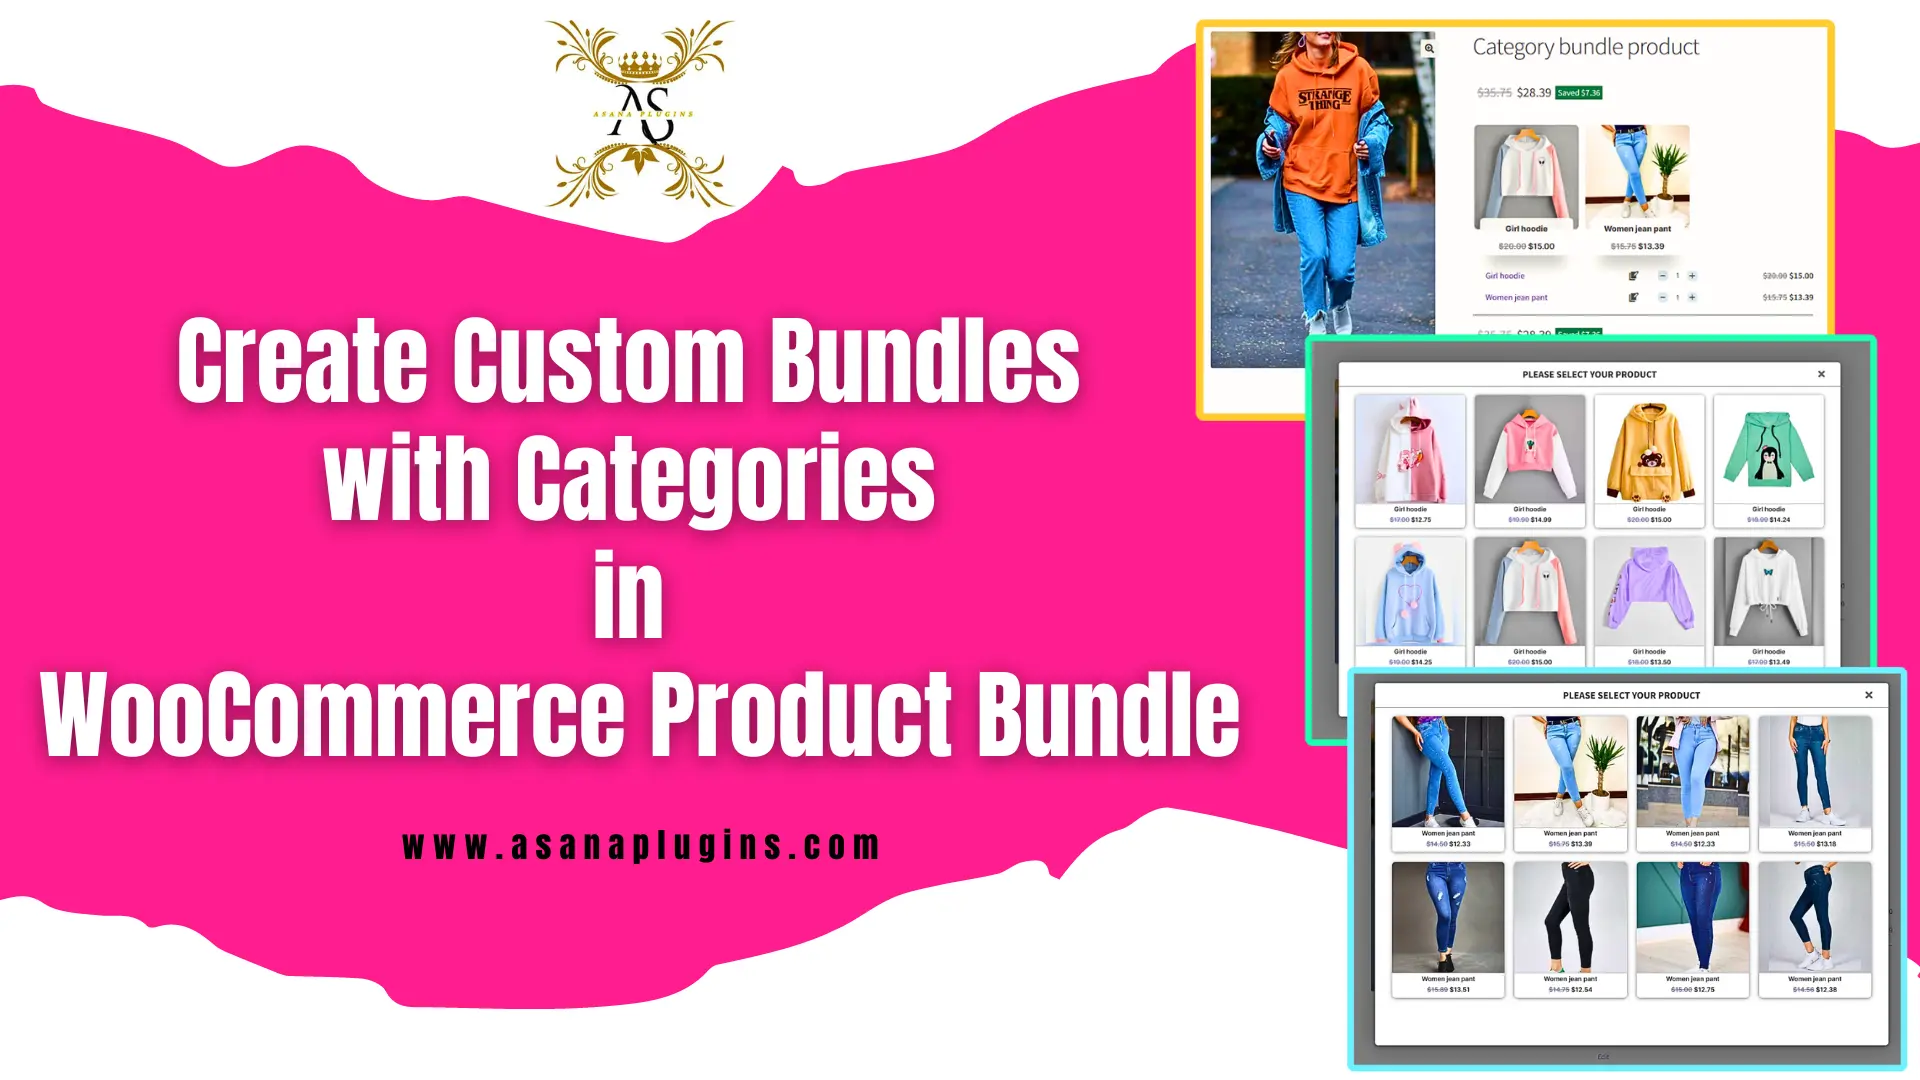
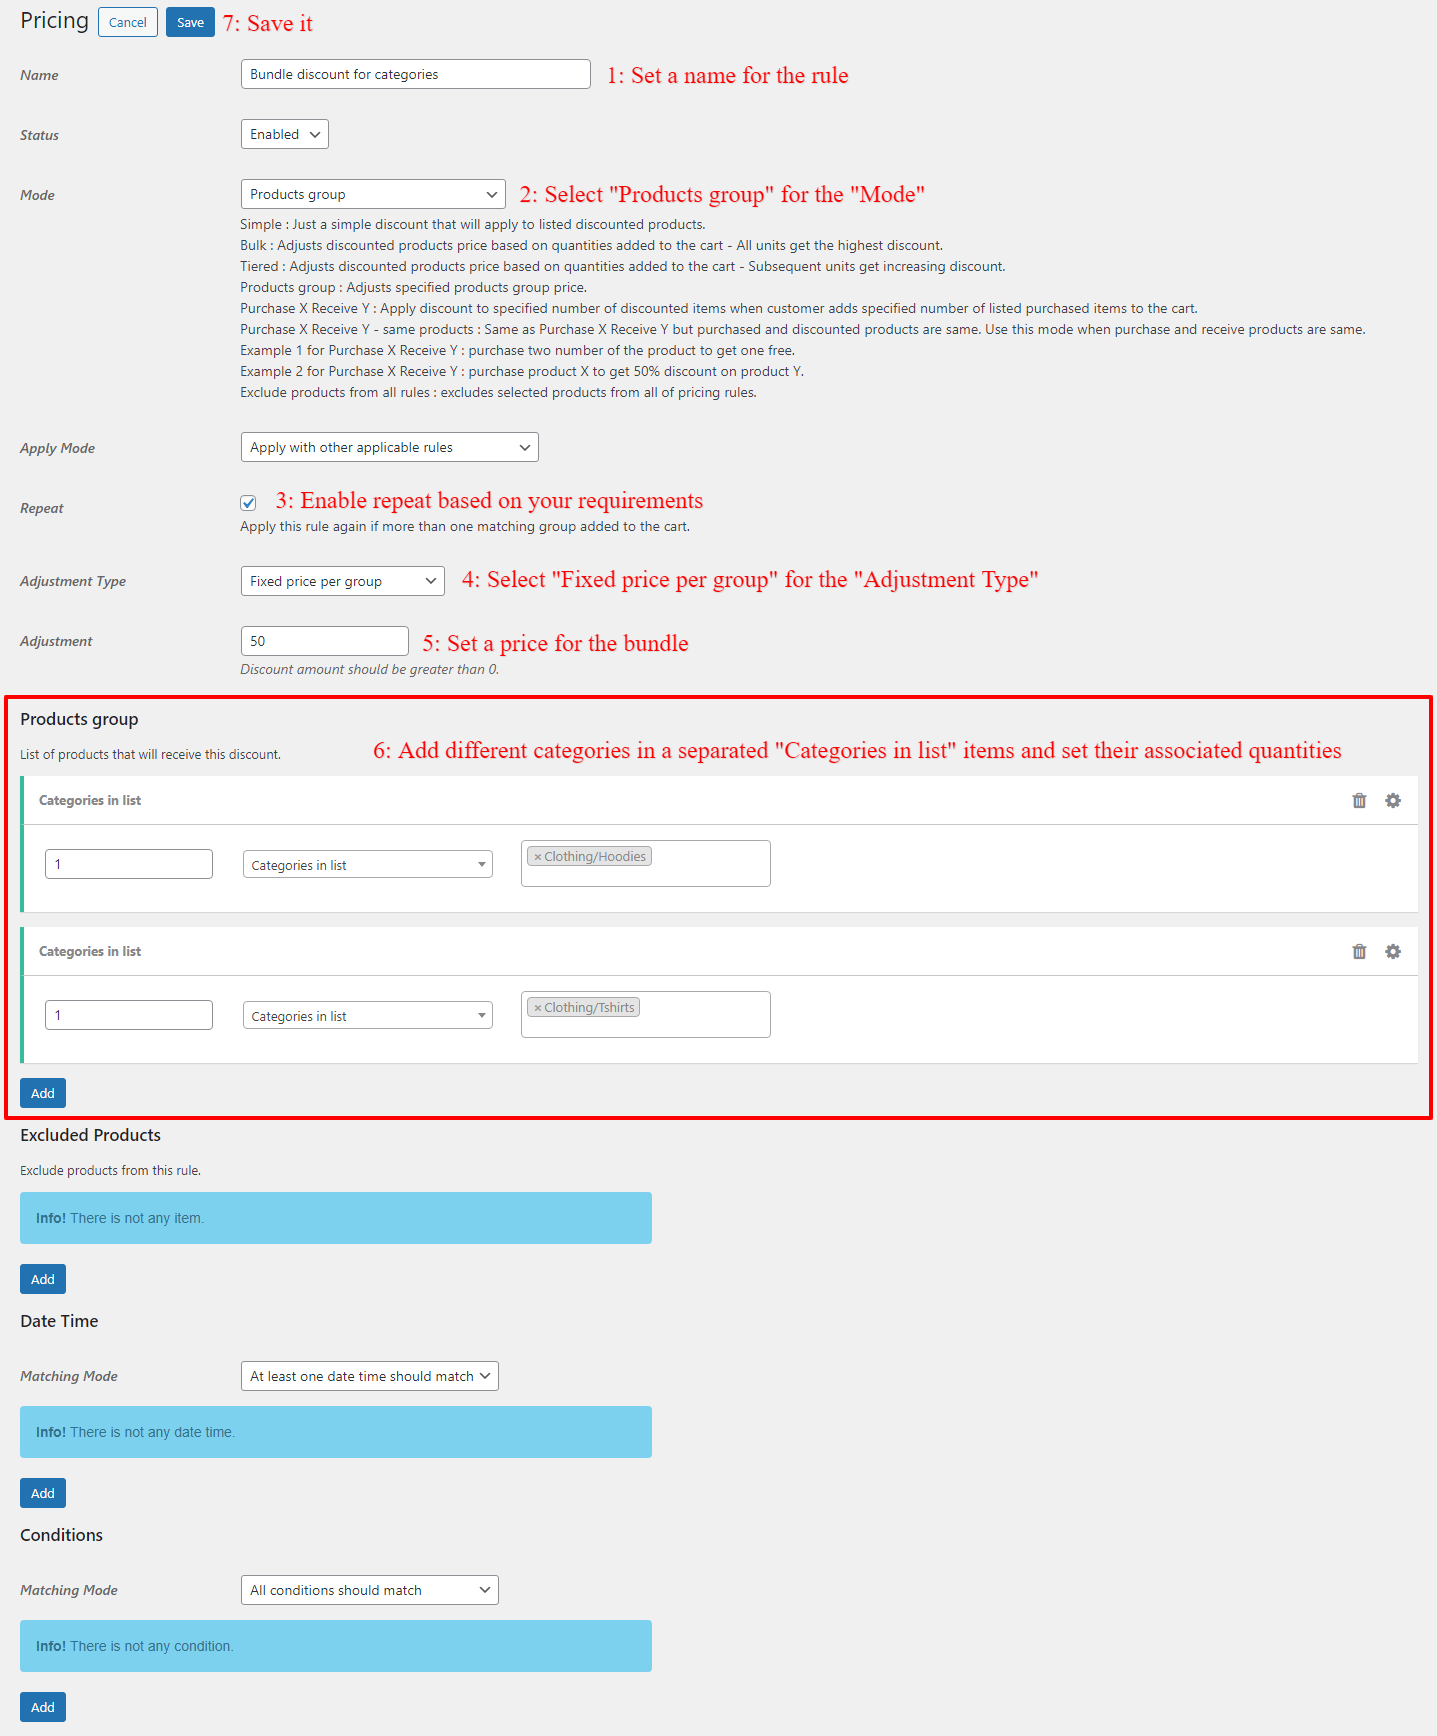
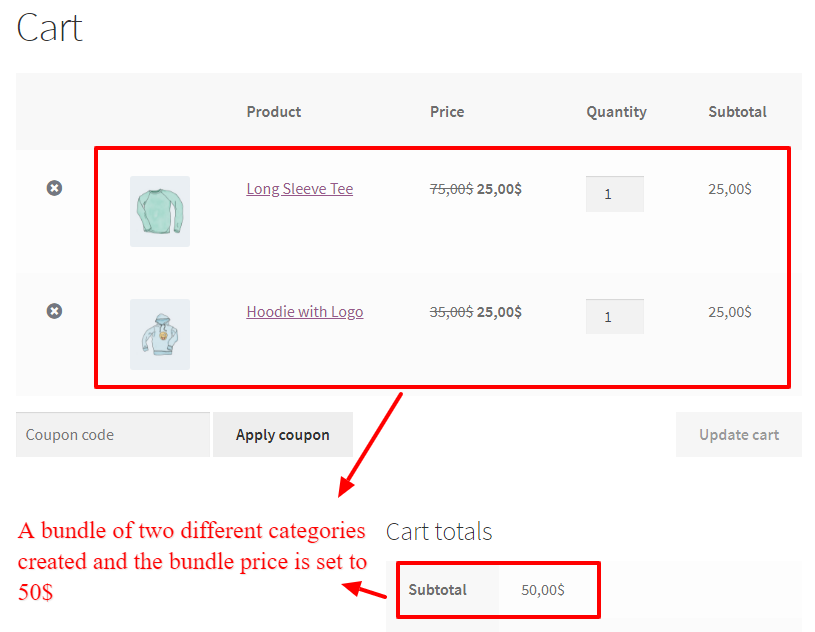
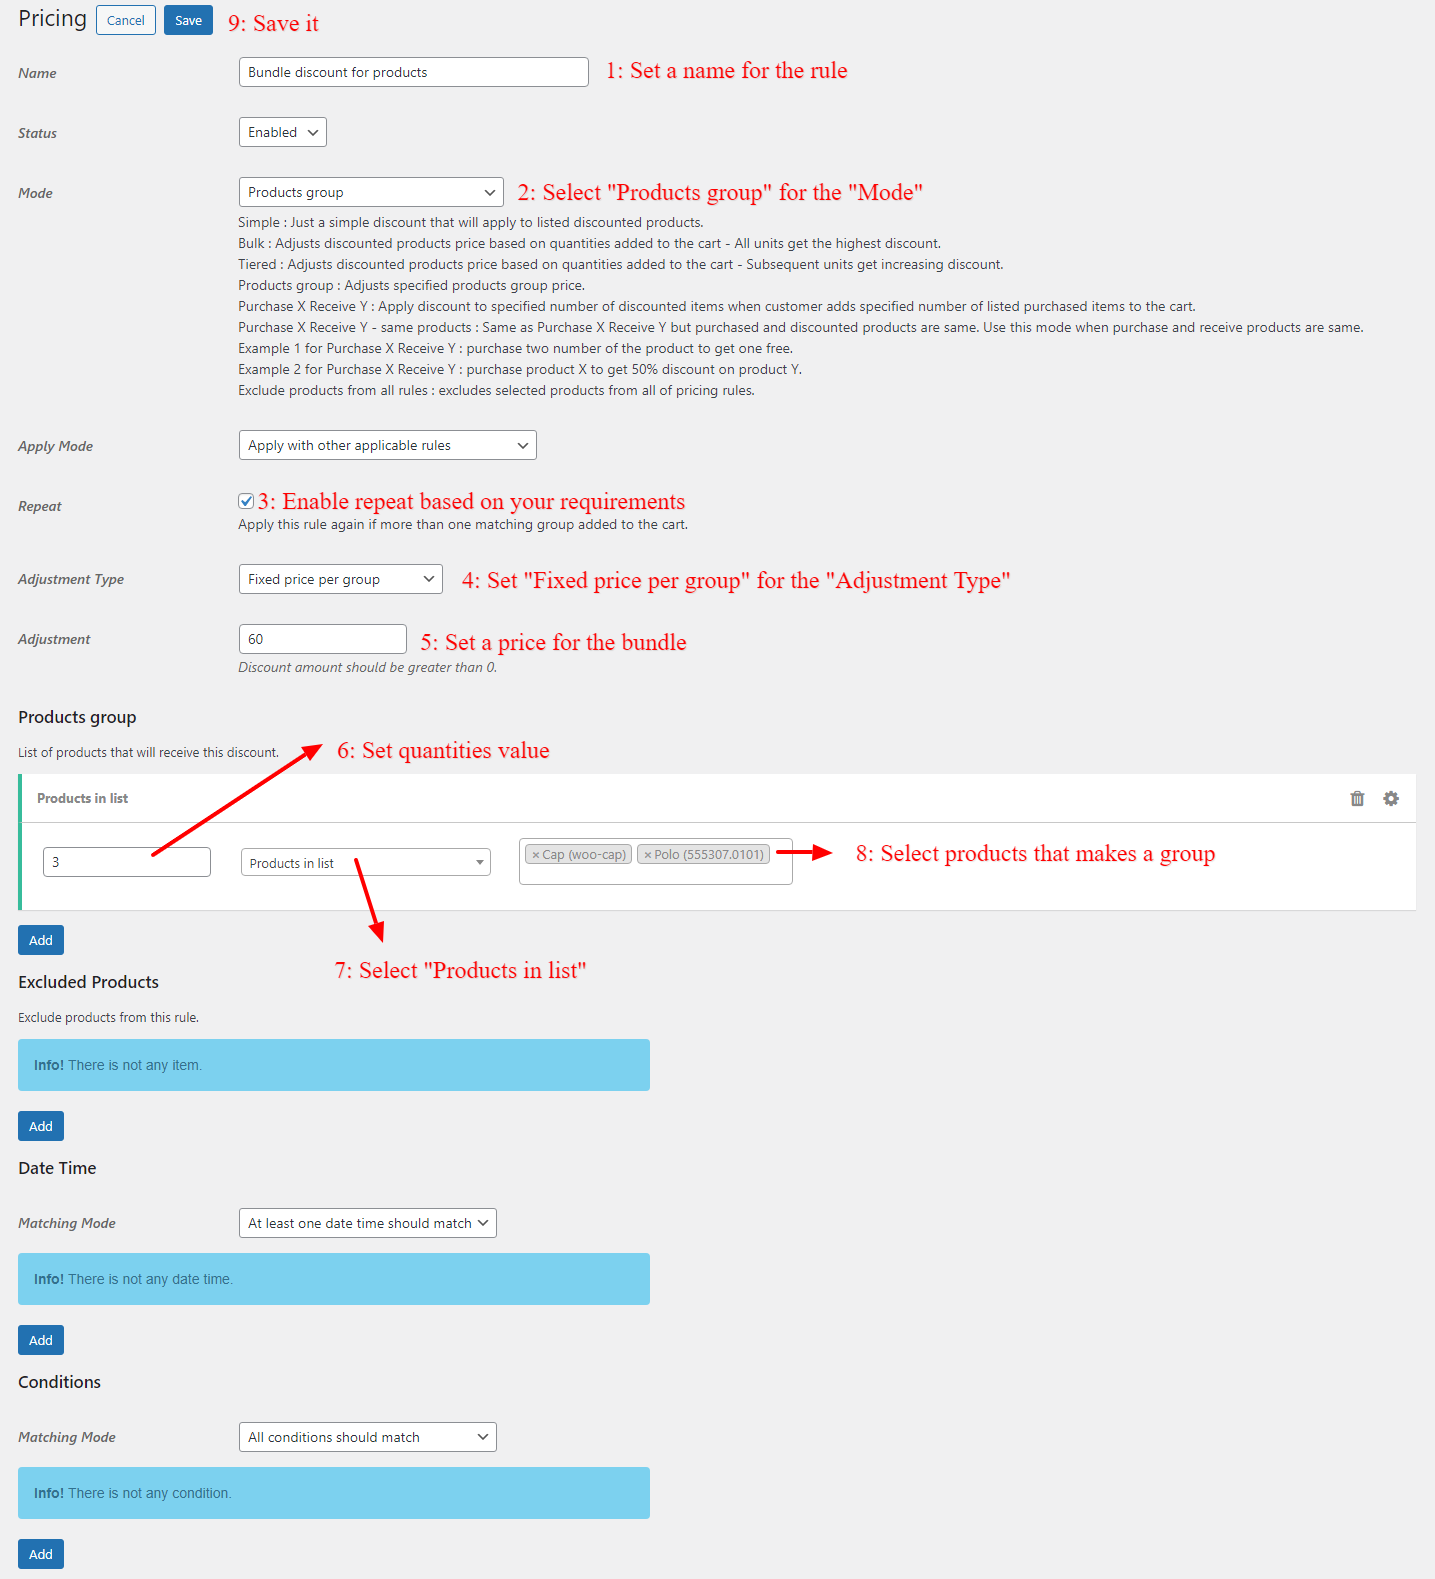
- Create Custom Bundles with Categories in WooCommerce Product Bundle Plugin
- How to Create WooCommerce Composite Products?
- WooCommerce Product Bundle: How to Create Dynamic and Flexible Bundles
- Gift a Product in WooCommerce with Product Bundles
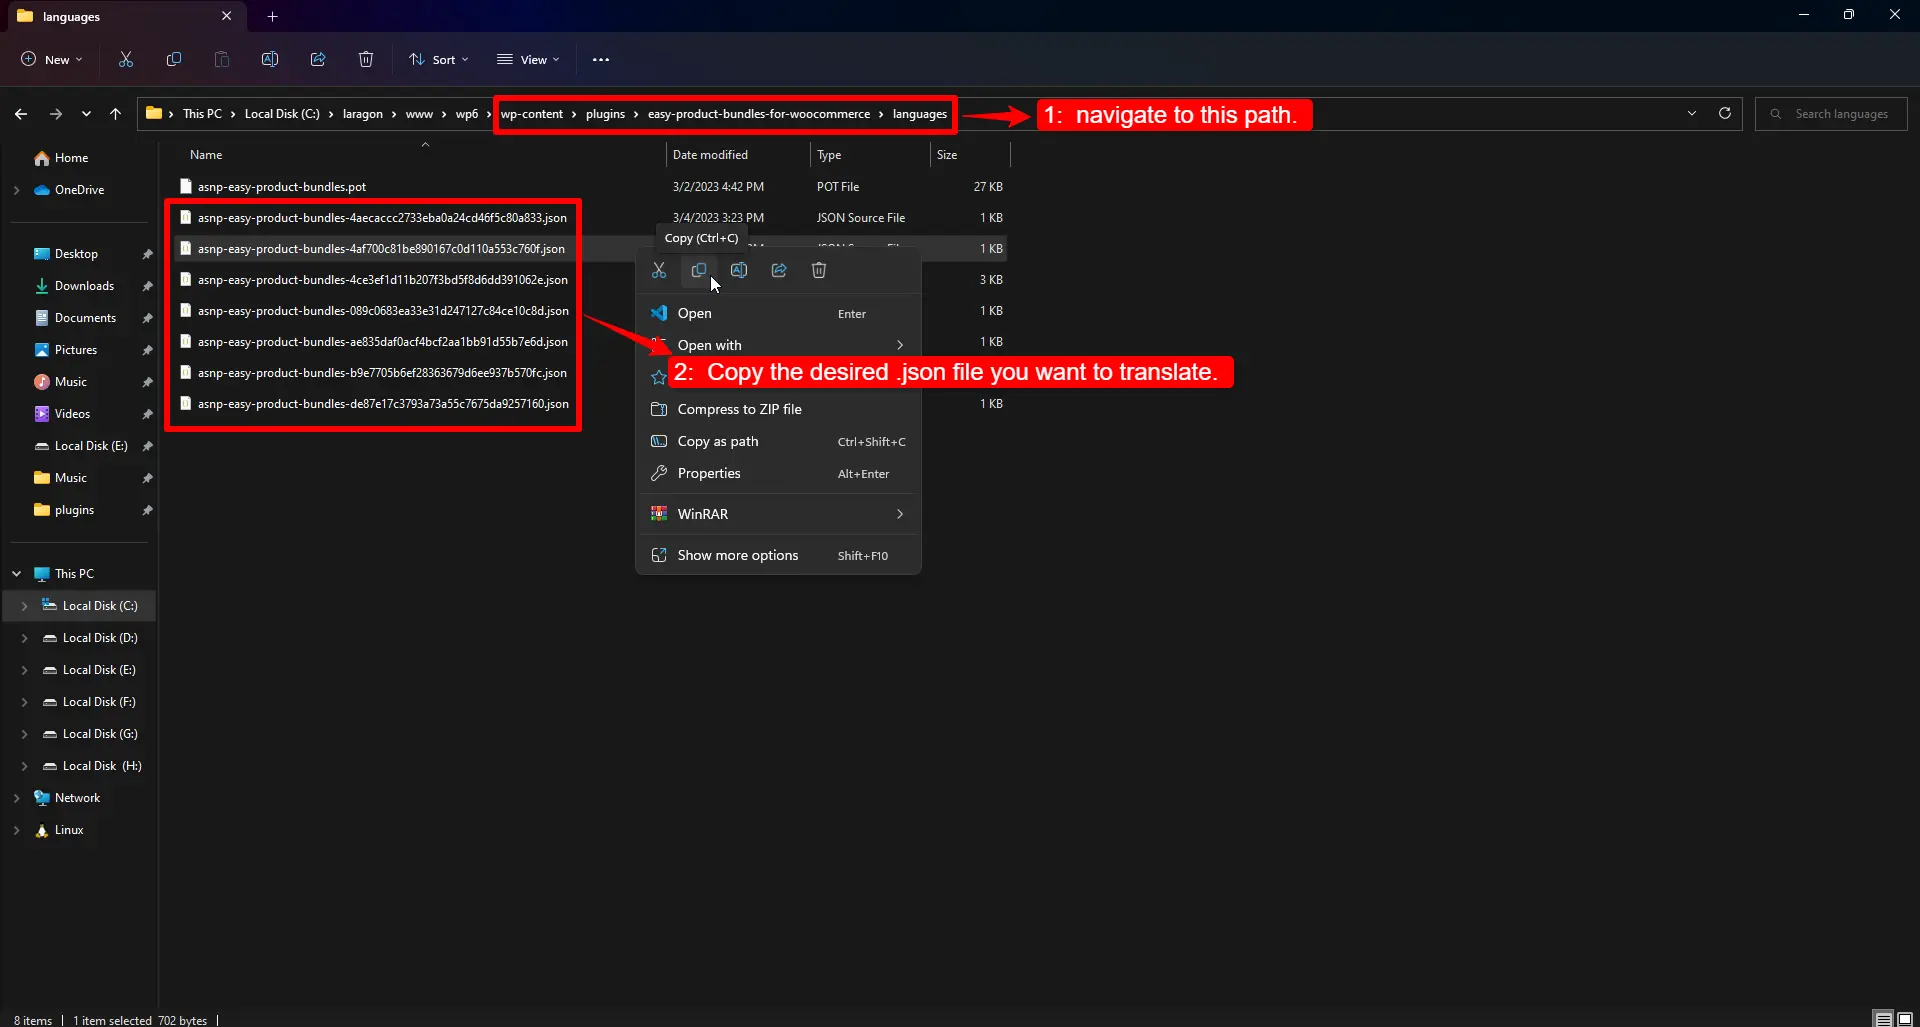
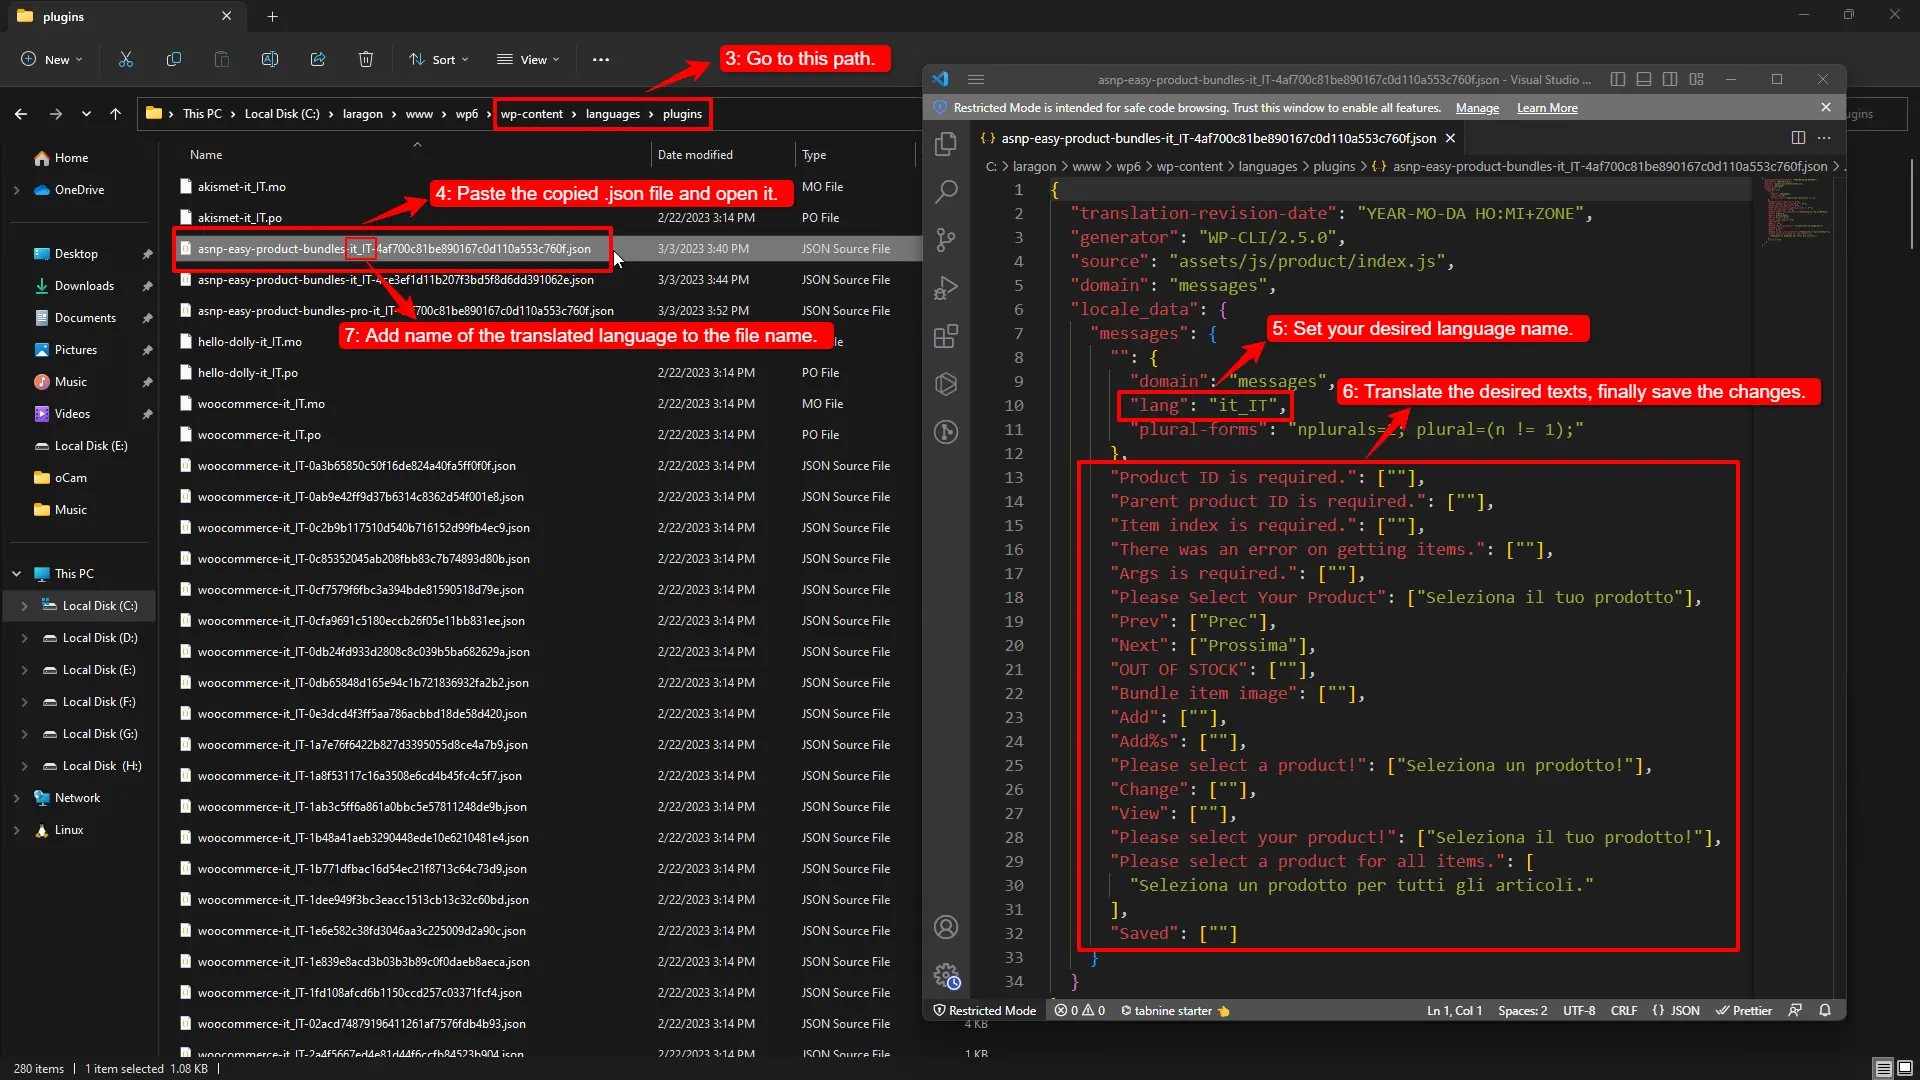
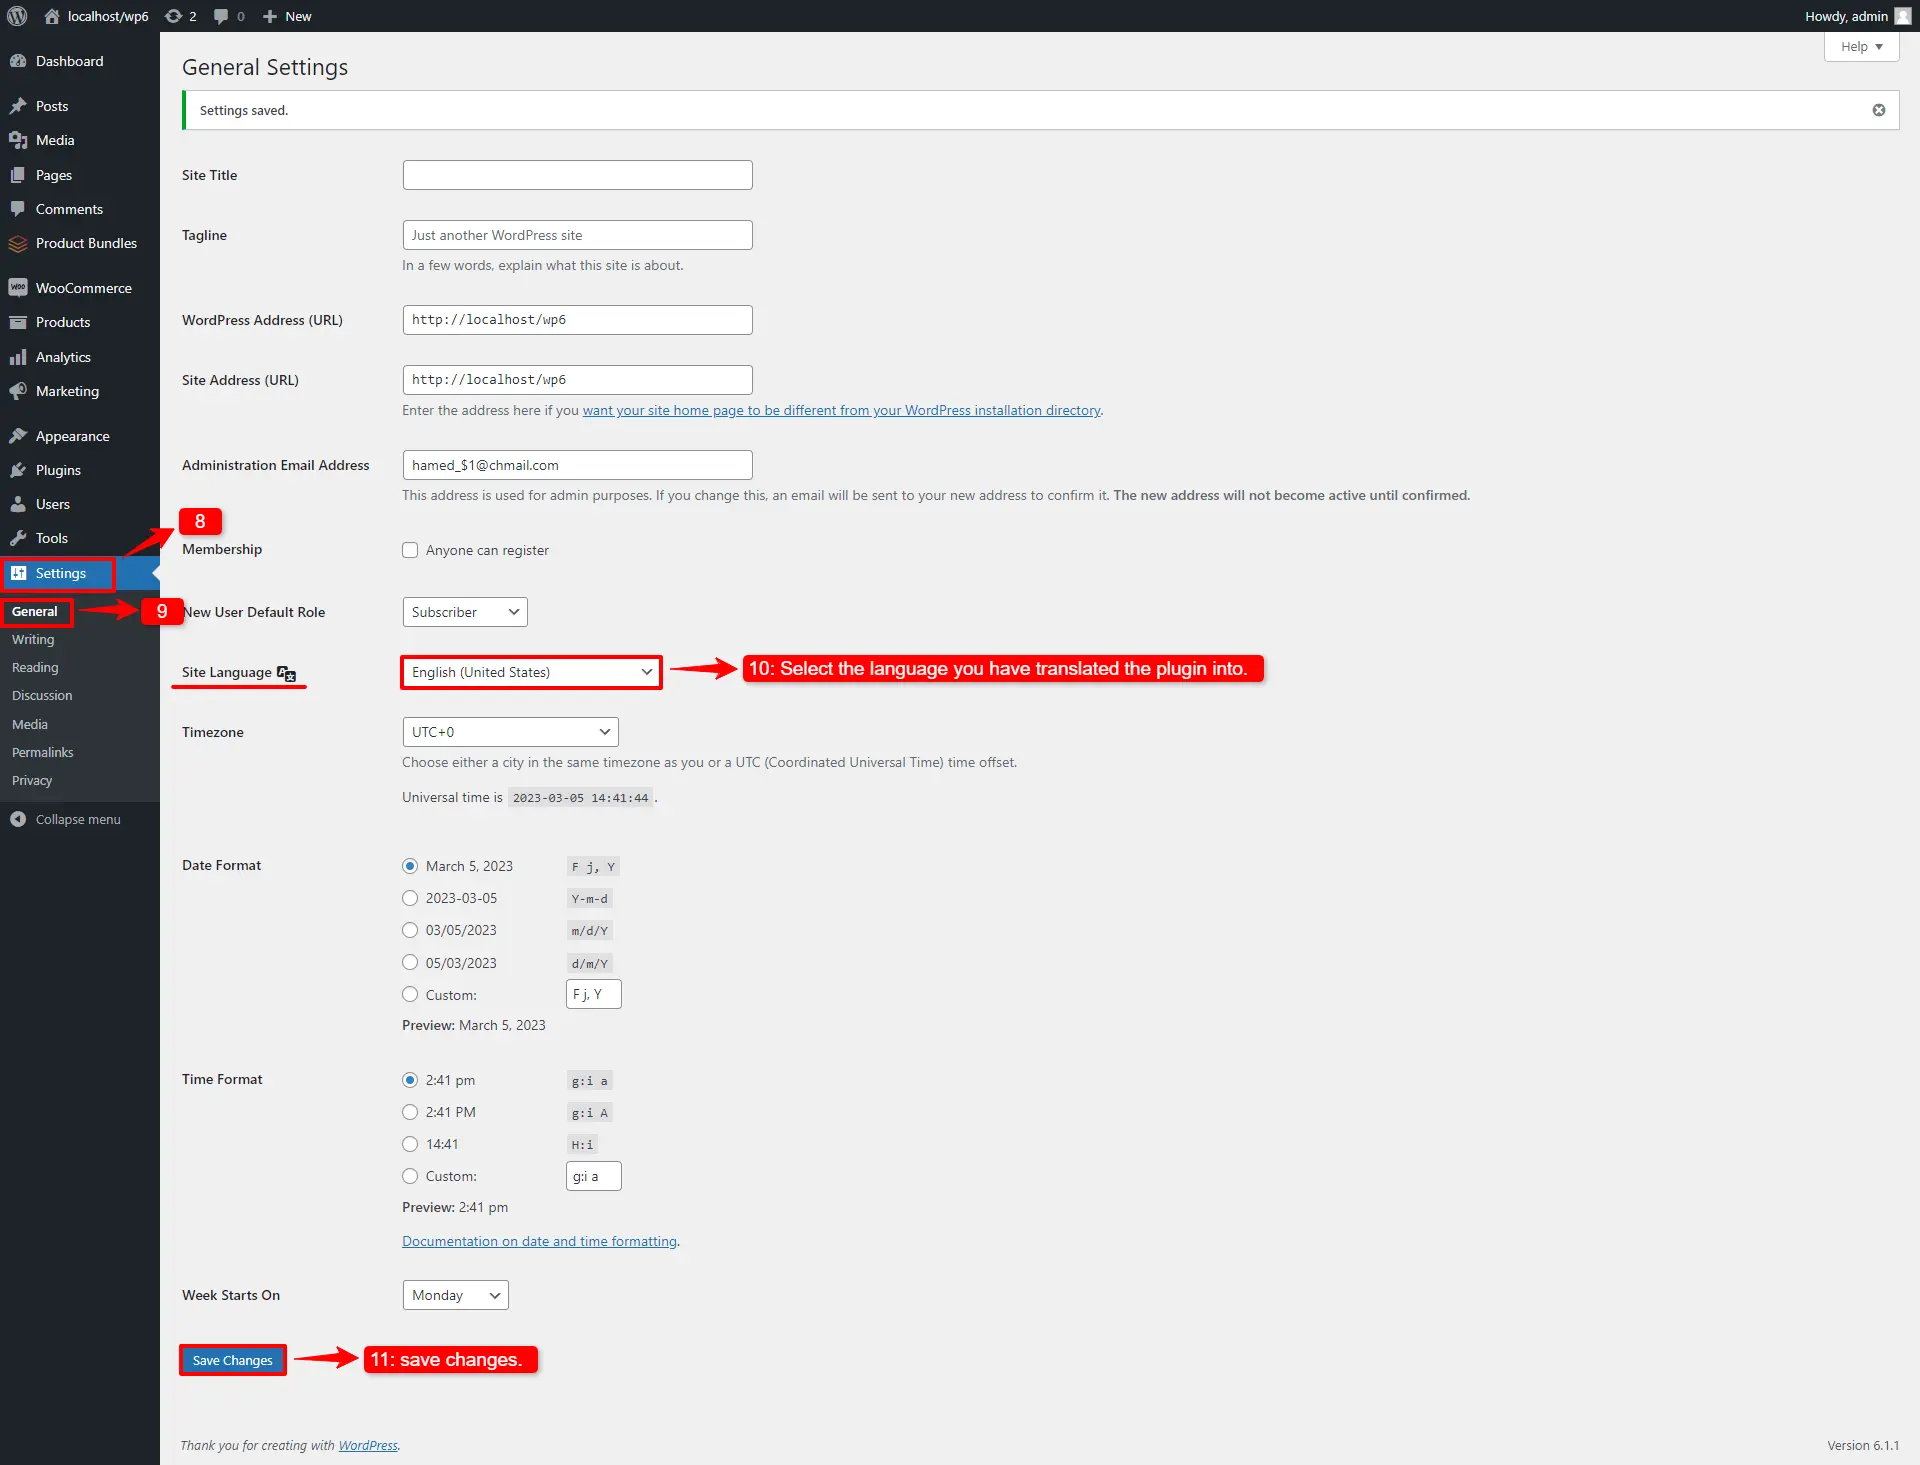
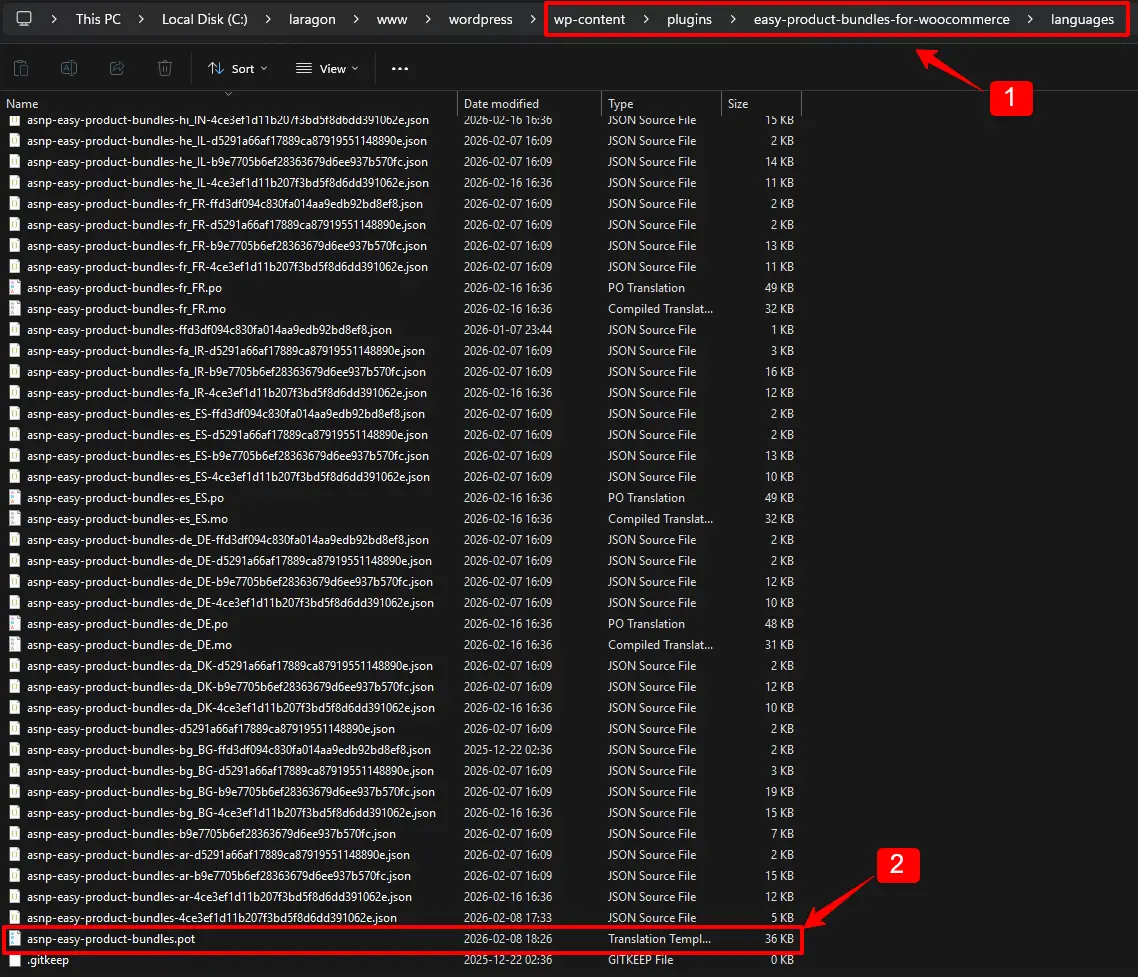
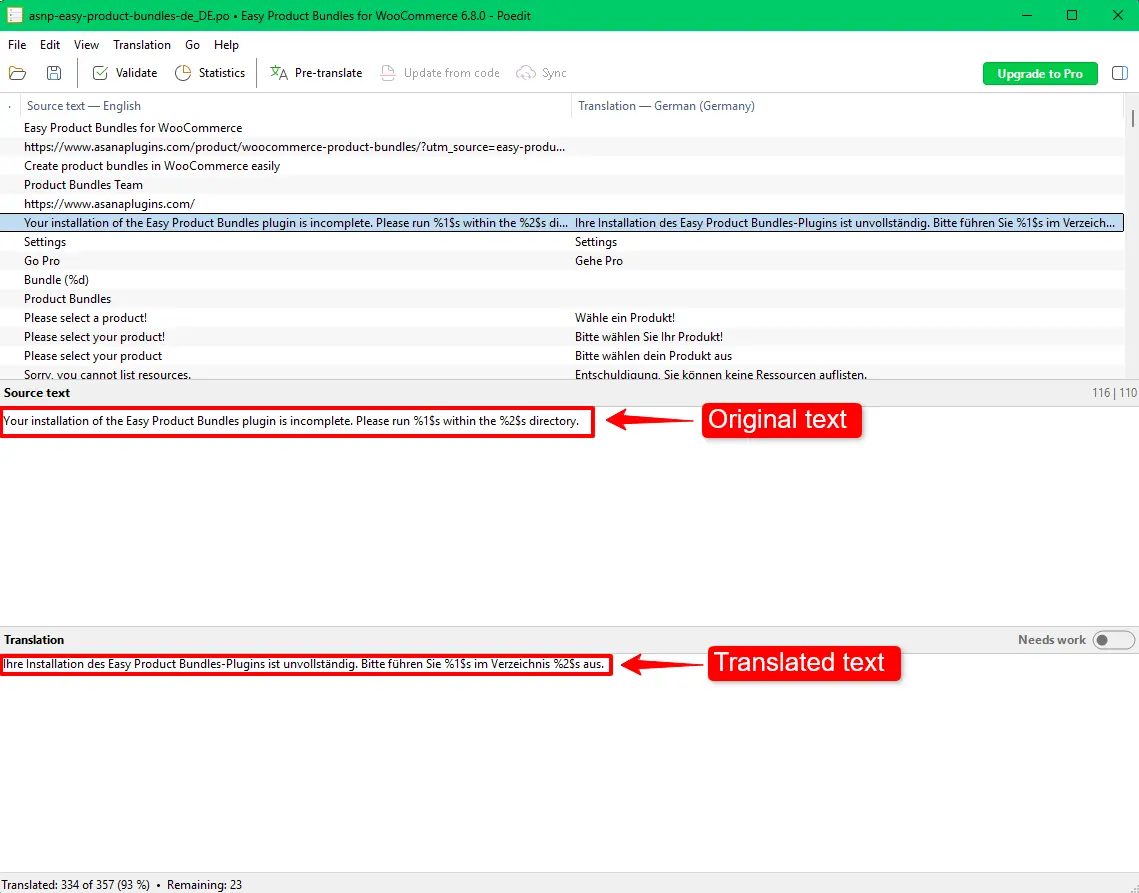
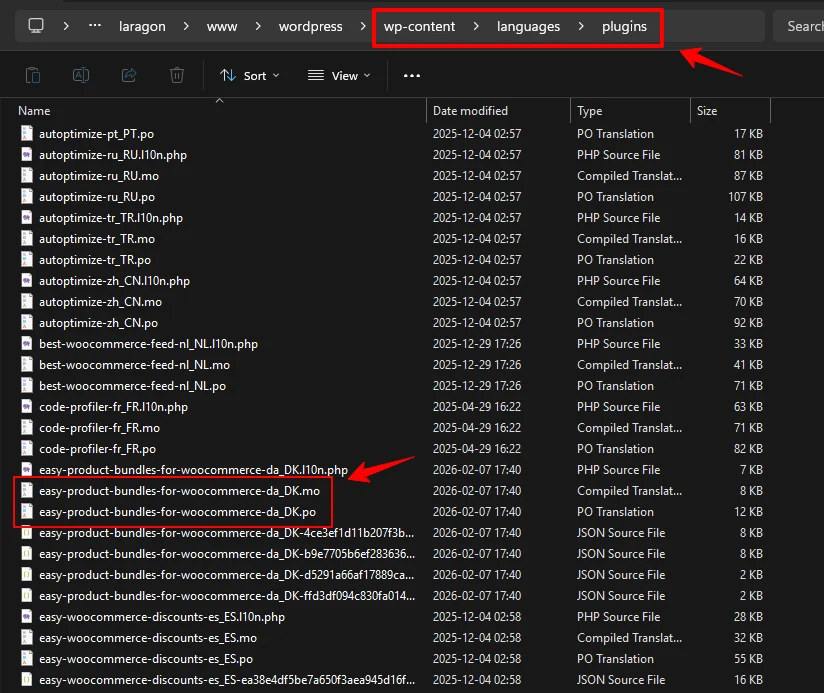
- How to translate the WooCommerce product bundle
FAQ
Grouped products in WooCommerce let customers buy related items individually or together, with each item managed separately. In contrast, bundled products create a custom package of items sold together at a discount, often with options for customization.
Product bundling offers customers a convenient way to purchase related items at a discounted price, enhancing their shopping experience and increasing overall sales. It simplifies buying, promotes additional product purchases, and often leads to higher average order values.
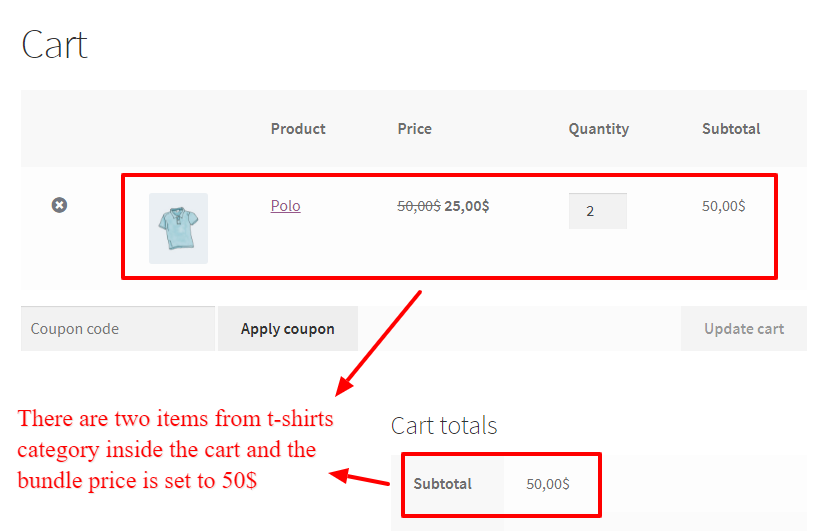
Instead of purchasing a single pencil, customers can be offered a bundle that includes a pencil, eraser, and sharpener, encouraging them to buy multiple items at once and increasing the average order value.
Product bundling is a smart strategy for clearing obsolete or excess inventory. Excess stock ties up cash, reduces business agility, and increases storage costs. By bundling slow-moving items with popular products, you can efficiently clear shelf space and improve cash flow while making room for better-selling goods.


