In this guide, we’ll walk you through the process of adding labels to a specific set of products in your WooCommerce store. Discover the power of product categorization and how it can enhance your customers’ shopping experience. Learn to effectively highlight and differentiate products, creating a more organized and visually appealing online store. Whether you want to promote special items, create product distinctions, or simply improve your store’s organization, this tutorial has you covered. Join us to gain control over your product presentation and make your WooCommerce store more user-friendly and engaging.
Contents
Why Need to add a Sale Badges and Product labels to Products in WooCommerce
Adding sale badges and product labels to custom products in WooCommerce is a strategic approach to enhance the visibility and appeal of your products. These visual elements can significantly impact customer engagement and sales. Here are three compelling reasons why you need to incorporate sale badges and product labels into your WooCommerce store:
1. Enhanced Visibility:
- Sale badges and product labels make your custom products stand out among the numerous options available to customers. When shoppers see a vibrant “Sale” label or a label that highlights specific product features, they are more likely to notice and explore those products. This increased visibility can lead to higher click-through rates and conversions.
2. Increased Trust and Credibility:
- Sale badges and product labels provide valuable information to customers. A “Sale” badge indicates a discounted price, which can instill a sense of urgency and encourage purchases. Additionally, labels that highlight product attributes, such as “New Arrival” or “Best Seller,” help customers make informed decisions. These labels build trust and credibility by offering clear and concise information about your products.
3. Improved User Experience and Conversion Rates:
- Sale badges and product labels contribute to a better user experience by simplifying product discovery. Customers can quickly identify products that match their preferences or needs, leading to a more efficient shopping experience. As a result, the likelihood of making a purchase increases. By leveraging these visual cues, you can improve your conversion rates and overall sales performance.
In summary, adding sale badges to your custom products in WooCommerce is an effective strategy for increasing visibility, building trust, and enhancing the user experience. These elements help customers make informed choices and ultimately contribute to higher conversion rates and increased sales for your online store.
How to Add Product Labels to WooCommerce Products (Full Guide)
In this article, we will provide you with a detailed guide to adding Sale Badges and Product Labels and Countdown Timer to Woocommerce All Products and Categories and Tags and Is On Sale and In Stock Out Of Stock and On Backorder.
Are you ready? Let’s dive in.
Installing Sale Badges and Product labels Plugin in WordPress
The Sale Badges and Product labels Plugin is an easy-to-use for WooCommerce. It will help you to add a Sale Badge and Product Labels and Countdown Timer to the website in less than 2 minutes.
Conditions
The WooCommerce Sale Badges and Product Labels Plugin have many conditions, such as :
- All Products
- Products
- Categories
- Tags
- “Is On Sale”
- “In Stock” and “Out Of Stock”, “on backorder”
- Discount Rules
Installing Sale Badges and Product label plugins in WordPress
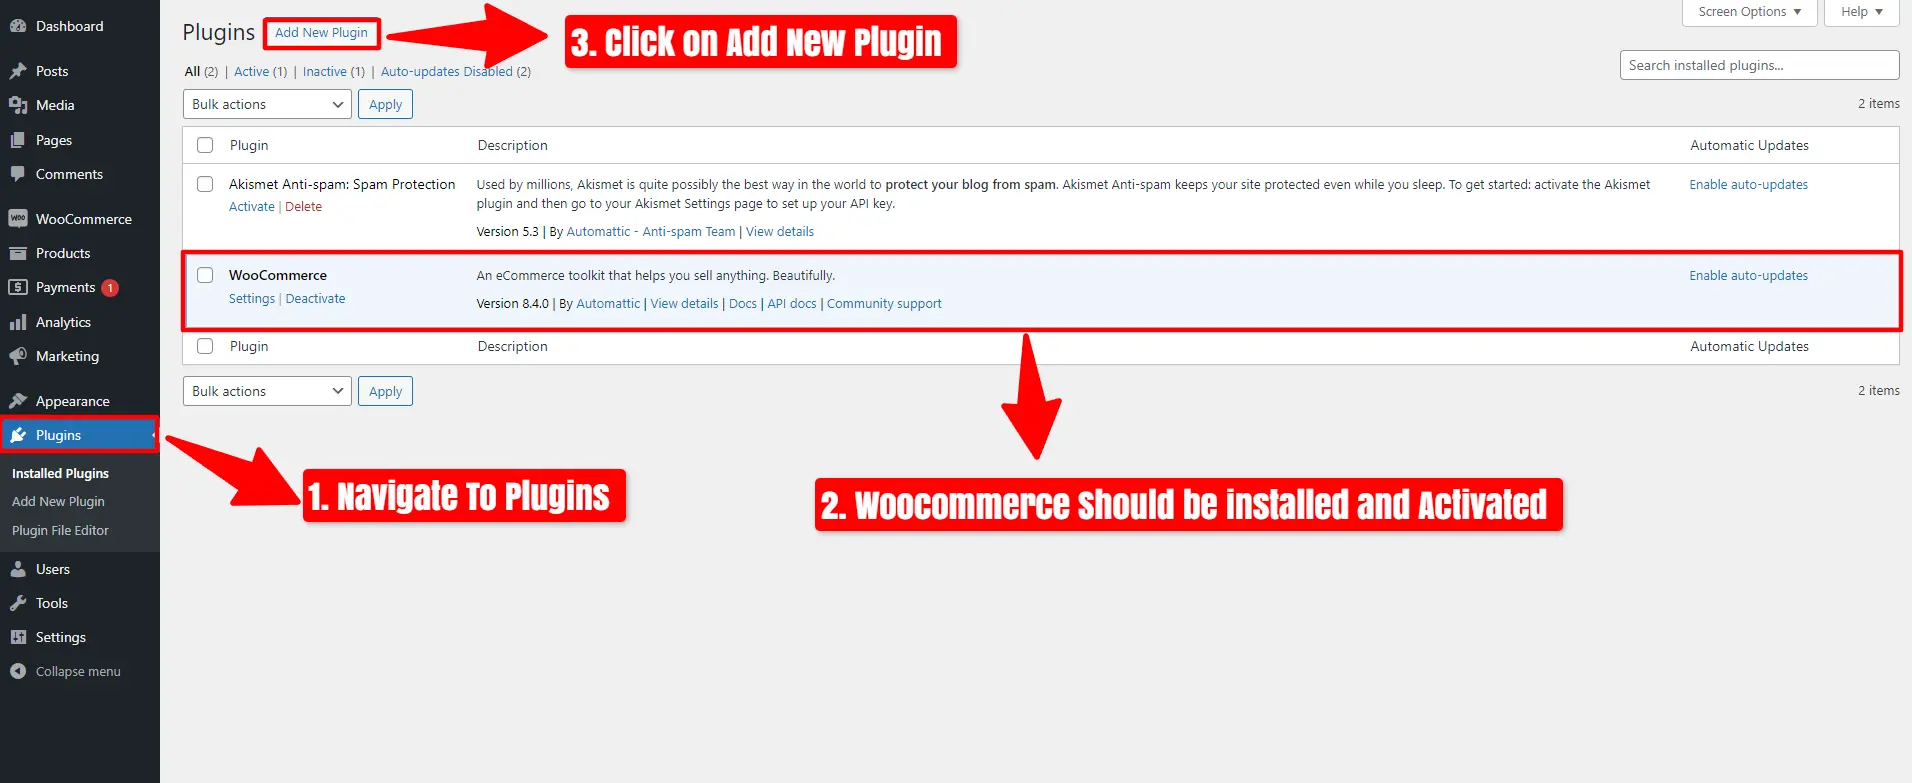
Follow these steps to install the Sale Badges and Product Labels for the WooCommerce plugin.
- Navigate To Plugins.
- Woocommerce Should be installed and Activated.
- Click on Add New Plugin.
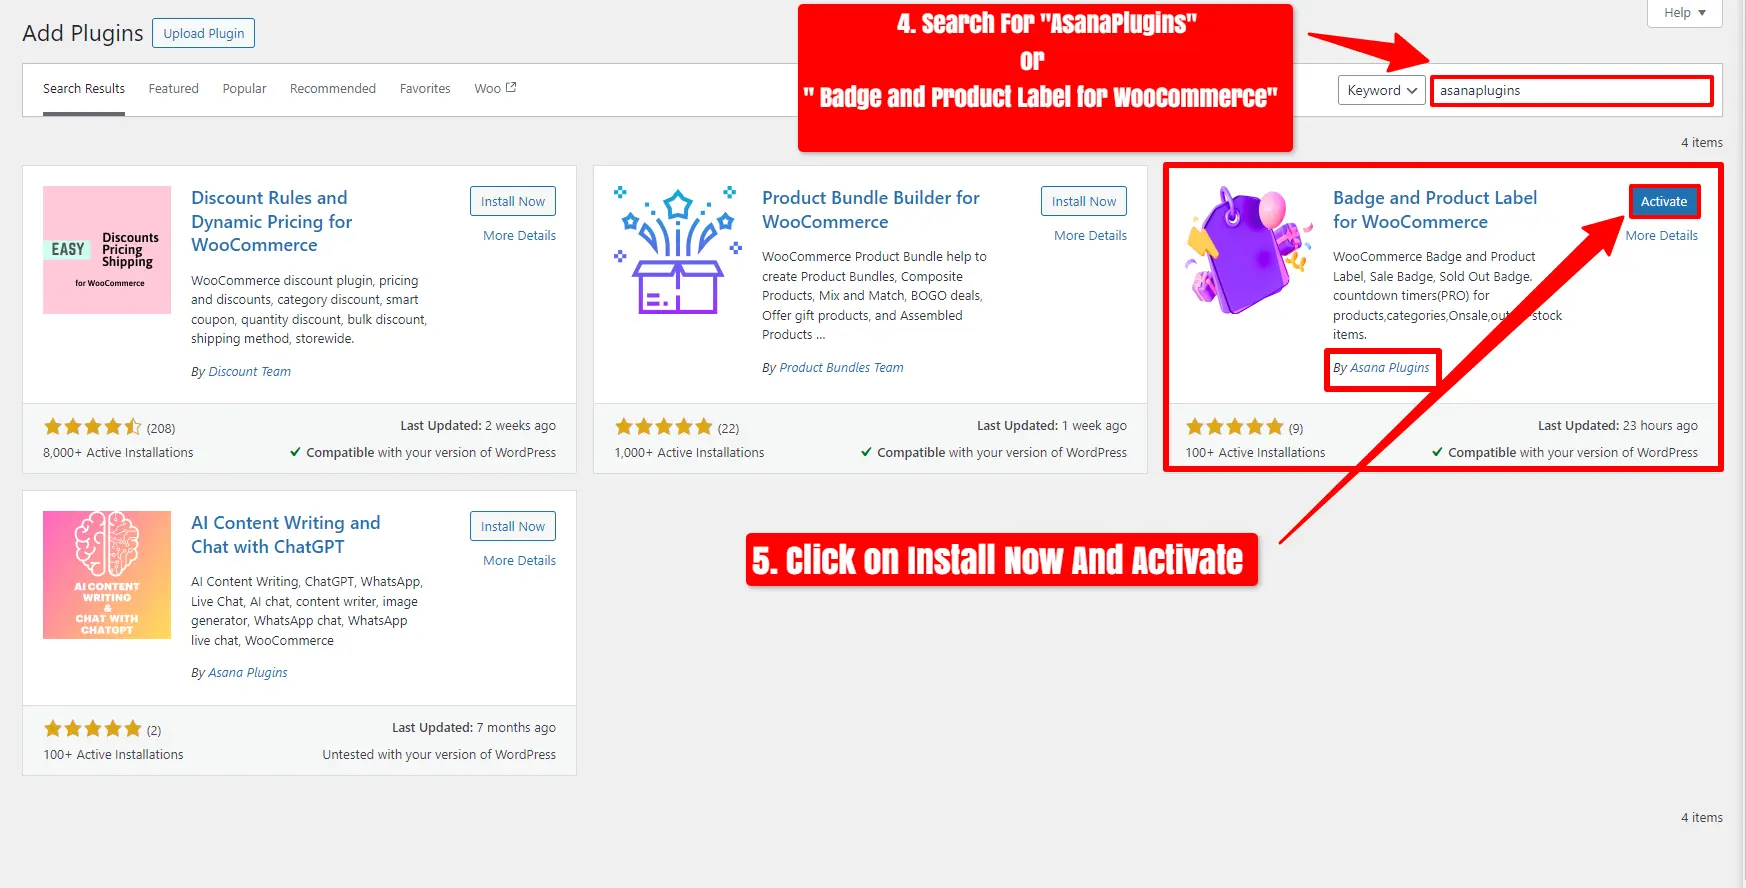
- Search For ‘Asanaplugins’ or ‘Badge and Product Label for WooCommerce‘.
- After seeing the plugin, click on “Install Now” and activate it.
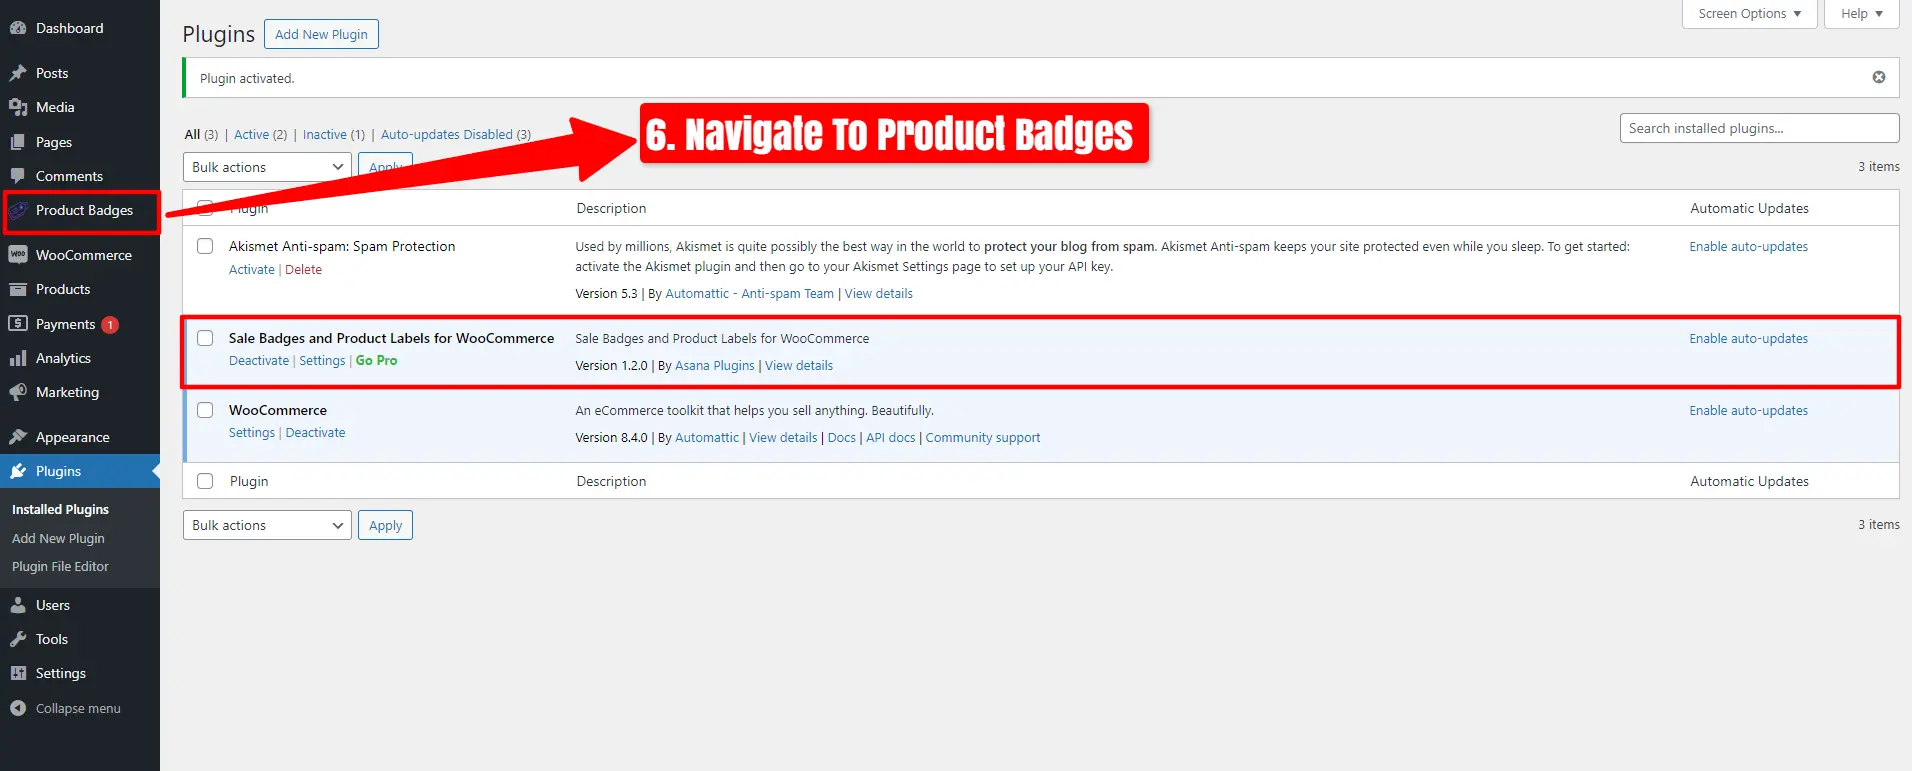
Now, Sale Badges and Product Labels for WooCommerce have been installed. Navigate to the Product Badges.
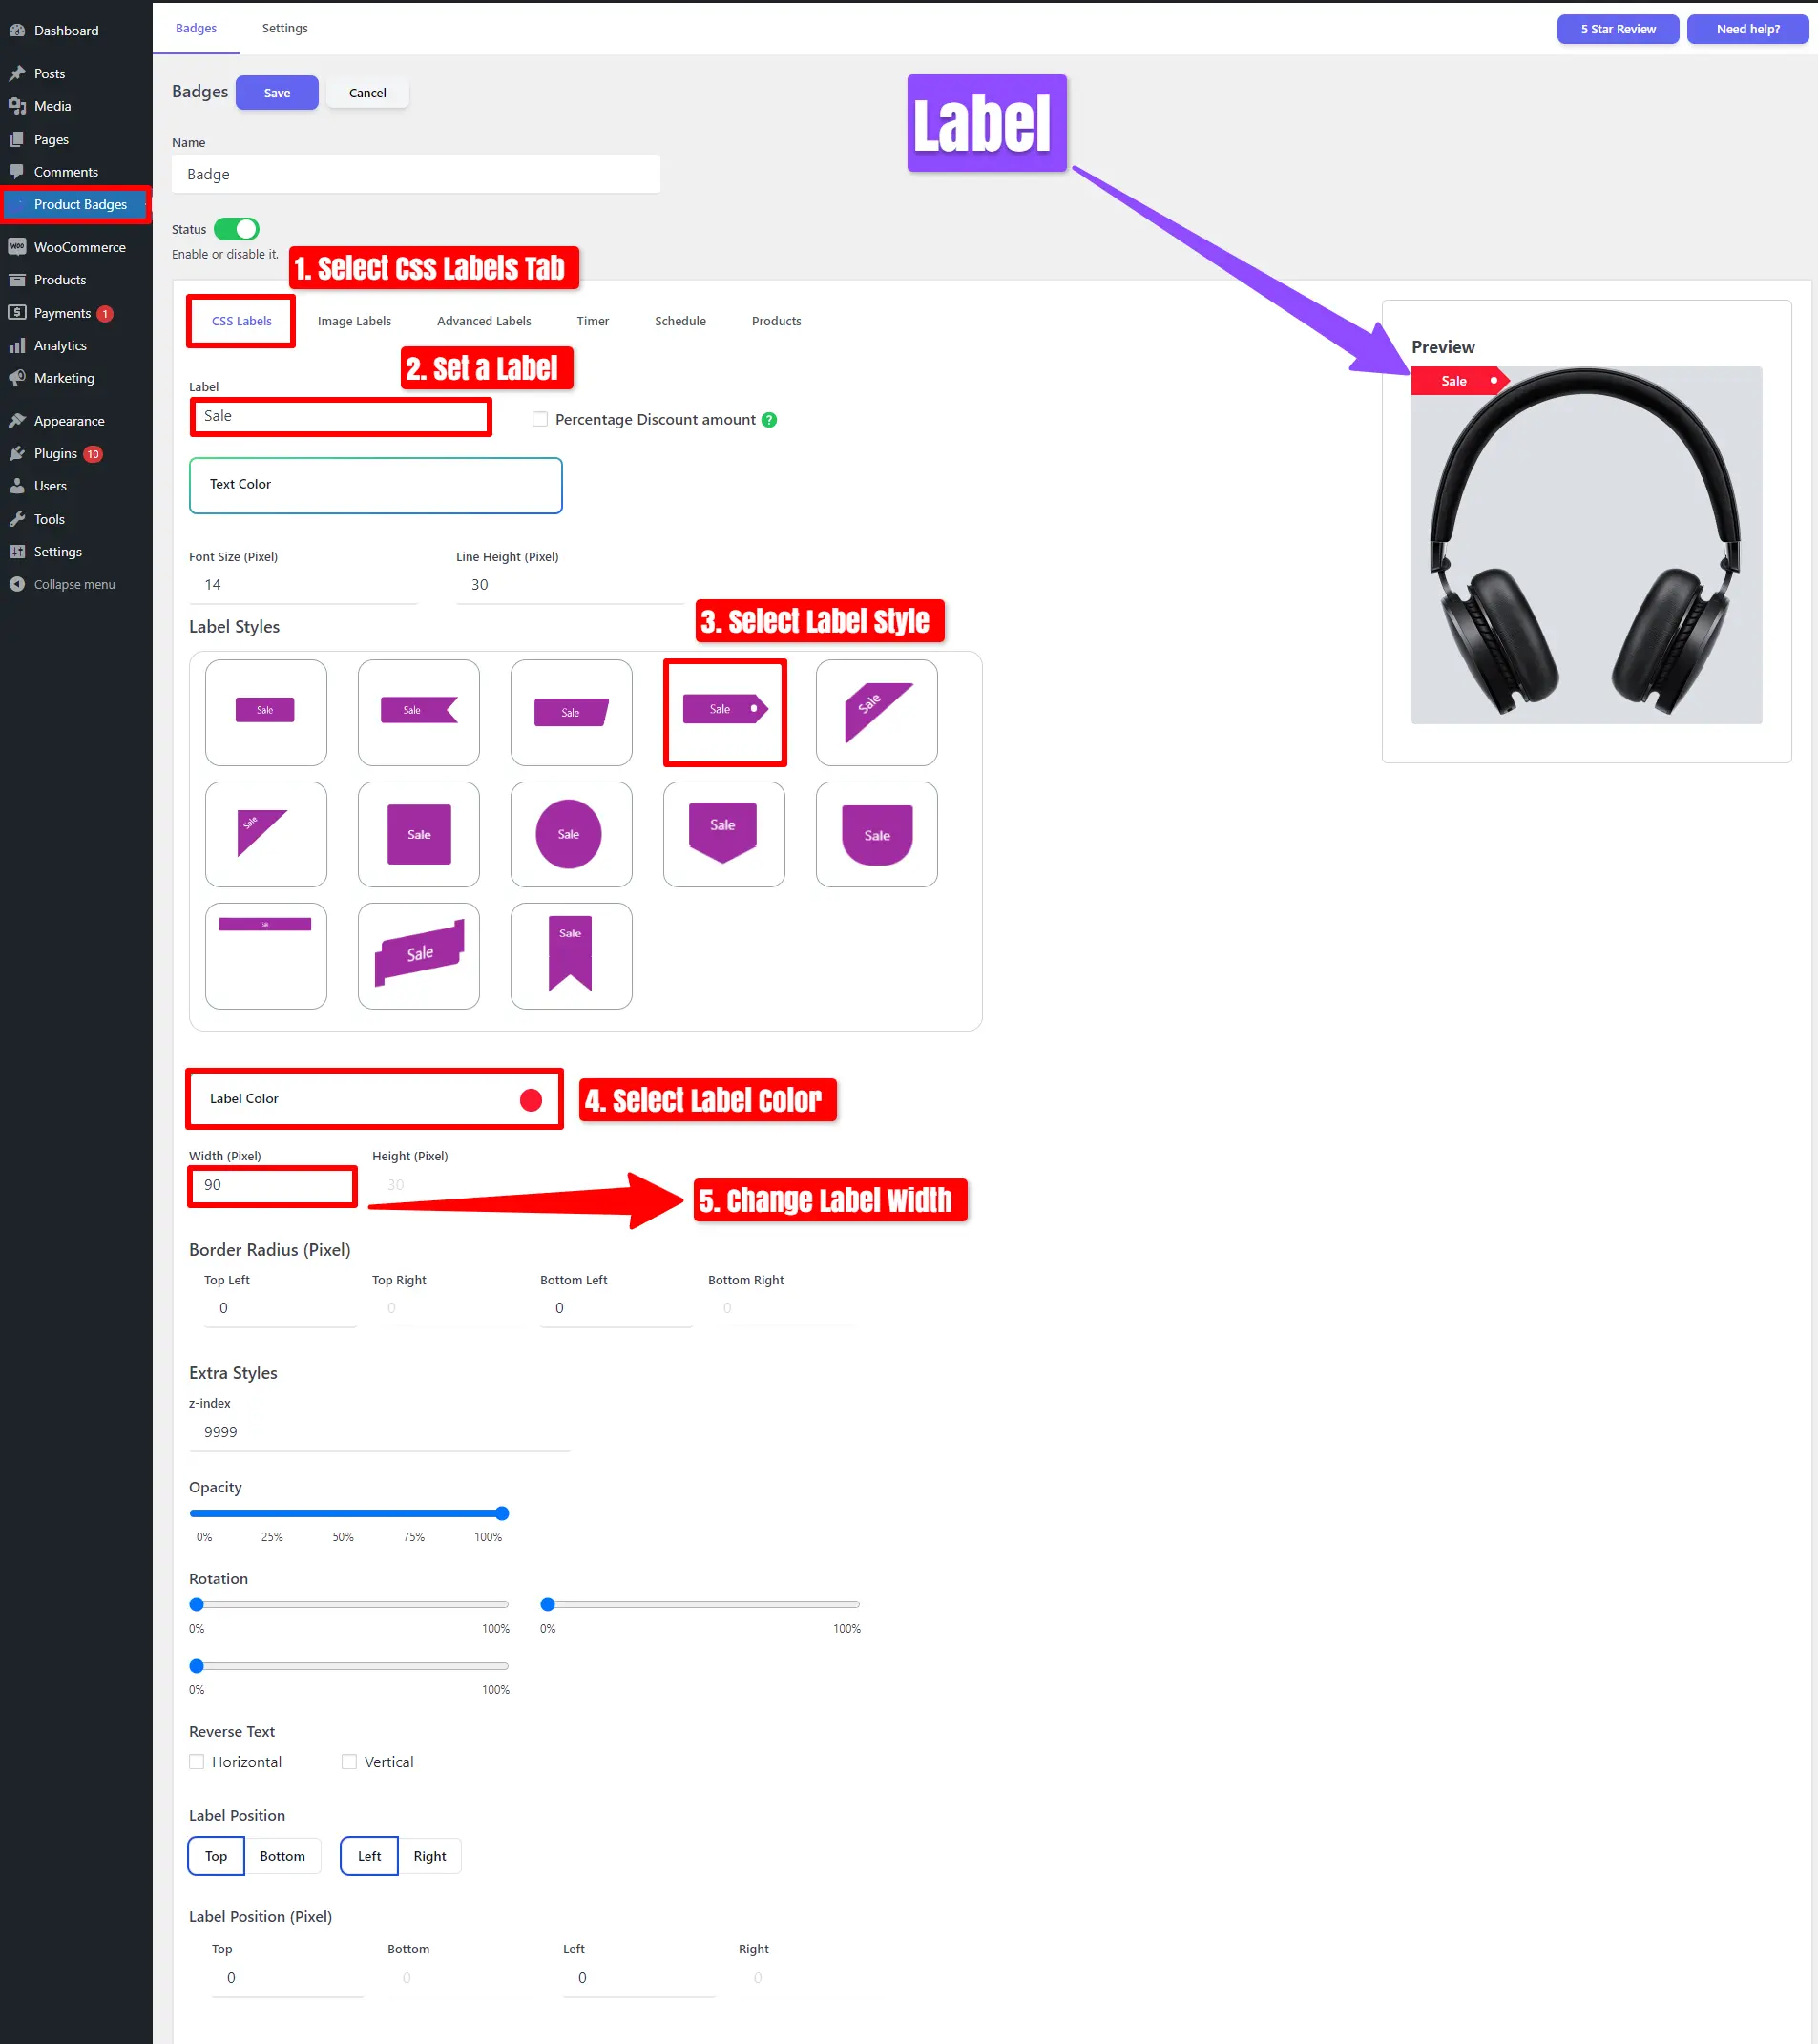
Create Product Label
- Begin by selecting the ‘CSS Label’ tab.
- Then, set a label and choose your preferred label style.
- Select the label color and adjust the label width.
Add Product Labels to All Products
Display Labels on All Products in WooCommerce.
- Navigate to the ‘Products’ tab.
- Choose ‘All Products.’
- Save your changes.
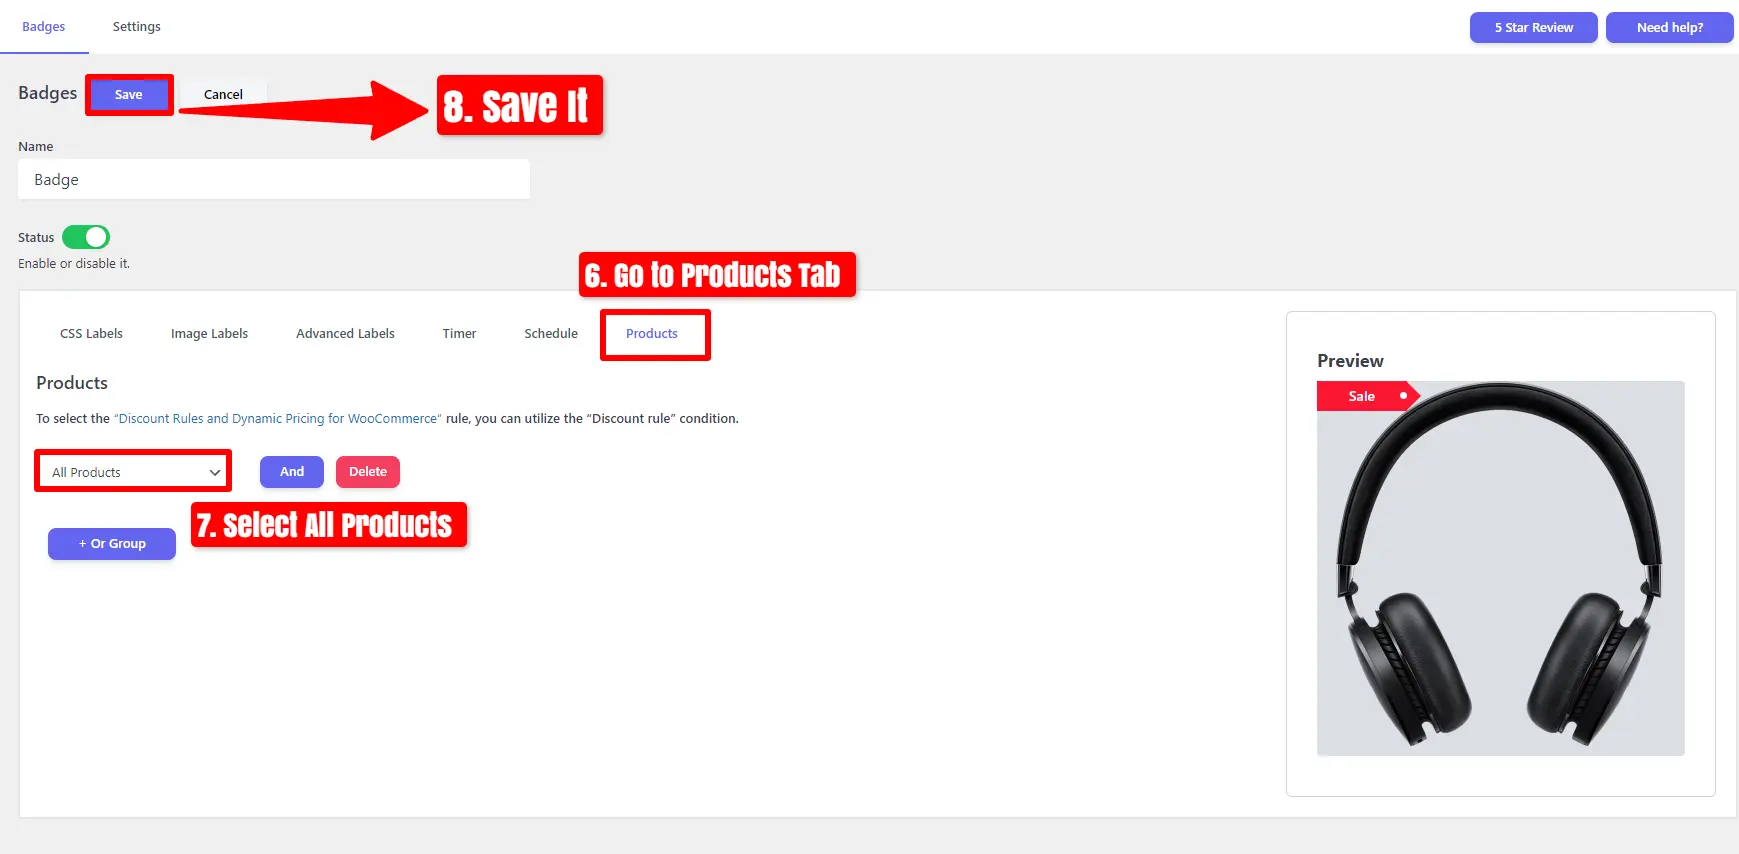
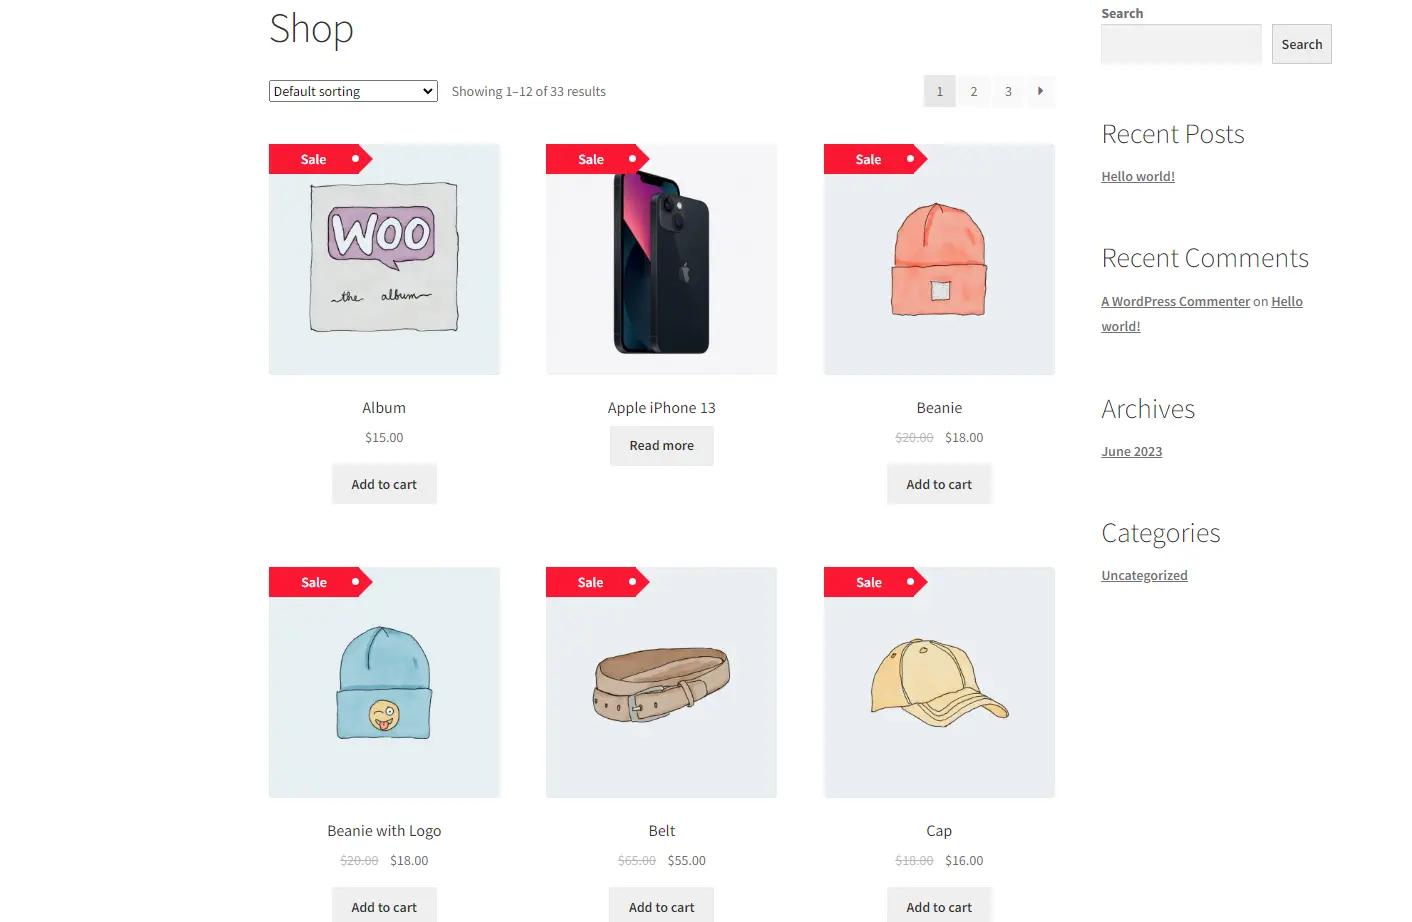
- View Labels on All Products on the Archive Page.
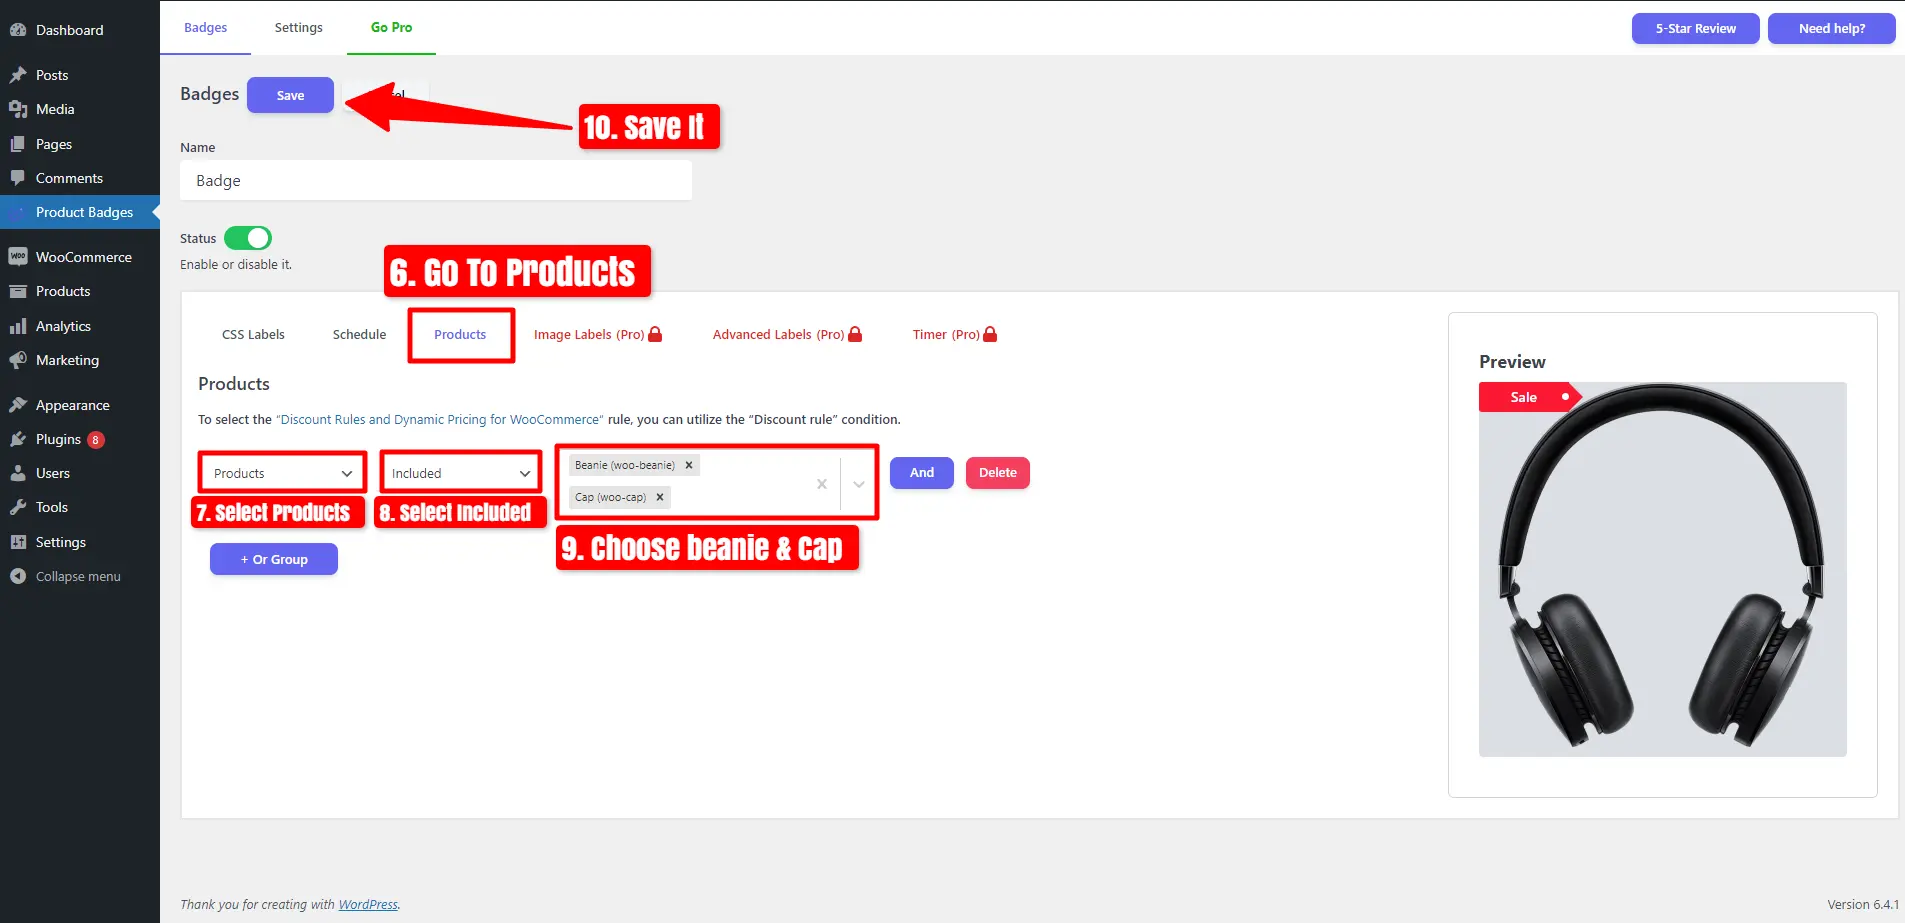
Add Product Labels to Products
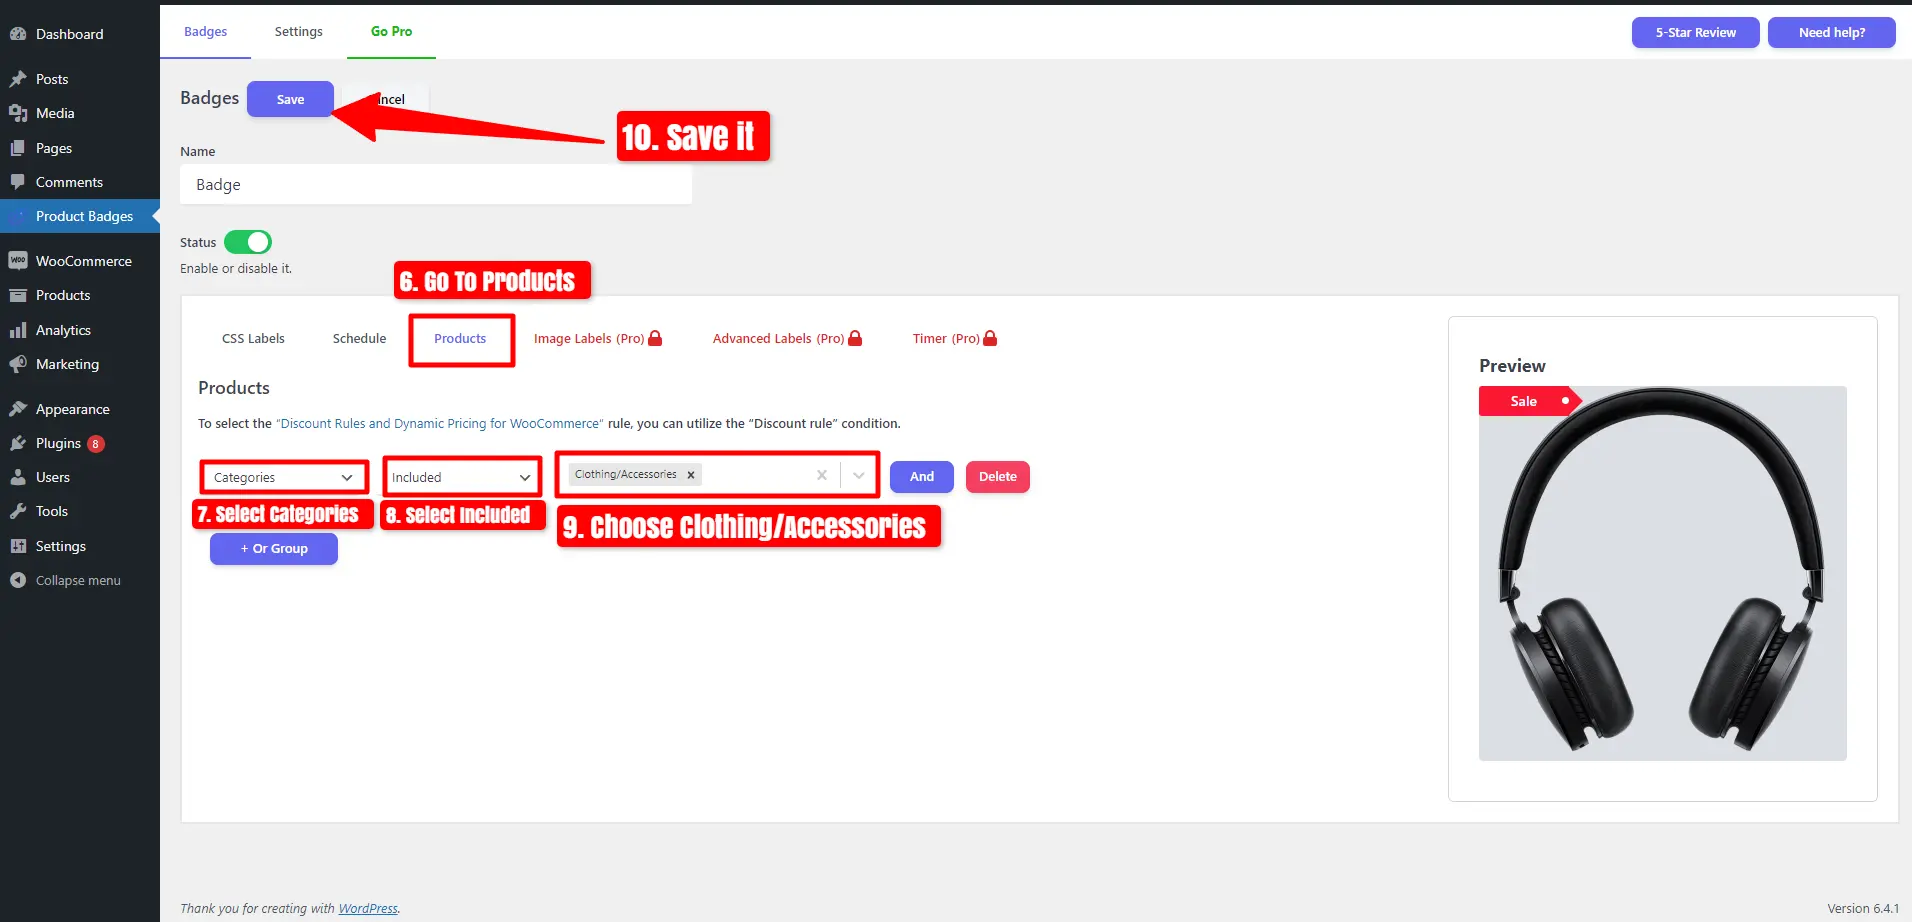
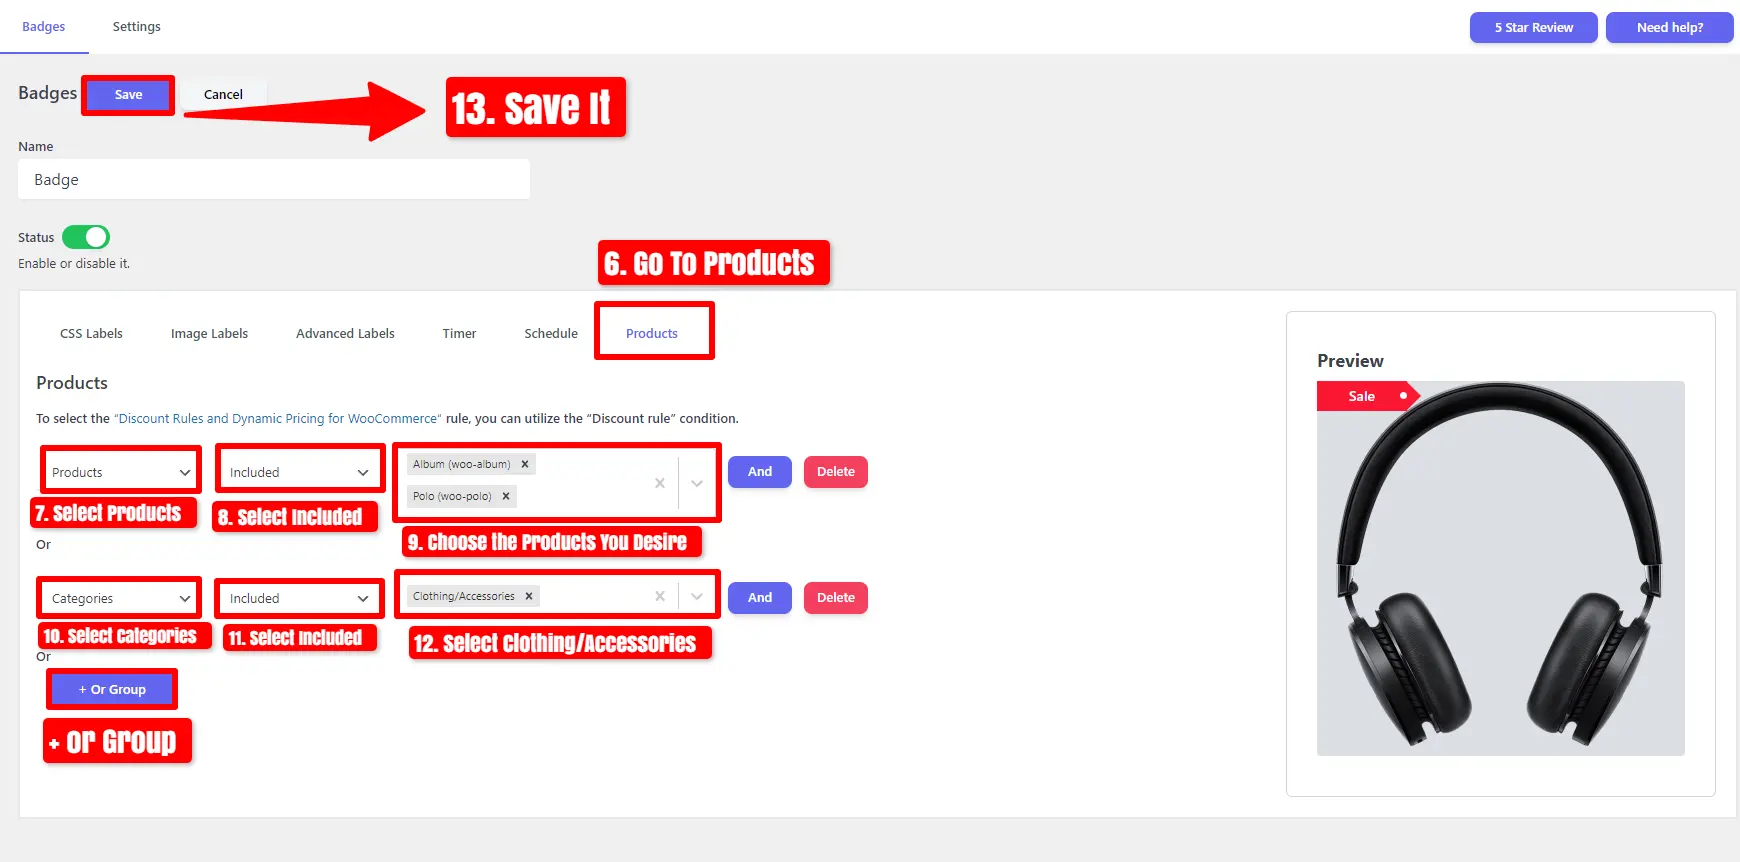
In the paragraph explaining how to Create Product Label, you learned how to create a CSS label. So, after creating the CSS label..
- Go to the ‘Products’ tab.
- Select ‘Products’ and choose ‘Included.’
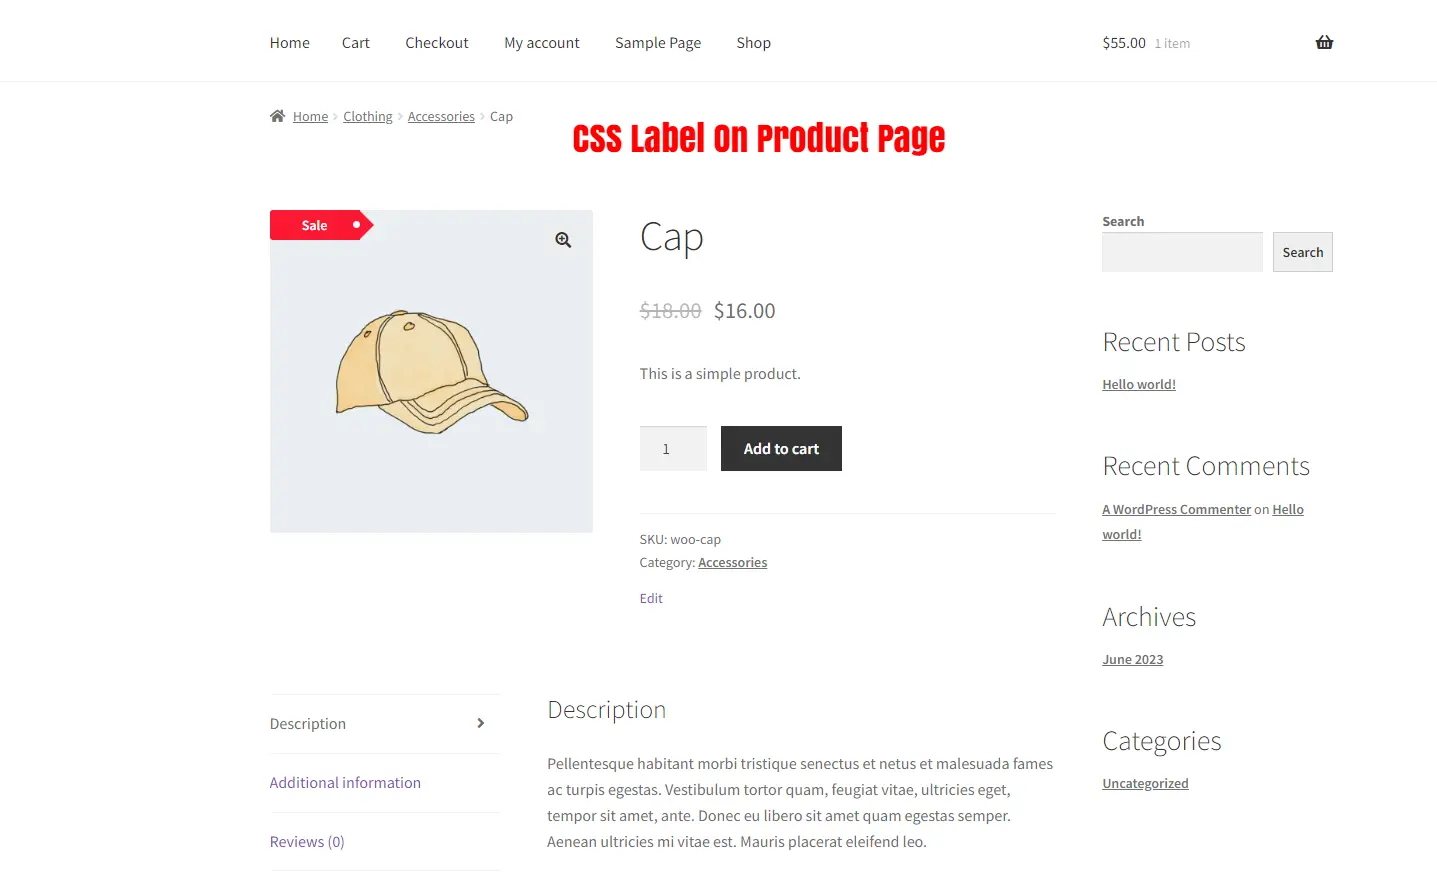
- Pick the products you desire, for example: ‘Beanie (woo-beanie),’ ‘Cap (woo-cap).’
- Save your changes.
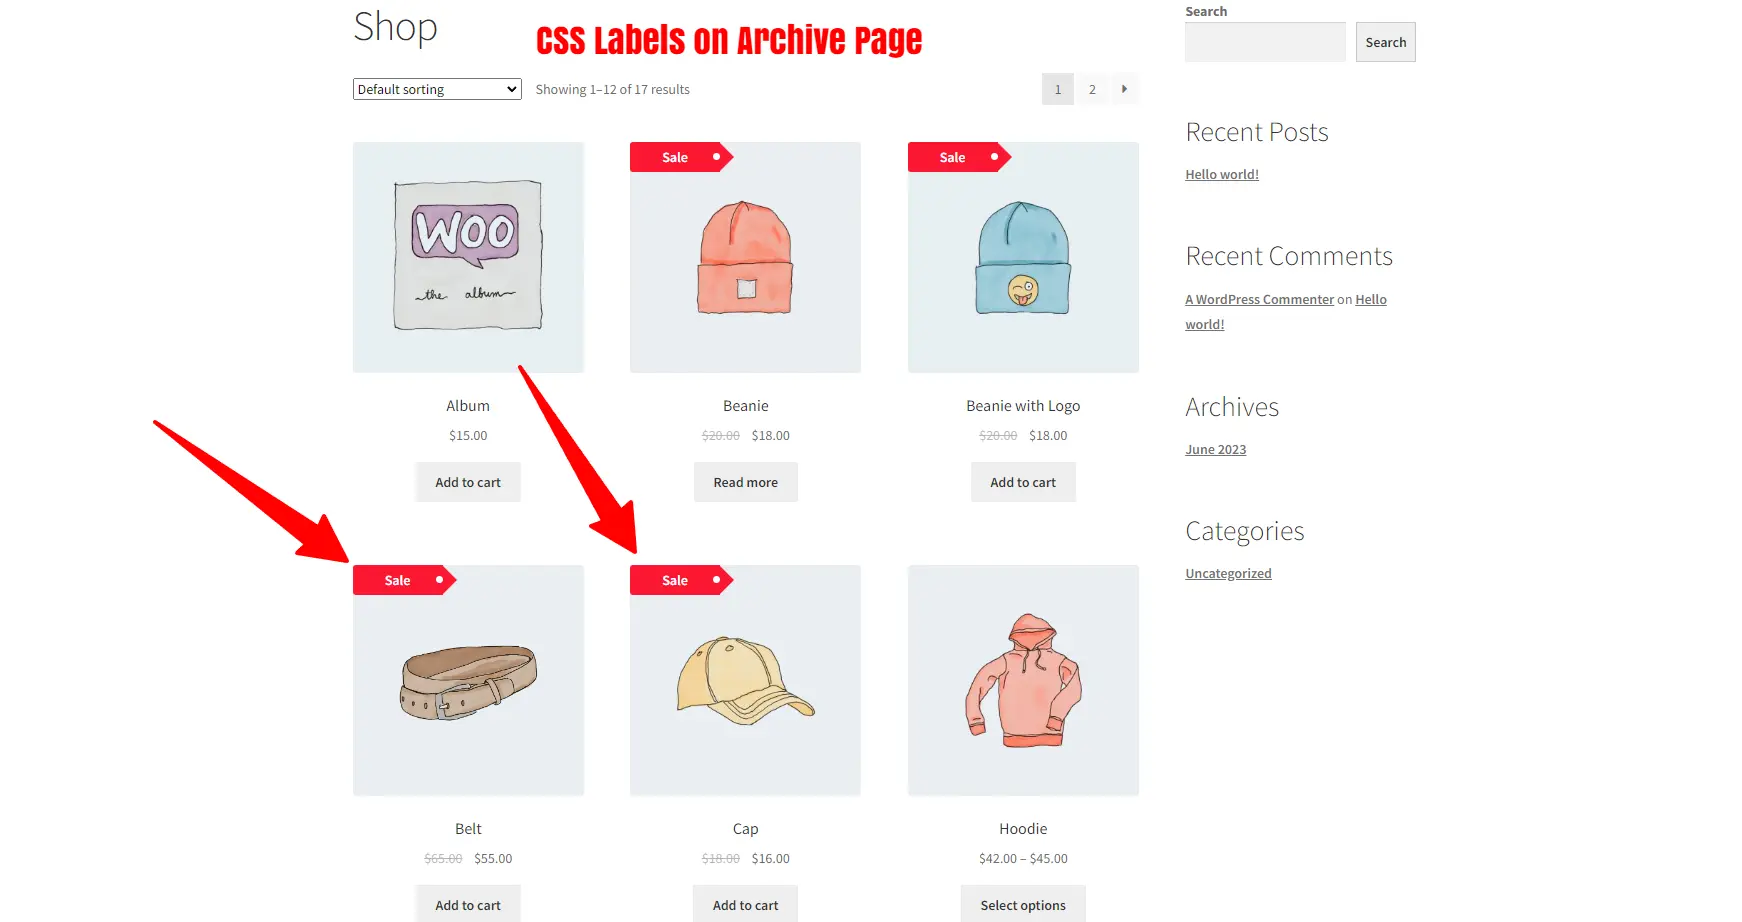
Additionally, Go to the archive page to see the CSS Labels.

Visit the Cap product page and check out the CSS label.
Add Product Labels to Categories
- Go to the ‘Products’ tab.
- Select ‘Categories’ and choose ‘Included.’
- Choose the categories you desire, for example: ‘Clothing/Accessories.’
- Save your changes.
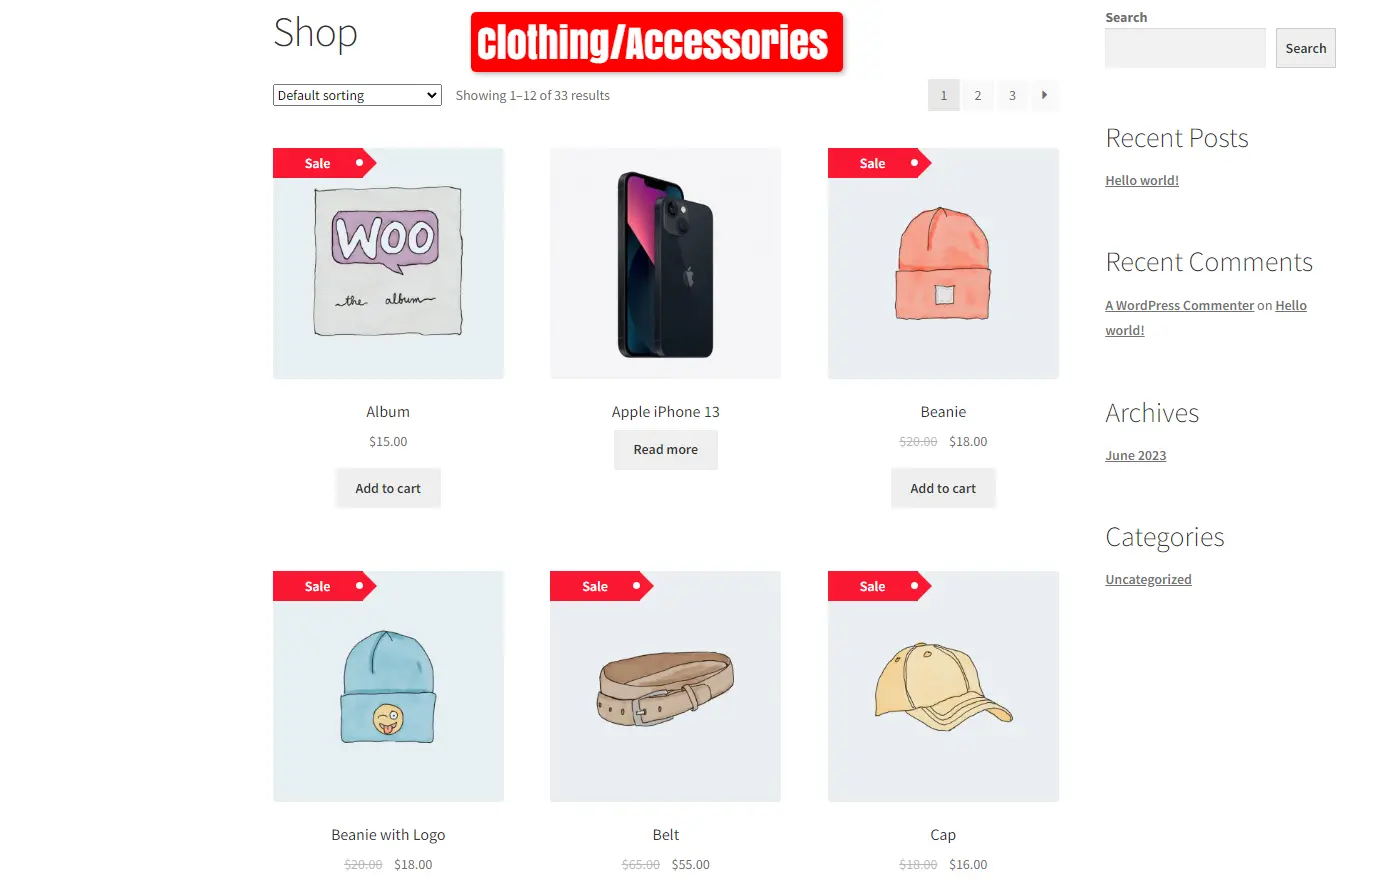
Additionally, Go to the archive page to see the CSS Labels in the ‘Clothing/Accessories’ category.
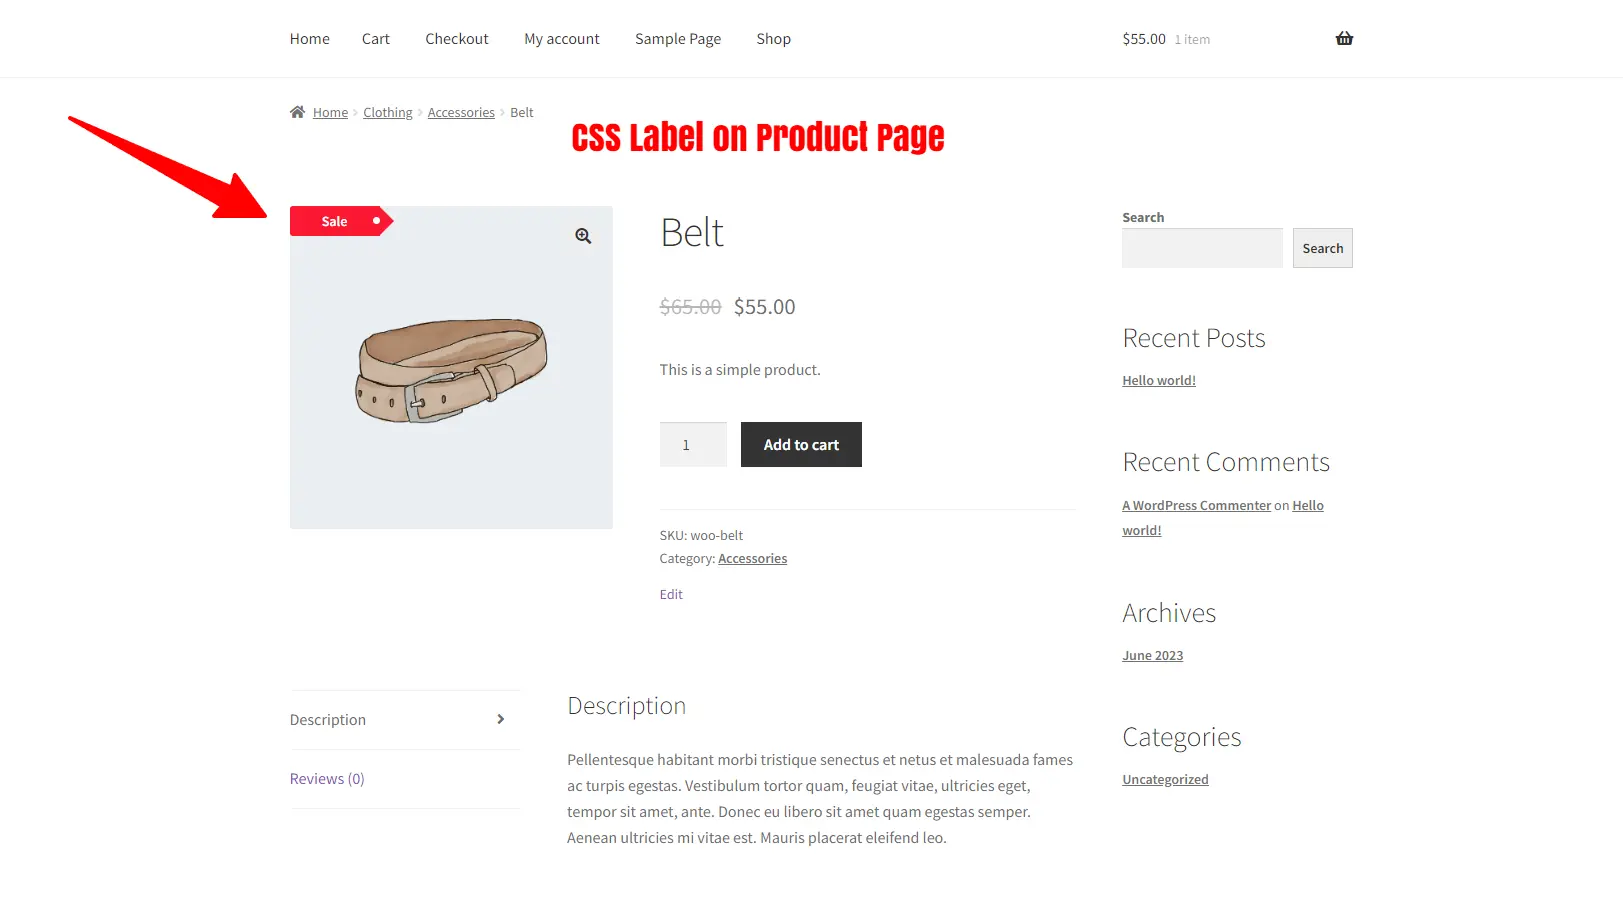
Visit the product page for the Belt and inspect the CSS label
Add Product Labels to Products and Categories
In the paragraph explaining how to Create Product Label, you learned how to create a CSS label. So, after creating the CSS label..
- Go to the ‘Products’ tab.
- Select ‘Products’ and choose ‘Included.’
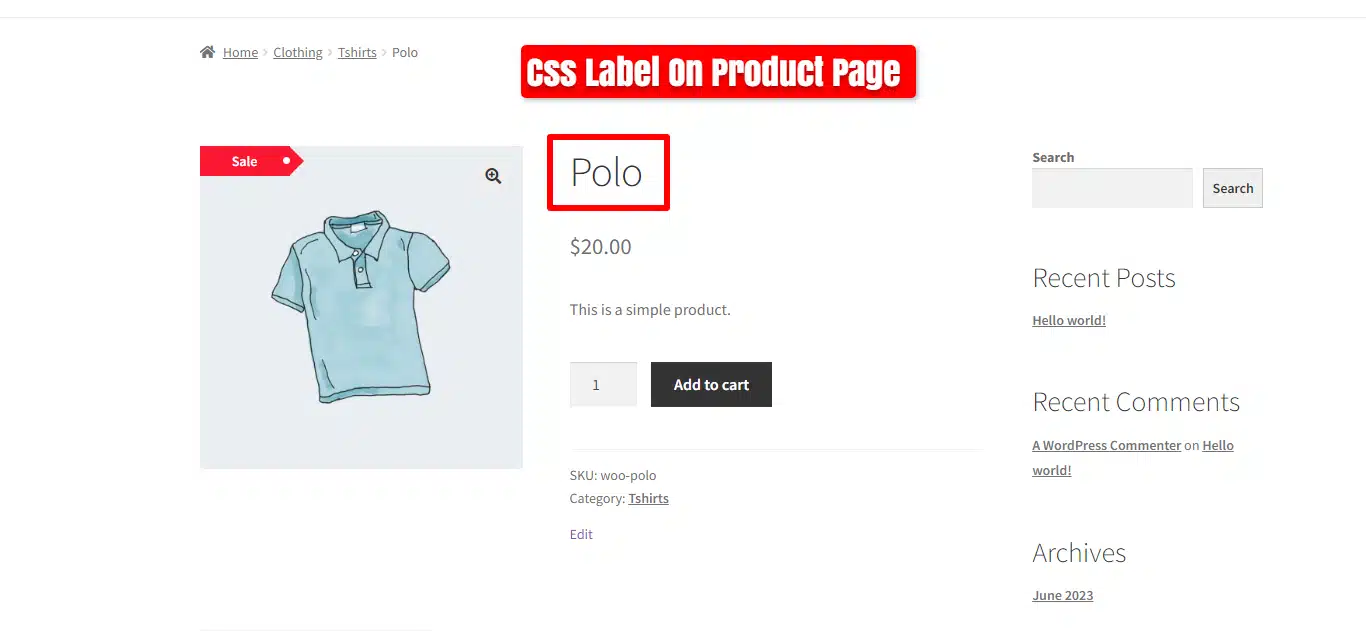
- Pick the products you desire, for example: ‘Album (woo-album),’ ‘Polo (woo-polo).’
- Select ‘Categories’ and choose ‘Included.’
- Choose the categories you desire, for example: ‘Clothing/Accessories.’
- Save your changes.
Additionally, Go to the archive page to see the CSS Labels in the ‘Clothing/Accessories’ category.
Visit the Polo product page and check out the CSS label.
Add Product Labels to On Sale
In the paragraph explaining how to Create Product Label, you learned how to create a CSS label. So, after creating the CSS label..
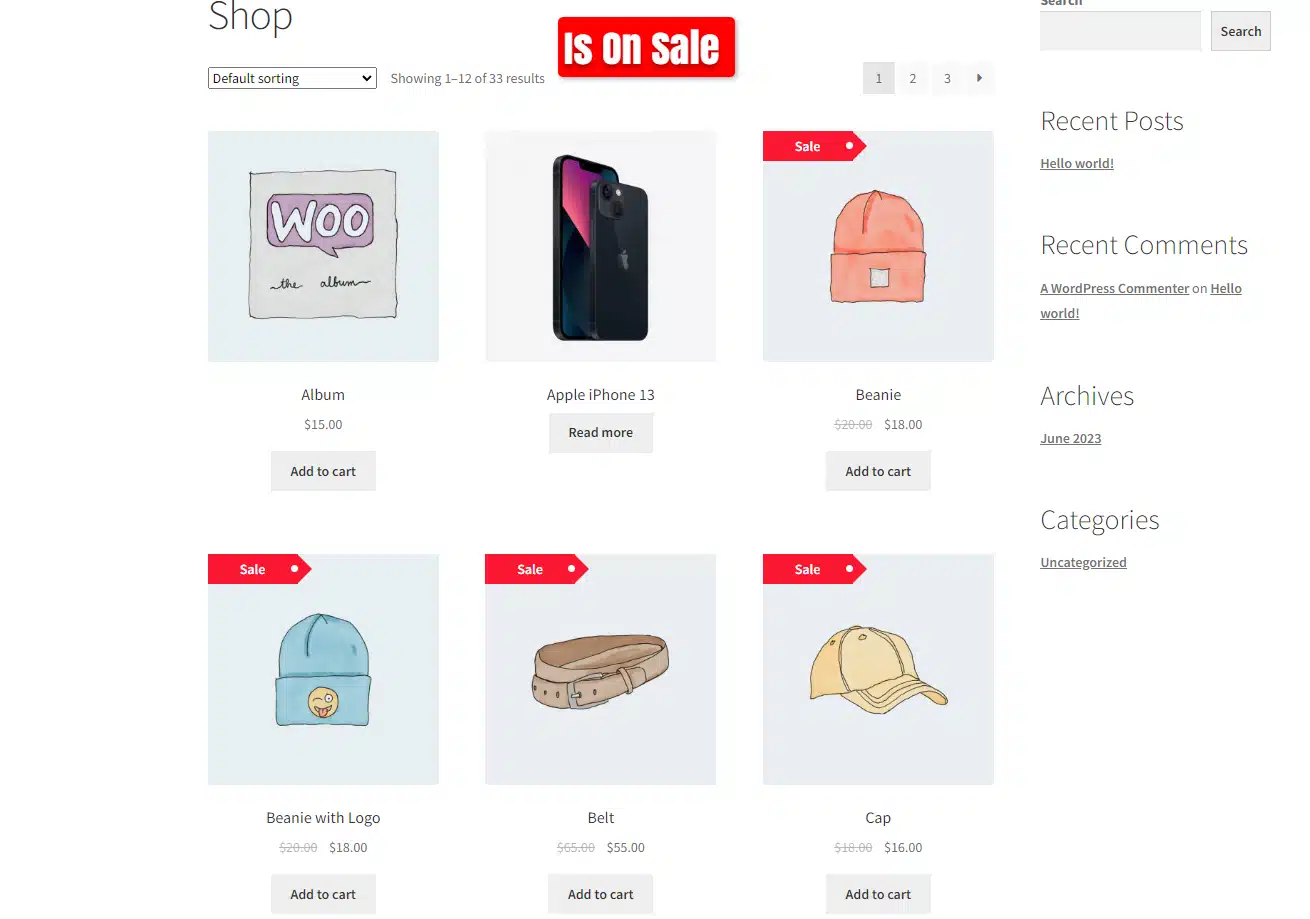
- Go to the ‘Products’ tab.
- Choose Is On Sale and Select Yes.
- Save your changes.

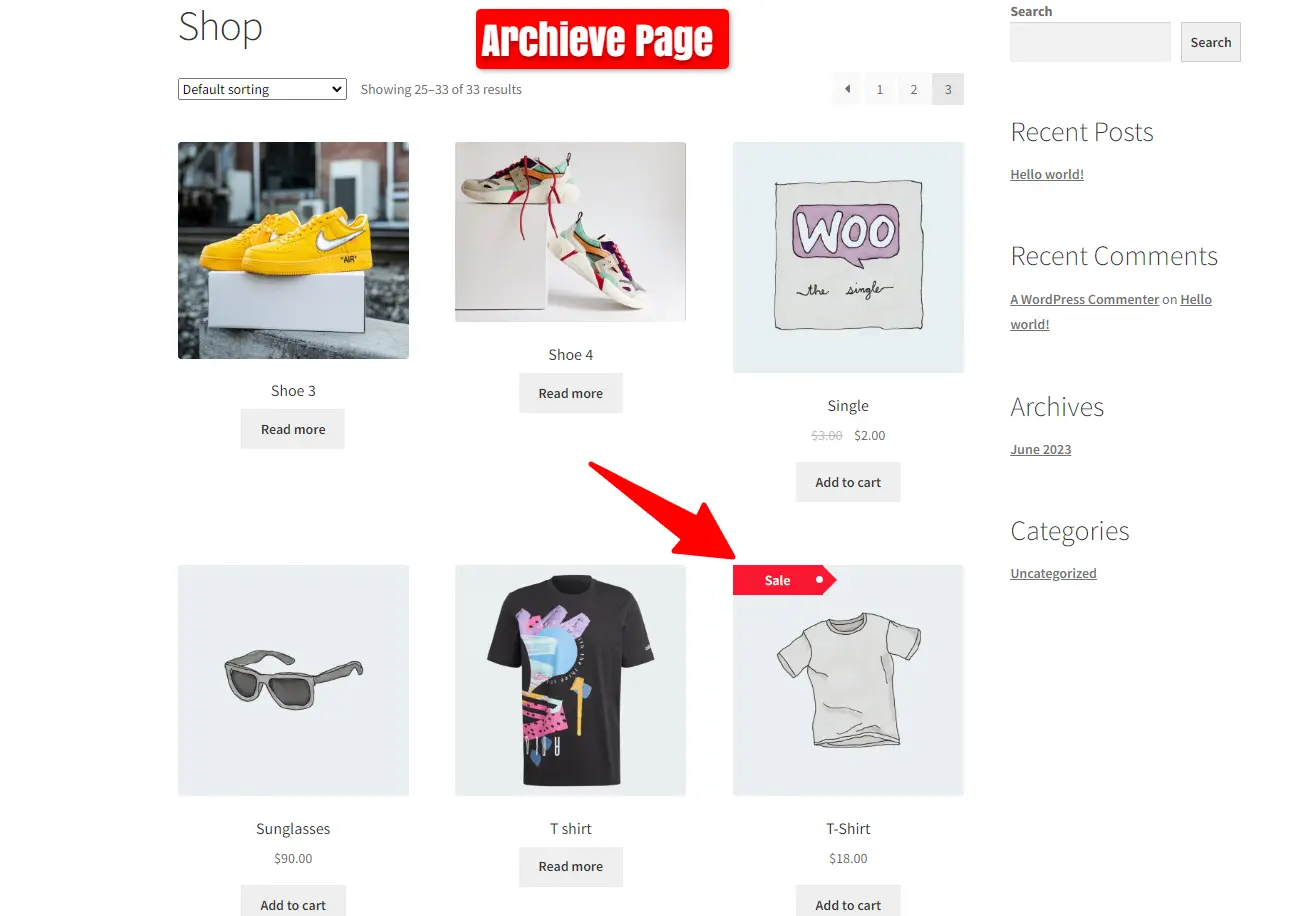
Visit the archive page to view the CSS Labels on the Is On Sale products.
Add Product Labels to Stock Status
In the paragraph explaining how to Create Product Label, you learned how to create a CSS label. So, after creating the CSS label..
- Go to the ‘Products’ tab.
- Select Stock Status and Choose In Stock
- Save your selection.
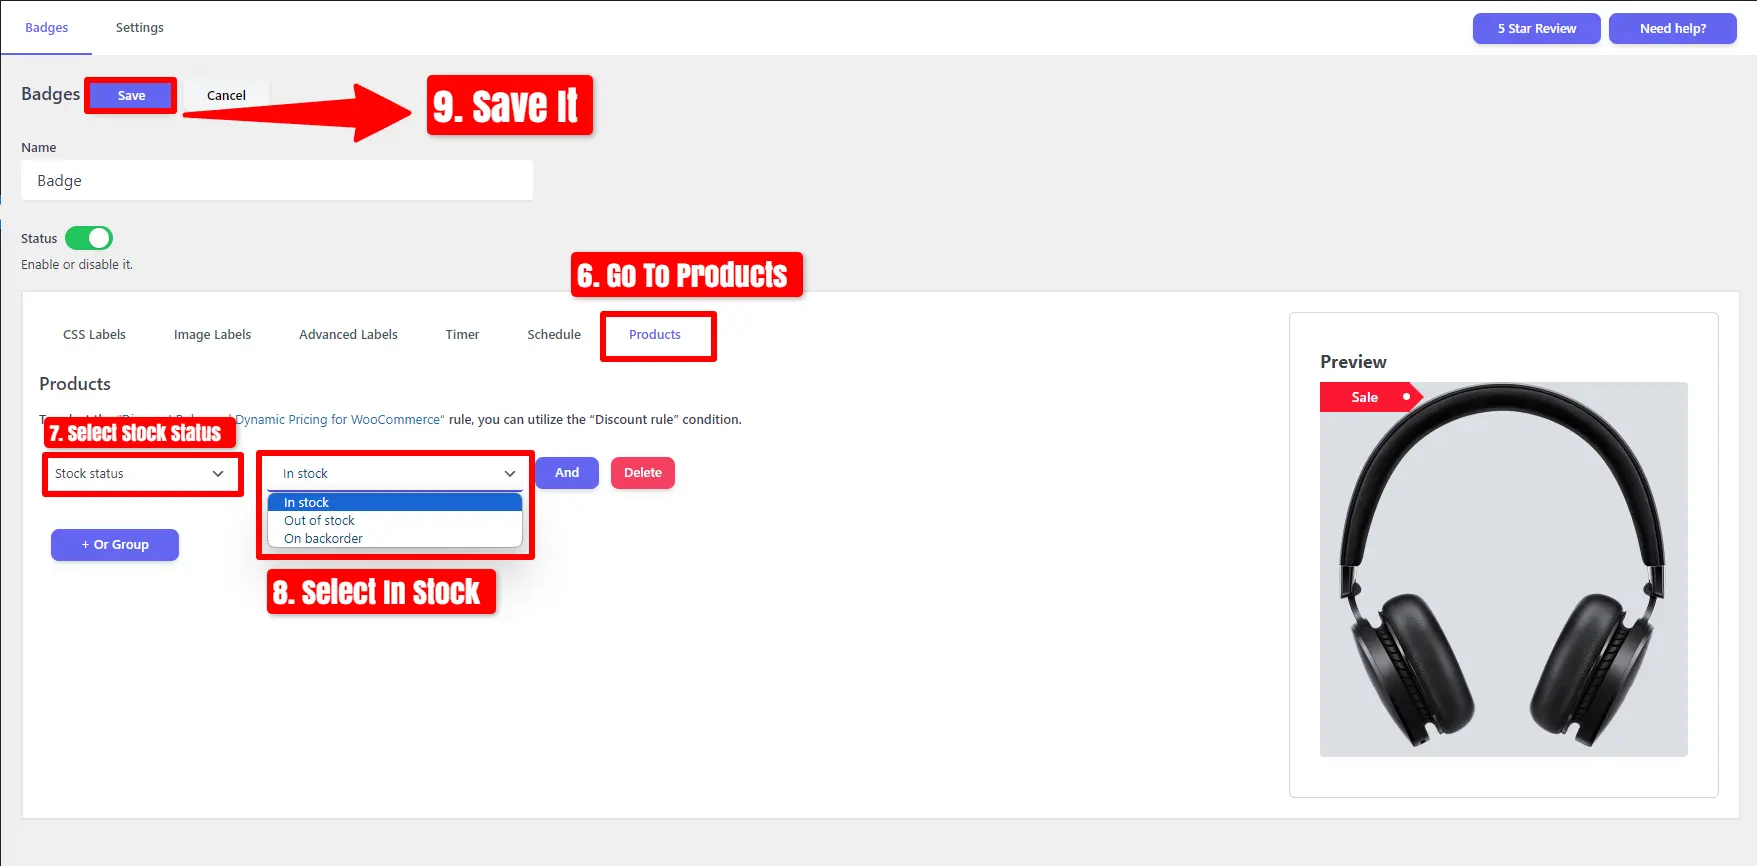
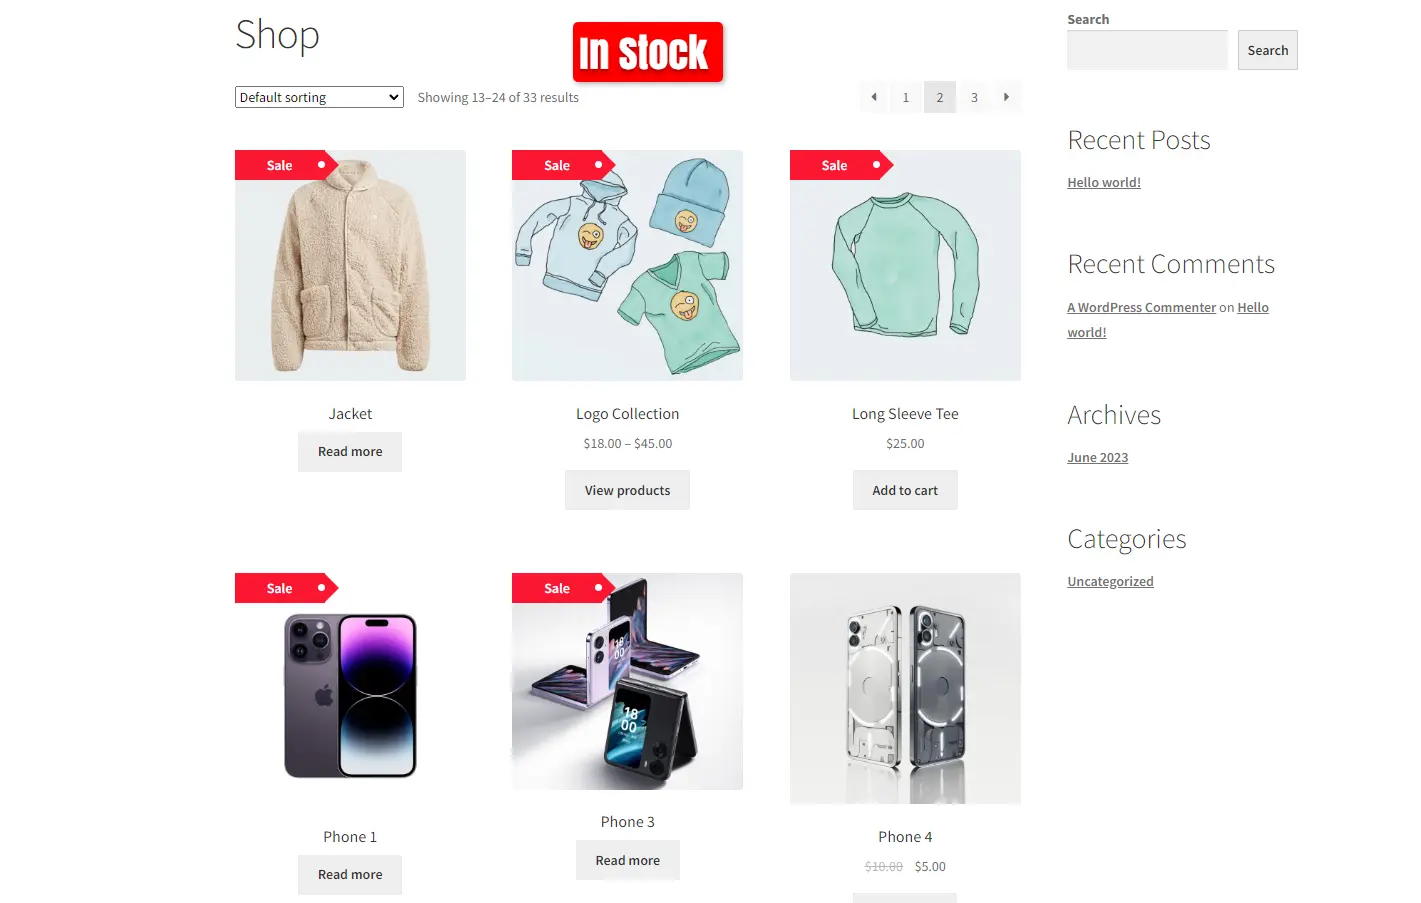
Visit the archive page to view the CSS Labels on the in-stock products.
Add Product Labels to Tags
In the paragraph explaining how to Create Product Label, you learned how to create a CSS label. So, after creating the CSS label..
Assign a tag to the product you desire in the image below.
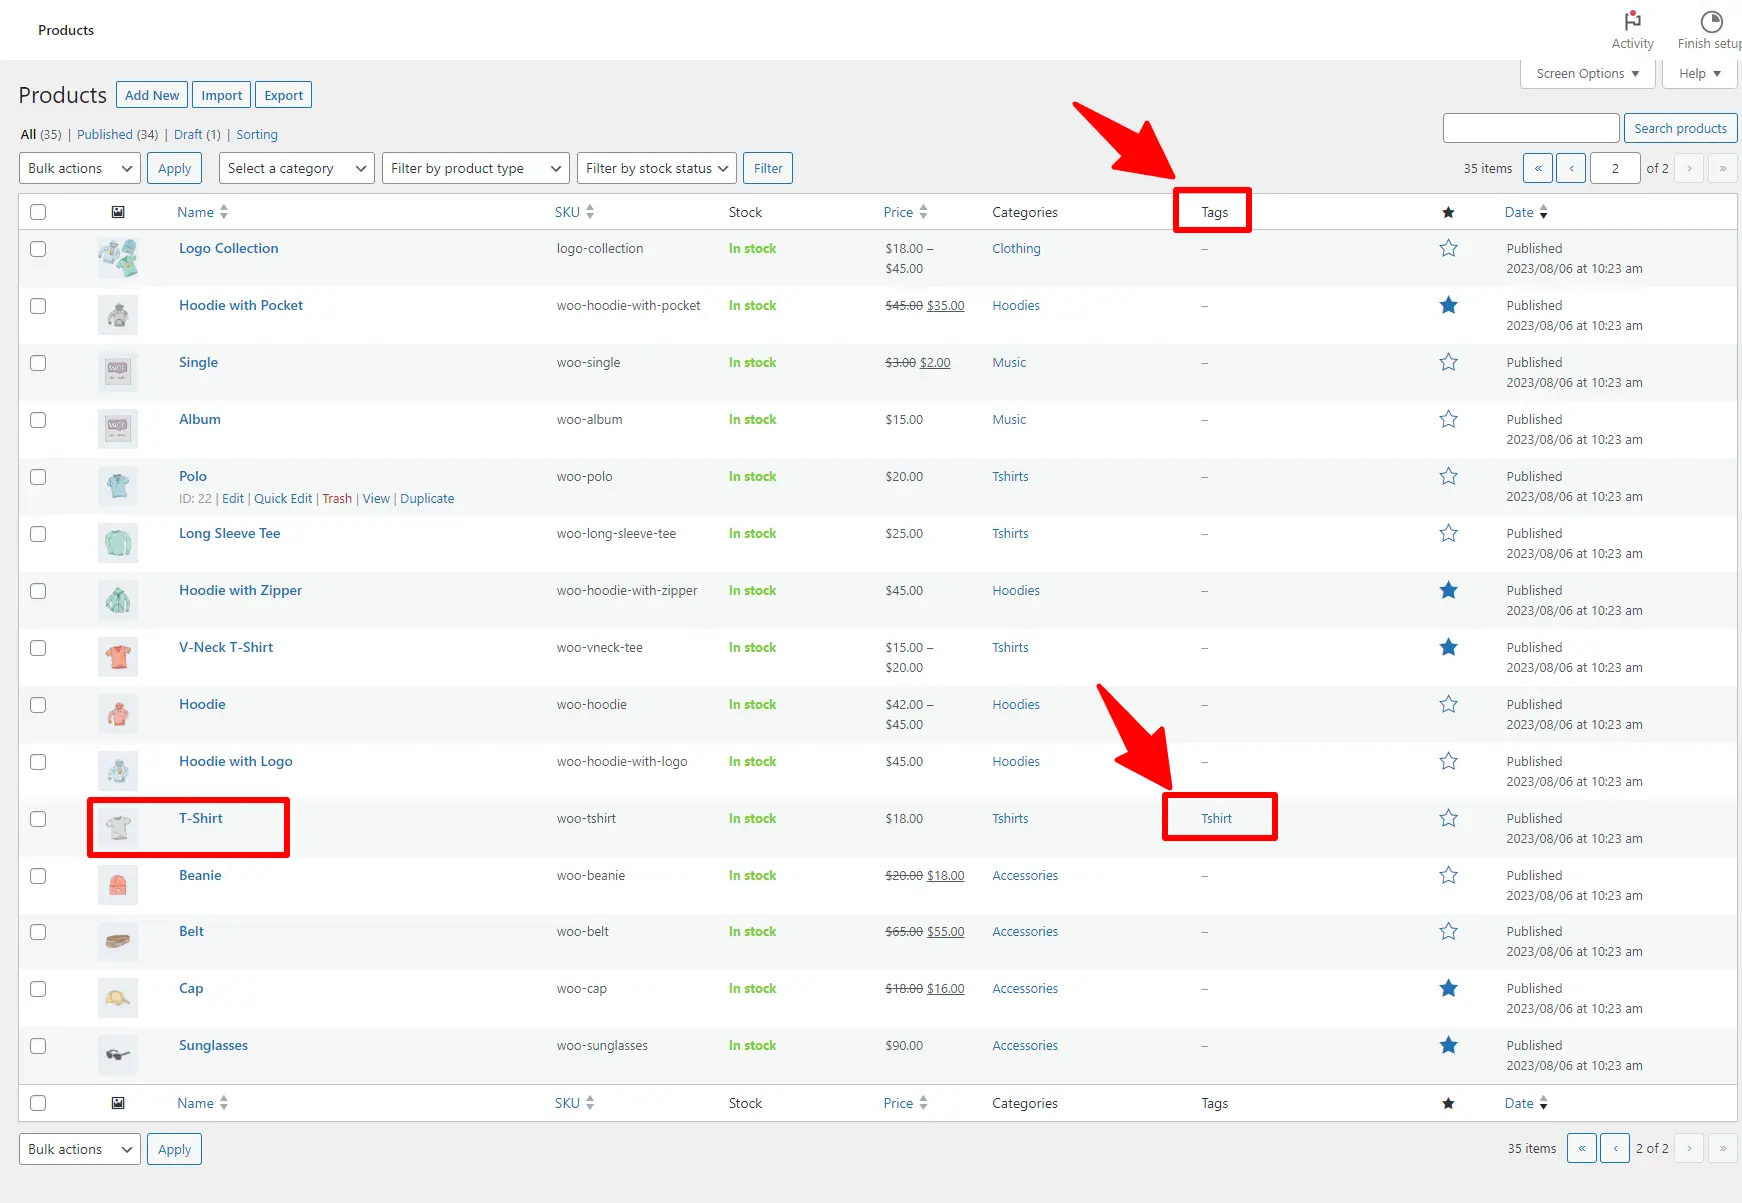
- Go to the ‘Products’ tab.
- Choose Tags and Select Included.
- Select Tag You Desire For Example (Tshirt).
- Save your changes.
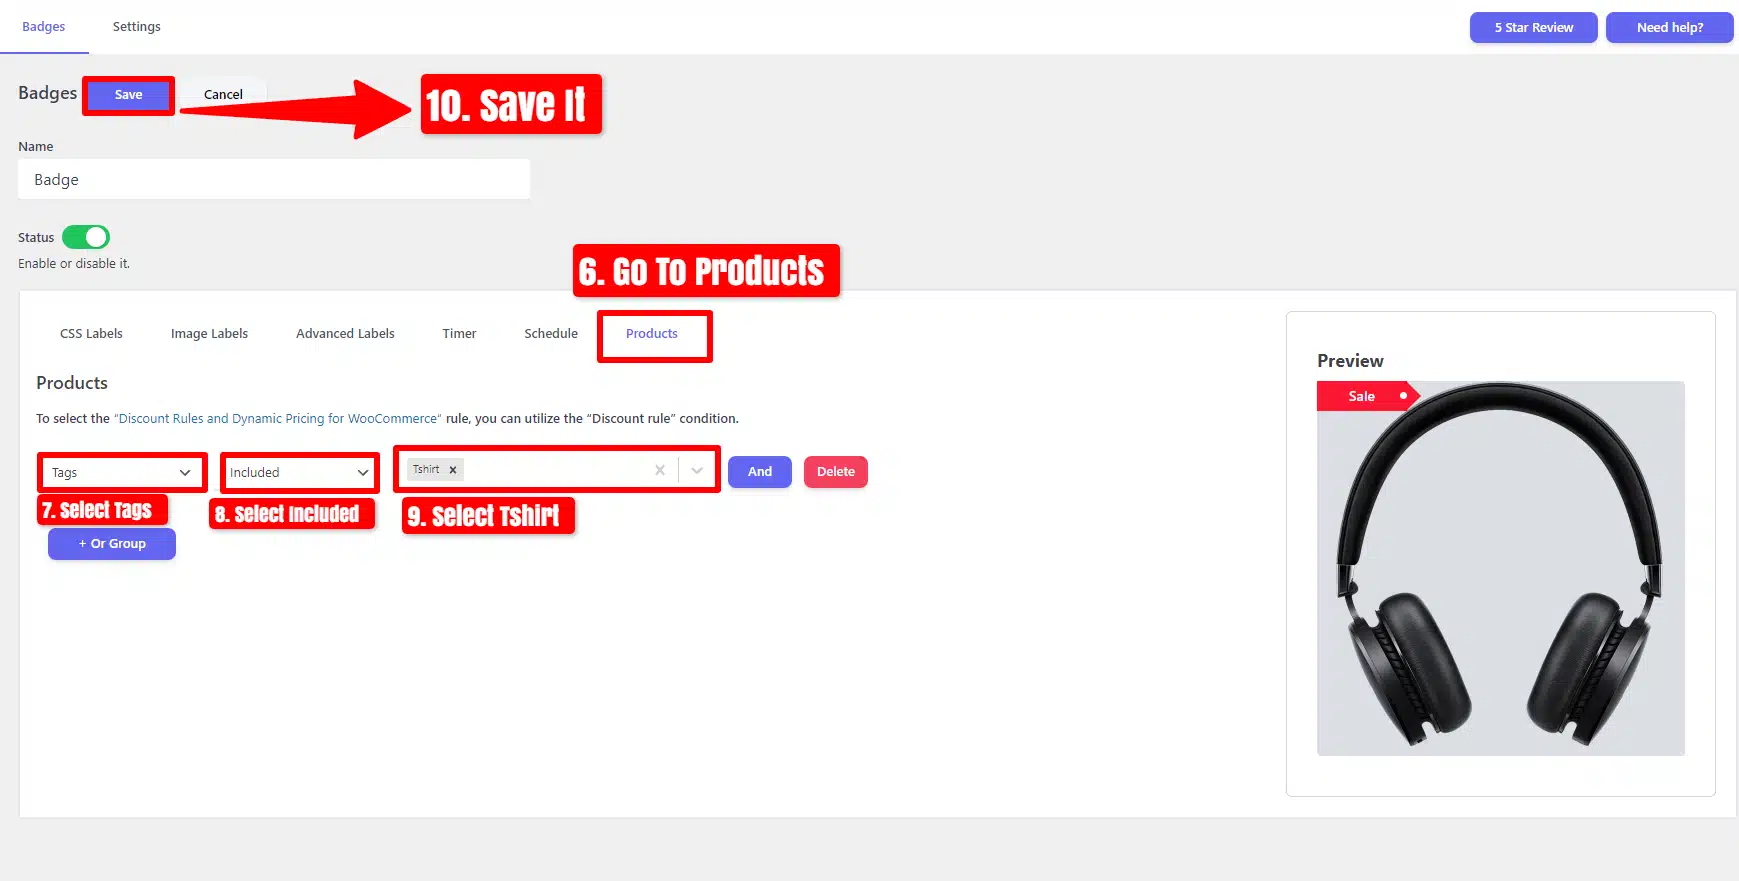
Go to the archive page to see the CSS labels on the tagged products.
View the CSS label on the product page.

Shortcodes
Sale Badges And Product Labels Plugin To Woocommerce has the below shortcodes.
- [asnp_badge hide="1"] to use on the product page.
- [asnp_badge] to use on the archive product or product listing page.
If you would like to show a specific product sale badges, then use the below shortcodes.
- [asnp_badge product_id=”7″ hide=”1″] To use on the product page, replace “7” with your product ID.
- [asnp_badge product_id=”7″] To use on the archive product or product listing page, replace “7” with your product ID.