Enhance your WooCommerce store with Sale Badges and Product Labels! Boost product visibility and customizable labels. Get started now!
Sale Badges and Product labels in WooCommerce Plugin have the power to boost your store’s sales and wow your customers simultaneously. By highlighting special offers, discounts, or new arrivals, you can create a sense of excitement and urgency, encouraging customers to take action. In a crowded marketplace, standing out and creating a memorable shopping experience is essential. Product labels provide an opportunity to showcase your products in a unique and enticing way, ultimately leading to increased sales and customer satisfaction.
Why do you need to add Sale Badges and Product Labels for WooCommerce Plugin?
Adding sale badges and product labels to your WooCommerce plugin is crucial for various reasons. Firstly, sale badges help create a sense of urgency and excitement among customers. When they see a product with a sale badge, they are more likely to feel compelled to make a purchase, as they perceive it as a limited-time opportunity to get a good deal. The visual representation of a sale badge also catches the attention of customers, making the discounted product stand out from the rest, increasing its visibility and attracting potential buyers.
Secondly, product labels in WooCommerce can provide additional information and enhance the shopping experience for customers. Labels can be used to highlight specific features or benefits of a product, such as “new arrival,” “bestseller,” or “limited edition.” These labels help customers quickly identify products that align with their preferences or requirements. For instance, a “new arrival” label can attract customers who are looking for the latest trends or releases. By using product labels in WooCommerce effectively, you can effectively communicate key information and influence customers’ purchasing decisions, leading to increased conversion rates and customer satisfaction.
How to add a Sale Badges and Product labels to your Woocommerce Products
In this article, we will provide you with a detailed guide to adding Sale Badges and Product Labels and Countdown Timer to your Woocommerce Products easily.
Are you ready? Let’s dive in.
What you can do with Sale Badges and Product Labels Plugin?
The Sale Badges and Product Labels plugin for Woocommerce has listed powerful features and helps you to Sale Badges and Product Labels and Countdown Timer to your Woocommerce Products easily.
- Over 200 Image Labels
- Over 10 CSS Labels
- 5 Advanced Labels
- 8 Timers Template
- Incorporate Gradient Colors
- Implement Discount Rules
- Add a Percentage Discount amount
- Rotate CSS Labels, Image Labels, and Advanced Labels
- Add Easy Custom labels on products
- Access CSS label templates
- Preview is available live for easy placement and customization
- Add Badges to specific WooCommerce products, categories, or tags
- Add Badges to “Is On Sale”
- Add Badges to “In Stock” and “Out Of Stock”
- Customize label attributes, including color, font size, line height, width, opacity, position, and much more
- Transform And Rotate Css Labels
- Set Toggle To the visibility of badges
- Include an option to set an expiration Date and Time for badges
- A unique feature for adjusting hooks that control the presentation of product labels, beneficial if your theme encounters issues displaying them or if you wish to reposition the labels
- Adjust the Position of CSS Labels, Image Labels, and Advanced Labels
- Include both Vertical and Horizontal Timers
- Personalize Sale Timers with Styling Options
- Sale Image Labels
- Percentage Off Image Labels
- Coming Soon Image Labels
- Pre-Order Image Labels
- Free Image Labels
- Black Friday Image Labels
- Valentine’s Day Image Labels
- Xmas Image Labels
Installing Sale Badges and Product label plugins in WordPress
Follow these steps to install the Sale Badges and Product Labels for the WooCommerce plugin.
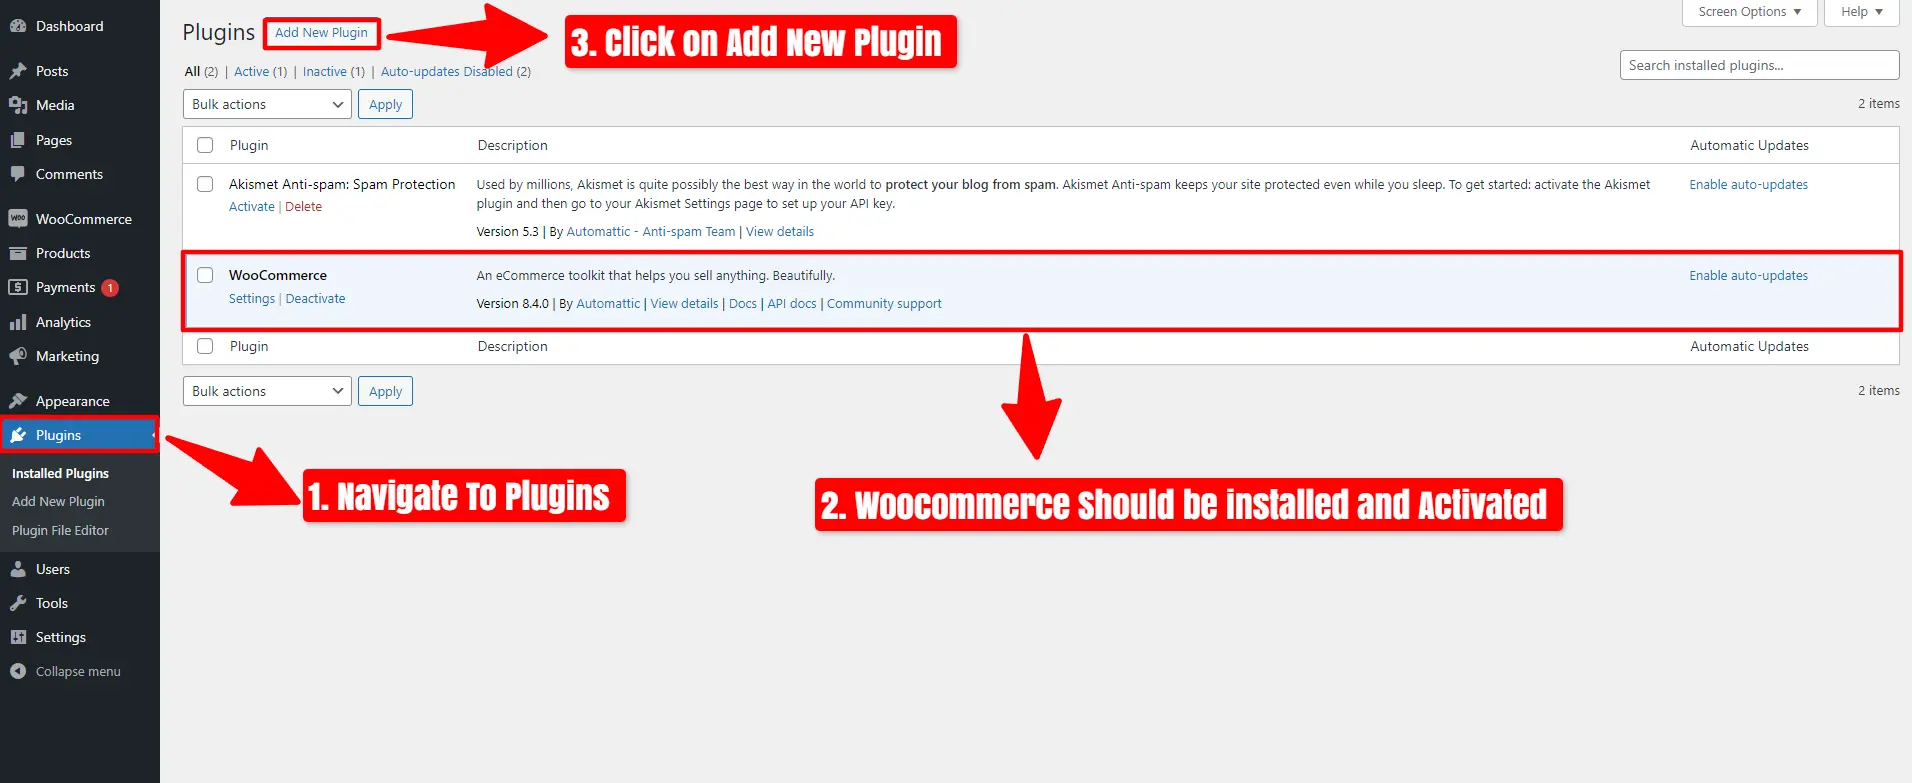
- Navigate To Plugins.
- Woocommerce Should be installed and Activated.
- Click on Add New Plugin.
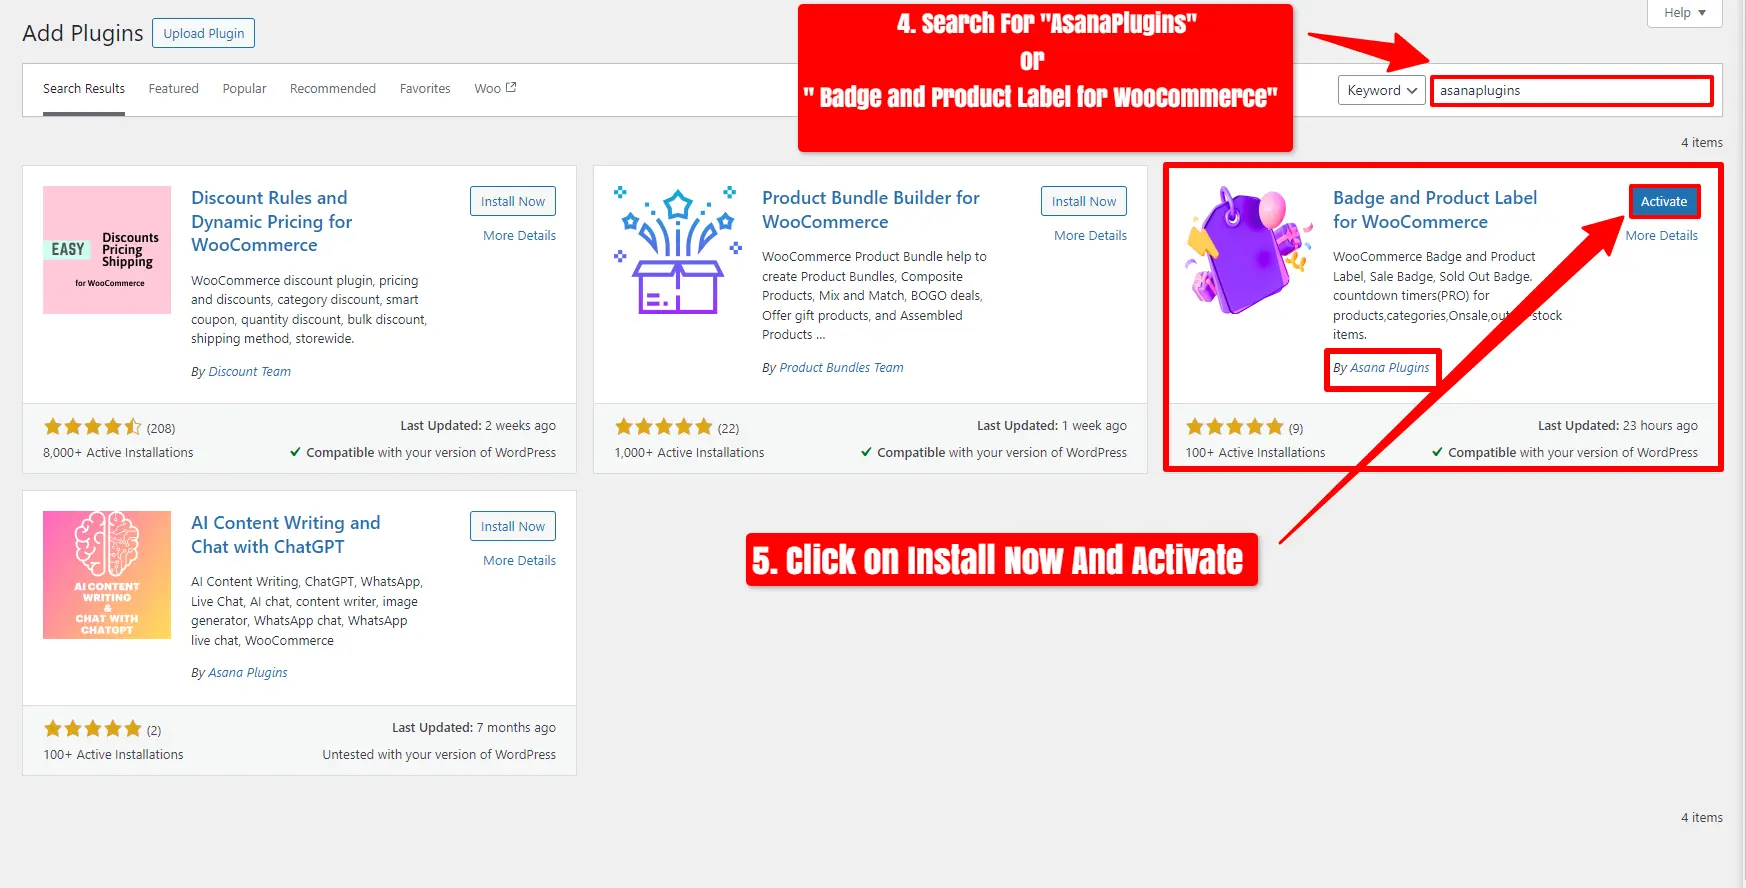
- Search For ‘Asanaplugins’ or ‘Badge and Product Label for WooCommerce ‘.
- After seeing the plugin, click on “Install Now” and activate it.
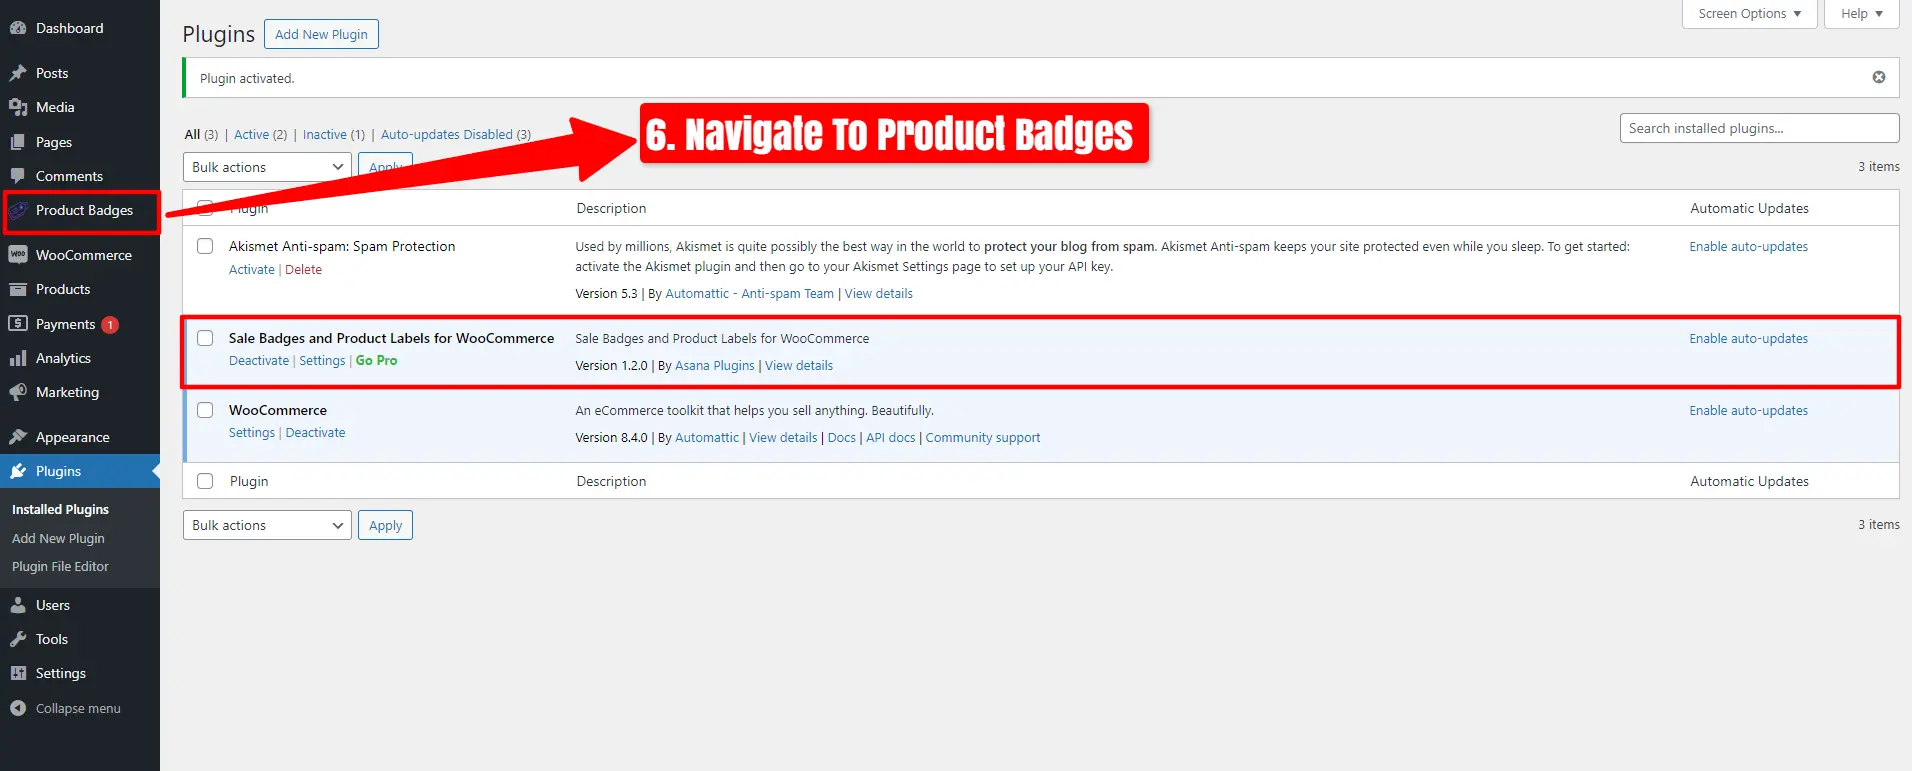
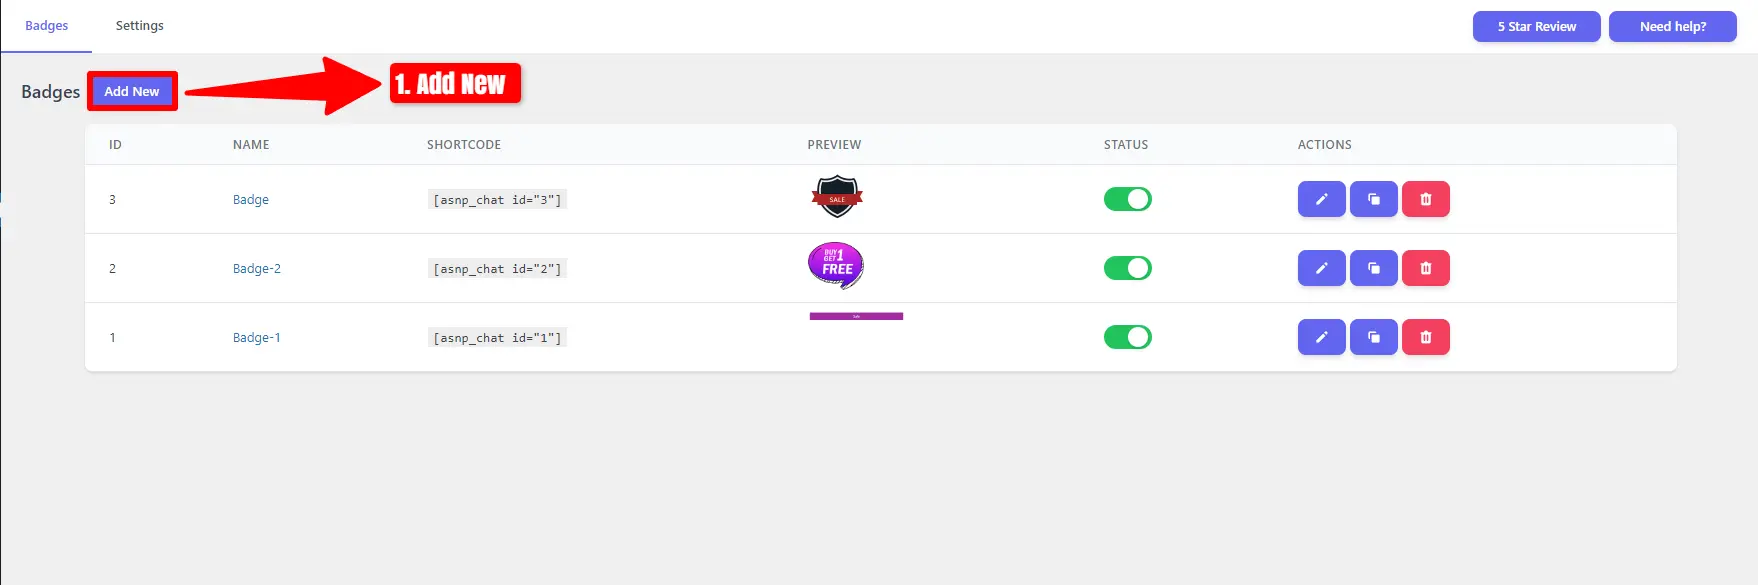
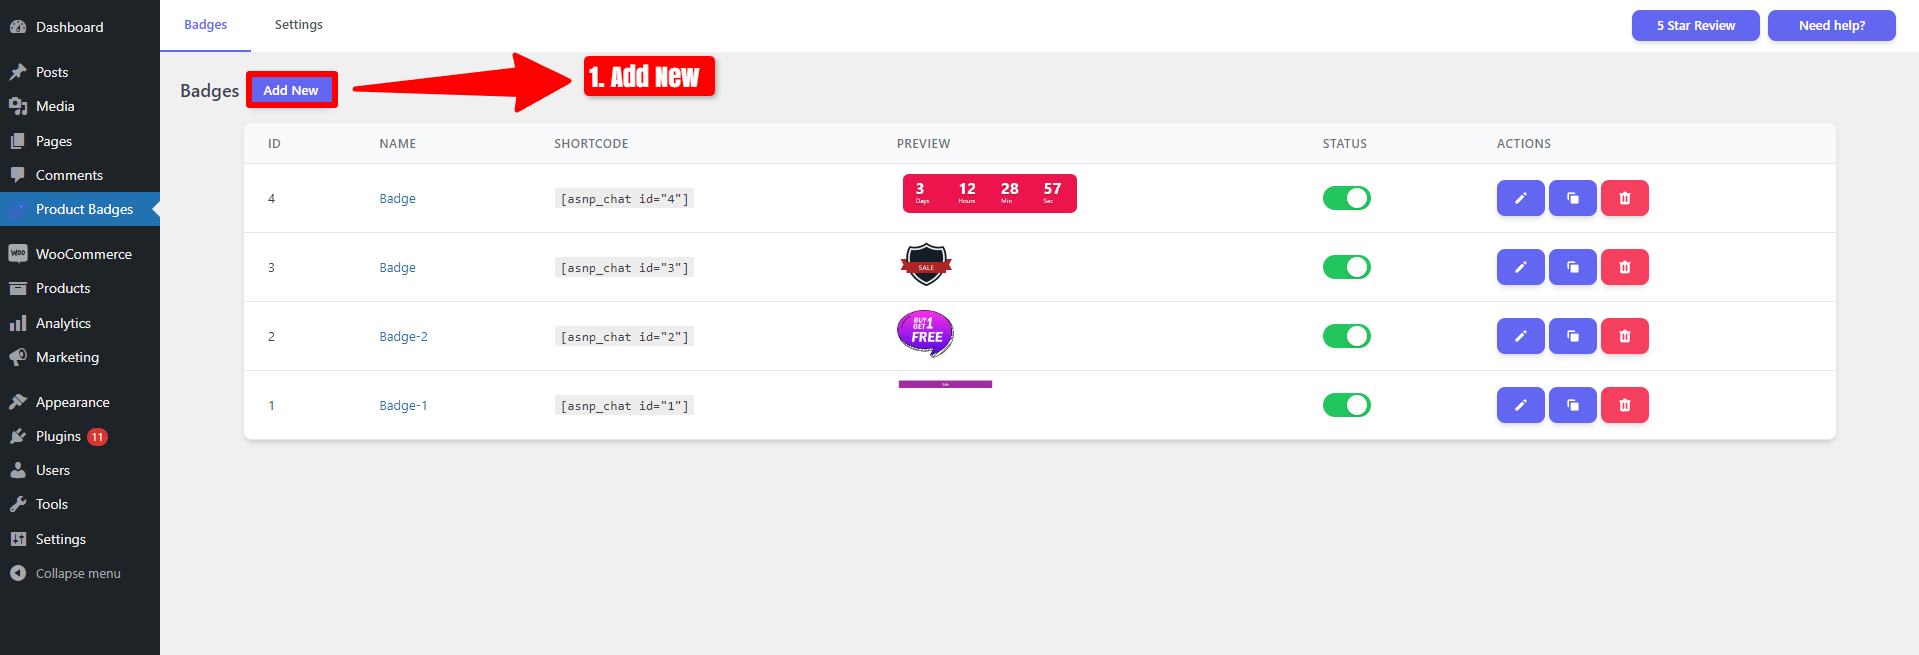
Now, Sale Badges and Product Labels for WooCommerce have been installed. Navigate to the Product Badges.
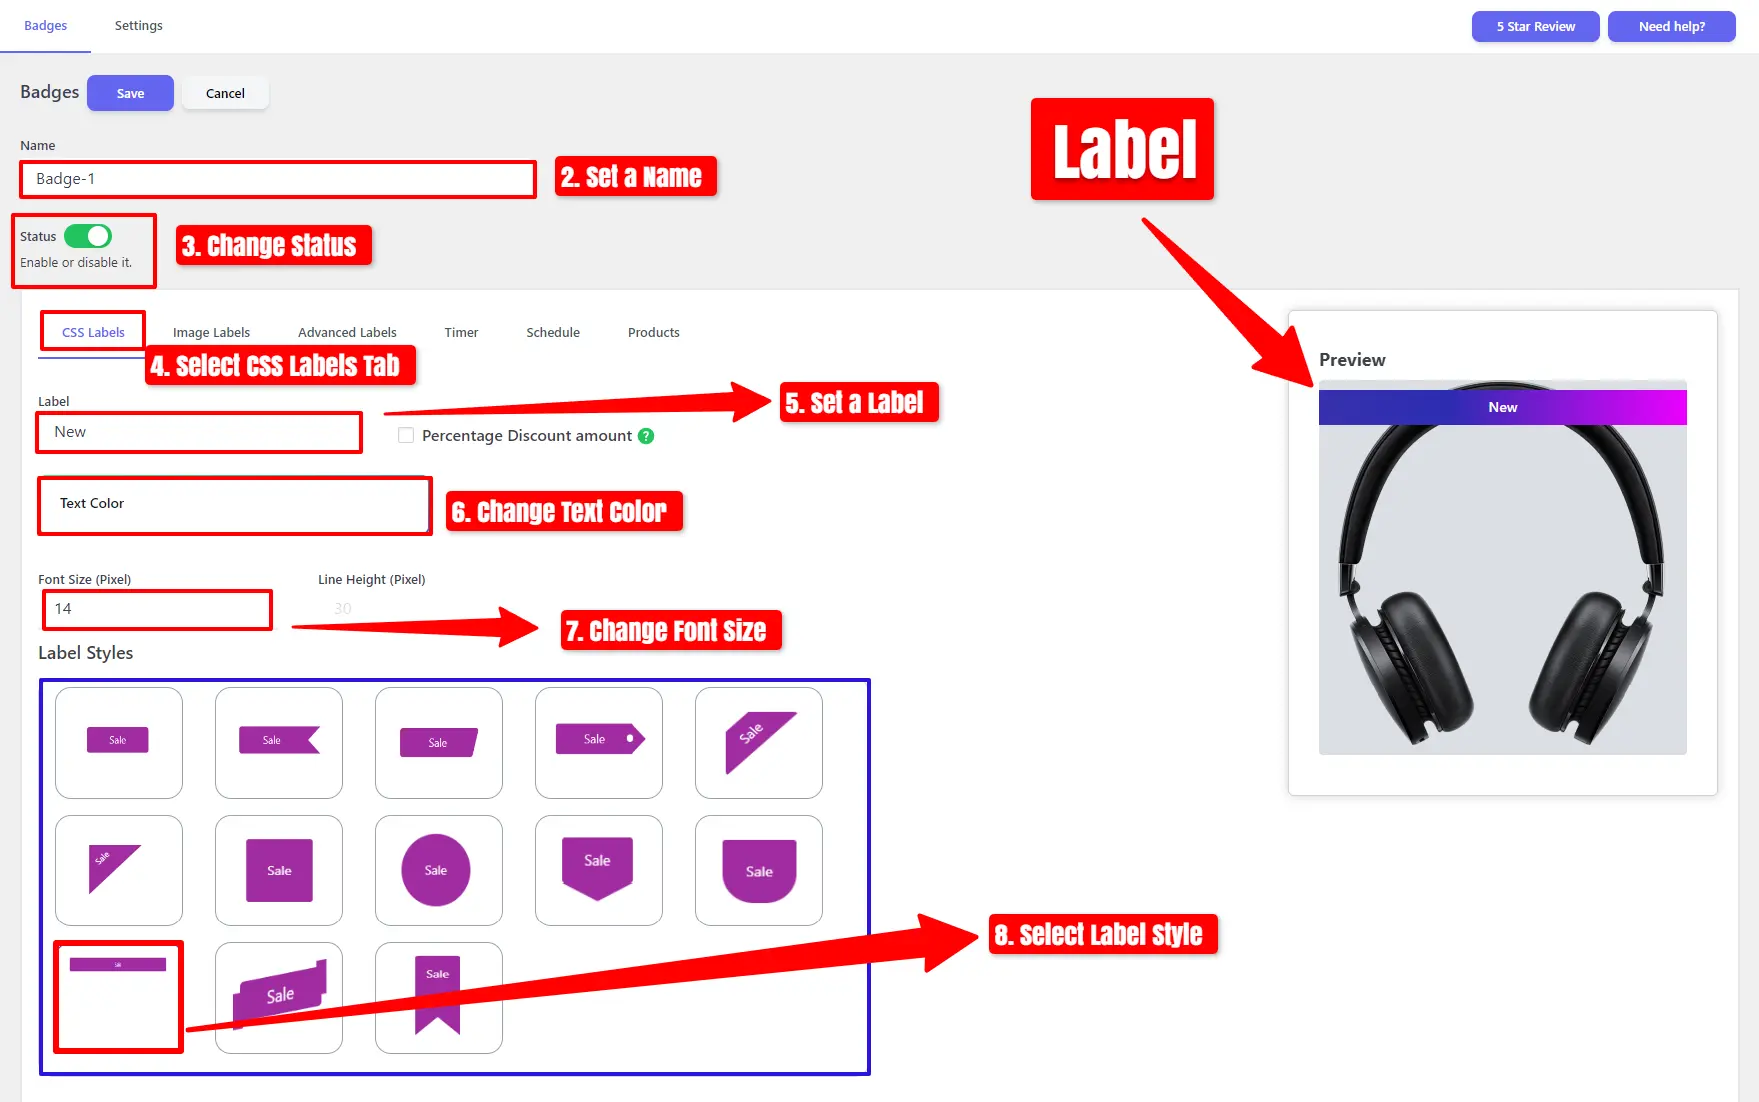
CSS Labels
After installing the Sale Badges and Product Labels for WooCommerce Plugin, you can create CSS labels as shown in the image below :
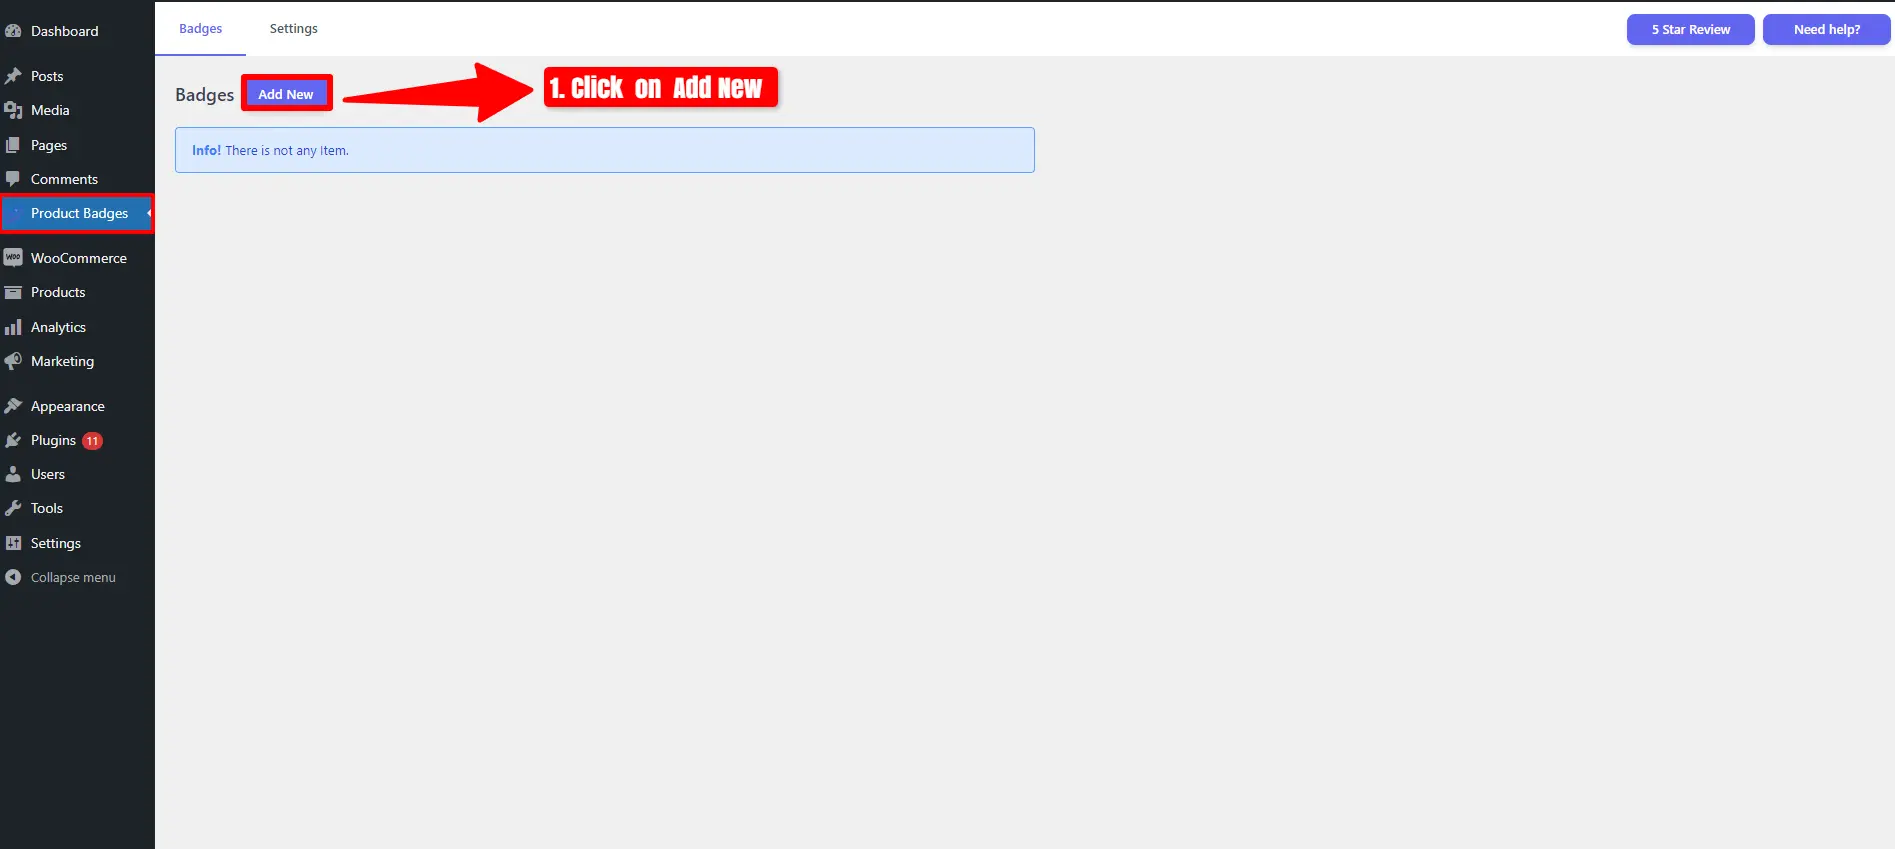
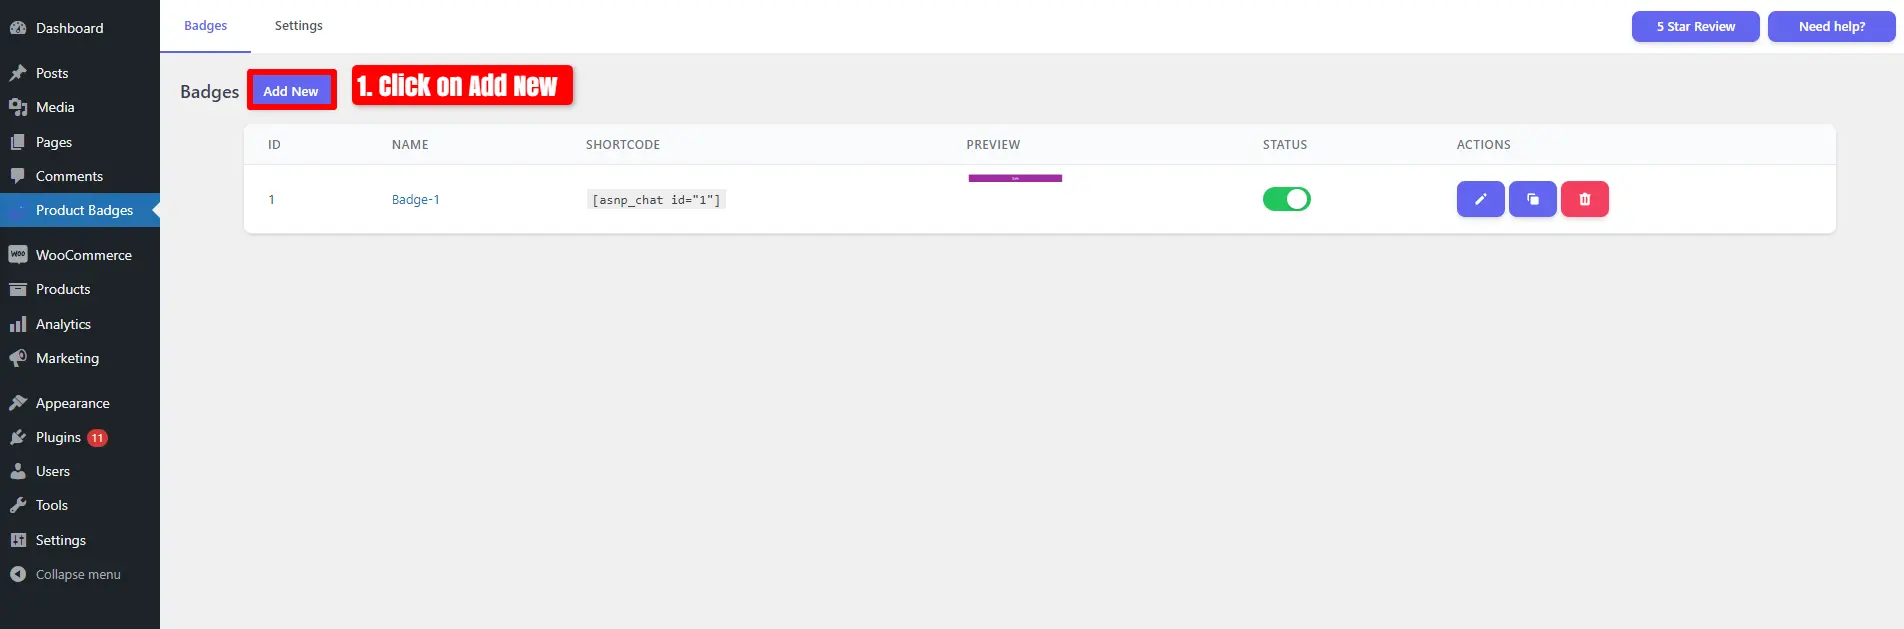
- Click on “Add New” first.
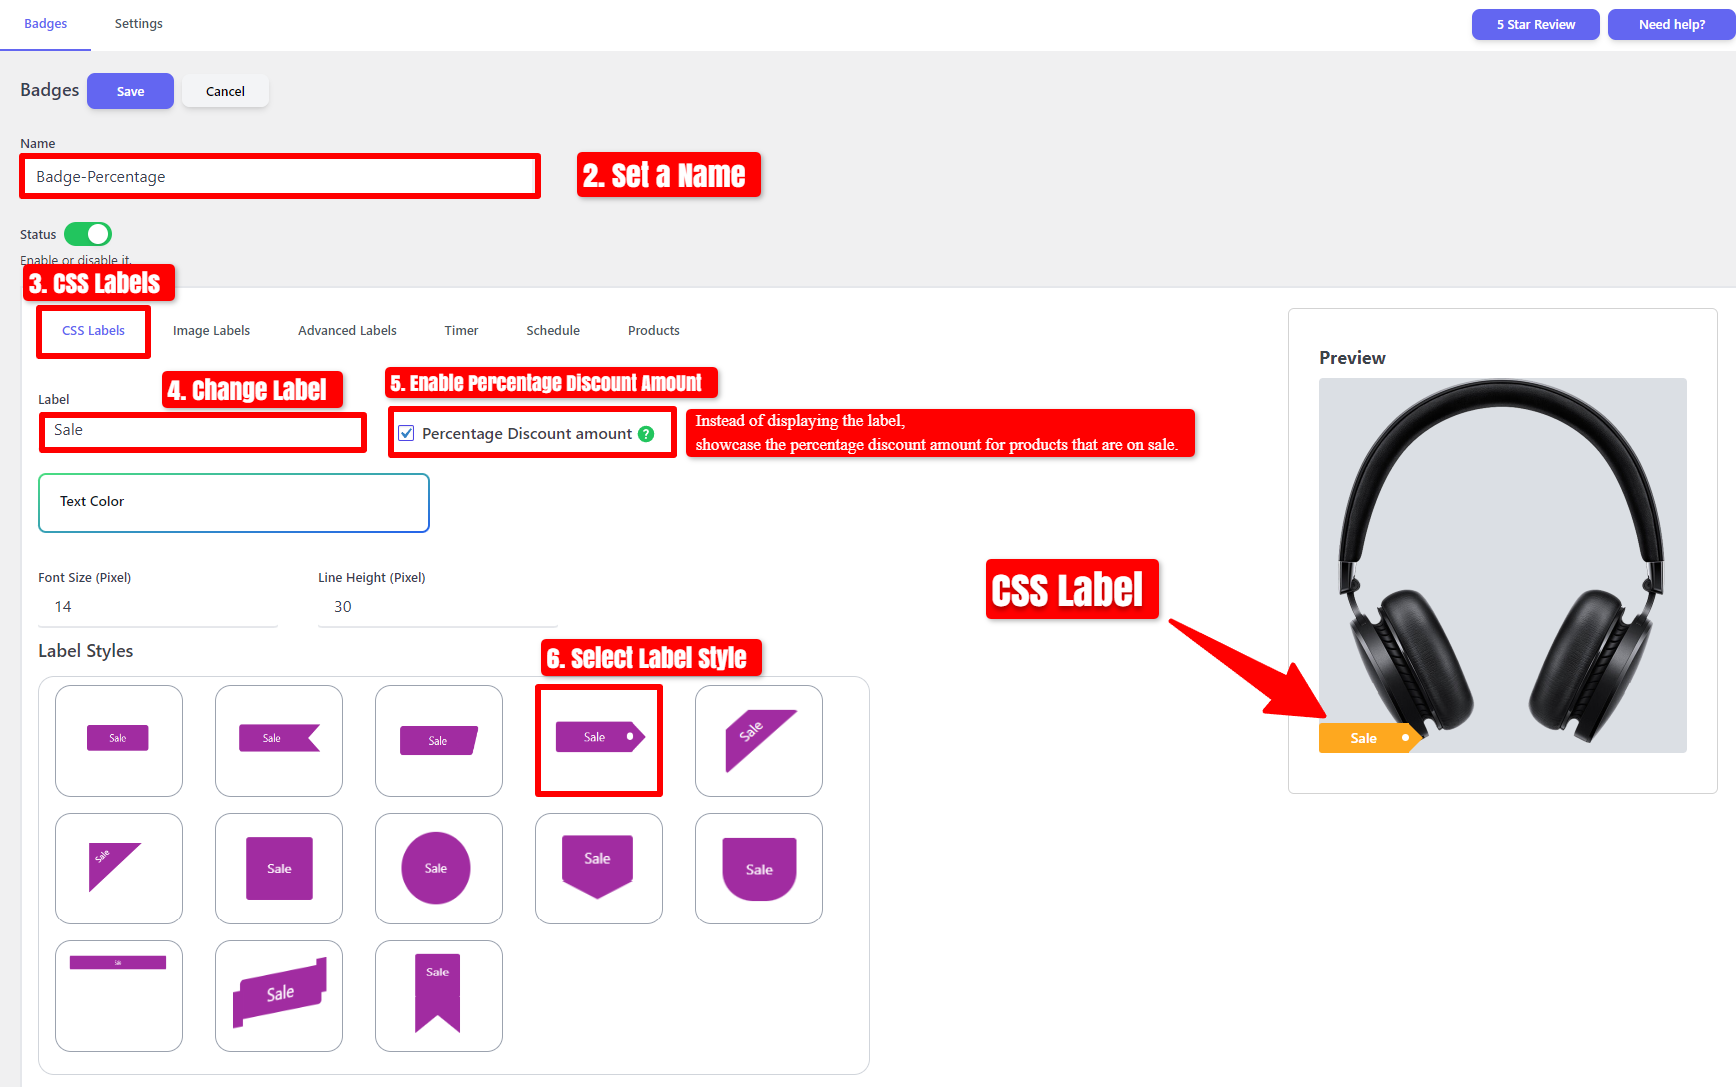
- Provide a name for the badge and select the “CSS Labels” tab.
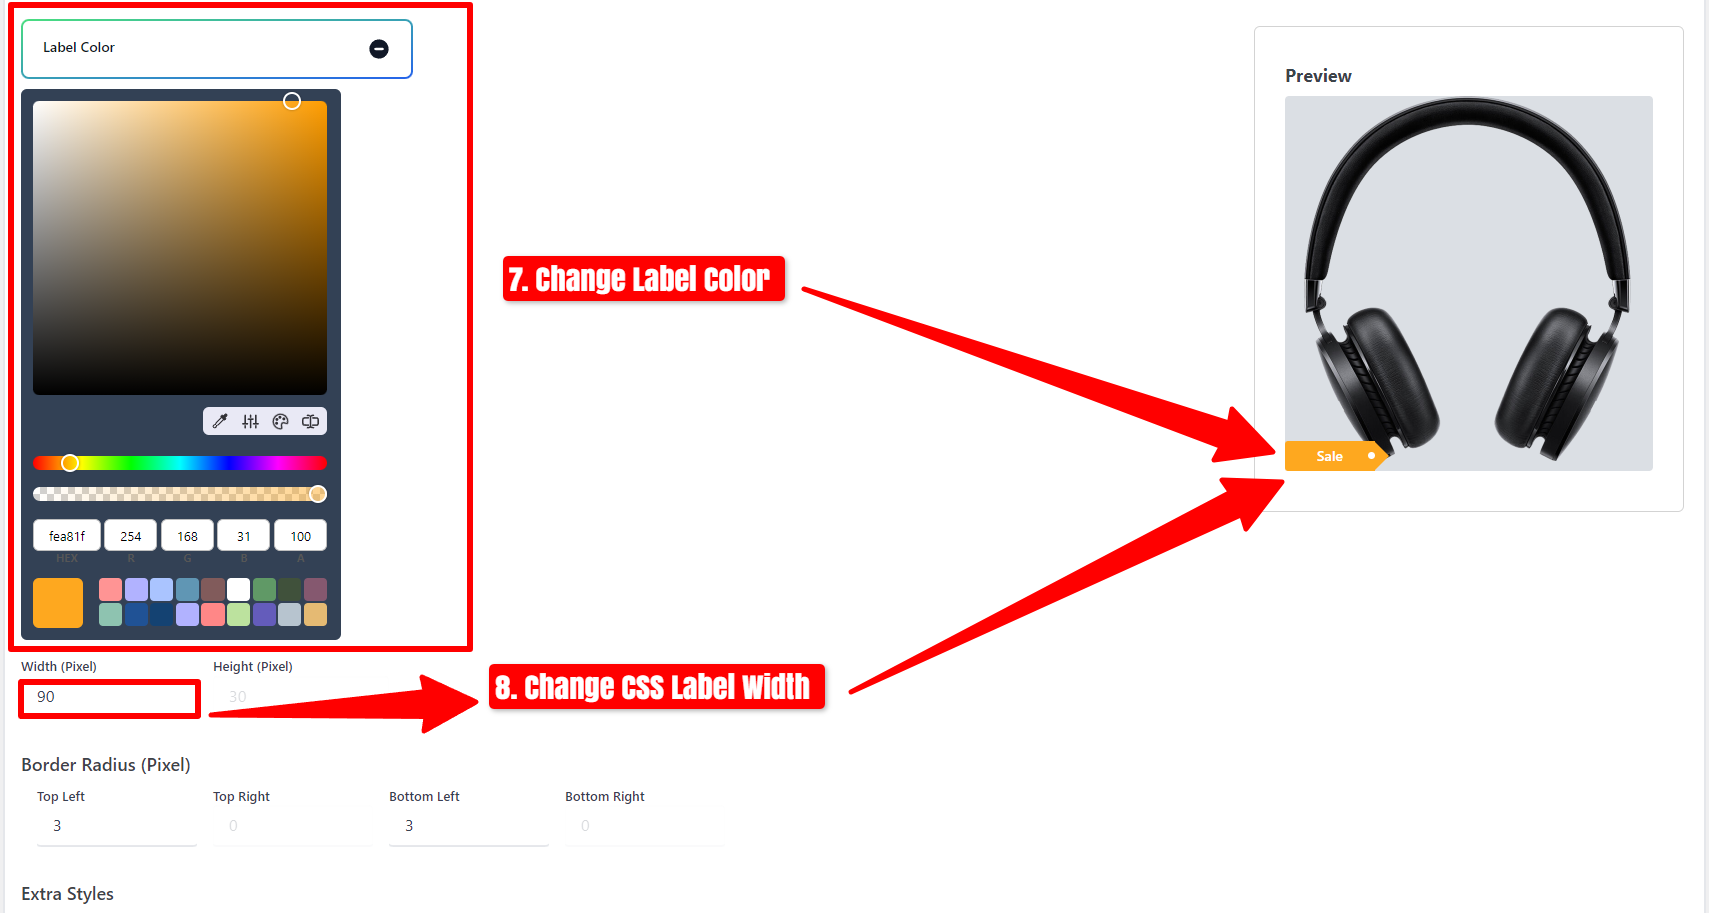
- Configure the label by specifying its text, text color, font, Label Color, Label Height and other customization options for the CSS label.

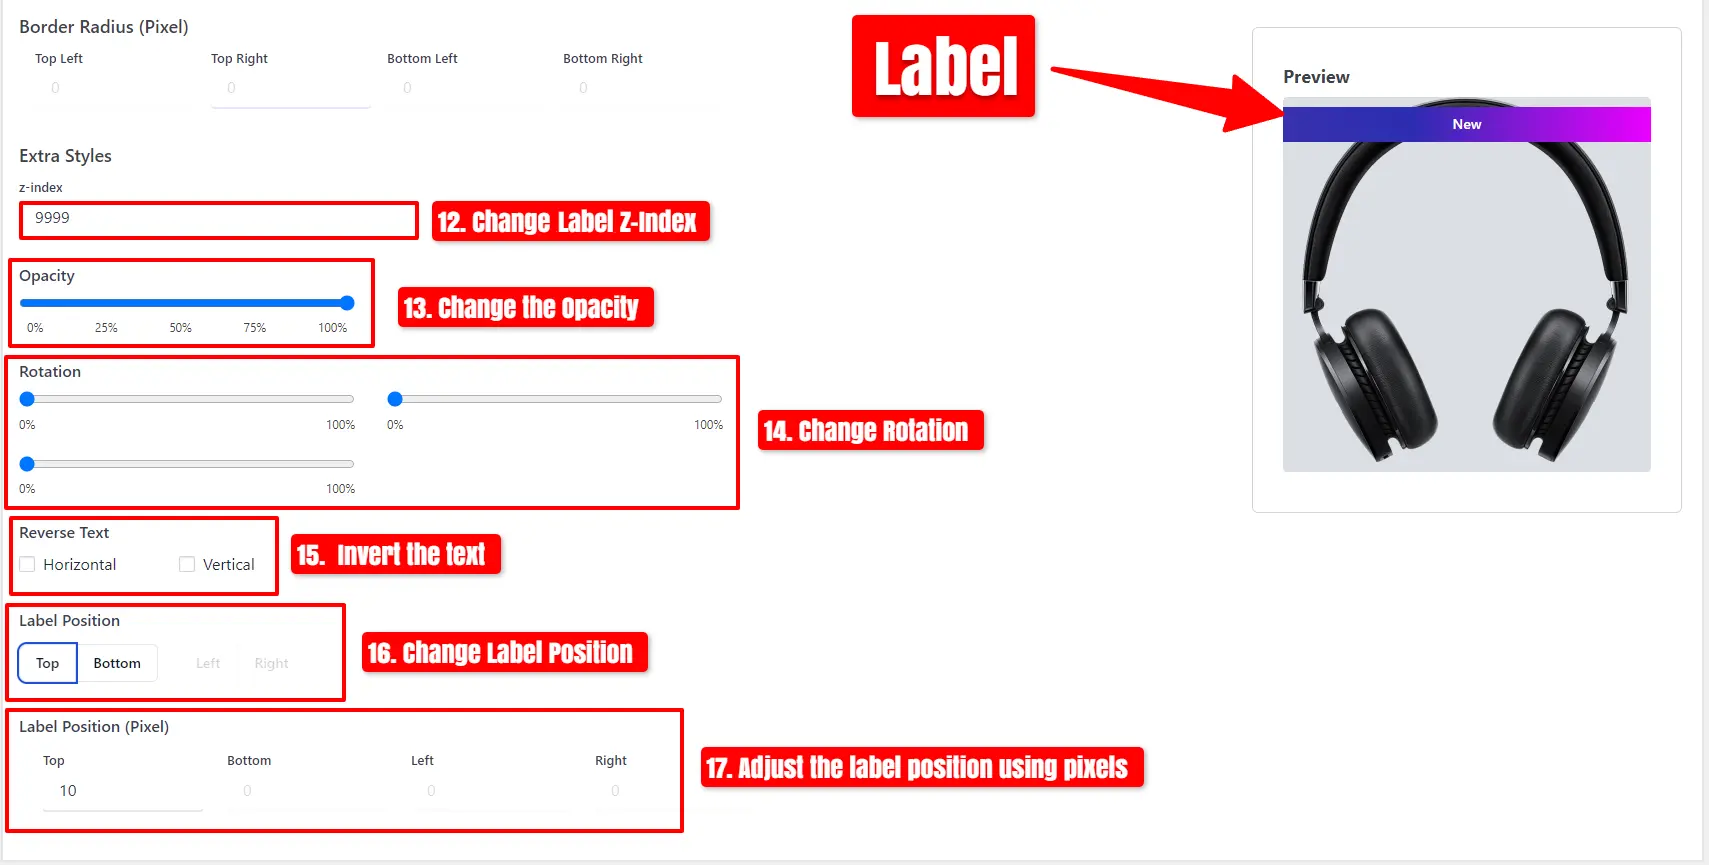
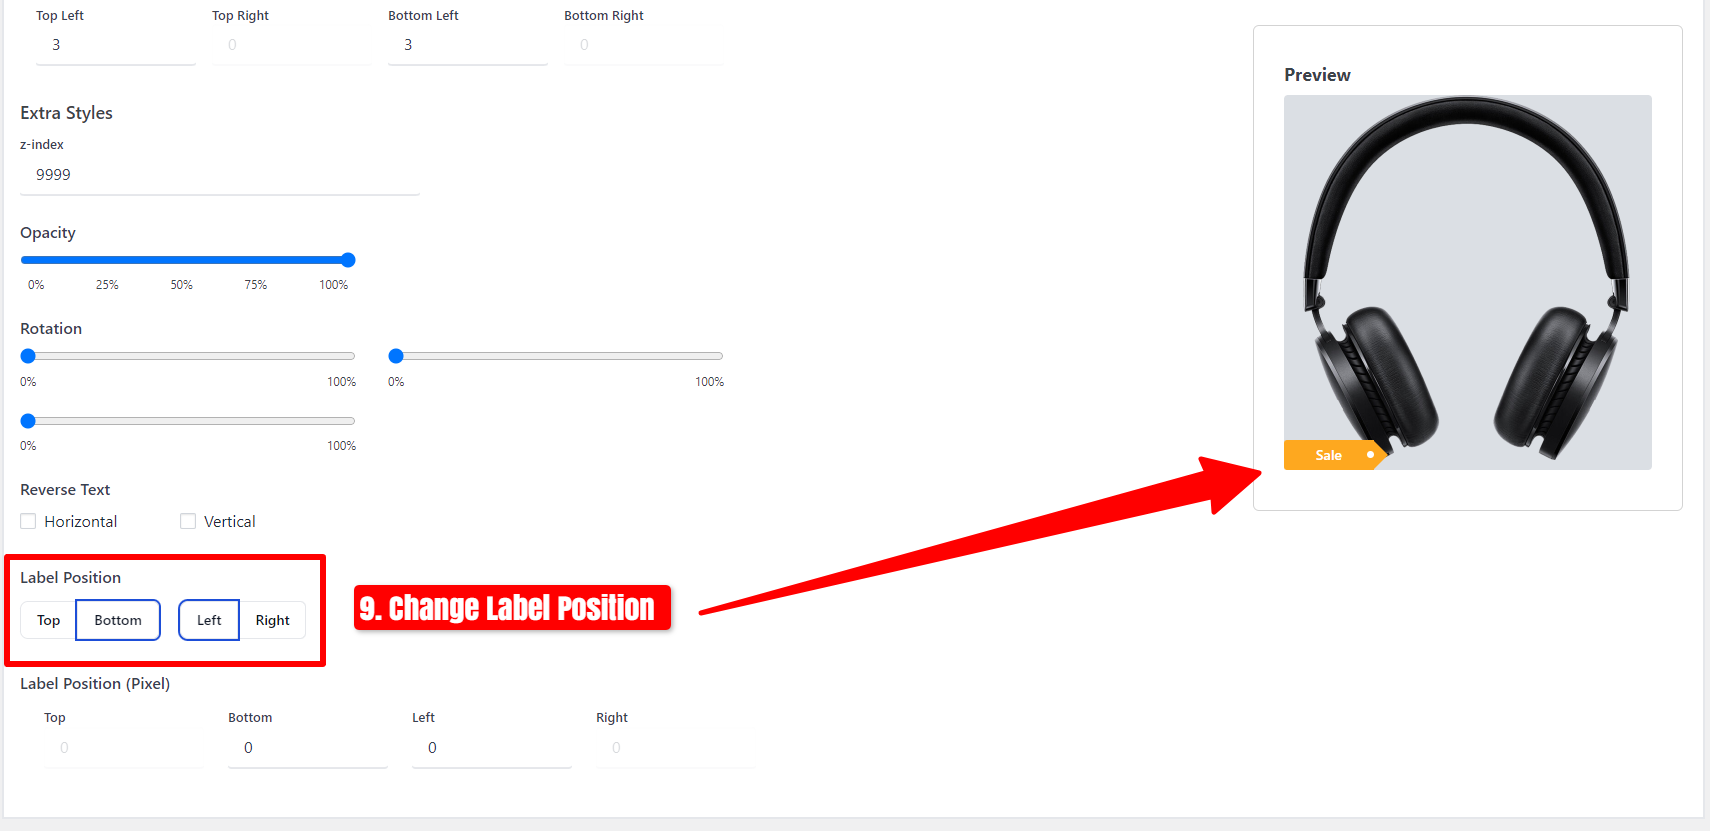
You have the flexibility to alter the label’s Z-Index, adjust its opacity, invert the text, and reposition the label.
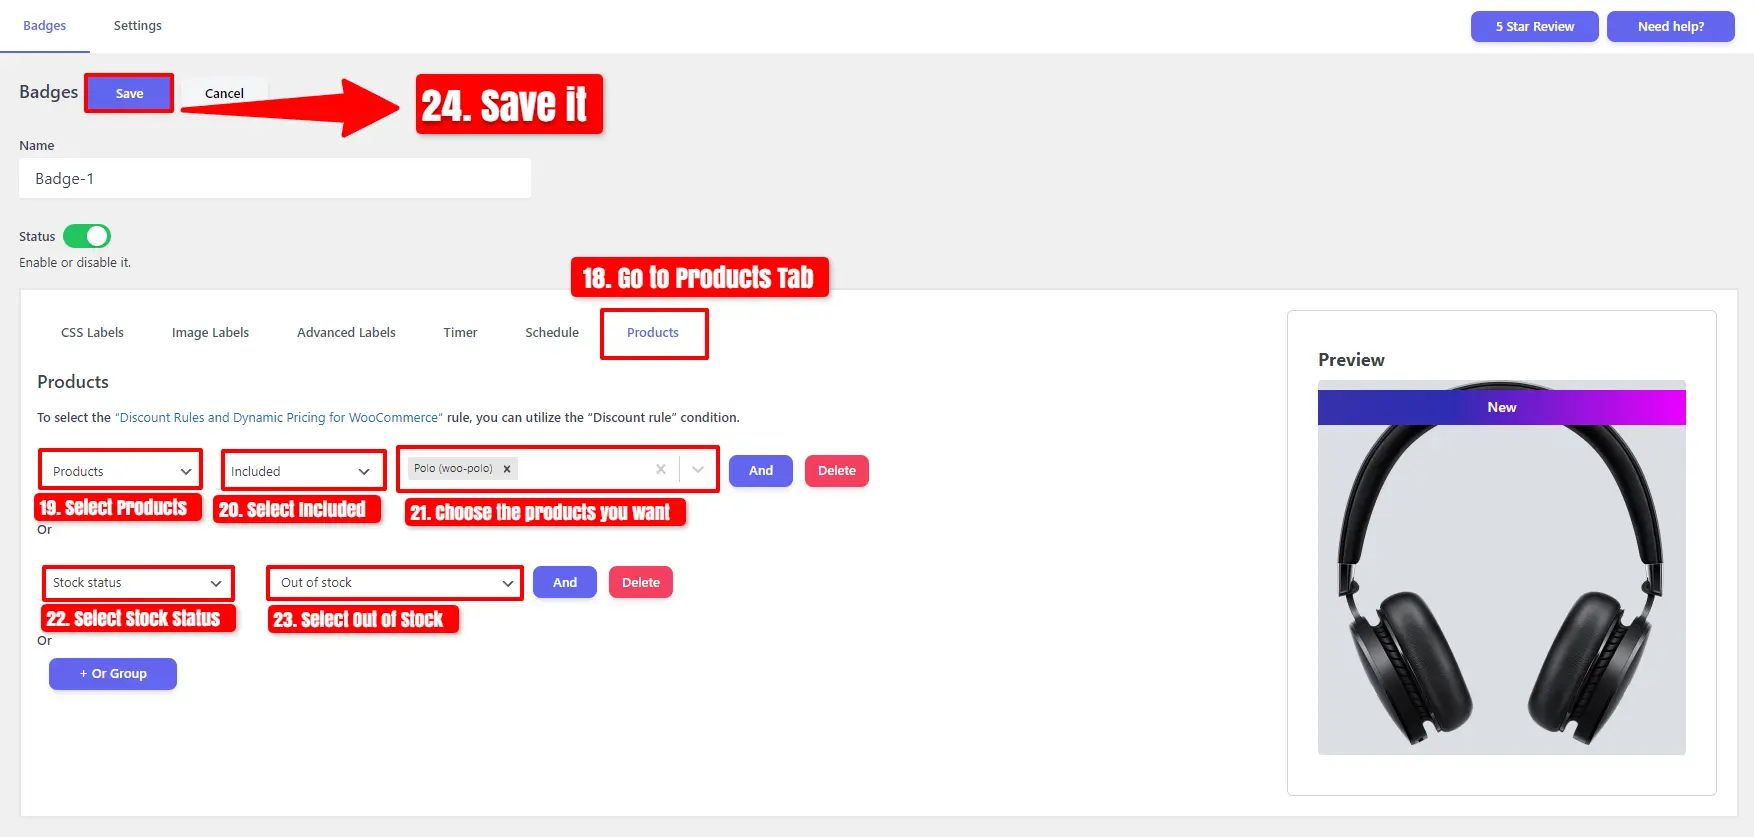
After you have finished customizing the style, navigate to the “Products” tab.
- Firstly, select the products you want and choose “Included”
- If you want to add a new condition, click on the “+ Or Group” button, then select “Stock Status” and choose “Out of Stock”
- Once you have completed these steps, click on “Save”
Additionally, navigate to the archive page and click on the “Polo” as shown in the image below:
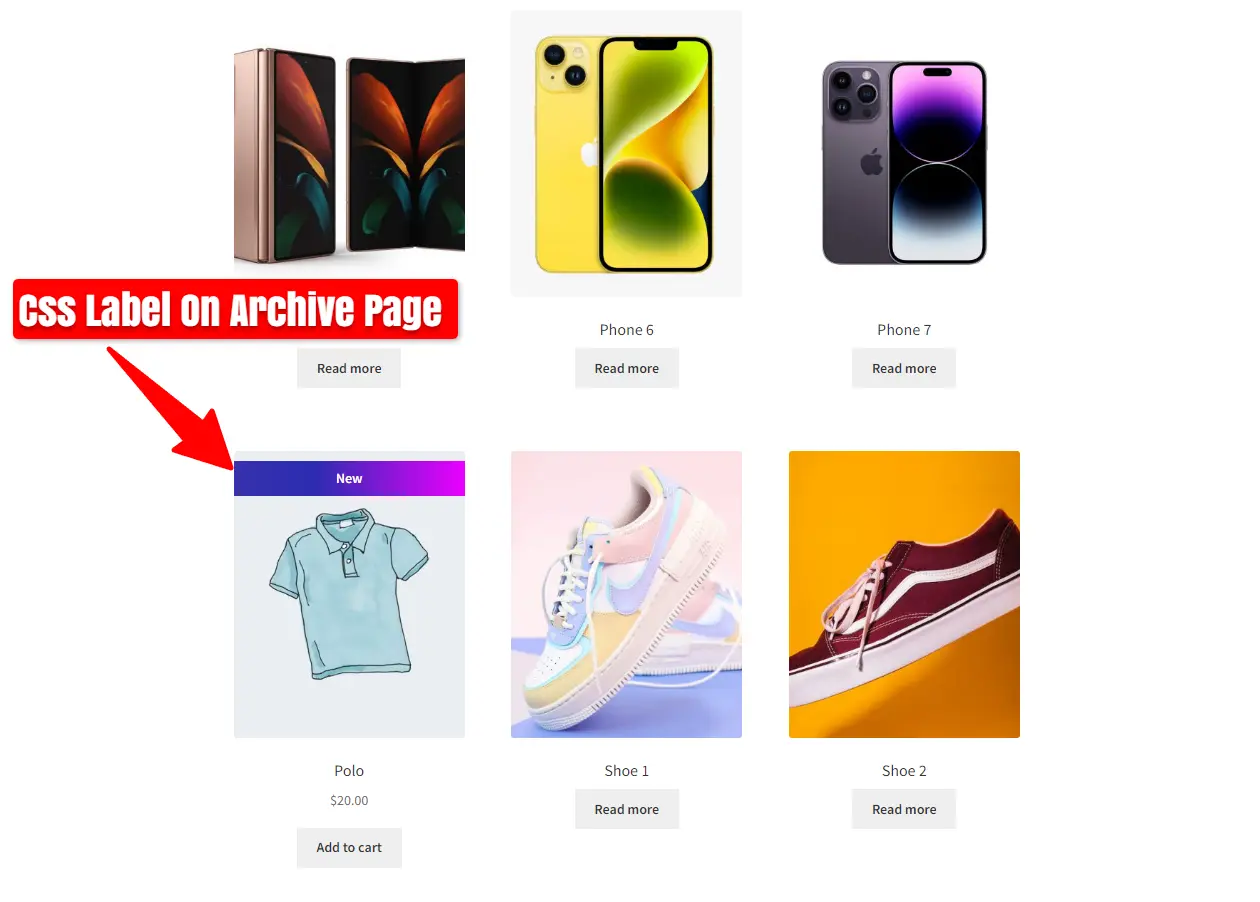
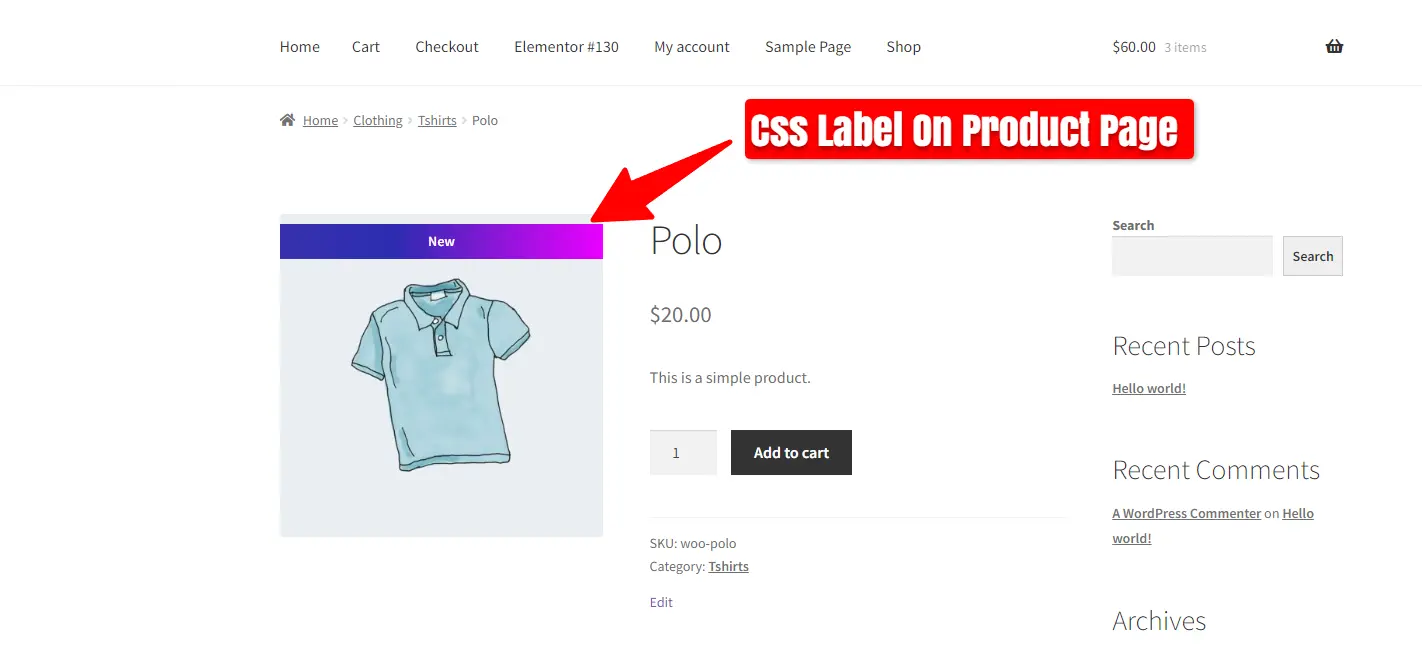
Image Labels
You have the option to choose an image label and customize it as shown in the image below:
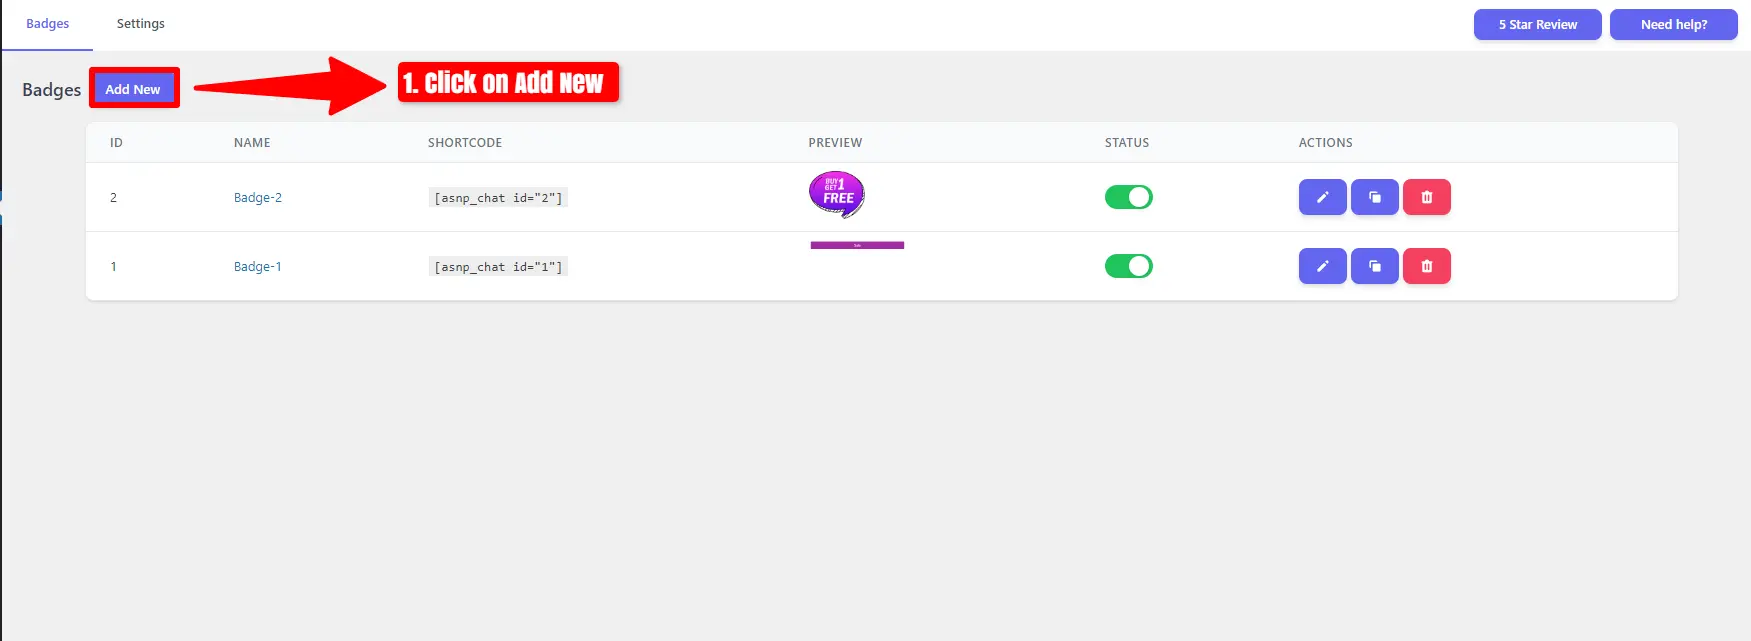
- To begin, click on “Add New”.
- Set a name, and you can enable or disable the status.
- Select the “Image Label” tab and choose an image badge or upload the image you prefer.
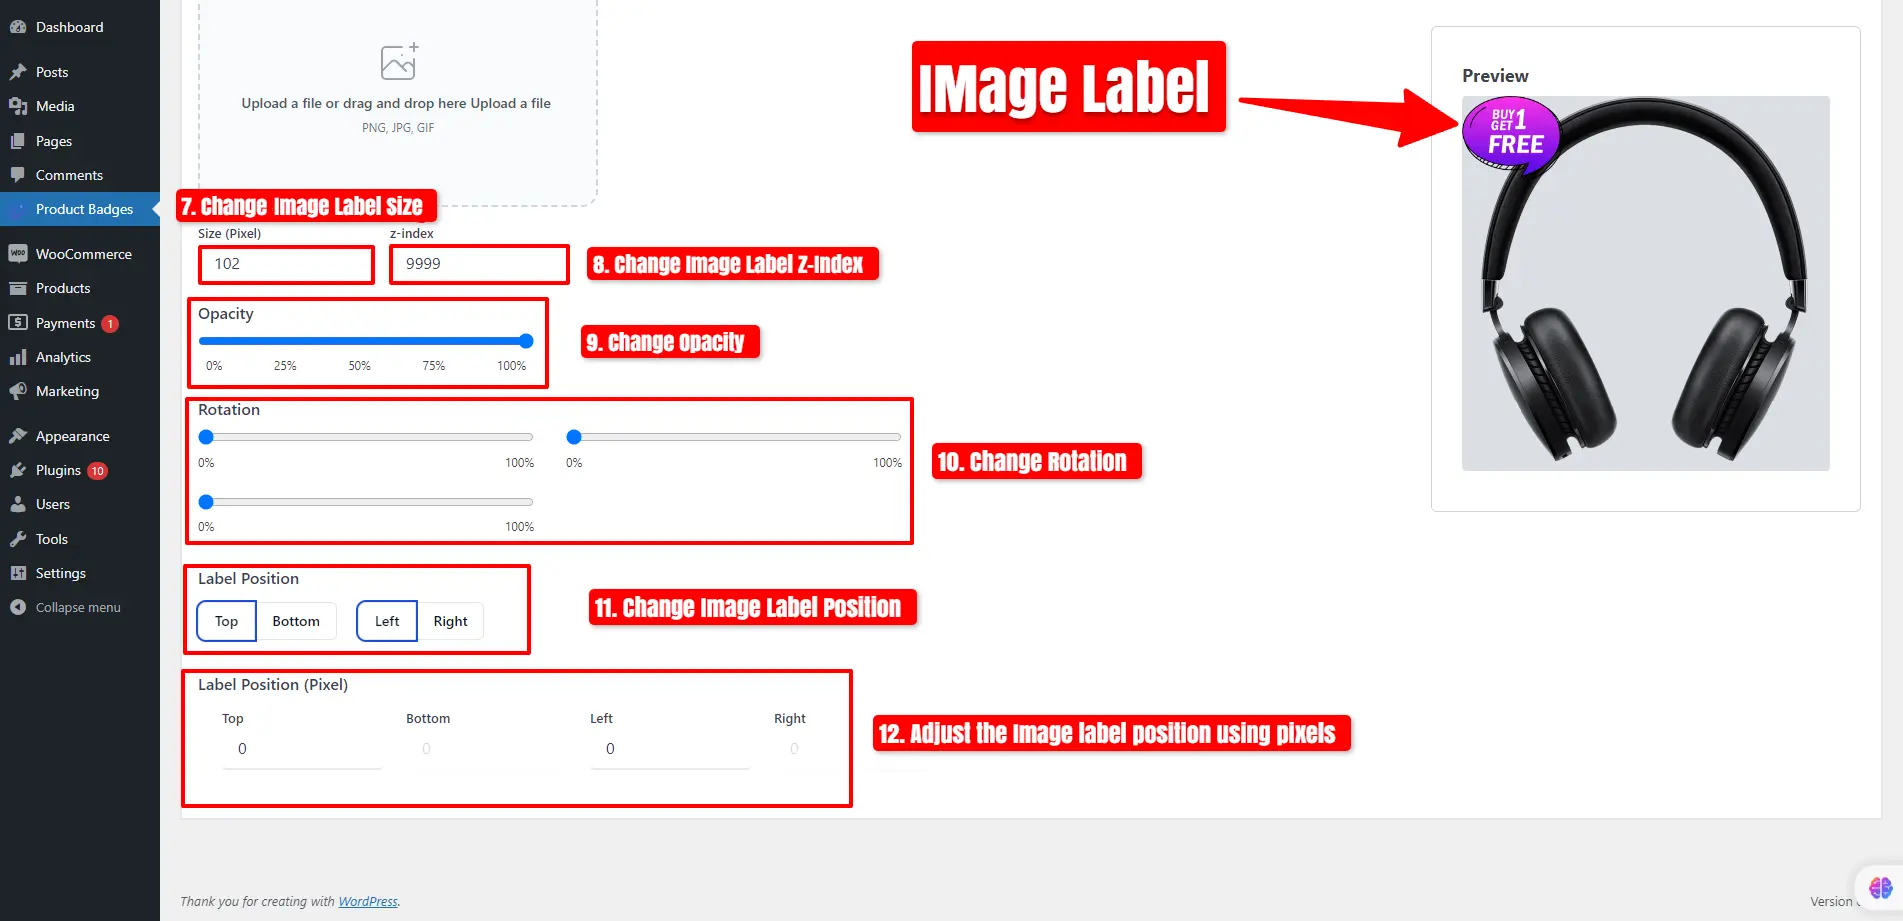
- You can adjust the image label’s size, z-index, opacity, rotation, and position.
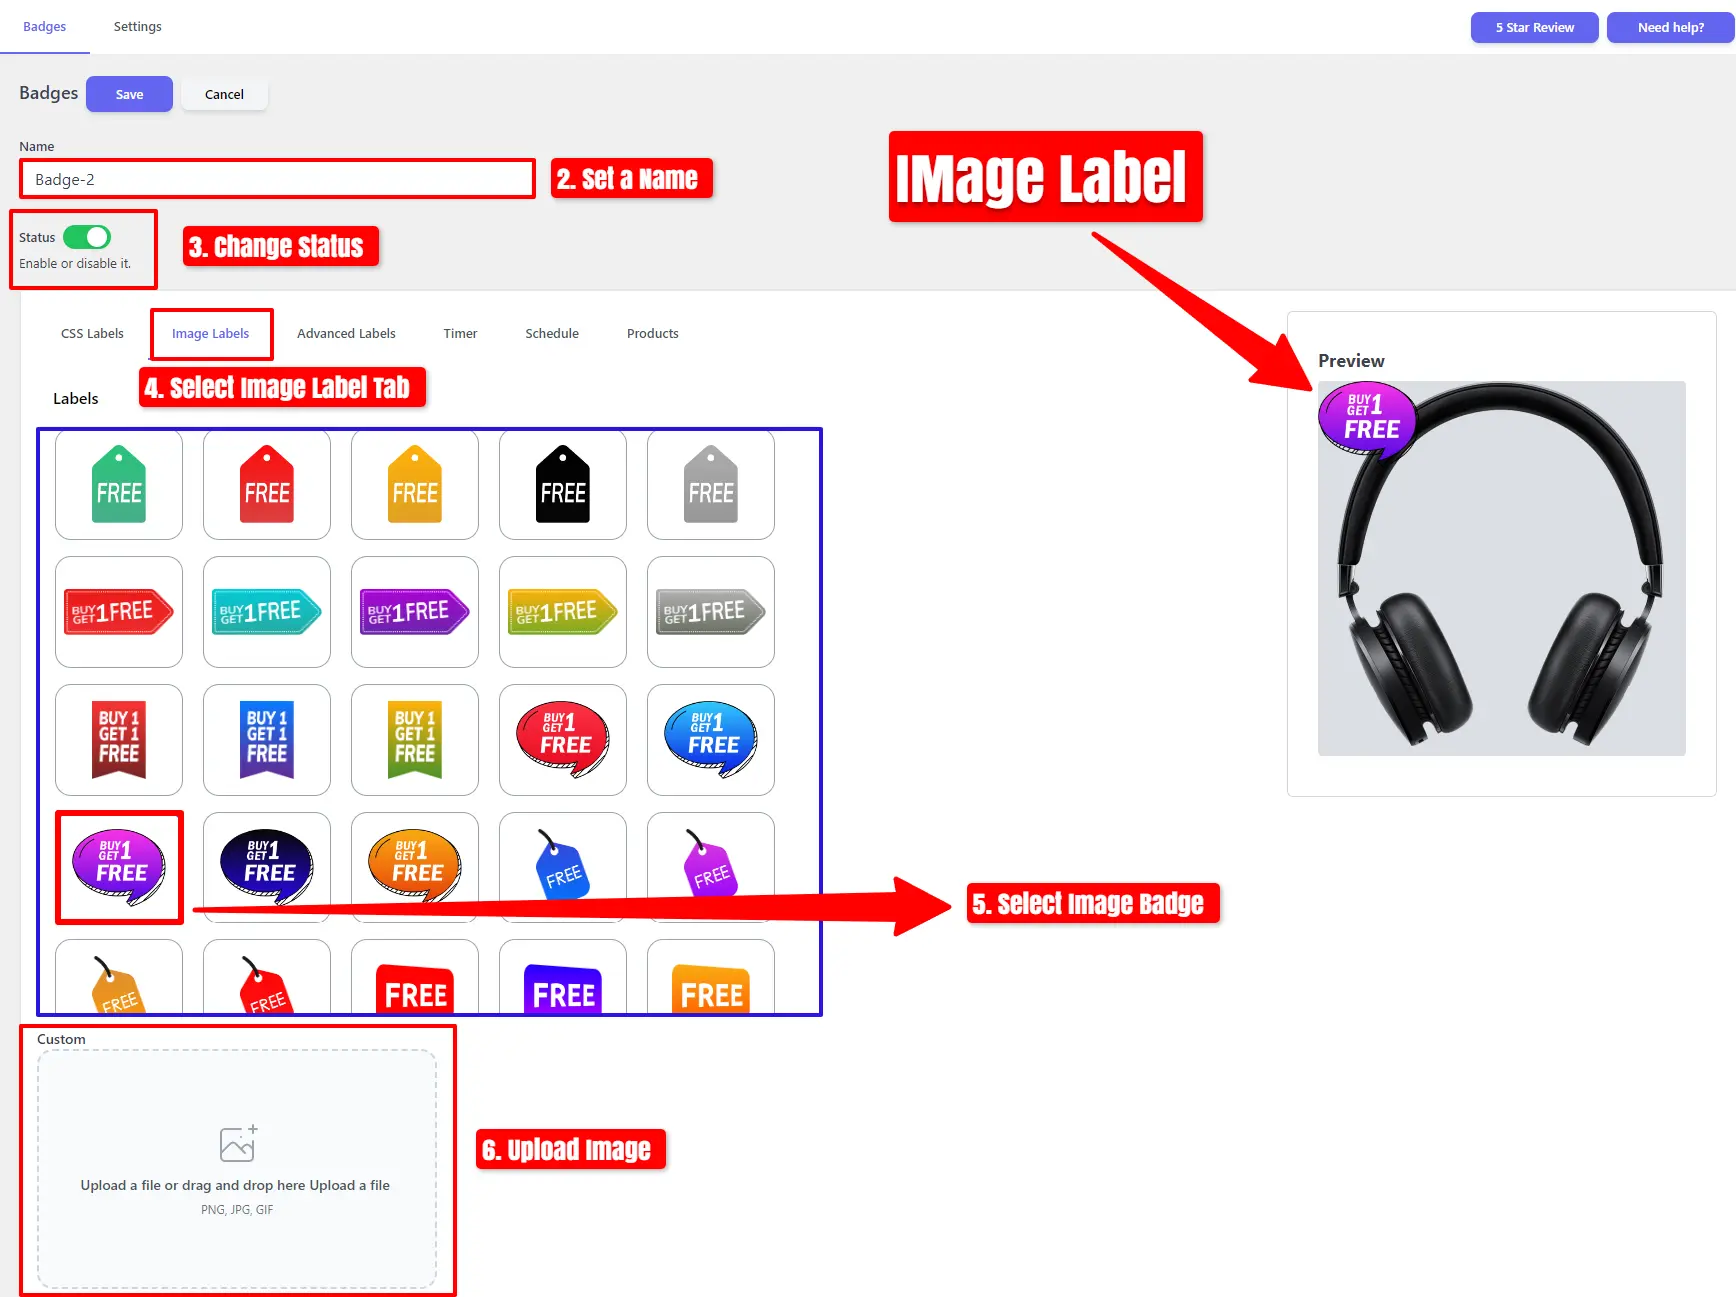
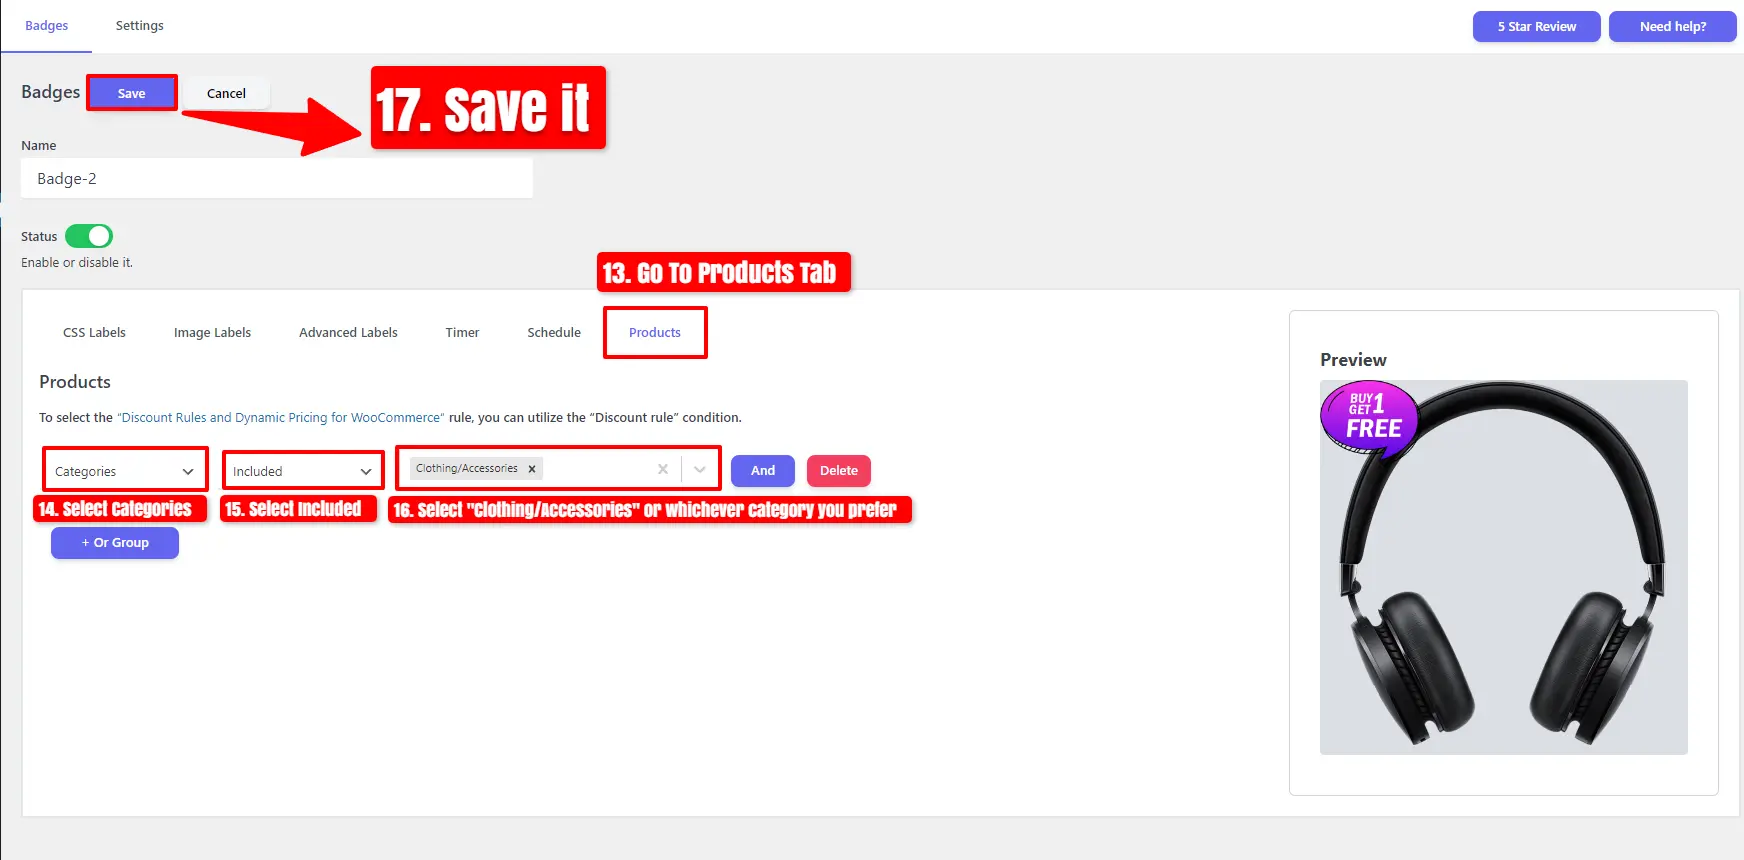
- After you have finished customizing the Image Label Style, navigate to the “Products” tab.
- Choose categories, select “Included,” and pick “Clothing/Accessories” or your preferred category.
- After you’ve finished these steps, click on the “Save” button.
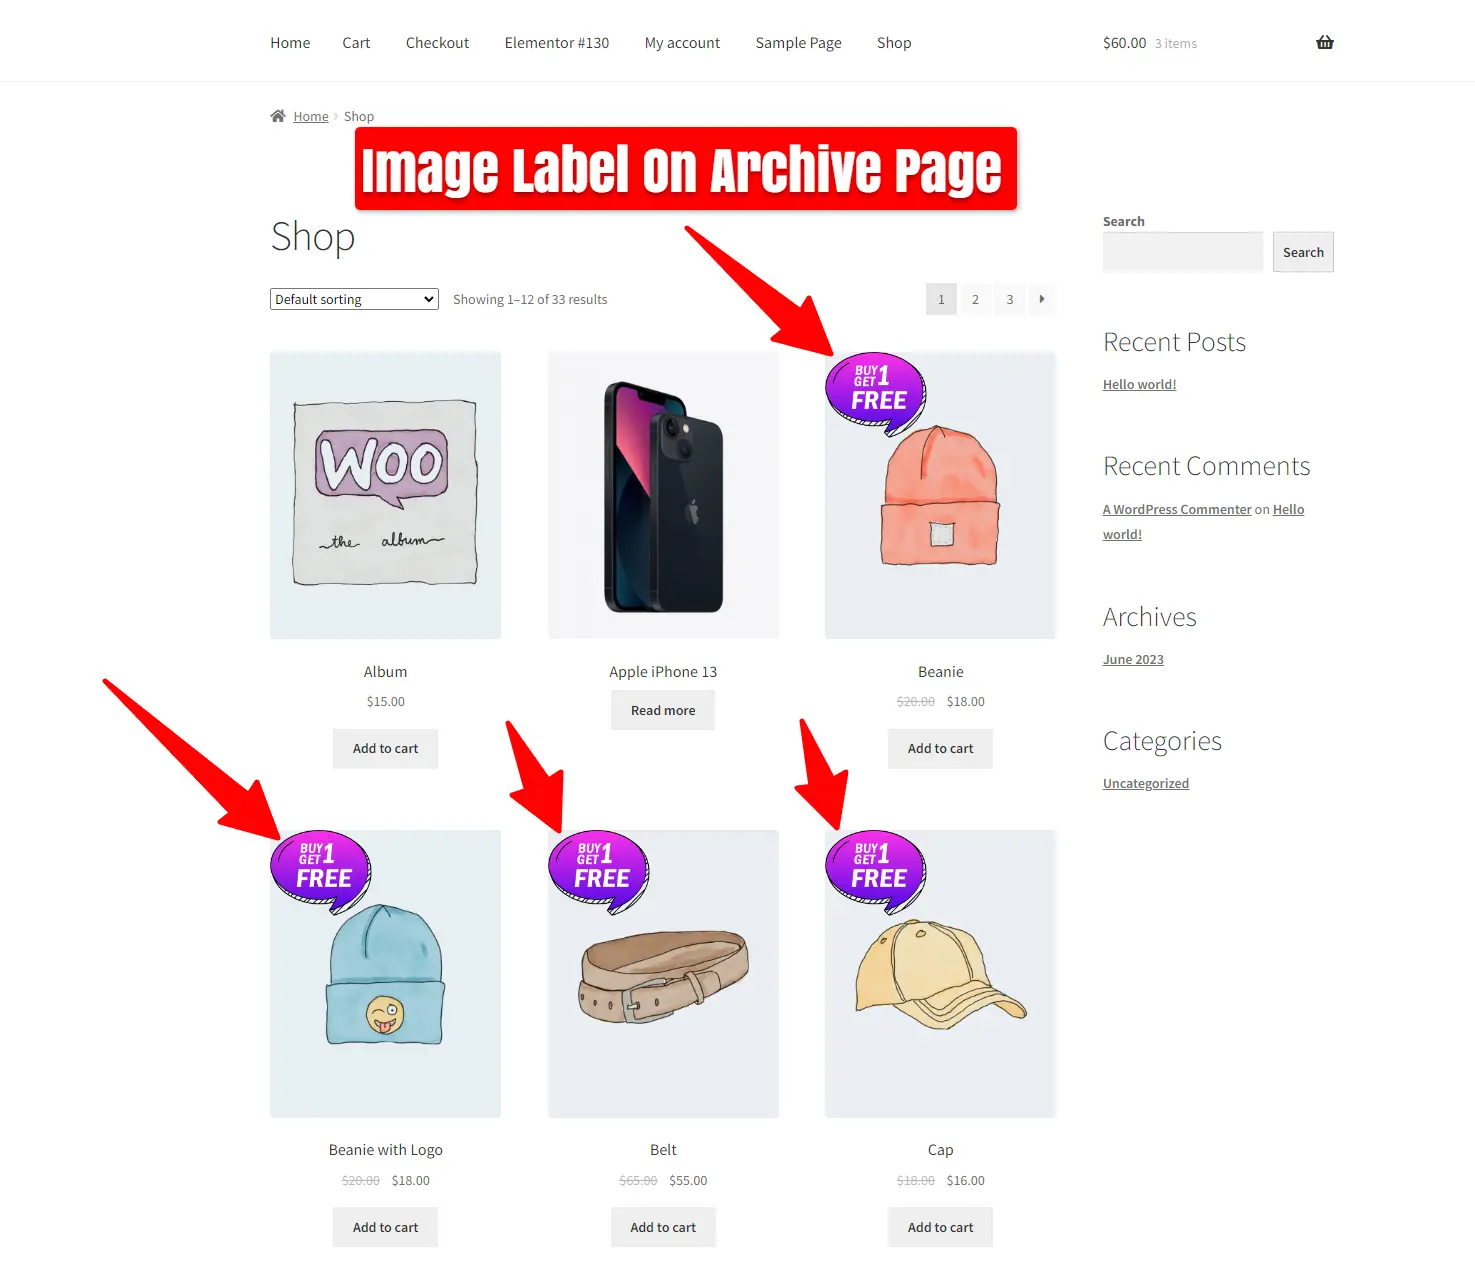
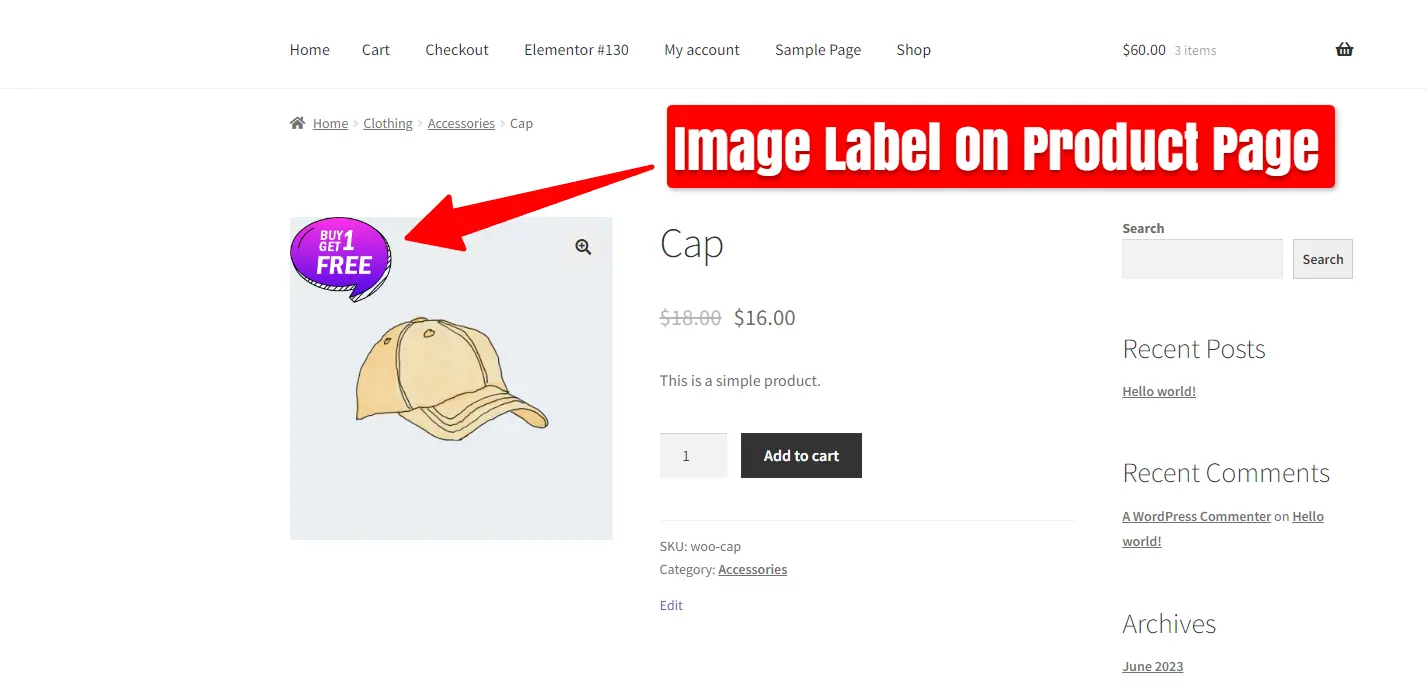
Furthermore, navigate to the archive page to view the image labels and also observe the image label on the product page.
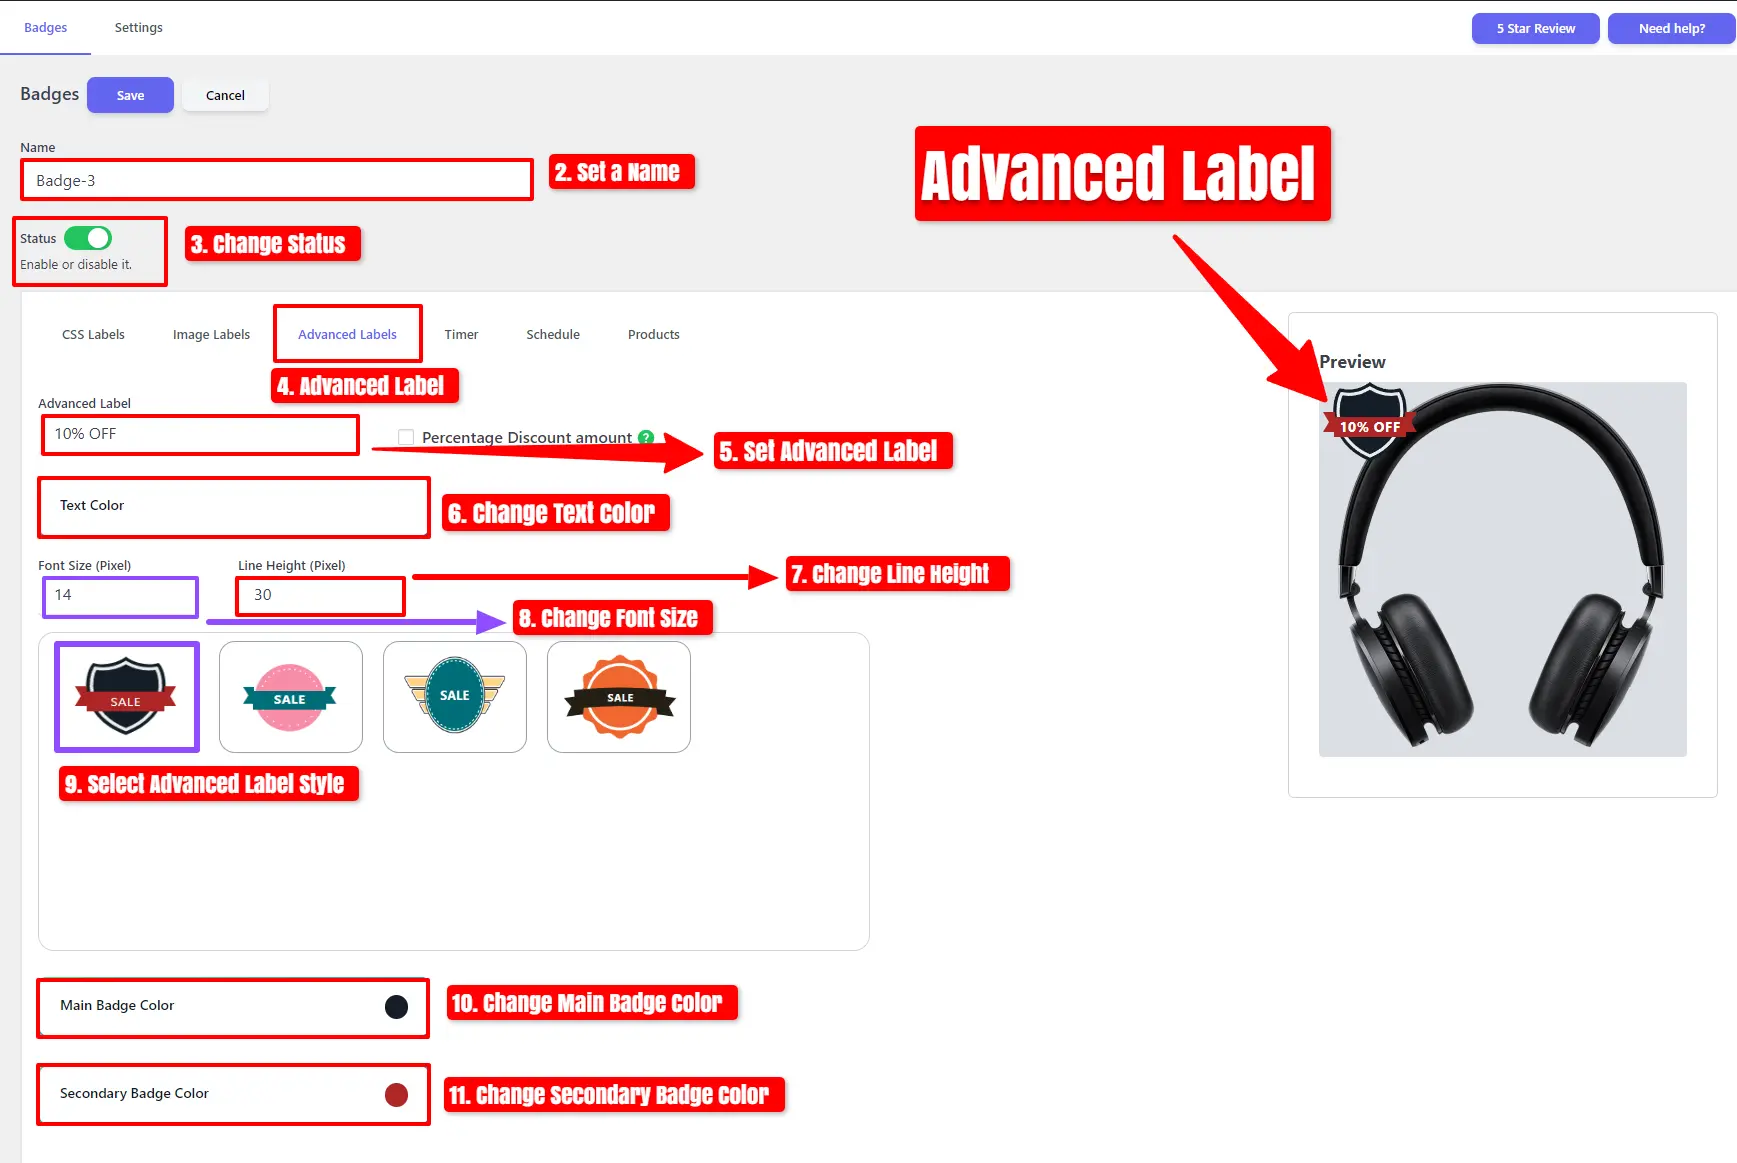
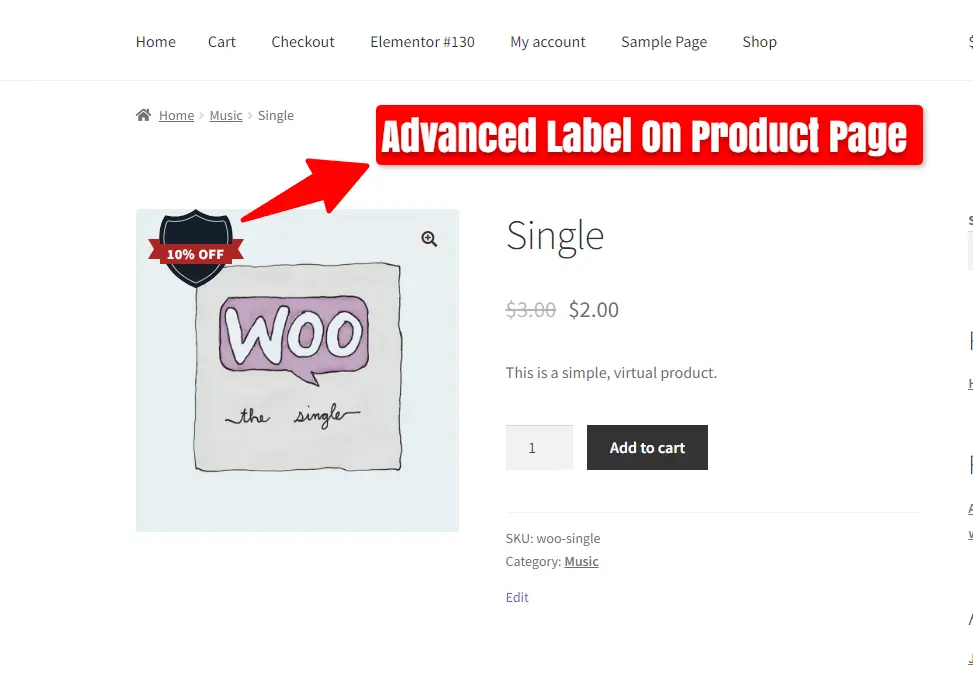
Advanced Labels
You can choose an advanced label and customize it as demonstrated in the image below :
- To begin, click on “Add New”.
- Set a name, and you can enable or disable the status.
- Choose the “Advanced Labels” Tab and configure your advanced label.
- You can modify the text color, font size, and line height.
- Additionally, you have the option to change the main badge color and secondary badge color.
- You can also adjust the Z-Index, opacity, and position.
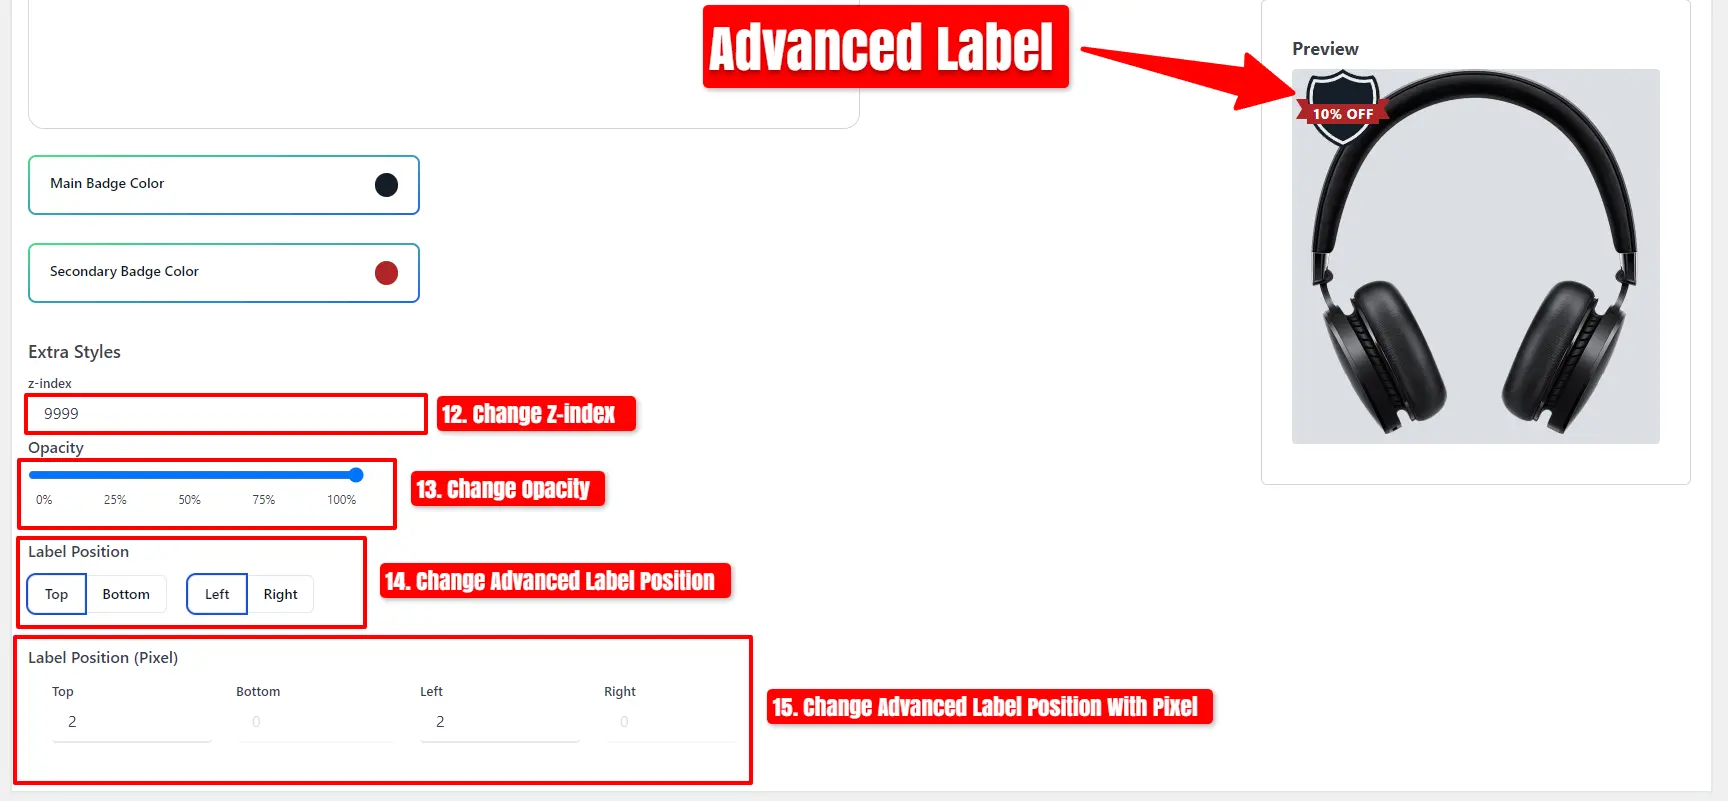
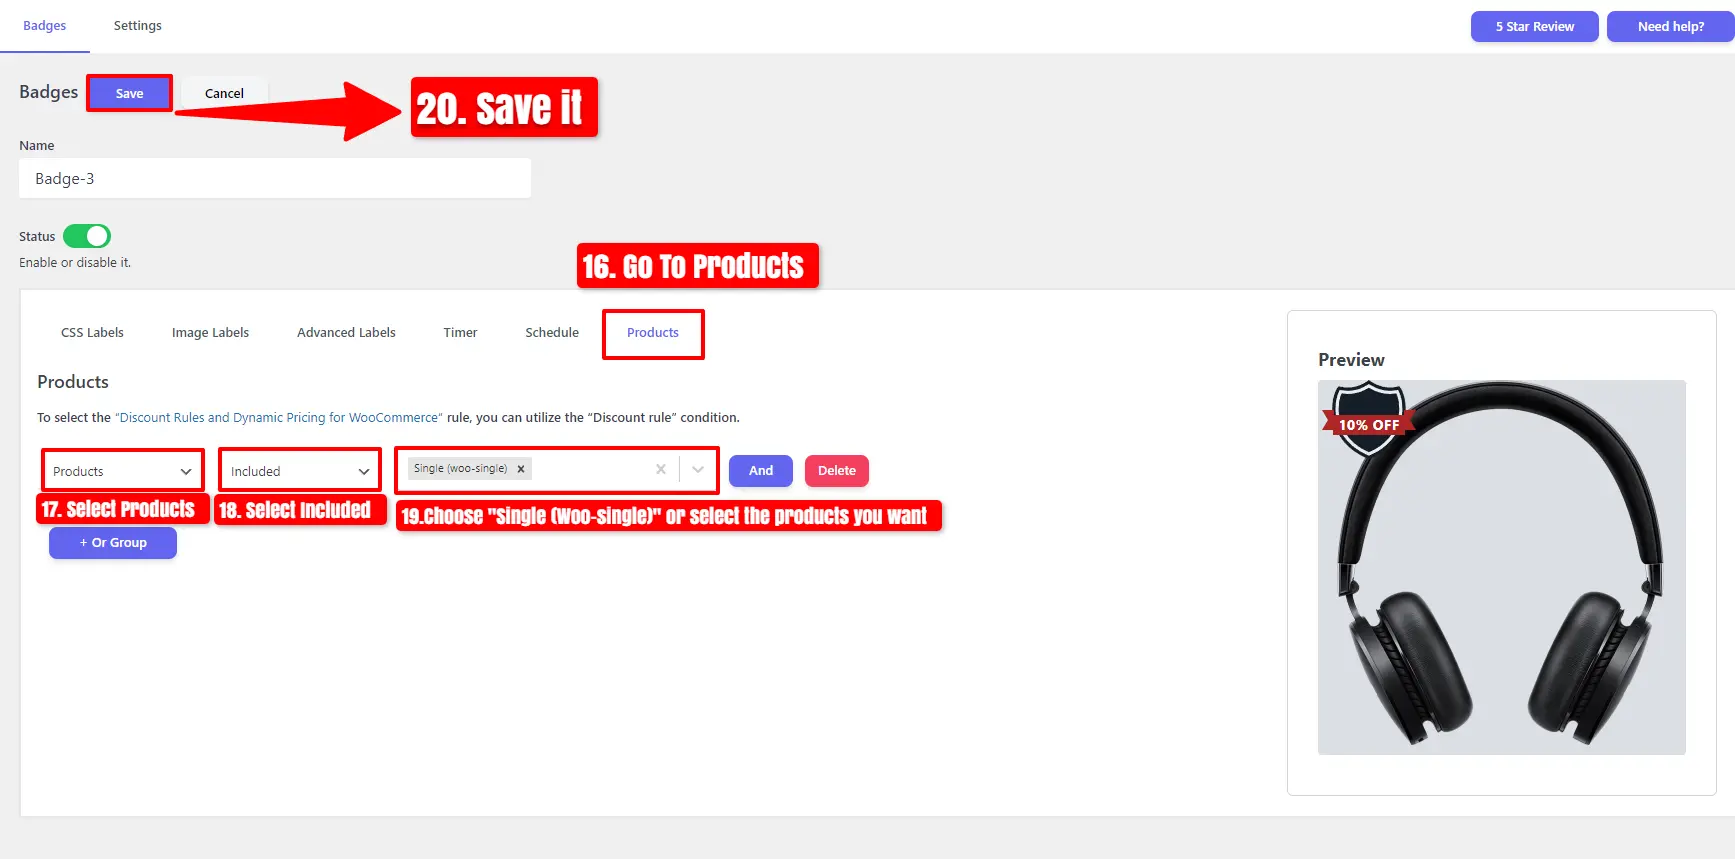
- After you have finished customizing the Advanced Label Style, navigate to the “Products” tab.
- Choose Products, select “Included,” and pick “Single (woo-Single)” or your preferred Products.
- After you’ve finished these steps, click on the “Save” button.
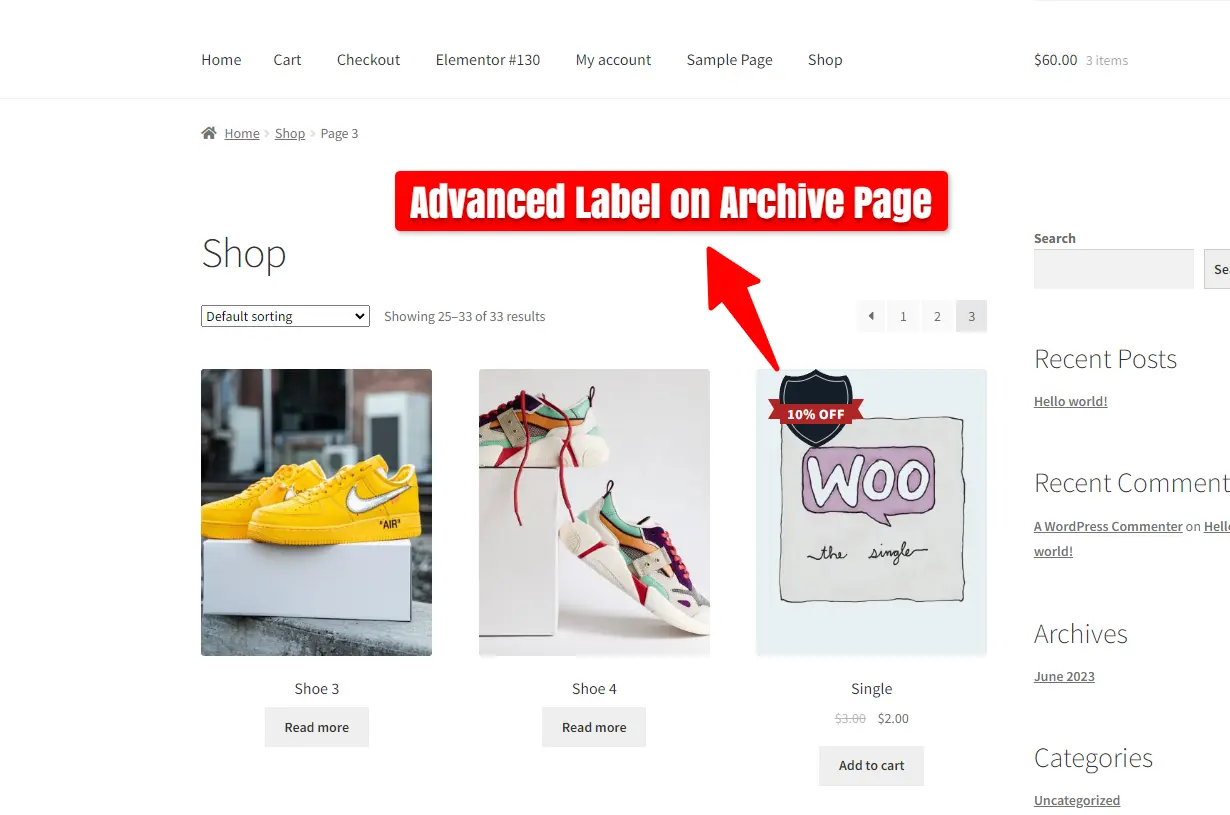
Moreover, go to the archive page to see the Advanced label, and also take a look at the Advanced label on the product page.
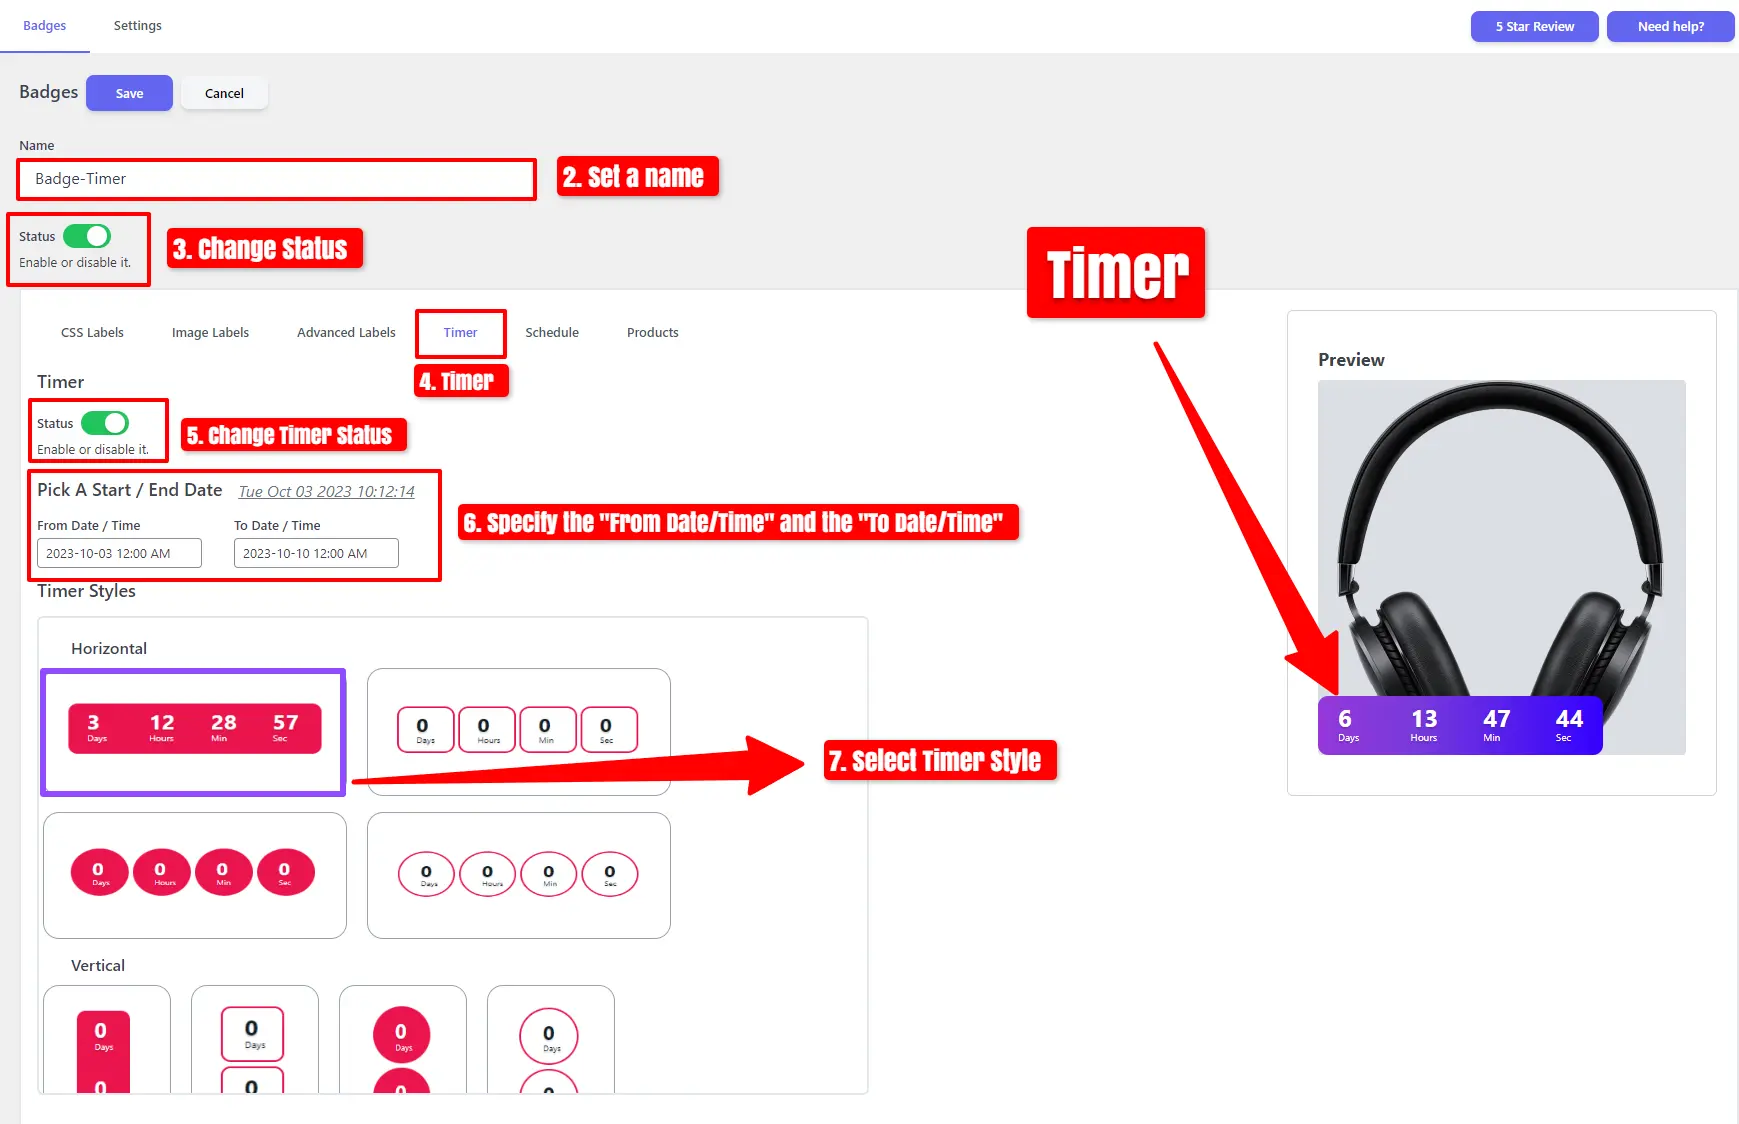
Countdown Timer
You can select the Countdown Timer and customize it as shown in the image below:
- To start, click on “Add New.”
- Set a name, and you can enable or disable the status.
- Go to the Timer Tab, where you have the option to change the timer’s status.
- You must include both a “From Date/Time” and a “To Date/Time” for the timer to function correctly.
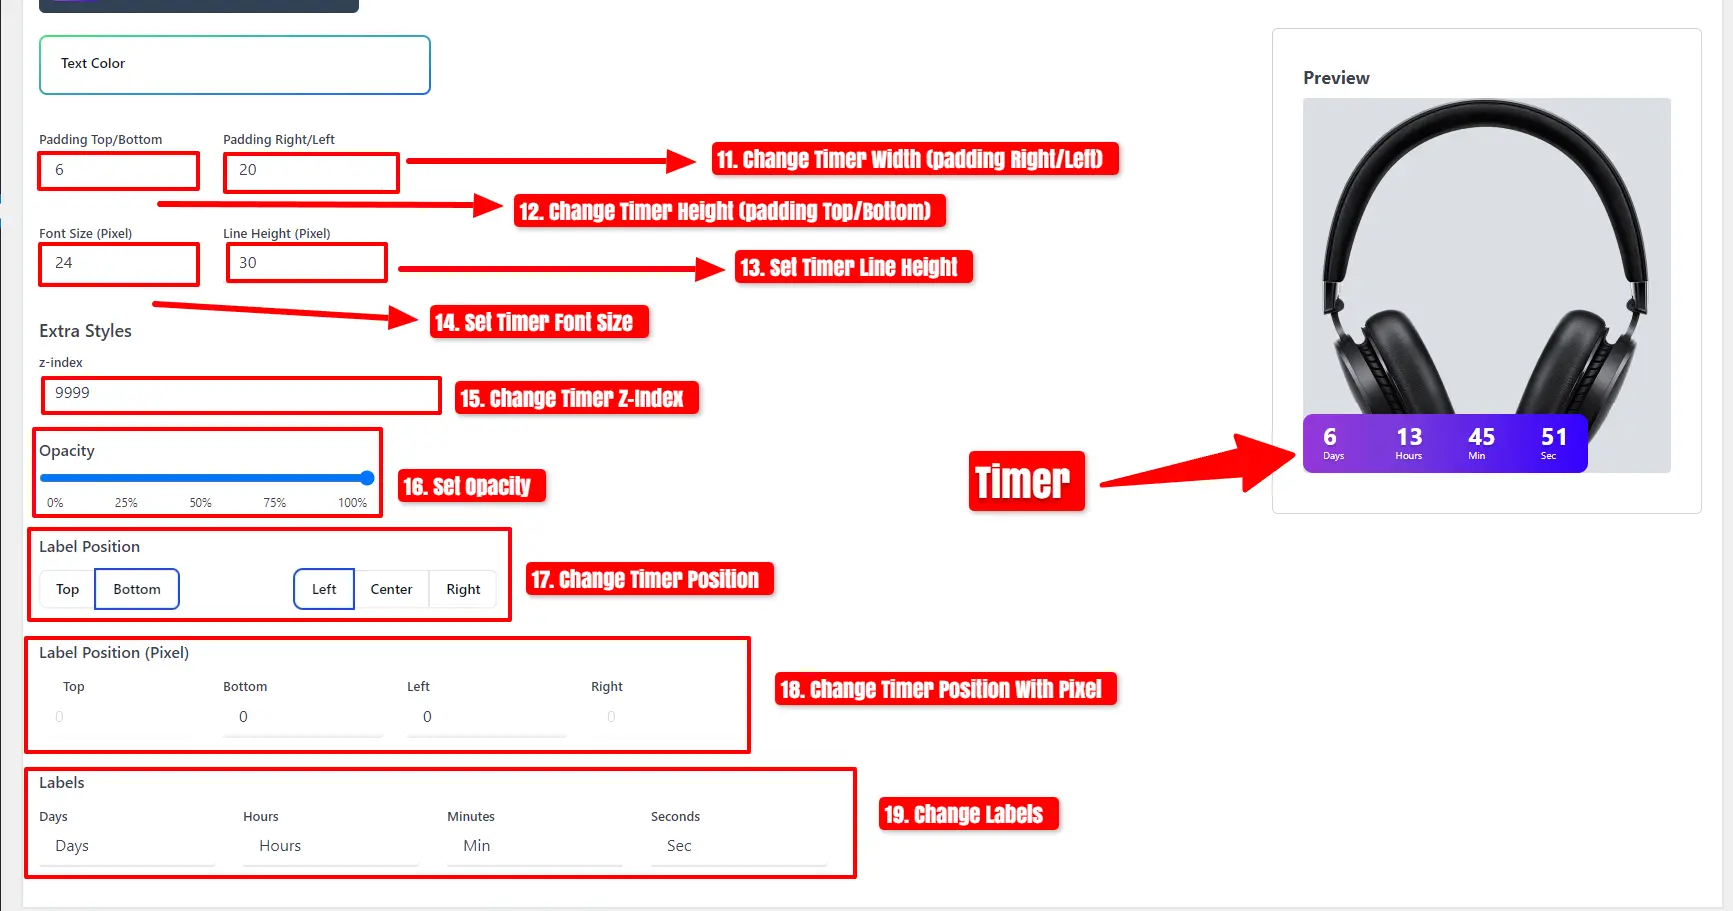
- Choose the Timer Style, and you can customize the background color and text color.
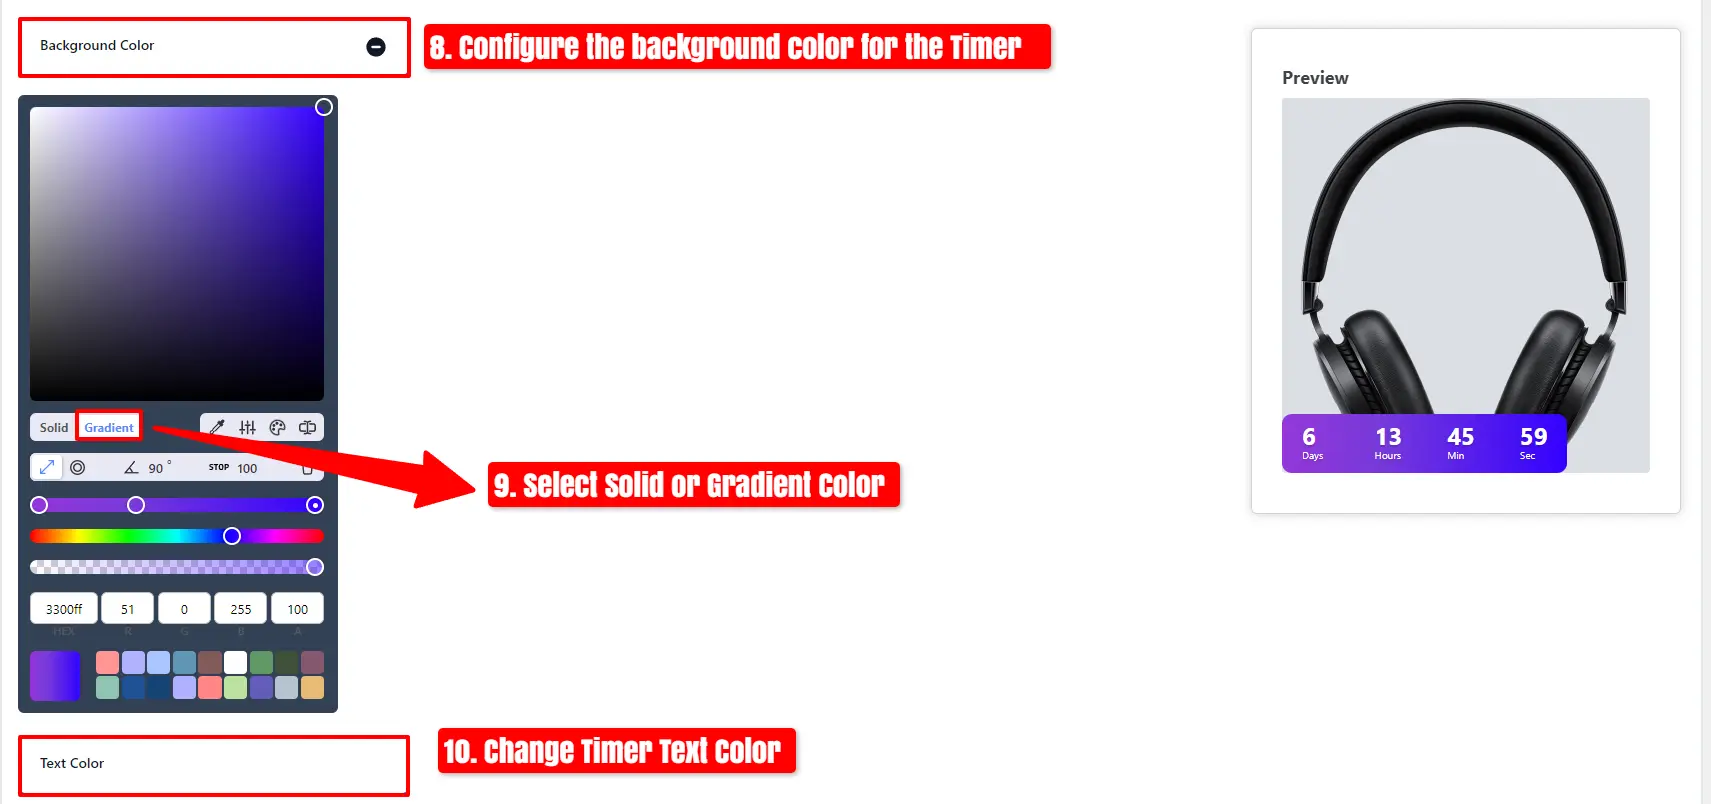
- You can adjust the timer’s width and height, change the font size and line height, modify the z-index and opacity.
- Additionally, you have the option to change the timer’s position and labels.
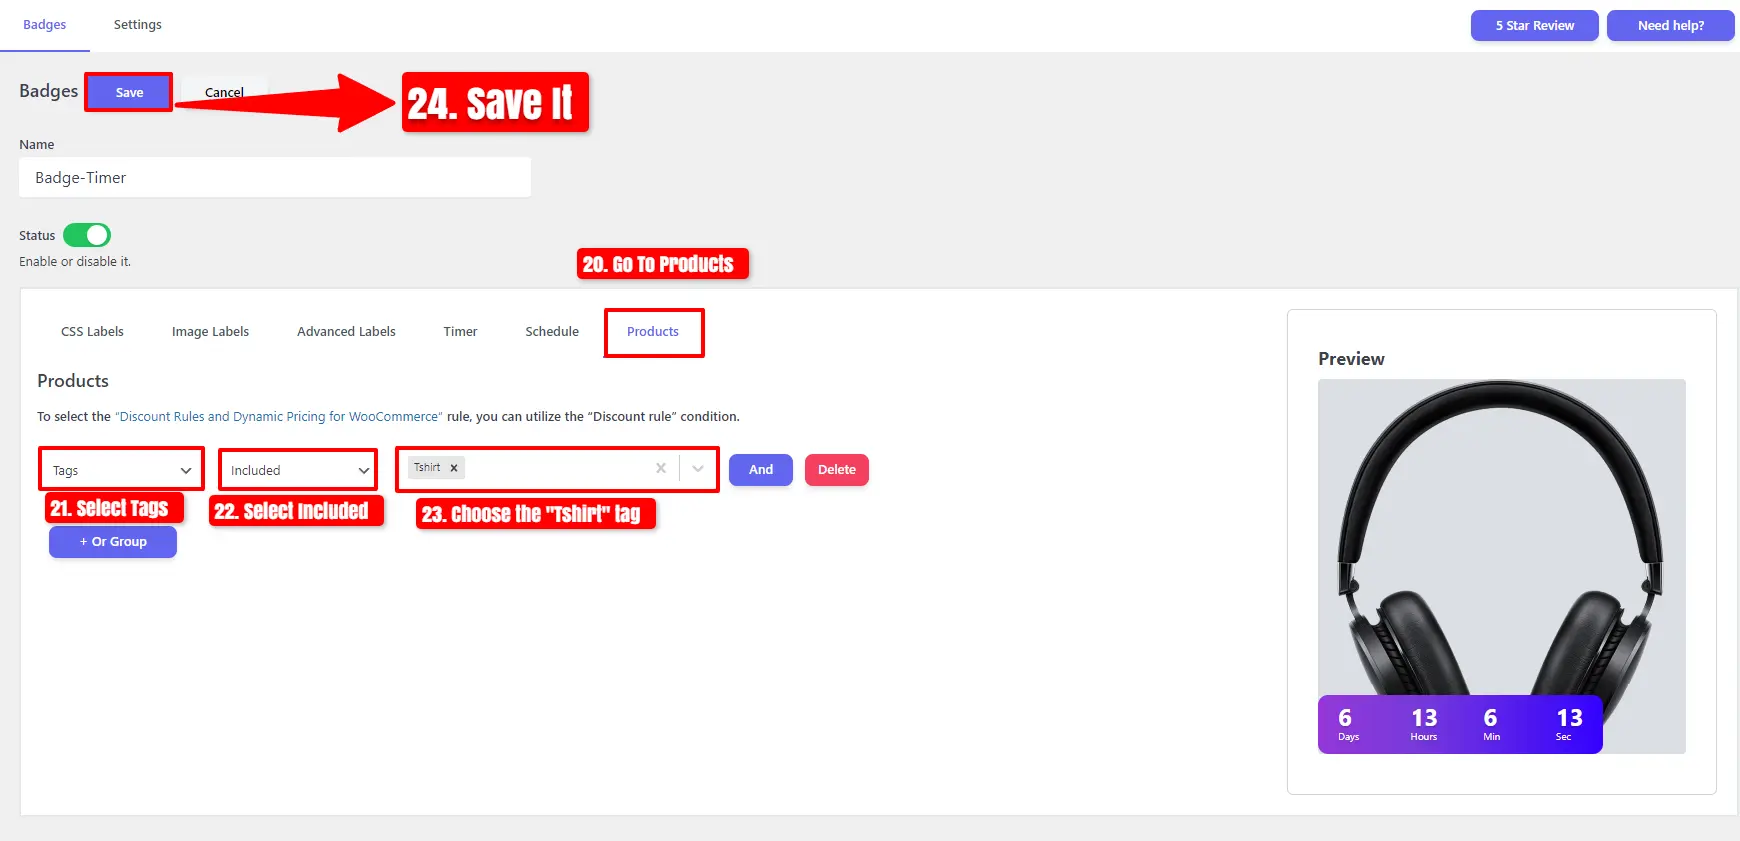
- Once you’ve completed customizing the Timer style, proceed to the “Products” tab.
- Select “Tags,” choose “Included,” and pick the “Tshirt” tag.
- After you’ve finished these steps, click on the “Save” button.
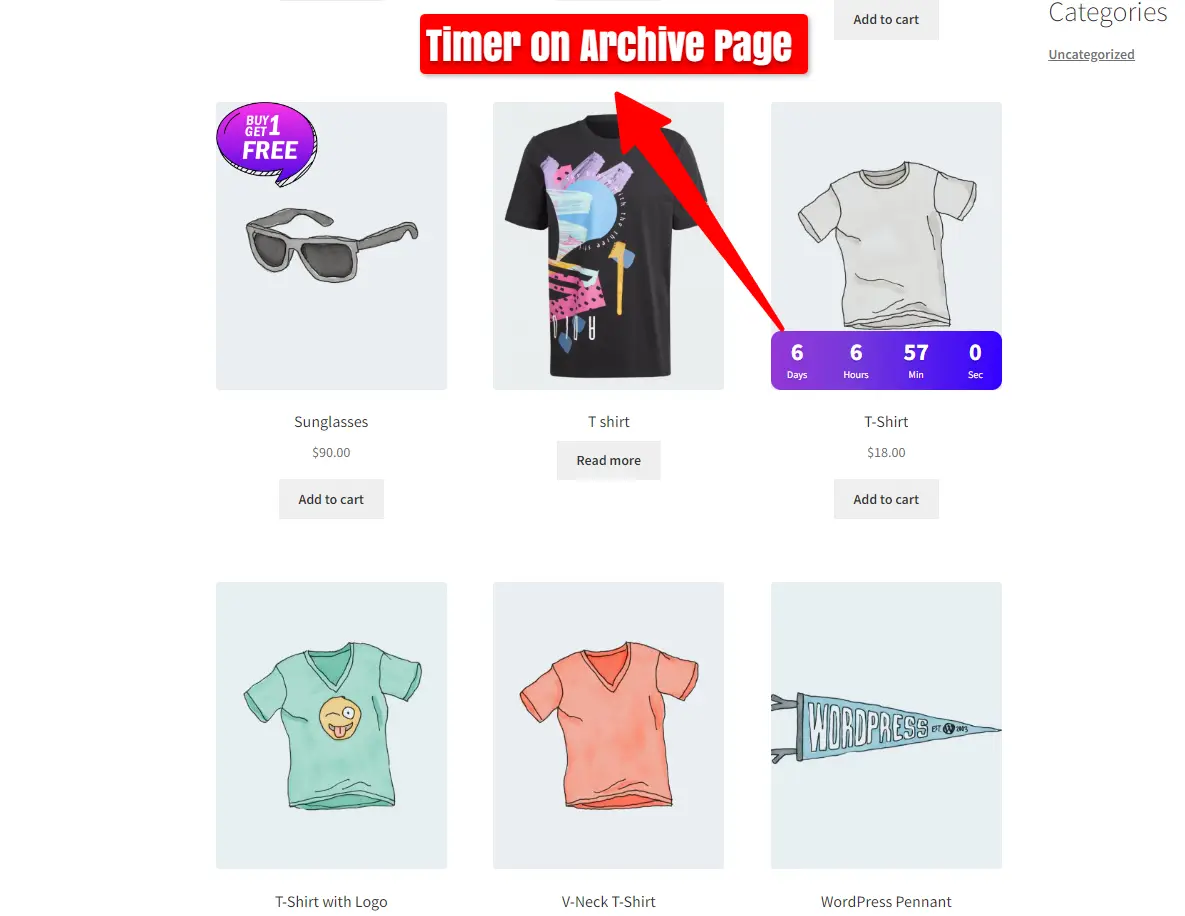
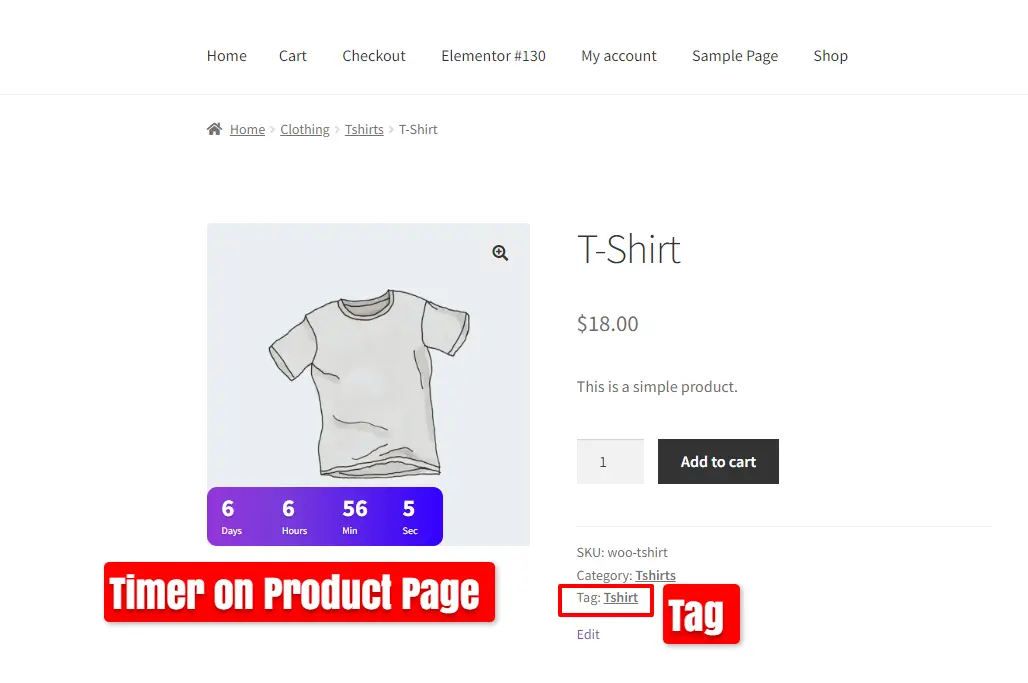
Furthermore, navigate to the archive page to view the Timer, and also observe the Timer on the product page.
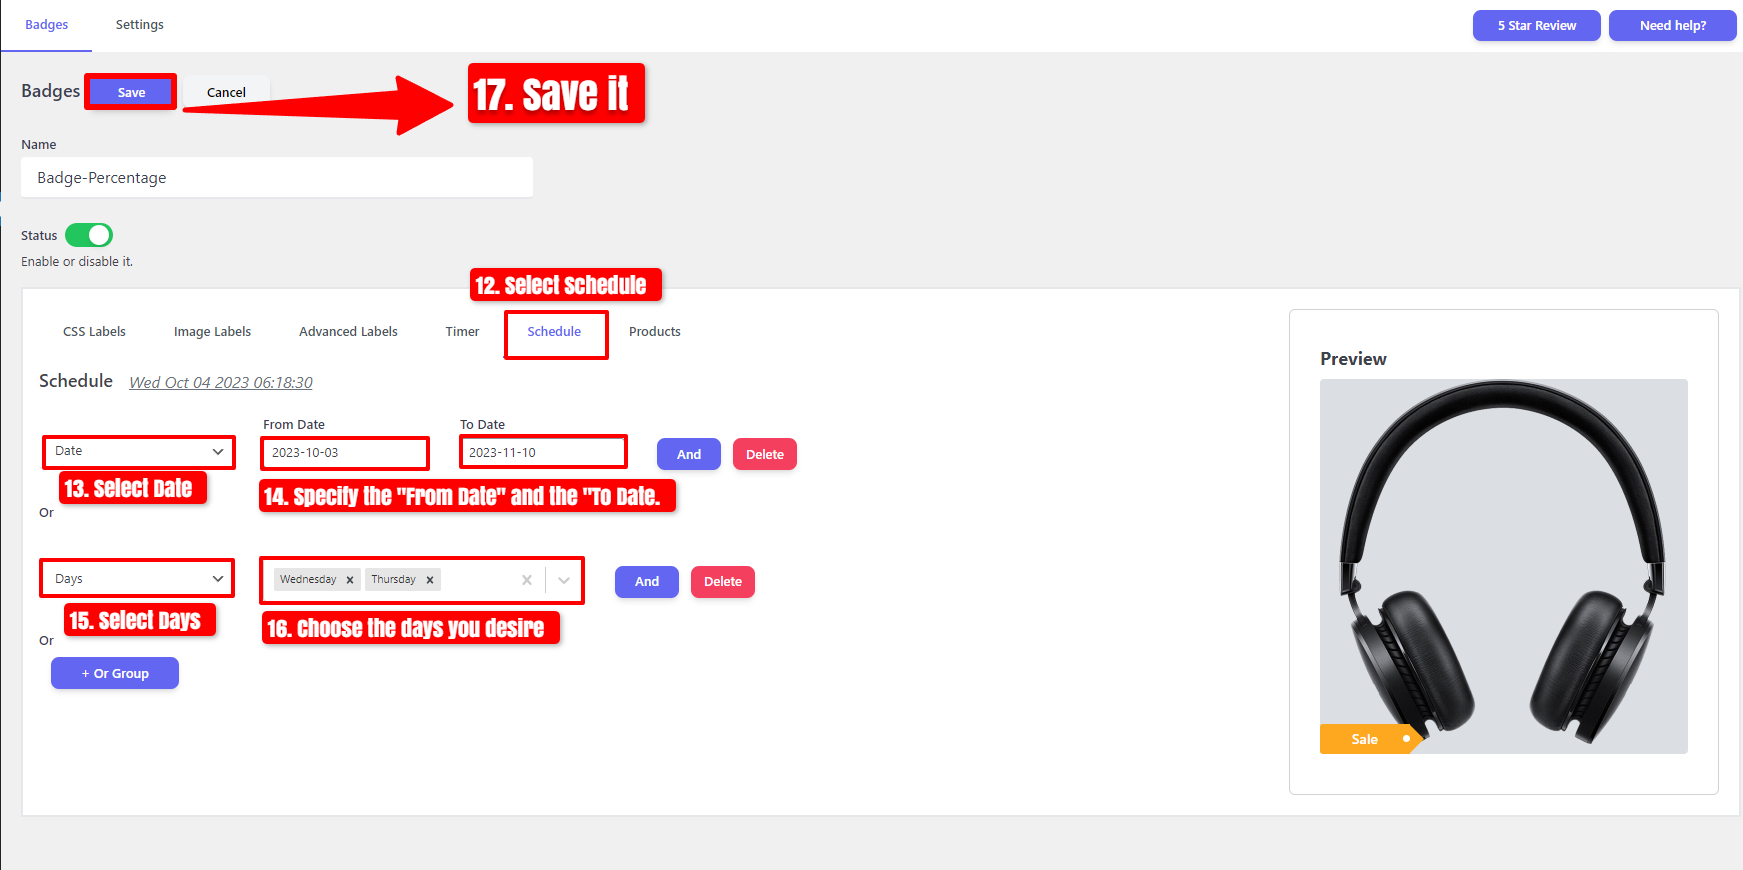
Schedule and Percentage Discount amount
You have the option to choose the CSS Label, apply a percentage discount amount, schedule it, and customize it as depicted in the image below:
- To start, click on “Add New.”
- Set a name, and you can enable or disable the status.
- Navigate to the CSS Label Tab.
- Specify a label and activate the Percentage Discount amount checkbox.
- Choose the Label Style and modify the label’s color, width, and position.
- Once you’ve completed customizing the Timer style, proceed to the “Products” tab.
- Select All products.
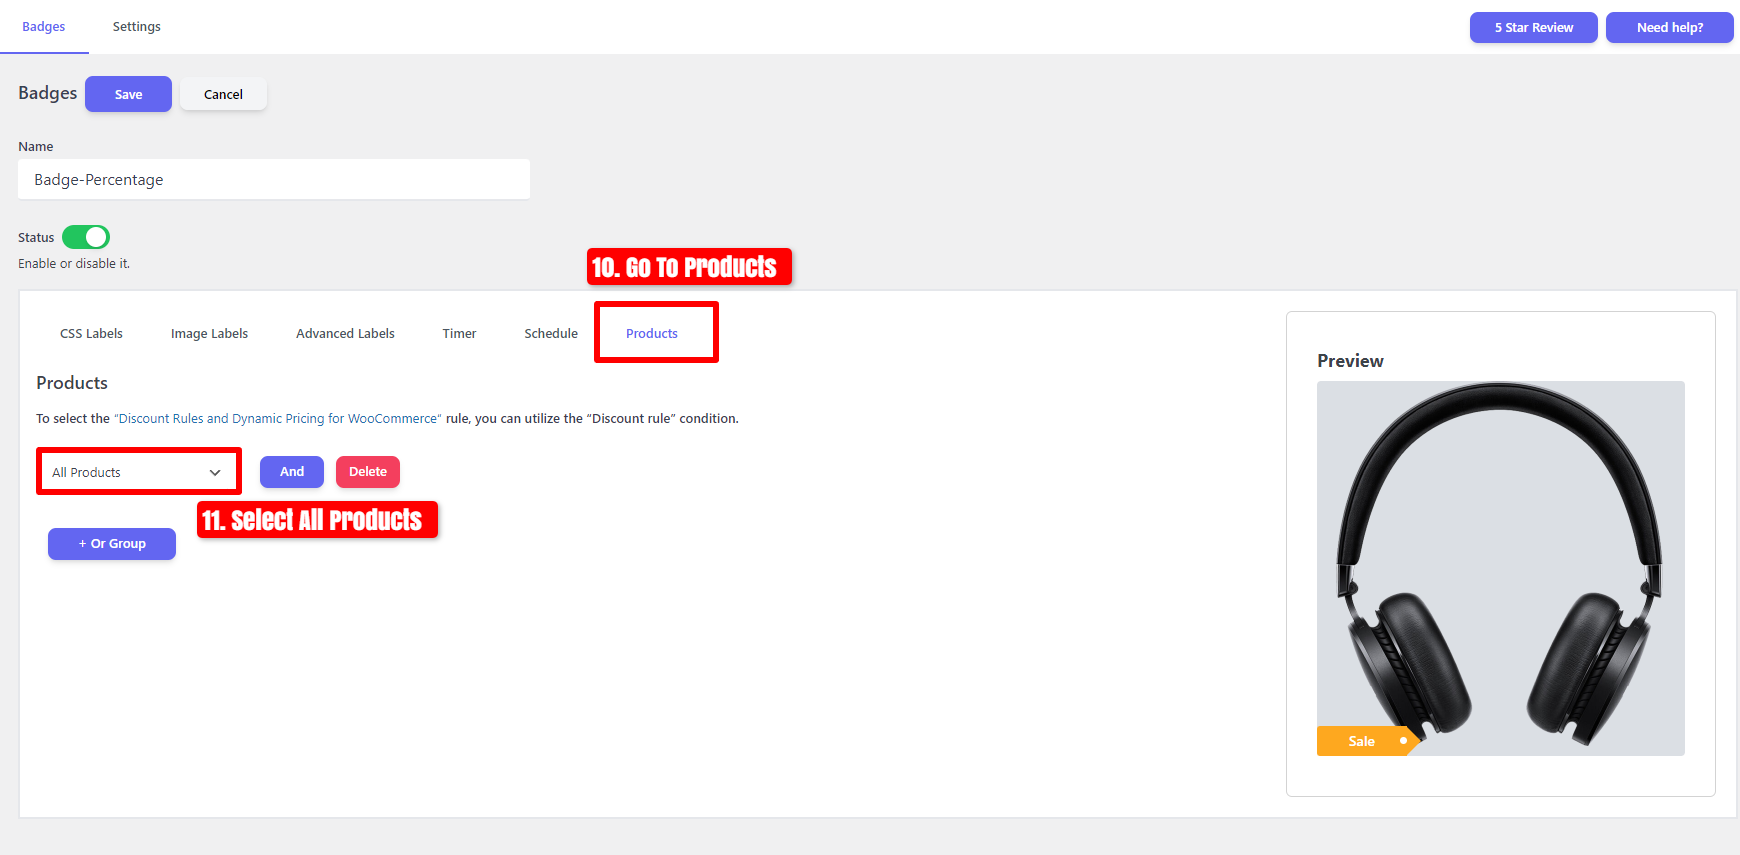
- Navigate to the Schedule Tab.
- Select Date and Specify the “From Date” and the “To Date.”
- Select Days and Choose the days you desire.
- After you’ve finished these steps, click on the “Save” button.
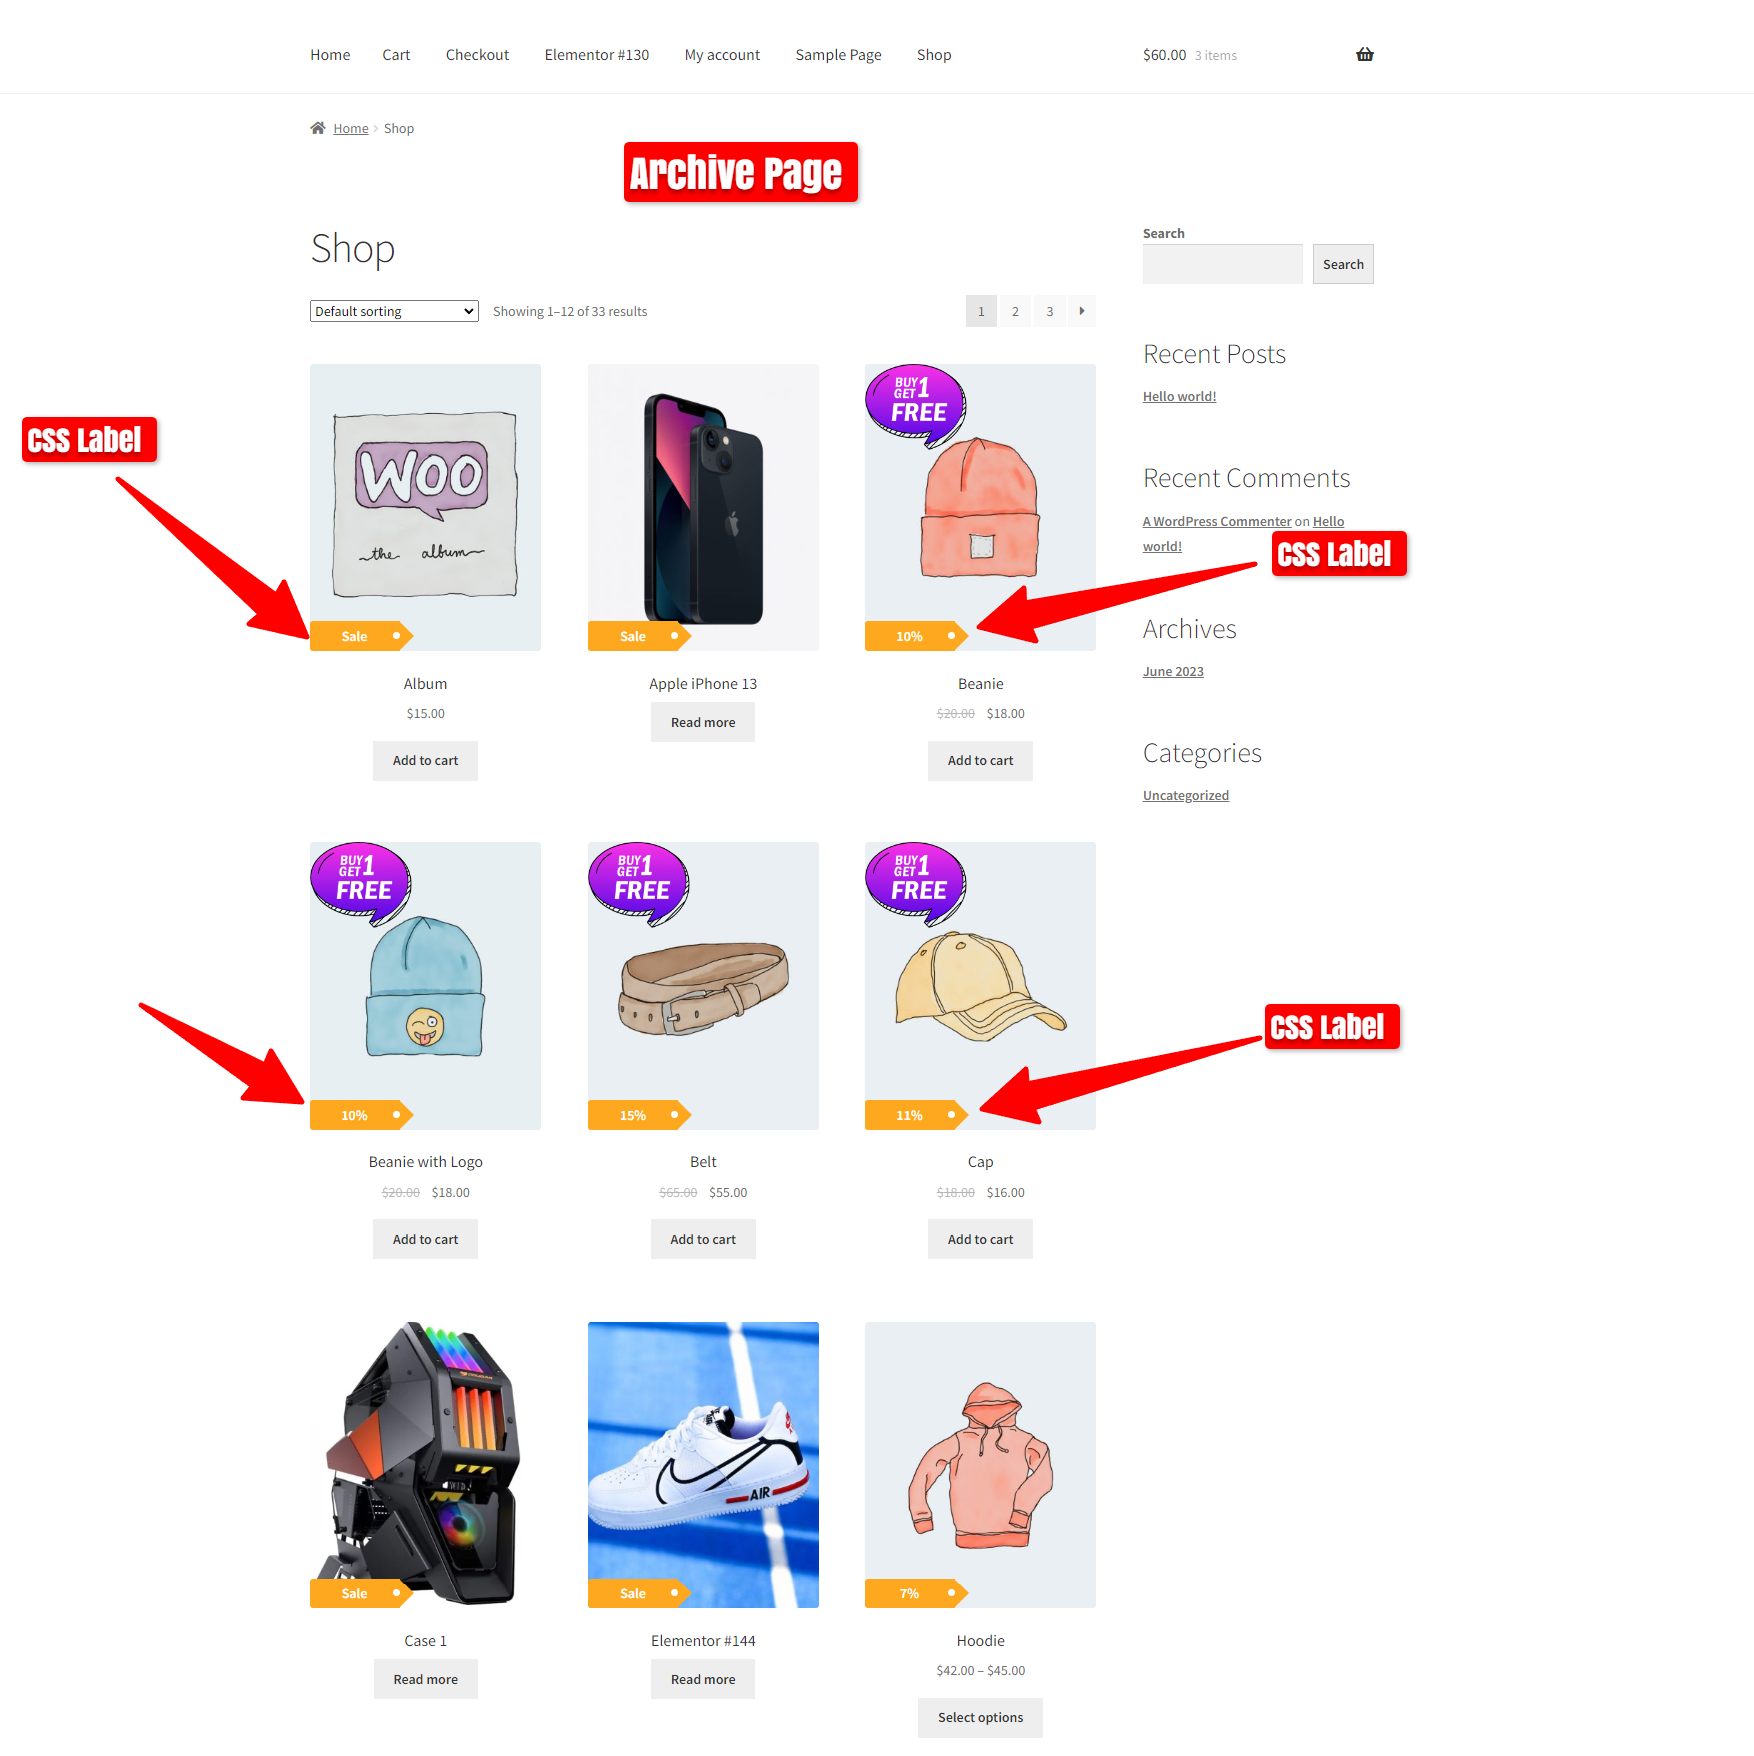
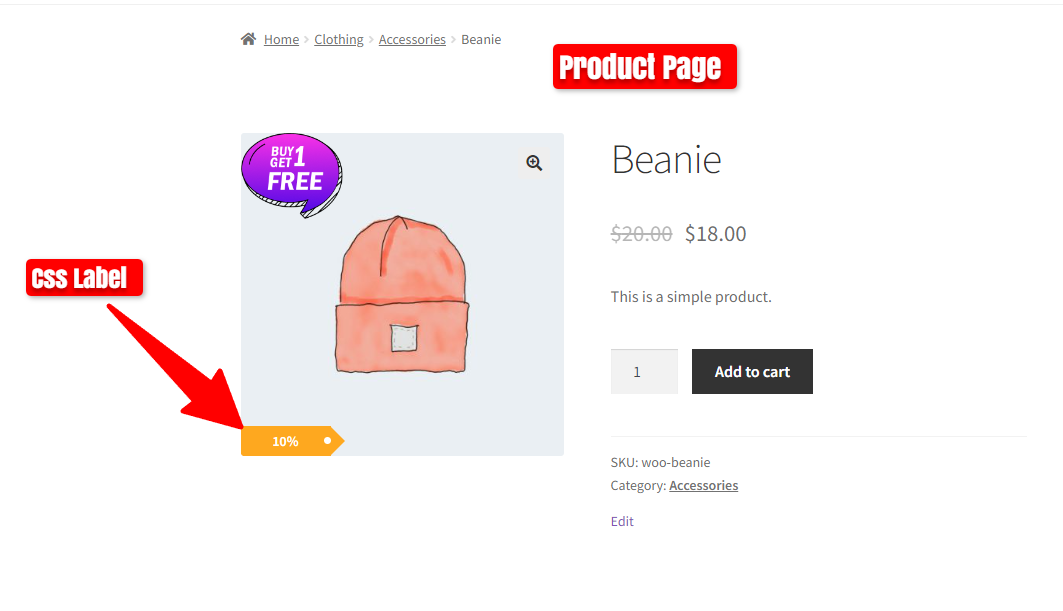
Furthermore, navigate to the archive page to view the CSS Labels, and also observe the CSS Label on the product page.
Shortcodes
Sale Badges And Product Labels Plugin To Woocommerce has the below shortcodes.
- [asnp_badge hide="1"] to use on the product page.
- [asnp_badge] to use on the archive product or product listing page.
If you would like to show a specific product sale badges, then use the below shortcodes.
- [asnp_badge product_id=”7″ hide=”1″] To use on the product page, replace “7” with your product ID.
- [asnp_badge product_id=”7″] To use on the archive product or product listing page, replace “7” with your product ID.