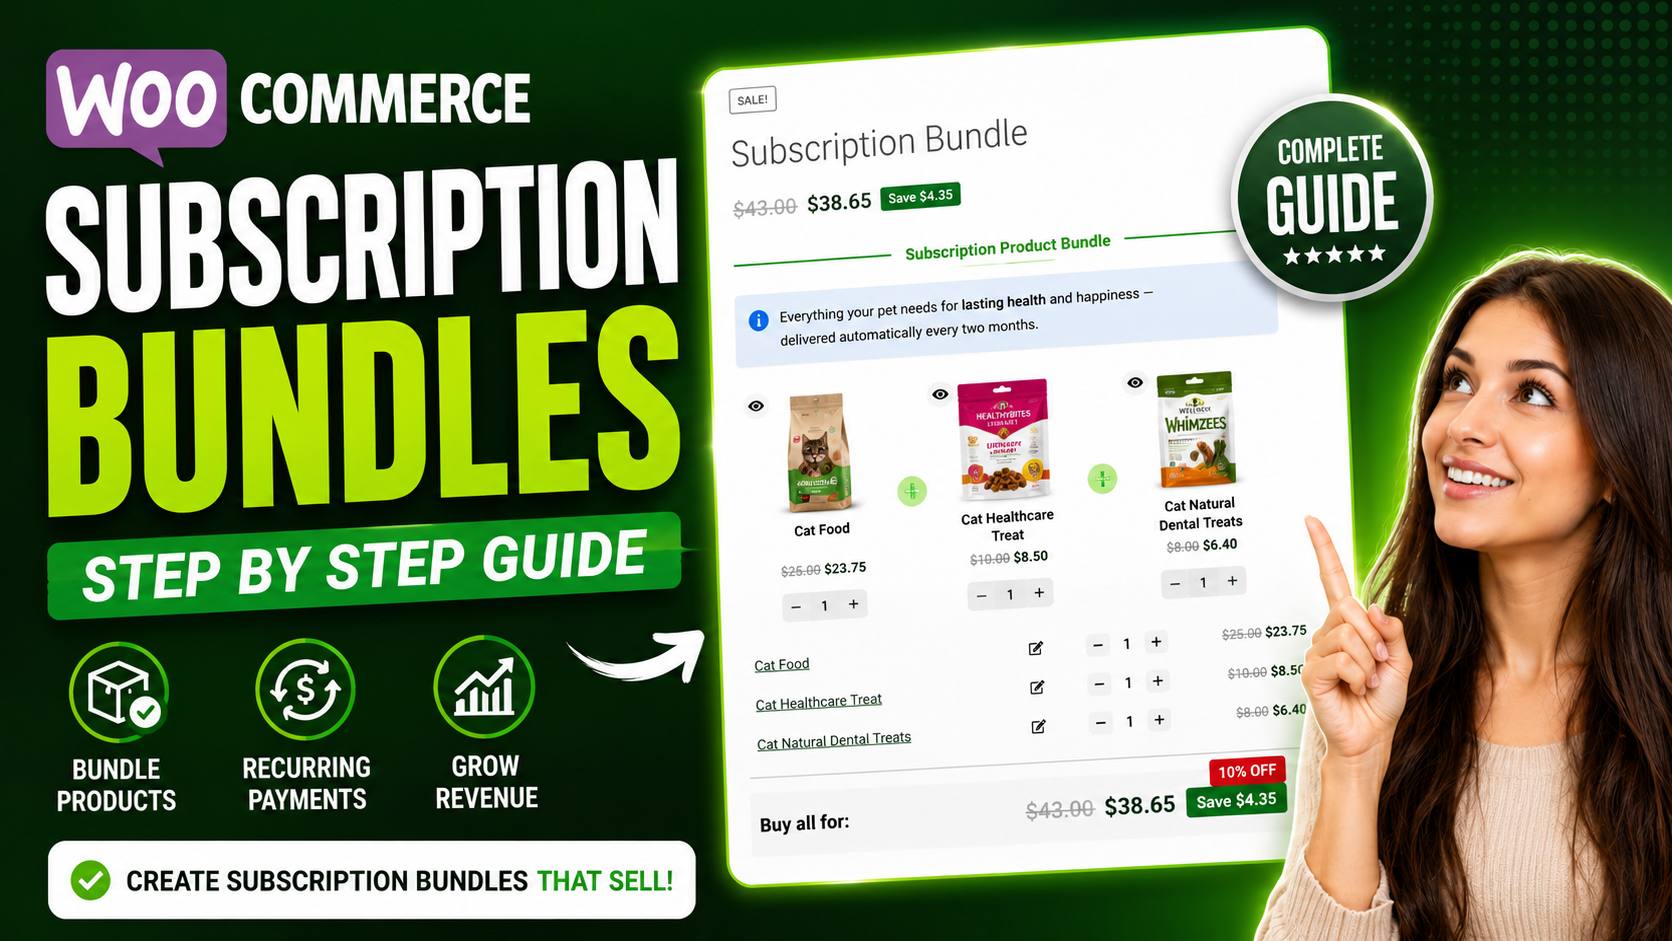
The title How to Create Subscription Bundles in WooCommerce (Complete Guide) addresses a growing need in e-commerce: combining multiple products into a recurring revenue model.
In this guide, you’ll learn how to use WooCommerce together with WooCommerce Subscriptions to combine subscription products with simple or variable products into a single bundle. The result? Instead of selling standalone items, you create recurring packages that customers pay for on a scheduled basis.
This guide will cover:
- How to create a subscription product
- How to add it to a bundle
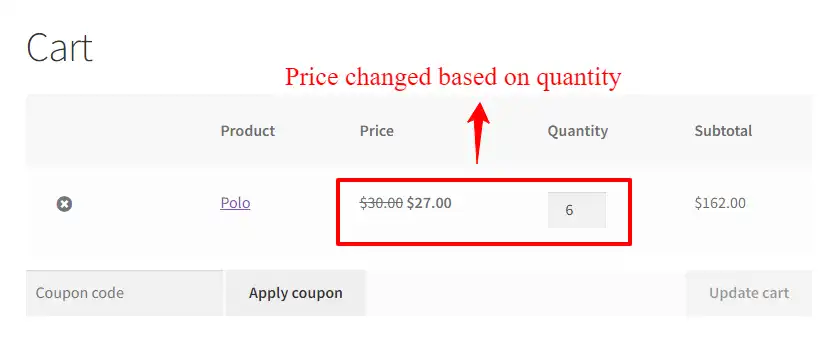
- The difference between fixed and dynamic pricing
- What happens during renewal orders
- How subscription bundles increase Average Order Value (AOV) and Customer Lifetime Value (LTV)
By the end, you’ll understand how to move beyond one-time transactions and turn WooCommerce into a structured recurring revenue system. When bundles and subscriptions work together, you’re not just selling products—you’re building a scalable business model.
Table of Contents
- What is a Subscription product?
- What is a Subscription Bundle?
- Benefits of Using Subscription Bundles
- Real-World Examples for Subscription Bundles
- Requirements
- Video Tutorial
- How to create Subscription Products
- How to Create Subscription Bundles in WooCommerce
- How to Create a WooCommerce Subscription Bundle with a Fixed Price
- Requirements
- Conclusion
What is a Subscription product?
A subscription product is a type of product that customers pay for on a recurring schedule, such as monthly, yearly, or weekly. Unlike one-time purchases, subscription products automatically renew at the end of each billing cycle, providing consistent revenue for the store and ongoing access or delivery for the customer.
Subscription products can take different forms depending on your store’s needs:
- Simple Subscription: A single product with a recurring price and schedule.
- Variable Subscription: Allows customers to choose variations like size, type, or frequency.
Real-world examples include:
- Software subscriptions for digital tools or SaaS platforms
- Monthly coffee or tea delivery boxes
- Memberships for online courses with new content every month
- Subscriptions for premium support or consulting services
- Monthly skincare or beauty boxes
- Vitamin or supplement packs delivered monthly
- Access to exclusive digital content like eBooks, templates, or design assets
- Curated snack boxes or gourmet food items
- Pet food or treat subscriptions, delivered monthly
- Subscription boxes for pet toys, accessories, or grooming products
By offering subscription products this way, store owners can turn one-time buyers into loyal, recurring customers while providing real value.
What is a Subscription Bundle?
Subscription bundles allow store owners to combine multiple subscription products into a single package, giving customers a convenient and cost-effective way to purchase recurring items. In other words, a subscription bundle groups one or more products billed on a recurring schedule into one streamlined offering.
Instead of managing separate subscriptions, customers can purchase a single bundle and receive all included products automatically based on one unified billing cycle. This approach reduces friction in the buying process and improves the overall customer experience. Meanwhile, store owners can increase average order value and encourage long-term commitment through a structured subscription model.
Benefits of Using Subscription Bundles
Subscription bundles offer several advantages for both store owners and customers. By combining products into a single recurring package, you can create more value while boosting your business performance.
- Combination of products: A bundle can include subscription products, simple products, or both, giving customers more value in a single purchase. For example, a monthly coffee subscription can be combined with a premium mug or brewing tools.
- Recurring revenue: Each subscription in the bundle automatically renews based on its schedule, creating consistent income for the store.
- Value for customers: Bundles often include discounts or extra convenience, allowing customers to get a complete package instead of buying multiple products separately.
- Business advantage: Subscription bundles can increase Average Order Value (AOV) and Customer Lifetime Value (LTV) while simplifying recurring sales management.
In short, subscription bundles are a smart way to sell multiple products as a recurring package, turning one-time buyers into loyal, repeat customers while maximizing revenue opportunities
Real-World Examples for Subscription Bundles
Subscription bundles combine multiple products—subscription or one-time—into a single recurring package, offering convenience and added value to customers. As a result, customers enjoy a more seamless buying experience. For example, below are some real-world use cases, organized by product type:
1. Digital Products
- Online Learning Bundle: Monthly course subscription bundled with exclusive worksheets, templates, or coaching sessions.
- Software + Support Bundle: SaaS subscription bundled with a premium support plan or additional features.
- Digital Content Packages: Subscription to eBooks, stock photos, design assets, or tutorials, combined into one recurring package
2. Physical Products
- Coffee or Tea Subscription Bundle: Monthly coffee or tea delivery combined with mugs, brewing tools, or accessories.
- Beauty & Skincare Boxes: Monthly skincare subscription bundled with sample products, masks, or tools.
- Vitamin & Supplement Packs: Recurring delivery of vitamins or supplements bundled with wellness guides or additional health products.
- Curated Snack Boxes: Monthly snacks combined with drinks or themed goodies for a complete package
3. Pet Products
- Pet Food & Treat Bundles: Recurring delivery of pet food or treats combined with toys, grooming supplies, or accessories.
- Pet Care Subscription Boxes: Monthly subscription boxes for pets that include food, toys, grooming items, or training tools
These examples demonstrate how subscription bundles allow businesses to:
- Provide more value and convenience to customers
- Increase recurring revenue and predictability
- Boost Average Order Value (AOV) and Customer Lifetime Value (LTV)
- Build stronger customer loyalty through ongoing engagement
By offering products as subscription bundles, store owners can turn one-time buyers into loyal, repeat customers while creating practical, appealing packages that generate predictable recurring revenue.
Requirements
Before creating subscription bundles, make sure you have the following installed and activated on your WordPress site:
- WooCommerce
- WooCommerce Subscriptions
or
Subscriptions for WooCommerce (free plugin) - Product Bundle Builder for WooCommerce
These plugins are required to create and manage subscription-based bundles properly.
Video Tutorial
How to create Subscription Products
In this tutorial, we will use the WooCommerce Subscriptions plugin to create subscription products.
Follow the steps below:
Step 1: Install WooCommerce Subscriptions
To create subscription products and recurring billing plans, you need the WooCommerce Subscriptions plugin. Specifically, this plugin enables recurring payments, automatic renewals, and subscription management within WooCommerce.
Installation Steps
- Log in to your WordPress dashboard.
- Go to “Plugins” → “Add Plugin”.
- Click “Upload Plugin”.
- Upload the WooCommerce Subscriptions ZIP file.
- Click “Install Now“, then “Activate”.
After activation, you will see new product types, such as Simple Subscription and Variable Subscription, when creating a new product.
Ensure your payment gateway supports recurring payments, since subscriptions rely on automatic billing.
Step 2: Create a Subscription Product
Once WooCommerce Subscriptions is installed and activated, you can create your first subscription product.
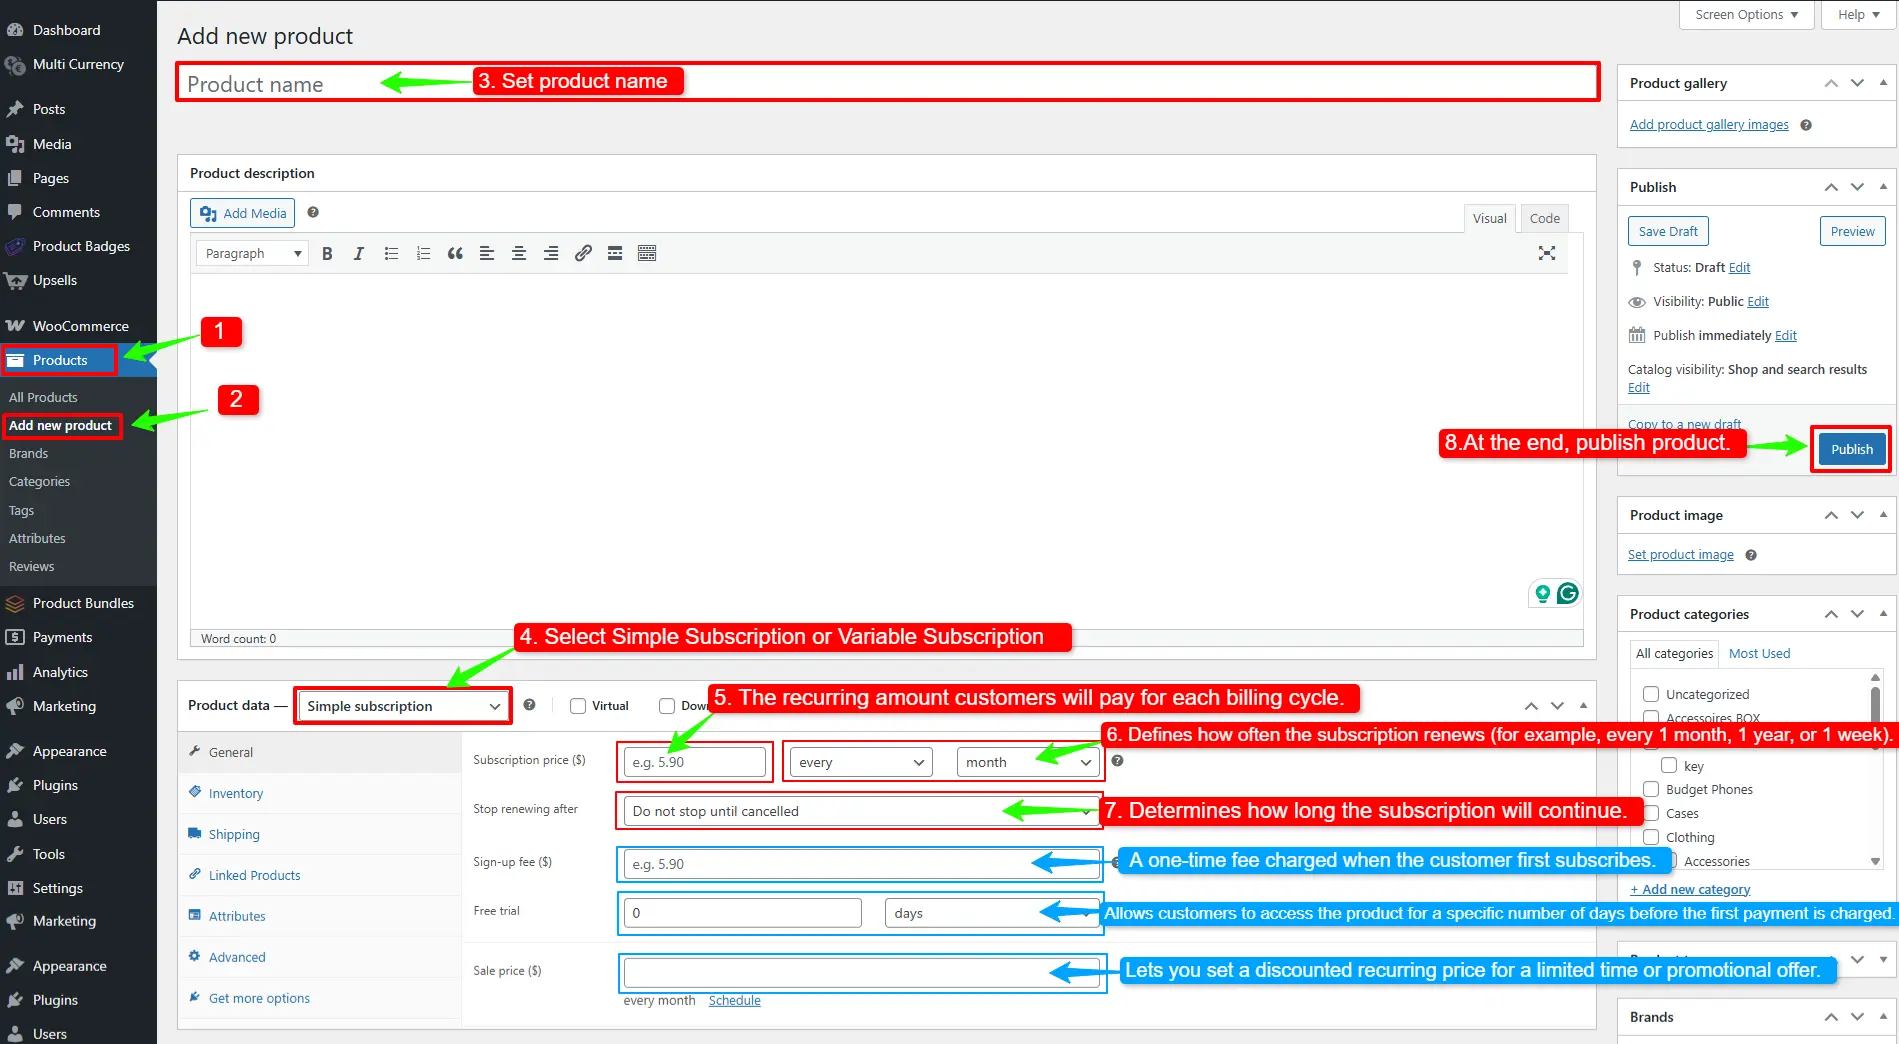
1: Add a New Product
- Go to “Products” → “Add Plugin” in your WordPress dashboard.
- Enter a product name and description.
- Set an image for your product.
2: Choose the Product Type
In the “Product Data” panel:
- Open the product type dropdown and select “Simple Subscription” (for a single recurring option)
or
Select “Variable Subscription” (if customers should choose options like size, plan, or billing frequency)
3: Configure Subscription Pricing
If you selected “Simple Subscription“, you will see the subscription pricing fields inside the General tab:
- Subscription Price – The recurring amount customers will pay for each billing cycle.
- Billing Interval – Defines how often the subscription renews (for example, every 1 month, 1 year, or 1 week).
- Stop Renewing After – Determines how long the subscription will continue. You can leave it set to Do not stop until cancelled for ongoing subscriptions or choose a fixed duration.
- Sign-up Fee (optional) – A one-time fee charged when the customer first subscribes.
- Free Trial (optional) – Allows customers to access the product for a specific number of days before the first payment is charged.
- Sale Price (optional) – Lets you set a discounted recurring price for a limited time or promotional offer.
If you selected “Variable Subscription“, these settings must be configured separately for each variation.
4: Publish the Product
- At the end, “publish” changes.
Your subscription product is now ready for sale. Customers can purchase it, and WooCommerce will automatically create renewal orders based on the defined billing schedule.
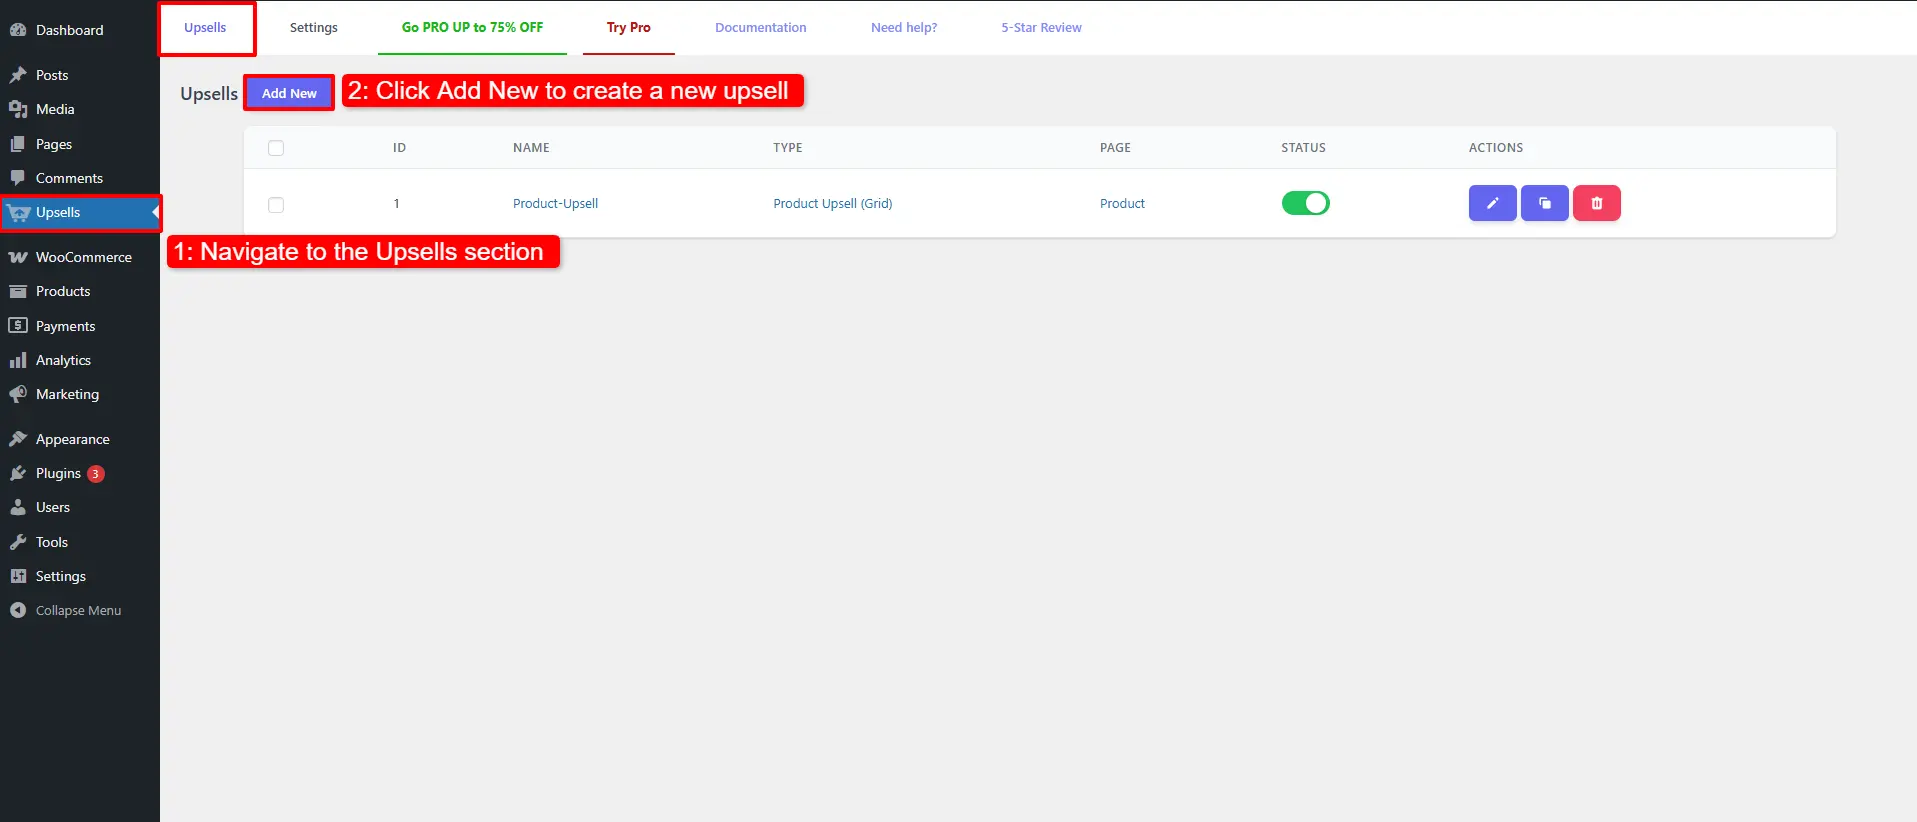
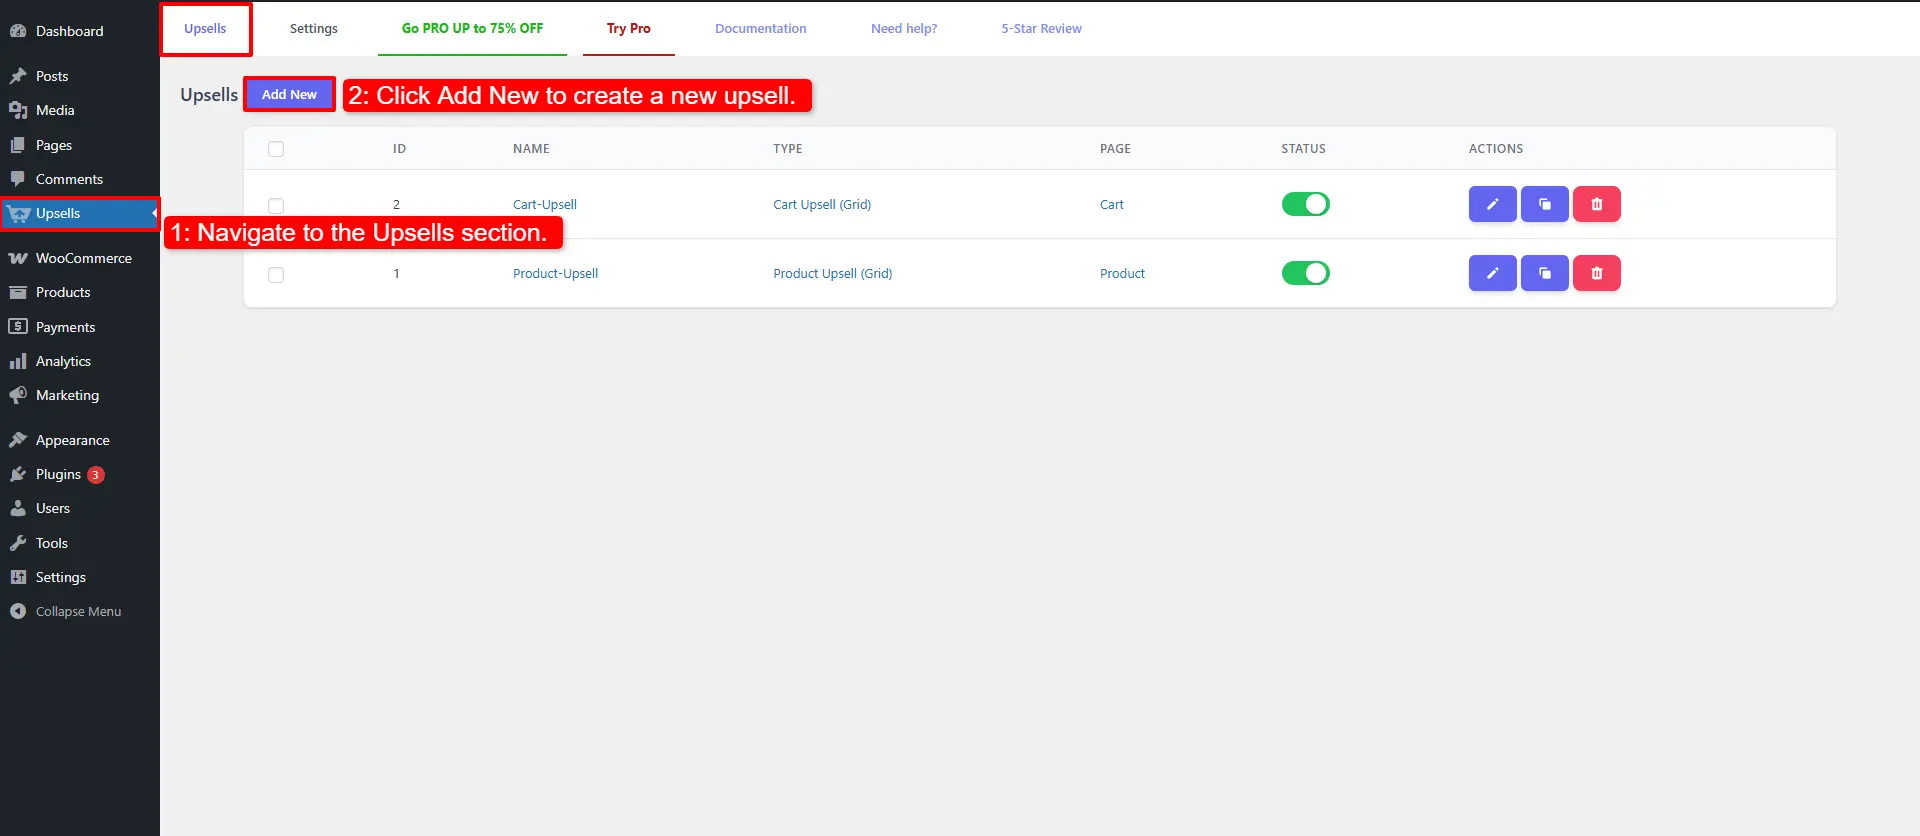
How to Create Subscription Bundles in WooCommerce
To create a Subscription Bundle, follow the steps below:
Step 1: Install Product Bundle Builder for WooCommerce
To install the Product Bundle Builder for the WooCommerce plugin, follow the steps below:
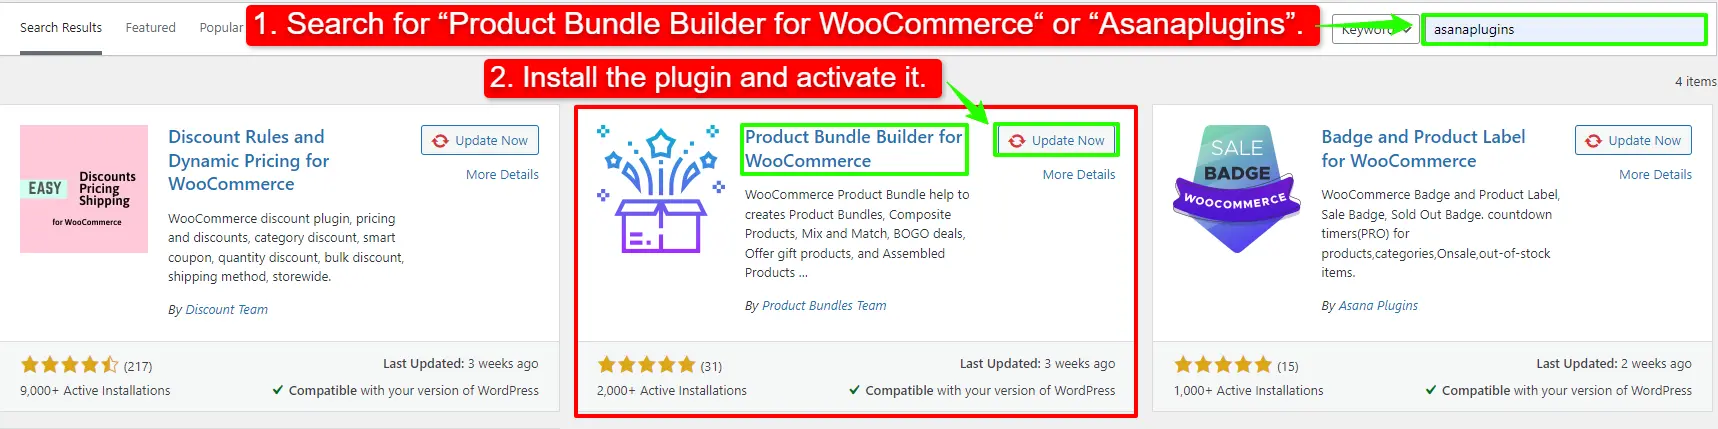
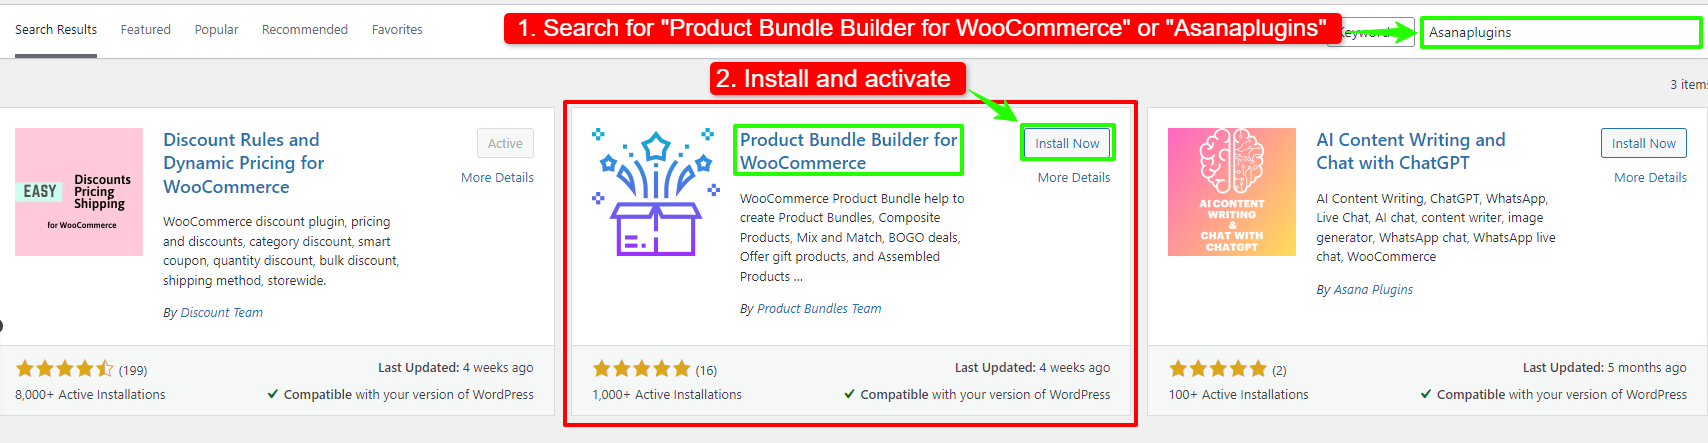
- Navigate to the “Plugins” >> “Add New” menu on your WordPress website
- Then search for “Product Bundle Builder for WooCommerce“ or “Asanaplugins”
- Find the “Product Bundle Builder for WooCommerce”
- Install the plugin and activate it.
Step 2: Create a Subscription Bundle
To create a WooCommerce Subscription Bundle, follow these steps:
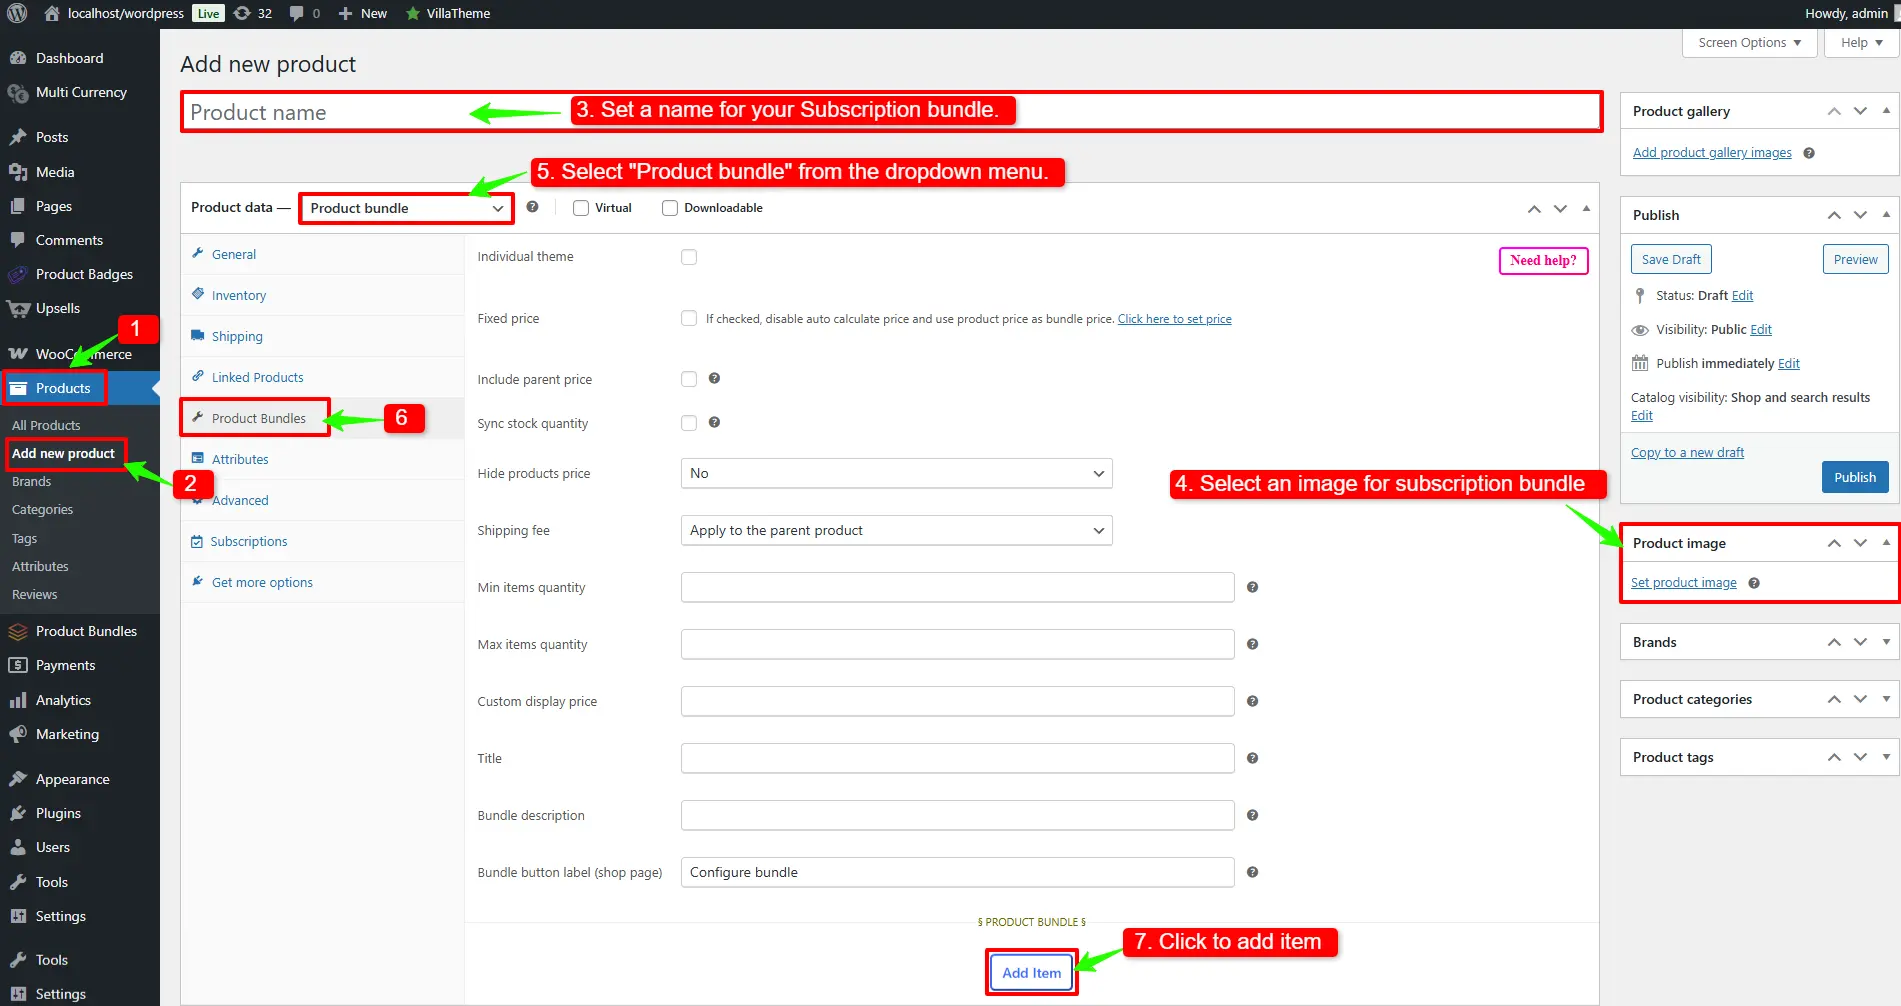
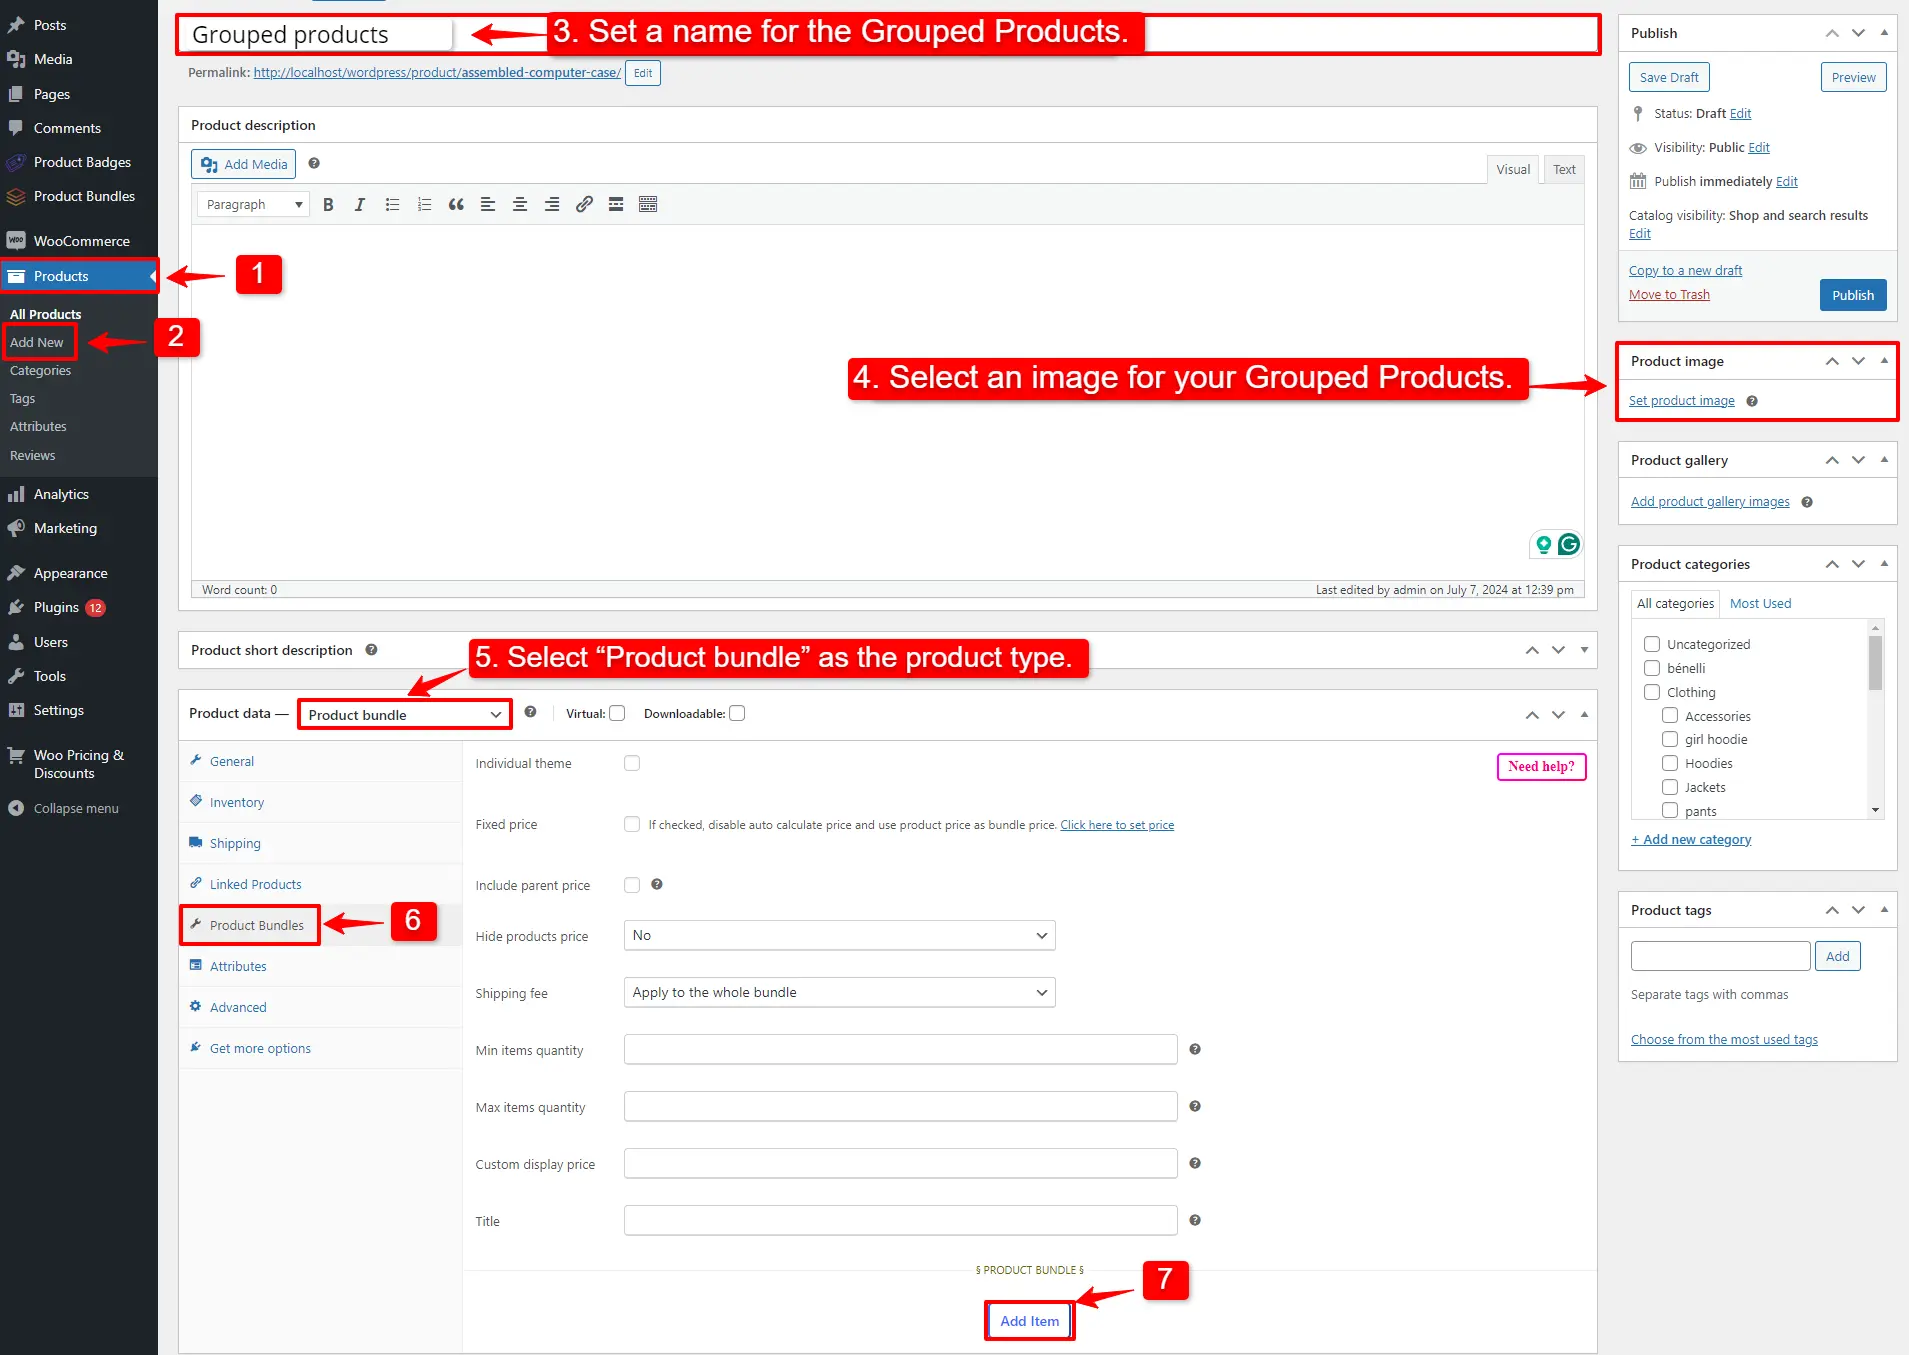
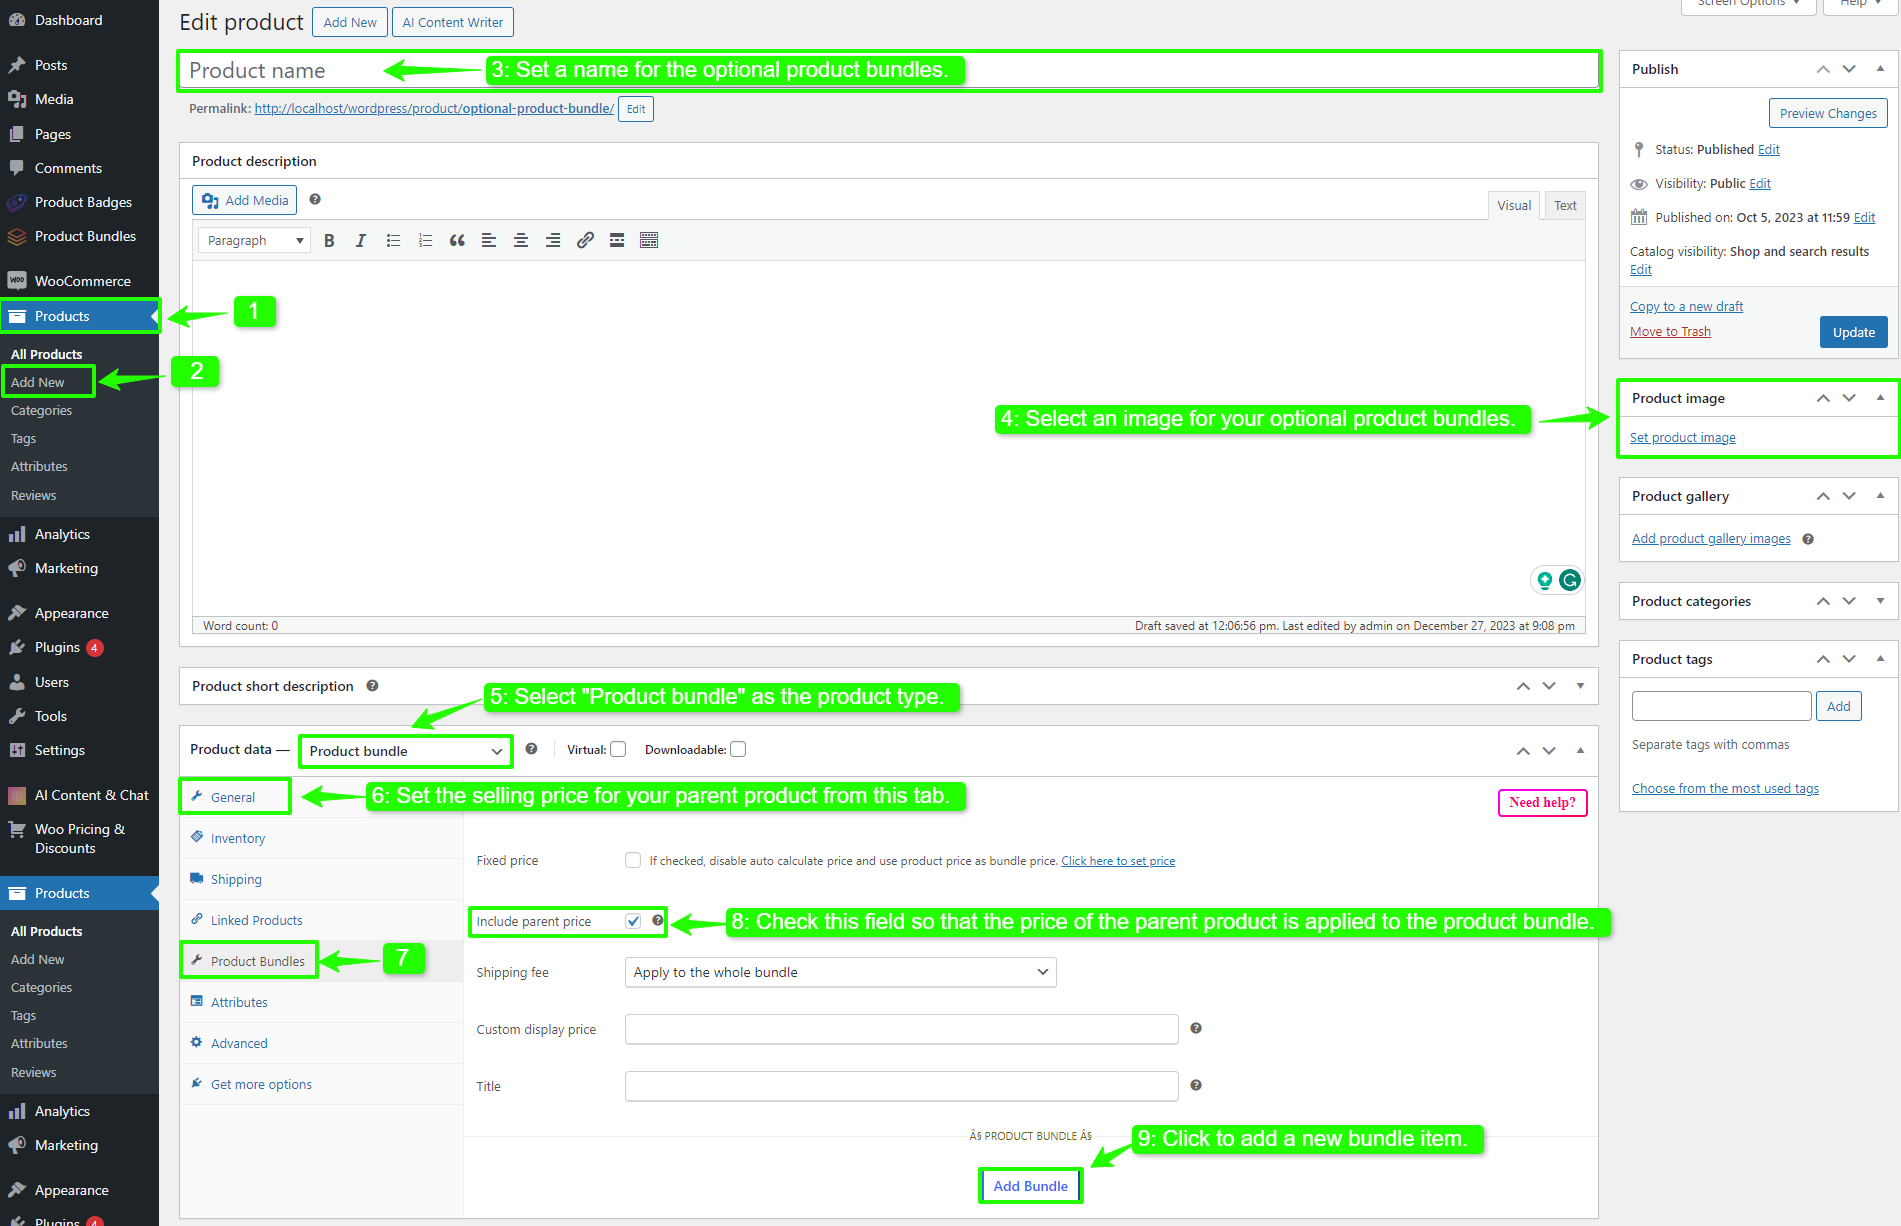
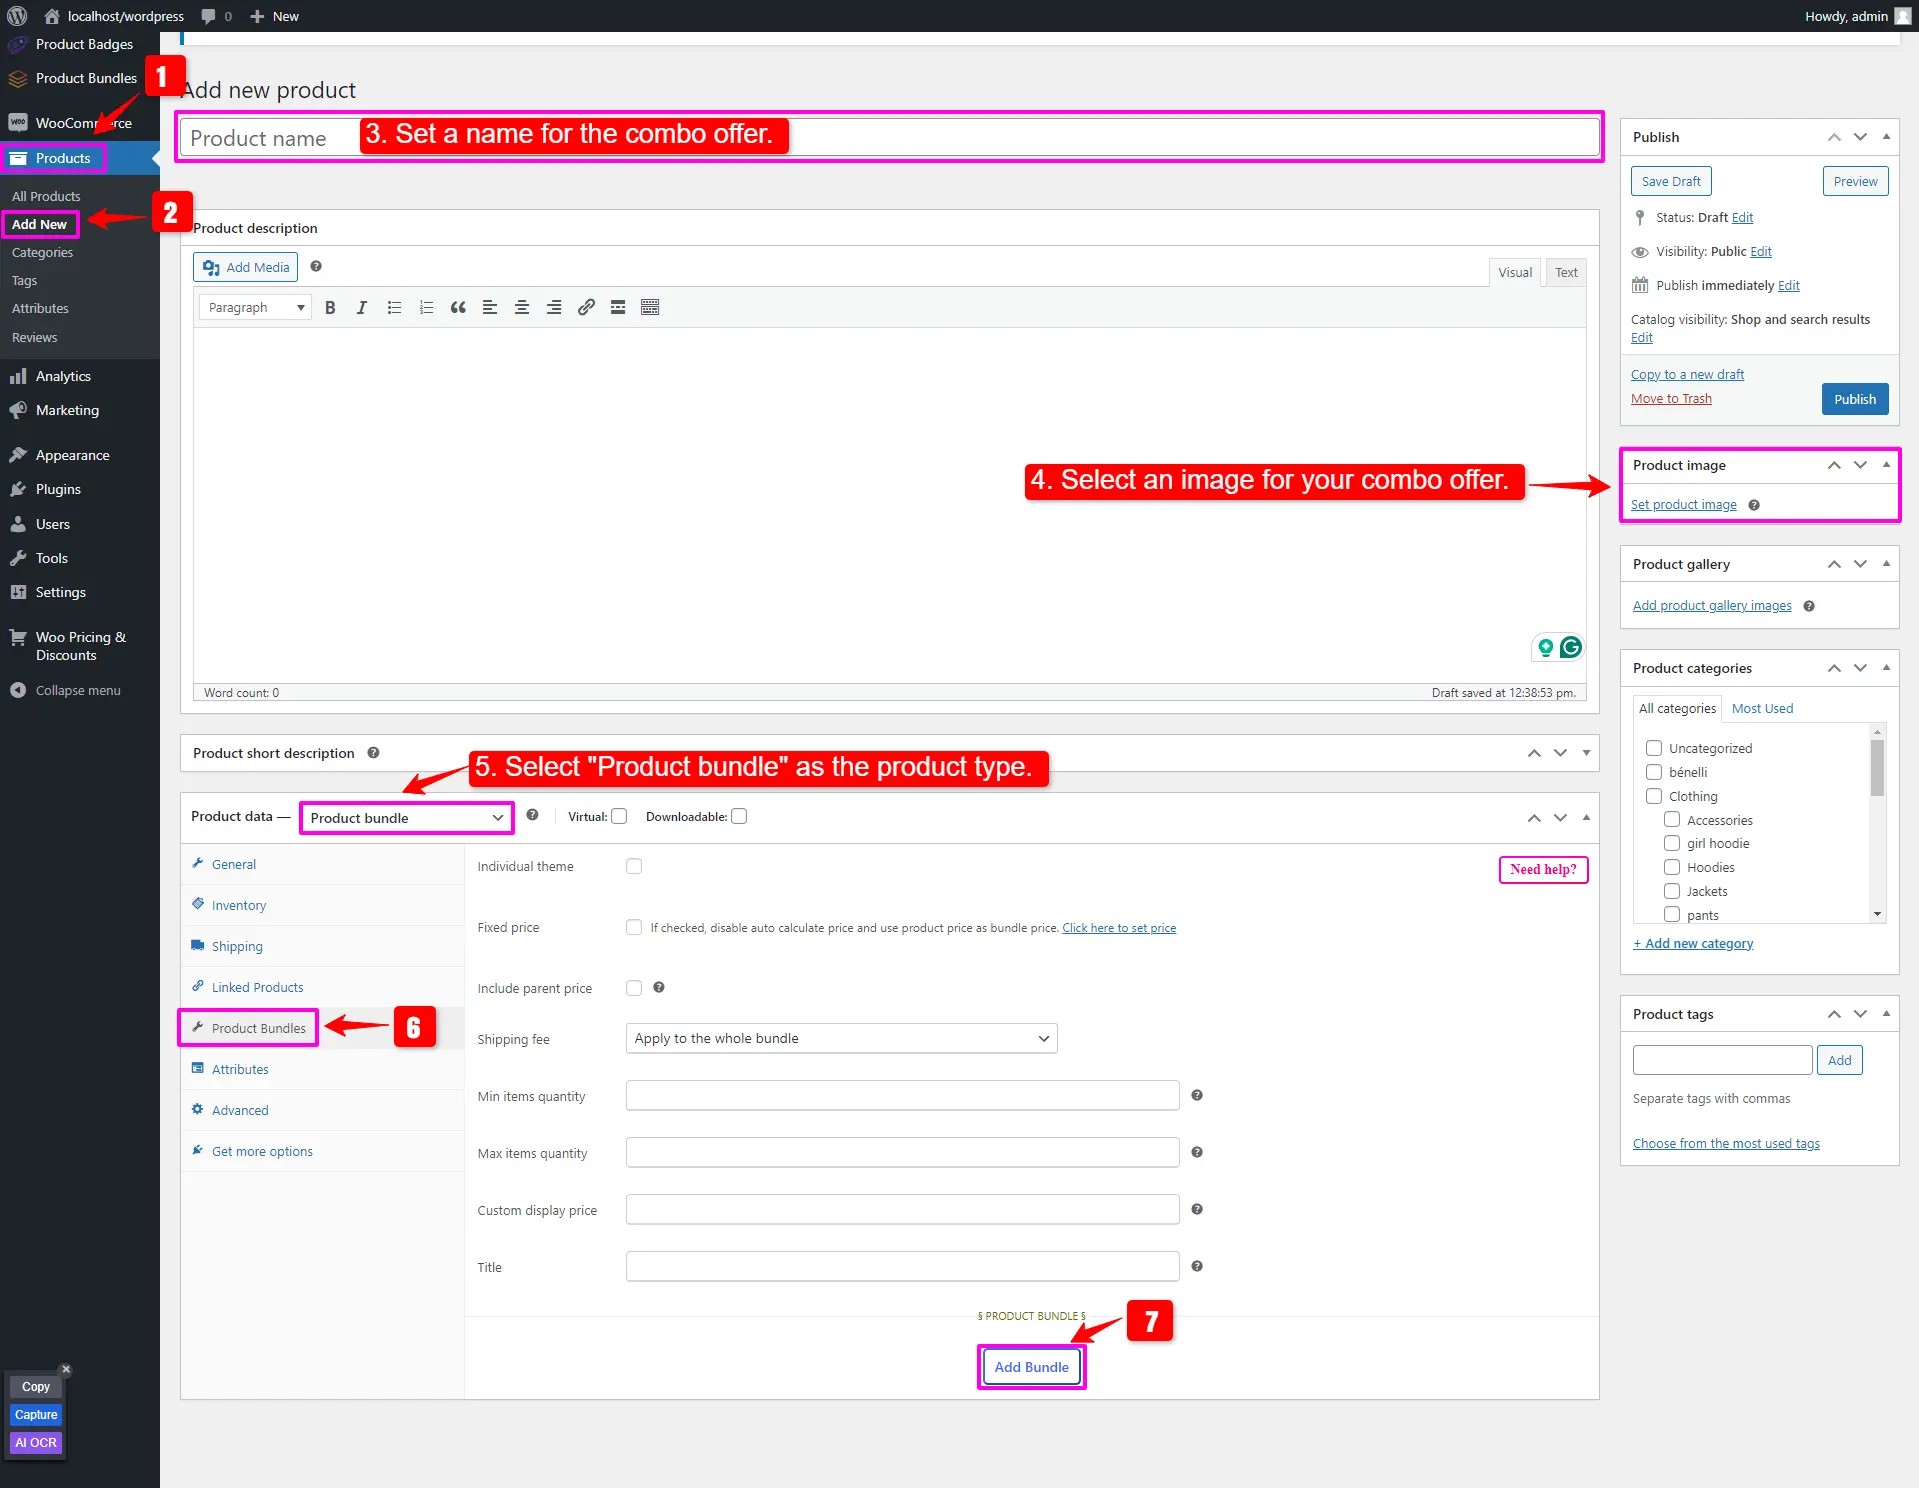
- Go to “WooCommerce” → “Products” in your WordPress dashboard.
- Click “Add New” to create a new product.
- Enter a “name” for your Subscription bundle.
- On the right sidebar, click “Set product image” and choose an image for your bundle.
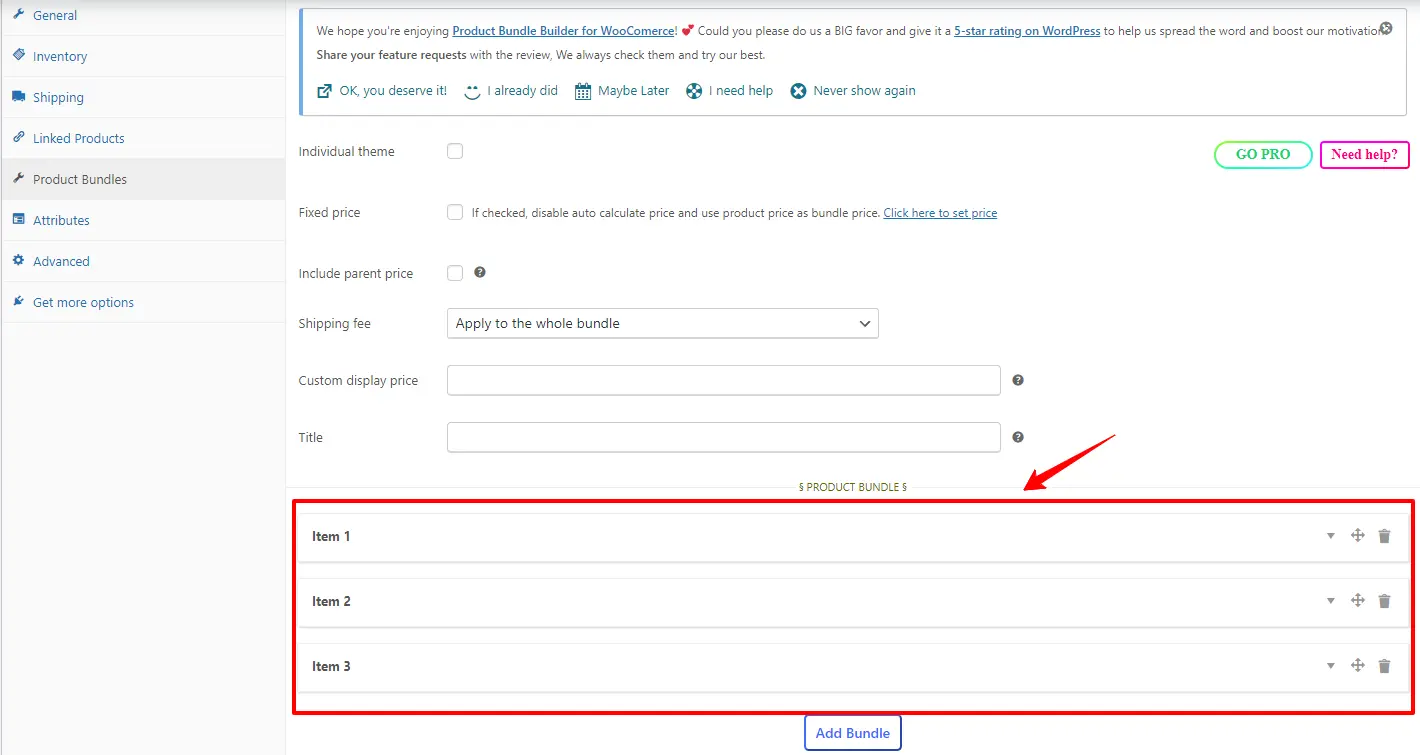
- Then, in the “Product data” section, select “Product bundle” from the dropdown menu.
- After selecting “Product bundle“, a “Product Bundles” tab will appear in the product data panel.
- Go to the “Product Bundles” tab and click “Add Item” to add products to your bundle
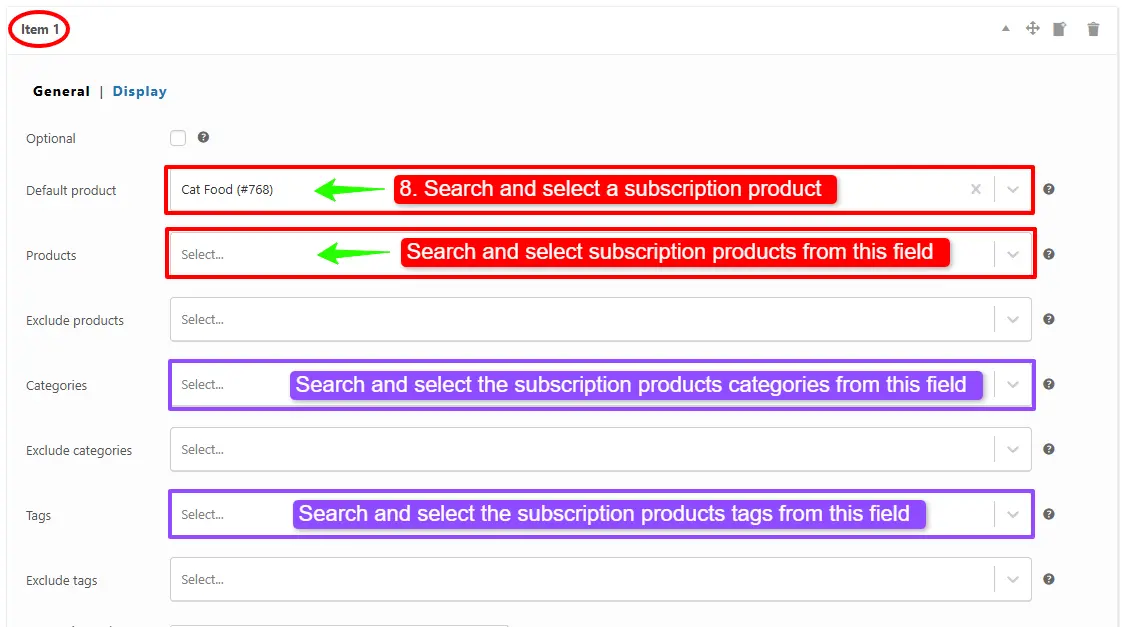
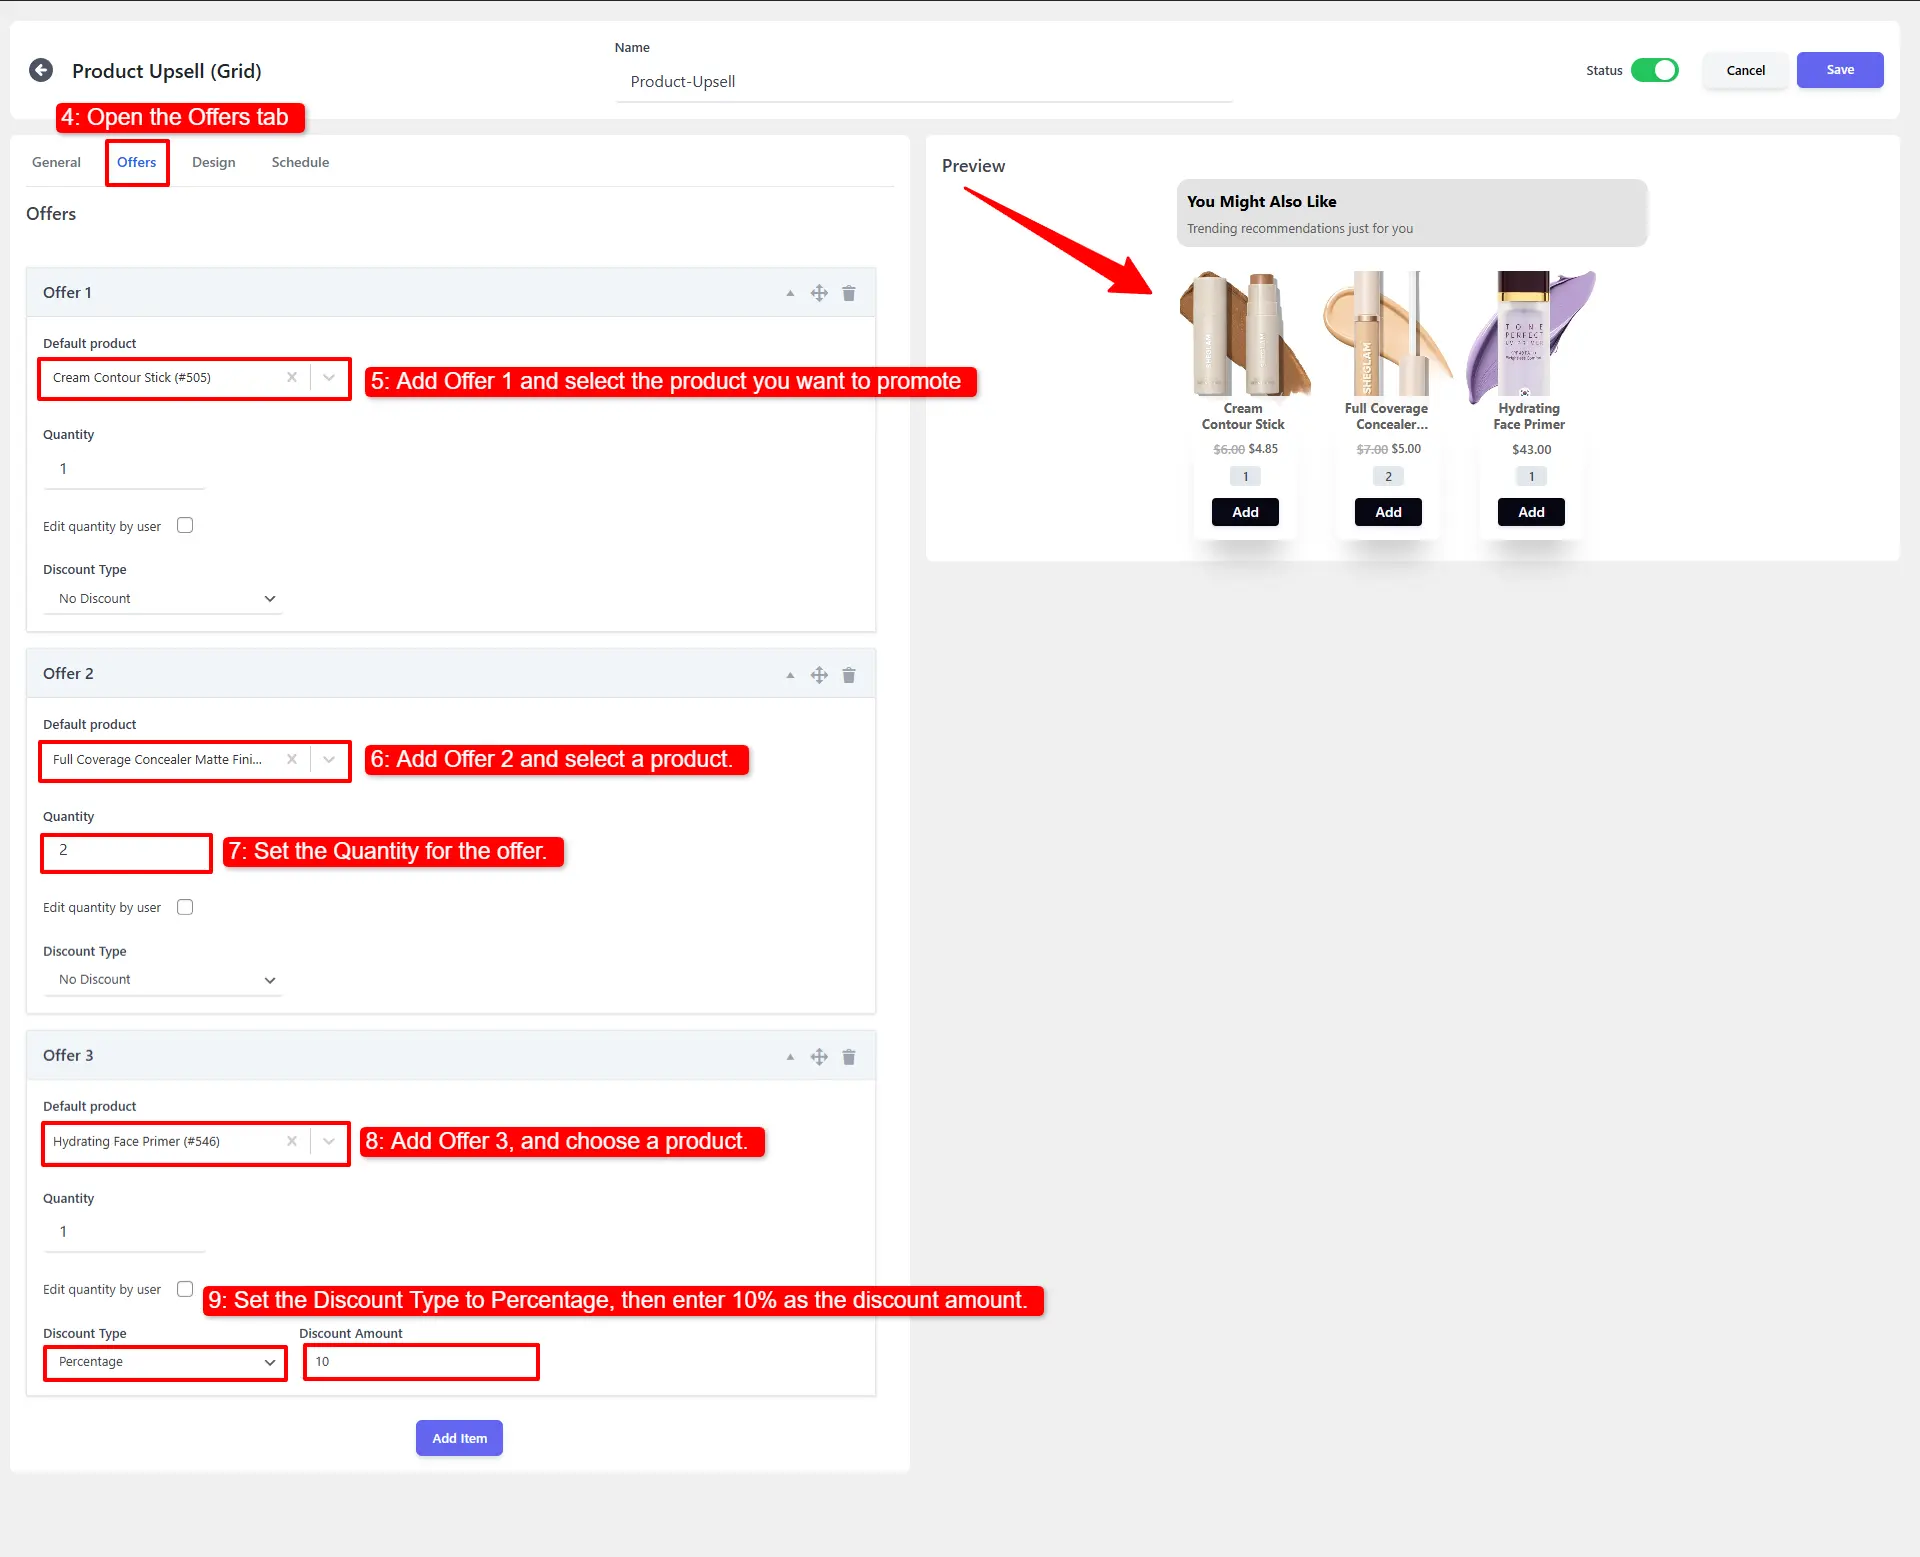
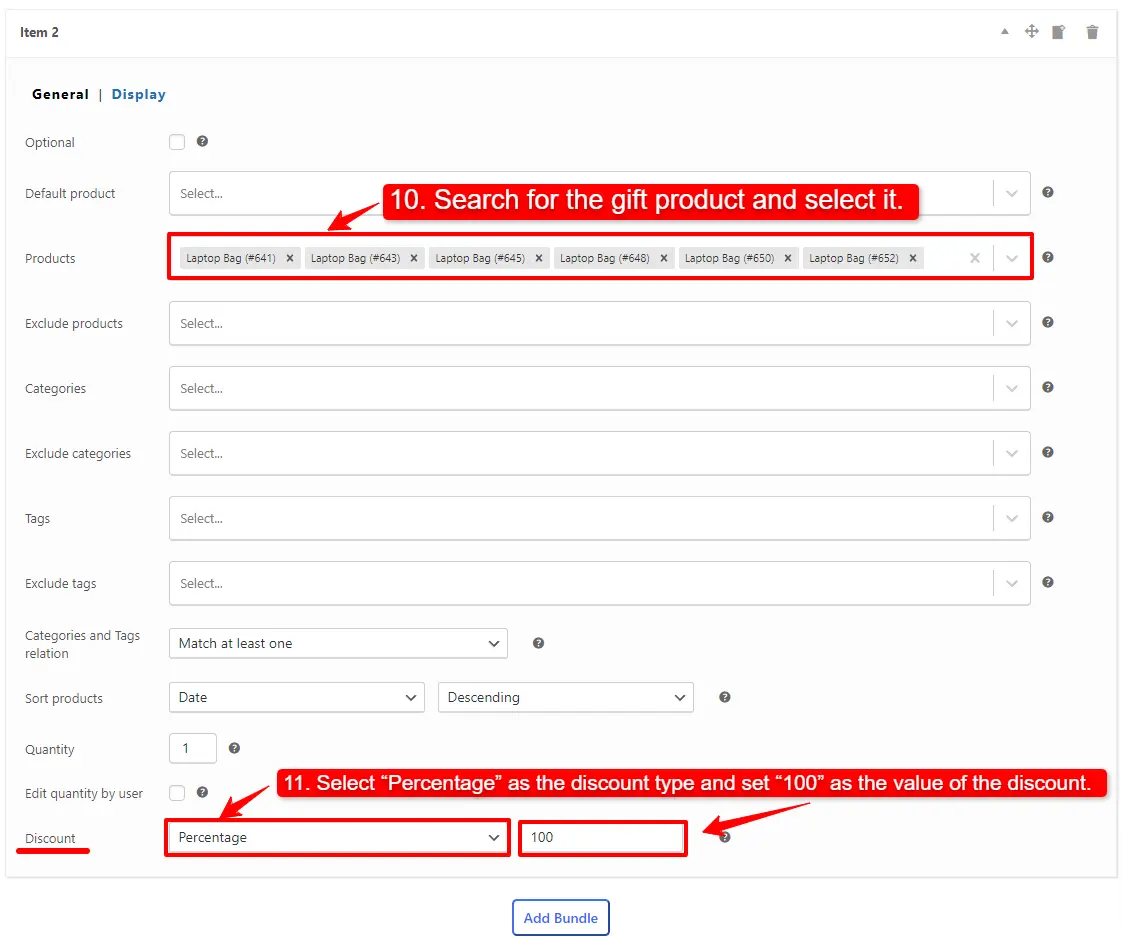
Step 3: Add product to the Subscription Bundle
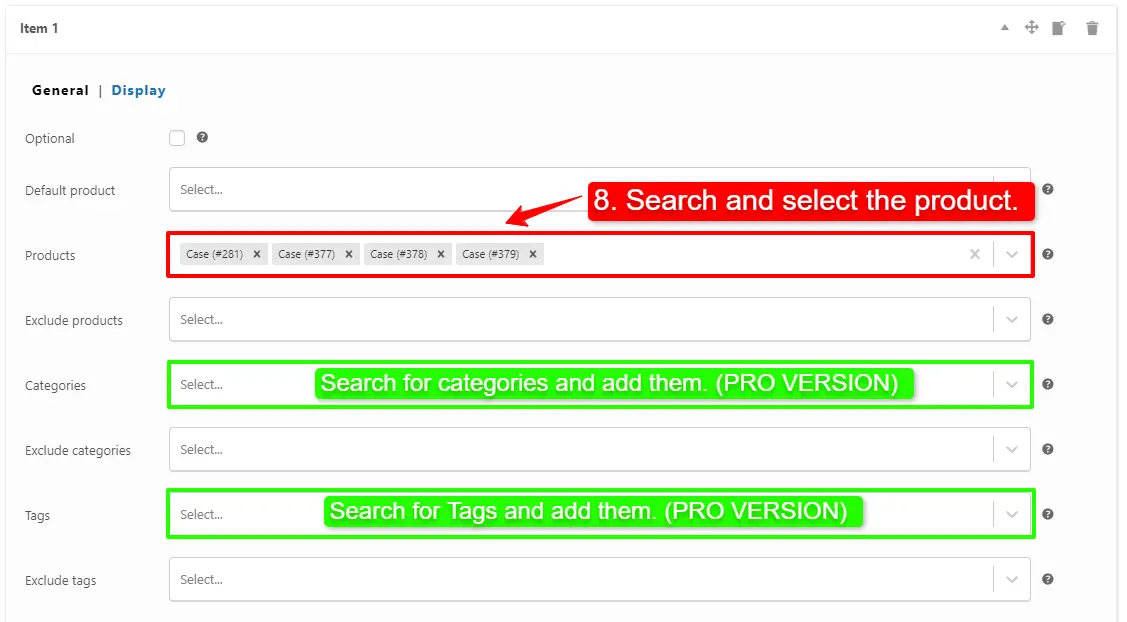
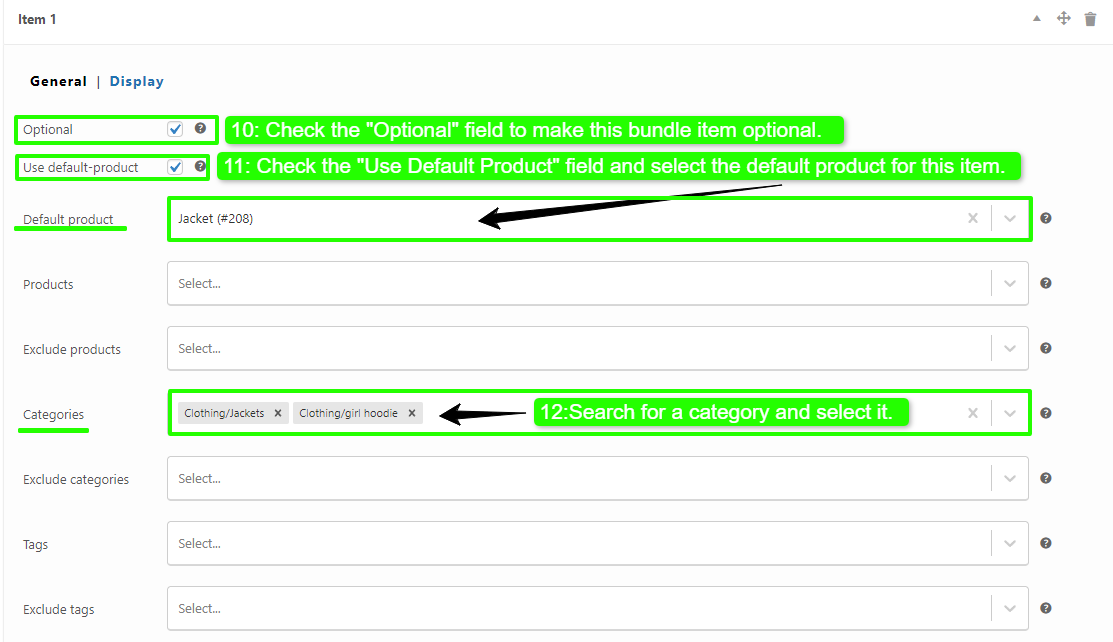
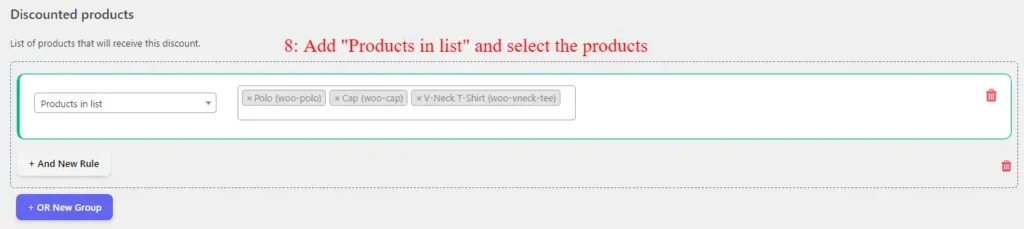
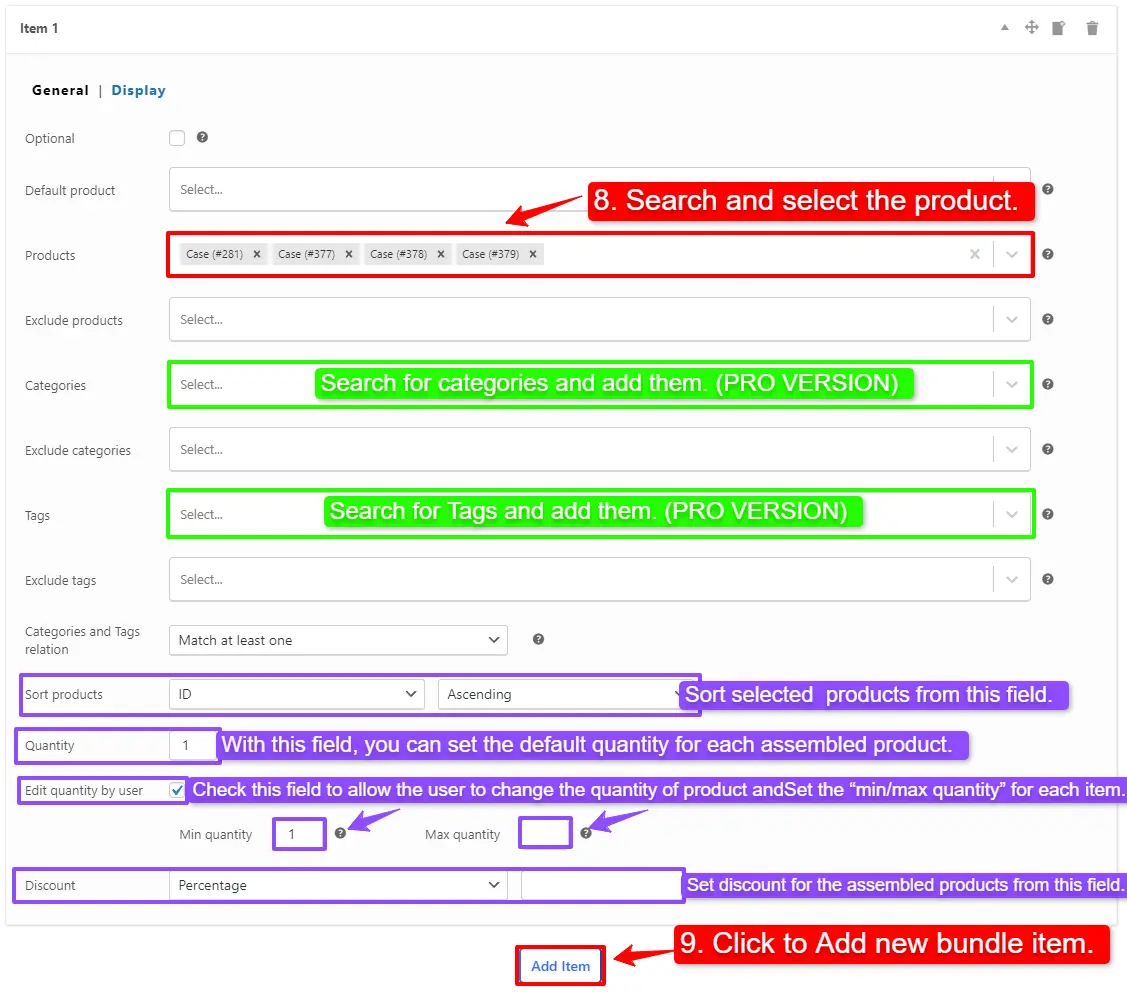
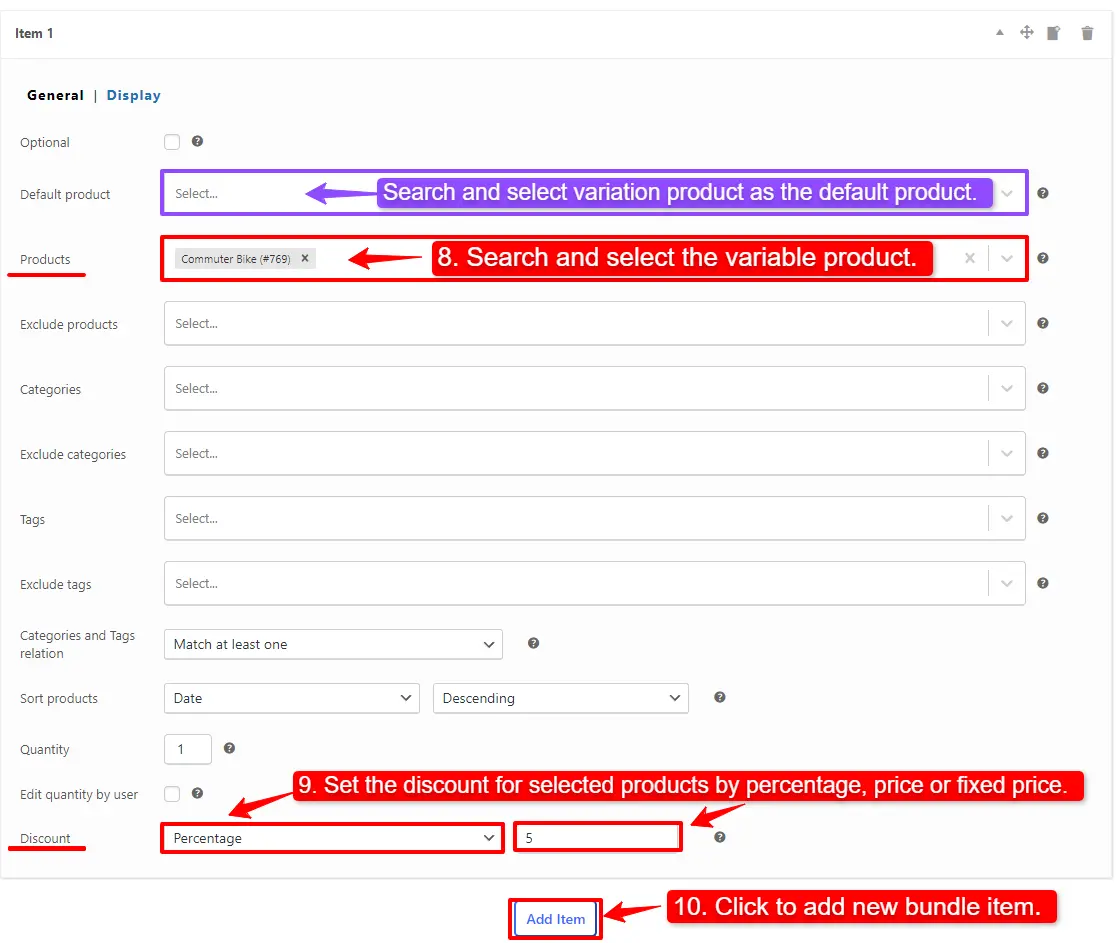
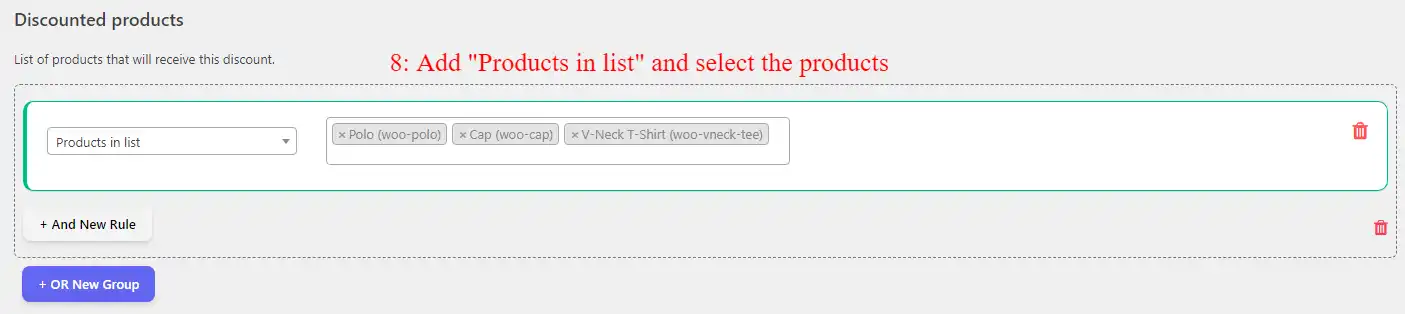
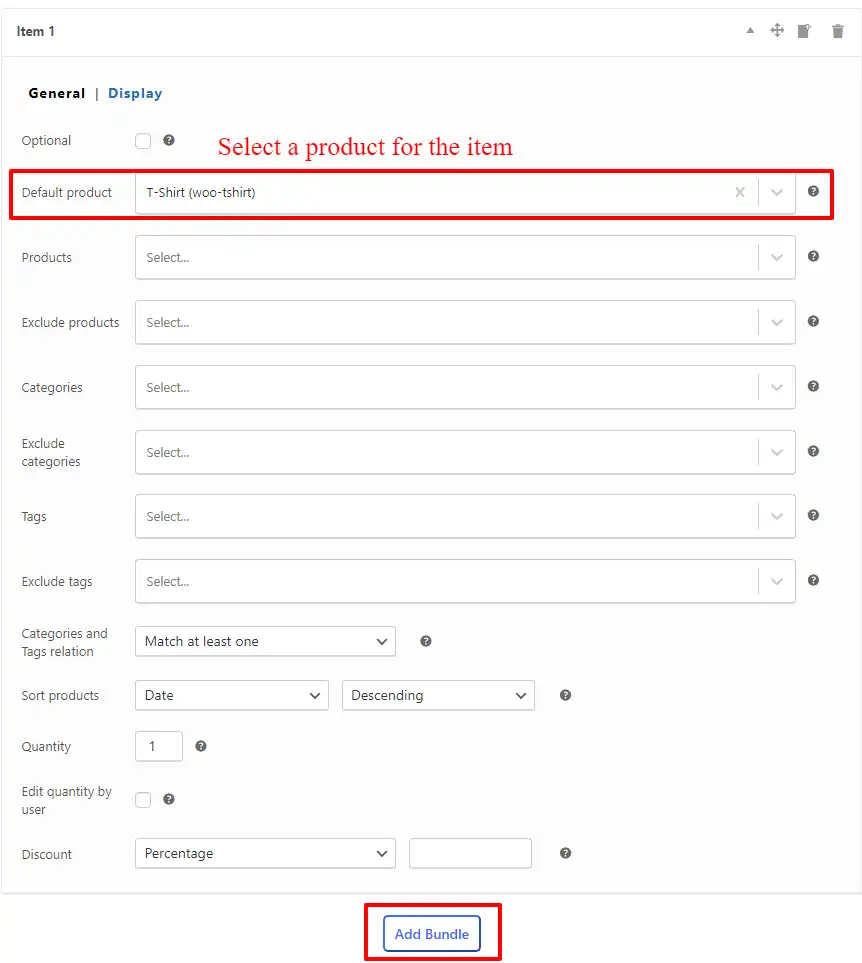
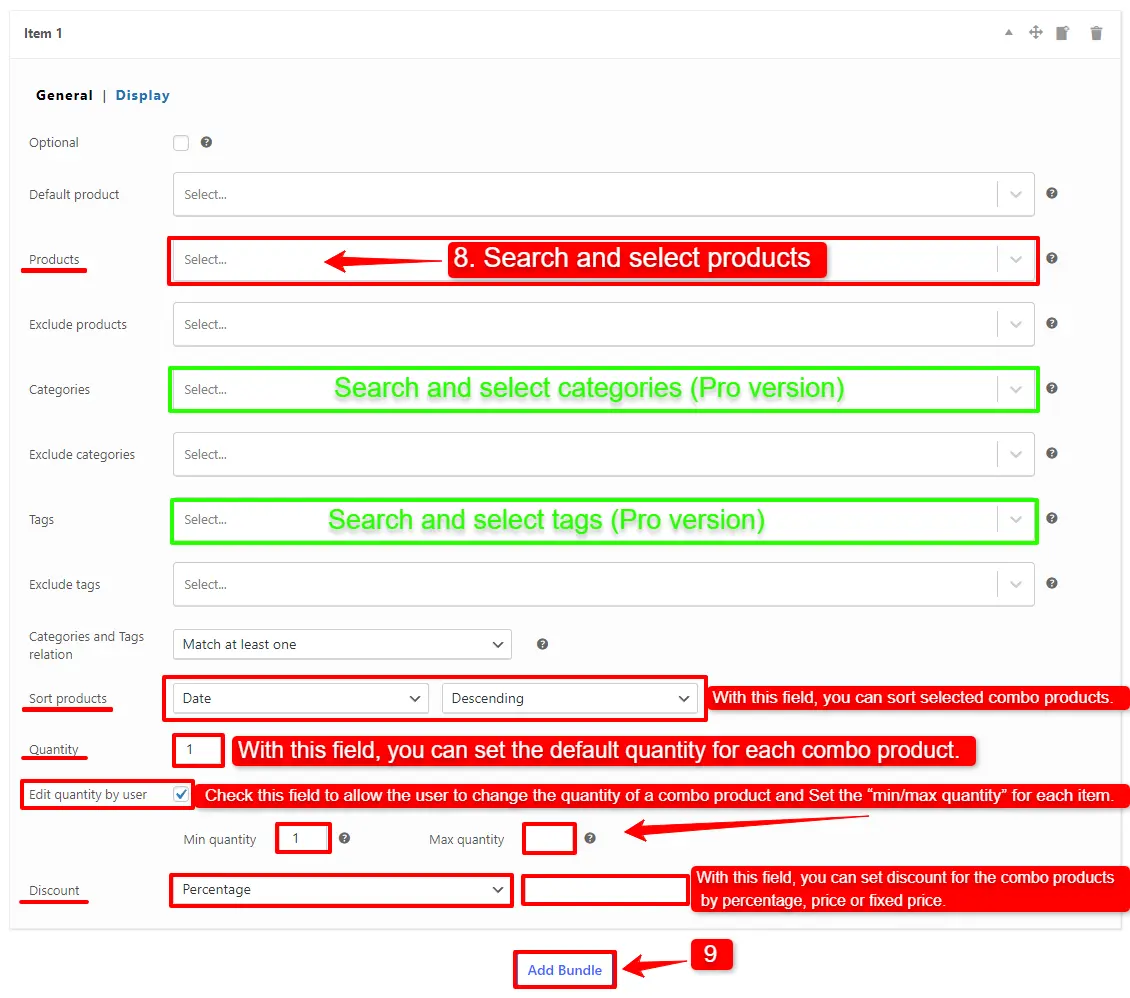
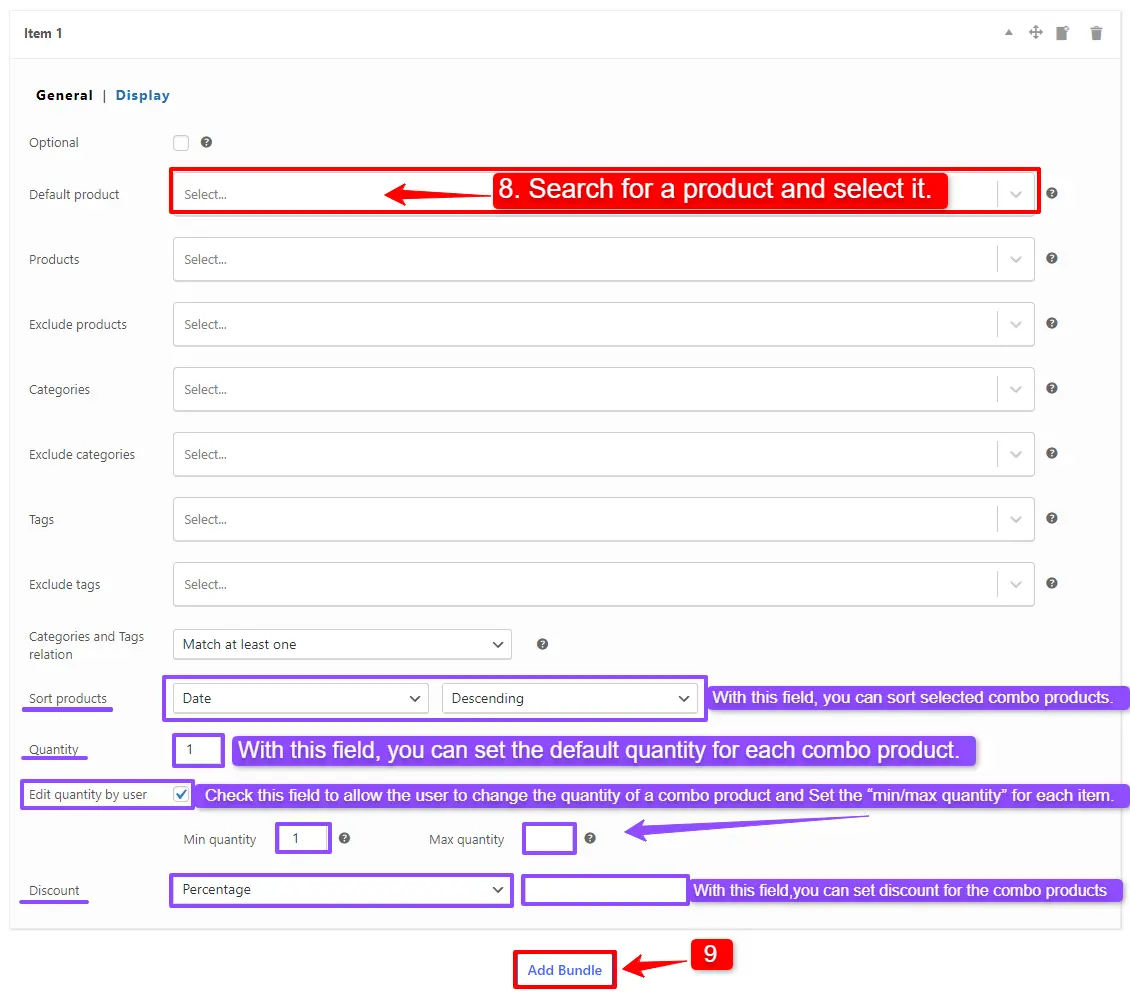
- Scroll down to the item field, and in the “Default Product” search box, select the subscription product you want to add.
or
In the “Products” field of the item search and select the subscription products you want.
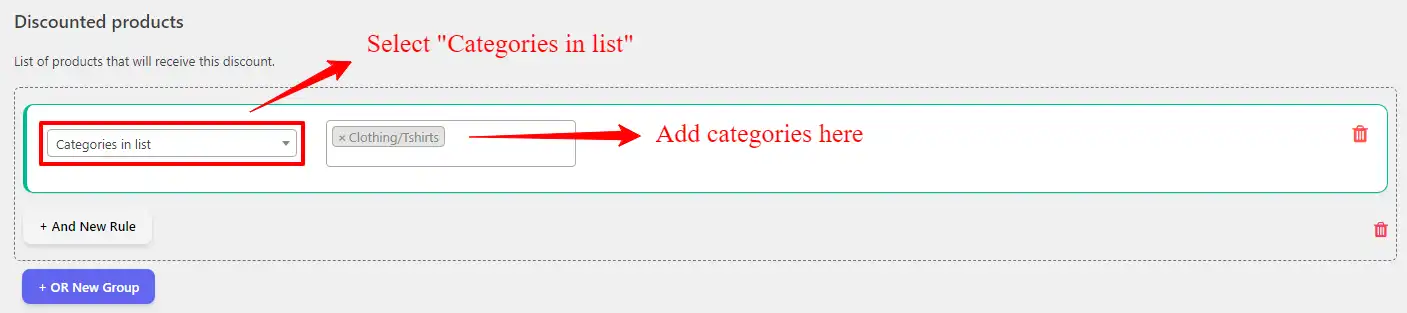
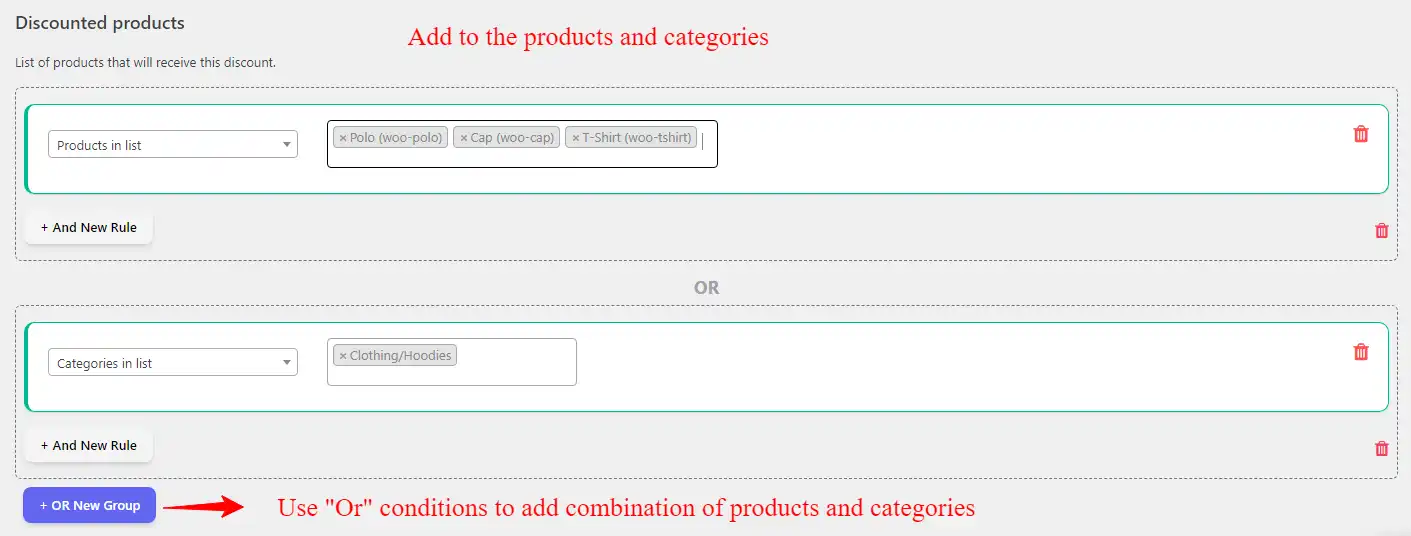
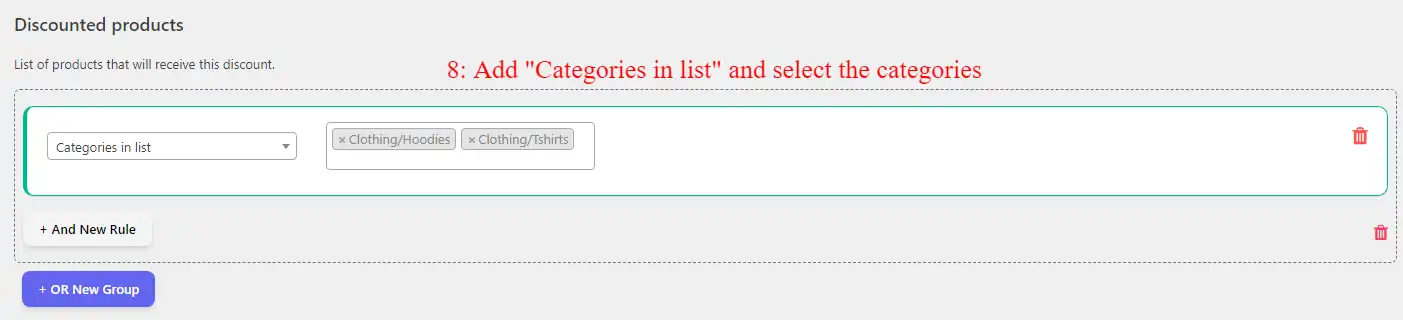
- Likewise, if you would like to include subscription products from a category, you can do so with the “Categories” field of the item. Therefore, you can search for categories and add them. (PRO VERSION)
- In addition, you can do the same for the subscription product tags and include them in the “Tags” field. (PRO VERSION)
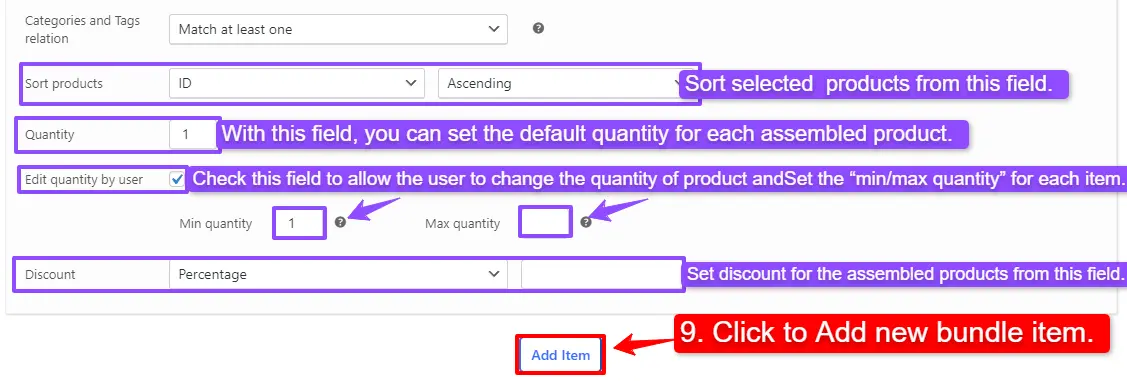
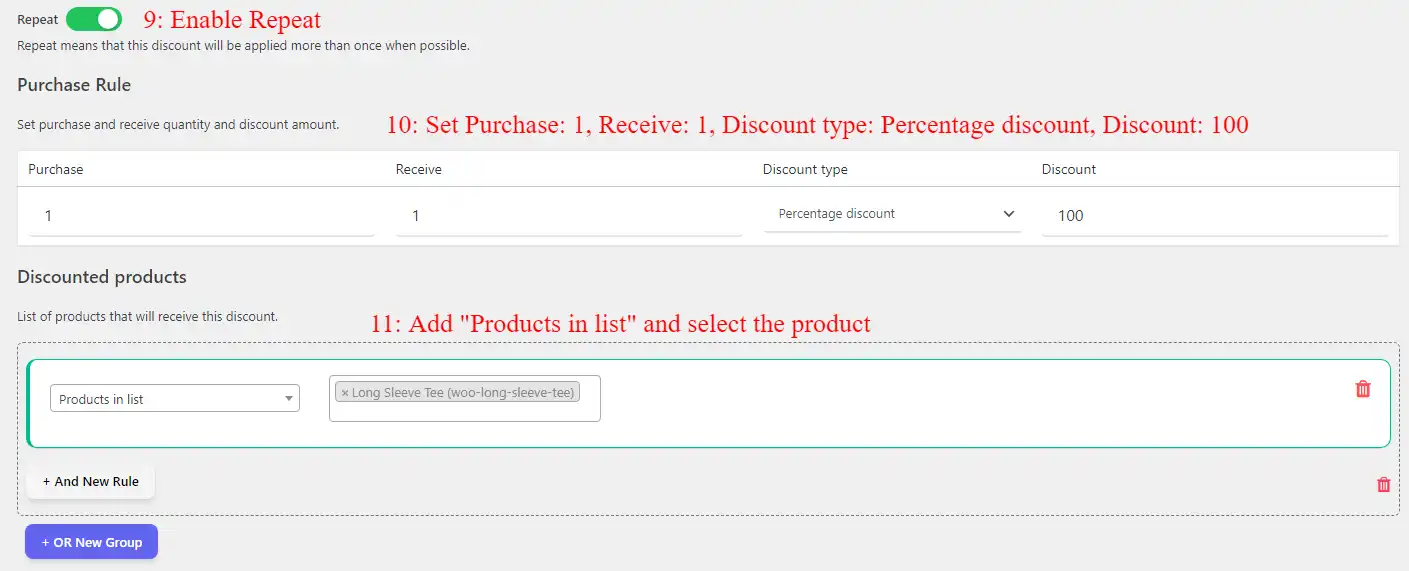
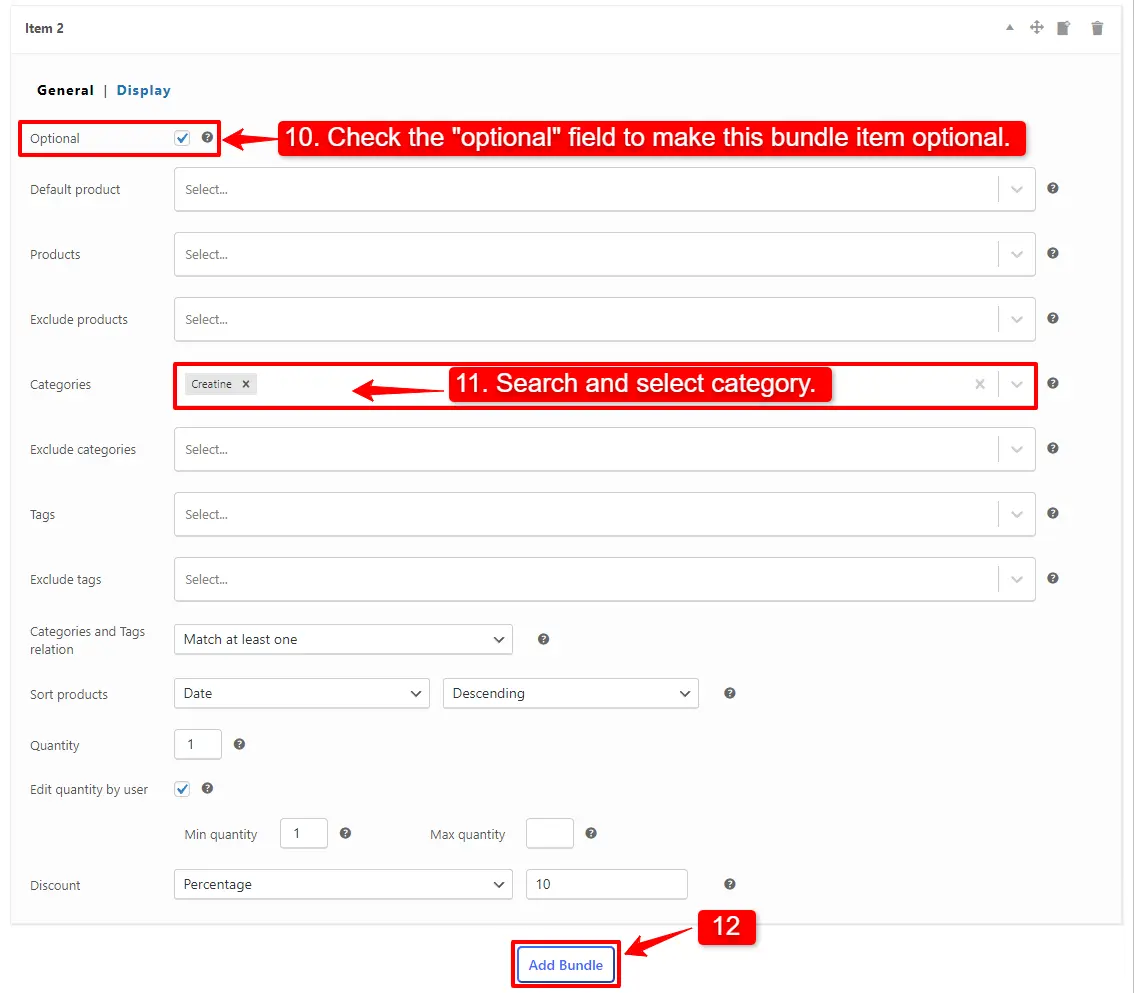
Step 4: Customising the Subscription Bundle
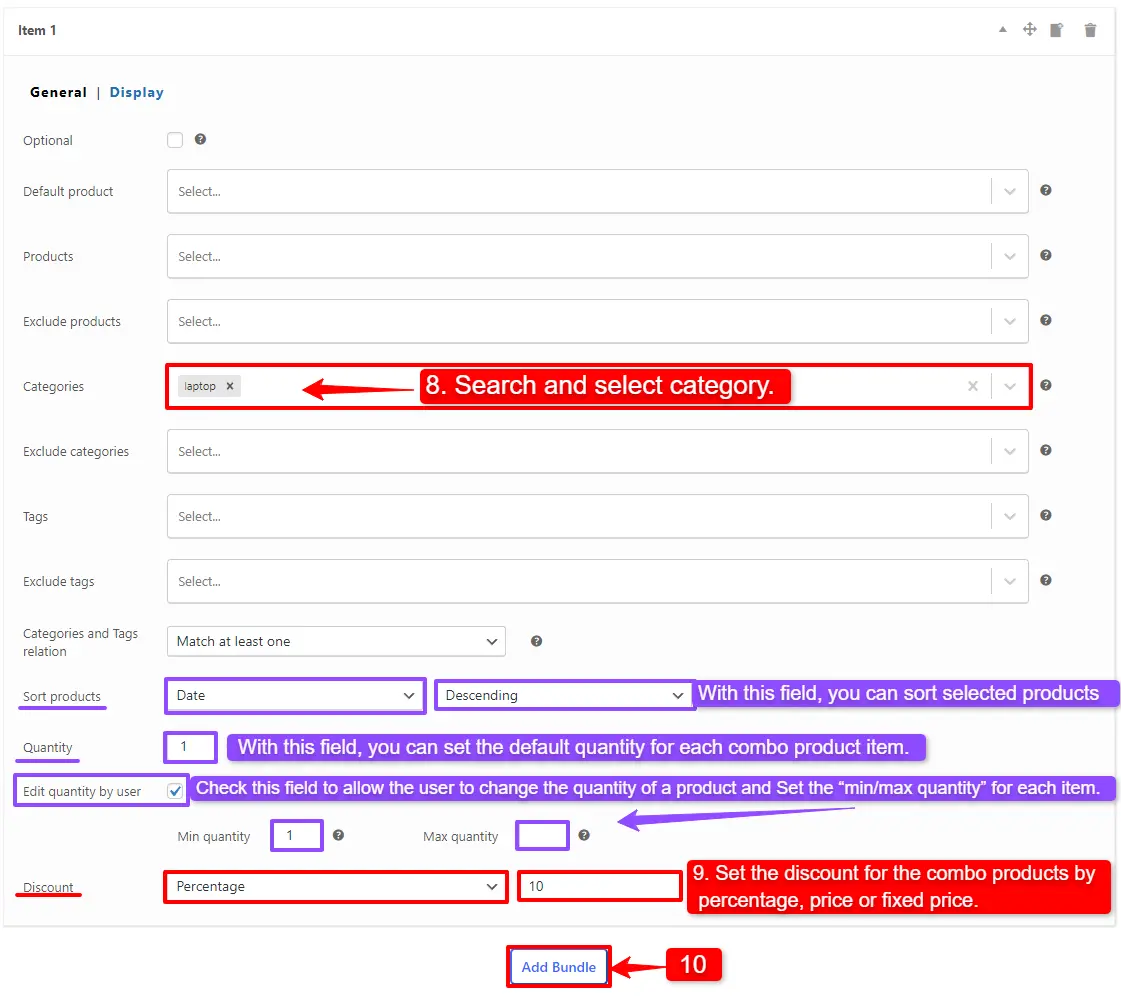
You can also configure the settings below for your subscription product bundle in the item field:
- Sort products: With this field, you can sort selected subscription products by “ID”, “Title”, “Menu order”,” Date”, “Price”, “popularity”, and “Rating”.
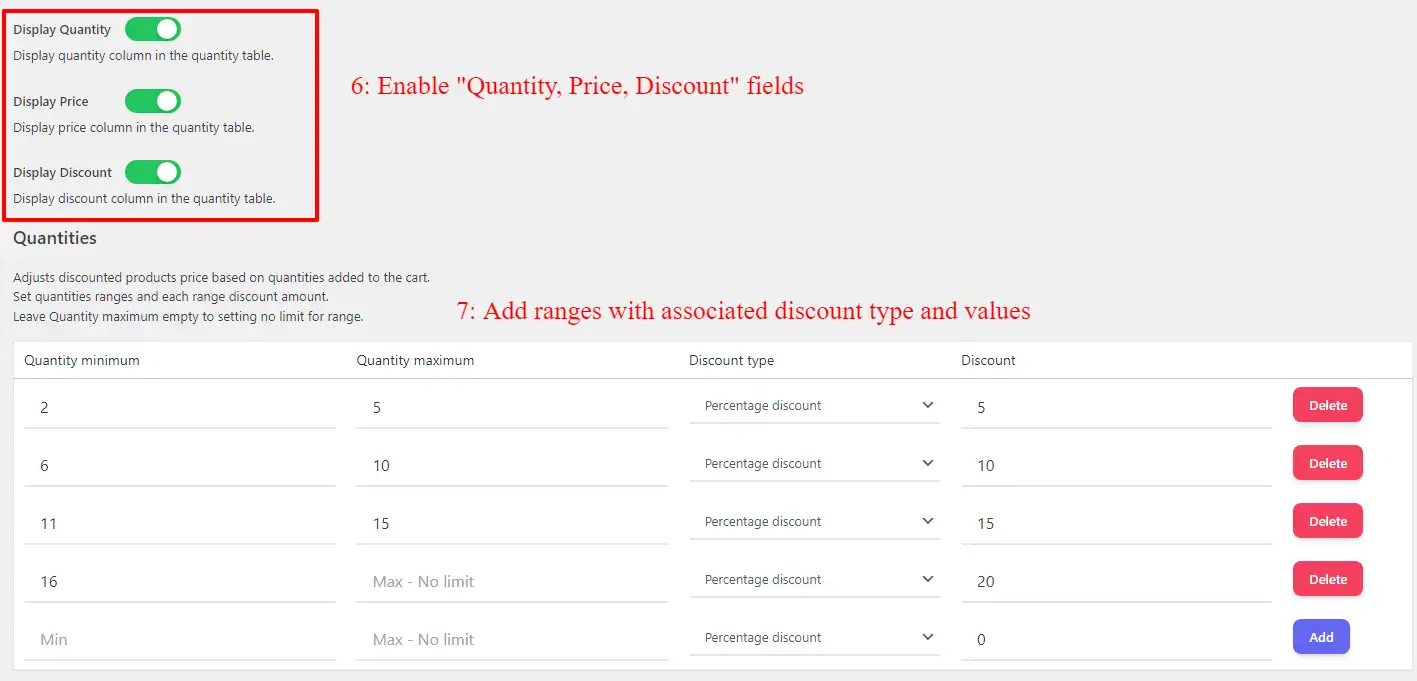
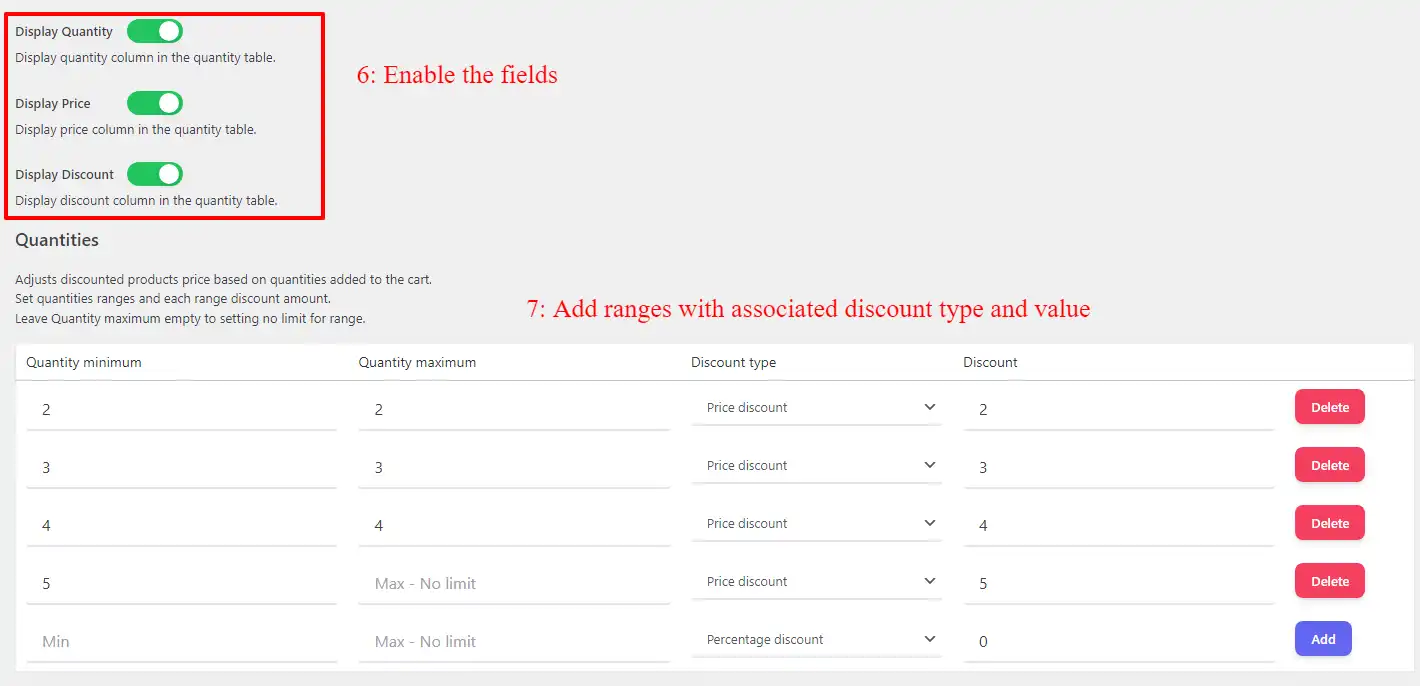
- Quantity: In this field, you can set the default quantity for each subscription product.
- Edit quantity by user: Check this field to allow the user to change the quantity of the product, and set the “min/max quantity” for each item.
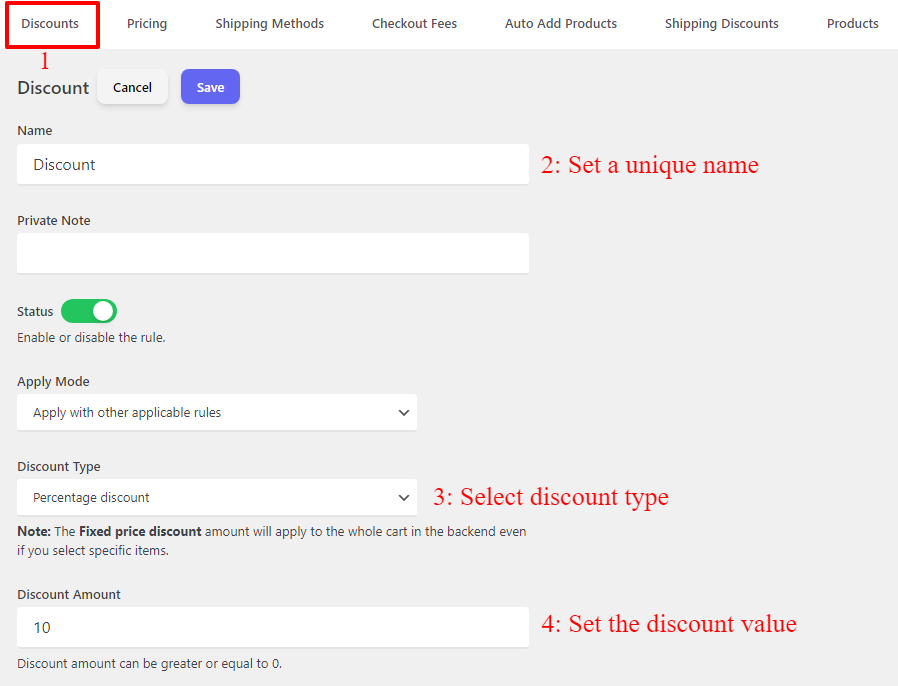
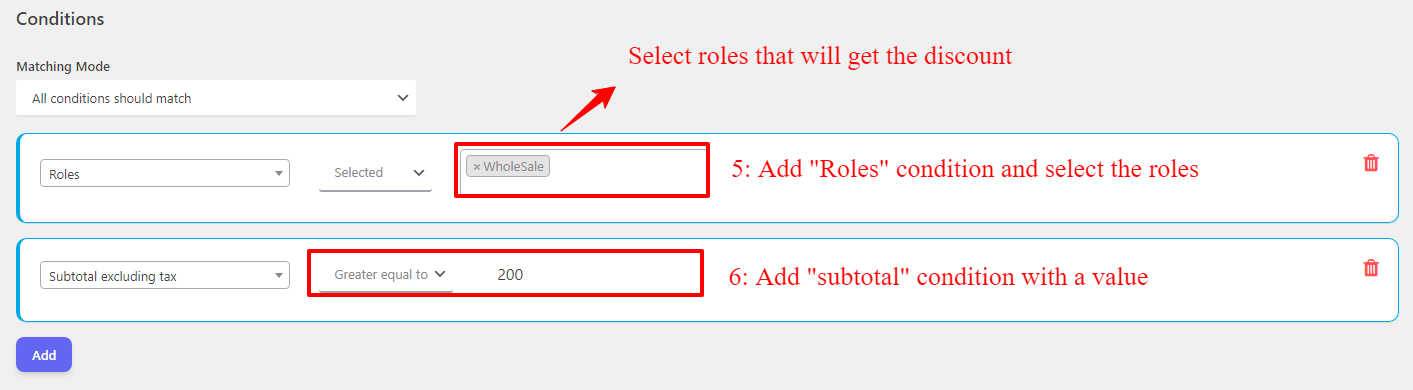
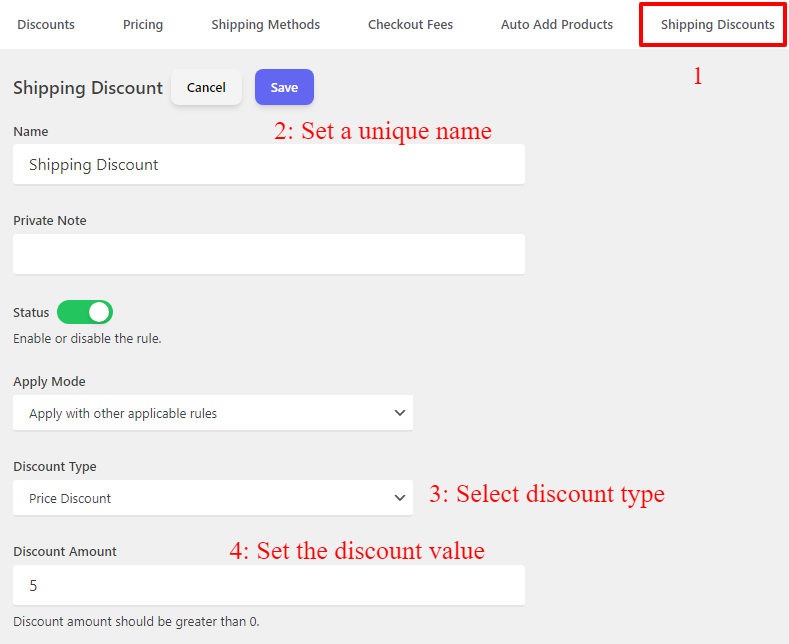
- Discount: In this field, you can set discounts for the subscription products by percentage, price, or fixed price.
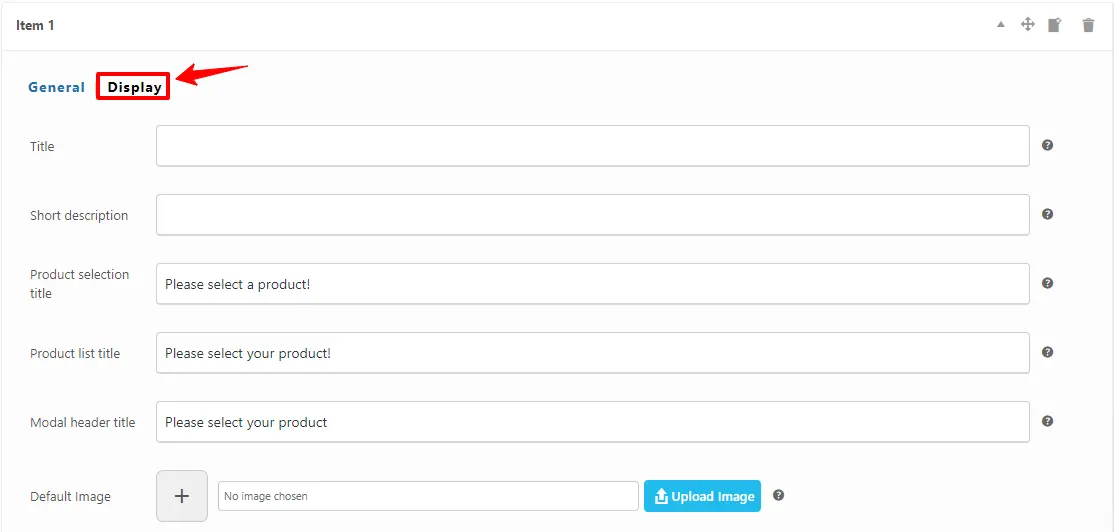
Now you can go to the “display” tab of the item and configure the following sections:
- Overwrite bundle item title.
- Overwrite bundle item short description. (Show when the mouse hovers over it)
- Change the title of the bundle’s empty item.
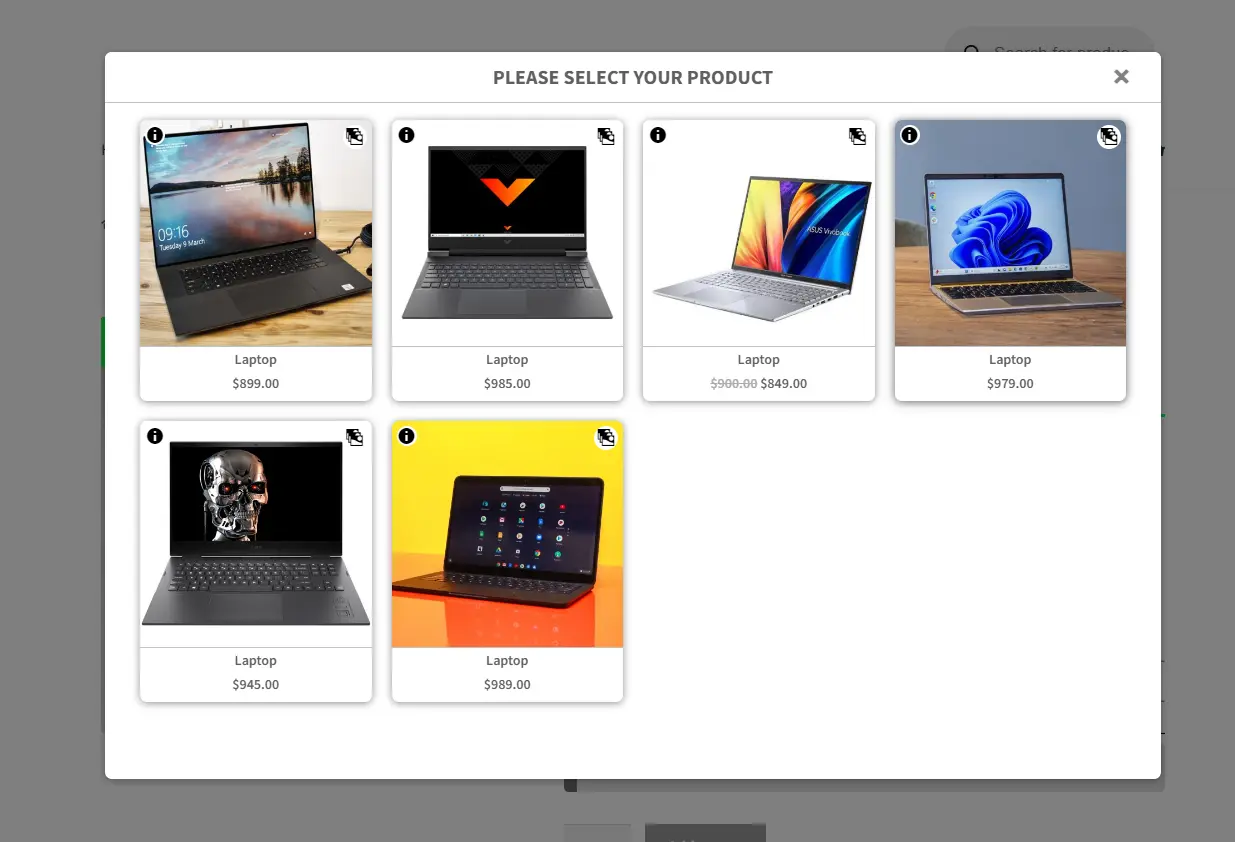
- Change the product list product selection title.
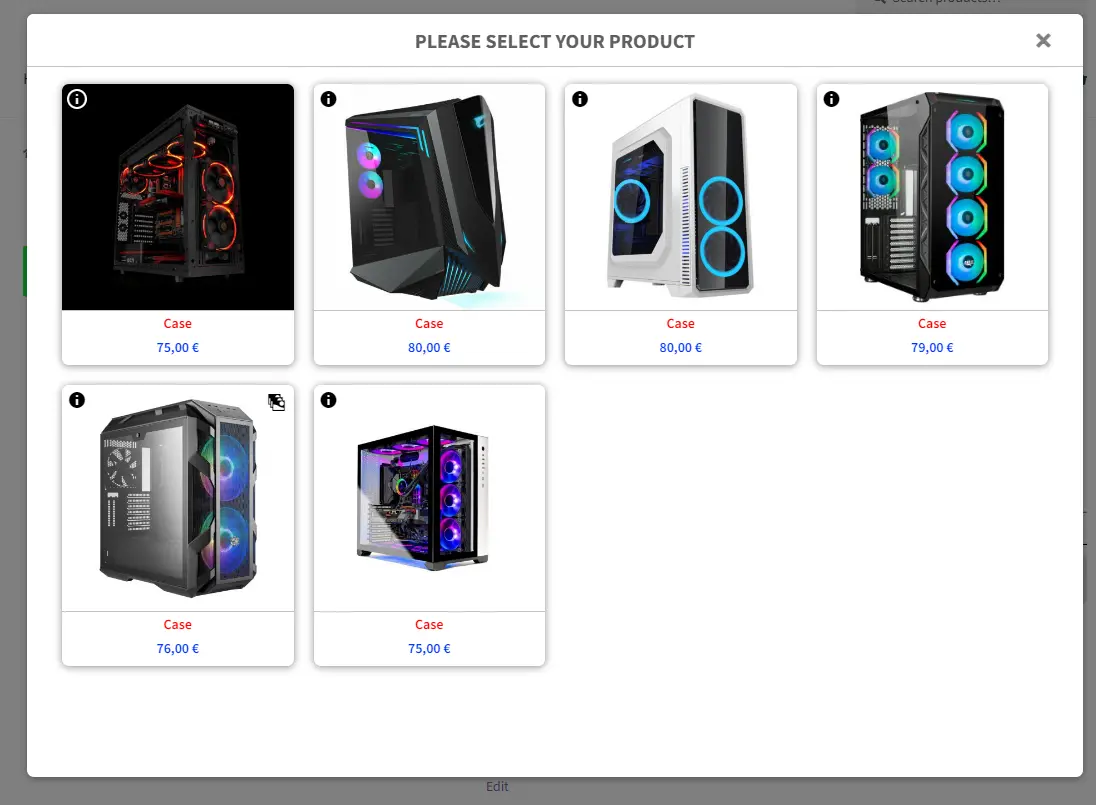
- Change the pop-up header title.
- Set an image for the empty item.
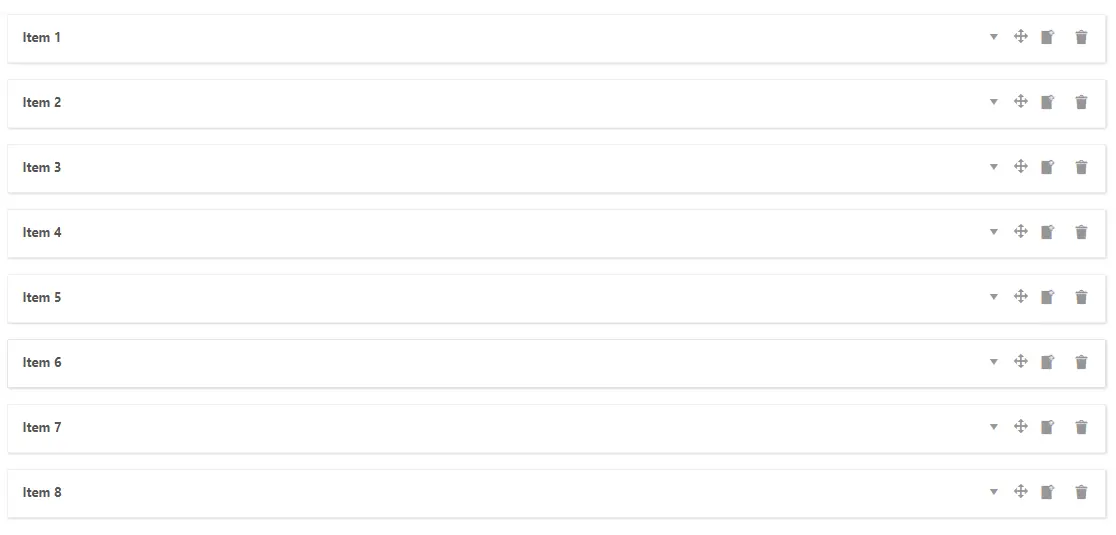
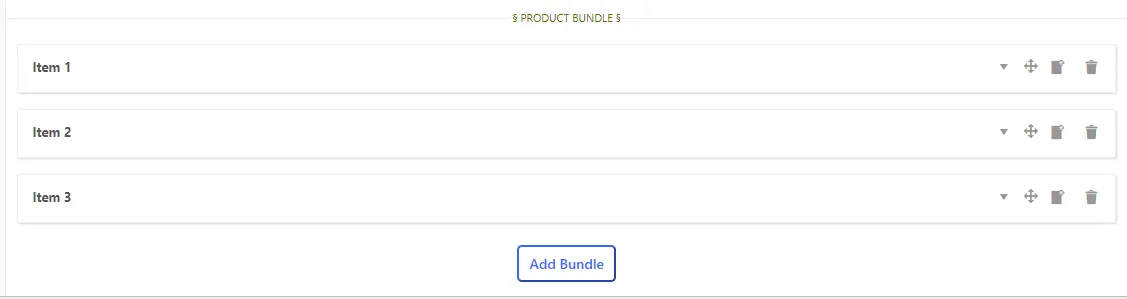
- Then you can click on “Add Item” to add a new item to the subscription products and configure it as in the previous steps. We have created one other bundle item.
- After configuring item 2 and setting your changes, “publish” the subscription products bundle.
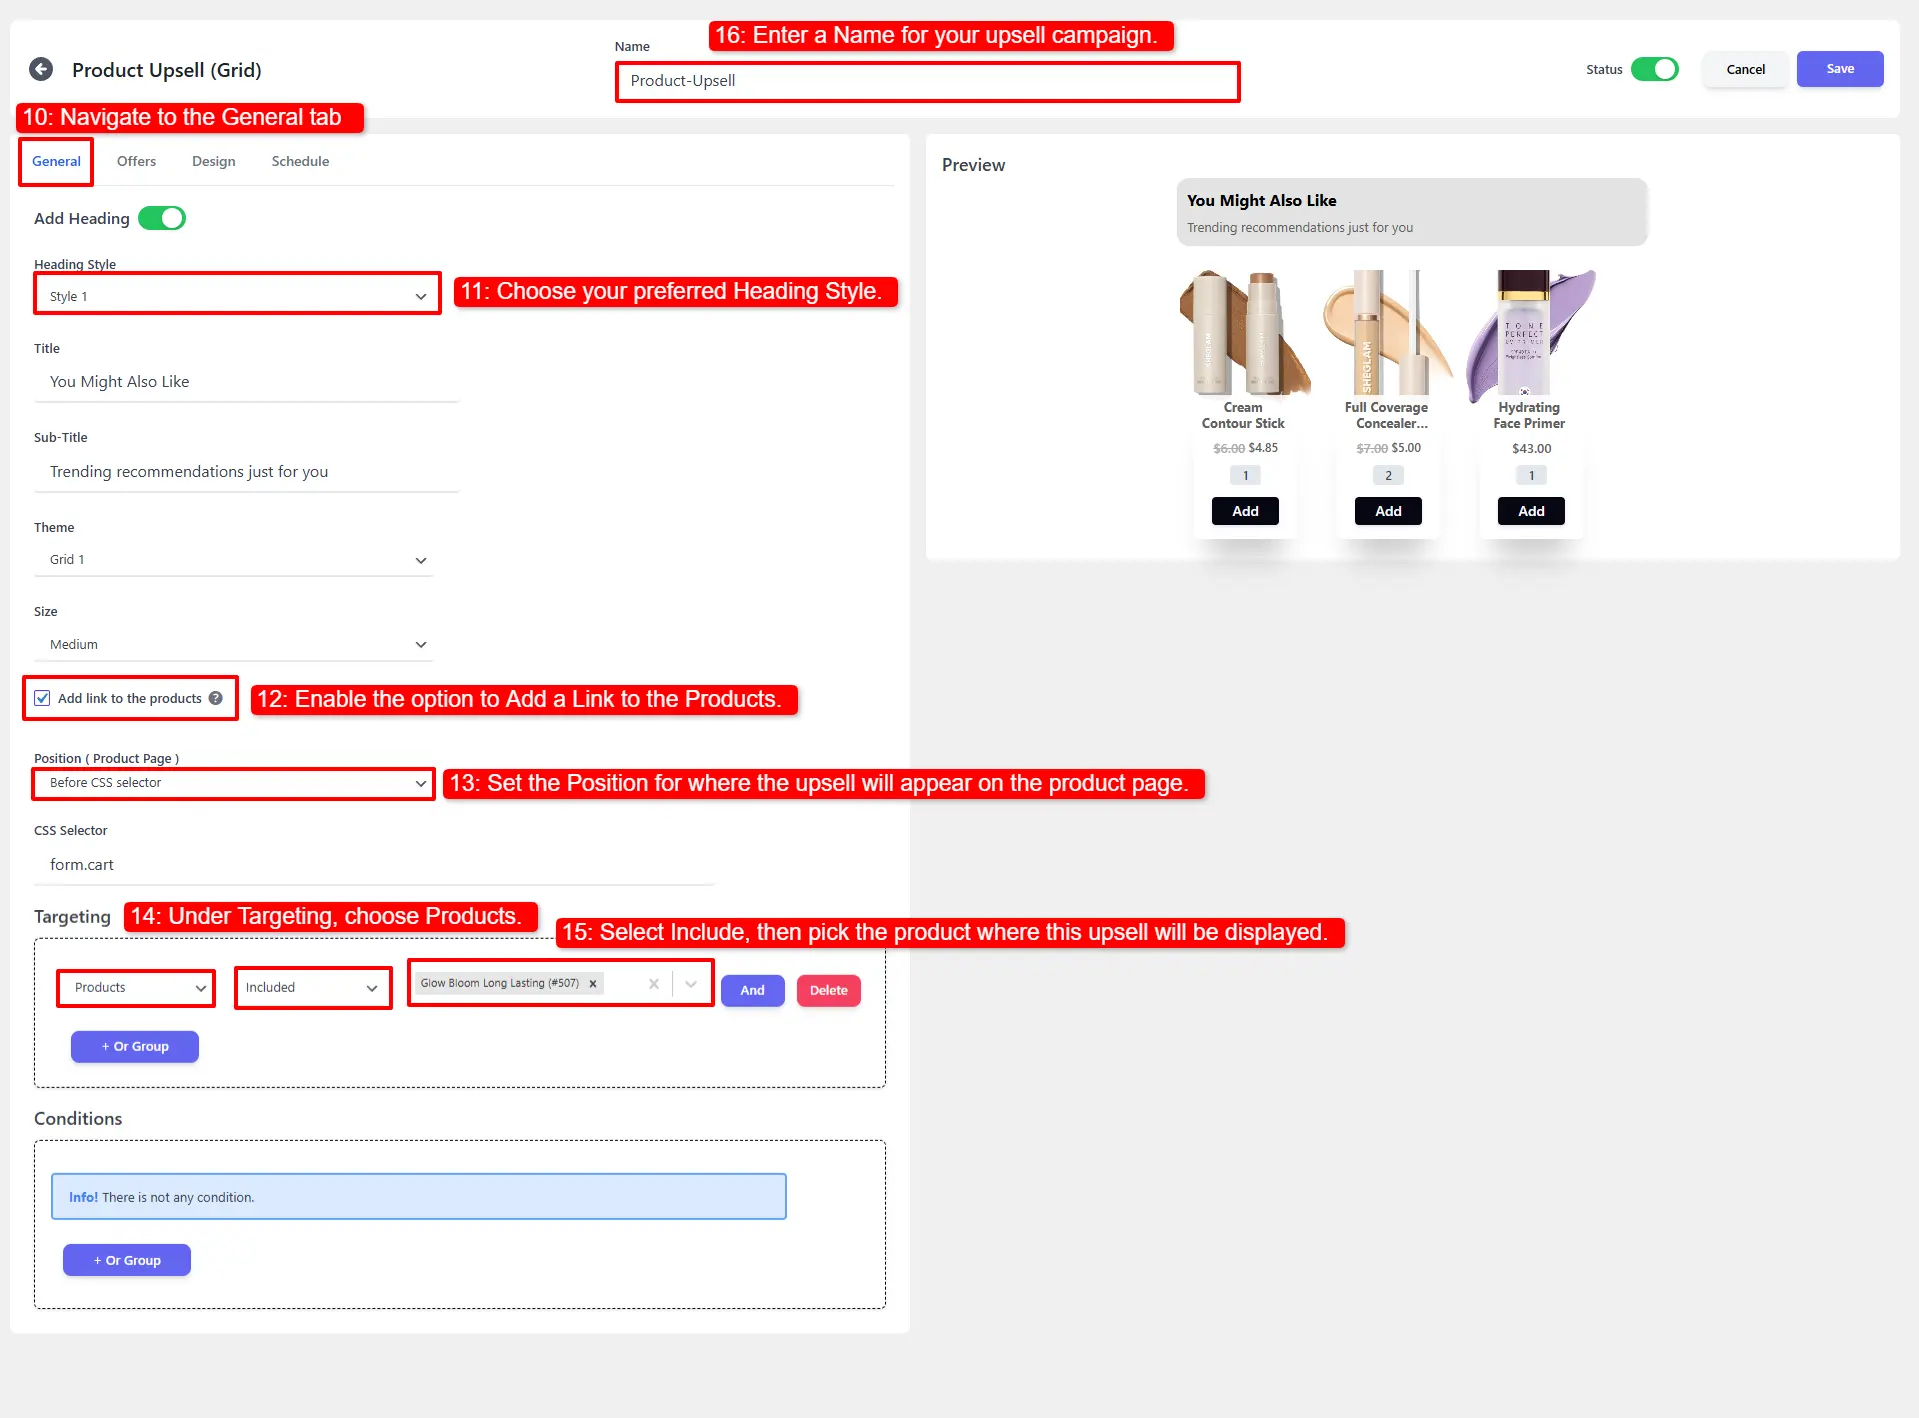
Step 6: Configure the Plugin Settings
All the plugin settings you need can be found on the “Product Bundles” tab in the WordPress dashboard.
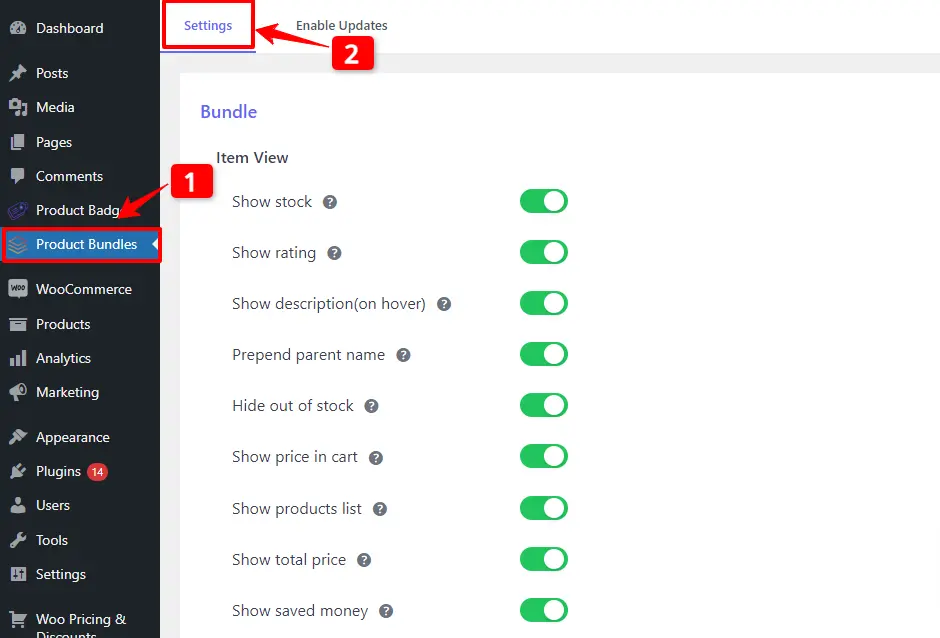
Settings and customization are available on this page:
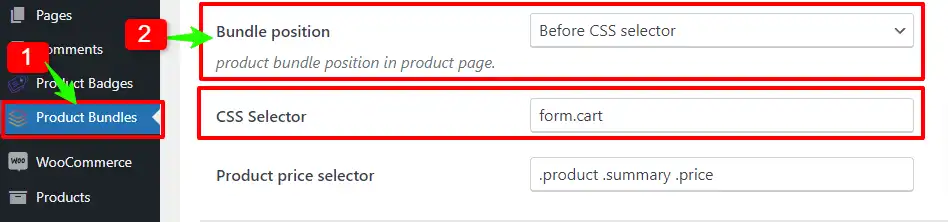
- Item View: In this section, you can configure various settings, such as displaying stock availability, showing product ratings and descriptions, adding a quantity field on item pages, displaying a plus icon for items, setting the theme and size options, positioning product bundles on the product page, defining custom CSS selectors, specifying the product price selector, and many other customizable options.
- Change product popup: In this section, you can configure popup settings.
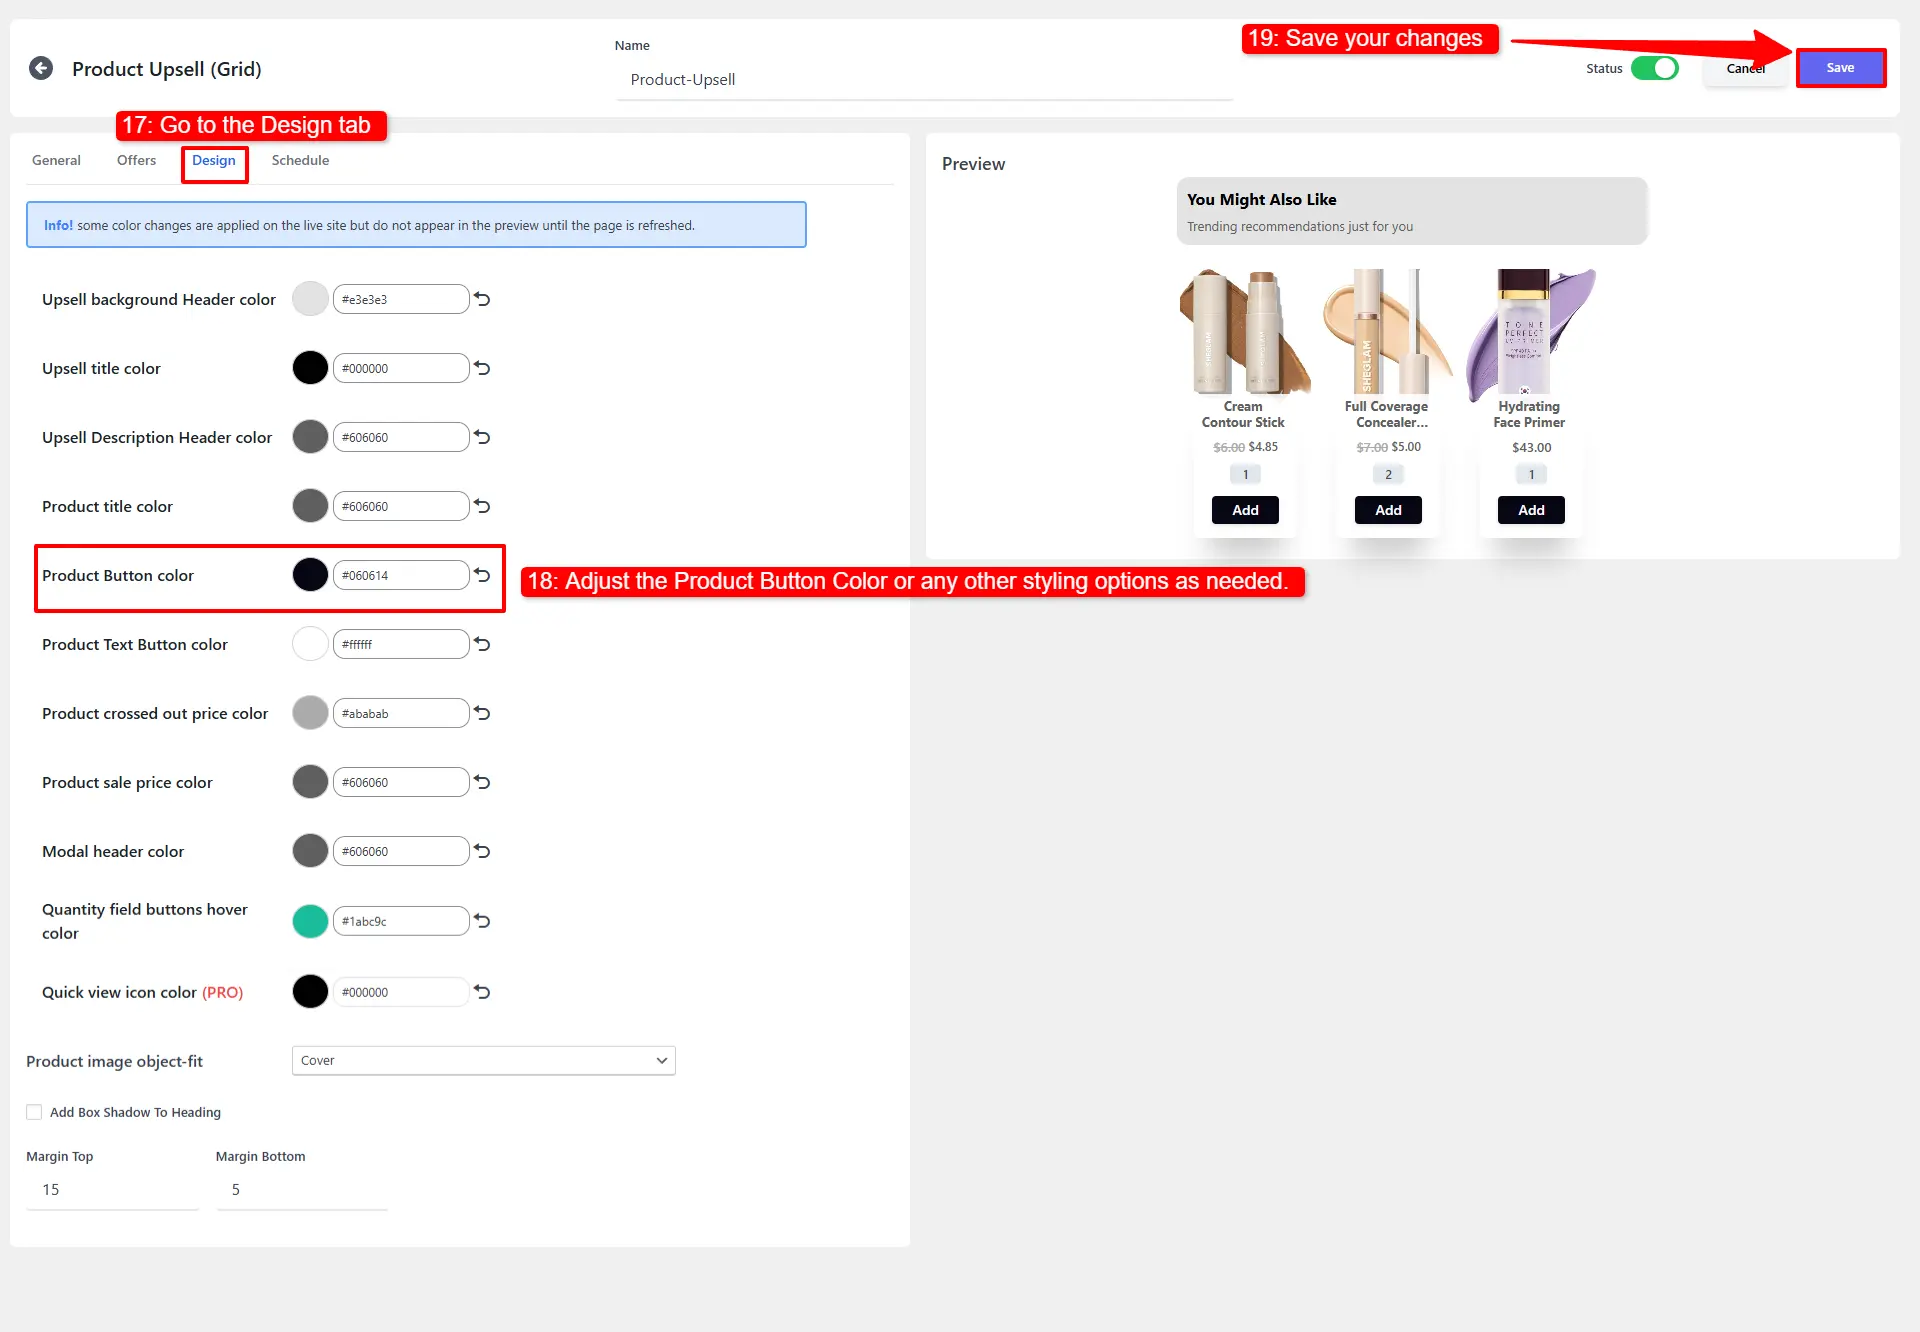
- Styles: In this section, you can customize the colours of different parts of your bundle and set the product image object-fit CSS.
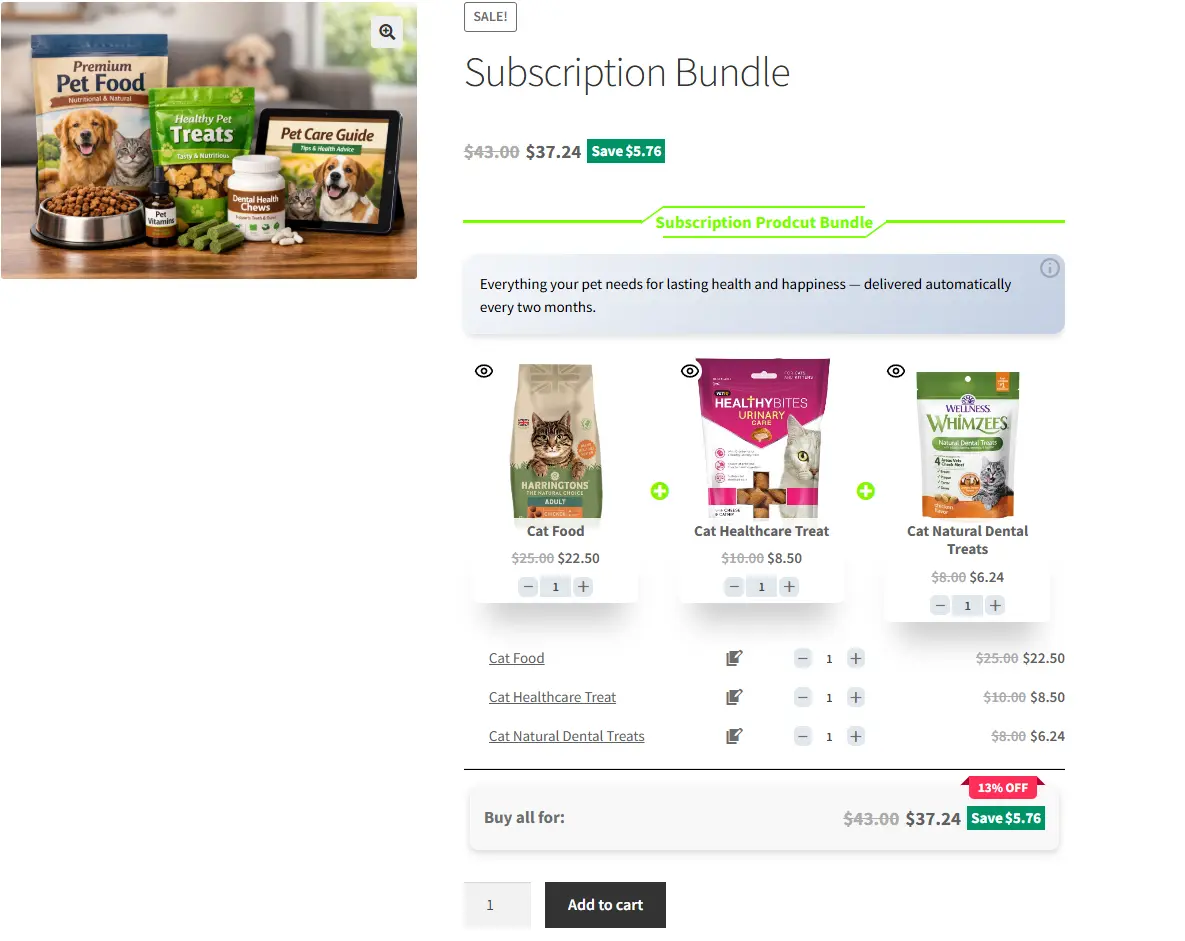
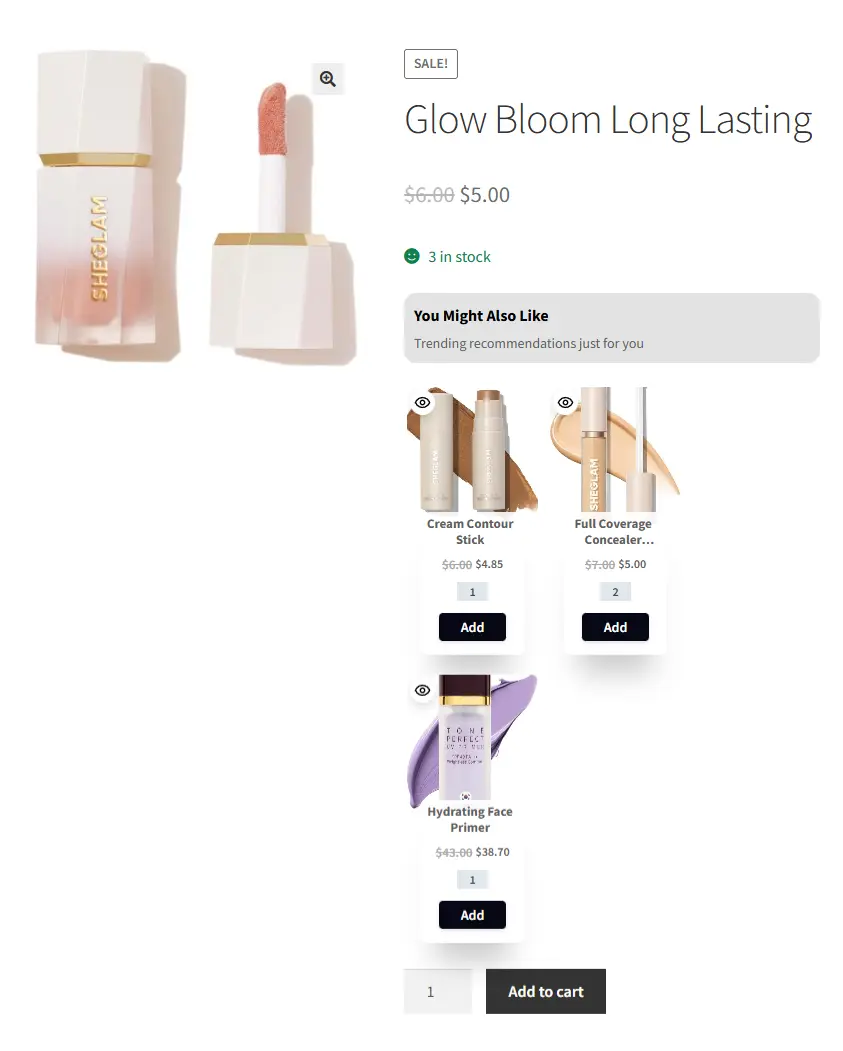
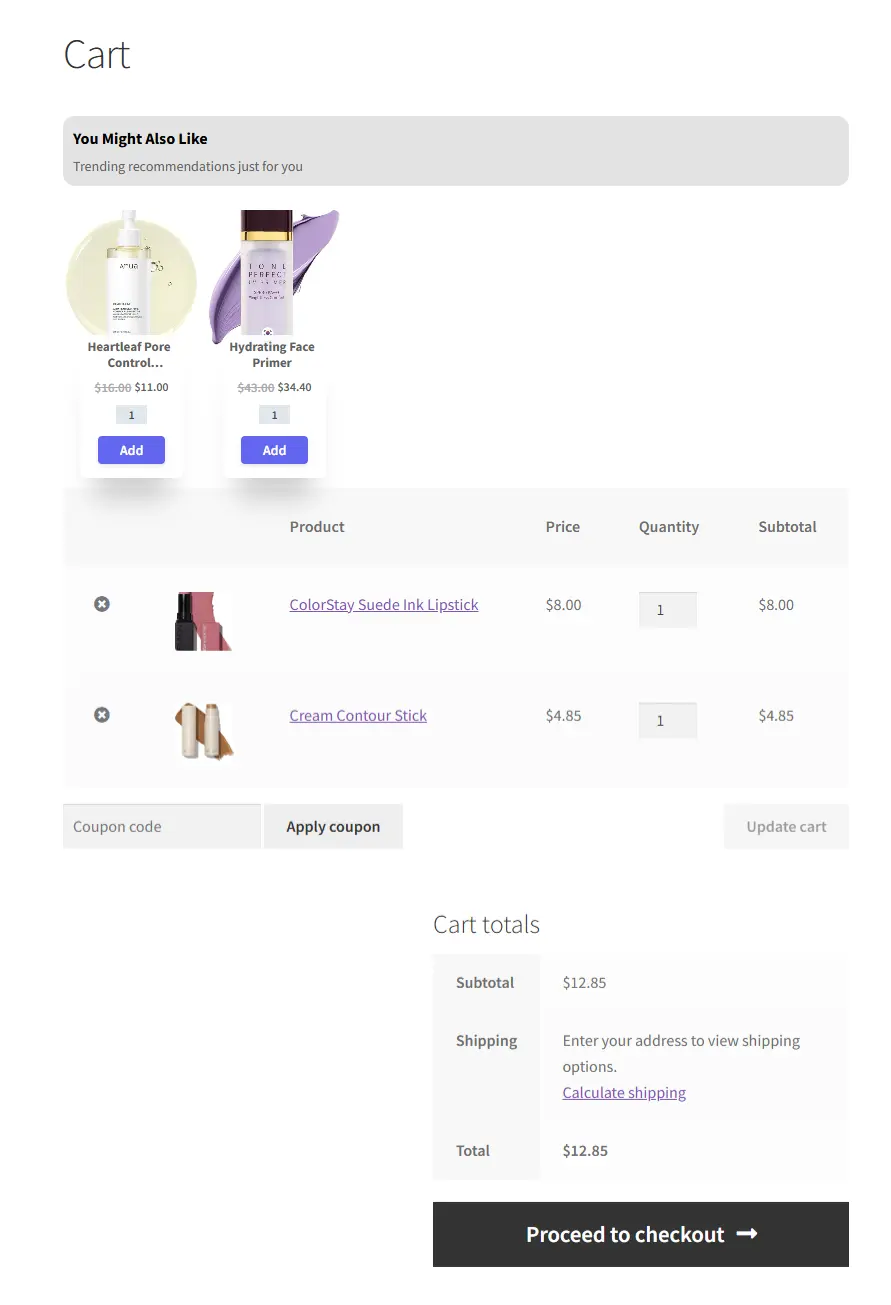
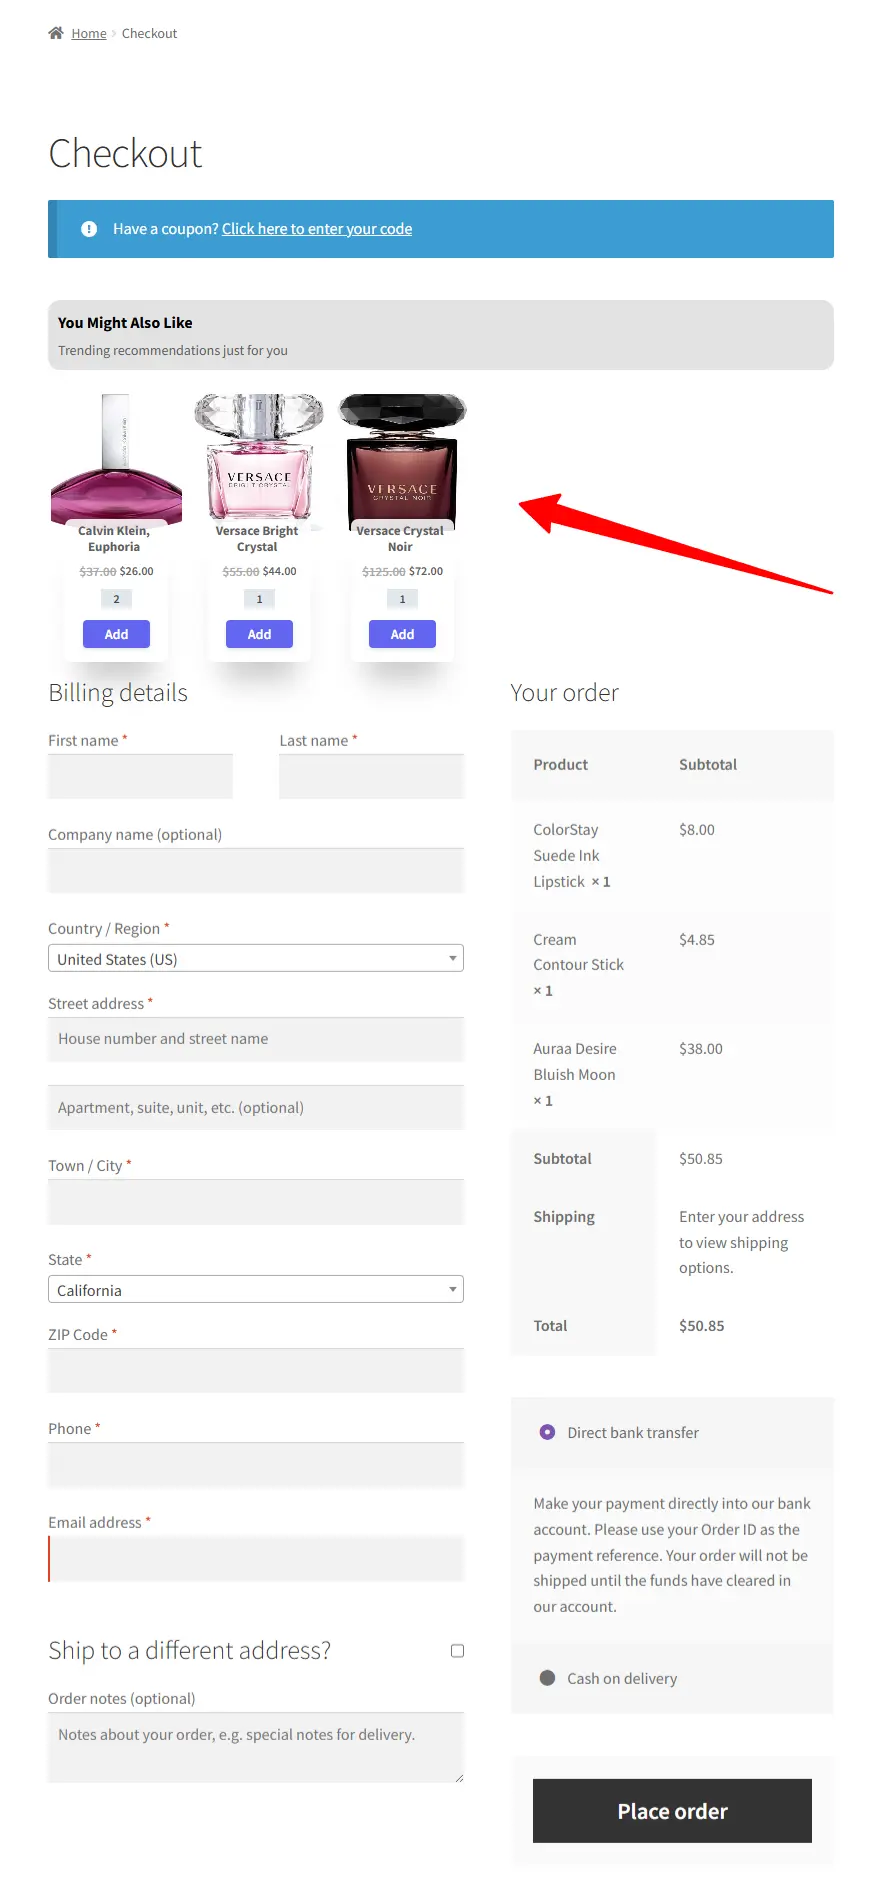
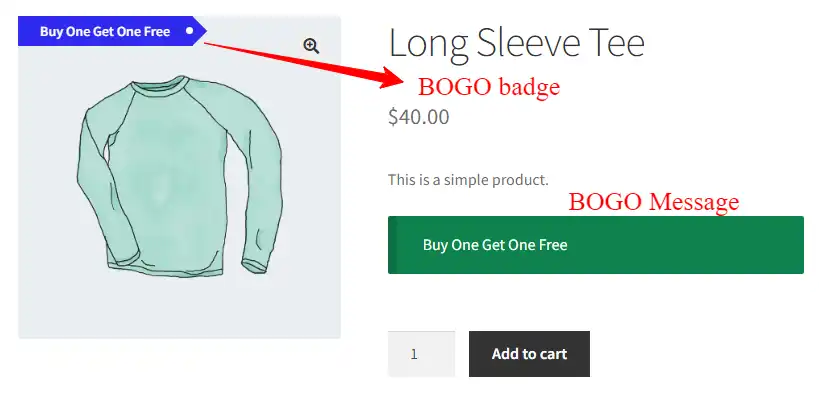
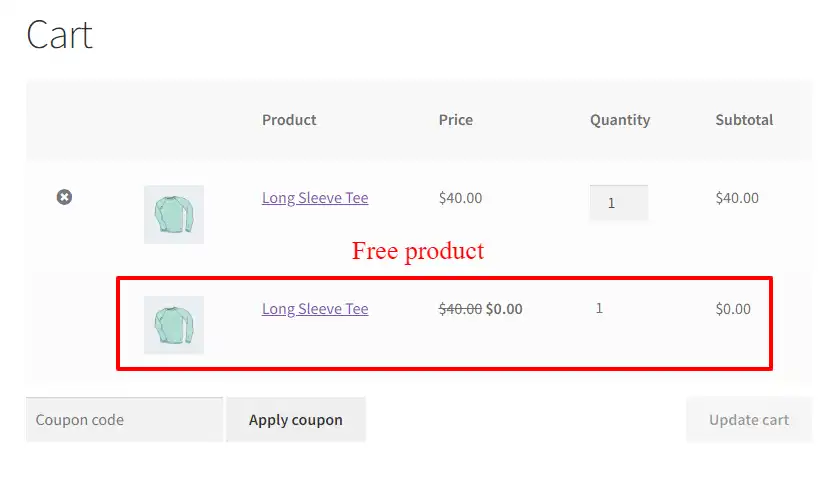
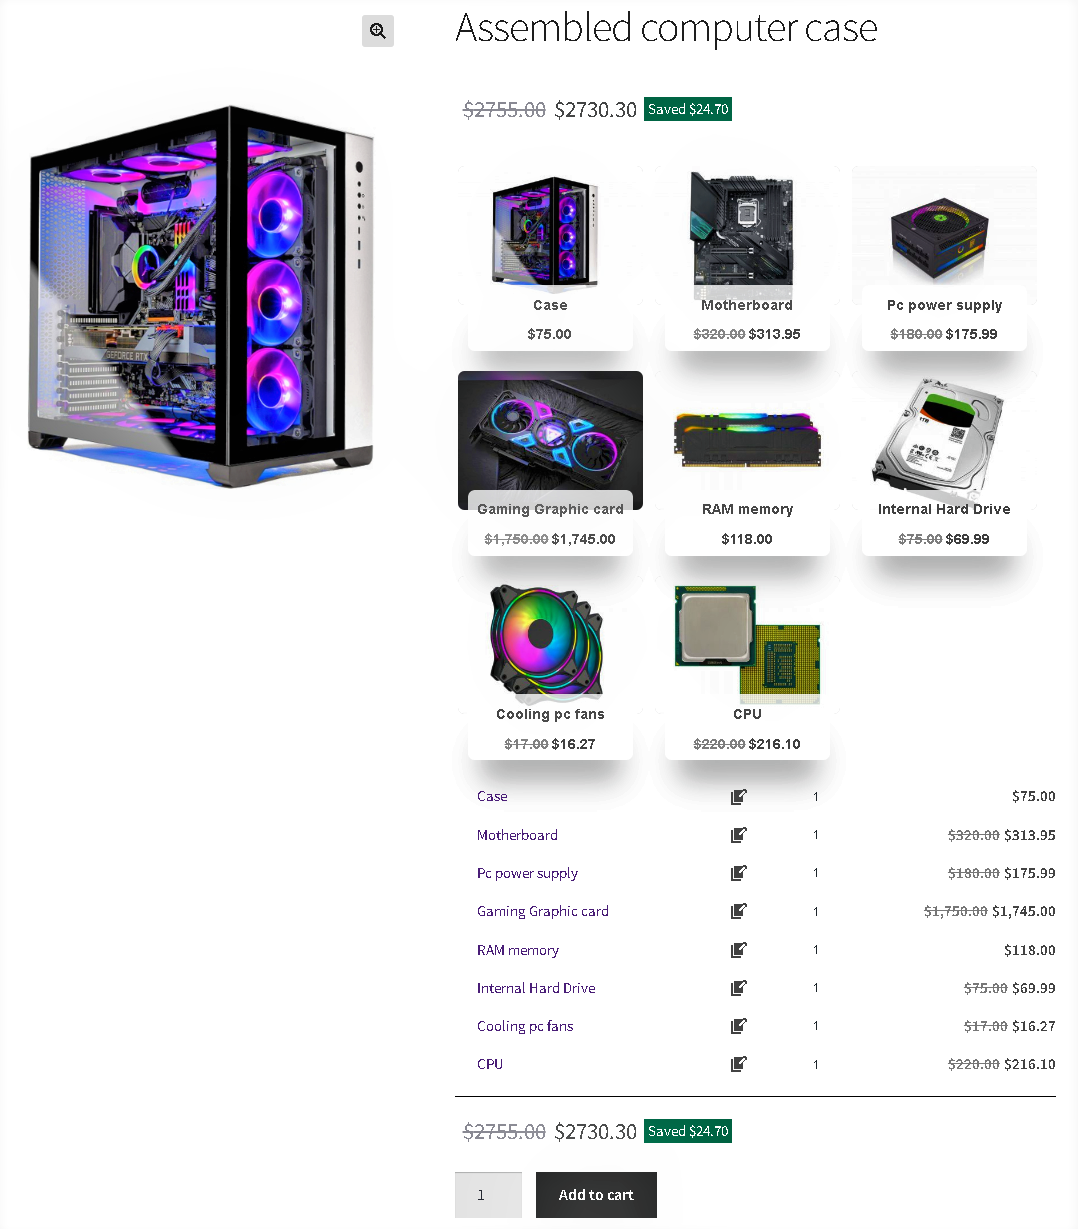
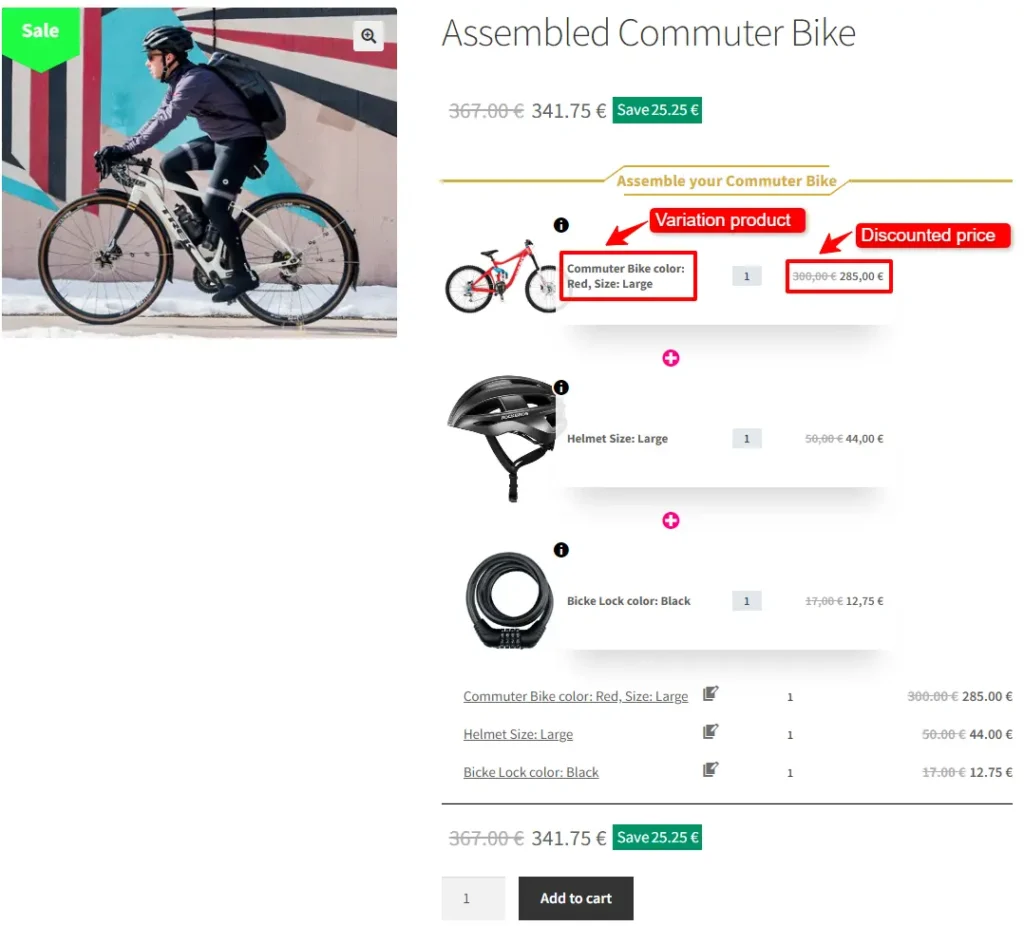
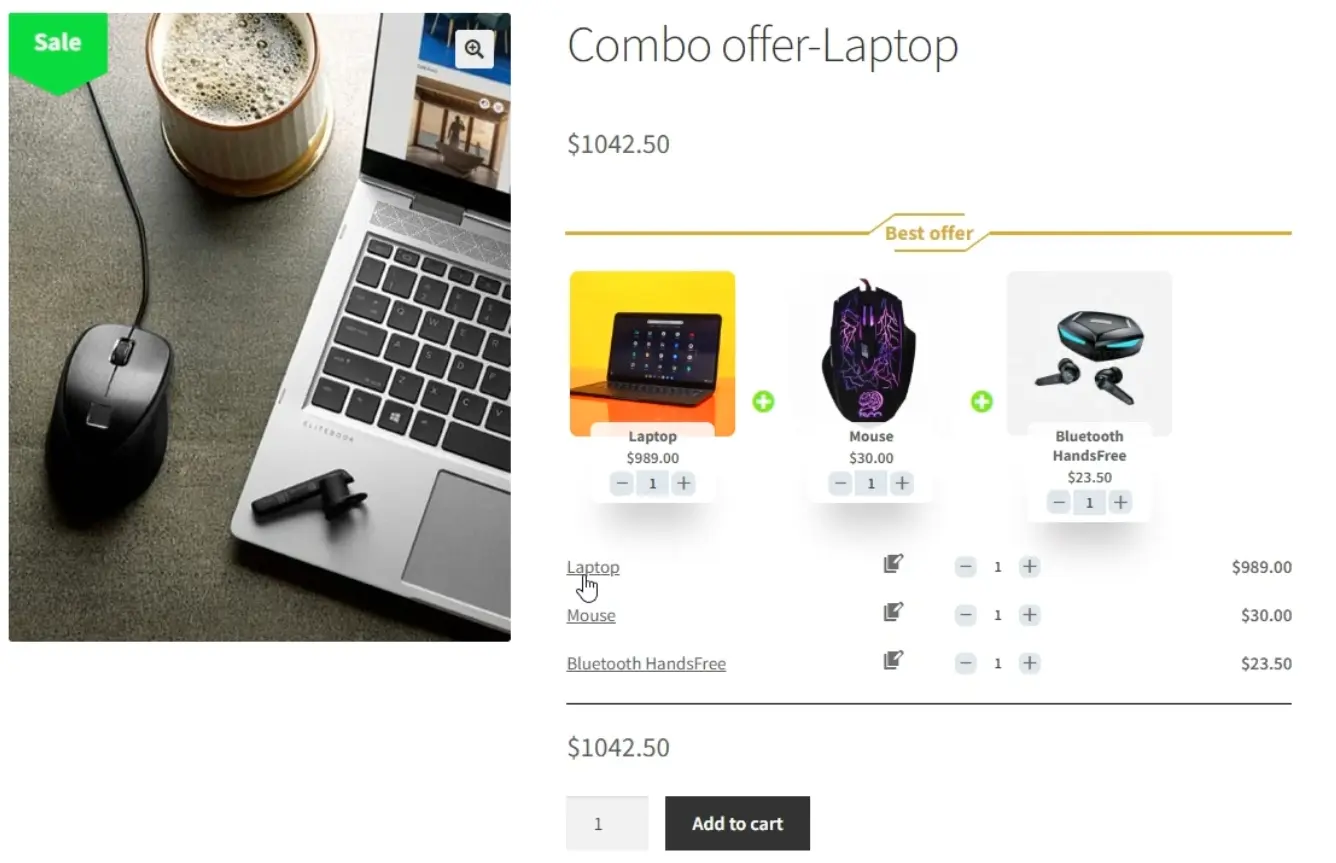
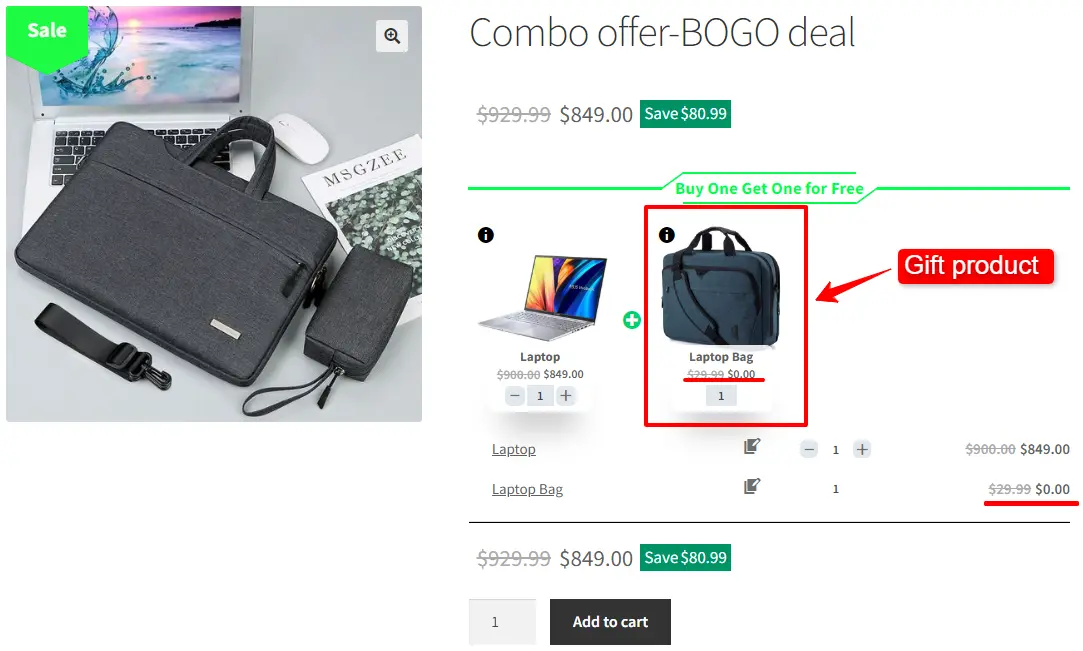
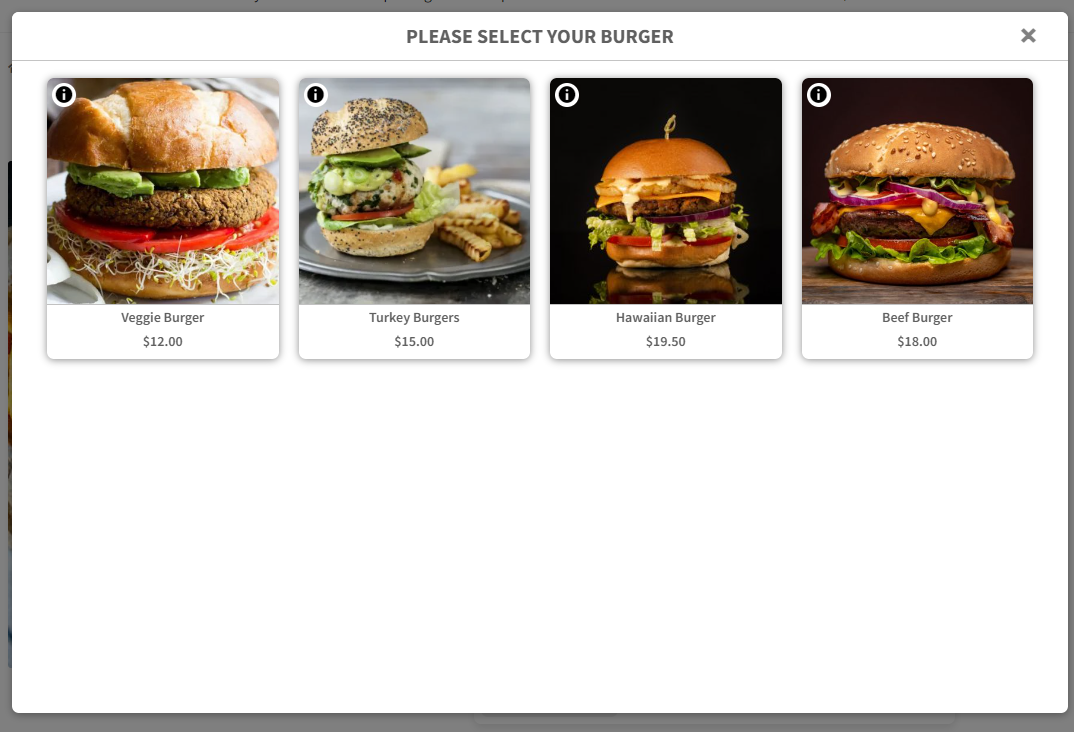
Final Result
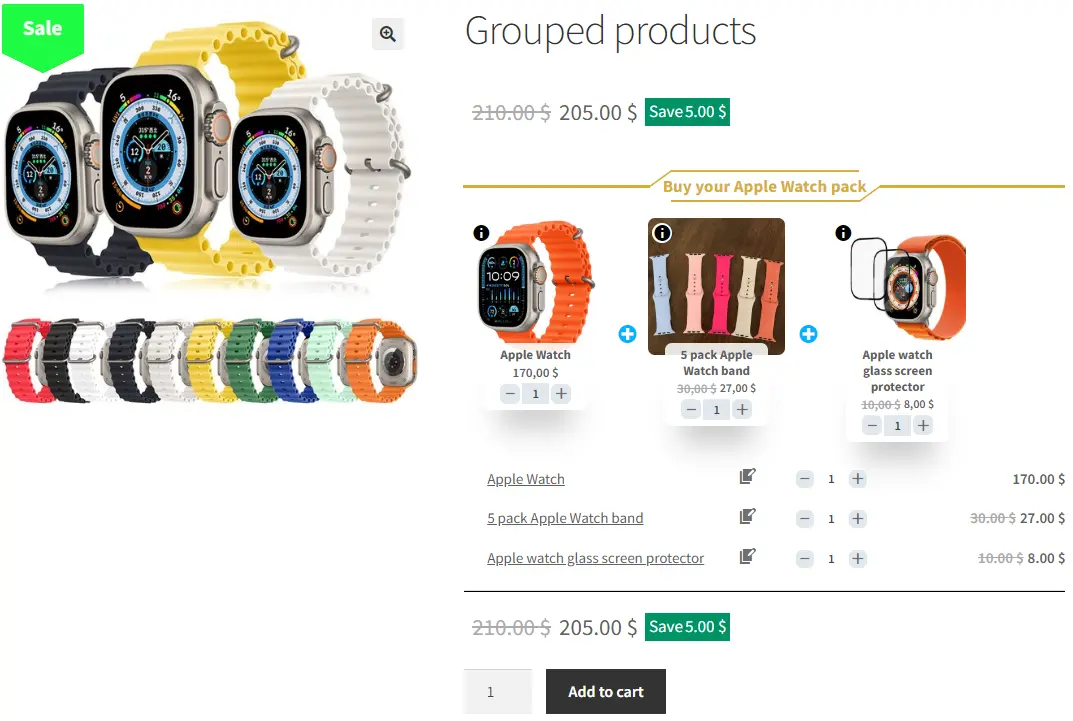
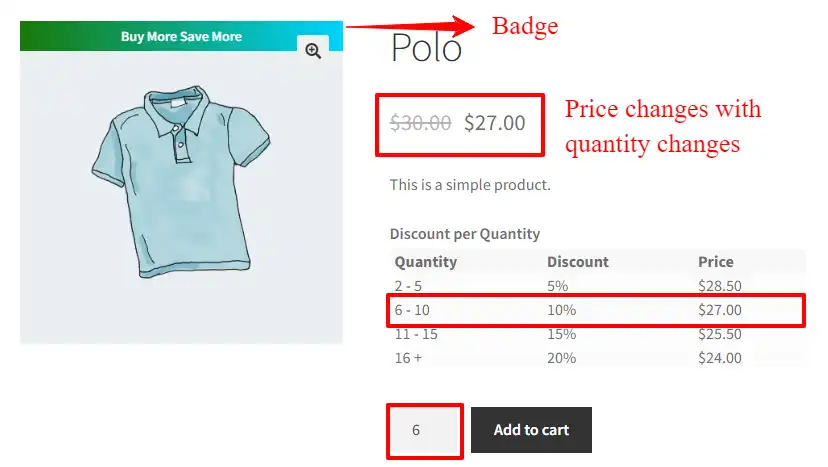
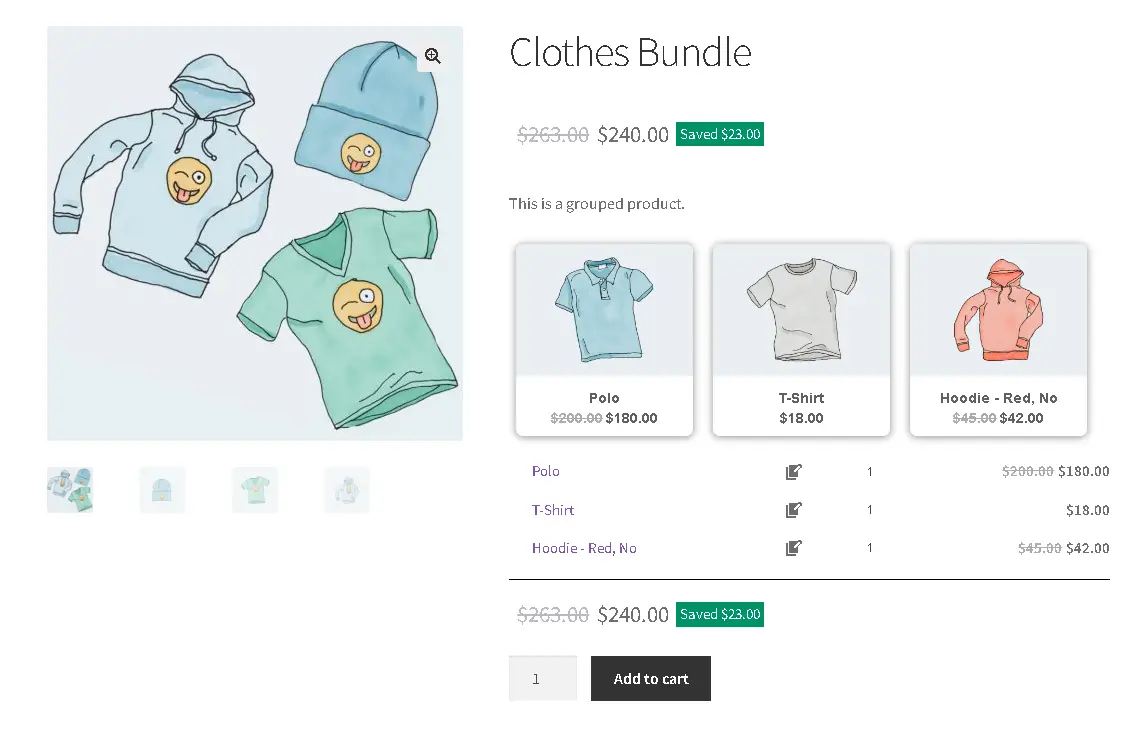
Once your subscription bundle is published, open its page on the front end of your store.
The WooCommerce subscription product bundle will now appear as shown below:
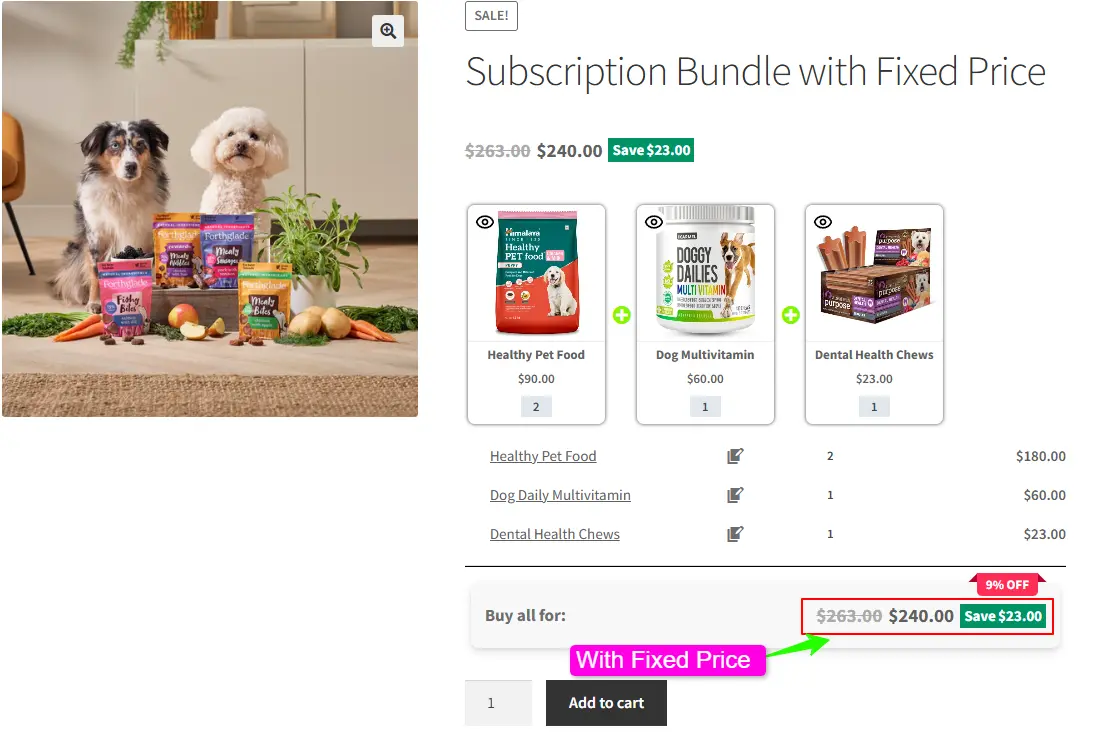
How to Create a WooCommerce Subscription Bundle with a Fixed Price
In the previous section, we created a subscription bundle using subscription products where the total price was calculated from the selected items.
Now, we’ll create a fixed-price subscription bundle using WooCommerce simple products and convert the entire bundle into a subscription product with the All Products for WooCommerce Subscriptions plugin.
Requirements
Before creating subscription bundles, make sure you have the following installed and activated on your WordPress site:
- WooCommerce
- Product Bundle Builder for WooCommerce
- WooCommerce Subscriptions
- All Products for WooCommerce Subscriptions
Note: The All Products for WooCommerce Subscriptions plugin requires WooCommerce Subscriptions to be installed and activated.
Step 1: Create a Product Bundle
- Go to “WooCommerce” → “Products” in your WordPress dashboard.
- Click “Add New” to create a new product.
- Enter a name for your Product Bundle.
- On the right sidebar, click “Set product image” and choose an image for your bundle.
- In the “Product data” section, select “Product bundle” from the dropdown menu.
- After selecting “Product bundle”, open the “Product Bundles” tab and click “Add Item” to add subscription products to your bundle
Step 2: Add Products to the Bundle
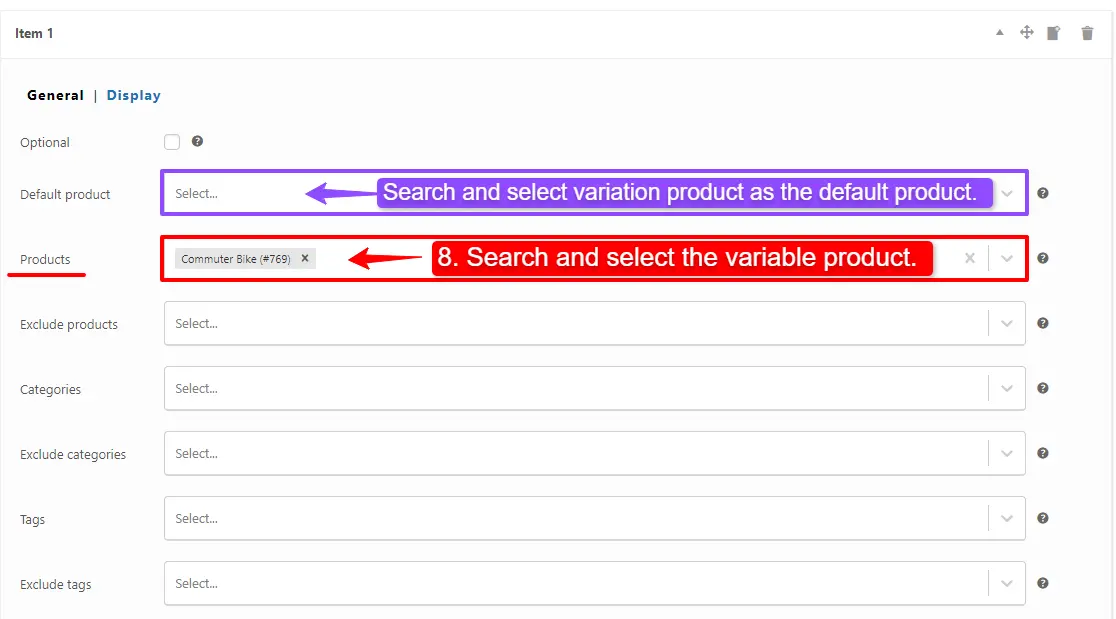
- In the item settings, use the “Default Product” or “Products” field to select the products you want to include in your bundle.
You can add simple products, variable products, or other supported WooCommerce product types.
( If you are using the Pro version, you can also include products using Categories or Tags. ) - Customize each bundle item based on your needs.
- Then you can click on “Add Item” to add a new item to Bundle and configure it as in the previous steps. We have created two other bundle item.
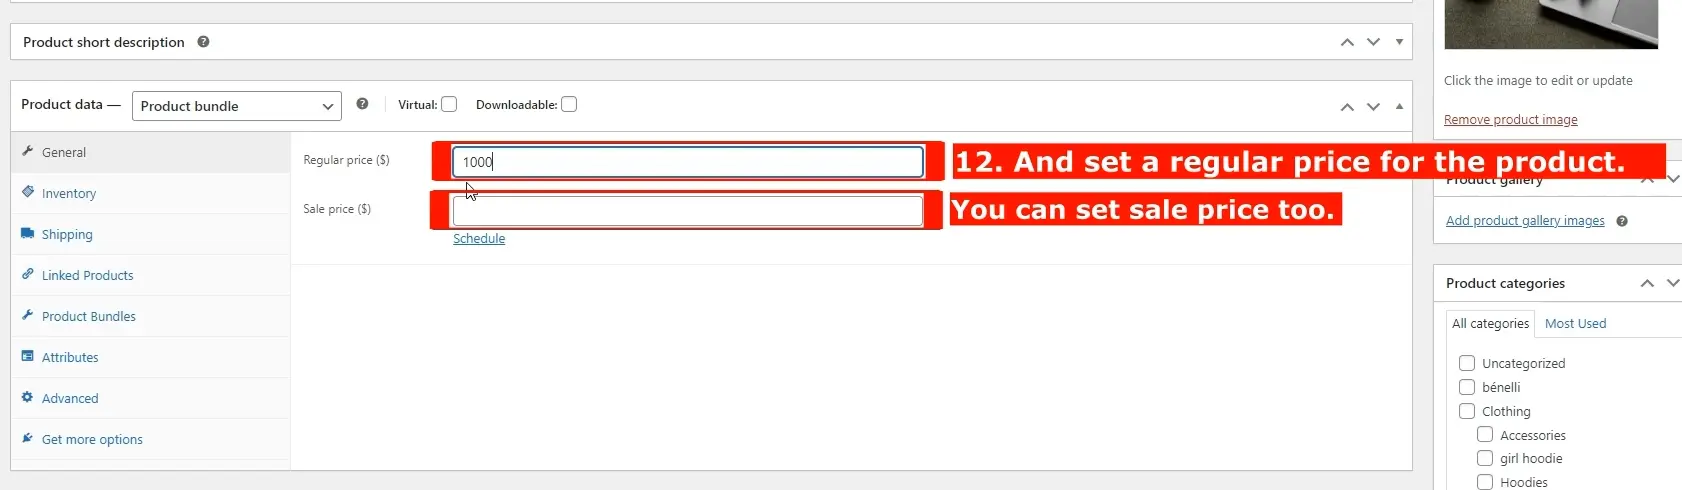
Step 3: Set a Fixed Price for the Bundle
The Easy WooCommerce Product Bundles plugin offers two pricing methods:
- Fixed Price
- Auto Calculate Bundle Price
To use a fixed bundle price:
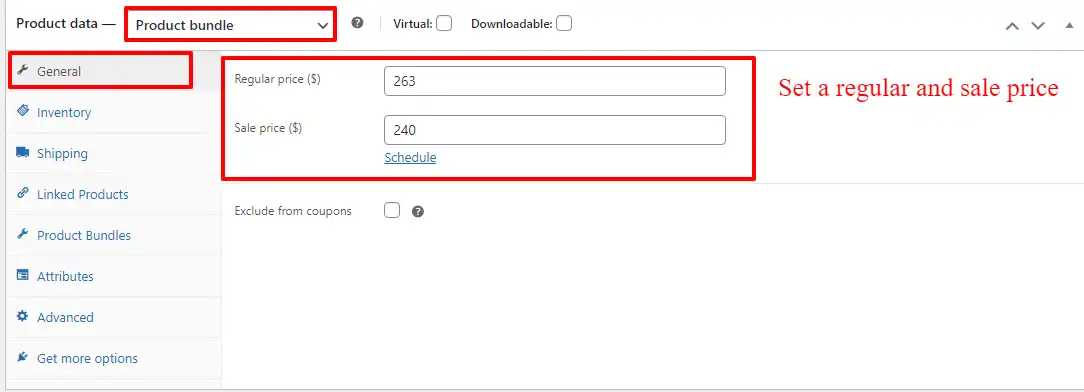
- Scroll to the top of the Product Bundles tab and check the “Fixed Price” option.
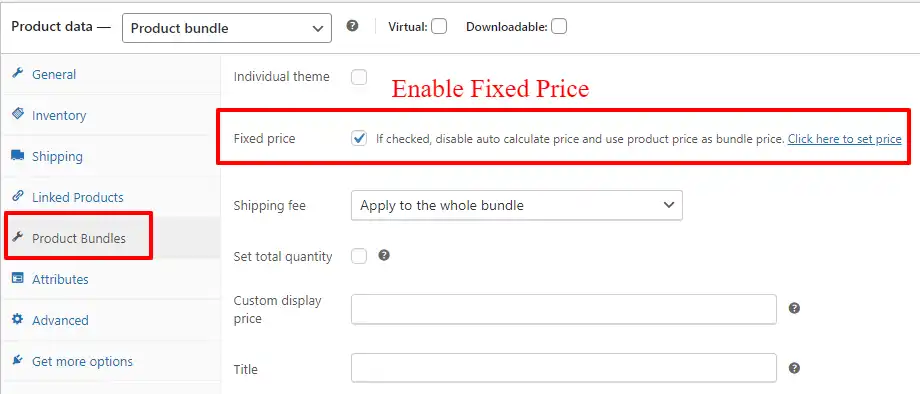
- Then go to the “General” tab and enter the bundle price.
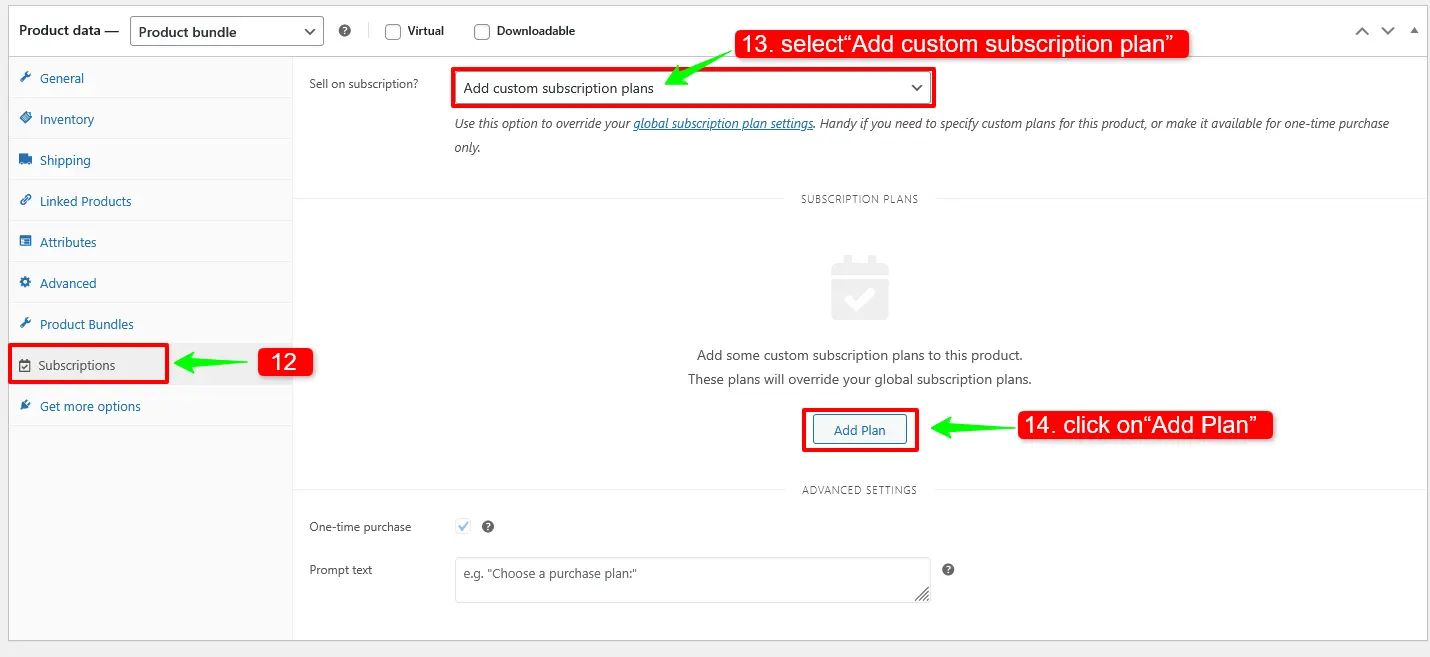
Step 4: Convert the Bundle into a Subscription
After creating and configuring your product bundle, you can turn the entire bundle into a subscription product using the All Products for WooCommerce Subscriptions plugin.
To do this:
- Go to the “Subscriptions” tab.
- In the “Sell on subscription?” dropdown menu, select “Add custom subscription plan”.
- Then click on“Add Plan” button to create a new subscription plan for the bundle.
You can now configure the subscription settings:
– Interval: Choose how often the subscription renews (daily, weekly, monthly, yearly, etc.).
-Length: Choose the subscription billing length from this field.
– Price: Configure the subscription pricing method:
Inherit from product : Use the original product price as the subscription price.
Override product : Set a custom subscription price for the bundle.
– Discount %: Apply a percentage discount to encourage customers to subscribe.
– One-time purchase: Allow customers to either purchase the bundle normally or subscribe to it.
– Prompt text: Customize the subscription option text displayed on the product page.
- At the end, publish your product bundle.
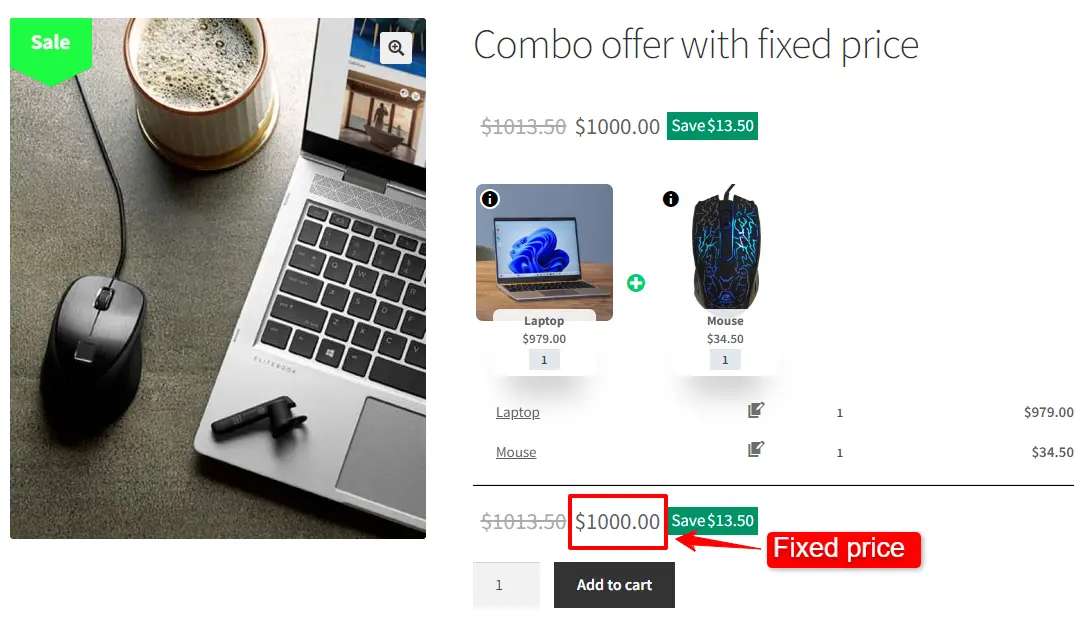
Final Result
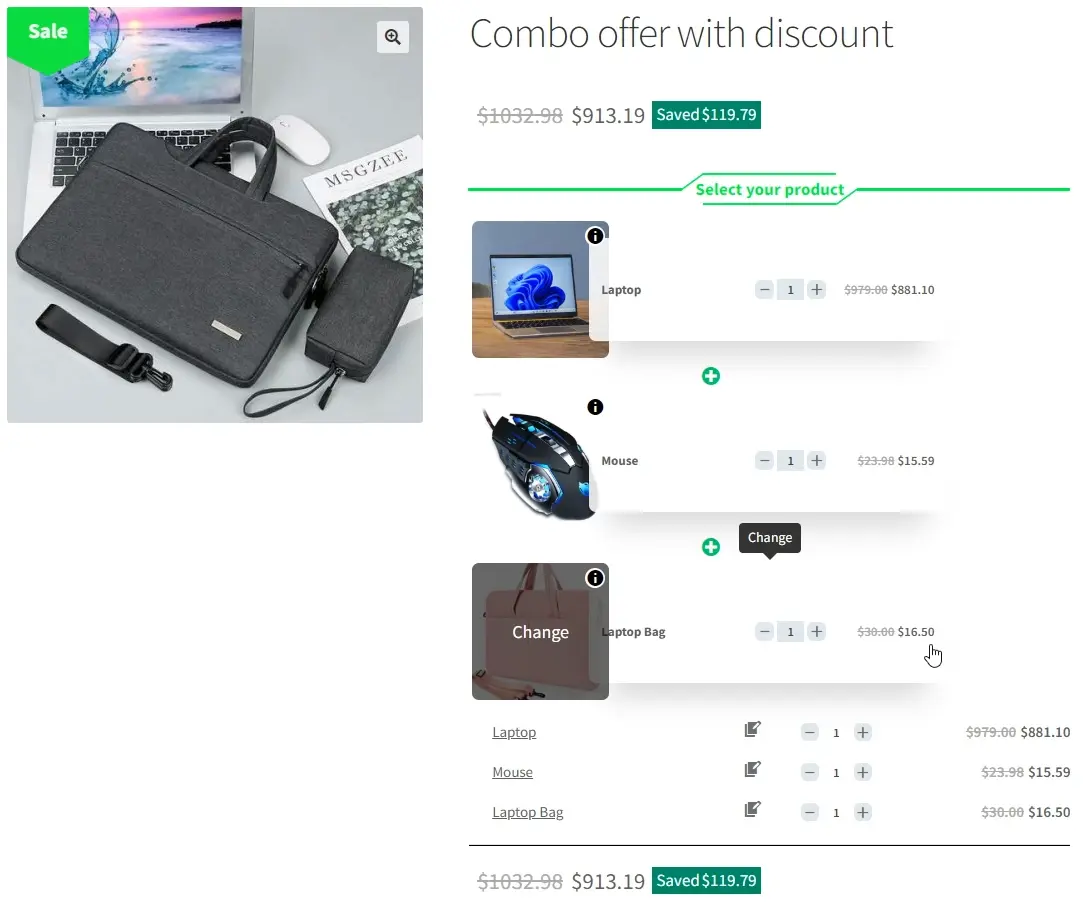
Once your subscription bundle is published, open the product page on the front end of your store.
Your WooCommerce product bundle will now be available as a fixed-price subscription product with recurring payments.
Depending on your settings, customers may also have the option to make a one-time purchase instead of subscribing.
Conclusion
Now that you have created a Subscription Bundle in WooCommerce, either with dynamic pricing or a fixed recurring price, you’ve taken an important step toward building a recurring revenue model for your store.
By combining multiple subscription products or even regular products into a single bundle, you can:
- Simplify the buying experience for customers
- Increase Average Order Value (AOV) and Customer Lifetime Value (LTV)
- Generate predictable recurring revenue
- Build stronger customer loyalty
Tips for maximizing subscription bundles:
- Offer discounts or bonuses for customers who subscribe to bundles.
- Use product categories or tags to manage multiple subscription items easily.
- Regularly review and update your bundles to include popular products or seasonal offers.
By following this guide, you can transform WooCommerce from a traditional e-commerce store into a scalable subscription-based business. Start experimenting with different product combinations and pricing strategies to see what works best for your customers.


