The WooCommerce Upsell Free Plugin is a powerful tool designed to help you boost sales by displaying targeted upsell offers across your product, cart, and checkout pages. By recommending complementary or higher-value products at the perfect moment, this plugin enhances the customer experience while increasing your store’s average order value. Whether you’re promoting beauty items, accessories, or bundled discounts, the WooCommerce Upsell Free Plugin makes it easy to create personalized shopping journeys that convert. For more details or to download the plugin, visit the official WordPress plugin page.
What Is the WooCommerce Upsell Free Plugin?
The WooCommerce Upsell Free Plugin allows you to showcase complementary or higher-value products directly on product, cart, and checkout pages. With targeted recommendations, you can increase customer engagement, boost conversions, and maximize average order value without any complex setup.
Why Use Product Upsells in WooCommerce?
The Product Upsell feature helps you promote add-on or premium products where customers are most likely to buy—right on the product page. By displaying relevant items, you encourage buyers to upgrade or purchase additional items.
Example: If a shopper is viewing Glow Bloom Long Lasting, you can promote upsell items like:
Cream Contour Stick
Full Coverage Concealer Matte Finish Concealer
Hydrating Face Primer
This personalized experience inspires customers to complete their look with complementary products.
Scenario: Smart Upsells in Action
Imagine a customer browsing Glow Bloom Long Lasting. Just below the main product, an upsell section appears showing perfectly matched items such as a contour stick, concealer, and primer. Customers can review product details, choose quantities, and even enjoy discounts. This seamless recommendation system helps increase revenue while improving the shopping experience.
How to Create a Product Upsell Using the WooCommerce Upsell Free Plugin
Navigate to Upsells.
Click on Add New.
Go to the Product Upsell section and click Add.
Open the Offers tab.
Add Offer 1 and select the product you want to promote.
Add Offer 2, then select a product.
Set the Quantity for the offer.
Add Offer 3, and choose a product.
For Offer 3, set the Discount Type to Percentage and enter 10% as the discount amount.
Navigate to the General tab.
Choose your preferred Heading Style.
Enable the option to Add a Link to the Products.
Set the Position for where the upsell will appear on the product page.
Under Targeting, choose Products.
Select Include, then pick the product where this upsell will be displayed.
Enter a Name for your upsell campaign.
Go to the Design tab.
Adjust the Product Button Color or any other styling options as needed.
Save your changes.
Once everything is set up, your Product Upsell section will automatically appear on the Glow Bloom Long Lasting product page. The offers you added will display according to your chosen theme and layout.
How to Create a Cart Upsell (WooCommerce Upsell Free Plugin)
Navigate to Upsells
Click Add New to create a new upsell
Go to the Cart Upsell section and click Add
Enter a Name for your cart upsell campaign.
Open the Offers tab.
Add Offer 1 and select the product you want to promote.
Add Offer 2, then select a product.
For Offer 2, set the Discount Type to Percentage and enter 20% as the discount amount.
Navigate to the General tab.
Choose your preferred Heading Style.
Set the Position for where the upsell will appear on the cart page..
Under Conditions, set the rule to display the upsell when the cart includes at least one of the selected products.
Save your changes.
Once everything is configured, the cart upsell will automatically appear at the top of the Cart page whenever a customer has at least one of the selected products in their cart.
How to Create a Checkout Upsell (WooCommerce Upsell Free Plugin)
Navigate to Upsells
Click Add New to create a new upsell
Go to the Checkout Upsell section and click Add.
Enter a Name for your checkout upsell.
Open the Offers tab.
Add Offer 1, then select a product.
Set the Quantity for the offer.
Set the Discount Type to Price, and enter a Discount Amount of 5.
Add Offer 2, then select a product.
Add Offer 3, and choose a product.
For Offer 3, set the Discount Type to Percentage and enter 10% as the discount amount.
Navigate to the General tab.
Set the Position for where the upsell will display on the checkout page.
Under Conditions, configure the rule to show the upsell when Product Categories in Cart include at least one product from the Perfume category.
Save your changes.
Once everything is set, the checkout upsell will automatically appear at the top of the Checkout page whenever a customer’s cart contains at least one product from the Perfume category.
Final Thoughts on the WooCommerce Upsell Free Plugin
The WooCommerce Upsell Free Plugin is a powerful tool for boosting your store’s average order value. With flexible display rules, smart targeting, and customizable designs, you can create highly effective upsells throughout your store. If you want to explore additional options and view more detailed guides, you can visit the plugin Documentation.
Looking for the best WooCommerce badge plugins to make your products stand out? Picture two nearly identical WooCommerce product pages. One is just a photo and a price. The other has a bold “Best Seller” badge, a bright “Only 3 Left in Stock” sticker, and a clean “New Arrival” flash. Which one earns the click?
That small visual nudge is why choosing the best WooCommerce badge plugins matters more than most store owners realize. Badges do more than decorate a product image. They guide attention, create urgency, and reassure shoppers they’re making the right choice. Done well, the best WooCommerce badge plugins can help improve click-through and add-to-cart rates without changing a single price.
The right plugin turns that psychology into a five-minute setup instead of custom code. In this guide, updated for 2026, we’ve researched and compared five of the best WooCommerce badge plugins, covering free and premium options, conditional logic, and design flexibility. Whether you need simple sale labels or advanced product rules, you’ll find a WooCommerce badge plugin that fits your store.
1. Product Badge, Label, Countdown Timer For WooCommerce – Sale Booster
Product Badge, Label, Countdown Timer for WooCommerce – Sale Booster. Elevate your store’s appeal with customized badges and countdown timers (PRO Version). Enhance your store with one of the most versatile WooCommerce badge plugins, along with product labels and countdown timers to drive sales. This all-in-one plugin empowers you to create eye-catching labels and scheduled badges for products, categories, and tags. Highlighting discount values, product quantities, stock status, and sale status, these labels provide valuable information to your customers. Plus, leverage the power of countdown timers to create urgency and drive conversions. With an intuitive interface, easily customize labels and replace default on-sale badges. Take your WooCommerce store to new heights with visually appealing badges, labels, and countdown timers tailored to your unique offerings.
🚀FEATURES
Let’s take a brief look at some of the cool features of this plugin:
Over 10 Modern Badges
Add Free Shipping on Product Page
Add Discount Popup
Add Trust Badges for embeds
Add Social Media Icons for embeds
Add Payment Icons for embeds
Add Multi Bar
Add Infinity Bar
Add Countdown stock for embeds
Add Announcement feature for embeds
Add Sales Pop-up
Add Notification Bar
Add Free Shipping Bar
Over 200 Image Labels
Over 10 CSS Labels
Over 10 Countdown Timers Template
10 Animation Effects
Add Badge to Out Of Image Position
Incorporate Gradient Colors
Implement Discount Rules
Add a Percentage Discount amount
Rotate CSS Labels, Image Labels, and Advanced Labels
Add Easy Custom labels on products
Access CSS label templates
Preview is available live for easy placement and customization
Add Badges to specific WooCommerce products, categories, or tags
Add Badges to “Is On Sale”
Add Badges to “In Stock” and “Out Of Stock”
Customize label attributes, including color, font size, line height, width, opacity, position, and much more
Transform And Rotate Css Labels
Set Toggle To the visibility of badges
Include an option to set an expiration Date and Time for badges
A unique feature for adjusting hooks that control the presentation of product labels, beneficial if your theme encounters issues displaying them or if you wish to reposition the labels
Adjust the Position of CSS Labels, Image Labels, and Advanced Labels
Include both Vertical and Horizontal Timers
Personalize Sale Timers with Styling Options
Sale Image Labels
Percentage Off Image Labels
Coming Soon Image Labels
Pre-Order Image Labels
Free Image Labels
Black Friday Image Labels
Valentine’s Day Image Labels
Xmas Image Labels
Tested with more than 40+ Themes
Flatsome
WoodMart
Avada
The7
Divi
Betheme
Uncode
Enfold
Bridge
Salient
JupiterX
XStore
Porto
StoreFront
Astra
OceanWP
and much more
📽️Demo
Visit this plugin Live Demo here to see how it works.
2. Advanced Woo Labels – Product Labels for WooCommerce
With the Advanced Woo Labels plugin, you can effortlessly generate labels or badges for all your WooCommerce products. Utilize label conditions to selectively display labels based on specific products, pages, or users. Customize label styles using the built-in options.
Capture users’ attention by incorporating information within labels such as discount value, product quantity, product rating, shipping class, stock status, sale status, and more.
🚀FEATURES
Let’s take a brief look at some of the cool features of this plugin:
Create unlimited number of labels for each WooCommerce product.
Display label in two positions: on product image or before title. Align label at any side of this position.
Use labels with custom text. Write any text inside product labels. Also use special text variables to show important product information like Price, Sale price, Discount percentage, Discount amount, SKU, Quantity.
Choose from 5 different text label shapes. Set unique styles for each of them with help of custom styling options.
Label groups. Show several labels for one product. Set maximal number of such labels, their alignment, priority, distance between them.
Label conditions. Show labels based on specific product, page or user conditions. Combine conditions to ‘AND’ and ‘OR’ groups to create more complex label rules.
Create unlimited label variations with advanced styling options: change label color, font color, font size, opacity, paddings and margins, set any other custom css individually for each label.
Cool admin panel with labels live preview.
Special option to change hooks that used to display product labels if your theme has some problem with showing them or if you want to change labels position.
Page builder plugins support: Gutenberg, Elementor, Beaver Builder, WPBakery, Divi Builder, Avada Builder, etc.
📽️Demo
Visit this plugin Live Demo here to see how it works.
The Advanced Product Labels plugin makes creating labels a breeze, allowing you to swiftly promote your free products or showcase special attributes such as “Free Shipping.” With the flexibility of conditions, you can assign each label to specific products within your shop, ensuring targeted promotion and highlighting of key features.
🚀FEATURES
Let’s take a brief look at some of the cool features of this plugin:
Custom labels on products
Labels for products by specific conditions
Labels by: product name, product category, sale status, stock status, bestsellers position, price, total sales count
Labels custom text and discount percentage type
Labels custom background and text colors
Custom label position
Multiple labels for one product
CSS templates
Custom image template
Better position for labels
Font size for labels
Font family for labels
Dimensions(px|em|%) for the Height, Width, Font size, Line height, Padding and Margin
z-index for labels
📽️Demo
Visit this plugin Live Demo here to see how it works.
The WooCommerce Product Labels plugin, also known as WooCommerce Sale Badges, simplifies the creation of product labels or badges effortlessly. With its user-friendly interface, you can easily craft custom product labels for WooCommerce products. Whether you want to add labels to specific products or categories or replace the default WooCommerce On Sale badges, this plugin offers the flexibility to do so with ease.
🚀FEATURES
Let’s take a brief look at some of the cool features of this plugin:
Can easily create / manage badges with our easy to use UI.
Option to customize badge color, font size, line height, width, opacity, position etc.
Live preview for easy positioning / styling.
Default / commonly used badge styles available to choose from.
Option to set hide / show badges.
Option to set badges to a set of products / category.
Option to set badges to all products ‘On Sale’.
Option to set badges to ‘Out Of Stock’ products.
Option to set expiry date & time on badges.
Option to hide the default WooCommerce ‘On Sale’ Badge.
Option to show discount percenatge (sale / regular price difference) as Badge text.
📽️Demo
Visit this plugin Live Demo here to see how it works.
Utilizing product badges is an effective strategy for enhancing sales within your e-commerce platform. These badges serve to spotlight key products, whether they’re new arrivals, popular items, featured selections, or others. Moreover, product badges can leverage potent psychological triggers such as scarcity, social proof, and urgency, effectively stimulating sales.
🚀FEATURES
Let’s take a brief look at some of the cool features of this plugin:
Create unlimited badges using the advanced builder
Create simple textual badges, with or without background
Create image badges and choose from 9 different images
Set the badge size
Set the padding for the textual badges
Set the badges border radius
Set the badge position (top, bottom, center) and alignment (left, right, center)
Hide or replace the default WooCommerce “on sale” badge
Assign badges to products
📽️Demo
Visit this plugin Live Demo here to see how it works.
If your WooCommerce store still relies on the default “Sale!” badge, you’re leaving conversions on the table. Product labels — the small badges, tags, and countdown stickers layered over your product images — do more than decorate a listing.
They flag urgency, highlight savings, call out bestsellers, and nudge a browsing visitor toward checkout, often without them consciously noticing why. That’s why choosing from the best WooCommerce product label plugins matters more than most store owners realize: the right plugin turns a plain catalog into a persuasive storefront, while the wrong one adds clutter, slows page speed, or breaks on your theme.
We’ve researched, compared, and refreshed this list for 2026, weighing setup ease, styling flexibility, performance, and free-vs-pro value across each option. Whether you want a simple “Out of Stock” sticker, an animated countdown timer, or fully custom image badges tied to specific sale rules, one of these ten plugins should fit your store.
1. Product Badge, Label, Countdown Timer for WooCommerce – Sale Booster
WooCommerce Product Badge, Label, Countdown Timer: Elevate your store’s appeal with customized badges and countdown timers (PRO Version). Enhance your WooCommerce store with sale badges, product labels, and countdown timers to drive sales. This all-in-one plugin empowers you to create eye-catching labels and scheduled badges for products, categories, and tags. Highlighting discount values, product quantities, ratings, shipping classes, stock status, and sale status, these labels provide valuable information to your customers. Plus, leverage the power of countdown timers to create urgency and drive conversions. With an intuitive interface, easily customize labels and replace default on-sale badges. Take your WooCommerce store to new heights with visually appealing badges, labels, and countdown timers tailored to your unique offerings.
Let’s take a brief look at some of the cool features of this plugin:
Over 15 Product Badges
Over 10 Modern Badges
Free Shipping With Upsell
Free Shipping Bar
Order Notifications
Over 200 Image Labels
Trust Badges
Payment icons
Social Media Icons
Countdown Timer
Countdown Stock
Sales Pop-up
Notification Bar
Over 10 CSS Labels
Over 10 Countdown Timers
10 Animation Effects
Add Badge to Out Of Image Position
Incorporate Gradient Colors
Implement Discount Rules
Add a Percentage Discount amount
Rotate CSS Labels, Image Labels, and Advanced Labels
Add Easy Custom labels on products
Access CSS label templates
Preview is available live for easy placement and customization
Add Badges to specific WooCommerce products, categories, or tags
Add Badges to “Is On Sale”
Add Badges to “In Stock” and “Out Of Stock”
Customize label attributes, including color, font size, line height, width, opacity, position, and much more
Transform And Rotate Css Labels
Set Toggle To the visibility of badges
Include an option to set an expiration Date and Time for badges
A unique feature for adjusting hooks that control the presentation of product labels, beneficial if your theme encounters issues displaying them or if you wish to reposition the labels
Adjust the Position of CSS Labels, Image Labels, and Advanced Labels
Include both Vertical and Horizontal Timers
Personalize Sale Timers with Styling Options
Sale Image Labels
Percentage Off Image Labels
Coming Soon Image Labels
Pre-Order Image Labels
Free Image Labels
Black Friday Image Labels
Valentine’s Day Image Labels
Xmas Image Labels
Tested with more than 40+ Themes
Flatsome
WoodMart
Avada
The7
Divi
Betheme
Uncode
Enfold
Bridge
Salient
JupiterX
XStore
Porto
StoreFront
Astra
OceanWP
and much more
📽️Demo
Visit this plugin Live Demo here to see how it works.
2. Advanced Woo Labels – Product Labels for WooCommerce
With the Advanced Woo Labels plugin, you can effortlessly generate labels or badges for all your WooCommerce products. Utilize label conditions to selectively display labels based on specific products, pages, or users. Customize label styles using the built-in options.
Capture users’ attention by incorporating information within labels such as discount value, product quantity, product rating, shipping class, stock status, sale status, and more.
🚀FEATURES
Let’s take a brief look at some of the cool features of this plugin:
Create unlimited number of labels for each WooCommerce product.
Display label in two positions: on product image or before title. Align label at any side of this position.
Use labels with custom text. Write any text inside product labels. Also use special text variables to show important product information like Price, Sale price, Discount percentage, Discount amount, SKU, Quantity.
Choose from 5 different text label shapes. Set unique styles for each of them with help of custom styling options.
Label groups. Show several labels for one product. Set maximal number of such labels, their alignment, priority, distance between them.
Label conditions. Show labels based on specific product, page or user conditions. Combine conditions to ‘AND’ and ‘OR’ groups to create more complex label rules.
Create unlimited label variations with advanced styling options: change label color, font color, font size, opacity, paddings and margins, set any other custom css individually for each label.
Cool admin panel with labels live preview.
Special option to change hooks that used to display product labels if your theme has some problem with showing them or if you want to change labels position.
Page builder plugins support: Gutenberg, Elementor, Beaver Builder, WPBakery, Divi Builder, Avada Builder, etc.
📽️Demo
Visit this plugin Live Demo here to see how it works.
The Advanced Product Labels plugin makes creating labels a breeze, allowing you to swiftly promote your free products or showcase special attributes such as “Free Shipping.” With the flexibility of conditions, you can assign each label to specific products within your shop, ensuring targeted promotion and highlighting of key features.
🚀FEATURES
Let’s take a brief look at some of the cool features of this plugin:
Custom labels on products
Labels for products by specific conditions
Labels by: product name, product category, sale status, stock status, bestsellers position, price, total sales count
Labels custom text and discount percentage type
Labels custom background and text colors
Custom label position
Multiple labels for one product
CSS templates
Custom image template
Better position for labels
Font size for labels
Font family for labels
Dimensions(px|em|%) for the Height, Width, Font size, Line height, Padding and Margin
z-index for labels
📽️Demo
Visit this plugin Live Demo here to see how it works.
The WooCommerce Product Labels plugin, also known as WooCommerce Sale Badges, simplifies the creation of product labels or badges effortlessly. With its user-friendly interface, you can easily craft custom product labels for WooCommerce products. Whether you want to add labels to specific products or categories or replace the default WooCommerce On Sale badges, this plugin offers the flexibility to do so with ease.
🚀FEATURES
Let’s take a brief look at some of the cool features of this plugin:
Can easily create / manage badges with our easy to use UI.
Option to customize badge color, font size, line height, width, opacity, position etc.
Live preview for easy positioning / styling.
Default / commonly used badge styles available to choose from.
Option to set hide / show badges.
Option to set badges to a set of products / category.
Option to set badges to all products ‘On Sale’.
Option to set badges to ‘Out Of Stock’ products.
Option to set expiry date & time on badges.
Option to hide the default WooCommerce ‘On Sale’ Badge.
Option to show discount percenatge (sale / regular price difference) as Badge text.
📽️Demo
Visit this plugin Live Demo here to see how it works.
Utilizing product badges is an effective strategy for enhancing sales within your e-commerce platform. These badges serve to spotlight key products, whether they’re new arrivals, popular items, featured selections, or others. Moreover, product badges can leverage potent psychological triggers such as scarcity, social proof, and urgency, effectively stimulating sales.
🚀FEATURES
Let’s take a brief look at some of the cool features of this plugin:
Create unlimited badges using the advanced builder
Create simple textual badges, with or without background
Create image badges and choose from 9 different images
Set the badge size
Set the padding for the textual badges
Set the badges border radius
Set the badge position (top, bottom, center) and alignment (left, right, center)
Hide or replace the default WooCommerce “on sale” badge
Assign badges to products
📽️Demo
Visit this plugin Live Demo here to see how it works.
Show a “Sold Out!” badge on products that are out of stock. This plugin for WooCommerce will display a badge on the product thumbnail, featuring the text you’ve specified, when the product becomes out of stock.
🚀FEATURES
Let’s take a brief look at some of the cool features of this plugin:
Badge text (you can replace “Sold Out” with any text you want, like “Out of stock” or “Coming Soon“)
Badge background color
Badge text color
Badge font size
Badge width
Badge height
…
An option to hide “Sale” badge if you get an overlap (checked by default)
📽️Demo
Visit this plugin Live Demo here to see how it works.
The WPC Badge Management plugin is incredibly versatile, multipurpose, and powerful. Specifically designed for managing badges in online shops and WooCommerce sites, it goes beyond simple product labeling. It serves as a potent tool for ecommerce business owners, aiding them in increasing conversion rates, boosting sales and revenues, ensuring speedy checkout processes, and enhancing customer retention rates.
🚀FEATURES
Let’s take a brief look at some of the cool features of this plugin:
More than 22 styles of badges that diversify in images, colors, shapes, texts, etc.
Highly customizable Global Badges: excerpt, applicable objects, position, text, colors, tooltip & order
Multi-level object application: storewide (all products), on-sale, featured, out of stock, selected tags, categories, brands, product types, specific attributes
Various positions: Show or hide badges in more than 10 positions on pages & product images
Icons & short-code supported custom text for badges
Icon library: support FontAwesome, Feather, Ionicons
Orderable badges: input the order to be arranged when there are various badges inserted
Instant preview of badges on product image
Quickly preview all details of badges from the dashboard
(PREMIUM) Using a combination of conditionals
(PREMIUM) Groupable badges: manage positions of badges in groups on the single product page, archive page and product image
(PREMIUM) Product-level badge management: customize badges for specific products
WPC Smart Quick View integration: Customizable position on quick view popup
Product Badge Manager for WooCommerce enables you to create unlimited product badges and assign them to your WooCommerce products based on various criteria such as category, attributes, terms, popularity, sales, time, stocks, and more. You can also filter the product archive using these badges.
🚀FEATURES
Let’s take a brief look at some of the cool features of this plugin:
Easy to use
You can add new product badges.
You can select Show Label.
Select Product badge position.
Customized Label font size, color and background color.
Add Product Discount Text.
You can Select Label Shape or Image Badge select.
Product Badges add conditionally with product wise and tag wise.
WPML Support
📽️Demo
Visit this plugin Live Demo here to see how it works.
In this article, we aim to provide a thorough and detailed review of WooCommerce Grouped Products. Subsequently, we will follow up with a step-by-step tutorial on creating and implementing them in your online store.
Looking to enhance your online store with product bundles? This guide to WooCommerce Grouped Products provides a comprehensive review and tutorial for creating and managing grouped products. Moreover, it is perfect for both seasoned pros and beginners. By following the guide, you can streamline store management and boost sales, as it improves the shopping experience. Consequently, dive in to unlock your WooCommerce store’s full potential!
WooCommerce Grouped Products let store owners showcase multiple related items together. Unlike simple or variable products, which are individual items or items with variations, grouped products are standalone items that can be purchased together or separately. This feature is ideal for selling complementary items like books, accessories, or tools. Consequently, it provides a more organized and appealing presentation, thereby making it easier for customers to find and buy what they need.
Benefits of Using Grouped Products
Cost Savings for Customers: Grouped products are attractive for customers buying related items together. Offering a discount on the group can increase appeal, providing value to customers and boosting sales.
Increased Sales Opportunities: Presenting related products as a group promotes cross-selling and upselling, encouraging customers to buy complementary items. This can increase average order values and overall sales.
Flexible Pricing and Promotions: Grouped products enable flexible pricing strategies. For instance, you can offer discounts or promotions to the entire group; alternatively, you can apply them to individual items. Consequently, this approach encourages customers to purchase more.
Enhanced Customer Experience: Grouped products display related items together. As a result, customers can more easily find and buy complementary products. Consequently, this enhances satisfaction and boosts purchases.
Improved SEO and Discoverability: Grouped products can boost your store’s SEO by adding more content and keywords. Consequently, this improves visibility in search results and makes it easier for customers to find your products.
Consistent Branding and Theming: Grouped products enable consistent branding and thematic presentation. As a result, they enhance your store’s aesthetic, strengthening brand identity. Consequently, this appeals to customers seeking specific styles or collections.
Enhanced Product Visibility: Grouped products can boost the visibility of less popular or new items by pairing them with best-sellers. Thus, this strategy helps introduce customers to products they might not have found otherwise.
Examples of Grouped Products
Fitness Starter Pack: A selection of fitness equipment is grouped for beginners, offering a comprehensive set for home workouts. For example, it includes dumbbells, a yoga mat, resistance bands, and a jump rope. Consequently, this collection provides everything needed to start an effective fitness routine at home.
Outdoor Adventure Gear: Key outdoor equipment is bundled together for camping enthusiasts, offering convenience for trip preparation. Specifically, it includes items such as a tent, sleeping bag, backpack, and camping stove. Consequently, this bundle simplifies the process of getting ready for a camping trip.
Gardening Starter Kit: A collection of essential gardening tools is grouped for easy purchase, making it ideal for new gardeners. For instance, it includes a trowel, pruning shears, gloves, and a watering can. As a result, this setup simplifies the process of getting started with gardening.
Kitchen Essentials Set: A grouped product of fundamental kitchen tools designed for cooking and baking. Specifically, it is perfect for new cooks or kitchen setups. Moreover, this collection provides essential items that facilitate a smoother cooking experience.
Art Supplies Collection: A set of basic art supplies is available for artists, allowing customers to purchase all necessary items in one go. For instance, this set includes sketchpads, coloured pencils, brushes, and acrylic paints. As a result, it simplifies the process of acquiring essential art materials.
Office Supplies Bundle: Essential office supplies are grouped together for easy restocking or setting up a new workspace. For instance, the collection includes notebooks, pens, a stapler, and a desk organizer. Consequently, this grouping streamlines the process of equipping an office efficiently.
Video Tutorial
Setting Up Grouped Products in WooCommerce
To set up a grouped product in WooCommerce, we use the free and powerful “ Product Bundle Builder for WooCommerce” plugin, one of the most popular WordPress plugins in 2025. This plugin is not only user-friendly but also offers numerous great tools for personalization.
To create WooCommerce Grouped Products, follow the below steps:
1. Go to WooCommerce “Products”.
2. Click on “Add New” to create a new product.
3. Set a name for the Grouped Products.
4. Click on “Set product image” from the right sidebar and select an image for your Grouped Products.
5. Now go to the Product data section, and select “Product bundle” as the product type from the dropdown menu.
6. After selecting “Product bundle” as the product type the “Product Bundles” tab will appear in the product data panel.
7. Go to the “Product Bundles” tab and click on the “Add Item” button to add a new bundle item.
Step 3: Add product to the Grouped Products
8. Now scroll down to the item field, and in the “Products” field of the item Search and select the product you want, you can also set the default product for this item in the default product field.
Likewise, if you would like to include products from a category, you can do so with the “Categories” field of the item. therefore you can search for categories and add them. (PRO VERSION)
in addition, you can do the same for the product tags and include them in the “Tags” field. (PRO VERSION)
Step 4: Customising the Grouped Products
You can also configure the below settings to your grouped products in the item field:
Sort products: With this field, you can sort selected grouped products by “ID”, “Title”, “Menu order”,” Date”, “Price”, “popularity” and“Rating”.
Quantity: In this field, you can set the default quantity for each grouped product.
Edit quantity by user: Check this field to allow the user to change the quantity of product and Set the “min/max quantity” for each item.
Discount: In this field, you can set discounts for the grouped products by percentage, price or fixed price.
Now you can go to the “display” tab of the item and configure the below sections:
Overwrite bundle item title.
Overwrite bundle item short description. (Show when the mouse hovers over it)
Change the title of the bundle empty item.
Change the product list product selection title.
Change the pop-up header title.
Set an image for the empty item.
9. Then you can click on “Add Item” to add a new item to the grouped products and Configure it as in the previous steps. We have created 2 other bundle items.
Step 5: Pricing for Grouped Products
After adding products and configuring settings for that you can choose how want to price your grouped products.
Fixed Price: Sets a fixed price for the whole assembled products.
Auto Calculate Bundle Price: Allow the plugin to calculate the grouped product price using the selected products for the bundle items.
1. Fixed Price
If you want to set a fixed price for the whole assembled products, check the “Fixed Price” option.
Navigate to the “General” tab and set a regular price for the grouped product. You can set a Sale price too.
After setting a price, update the product
2. Auto Calculate Price
Auto calculates price helps to set a dynamic price for the grouped products on selected items for the bundle.
Therefore to use the auto-calculate price feature, uncheck the “Fixed Price” option and update the product.
10. At the end publish the grouped products.
Step 6: Configure the Plugin Settings
All the plugin settings you need can be found on the “Product Bundles” tab in the WordPress dashboard.
Settings and customization are available on this page:
Item View: In this section, you can configure various settings, such as displaying stock availability, showing product ratings and descriptions, enabling modal quick views, adding a quantity field on item pages, displaying a plus icon for items, setting the theme and size options, positioning product bundles on the product page, defining custom CSS selectors, specifying the product price selector, and many other customizable options.
Change product model: In this section, you can configure the number of products per pop-up page.
Styles: In this section, you can customize the colours of different parts of your bundle and set the product image object-fit CSS.
Final Result
Now open the product page on the front end. As a result, After selecting a product, for all of the bundle items, the WooCommerce grouped products will be shown as the image below.
Grouped Products With Variable Product in WooCommerce
Creating Grouped Products in WooCommerce allows you to showcase multiple related items together as a single offering. This feature can be particularly powerful, especially when combined with Variable Products, as it provides even more flexibility and options for customers. Here’s how you can effectively use WooCommerce Grouped Products with Variable Products:
Step 1: Create a Grouped Products
To create WooCommerce Grouped Products with Variable products, you can follow the steps below:
1. Go to WooCommerce “Products”.
2. Click on “Add New” to create a new product.
3. Set a name for the Grouped Products with Variable.
4. Click on “Set product image” from the right sidebar and select an image for your Grouped Products.
5. Go to the Product data section, and select “Product bundle” as the product type from the dropdown menu.
6. After selecting “Product bundle” as the product type the “Product Bundles” tab will appear in the product data panel.
7. Go to the “Product Bundles” tab and click on the “Add Item” button to add a new bundle item.
Step 2: Add Variable product to the Grouped Products
8. Now scroll down to the item field, and in the “Products” field of the item Search and select the Variable products you want.
you can also set the default variation product for this item in the default product field. (PRO VERSION)
Likewise, if you would like to include Variable products from a category, you can do so with the “Categories” field of the item. therefore you can search for variable product categories and add them. (PRO VERSION)
in addition, you can do the same for the variable product tags and include them in the “Tags” field. (PRO VERSION)
Step 3: Customising the Grouped Products
For customising the grouped products, therefore please Read this sectionof the article for more information.
9. Then you can click on “Add Item” to add a new item to the grouped products with Variable product and Configure it as in the previous steps. We have created 2 other bundle items.
Step 4: Pricing for Grouped Products with Variable Products
Now you should decide about the pricing of the Grouped Products with Variable Products. therefore You can use a fixed price for the whole bundle or use auto calculate price, to calculate the bundle price based on selected items.
To configure the plugin settings, therefore please Read this sectionof the article for more information.
Final Result
Now open the product page on the front end. As a result, After selecting a variation product, for all of the bundle items, the WooCommerce grouped products with Variable will be shown as the image below.
How to Create Flexible Optional Grouped Products
Flexible Optional Grouped Products offer a personalized shopping experience by allowing customers to customize combinations of products or services according to their preferences. This feature enables customers to choose whether or not to purchase additional products within the group, giving them full control over their shopping experience. As a result, this flexibility not only enhances customer satisfaction but also drives higher spending through cost savings and upselling opportunities. Businesses, in turn, benefit from increased revenue, improved customer loyalty, and a versatile marketing tool that adapts effectively to market trends.
4. Click on “Set product image” from the right sidebar and select an image for your optional Grouped Products.
5. Go to the Product data panel, and select “Product bundle” as the product type.
6. Set the selling price for your parent product.
7. Now go to the “Product Bundles” tab.
8. Check “Include parent price” so that the price of the parent product is applied to the product bundle.
9. Click on the “Add Bundle” button to add a new bundle item.
Step 2: Add items to Flexible Optional Grouped Products
10. Now scroll down to the item field, and check the “Optional” field to make this bundle item optional.
11. Now select the default product for this item in the “Default Product” field.
12. In the “Categories” field search for a category and select it.
Step 3: Customising the Grouped Products
For customising the grouped products, therefore please Read this sectionof the article for more information.
13. Then you can click on “Add Bundle” to add a new item to the bundle and Configure it as in the previous steps. We created another bundle item.
Step 4: Pricing for Flexible Optional Grouped Products
Now you should decide about the pricing of the Flexible Optional Grouped Products. therefore You can use a fixed price for the whole bundle or use auto calculate price, to calculate the bundle price based on selected items.
To configure the plugin settings, therefore please Read this sectionof the article for more information.
Final Result
After creating and publishing the flexible optional grouped products, open the product page on the front end. The WooCommerce Flexible Optional Grouped Products will be shown as the image below.
Note: By clicking on the add to cart, the customer adds 1 parent product + 2 or 1 selected product to the cart and when the customer removes the chosen products, she/he can buy only the parent product.
The Best Way to Use WooCommerce Grouped Products
The best way to use WooCommerce grouped products is to strategically bundle complementary items together, as a result enhancing the shopping experience and increasing sales. Here are some tips:
Bundle Related Items: First and foremost, group products that naturally go together, such as a camera with a memory card and camera case. This makes it convenient for customers to purchase all necessary items at once.
Offer Discounts: Additionally, provide a slight discount when customers purchase the entire group. This encourages them to buy more, thereby boosting your sales.
Promote Visibility: Moreover, use grouped products to highlight less popular or new items by pairing them with best-sellers. This can help introduce customers to products they might not have discovered otherwise.
Simplify Shopping: Make it easier for customers to find and buy complementary products by presenting them together, Consequently, this streamlined shopping experience can increase customer satisfaction and encourage more purchases.
Enhance SEO: Consequently, grouped products can improve your store’s SEO by adding more content and keywords, making it easier for potential customers to find your products through search engines.
Consistent Branding: Finally, use grouped products to present items with consistent branding or themes, thereby enhancing your store’s aesthetic and strengthening your brand identity.
By leveraging these strategies, you can effectively use WooCommerce grouped products to enhance your store’s functionality and appeal.
Conclusion
In conclusion, using grouped products in WooCommerce offers a strategic advantage for enhancing your online store. By grouping related items, you can provide a more organized and appealing shopping experience for customers, making it easier for them to find and purchase complementary products. This approach not only simplifies the purchasing process but also boosts sales by encouraging customers to buy multiple items at once. Additionally, the flexibility to include variable products within grouped offerings allows for greater customization and personalization, further improving customer satisfaction. Effectively leveraging grouped products can streamline store management, increase visibility for less popular items, and enhance your store’s overall functionality and appeal.
Articles
To delve deeper into the realm of Product Bundle plugin and their applications, we invite you to explore the array of informative resources we’ve compiled in the list below. These resources promise to expand your understanding and proficiency in leveraging the potential of this plugin to the fullest:
What is the difference between bundled products and grouped products in WooCommerce?
Grouped products in WooCommerce let customers buy related items individually or together, with each item managed separately. In contrast, bundled products create a custom package of items sold together at a discount, often with options for customization.
Why use product bundling?
Product bundling offers customers a convenient way to purchase related items at a discounted price, enhancing their shopping experience and increasing overall sales. It simplifies buying, promotes additional product purchases, and often leads to higher average order values.
Which is an example of product bundling?
Instead of purchasing a single pencil, customers can be offered a bundle that includes a pencil, eraser, and sharpener, encouraging them to buy multiple items at once and increasing the average order value.
Is product bundling effective?
Product bundling is a smart strategy for clearing obsolete or excess inventory. Excess stock ties up cash, reduces business agility, and increases storage costs. By bundling slow-moving items with popular products, you can efficiently clear shelf space and improve cash flow while making room for better-selling goods.
In this article, we thoroughly explore WooCommerce Assembled Products. We delve into its numerous benefits and advantages for online stores and provide a step-by-step guide on how to create WooCommerce Assembled Products for free in your online store.
Don’t miss out on this valuable information read the full article to discover how WooCommerce Assembled Products can enhance your business and streamline your online store setup!
Assembled Products refer to items created by combining multiple individual components into a single package, providing a unified product for customers. This concept is widely used across various industries to enhance convenience and increase sales. For example, consider a DIY electronics kit sold in an online store. Instead of purchasing each component separately—such as resistors, capacitors, wires, and a soldering iron—the customer can buy a complete kit that includes all these items, along with detailed instructions. This assembled product simplifies the purchasing process, ensuring that the customer has everything needed for the project, and often comes at a lower total cost than buying the parts individually. By offering such bundled products, businesses can improve the customer experience, manage inventory more effectively, and boost their average order value.
Benefits of Using WooCommerce Assembled Products
Utilizing WooCommerce Assembled Products provides numerous benefits for online store owners, significantly improving business operations and enhancing customer satisfaction. Here are some of the key advantages:
Increased Product Visibility: Featuring assembled products can draw attention to individual items that customers might not have otherwise noticed. This can drive interest and sales for those components.
Boosted Sales: By grouping related items together, you incentivize customers to purchase more in a single transaction, leading to higher average order values and increased overall revenue.
Enhanced Customer Experience: Providing assembled products streamlines the shopping journey, enabling customers to easily acquire all the necessary items in one go. This added convenience can result in greater customer satisfaction and loyalty.
Personalization Options: Customers often have the ability to select specific components or variations within the assembled product, offering a personalized shopping experience. This customization can attract broader customers.
Cost Savings: Offering bundled items typically provide a cost-benefit for both the business and the customer. Businesses can offer discounts on these bundles, making them more appealing, while customers save money compared to purchasing each item separately.
Increased Product Visibility: Featuring assembled products can draw attention to individual items that customers might not have otherwise noticed. This can drive interest and sales for those components.
Enhanced Cross-Selling: Assembled products naturally promote cross-selling, as customers are introduced to complementary items they might not have considered purchasing together.
Streamlined Order Processing: Managing a single order for an assembled product is often more efficient than handling multiple separate orders, reducing administrative tasks and speeding up fulfilment.
Build Customer Loyalty: Offering thoughtfully curated bundles that meet your customers’ needs will foster loyalty. Customers will appreciate the convenience and value, making them more likely to return.
Examples of Assembled Products
Custom Computer Build: Customers can customize their computer by selecting specific components like the processor, graphics card, and storage options, and have it assembled by the seller before shipping.
Custom Gift Basket: Customers can select gourmet foods, skincare products, and candles to create a personalized gift basket that is carefully assembled and beautifully packaged.
Fitness Equipment Package: Customers can choose a combination of fitness equipment like dumbbells, resistance bands, and a yoga mat, and have it packaged together and delivered fully assembled for a convenient workout experience.
Custom Furniture Set: Customers can select different pieces of furniture, such as a desk, chair, and bookshelf, to create a coordinated set that is assembled and delivered by the seller for easy setup.
Personalized Skincare Kit: Customers can select different skincare products, such as cleansers, toners, moisturizers, and serums, to create a customized skincare routine that is assembled and packaged together.
Custom Bicycle Build: Customers can select the frame, handlebars, wheels, and other components to create a custom bicycle that is assembled by the seller and delivered ready to ride.
Gourmet Cooking Kit: Customers can choose from a selection of high-quality ingredients, such as spices, oils, and speciality foods, to create a gourmet cooking kit that is assembled and packaged for a culinary experience.
Custom Jewelry Set: Customers can select various pieces of jewellery, such as necklaces, bracelets, and earrings, to create a personalized jewellery set that is assembled and packaged in a gift box.
Travel Essentials Kit: Customers can choose travel-sized toiletries, accessories, and comfort items to create a travel kit that is assembled and packaged for convenience.
Best Plugin to Create WooCommerce Assembled Products
To craft our assembled products, We utilize WordPress’s favourite plugin of 2023, Product Bundle Builder for WooCommerce. This dynamic tool offers an array of unique and innovative features, all at no cost. With its user-friendly interface and strong features, the plugin enables us to easily produce assembled products that improve the shopping experience and boost sales. Experience the convenience and flexibility of the WooCommerce Product Bundle Builder and transform your store’s product offerings today. therefore we’ll guide you through the step-by-step process of installing and creating assembled products in WooCommerce:
Video Tutorial
How To Create Assembled Products in WooCommerce
To create assembled products in WooCommerce, follow the steps below:
To create WooCommerce Assembled Products, follow the below steps:
1. Go to WooCommerce “Products”.
2. Click on “Add New” to create a new product.
3. Set a name for the assembled products.
4. Click on “Set product image” from the right sidebar and select an image for your assembled products.
5. Now go to the Product data panel, and select “Product bundle” as the product type.
6. After selecting “Product bundle” as the product type the “Product Bundles” tab will appear in the product data panel.
7. Go to the “Product Bundles” tab and click on the “Add Item” button to add a new bundle item.
Step 3: Add items to Assembled Products in WooCommerce
8. Now in the “Products” field Search and select the product you want, you can also set the default product for this item in the default product field.
Likewise, if you would like to include products from a category, you can do it with the “Categories” field of the item. therefore you can search for categories and add them. (PRO VERSION)
in addition, you can do the same for the product tags and include them in the “Tags” field. (PRO VERSION)
You can also add the following settings to your assembled products:
Sort products: With this field, you can sort selected assembled products by “ID”, “Title”, “Menu order”,” Date”, “Price”, “popularity” and“Rating”.
Quantity: In this field, you can set the default quantity for each assembled product.
Edit quantity by user: Check this field to allow the user to change the quantity of product and Set the “min/max quantity” for each item.
Discount: In this field, you can set discount for the assembled products by percentage, price or fixed price.
9. Then you can click on “Add Item” to add a new item to the assembled products and Configure it as in the previous steps. We have created 8 bundle items like the below image.
Step 4: Pricing for WooCommerce Assembled Products
After adding products you can choose how want to price your assembled products.
Fixed Price: Sets a fixed price for the whole assembled products.
Auto Calculate Bundle Price: Allow the plugin to calculate the assembled product price using the selected products for the bundle items.
1. Fixed Price
If you want to set a fixed price for the whole assembled products, check the “Fixed Price” option.
Navigate to the “General” tab and set a regular price for the assembled product. You can set a Sale price too.
After setting a price, update the product
2. Auto Calculate Price
Auto calculates price helps to set a dynamic price for the assembled products on selected items for the bundle.
Therefore to use the auto-calculate price feature, uncheck the “Fixed Price” option and update the product.
Step 5: Position of WooCommerce Assembled Products
You can set a position for the assembled products on the product page by following the below steps.
Navigate to the “Product Bundles” menu page in WordPress admin.
In the settings tab, there is a “Bundle position” option to change the bundle position on the product page.
You can select the appropriate position from the available options like “before add to cart button”, “after add to cart button”, etc.
Also, there are options to show the product bundle before or after a CSS selector.
After selecting “before” or “after” CSS selector, find a CSS selector on the product page and put it in the “CSS Selector” field.
Save the settings, after selecting a position for the bundle.
In the case, that none of the listed positions helps, you can use the below shortcodes of the plugin.
Use it on the product page to show the bundles.
Use it on the product page to show the bundles + add to cart button.
After creating and publishing the assembled products, open the product page on the front end. As a result, After selecting a product, for all of the bundle items, the WooCommerce assembled products will be shown as the image below.
Final Result
When the user clicks on each bundle item, he can select the desired product from multiple available products like in the below image.
How to Create Assembled Variable Products with Discount
In an online store, using assembled variable products with discount benefits can enhance the shopping experience for customers and drive sales. By offering bundled products at a discounted price, you provide value and convenience to shoppers who are looking to purchase multiple items together. This strategy encourages customers to spend more by incentivizing them with cost savings and simplifying the decision-making process. Additionally, promoting these discounted assembled variable products can help increase average order value, loyalty, and customer satisfaction. Overall, utilizing assembled variable products with discount benefits in an online store can attract more customers, boost sales, and differentiate your store from competitors.
Step 1: Create assembled Variable products with discount
1. Navigate to WooCommerce “Products”.
2. Click on “Add New” to create a new product.
3. Set a name for the assembled products.
4. Click on “Set product image” from the right sidebar and select an image for your assembled products.
5. Now navigate to the Product data panel, and select “Product bundle” as the product type.
6. After selecting “Product bundle” as the product type the “Product Bundles” tab will appear in the product data panel.
7. Navigate to the “Product Bundles” tab and click on the “Add Item” button to add a new bundle item.
Step 2: Add items to assembled Variable products with a discount
8. Now in the “Products” field Search and select the variable product you want, also you can search for the variation product and select it, search and select the variation product is available in the pro version.
Likewise, if you would like to include variable products from a category, you can do it with the “Categories” field of the item, therefore you can search for categories and add them. (PRO VERSION)
in addition, you can do the same for the variable product tags and include them in the “Tags” field. (PRO VERSION)
You can also add the following settings to your products :
Sort products: With this field, you can sort selected variable products by “ID”, “Title”, “Menu order”,” Date”, “Price”, “popularity” and“Rating”.
Quantity: In this field, you can set the default quantity for each bundled product item.
Edit quantity by user: Check this field to allow the user to change the quantity of a product and Set the “min/max quantity” for each item.
9. Now In the discount field, set the discount for the assembled variable products by percentage, price or fixed price.
10. Then you can click on “Add Item” button to add a new item to the assembled variable products with discount and Configure it as in the previous steps. We have created two other bundle items with discounts.
11. After making the desired settings, at the end publish the changes.
After creating and publishing the assembled variable products with discount, open the product page on the front end. As a result, After selecting a variation product, for all of the bundle items the WooCommerce variable assembled products with discount will be shown as the image below.
Final Result
Other features of the used plugin
In addition to its powerful product bundling capabilities, Product Bundle Builder for WooCommerce offers a variety of other features that can help boost the popularity and appeal of your online store. this plugin allows you to create unique and compelling offers that will attract and retain customers. By leveraging these tools effectively, you can enhance your store’s visibility and customer engagement, leading to increased sales and profitability. Below, we present some excellent features of this plugin:
💎 WooCommerce Product Bundle Features
Create Woocommerce Composite Products Allow customers to create and purchase customized products by selecting from a list of pre-defined components or options. Therefore with composite products, you can provide customers with a variety of options while simplifying the purchasing process and boosting sales and revenue in your online store.
Create Dynamic Product Bundles Allow your customers to create dynamic and advanced bundles at the same time.
Create Mix and Match Products
Create BOGO deals Offer Buy One Get One deal.
Create Buy 2 Get 1 deals
Create Personalized Products Allow customers to create a personalized product from multiple available products to pick from.
Gift Products Allow your customers to choose gift products from multiple available gift products.
Shipping fee Select to calculate the shipping fee for the whole bundle or each bundle item.
Drag & Drop Rearrange bundled product order.
Rules Select which products appear in the bundle item list.
Virtual or Downloadable product bundles Allow creating Virtual or Downloadable product bundles.
Show Stock Displays stock quantity for each of the bundle items.
Show Rating Displays rating for each of the bundle items.
Show Description Displays each of the bundle item’s description on hover.
Link to Products Choose how to link to the product bundle items when clicking on the title ( New Tab | No Link | Show the product change modal to select from available items)
Coupon Apply Method Control how coupons should be applied on the bundle product (Both bundle and bundle items | Only bundle | Only bundle items | None)
Cart Contents Count Choose how to count bundle products in the cart? Count both “bundle and its items” or “only bundle” or “only bundle items”.
🚀 WooCommerce Product Bundle PRO VERSION Feature
Exclude products Select which products can not appear on the bundle item list.
Exclude categories Select which categories can not appear on the bundle item list.
Exclude tags Select which tags can not appear on the bundle item list.
Optional Items Make an item of the product bundle optional so the customer does not have to choose a product for that item.
Themes Multiple and beautiful grids and list items theme.
Size Small/Medium/Large size for bundle items.
Item Gallery View the product gallery in a popup.
Product Quick View View the product quick view in a popup.
Total quantity Set min or max total quantity of bundled items.
Duplicate the item in the backend. (new)
Empty item image assign a photo to the empty item. (new)
📚 SUPPORTED LANGUAGES
English
Български (Bulgarian)
Deutsch (German)
Español (Spanish)
Français (French)
Italiano (Italian)
Português (Portuguese)
Polski (Polish)
Русский (Russian)
Türkçe (Turkish)
עִבְרִית (Hebrew)
العربية (Arabic)
فارسی (Persian)
📽️Demo
Explore the links below to observe how this plugin functions:
Utilizing the assembled products sales method in an online store allows retailers to offer a highly customizable and engaging shopping experience. By enabling customers to select and assemble their own products from various components or items, retailers can cater to individual preferences and needs, enhancing customer satisfaction. This approach not only adds value through personalization but also can streamline inventory management and boost sales by appealing to a broader audience. Overall, the assembled products method is a strategic way to differentiate an online store, attract diverse customers, and drive growth.
Articles
To delve deeper into the realm of Product Bundle plugin and their applications, we invite you to explore the array of informative resources we’ve compiled in the list below. These resources promise to expand your understanding and proficiency in leveraging the potential of this plugin to the fullest:
WooCommerce Product Bundle or Product Groups are a way to group products and offer them at a discounted price or individually. Ultimately, this approach encourages customers to increase their spending and boosts the average order value.
Can I use assembled products for any type of product?
Yes, assembled products can be used for a wide range of items, including electronics, furniture, gift baskets, fitness equipment, and more. The key is to define the components or options that customers can choose to build their customized product.
Can I set pricing for different components or options in assembled products?
Yes, you can set individual prices for each component or option. The final price of the assembled product will be dynamically calculated based on the components selected by the customer.
WooCommerce flash sale is an exciting marketing strategy employed by online businesses using the popular WooCommerce platform. A flash sale is a limited-time promotion that offers significant discounts and exclusive deals on select products or services. This high-intensity sales event creates a sense of urgency and excitement among customers, encouraging them to make immediate purchases. With WooCommerce, online store owners can effectively implement flash sales by setting up time-limited discounts, showcasing countdown timers, and creating a dynamic shopping experience. By harnessing the power of flash sales, WooCommerce merchants can drive customer engagement, boost sales, and create a buzz around their brand, ultimately fostering customer loyalty and increasing revenue.
Adobe Analytics data reveals a record-breaking holiday season in terms of spending. Cyber Monday witnessed a remarkable 9.6% YoY growth, reaching an impressive $12.4 billion in sales. Additionally, Cyber Week experienced a substantial 7.8% YoY increase, generating a total of $38 billion in sales. These figures underscore the growing significance of online shopping during the holiday season, highlighting consumers’ preference for digital channels. To leverage this trend, businesses can capitalize on the momentum by incorporating enticing flash sales, particularly during prominent shopping events like Black Friday and Cyber Monday. By offering time-limited discounts and exclusive deals, businesses can create a sense of urgency and excitement among customers, boosting engagement, sales, and overall revenue.
A WooCommerce flash sale is a powerful marketing tactic used by online businesses to drive sales and create a sense of urgency among customers. It is a time-limited promotion where select products or services are offered at significant discounts or exclusive deals. The concept behind a flash sale is to capture the attention of potential customers and encourage them to make immediate purchases. With WooCommerce, businesses can easily set up and manage flash sales, applying time-limited discounts, showcasing countdown timers, and creating a dynamic shopping experience. These flash sales not only generate a surge in sales within a short period but also create a buzz around the brand, attracting new customers and fostering loyalty.
By leveraging the power of a WooCommerce flash sale, businesses can boost their revenue and increase customer engagement. The combination of discounted prices, limited-time offers, and the sense of urgency created by countdown timers creates a compelling incentive for customers to take action. Additionally, the dynamic and interactive nature of flash sales helps businesses create a memorable shopping experience for their audience, leaving a positive impression. This encourages repeat purchases and strengthens customer loyalty. In conclusion, a WooCommerce flash sale is an effective strategy to drive sales, attract new customers, and foster long-term relationships with existing ones.
Benefits of a WooCommerce flash sale
WooCommerce flash sales offer several benefits for online businesses looking to drive sales and create a sense of urgency among customers. Here are some key advantages of implementing flash sales using WooCommerce:
Increased Sales: Flash sales create a sense of urgency and exclusivity, encouraging customers to make immediate purchases. The limited-time nature of the sale motivates customers to take advantage of the discounted prices, resulting in increased sales for the business.
Customer Engagement: Flash sales generate excitement and buzz around your brand. They capture the attention of customers and create a sense of anticipation, leading to increased engagement on your website and social media platforms. This heightened engagement can also translate into improved brand awareness and customer loyalty.
Clear Inventory: If you have excess inventory or want to promote specific products, flash sales can effectively clear out unwanted stock. By offering attractive discounts, you can quickly sell off products that may otherwise have remained stagnant, freeing up space and resources for new inventory.
Attract New Customers: Flash sales can serve as an effective strategy to attract new customers.
Upselling and Cross-selling Opportunities: Flash sales can be an excellent opportunity to implement upselling and cross-selling techniques. By strategically offering related products or upgrades at discounted prices during the flash sale, you can encourage customers to spend more and increase their average order value.
Social Proof and Word-of-Mouth Marketing: Successful flash sales can generate positive customer reviews, testimonials, and social proof. Satisfied customers are likely to share their purchase experience with others, leading to word-of-mouth marketing and potential referrals, further amplifying the impact of your flash sale.
Best WooCommerce flash sale plugin
Discount Rules and Dynamic Pricing for WooCommerce is the best discount plugin that helps you create flash sales easily and effortlessly. It supports various types of discounts like bulk discounts, BOGO (Buy One Get One Free), tiered discounts, buy 2 get 1 free, volume discounts, schedule discounts, category discounts, and more.
Steps to create a WooCommerce flash sale
Creating a WooCommerce flash sale is a straightforward process that can help businesses drive sales and create a sense of urgency among customers. Here’s a step-by-step guide on how to create a successful flash sale using WooCommerce:
Define Your Goals: Determine the objectives of your flash sale. Are you aiming to increase sales, clear inventory, attract new customers, or promote specific products? Clearly defining your goals will help you shape the structure and strategy of your flash sale.
Select Products or Categories: Choose the products or categories that will be included in the flash sale. Focus on items that are popular, have higher profit margins, or need a sales boost.
Set Discounts and Time Frame: Decide on the discount percentage or fixed amount for the flash sale. Ensure that the discount is attractive enough to entice customers. Determine the start and end time of the flash sale to create a sense of urgency.
Promote Your Flash Sale: Spread the word about your flash sale through various marketing channels. Utilize email marketing, social media, website banners, and other advertising platforms to create awareness and generate excitement.
Enhance the Shopping Experience: Consider adding a countdown timer on your website or product pages to create a sense of urgency.
Monitor and Analyze Results: Throughout the flash sale, monitor the performance of your campaign. Track sales, conversion rates, customer feedback, and engagement metrics.
By following these steps, you can effectively create a compelling WooCommerce flash sale. Remember to align your goals, select the right products, set enticing discounts, promote the sale, and analyze the results to continuously improve your flash sale strategies and maximize their impact on your business.
How to create a WooCommerce flash sale
To create a WooCommerce flash sale, follow the steps below:
1: Install plugin
The process of installing and activating the plugin is like any other plugin:
To begin the installation and activation process, access your WordPress admin dashboard and sign in. Once signed in, navigate to the “Plugins” tab and click on “Add New” From there, locate and click on the “Upload Plugin” button to proceed.
After selecting the “Upload Plugin” button, you will be prompted to choose the plugin ZIP file that you have recently downloaded. Simply locate the file on your computer and click on it. Next, click on the “Install Now” button to initiate the installation process. Once the installation is complete, click on the “Activate” button to activate the plugin and start using it.
2: Create a WooCommerce flash sale discount rule
Navigate to the “Woo Pricing & Discounts” menu, then open the “Pricing” tab.
Click on the Add New button to create a new pricing rule.
Set a name for the rule. e.g: WooCommerce flash sale
Select “Simple” for the “Mode”
Select the appropriate discount type. e.g. Percentage discount
Set the discount amount
3: Select Products for sale flash
You can offer a storewide sale flash by selecting all products under the “Discounted Products” section.
Give a sale flash discount on specific products.
Provide sale flash discounts on categories.
Or apply a WooCommerce sale flash on a combination of products and categories.
4: Schedule WooCommerce flash sale
Under the “Date time” section, you can schedule sale flash to specific dates, days, date times, weekends, Black Friday, and Cyber Monday.
After configuring the discount rule, hit the save button to save the changes.
5: Final result
It is done successfully. You have created a WooCommerce sale flash discount easily and effortlessly in a few steps.
Promote WooCommerce sale flash
To effectively promote a WooCommerce flash sale, employ various marketing strategies such as targeted email campaigns, social media engagement, paid ads, optimized website banners, influencer collaborations, and remarketing efforts. Create excitement, generate awareness, and drive customer engagement by utilizing these tactics. Monitor key metrics to evaluate the performance of your promotional efforts. Implementing a comprehensive and targeted promotional strategy will maximize the impact of your flash sale and generate significant awareness and sales.
To effectively promote a WooCommerce flash sale on your website, there are a few key strategies you can implement. Firstly, consider adding a sale flash badge to the products included in the flash sale. This visual indicator will catch the attention of visitors and clearly communicate that these items are part of a limited-time offer. Additionally, incorporating a countdown timer creates a sense of urgency and encourages immediate action from potential customers. The countdown timer visually displays the time remaining until the flash sale ends, further motivating visitors to make a purchase before the opportunity expires. By combining the sale flash badge and countdown timer, you create a compelling and visually enticing experience that grabs the attention of visitors, effectively communicates the urgency of the flash sale, and encourages them to take advantage of the discounted prices.
After you have installed the plugin, then follow the below steps to create a badge.
1: Create a badge
Navigate to the “Product Badges” menu, then open the “Badges” tab.
Click on the Add New button to create a new product badge.
Set a name for the product badge like the “Flash sale badge”.
Under the “CSS Labels” tab, use the “Label” field to set a label for the badge like “Flash Sale {saved_percent}”.
Use the “Text color” field to set the product label text color.
2: Select product label style
Under “label styles”, select the label that you want. like the below image.
Use the “Label color” field to set the label color. You can set a gradient color too.
3: Schedule sale flash badge
If you schedule your “flash sale” discount to a specific date time, then you can schedule the countdown timer to the same date time too.
Navigate to the “Schedule” tab.
Schedule the “Countdown timer” to your “flash sale” discount time.
4: Select products
Navigate to the “Products” tab.
Add a “Discount rules” condition and search and select the flash sale discount rule that is created in the previous step.
Save the badge.
It is done successfully. As a result, if you open the products list page or the product page a “Flash Sale” badge will be shown on the product images.
WooCommerce flash sale countdown timer
When it comes to your online store’s promotional campaigns, one powerful feature that can significantly enhance the shopping experience for your customers is the WooCommerce flash sale countdown timer. This tool allows you to visually display the time remaining until the end of your flash sale, creating a dynamic and engaging atmosphere. The countdown timer serves as a constant reminder of the limited-time nature of the sale, effectively encouraging visitors to make their purchase before the opportunity expires. With WooCommerce, you have the flexibility to customize various aspects of the countdown timer, such as its design, placement, and behavior, ensuring it aligns perfectly with your brand and website aesthetics.
You can choose to showcase the countdown timer as a prominent banner at the top of the page or seamlessly integrate it into your product listings for a more subtle approach. Regardless of the chosen style, the countdown timer captures attention and motivates customers to act quickly, fostering a sense of urgency. By leveraging the power of the WooCommerce flash sale countdown timer, you can effectively drive sales and increase conversions. This valuable tool not only creates a sense of exclusivity but also adds an element of excitement to the shopping experience, leading to higher customer engagement and overall sales performance.
Follow the below steps to create a countdown timer for WooCommerce sale flash.
1: Create a countdown timer
Navigate to the “Product Badges” menu, then open the “Badges” tab.
Click on the Add New button to create a new product badge.
Set a name for the product badge like the “Flash sale countdown timer”.
Navigate to the “Timer” tab and enable the “Status” field.
Set a “From date/time” and “To date/time” for the countdown timer.
2: Select countdown timer style
Select a style for the countdown timer from the available styles.
Set the “background” and “text” colors of the timer.
3: Configure countdown timer size
Configure the timer sizes for the best values based on your theme.
4: Set countdown timer position
Set the countdown timer position to one of the “on image” or “out of image” values. In this example, we selected “out of image”
5: Schedule countdown timer
If you schedule your “flash sale” discount to a specific date time, then you can schedule the countdown timer to the same date time too.
Navigate to the “Schedule” tab.
Schedule the “Countdown timer” to your “flash sale” discount time.
6: Select Products
Navigate to the “Products” tab.
Add a “Discount rules” condition and search and select the flash sale discount rule that is created in the previous step.
Save the countdown timer.
7: Final result
The final result of the countdown timer for the WooCommerce flash sale will be like the below image.
Conclusion
In conclusion, implementing a WooCommerce flash sale can be a highly effective strategy to drive sales, engage customers, and create a sense of urgency. By following the steps to create a flash sale, businesses can strategically select products, set attractive discounts, and establish a time-limited promotion. Moreover, promoting the flash sale with the use of a flash sale badge and a countdown timer enhances its impact. The flash sale badge visually highlights the discounted products, catching the attention of visitors and conveying the exclusivity of the offer. Meanwhile, the countdown timer creates a sense of urgency, reminding customers of the limited time remaining to take advantage of the sale. Together, these elements create an enticing and engaging shopping experience, motivating customers to make immediate purchases. By leveraging the power of WooCommerce, businesses can effectively create and promote flash sales, leading to increased sales, customer engagement, and a memorable shopping experience.
FAQ
What is a WooCommerce flash sale?
A WooCommerce flash sale is a limited-time promotion where products are offered at discounted prices to create a sense of urgency and drive sales. It is a time-limited opportunity for customers to purchase products at reduced prices.
How do I create a WooCommerce flash sale?
To create a WooCommerce flash sale, you can begin by defining your goals. Next, select products or categories to include, set discounts and time frames, configure coupons or sale pricing, promote the sale, and finally, monitor and analyze the results. By following this strategic process, you can effectively create an impactful flash sale campaign.
How long should a WooCommerce flash sale last?
The duration of a WooCommerce flash sale depends on your marketing strategy and goals. Typically, flash sales last between a few hours to a couple of days. The shorter the duration, the more urgency it creates among customers. However, ensure the time frame is long enough to allow sufficient customer engagement and awareness.
How can I promote my WooCommerce flash sale?
You can promote your WooCommerce flash sale through various channels such as targeted email campaigns, social media engagement, paid ads, optimized website banners, flash sale badges, countdown timers, influencer collaborations, and remarketing efforts. Utilize these strategies to generate awareness, excitement, and engagement among your target audience.
In this article, our goal is to offer comprehensive guidance on utilizing WooCommerce Combo Offers (Free Plugin) the feature to its fullest potential. We’ll walk you through the process step-by-step, from setting up your combo offers to implementing effective marketing strategies. Whether you’re a beginner looking to increase sales or a seasoned e-commerce veteran seeking to optimize your offerings, this guide will equip you with the knowledge and tools you need to succeed with WooCommerce combo offers.
WooCommerce combo offers harness the dynamic strategy of bundling multiple products or services into irresistible deals, designed to captivate customers and drive sales. This feature empowers online store owners using the WooCommerce platform to craft compelling incentives, such as exclusive discounts or special pricing, when customers purchase specific combinations of items. For instance, imagine enticing “buy one, get one free” promotions on related products or bundled packages of complementary items offered at a discounted rate. By tapping into the potential of WooCommerce combo offers, merchants can supercharge their sales, inspire larger transactions, swiftly clear inventory, and elevate the shopping journey for their valued clientele.
Enhanced Value Perception: Bundling products together creates a perception of greater value for customers, making your offers more appealing and irresistible.
Cost Savings: Combo offers usually come at a discounted price compared to purchasing each item individually. This cost savings is attractive to consumers who perceive greater value in getting multiple items for a lower overall price.
Convenience: Buying multiple items together saves consumers time and effort compared to purchasing each item separately. It simplifies the shopping process and reduces the need to search for individual products.
Customer Satisfaction: Combo offers offer customers more options and flexibility in purchasing decisions. They can choose from different combinations of products or services that best suit their needs, leading to greater satisfaction with their purchase.
Competitive Advantage: Offering attractive combo deals can differentiate a business from its competitors and attract customers looking for the best value for their money. It can also help build customer loyalty by providing added benefits and savings.
Promotional Opportunities: Combo offers can be used as part of promotional campaigns to attract attention and generate buzz around specific products or services. They provide businesses with a flexible marketing tool to drive sales and increase brand visibility.
Seasonal Promotions: Combo offers can be tailored to seasonal trends or occasions, such as holidays, festivals, or special events. Businesses can create themed bundles that appeal to seasonal demand and capitalize on consumer spending patterns during specific times of the year.
Brand Awareness and Exposure: Offering combo deals can help increase brand awareness and exposure. When customers see enticing bundle offers, they become more familiar with the brand and its range of products or services, potentially leading to future purchases.
Video Tuorial
How to Create WooCommerce Combo Offers
Harnessing the power of the Product Bundle Builder for WooCommerce, we seamlessly concoct captivating combo offers within our WooCommerce platform. This invaluable tool empowers us with the effortless creation of bundled deals, streamlining the process for an enhanced shopping experience and heightened sales potential. therefore In the below section, we’ll guide you through the step-by-step process of installing and creating combo offers in WooCommerce:
To create WooCommerce combo offers, follow the below steps:
1. Navigate to WooCommerce “Products”.
2. Click on “Add New” to create a new product.
3. Set a name for the combo offer.
4. Click on “Set product image” from the right sidebar and select an image for your combo offer.
5. Now navigate to the Product data panel, and select “Product bundle” as the product type.
6. After selecting “Product bundle” as the product type the “Product Bundles” tab will appear in the product data panel.
7. Navigate to the “Product Bundles” tab and click on the “Add Bundle” button to add a new bundle item.
Step 3: Add items to Combo offers in WooCommerce
8. Now in the “Products” field Search and select the product you want, you can also set the default product for this item in the default product field.
Likewise, if you would like to include products from a category, you can do it with the “Categories” field of the item. therefore you can search for categories and add them to the “Categories” field. (PRO VERSION)
in addition, you can do the same for the product tags and include them in the “Tags” field. (PRO VERSION)
You can also add the following settings to your products :
Sort products: With this field, you can sort selected combo products by “ID”, “Title”, “Menu order”,” Date”, “Price”, “popularity” and“Rating”.
Quantity: In this field, you can set the default quantity for each combo product.
Edit quantity by user: Check this field to allow the user to change the quantity of a combo product and Set the “min/max quantity” for each item.
Discount: In this field, you can set discount for the combo products by percentage, price or fixed price.
9. Then you can click on “Add Bundle” to add a new item to the combo offer and Configure it as in the previous steps. We have created three bundle items like the below image.
Step 4: Pricing for WooCommerce Combo offers
After adding products you can choose how want to price your combo product.
Fixed Price: Sets a fixed price for the whole combo offer.
Auto Calculate Bundle Price: Allow the plugin to calculate the combo offer price using the selected products for the bundle items.
1. Fixed Price
If you want to set a fixed price for the whole combo offer product, check the “Fixed Price” option.
Navigate to the “General” tab and set a regular price for the Product. You can set a Sale price too.
After setting a price, update the product
2. Auto Calculate Price
Auto calculates price helps to set a dynamic price for the combo offer on selected items for the bundle.
Therefore to use the auto-calculate price feature, uncheck the “Fixed Price” option and update the product.
Step 5: Position of Combo Offers
You can set a position for the Combo offers on the product page by following the below steps.
Navigate to the “Product Bundles” menu page in WordPress admin.
In the settings tab, there is a “Bundle position” option to change the bundle position on the product page.
You can select the appropriate position from the available options like “before add to cart button”, “after add to cart button”, etc.
Also, there are options to show the product bundle before or after a CSS selector.
After selecting “before” or “after” CSS selector, find a CSS selector on the product page and put it in the “CSS Selector” field.
Save the settings, after selecting a position for the bundle.
In the case, that none of the listed positions helps, you can use the below shortcodes of the plugin.
Use it on the product page to show the bundles.
Use it on the product page to show the bundles + add to cart button.
After creating and publishing the combo offer, open the product page on the front end. As a result, After selecting a product, for all of the bundle items the WooCommerce combo offer will be shown as the image below.
Final Result
When the user clicks on each bundle item, he can select the desired product from multiple available products like in the below image.
How to create combo offers with discount
Creating combo offers with discounts provides a myriad of benefits for businesses and customers alike. Not only do these promotions boost sales volumes by enticing customers to purchase multiple items at once, but they also facilitate inventory clearance by bundling slower-moving products with more popular ones. Customers appreciate the added value and savings, resulting in increased satisfaction and loyalty. Moreover, these offers enable cross-promotion of related items, enhancing product visibility and potentially attracting new customers. With the potential for higher average order values and a competitive edge in the market, combo offers with discounts serve as effective marketing tools that drive sales while benefiting both businesses and consumers. So follow the steps below to create a combined offer with a discount
Step 1: Create combo offers with discount
1. Navigate to WooCommerce “Products”.
2. Click on “Add New” to create a new product.
3. Set a name for the combo offer.
4. Click on “Set product image” from the right sidebar and select an image for your combo offer.
5. Now navigate to the Product data panel, and select “Product bundle” as the product type.
6. After selecting “Product bundle” as the product type the “Product Bundles” tab will appear in the product data panel.
7. Navigate to the “Product Bundles” tab and click on the “Add Bundle” button to add a new bundle item.
Step 2: Add items to combo offers with discount
8. Now if you have the pro version of Easy WooCommerce Product Bundles in the “Categories” field of the bundle item search for a category and select it. otherwise in the “Products” field of the bundle item search for a product and select it.
You can also add the following settings to your products :
Sort products: With this field, you can sort selected products by “ID”, “Title”, “Menu order”,” Date”, “Price”, “popularity” and“Rating”.
Quantity: In this field, you can set the default quantity for each bundled product item.
Edit quantity by user: Check this field to allow the user to change the quantity of a product and Set the “min/max quantity” for each item.
9. Now In the discount field, set the discount for the combo products by percentage, price or fixed price.
10. Then you can click on “Add Bundle” button to add a new item to the combo offer with discount and Configure it as in the previous steps. We have created two other bundle items with discounts.
11. After making the desired settings, at the end publish the changes.
Final Result
After creating and publishing the combo offer with discount, open the product page on the front end. As a result, After selecting a product, for all of the bundle items the WooCommerce combo offer with discount will be shown as the image below.
How to create WooCommerce combo offers with a fixed price
A combo offer with a fixed price is a marketing strategy businesses use to attract customers by bundling several products or services together and selling them at a set price. This type of offer typically provides better customer value than purchasing each item individually, So follow the steps below to create the WooCommerce combo offers with a fixed price:
Step 1: Create combo offers with a fixed price
1. Navigate to WooCommerce “Products”.
2. Click on “Add New” to create a new product.
3. Set a name for the combo offer.
4. Click on “Set product image” from the right sidebar and select an image for your combo offer.
5. Now navigate to the Product data panel, and select “Product bundle” as the product type.
6. After selecting “Product bundle” as the product type the “Product Bundles” tab will appear in the product data panel.
7. Navigate to the “Product Bundles” tab and click on the “Add Bundle” button to add a new bundle item.
Step 2: Add item to combo offers with a fixed price
8. Now in the “default product” search for a product and select it as the default product for this item.
Likewise, if you would like to include products from a category, you can do it with the “Categories” field of the item. therefore you can search for categories and add them to the “Categories” field. (PRO VERSION)
in addition, you can do the same for the product tags and include them in the “Tags” field. (PRO VERSION)
You can also add the following settings to your products :
Sort products: With this field, you can sort selected combo products by “ID”, “Title”, “Menu order”,” Date”, “Price”, “popularity” and“Rating”.
Quantity: In this field, you can set the default quantity for each combo product.
Edit quantity by user: Check this field to allow the user to change the quantity of a combo product and Set the “min/max quantity” for each item.
Discount: In this field, you can set discount for the combo products by percentage, price or fixed price.
9. Then you can click on the “Add Bundle” button to add a new item to the combo offer with a fixed price and Configure it as in the previous steps. We have created one other bundle item.
Step 3: Set fixed price to combo offers with a fixed price
10. Now to set fixed for the whole combo offer navigate top of the page and check the “Fixed Price” option.
11. Navigate to the “General” tab and set a regular price for the Product. You can set a Sale price too.
12. At the end publish the changes.
Final Result
After creating and publishing the combo offer with a fixed price, open the product page on the front end. the WooCommerce combo offer with a fixed price will be shown as the image below.
How to create WooCommerce combo offers BOGO deal
A BOGO (Buy One, Get One) deal is a popular type of promotional offer used by businesses to attract customers and boost sales.BOGO deal is used in two ways: 1)Buy One, Get One Free (BOGO Free), 2)Buy One, Get One at a Discount (BOGO Half-Off), In this tutorial, we use the first method (Buy One, Get One Free) So follow the steps below to create this method:
Step 1: Create WooCommerce combo offers BOGO deal
1. Navigate to WooCommerce “Products”.
2. Click on “Add New” to create a new product.
3. Set a name for the combo offer.
4. Click on “Set product image” from the right sidebar and select an image for your combo offer.
5. Now navigate to the Product data panel, and select “Product bundle” as the product type.
6. After selecting “Product bundle” as the product type the “Product Bundles” tab will appear in the product data panel.
7. Navigate to the “Product Bundles” tab and click on the “Add Bundle” button to add a new bundle item.
Step 2: Add item to WooCommerce combo offers BOGO deal
8. Now in the “product” field search for product and select it.
Likewise, if you would like to include products from a category, you can do it with the “Categories” field of the item. therefore you can search for categories and add them to the “Categories” field. (PRO VERSION)
in addition, you can do the same for the product tags and include them in the “Tags” field. (PRO VERSION)
You can also add the following settings to your products :
Sort products: With this field, you can sort selected combo products by “ID”, “Title”, “Menu order”,” Date”, “Price”, “popularity” and“Rating”.
Quantity: In this field, you can set the default quantity for each combo product.
Edit quantity by user: Check this field to allow the user to change the quantity of a combo product and Set the “min/max quantity” for each item.
9. Then you can click on the “Add Bundle” button to add a new bundle item for the gift product.
10. Now in the “product” field search for the gift product and select it.
11. in the “discount” field Select “Percentage” as the discount type and set “100” as the value of the discount. The gift products will be free.
12. After making the desired settings, at the end publish the changes.
Final Result
After creating and publishing the combo offer BOGO deal, open the product page on the front end. the WooCommerce combo offer BOGO deal will be shown as the image below.
How to create Optional Combo Offers
Optional Combo Offers in WooCommerce allow store owners to create special promotions where customers can purchase multiple products together at a discounted rate. These offers can greatly increase average order value, clear out inventory, or introduce new products. So if you have the pro version of Easy WooCommerce Product Bundles follow the steps below to create the WooCommerce optional combo offers:
Step 1: Create Optional Combo Offers
1. Navigate to WooCommerce “Products”.
2. Click on “Add New” to create a new product.
3. Set a name for the combo offer.
4. Click on “Set product image” from the right sidebar and select an image for your combo offer.
5. Now navigate to the Product data panel, and select “Product bundle” as the product type.
6. After selecting “Product bundle” as the product type the “Product Bundles” tab will appear in the product data panel.
7. Navigate to the “Product Bundles” tab and click on the “Add Bundle” button to add a new bundle item.
Step 2: Add item to Optional Combo Offers
8. in the “Categories” field search for a category and select it.
You can also add the following settings to your products :
Sort products: With this field, you can sort selected combo products by “ID”, “Title”, “Menu order”,” Date”, “Price”, “popularity” and“Rating”.
Quantity: In this field, you can set the default quantity for each combo product.
Edit quantity by user: Check this field to allow the user to change the quantity of a combo product and Set the “min/max quantity” for each item.
Discount: In this field, you can set discount for the combo products by percentage, price or fixed price.
9. Then click on the “Add Bundle” button to add a new item to the optional combo offer.
10. Check the “optional” field to make this bundle item optional.
11. And in the “Categories” field search for a category and select it.
12. Then click on the “Add Bundle” button to add another new item to the optional combo offer.
12. And we set the third item as the second item.
13. After making the desired settings, at the end publish the changes.
Final Result
After creating and publishing the WooCommerce optional combo offer, open the product page on the front end. the WooCommerce optional combo offer will be shown as the image below.
Shortcodes
The plugin has the below shortcodes and you can use them:
[asnp_wepb_product] Use it on the product page to show the bundles.
[asnp_wepb_product show_add_to_cart="1"] Use it on the product page to show the bundles + add to cart button.
Other Articles
To delve deeper into the realm of the Product Bundle plugin and its applications, we invite you to explore the array of informative resources we’ve compiled in the list below, Furthermore, these resources promise to expand your understanding and proficiency in leveraging the full potential of this plugin:
Unleash the power of savings with WooCommerce Discount for Multiple Items! Say goodbye to mundane pricing strategies and embrace the enticing world of bulk discounts, bundle offers, and more. This revolutionary feature takes your online store to new heights, allowing you to reward your customers with irresistible deals that leave them craving for more.
Whether it’s enticing customers to purchase in larger quantities or captivating them with exclusive package deals, WooCommerce Discount for Multiple Items unleashes a world of possibilities for your e-commerce empire. Prepare to witness a surge in sales, a boost in customer satisfaction, and a firm grip on the competitive market.
Brace yourself for the ultimate discount revolution that will leave your rivals trembling in awe. The time has come to revolutionize your pricing game and dominate the e-commerce landscape with unmatched assertiveness. Get ready to wield the power of WooCommerce Discount for Multiple Items and unleash a discount revolution like never before! Your online store will become a magnet for customers seeking unbeatable deals, and your business will thrive as you solidify your position as a leader in the industry. Embrace this game-changing feature and watch your success soar to new heights.
What is a WooCommerce discount for multiple items?
Let’s explore the concept of Multiple Items Discount in a beginner-friendly manner. Multiple Items Discount is a clever pricing strategy that encourages customers to buy more by offering them special savings. It’s like a magical way to attract shoppers and boost sales. Instead of just buying one item, customers are tempted to grab multiple items because of the enticing discounts available. Imagine finding a great deal that makes you excited to buy more! Multiple Items Discount gives you the power to stand out in the competitive market and leave your competitors amazed. It’s a strategy that can help you achieve higher sales, build a loyal customer base, and achieve remarkable success. So get ready to dive into the world of Multiple Items Discount and create an irresistible shopping experience that customers will love.
In this article, we will learn to create multiple items discounts like:
Bulk Discount (Quantity based discount)
Grouped Product Discount
Product Bundle Discount
Why offer multiple items discount
Prepare to discover the compelling reasons why offering Multiple Items Discount is an absolute game-changer for your business. First and foremost, it’s a surefire way to skyrocket your sales and revenue. By enticing customers to purchase more items through attractive discounts, you’ll witness a surge in your bottom line that will leave your competitors green with envy.
Moreover, Multiple Items Discount cultivates customer loyalty and satisfaction. When shoppers feel they’re getting a fantastic deal by buying in bulk or as part of a bundle, they’ll keep coming back for more. It’s a powerful tool for building a devoted customer base that will fuel your success for years to come.
Furthermore, offering Multiple Items Discount showcases your assertive nature as a brand that understands the value of providing exceptional savings. It sets you apart from the competition and positions you as a leader in your industry.
So don’t hesitate – embrace the power of Multiple Items Discount and unleash a sales revolution that will propel your business to new heights. Get ready to witness unparalleled growth, customer satisfaction, and a reputation that resonates with success. The time is now to seize the opportunity and offer Multiple Items Discount because your business deserves nothing less than greatness.
What is a bulk discount?
Prepare to unravel the magic of bulk discounts and discover how they can revolutionize your pricing strategy. A bulk discount is a powerful pricing tactic that offers customers significant savings when they purchase larger quantities of a product. It’s a win-win situation where customers benefit from lower prices, and businesses experience increased sales and customer loyalty. With tiered discounts, you can take this concept even further. By setting different price tiers based on the quantity purchased, you create an enticing incentive for customers to buy more, unlocking higher discounts as they reach each tier. This dynamic pricing approach ensures that everyone feels like a winner, whether they’re buying a few items or stocking up in bulk.
When it comes to bulk discounts, the options are endless. You can choose to offer a percentage discount, where the discount is a percentage off the total price based on the quantity purchased. Alternatively, an amount-based discount provides a fixed dollar amount off the total price when customers reach a certain quantity threshold. The flexibility of bulk discounts allows you to tailor your pricing strategy to suit your business needs and customer preferences. Whether you’re running an e-commerce store, a retail business, or a wholesale operation, implementing bulk discounts can give you a competitive edge and keep customers coming back for more.
Bulk Discounts Advantages
Bulk discounts offer a plethora of advantages that can propel your business to new heights. Here are some key benefits you can enjoy by implementing bulk discounts:
Increased Sales Volume: By enticing customers to purchase larger quantities through attractive discounts, bulk discounts can significantly boost your sales volume. Customers are motivated to buy more, resulting in higher revenue for your business.
Customer Loyalty and Satisfaction: Offering bulk discounts creates a sense of value and appreciation among customers. They feel rewarded for their larger purchases, which fosters loyalty and encourages repeat business. Satisfied customers are more likely to become brand advocates, spreading positive word-of-mouth and attracting new customers.
Efficient Inventory Management: Bulk discounts help streamline your inventory management processes. By selling larger quantities of products at once, you can optimize your stock levels, reduce storage costs, and minimize handling efforts. This allows for smoother operations and improved efficiency.
Competitive Advantage: Implementing bulk discounts sets your business apart from competitors. It demonstrates your commitment to providing exceptional value to customers and positions you as a market leader. This competitive edge can attract new customers, retain existing ones, and establish your brand as a trusted choice in the industry.
Increased Cash Flow: Bulk discounts encourage customers to make larger upfront purchases, resulting in increased cash flow for your business. This can help improve your financial stability, enable investment in growth opportunities, and drive overall business success.
WooCommerce bulk discount use cases
Here are some use cases for WooCommerce bulk discounts tailored for wholesale stores and retail stores:
Wholesale Pricing: Wholesale stores can utilize WooCommerce bulk discounts to offer tiered pricing based on the quantity purchased. This enables them to incentivize bulk orders from retailers or other businesses by providing discounted rates for larger quantities. It encourages wholesale customers to increase their order size, resulting in higher sales volume and stronger business relationships.
Seasonal Promotions: Retail stores can leverage WooCommerce bulk discounts to run seasonal promotions, such as during holidays or special events. By offering discounts on bulk purchases, they can entice customers to stock up on products for gift-giving or personal use. This strategy helps drive sales during peak seasons and creates a sense of urgency for customers to take advantage of the limited-time discounts.
Clearance Sales: Both wholesale and retail stores can utilize WooCommerce bulk discounts for clearance sales. When stores need to clear out excess inventory or discontinued products, offering bulk discounts can encourage customers to buy larger quantities at discounted prices. This helps to free up valuable shelf space, generate revenue from slow-moving items, and create a sense of urgency among buyers.
B2B Sales: WooCommerce bulk discounts can be used for business-to-business (B2B) sales, where retailers or businesses purchase products in bulk for resale. By providing discounted rates based on order volume, businesses can attract B2B customers and foster long-term partnerships. This strategy encourages B2B buyers to choose your store over competitors, leading to increased sales and customer loyalty.
How to create WooCommerce bulk discounts
WooCommerce doesn’t have a feature to create a bulk discount, so we use the Discount Rules and Dynamic Pricing plugin to create this type of discount.
1: Install discount plugin
The process of installing and activating the plugin is like any other plugin:
To begin the installation and activation process, access your WordPress admin dashboard and sign in. Once signed in, navigate to the “Plugins” tab and click on “Add New” From there, locate and click on the “Upload Plugin” button to proceed.
After selecting the “Upload Plugin” button, you will be prompted to choose the plugin ZIP file that you have recently downloaded. Simply locate the file on your computer and click on it. Next, click on the “Install Now” button to initiate the installation process. Once the installation is complete, click on the “Activate” button to activate the plugin and make it fully functional on your WordPress site.
Navigate to the “Woo Pricing & Discounts” menu, then open the “Pricing” tab.
Click on the Add New button to create a new pricing rule.
Set a name for the rule.
Select “Bulk” as the “Mode“.
Set “Apply mode” to “Apply with other applicable rules” or based on your requirements.
Set “Quantity based on” to “Sum of all products quantities”.
Add required ranges and associated discounts like percentage or amount discount.
Select products that should be discounted. You can also, choose categories, product attributes, or tags.
Save the rule.
It is done and you successfully added a WooCommerce discount for multiple items with a bulk discount rule.
Here is a screenshot of it on the product page.
Grouped product discount
WooCommerce grouped product discount allows online store owners to offer enticing discounts when customers purchase products as part of a group. With this feature, store owners can create product groups by combining related items, such as a set of accessories or a bundle of complementary products. By applying a discount to the grouped products, customers are incentivized to purchase the entire collection instead of individual items. This strategy not only increases the average order value but also enhances the customer shopping experience by providing them with a cost-saving opportunity. WooCommerce’s grouped product discount feature empowers businesses to implement effective pricing strategies and boost sales by encouraging customers to explore and purchase related products together.
Examples:
Any 4 T-shirts for 100$
Buy a T-shirt and a hoodie for 300$
Buy 5 products for 250$
and more
How to create WooCommerce grouped product discount
We will use the Discount Rules and Dynamic Pricing for WooCommerce plugin to create grouped product discount.
Here we will cover how to create any 4 t-shirts for 100$.
Navigate to the “Woo Pricing & Discounts” menu, then open the “Pricing” tab.
Click on the Add New button to create a new pricing rule.
Set a name for the rule.
Select “Products group” as the “Mode“.
Set “Apply mode” to “Apply with other applicable rules” or based on your requirements.
Enable the “Repeat” field to give this discount for any 4 items group.
Set “Adjustment Type” to the “Fixed price per group”.
Set the “Adjustment” value to 100, or any value that you want.
Under “Products group” add an item with quantity: 4, and select “categories in list” then select the category that you want.
Save the rule.
It is done successfully. Now if you add any 4 t-shirts to the cart the discount will be applied to this group.
Product bundle discount
The WooCommerce product bundle discount feature empowers online store owners to create attractive offers by bundling multiple products together at a discounted price. With this functionality, businesses can curate product bundles that combine complementary items or create themed assortments to cater to specific customer needs. By offering a bundled discount, customers are motivated to purchase the entire package instead of individual products, resulting in increased sales and improved customer satisfaction. The product bundle discount feature in WooCommerce provides a flexible and effective way for businesses to promote cross-selling, upselling, and create enticing offers that drive customer engagement and boost revenue.
Access your WordPress admin dashboard and sign in. Once signed in, navigate to the “Plugins” tab and click on “Add New” From there, locate and click on the “Upload Plugin” button to proceed.
After selecting the “Upload Plugin” button, you will be prompted to choose the plugin ZIP file that you have recently downloaded. Simply locate the file on your computer and click on it. Next, click on the “Install Now” button to initiate the installation process. Once the installation is complete, click on the “Activate” button to activate the plugin and make it fully functional on your WordPress site.
2: Create a product bundle
Navigate to WooCommerce Products >> Add New to create a new product.
Set a name for the bundle product, for instance, “Mobile Bundle”.
Click on “Add Media” and select an image for your product bundle.
Now navigate to the Product data panel, and select “Product bundle” as the product type.
3: Set a discount for the product bundle
In the “General” tab, you can set a “Regular price” and “Sale price” of the bundle product.
Navigate to the “Product Bundles” tab .
Enable the “Fixed price” field to use the prices that you set in the “General” tab as the product bundle price.
4: Add product bundle items
Click on the “Add Bundle” button to add a new bundle item to the product bundle.
Inside the item, use the “Default Product” field and set a default product for the item.
Use “Products“, “Categories“, or “tags” fields to list more products for this item. Users will be able to select a product from a list of products.
You can use the “Discount” field to set a discount for this item.
Repeat the above steps, to add more items to the bundle.
Publish the product.
You have created a product bundle discount in WooCommerce successfully.
Refer to the product page, to see the bundle with a discount like the below image.
Create WooCommerce discount for multiple items now
In this article, we explored various ways to create discounts for multiple items in WooCommerce. We delved into three powerful features: WooCommerce bulk discount, WooCommerce grouped product discount, and WooCommerce product bundle discount. Each of these features provides unique opportunities for online store owners to incentivize customers, increase sales, and enhance the overall shopping experience.
By implementing WooCommerce bulk discount, businesses can offer tiered pricing based on quantity, encouraging customers to purchase more and save. This strategy not only boosts sales volume but also rewards loyal customers and promotes customer retention.
With WooCommerce grouped product discount, store owners can create bundles of related items and apply attractive discounts to the entire group. This tactic entices customers to explore complementary products and increases the average order value while delivering a cost-saving benefit.
Lastly, WooCommerce product bundle discount empowers businesses to curate enticing packages of multiple products at a discounted price. By bundling complementary or themed items, store owners can promote cross-selling, upselling, and provide customers with value-packed offerings.
By leveraging these WooCommerce discount features, online store owners have a powerful arsenal to implement dynamic pricing strategies, increase customer engagement, and ultimately drive revenue growth. Whether it’s through bulk discounts, grouped product discounts, or product bundle discounts, WooCommerce equips businesses with the tools to create compelling offers and stand out in the competitive e-commerce landscape.
Unveiling the ultimate guide to the 10 best WooCommerce badge plugins in 2025! Elevate your online store’s visibility and customer engagement with these carefully curated badge solutions. Whether you’re highlighting discounts, showcasing bestsellers, or indicating product quality, these plugins offer unparalleled versatility and functionality. Explore this comprehensive list to find the perfect badge plugin tailored to your store’s needs and stay ahead of the competition in 2025.
1. Badge and Product Label for WooCommerce
WooCommerce Badge and Countdown Timer elevate your store’s appeal with customized badges and countdown timers. Maximize your store’s performance and captivate your customers with powerful WooCommerce tools designed to boost sales and engagement. Highlight bestsellers, new arrivals, and special offers with eye-catching WooCommerce product badges that grab attention instantly. Create urgency and drive faster purchases using a dynamic WooCommerce countdown timer for flash sales, limited-time deals, and promotions. Build credibility and social proof with real-time WooCommerce order notifications that show shoppers your store is active and trusted by others. Plus, encourage higher cart values with a fully customizable WooCommerce free shipping bar that motivates customers to reach shipping thresholds.
With these conversion-focused features, you’ll drive urgency, build trust, and turn browsers into loyal buyers—effortlessly
🚀FEATURES
Let’s take a brief look at some of the cool features of this plugin:
Over 20 Product Badges
Over 10 Modern Badges
Add Free Shipping on Product Page
Add Discount Popup
Add Trust Badges for embeds
Add Social Media Icons for embeds
Add Payment Icons for embeds
Add Multi Bar
Add Infinity Bar
Add Countdown stock for embeds
Add Announcement feature for embeds
Add Sales Pop-up
Add Notification Bar
Add Free Shipping Bar
Over 200 Image Labels
Over 10 CSS Labels
5 Advanced Labels
8 Timers Template
10 Animation Effects
Add Badge to Out Of Image Position
Incorporate Gradient Colors
Implement Discount Rules
Add a Percentage Discount amount
Rotate CSS Labels, Image Labels, and Advanced Labels
Add Easy Custom labels on products
Access CSS label templates
Preview is available live for easy placement and customization
Add Badges to specific WooCommerce products, categories, or tags
Add Badges to “Is On Sale”
Add Badges to “In Stock” and “Out Of Stock”
Customize label attributes, including color, font size, line height, width, opacity, position, and much more
Transform And Rotate Css Labels
Set Toggle To the visibility of badges
Include an option to set an expiration Date and Time for badges
A unique feature for adjusting hooks that control the presentation of product labels, beneficial if your theme encounters issues displaying them or if you wish to reposition the labels
Adjust the Position of CSS Labels, Image Labels, and Advanced Labels
Include both Vertical and Horizontal Timers
Personalize Sale Timers with Styling Options
Sale Image Labels
Percentage Off Image Labels
Coming Soon Image Labels
Pre-Order Image Labels
Free Image Labels
Black Friday Image Labels
Valentine’s Day Image Labels
Xmas Image Labels
Tested with more than 40+ Themes
Flatsome
WoodMart
Avada
The7
Divi
Betheme
Uncode
Enfold
Bridge
Salient
JupiterX
XStore
Porto
StoreFront
Astra
OceanWP
and much more
📽️Demo
Visit this plugin Live Demo here to see how it works.
2. Advanced Woo Labels – Product Labels for WooCommerce
With the Advanced Woo Labels plugin, you can effortlessly generate labels or badges for all your WooCommerce products. Utilize label conditions to selectively display labels based on specific products, pages, or users. Customize label styles using the built-in options.
Capture users’ attention by incorporating information within labels such as discount value, product quantity, product rating, shipping class, stock status, sale status, and more.
🚀FEATURES
Let’s take a brief look at some of the cool features of this plugin:
Create unlimited number of labels for each WooCommerce product.
Display label in two positions: on product image or before title. Align label at any side of this position.
Use labels with custom text. Write any text inside product labels. Also use special text variables to show important product information like Price, Sale price, Discount percentage, Discount amount, SKU, Quantity.
Choose from 5 different text label shapes. Set unique styles for each of them with help of custom styling options.
Label groups. Show several labels for one product. Set maximal number of such labels, their alignment, priority, distance between them.
Label conditions. Show labels based on specific product, page or user conditions. Combine conditions to ‘AND’ and ‘OR’ groups to create more complex label rules.
Create unlimited label variations with advanced styling options: change label color, font color, font size, opacity, paddings and margins, set any other custom css individually for each label.
Cool admin panel with labels live preview.
Special option to change hooks that used to display product labels if your theme has some problem with showing them or if you want to change labels position.
Page builder plugins support: Gutenberg, Elementor, Beaver Builder, WPBakery, Divi Builder, Avada Builder, etc.
📽️Demo
Visit this plugin Live Demo here to see how it works.
The Advanced Product Labels plugin makes creating labels a breeze, allowing you to swiftly promote your free products or showcase special attributes such as “Free Shipping.” With the flexibility of conditions, you can assign each label to specific products within your shop, ensuring targeted promotion and highlighting of key features.
🚀FEATURES
Let’s take a brief look at some of the cool features of this plugin:
Custom labels on products
Labels for products by specific conditions
Labels by: product name, product category, sale status, stock status, bestsellers position, price, total sales count
Labels custom text and discount percentage type
Labels custom background and text colors
Custom label position
Multiple labels for one product
CSS templates
Custom image template
Better position for labels
Font size for labels
Font family for labels
Dimensions(px|em|%) for the Height, Width, Font size, Line height, Padding and Margin
z-index for labels
📽️Demo
Visit this plugin Live Demo here to see how it works.
The WooCommerce Product Labels plugin, also known as WooCommerce Sale Badges, simplifies the creation of product labels or badges effortlessly. With its user-friendly interface, you can easily craft custom product labels for WooCommerce products. Whether you want to add labels to specific products or categories or replace the default WooCommerce On Sale badges, this plugin offers the flexibility to do so with ease.
🚀FEATURES
Let’s take a brief look at some of the cool features of this plugin:
Can easily create / manage badges with our easy to use UI.
Option to customize badge color, font size, line height, width, opacity, position etc.
Live preview for easy positioning / styling.
Default / commonly used badge styles available to choose from.
Option to set hide / show badges.
Option to set badges to a set of products / category.
Option to set badges to all products ‘On Sale’.
Option to set badges to ‘Out Of Stock’ products.
Option to set expiry date & time on badges.
Option to hide the default WooCommerce ‘On Sale’ Badge.
Option to show discount percenatge (sale / regular price difference) as Badge text.
📽️Demo
Visit this plugin Live Demo here to see how it works.
Utilizing product badges is an effective strategy for enhancing sales within your e-commerce platform. These badges serve to spotlight key products, whether they’re new arrivals, popular items, featured selections, or others. Moreover, product badges can leverage potent psychological triggers such as scarcity, social proof, and urgency, effectively stimulating sales.
🚀FEATURES
Let’s take a brief look at some of the cool features of this plugin:
Create unlimited badges using the advanced builder
Create simple textual badges, with or without background
Create image badges and choose from 9 different images
Set the badge size
Set the padding for the textual badges
Set the badges border radius
Set the badge position (top, bottom, center) and alignment (left, right, center)
Hide or replace the default WooCommerce “on sale” badge
Assign badges to products
📽️Demo
Visit this plugin Live Demo here to see how it works.
Show a “Sold Out!” badge on products that are out of stock. This plugin for WooCommerce will display a badge on the product thumbnail, featuring the text you’ve specified, when the product becomes out of stock.
🚀FEATURES
Let’s take a brief look at some of the cool features of this plugin:
Badge text (you can replace “Sold Out” with any text you want, like “Out of stock” or “Coming Soon“)
Badge background color
Badge text color
Badge font size
Badge width
Badge height
…
An option to hide “Sale” badge if you get an overlap (checked by default)
📽️Demo
Visit this plugin Live Demo here to see how it works.
The WPC Badge Management plugin is incredibly versatile, multipurpose, and powerful. Specifically designed for managing badges in online shops and WooCommerce sites, it goes beyond simple product labeling. It serves as a potent tool for ecommerce business owners, aiding them in increasing conversion rates, boosting sales and revenues, ensuring speedy checkout processes, and enhancing customer retention rates.
🚀FEATURES
Let’s take a brief look at some of the cool features of this plugin:
More than 22 styles of badges that diversify in images, colors, shapes, texts, etc.
Highly customizable Global Badges: excerpt, applicable objects, position, text, colors, tooltip & order
Multi-level object application: storewide (all products), on-sale, featured, out of stock, selected tags, categories, brands, product types, specific attributes
Various positions: Show or hide badges in more than 10 positions on pages & product images
Icons & short-code supported custom text for badges
Icon library: support FontAwesome, Feather, Ionicons
Orderable badges: input the order to be arranged when there are various badges inserted
Instant preview of badges on product image
Quickly preview all details of badges from the dashboard
(PREMIUM) Using a combination of conditionals
(PREMIUM) Groupable badges: manage positions of badges in groups on the single product page, archive page and product image
(PREMIUM) Product-level badge management: customize badges for specific products
WPC Smart Quick View integration: Customizable position on quick view popup
Product Badge Manager for WooCommerce enables you to create unlimited product badges and assign them to your WooCommerce products based on various criteria such as category, attributes, terms, popularity, sales, time, stocks, and more. You can also filter the product archive using these badges.
🚀FEATURES
Let’s take a brief look at some of the cool features of this plugin:
Easy to use
You can add new product badges.
You can select Show Label.
Select Product badge position.
Customized Label font size, color and background color.
Add Product Discount Text.
You can Select Label Shape or Image Badge select.
Product Badges add conditionally with product wise and tag wise.
WPML Support
📽️Demo
Visit this plugin Live Demo here to see how it works.
In the dynamic landscape of e-commerce, managing product availability is crucial for maintaining customer satisfaction and optimizing sales. One essential tool for conveying product availability status to shoppers is the “Out of Stock” badge. In the realm of WooCommerce, a leading e-commerce platform for WordPress, this badge plays a significant role in guiding customer purchasing decisions. This text explores the importance of the WooCommerce Out of Stock Badge, its functionalities, and strategies for effective implementation to enhance the shopping experience and drive conversions.
Optimizing Customer Experience with WooCommerce Out of Stock Badge
delves into the pivotal role of the Out of Stock badge within the WooCommerce ecosystem. This text explores how businesses can utilize this badge to enhance customer satisfaction and streamline the shopping experience. It delves into various strategies and best practices for effectively managing product availability, ensuring that customers are promptly informed when items are out of stock. Additionally, it discusses customization options and innovative features that can further improve user engagement and drive conversions. By leveraging the WooCommerce Out of Stock badge effectively, businesses can create a seamless and transparent shopping experience that fosters trust and loyalty among customers.
Leveraging WooCommerce Out of Stock Badge for Increased Sales
explores how businesses can strategically use the Out of Stock badge to drive sales and revenue within the WooCommerce platform. This text provides insights into the importance of effectively managing product availability and how displaying the Out of Stock badge can create a sense of urgency and scarcity, motivating customers to make a purchase decision sooner rather than later. It discusses tactics such as offering alternative products, pre-order options, or notifying customers when items are back in stock to keep them engaged and encourage them to explore other offerings. By leveraging the WooCommerce Out of Stock badge strategically, businesses can capitalize on customer demand, optimize inventory management, and ultimately increase sales and profitability.
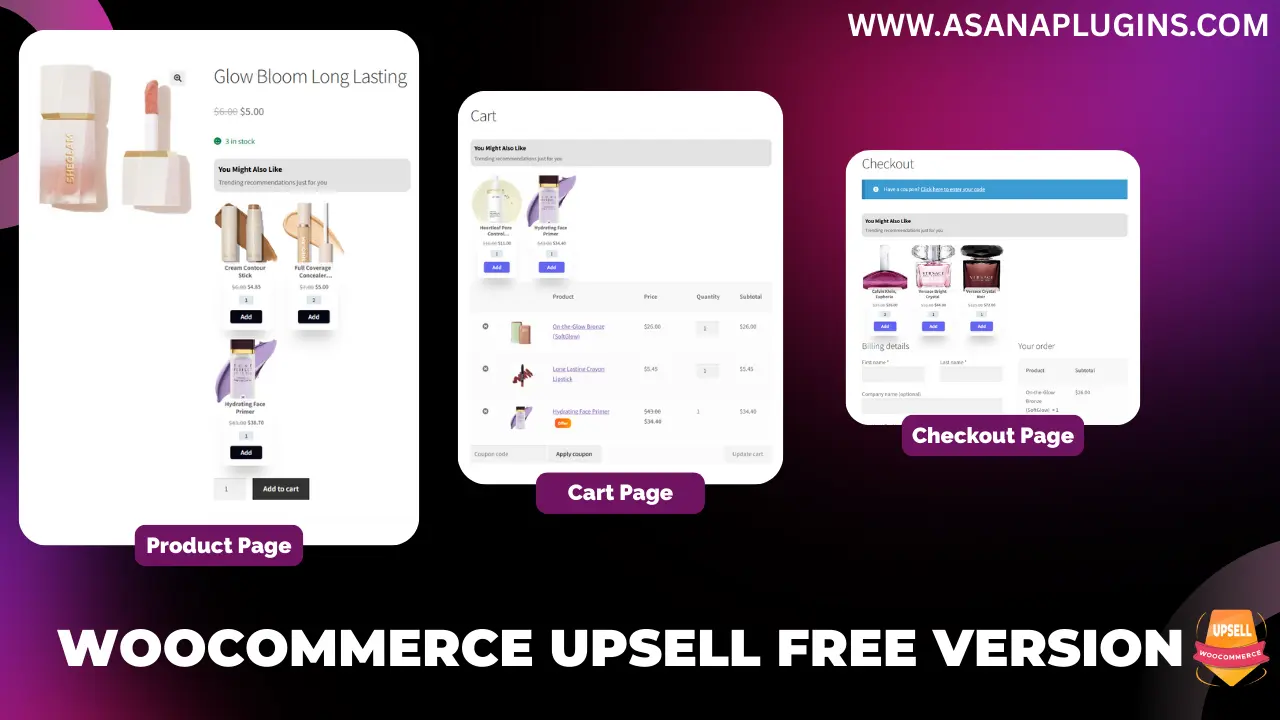
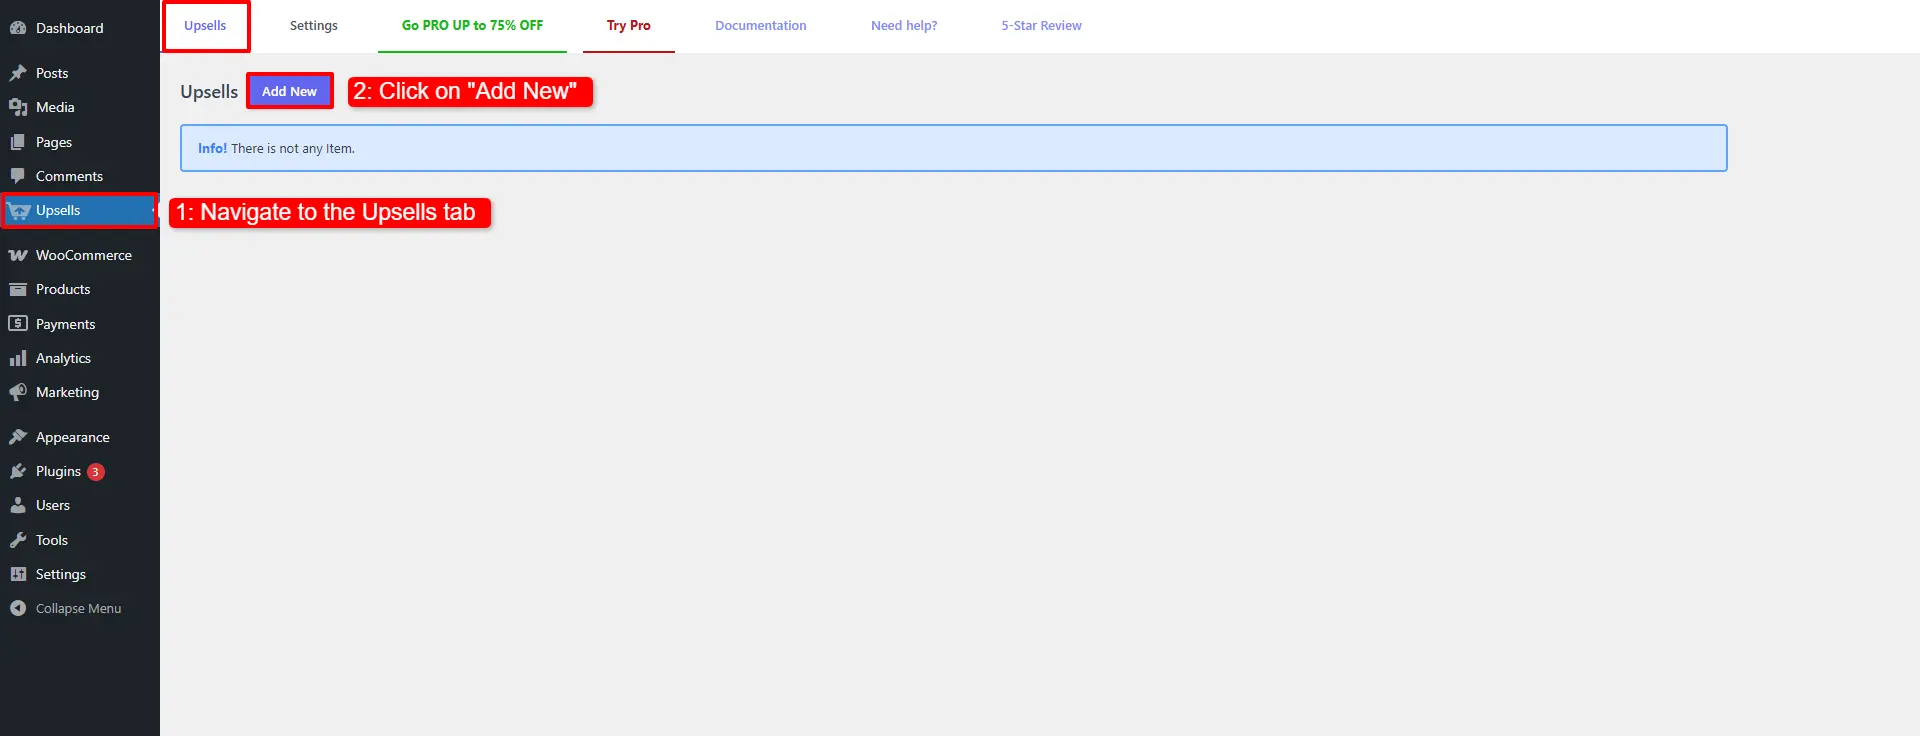
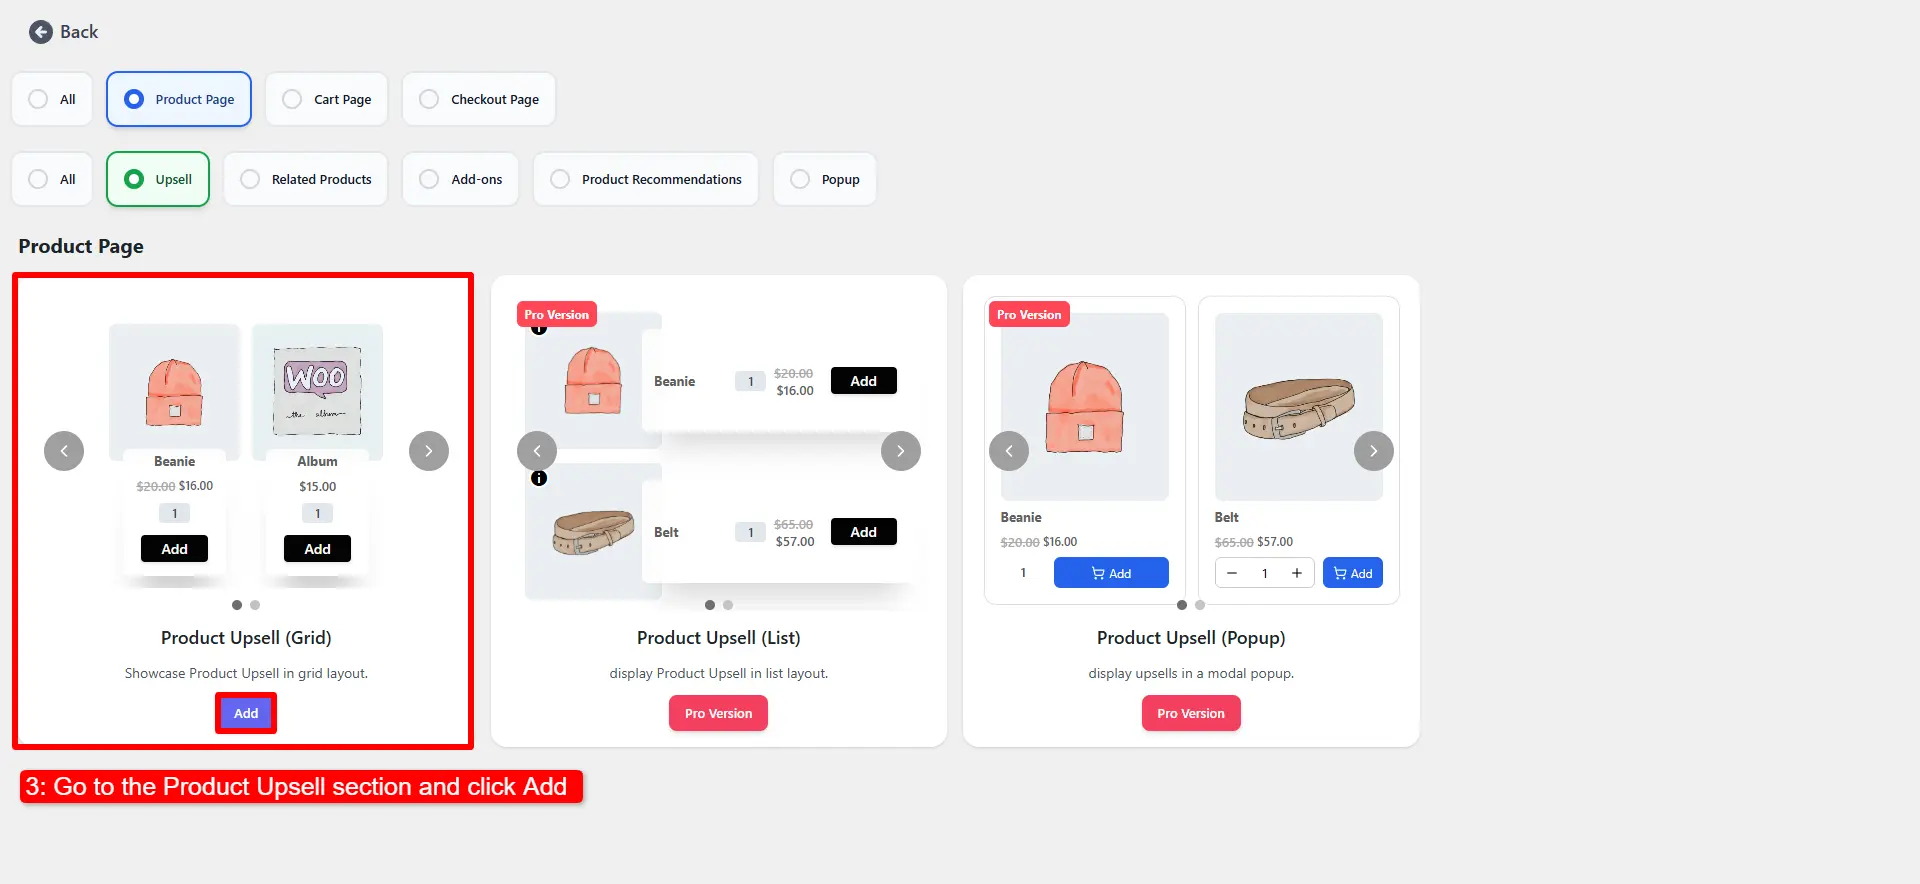
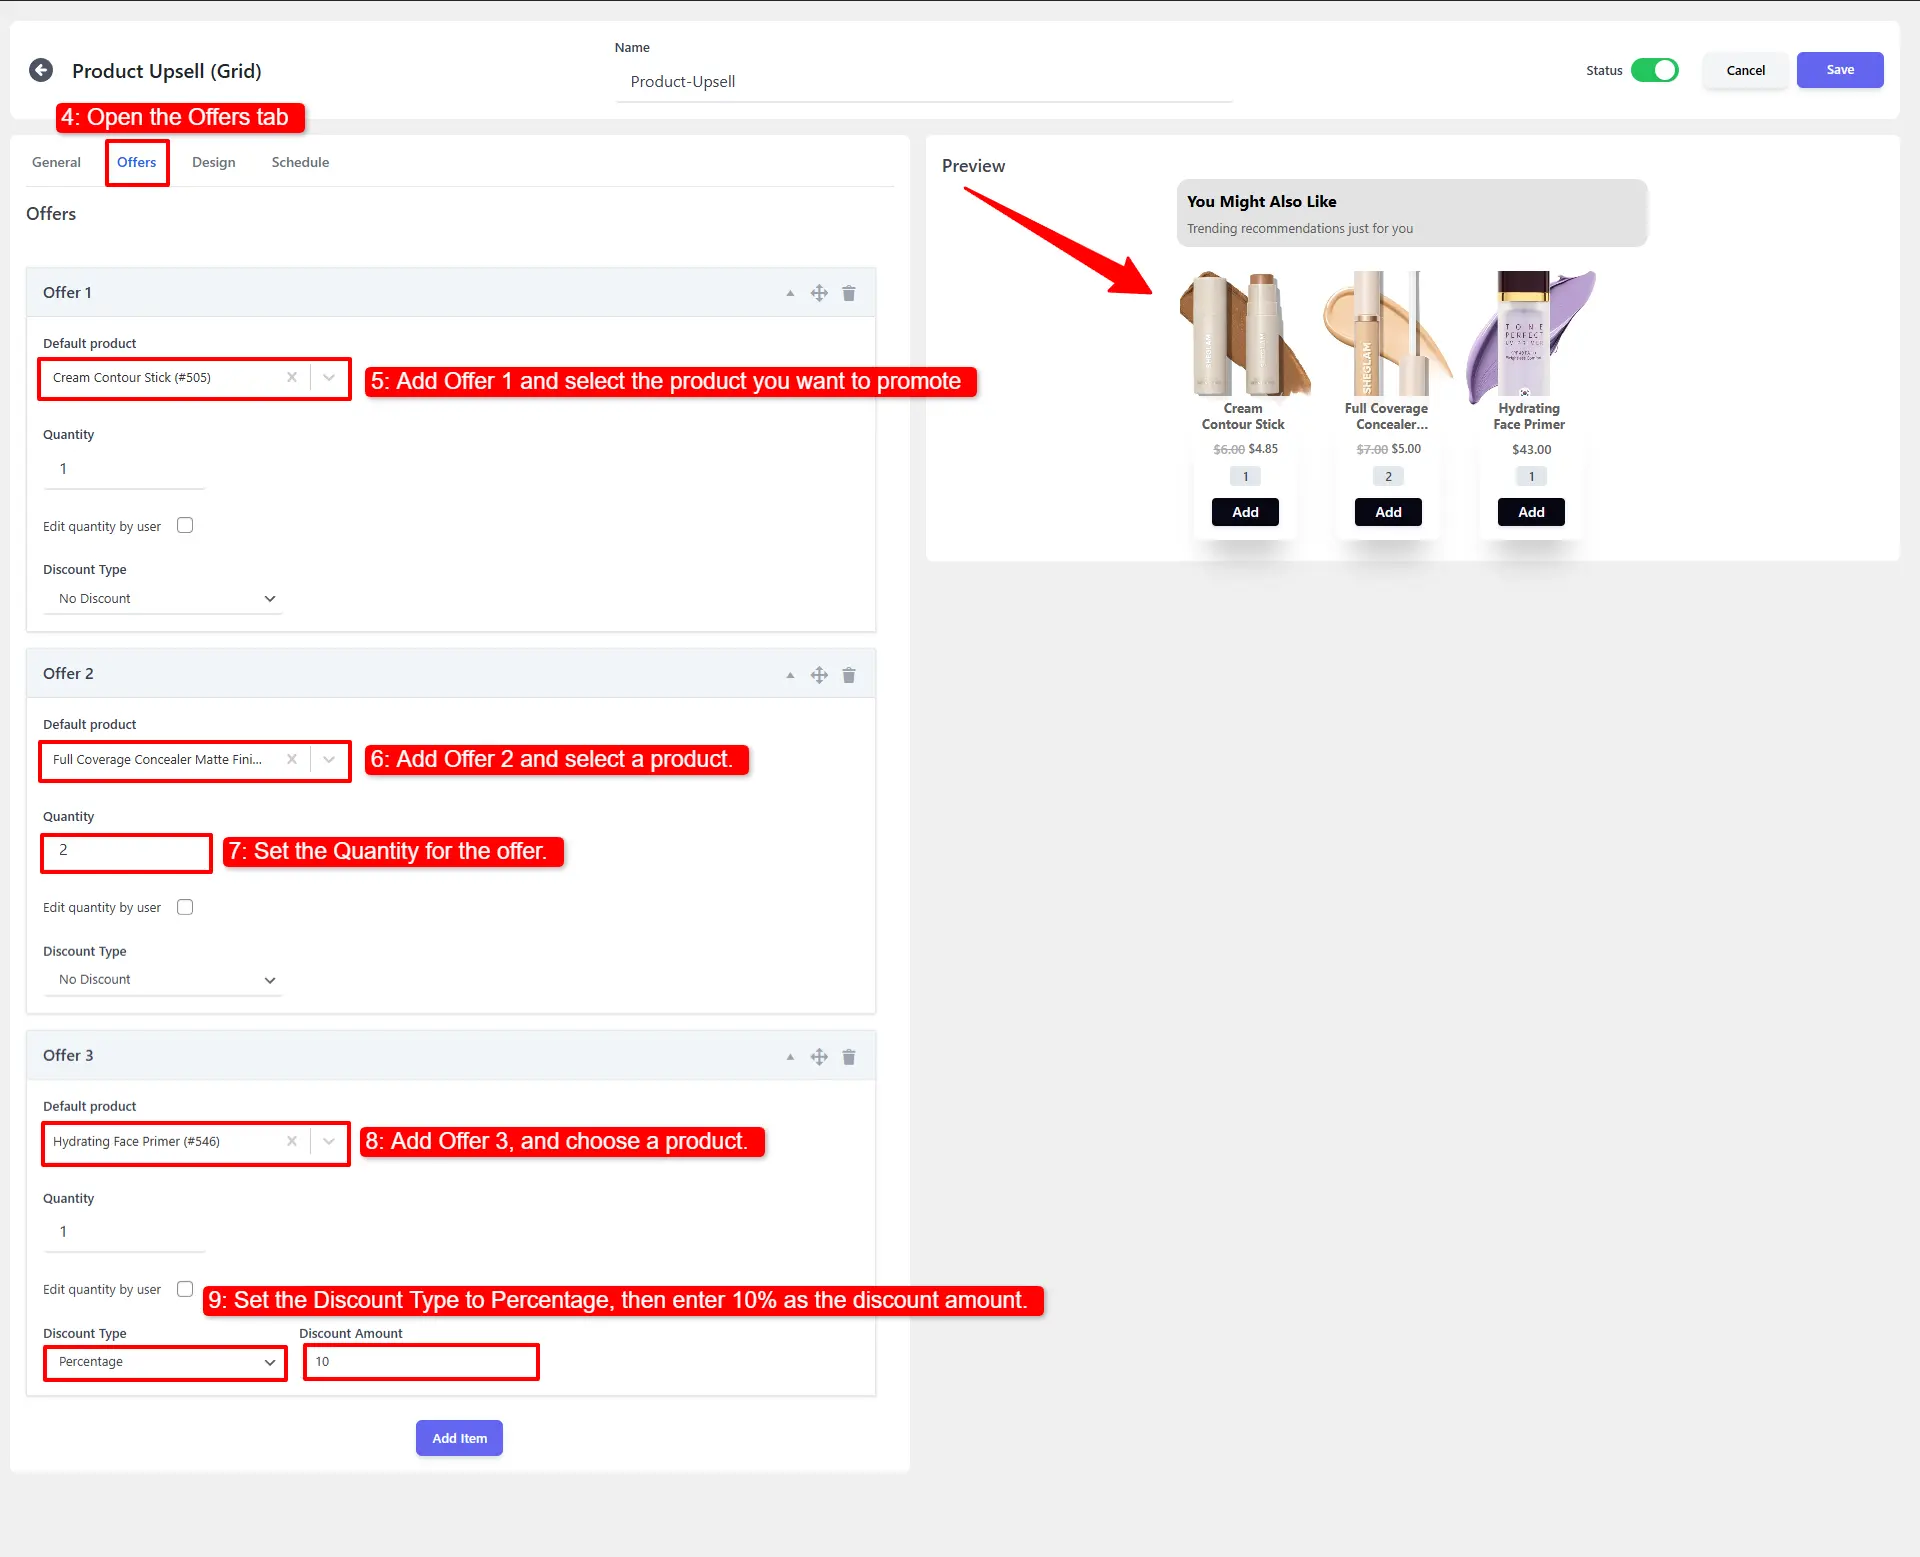
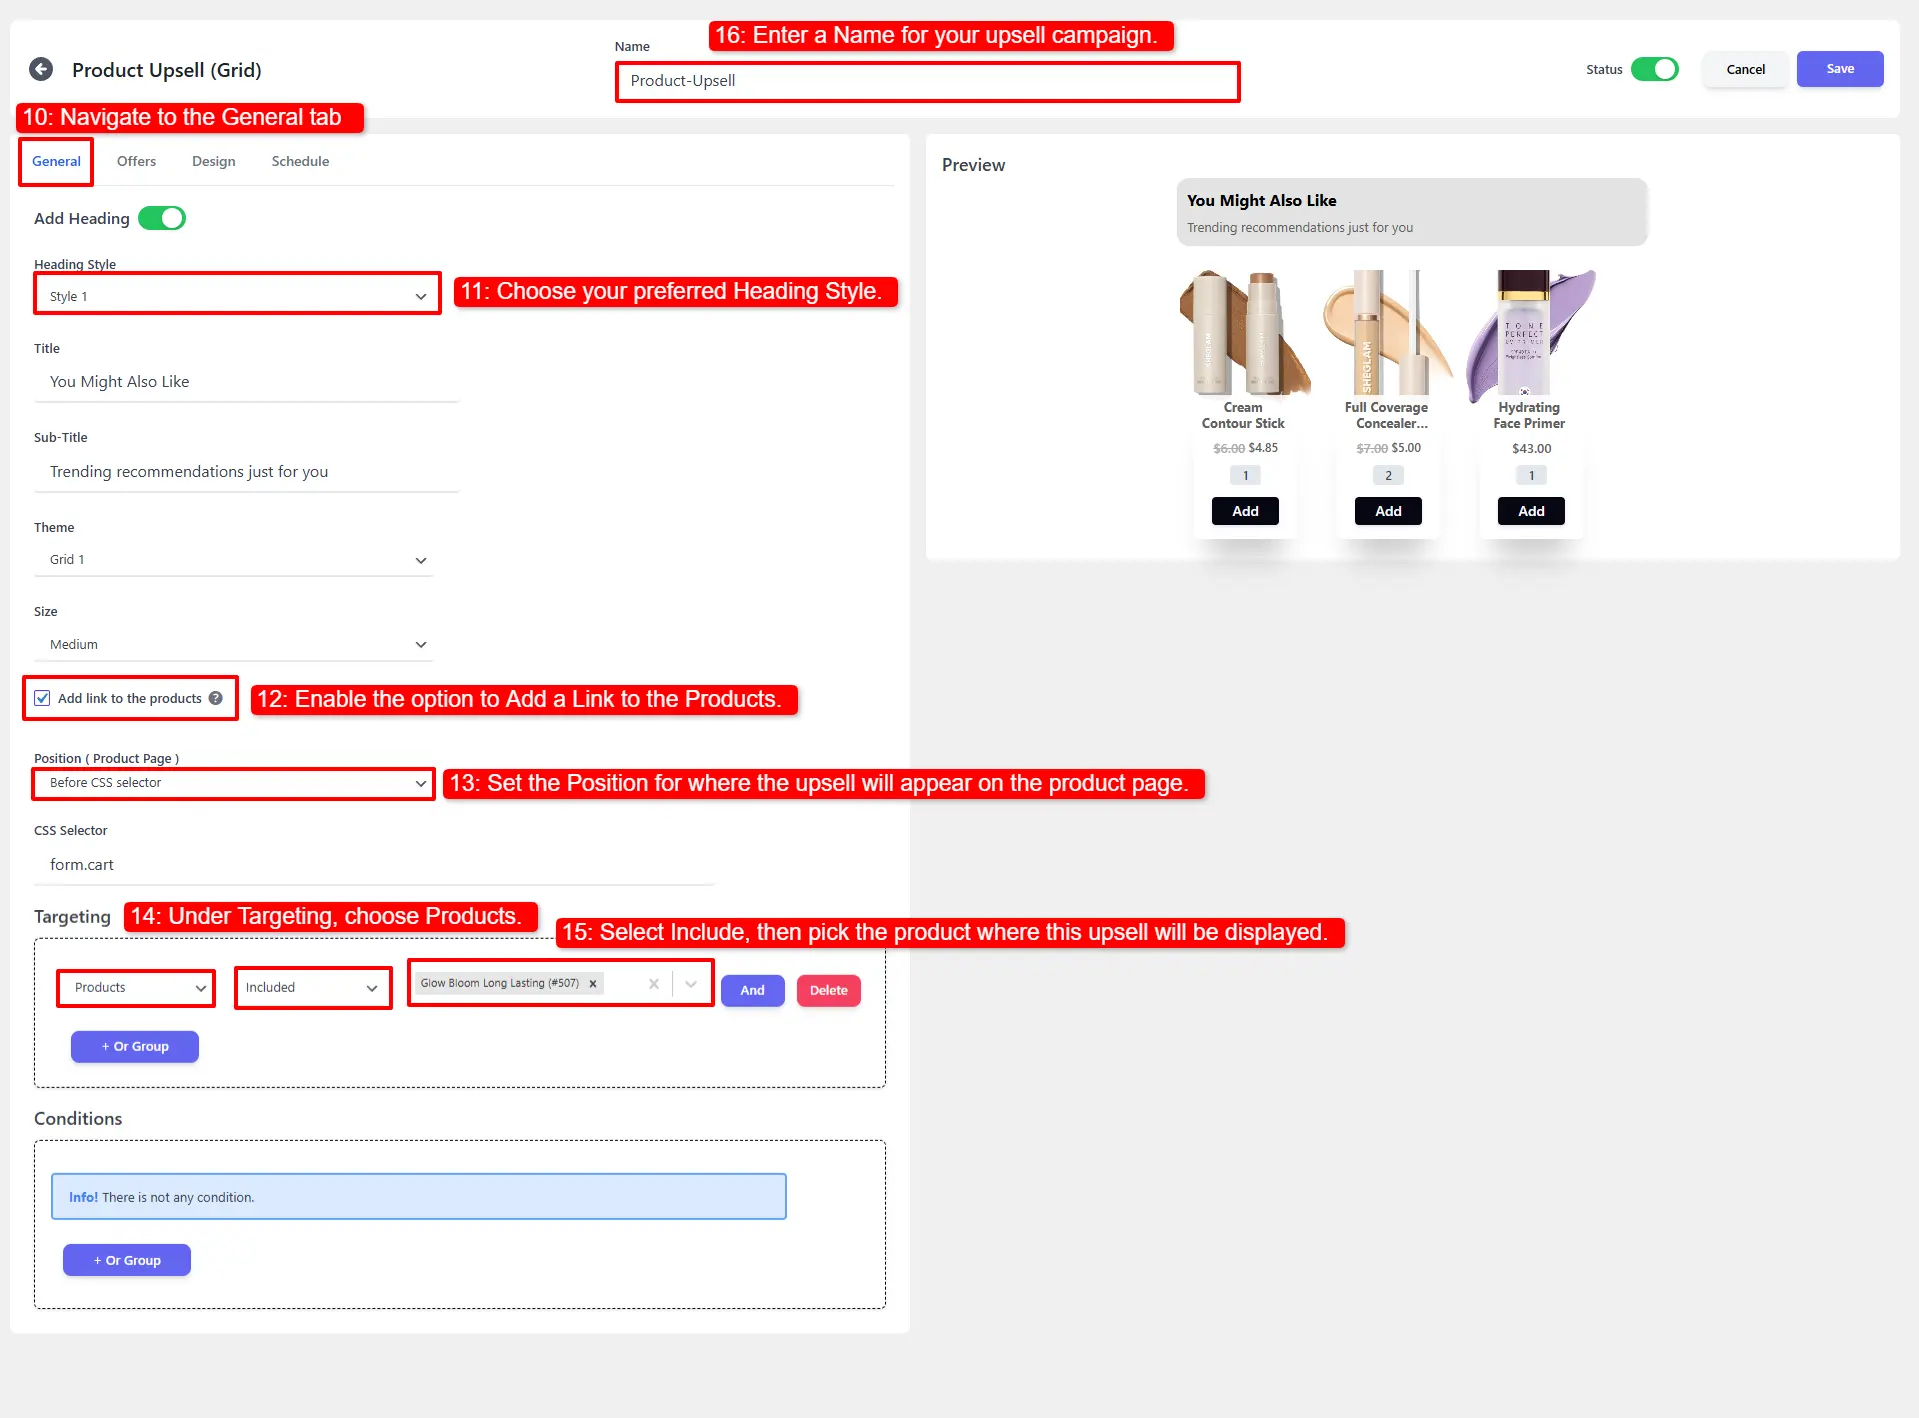
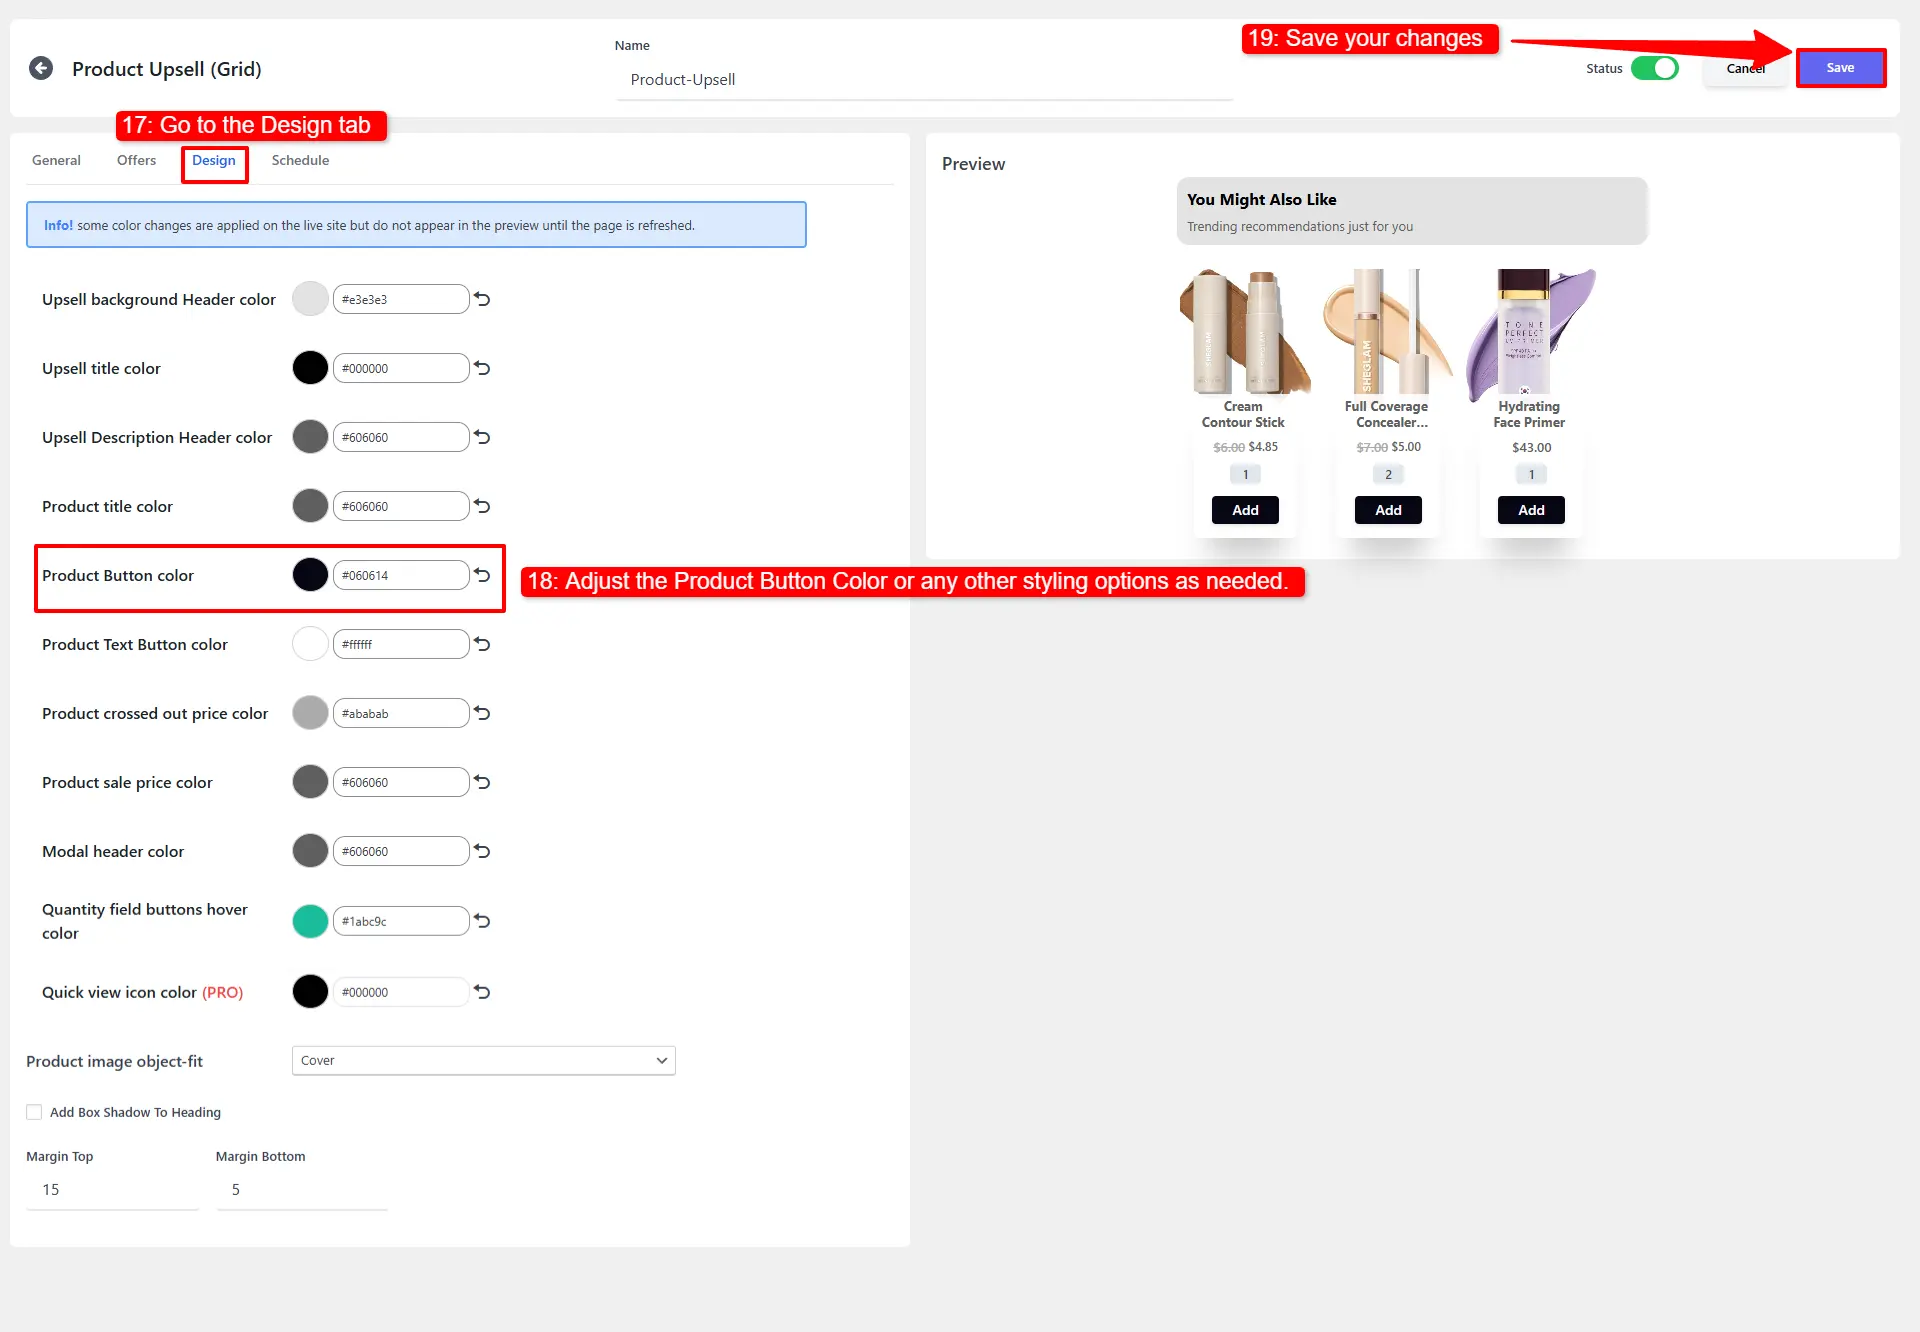
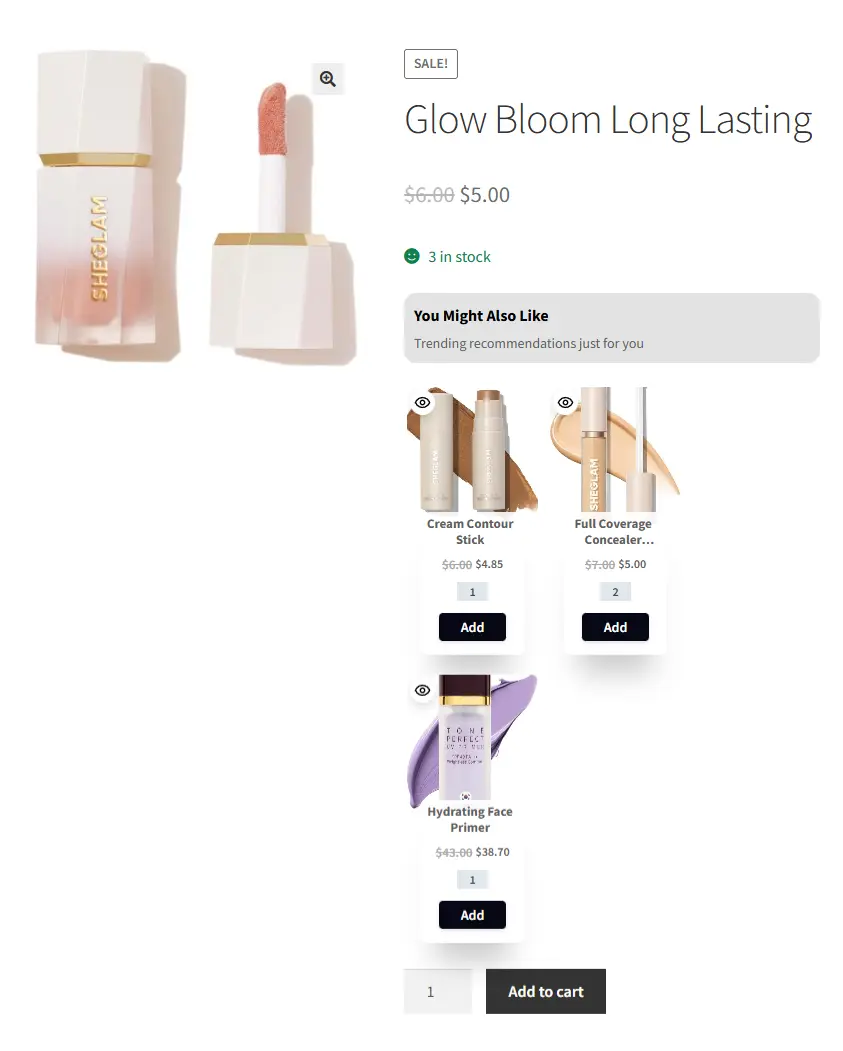
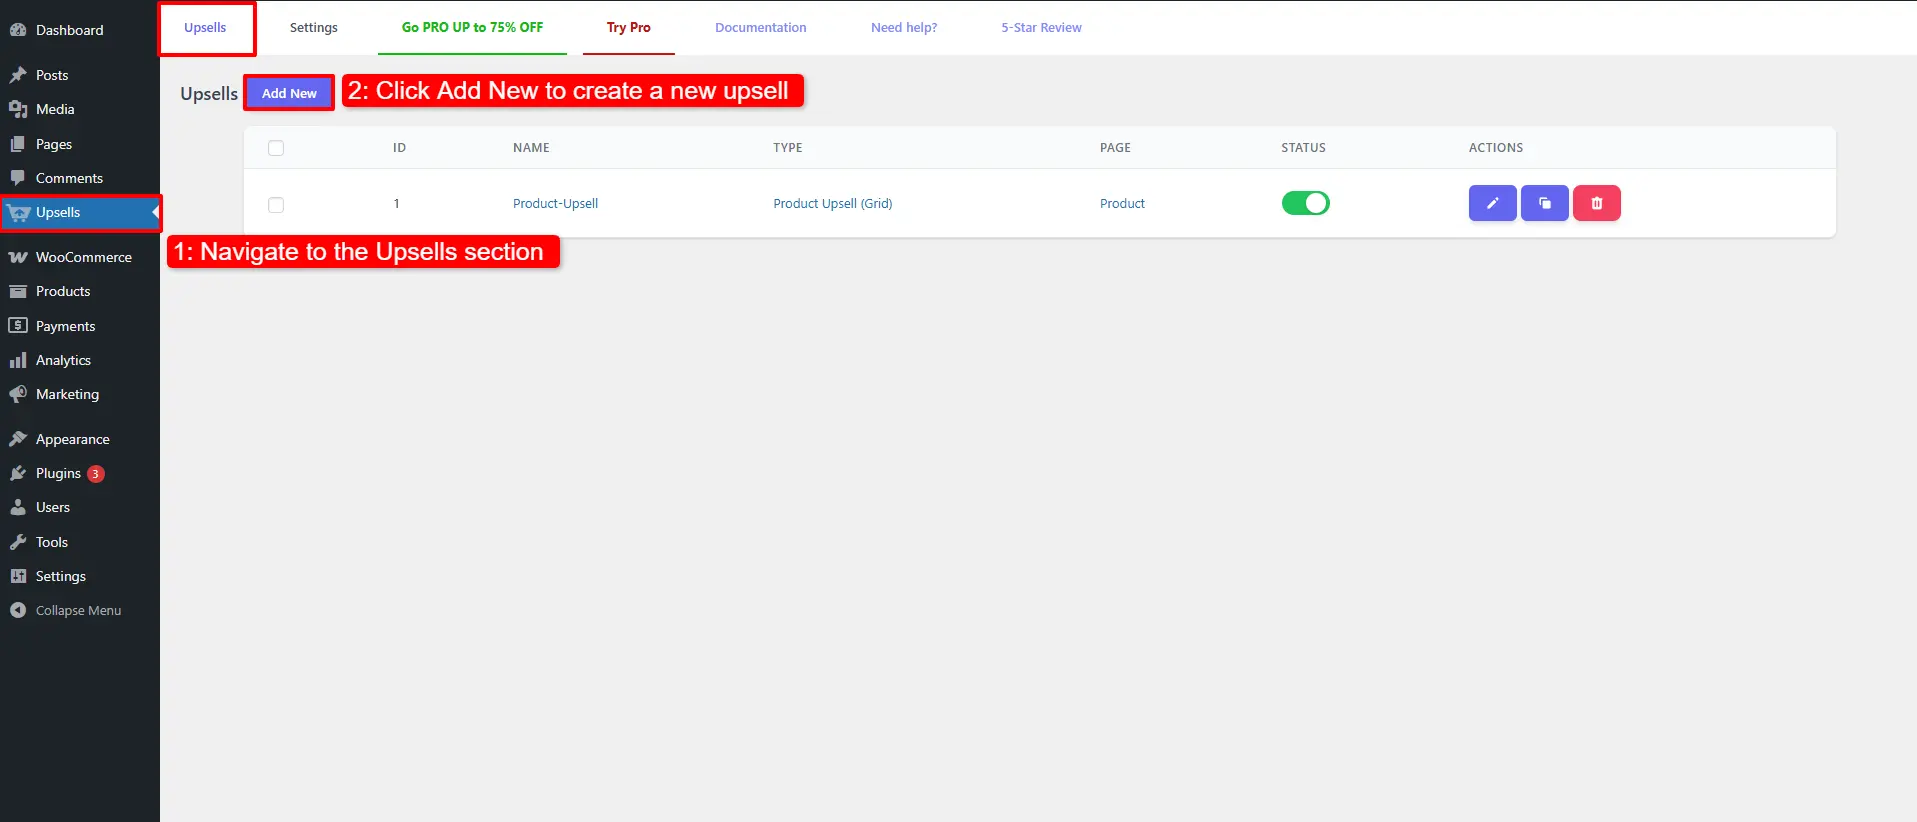
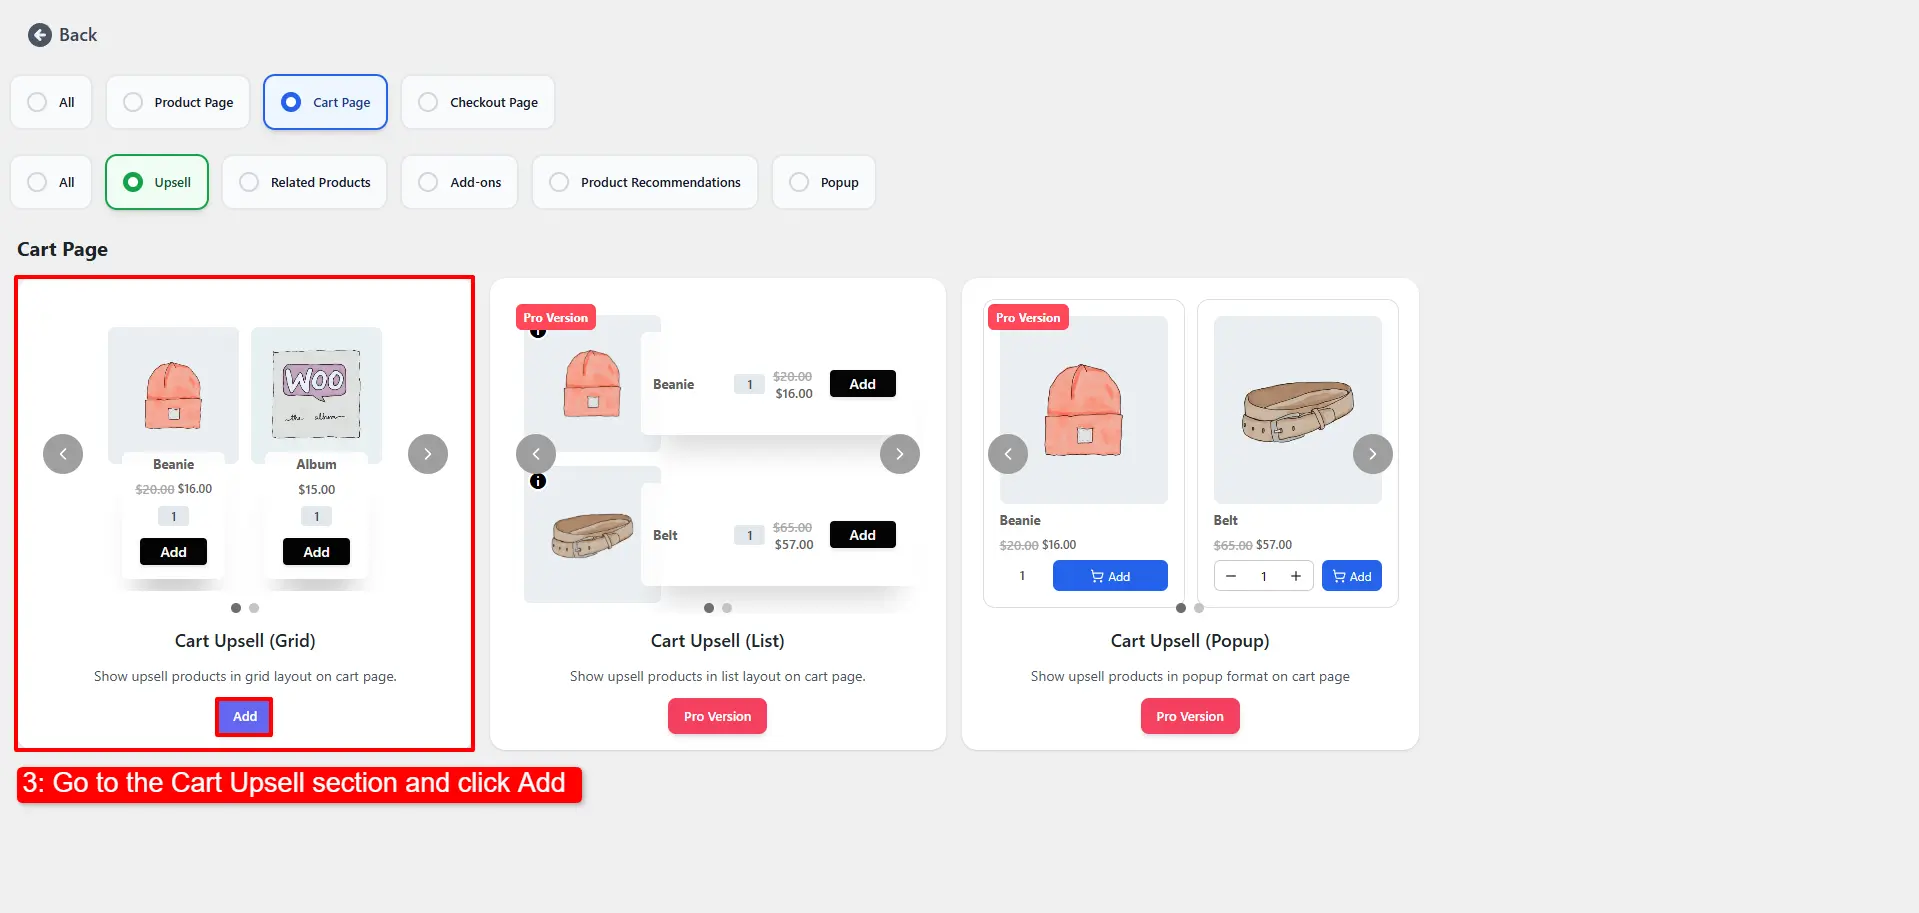

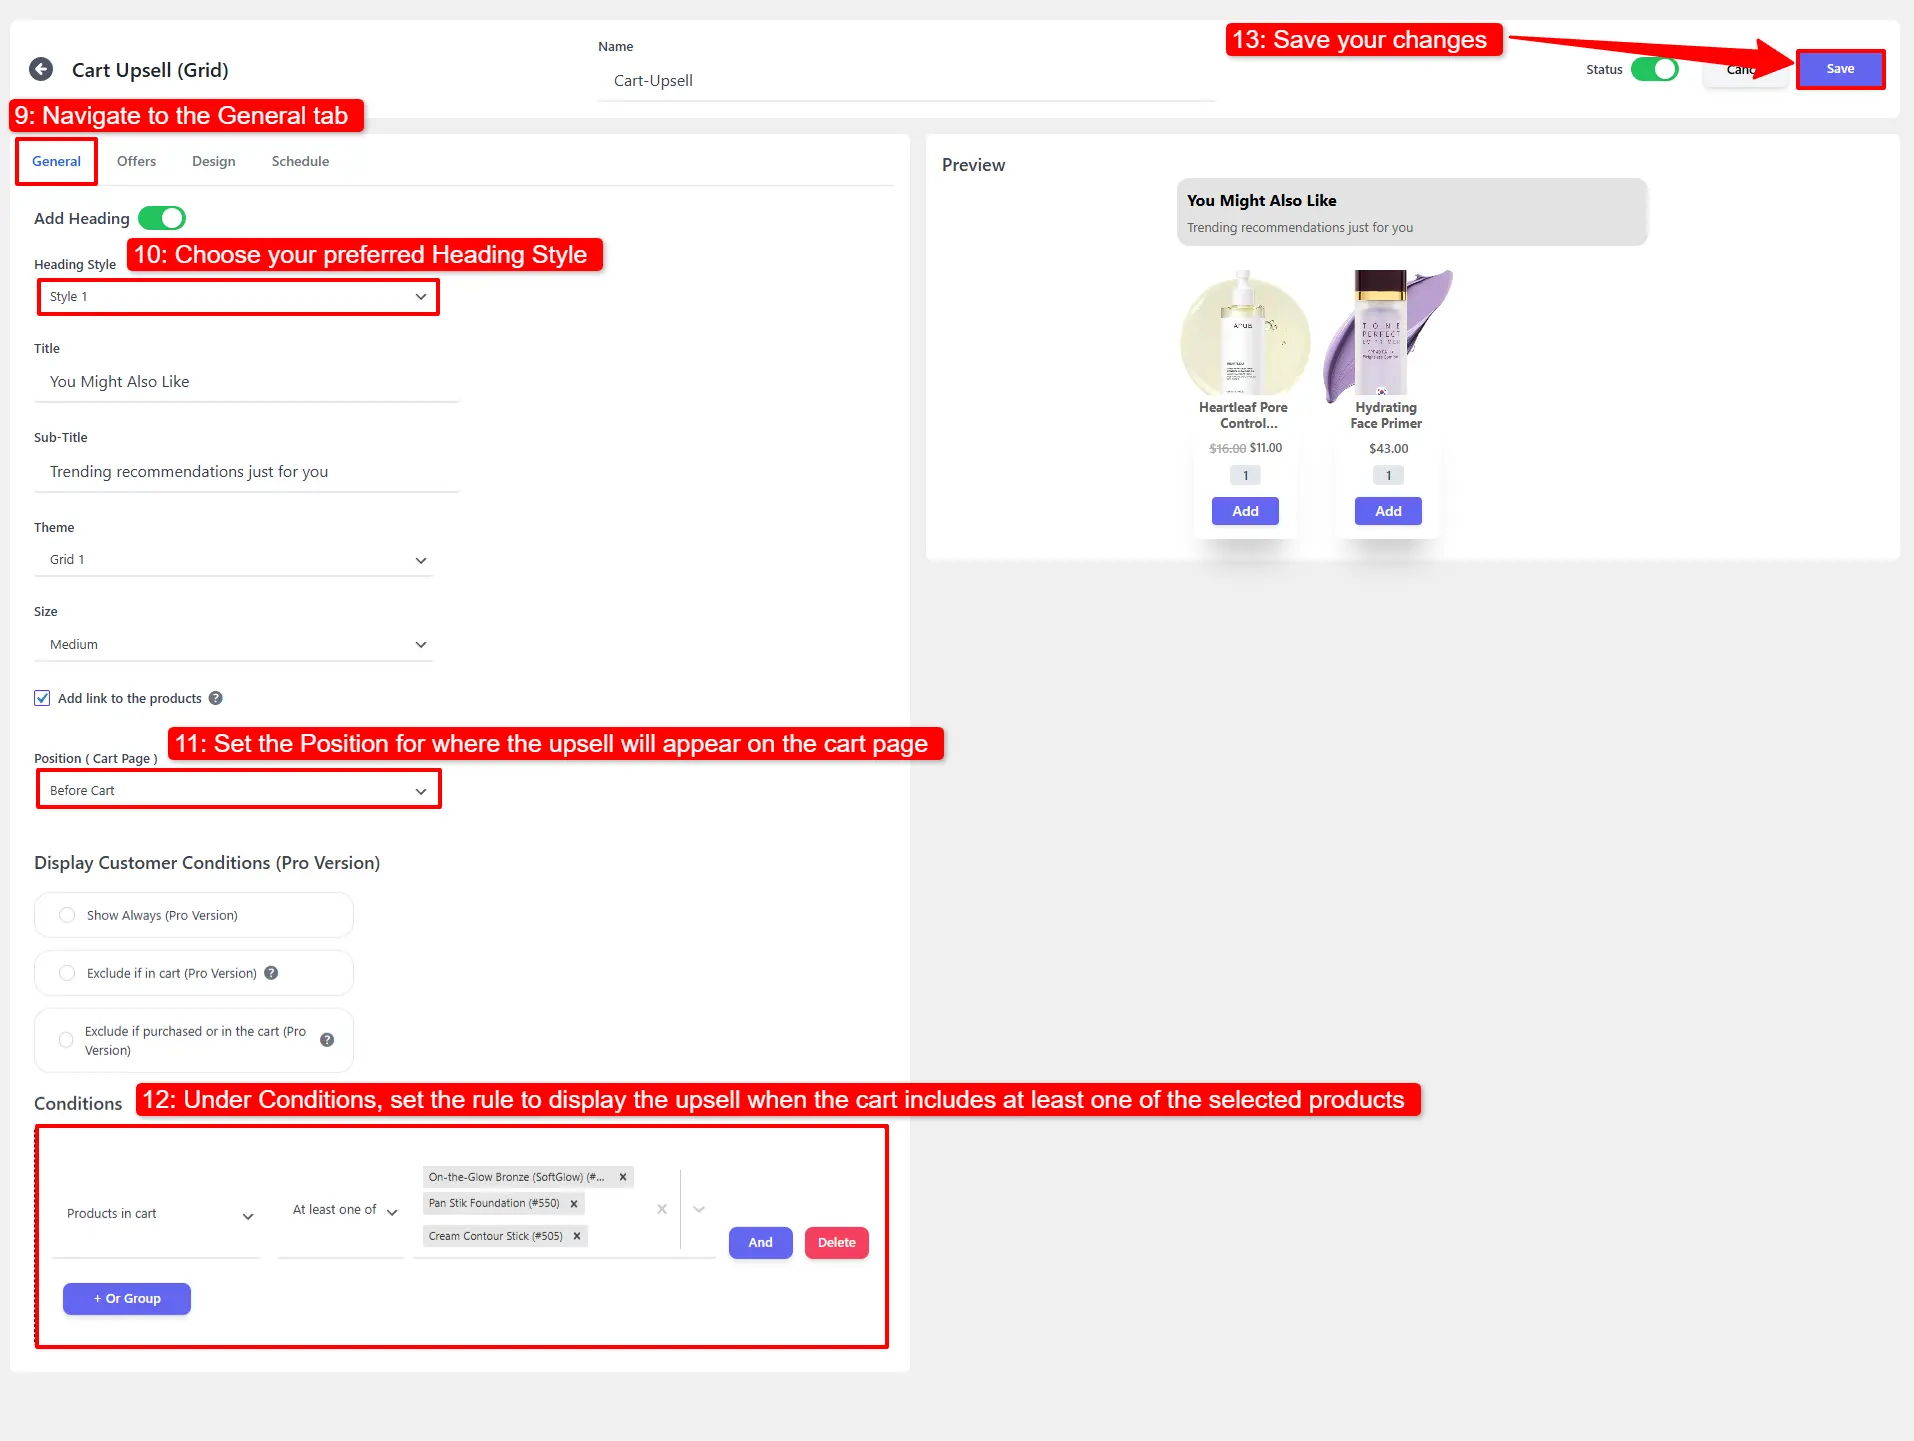
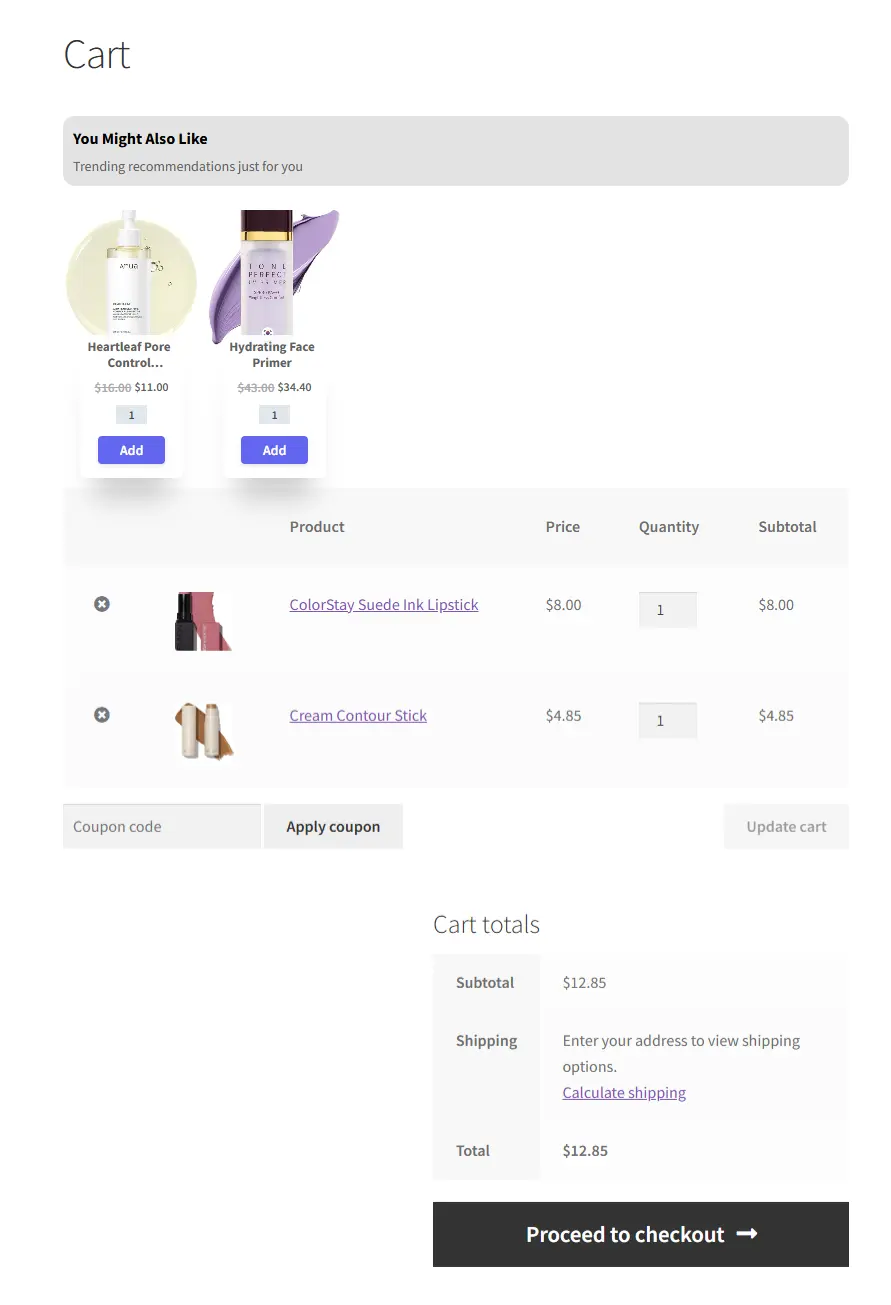
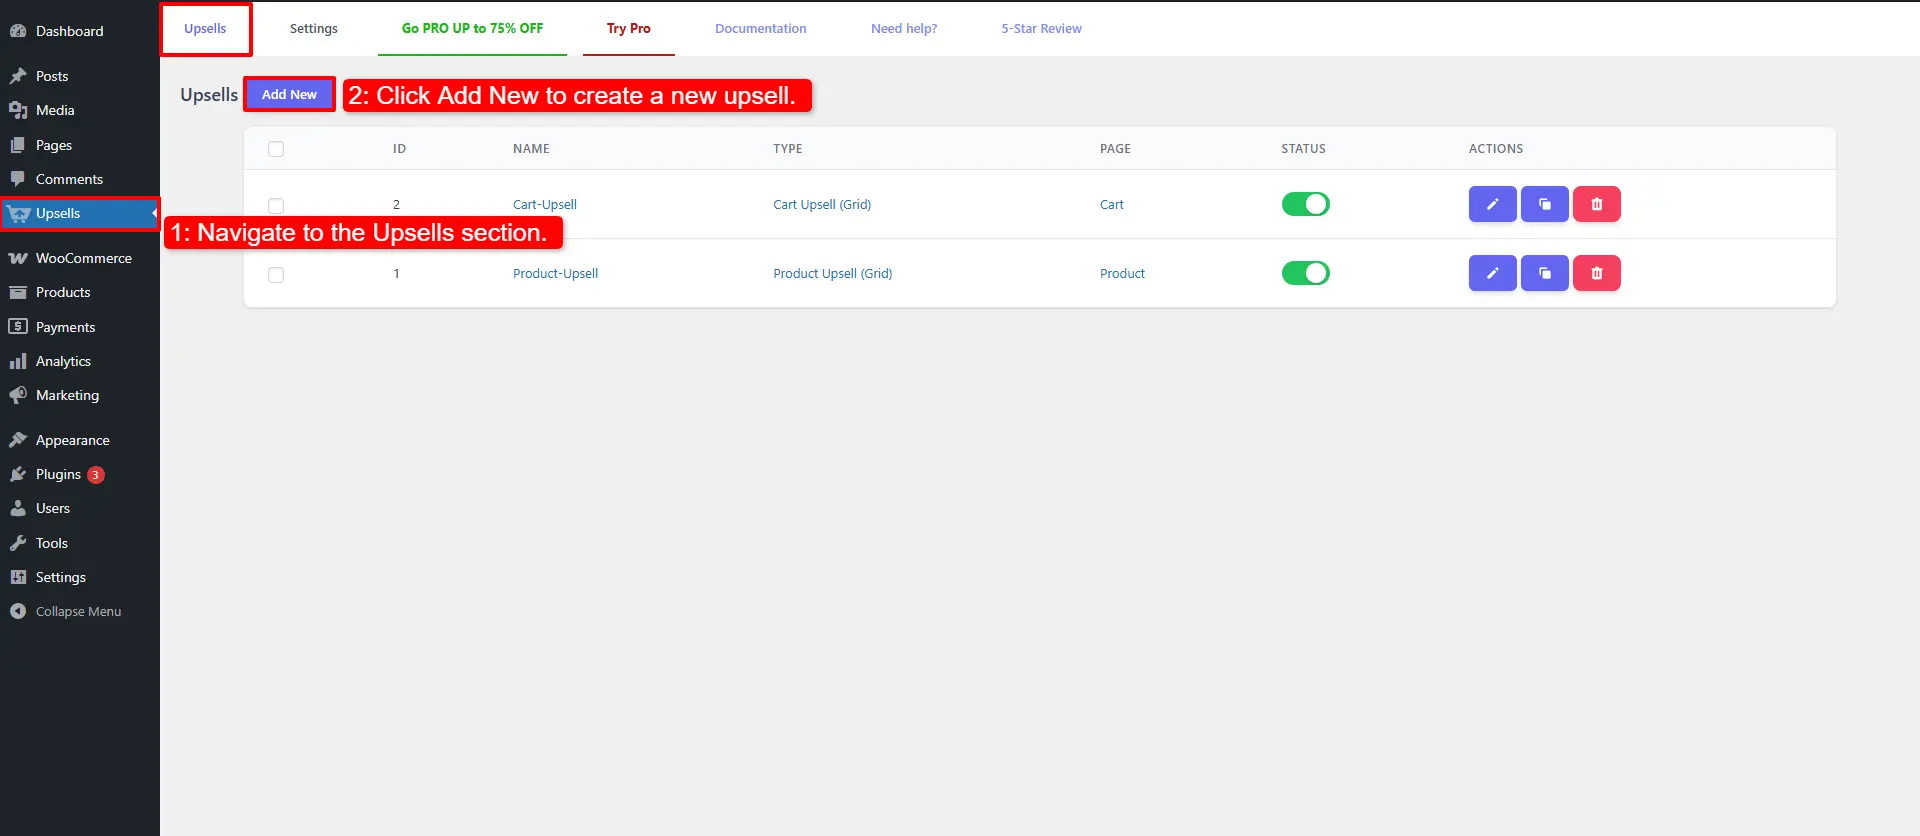
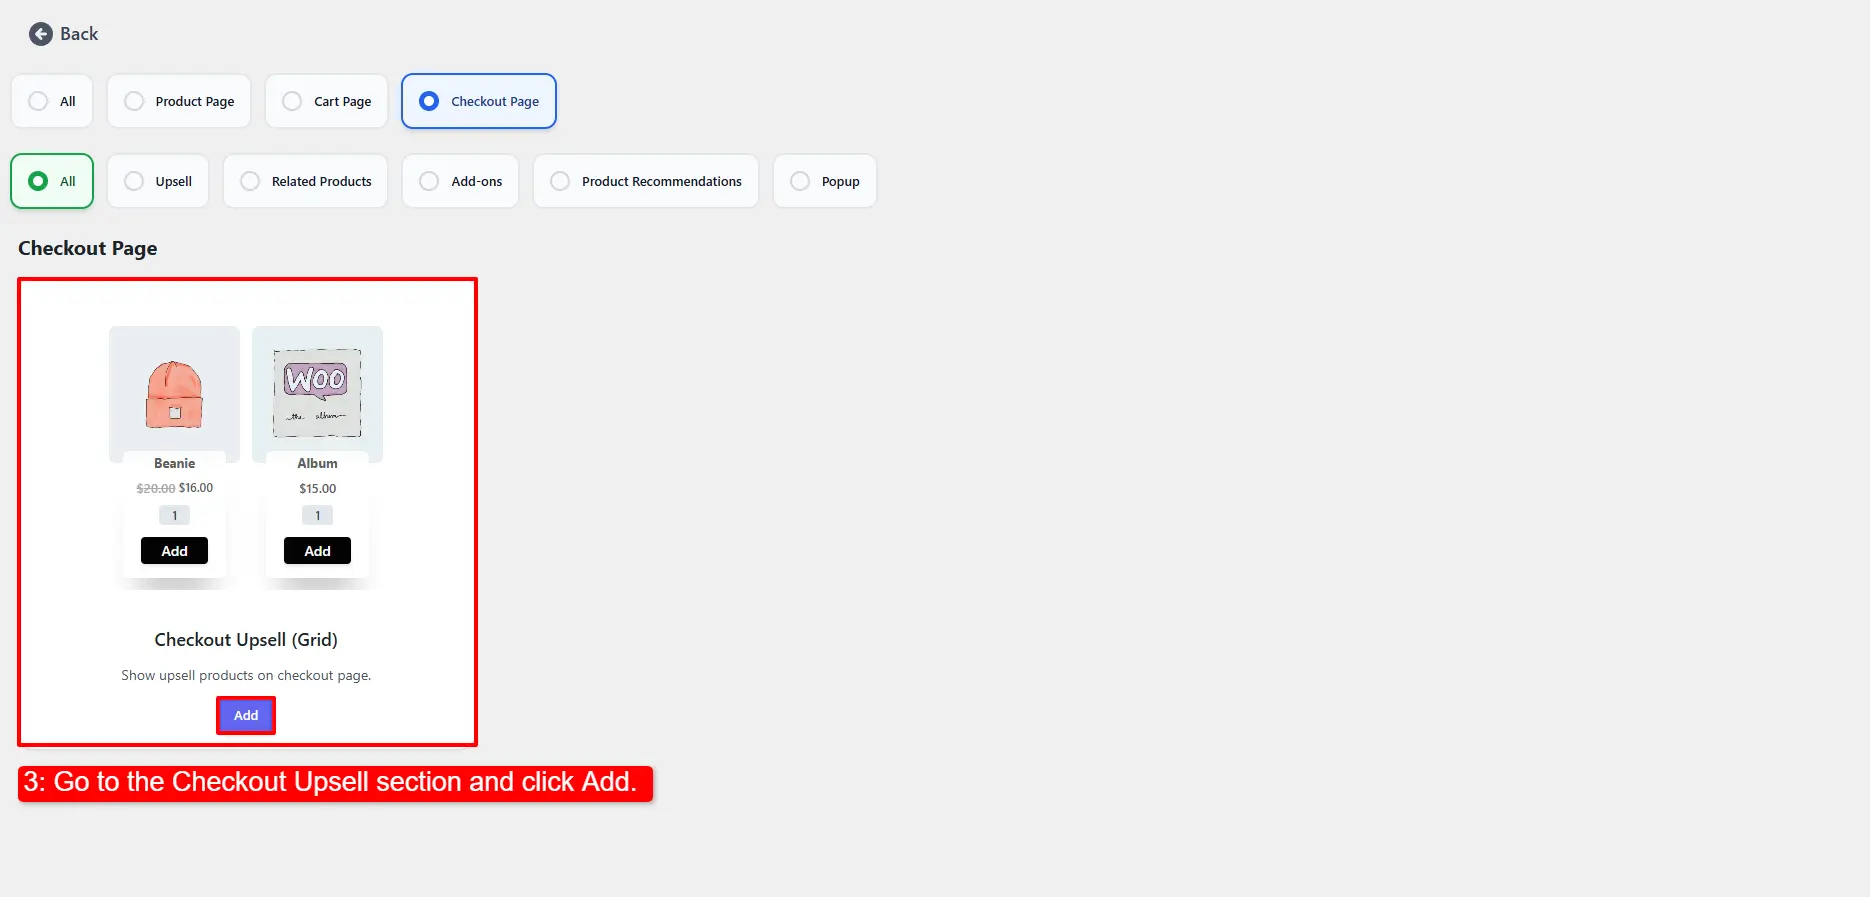
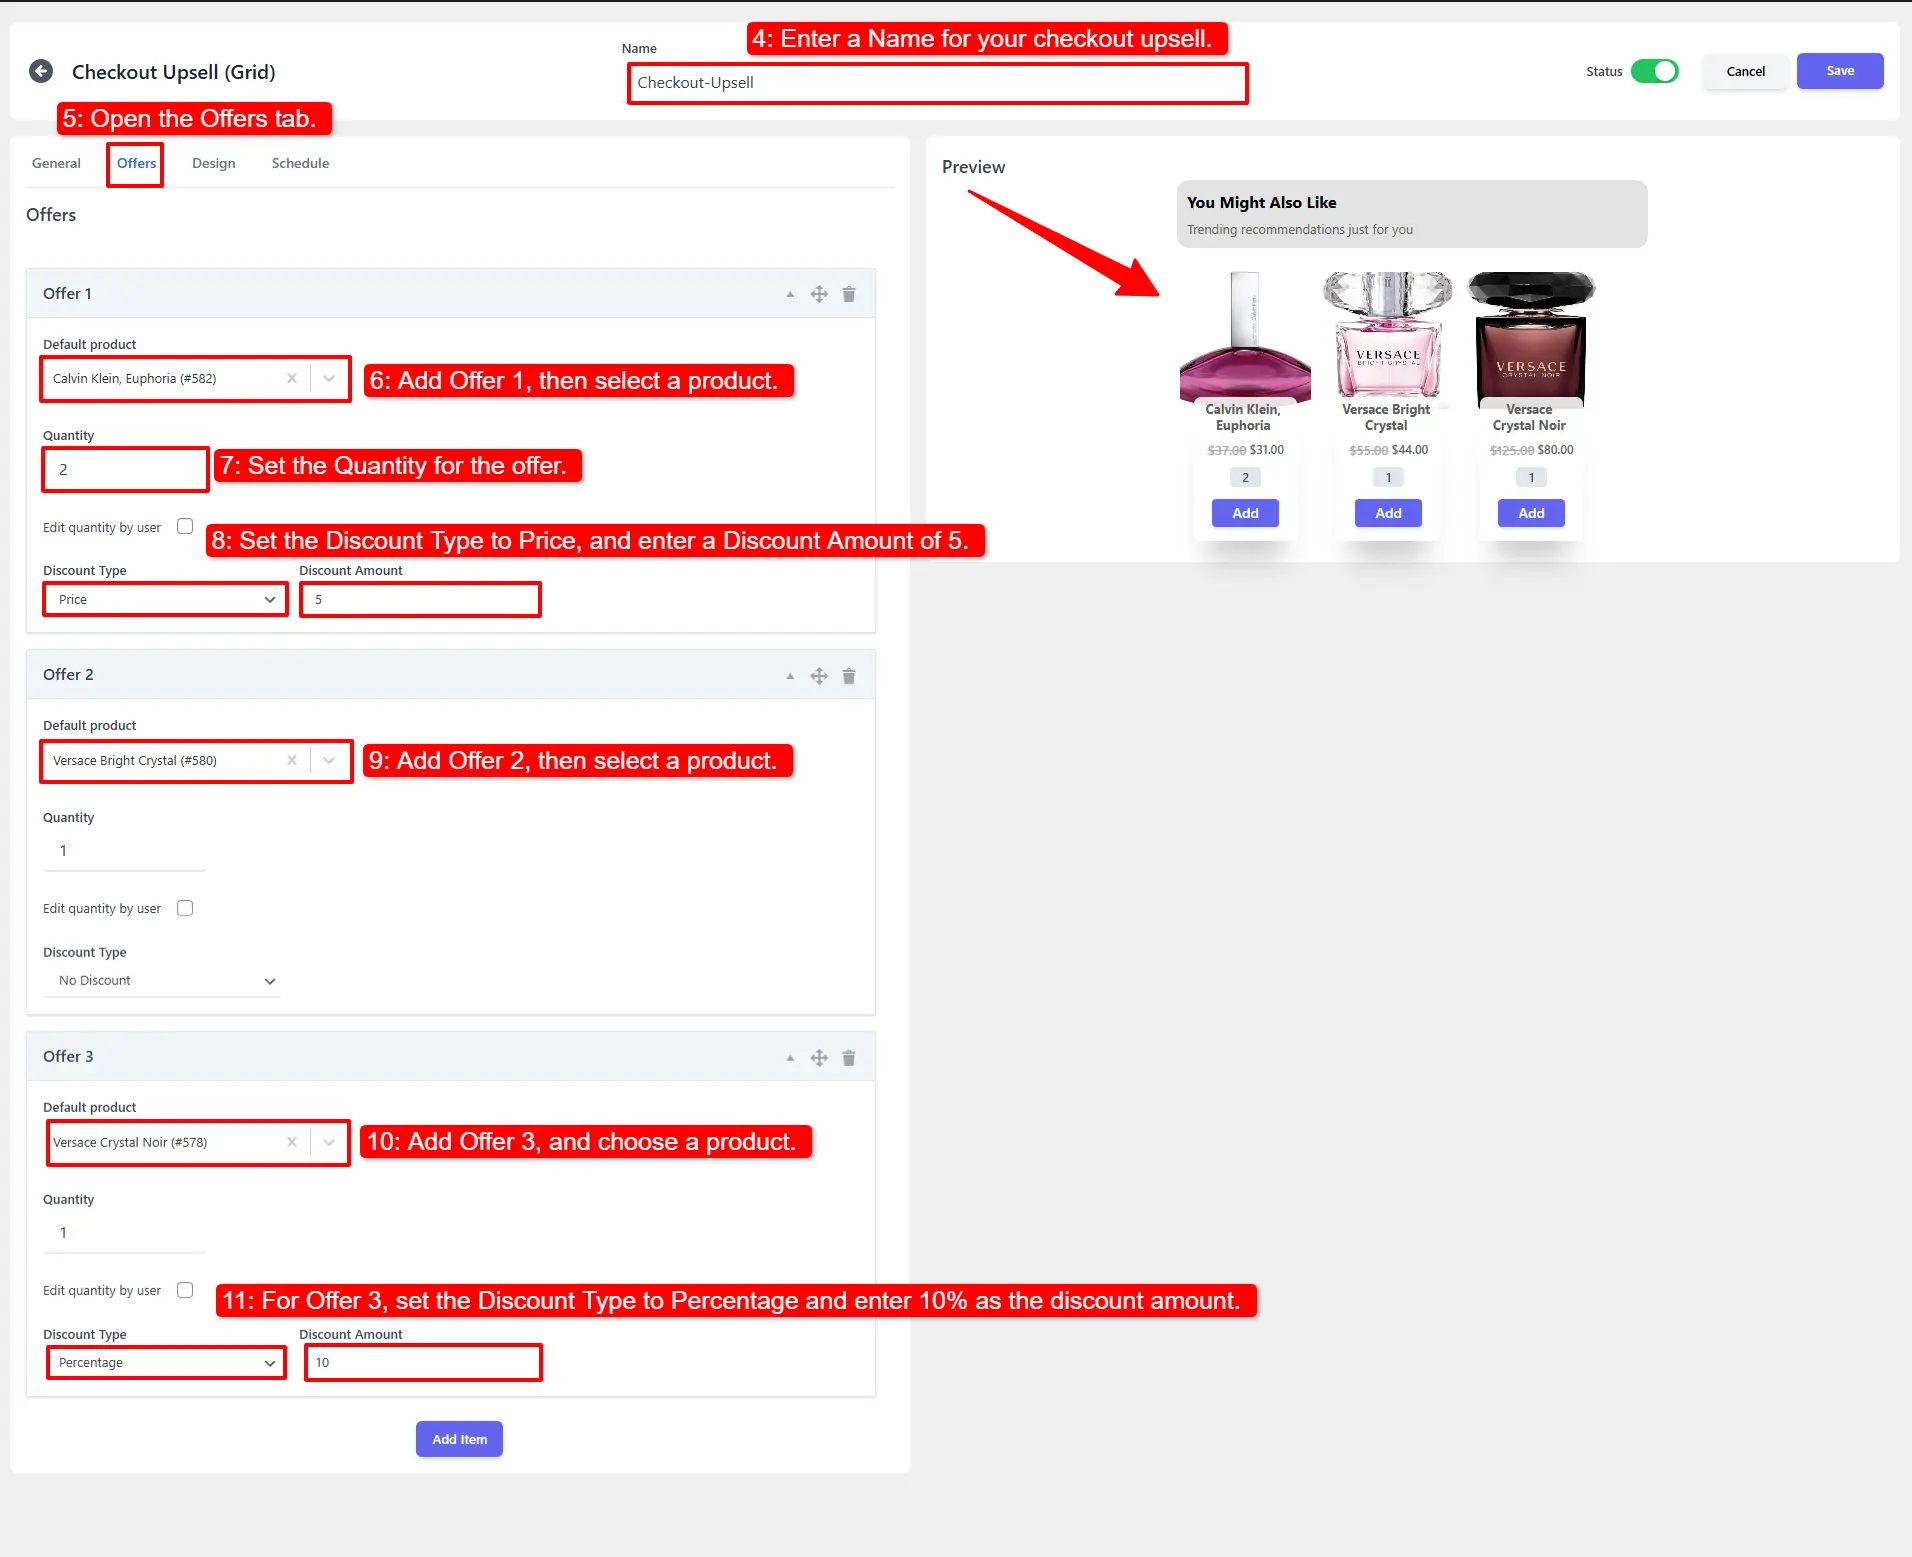
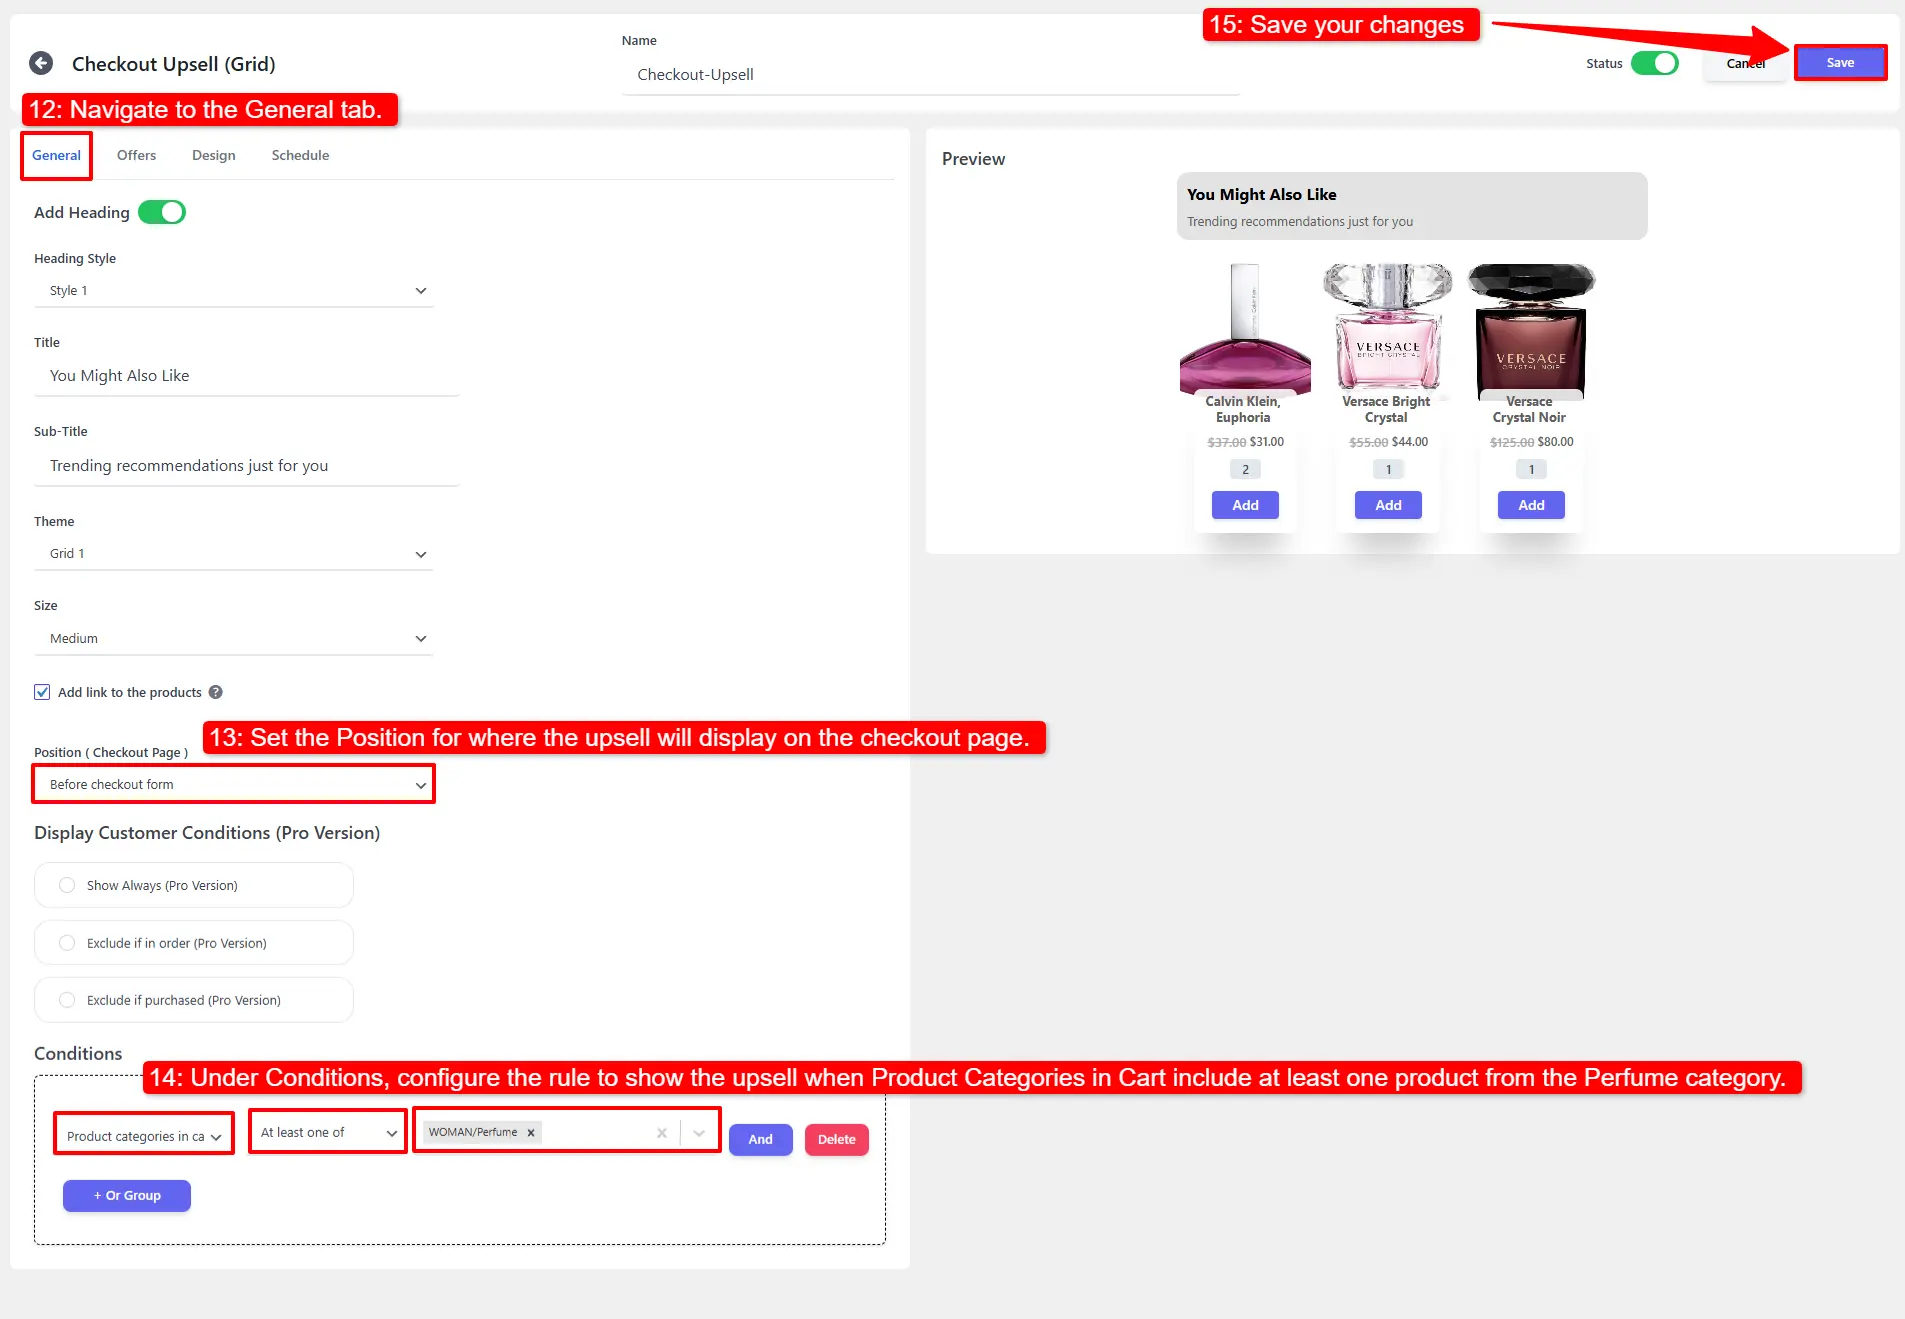
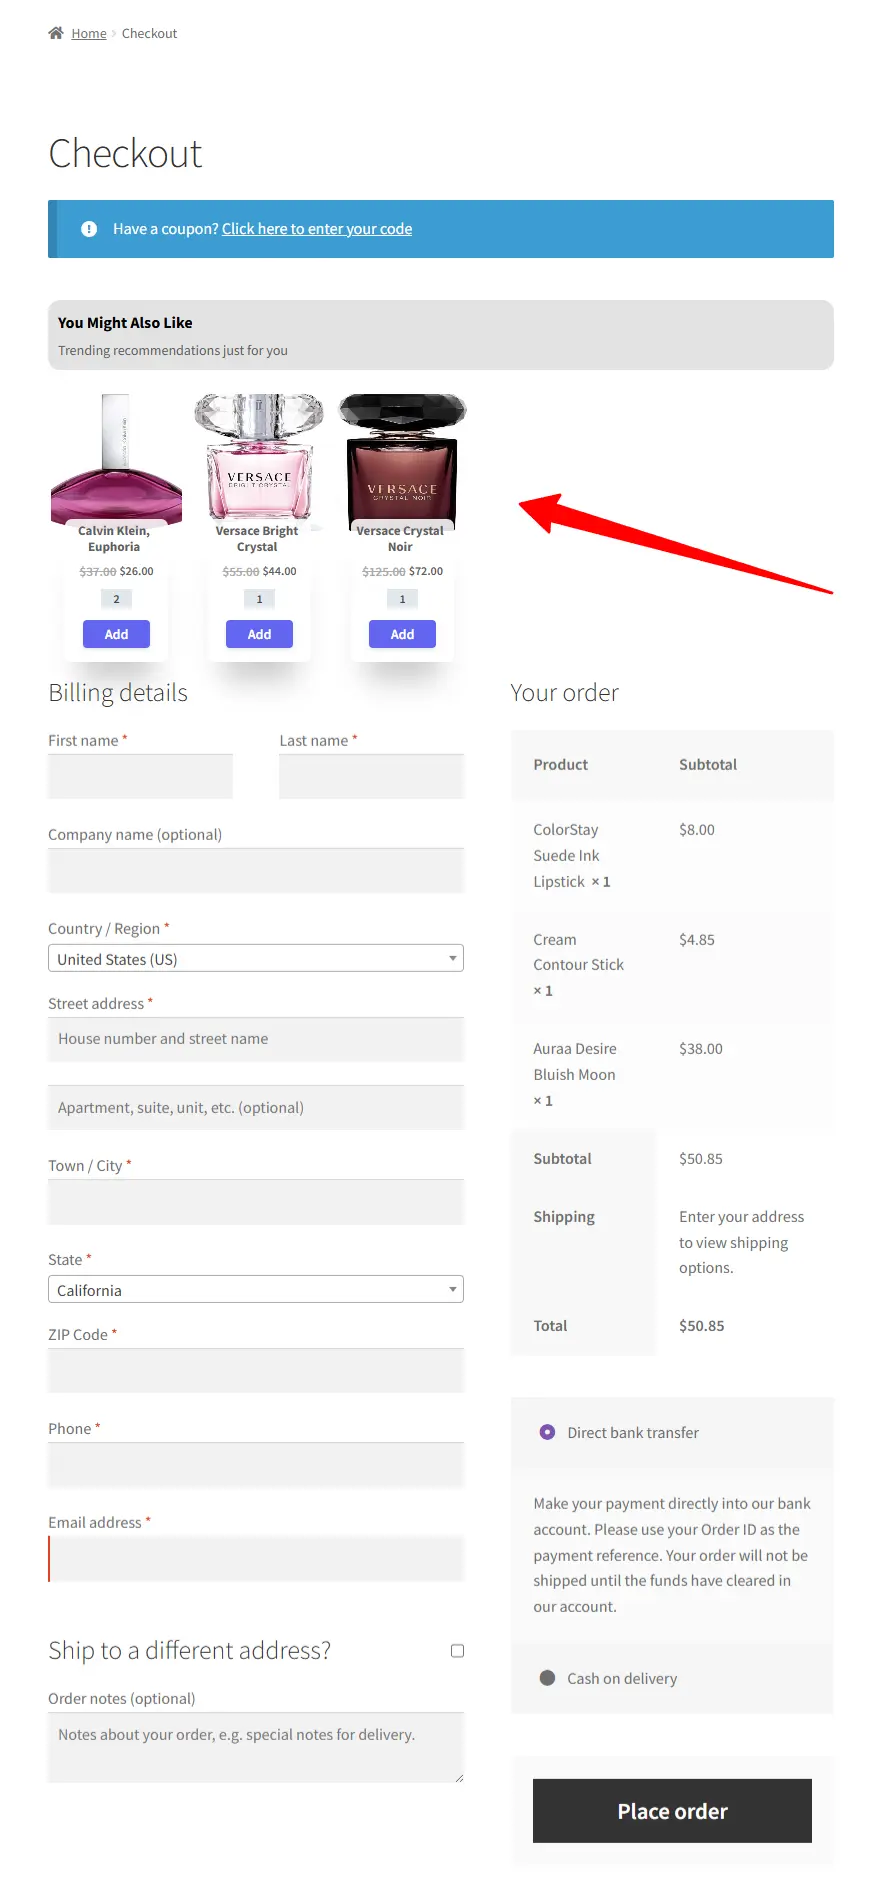
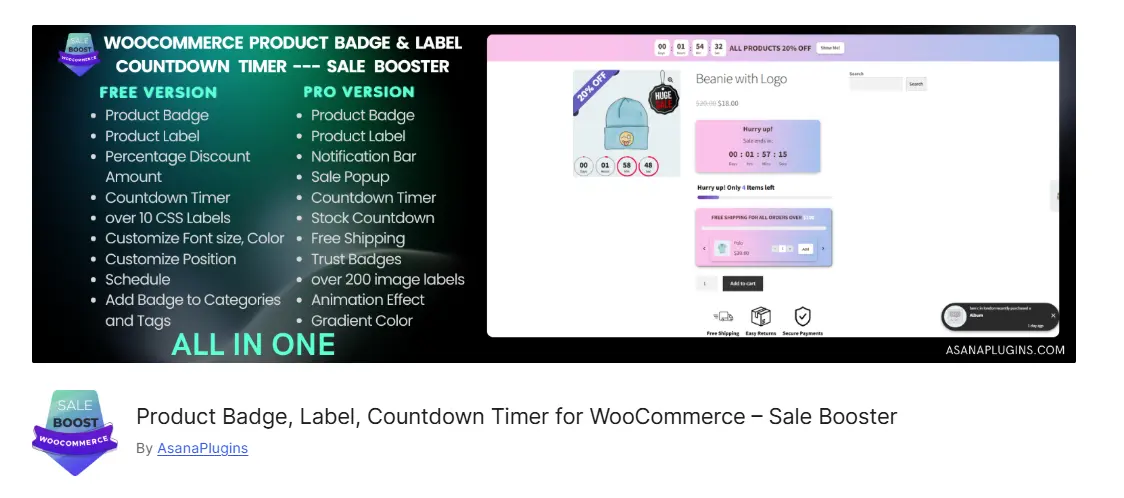
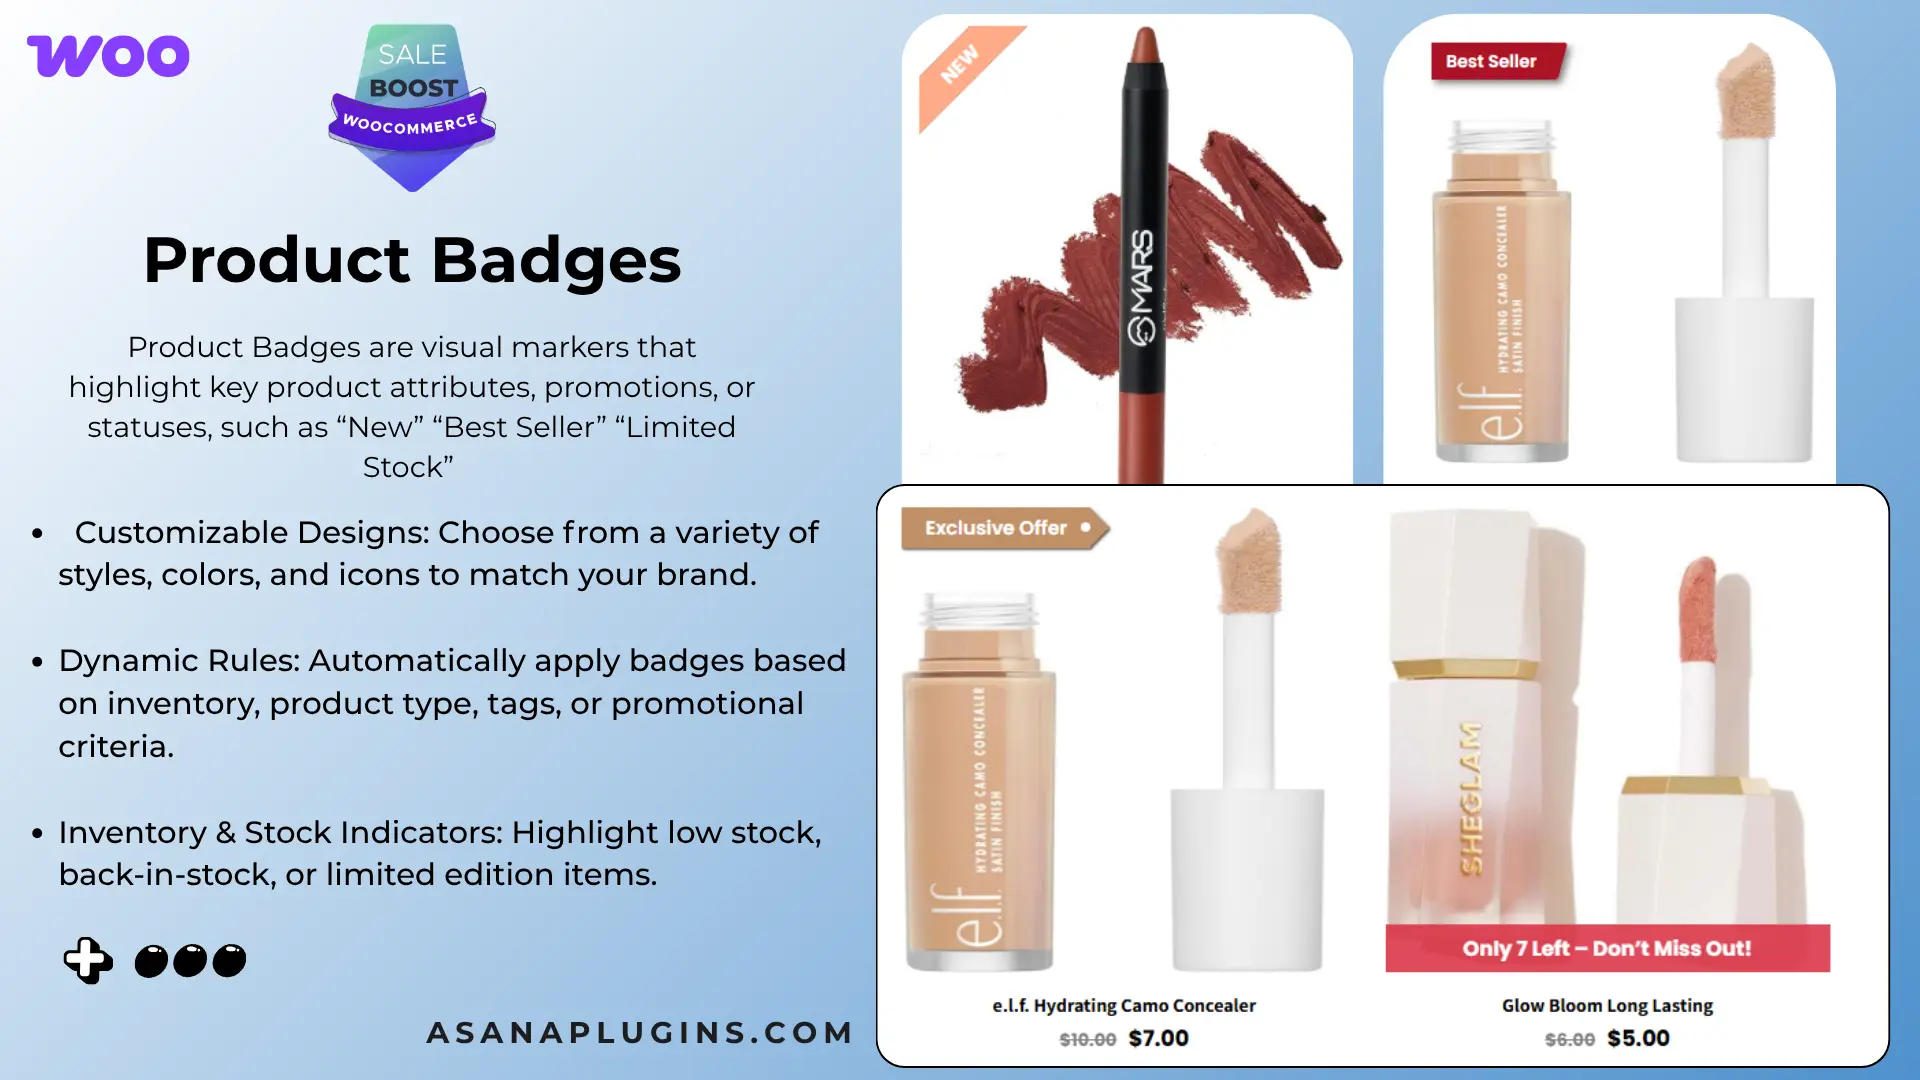
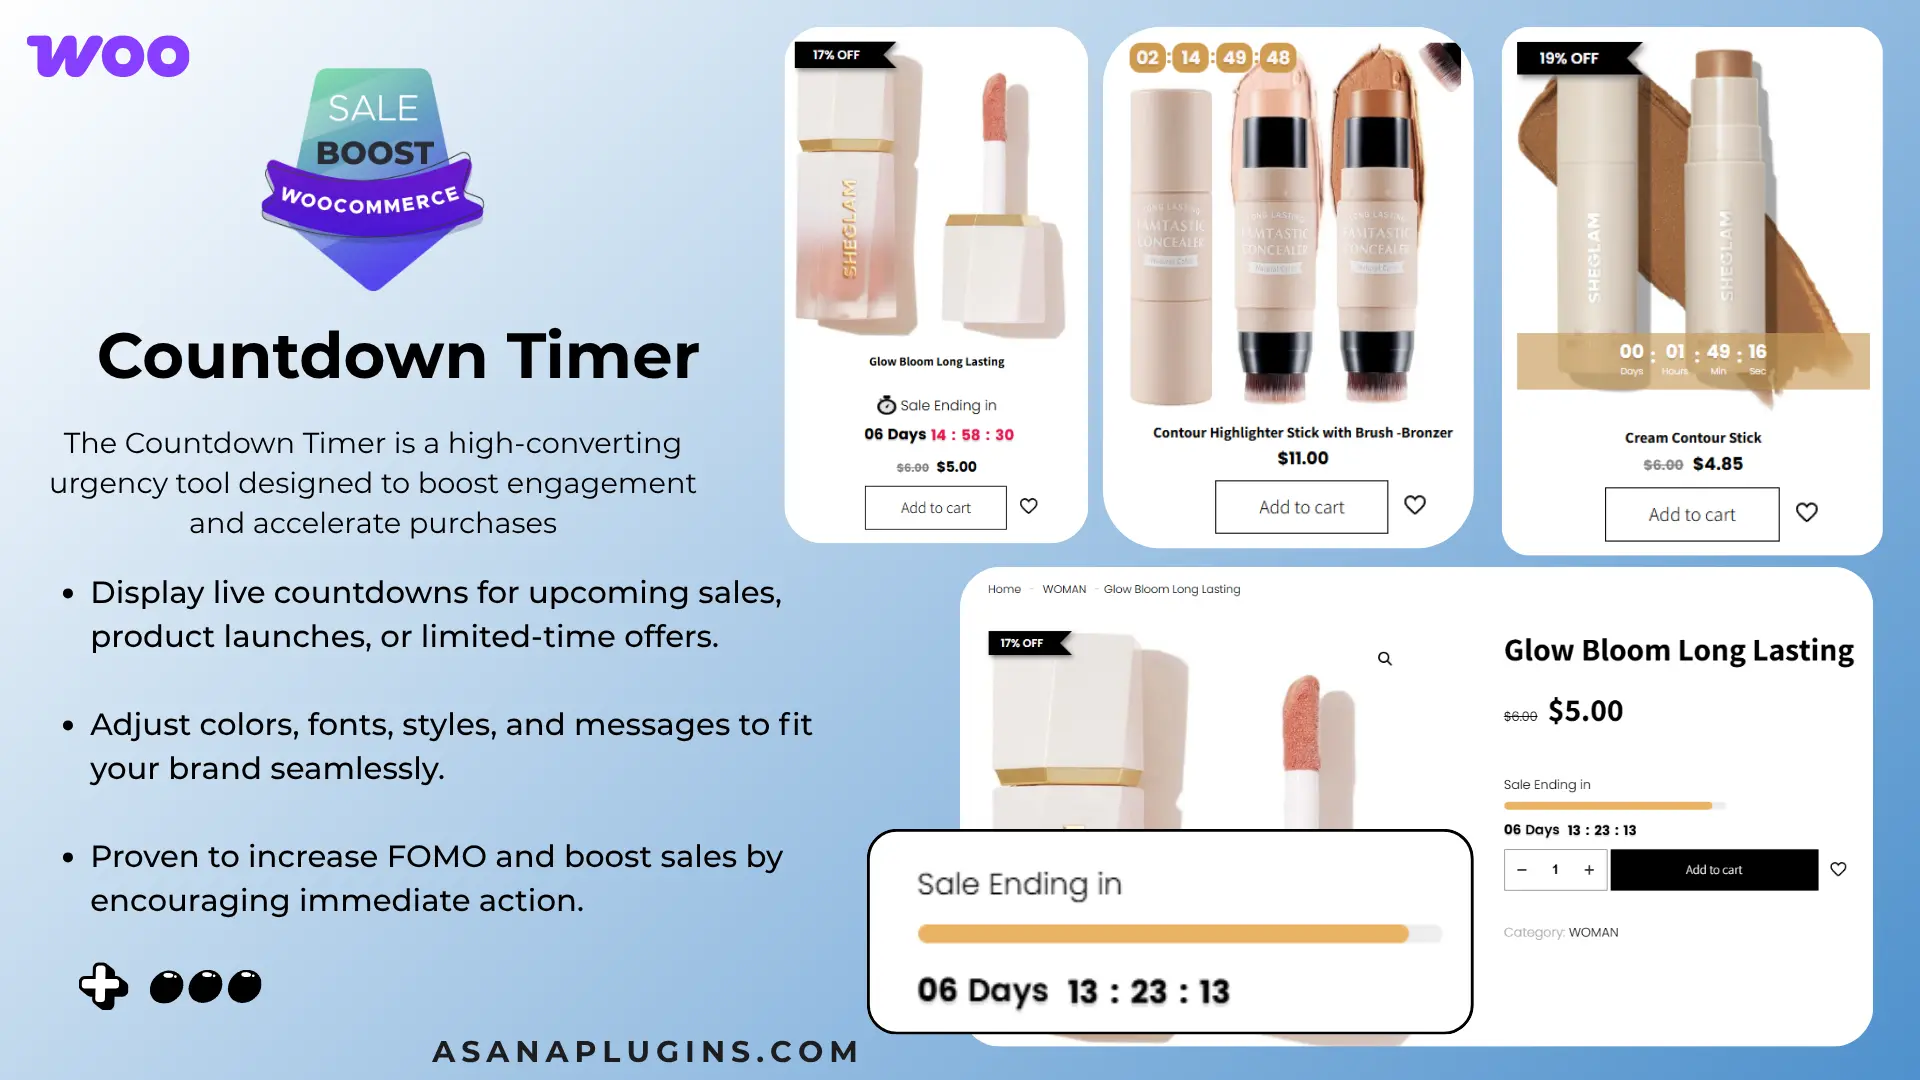
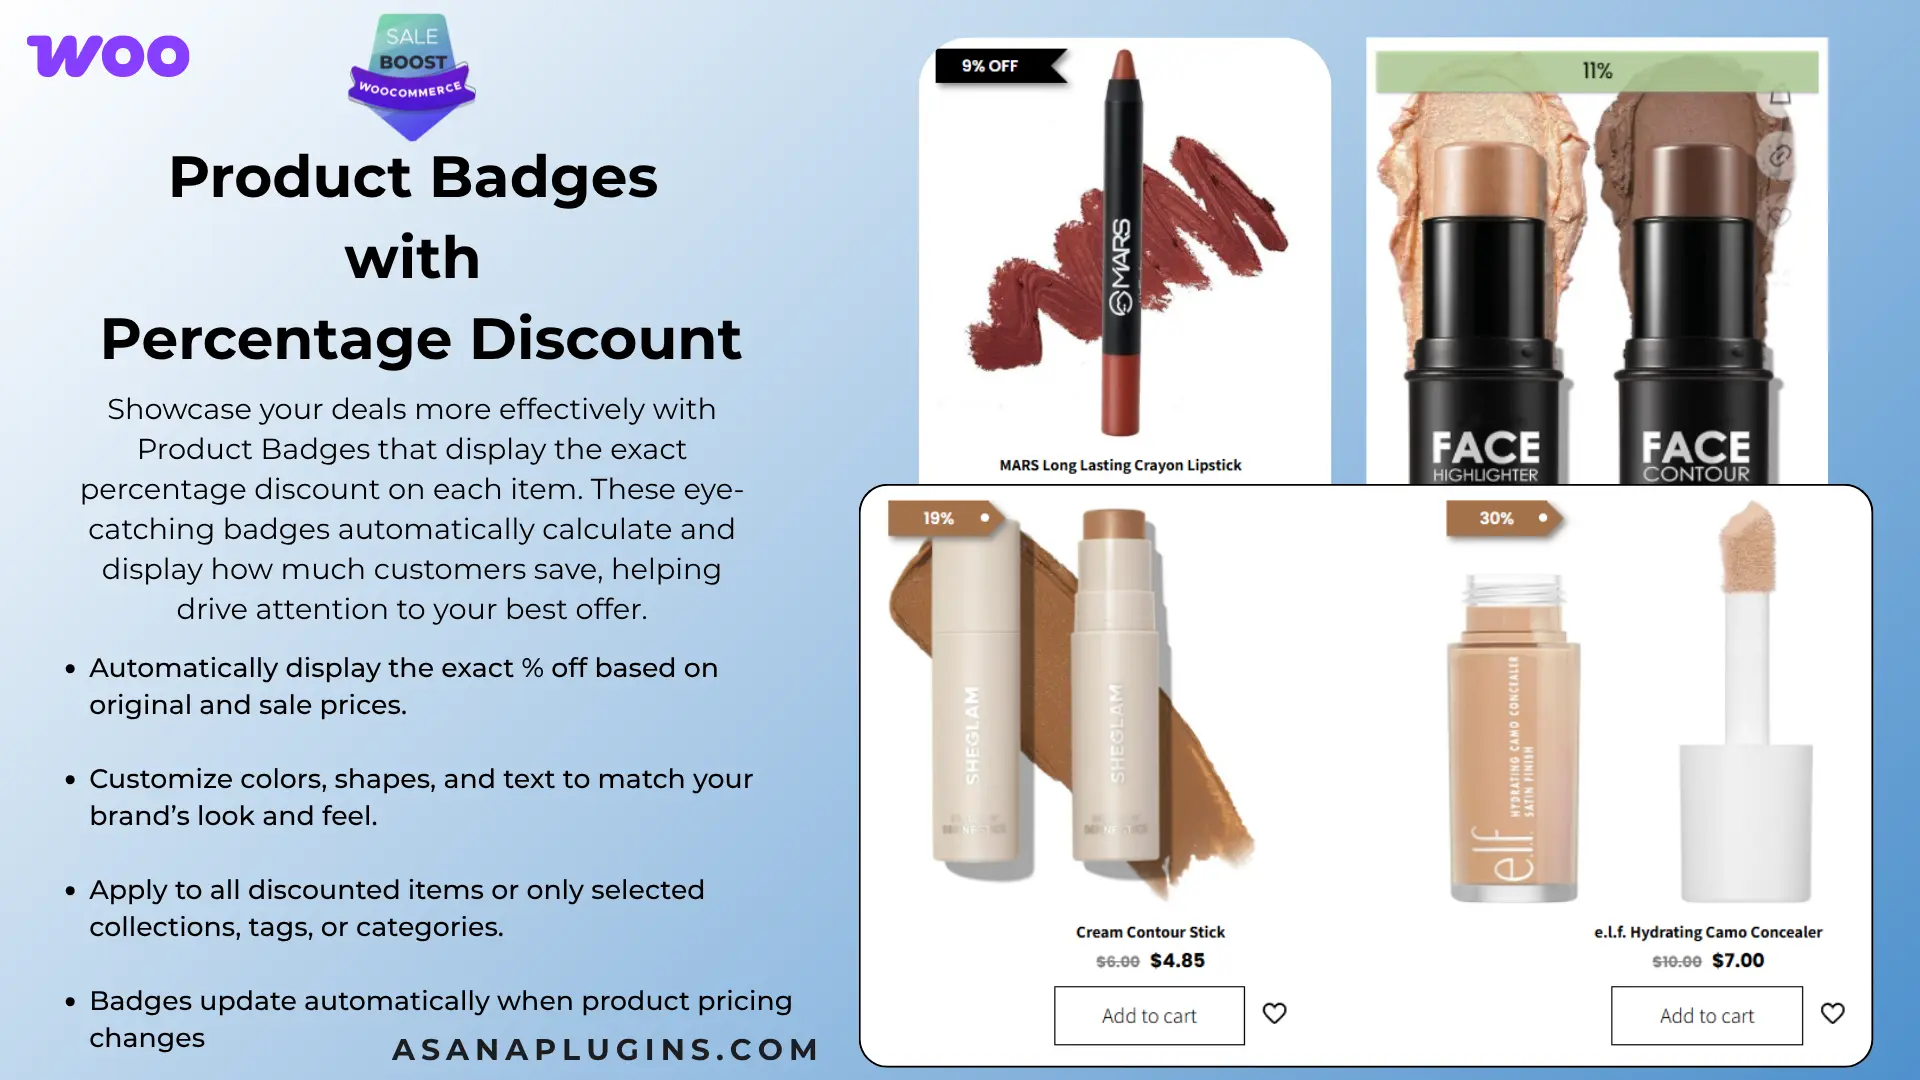
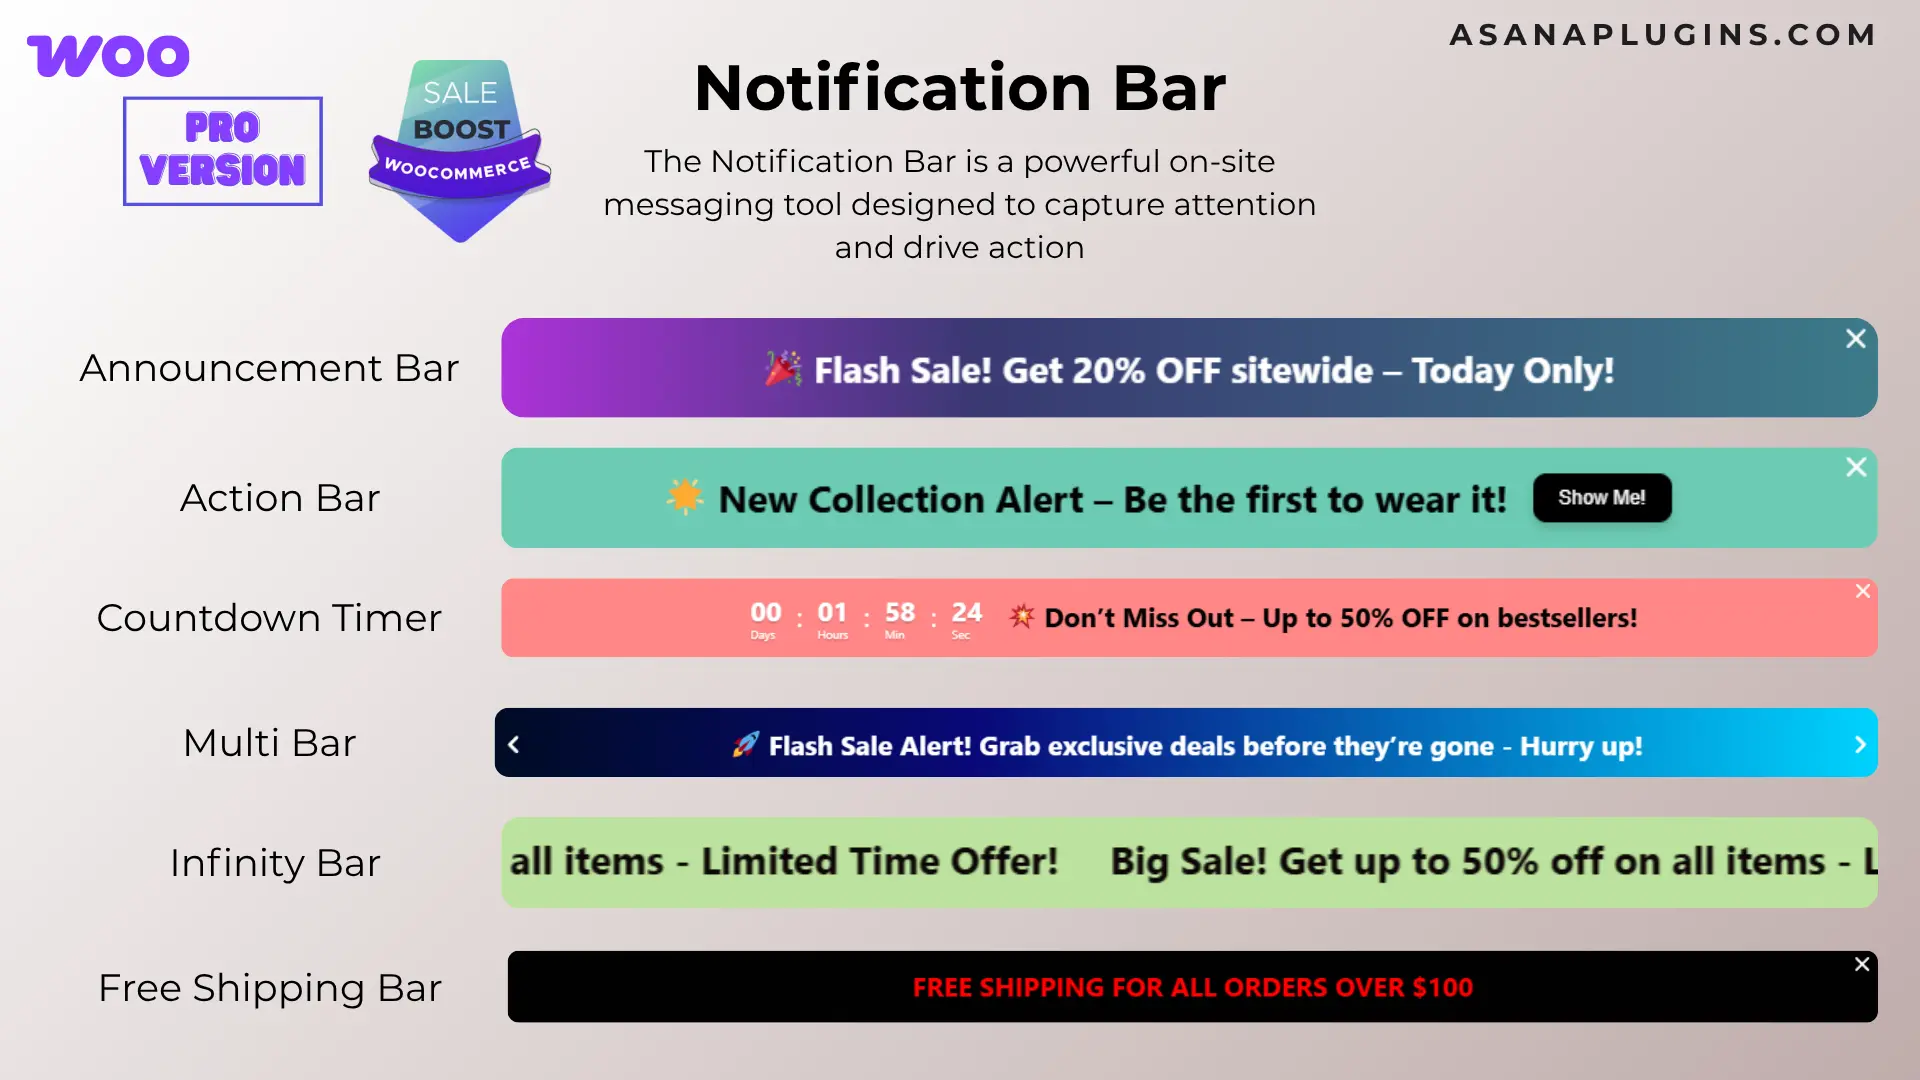
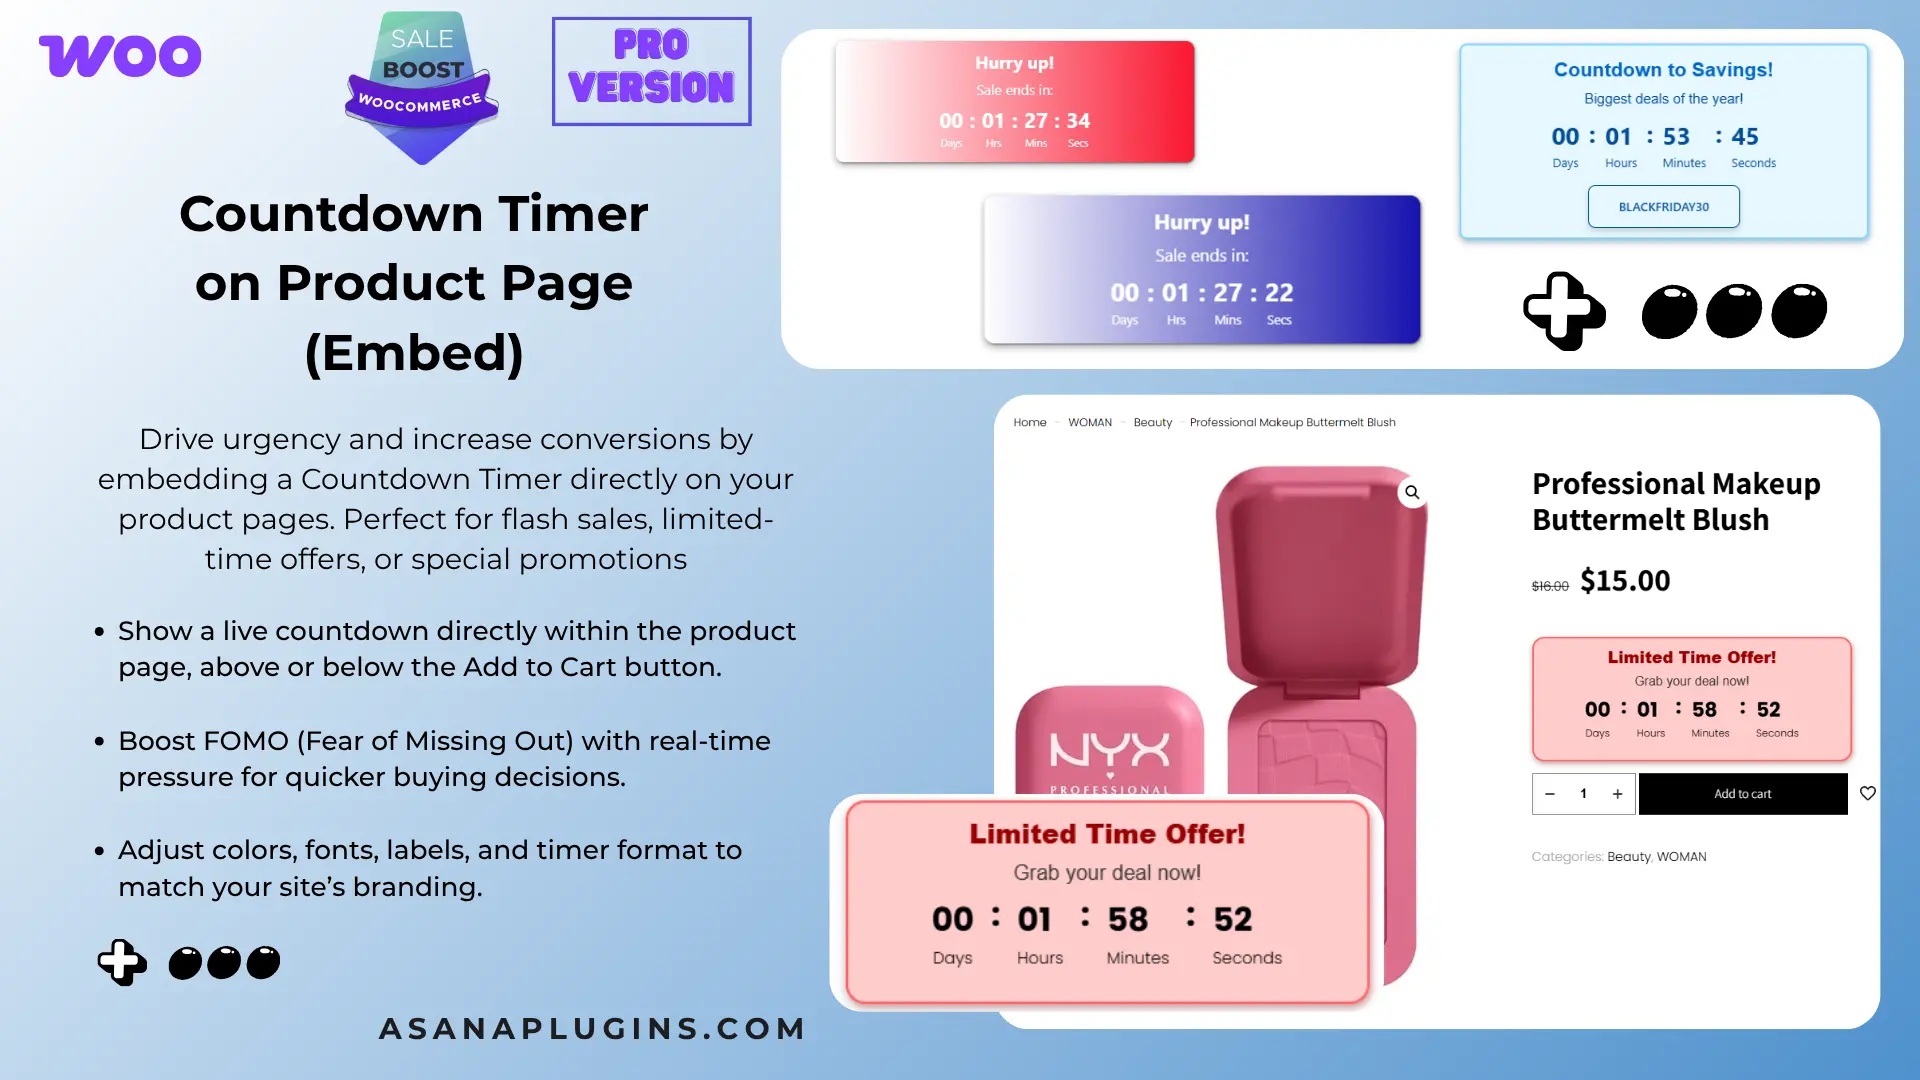
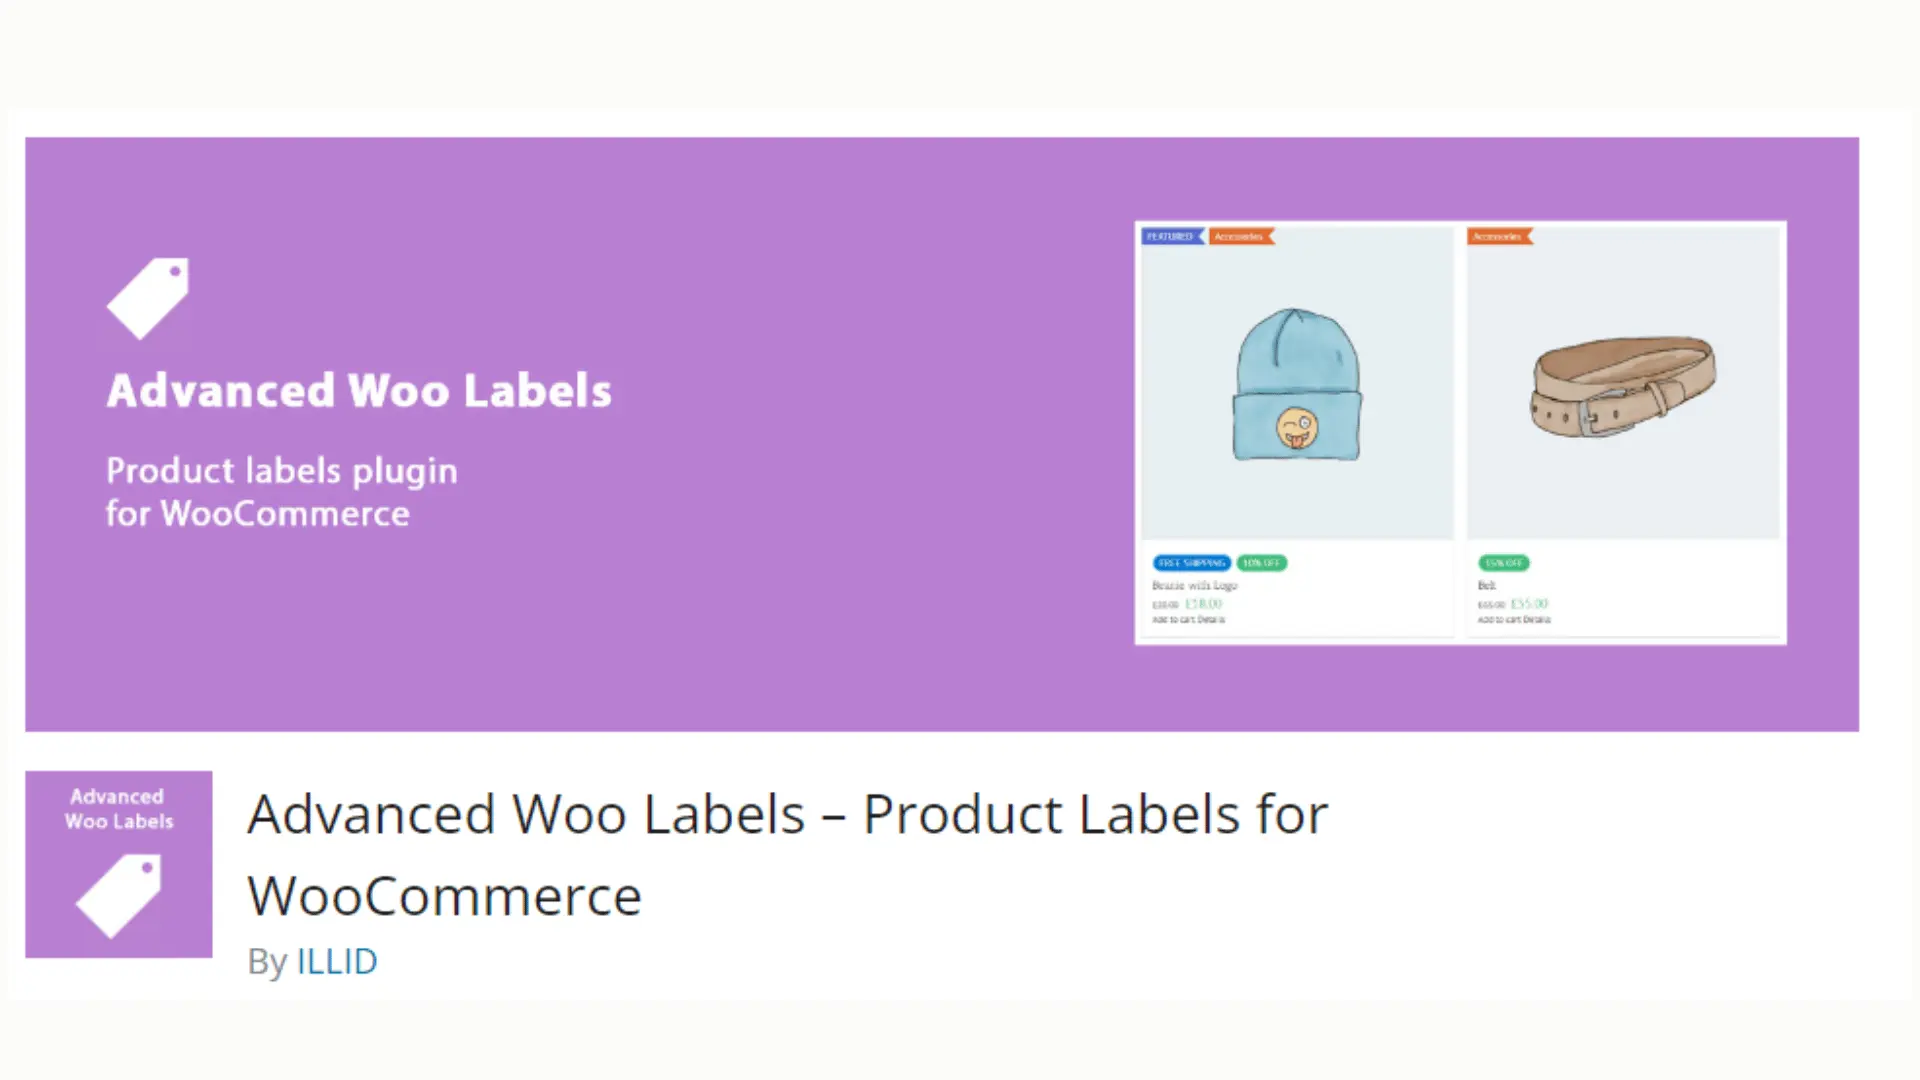
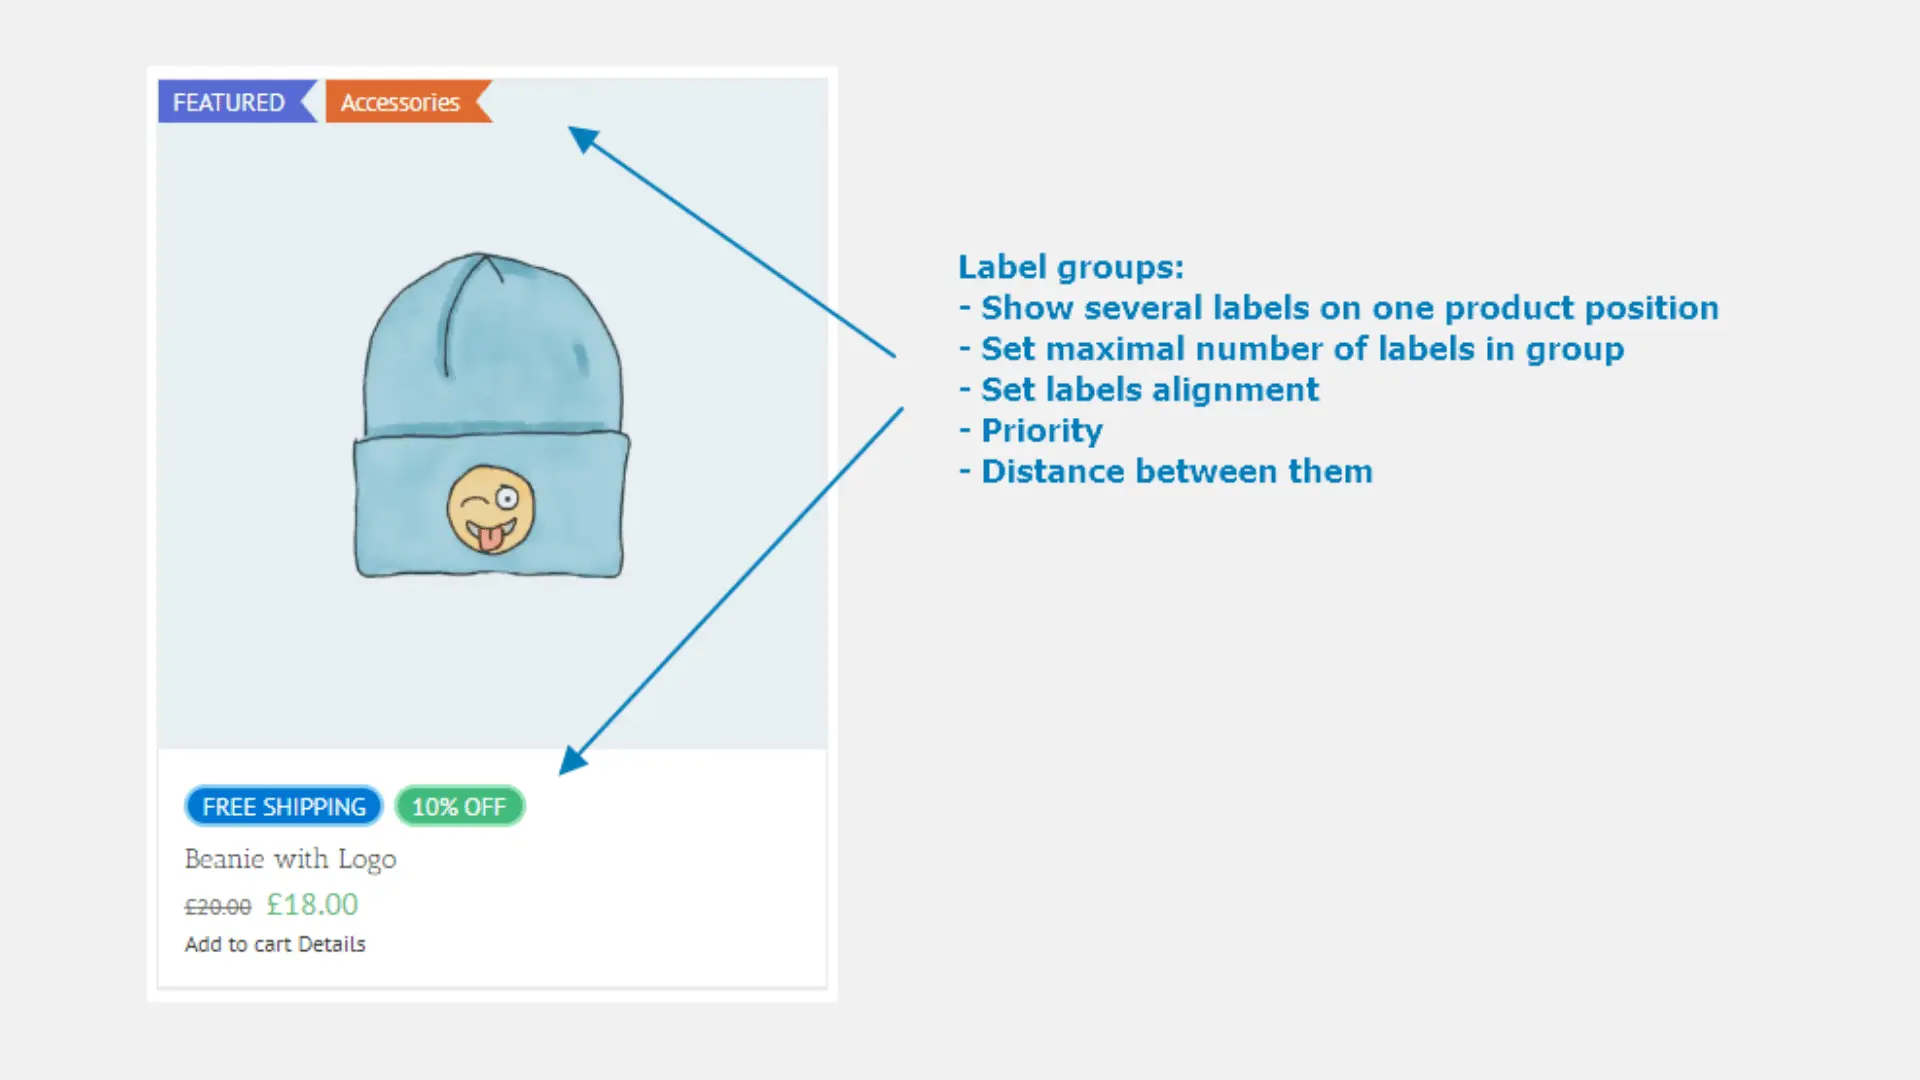
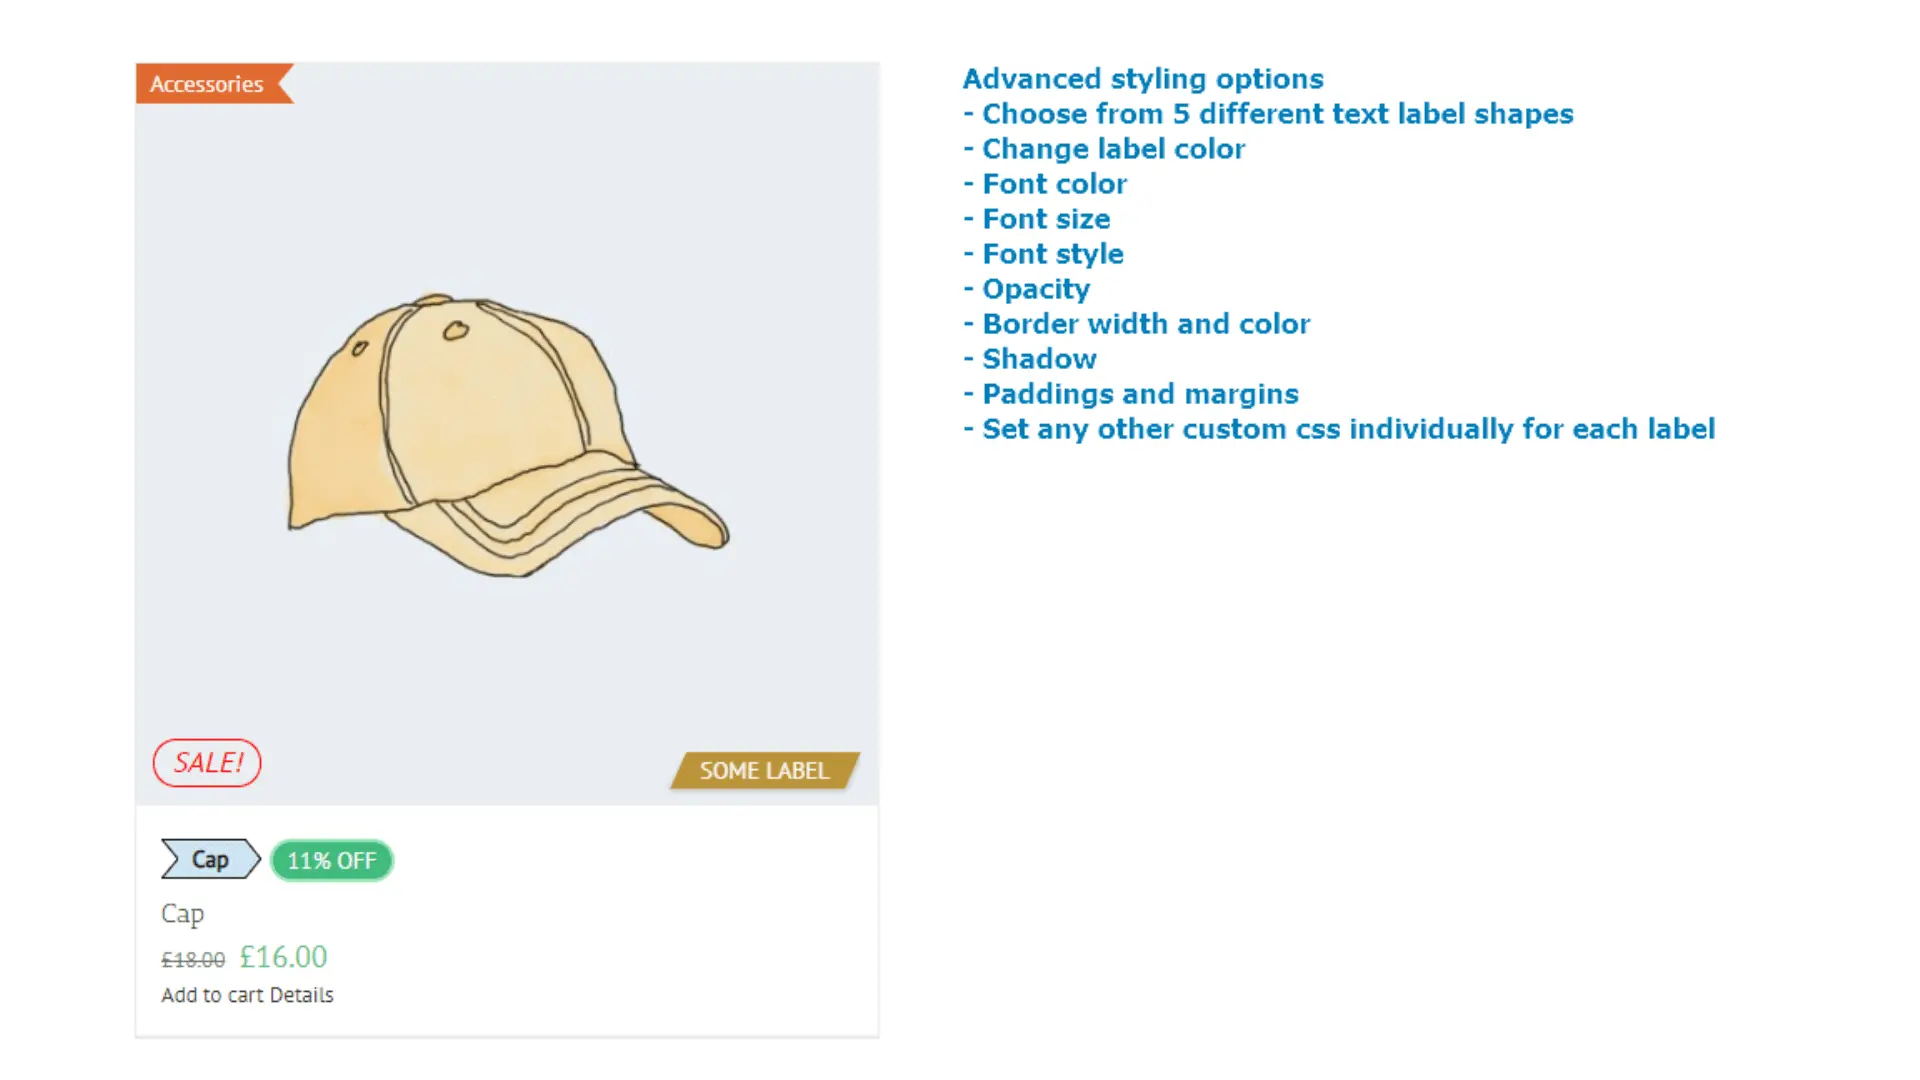
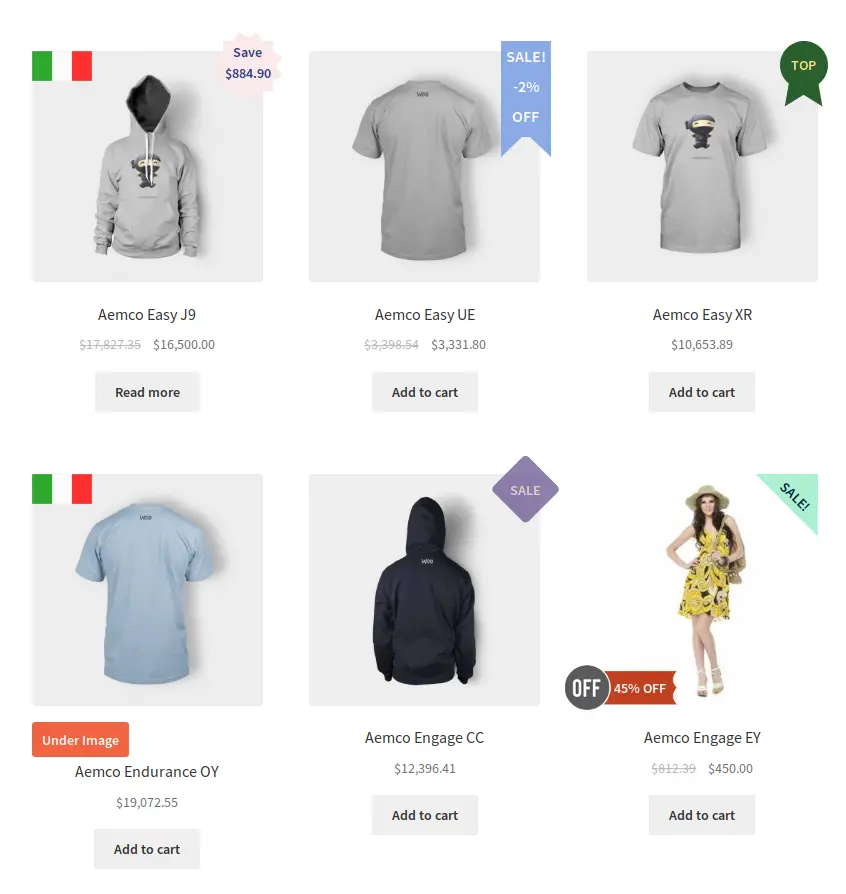
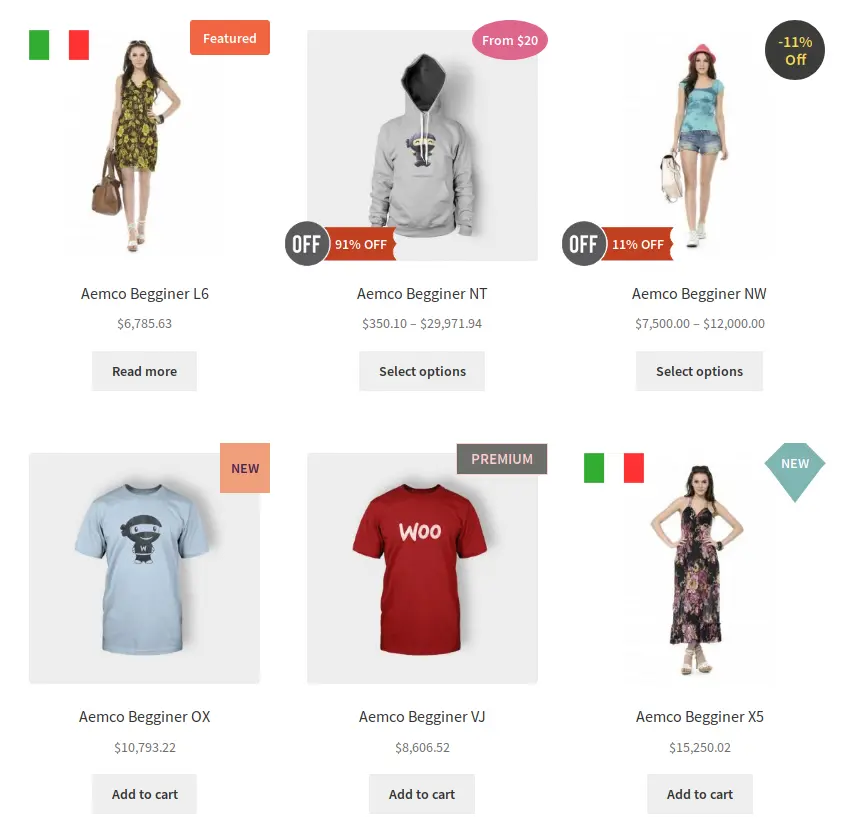
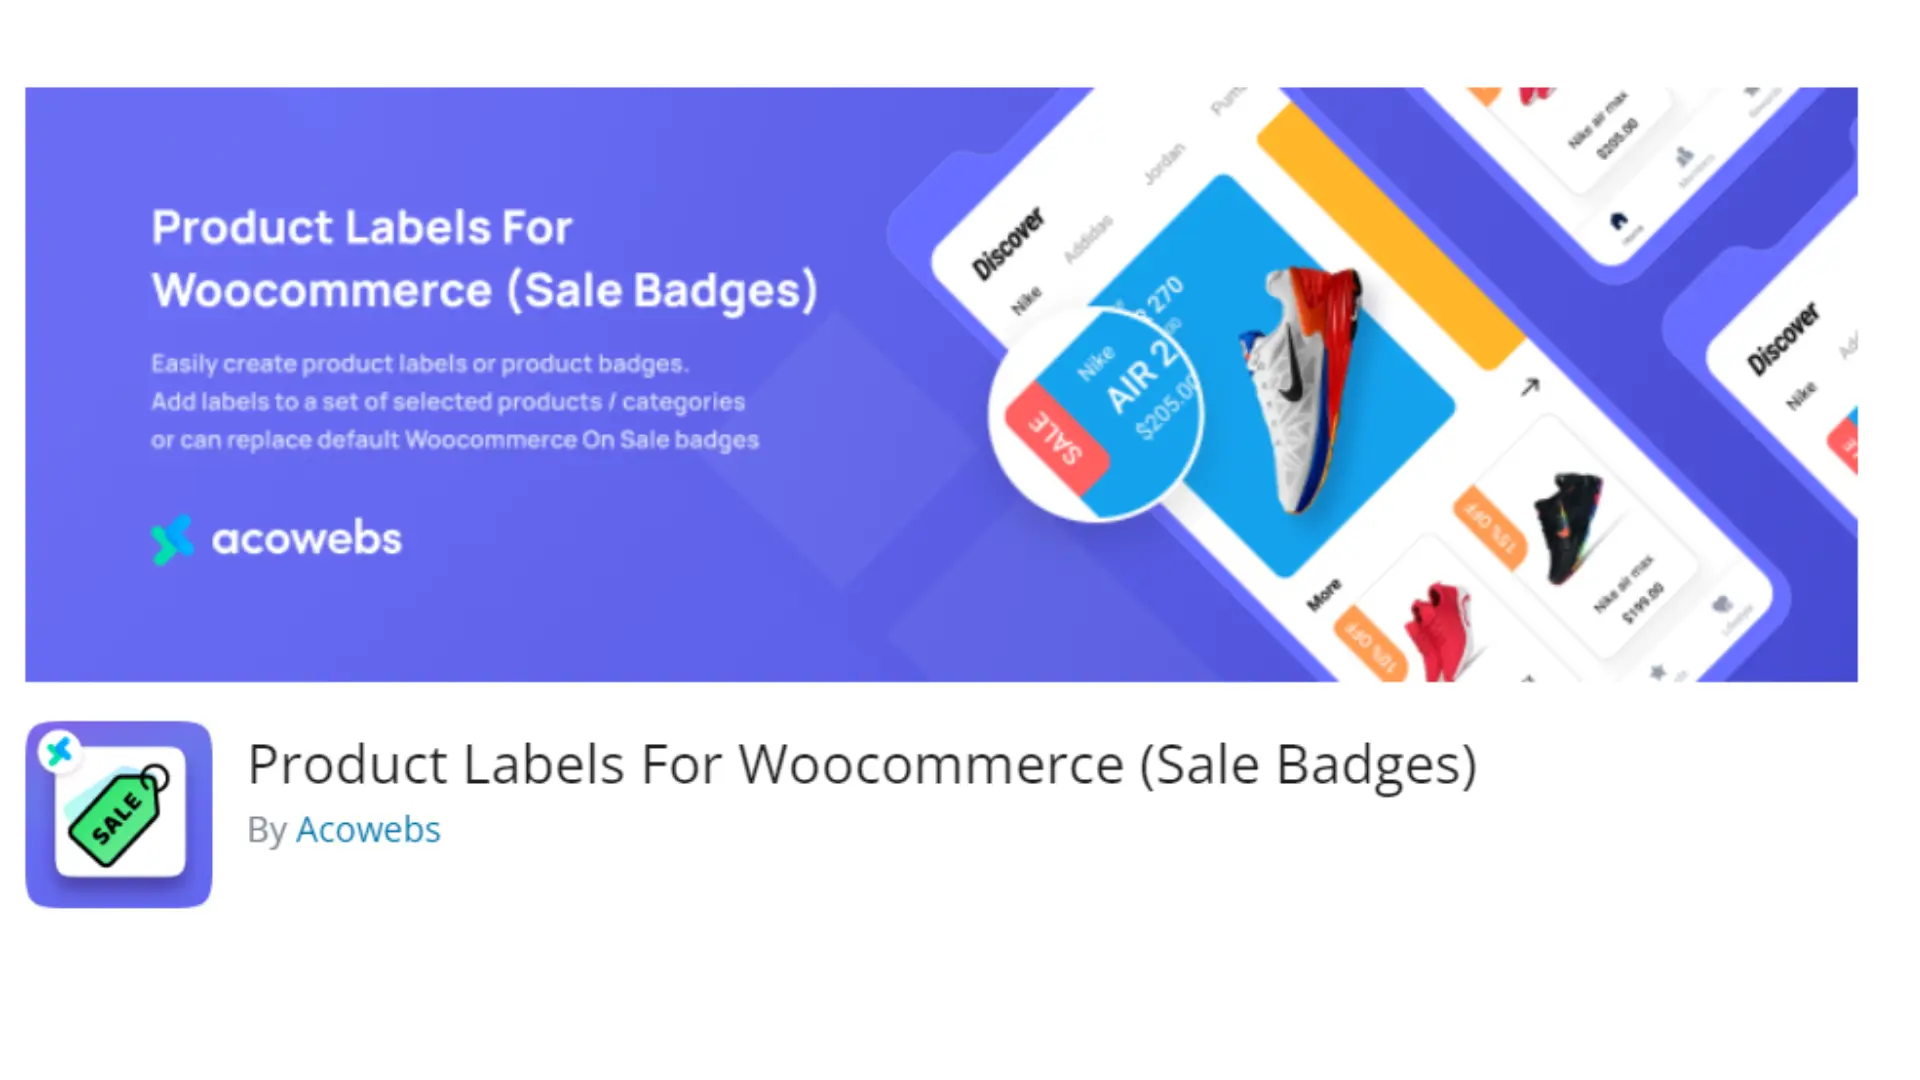
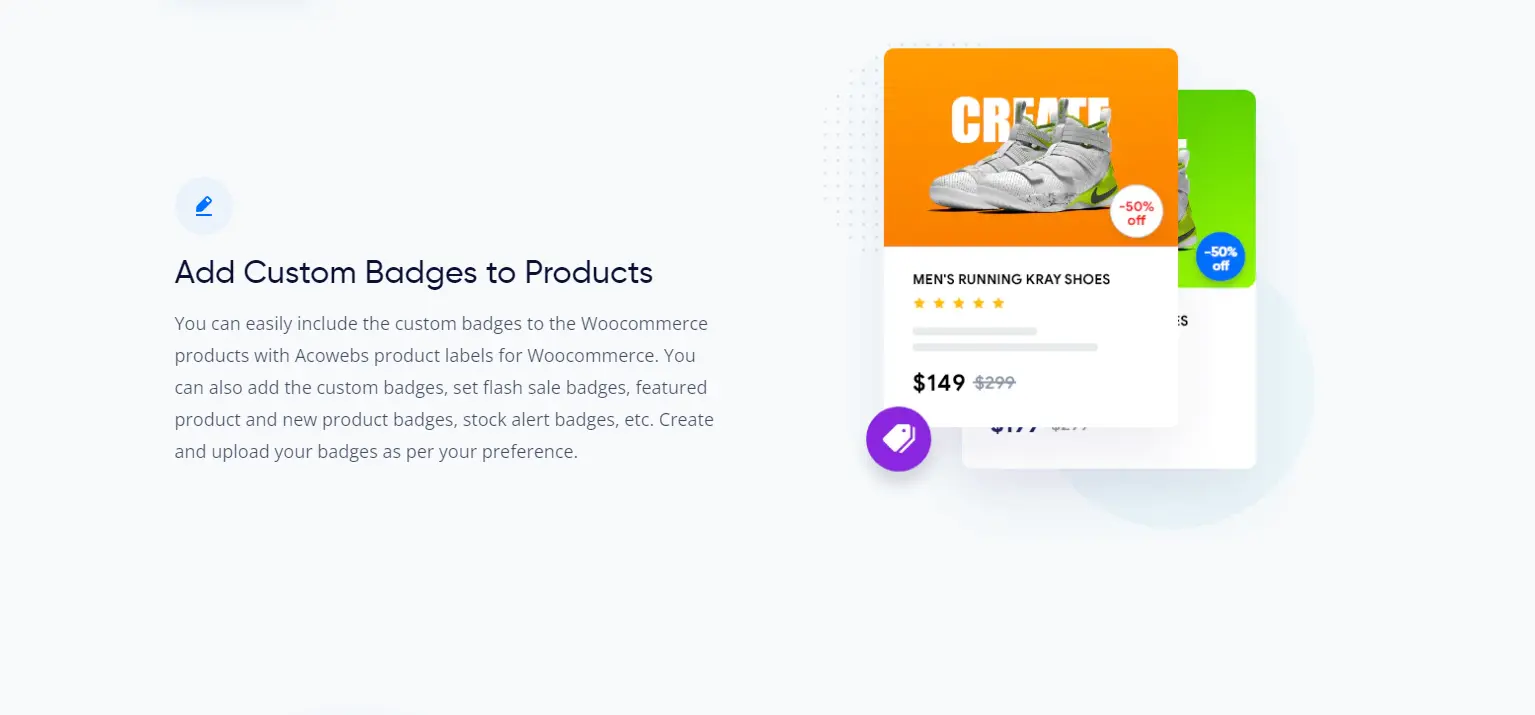
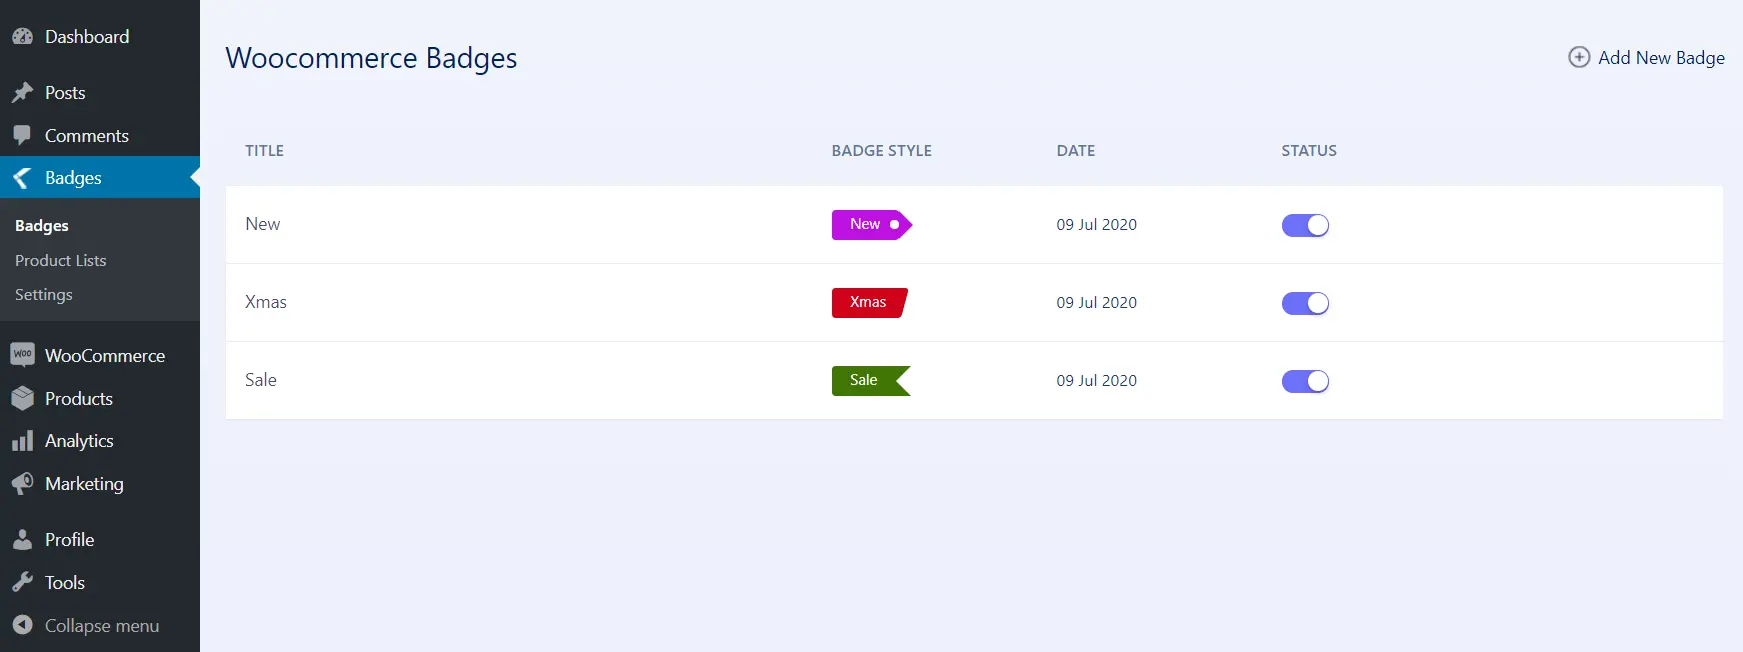
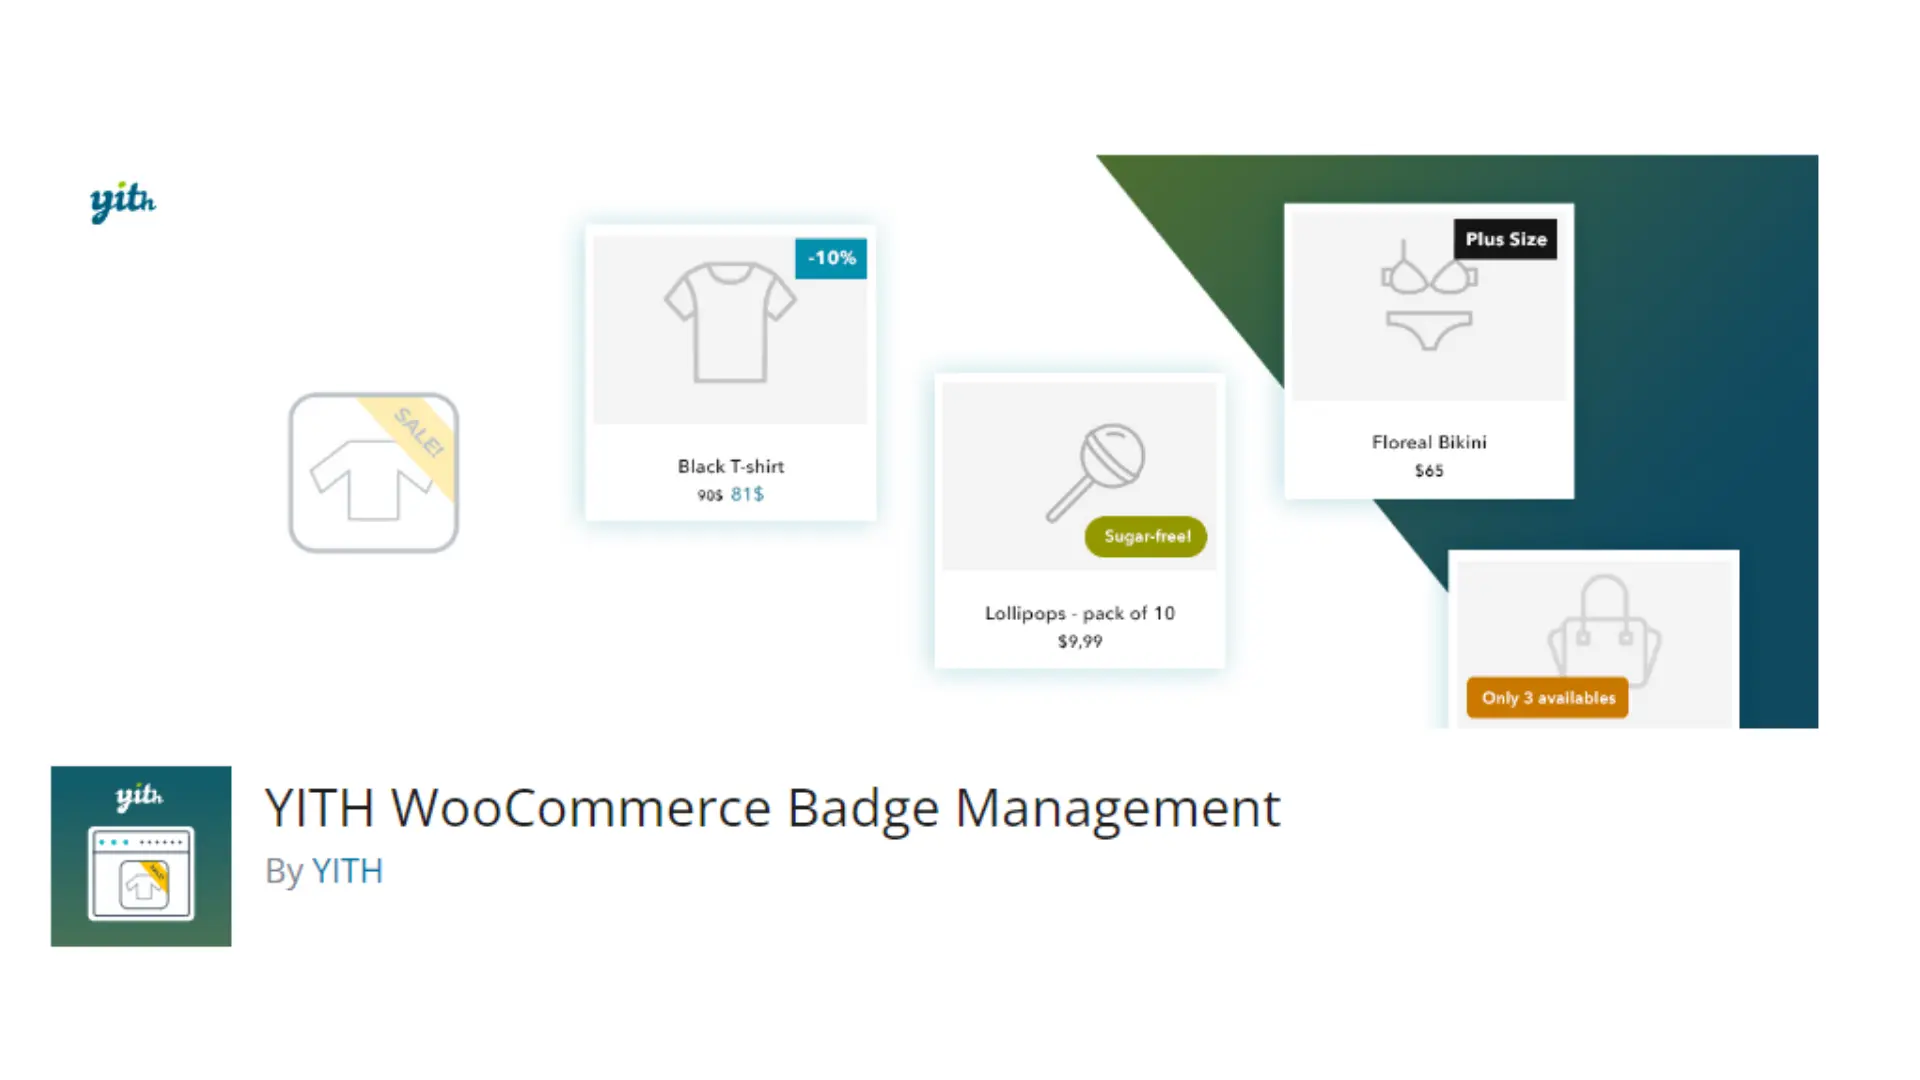
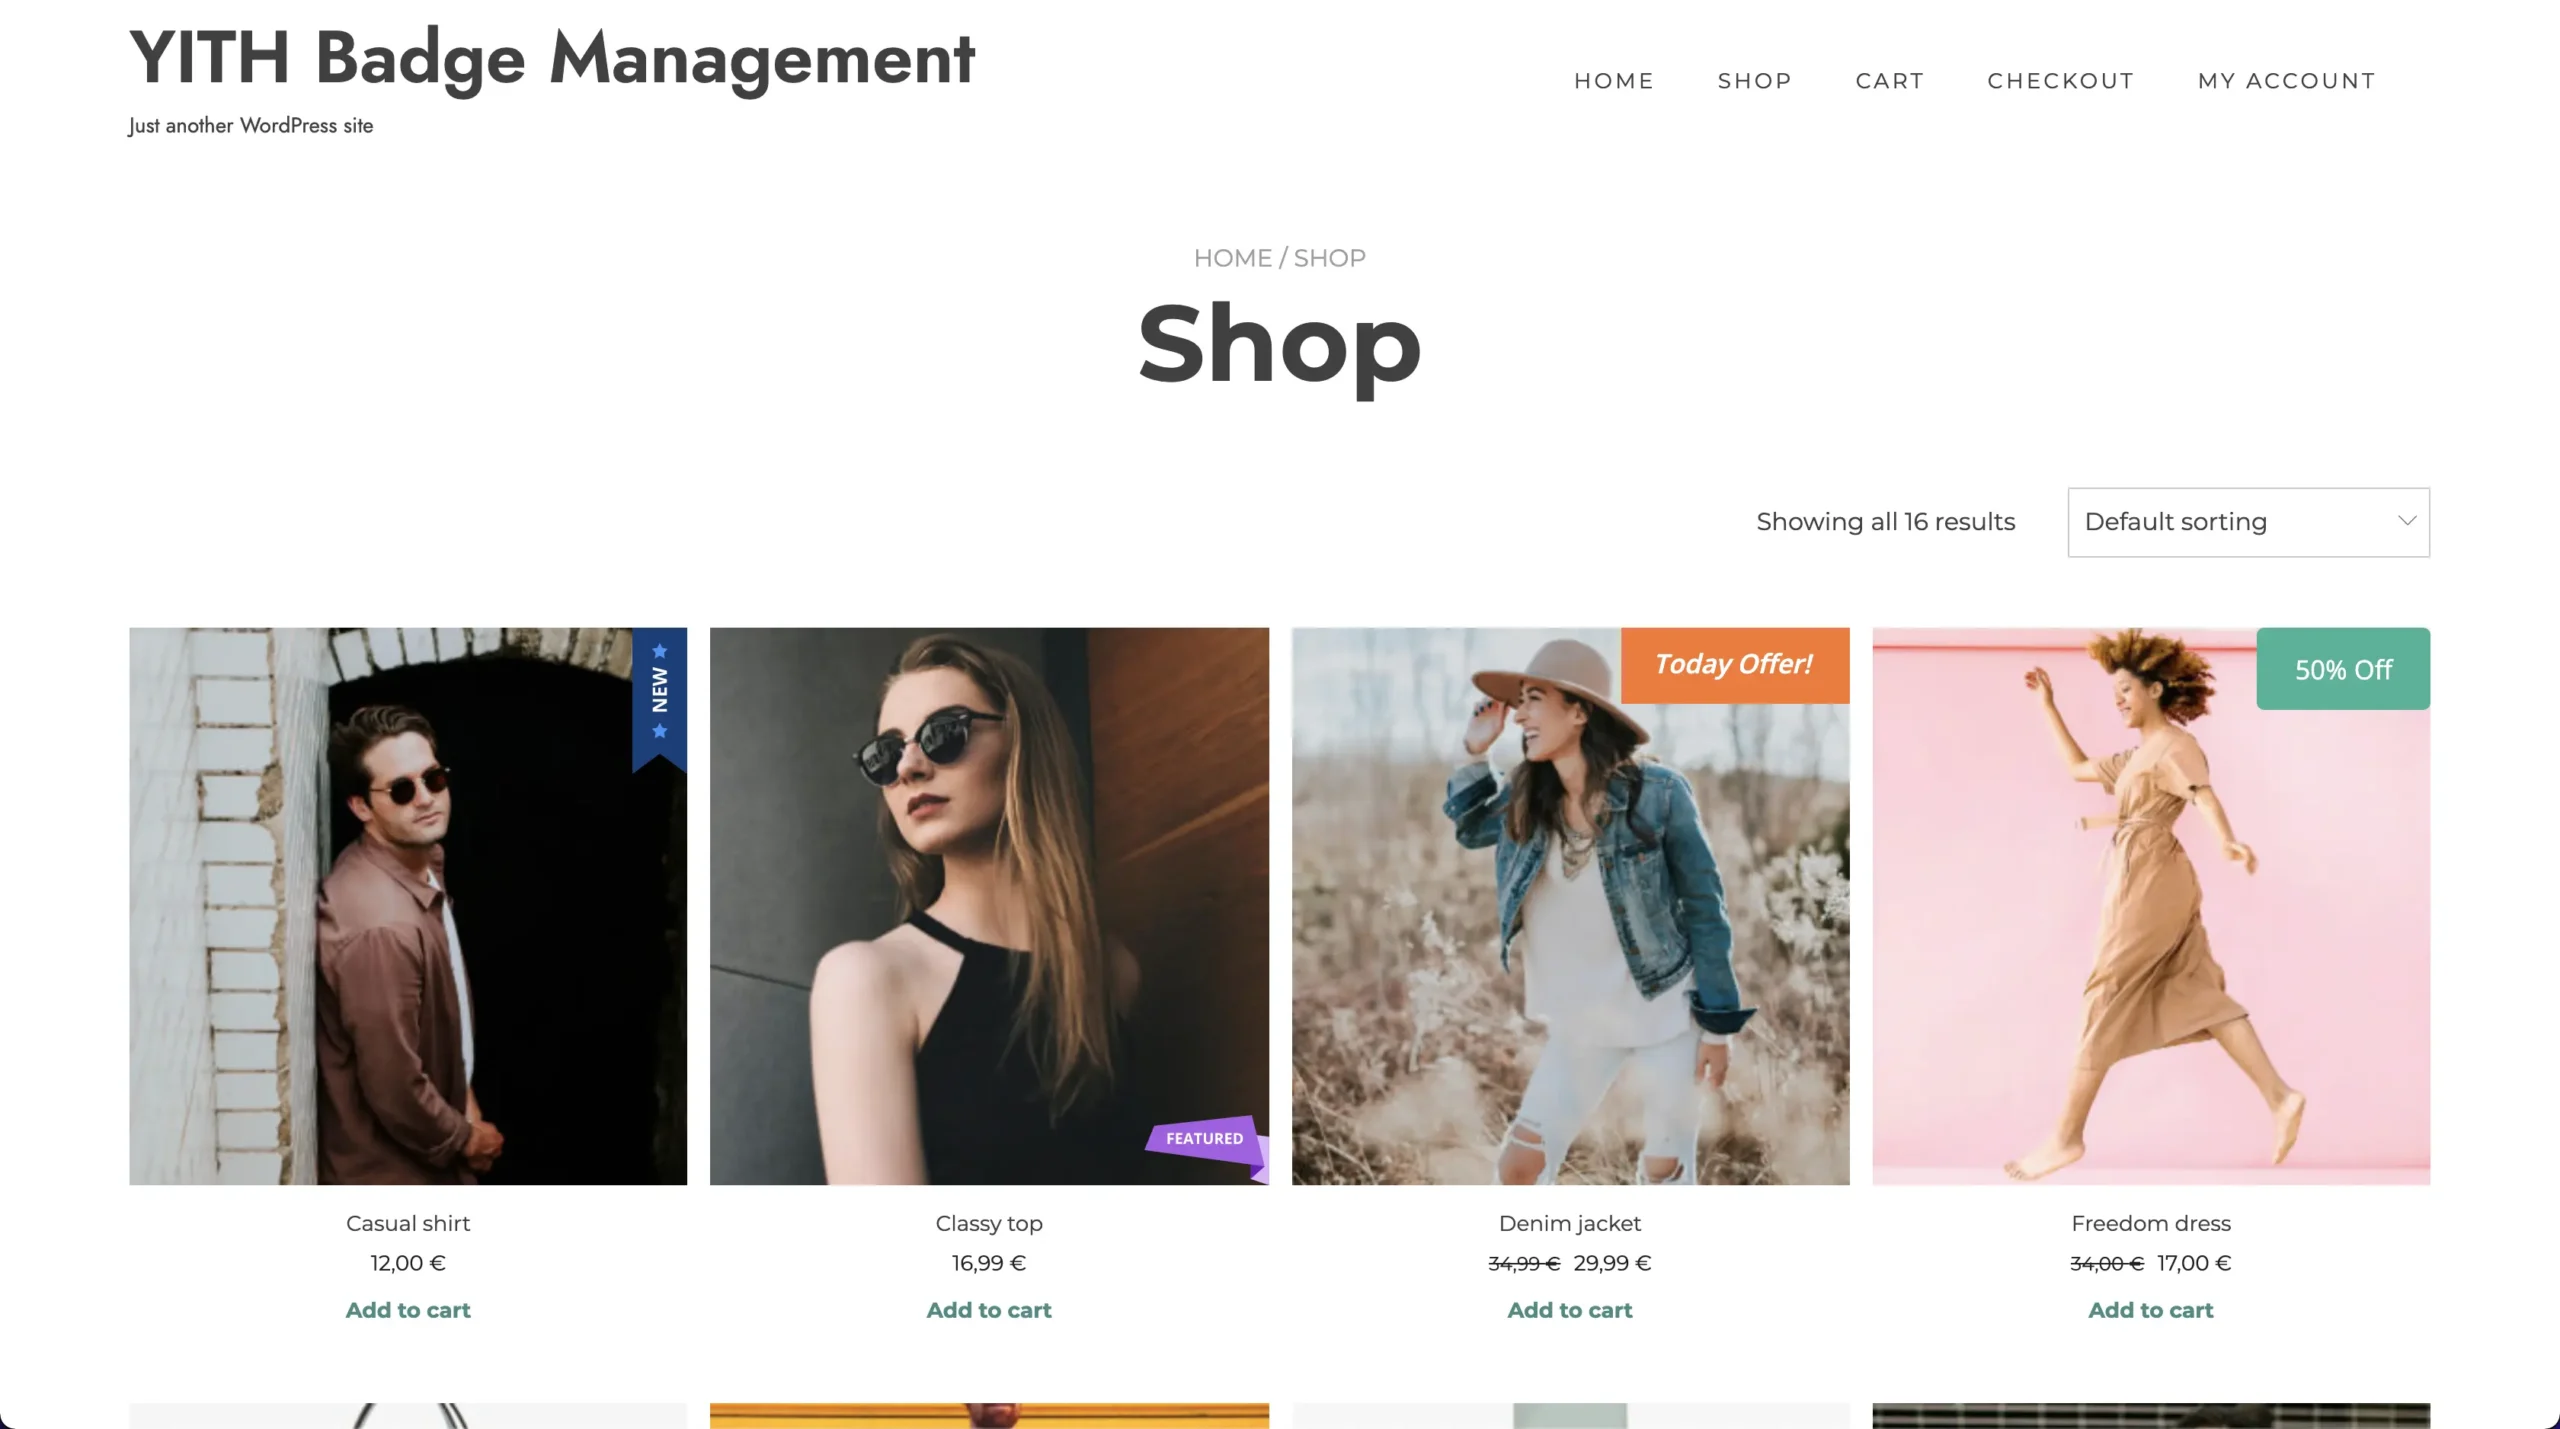
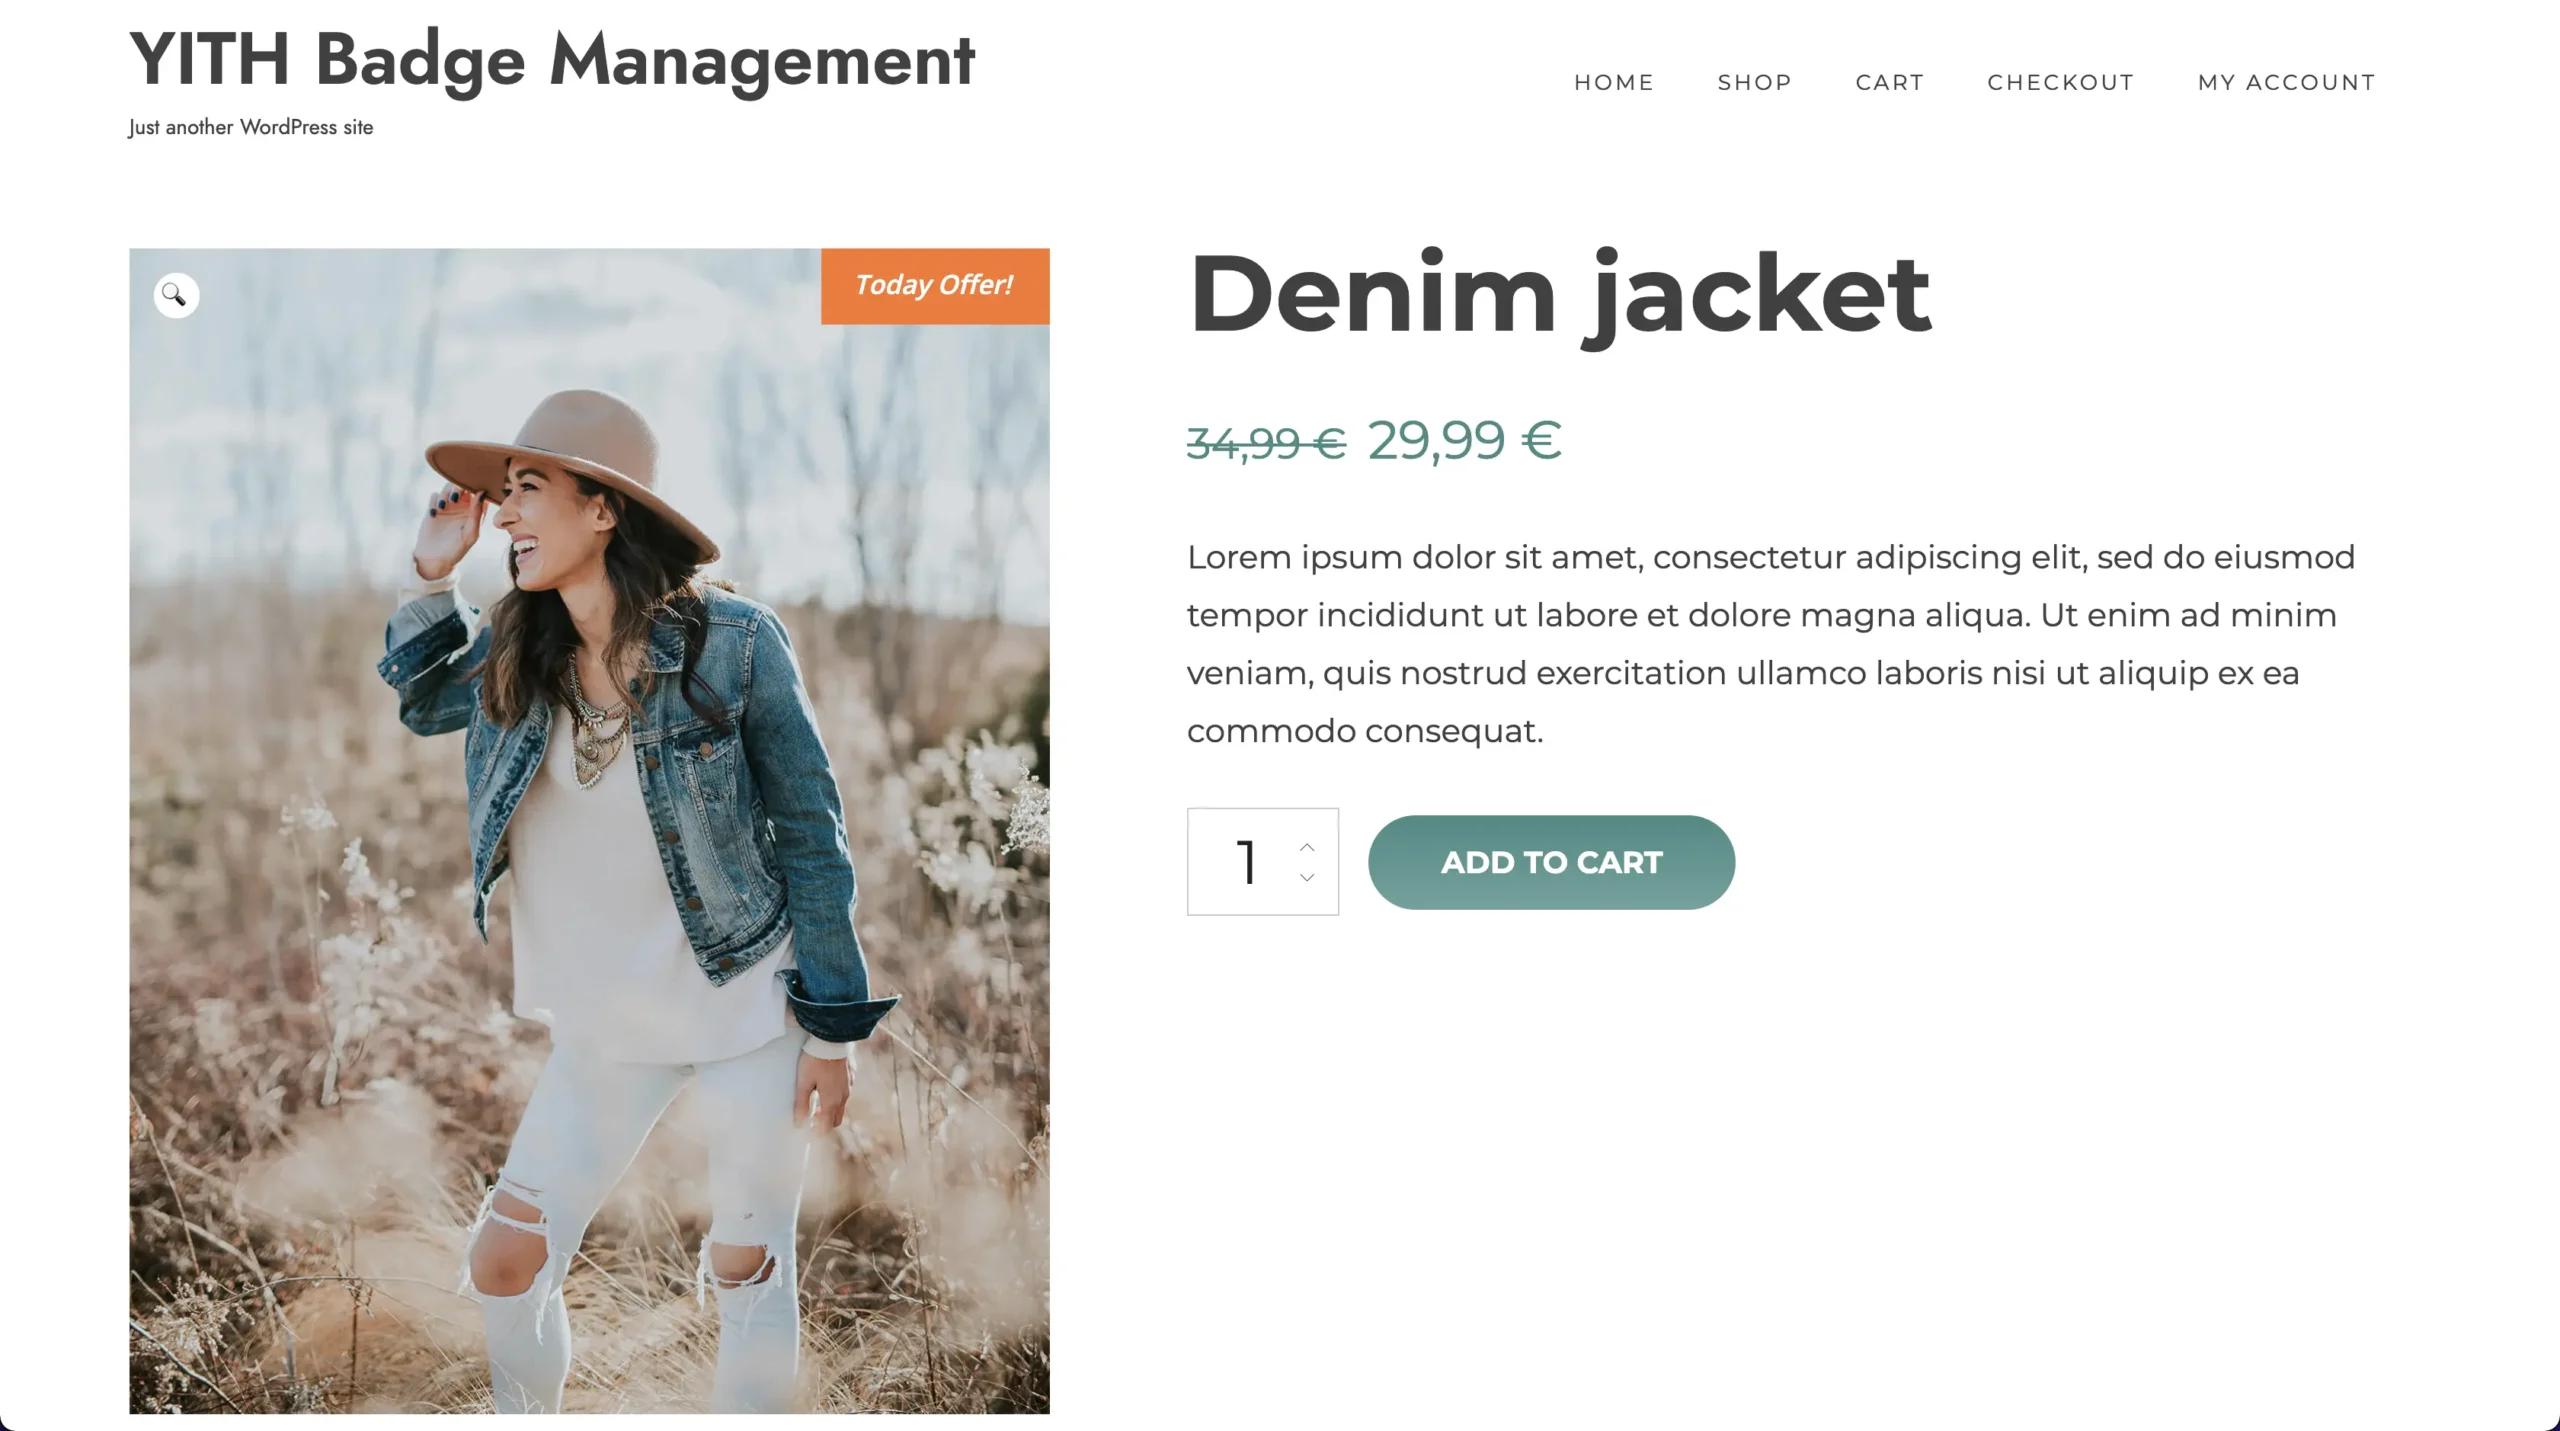
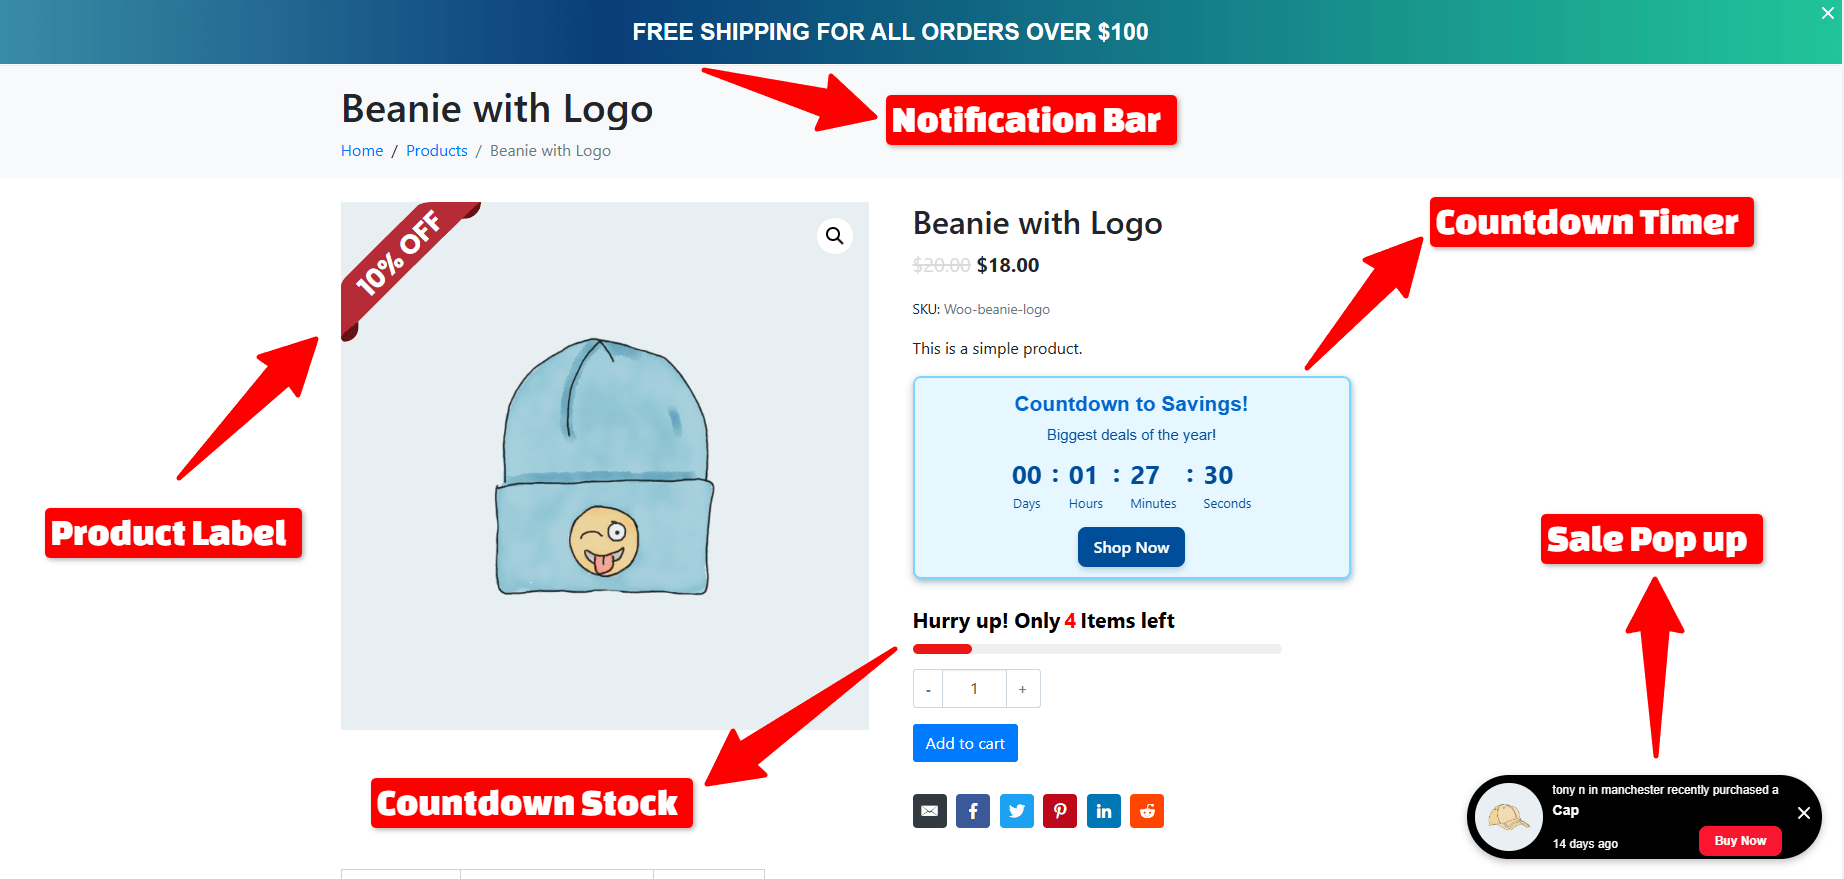
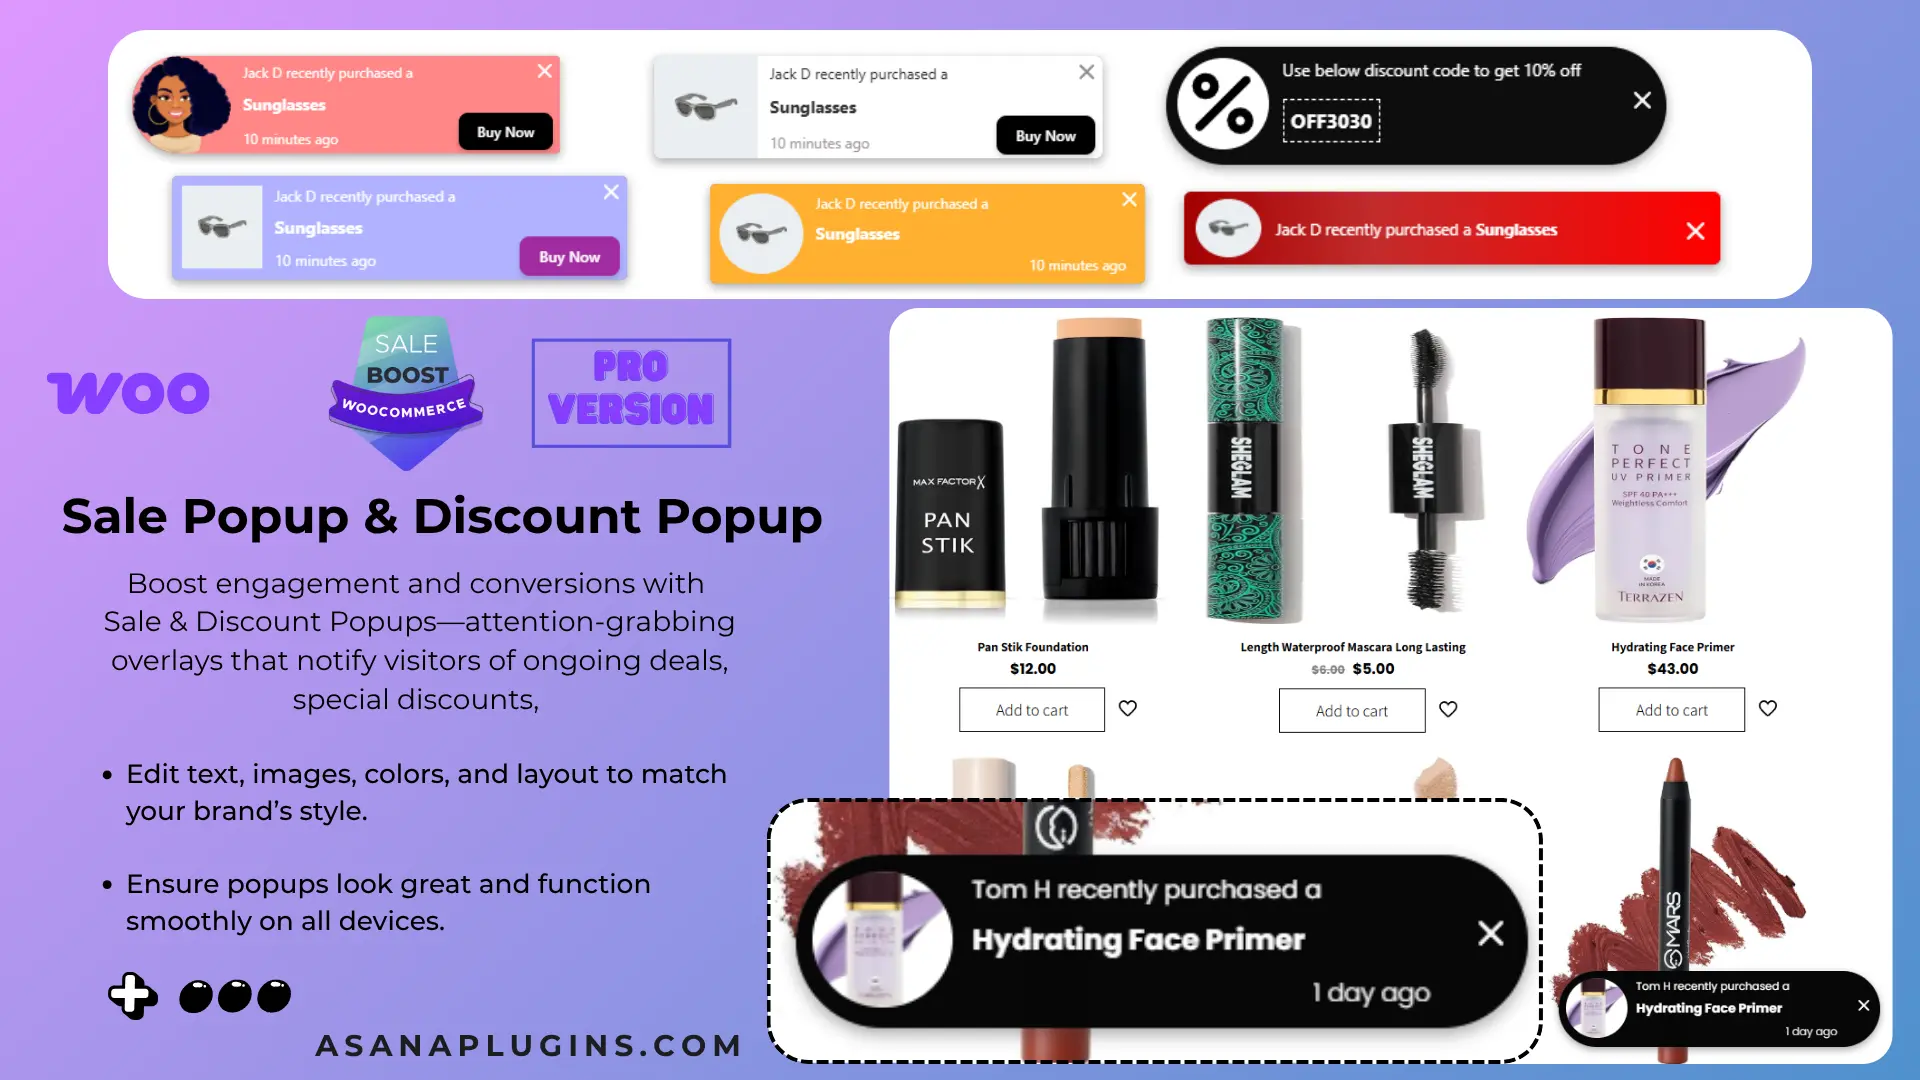
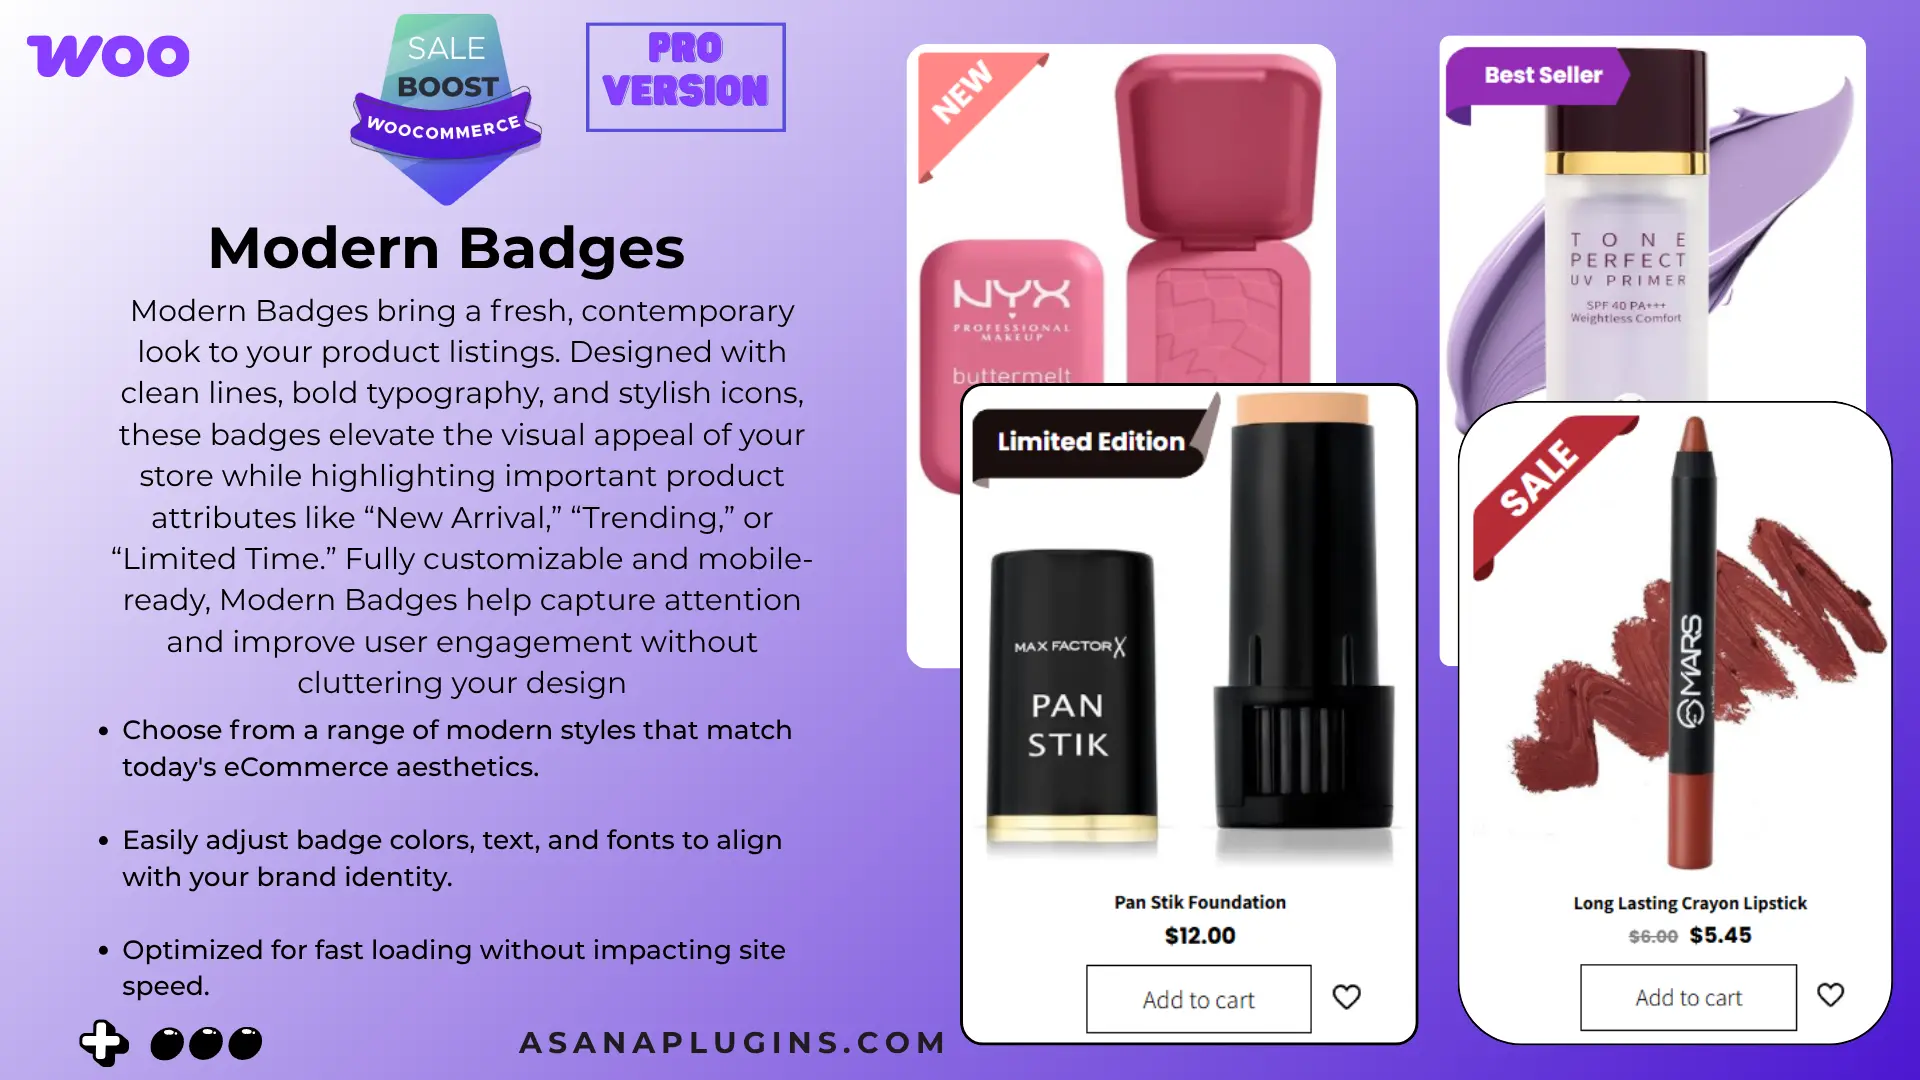
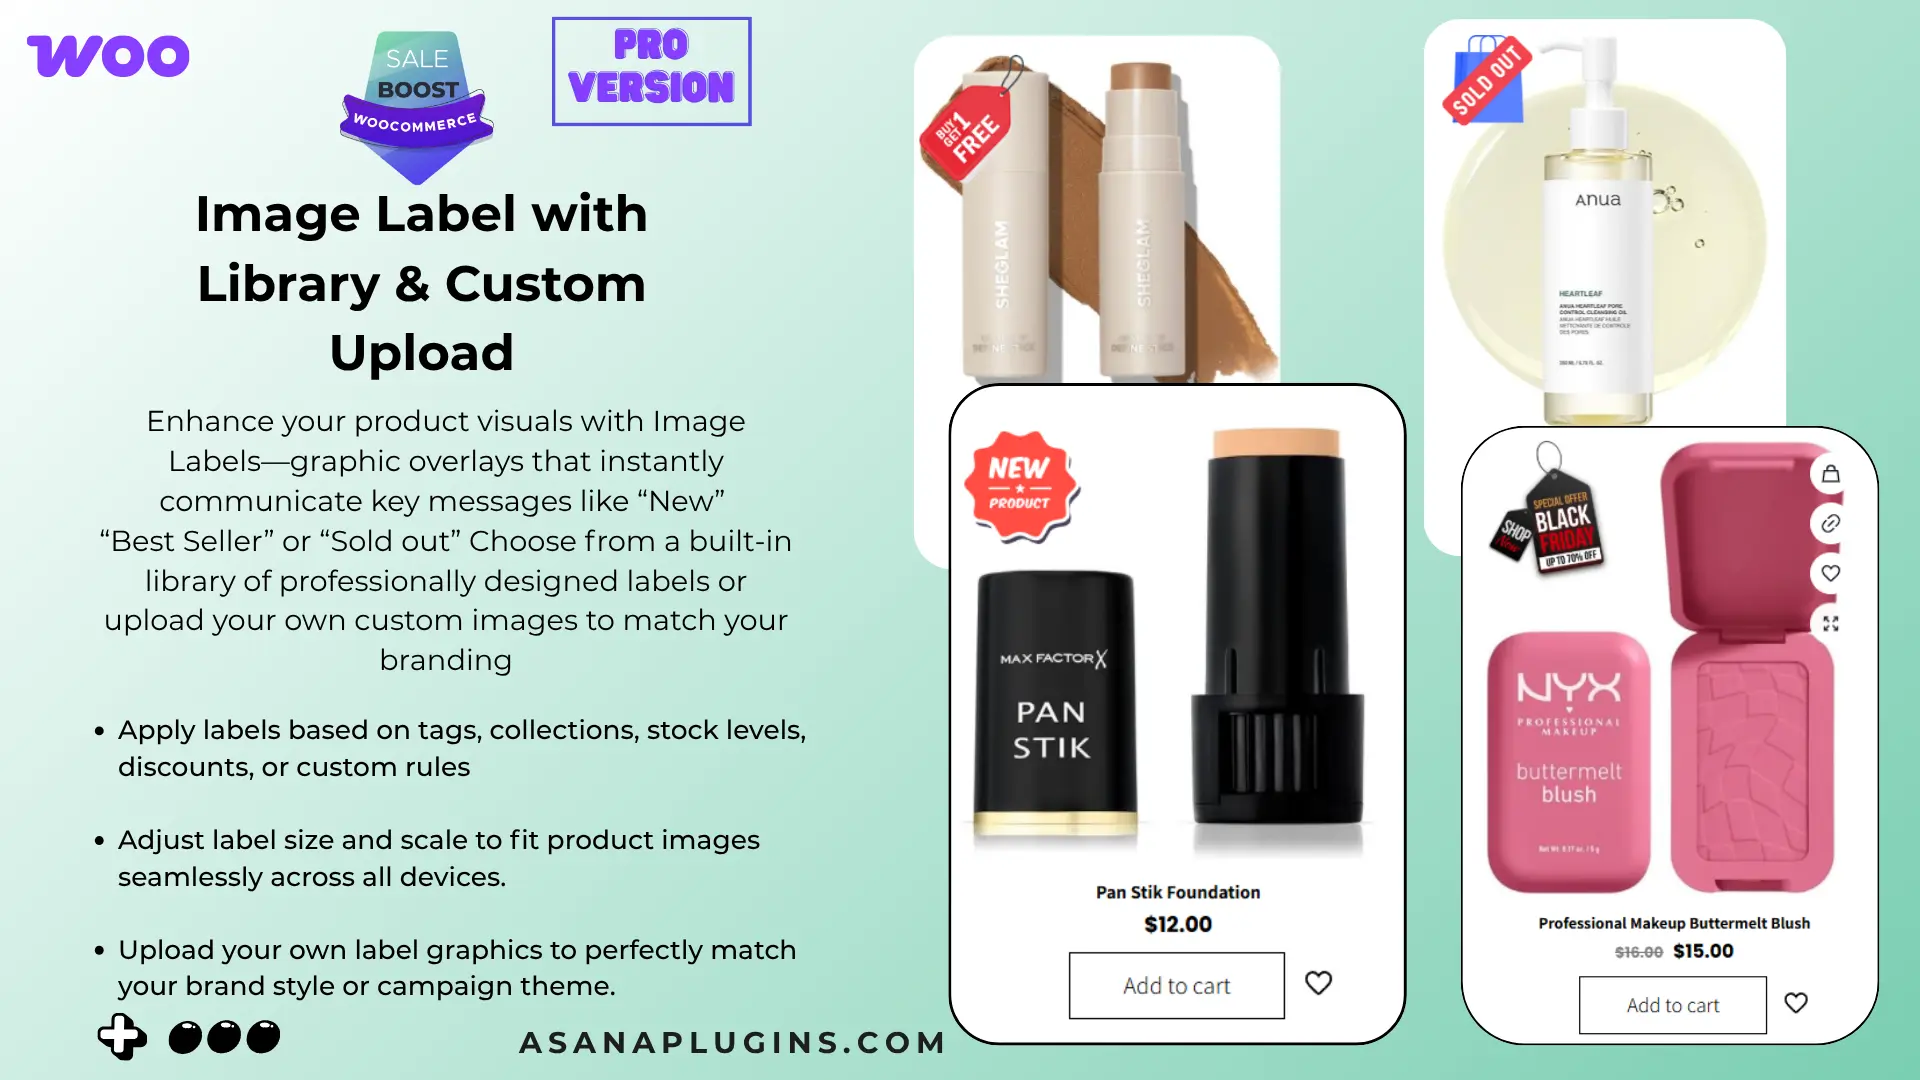
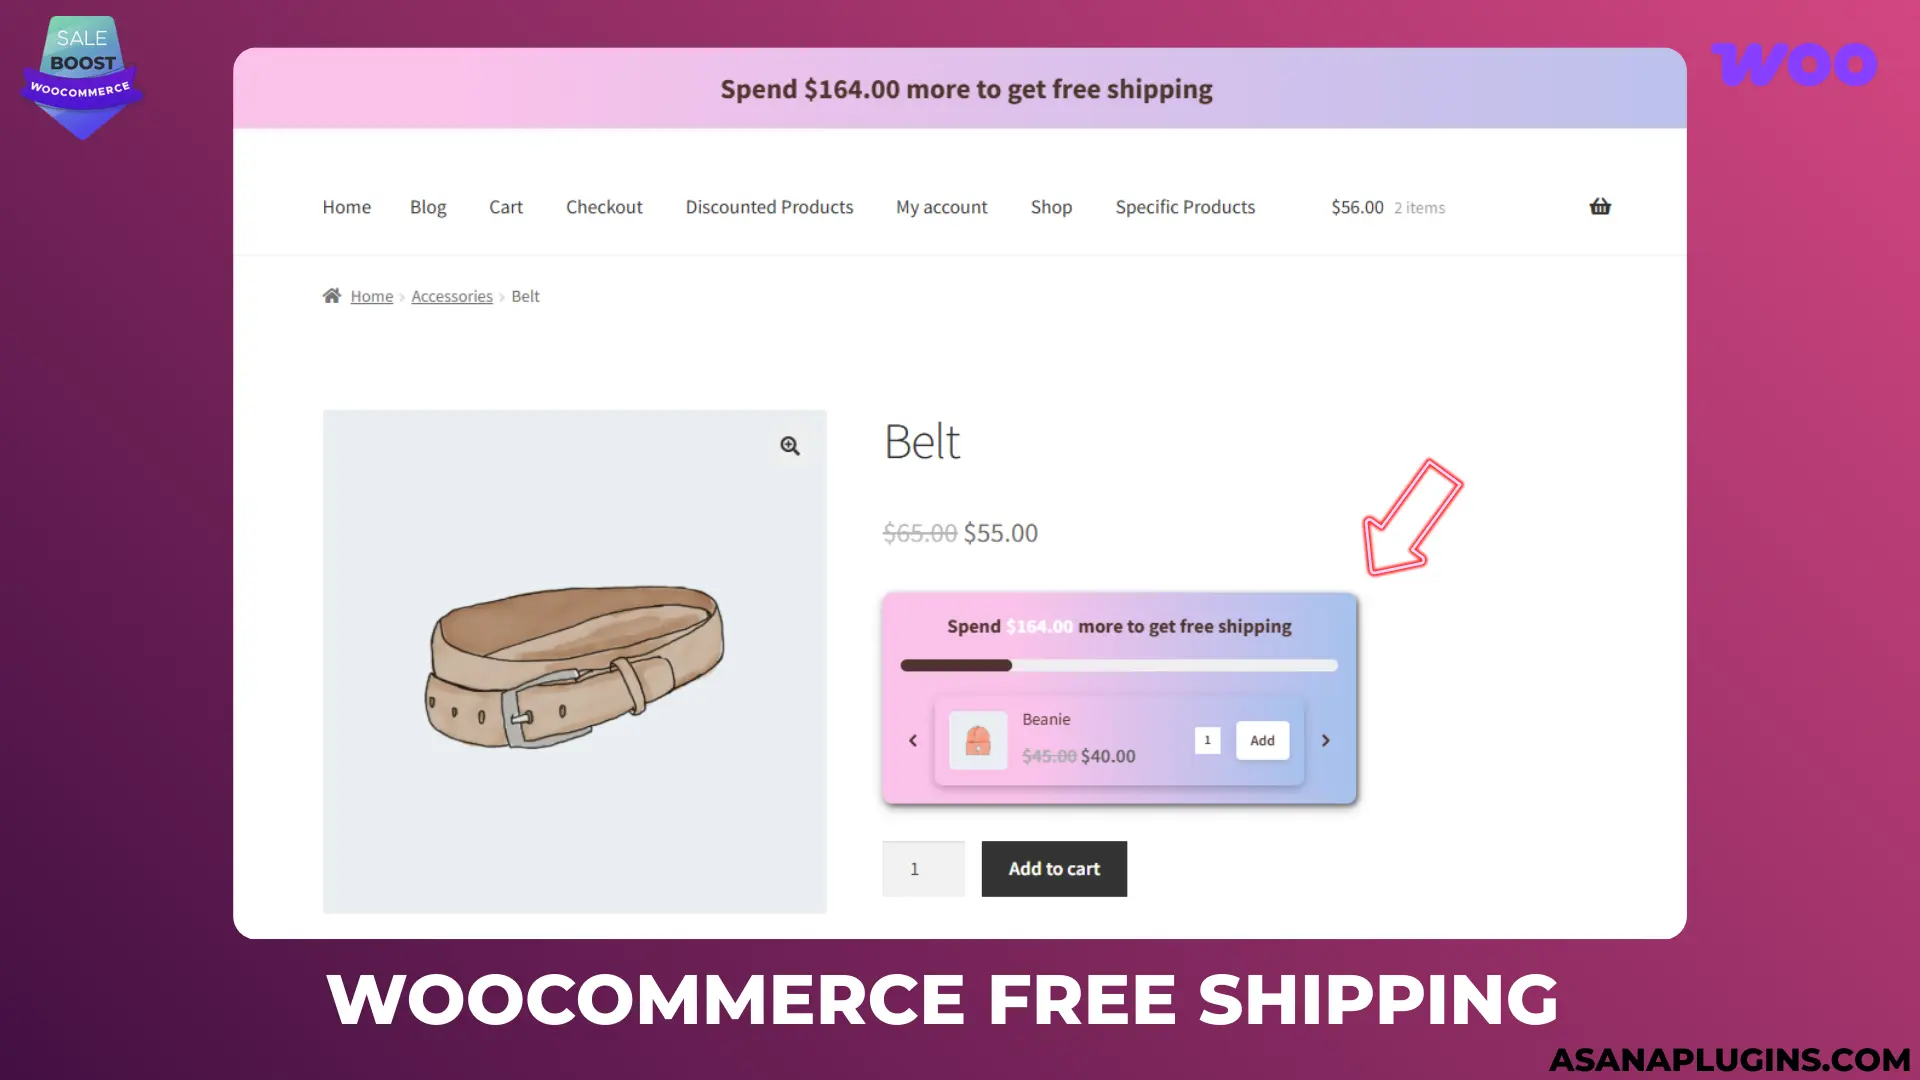
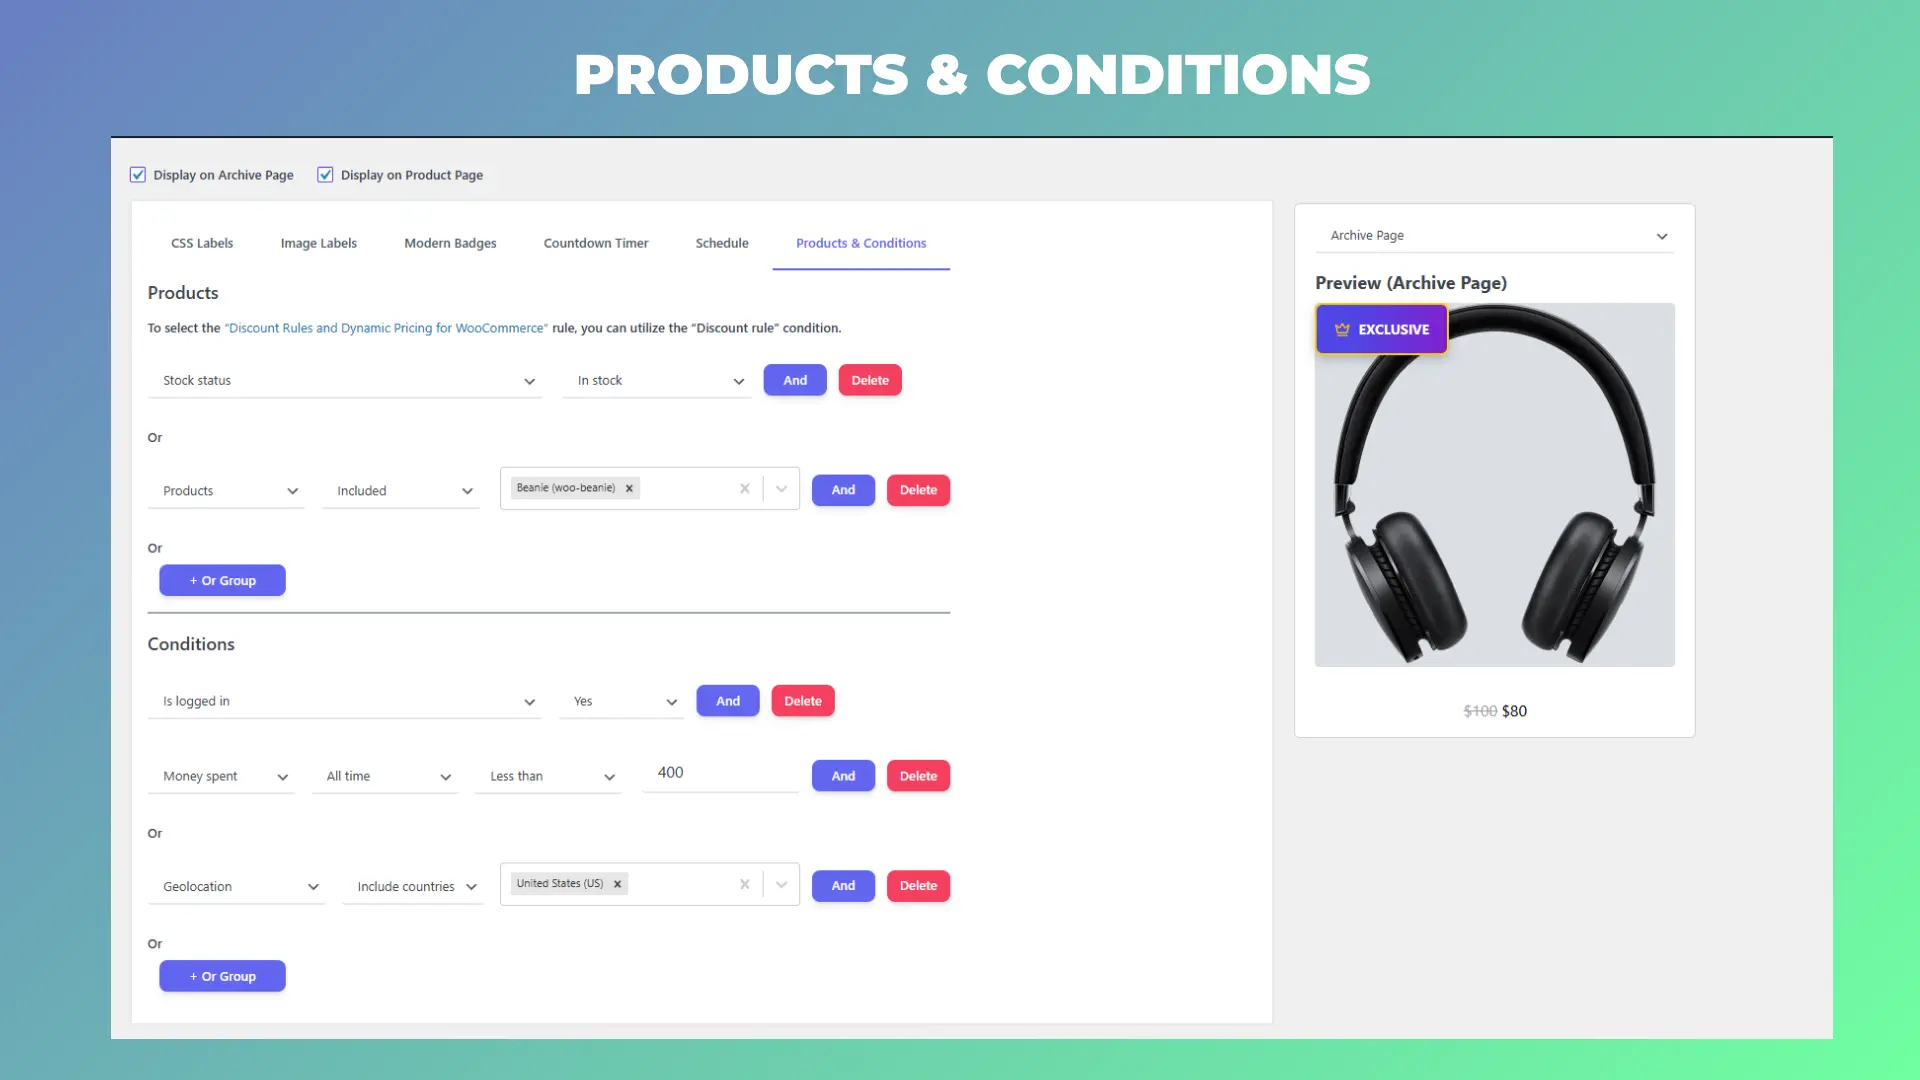
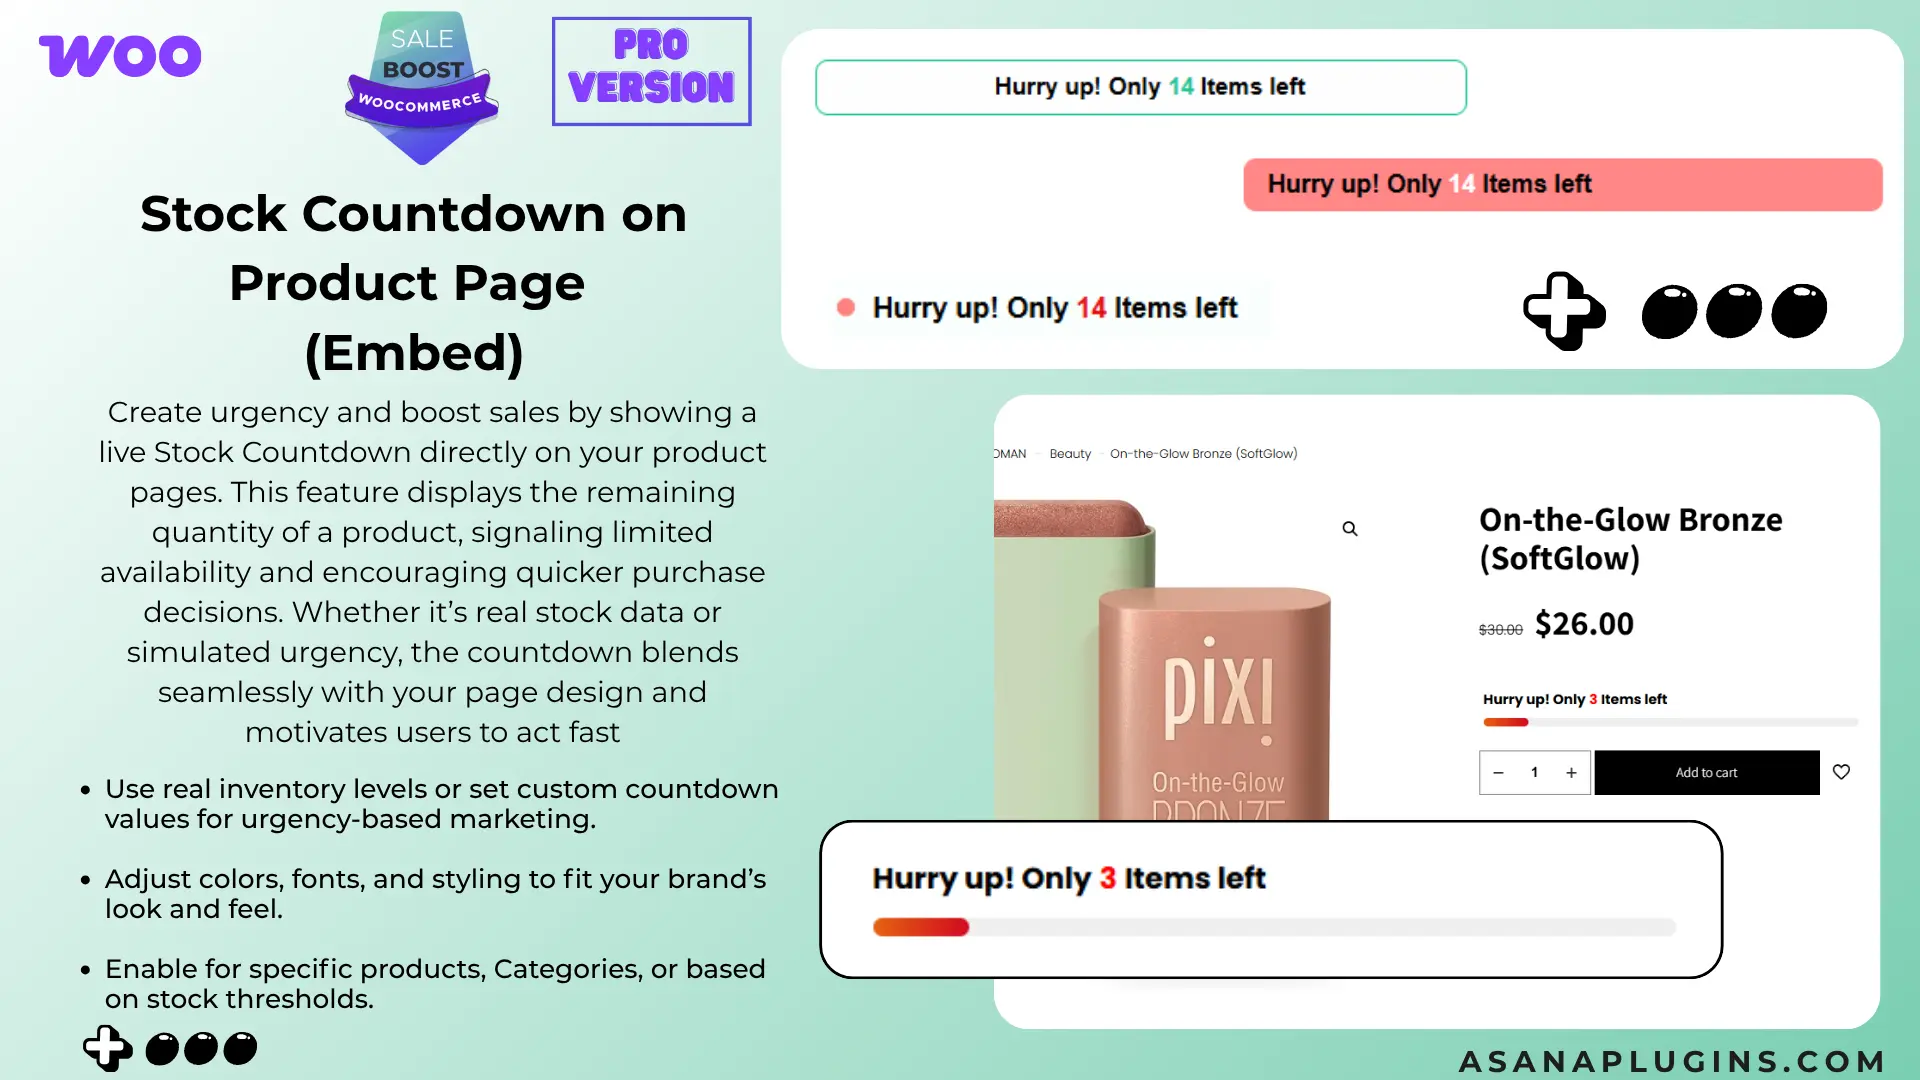
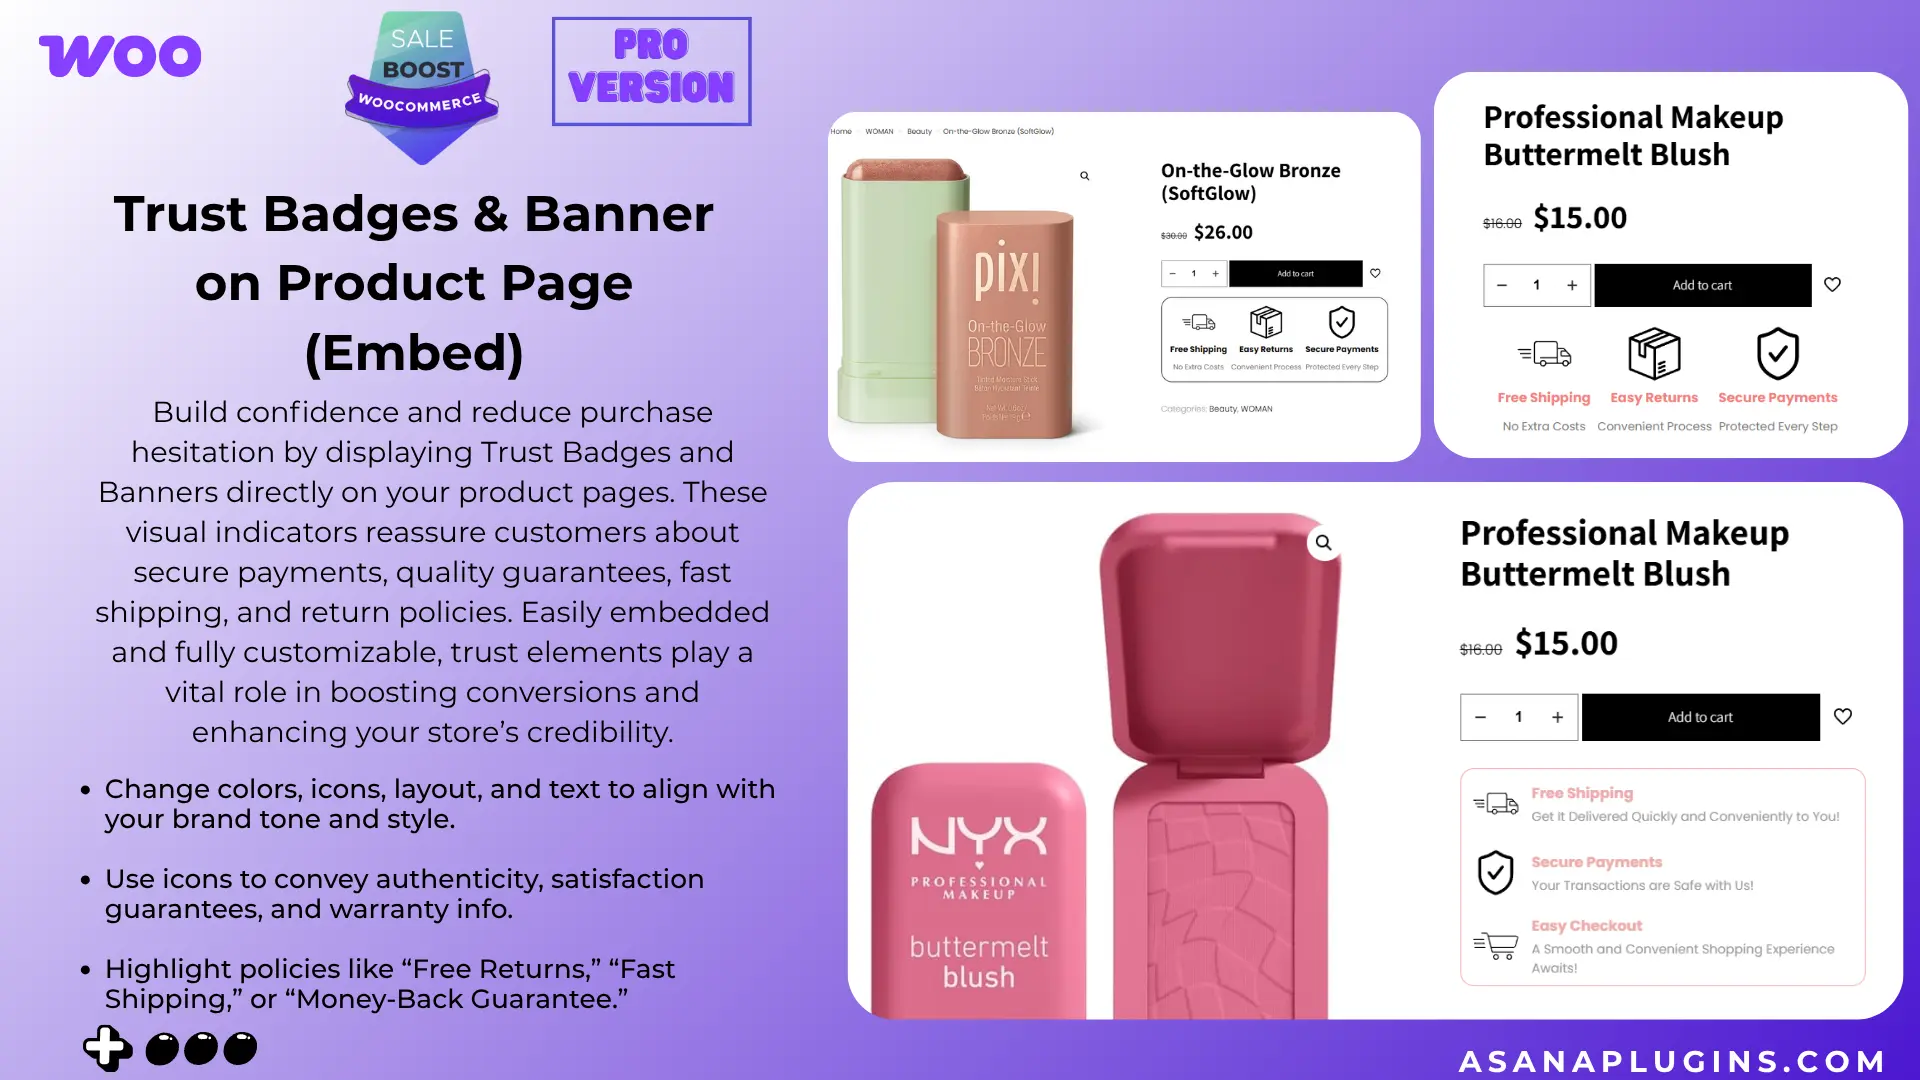
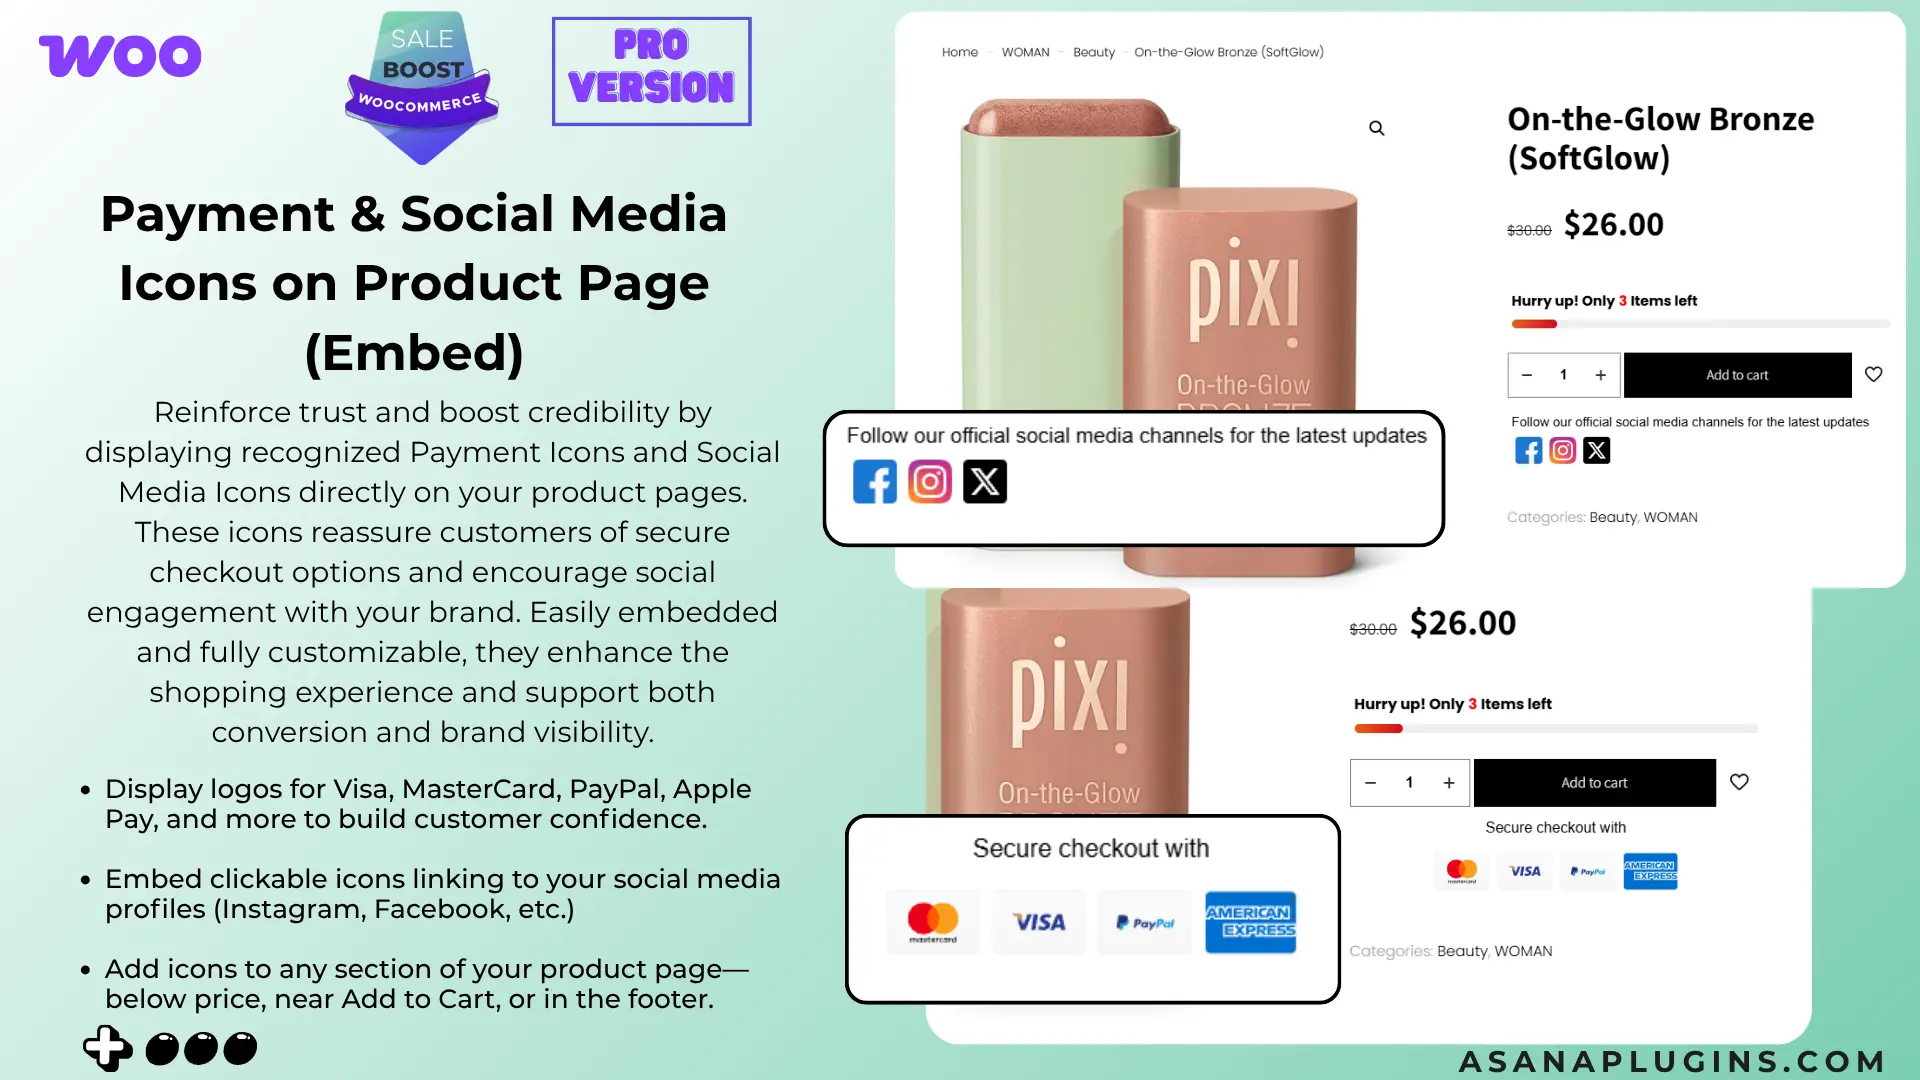
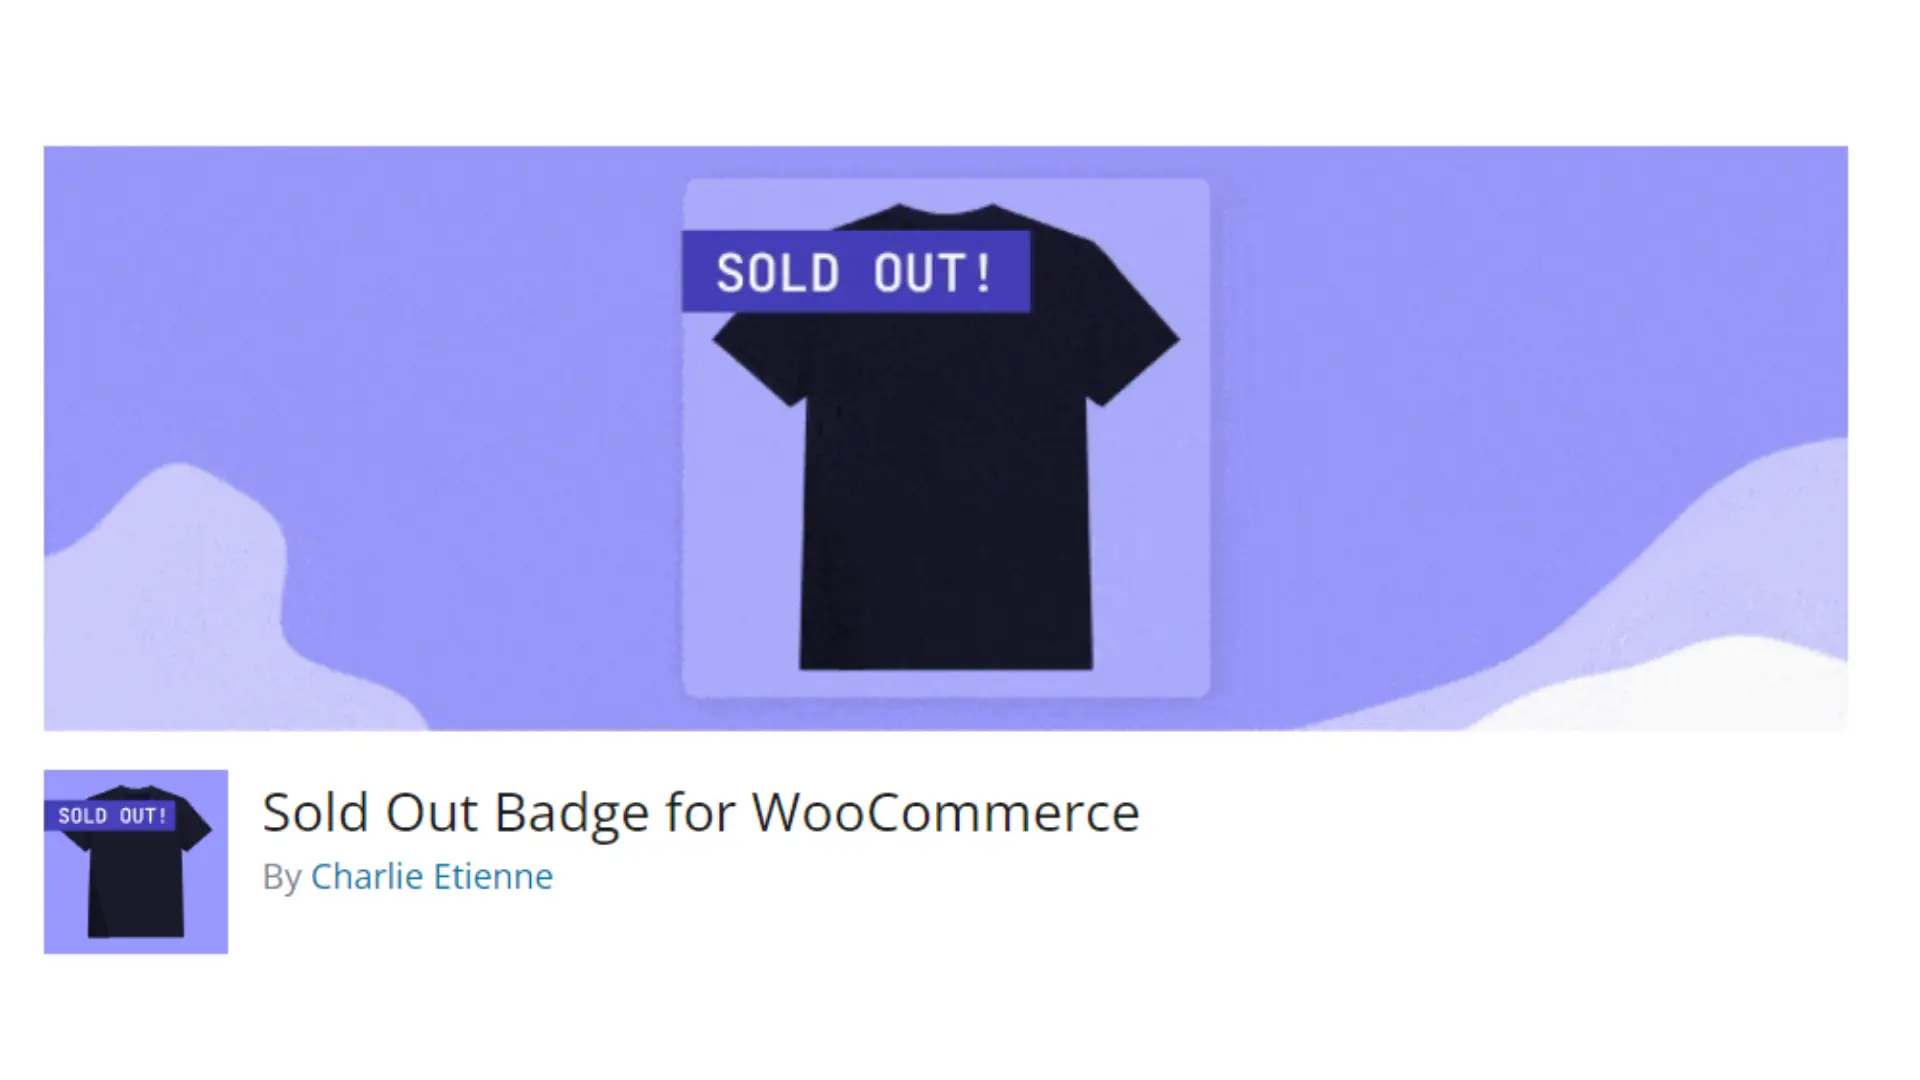
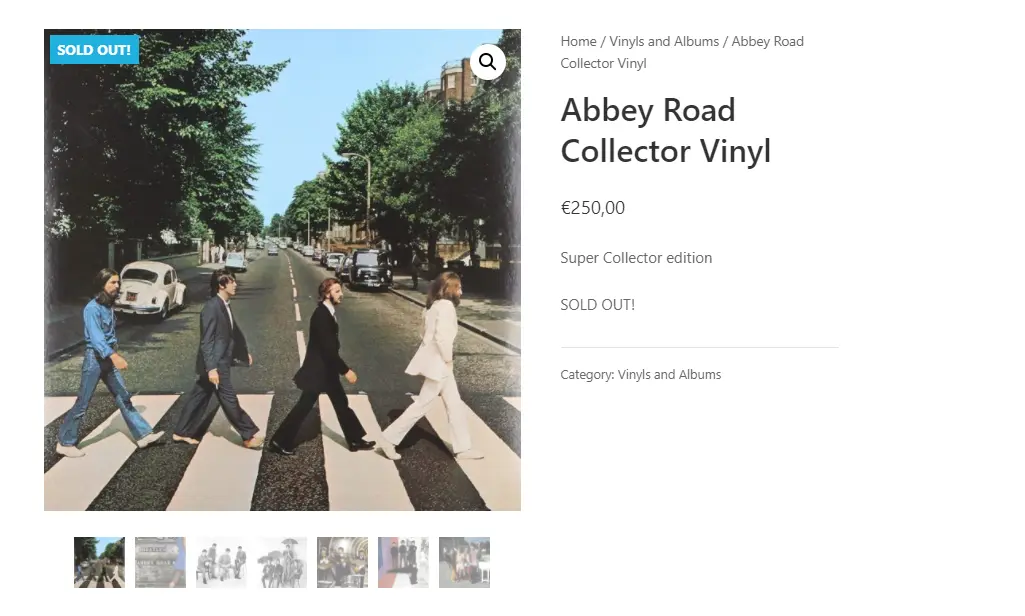
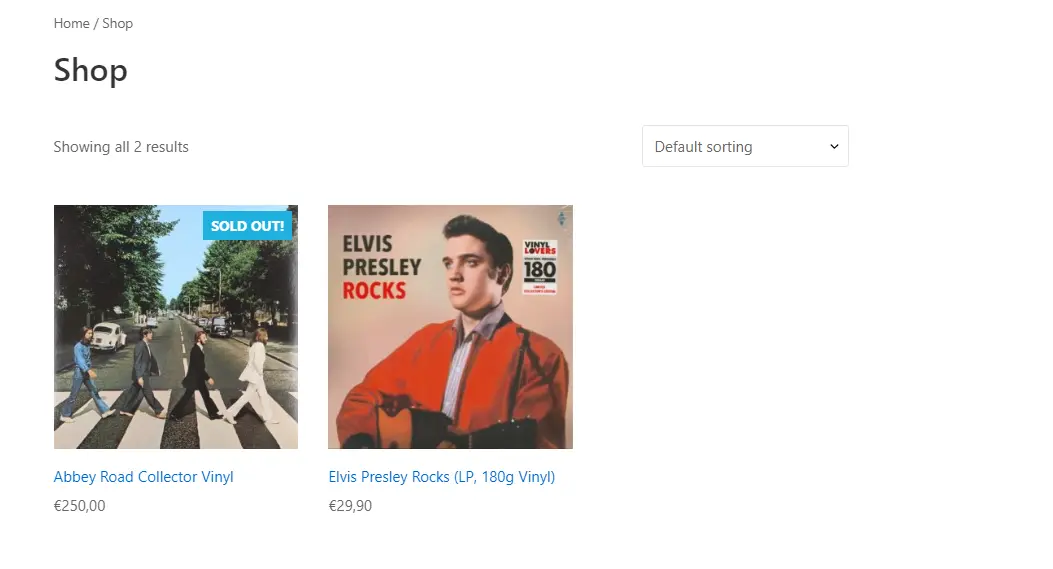
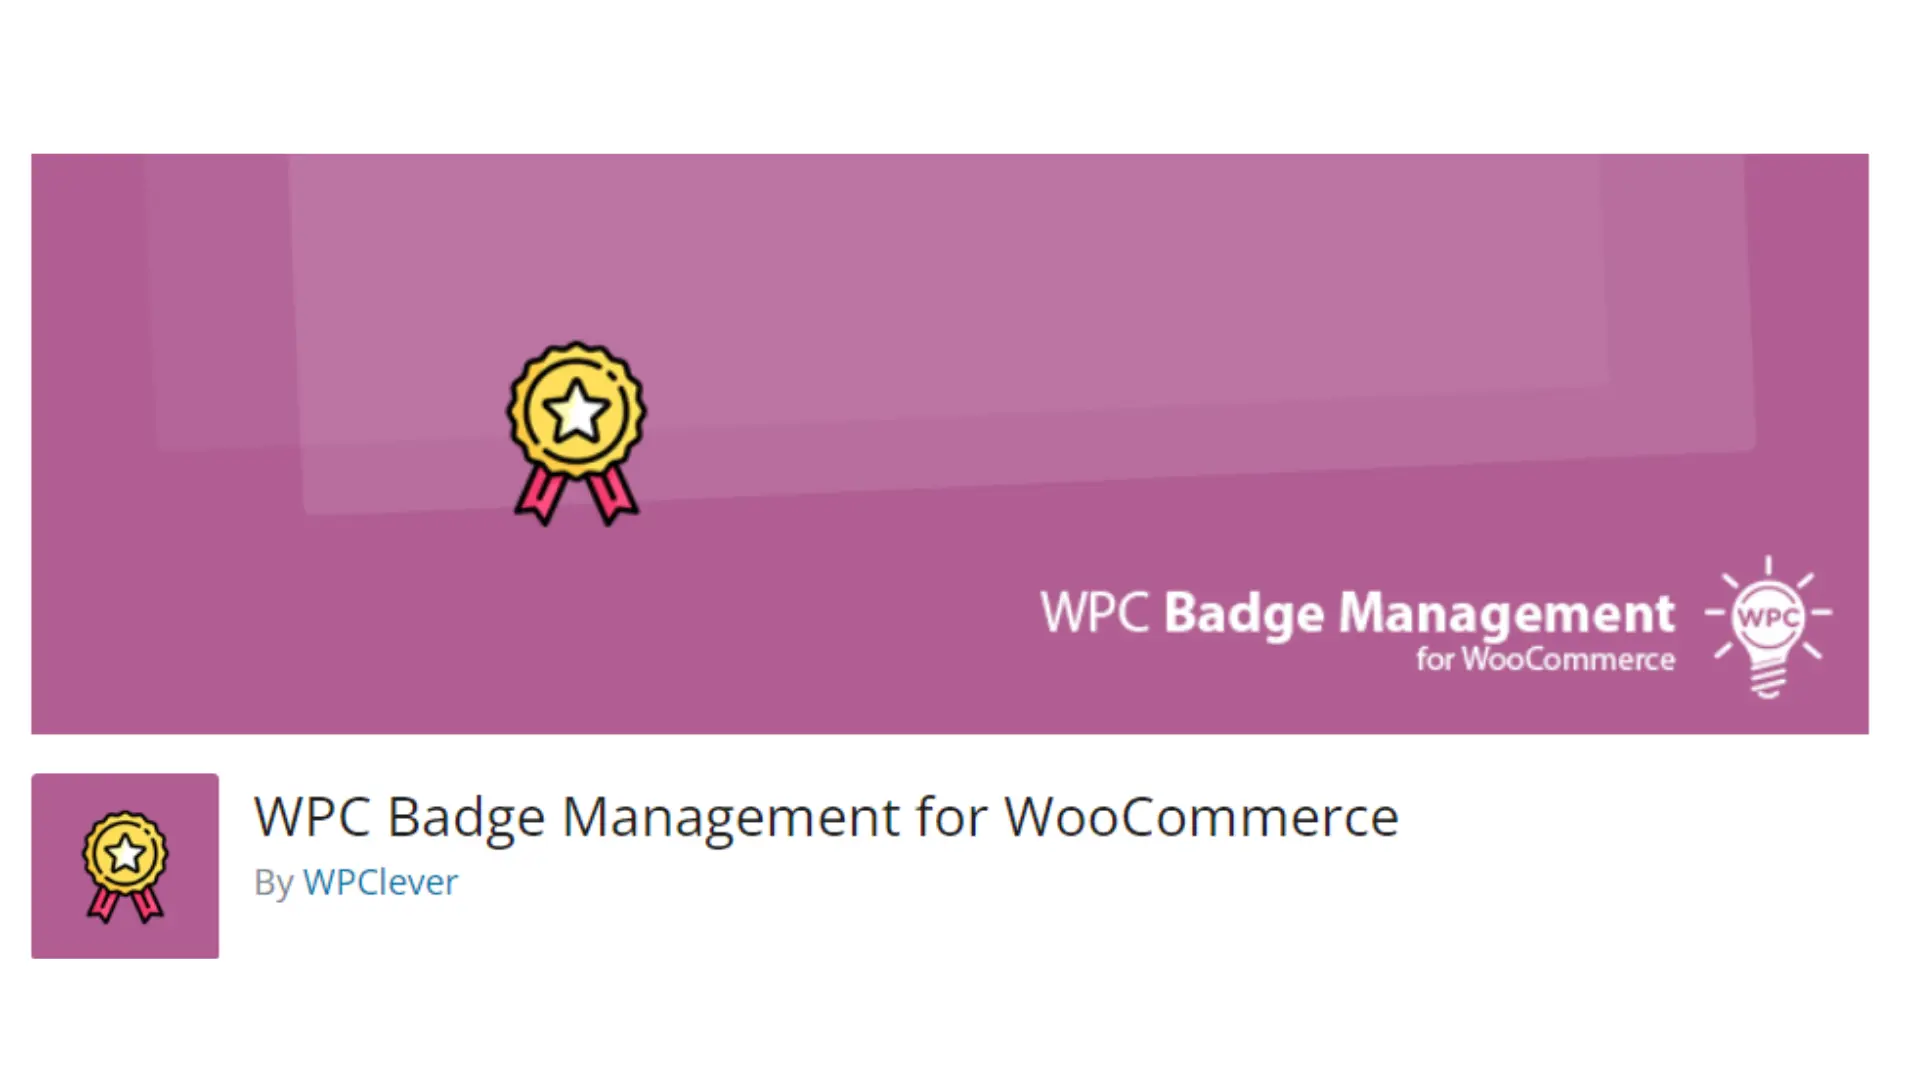
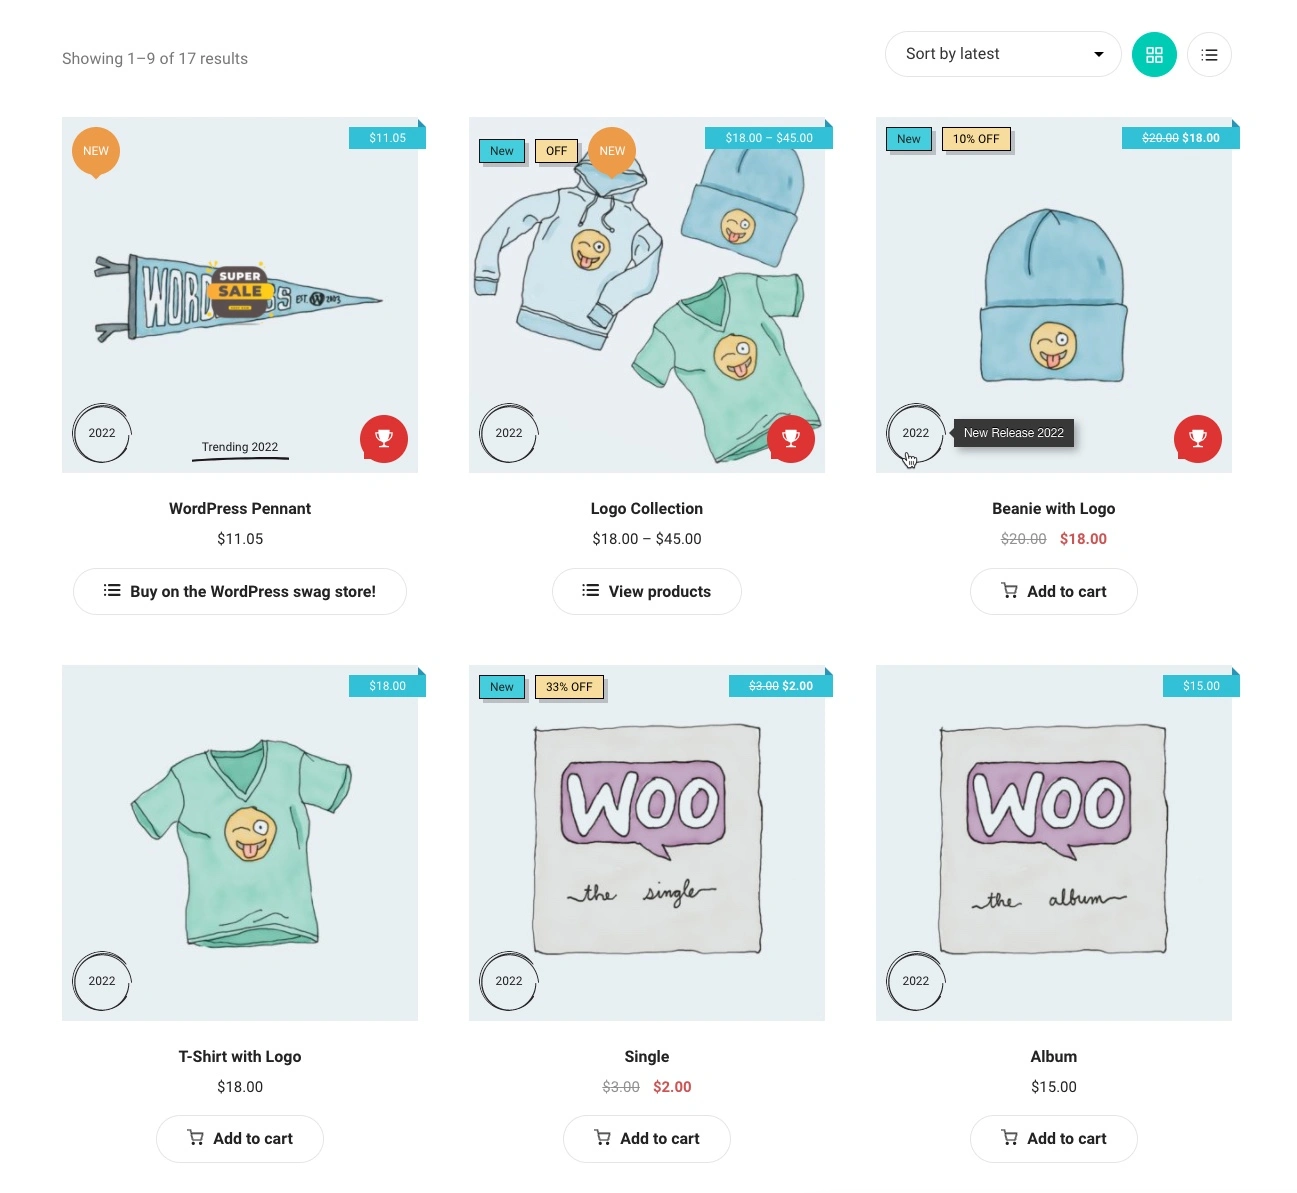
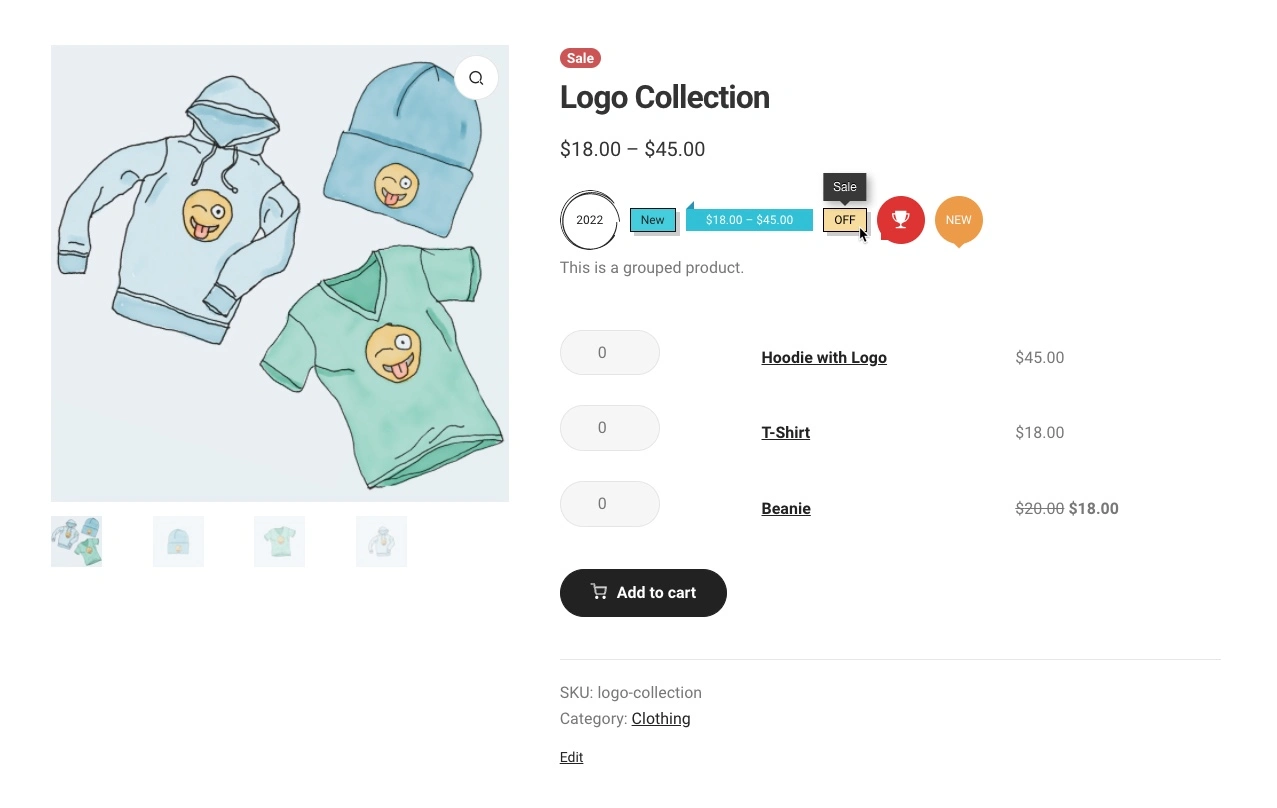
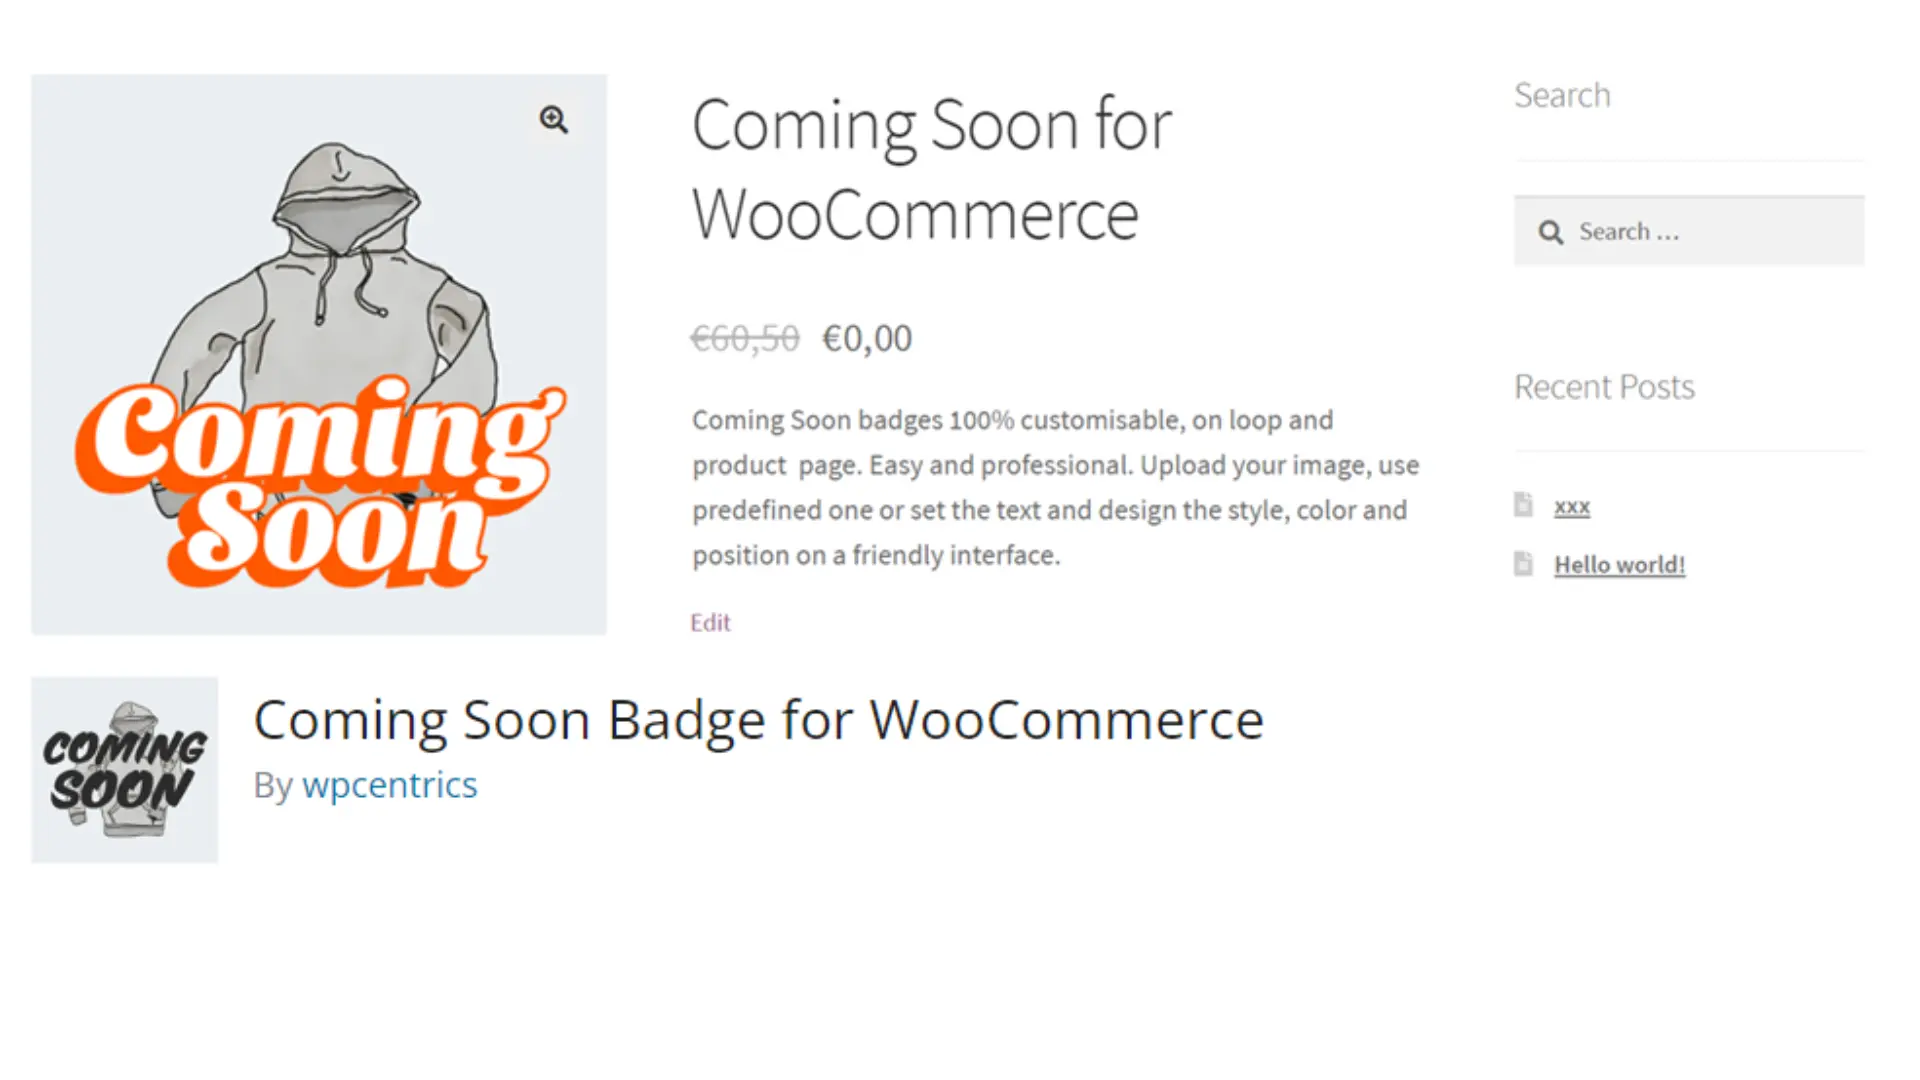
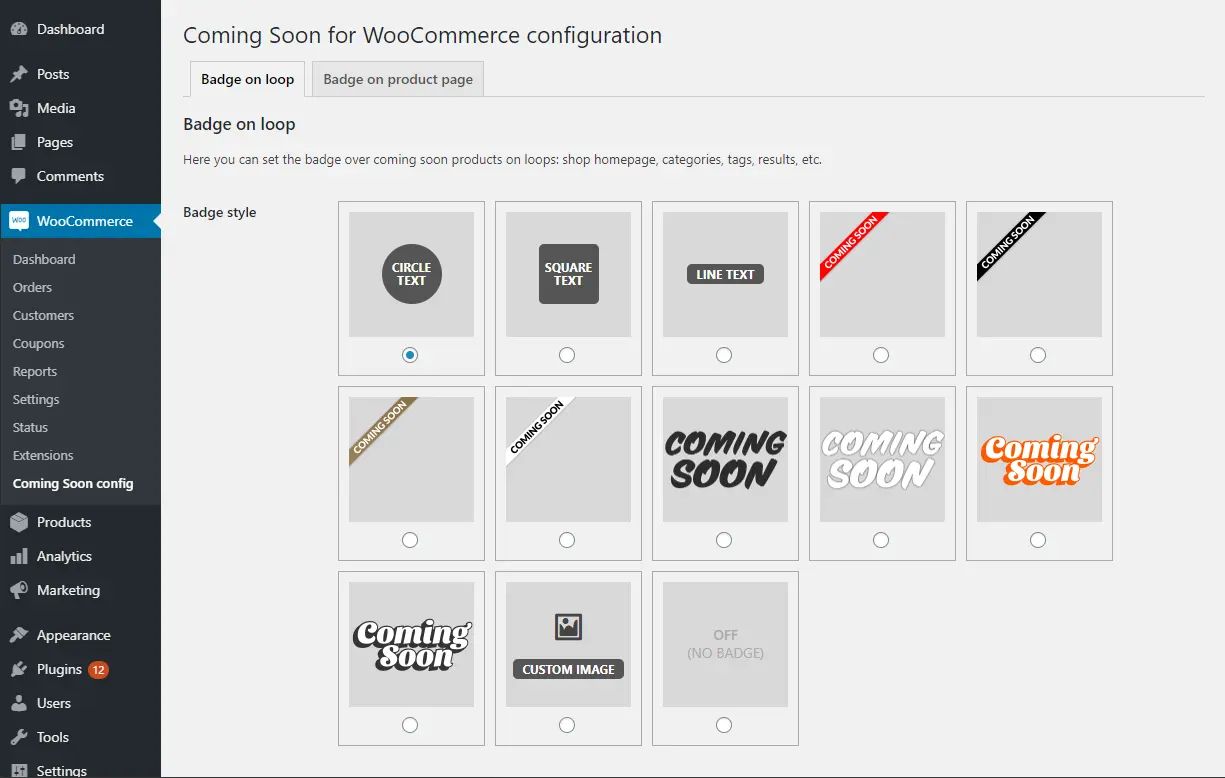
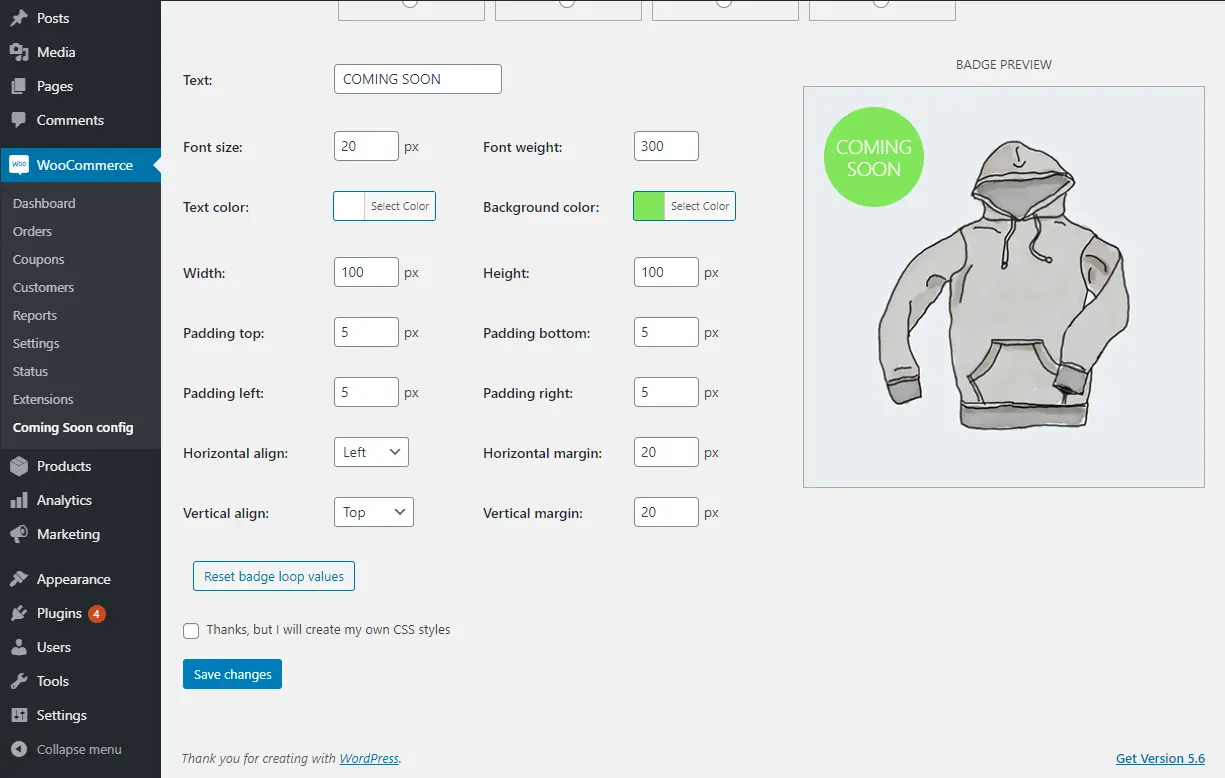
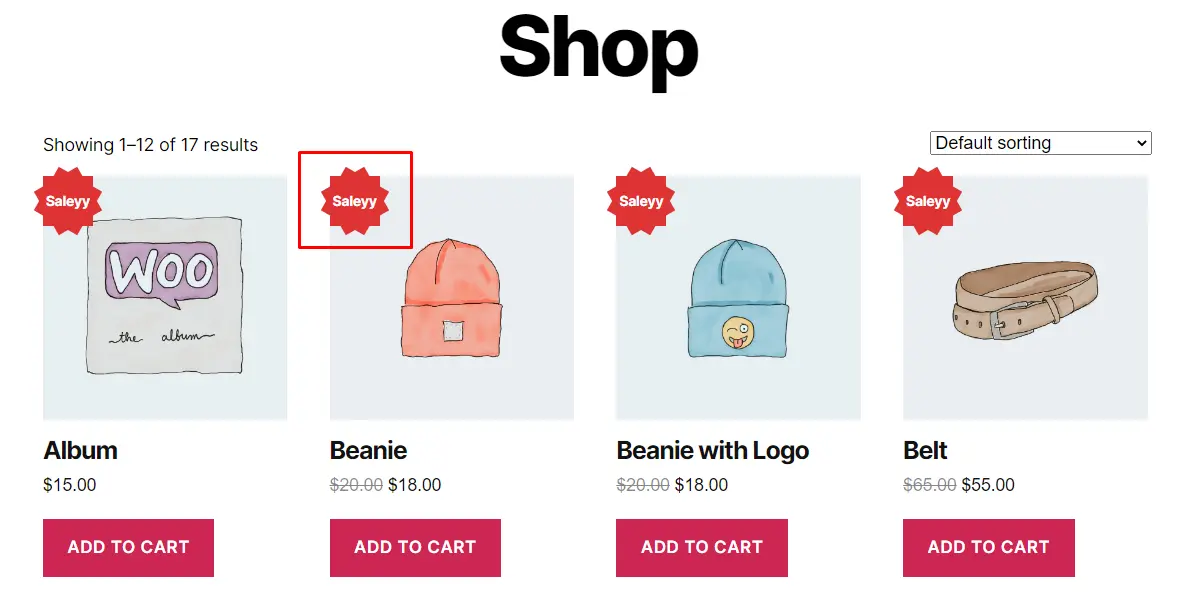
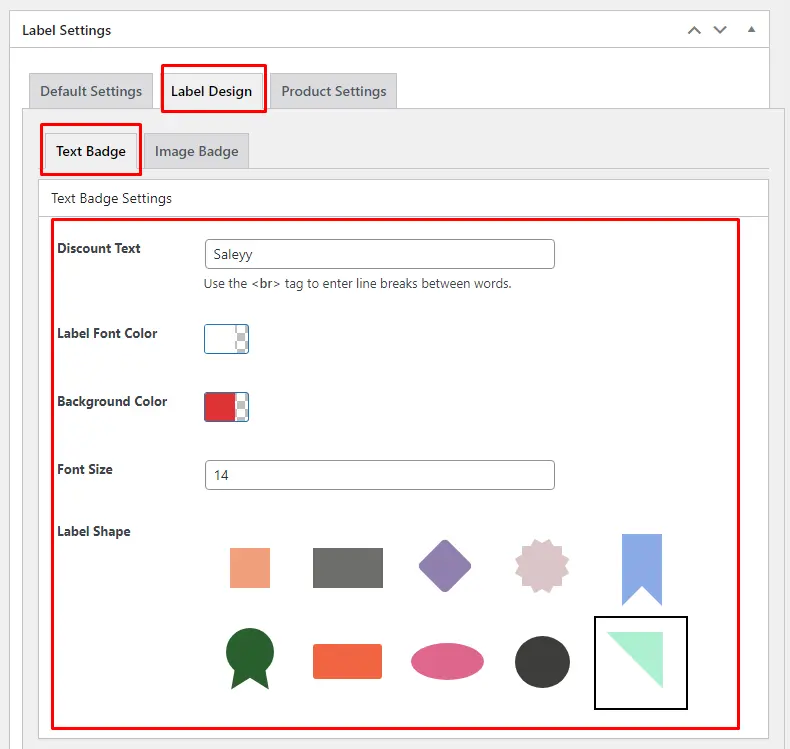
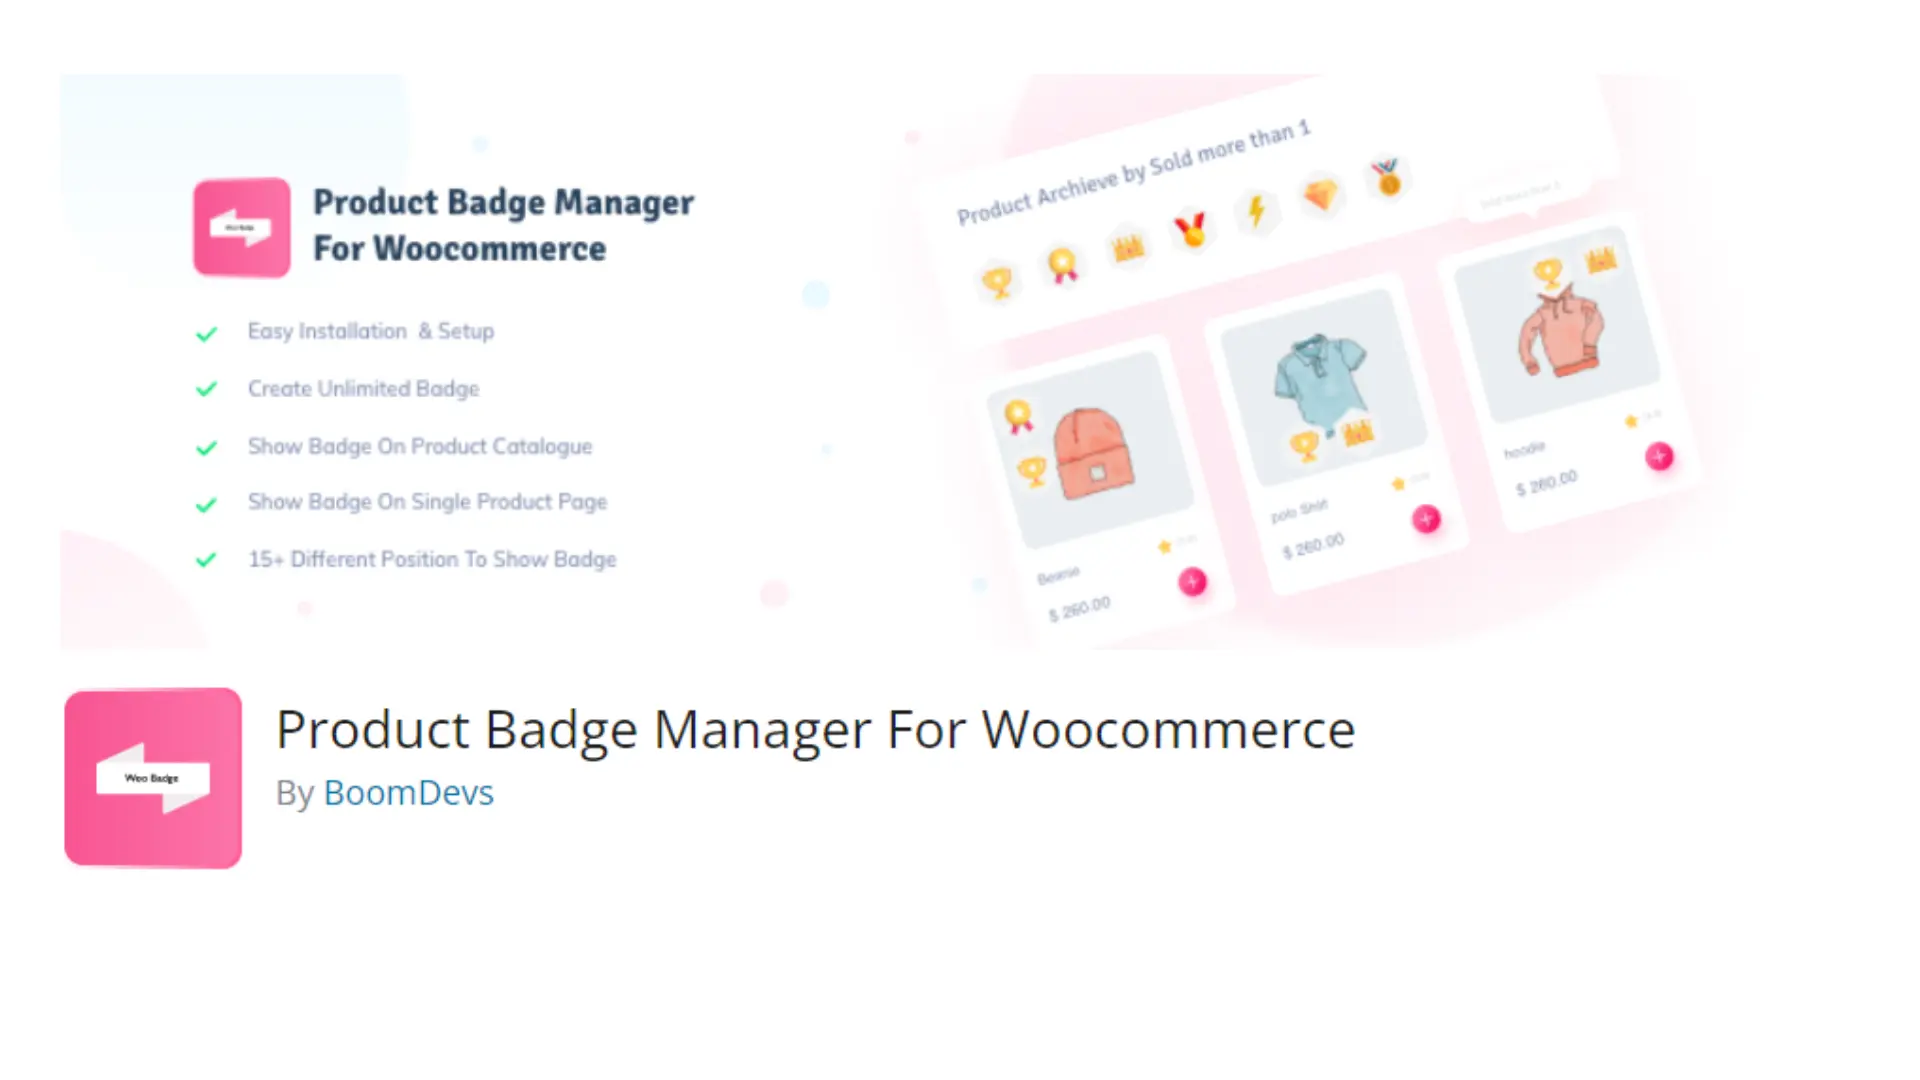
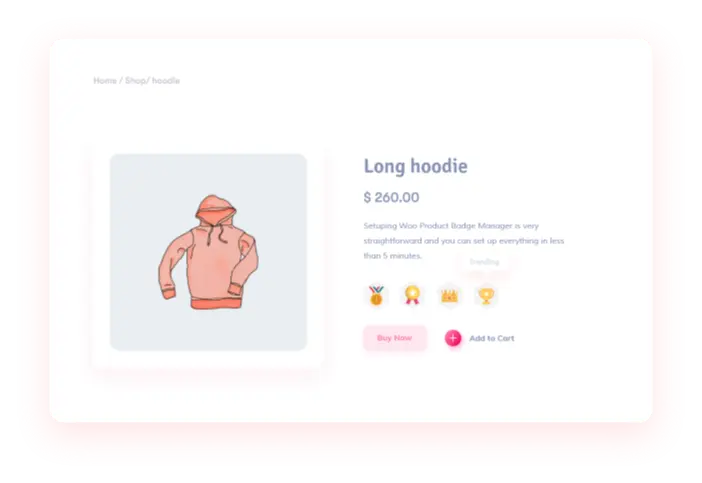
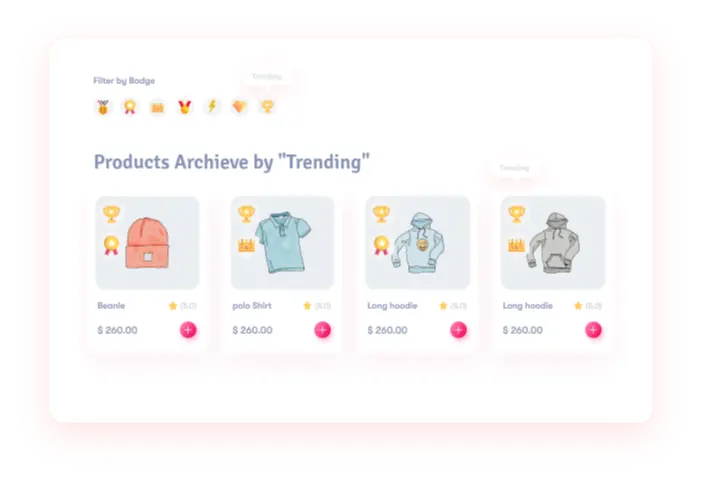
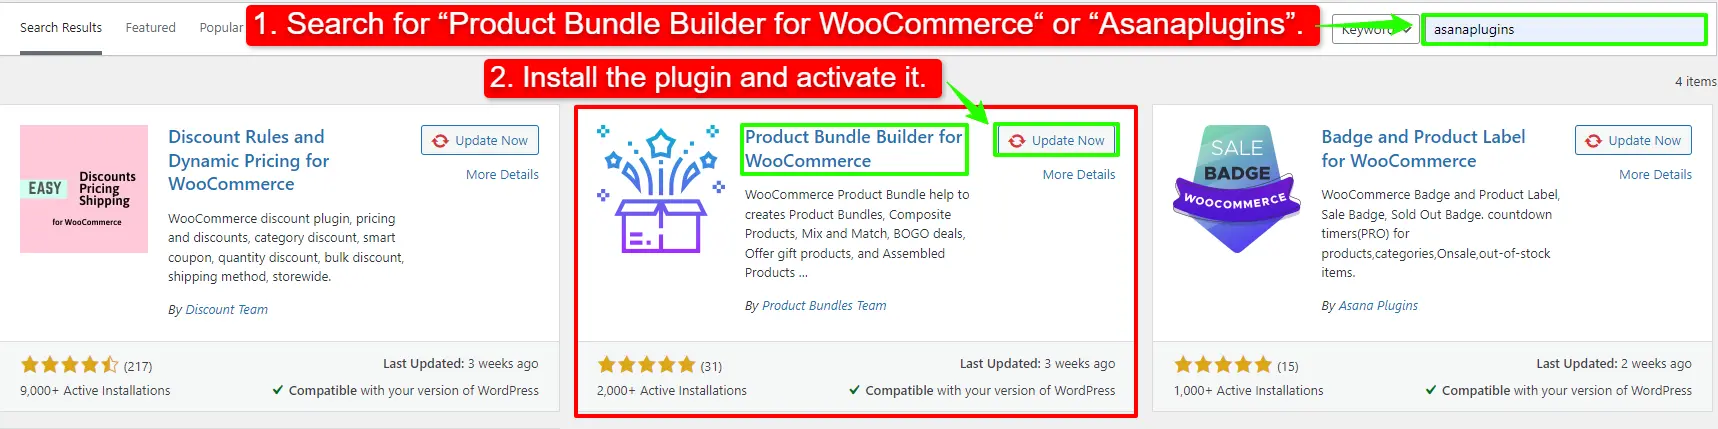
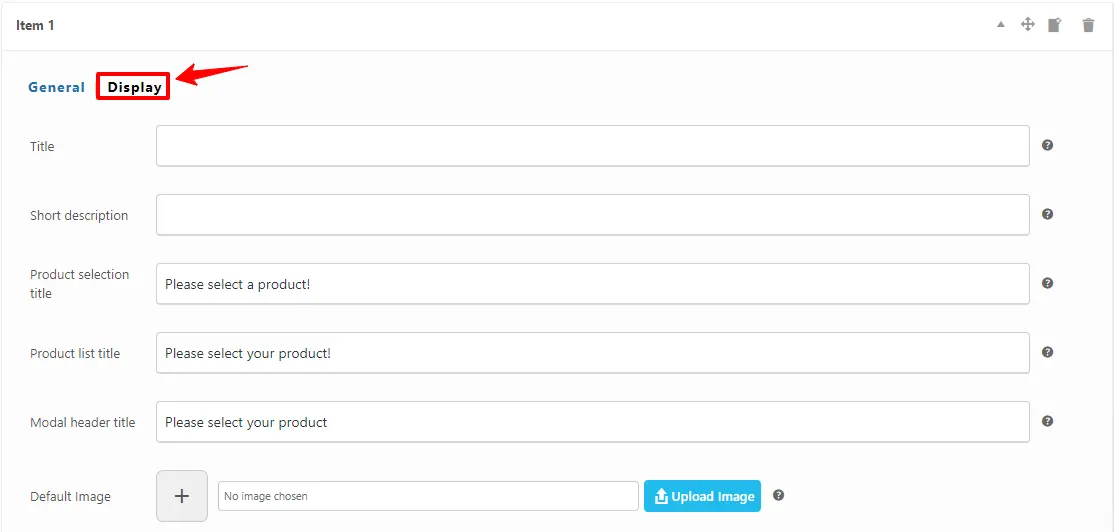
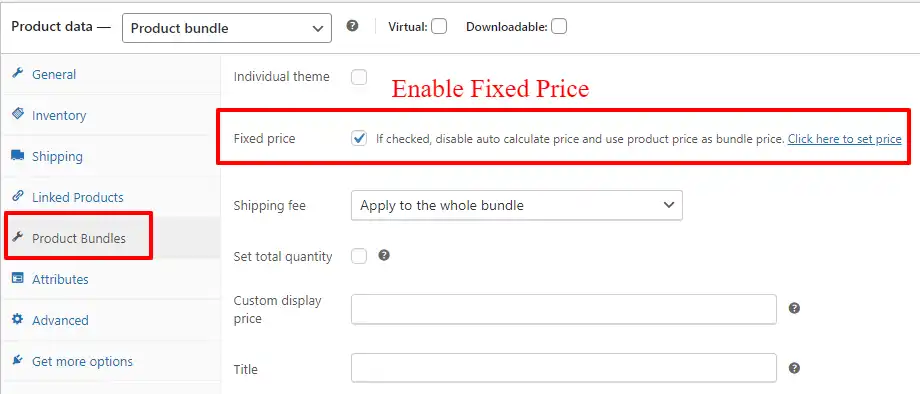
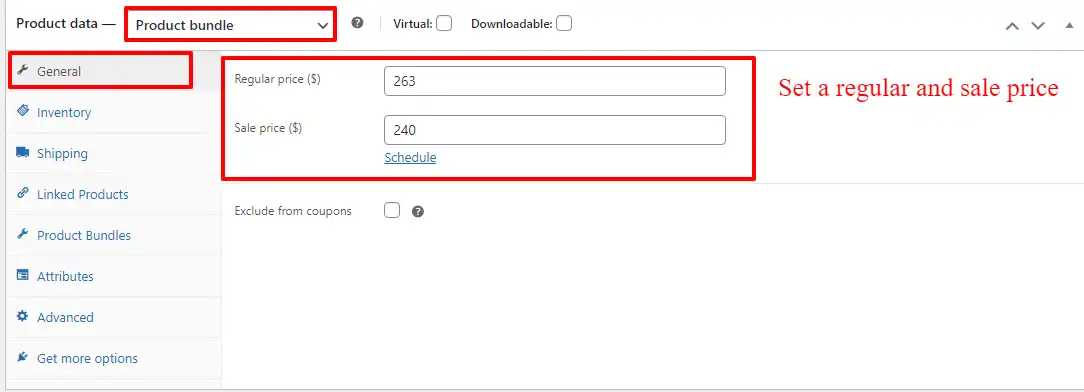
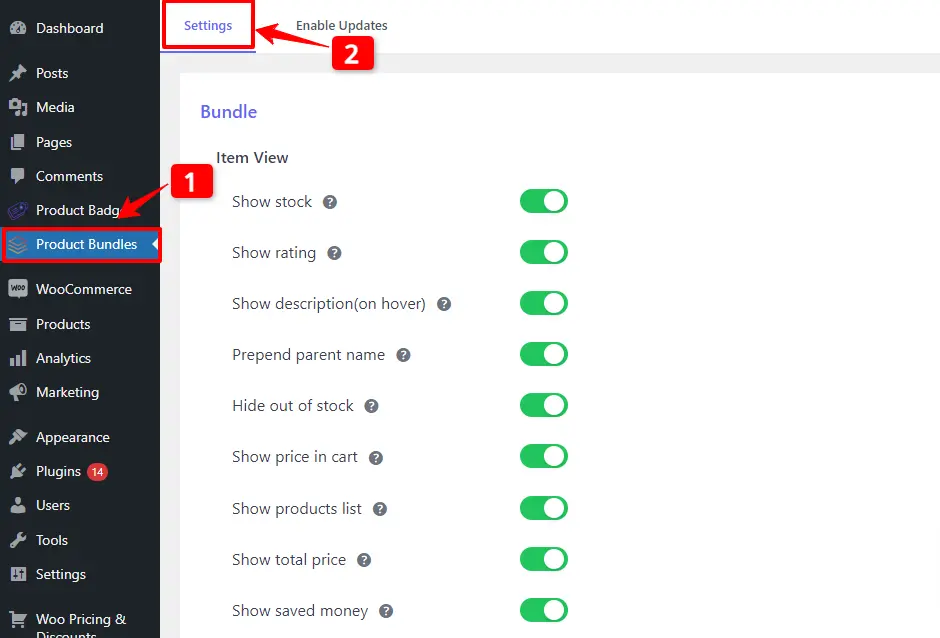
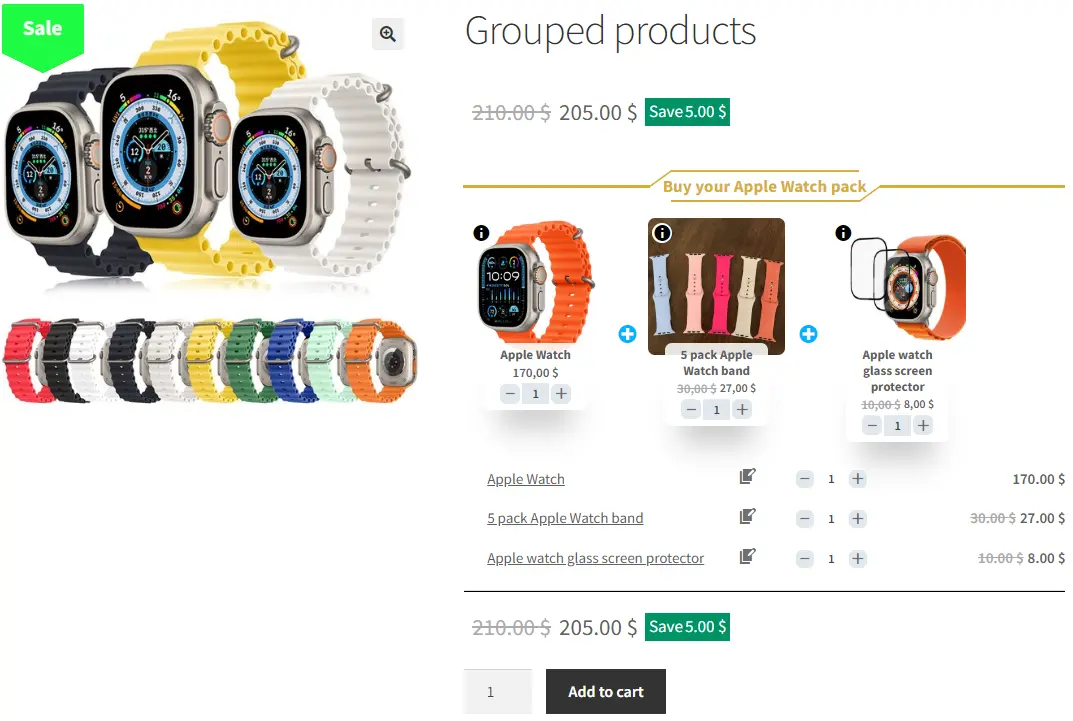
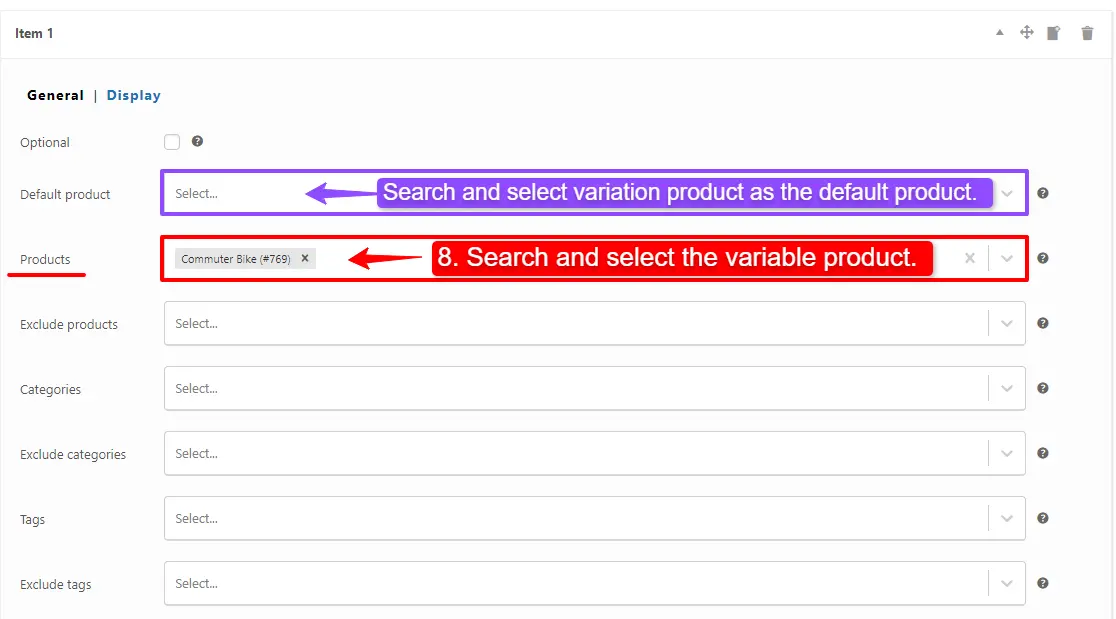

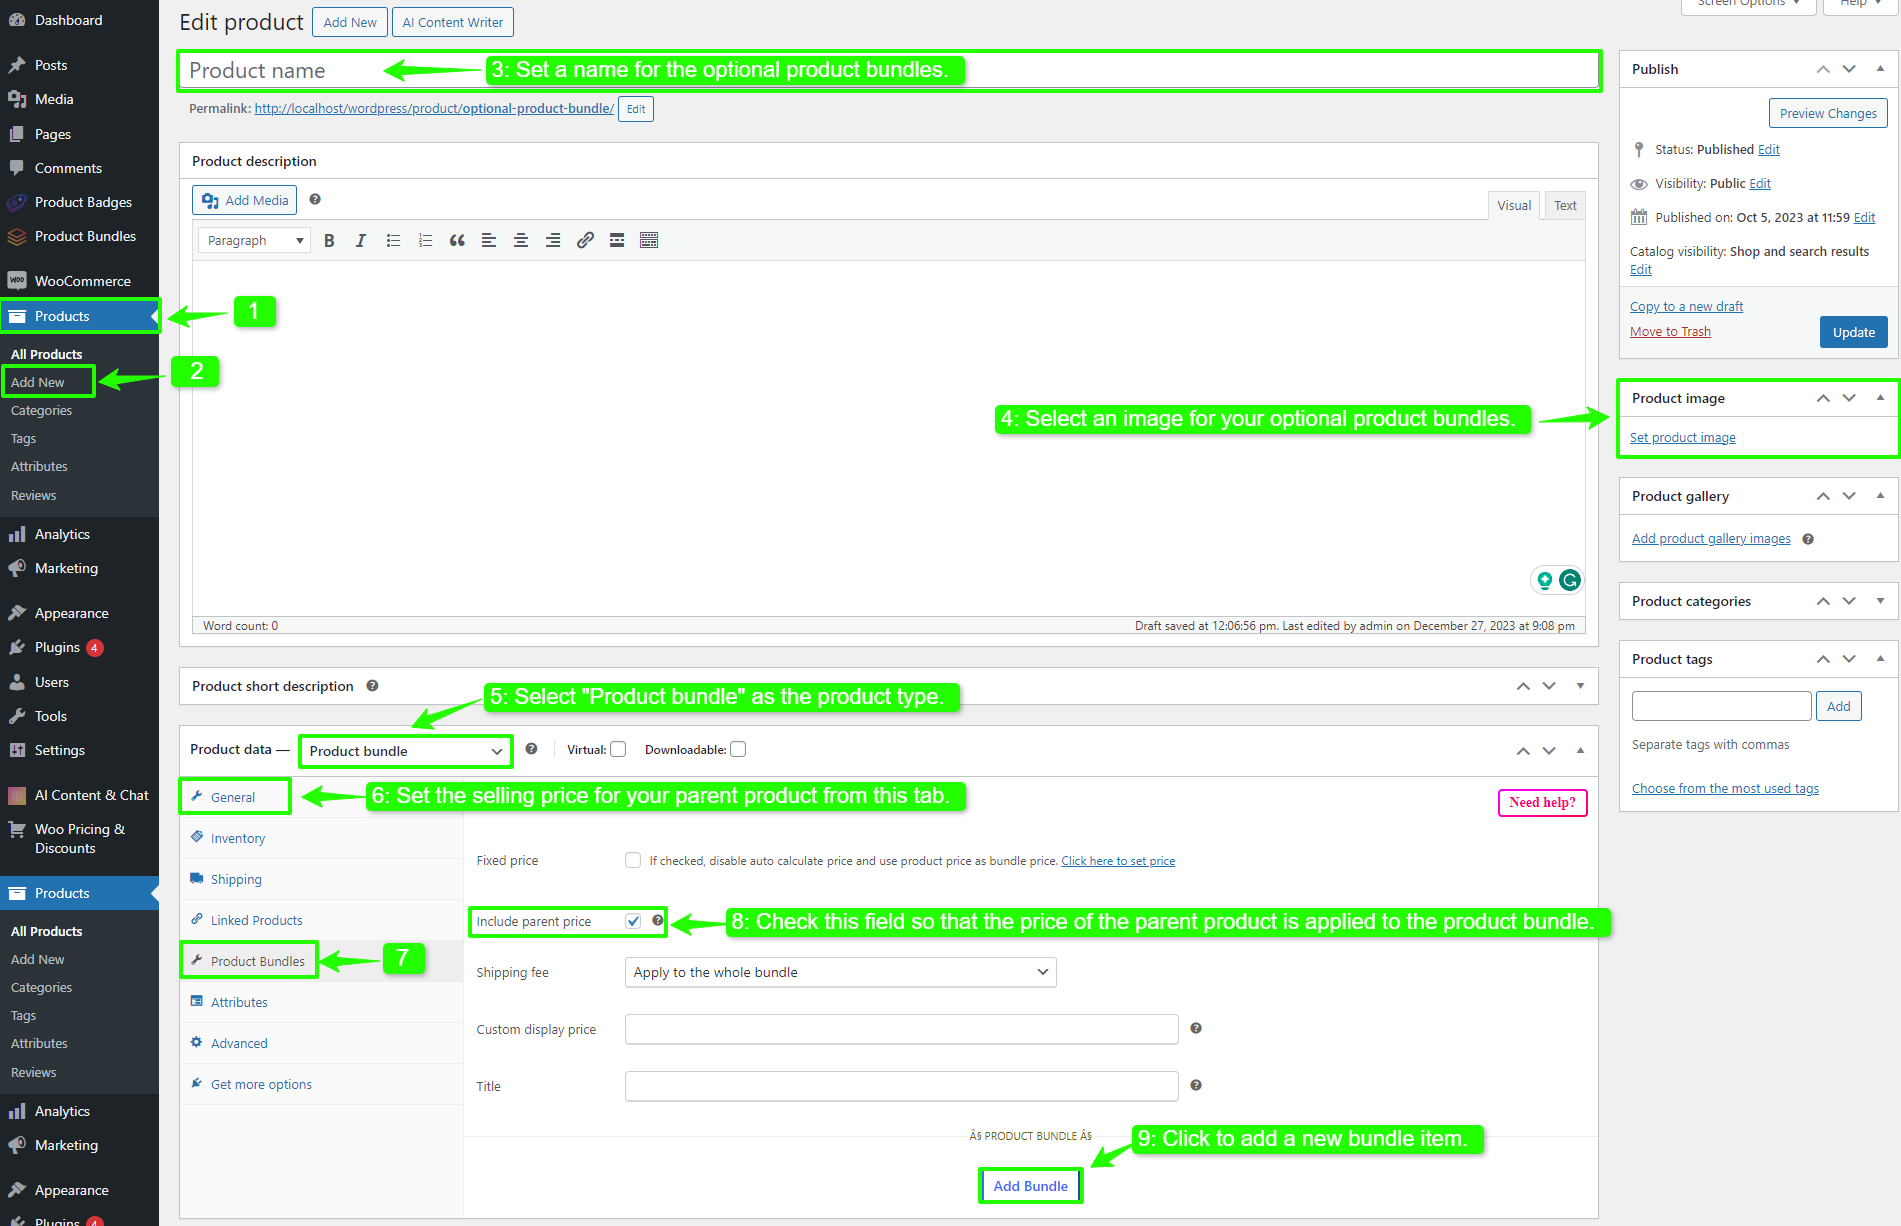
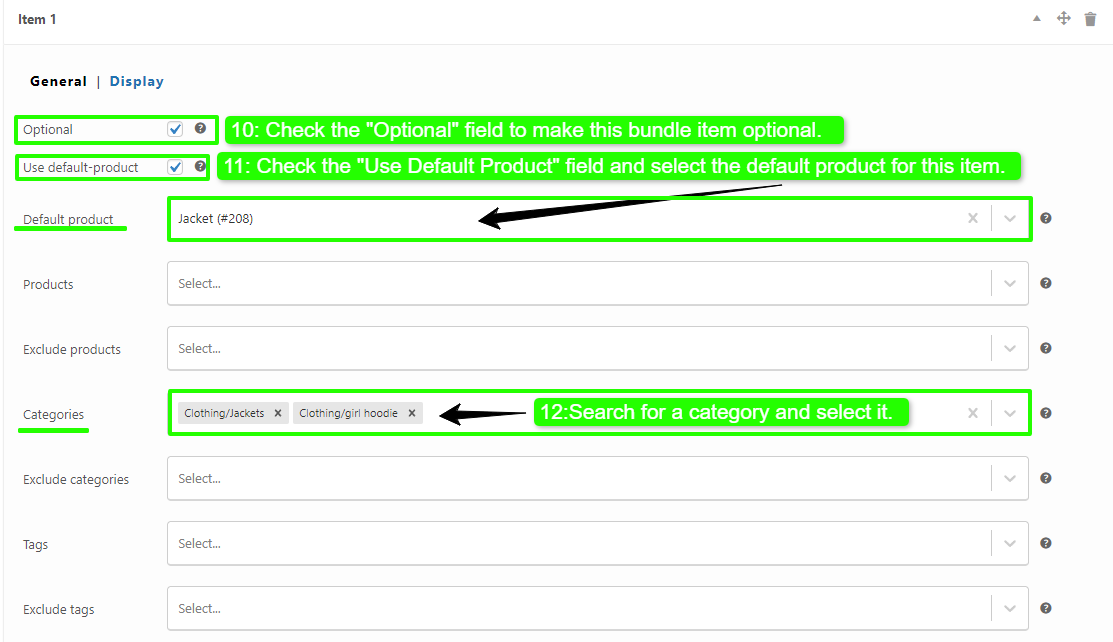

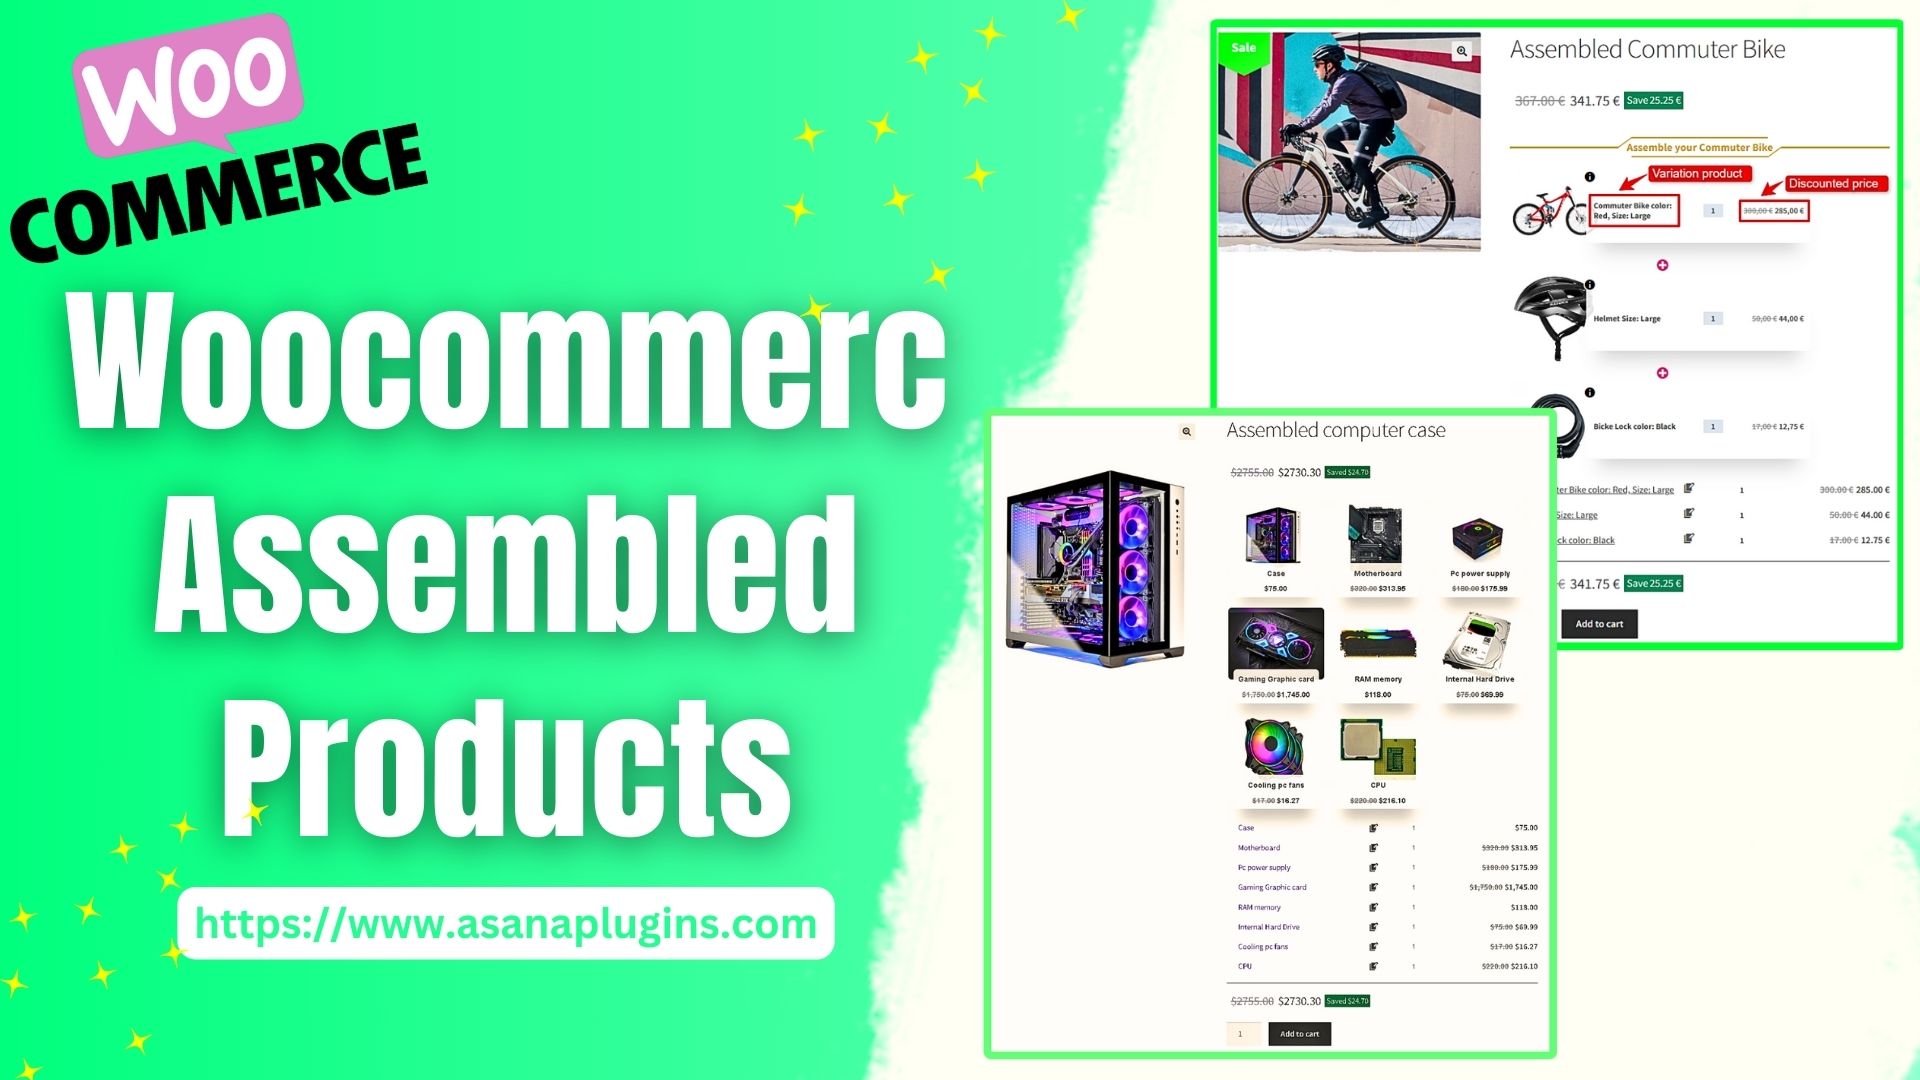

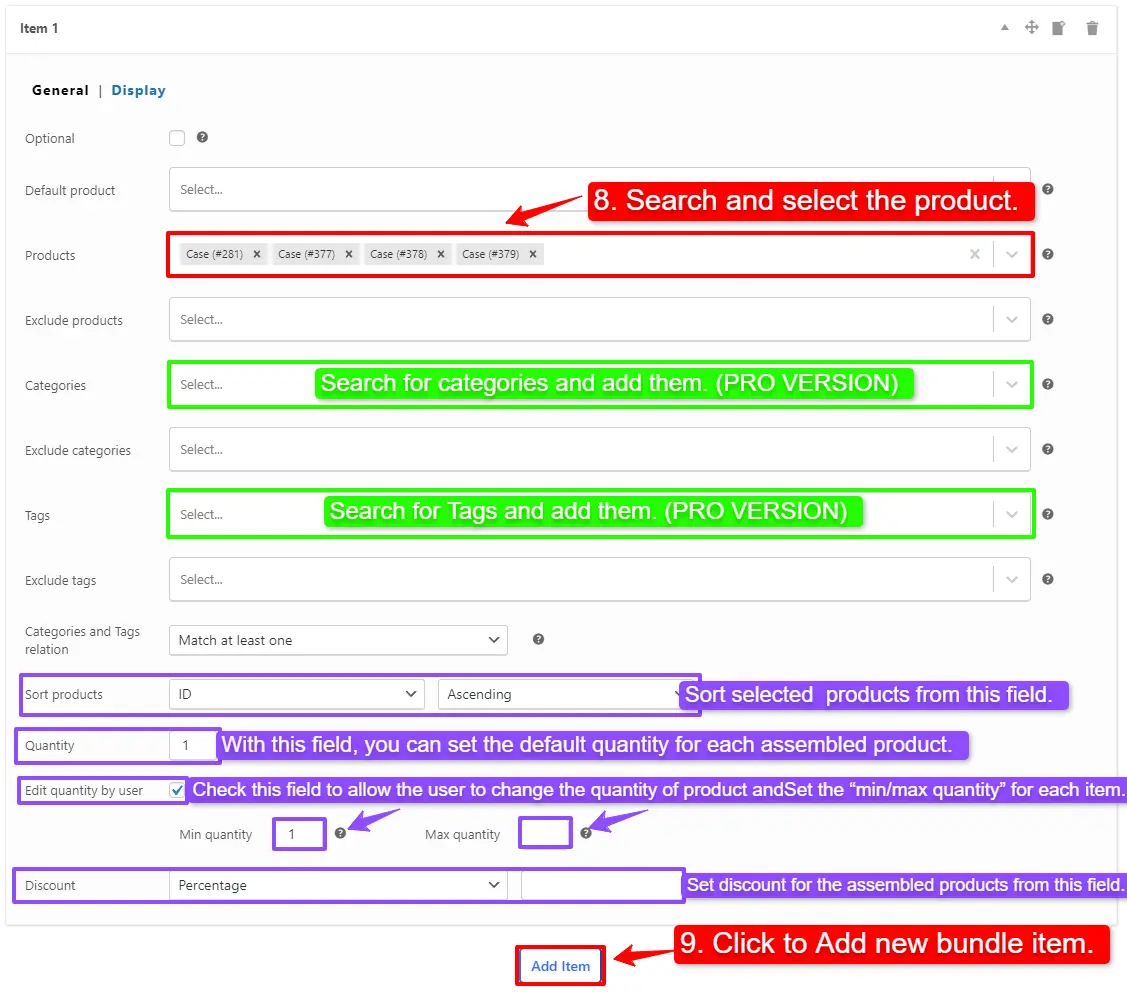


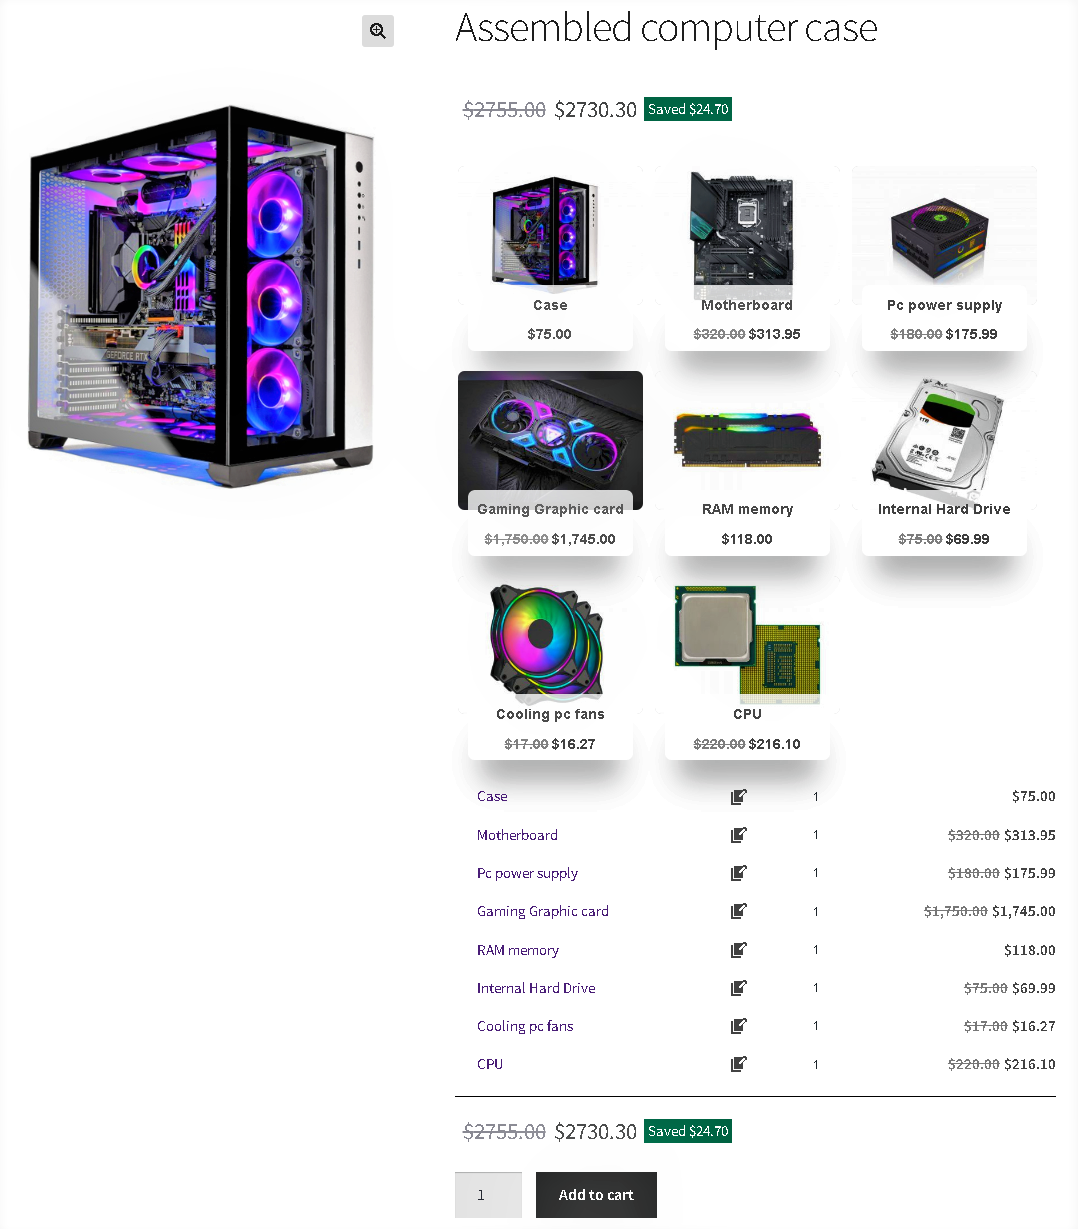
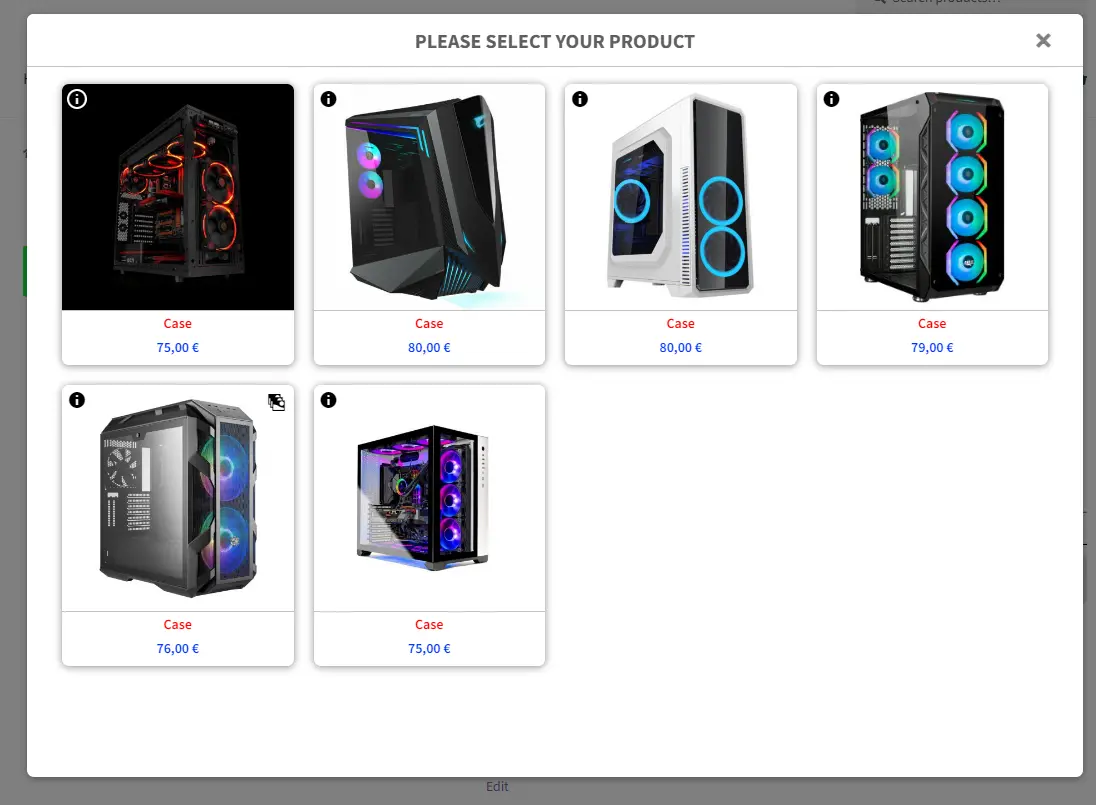
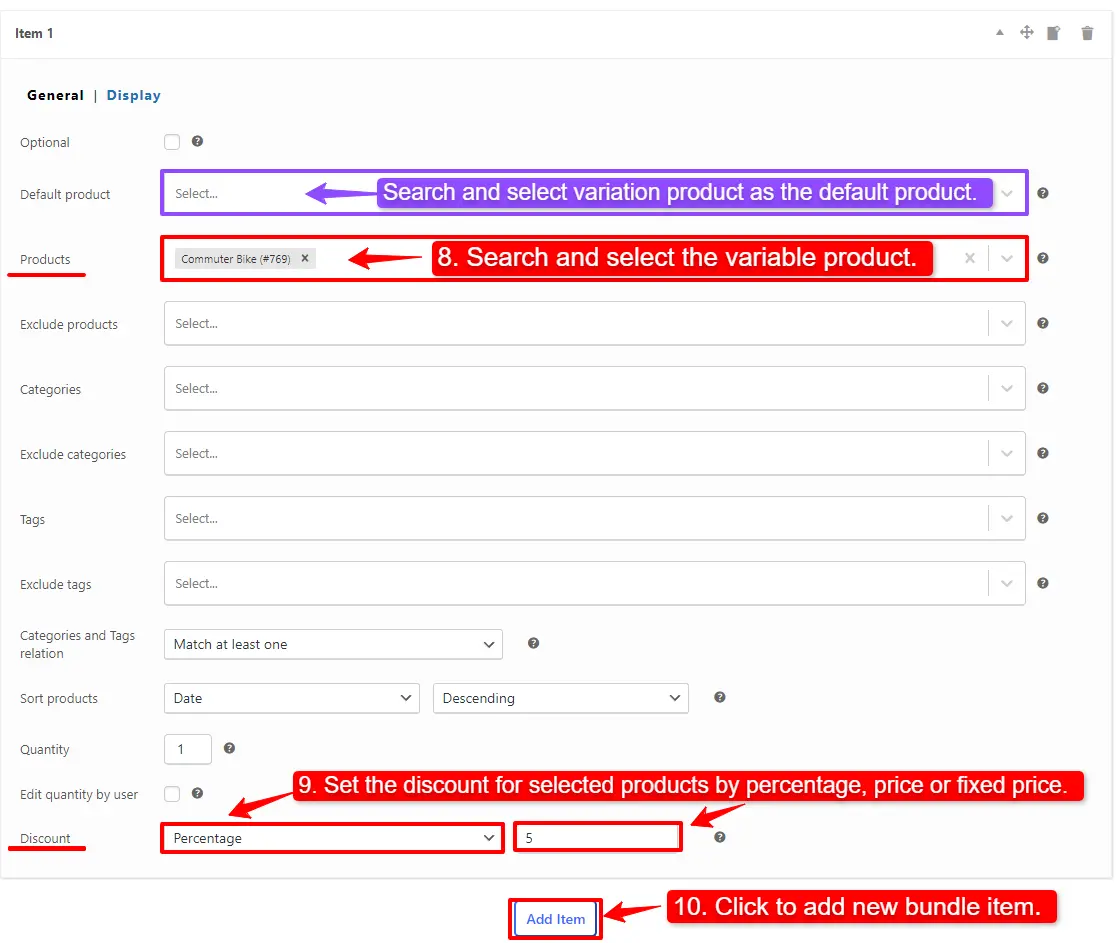
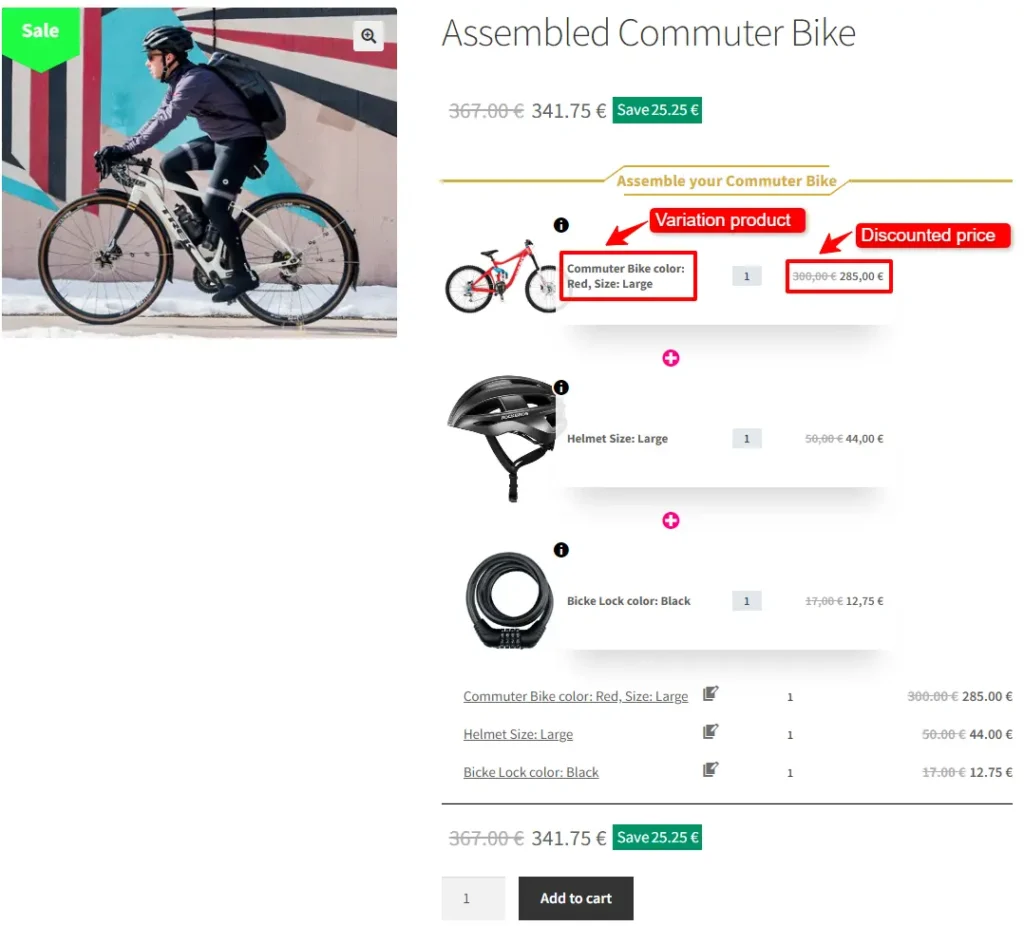

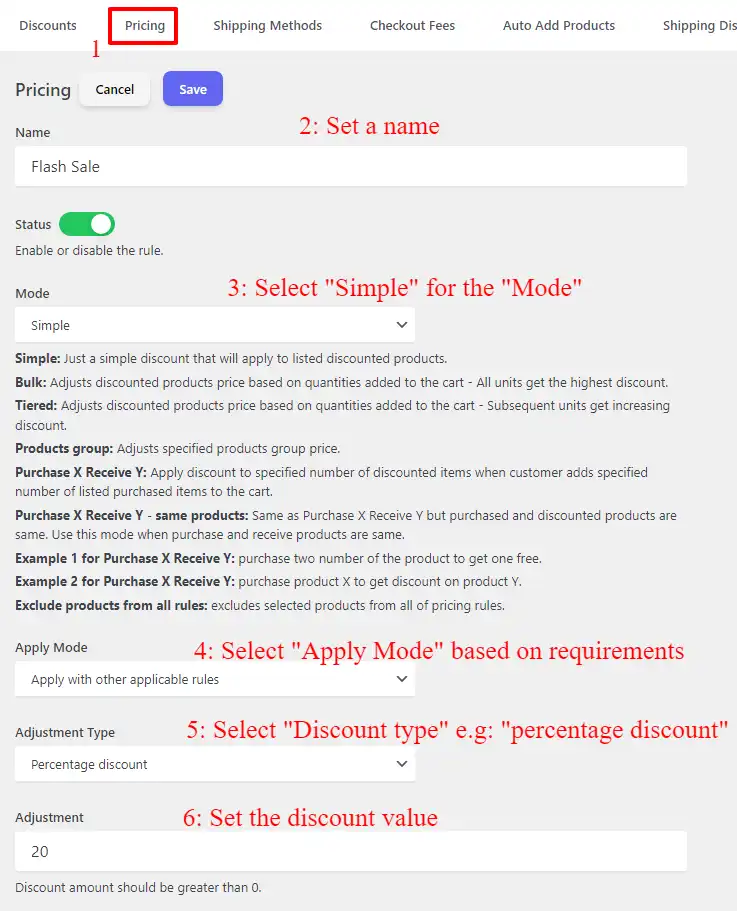

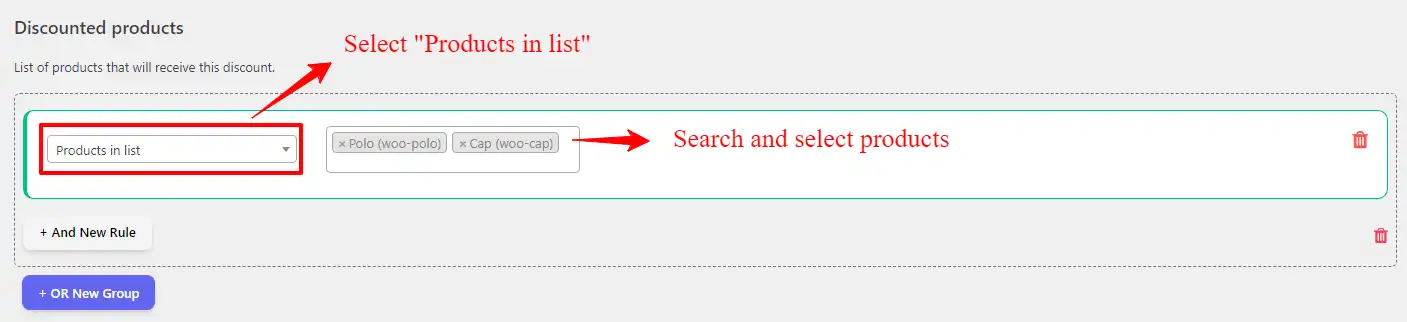
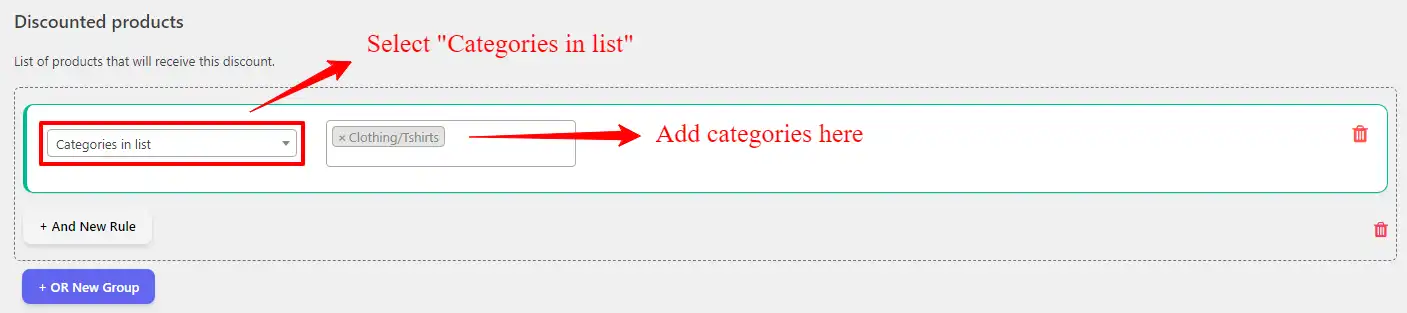
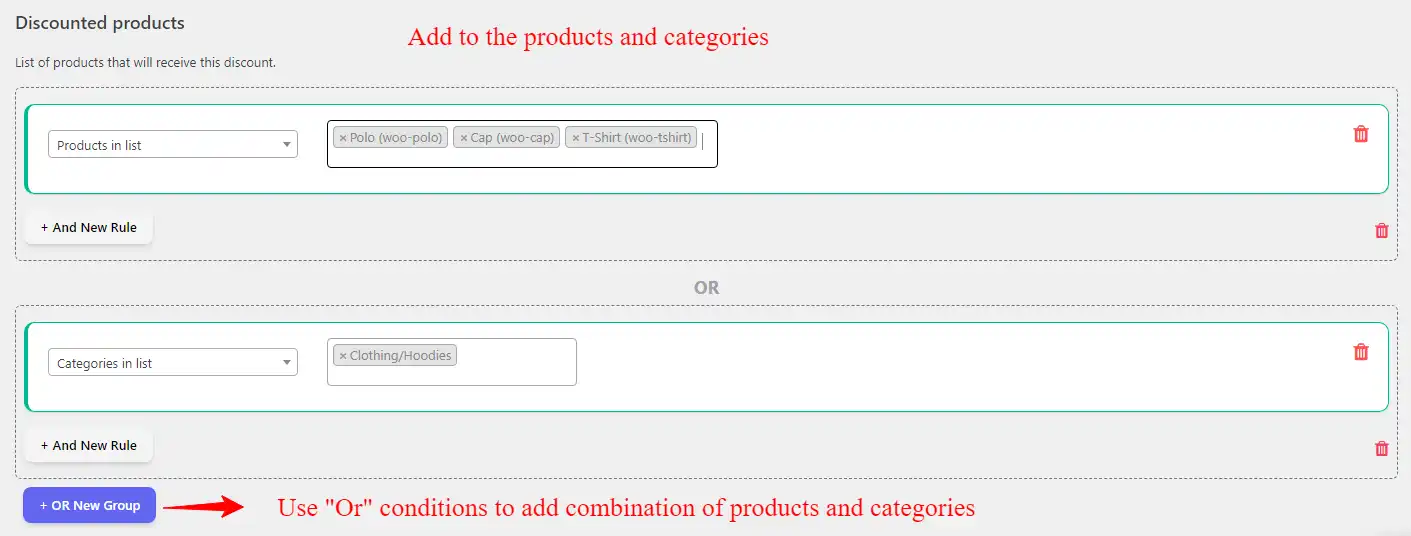

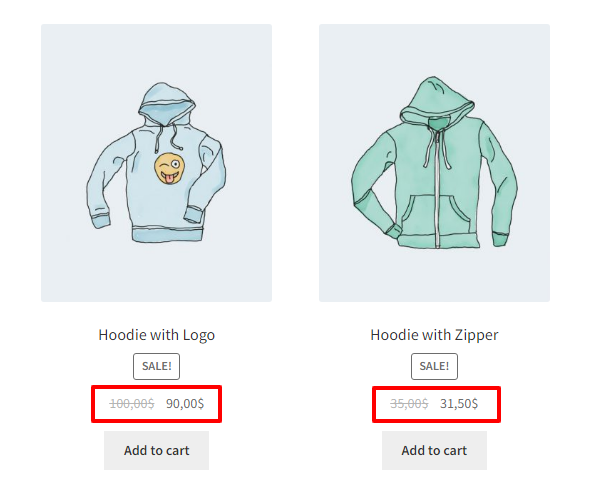


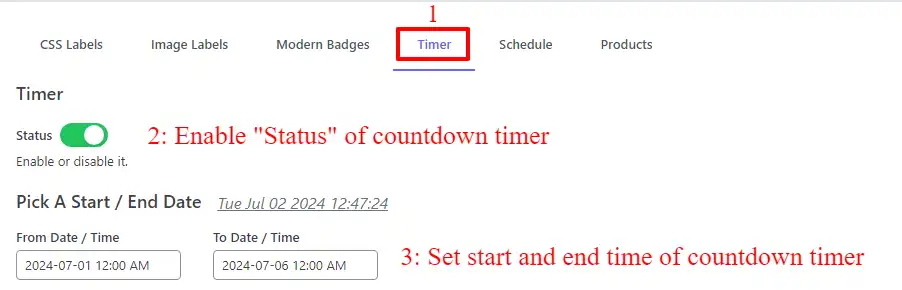
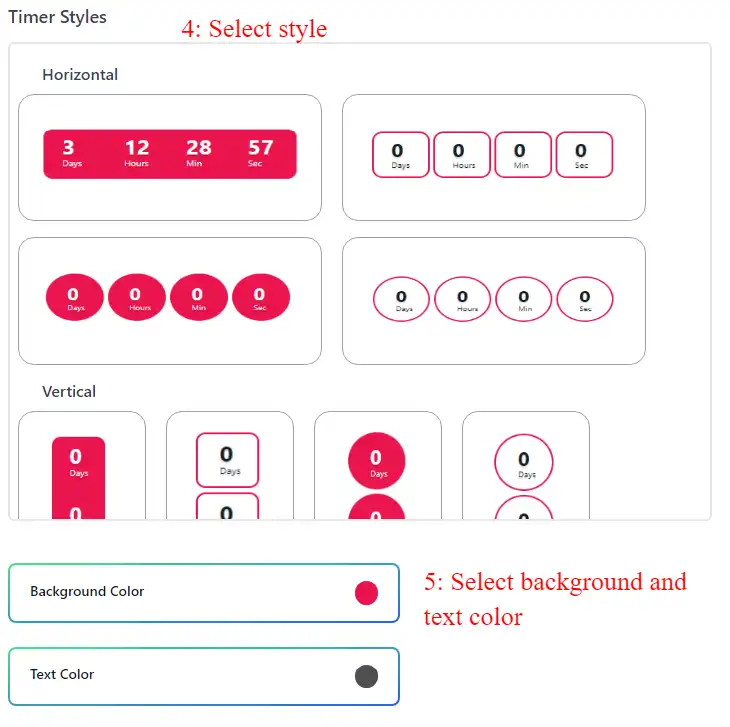
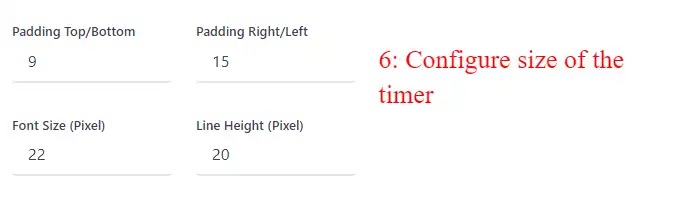

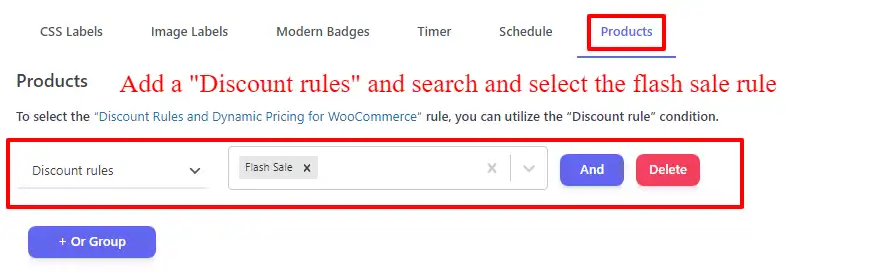
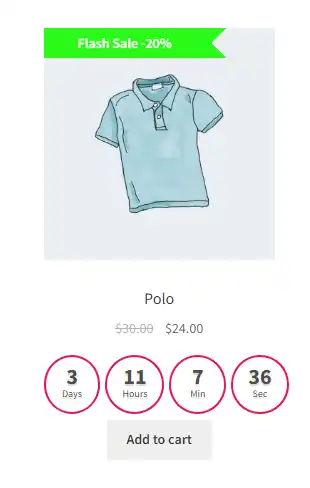
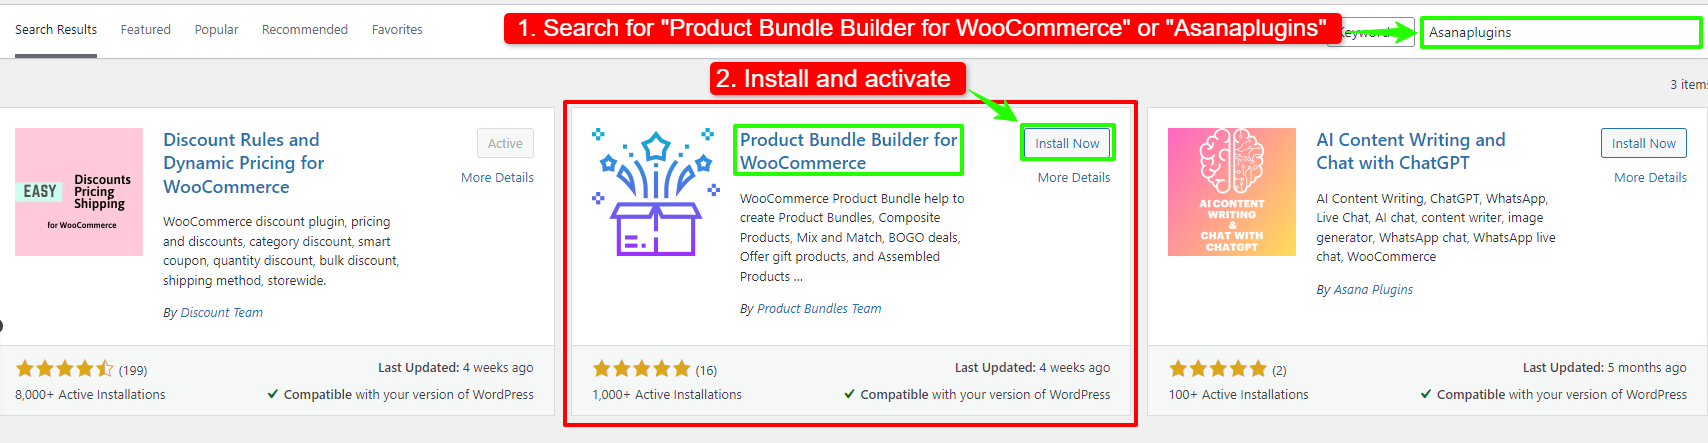
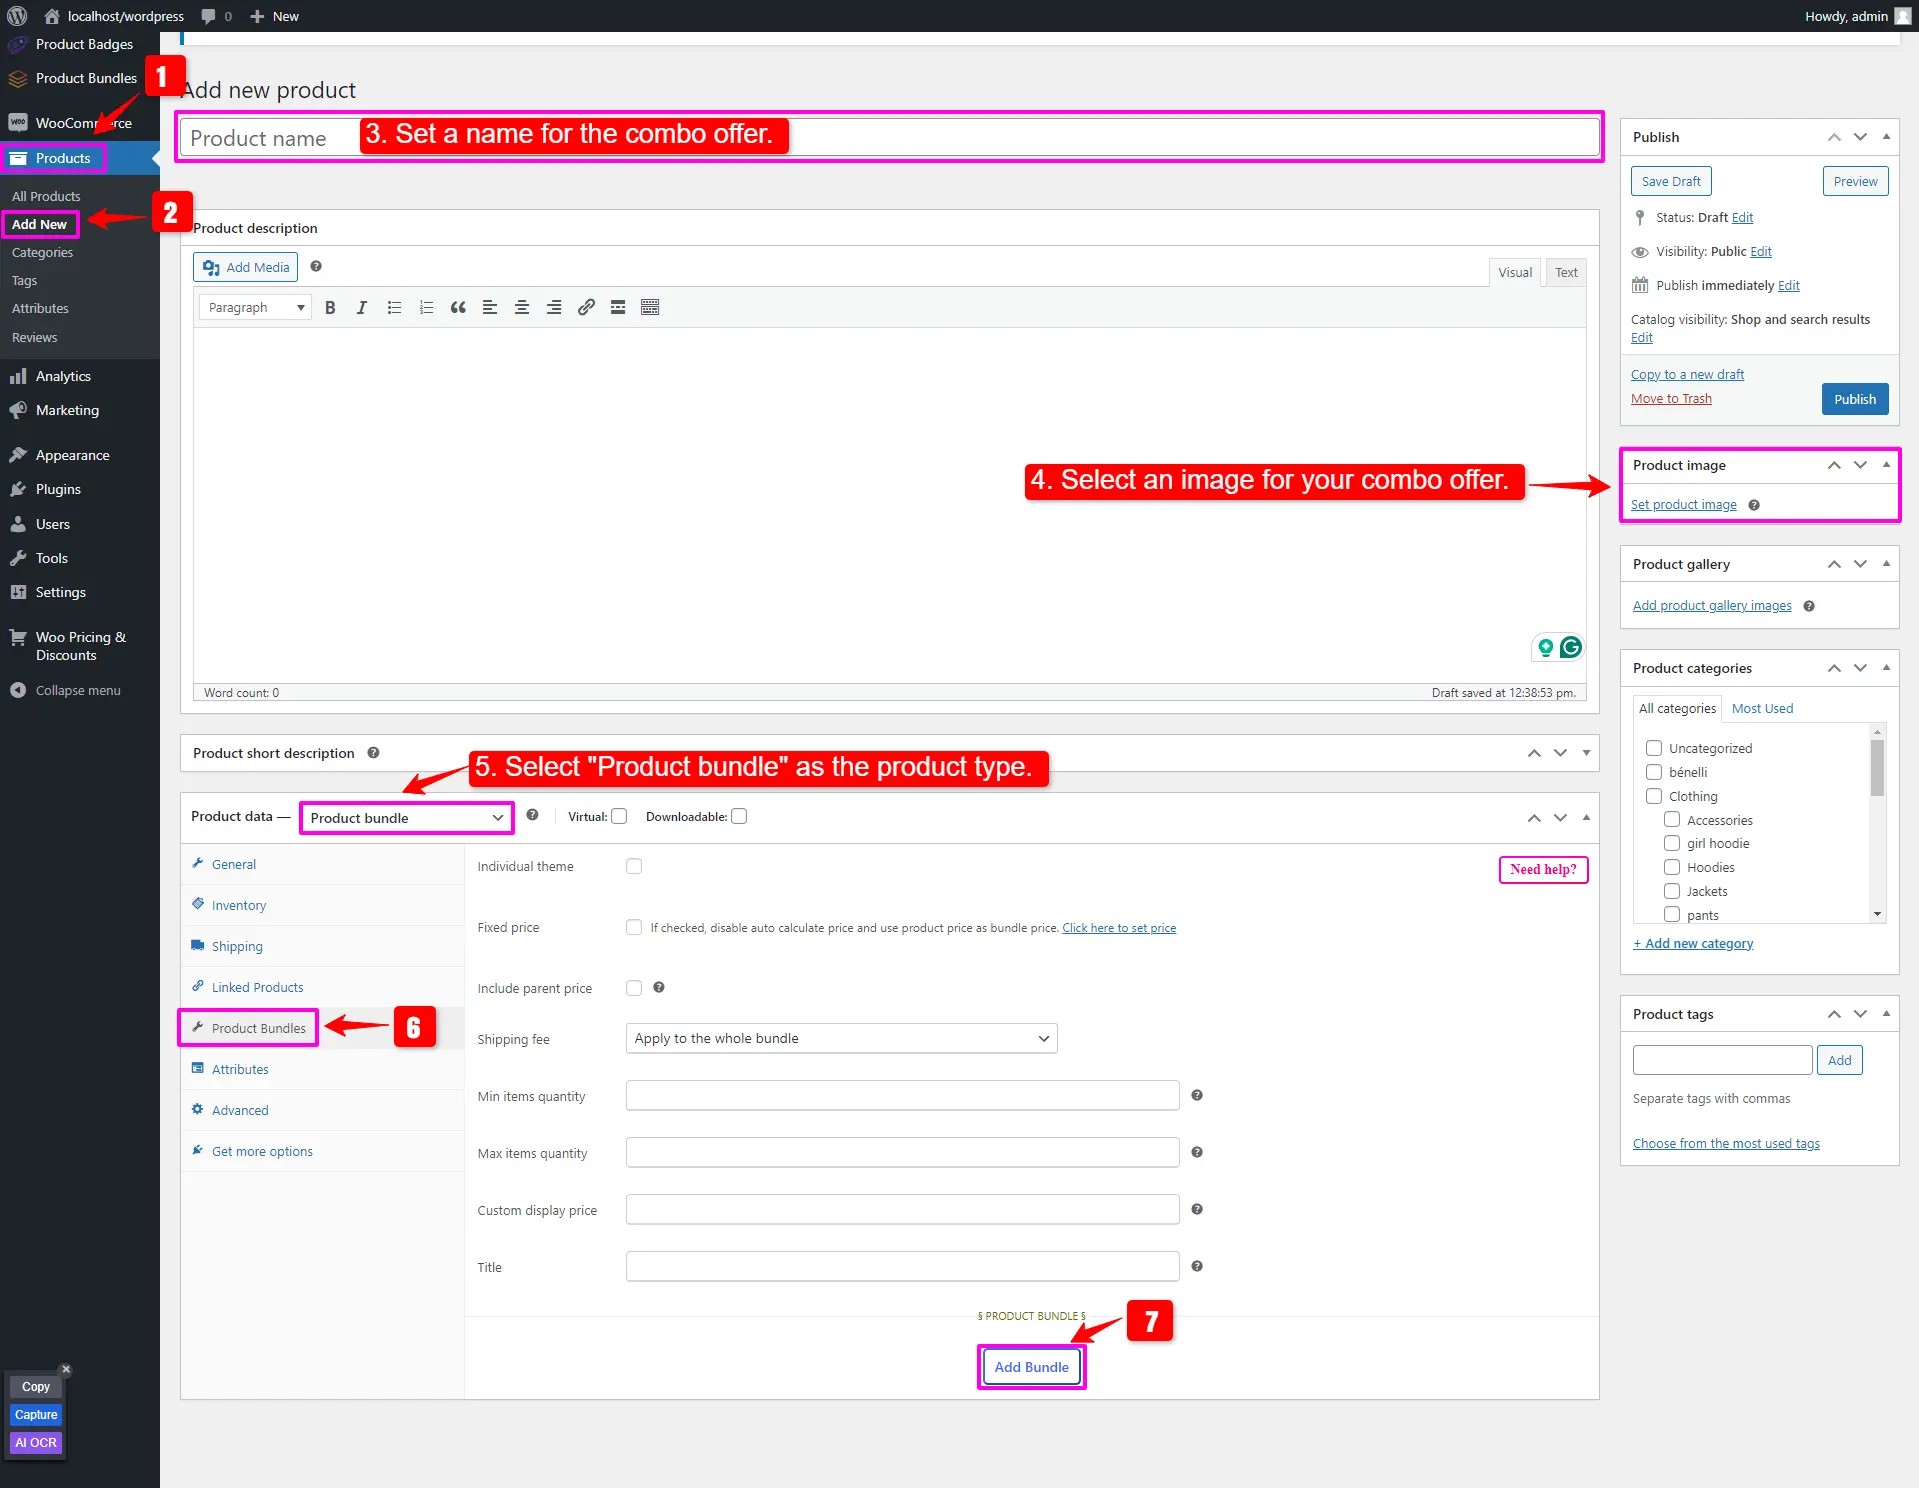
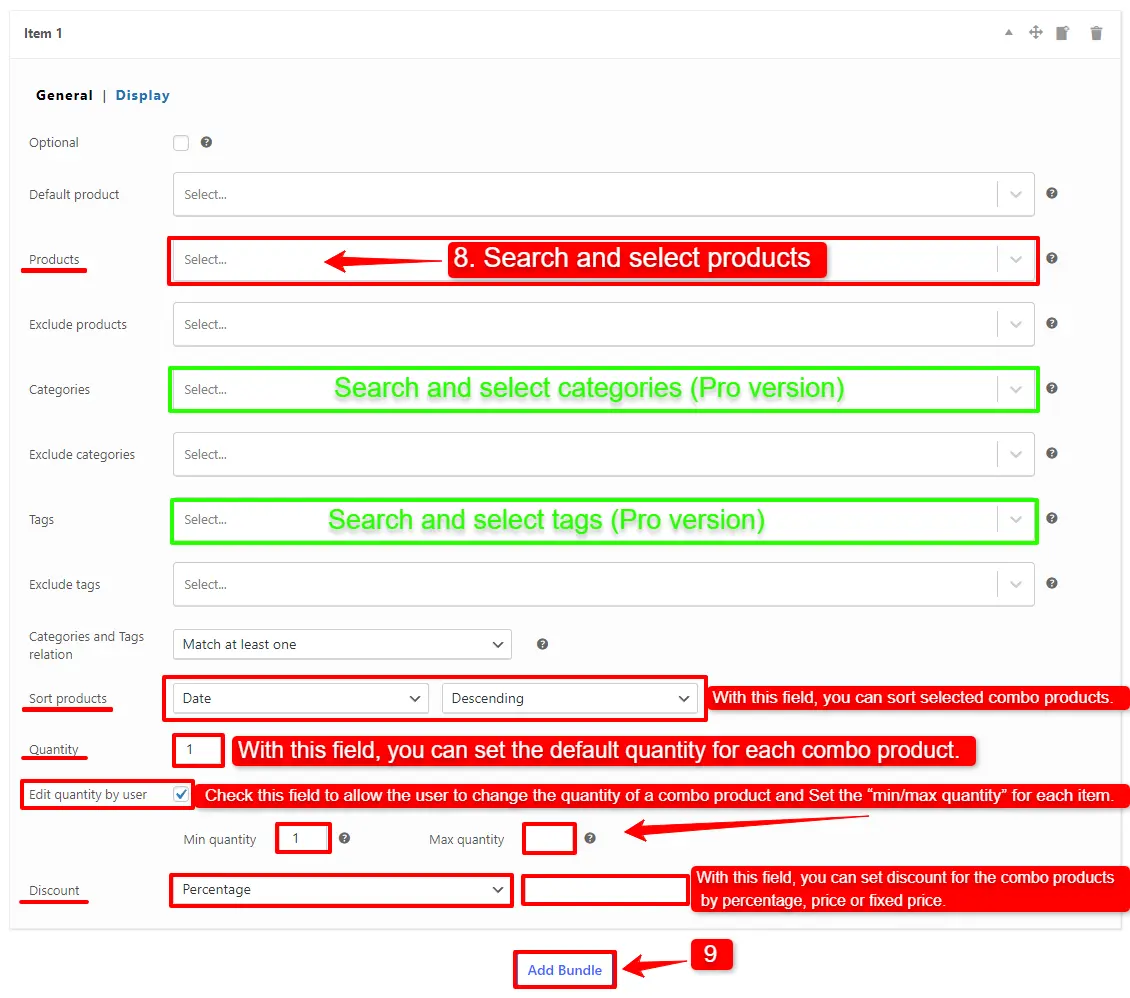
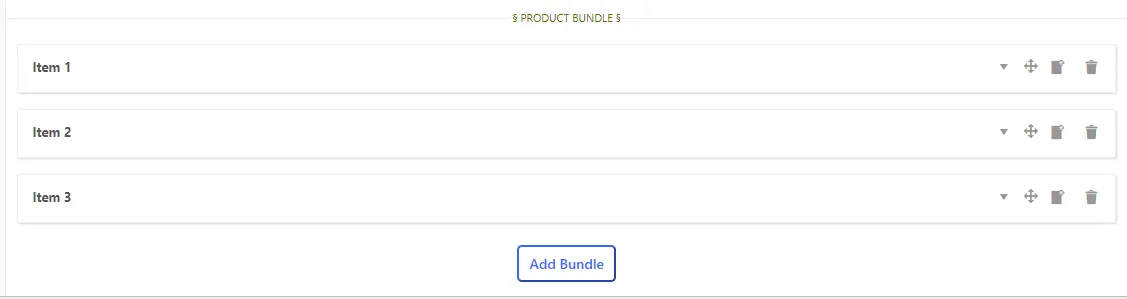
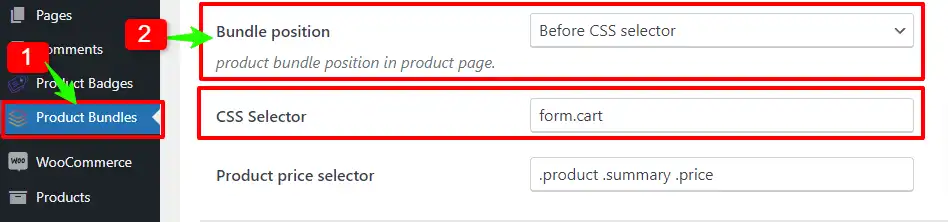
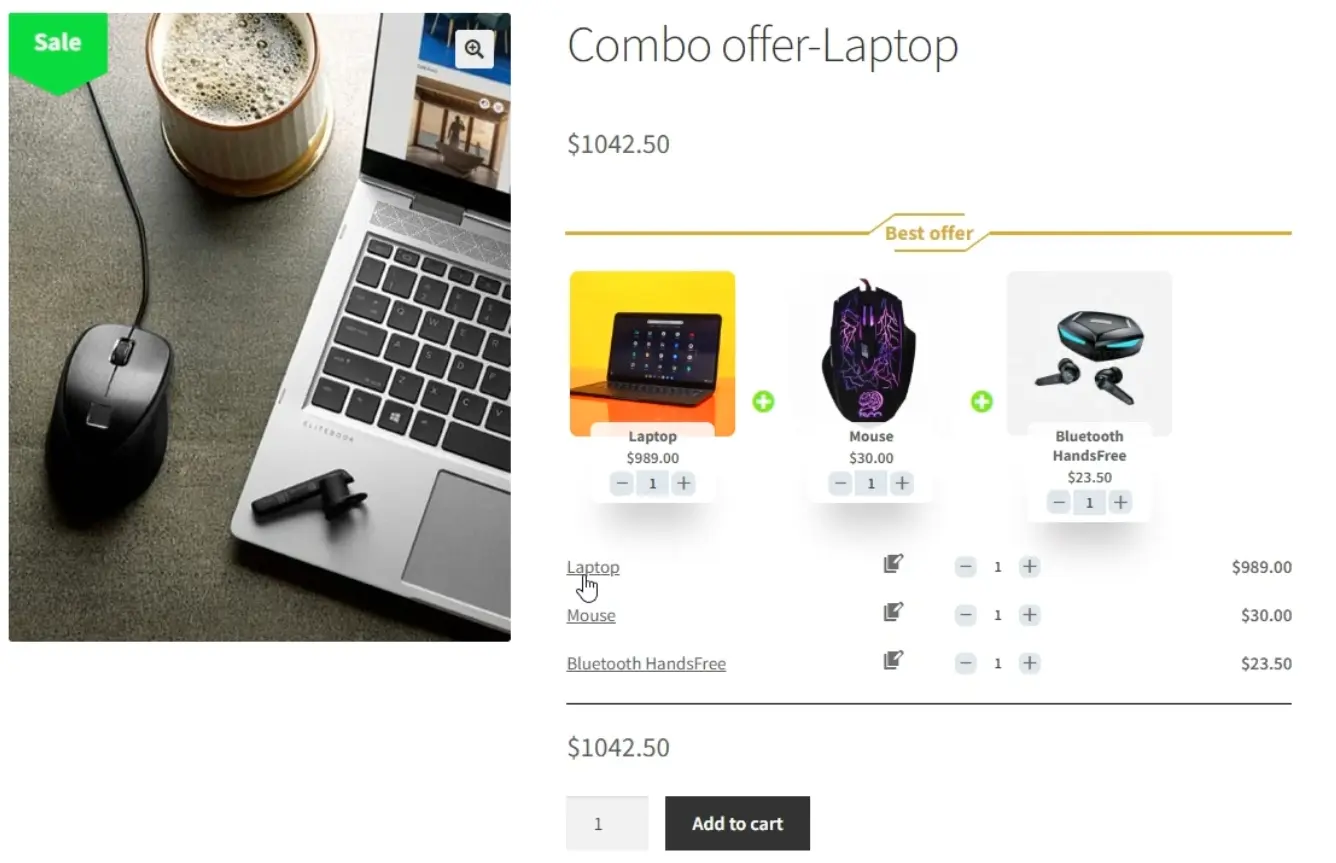
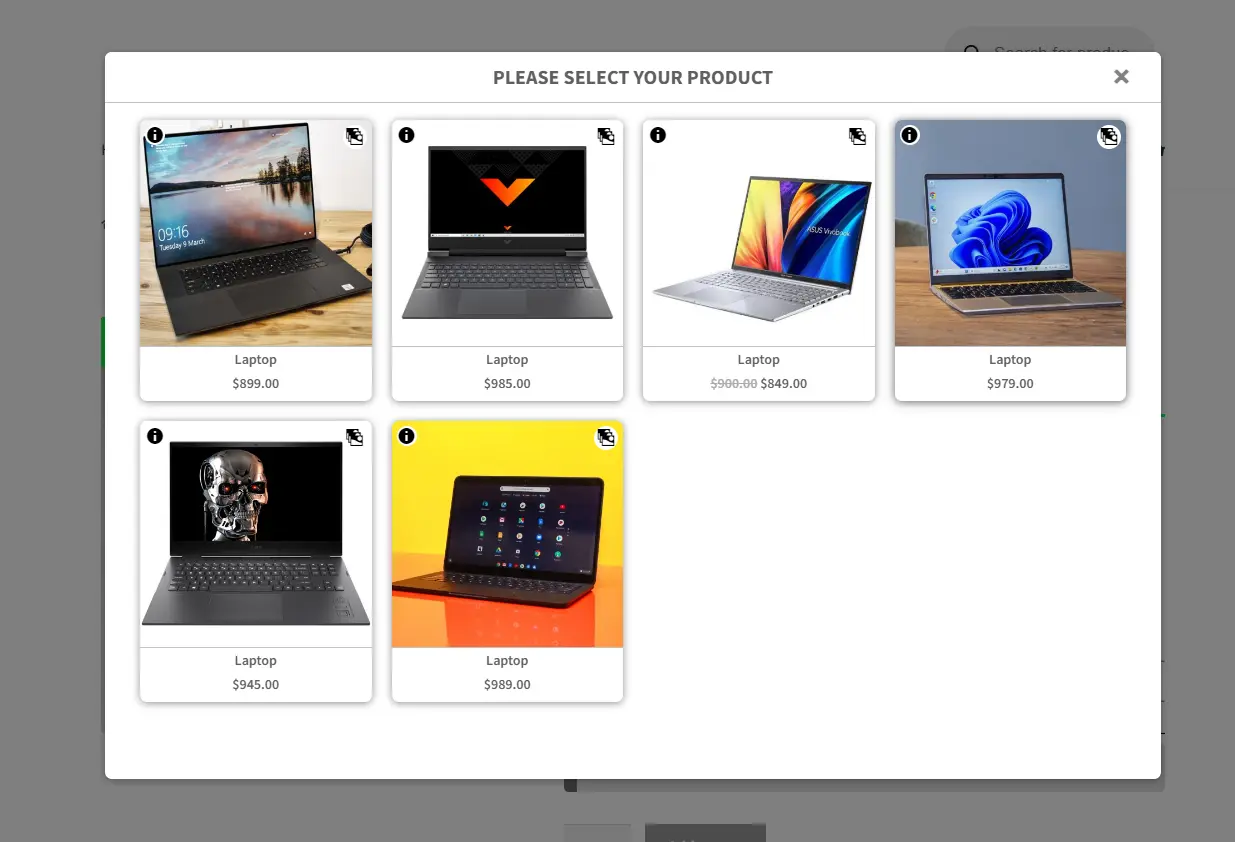
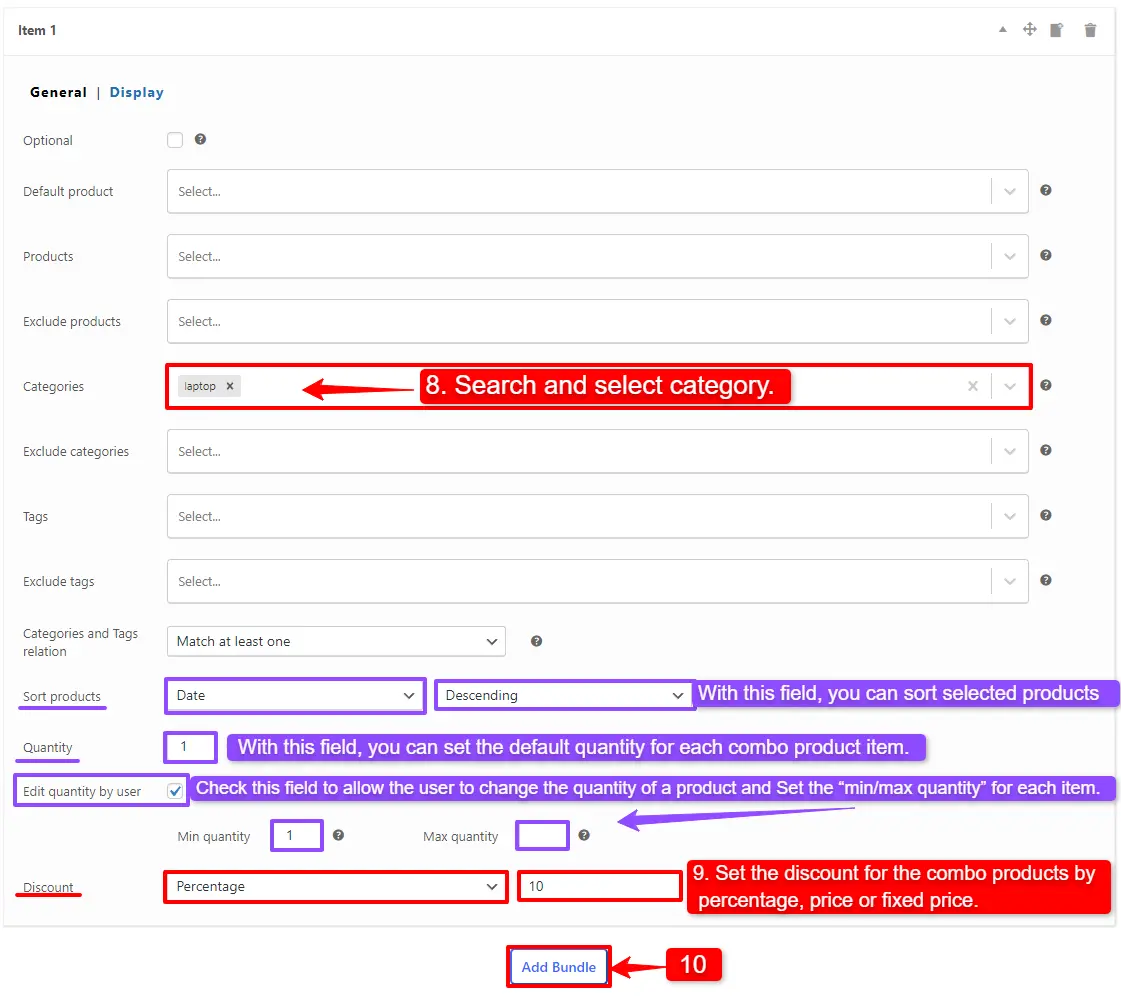
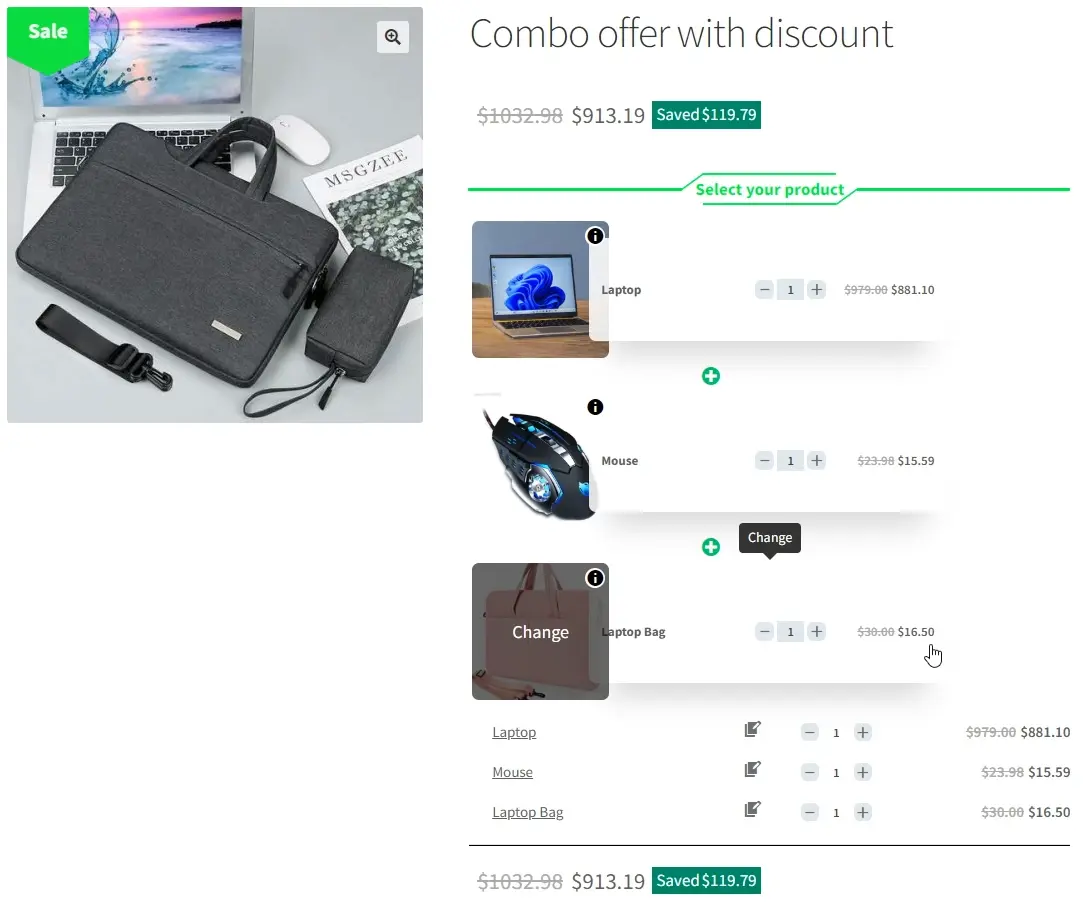
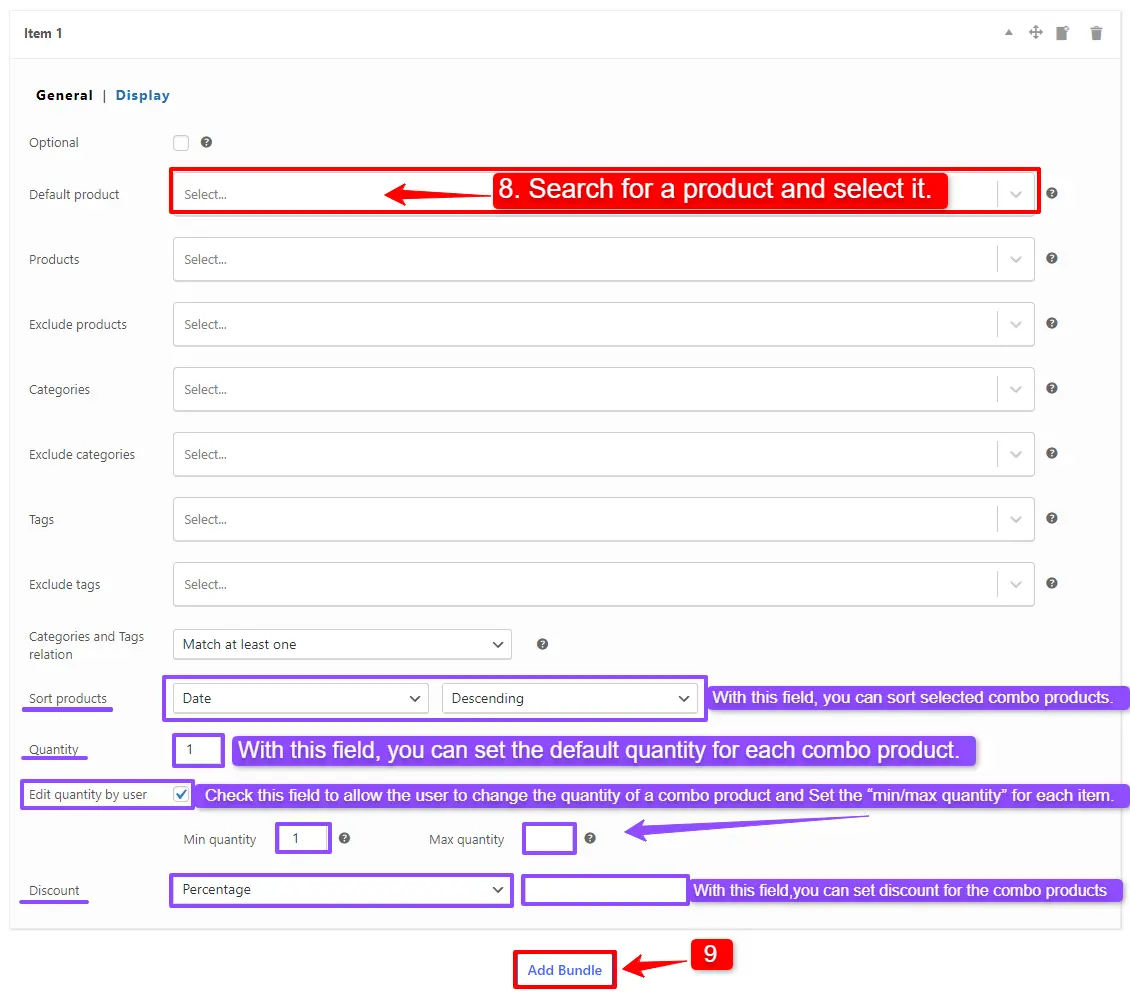
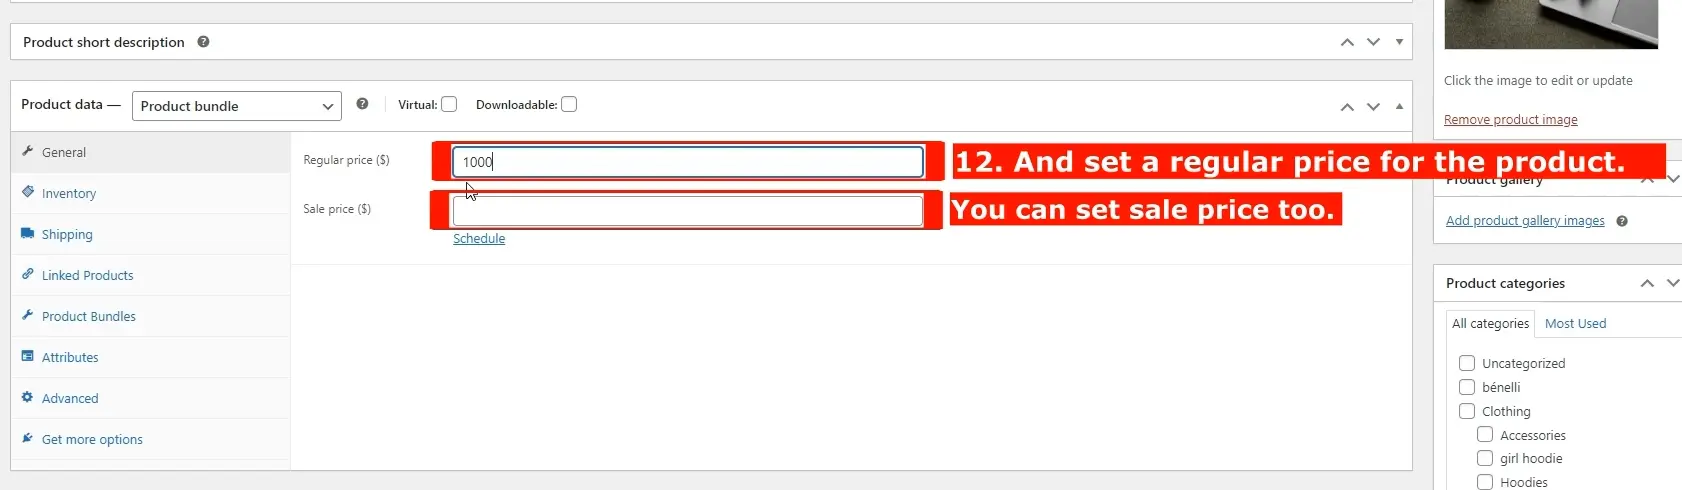
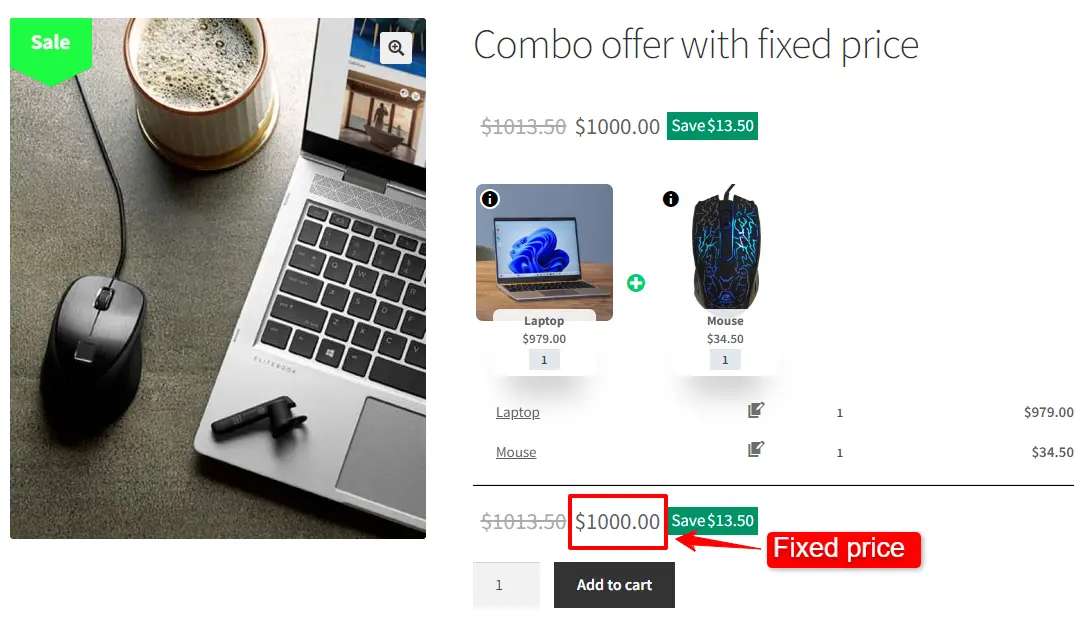
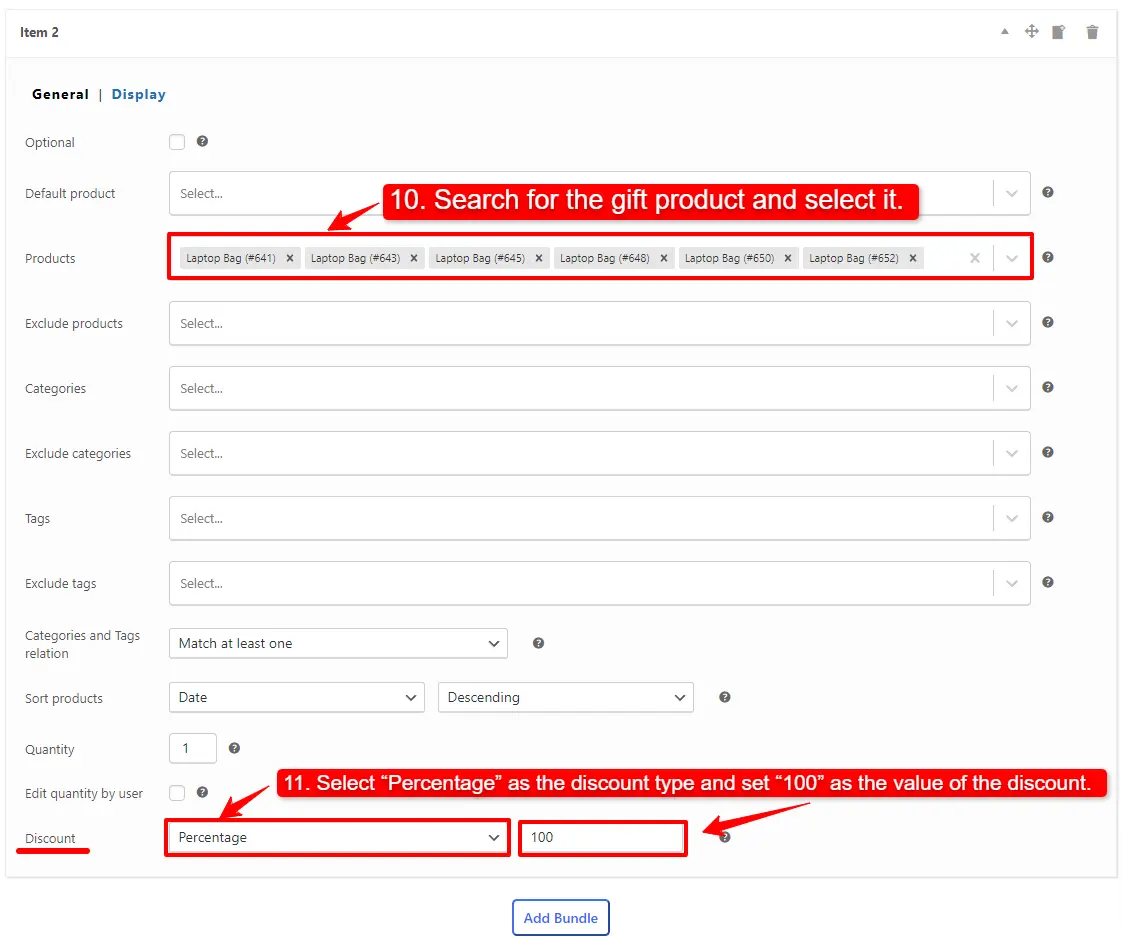
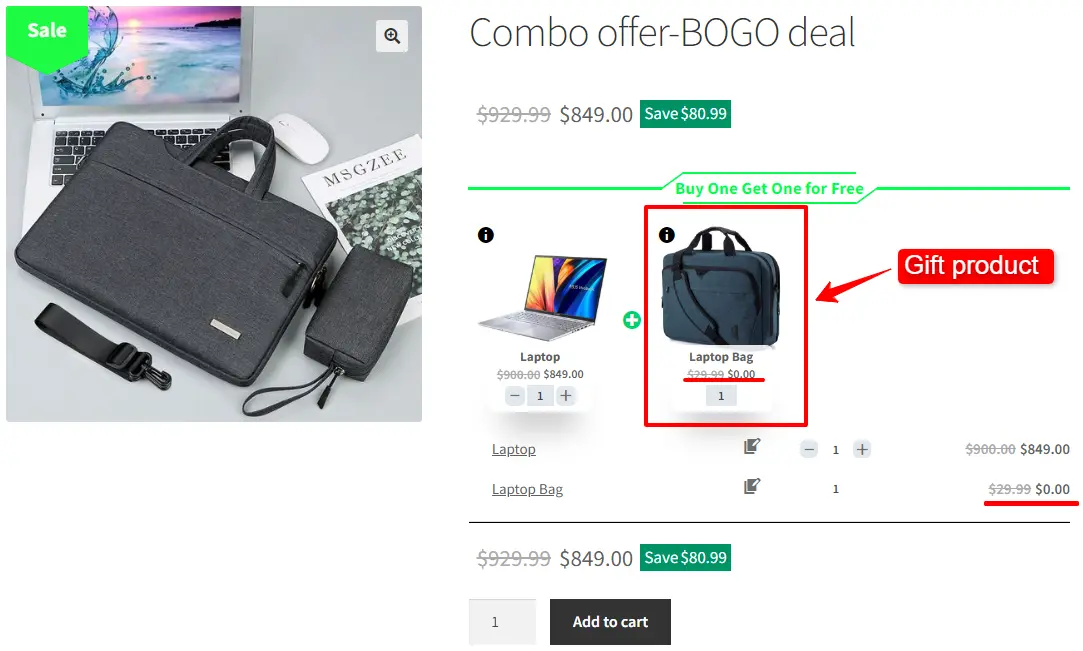
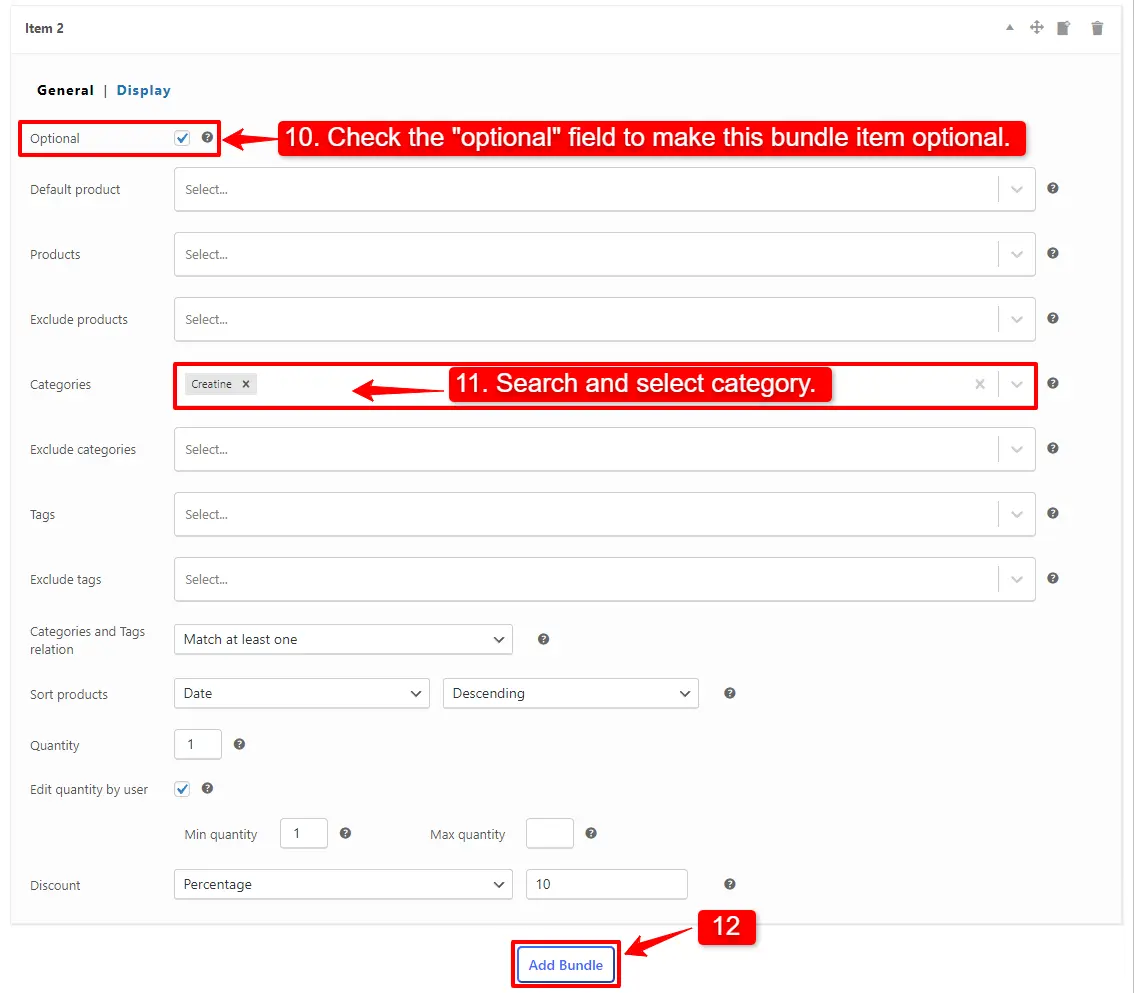

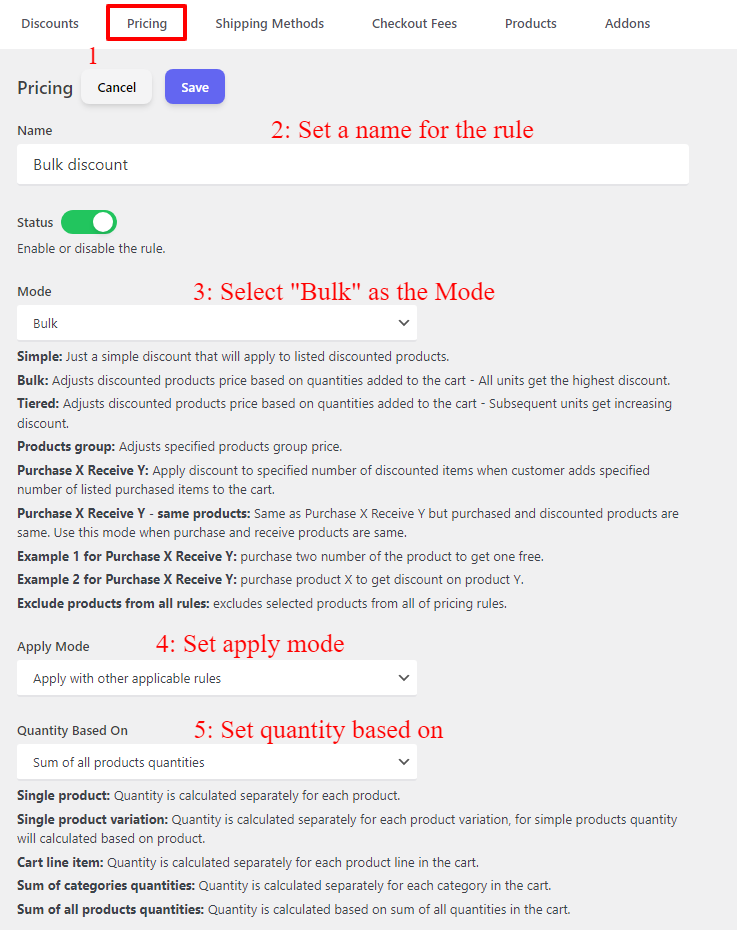
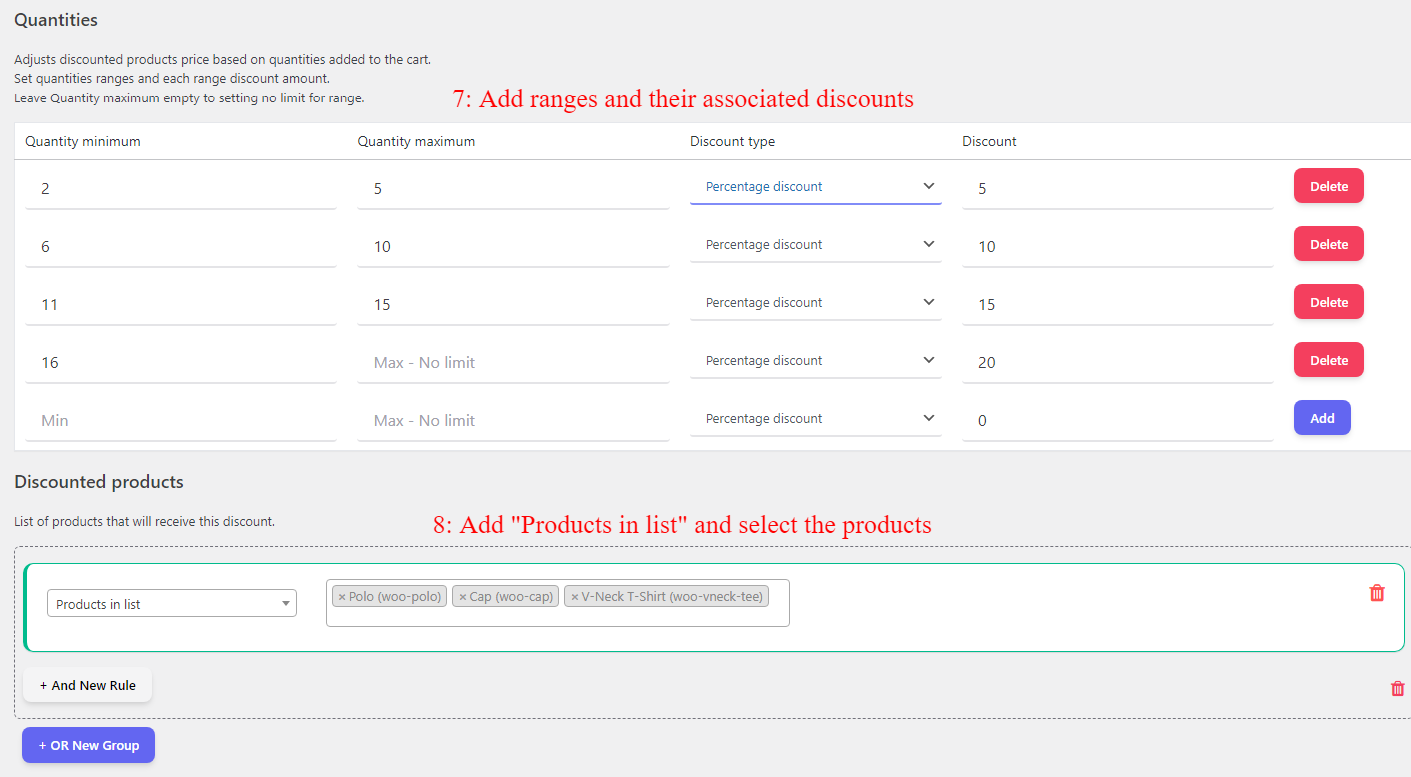
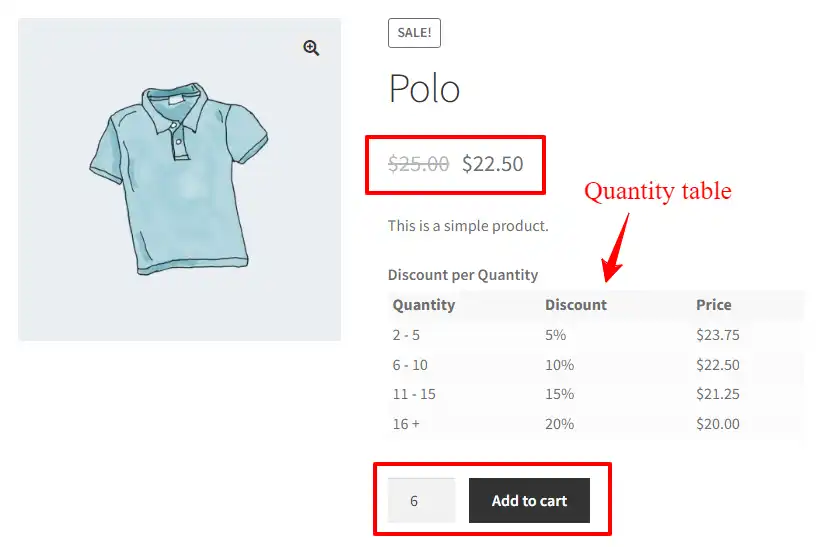
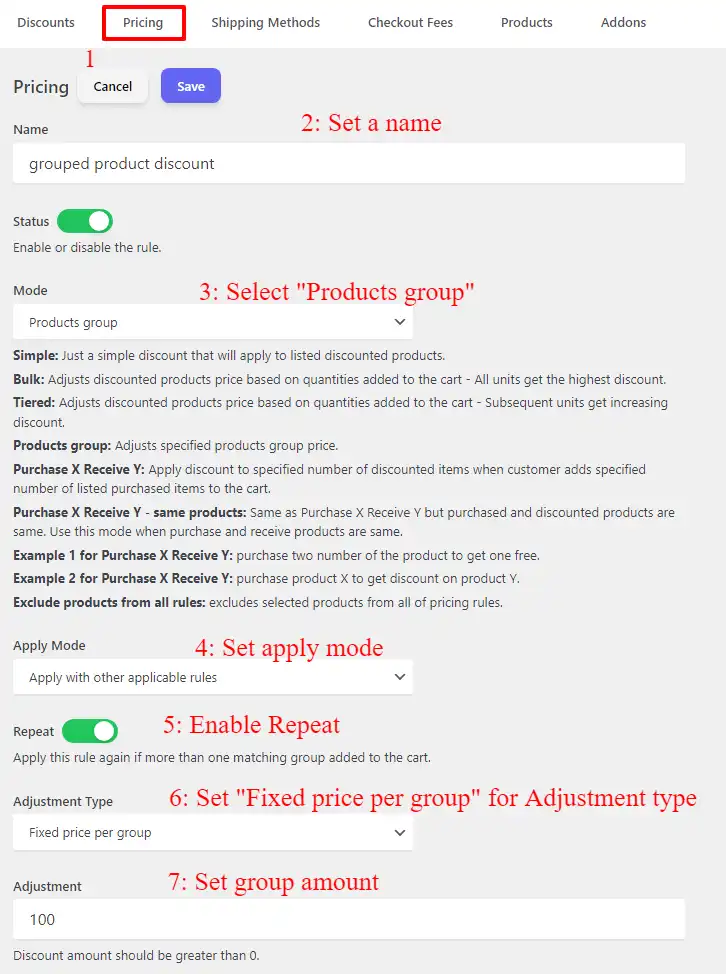


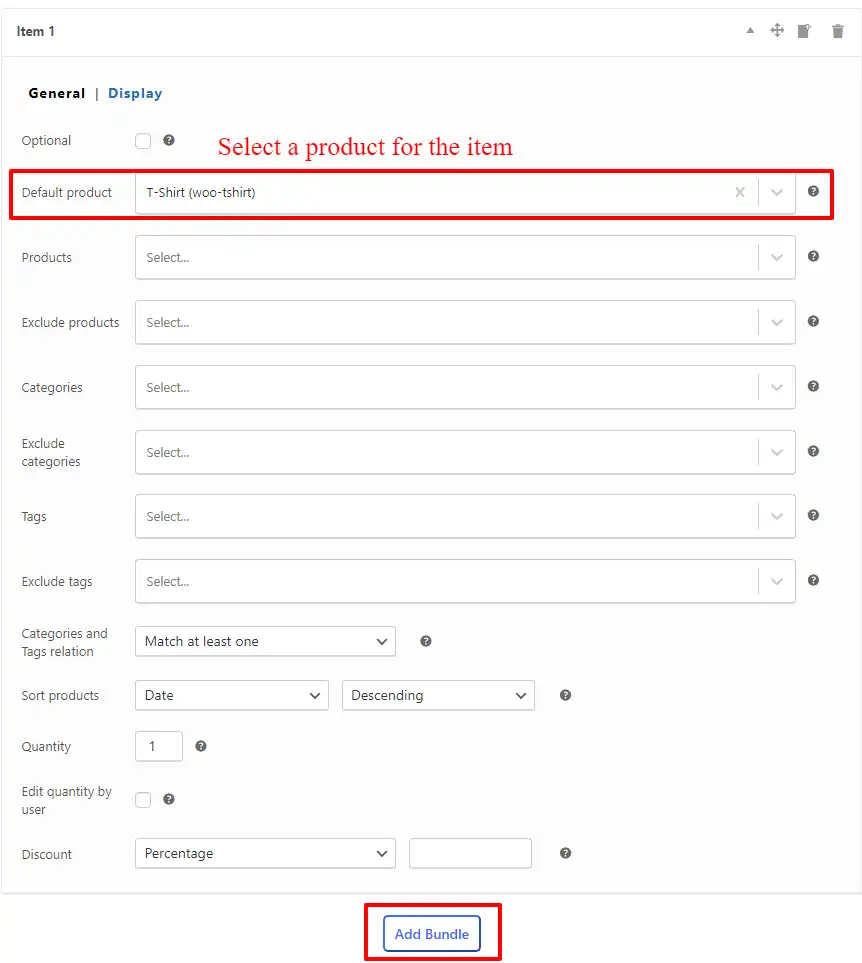
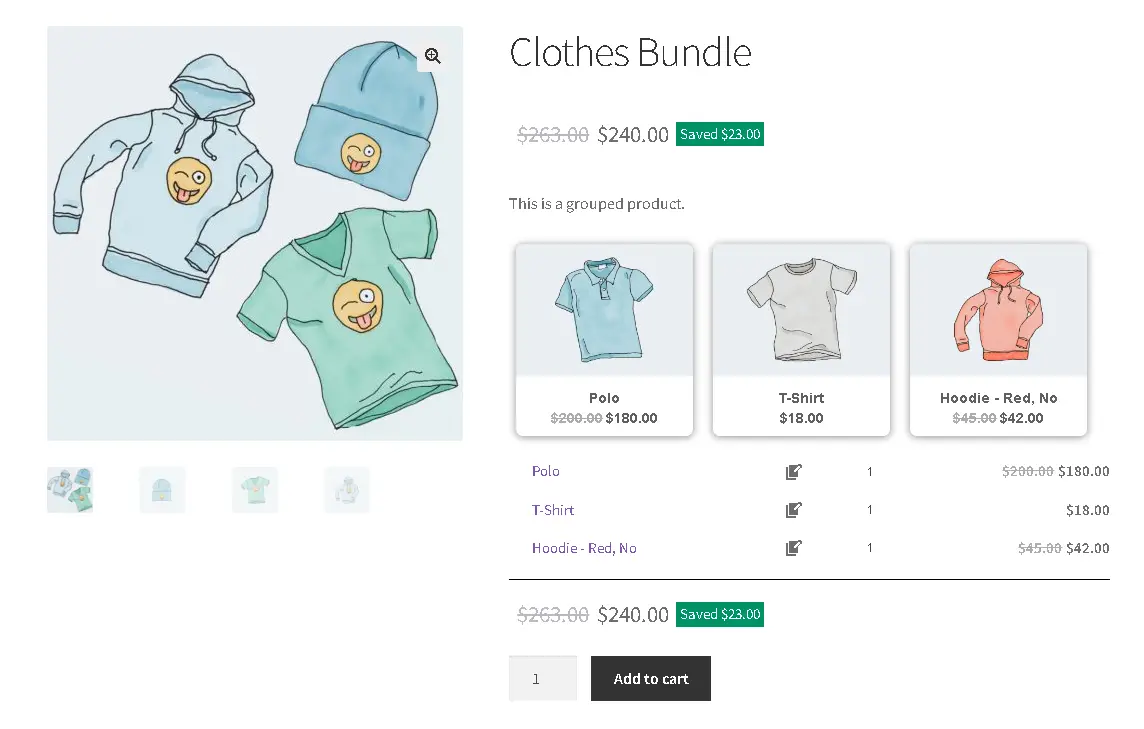

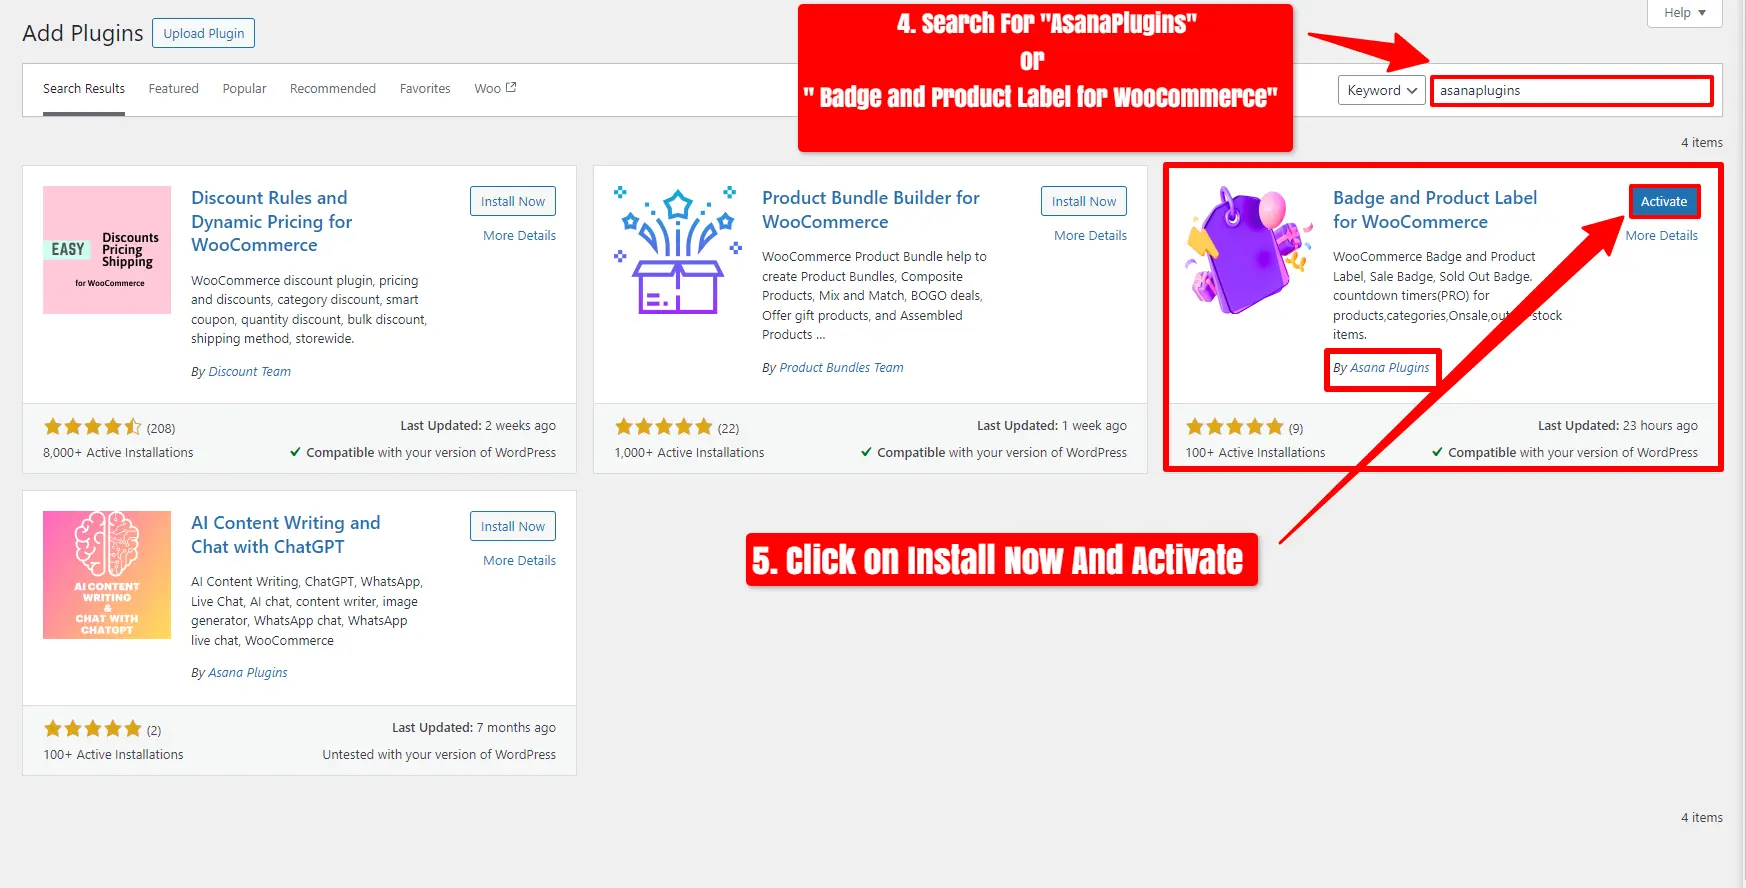
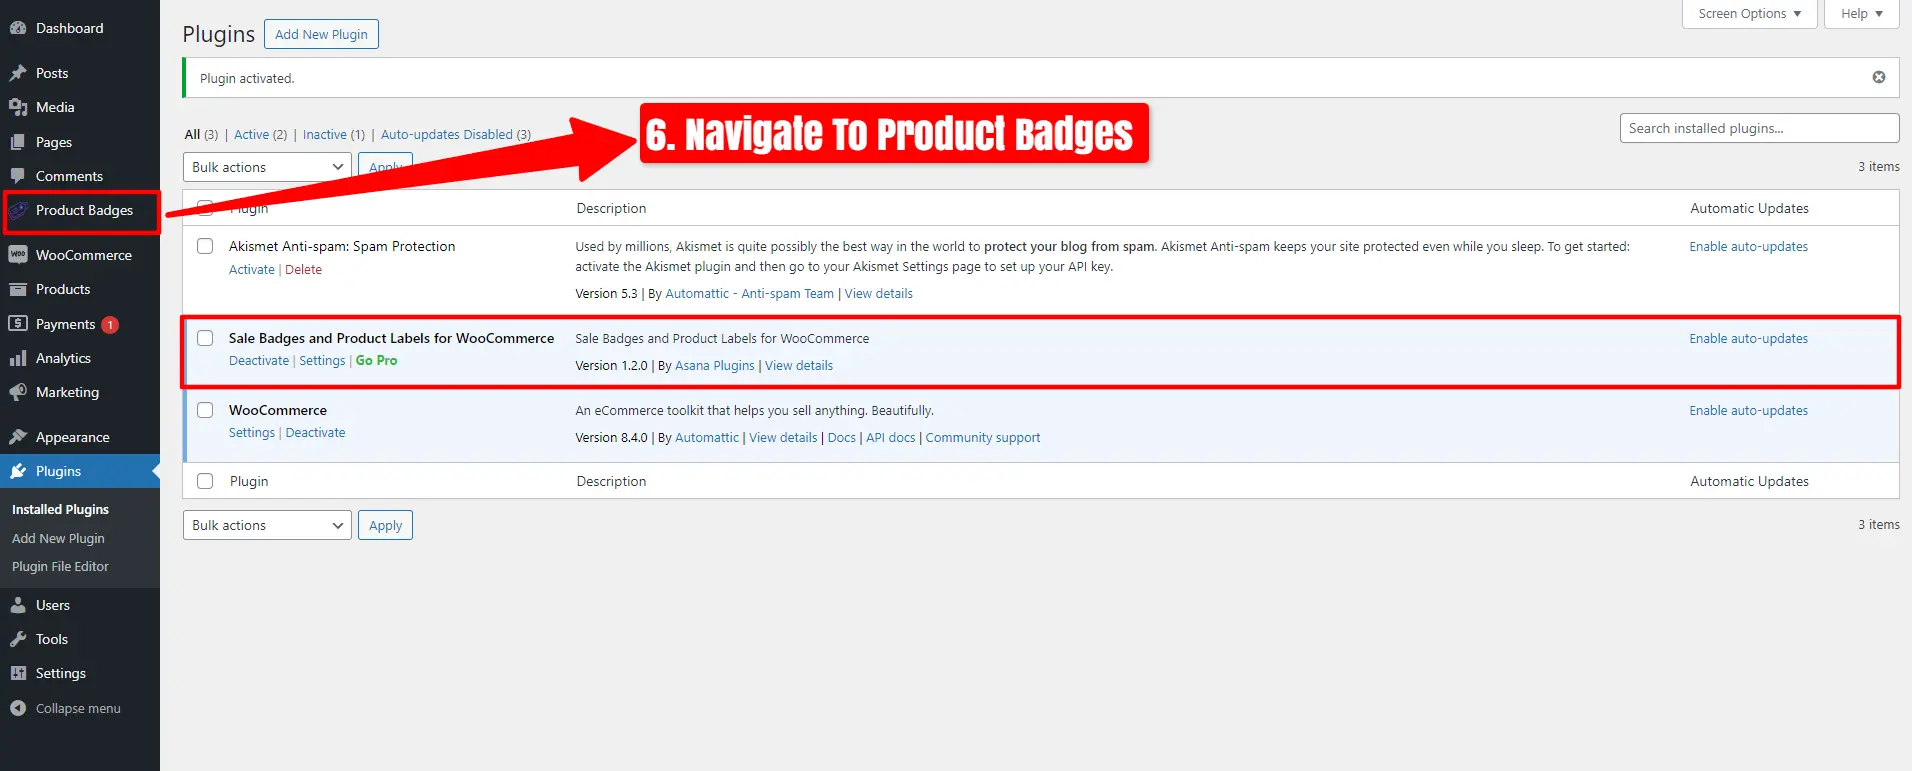
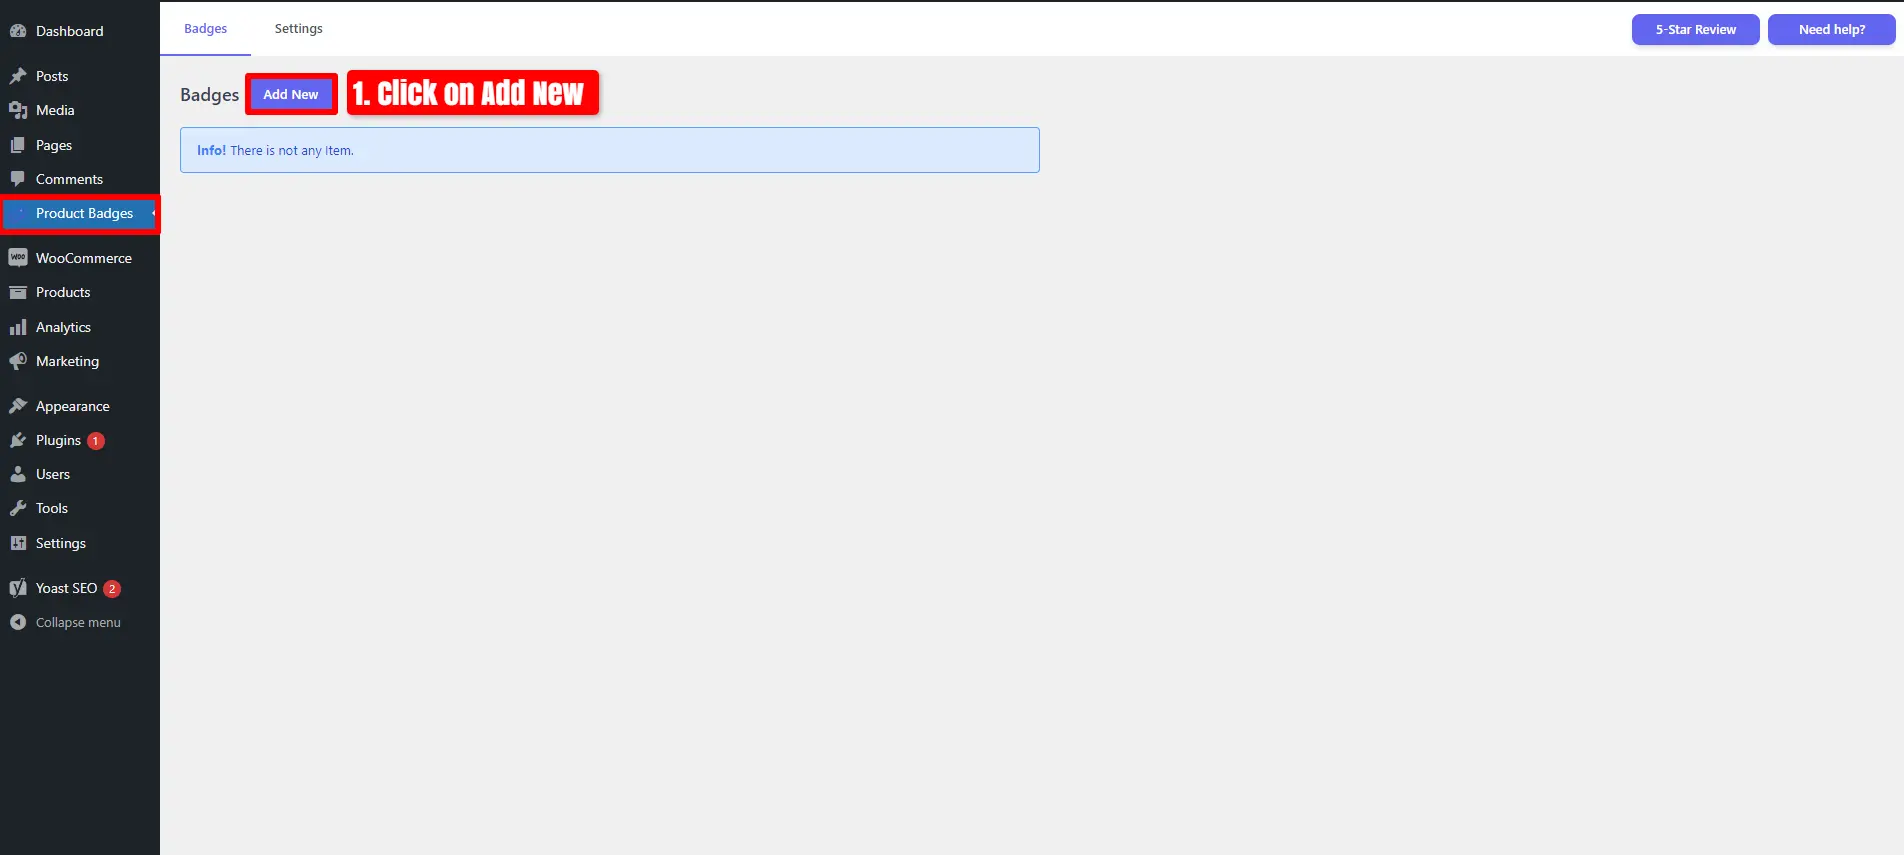
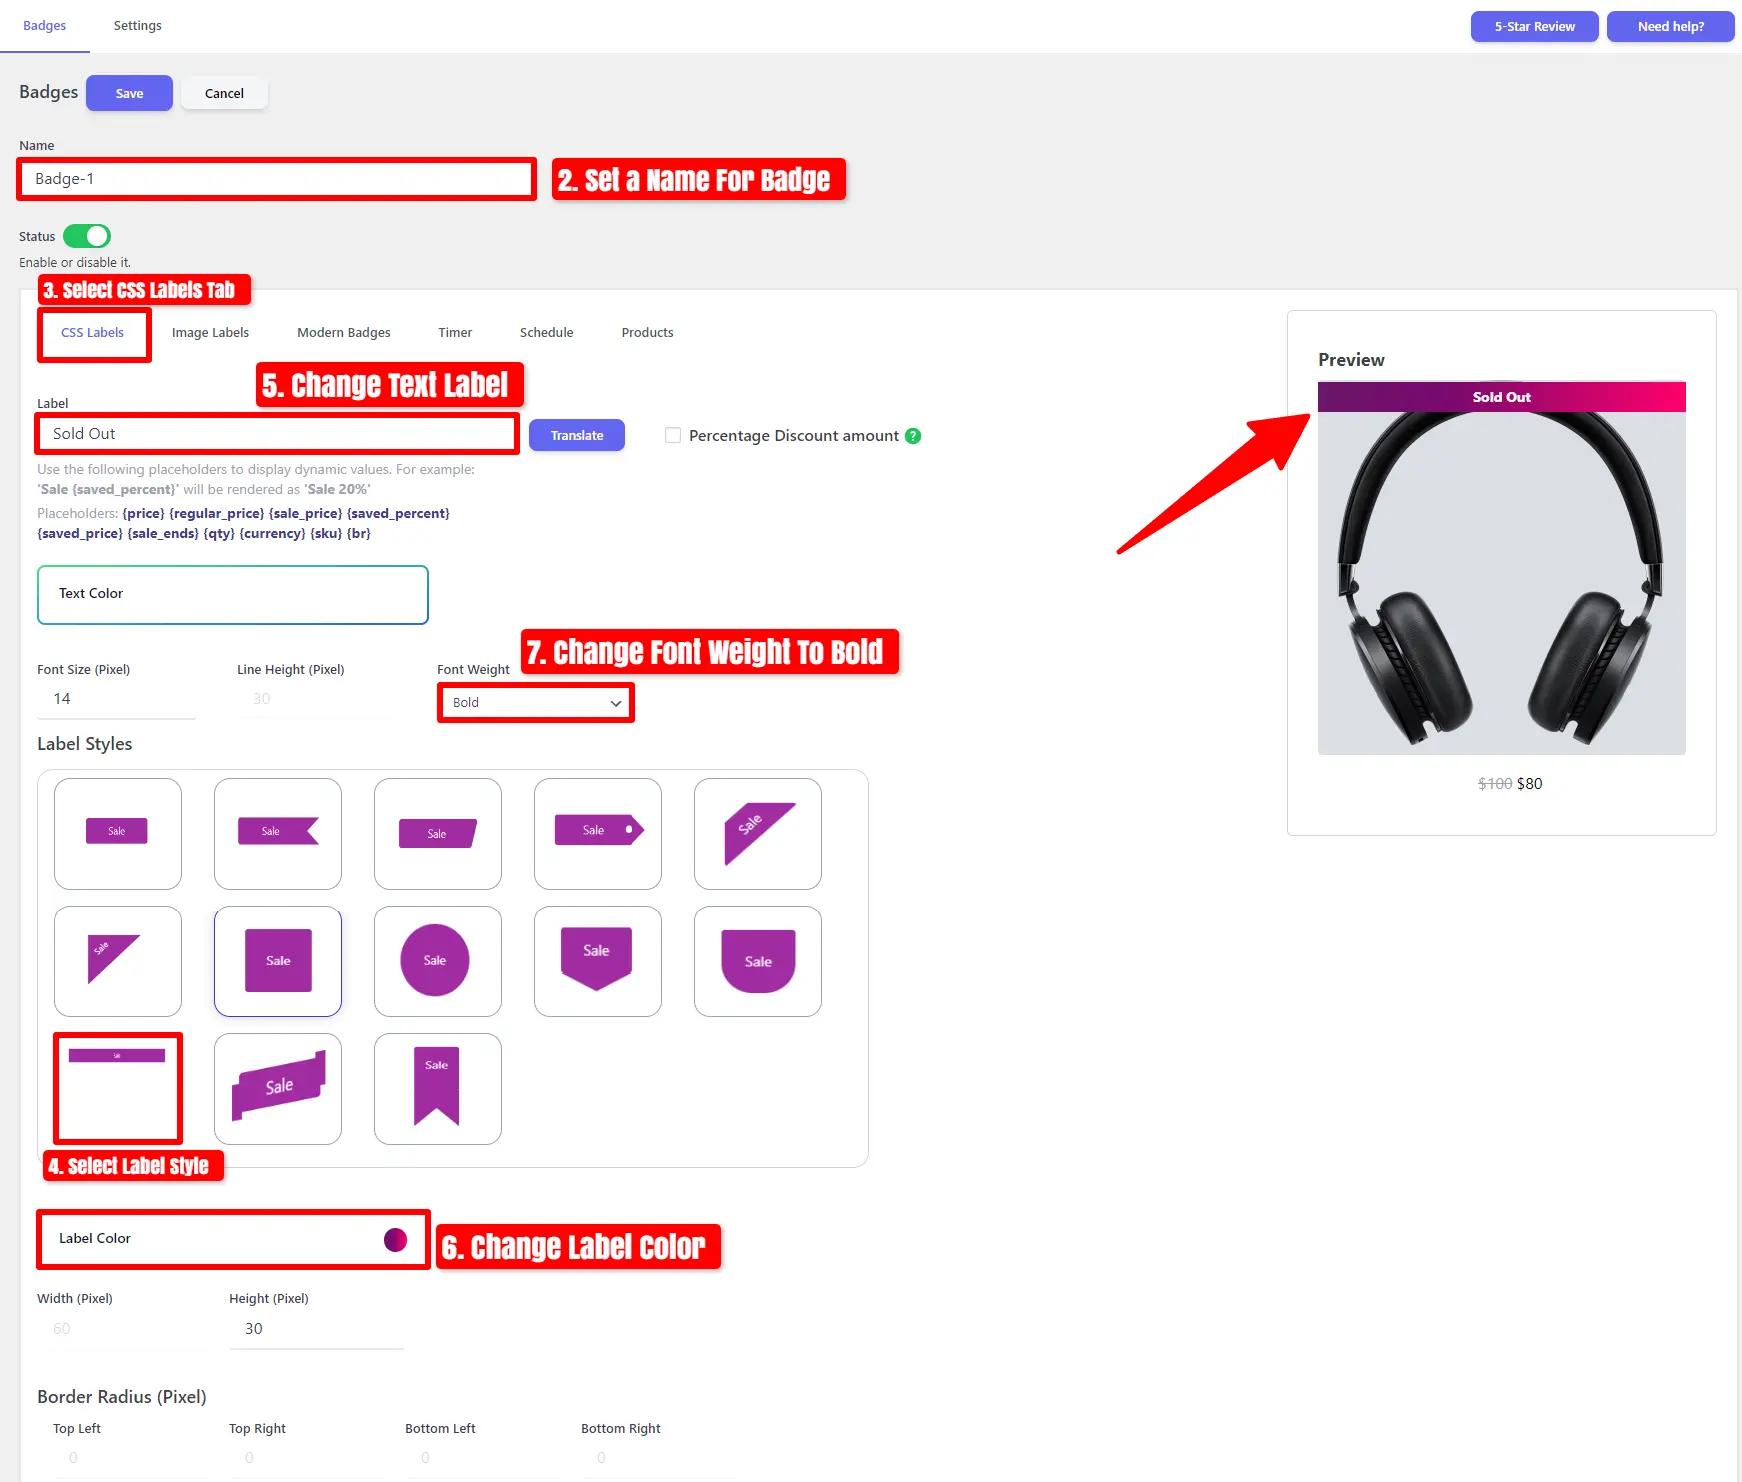
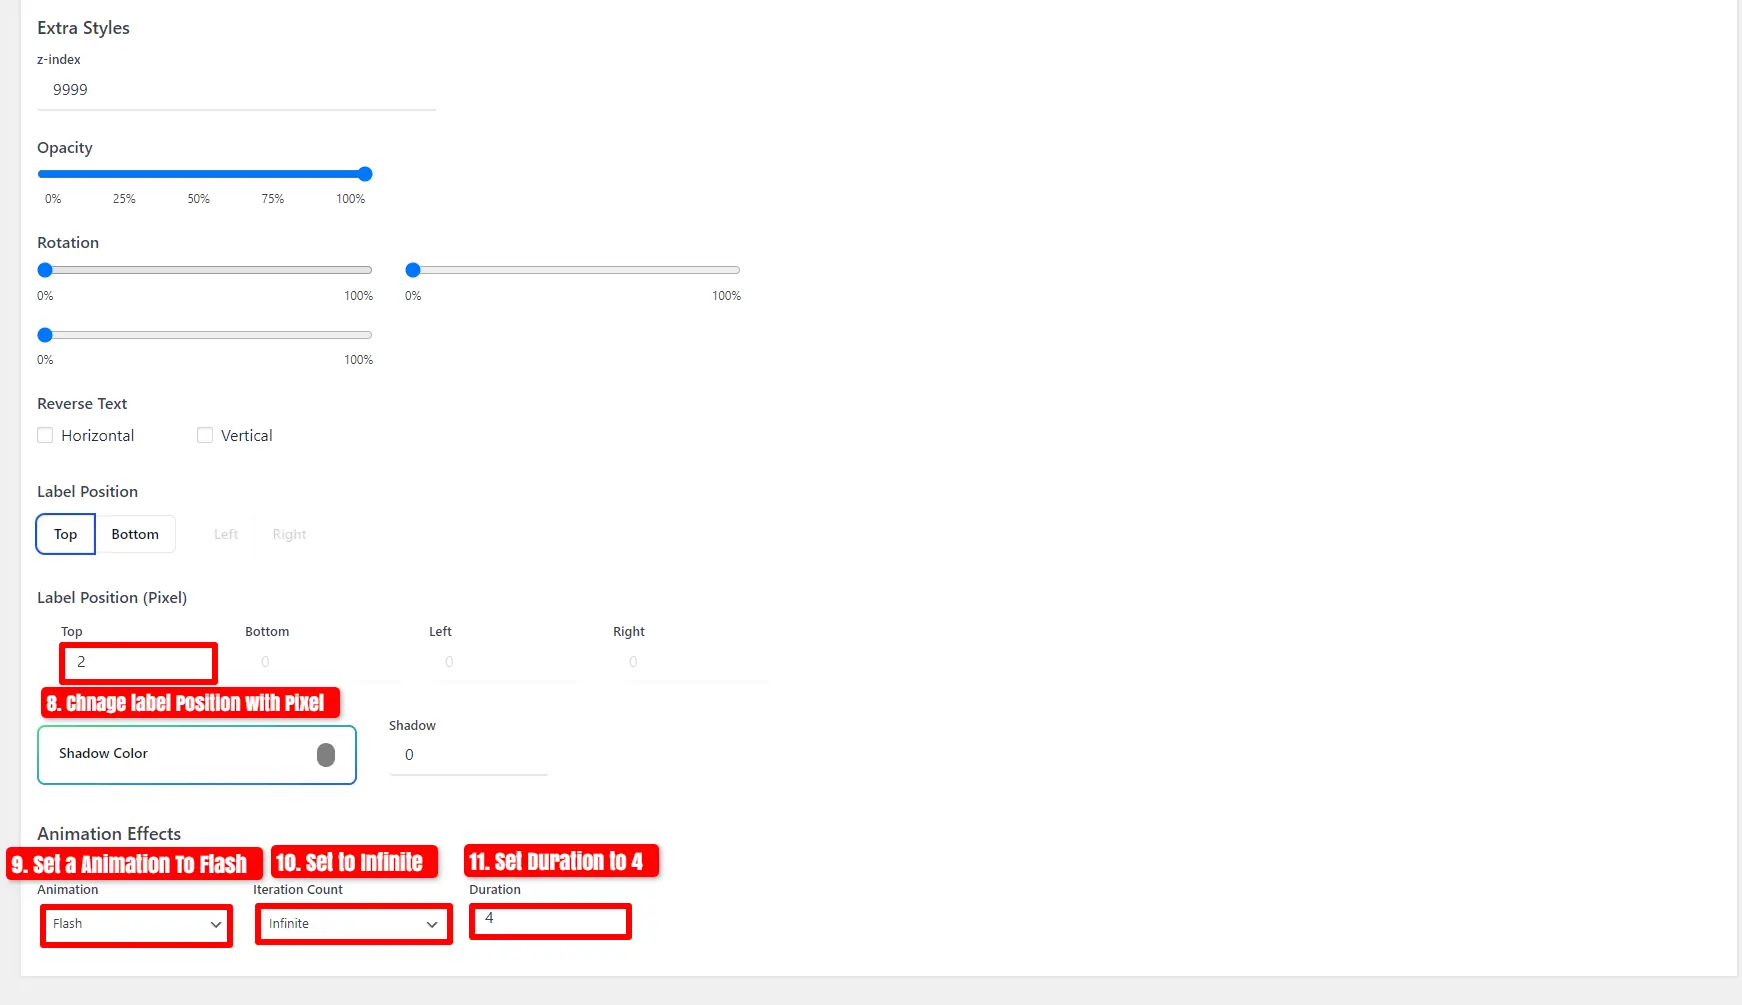


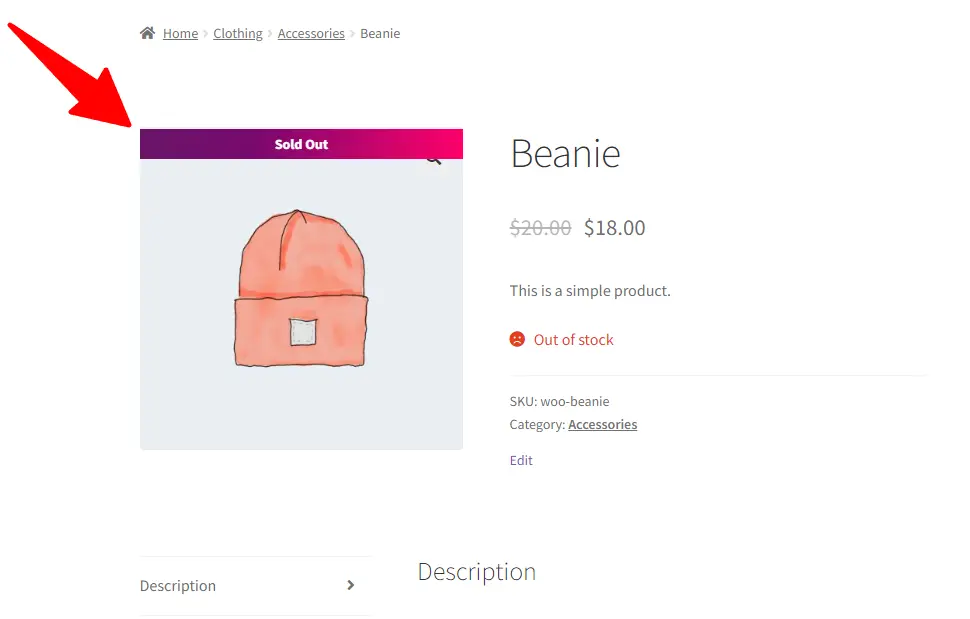
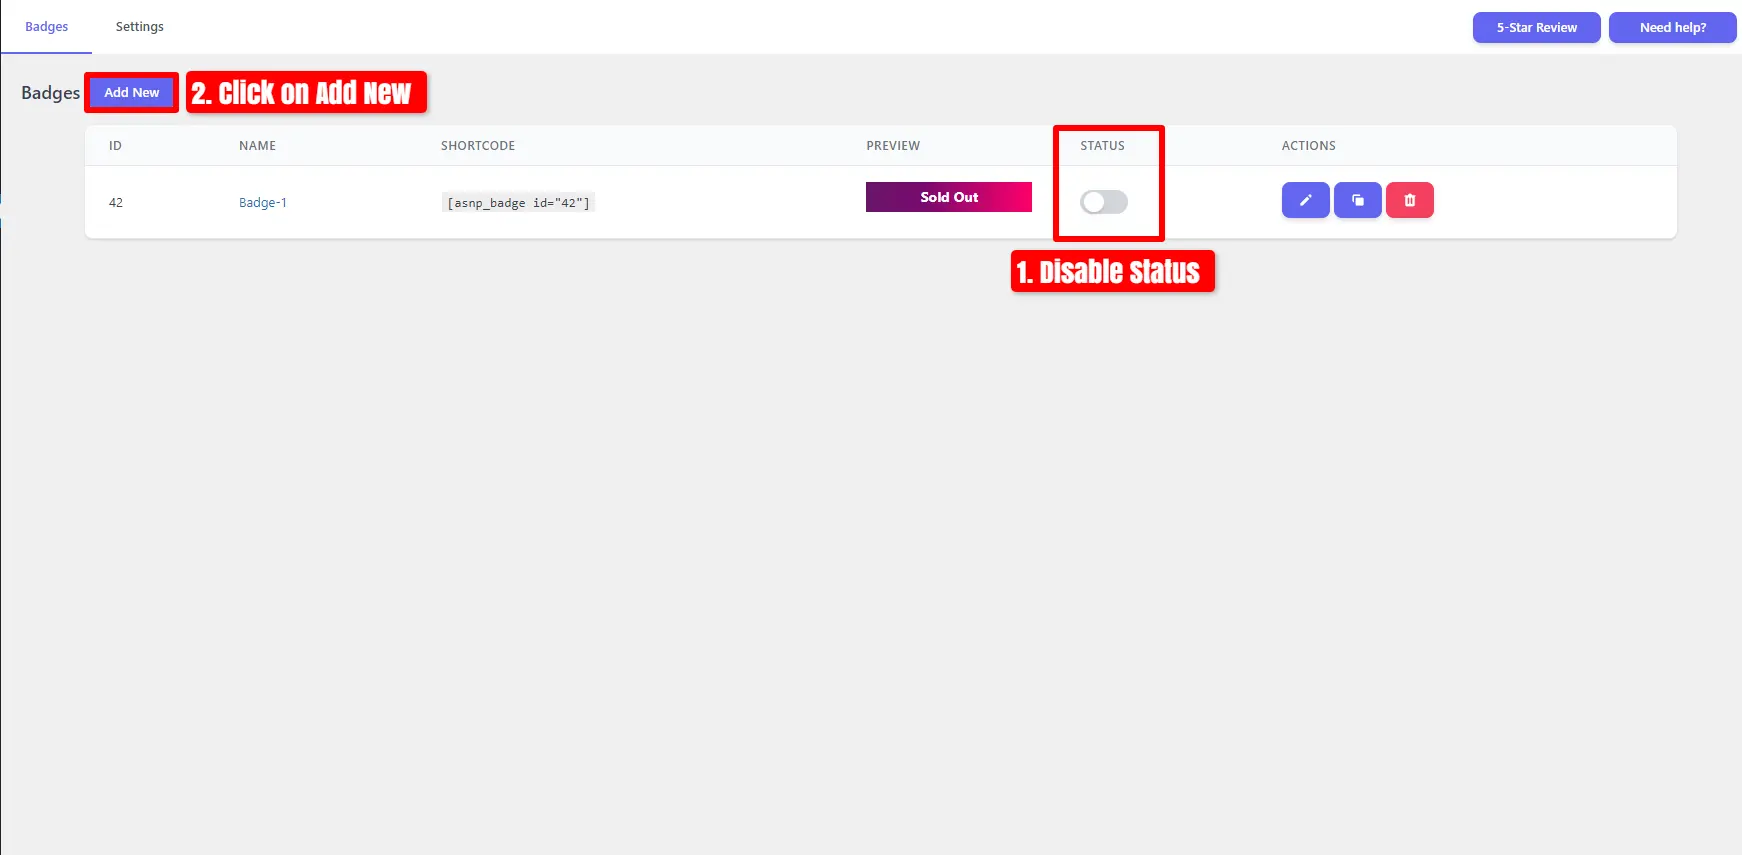
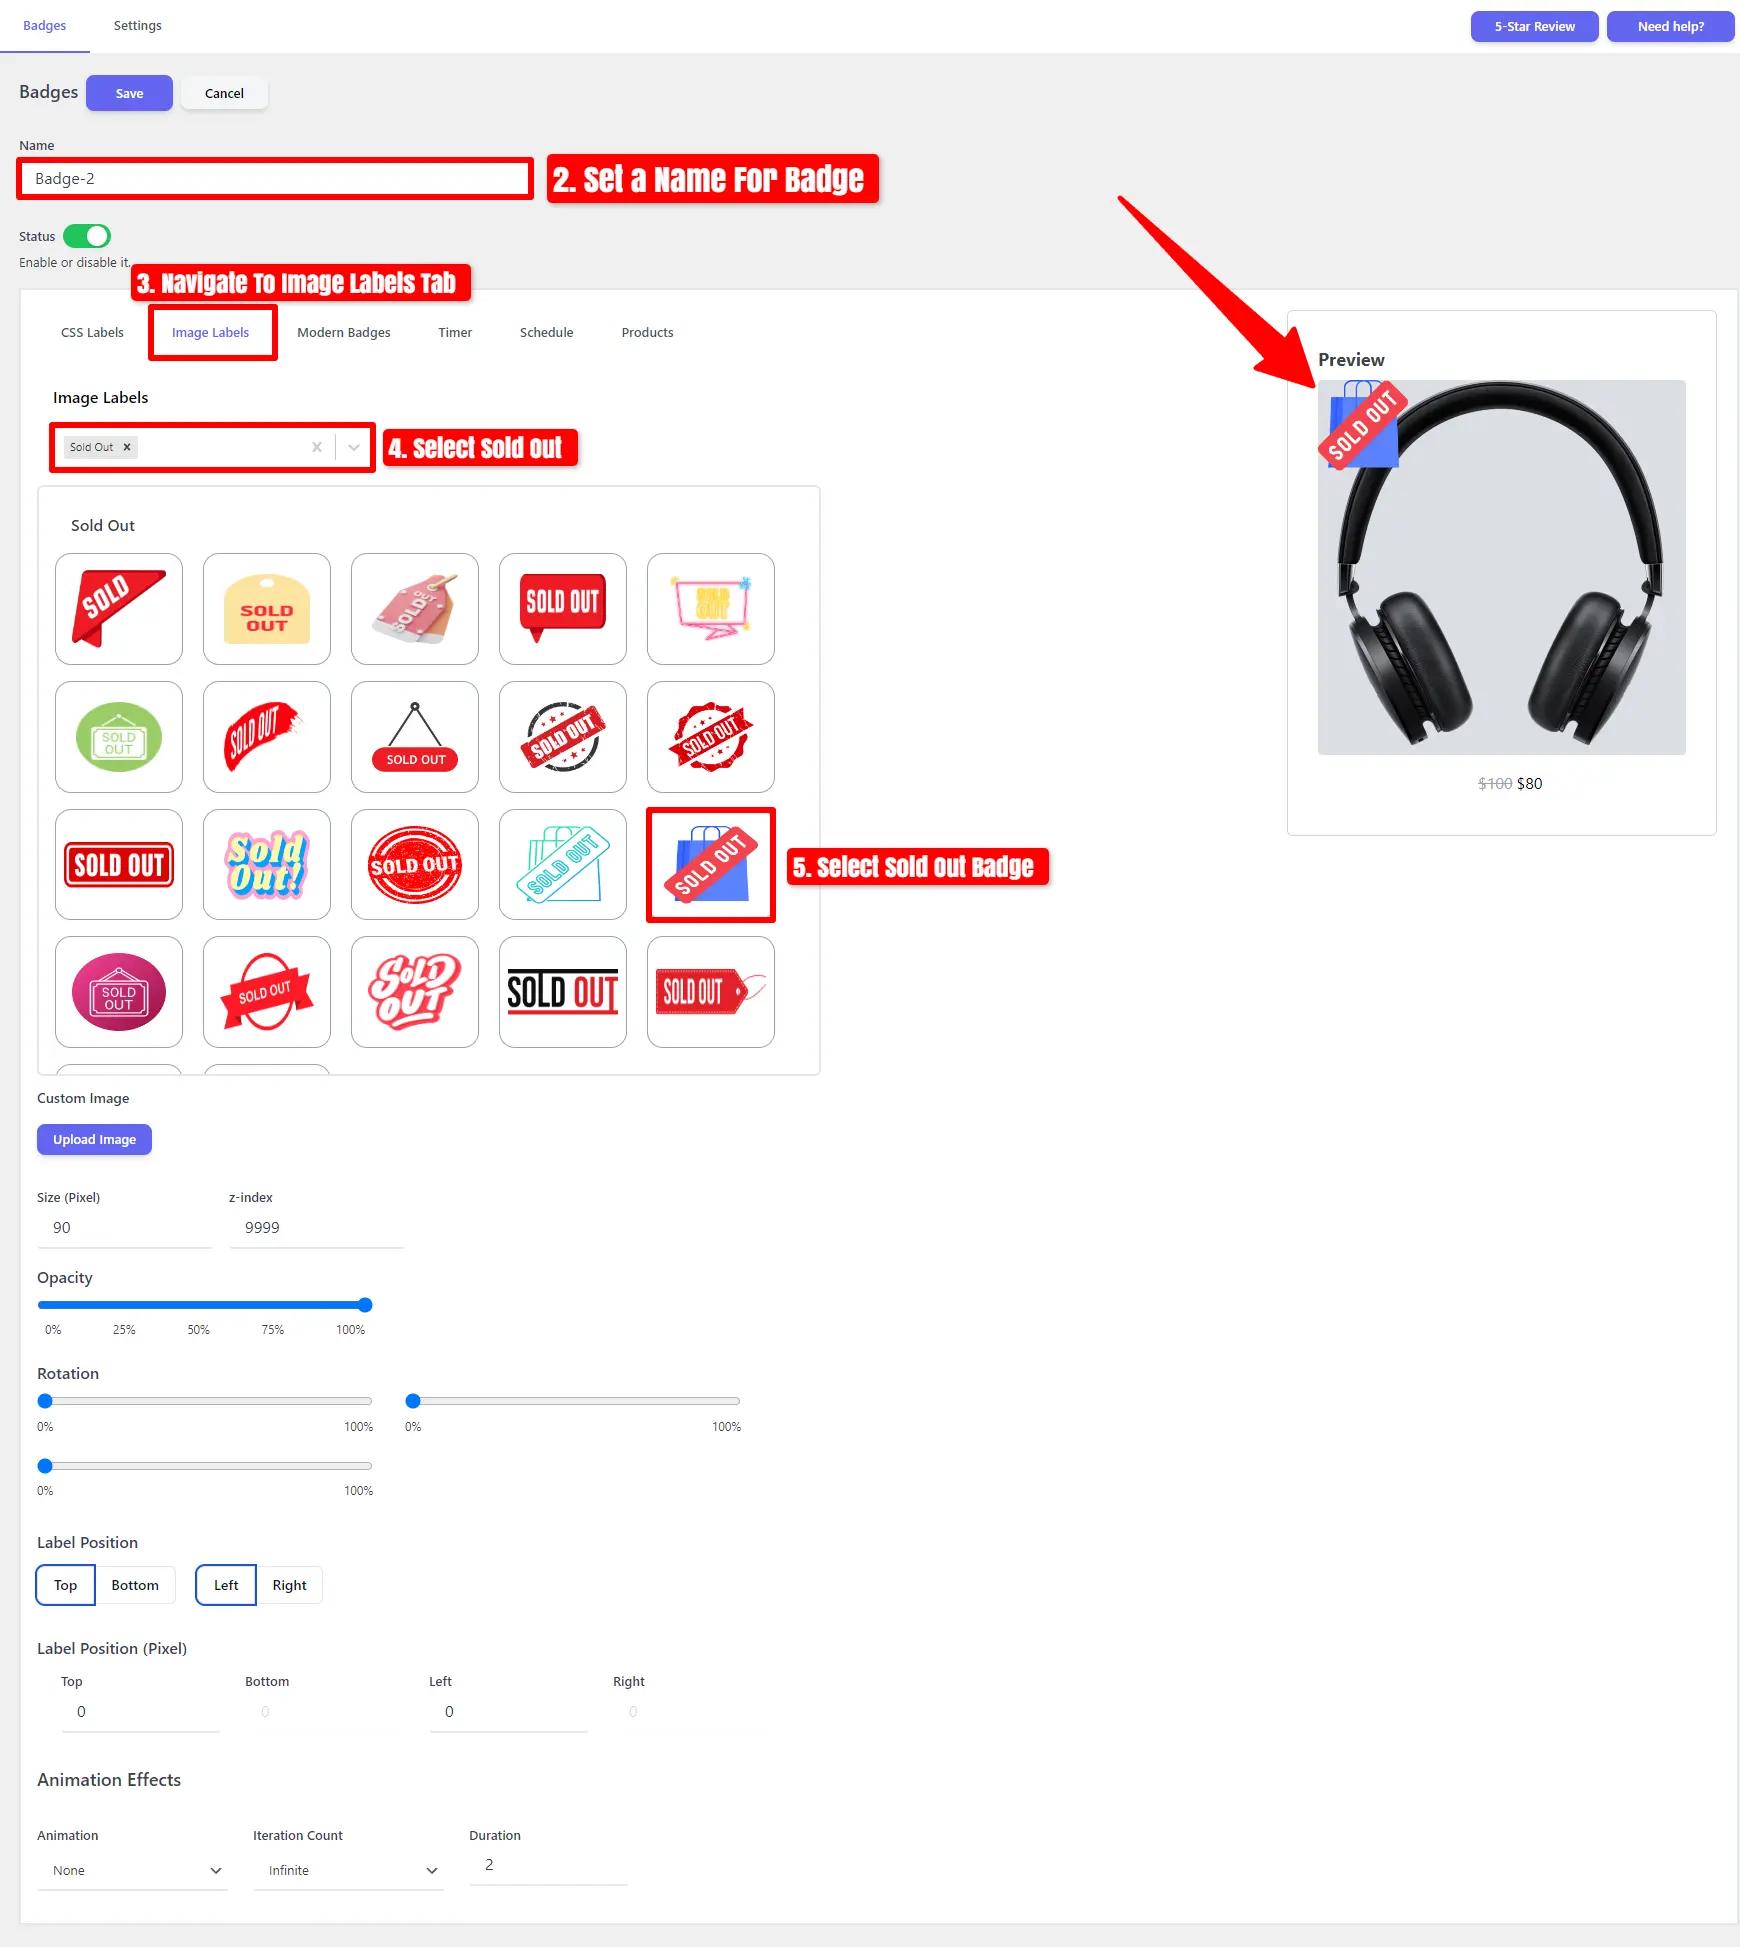
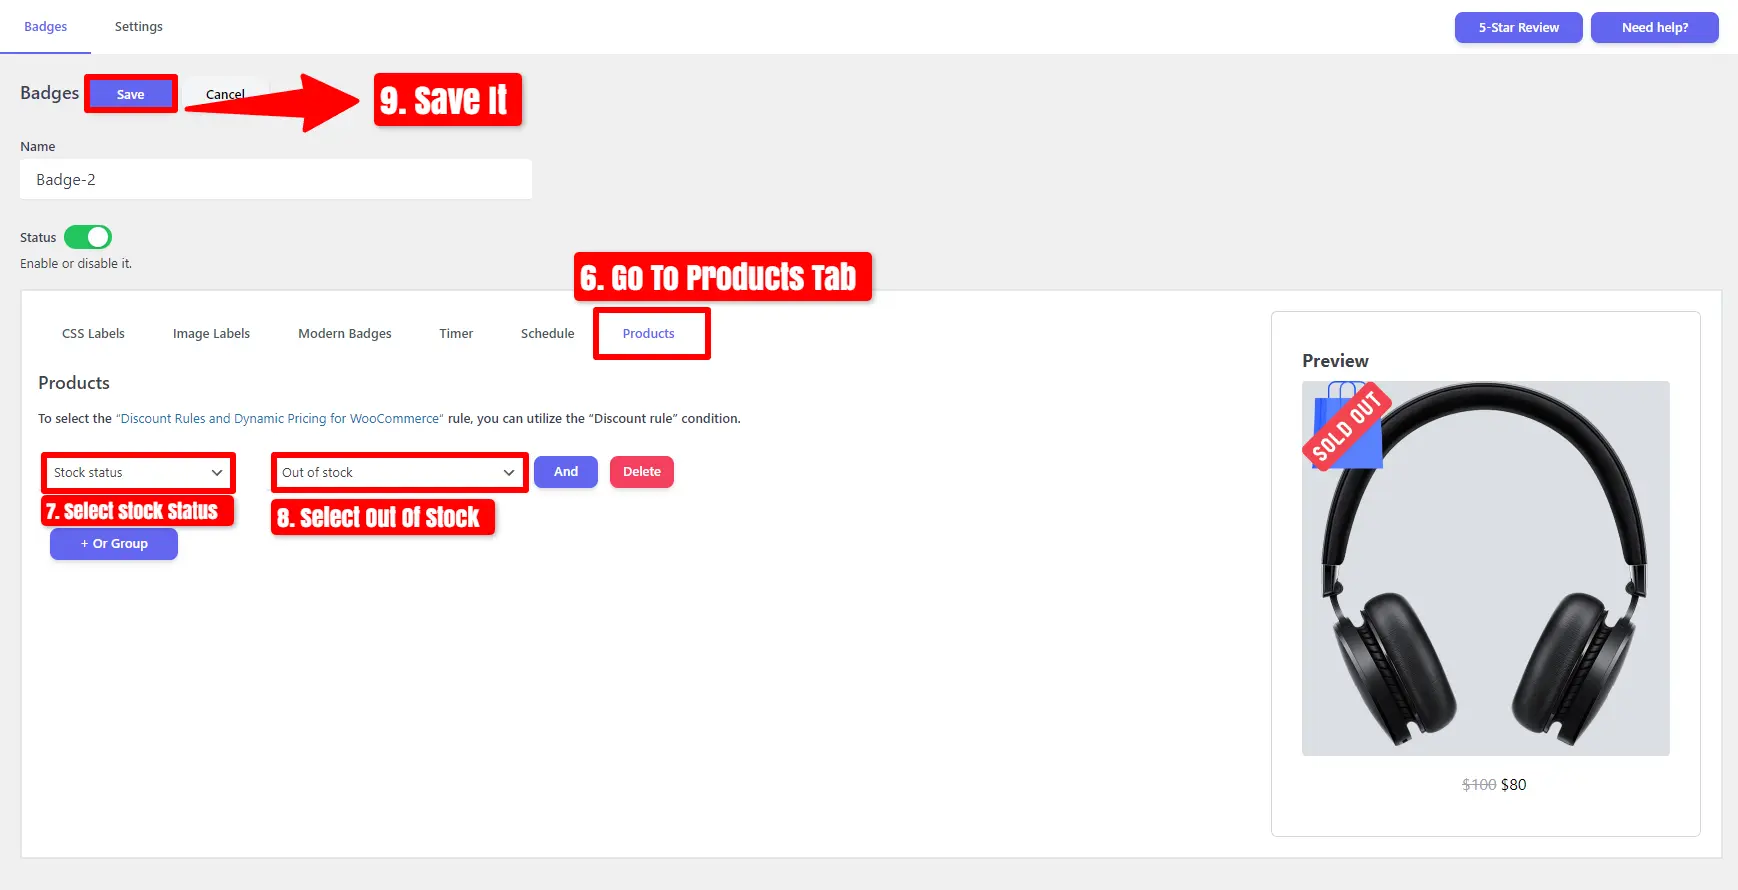
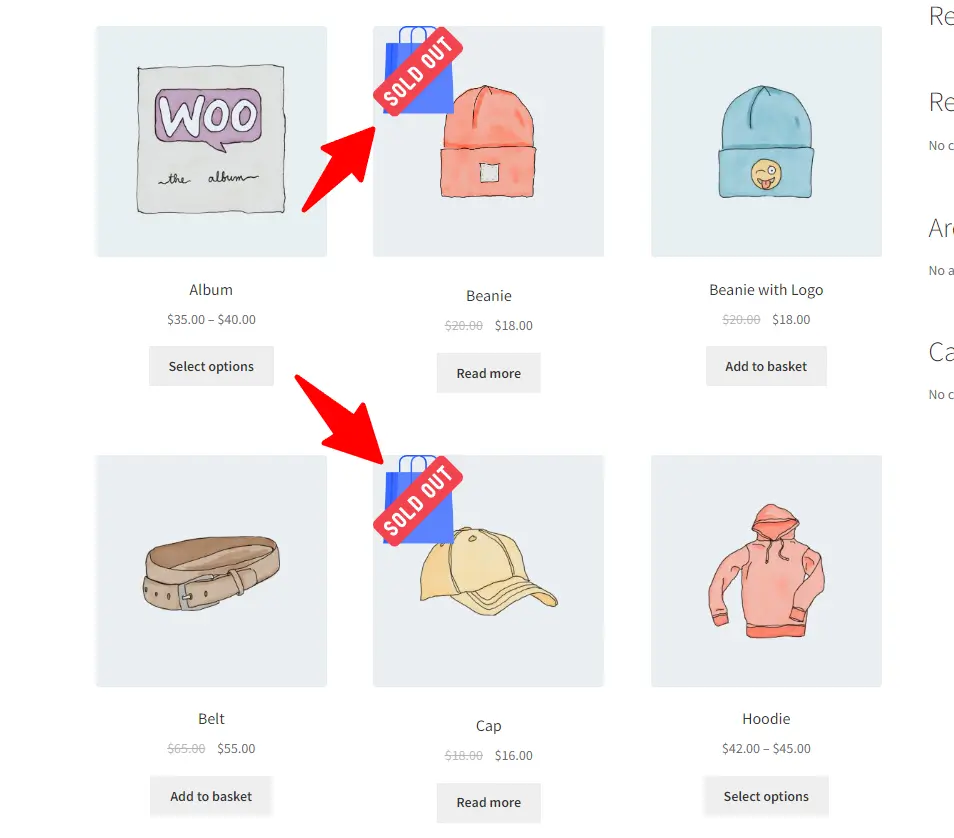
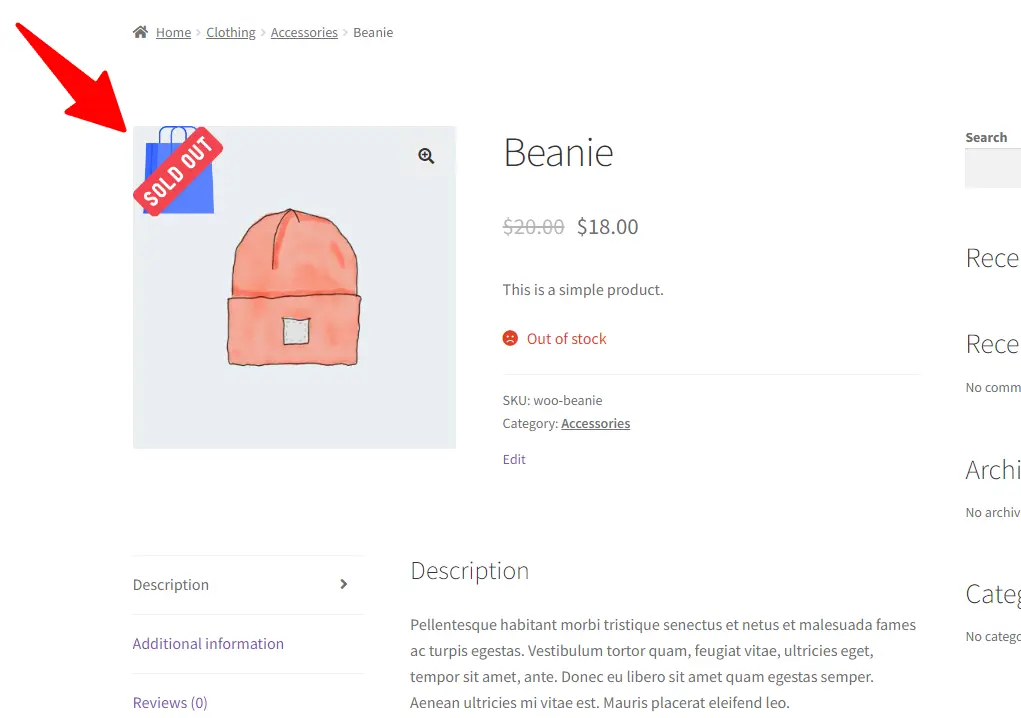
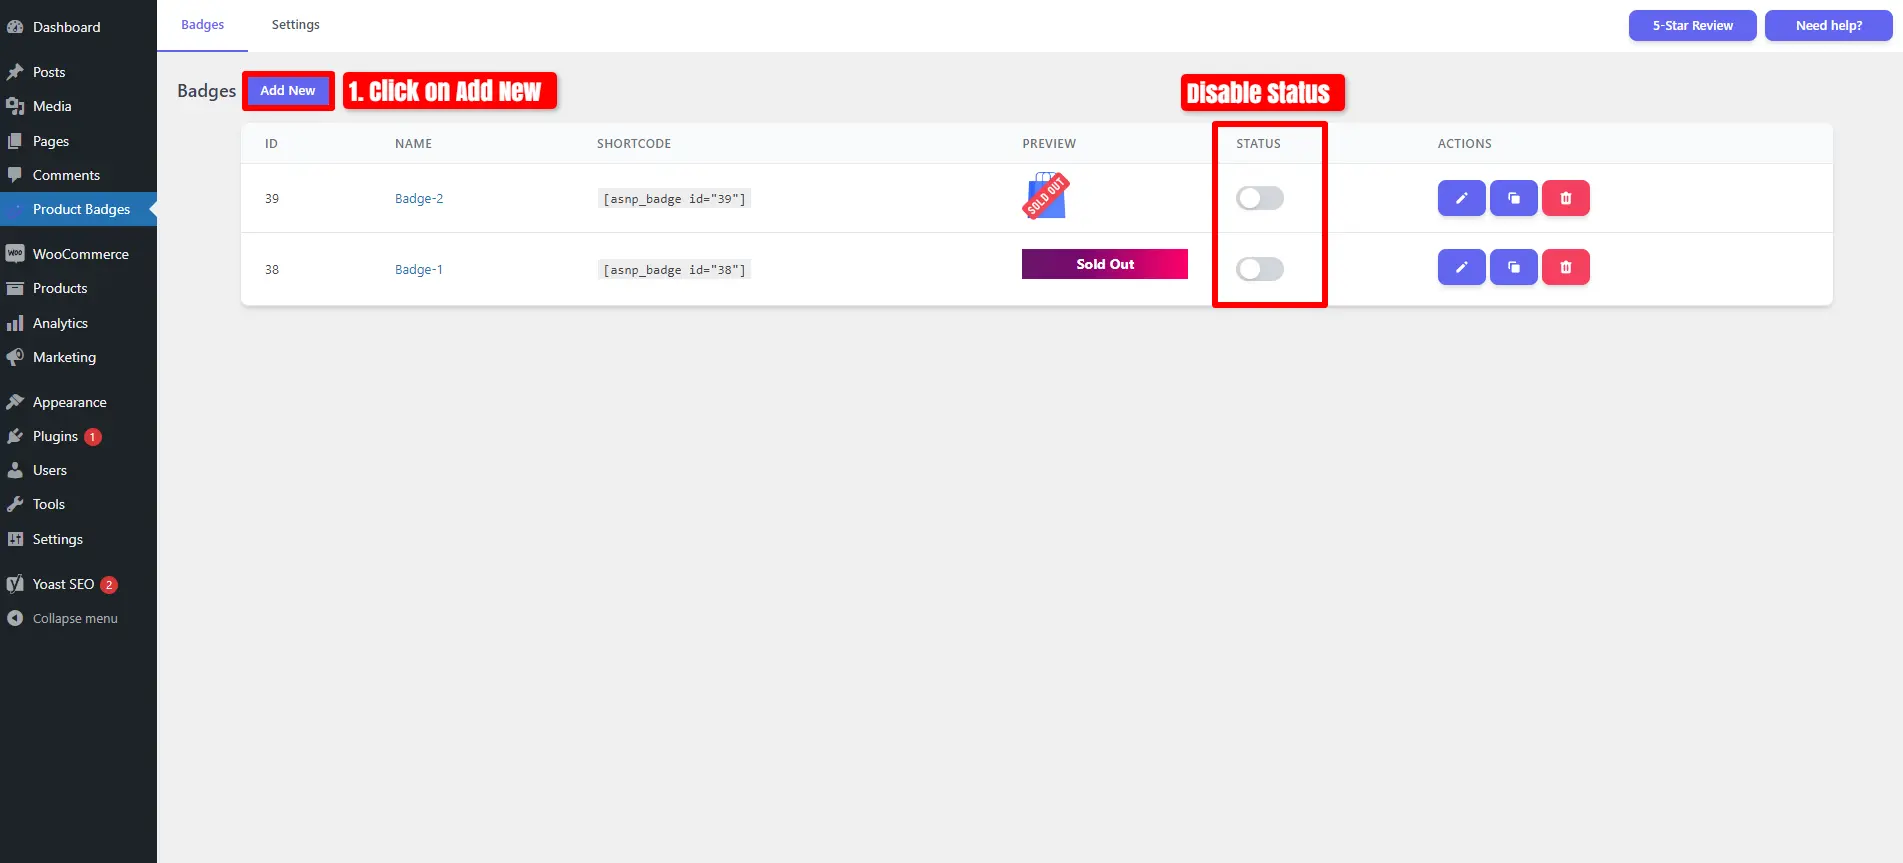
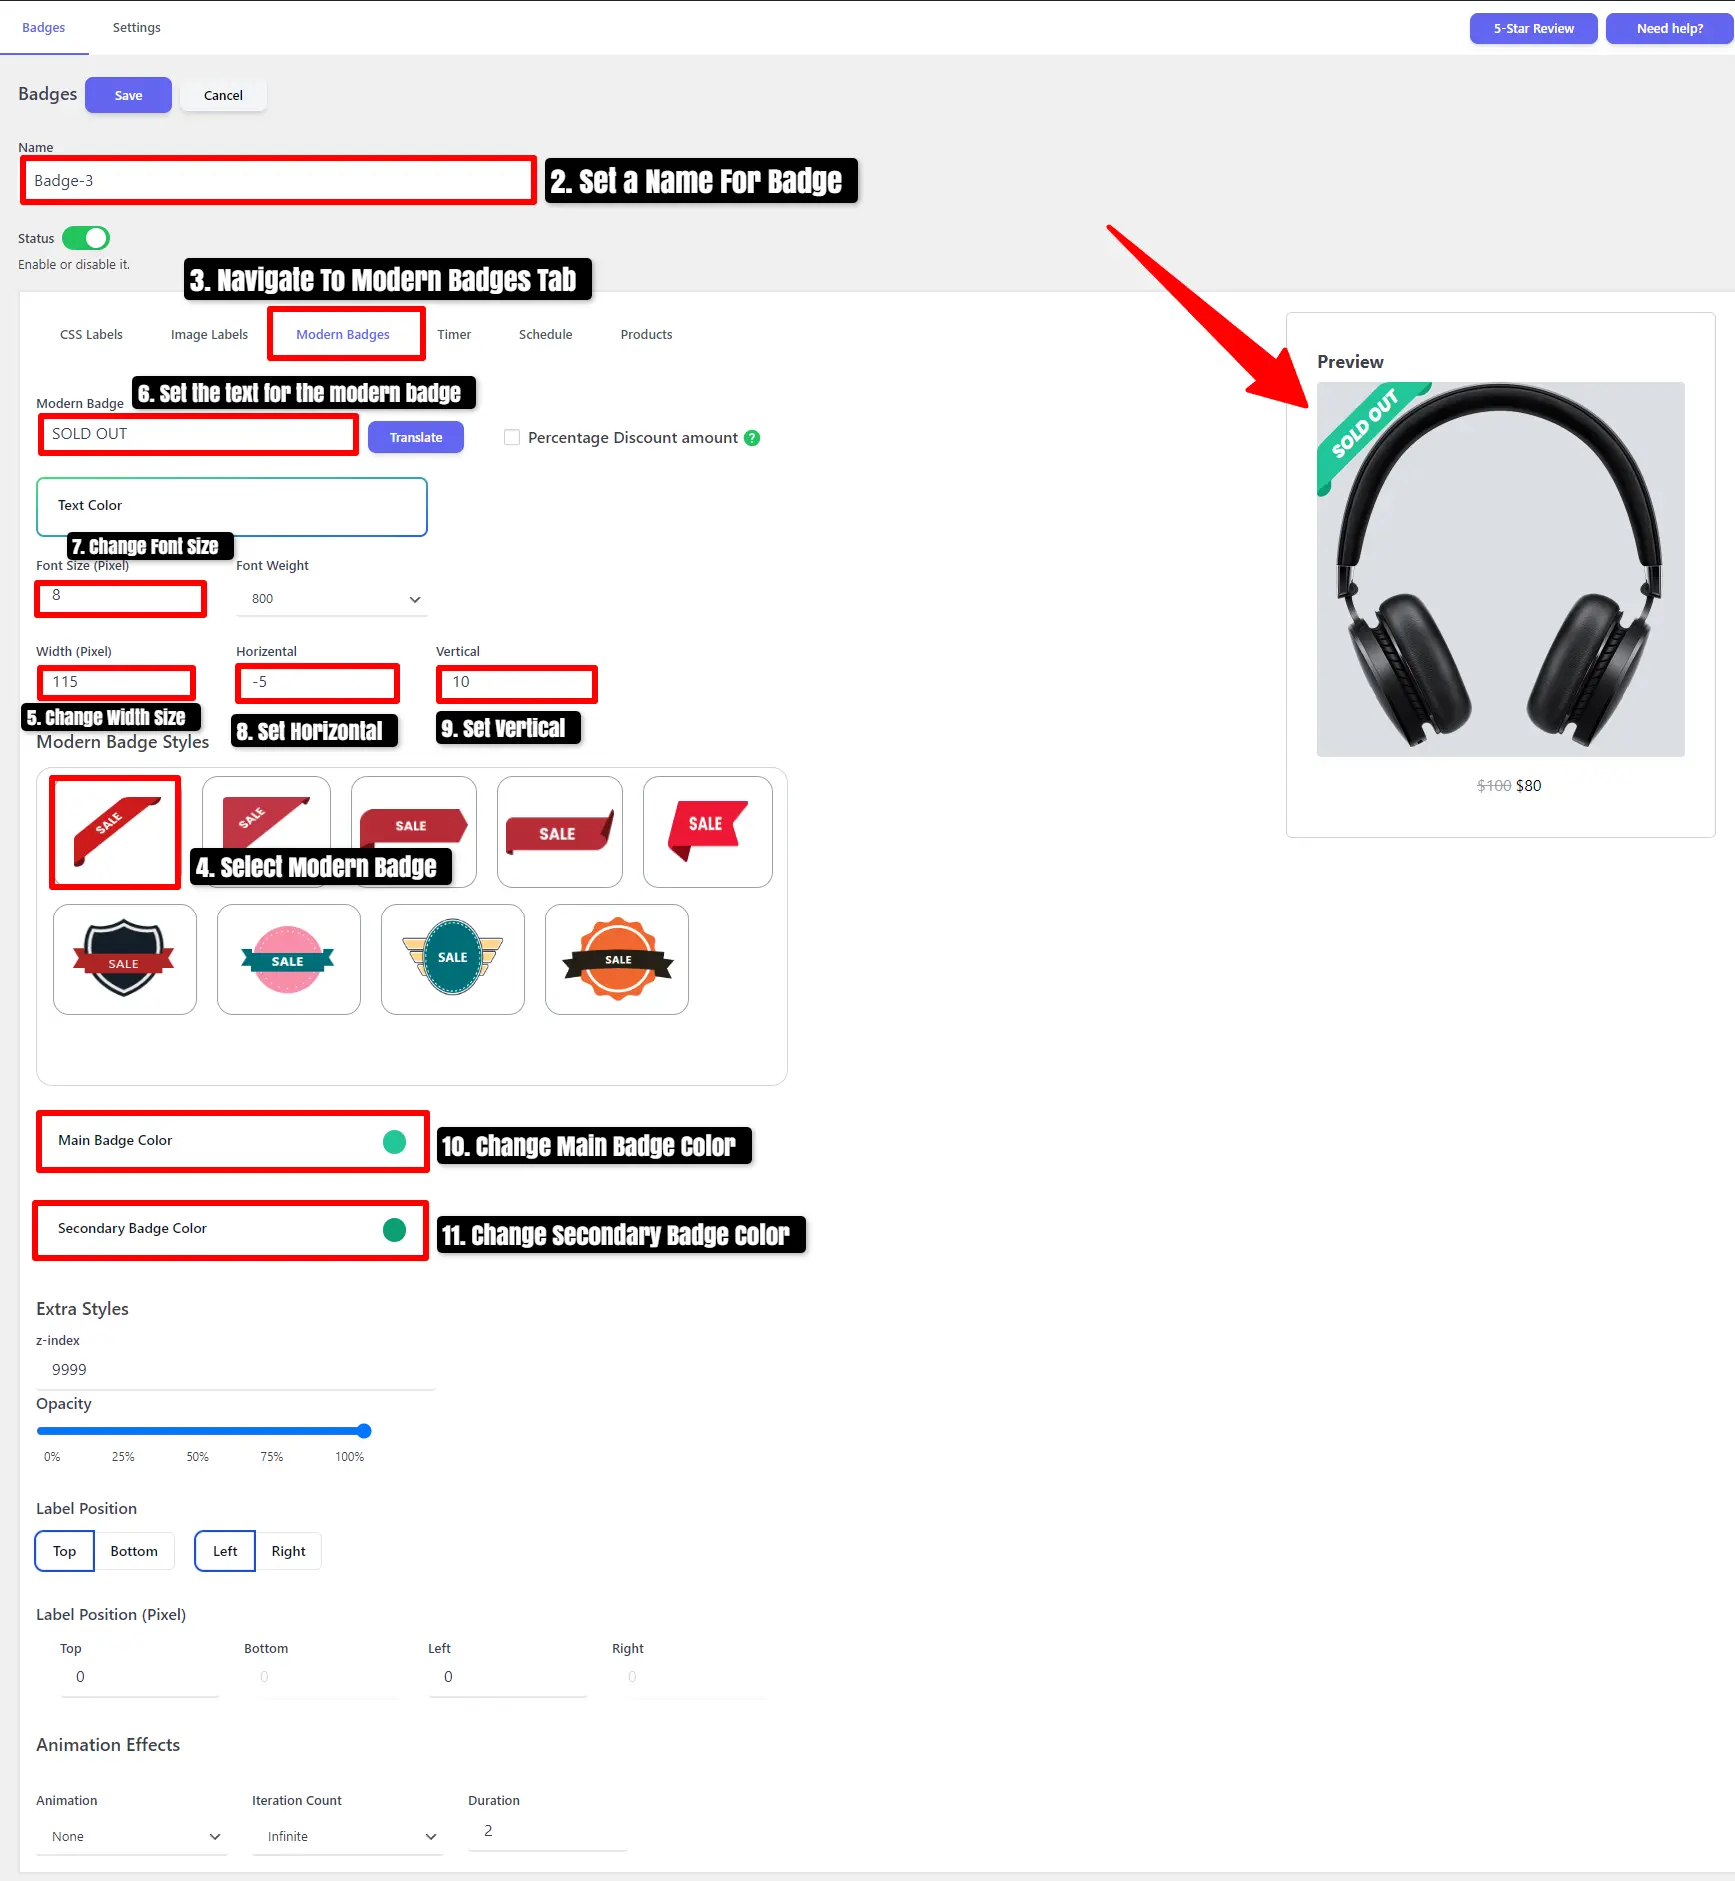
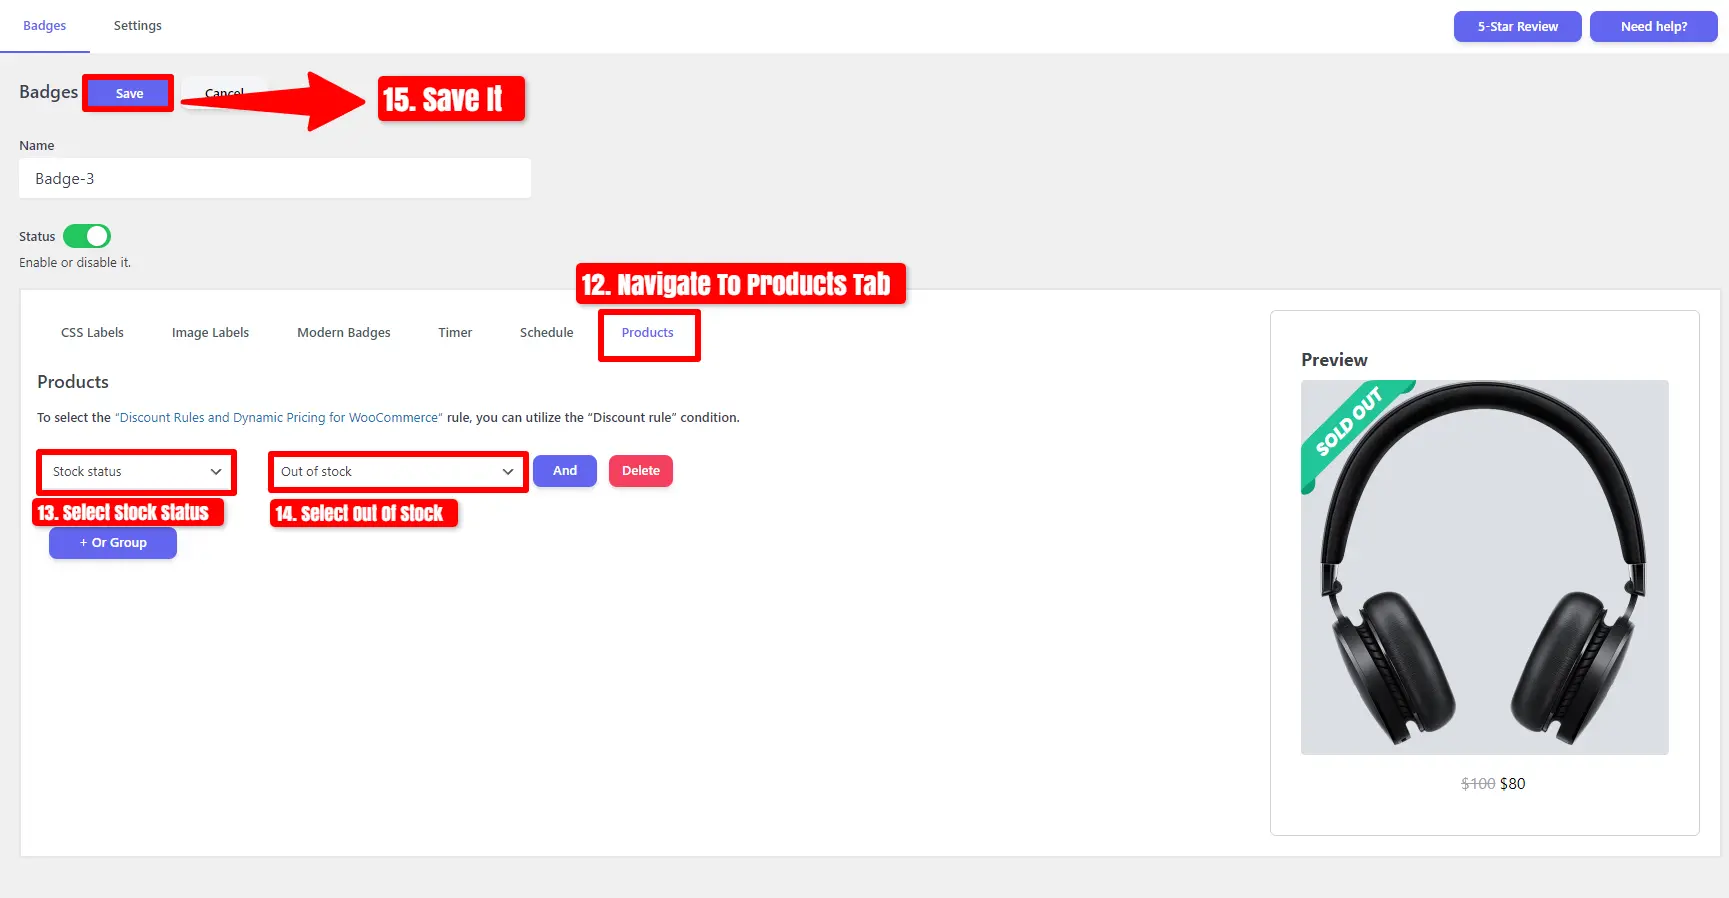
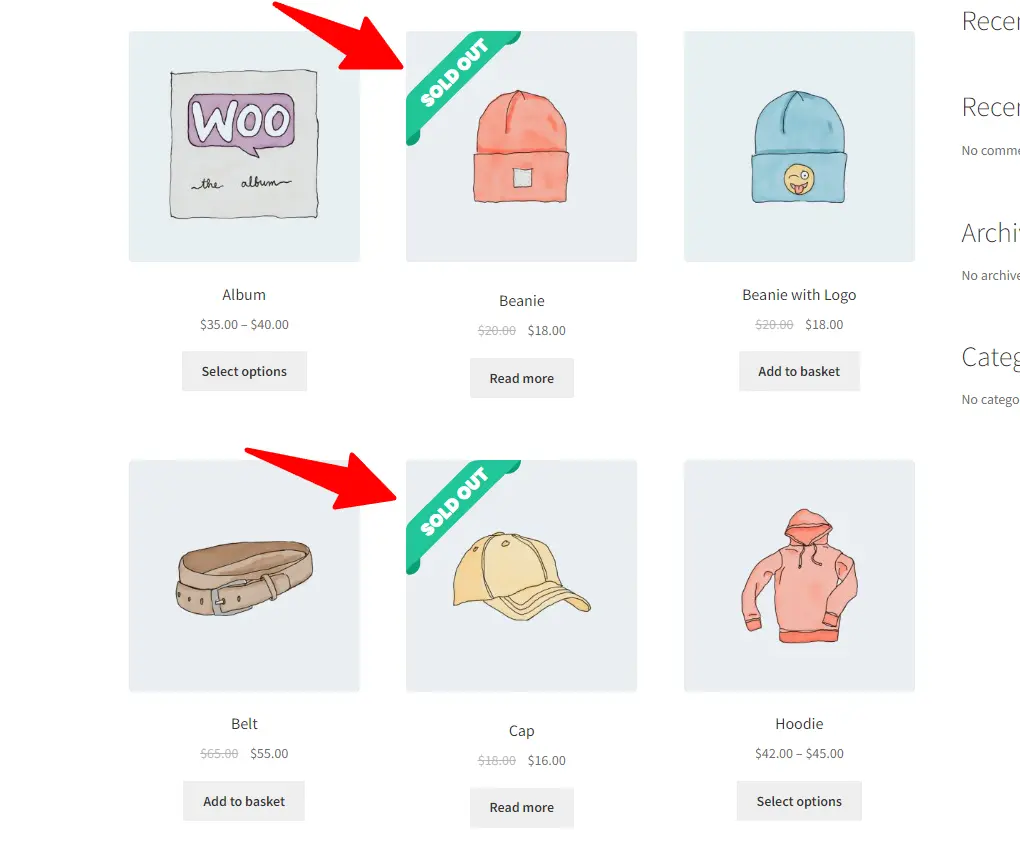
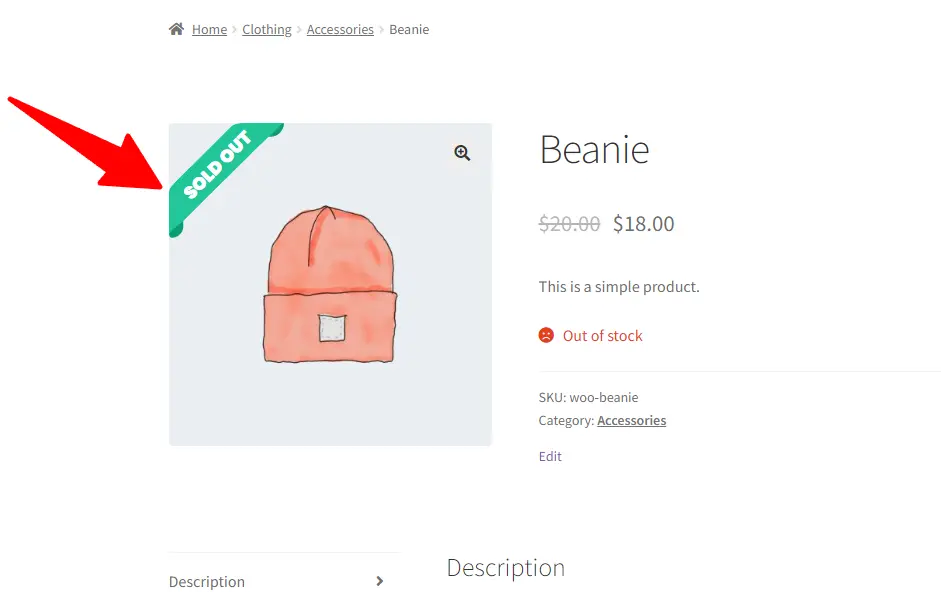
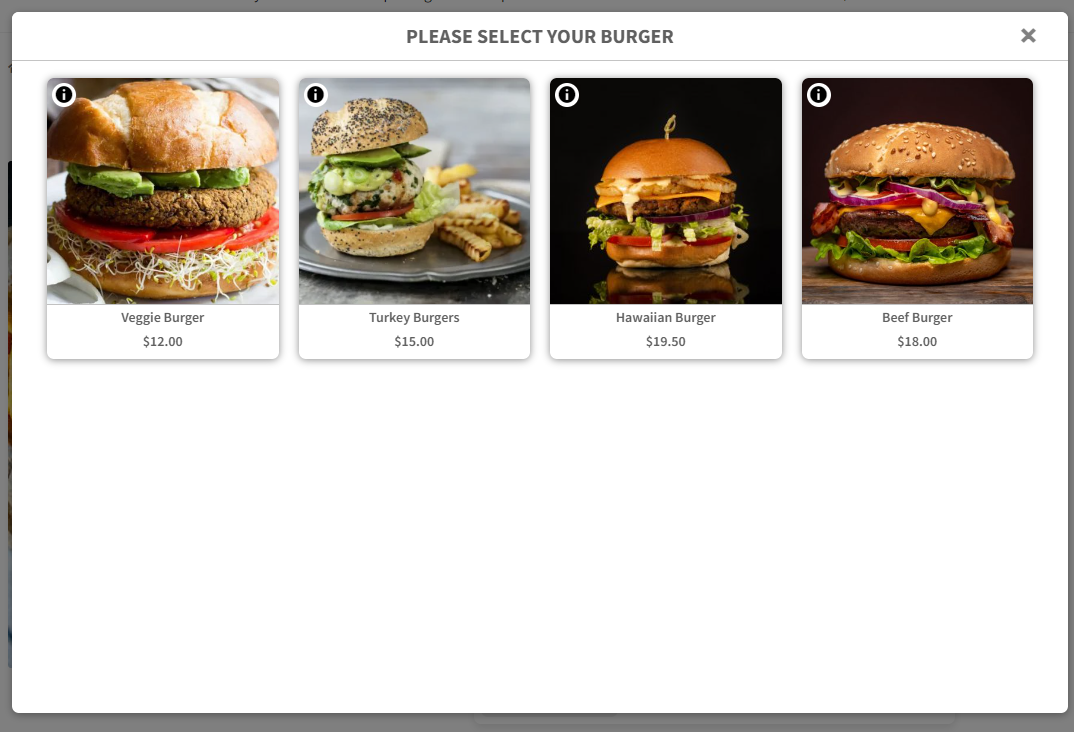
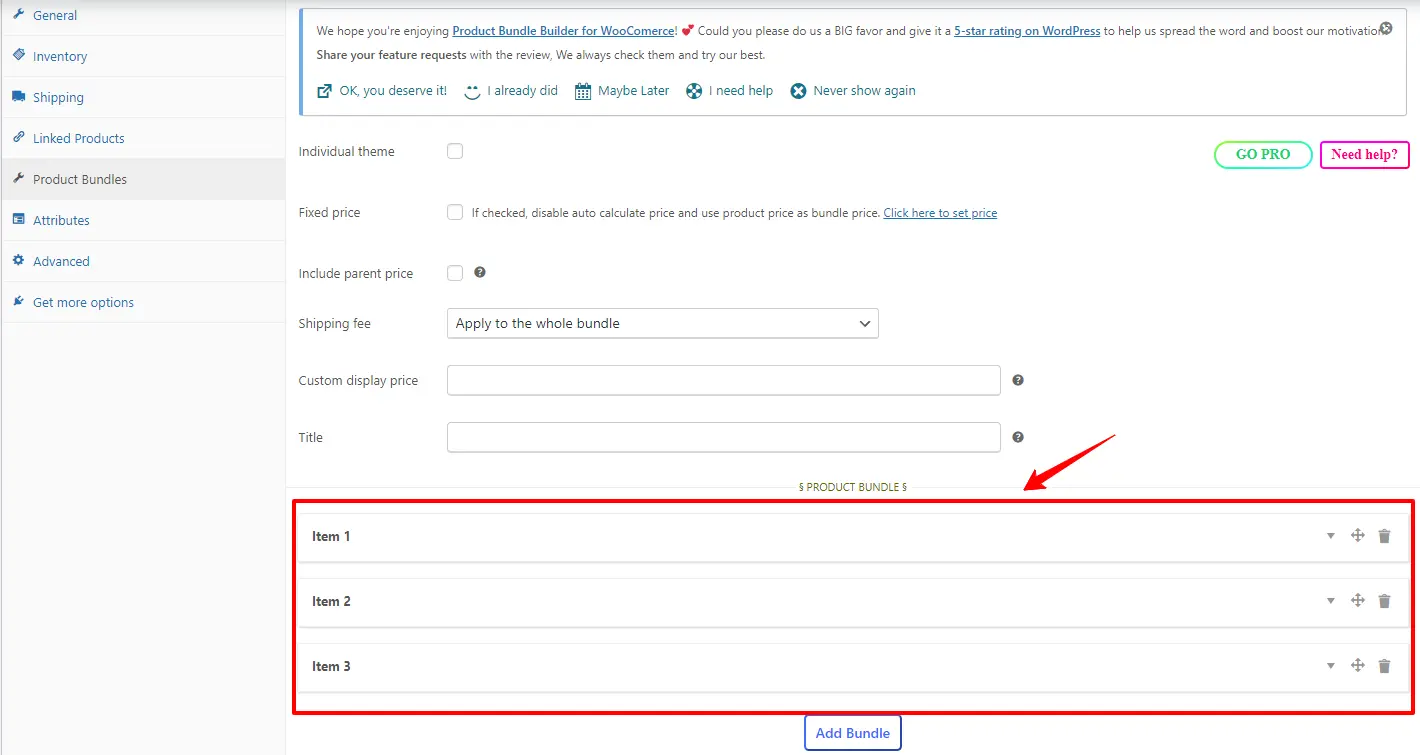