WooCommerce Sticky Add to Cart Bar: Setup Guide
Overview
WooCommerce sticky add to cart keeps a compact buy bar—product image, name, price, variations, quantity, and an Add to Cart button—pinned to the top or bottom of the single product page as the shopper scrolls. This sticky add to cart WooCommerce setup keeps the buying action available on long product pages and mobile screens without replacing the native product form.
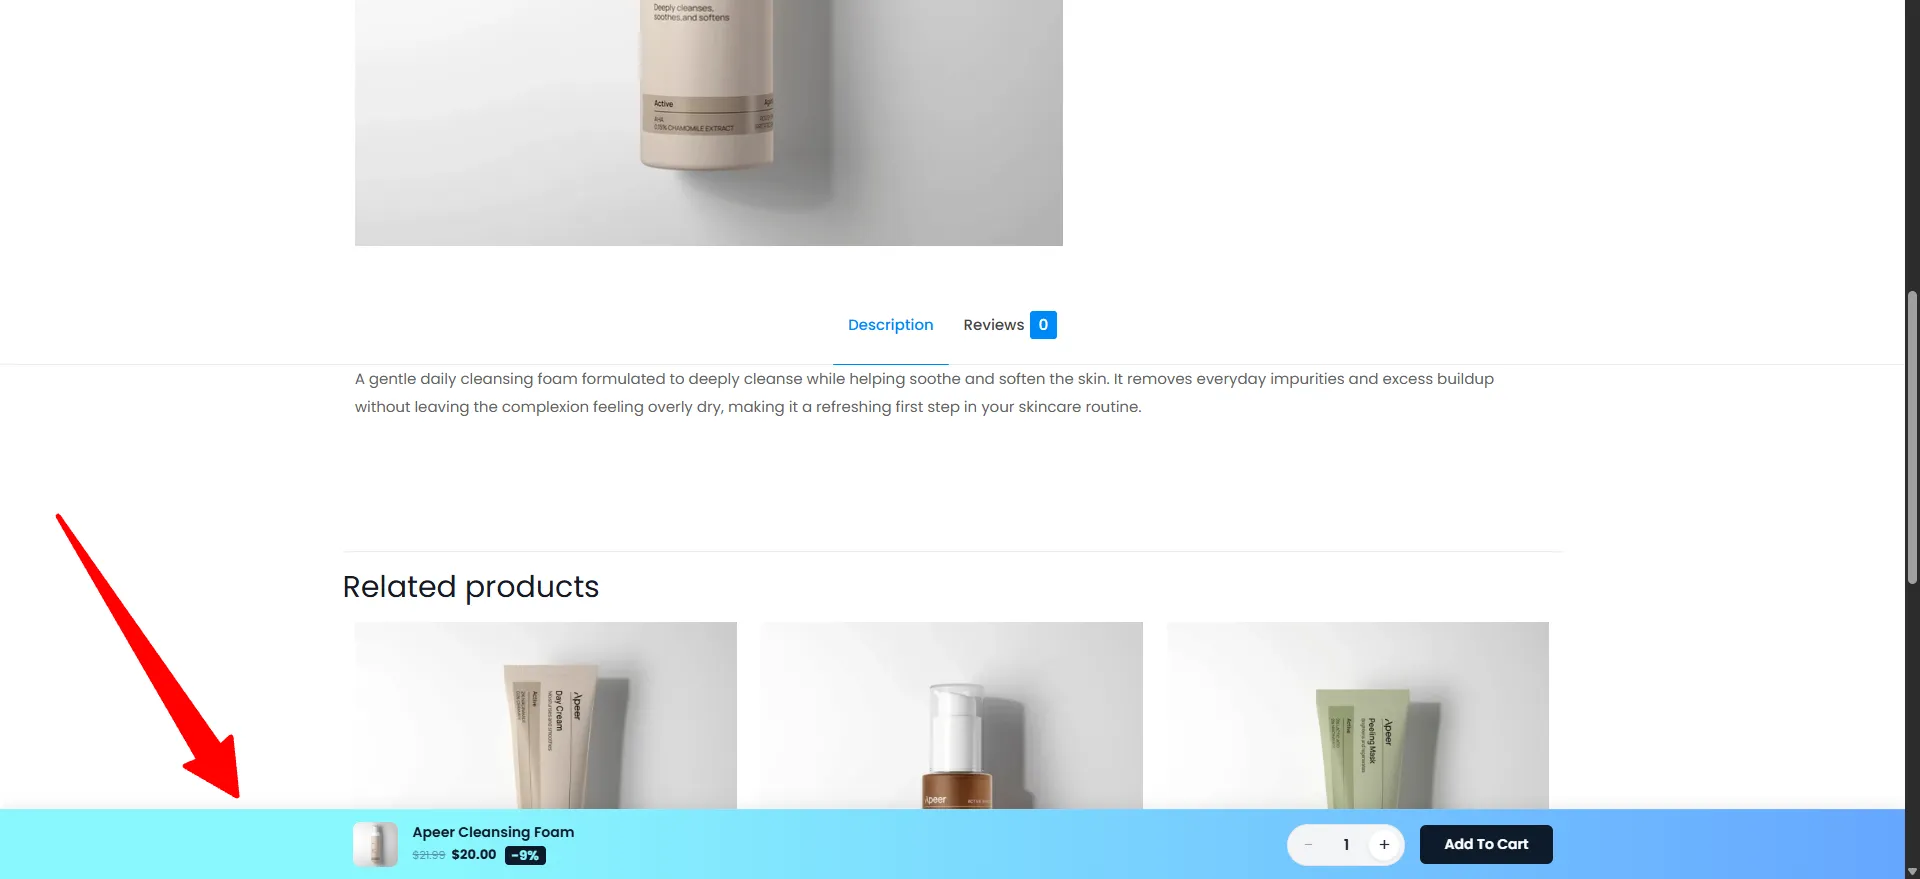
Sticky Add to Cart is available in the Pro version. Configure it from Sale Badges → Store Features → Sticky Add to Cart.
How it works
A shopper opens a product, reads the description, scrolls through the gallery and reviews — and the real Add to Cart button is now far above the fold. Instead of scrolling back up, they use the sticky bar that followed them down the page: pick a variation, set the quantity, and add to cart without losing their place.
Popular use cases
| Your goal | How to set it up |
|---|---|
| Keep the buy button reachable on long pages | Position: Bottom, Display Button: When Add to Cart is out of view — the bar appears only once the real button scrolls away. |
| Recover mobile sales | Enable Display on Mobile, use the Icon (Bag) mobile button style, and keep variations/quantity available on mobile. |
| Highlight a discount at the point of decision | Turn on the Discount Badge (Percentage -25% or Amount -$10) next to the price. |
| Speed up variable products | Keep Show Variations and Show Quantity on so shoppers choose and add in one place. |
| Match your brand instantly | Apply a Quick Template color preset (e.g. Sky Breeze, Sunset Blaze, Ocean Deep), then fine-tune individual colors. |
| Send shoppers straight to checkout flow | Set Action Click → Go to Cart so the button adds and redirects to the cart. |
| Keep a minimal original page but nudge on scroll | Display Button: After Scroll past "Add To Cart" so the bar only shows deeper down the page. |
| Handle out-of-stock items gracefully | Set the Sold Out Button Text (e.g. Sold Out); toggle Display on Sold out Product to show or hide it. |
| Limit the bar to specific products or categories | Use Targeting — e.g. Categories → Included, or Is on sale → Yes to show it only on discounted items. |
The sticky bar earns the most on long product pages and mobile, where the native Add to Cart button disappears fastest. On short pages it rarely triggers, so When Add to Cart is out of view keeps it from showing when it isn't needed.
Step-by-step setup
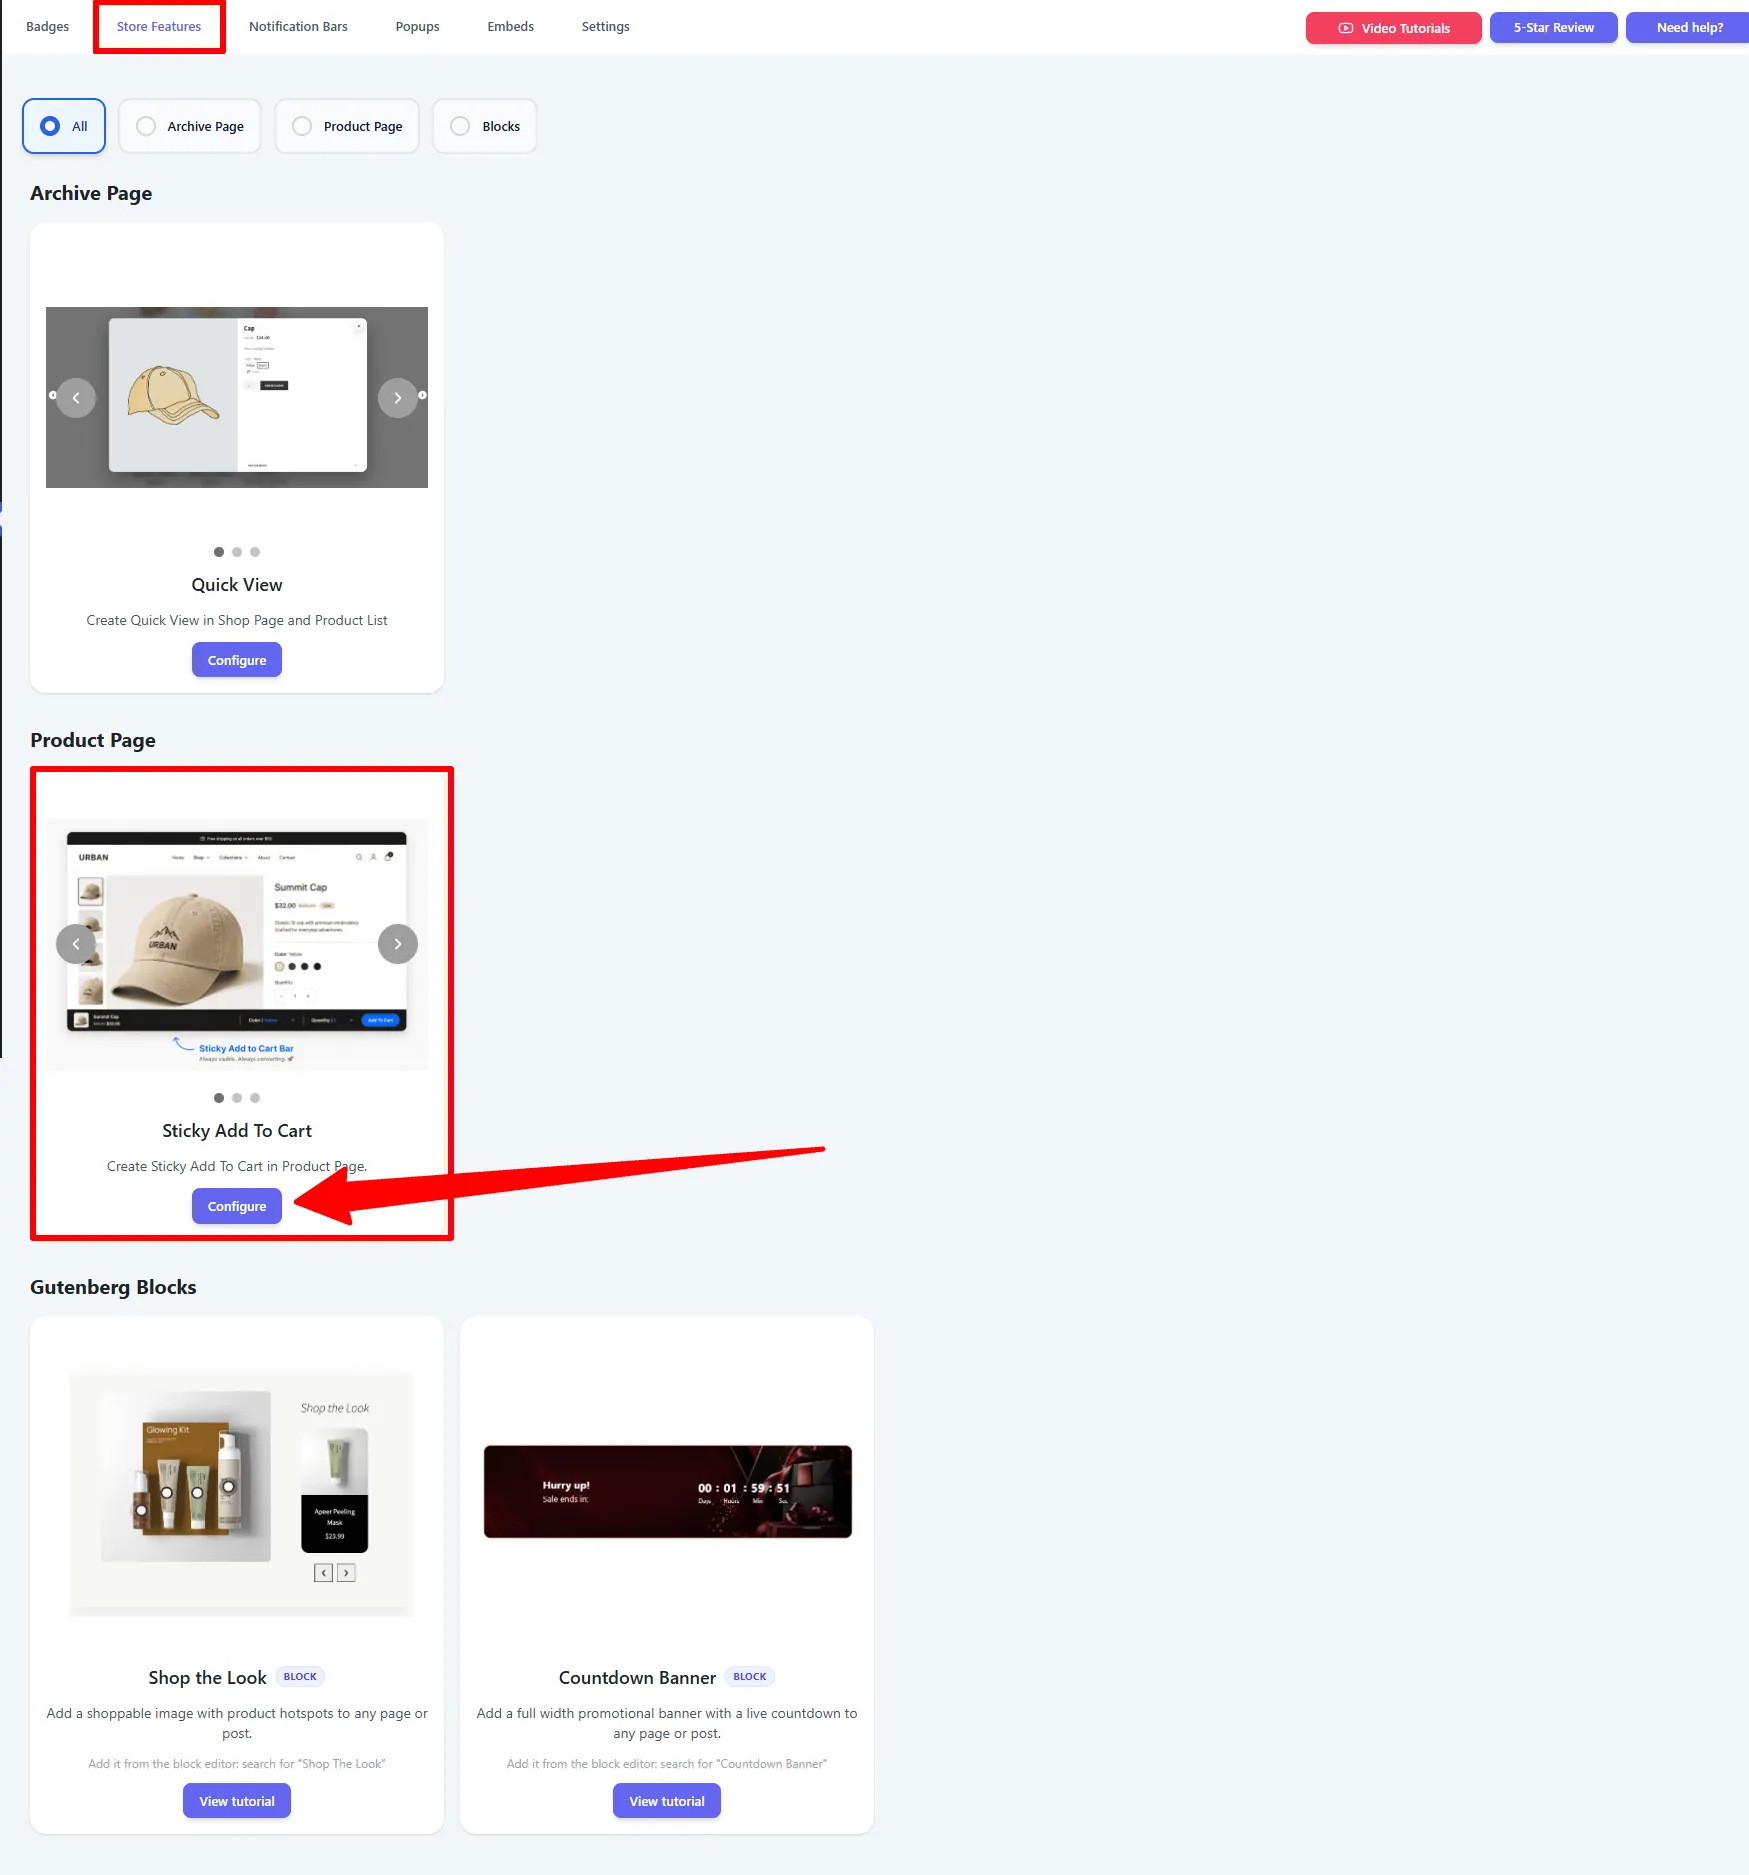
1. Open it from Store Features
Go to Sale Badges → Store Features, then on the Sticky Add To Cart card (under Product Page) click Configure.
2. General settings
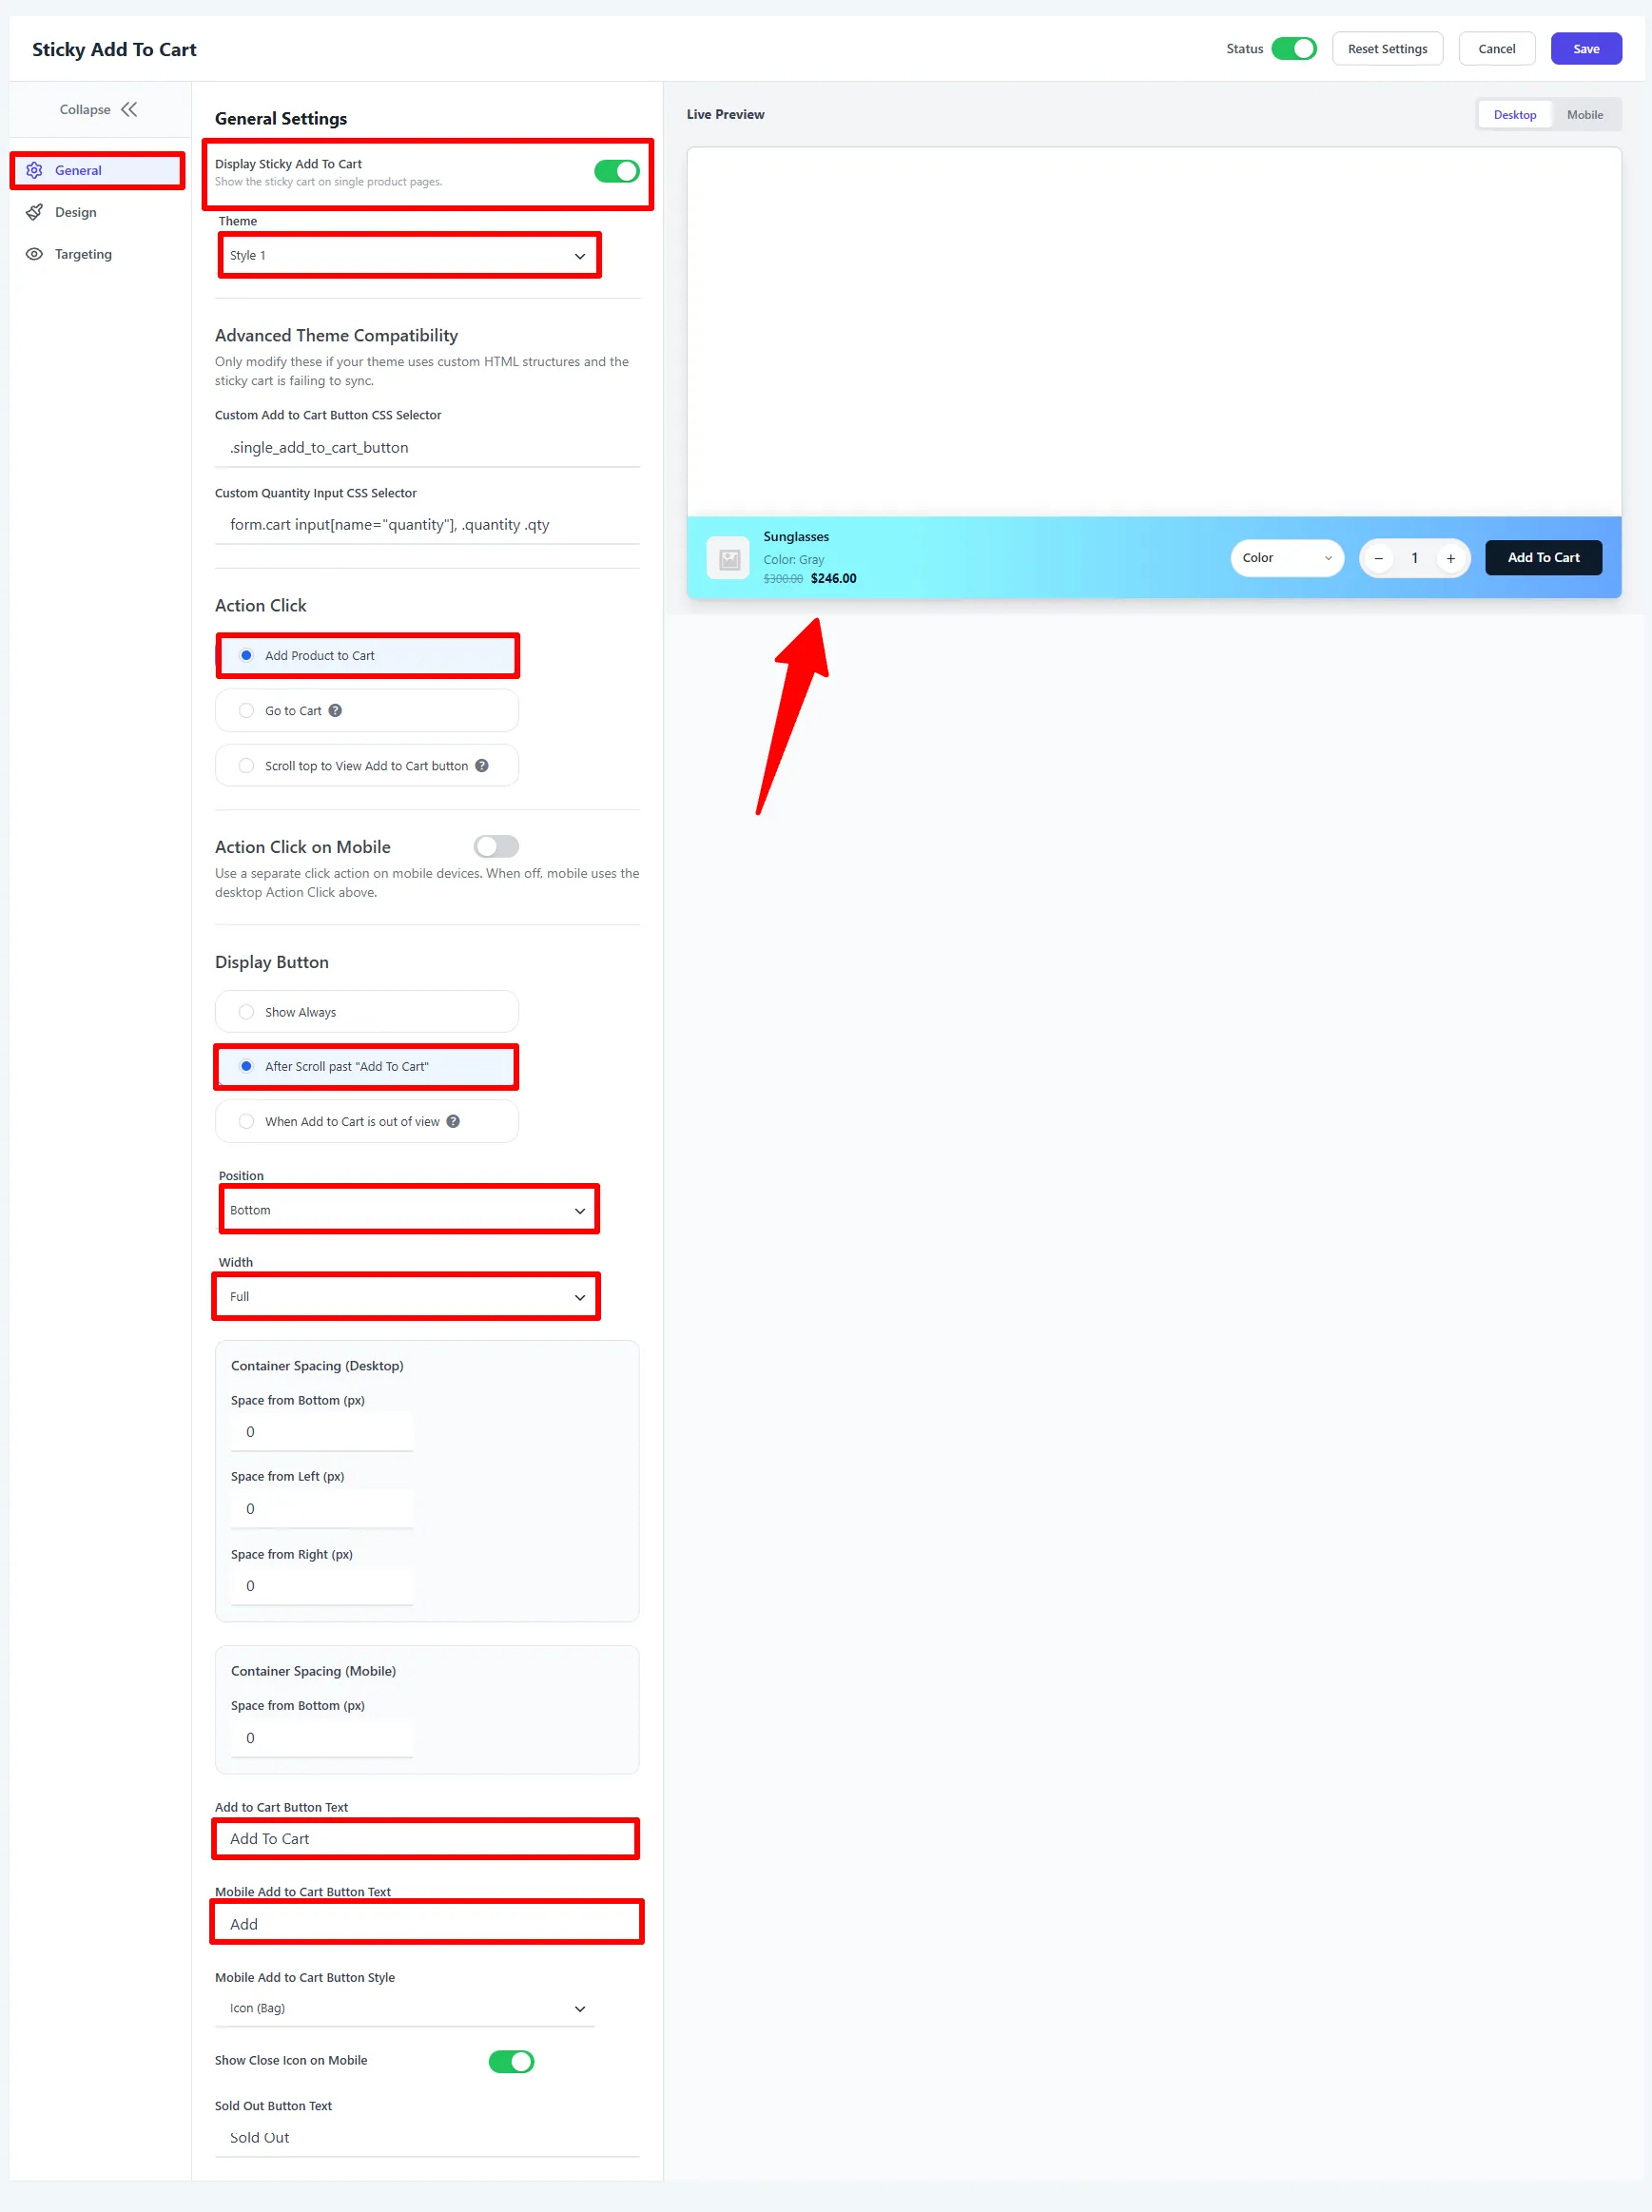
On the General tab, toggle Display Sticky Add To Cart on and set the core behavior. The Live Preview on the right updates as you go.
| Setting | What it does |
|---|---|
| Theme | Style 1, Style 2 (Popover / Inline Selector), or Style 3. |
| Action Click | What the button does — Add Product to Cart, Go to Cart, or Scroll to the Add to Cart button (with an optional separate Action Click on Mobile). |
| Display Button | When the bar appears — Show Always, After Scroll past "Add To Cart", or When Add to Cart is out of view. |
| Position / Width | Top or Bottom; Full or Custom width. Plus Container Spacing for desktop & mobile. |
| Button text | Add to Cart Button Text, a shorter Mobile label, Mobile Button Style (Icon (Bag) / Text), Show Close Icon on Mobile, and Sold Out Button Text. |
| Advanced Theme Compatibility | Custom Add to Cart / quantity CSS selectors — only if your theme's markup stops the bar syncing. |
3. Design
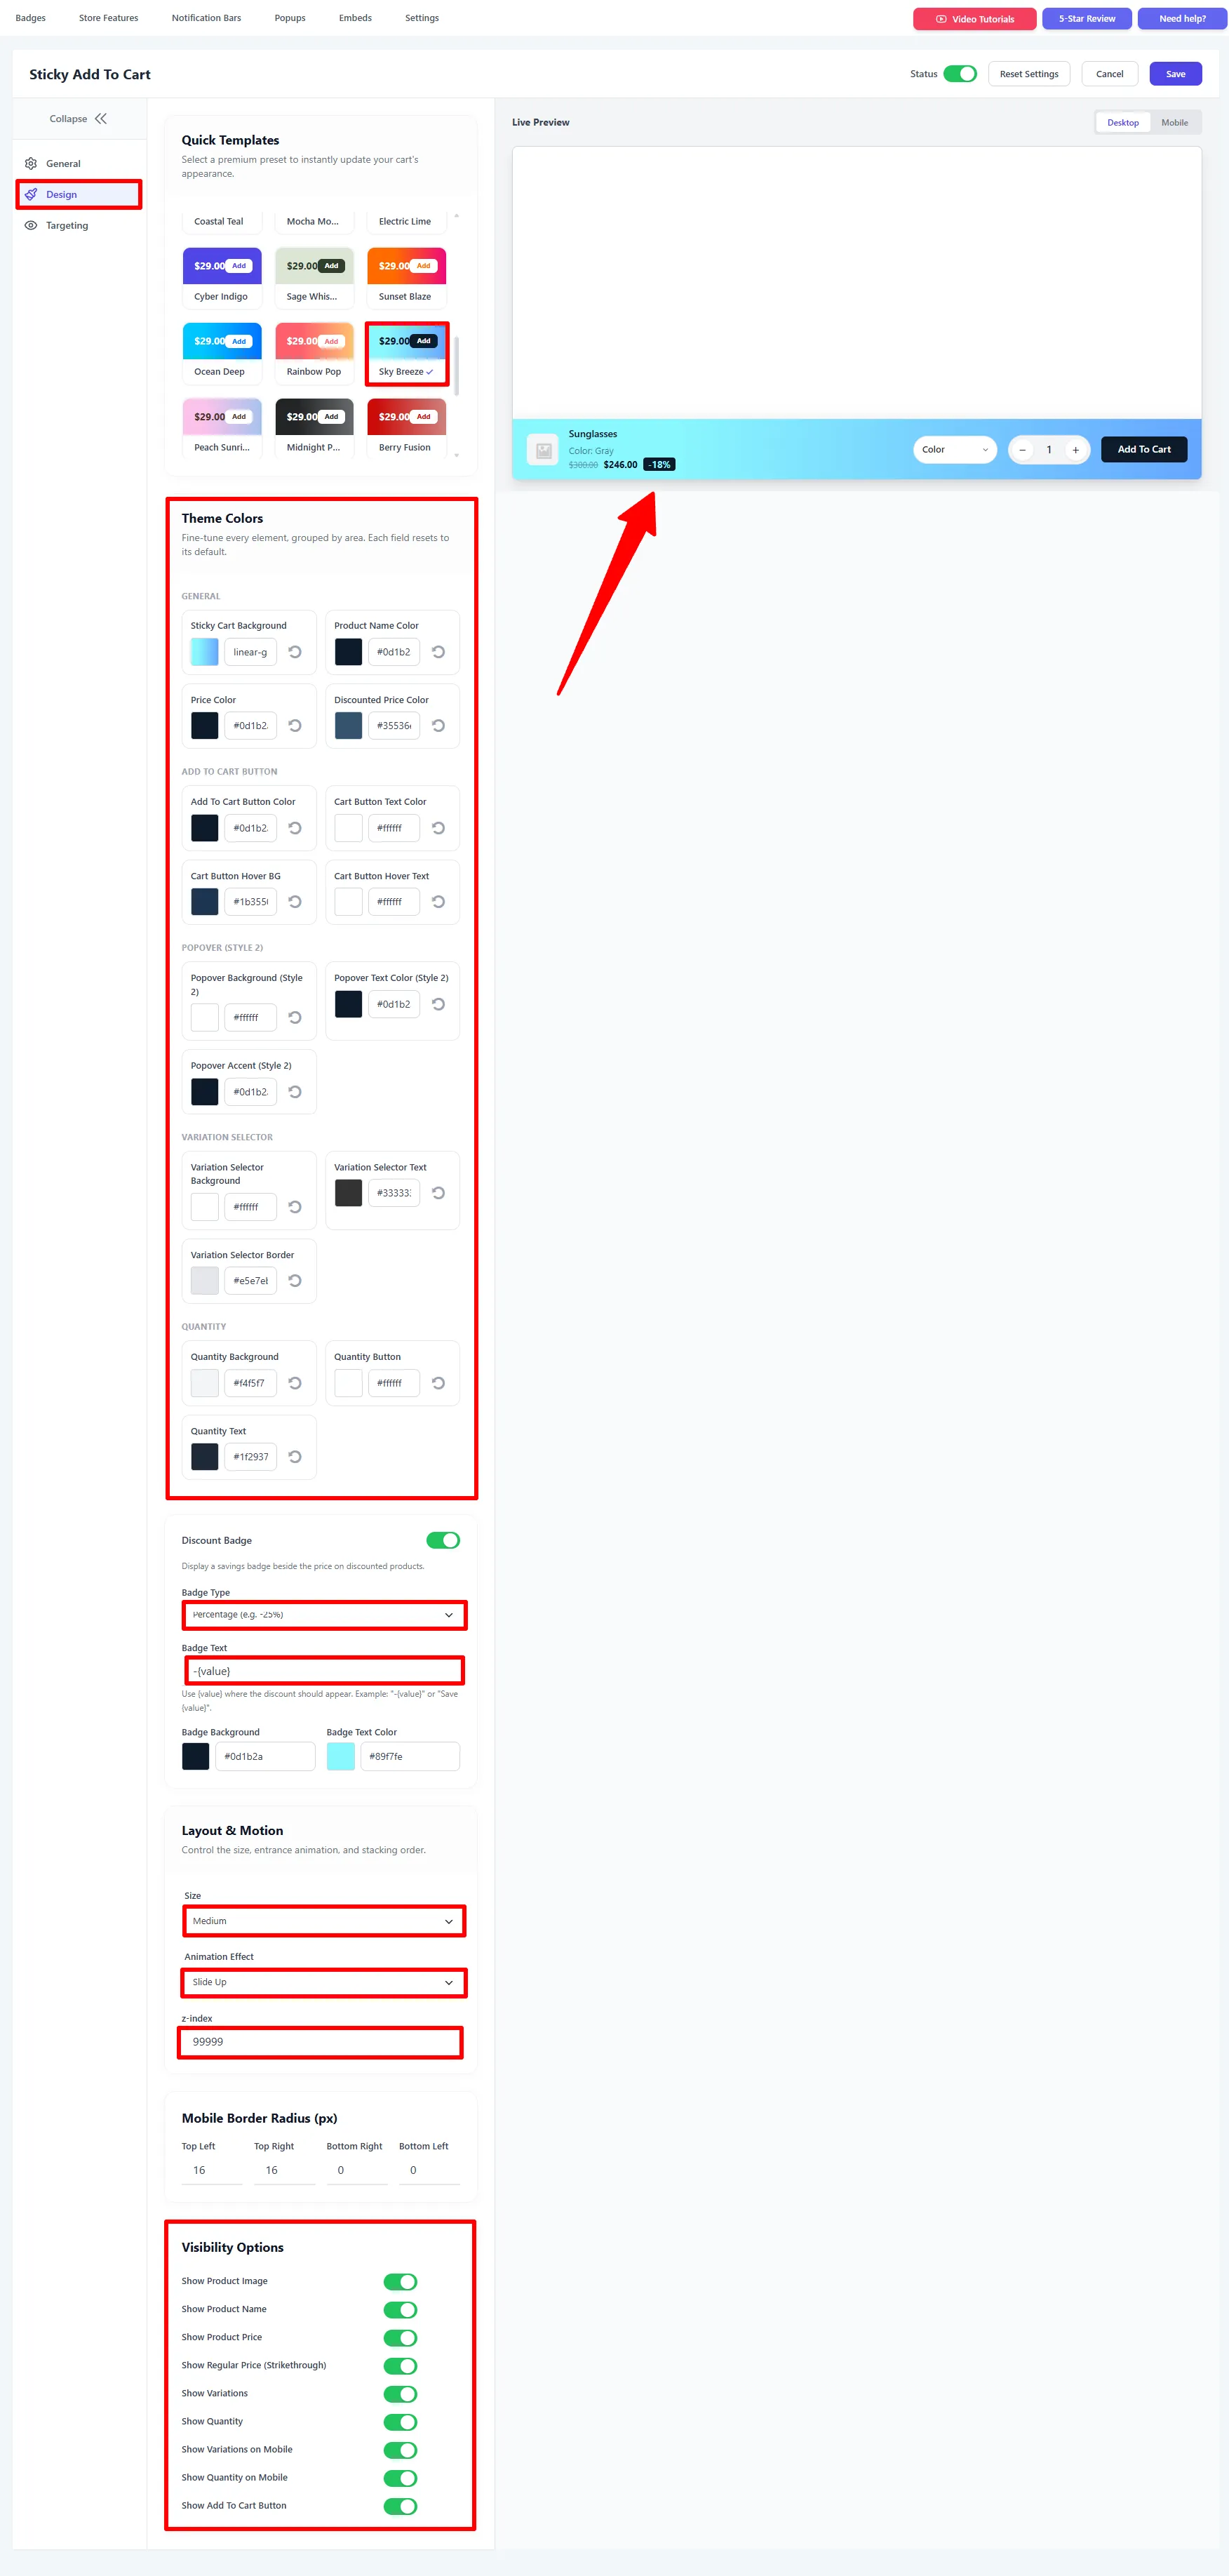
On the Design tab, apply a look and choose what shows:
| Section | What it does |
|---|---|
| Quick Templates | One-click color presets (e.g. Coastal Teal, Sky Breeze, Sunset Blaze, Ocean Deep, Midnight Pulse, Berry Fusion). Editing a color switches it to Custom. |
| Theme Colors | Fine-tune every element by area: General (background, name, price, discounted price), Add to Cart Button, Popover (Style 2), Variation Selector, and Quantity. |
| Discount Badge | Show a savings badge on discounted products — Badge Type (Percentage / Amount), Badge Text using {value} (e.g. -{value} or Save {value}), and its colors. |
| Layout & Motion | Size (Small / Medium / Large), Animation Effect (Fade, Slide Up/Down/Left, Zoom, Bounce, Flip 3D), z-index, and Mobile Border Radius. |
| Visibility Options | Toggle the product image, name, price, regular (strikethrough) price, variations, quantity, and Add to Cart button — with separate on Mobile switches. |
4. Targeting, then Save
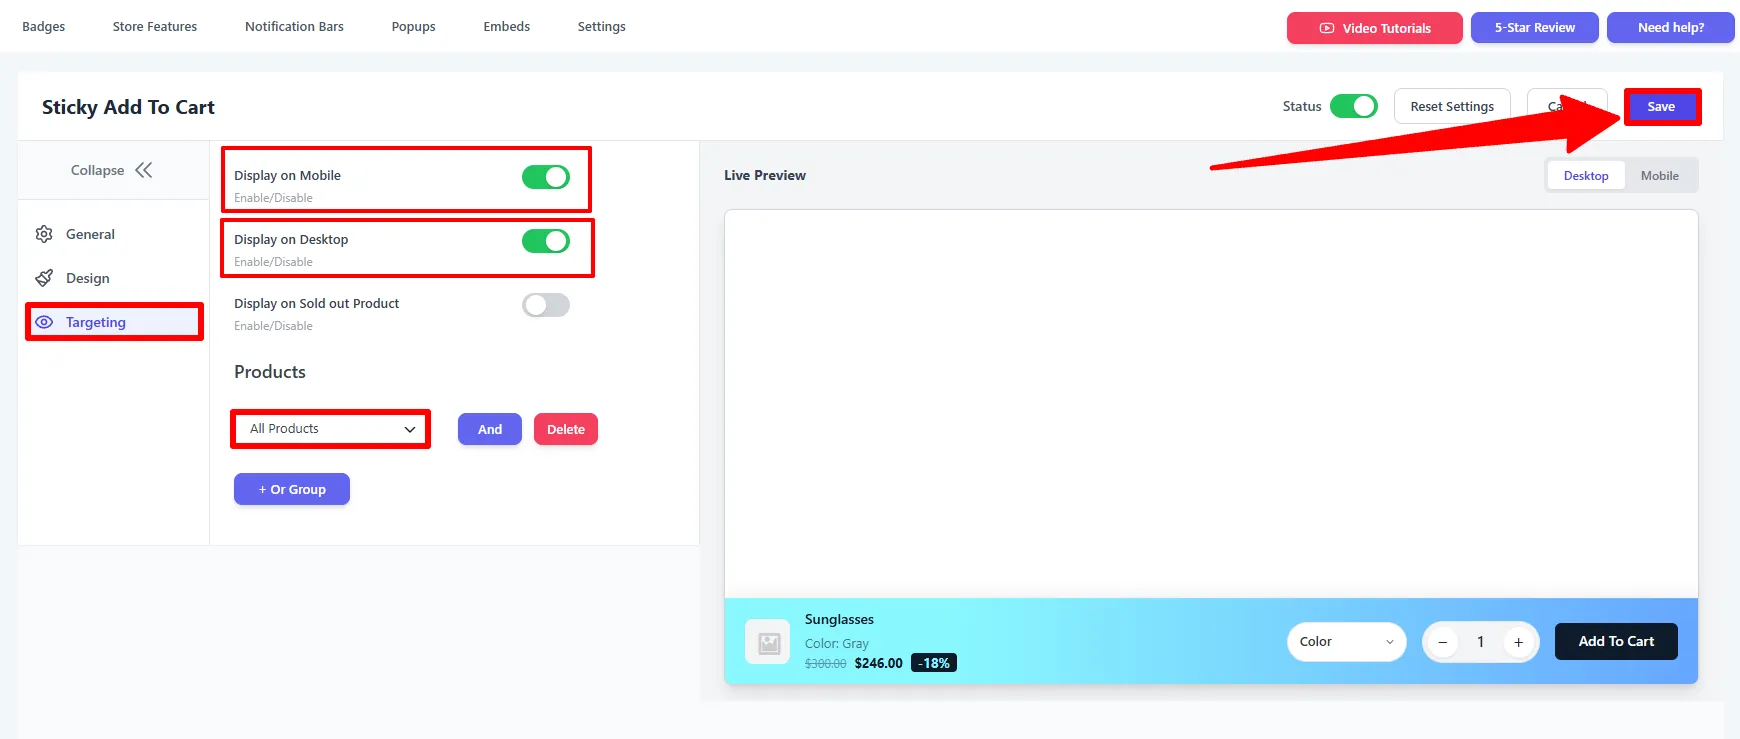
On the Targeting tab, choose where the bar shows and click Save.
| Setting | What it does |
|---|---|
| Display on Desktop / Mobile | Turn the bar on per device. |
| Display on Sold out Product | Show (or hide) the bar for out-of-stock items. |
| Products | Limit it by All Products, Products, Categories, Tags, Stock status, Is on sale, or Brands — each Included / Excluded, combined with And / + Or Group. |
🧪 Example configuration
The bar shown in the screenshots:
| Setting | Value |
|---|---|
| Theme | Style 1 |
| Action Click | Add Product to Cart |
| Display Button | After Scroll past "Add To Cart" |
| Position / Width | Bottom / Full |
| Color template | Sky Breeze |
| Discount Badge | On — Percentage, -{value} |
| Size / Animation | Medium / Slide Up |
| Targeting | Desktop + Mobile, All Products |
What customers see
As the shopper scrolls past the fold, a slim bar slides in from the bottom with the product, its price (and a savings badge if it's on sale), variation and quantity controls, and a prominent Add to Cart button — so buying never requires scrolling back up.
SEO, mobile UX, and conversion checklist
Keep the original WooCommerce product form in the page and use the sticky cart bar as a synchronized shortcut. The bar should reflect the selected variation, quantity, price, stock state, and discount; it should never display a stale price or an Add to Cart action for an unavailable variation. Use When Add to Cart is out of view on long pages so the bar does not compete with the native purchase area.
Test the mobile add to cart WooCommerce experience with one simple product, one variable product, an unavailable variation, an out-of-stock product, and a theme with a sticky header. Check safe spacing around browser controls, keyboard focus, screen-reader labels, close behavior, and the z-index. Track sticky-bar impressions, clicks, variation changes, add-to-cart success, cart visits, checkout starts, and completed orders. Keep product titles, descriptions, canonical URLs, prices, availability, and structured data in the underlying product page so the WooCommerce product page conversion layer does not interfere with search visibility. See Google’s Product structured data guidance for the data that should remain accurate.
Frequently Asked Questions
What is a WooCommerce sticky add to cart bar?
A WooCommerce sticky add to cart bar is a compact purchase control that stays visible while a shopper scrolls a single product page. Sale Booster can show the product, price, variations, quantity, discount badge, and Add to Cart button.
When should the sticky cart bar appear?
Use When Add to Cart is out of view for long product pages, or After Scroll past “Add To Cart” when the bar should appear after the native form. Show Always is suitable only when the persistent bar does not obstruct important content.
Does Sticky Add to Cart support variable products?
Yes. Keep Show Variations enabled when shoppers must select size, color, or another attribute before adding to the cart. Test each required option and confirm the sticky bar updates after a variation changes.
Can I show the sticky add to cart bar only on mobile or selected products?
Yes. Use the device settings and Targeting rules to include or exclude products, categories, tags, stock status, sale status, brands, or other supported conditions.