WooCommerce Countdown Banner Block: Setup & SEO Guide
Overview
The WooCommerce Countdown Banner is a full-width promotional banner with a live countdown built into a Gutenberg block. It combines a headline, supporting line, optional button or coupon code, and ticking timer in one of six layouts, with a ready-made design or your own colors and background image.
It's the block to reach for when a whole page needs to say "this offer ends soon": a Black Friday landing page, a flash-sale post, a seasonal homepage hero.
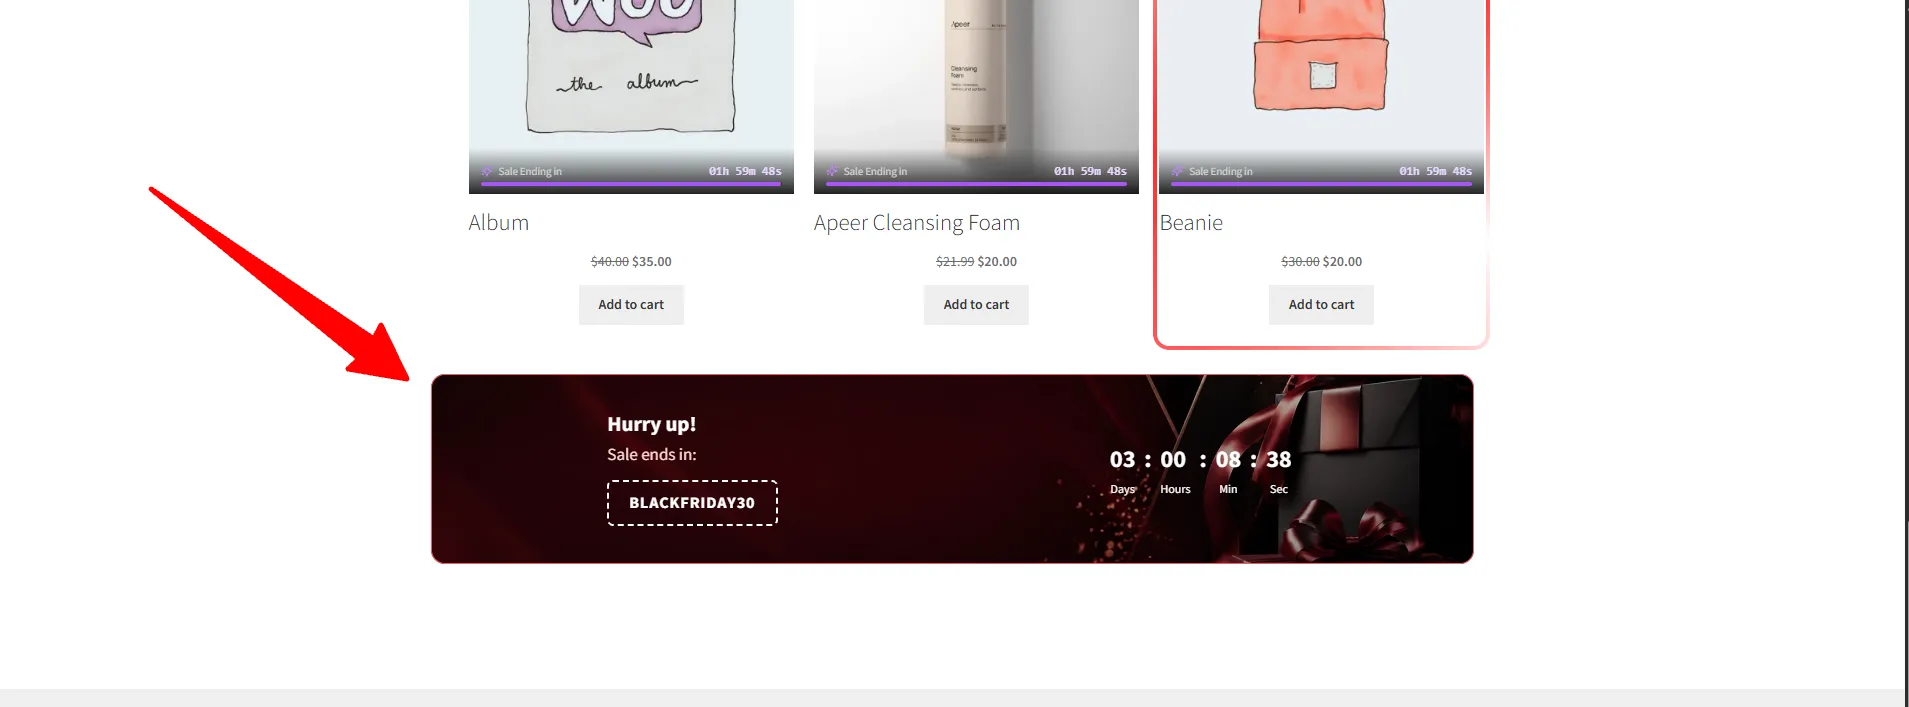
The Countdown Banner is available in the Pro version, both as this block and as an embed type under Sale Badges → Embeds.
How it works
You're running a 48-hour flash sale. You open your campaign page, insert the Countdown Banner block, and pick the Crimson Rush design from the Banner design library — which sets a coordinated background, colours, and timer in one click. You write the headline, add your coupon code, and set the end date. Shoppers land on the page and see the offer, the deadline, and the ticking clock in one glance — and the banner removes itself automatically the moment the sale ends.
Step-by-step setup
- Edit the page or post and insert the Countdown Banner block.
- Open Layout and pick an arrangement (each sets a sensible height and padding).
- Open Banner design library → Browse designs and click a ready-made design.
- Open Content and set the Headline, Description, and Call to action (None / Button / Coupon code).
- Open Countdown and set the end date, or switch to evergreen.
- Optionally open Image Background and upload an image.
- Fine-tune under Size & Spacing, then Save.
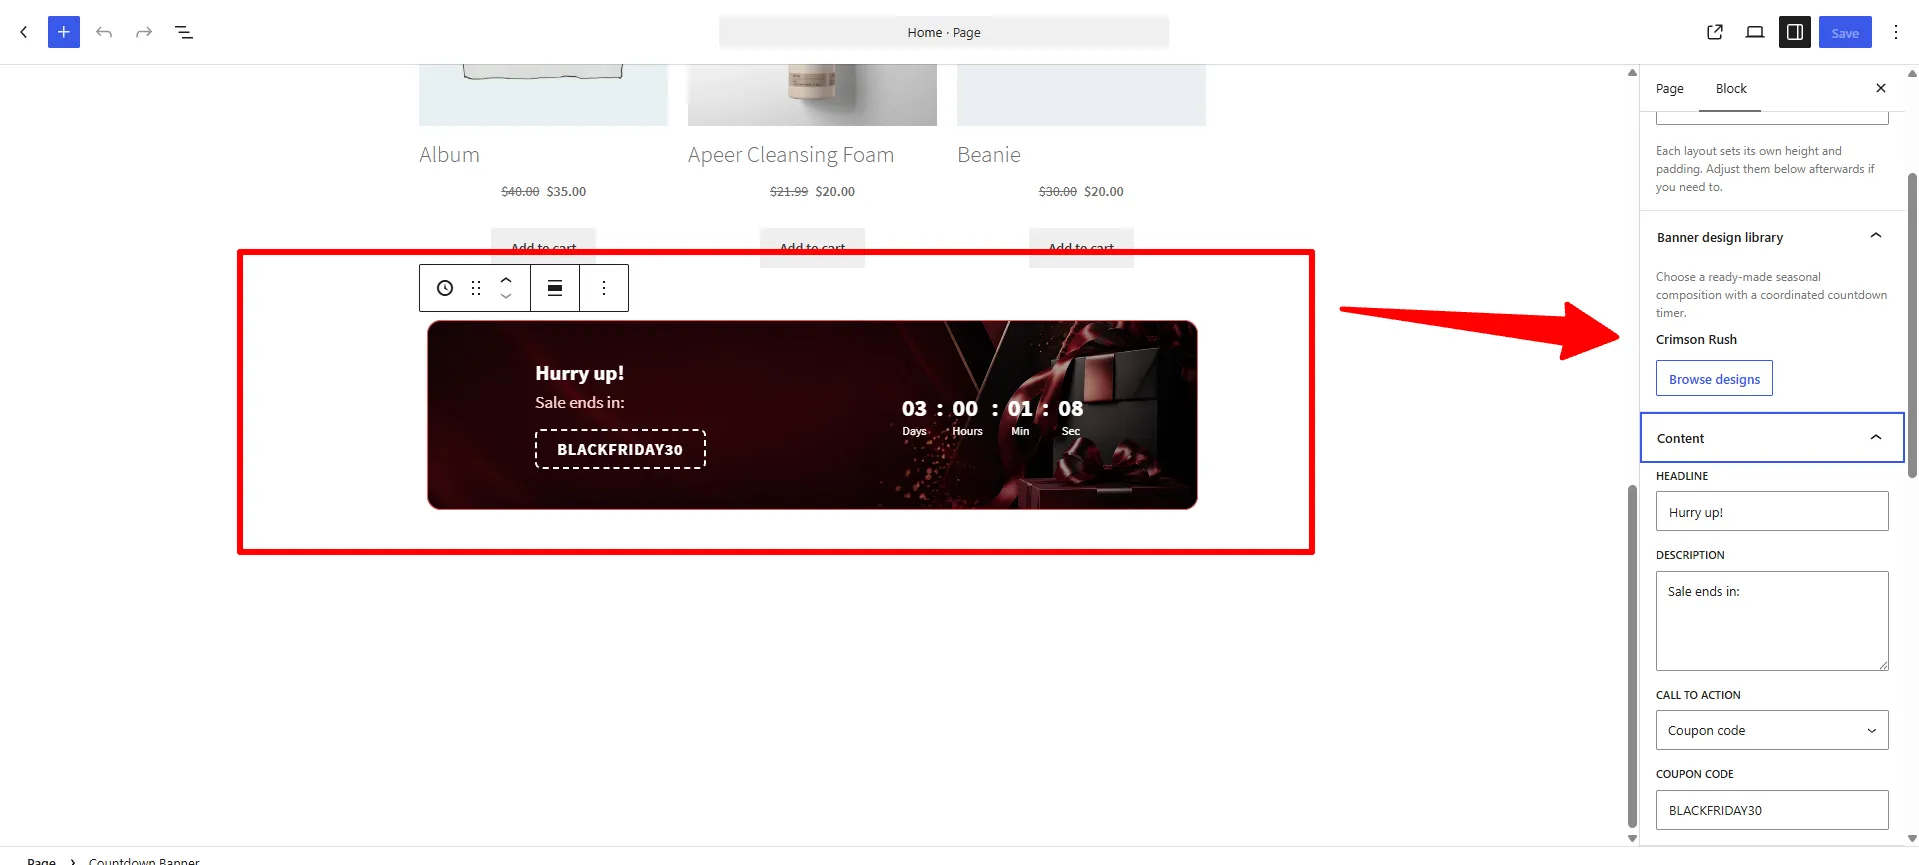
Banner design library
The Banner design library gives you ready-made seasonal compositions — a coordinated background image, colours, and countdown timer in one click. Open it from the block sidebar with Browse designs.
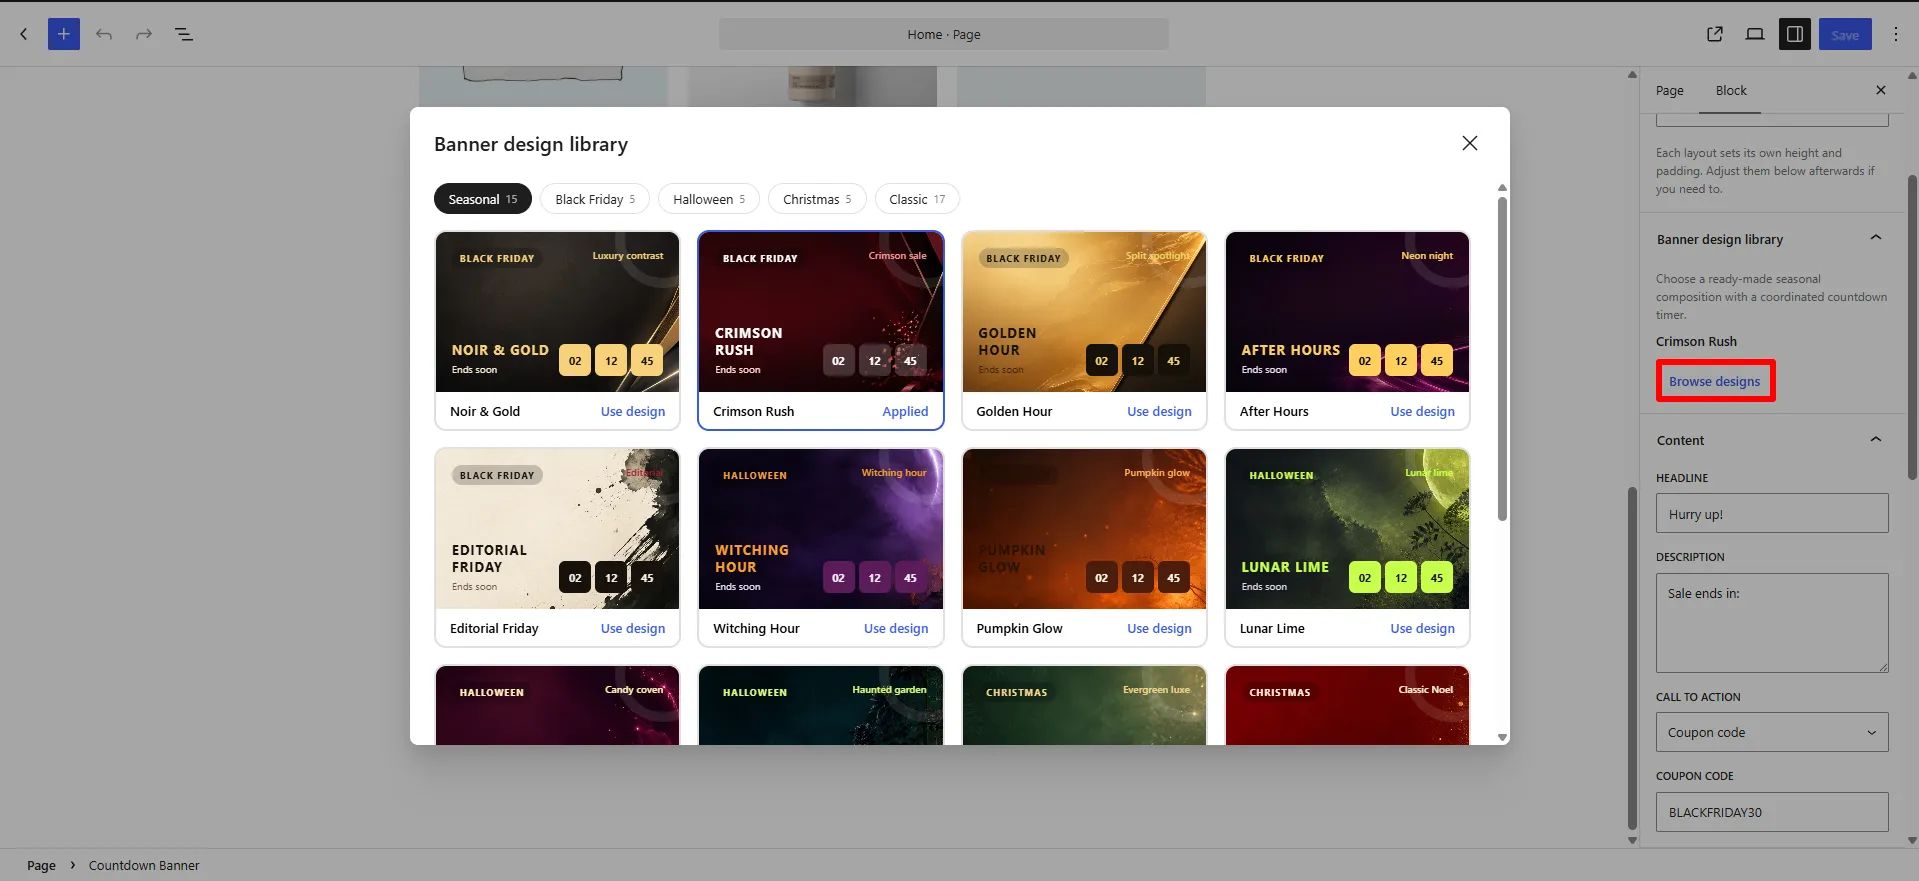
The designs are grouped into categories:
| Category | Count | Example designs |
|---|---|---|
| Seasonal | 15 | A mix of the ones below. |
| Black Friday | 5 | Noir & Gold, Crimson Rush, Golden Hour, After Hours, Editorial Friday. |
| Halloween | 5 | Witching Hour, Pumpkin Glow, Lunar Lime, Candy Coven, Haunted Garden. |
| Christmas | 5 | Evergreen Luxe, Classic Noel, and more. |
| Classic | 17 | Neutral, non-seasonal compositions. |
Click Use design to apply one — the active design shows Applied. A design is a starting point: you can still adjust the colours, upload your own Image background, or change the Layout afterwards.
Layouts
Choosing a layout also applies a sensible height and padding for that shape. You can adjust both afterwards under Size & Spacing.
| Layout | Shape | Default height |
|---|---|---|
| Text left, timer right | Balanced two-column strip. | 180px |
| Timer left, text right | The same, mirrored — leads with the clock. | 180px |
| Text aligned left, timer far right | Text anchored to the left edge, timer pushed right. | 300px |
| Compact bar: timer with button beside it | Slim strip: timer and a pill button, centred together. | 100px |
| Centered hero | Headline, description, and timer stacked and centred. | 520px |
| Image on top, text and timer on a bar below | Image band with a coloured bar underneath. | 540px |
On mobile
Every layout stacks vertically on screens narrower than 768px, and the banner's height becomes automatic so nothing is cut off. Which element ends up on top follows the layout: Timer left and Compact bar put the timer above the text, the others put the text first. The Image on top layout keeps its image band visible above the stacked content.
Content
The Content panel holds the text and call to action:
| Field | What it does |
|---|---|
| Headline | The bold top line (e.g. Hurry up!). |
| Description | The supporting line beneath it (e.g. Sale ends in:). |
| Call to action | None, a Button (text + URL), or a Coupon code. |
| Coupon code | (Call to action → Coupon code) the code shown on the banner (e.g. BLACKFRIDAY30). |
Countdown
| Mode | What it does | When & why to use |
|---|---|---|
| Count down to a date | Every visitor sees the same deadline. | Real, dated campaigns — a sale that genuinely ends Sunday. |
| Evergreen (per visitor) | Each visitor gets their own timer, starting on their first view. | Always-on urgency for offers with no fixed end. |
For evergreen you set the minutes per visitor and what happens at zero — Restart the timer, or Hide banner.
A dated countdown in the block is read in each visitor's own browser time zone. If your store's audience spans time zones and the deadline must be exact for everyone, use the Countdown Banner embed instead — embeds receive the end time calculated on the server in your store's time zone.
When a dated countdown reaches zero, the banner removes itself from the page — no expired offer left on display.
Image background
Upload any image as the banner background, then control how it fills the space:
| Image fit | What it does | When & why to use |
|---|---|---|
| Cover | Fills the banner and crops whatever doesn't fit. Proportions preserved. | The default. Best for photos. |
| Contain | Shows the whole image, leaving the banner colour around it. | Logos, artwork, anything that must not be cropped. |
| Stretch | Forces the image to exactly the banner's width and height. | Only when the image already matches your banner's proportions — it distorts otherwise. |
Focus point (centre, top, bottom, left, right) decides which part survives when using Cover. If your subject sits on the right of the photo and keeps getting cropped, set the focus to Right rather than re-cropping the file.
Overlay opacity lays your overlay colour between the image and the text. A dark overlay at 30–50% is what keeps white text readable over a busy photo.
Recommended image size
Because Cover crops to fit, the aspect ratio matters more than exact pixels. Match the ratio to the height you've set:
| Use | Size |
|---|---|
| Recommended starting point | 1920 × 600 |
| Retina / high-DPI screens | 2560 × 800 |
| Slim strip (height 180 or less) | 1920 × 400 |
| Tall hero (height around 520) | 1920 × 700 |
- Aim for under 250 KB, and use WebP where you can — this image loads for every visitor to the page.
- Keep the subject centred. On mobile the banner becomes narrow and tall, so Cover crops the sides hard.
Size & spacing
| Option | What it does |
|---|---|
| Height | The banner's height in pixels. Font-size changes won't alter it. |
| Width (%) | Banner width as a percentage of its container. |
| Corner radius | Rounds the banner's corners. |
| Padding | Independent top, right, bottom, and left spacing. |
🧪 Example configuration
The banner shown in the screenshots:
| Setting | Value |
|---|---|
| Design | Black Friday → Crimson Rush |
| Layout | Text left, timer right |
| Headline | Hurry up! |
| Description | Sale ends in: |
| Call to action | Coupon code — BLACKFRIDAY30 |
| Countdown | Count down to a date |
What customers see
A bold, unmissable banner that states the offer and shows exactly how long is left — then quietly disappears when the offer expires, so nobody ever sees a dead sale.
- Give the deadline a reason ("ends Sunday", "while stocks last") — a bare clock is less persuasive than a clock with a cause.
- Use one banner per page. Two competing countdowns dilute the urgency.
- Check the mobile result: the layout restacks, so a headline that fits on one desktop line may wrap to three.
SEO, accessibility, and campaign QA
Use a WooCommerce sale banner to clarify a real offer on a campaign page, not to replace the page’s title, supporting copy, product links, or checkout information. Write a descriptive headline, keep the CTA destination relevant, provide useful alt text for a meaningful background image, and maintain sufficient text contrast after applying an image overlay. The block’s visible copy should match the campaign terms and the linked offer.
Test the WooCommerce flash sale banner at mobile widths, with keyboard navigation, and after the timer reaches zero. Confirm that the date uses the visitor’s browser time zone as documented above, that an evergreen timer is clearly a per-visitor experience, and that coupon codes are valid for the products and dates advertised. Track banner impressions, CTA clicks, coupon redemptions, product-page visits, add-to-cart events, and completed orders. If the promotion changes product price or availability, keep the underlying product data and structured data synchronized with WooCommerce; see Google’s Product structured data guidance.
Frequently Asked Questions
How do I add a WooCommerce Countdown Banner block?
Edit a page or post, open the WordPress block inserter, search for Countdown Banner, and insert it. Configure the layout, design, content, countdown mode, image background, size, and spacing from the block settings sidebar, then preview and publish.
Can the WooCommerce countdown banner block show a coupon?
Yes. Set Call to action to Coupon code, enter the campaign code, and check that the coupon’s eligibility and expiry match the banner copy. A Button CTA can link shoppers to a shop, category, or product page instead.
Does the WooCommerce Countdown Banner block support evergreen timers?
Yes. Evergreen mode starts a separate timer for each visitor. Set the duration in minutes and choose whether the banner restarts or hides at zero; use a dated timer when every shopper must see the same campaign deadline.
What happens when the Countdown Banner reaches zero?
For a dated campaign, the banner removes itself from the page when the deadline is reached. Test the expired state and remove or update any nearby copy that still promises an unavailable offer.