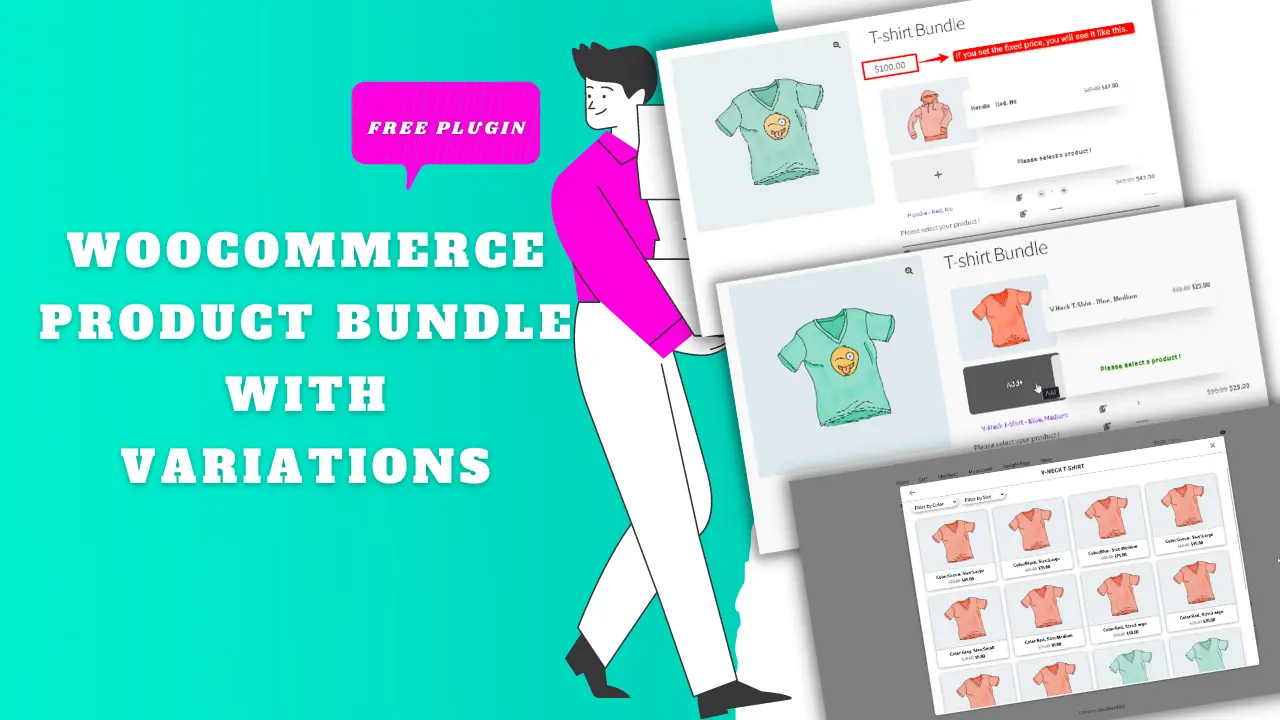
Do you want to create powerful WooCommerce Product Bundle with Variations and boost your store’s sales? In this article, we’ll show you how to build flexible product bundles using variable products and product variations—the smart way.
With product bundles, customers can create their own custom bundles from available products, choose the desired variations, and set the quantity for each item. The result? A fully personalized bundle offered at an attractive discounted price that encourages higher spending.
Product bundles are not just a sales feature—they’re a proven strategy to increase average order value (AOV), improve customer experience, and drive more conversions. When done right, bundles help you sell more products in a single order while giving customers the feeling of control and savings.
In this guide, you’ll learn how to create professional WooCommerce bundles with variations that are easy to manage, visually appealing, and optimized for higher revenue.
A WooCommerce Product Bundle is a product type that combines multiple related products into a single package. Instead of buying items separately, customers can purchase them together as one bundle—often at a discounted price.
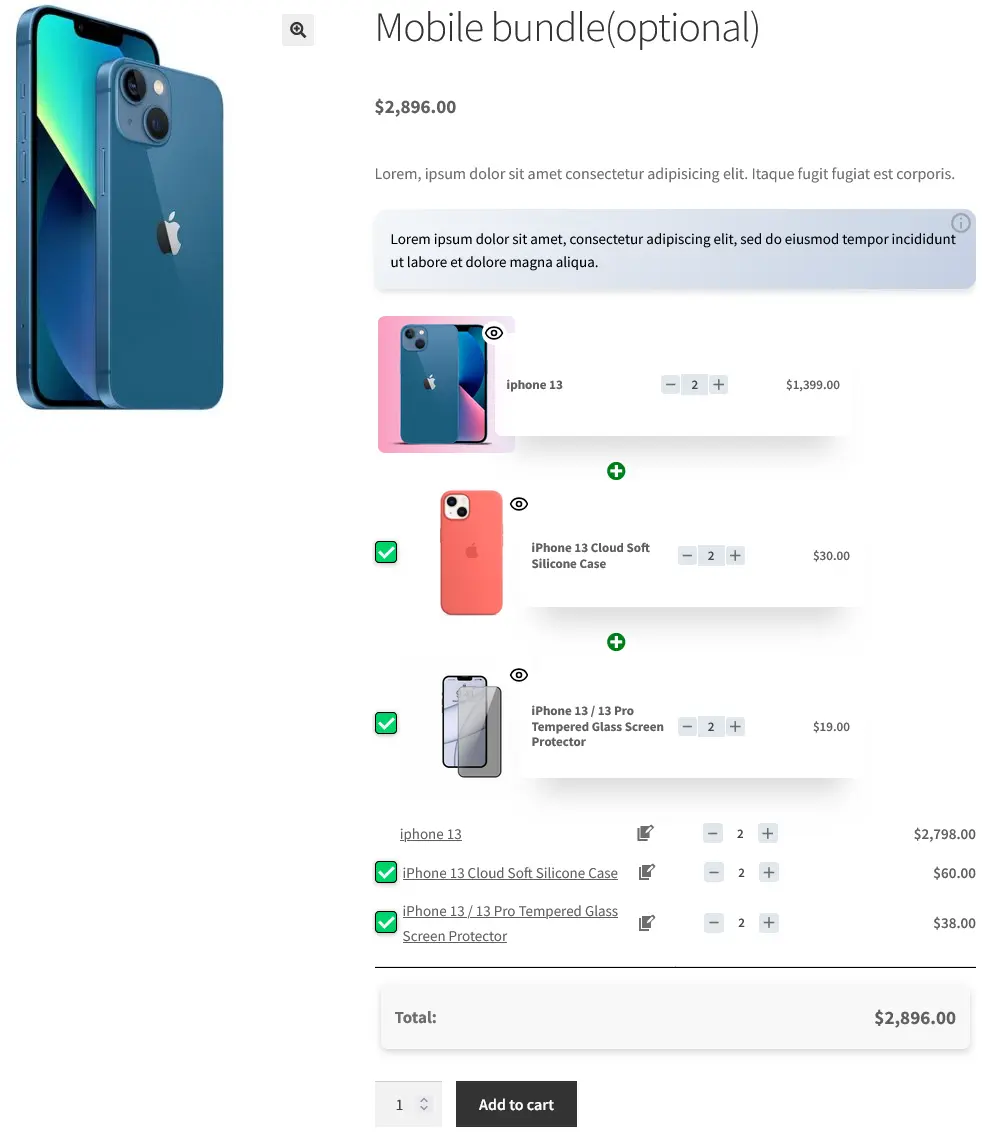
For example, an iPhone bundle may include an iPhone 14, a protective case, and a screen protector, all in one convenient offer. Product bundles help improve the shopping experience and increase average order value (AOV) by encouraging customers to purchase more in a single order.
What is the goal of the WooCommerce Product Bundle?
The main goal of a WooCommerce Product Bundle is to increase your store’s sales by encouraging customers to purchase multiple products in a single order. By offering attractive bundles with a discounted price, customers are more likely to buy related products together instead of purchasing them separately. Product bundles also improve the shopping experience by making it easier and more convenient for customers to get everything they need in one package.
Benefits of Creating Product Bundles in WooCommerce
Some of the important benefits of creating product bundles in WooCommerce are:
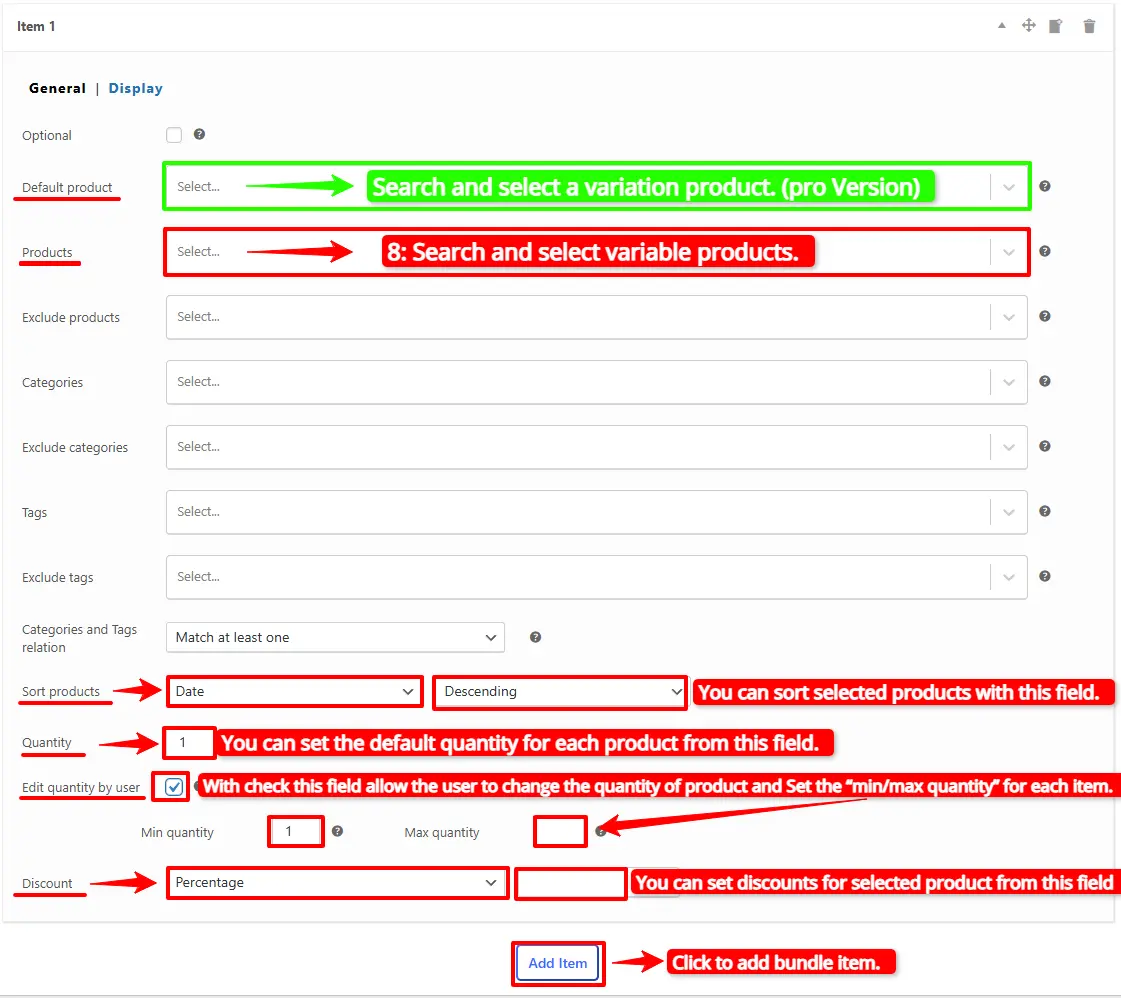
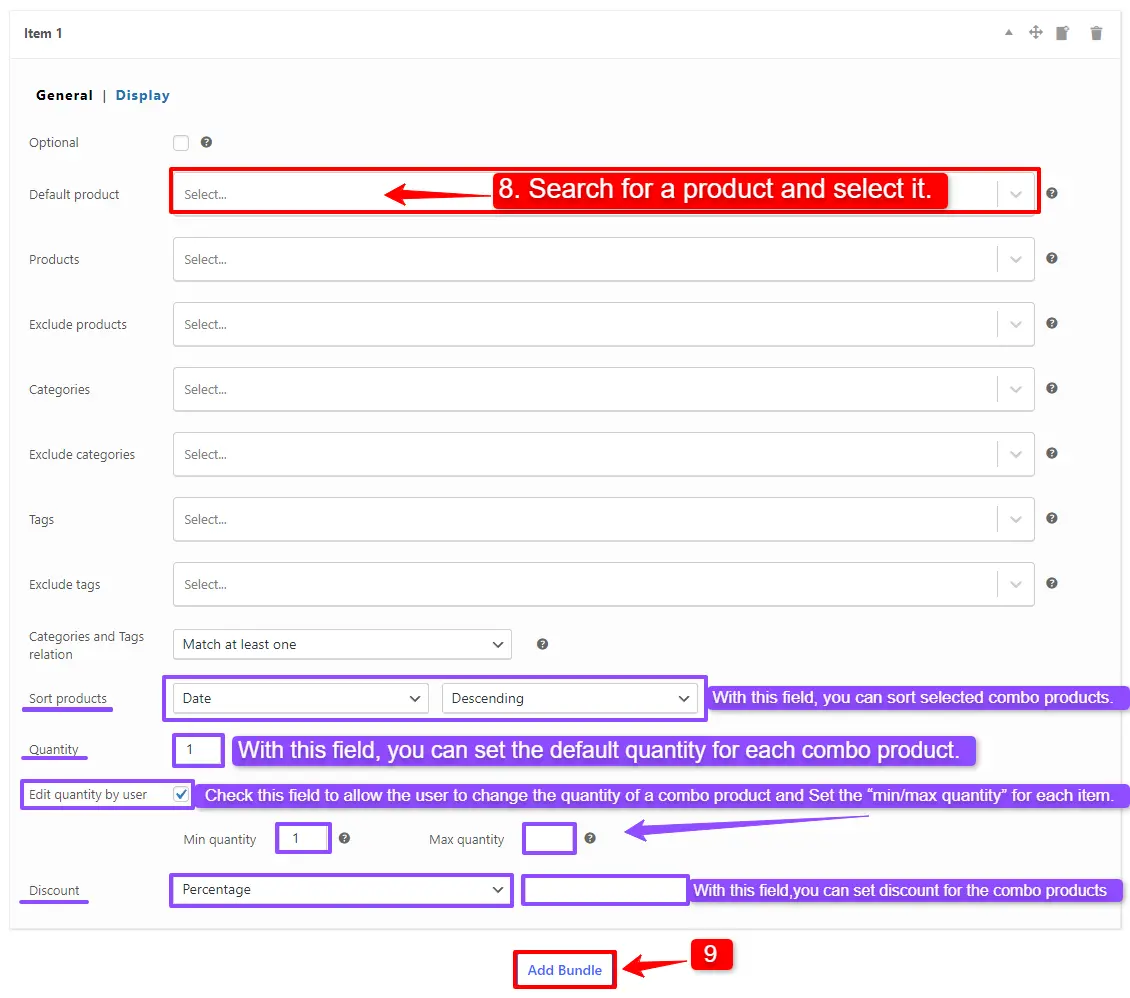
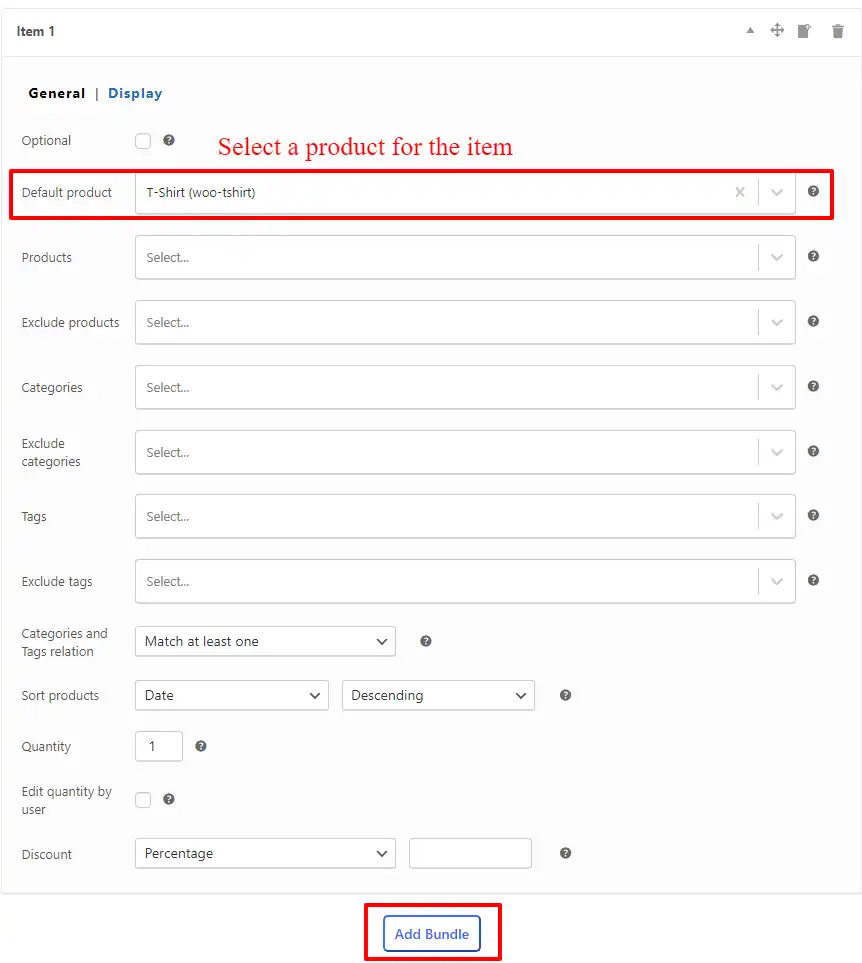
To set a default product for the item, in the “Default Product” field, search for a variation and select it. Selecting variation products is only available in the Pro version.
Step 4: Customising WooCommerce Product Bundle
You can also configure the below settings to your WooCommerce Product Bundlein the item field:
Sort products: With this field, you can sort selected products by “ID”, “Title”, “Menu order”,” Date”, “Price”, “popularity” and“Rating”.
Quantity: In this field, you can set the default quantity for each product.
Edit quantity by user: Check this field to allow the user to change the quantity of product and Set the “min/max quantity” for each item.
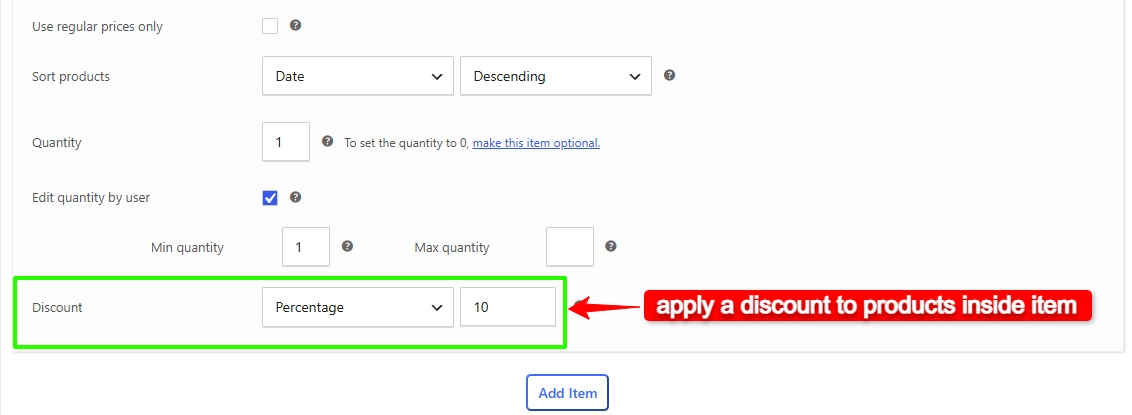
Discount: In this field, you can set discounts for product bundles by percentage, price or fixed price.
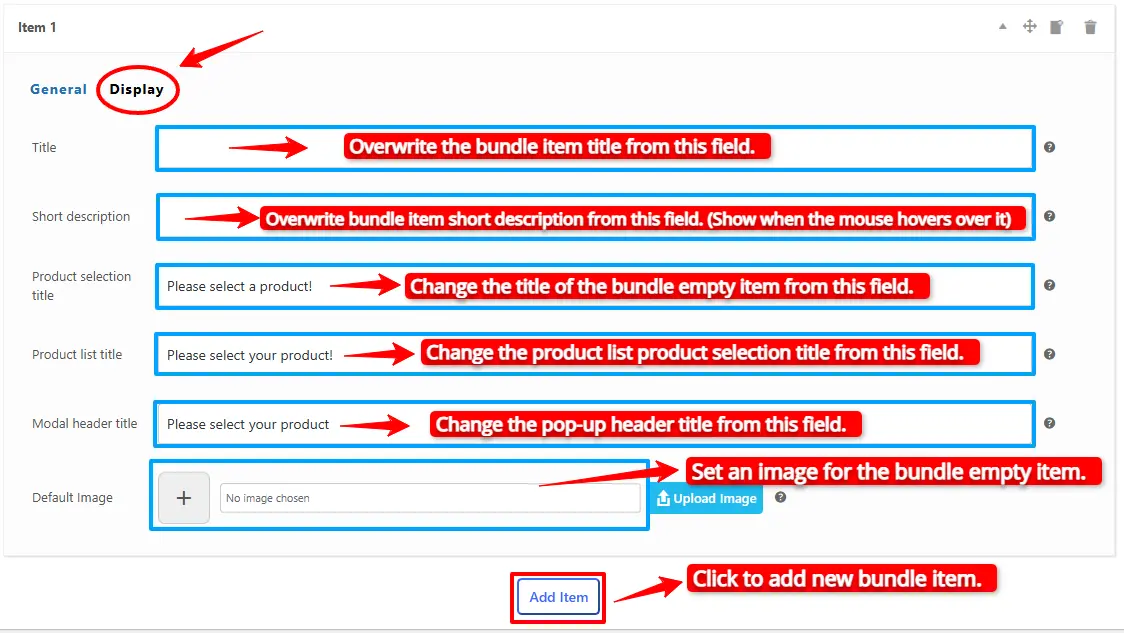
Now you can go to the “display” tab of the item and configure the following sections:
Overwrite bundle item title.
Overwrite bundle item short description. (Show when the mouse hovers over it)
Change the title of the bundle empty item.
Change the product list product selection title.
Change the pop-up header title.
Set an image for the empty item.
9. Then you can click on “Add item” to add a new item to the bundle and select a default product for it. We have created two bundle items .
Step 5: Set price for Product Bundle
The plugin allows two types of pricing for product bundles.
Fixed Price: Sets a fixed price for the whole bundle product.
Auto Calculate Bundle Price: Allow the plugin to calculate the bundle product price using the selected products for the bundle items.
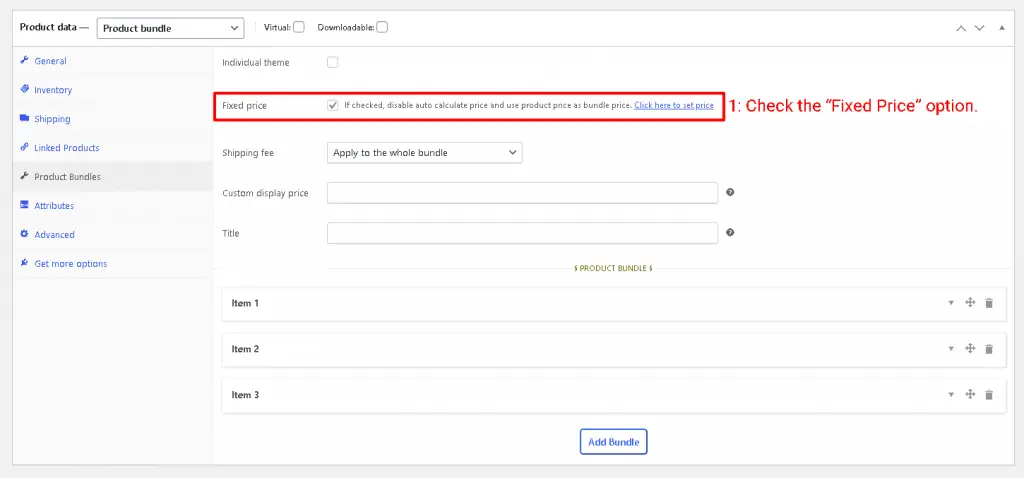
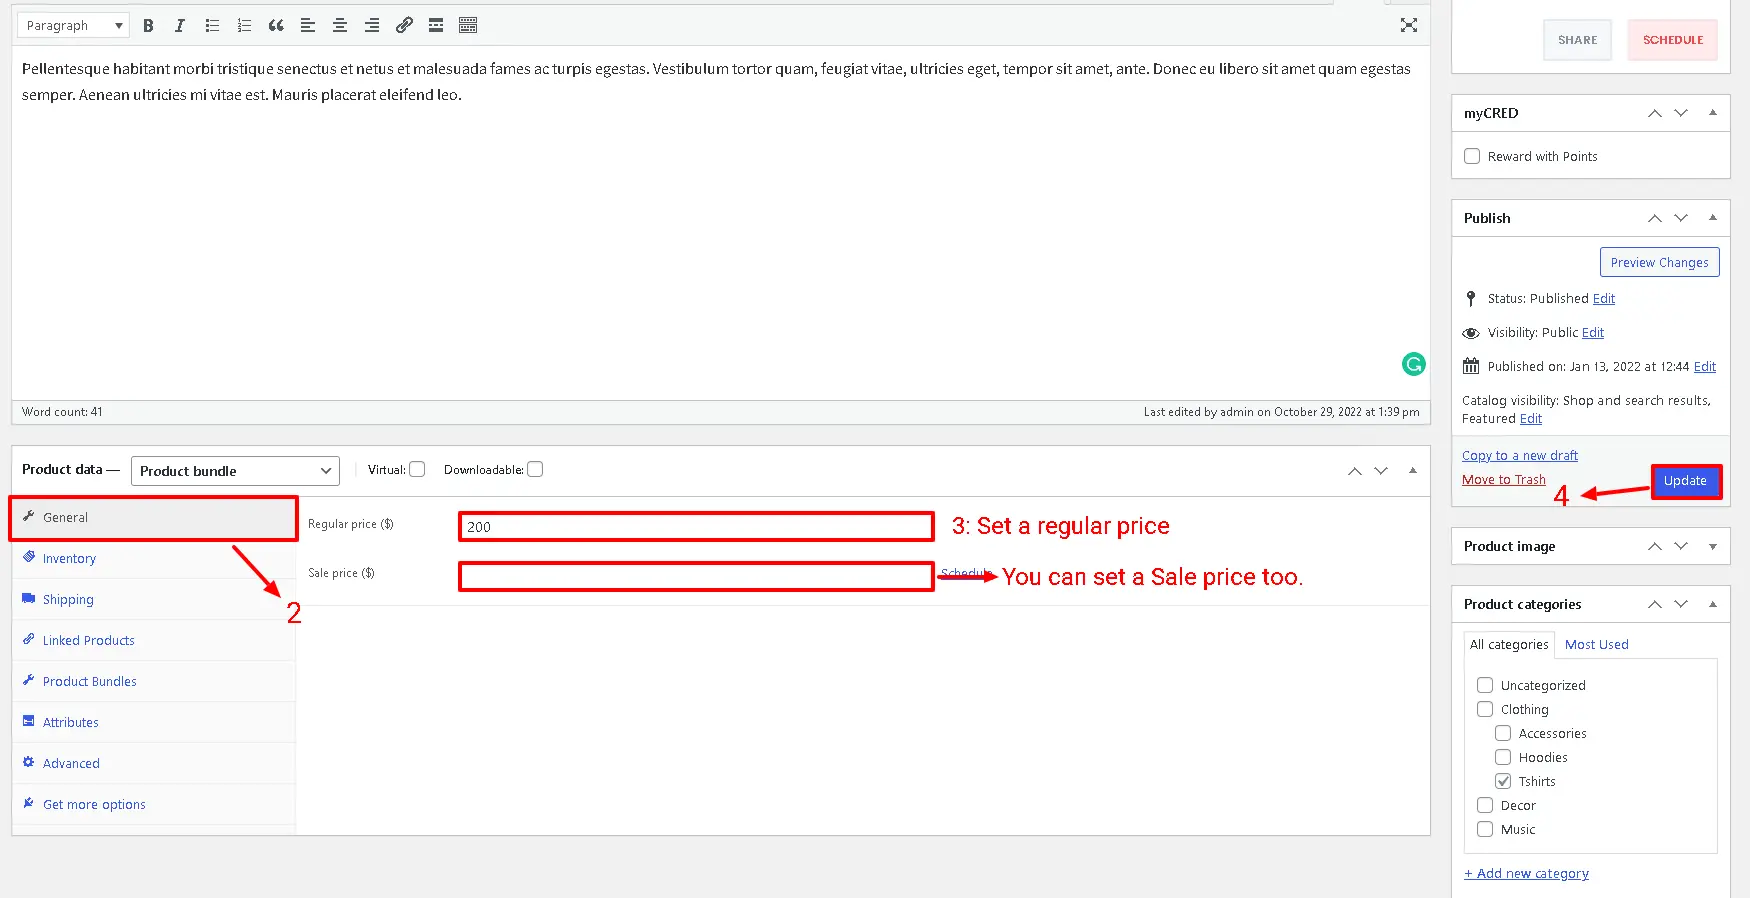
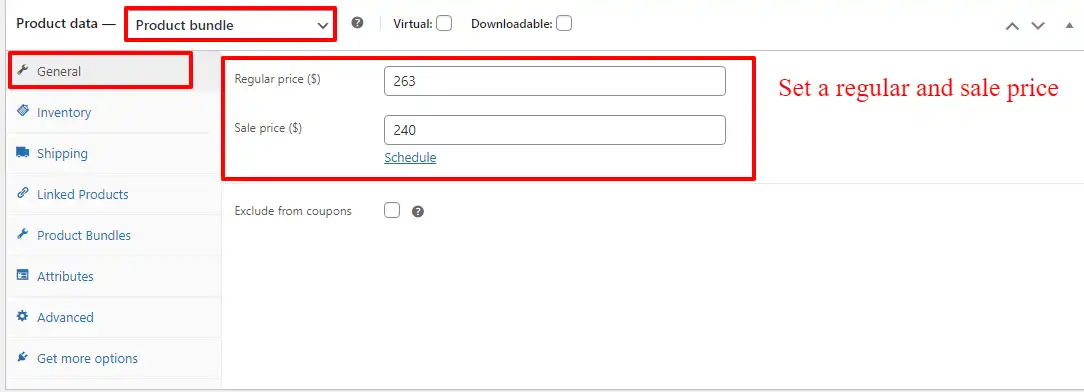
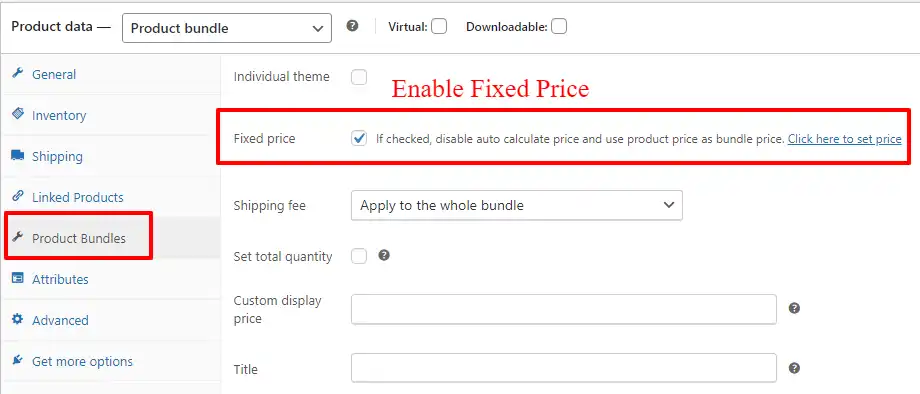
If you want to set a fixed price for the product bundle, enable the “Fixed price” option and navigate to the “General” tab, and set a price for the “Regular price” field. You can set a “Sale price” too.
To use the “Auto Calculate Bundle Price” disable the “Fixed price” option.
10. Finally, publish the Product Bundle with Variations on your website.
Step 6: Configure the Plugin Settings
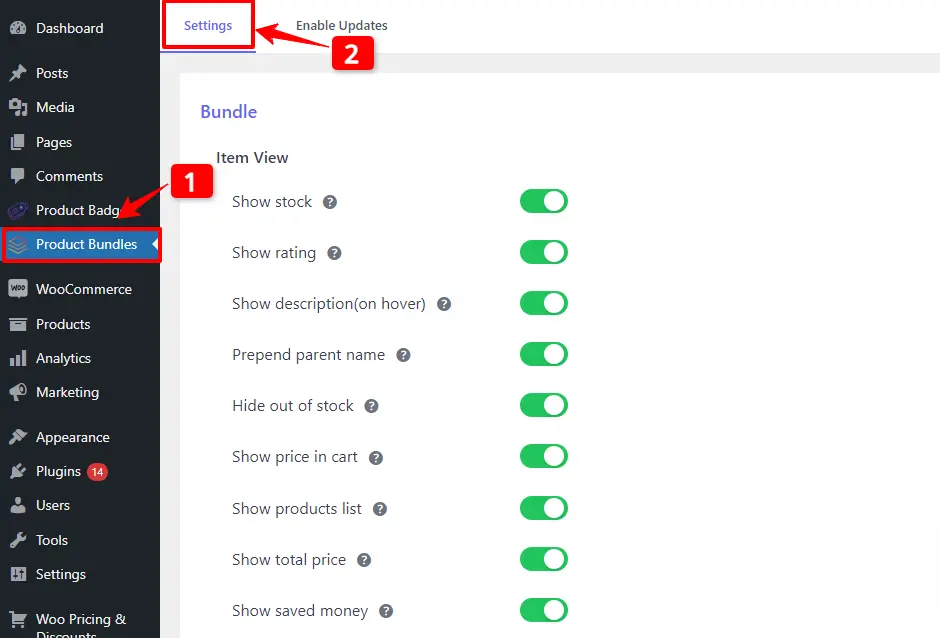
All the plugin settings you need can be found on the “Product Bundles” tab in the WordPress dashboard.
Settings and customization are available on this page:
Item View: In this section, you can configure various settings, such as displaying stock availability, showing product ratings and descriptions, adding a quantity field on item pages, displaying a plus icon for items, setting the theme and size options, positioning product bundles on the product page, defining custom CSS selectors, specifying the product price selector, and many other customizable options.
Change product popup: In this section, you can configure popup settings.
Styles: In this section, you can customize the colours of different parts of your bundle and set the product image object-fit CSS.
Final Result
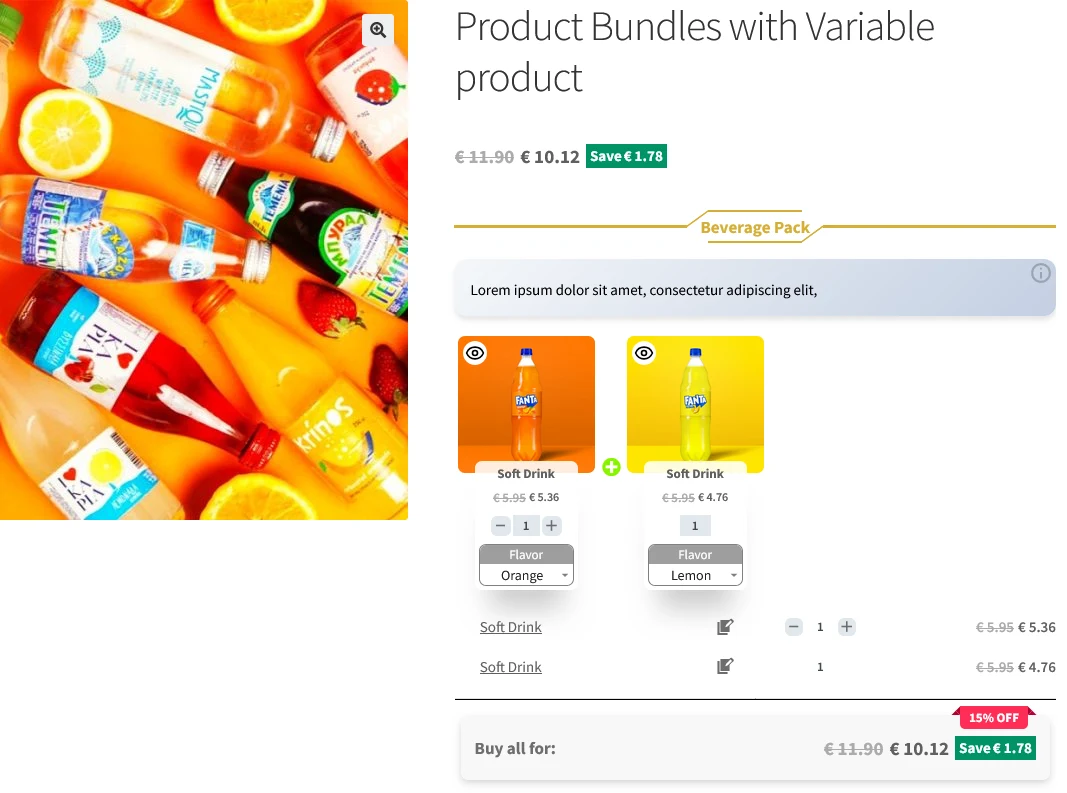
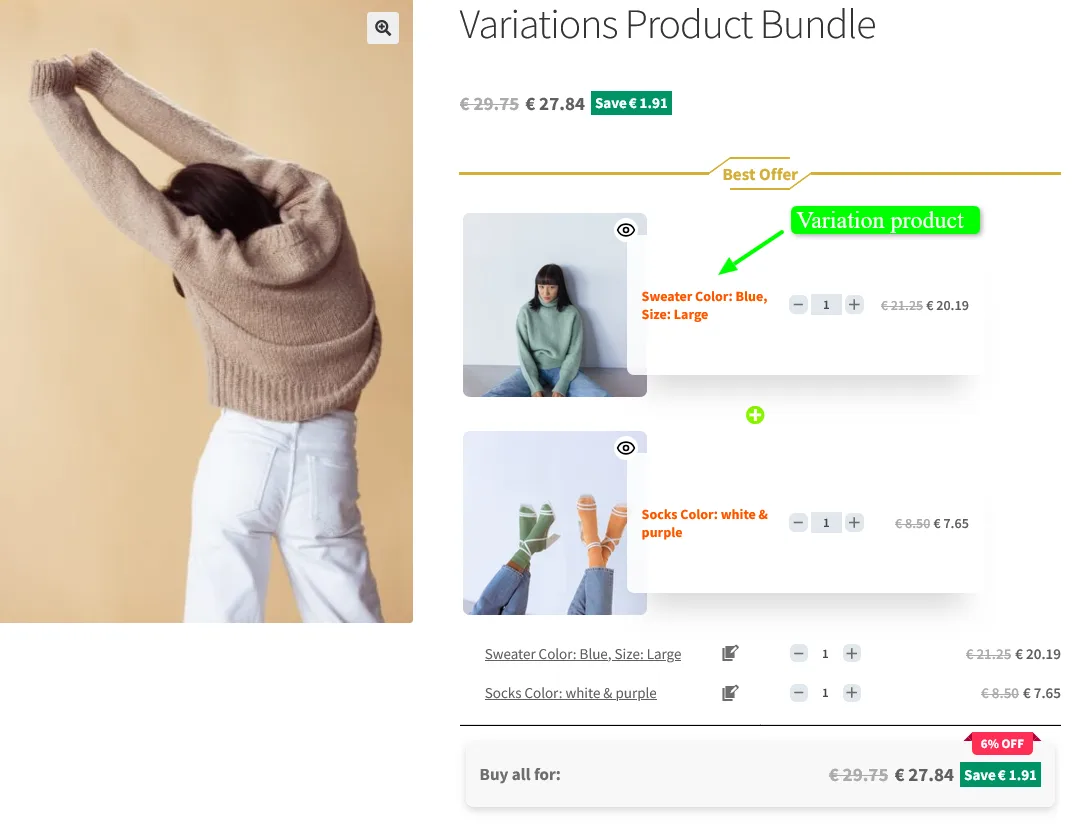
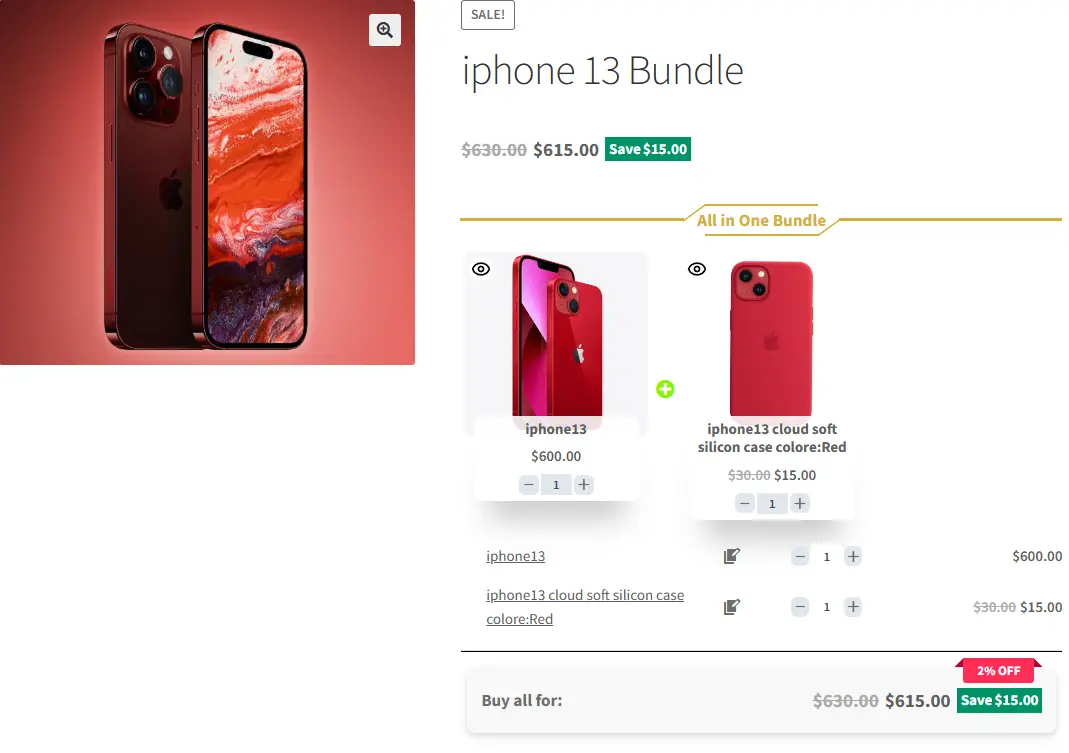
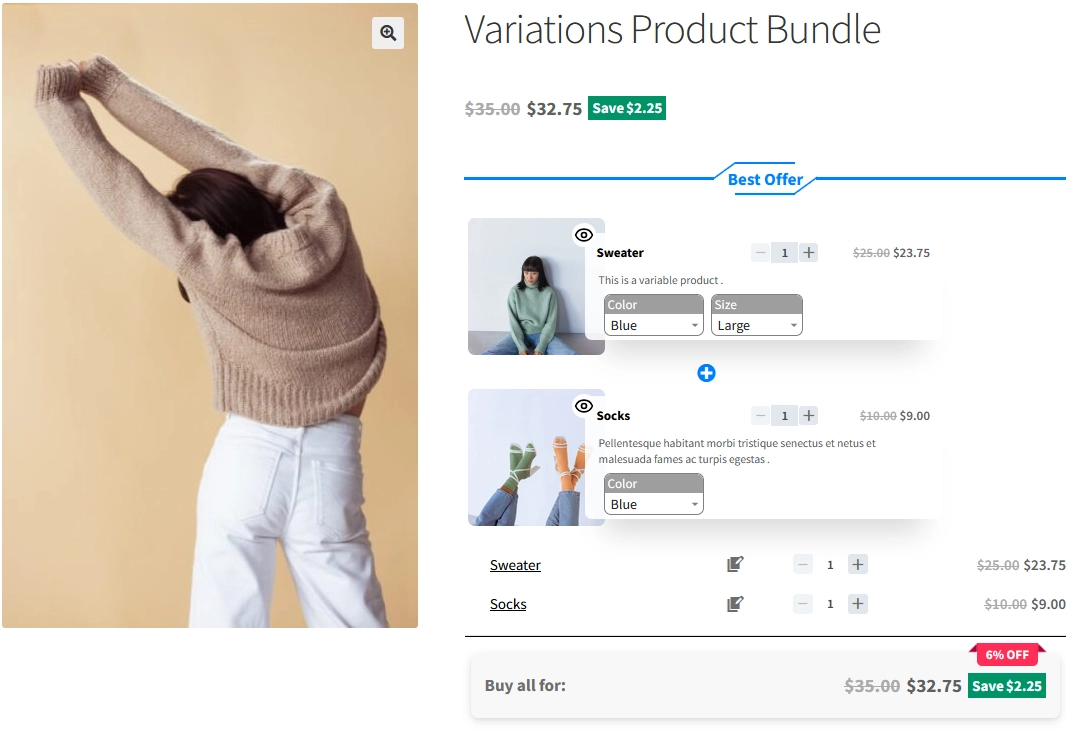
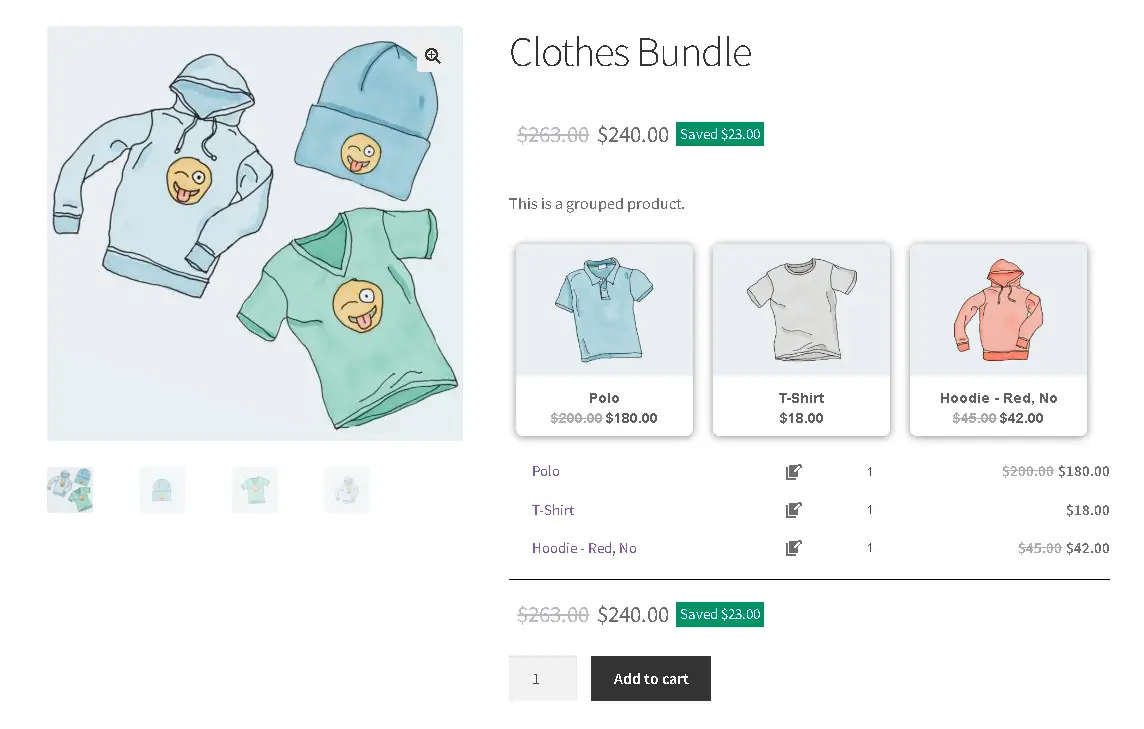
WooCommerce product bundle with variations will be shown in front like this image.
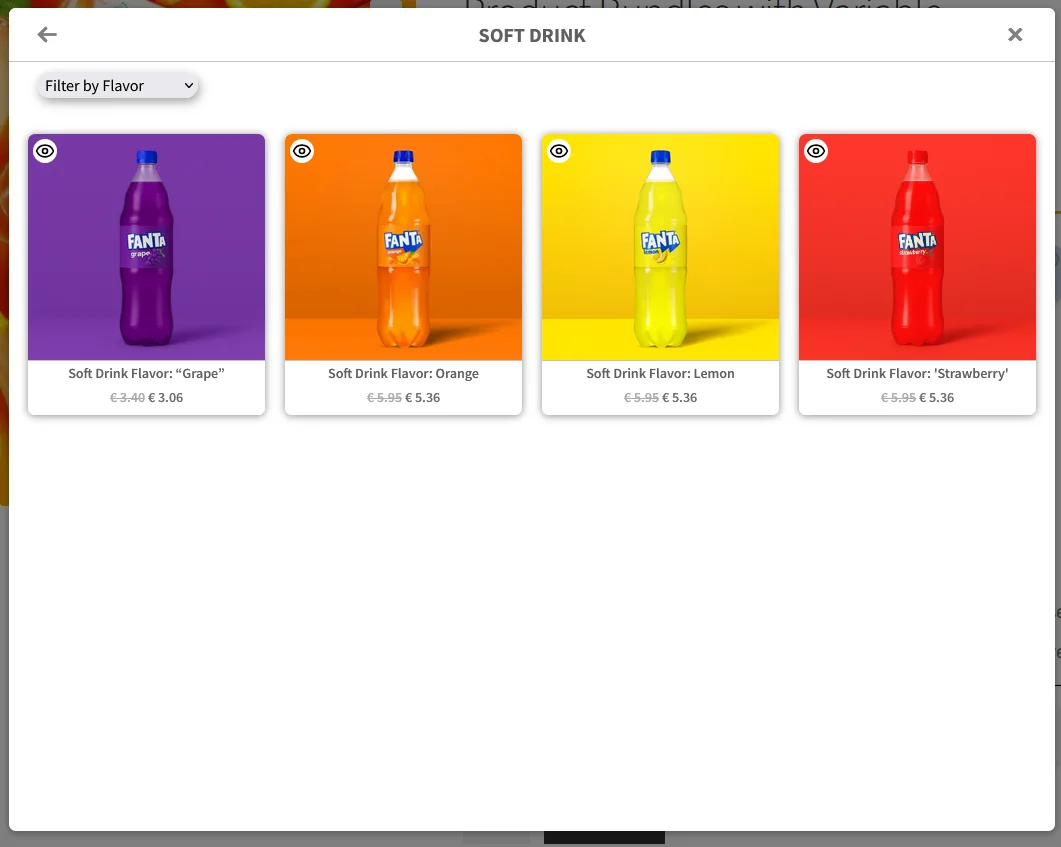
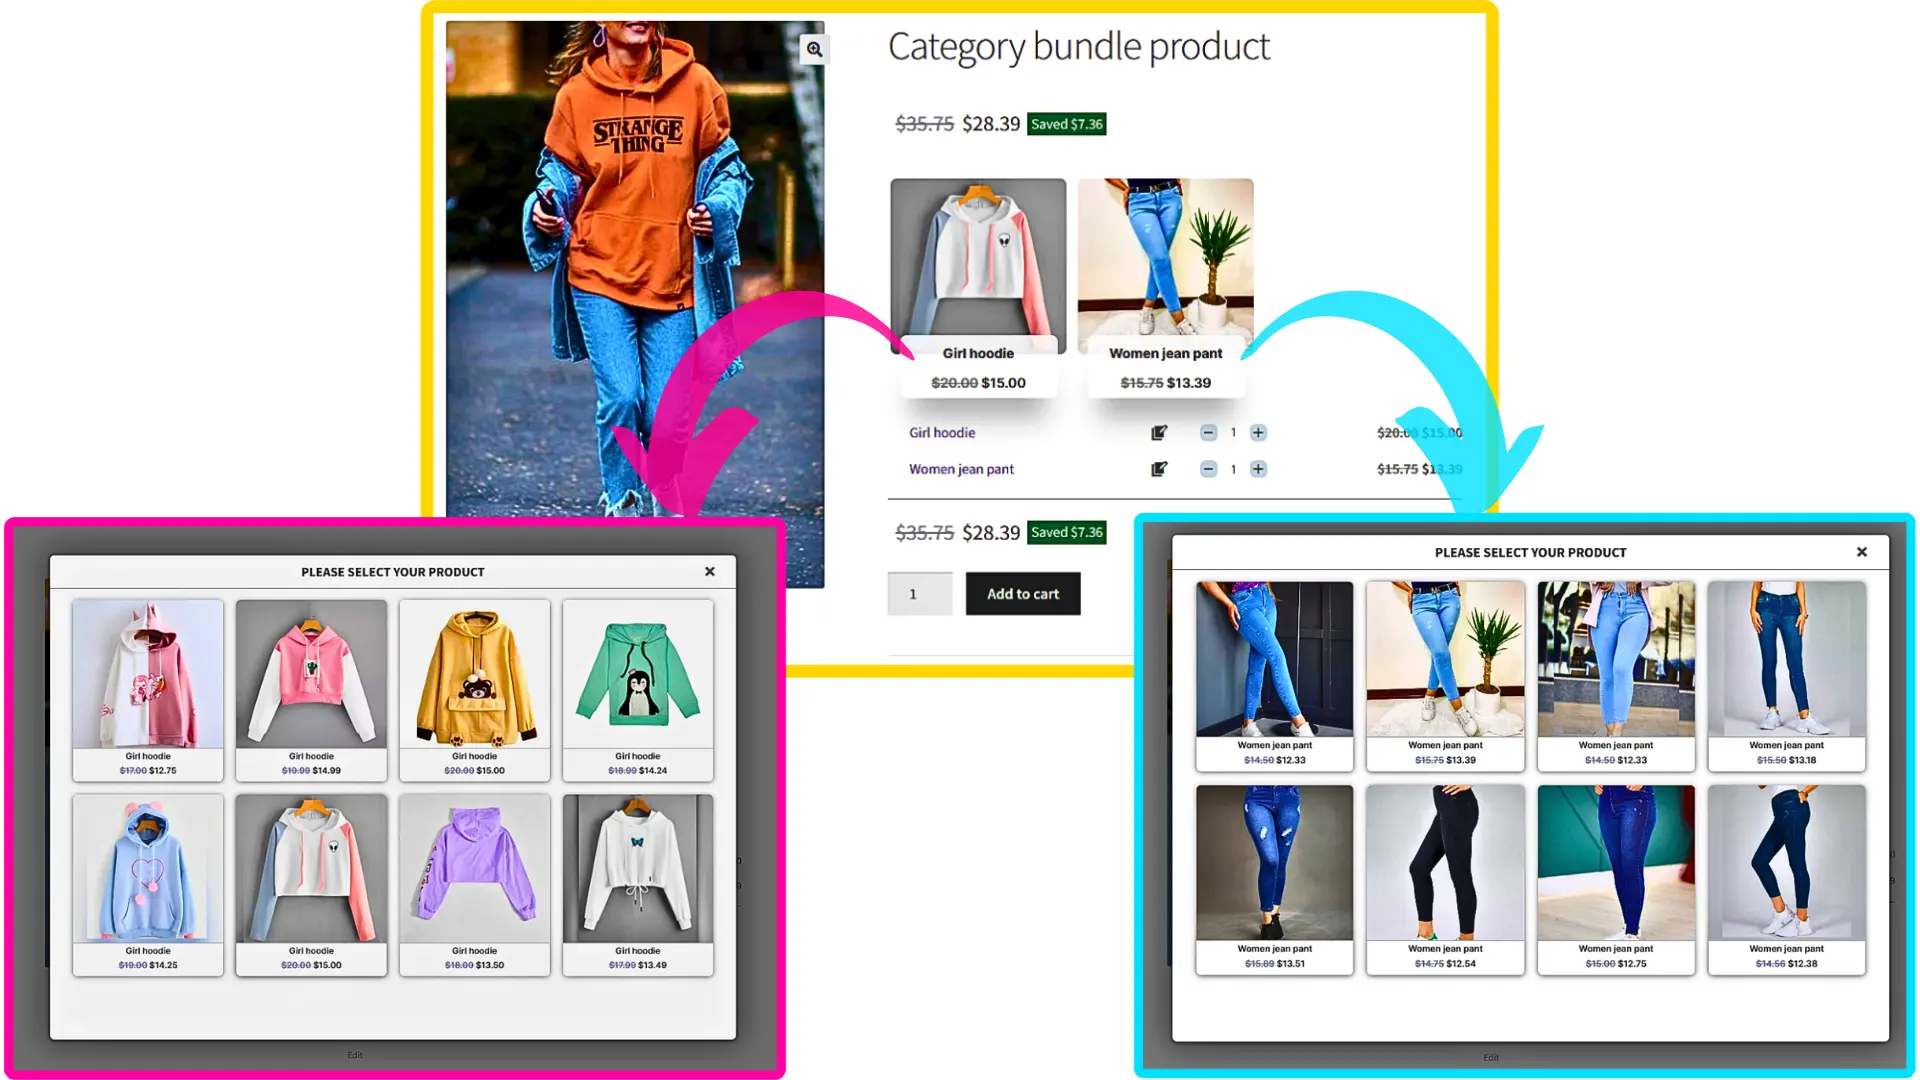
The customer can choose other available variations from the popup.
How to Create a WooCommerce Product Bundle with Variations
If you want to create a WooCommerce product bundle with variations, then you can use the WooCommerce Product Bundles pro version. You have the ability to include specific variations in the product bundle.
Step 1: Install WooCommerce Product Bundles Pro Plugin
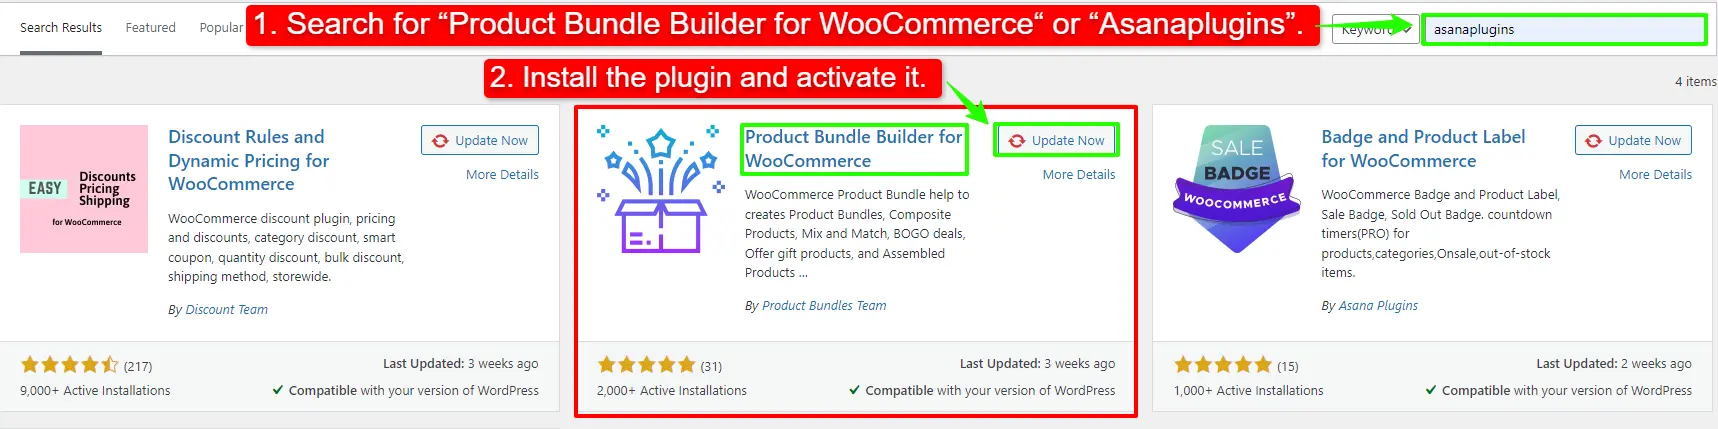
To create a WooCommerce Product Bundle with Variations, you should install and activate the WooCommerce Product Bundles Pro plugin.
Step 2: Create a Bundle Product in WooCommerce
To include variation products in the bundle items follow the below steps.
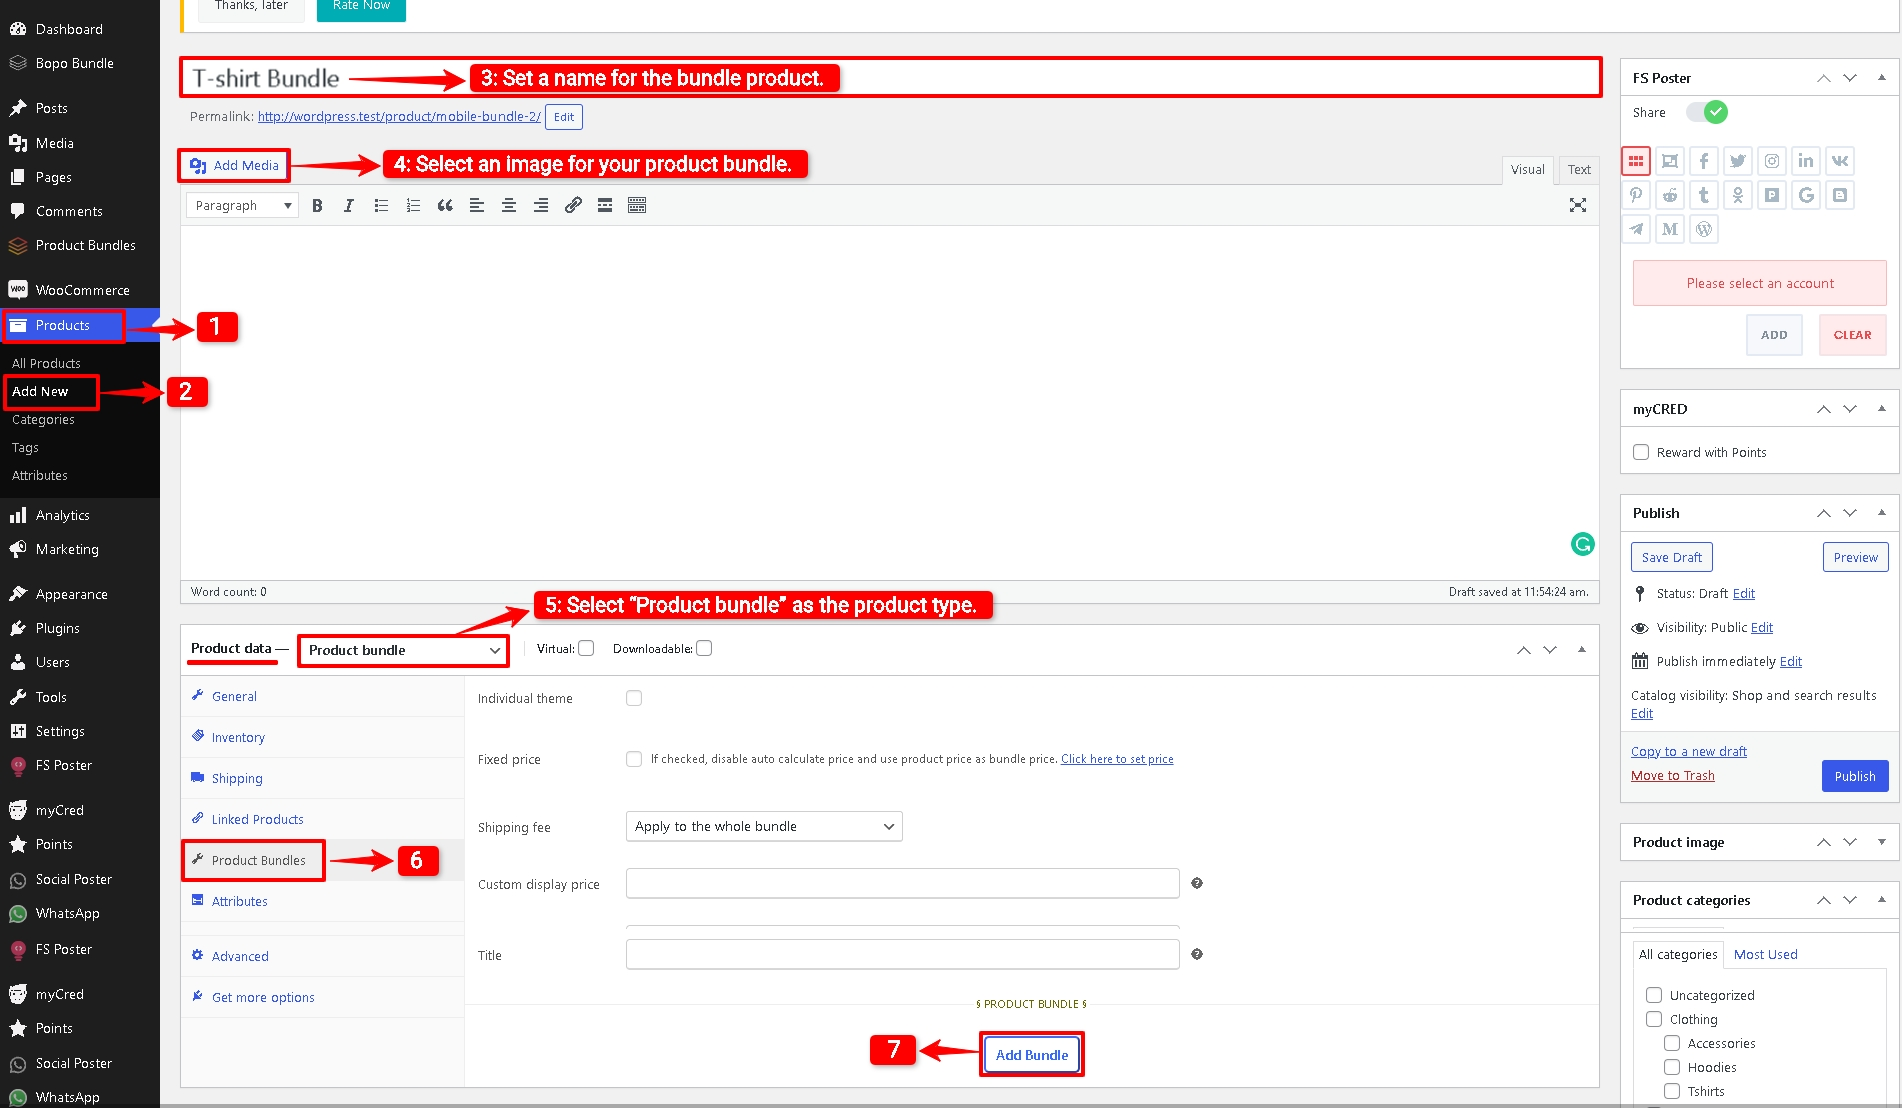
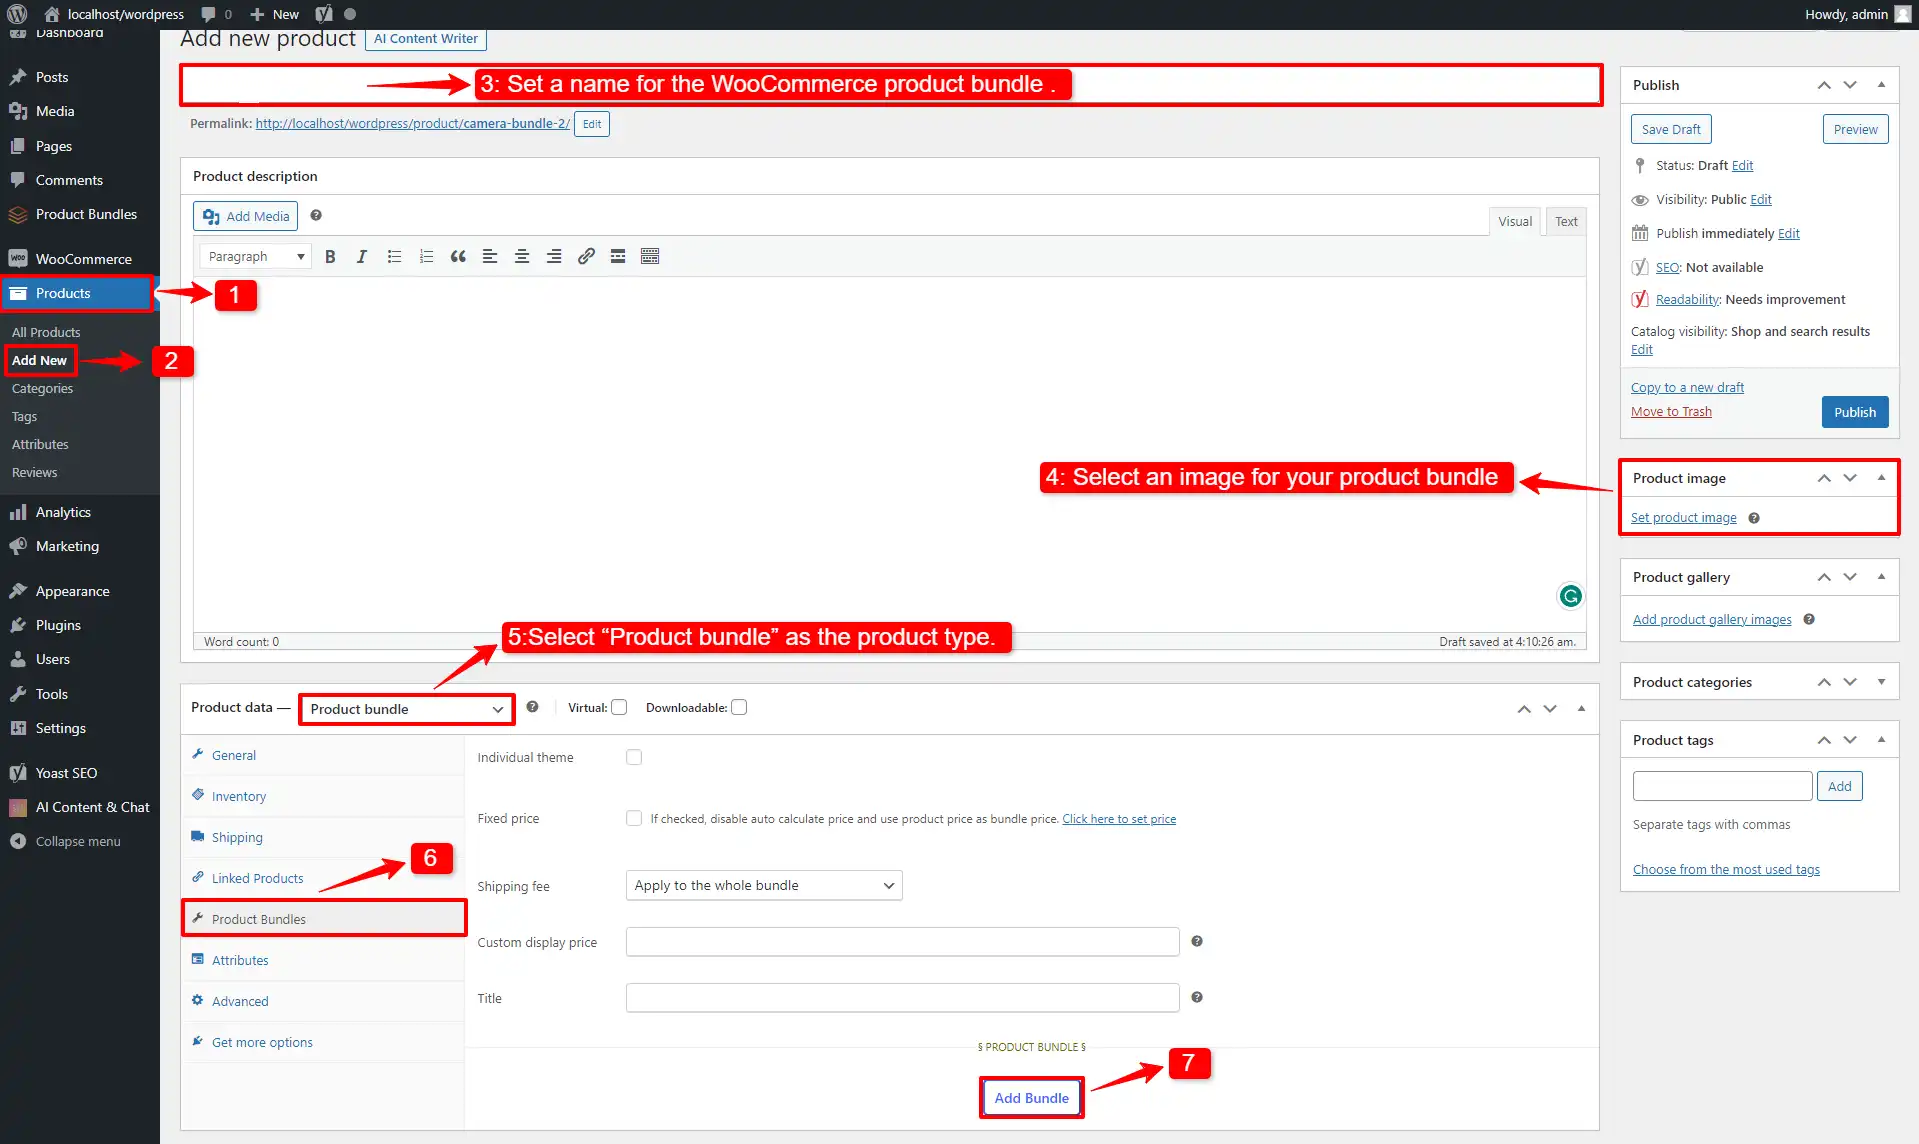
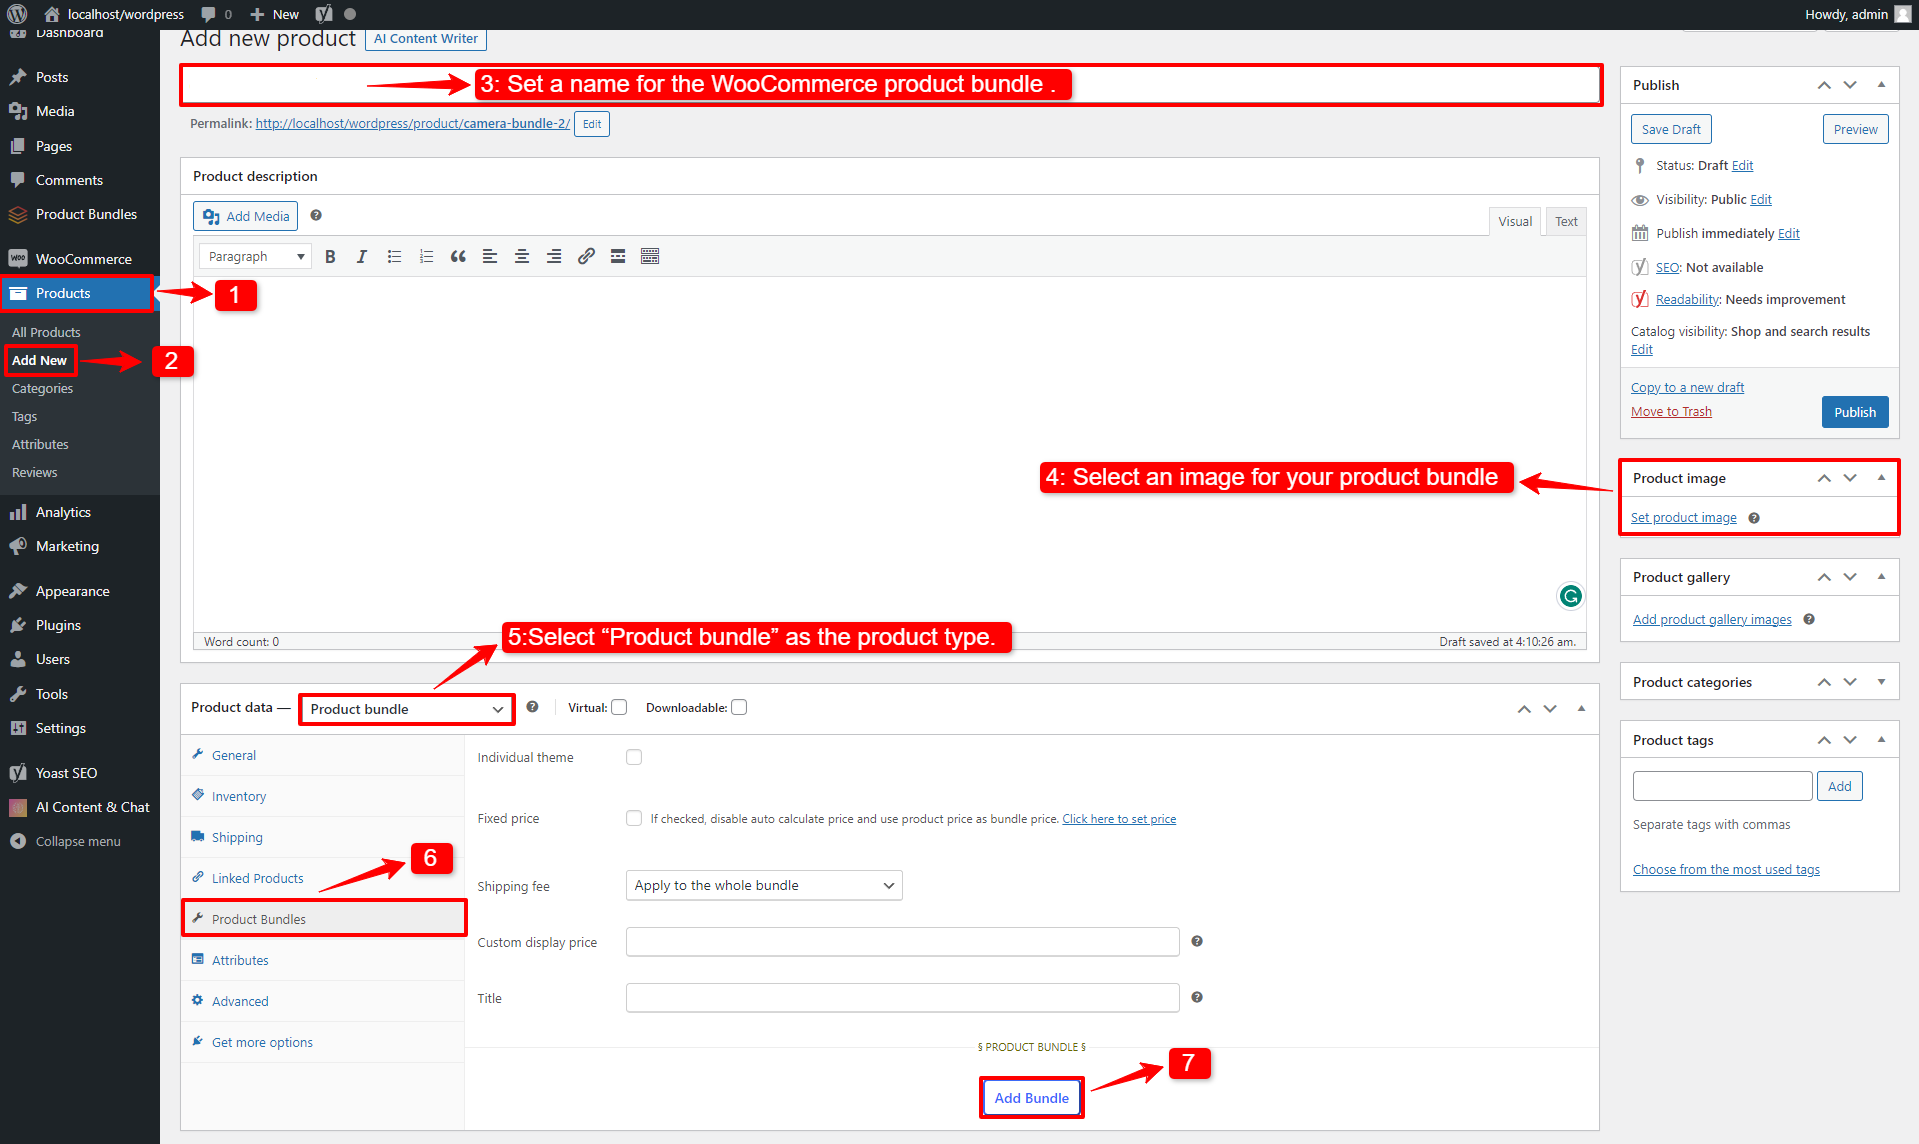
1. Navigate to WooCommerce Products >> Add New product to create a new product.
2. Set a name for the product bundle.
3. Click “Set product image” from the right sidebar and select an image for your Product Bundle.
4. Now navigate to the Product data panel, and select “Product bundle” as the product type.
6. After selecting “Product bundle” as the product type, the “Product Bundles” tab will appear in the product data panel.
Step3: Add Bundle Items
7. Navigate to the “Product Bundles” tab and click on the “Add item” button to add a new bundle item to the product bundle.
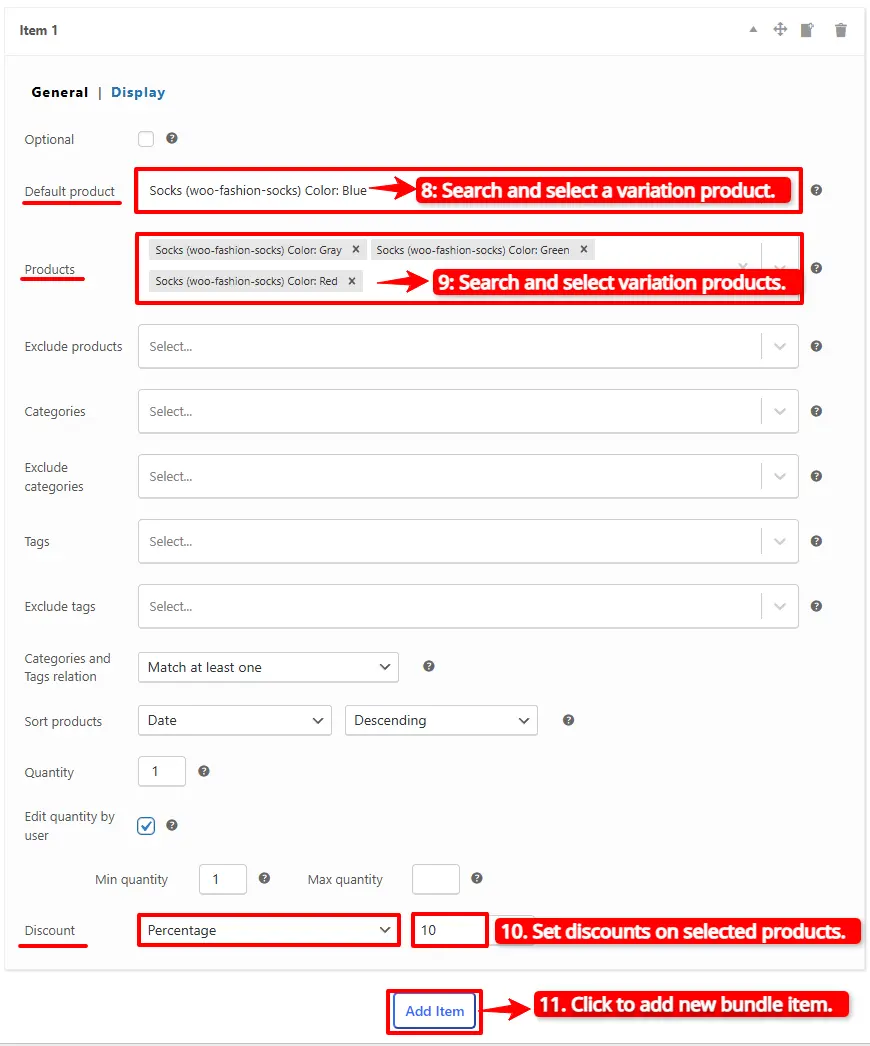
8. Search and select a variation product in the “default product” field.
9. To add other variations to the item, in the “Products” field search for variations and select them.
10. You can set a “percentage, price, or fixed price” discount on the bundle item by using the “Discount” field of the item.
11. If you want to add other bundle items, you can click on the “Add item” button to add another bundle item. Follow the steps “Add bundle items“. We created two bundle items.
Step 4: Set price for Product Bundle
The plugin allows two types of pricing for product bundles.
Fixed Price: Sets a fixed price for the whole bundle product.
Auto Calculate Bundle Price: Allow the plugin to calculate the bundle product price using the selected products for the bundle items.
If you want to set a fixed price for the product bundle, enable the “Fixed price” option and navigate to the “General tab”, and enter a price in the “Regular price” field. You can set a “Sale price” too.
To use the “Auto Calculate Bundle Price” disable the “Fixed price” option.
Final Result
12. Now you can publish the product on your website.
The WooCommerce product bundle with variations is like the image.
The customer can choose other available variations from the pop-up.
Shortcodes
The plugin has the below shortcodes, and you can use them:
[asnp_wepb_product] Use it on the product page to show the bundles.
[asnp_wepb_product show_add_to_cart="1"] Use it on the product page to show the bundles + add to cart button.
Related Resources
Want to learn more about WooCommerce product bundles and related strategies? Explore these helpful guides:
Easy WooCommerce Product Bundles is a free plugin designed to help store owners create attractive product bundles and sell multiple products together as a single offer. It allows you to build powerful deals across different product types, boosting sales while giving customers better value and a smoother shopping experience. As a smart product bundle builder, this plugin strengthens cross-selling strategies, improves conversions, and supports better visibility in search engines.
In this article, you’ll learn how to create product bundles in WooCommerce step by step using this free plugin.
To create product bundles in WooCommerce, we use the free and powerfulProduct Bundle Builder for WooCommerceplugin, one of the most popular WordPress plugins in 2025. This plugin is easy to use and provides a wide range of customization options, allowing store owners to create flexible, attractive bundles tailored to their customers’ needs.
Here we will create a product bundle with three default products.
Navigate to WooCommerce Products >> Add New to create a new product.
Set a name for the product bundles.
Click on “Set product image” from the right sidebar and select an image for your Product Bundles.
Now navigate to the Product data panel, and select “Product bundle” as the product type.
After selecting “Product bundle” as the product type, the “Product Bundles” tab will appear in the product data panel.
Click on the “Product Bundles” tab.
And click on the “Add Bundle” button to add a new bundle item to the product bundle.
8. Now, in “the default product” field, search for a product and select it.
Step 3: Customising WooCommerce Product Bundles
You can also configure the settings below for your WooCommerce Product Bundlesin the item field:
Sort products: With this field, you can sort selected products by “ID”, “Title”, “Menu order”,” Date”, “Price”, “popularity” and“Rating”.
Quantity: In this field, you can set the default quantity for each product.
Edit quantity by user: Check this field to allow the user to change the quantity of product and Set the “min/max quantity” for each item.
Discount: In this field, you can set discounts for product bundles by percentage, price or fixed price.
Now you can go to the “display” tab of the item and configure the following sections:
Overwrite bundle item title.
Overwrite bundle item short description. (Show when the mouse hovers over it)
Change the title of the bundle’s empty item.
Change the product list product selection title.
Change the pop-up header title.
Set an image for the empty item.
9. Then you can click on “Add Item” to add a new item to the bundle and select a default product for it. We have created two bundle items.
10. At the end, publish the product bundles on your website.
Step 4: Configure the Plugin Settings
All the plugin settings you need can be found on the “Product Bundles” tab in the WordPress dashboard.
Settings and customization are available on this page:
Item View: In this section, you can configure various settings, such as displaying stock availability, showing product ratings and descriptions, adding a quantity field on item pages, displaying a plus icon for items, setting the theme and size options, positioning product bundles on the product page, defining custom CSS selectors, specifying the product price selector, and many other customizable options.
Change product popup: In this section, you can configure popup settings.
Styles: In this section, you can customize the colours of different parts of your bundle and set the product image object-fit CSS.
Final Result
WooCommerce product bundles will be shown in front like this image.
Auto calculate the price based on selected products
1. Fixed Price
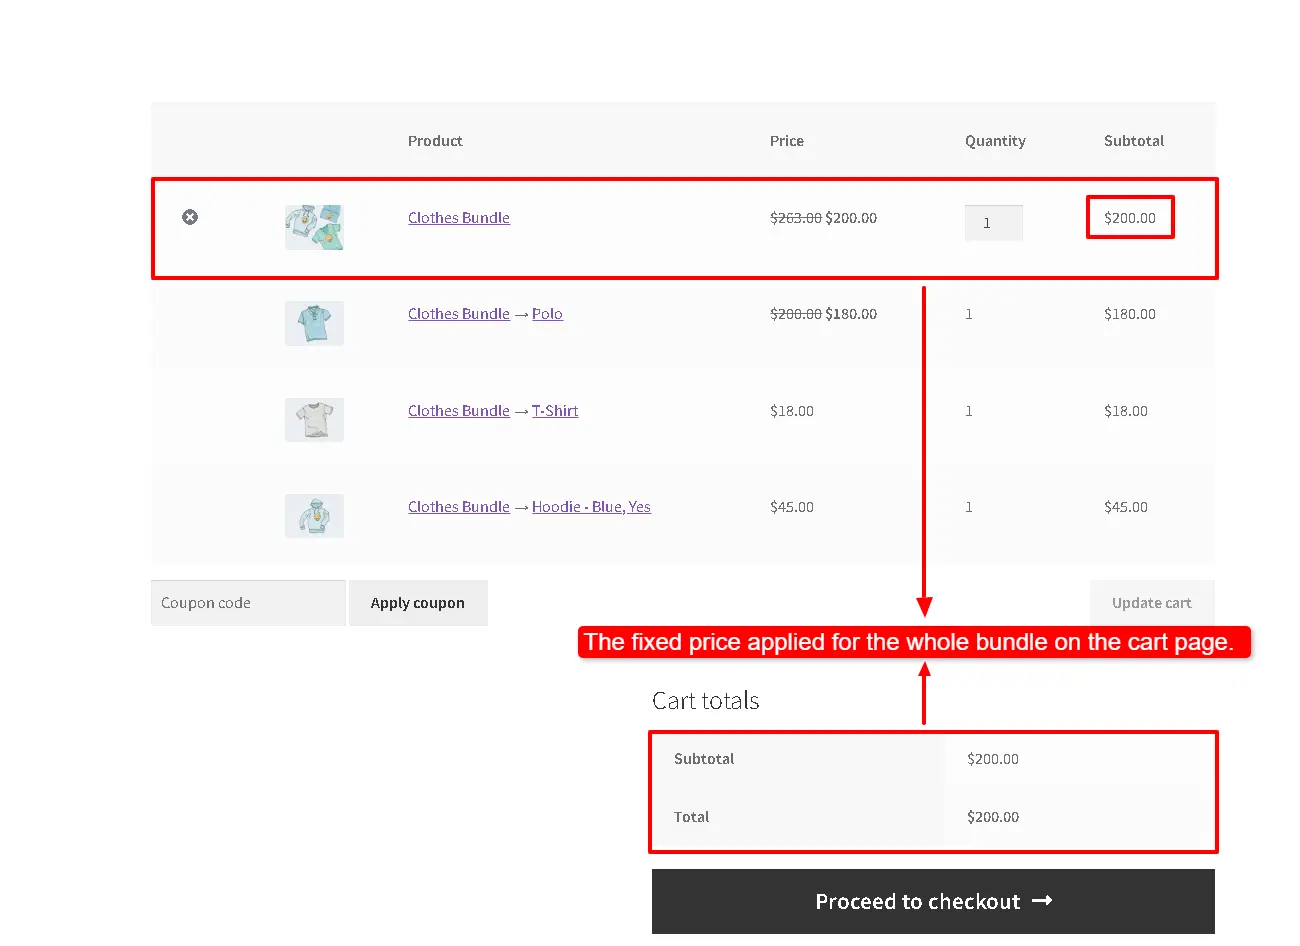
If you would like to set a fixed price for the whole bundle product, then check the “Fixed Price” option.
Navigate to the “General” tab and set a regular price for the Product. You can set a Sale price too.
After setting a price, update the product.
Now you can see the fixed price for the whole bundle on the product and cart pages.
2.Auto Calculate Price
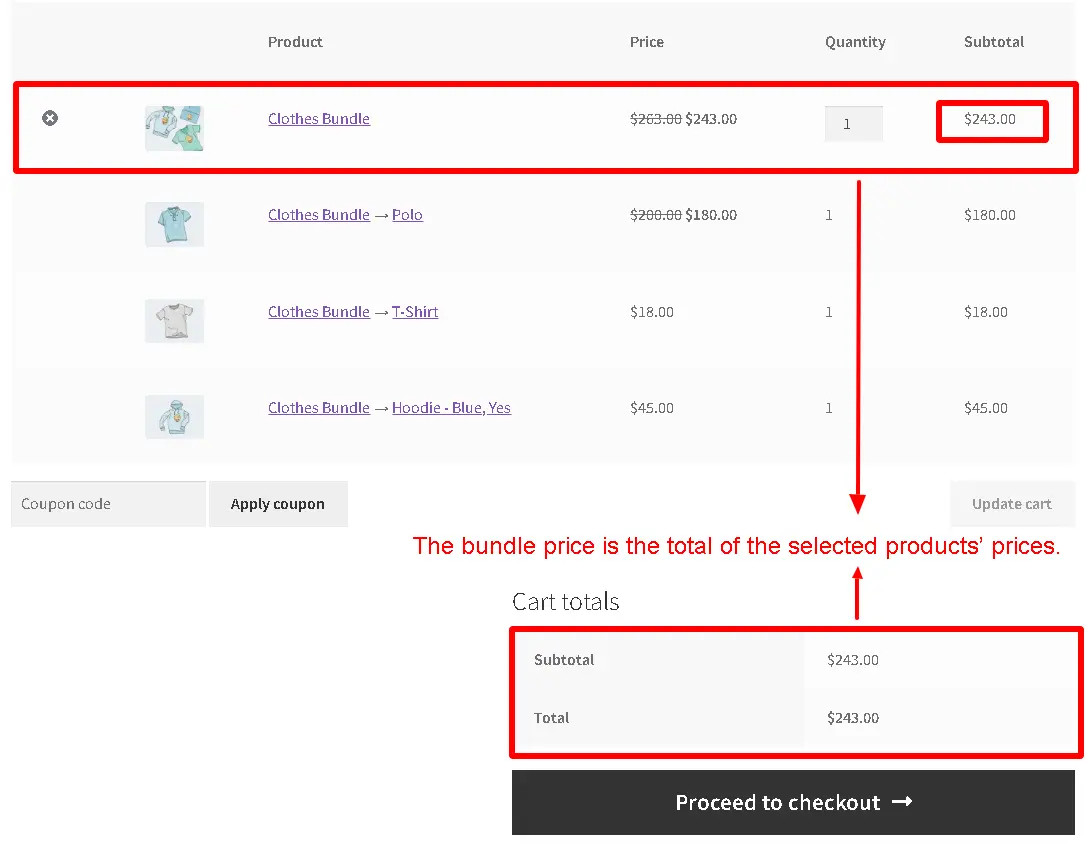
Auto calculates price helps to set a dynamic price for the product bundle based on selected items for the bundle.
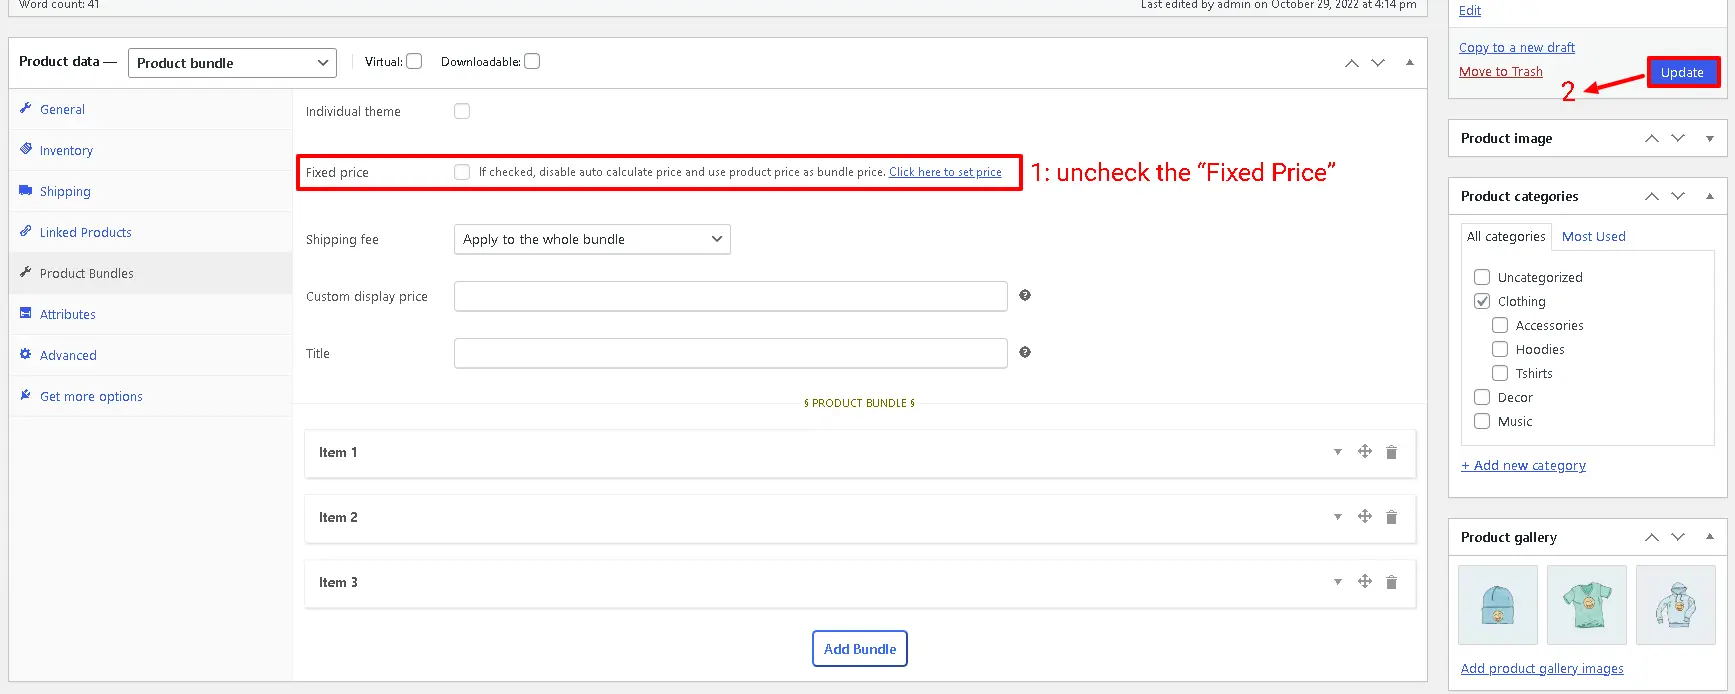
To use the auto-calculate price feature, uncheck the “Fixed Price” option and update the product.
As you can see in the below image, the bundle price is the total of the selected products’ prices.
WooCommerce Product Bundles with Variables
Learn how to create product bundles that include variable products in WooCommerce. In the following, we’ll guide you through the step-by-step process of setting them up.
Video
Step 1: Create WooCommerce Product Bundles with Variables
Navigate to WooCommerce Products >> Add New to create a new product.
Set a name for the Variables product bundles.
Click on “Set product image” from the right sidebar and select an image for your Variables Product Bundles.
Now navigate to the Product data panel, and select “Product bundle” as the product type.
After selecting “Product bundle” as the product type the “Product Bundles” tab will appear in the product data panel.
Navigate to the “Product Bundles” tab and click on the “Add Bundle” button to add a new bundle item to the product bundle.
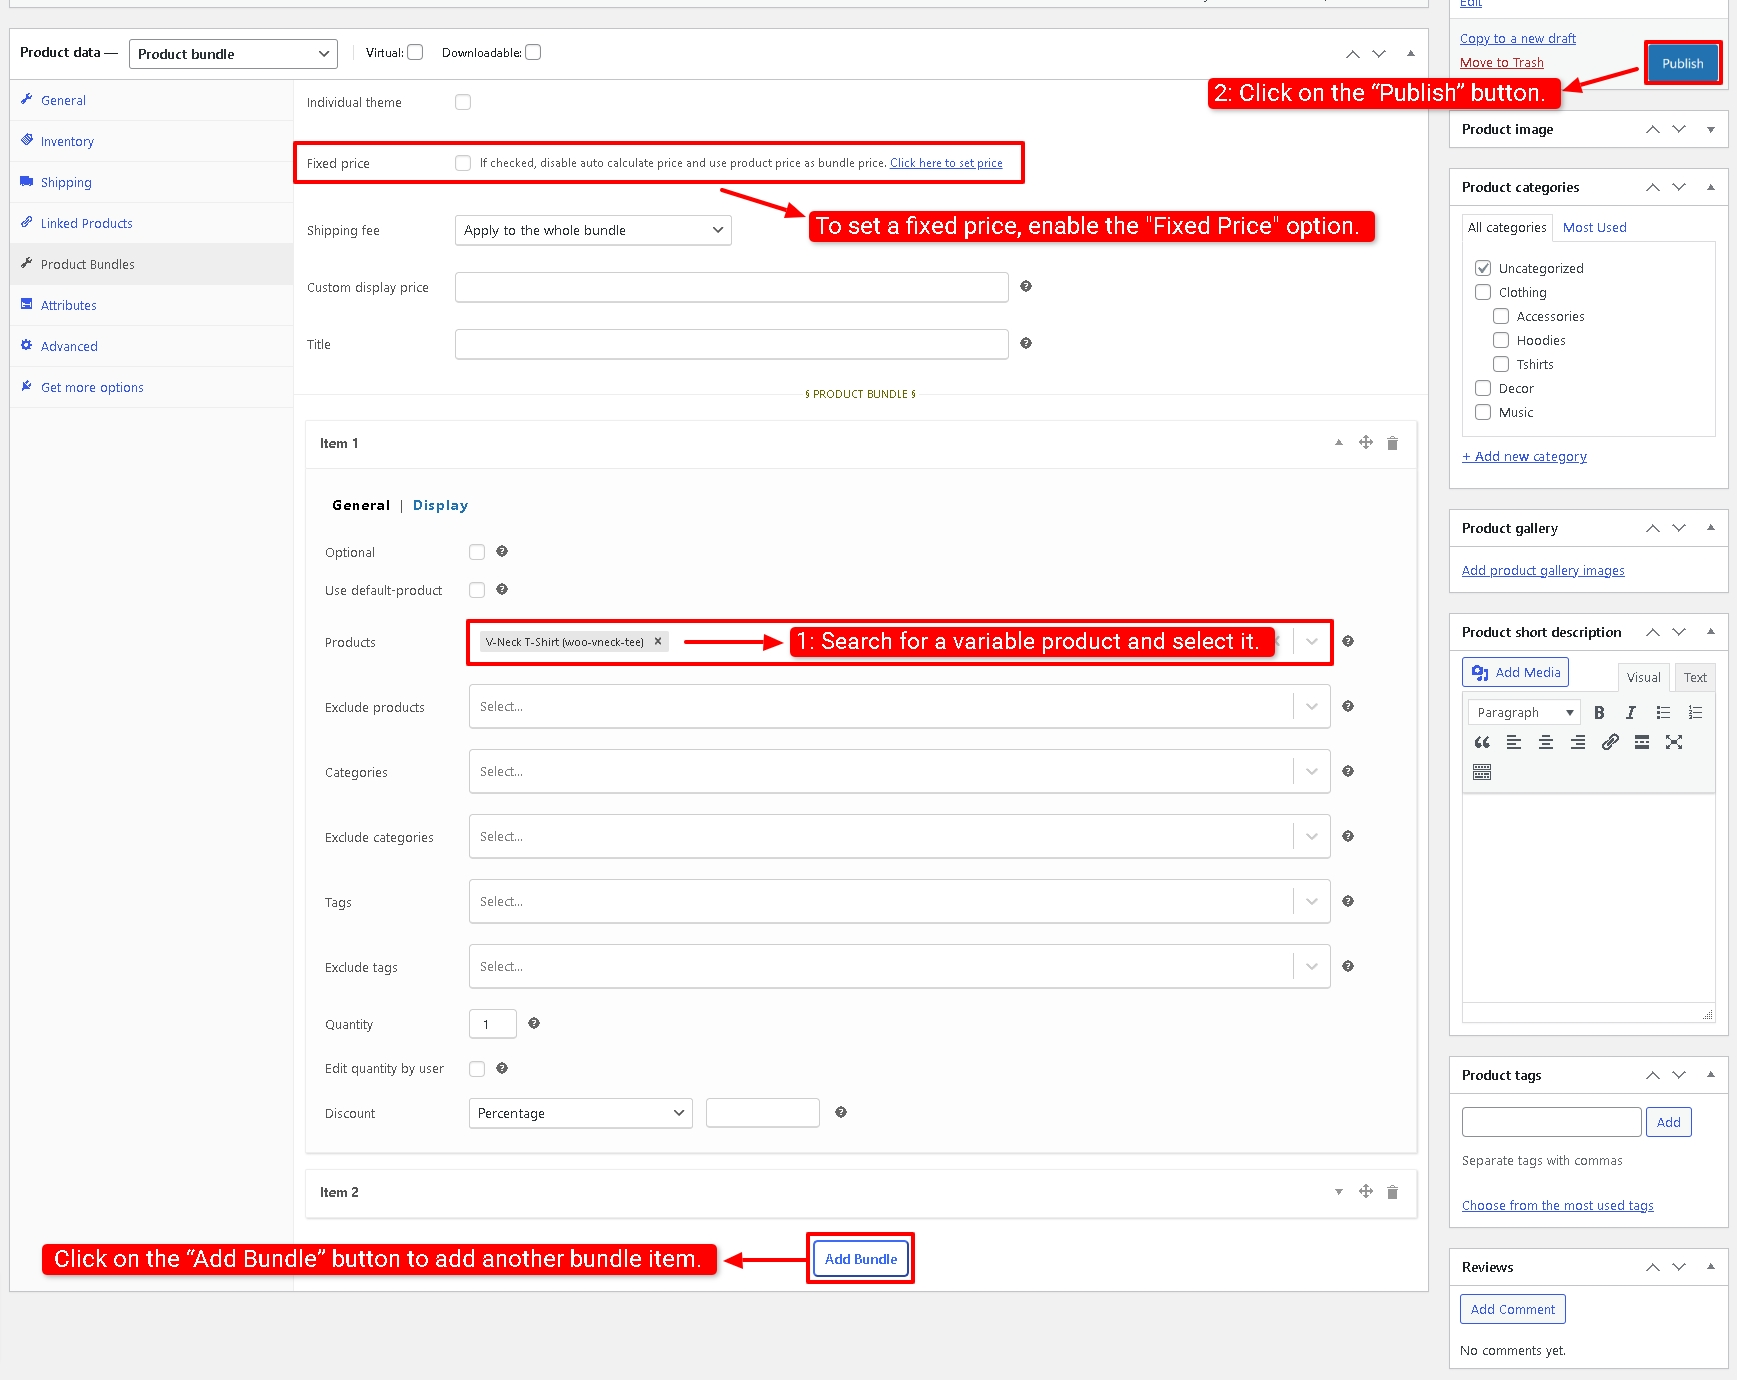
7. Now in the “Products” field of the bundle item search for a variable product and select it.
8. You can include as many products as you want in the “Products” field.
9. If you want to add another bundle item, you can click on the “Add Bundle” button to add another bundle item. We created a product bundle with two bundle items.
10. You can set a fixed price or auto-calculate the price for the product bundle.
To set a fixed price, enable the Fixed Price option and set a regular price for the product in the General tab.
To use the auto-calculate price, disable the fixed price option.
11. Click on the “Publish” button to publish the bundle product in your WooCommerce store.
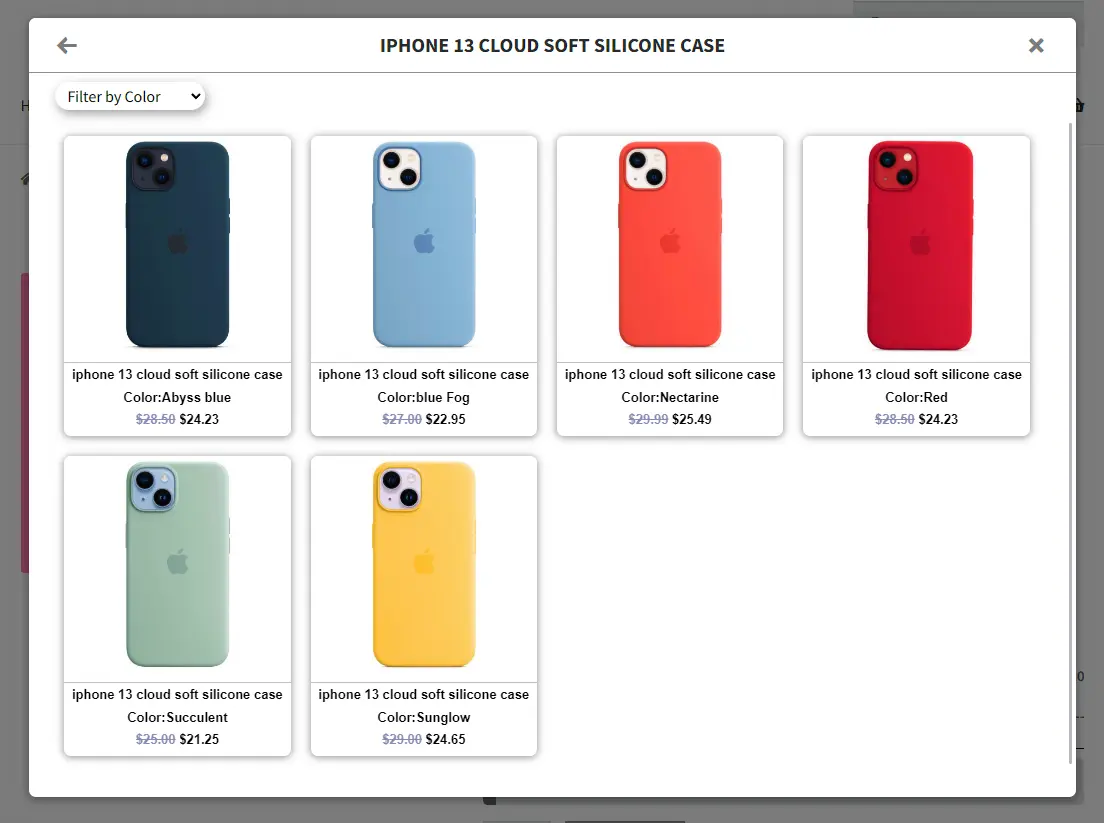
The variable product in the frontend will be shown as below in a pop-up.
Apply Discounts on WooCommerce Product Bundles
It is possible to apply discounts to WooCommerce Product Bundle items.
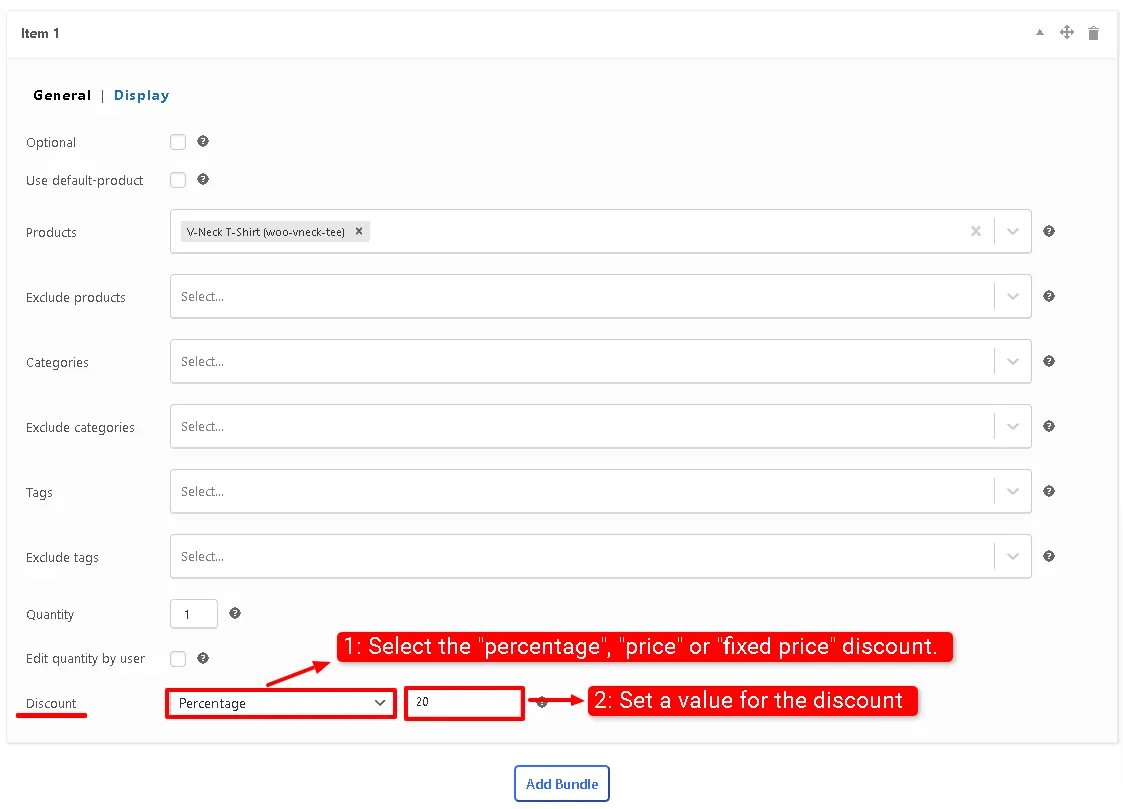
You can set a percentage, price, or fixed price discount on the products
Each bundle item in Product Bundles for WooCommerce has a discount field, and you can use it to apply a discount.
In the example, we applied a 20% discount on the bundle item.
Create WooCommerce Product Bundles with Variations
If you would like to include variation products in your WooCommerce Product Bundle, we recommend you use the pro version of the Easy WooCommerce Product Bundles pro plugin.
You can read this article to create WooCommerce Product Bundles with Variations.
Create Personalized Product Bundles in WooCommerce
If you want to offer your customers to create their Product Bundles from multiple available products, then personalized product bundles can help you.
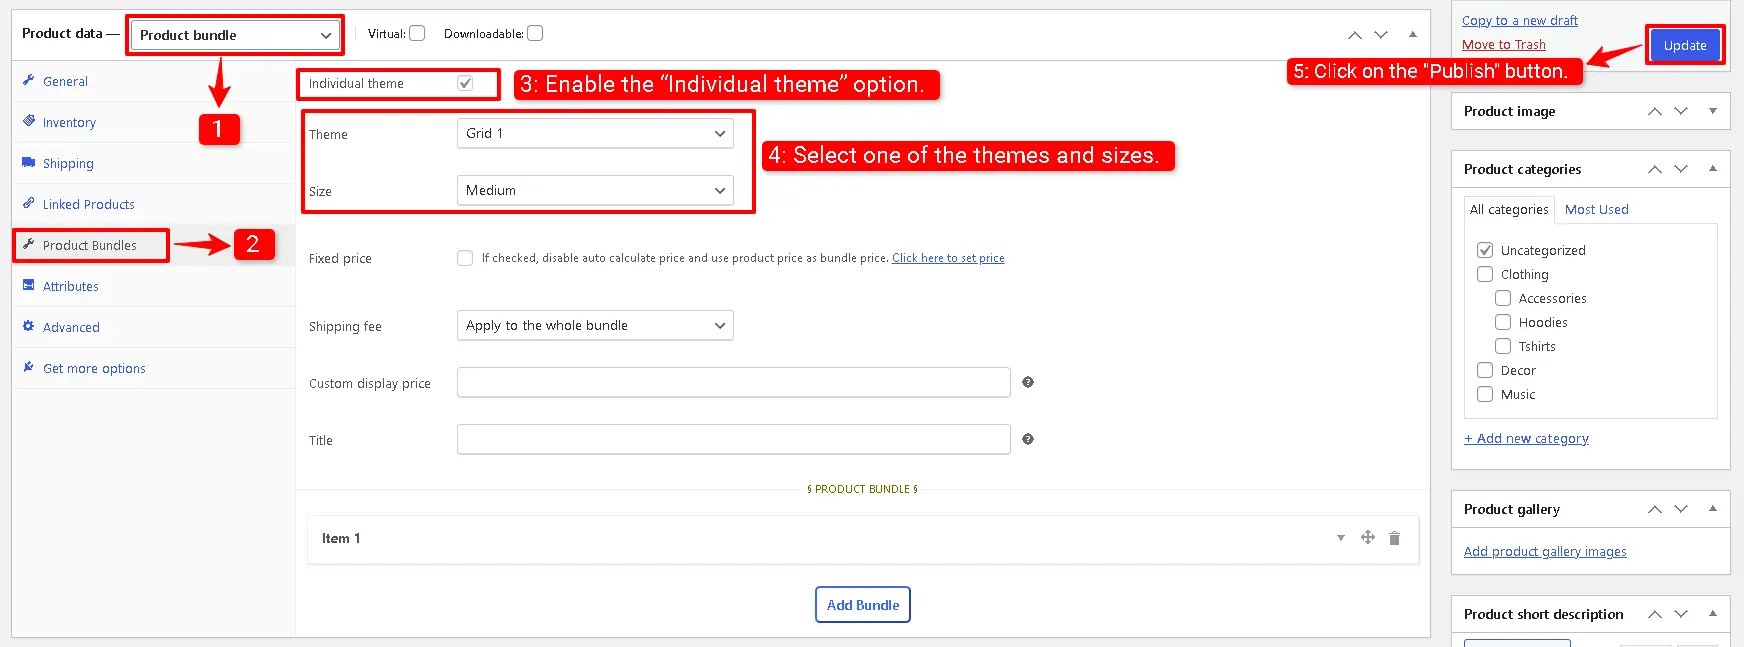
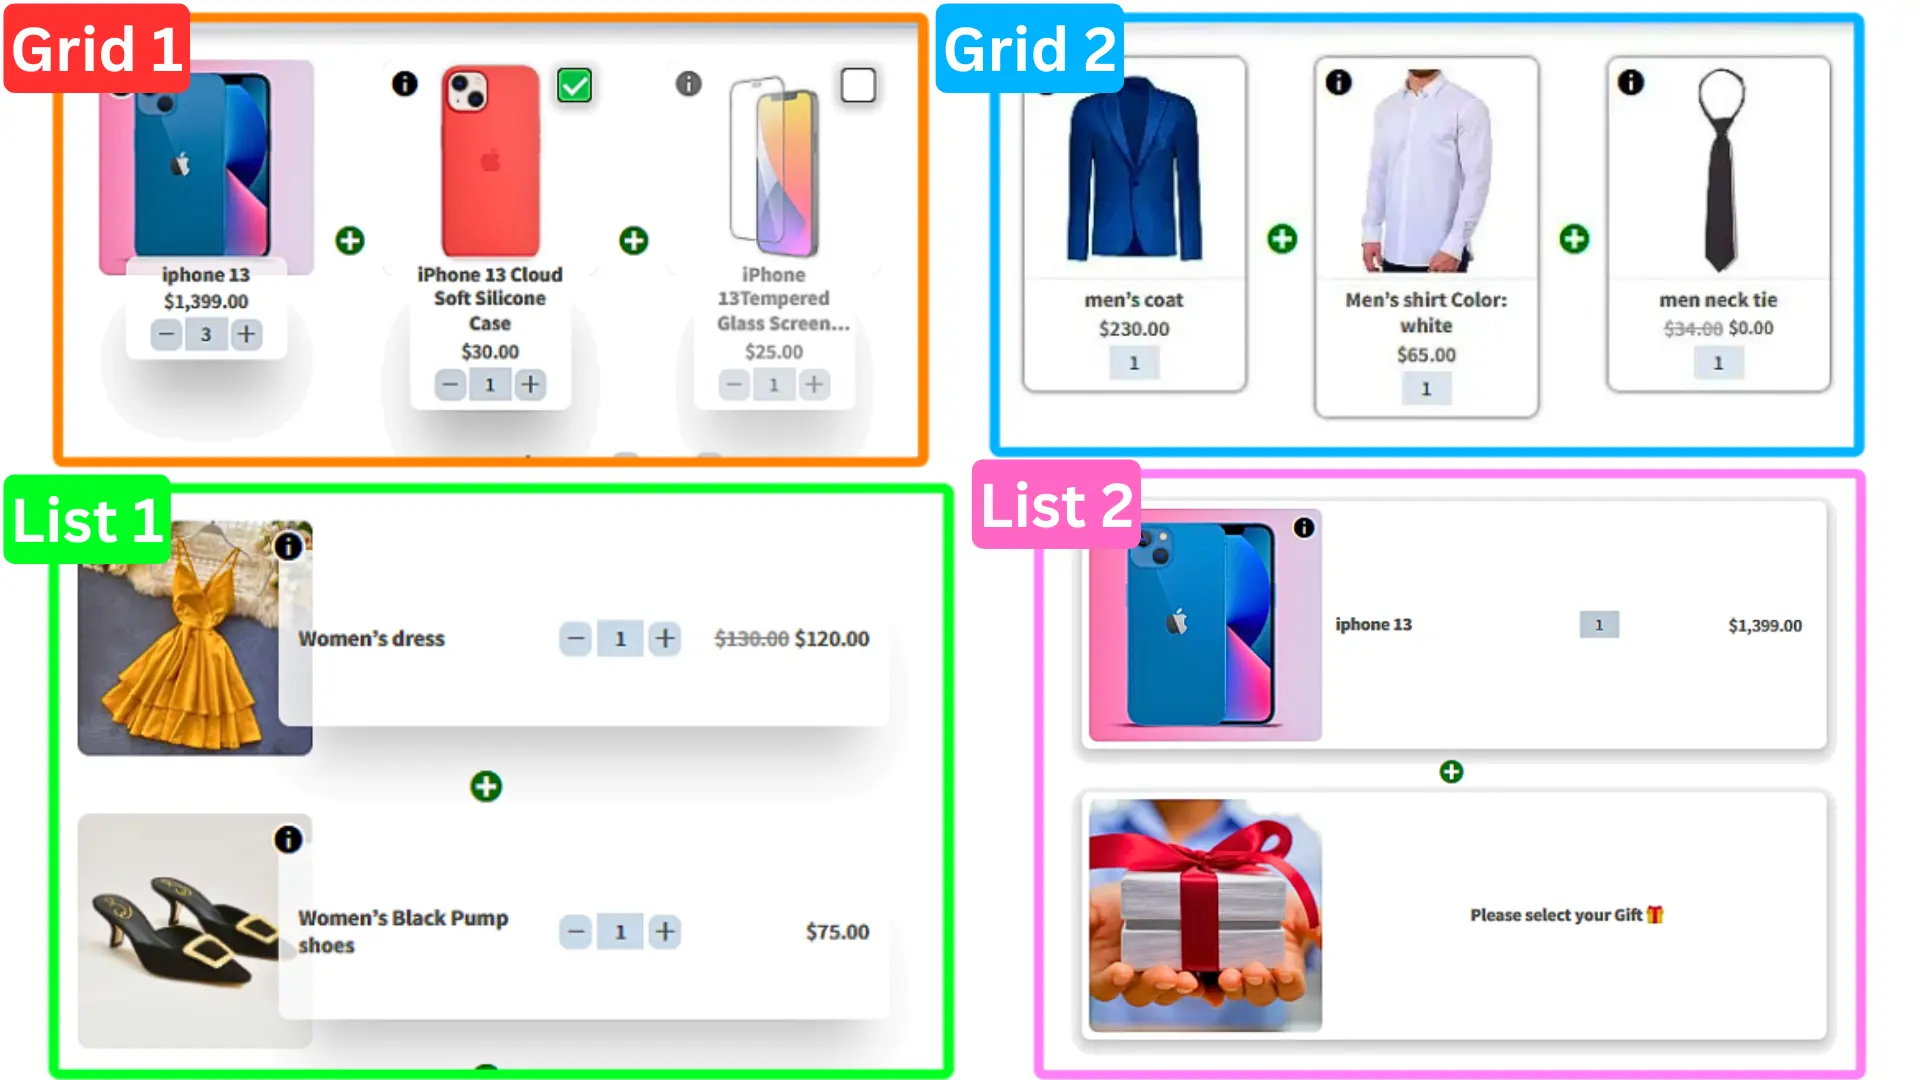
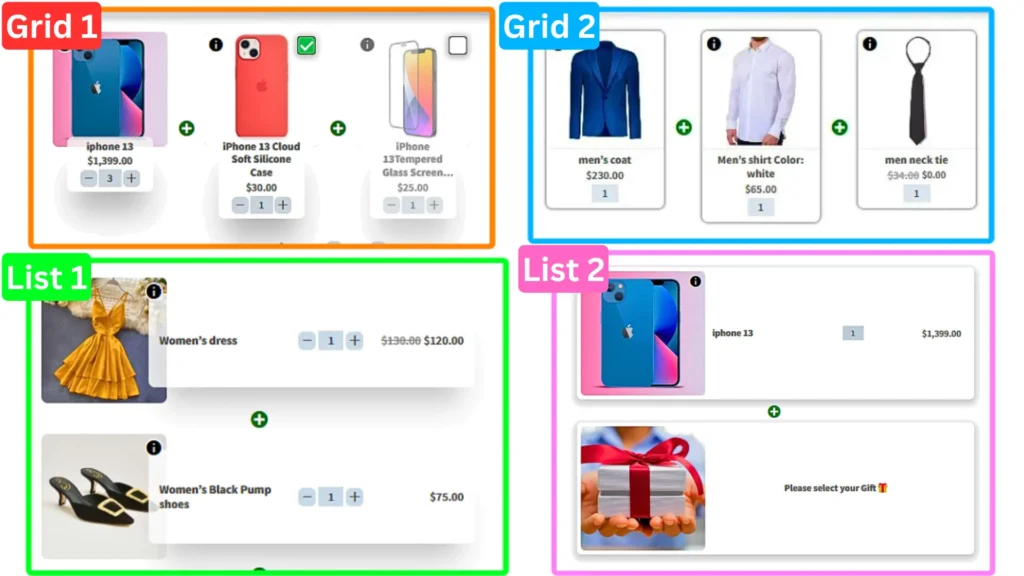
The Easy WooCommerce Product Bundles pro plugin offers multiple beautiful Grid and List themes. Also, you can select “small, medium, large” for the theme size.
You can set a theme for all of the product bundles on your site, or you can set a theme individually for a specific product bundle.
To set a theme, follow the steps below:
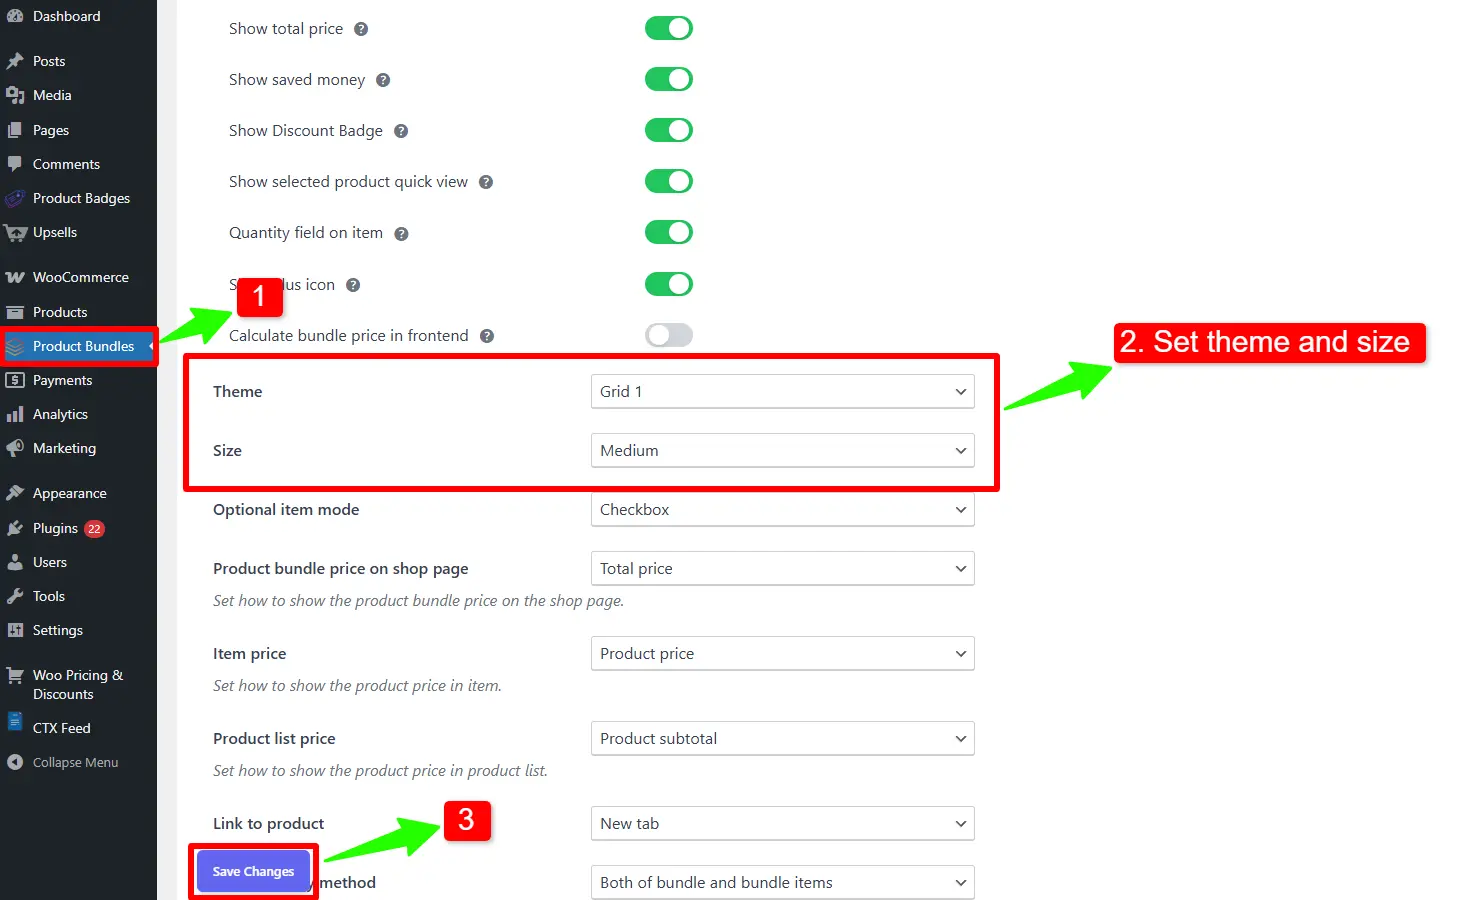
Navigate to the “Product Bundles” menu in the WordPress dashboard.
In the Settings tab, there is a Theme and Size option to set a global theme and size.
Set your desired theme and size and save the settings.
Save the changes.
To apply a theme individually to a specific product bundle, follow the below steps.
Open the edit product page.
Navigate to the “Product Bundles” tab in the “Product data” panel.
WooCommerce product bundles allow you to combine multiple products into a single offer and sell them together as one bundle. You can use bundles to group complementary products, create special offers, encourage customers to buy related products, or offer multiple products at a combined price.
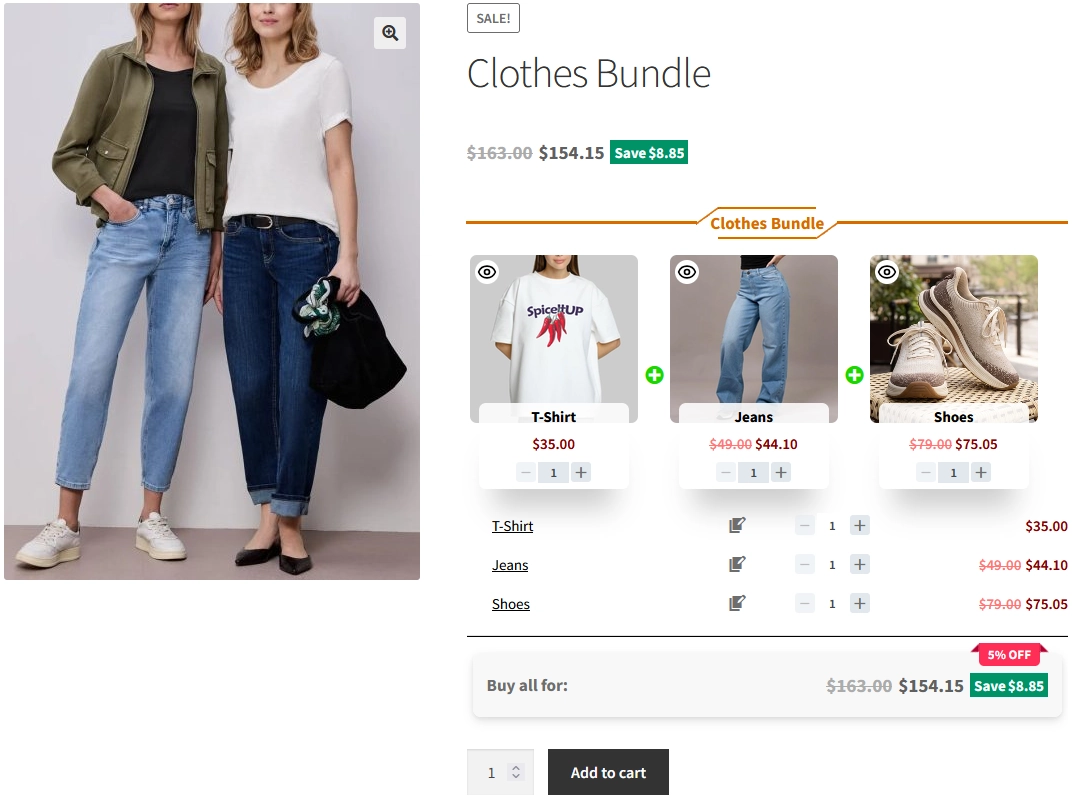
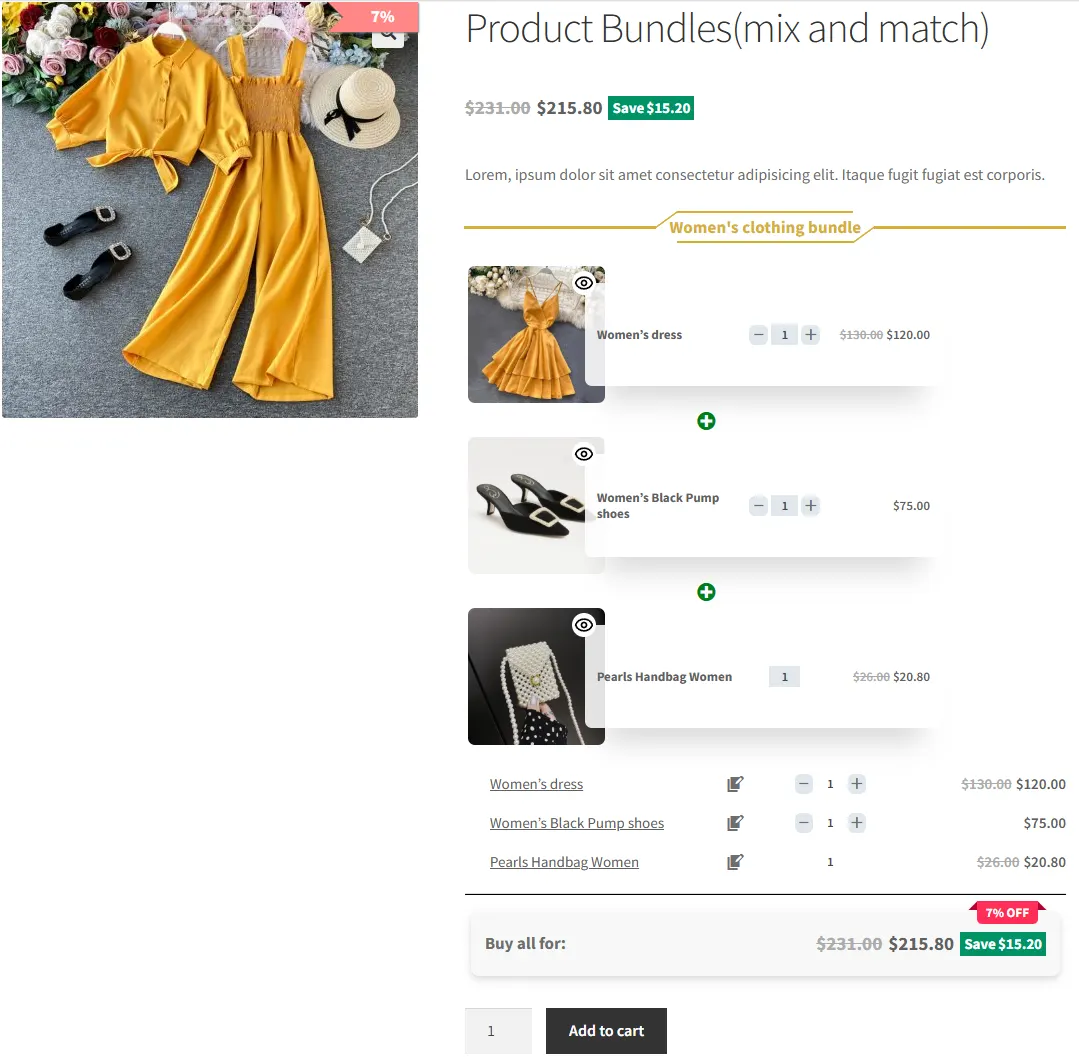
For example, a clothing store could create a bundle that includes a shirt, pants, and shoes. Instead of purchasing each product separately, customers can purchase the complete bundle from a single product page.
In this guide, you’ll learn how to create WooCommerce product bundles step by step using the Product Bundle Builder for WooCommerce plugin. We’ll start with a simple product bundle and then look at other bundle types, pricing methods, shipping, and advanced options.
A WooCommerce product bundle is a product that combines multiple individual products into one package.
You can create bundles with fixed products or, depending on your configuration, allow customers to choose products, quantities, or variations within the bundle.
For example, you could create:
A clothing bundle with a shirt, pants, and shoes
A computer bundle with a laptop, mouse, and keyboard
A skincare bundle with cleanser, serum, and moisturizer
A gift bundle containing several complementary products
Product bundles can be configured in different ways depending on the products you sell and how you want customers to purchase them.
Why Create Product Bundles in WooCommerce?
Product bundles can help you offer related products together and create more flexible purchasing options for your customers.
Here are some common reasons to create product bundles in WooCommerce:
Increase average order value: Encourage customers to purchase multiple related products together.
Promote complementary products: Group products that are commonly used or purchased together.
Create special offers: Sell several products as a package with a fixed price or discount.
Simplify the buying process: Let customers purchase multiple products from a single product page.
Create customizable offers: Allow customers to choose products, quantities, or variations when needed.
How to Create a WooCommerce Product Bundle
The easiest way to create a WooCommerce product bundle is to use a product bundle plugin that integrates with WooCommerce.
In the following steps, we’ll use Product Bundle Builder for WooCommerce to create a simple product bundle.
Step 1: Install Product Bundle Builder for WooCommerce
To install Product Bundle Builder for WooCommerce, follow these steps:
Go to Plugins → Add New in your WordPress dashboard.
Search for “Product Bundle Builder for WooCommerce” or “AsanaPlugins.”
Find Product Bundle Builder for WooCommerce in the search results.
To create a WooCommerce Product Bundle, follow these steps:
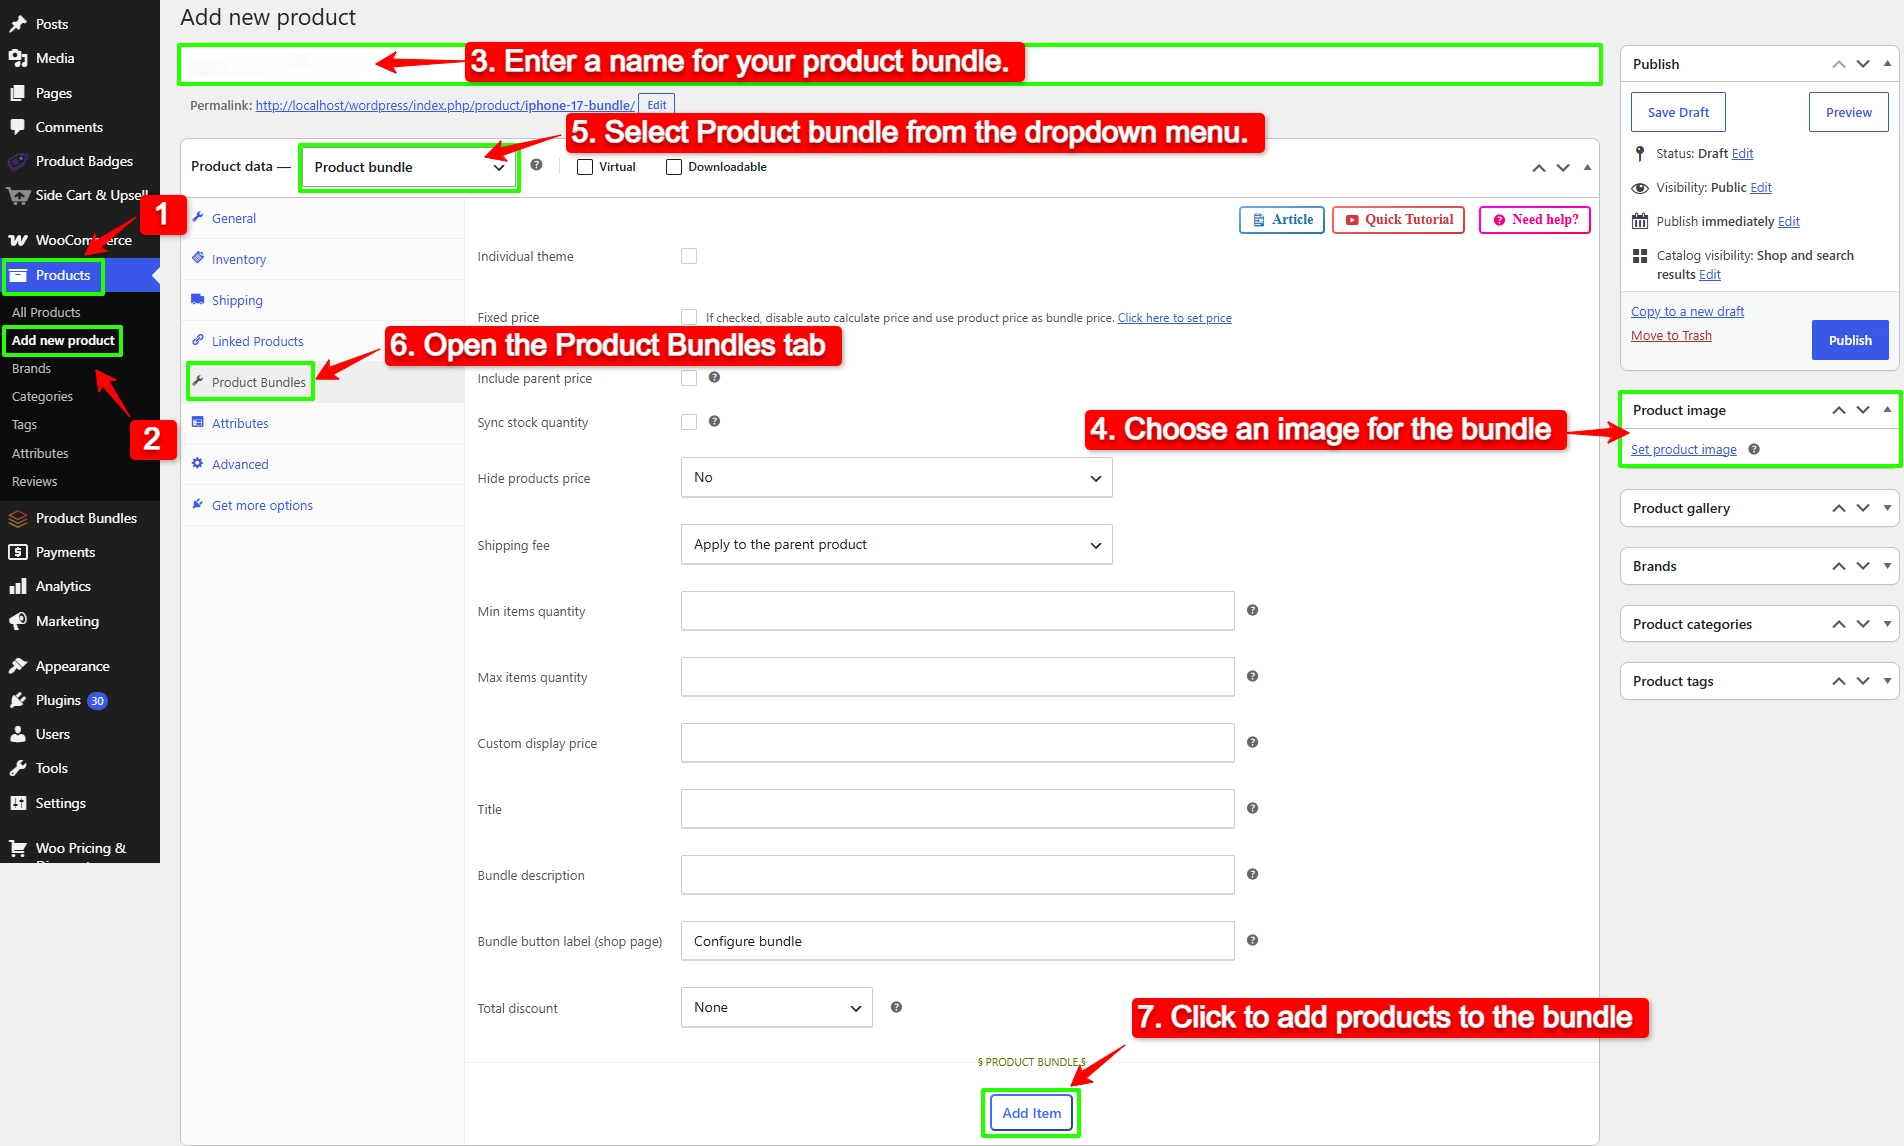
Go to “WooCommerce” → “Products” in your WordPress dashboard.
Click “Add New” to create a new product.
Enter a name for your product bundle.
In the right sidebar, click “Set product image” and choose an image for your bundle.
In the “Product data” section, select “Product bundle” from the product type dropdown.
After selecting “Product bundle,” the “Product Bundles” tab will appear in the product data panel.
Go to the “Product Bundles” tab and click “Add Item” to add products to your bundle.
Step 3: Add and Configure Bundle Items
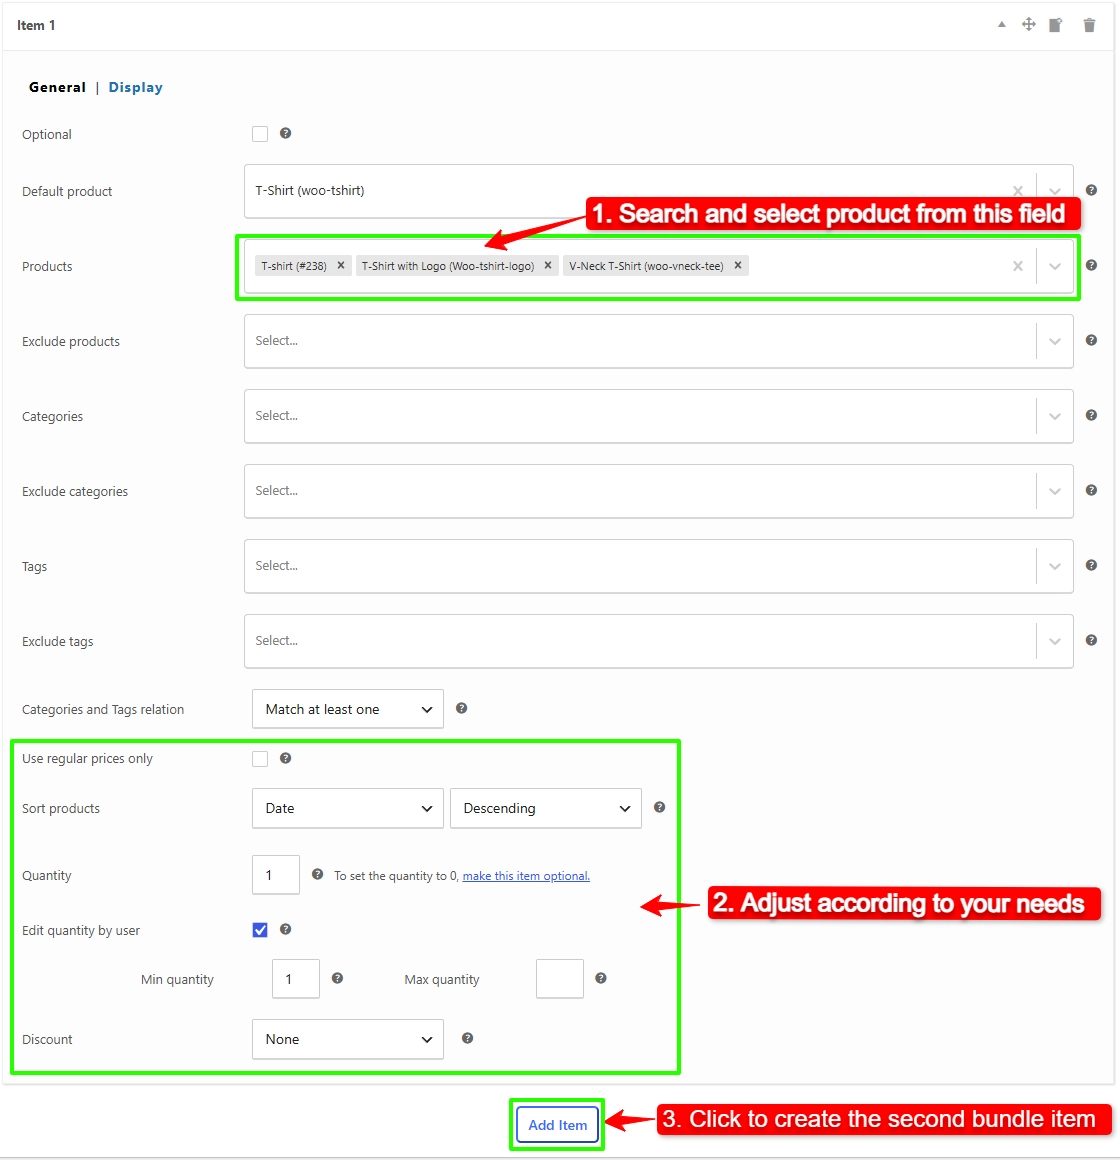
After clicking on “Add Item”, configure the first bundle item using the available options:
In the “Products” field, search for and select the product you want to add to the bundle.
Set the “Quantity” for the selected product.
Configure the available quantity options according to your requirements.
Configure any other available options for the bundle item.
Review the item settings and make sure they are configured as needed.
For example, if you are creating a clothing bundle, you can add a T-Shirt as the first bundle item and configure its quantity and other available options.
Once you have finished configuring the first item, click “Add Item” to create the second bundle item.
Select another product, such as Jeans, and configure its quantity and available options.
Repeat the same process to add and configure the remaining bundle items, such as Shoes.
Your bundle can now contain:
Item 1: T-Shirt
Item 2: Jeans
Item 3: Shoes
Each bundle item can be configured separately according to your requirements.
Step 4: Configure the Bundle Price
After adding and configuring all the bundle items, configure the pricing method for your bundle.
In the “Product Bundles” tab, configure the bundle price according to your requirements.
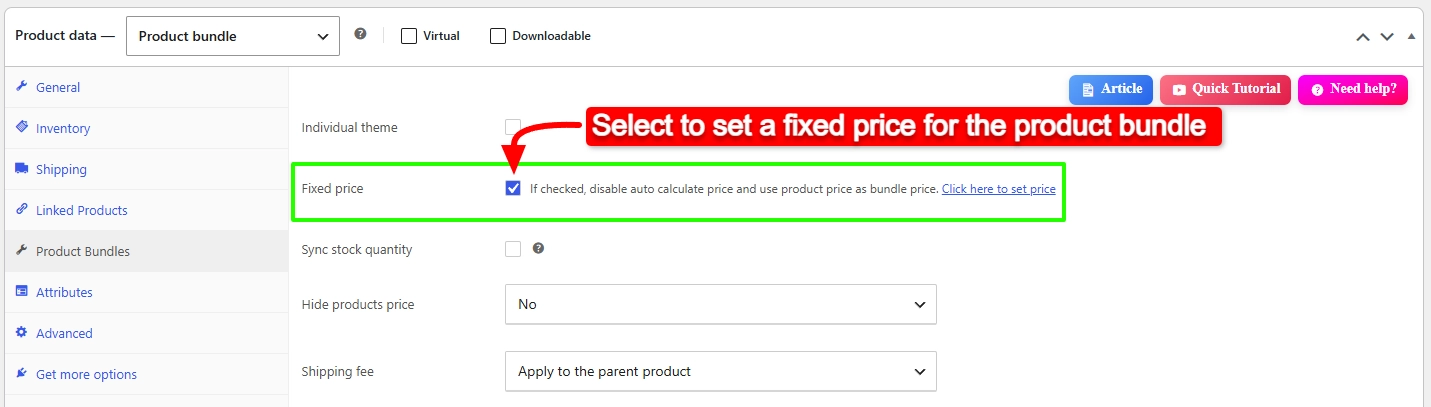
The plugin provides two pricing methods:
1. Fixed Price
Select the fixed pricing option if you want to set one specific price for the entire bundle.
For example, if the products in your bundle have a combined regular price of $100, you can sell the complete bundle for $85.
2. Automatically Calculated Price
The Auto Calculate Price option dynamically calculates the price of the product bundle based on the selected items.
To use the automatic pricing feature, uncheck the “Fixed Price” option and update the product.
This option is useful when the products in your bundle have different prices or when you want the bundle price to change based on the products selected by the customer.
Step 5: Configure Additional Bundle Options
After configuring the bundle items and pricing, review the available bundle options and configure them according to your requirements.
Depending on your bundle configuration, you can customize options such as product selection, quantities, discounts, and other available settings.
For more advanced bundle configurations, such as product variations, Mix and Match, categories, tags, optional products, and dynamic product selection, you can follow the dedicated guides linked in this article.
Step 6: Publish the Bundle
Once you have finished configuring your bundle, click “Publish” to publish the product.
Your WooCommerce product bundle is now ready to be displayed in your store.
Open the product page and make sure that the bundle works as expected before making it available to your customers.
Check that:
All bundle items are displayed correctly.
The selected products are correct.
Quantities work as expected.
The bundle price is correct.
Any configured discounts are applied correctly.
The bundle can be added to the cart successfully.
Different Types of WooCommerce Product Bundles
WooCommerce product bundles can be created in different ways depending on how you want customers to select and purchase products. With Product Bundle Builder for WooCommerce, you can create simple fixed bundles as well as more flexible bundle configurations.
Simple Product Bundles
A simple product bundle combines specific products into one package. The store owner selects the products included in the bundle, and customers purchase them together.
For example, you can create a bundle containing a T-shirt, jeans, and shoes and sell them as one package.
This is the simplest way to create a WooCommerce product bundle and is covered in the step-by-step tutorial above.
Product Bundles with Variations
You can also include variable products in your WooCommerce bundles and allow customers to select the variation they want.
For example, if a bundle contains a T-shirt, customers can choose its size and color before adding the bundle to the cart.
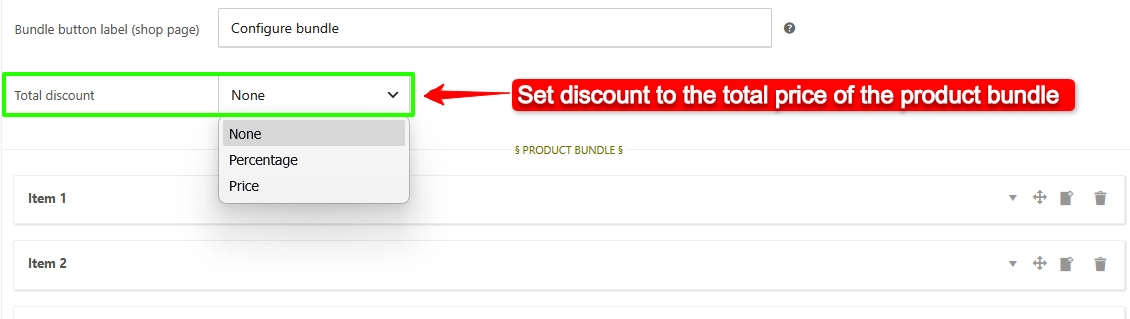
Product Bundle Builder for WooCommerce allows you to apply discounts to both the entire product bundle and individual bundle items when using the Auto Calculate Price option.
Discount on the Entire Bundle
You can apply a discount to the total price of the product bundle. The discount can be configured as either a percentage or a price discount.
This allows you to offer a discount on the complete bundle rather than applying a separate discount to each product.
Discount on Individual Bundle Items
You can also apply a discount to individual products included in the bundle.
Each bundle item can have its own discount, allowing you to apply different discounts to different products within the same bundle.
This is useful when you want to offer specific discounts on selected products while keeping other bundle items at their regular prices.
Shipping Fee Calculation
Product Bundle Builder for WooCommerce allows you to choose how the shipping fee is calculated for a product bundle.
You can choose to apply the shipping fee for the whole bundle or each bundle item, or the parent product.
How to Configure Plugin Settings
The main plugin settings are available in the “Product Bundles” tab in your WordPress dashboard.
From there, you can configure the general options that control how product bundles work and are displayed in your store.
Settings and customization are available on this page:
Item View: In this section, you can configure various settings, such as displaying stock availability, showing product ratings and descriptions, enabling modal quick views, adding a quantity field on item pages, displaying a plus icon for items, setting the theme and size options, positioning product bundles on the product page, defining custom CSS selectors, specifying the product price selector, and many other customizable options.
Change product model: In this section, you can configure the number of products per pop-up page.
Styles: In this section, you can customize the colours of different parts of your bundle and set the product image object-fit CSS.
Themes and Sizes
Product Bundle Builder for WooCommerce includes multiple grid and list themes for displaying bundle items on your product pages.
You can also choose the item size for your product bundle, with Small, Medium, and Large size options.
These settings allow you to customize how bundle items are displayed and choose a layout and size that best fits your store’s design.
Coupon Apply Method
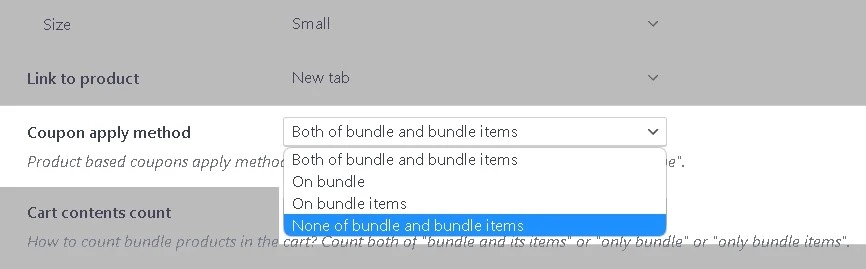
You can also control how WooCommerce coupons are applied to a product bundle.
The plugin provides the following options:
Both Bundle and Bundle Items
Only Bundle
On Bundle Items
None
Choose the coupon application method that best fits your bundle pricing and discount strategy
Shortcodes
The Product Bundle Builder plugin provides shortcodes that you can use to display product bundles on your product pages.
These shortcodes are especially useful when you want to manually place the bundle output in a specific location or use it with page builders such as Elementor.
Available Shortcodes
Display Product Bundles
Use the following shortcode to display product bundles:
[asnp_wepb_product]
Display Product Bundles with Add to Cart
Use the following shortcode to display product bundles with an Add to Cart button:
[asnp_wepb_product show_add_to_cart="1"]
Using Shortcodes with Elementor
To use a shortcode with Elementor:
Edit your page with Elementor.
Add the Shortcode widget.
Enter one of the Product Bundle Builder shortcodes.
Save or update the page.
For example:
[asnp_wepb_product show_add_to_cart="1"]
The product bundles will be displayed where the shortcode is placed.
How to translate WooCommerce product bundles
Translating your WooCommerce product bundles can help you provide a better shopping experience for customers who speak different languages. It allows you to display bundle-related text and product information in your customers’ preferred language.
Product bundles can be used in many different ways depending on your products and business model. Here are some common examples:
Clothing Bundle
Combine products such as a T-Shirt, Jeans, and Shoes into a complete outfit and offer them together as one bundle.
Computer Bundle
Create a bundle containing products such as a computer, monitor, keyboard, mouse, and other accessories.
Skincare Bundle
Combine complementary products such as cleanser, moisturizer, and serum into one skincare package.
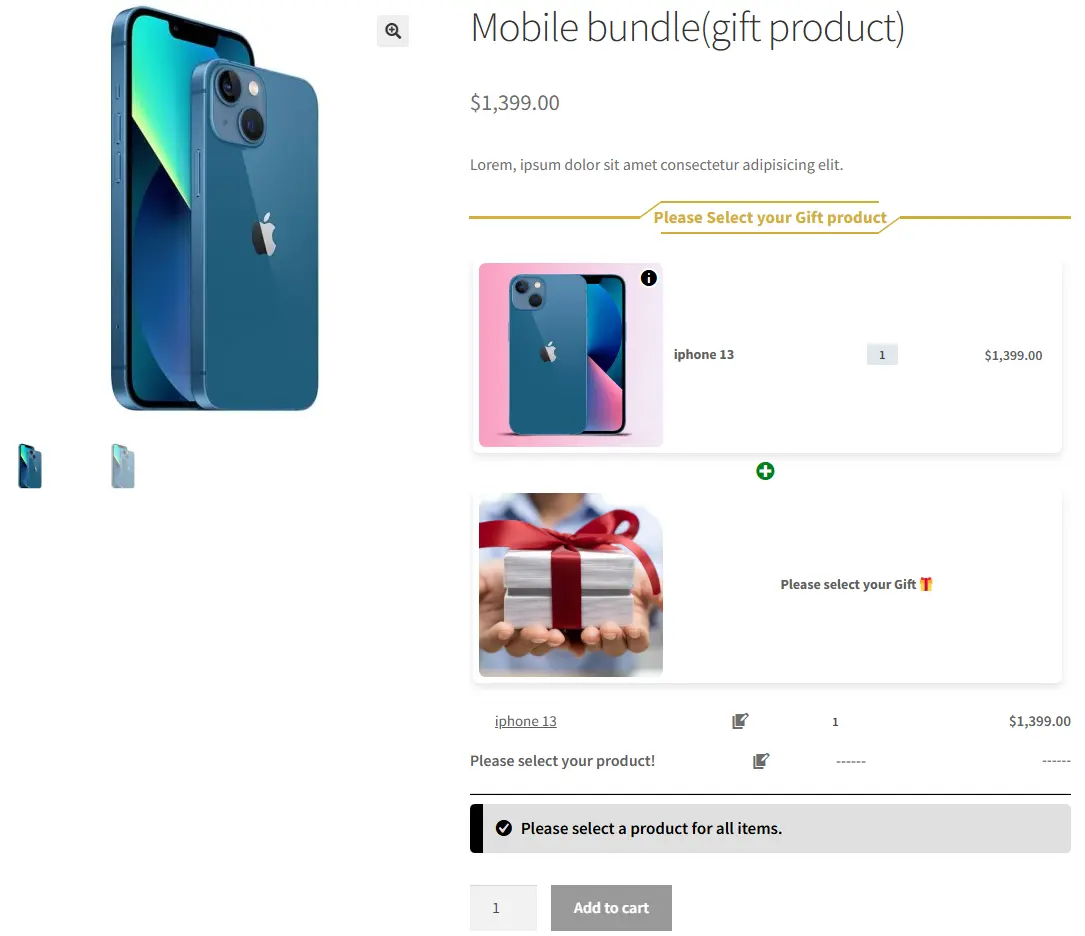
Gift Bundle
Create a package containing several related products and offer it as a ready-made gift.
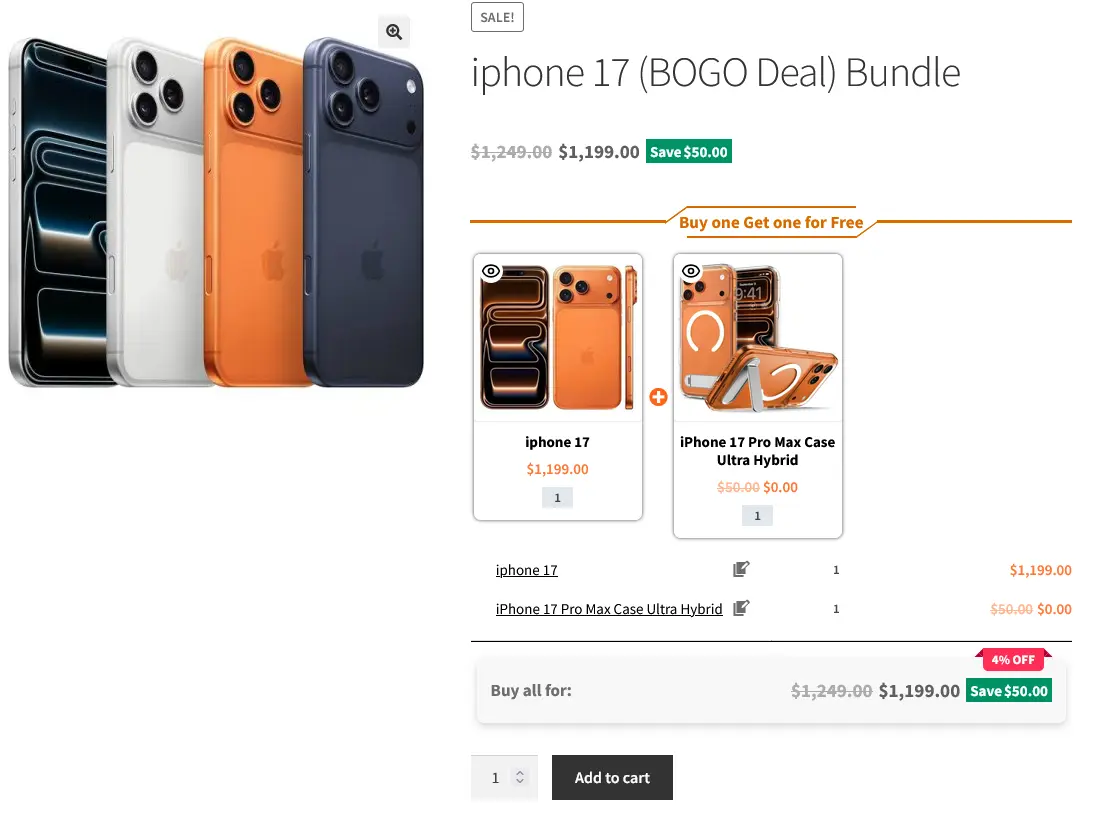
BOGO Offer
Offer a free or discounted product when a customer purchases a qualifying product.
Build Your Own Bundle
Allow customers to choose products from a predefined selection and create their own personalized bundle.
These examples show how WooCommerce product bundles can be adapted to different products, offers, and customer needs.
WooCommerce Product Bundles Free vs Pro
Product Bundle Builder for WooCommerce is available in both Free and Pro versions.
The free version provides the essential features needed to create and sell product bundles, while the Pro version adds more advanced bundle types, customization options, and additional features.
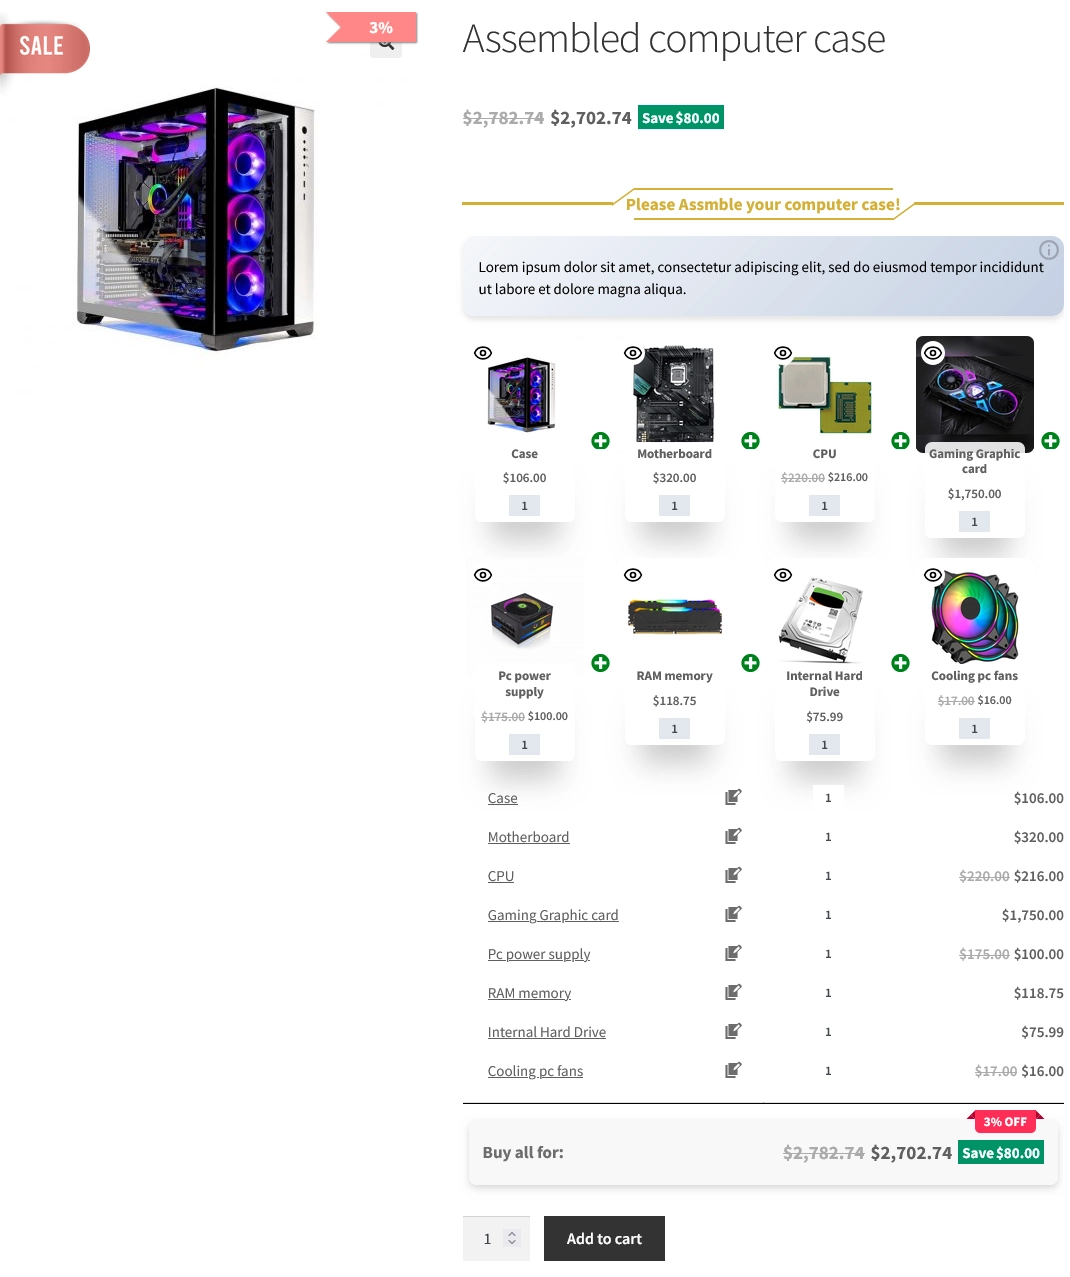
With the Pro version, you can create advanced bundle offers such as Mix and Match, Dynamic Bundles, Category-Based Bundles, Optional Products, and Assembled Products, along with additional display and customization options.
Can I create WooCommerce product bundles for free?
Yes. You can create basic product bundles using the free version of Product Bundle Builder for WooCommerce.
Can customers choose products in a WooCommerce bundle?
Yes. Depending on how you configure the bundle, you can allow customers to select products, quantities, or variations.
Can I create a bundle with variable products?
Yes. You can include variable products in a bundle and allow customers to select the available variations.
Can I set a fixed price for a WooCommerce product bundle?
Yes. You can enable the Fixed Price option and set a specific price for the entire bundle.
Can WooCommerce bundle prices be calculated automatically?
Yes. By disabling the Fixed Price option, you can use Auto Calculate Price to calculate the bundle price based on the selected products.
Can I create BOGO offers in WooCommerce?
Yes. Product Bundle Builder for WooCommerce can be used to create Buy One Get One offers where customers receive a free or discounted product.
Can I offer a free gift with a WooCommerce product?
Yes. You can configure a bundle to include a free gift product with a qualifying purchase.
Can customers choose product variations in a bundle?
Yes. Variable products can be included in bundles, allowing customers to select available variations according to your configuration.
Conclusion
WooCommerce product bundles allow you to combine related products, create special offers, and give customers a more convenient way to purchase multiple products together.
With Product Bundle Builder for WooCommerce, you can start with simple product bundles and create more advanced offers such as Mix and Match bundles, Dynamic Bundles, Optional Products, BOGO offers, Gift Products, Category-Based Bundles, and Assembled Products.
Whether you want to increase the value of each order, promote complementary products, or create customizable product offers, product bundles can be adapted to different types of WooCommerce stores.
Start with a simple bundle using the step-by-step tutorial above, or explore the dedicated guides throughout this article to create more advanced WooCommerce product bundle offers.
Related Resources
Want to learn more about WooCommerce product bundles and related strategies? Explore these helpful guides:
Would you like to add WhatsApp Chat to WooCommerce? Would you like to increase your sales with customer satisfaction? WhatsApp Chat support is the best way to communicate with your customers and provide better support to them. If you have a sincere conversation with your customers, they are more likely to buy your products or services.
Communicating and chatting with customers helps to increase customer satisfaction and WhatApp Chat Plugin for WooCommerce helps you to do it better.
In this article, you will learn how to add WhatsApp Chat Button to WooCommerce in less than 2 minutes.
If you would like to increase your WooCommerce store sales, then you should provide better support to your customers. Because when you provide better support for your customers it encourages them to buy more from you instead of buying from your competitors.
One of the best strategies in online marketing is to communicate with customers and answer their questions and help them. WhatsApp is the most popular instant messaging application in the world that is used by more than 2 billion people worldwide. Based on this fact, if you would like to attract more customers you have to add WhatsApp Chat Plugin to your WooCommerce store.
How to add a WhatsApp Live Chat plugin to your WooCommerce website
In this article, we will provide you with a detailed guide to adding WhatsApp Live Chat Plugin to your WooCommerce website easily.
This article provides a detailed guide to adding WhatsApp live chat to WooCommerce products, categories, and tags.
What you can do with WhatsApp Chat support?
The WhatsApp Chat Support plugin for WordPress has listed powerful features and helps you to add WhatsApp Chat support to your website easily.
Add single agent WhatsApp chat
Add multi-agent WhatsApp chat
Add a floating WhatsApp chat button to your website
Add a floating WhatsApp chat button to specific pages
Display WhatsApp chat support for “All Visitors”, “New Visitors”, “Returning Visitors”, “Logged in users”, and “Guest Users”
Add a WhatsApp chat button to specific WooCommerce products, categories, or tags
Add WhatsApp chat support to specific WooCommerce Categories
Add WhatsApp chat support to specific pages by URL.
Exclude WhatsApp chat support from specific pages by URL.
Display a single account or multi-account chat window in the floating WhatsApp chat button
Create multiple WhatsApp accounts with specific avatars or predefined avatars
Predefined templates to create WhatsApp chat easily and in a minute
Different styles and positions for Mobile and Desktop
Preview the WhatsApp chat in the admin when designing it
Custom colors, greetings, icons, and avatars
Define custom availability and working hours for each account
Define custom availability timezone for each account
Keep communicating directly from your WhatsApp account
Installing WhatsApp Chat Button Plugin on WooCommerce Website
The Live Chat Button for WhatsApp is an easy-to-use WhatsApp plugin for WooCommerce. It will help you to add a single account or multi-account floating WhatsApp chat to the website in less than 2 minutes. It provides built-in templates for WhatsApp chat that speed up the workflow of adding WhatsApp Support to the website.
Create Account
After installing the WhatsApp Chat plugin, you must create an account to add WhatsApp Live Chat to WooCommerce.
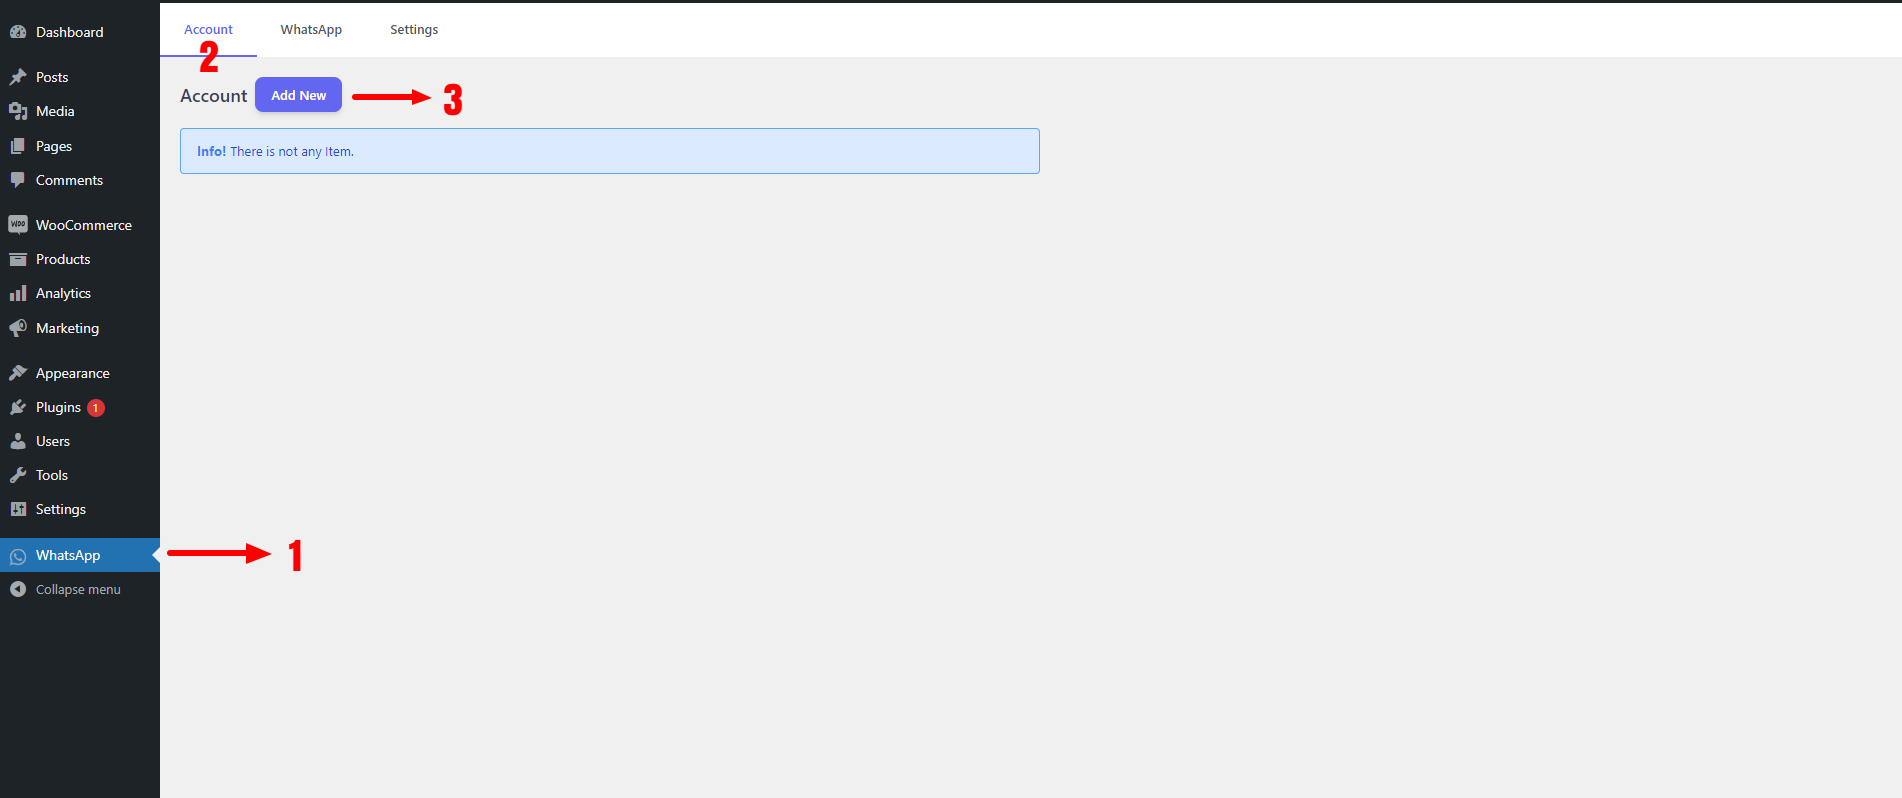
To create an account, navigate to the WhatsApp >> Account tab and create an account like the below image.
Add An Account
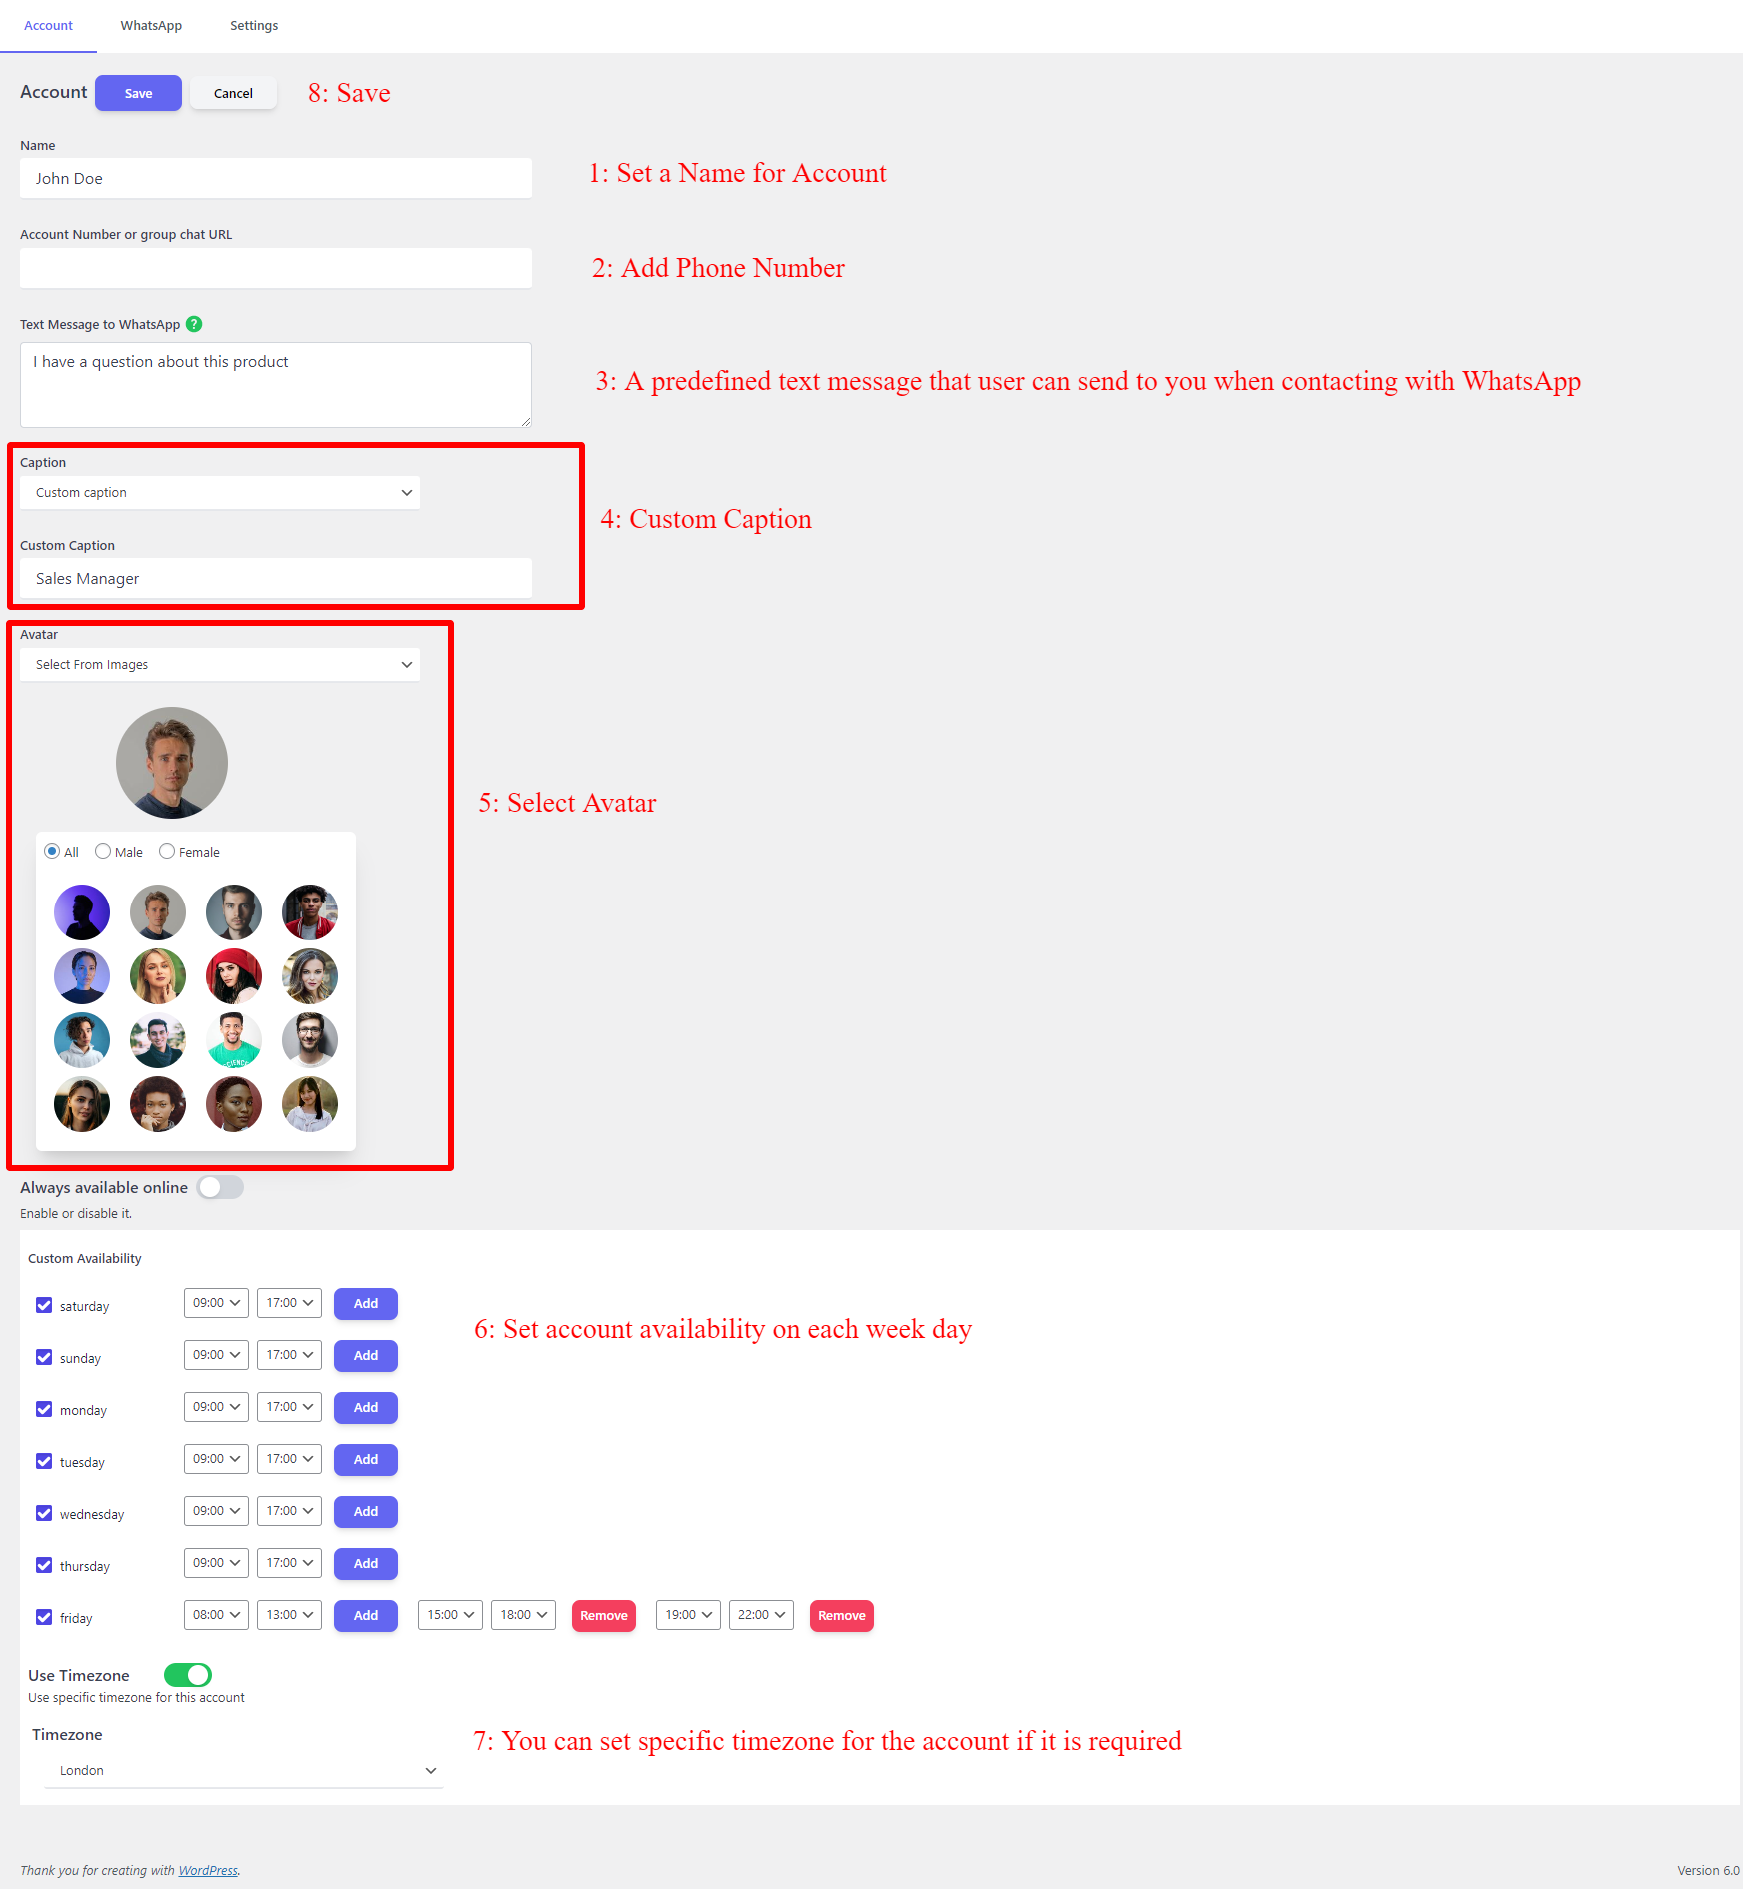
Now fill the required field of the account like “Name”, and ‘Phone number” and set an avatar to the account. You can set the account availability to “Always available” or add custom availability for it. Adding custom availability is available in the pro version of the plugin. Also, you can set a custom timezone for each account that you create, it can help when you have a worldwide team.
Save the account and go to the next step.
Create Account Form
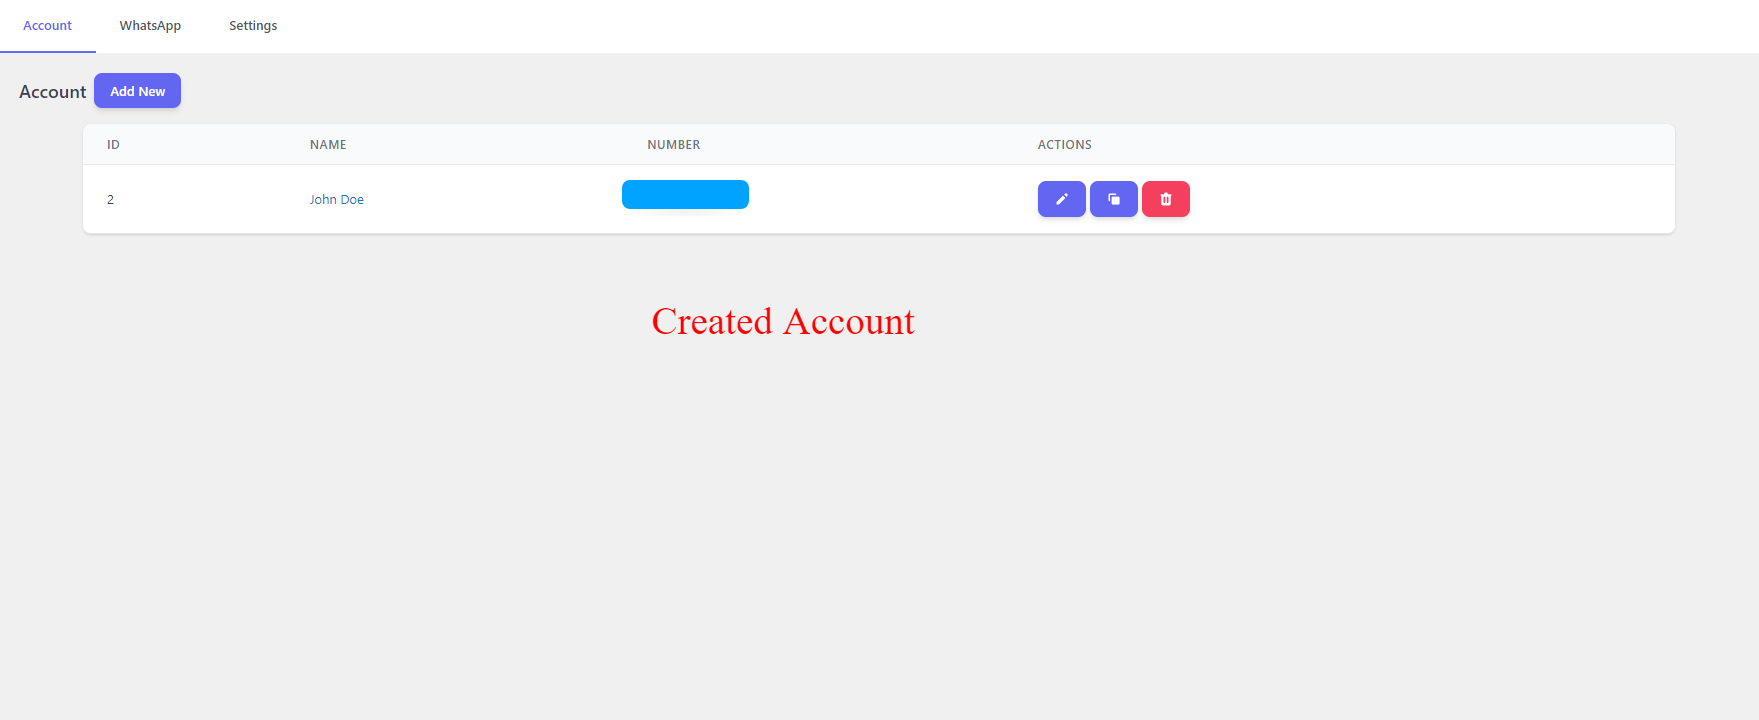
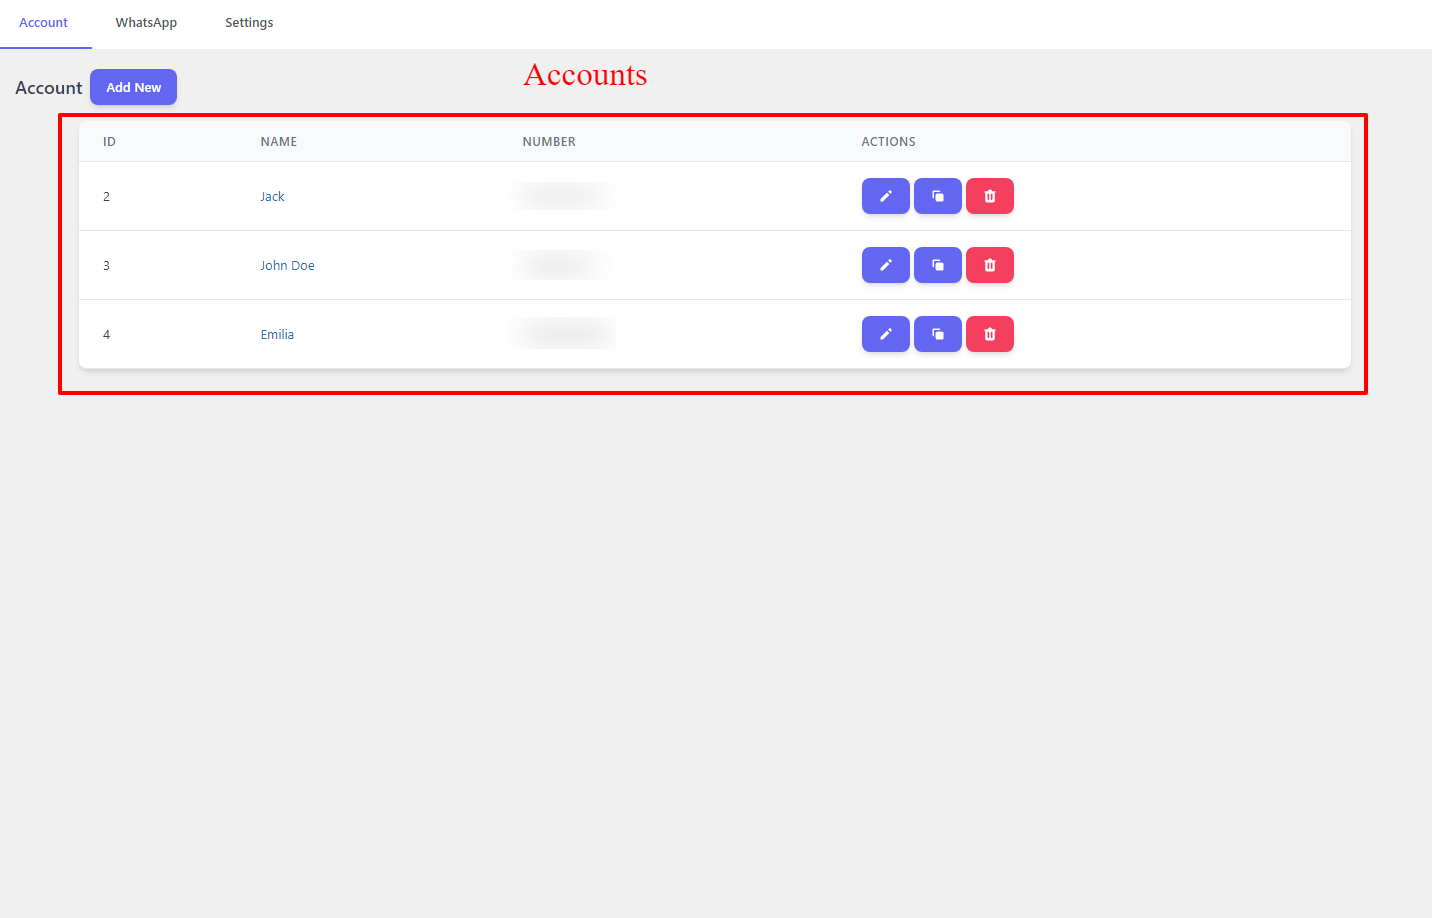
After you create the account it will be listed in the Accounts list like the below image.
Accounts List
Create Single Account WhatsApp Chat for WooCommerce
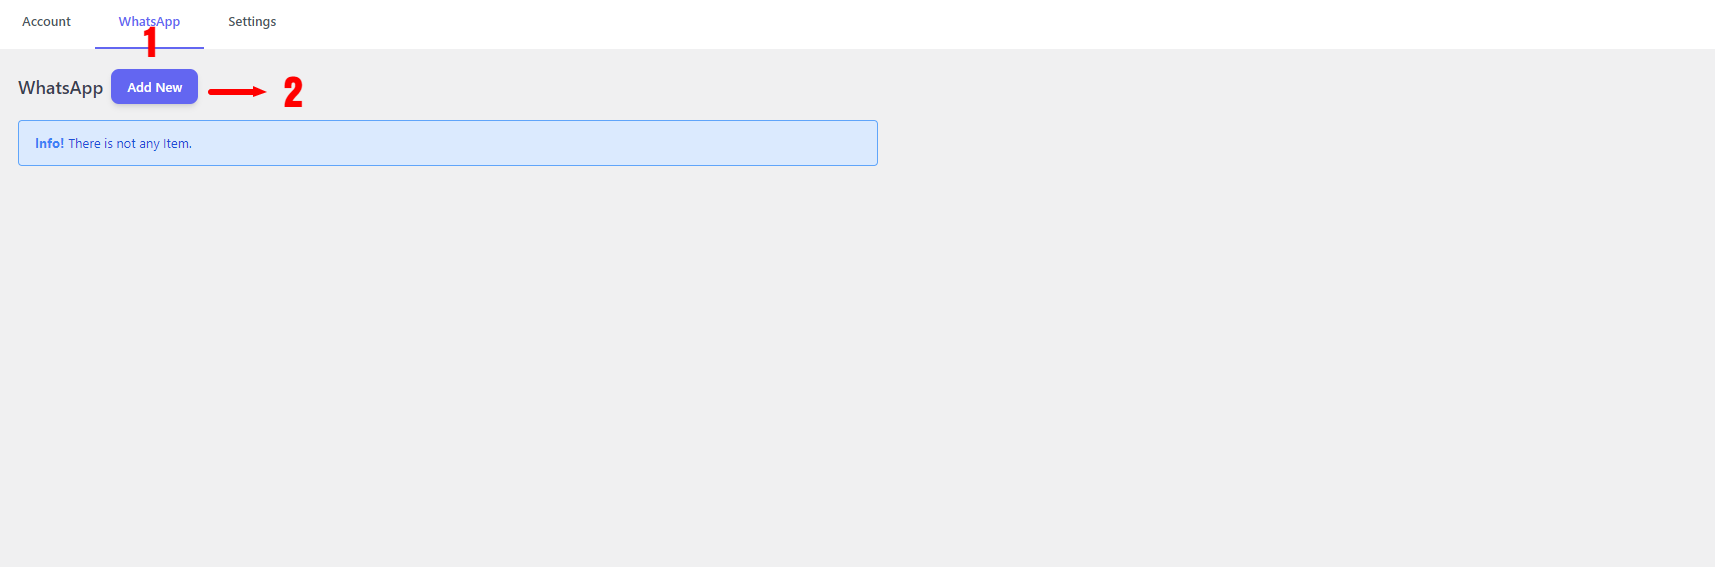
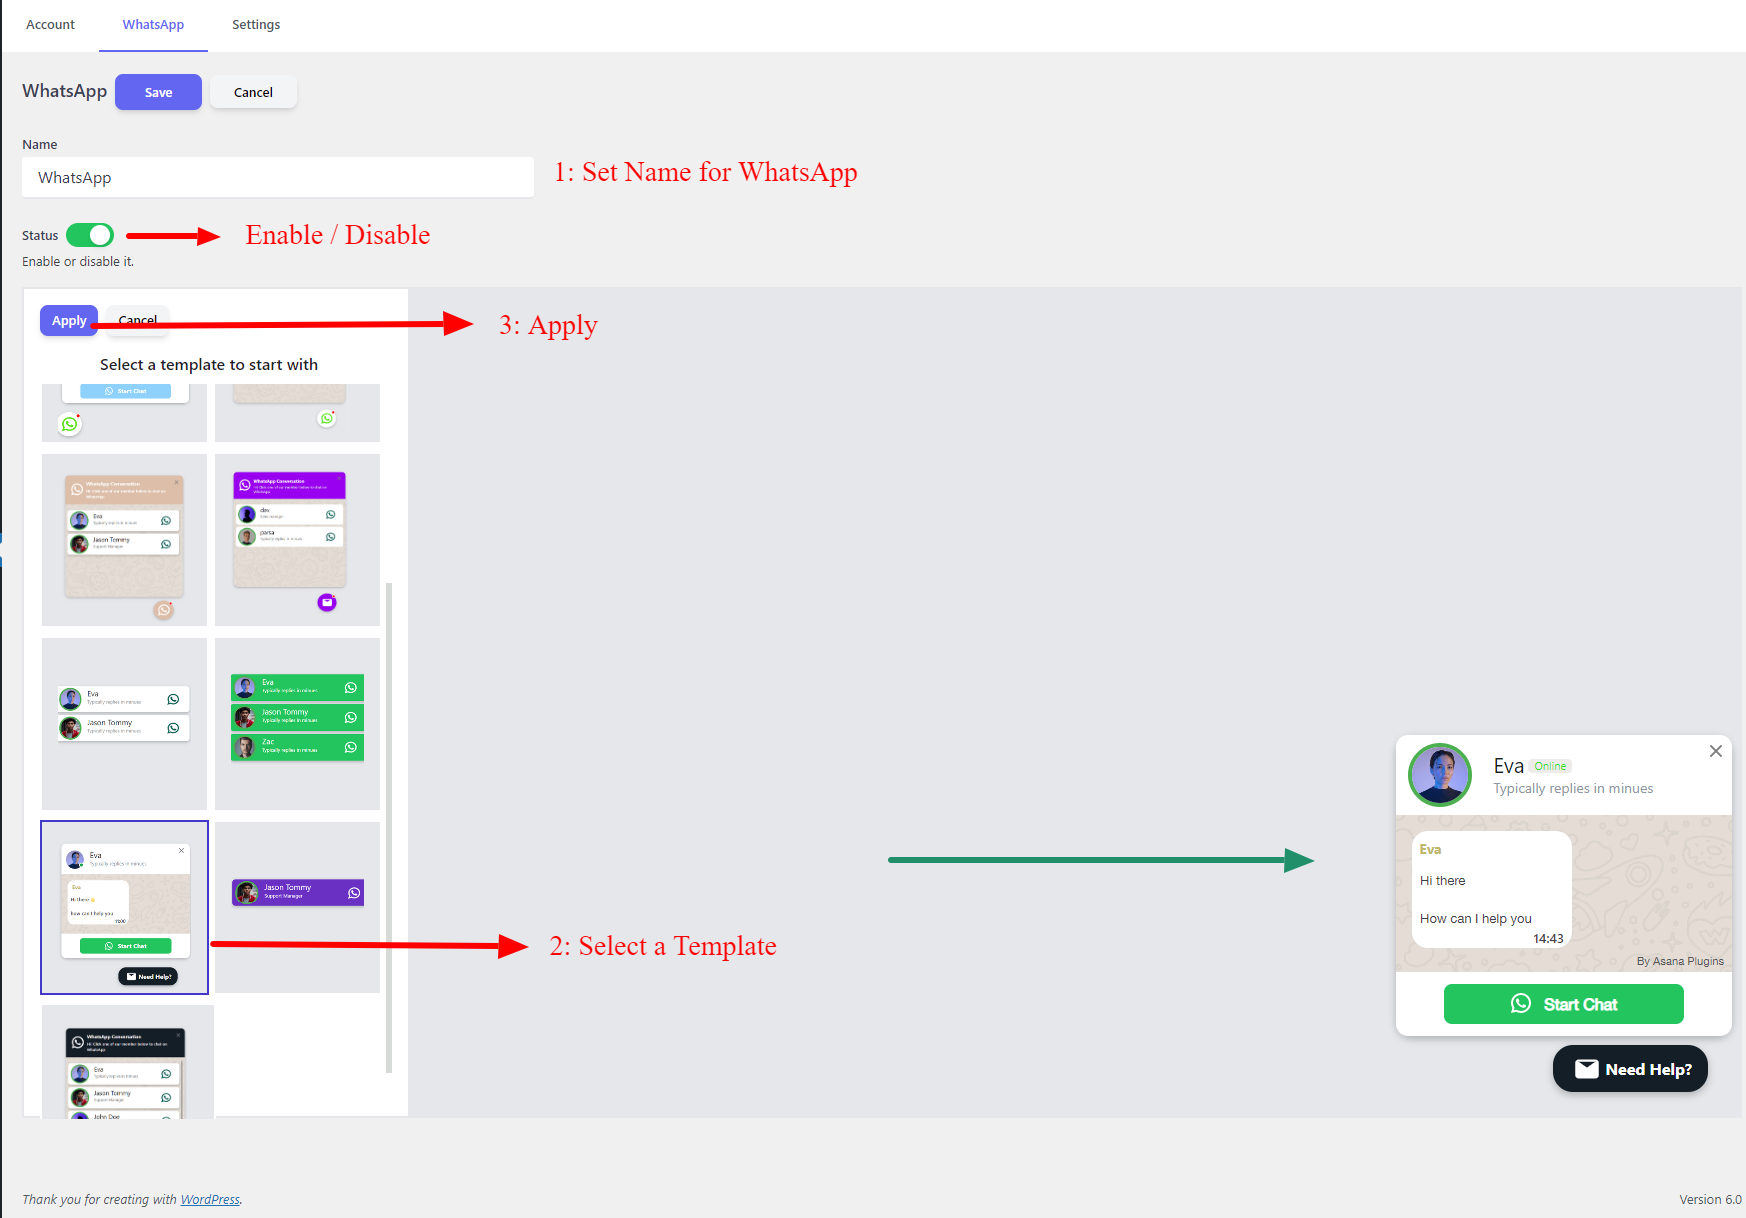
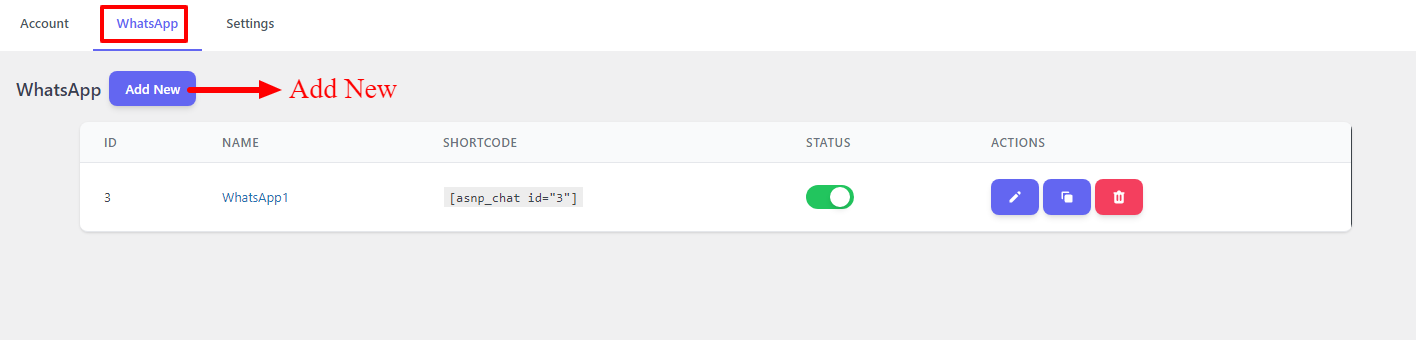
After creating an account in the previous step, navigate to the WhatsApp tab and click on Add New button to create a WhatsApp chat.
Add WhatsApp
Set a name for WhatsApp.
Select a template from the predefined templates list.
A preview of the selected template will be shown on the right side.
Click on the Apply button to start using the selected template.
Single Account Template
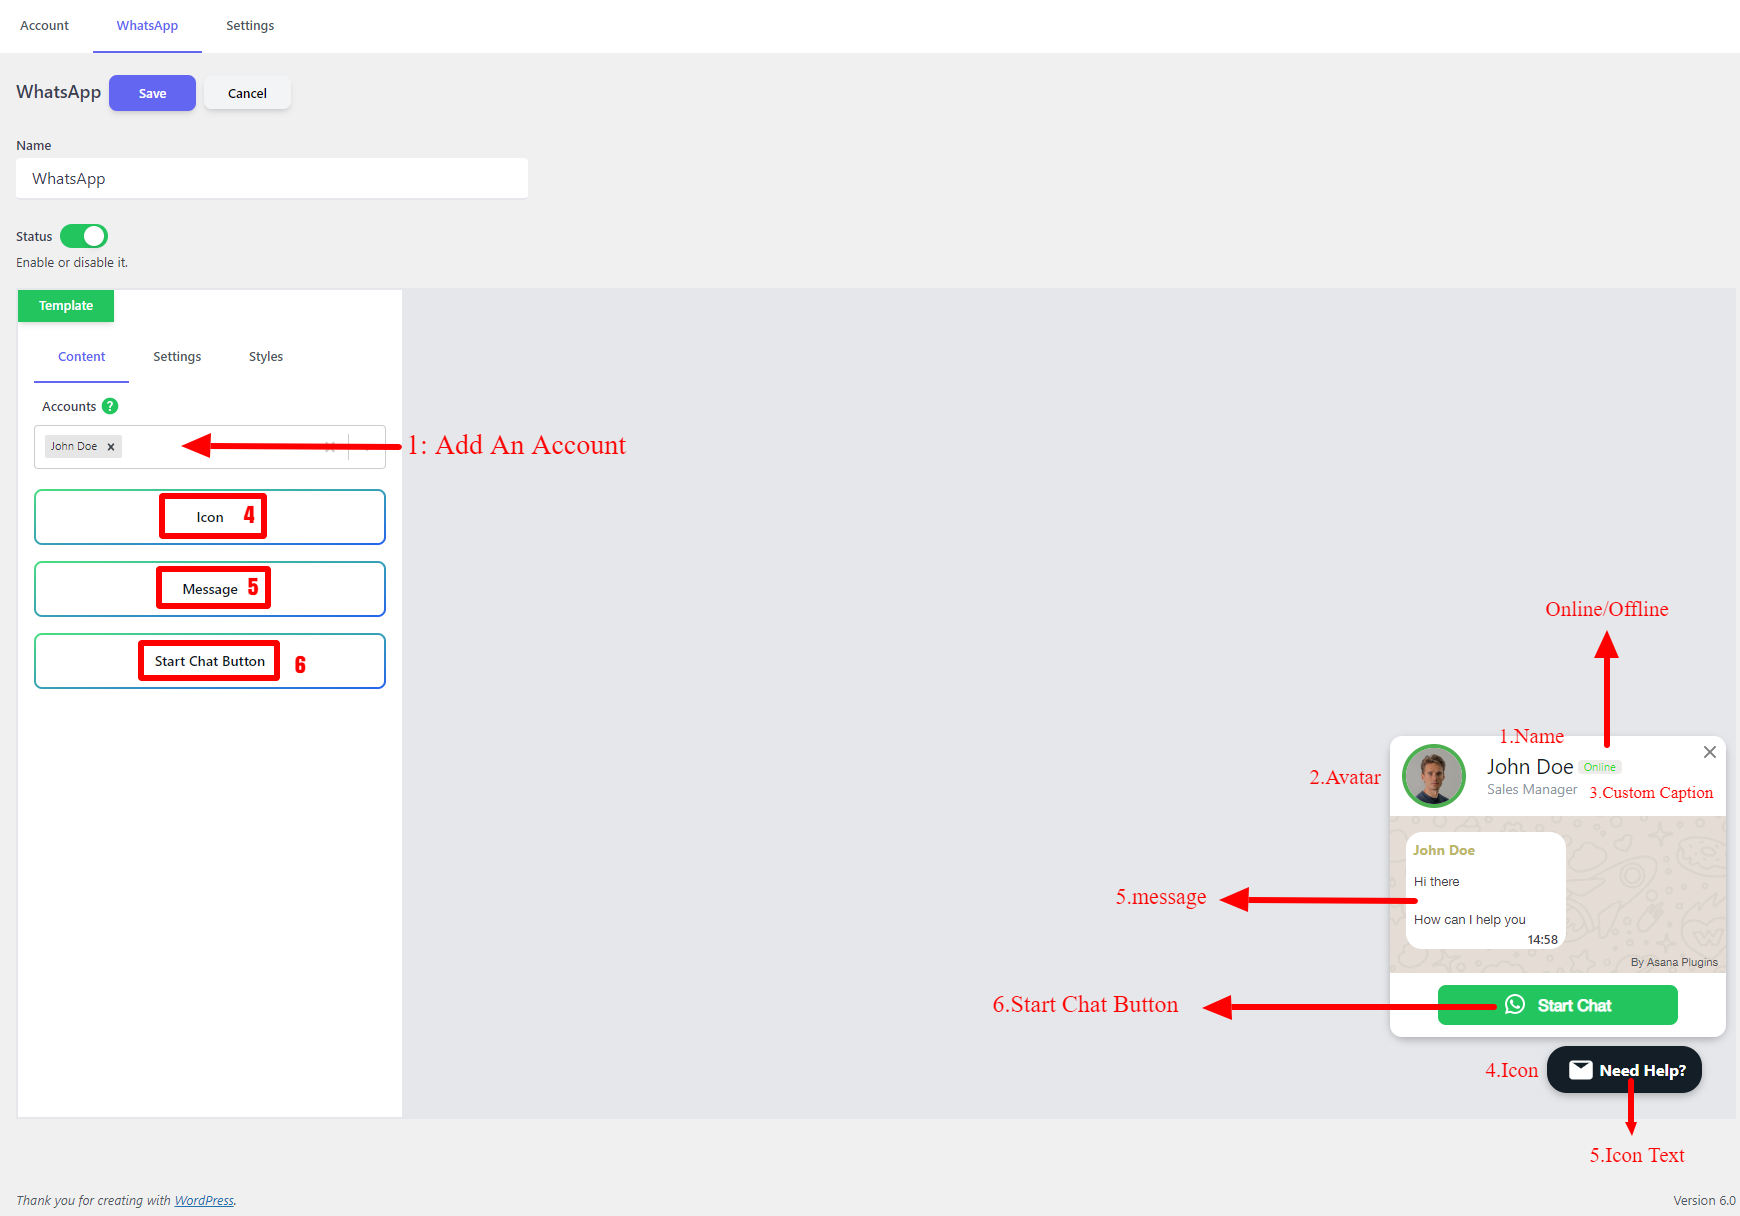
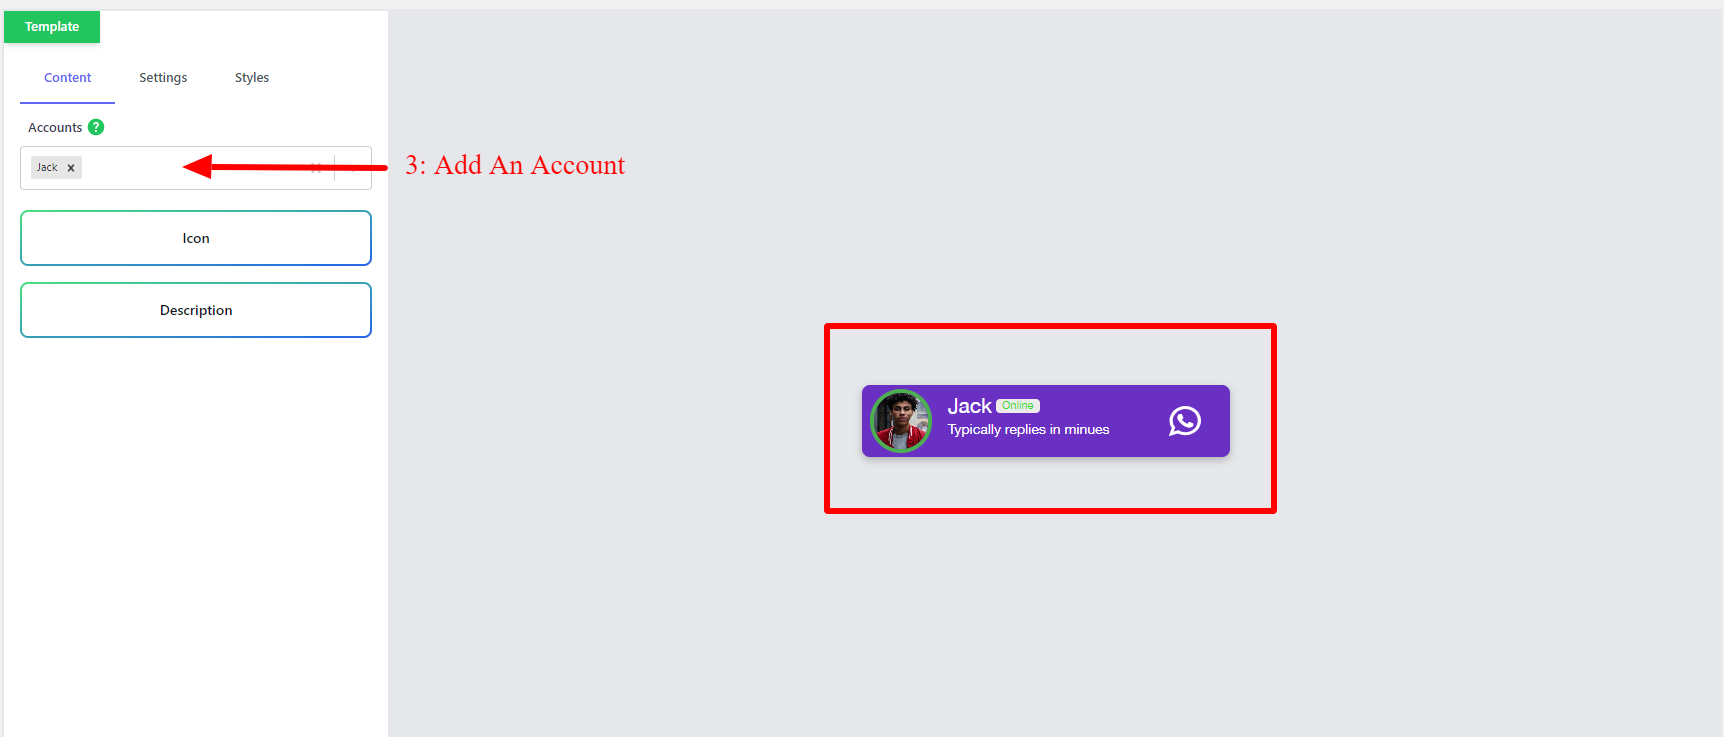
Now in the Accounts field, you should search for the account name that you have created in the previous step. Search for the created account and select it to add it to the WhatsApp Chat Button.
Add an account
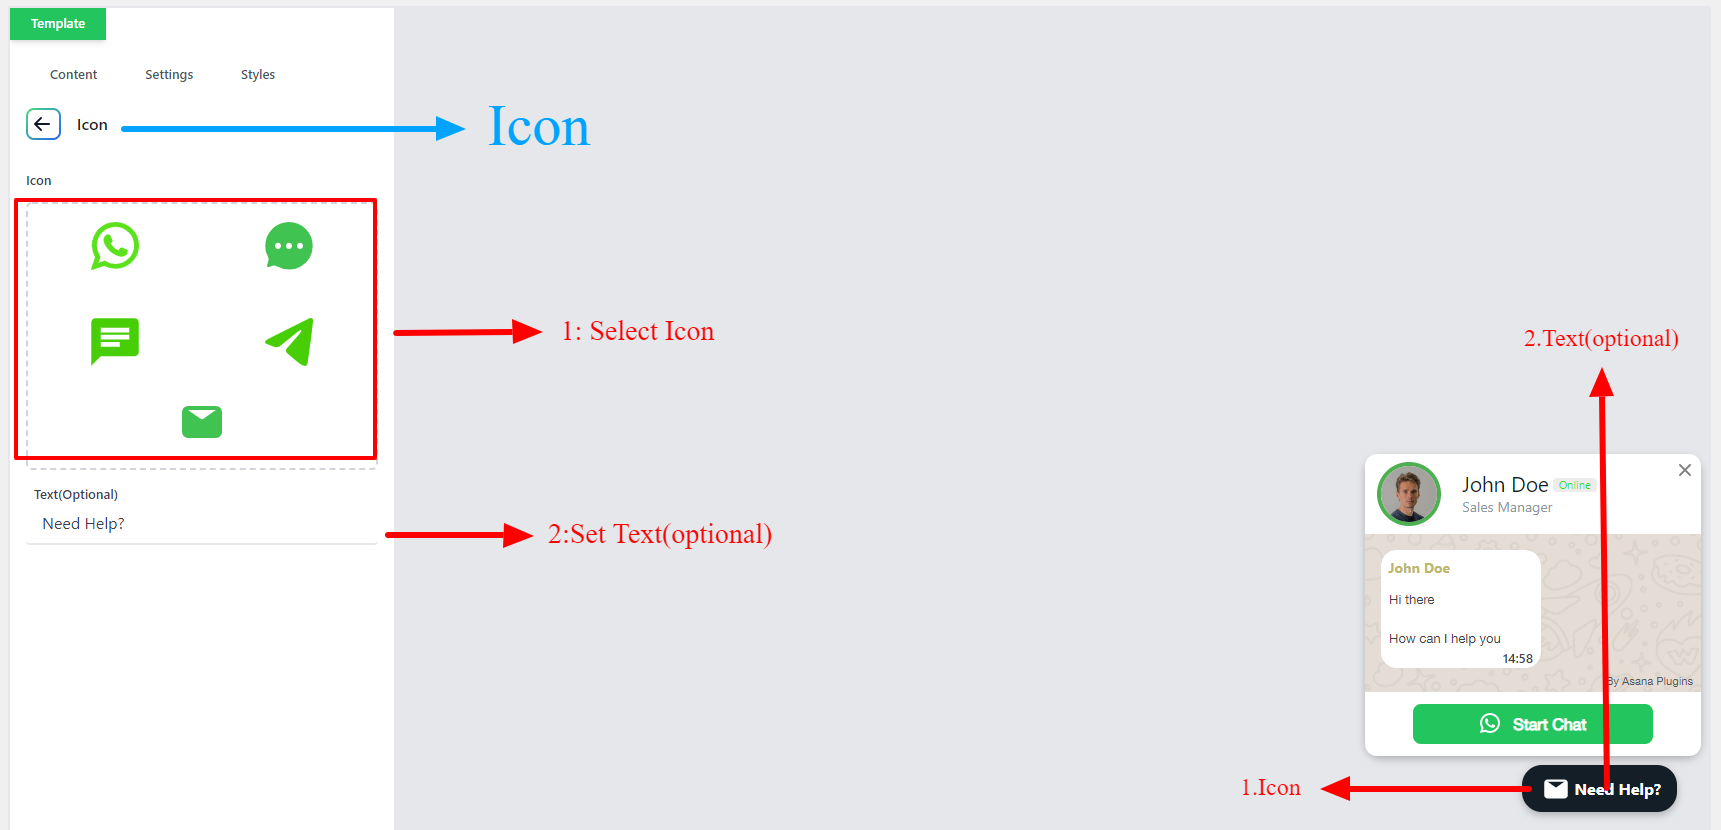
From the Icon section, you can change the button icon and set a text beside the icon.
Icon
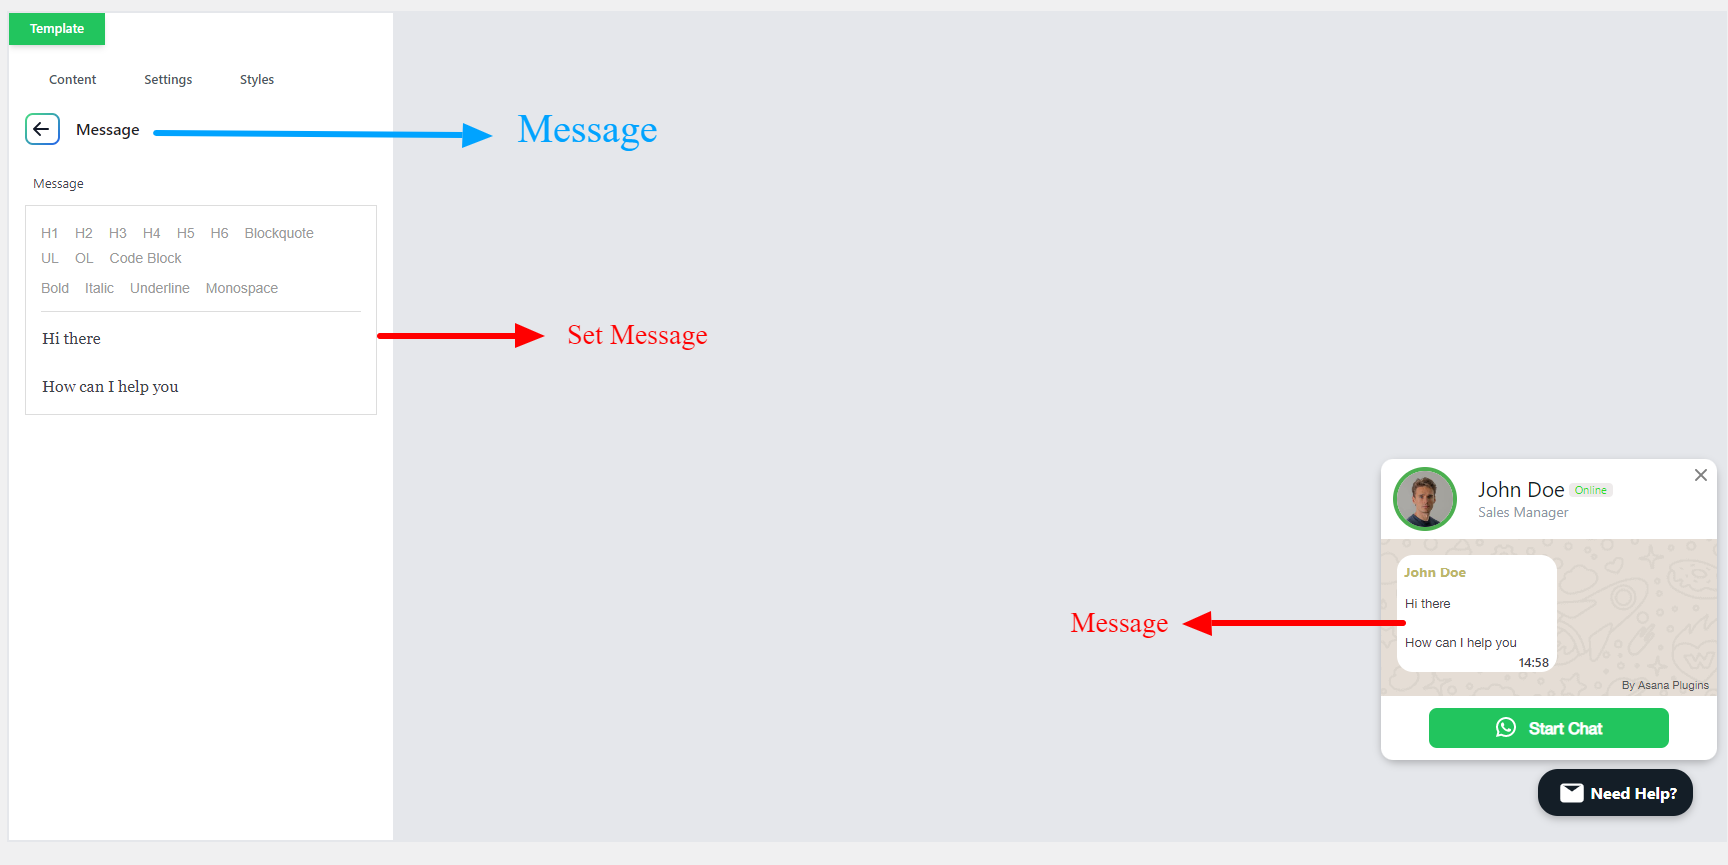
Also, you can change the WhatsApp Button message from the Message section.
Message
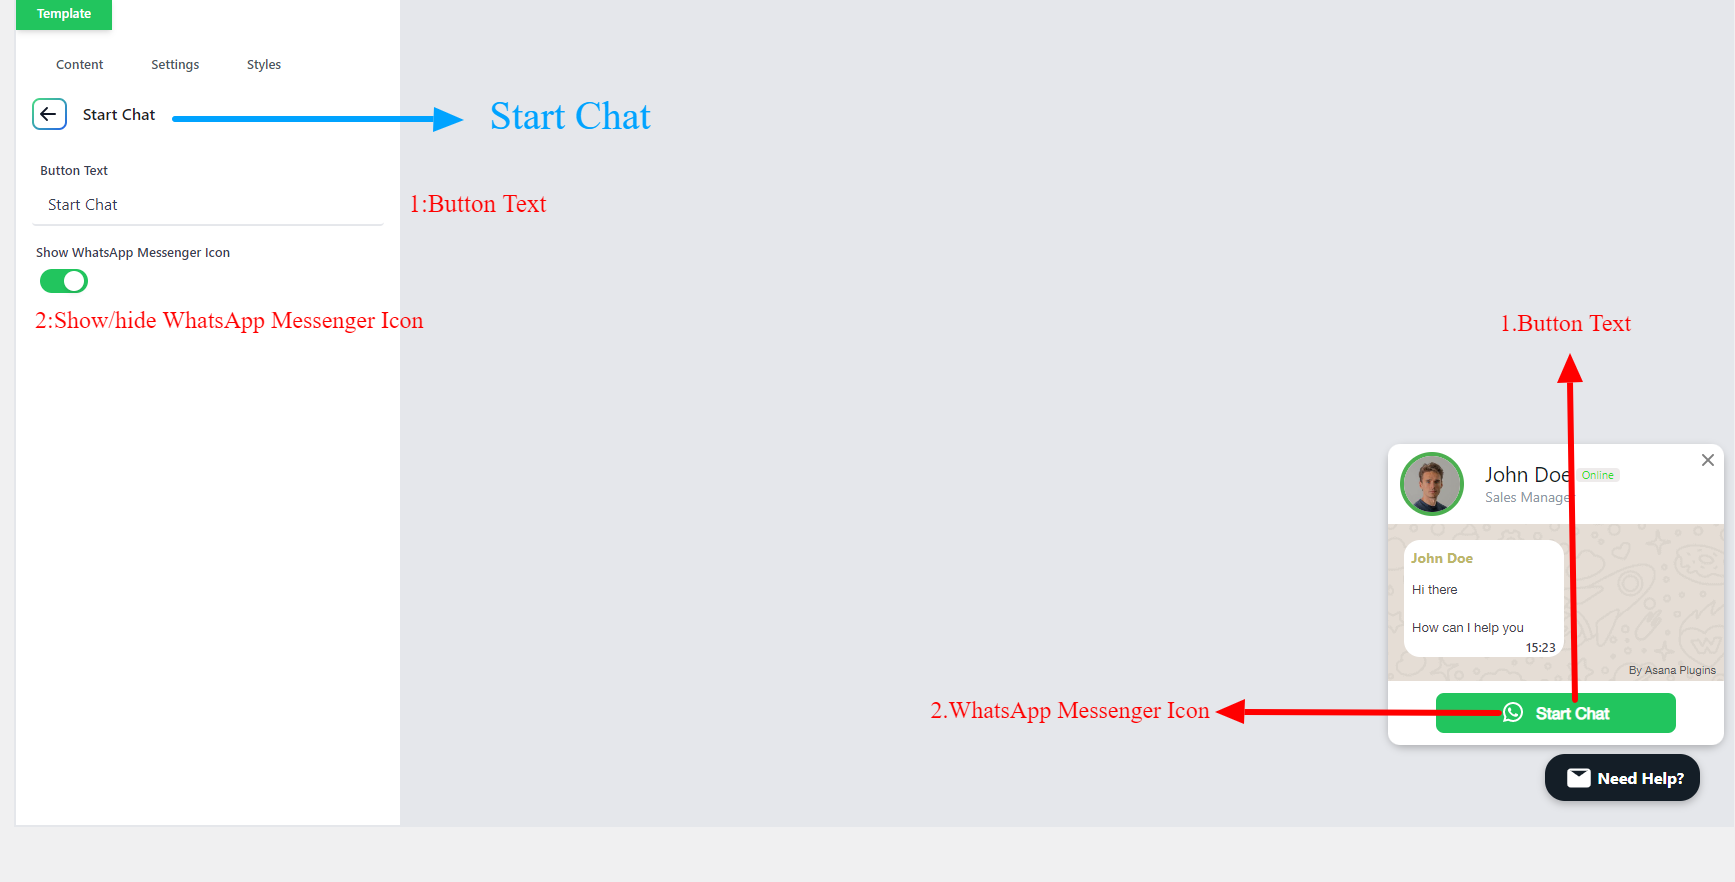
You can change the “Start Chat” button text and icon from the “Start Chat Button” section as in the below image.
Start Chat
Select Products
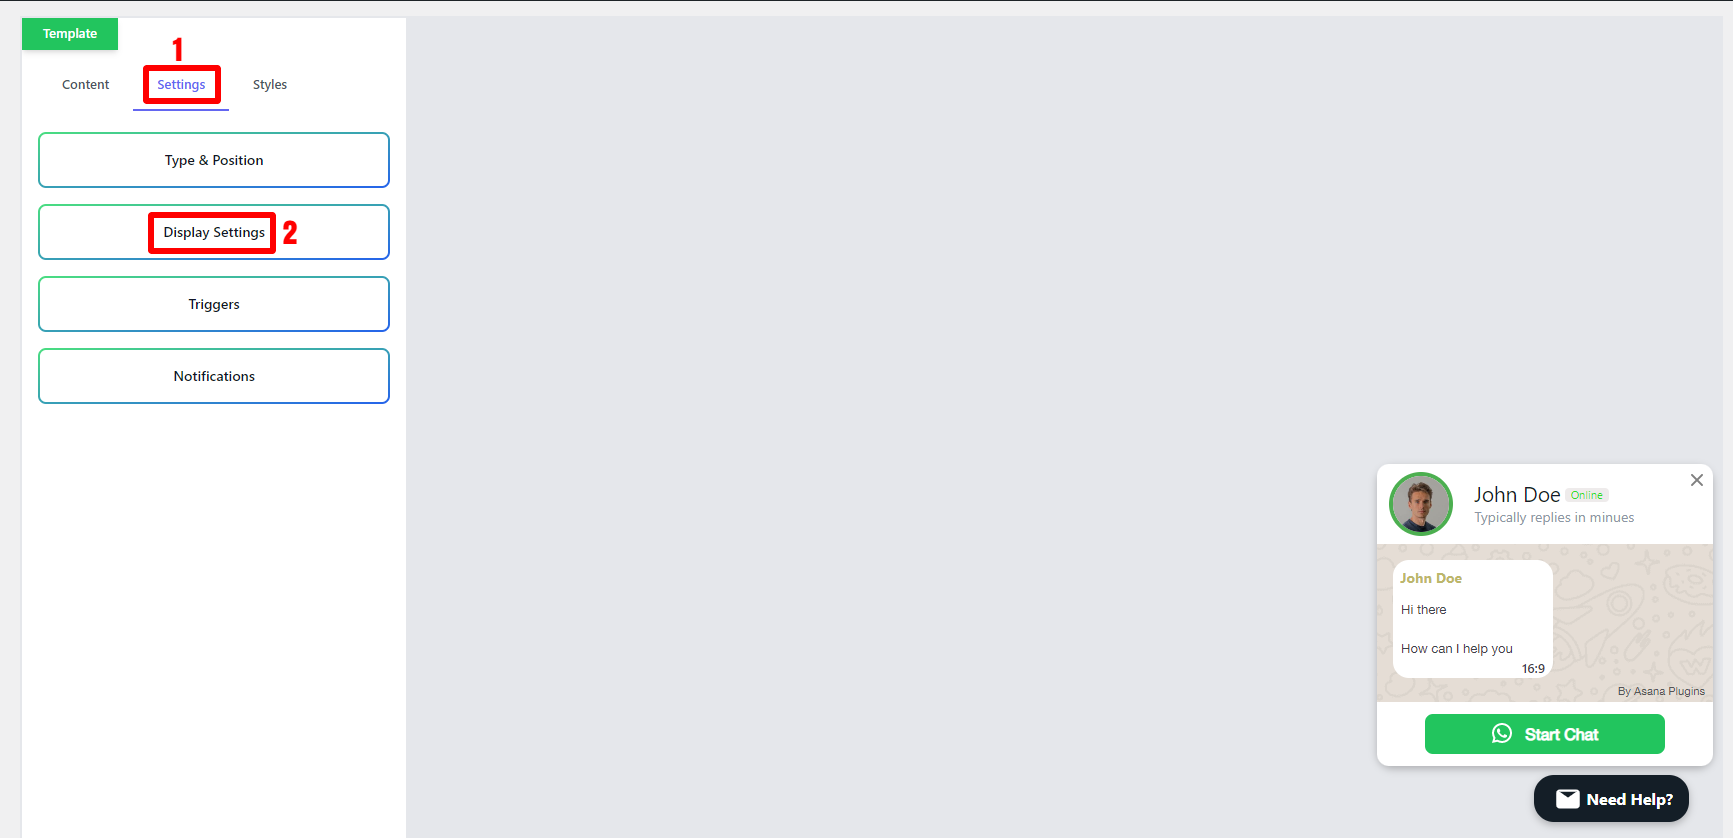
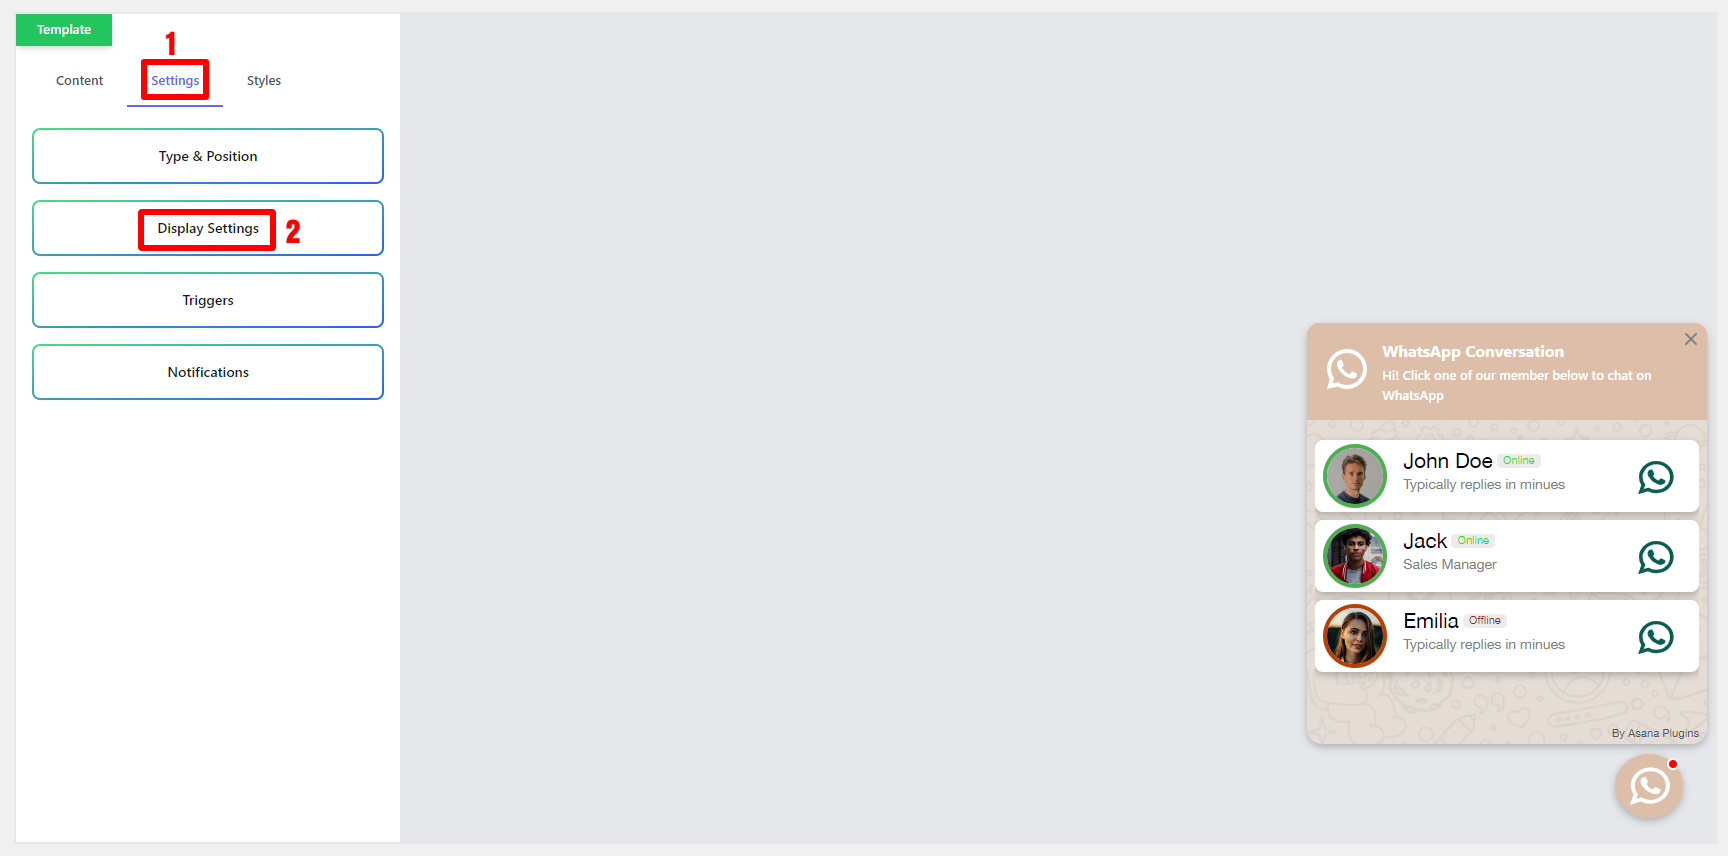
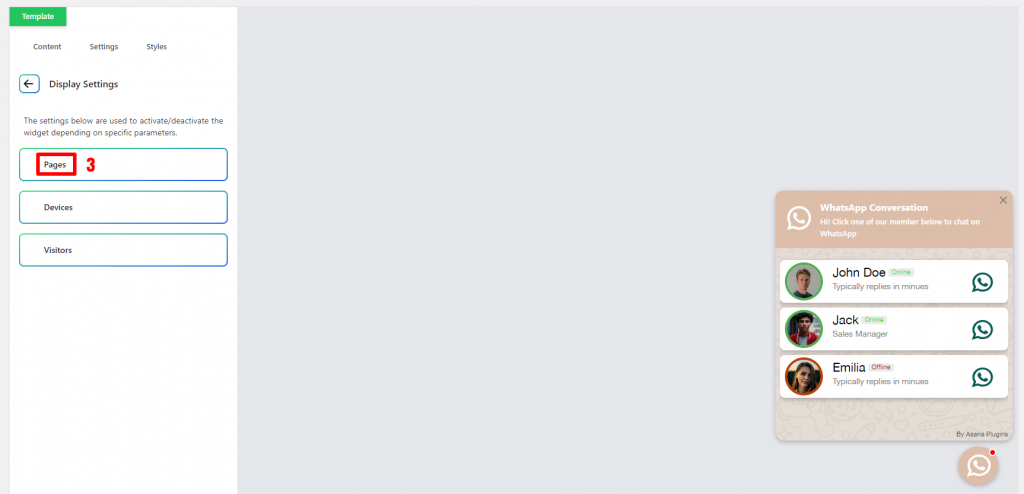
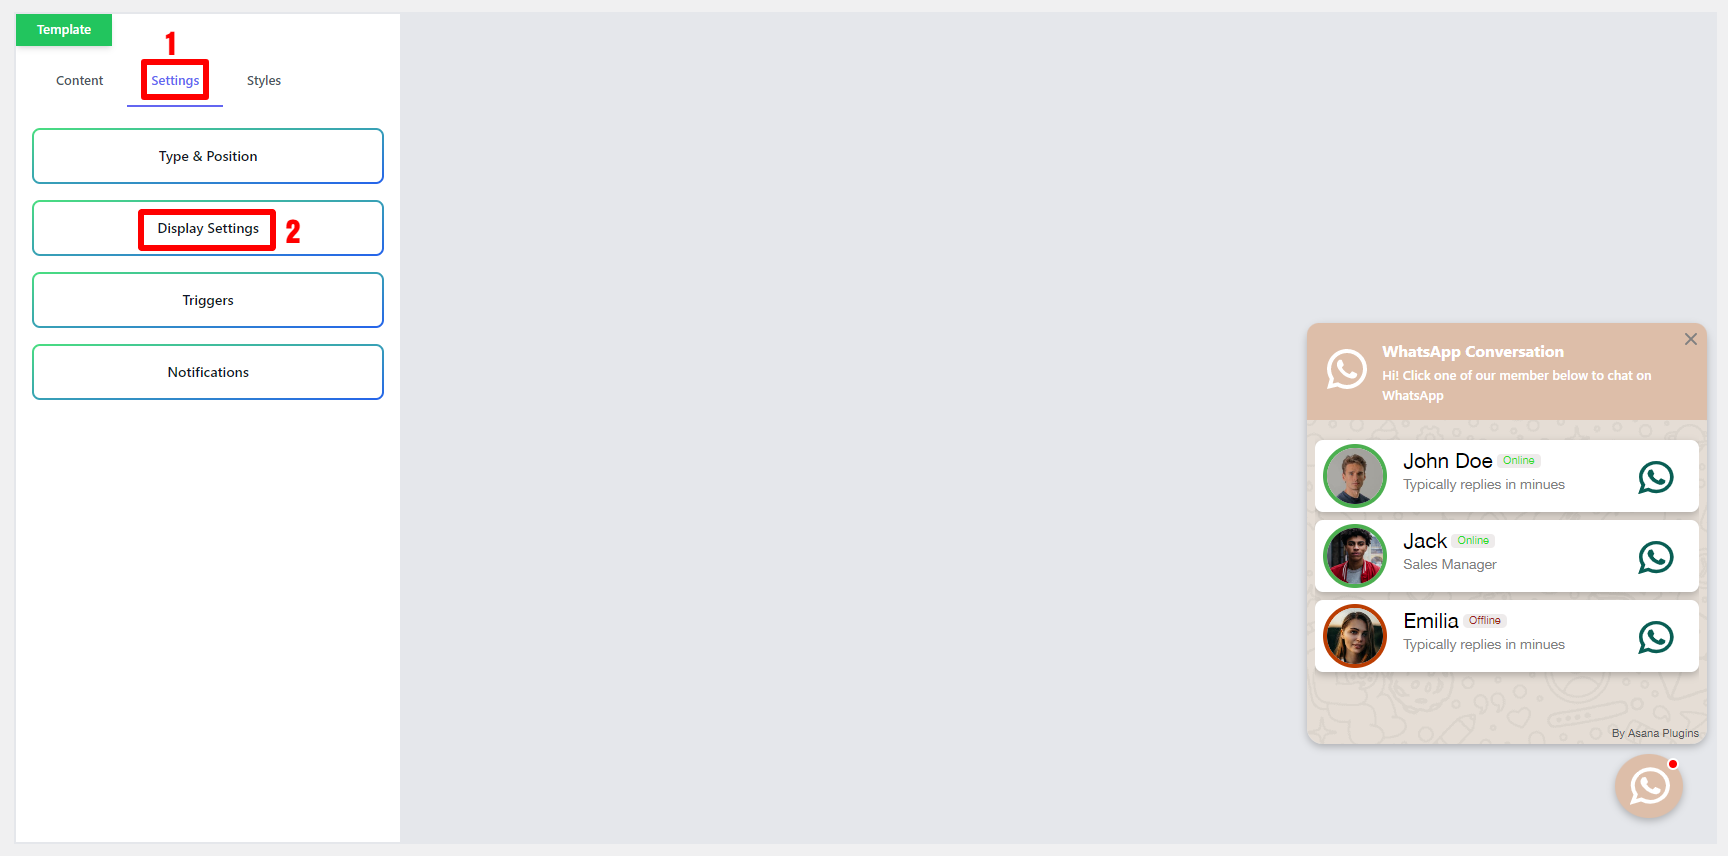
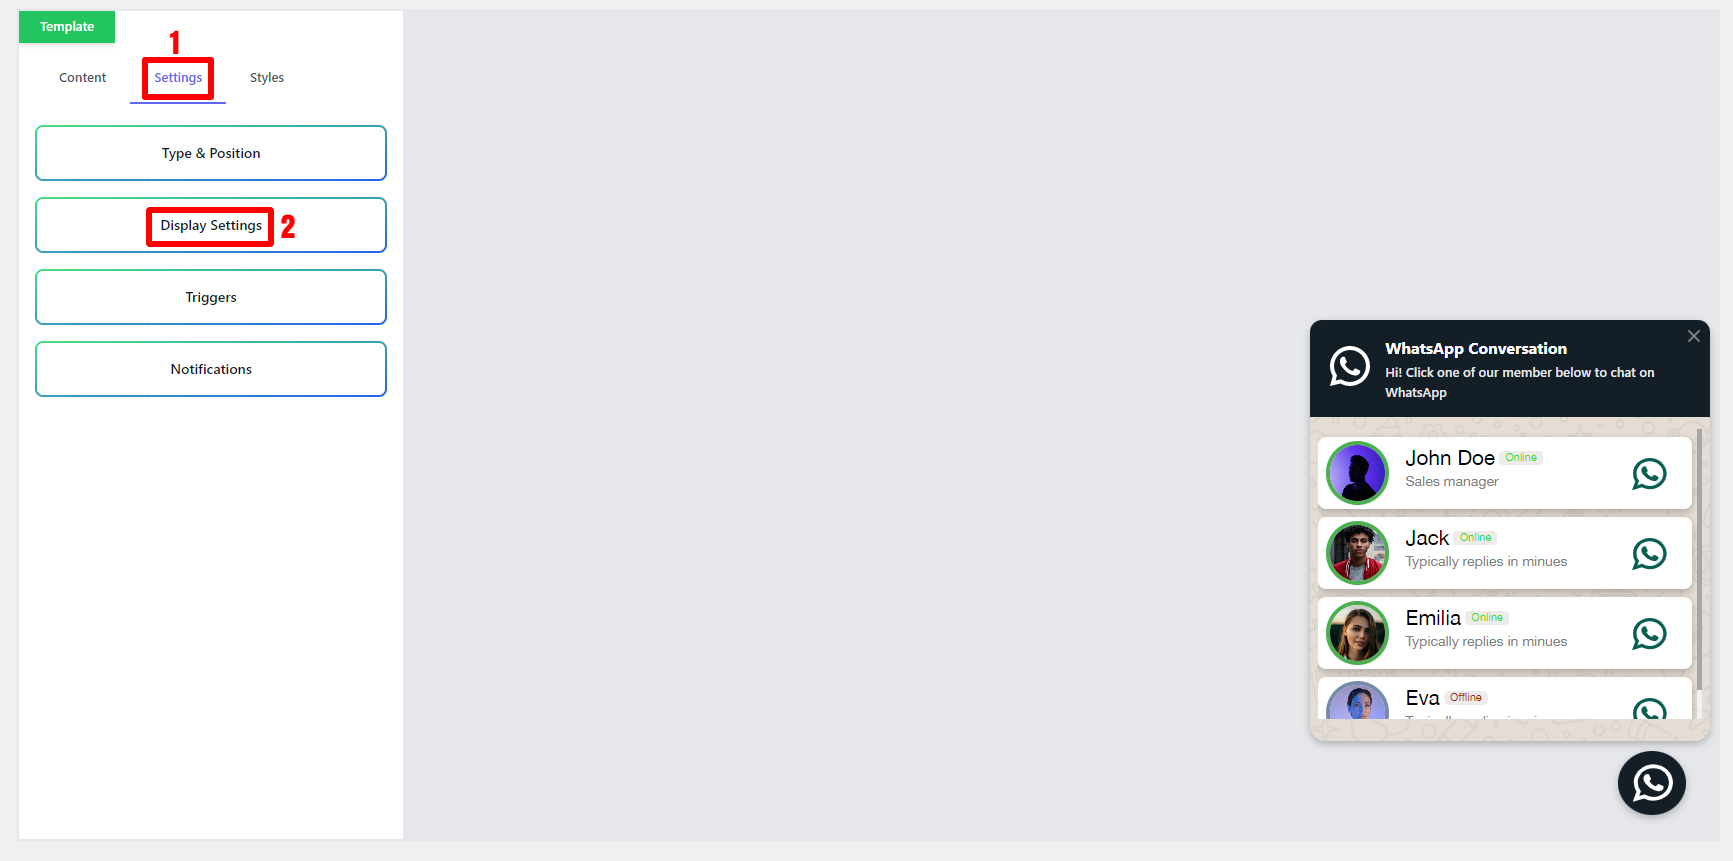
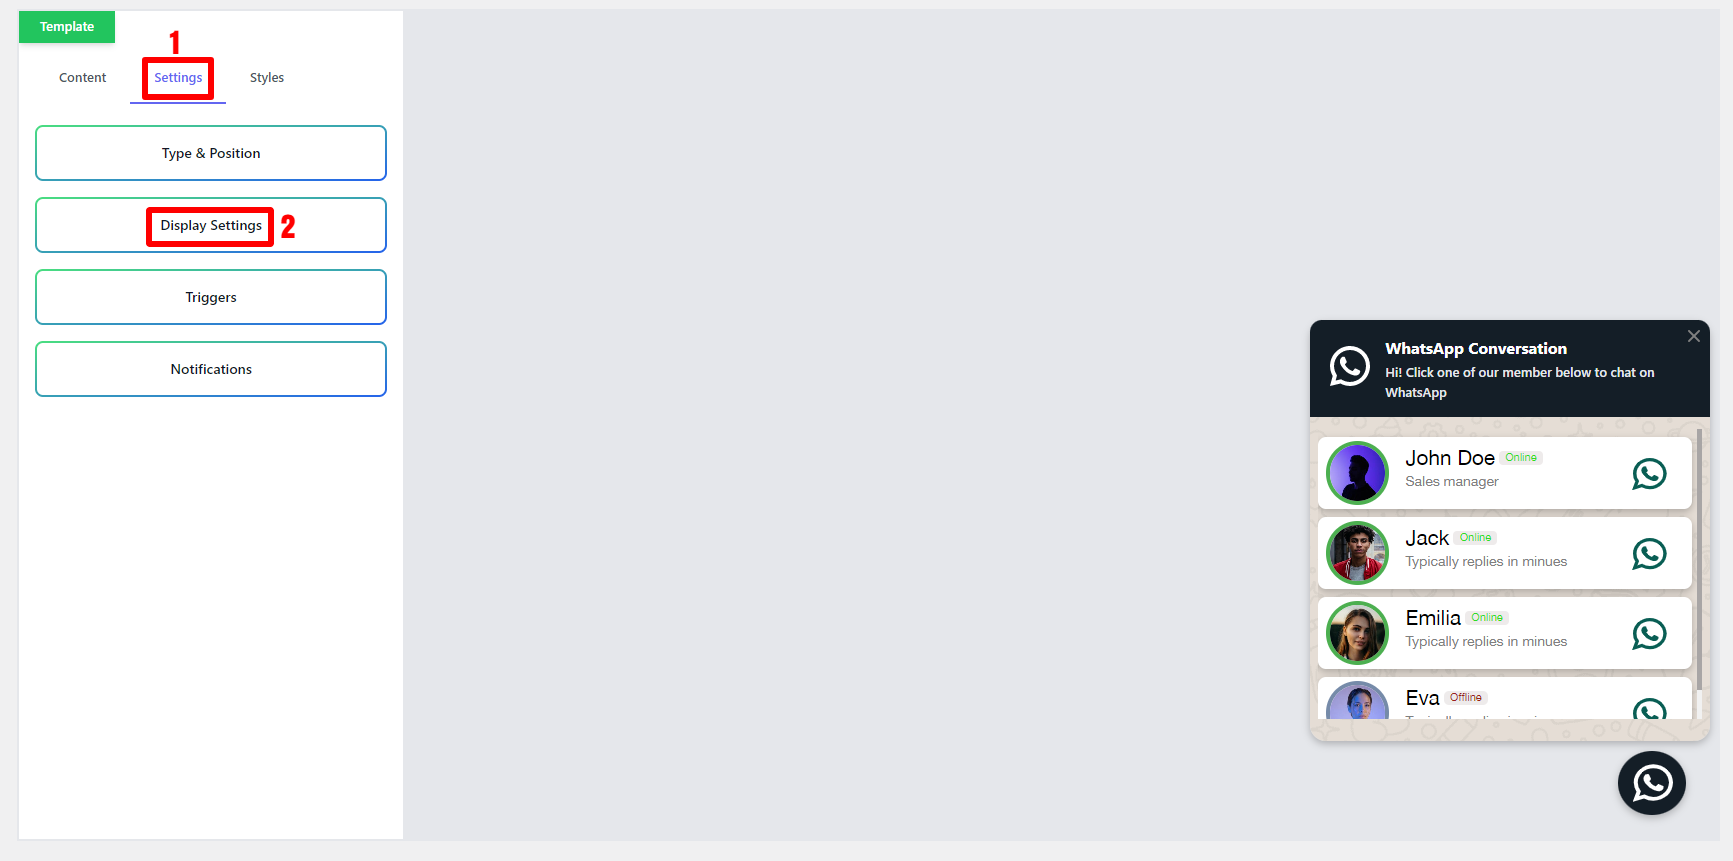
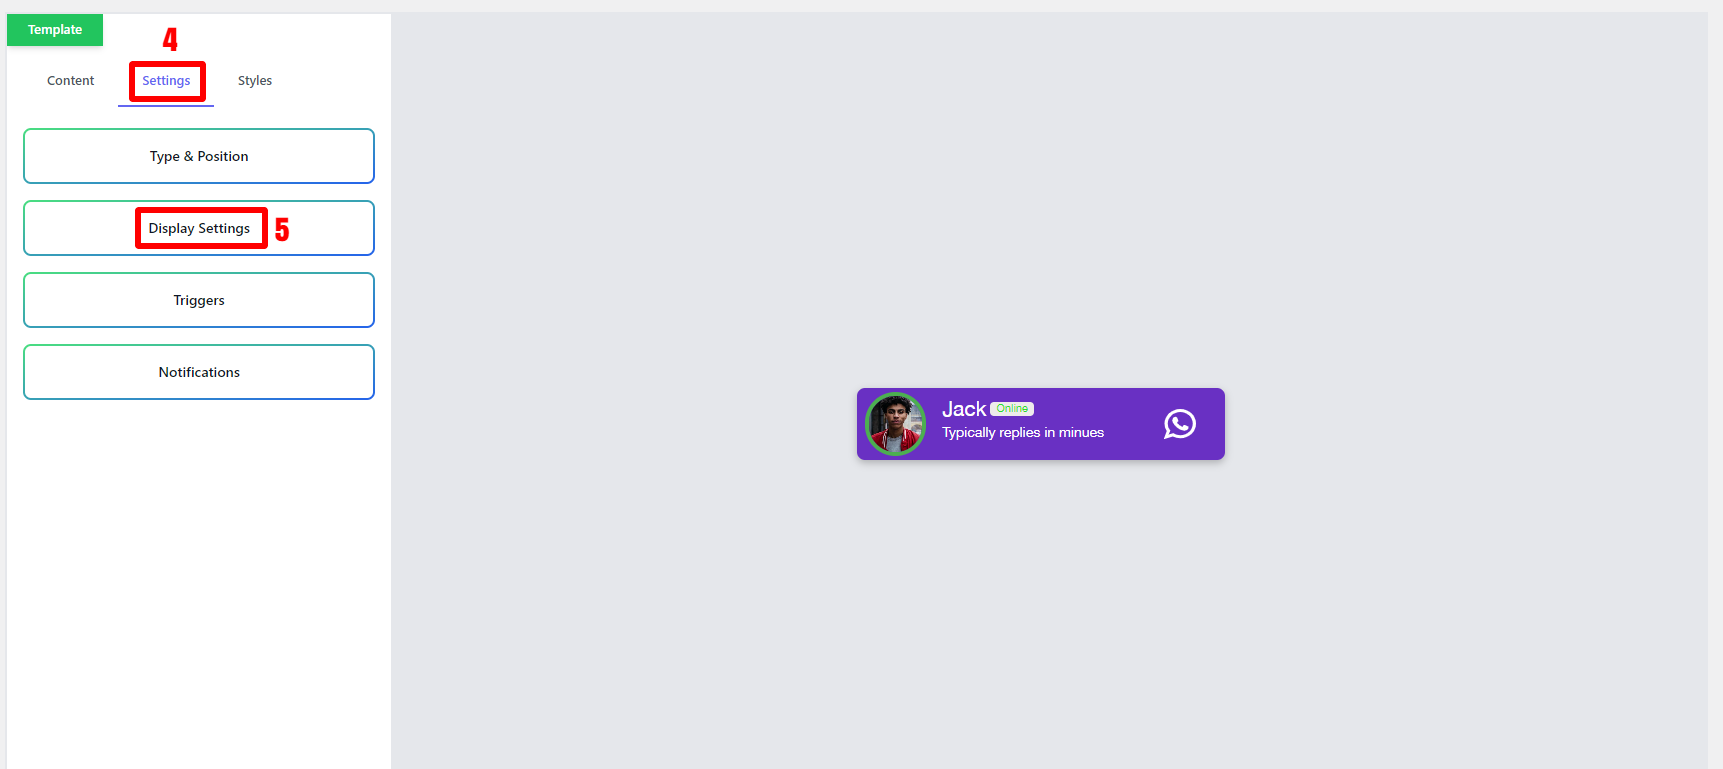
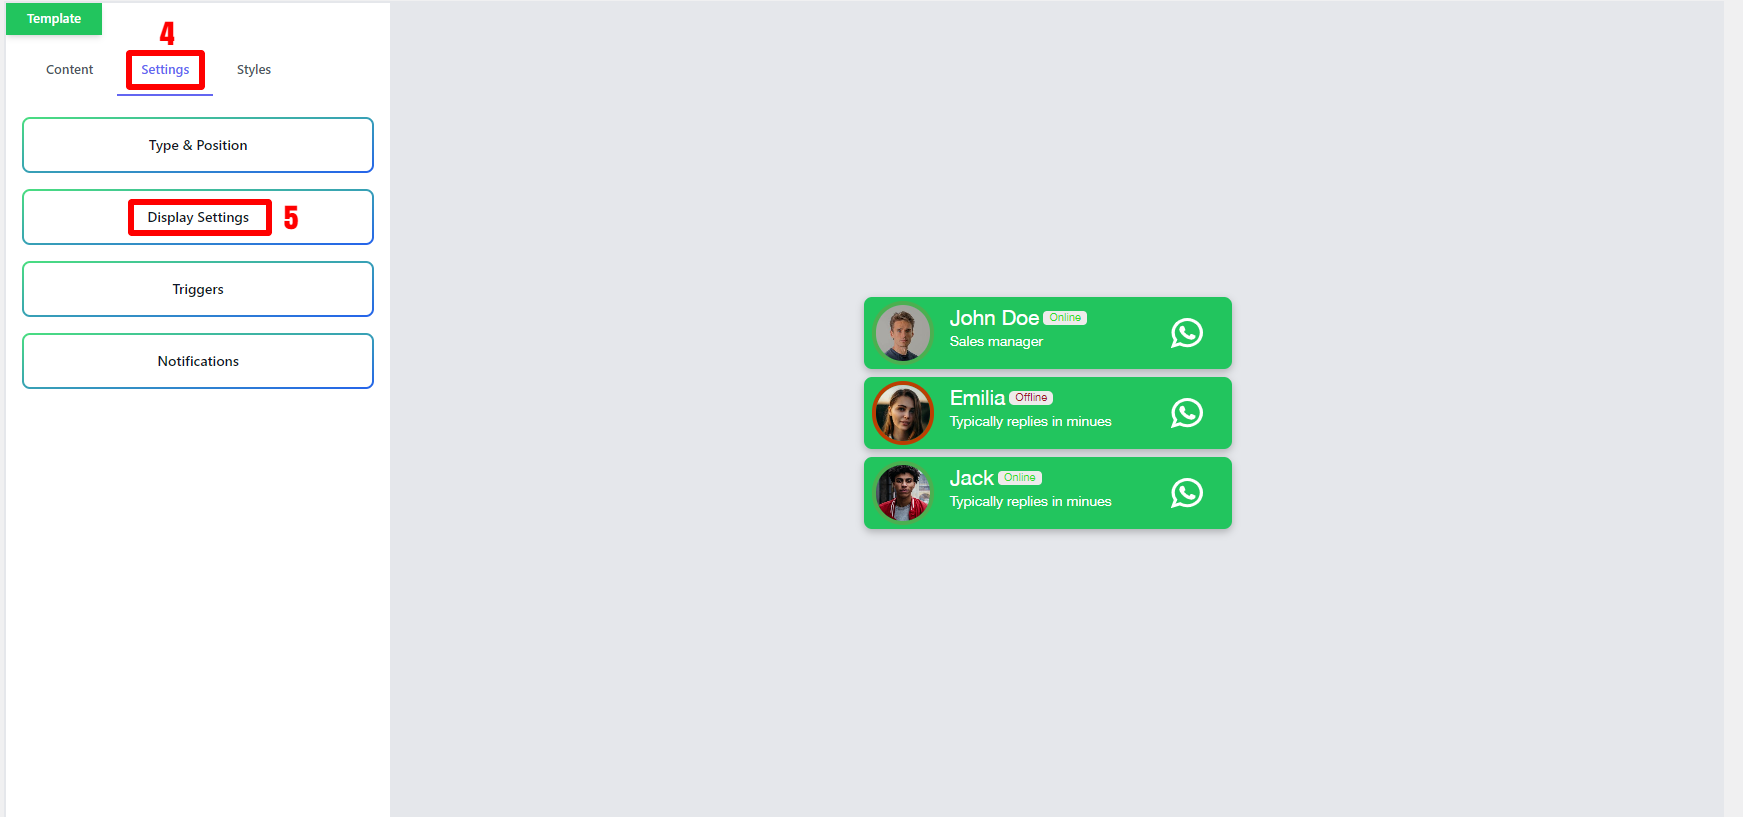
Navigate to the Settings tab on the WhatsApp details page.
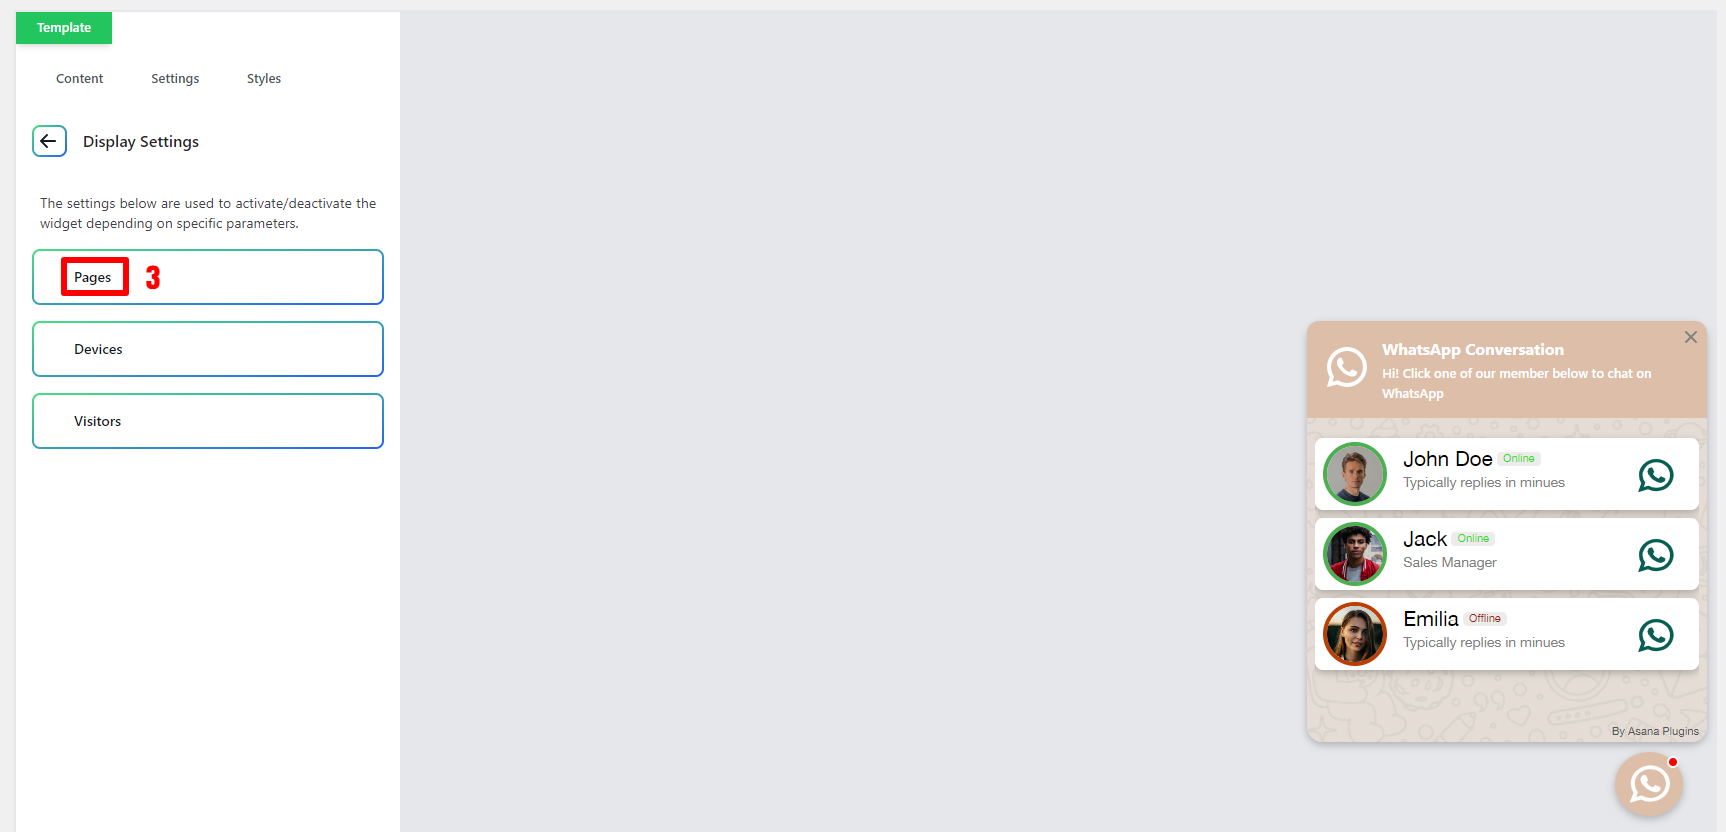
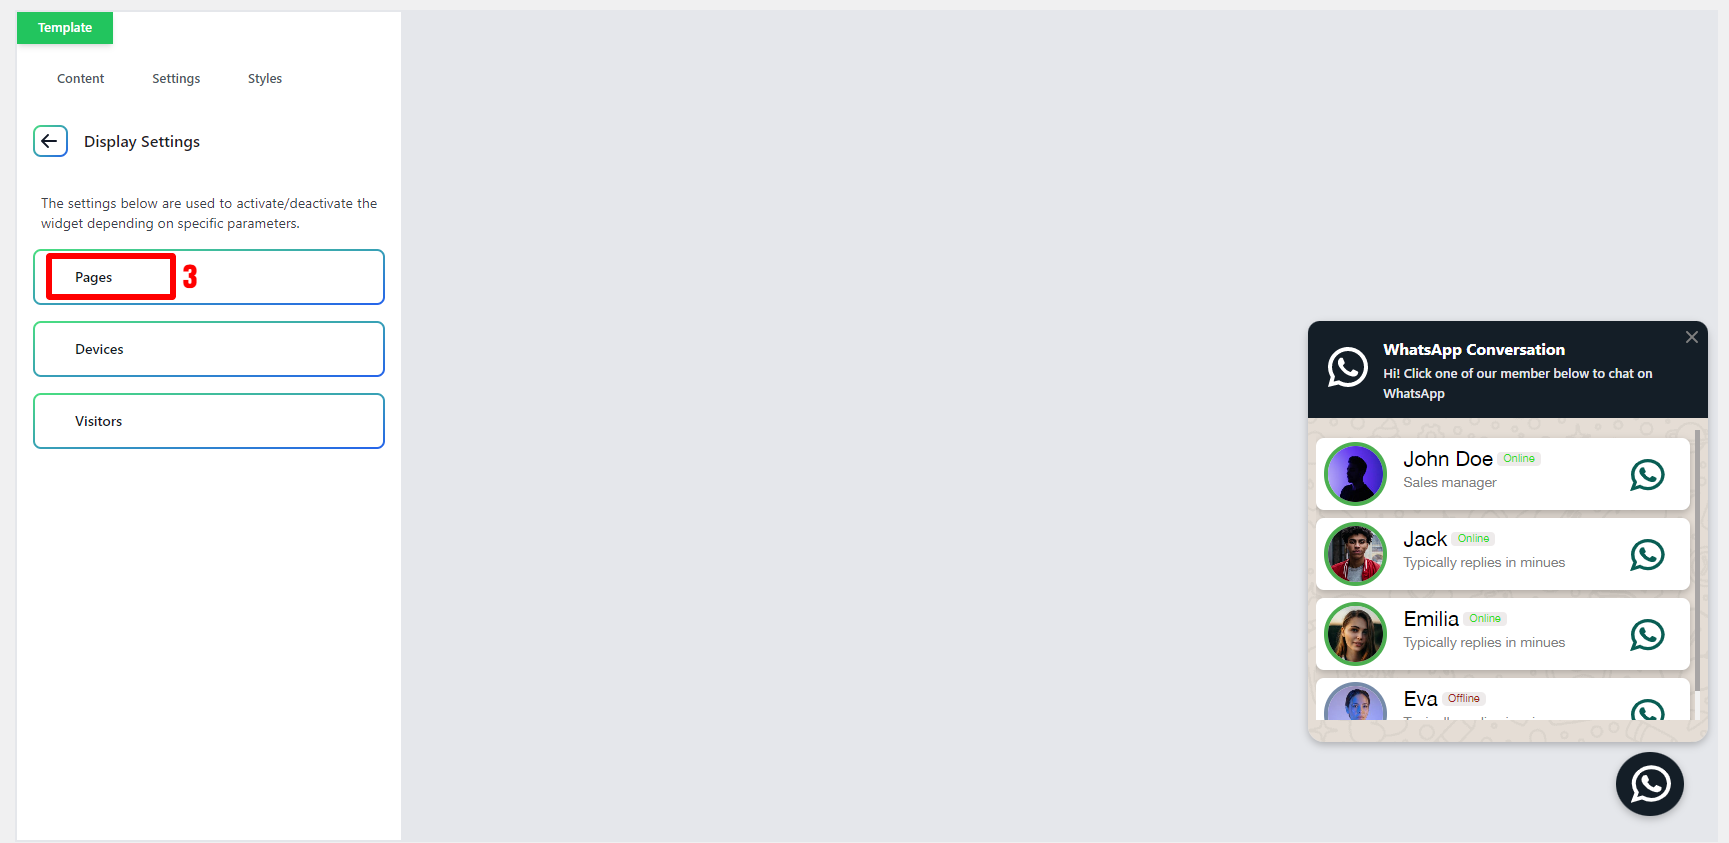
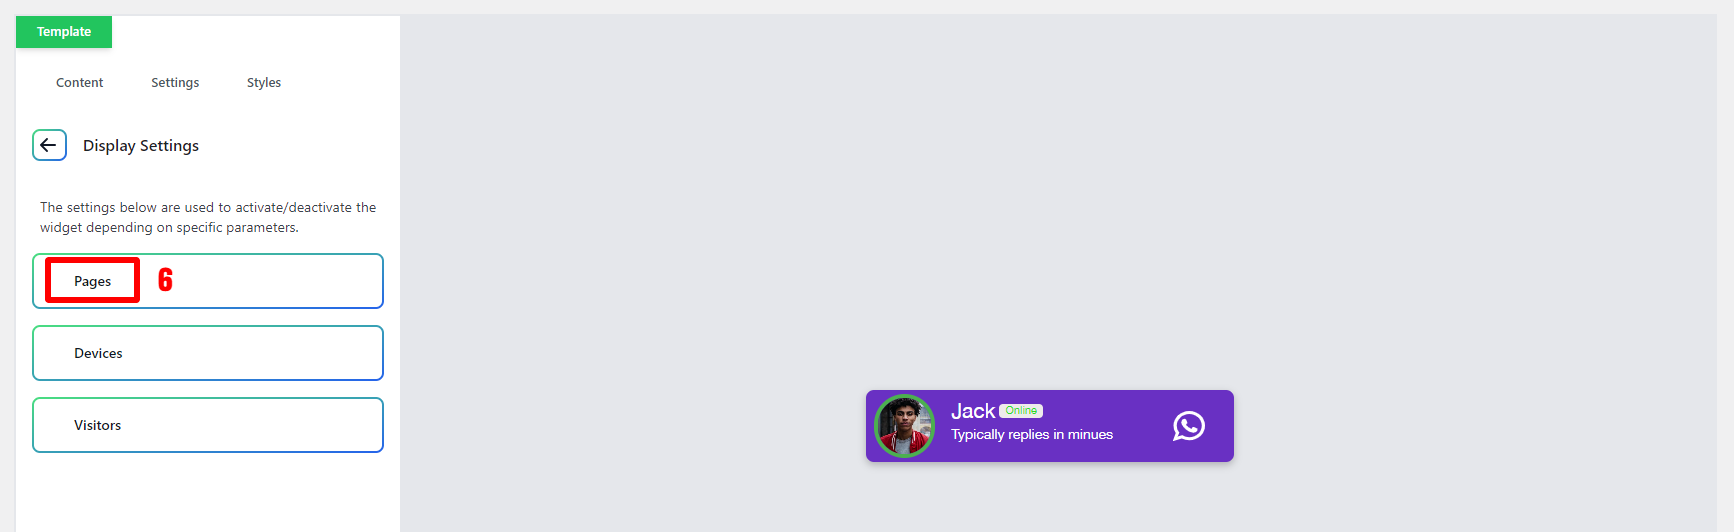
Open Display Settings
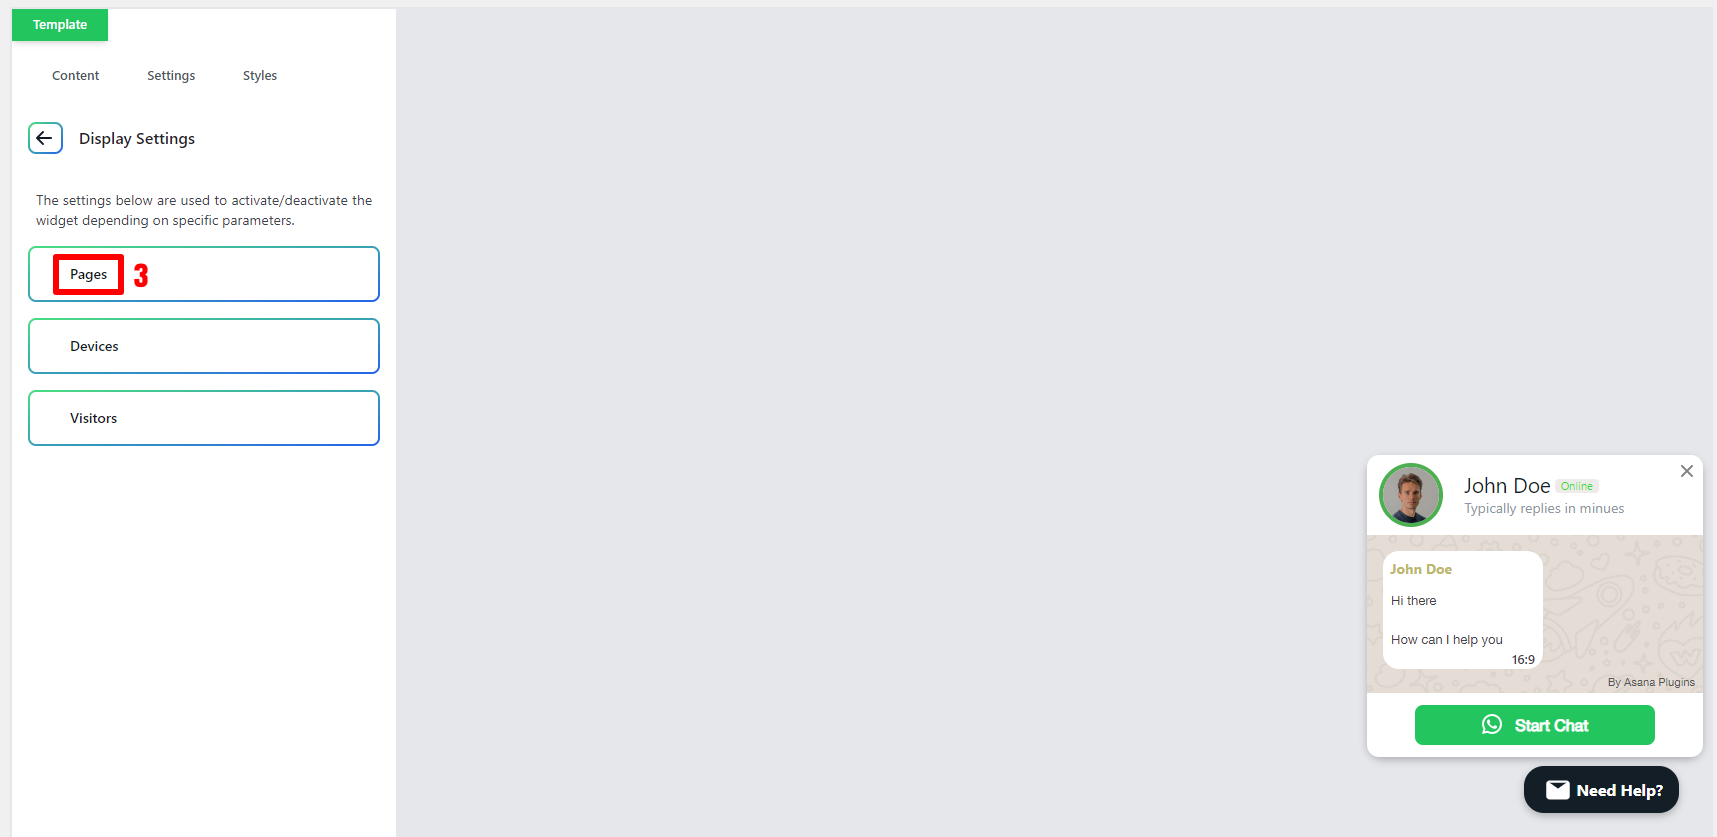
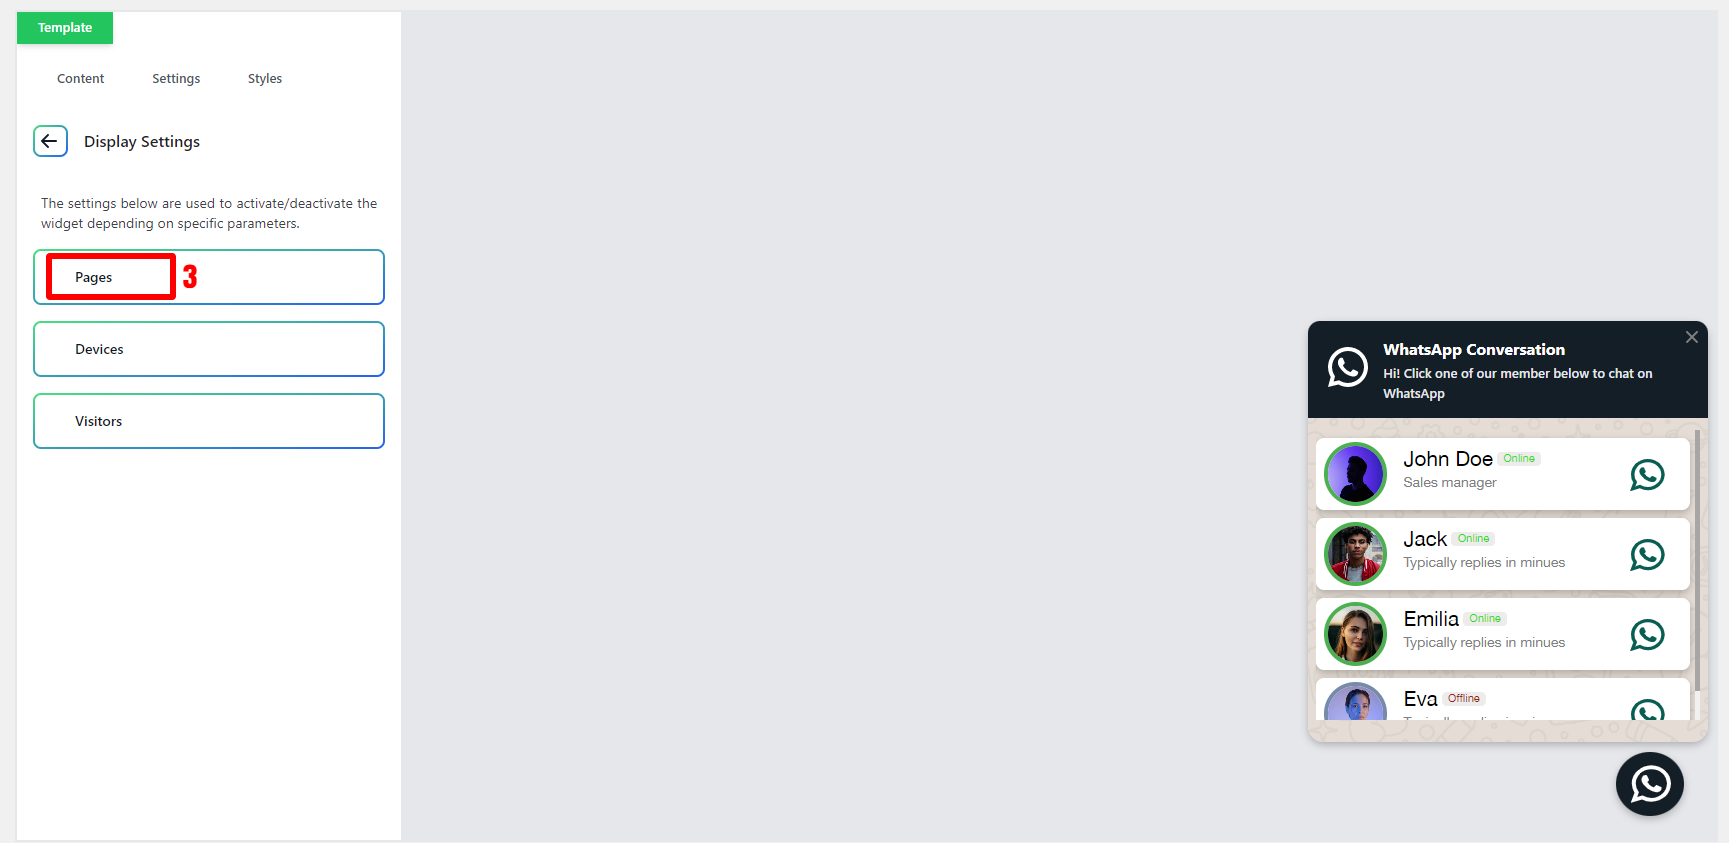
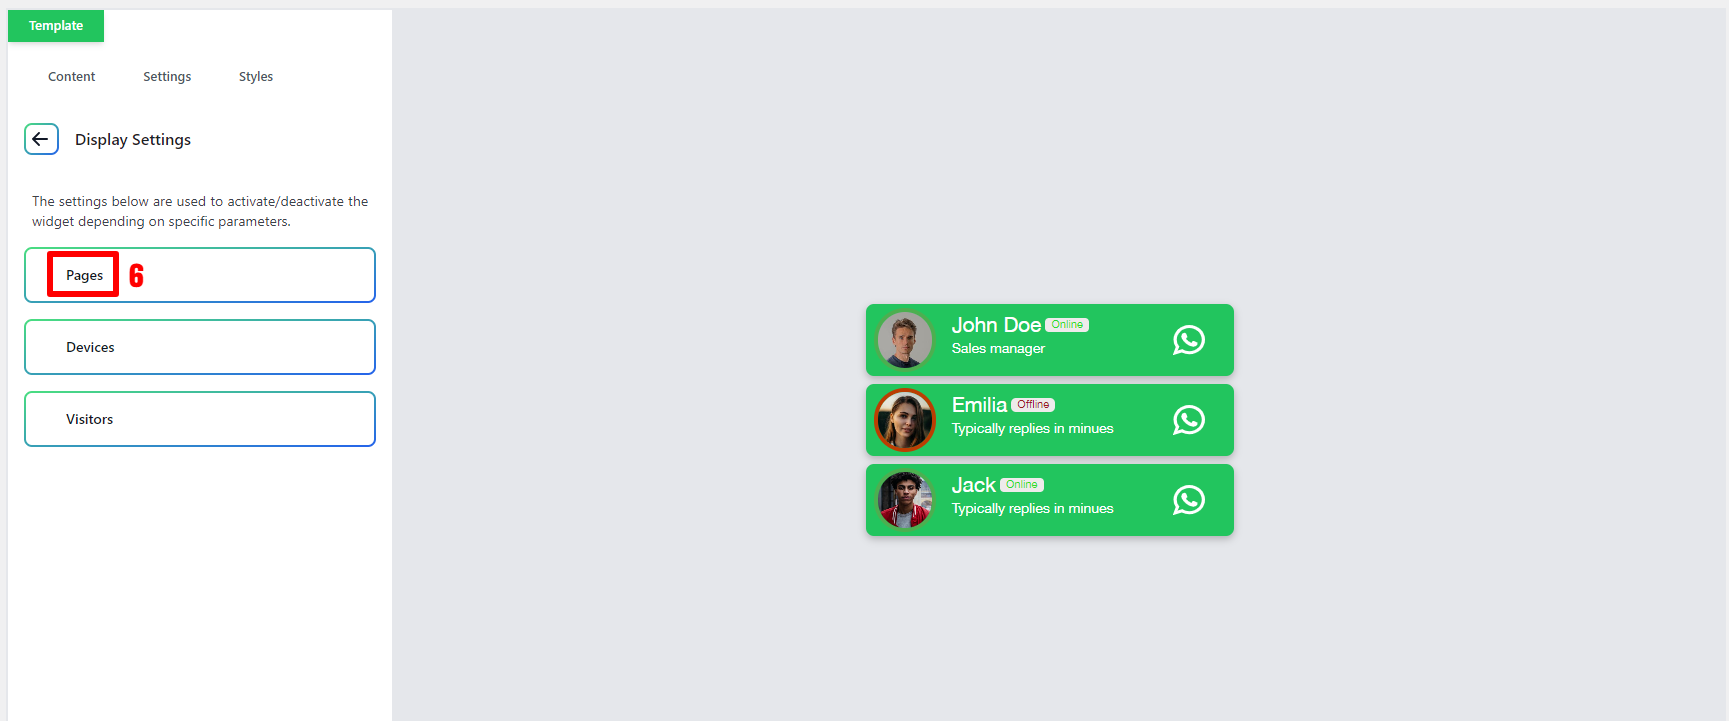
Open Pages
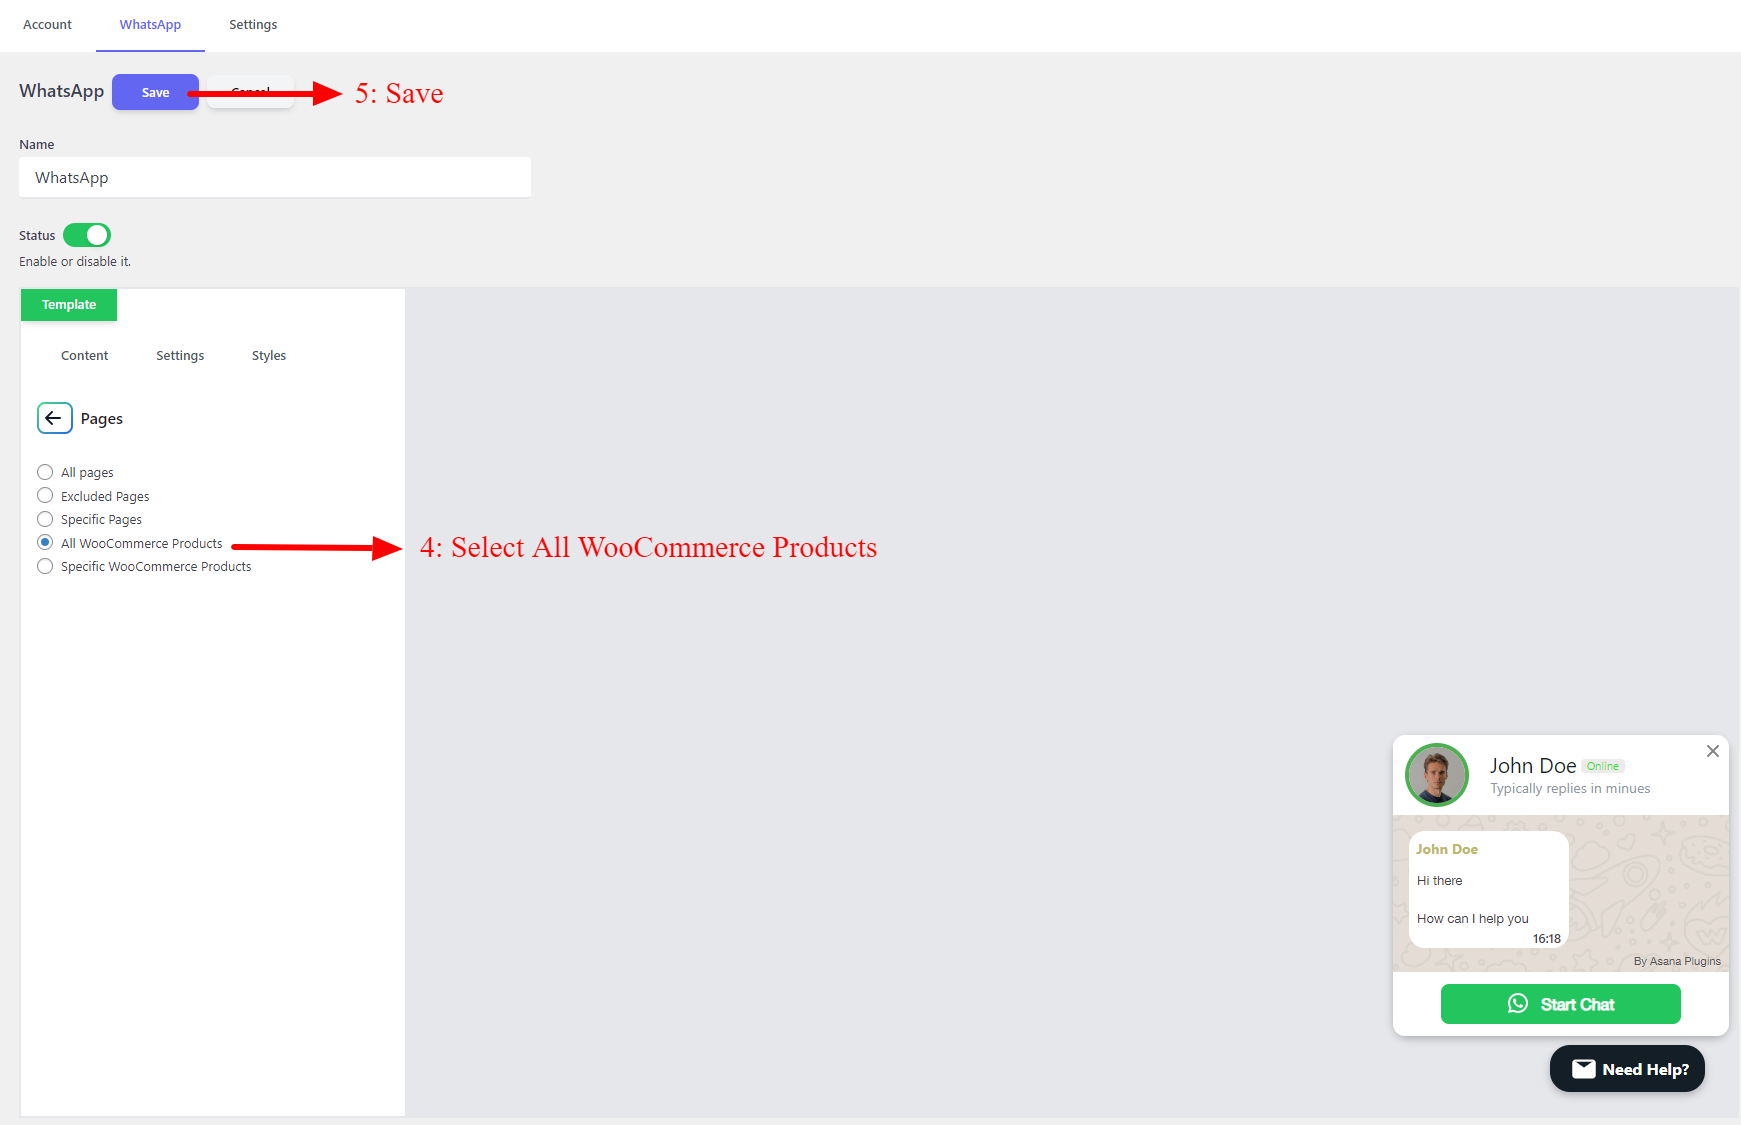
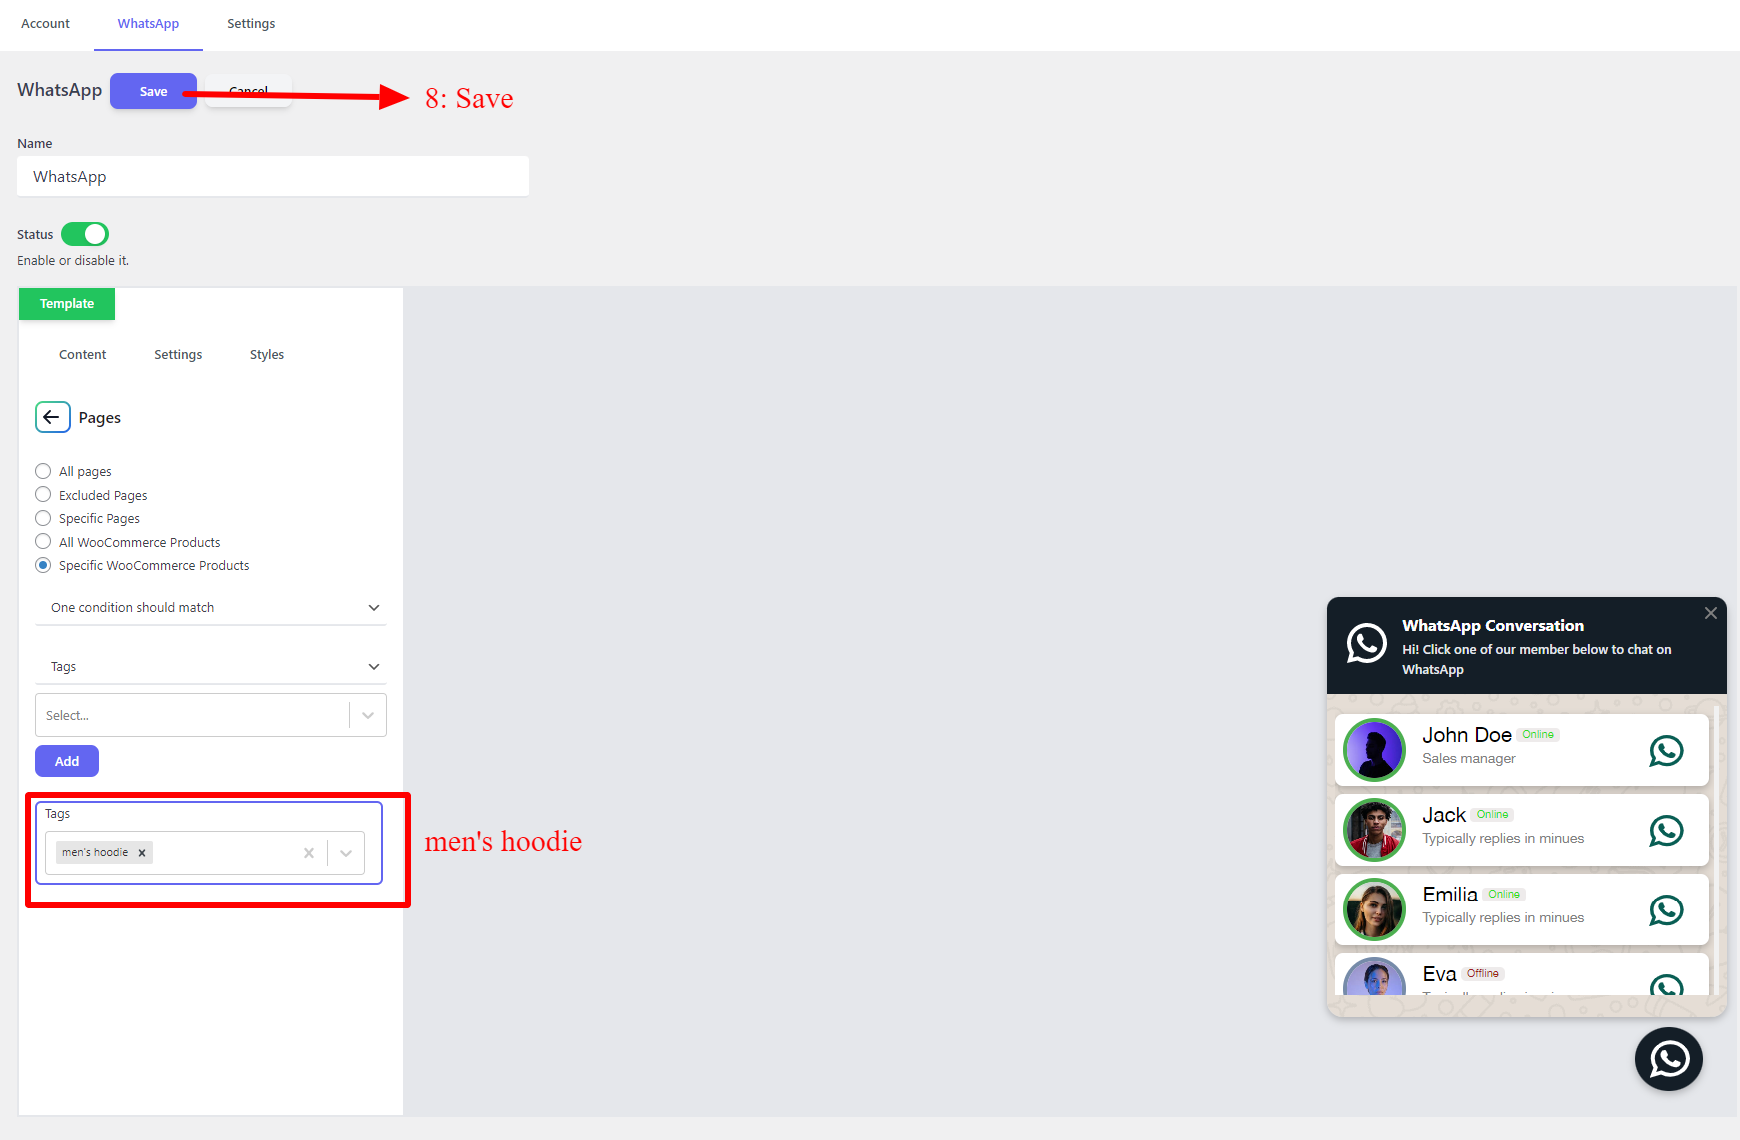
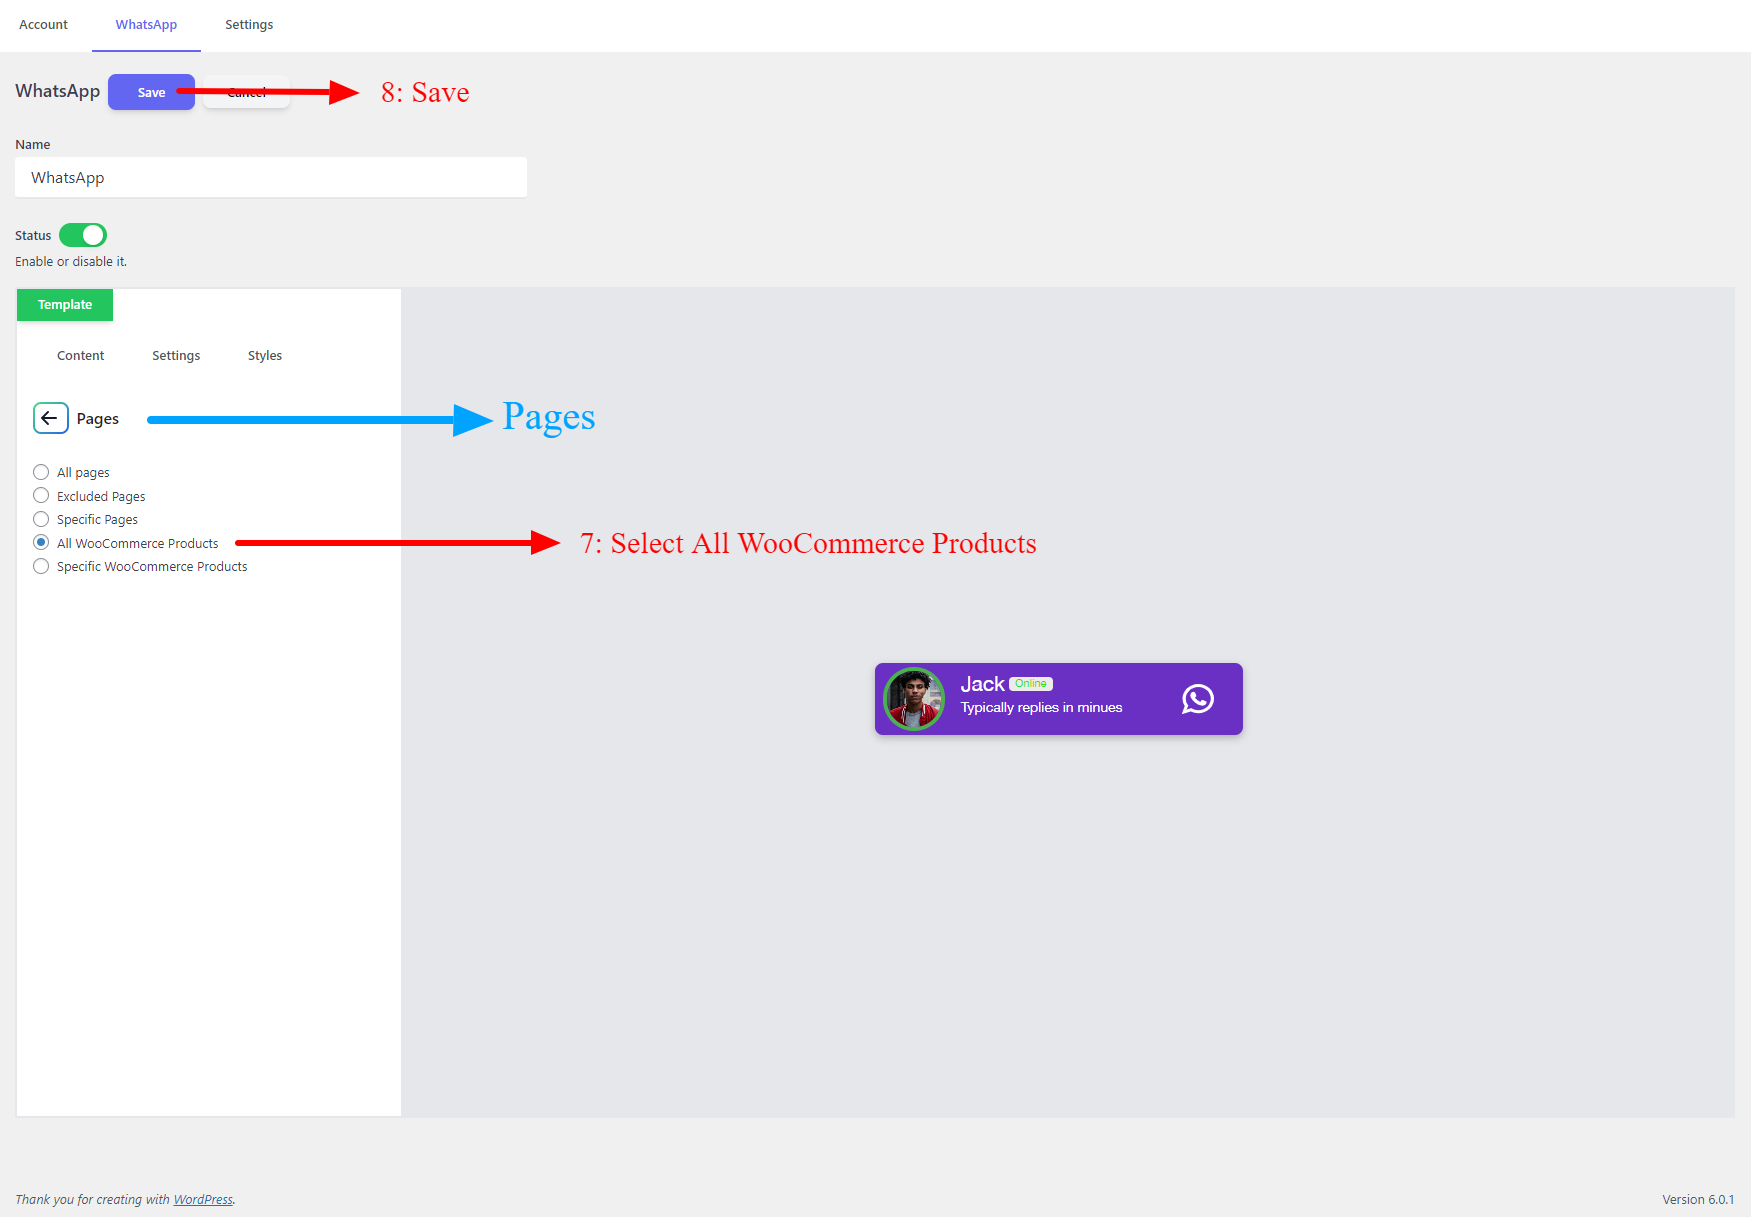
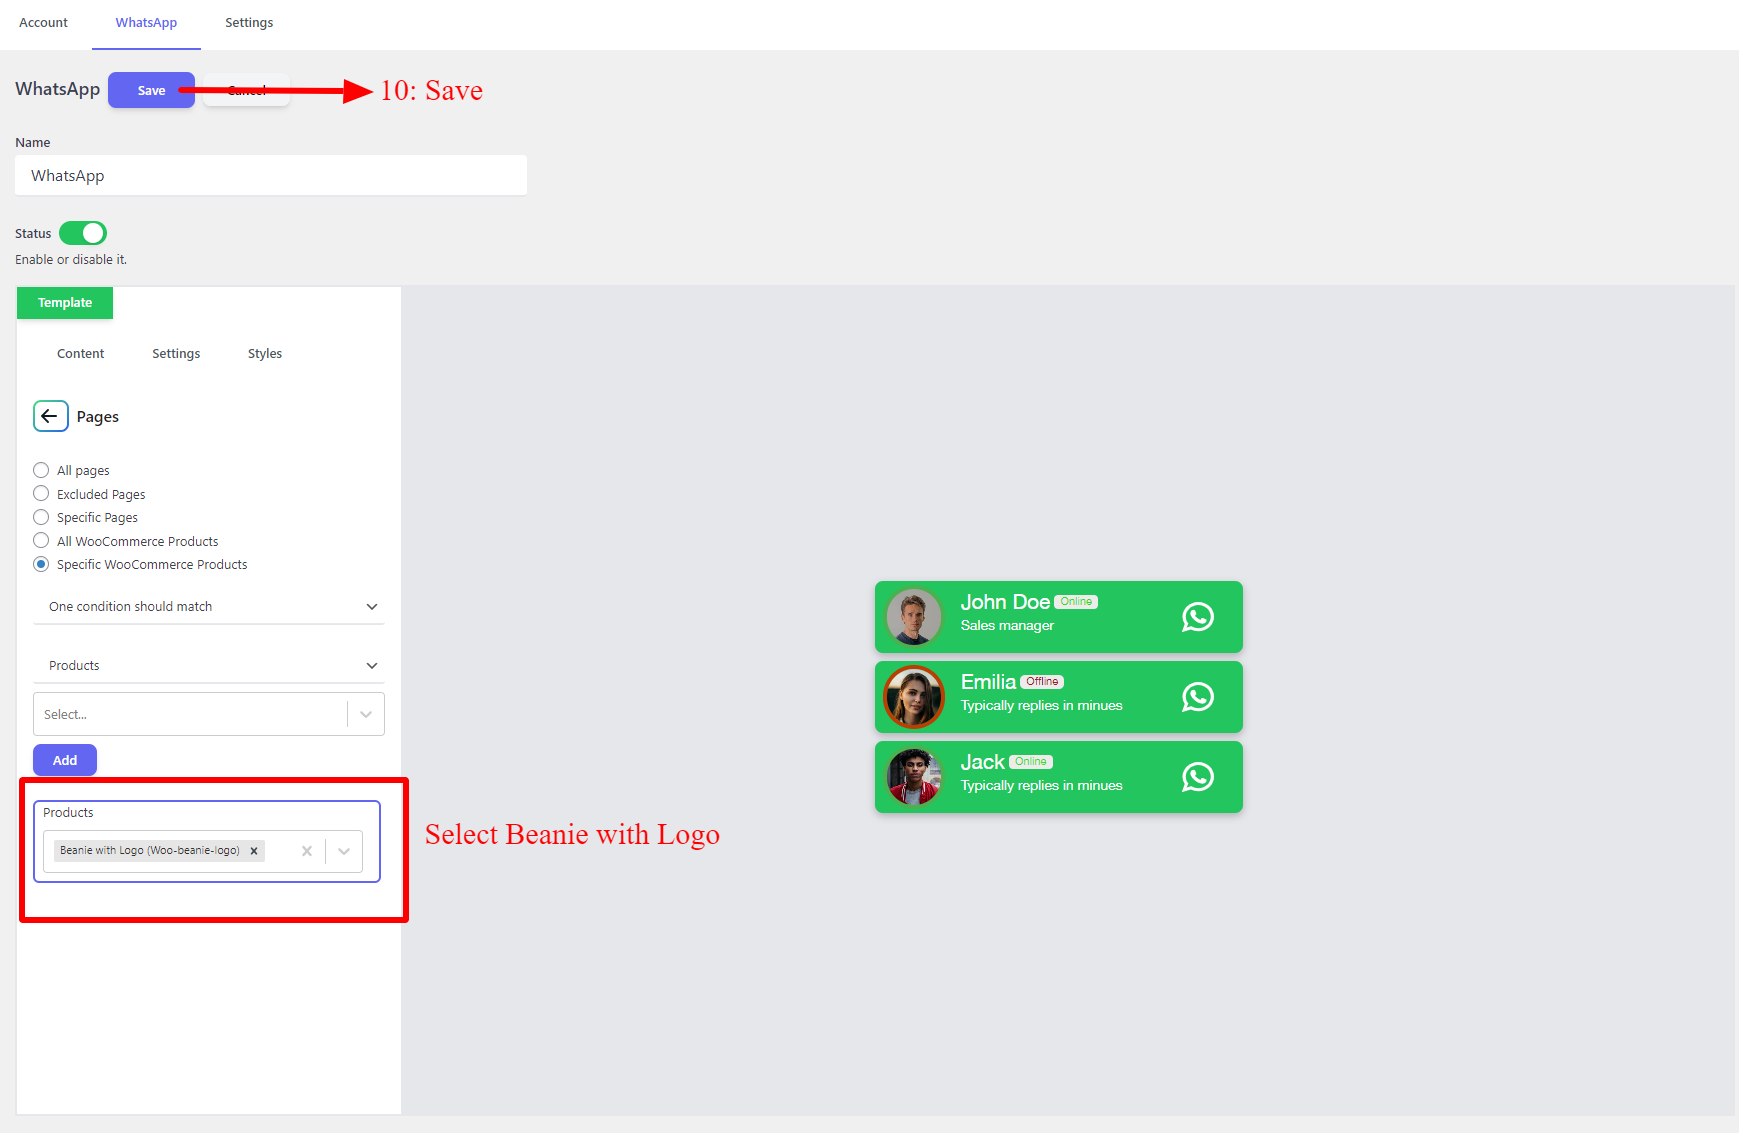
Select All WooCommerce Products to add the WhatsApp chat button to all of WooCommerce products
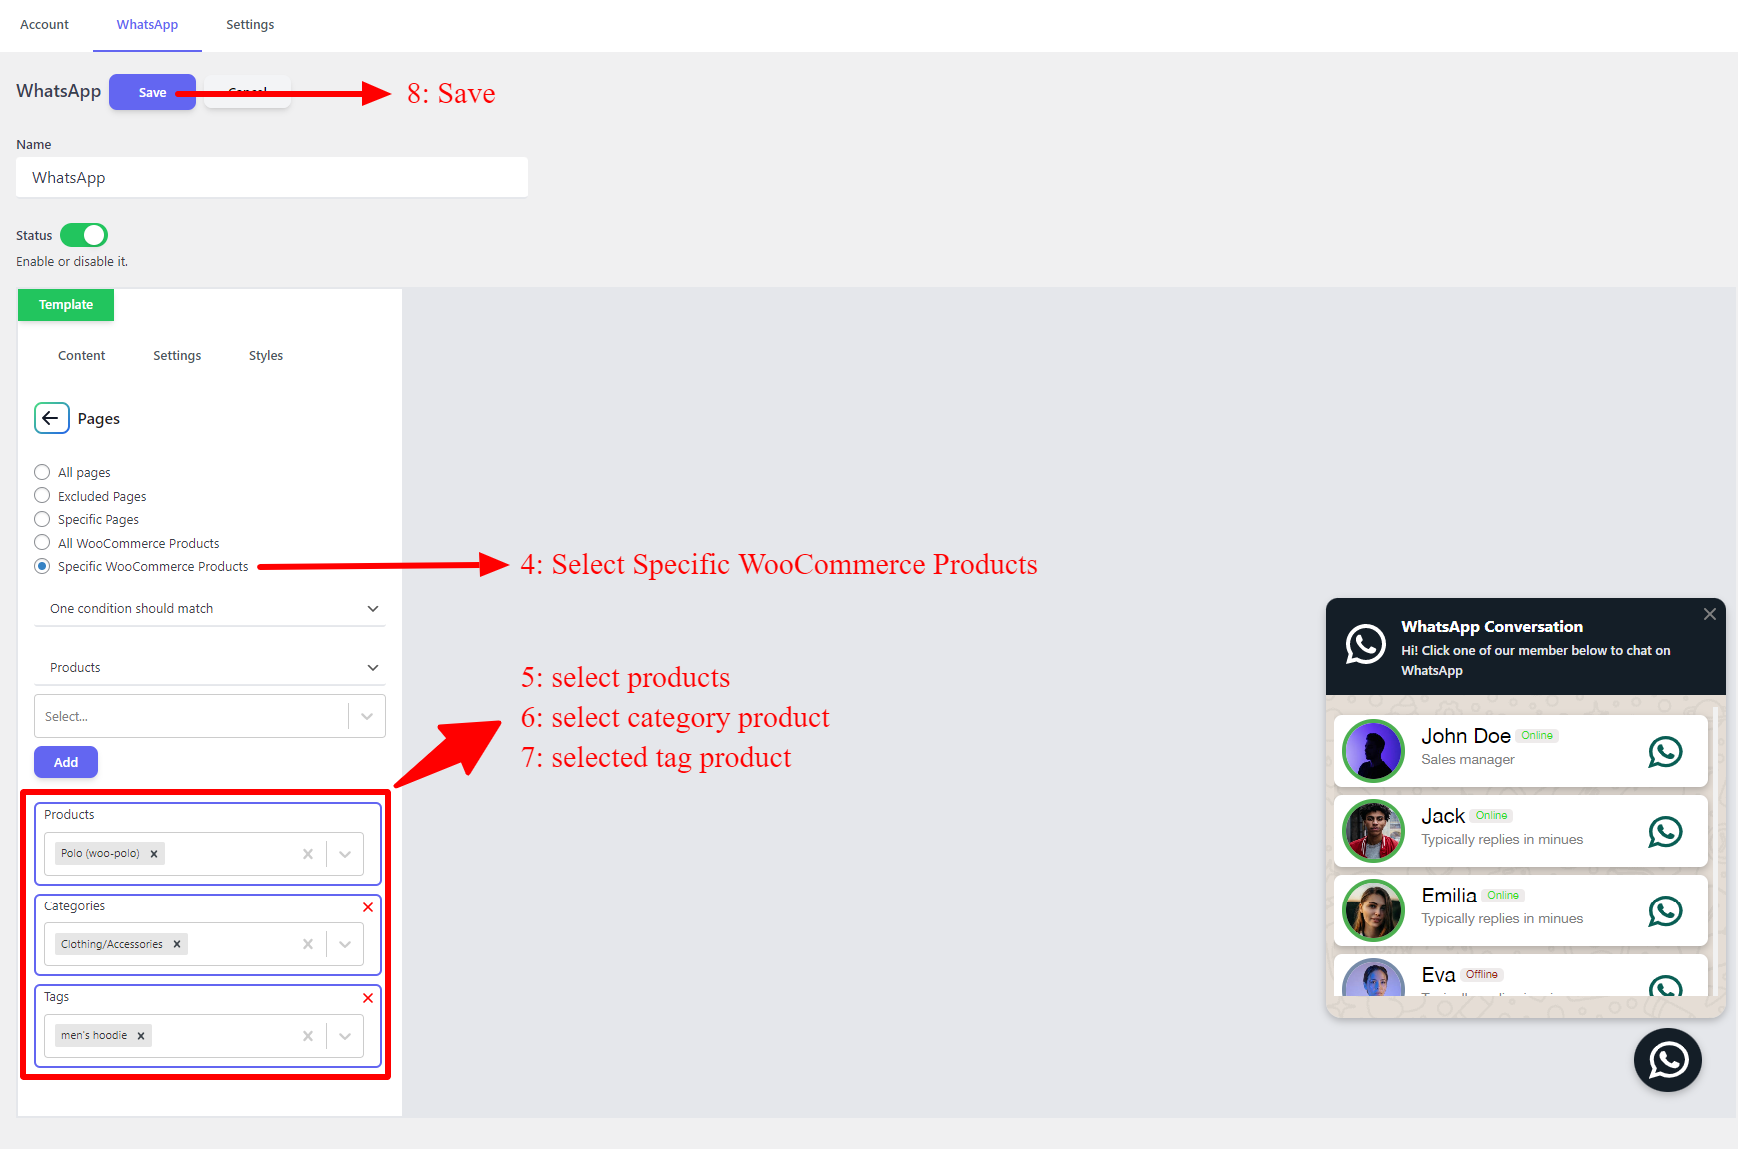
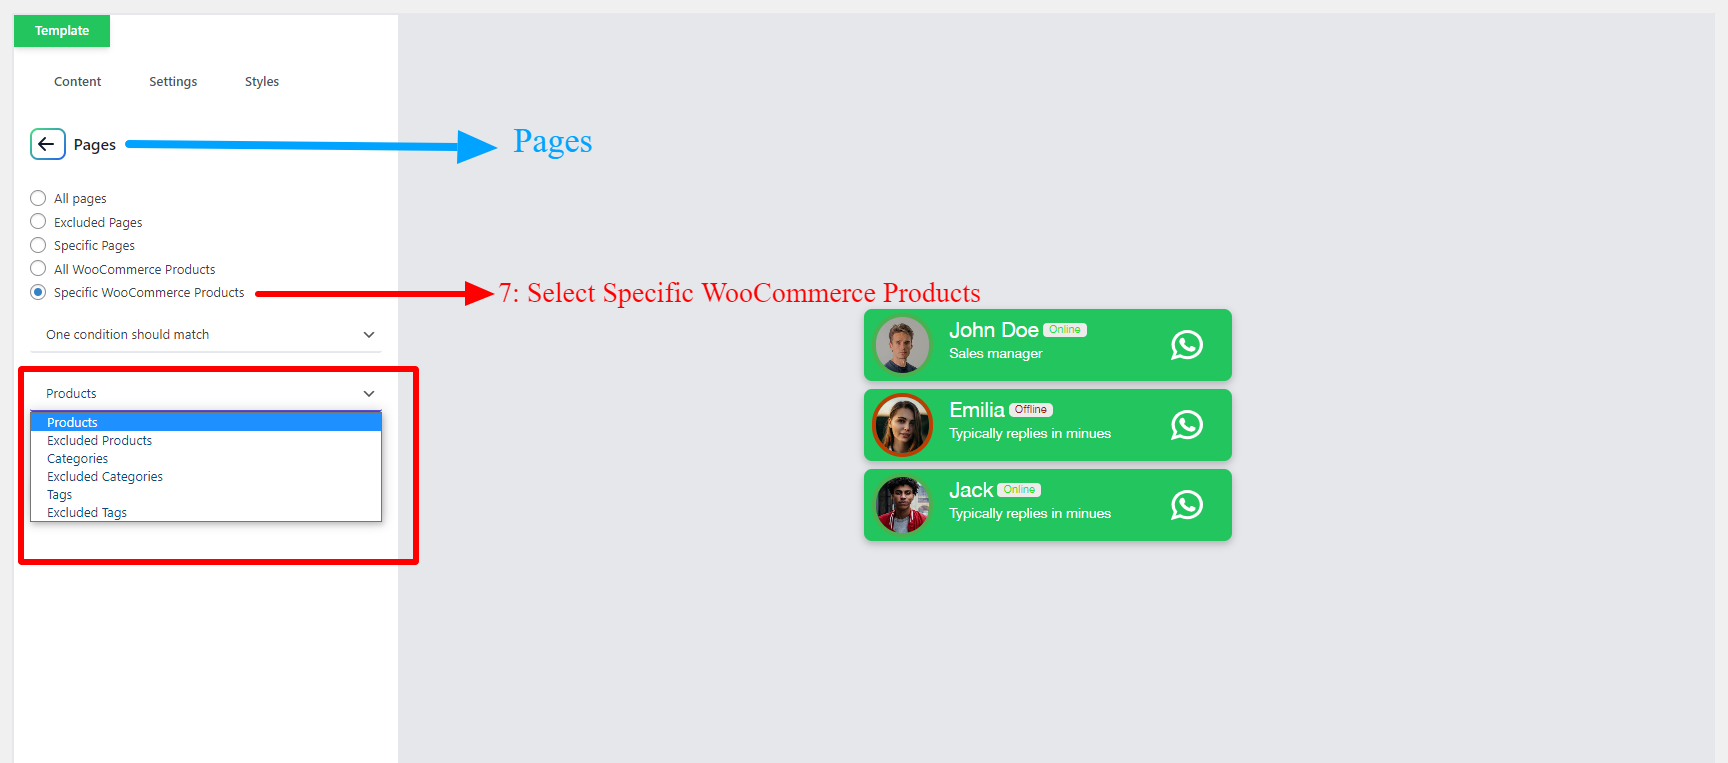
Select Specific WooCommerce Products: to add WhatsApp chat to specific products, categories, or tags.
WhatsApp settings tab
Display settings
After applying the required changes on the WhatsApp Chat button, click on the Save button to save the changes.
WooCommerce products settings
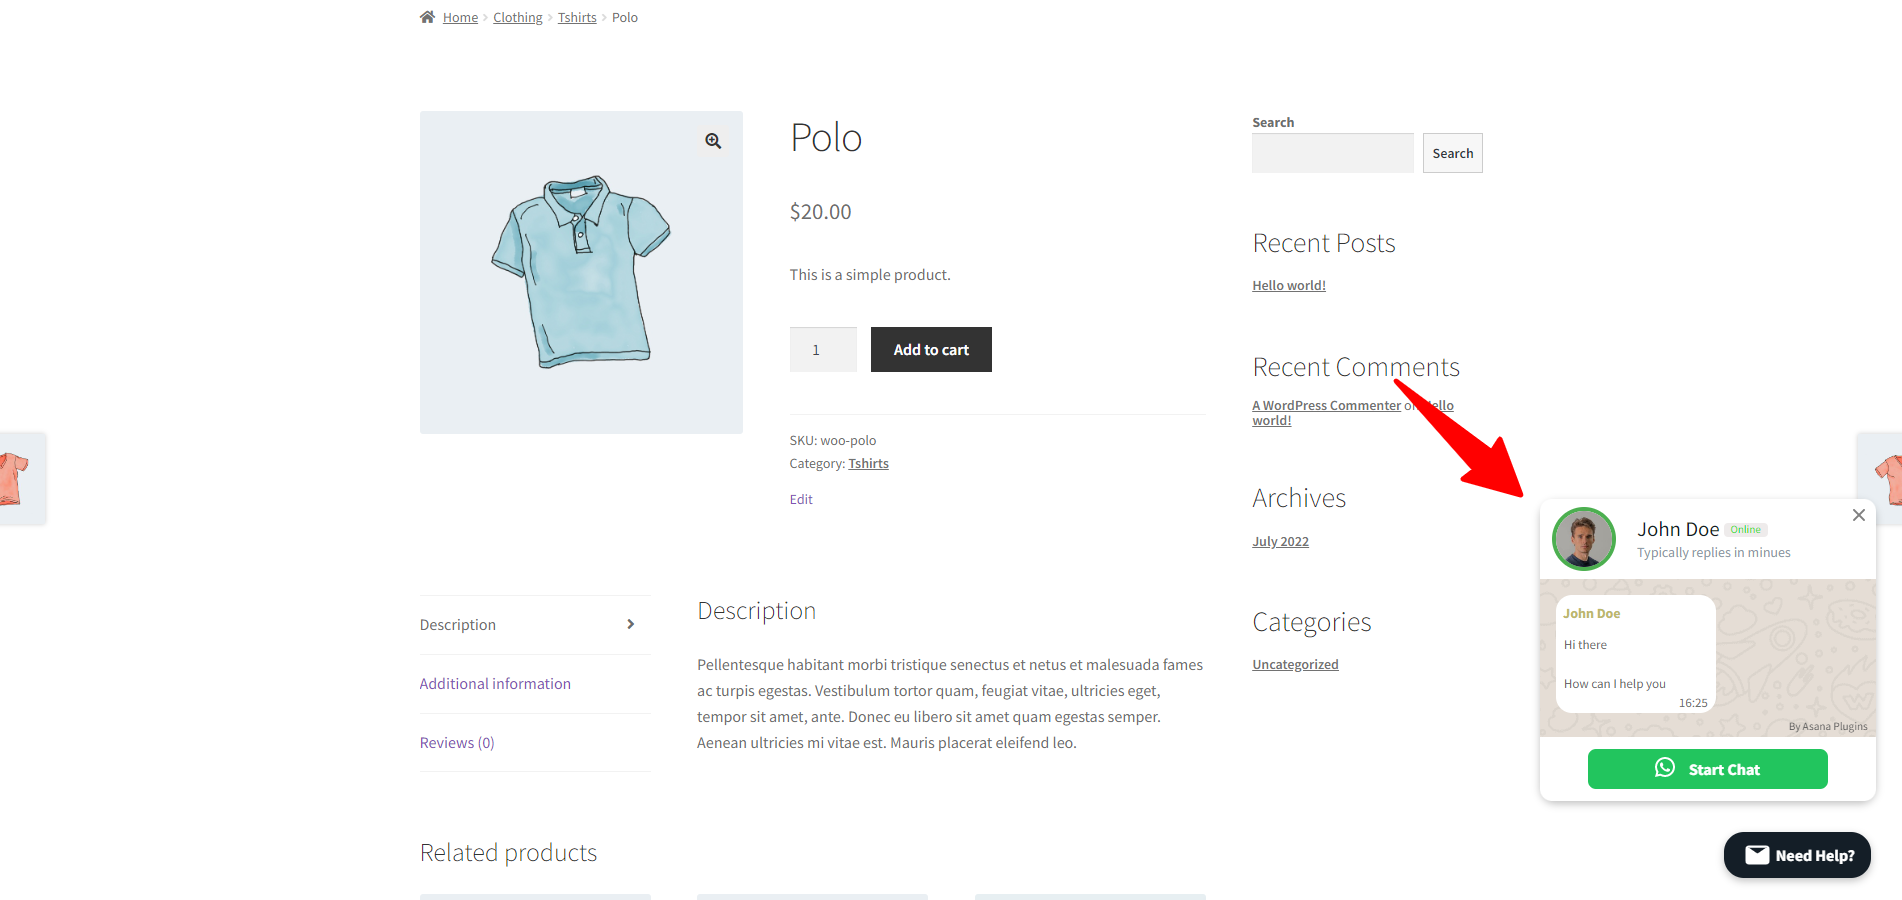
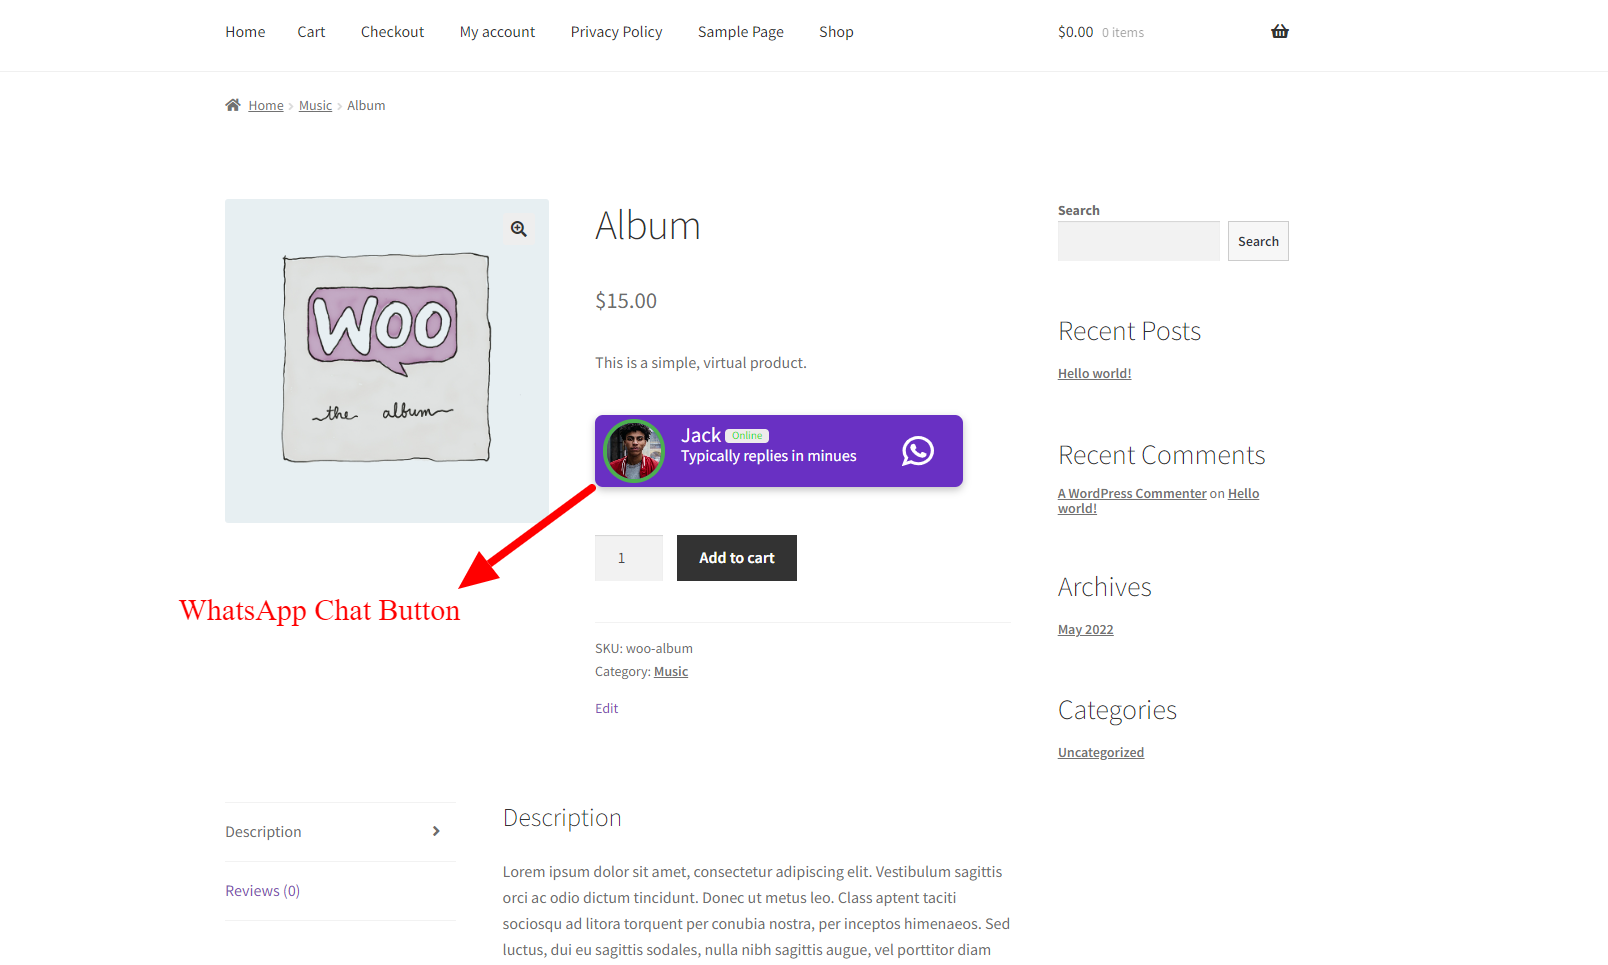
Now you will see the floating WhatsApp Chat button on the products that you have selected or on all of the WooCommerce products pages if you have chosen the All WooCommerce Products option in the previous step.
Live Chat Button on WooCommerce Product
Create Multi Account WhatsApp Chat Button for WooCommerce
To create a multi-account WhatsApp Chat Button, you should create at least two accounts that we explained it in the Create Account section.
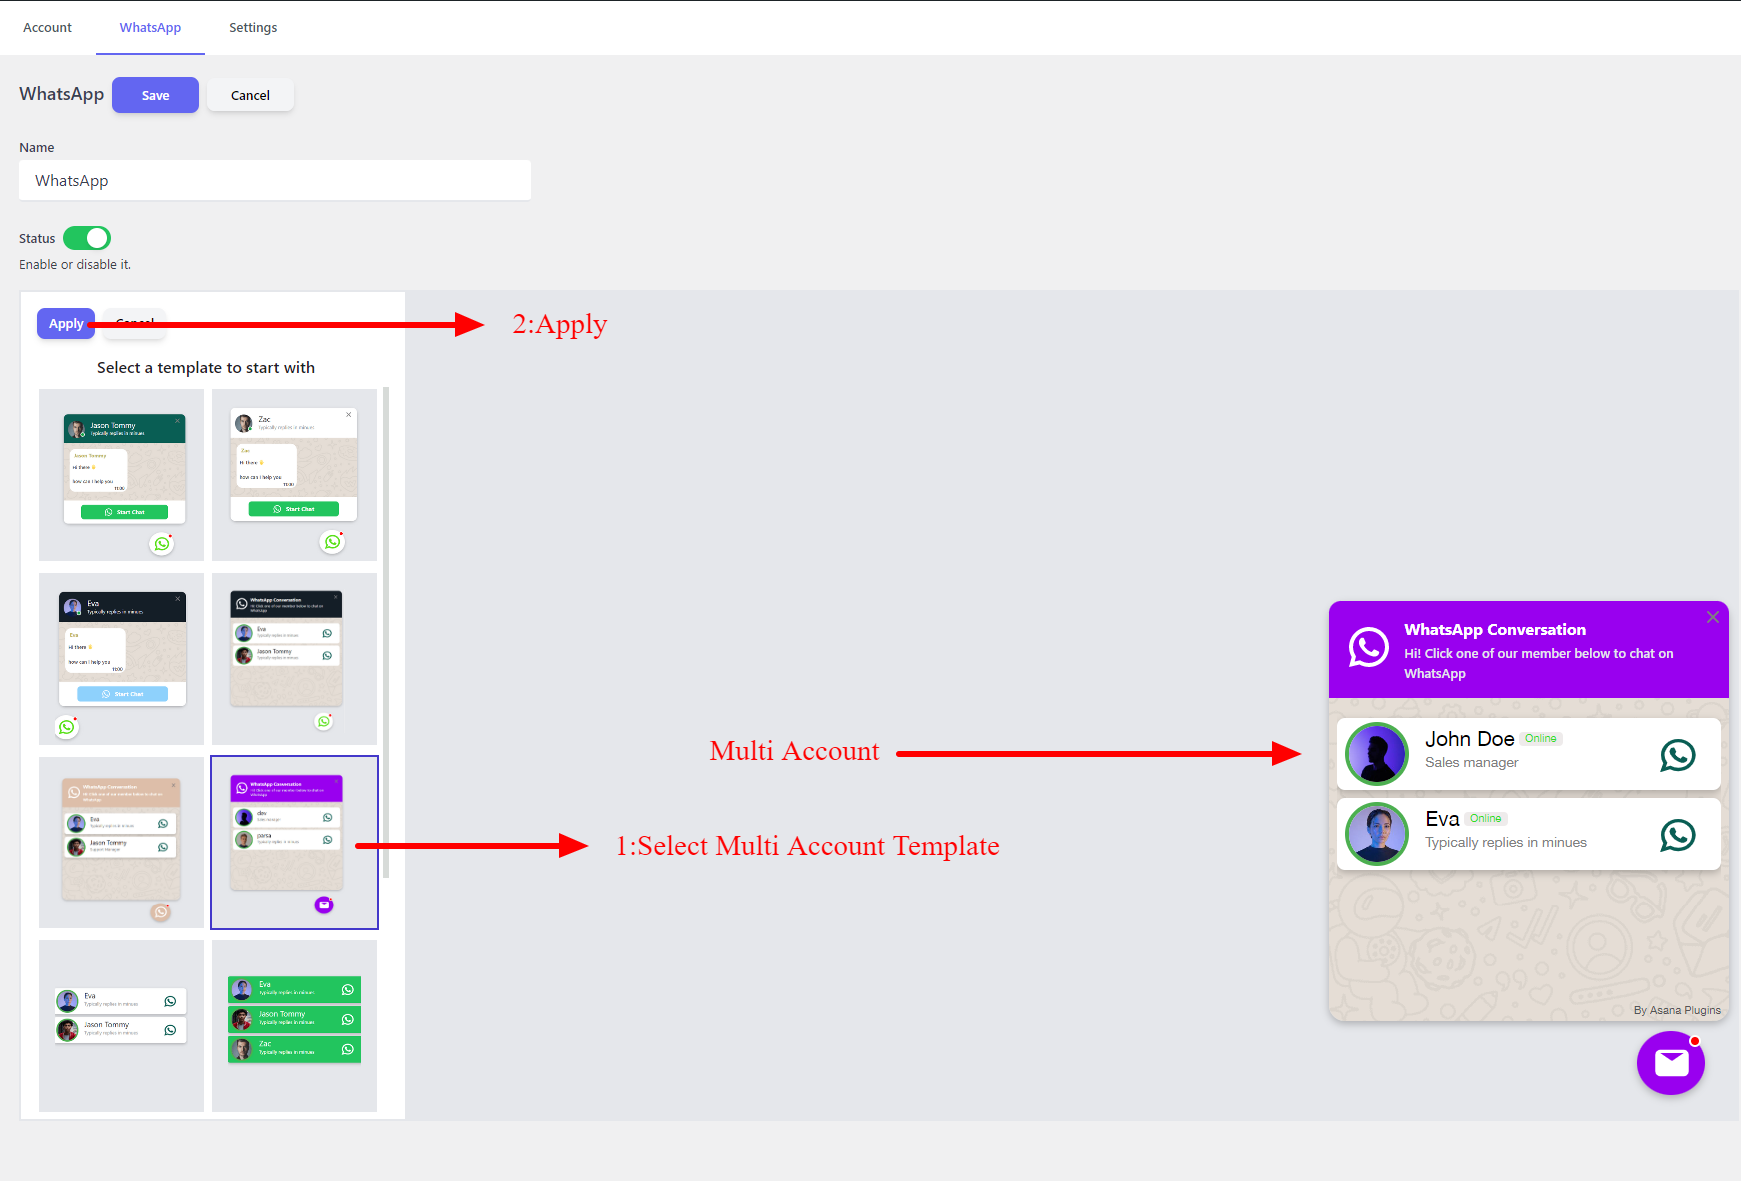
After creating at least two accounts, navigate to the WhatsApp tab and click on the Add New button to create a new multi-account WhatsApp Chat Support.
Set a name for the multi-account WhatsApp
Select a multi-account template from the predefined templates list.
A preview of the selected template will be shown on the right side.
Click on the Apply button to start using the selected template.
Multi-Account Template
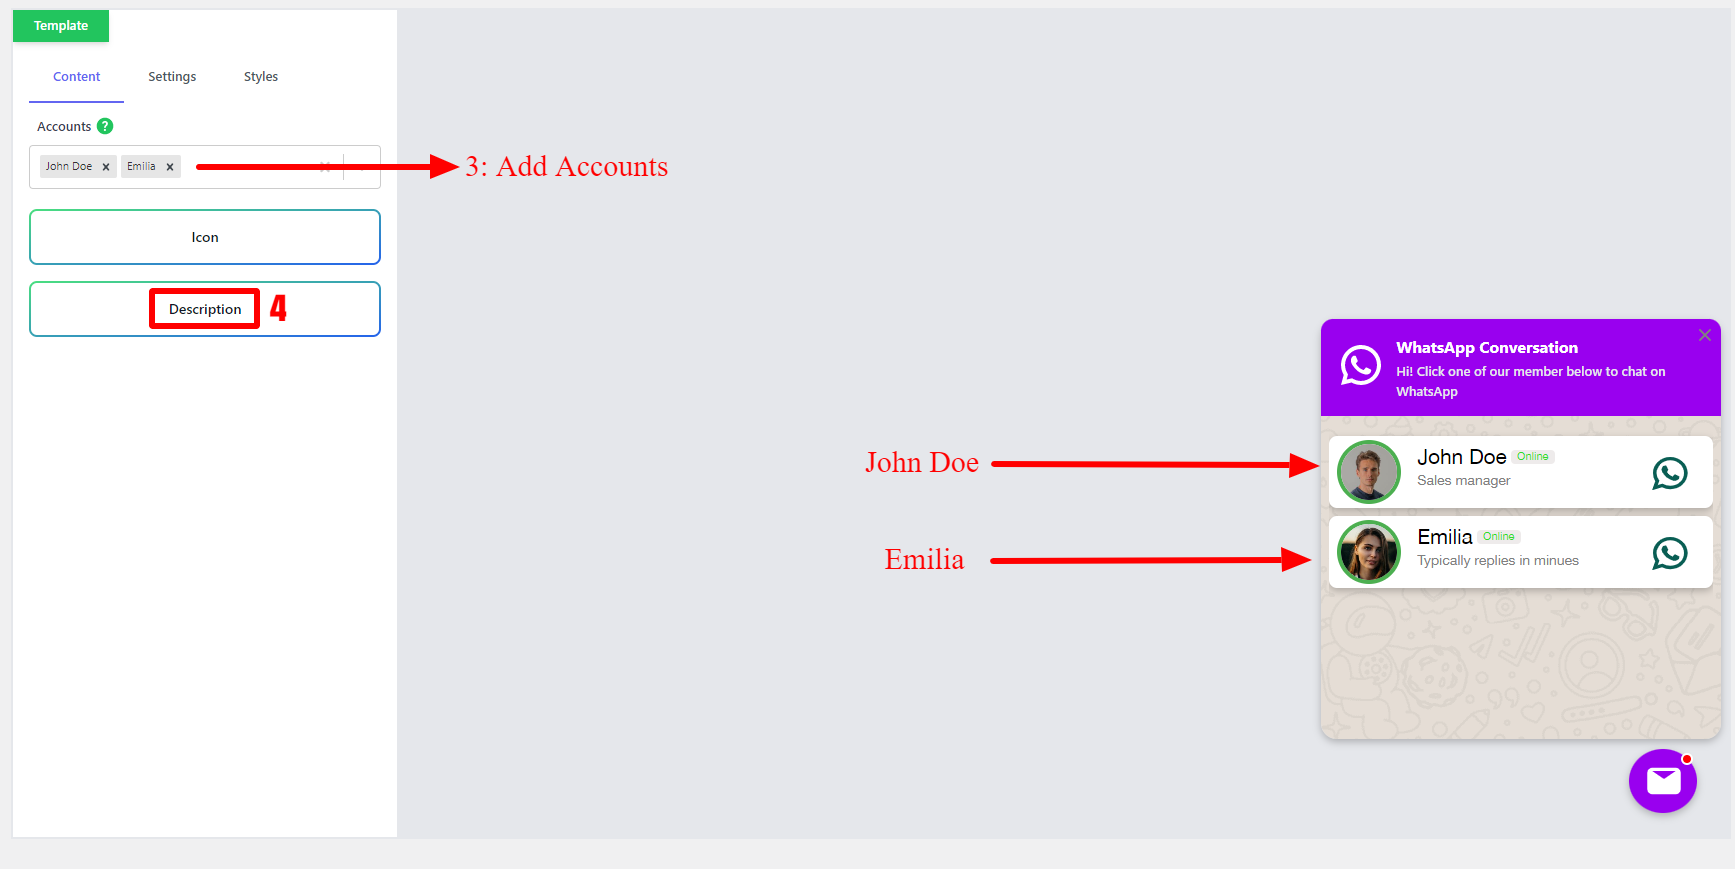
After selecting a template, you need to add at least two accounts to WhatsApp. Search for the accounts that you have created and select them in the Accounts field.
Add Accounts
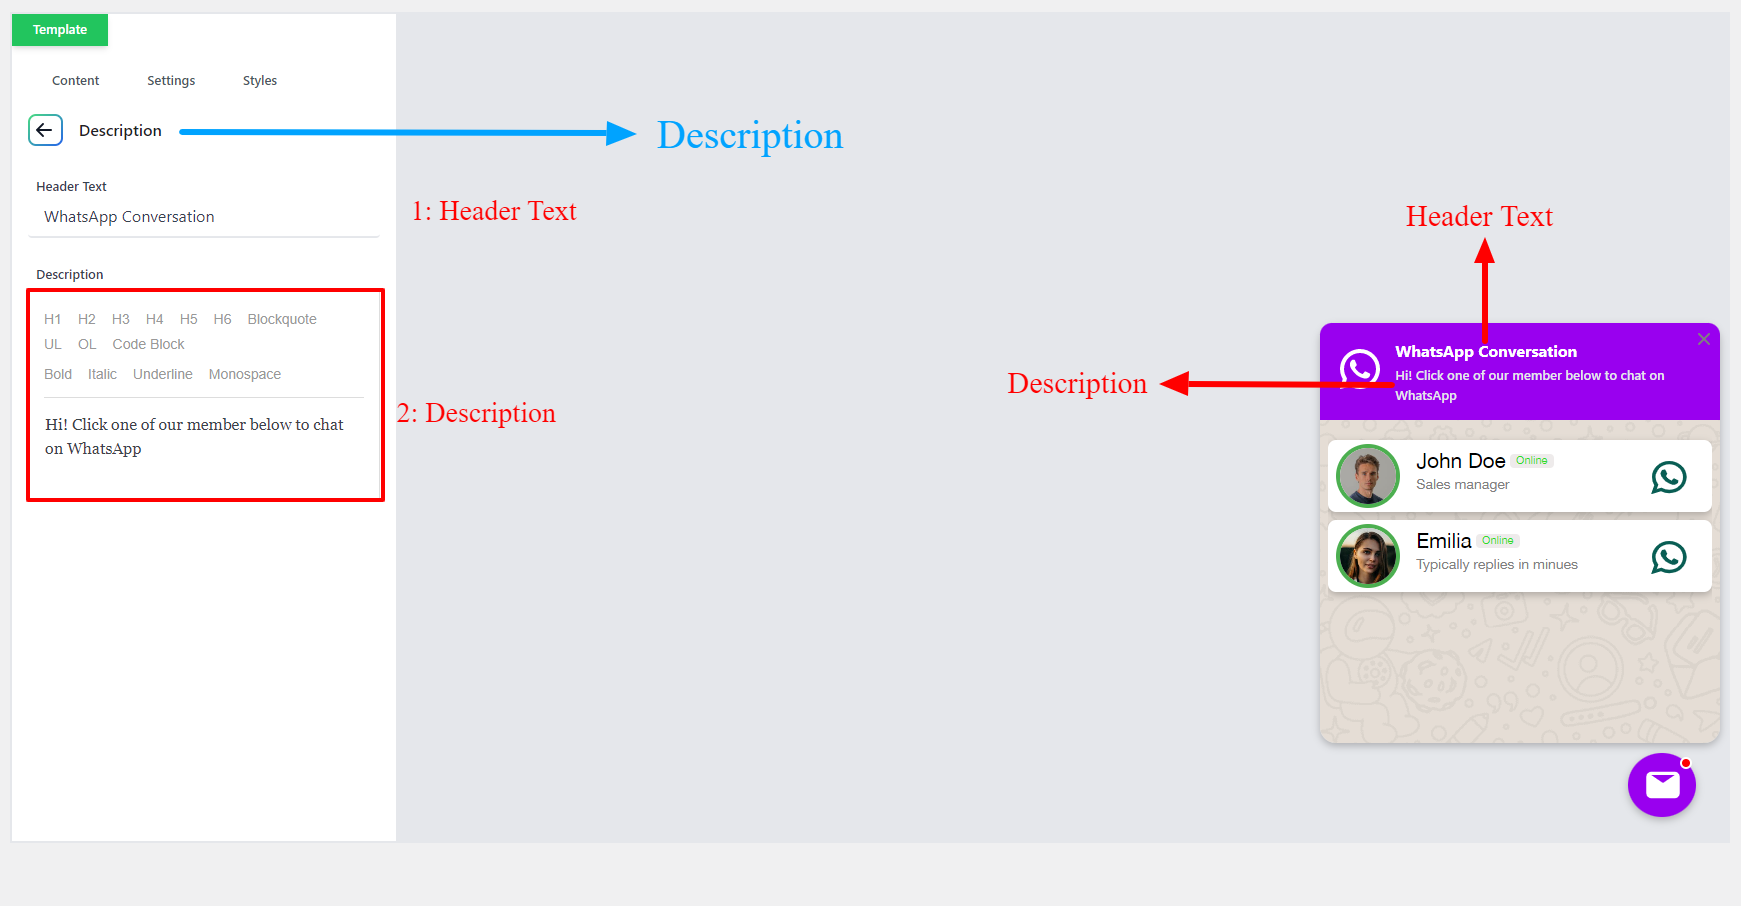
You can change the Header Text and Description from the Description section like the below image.
Description
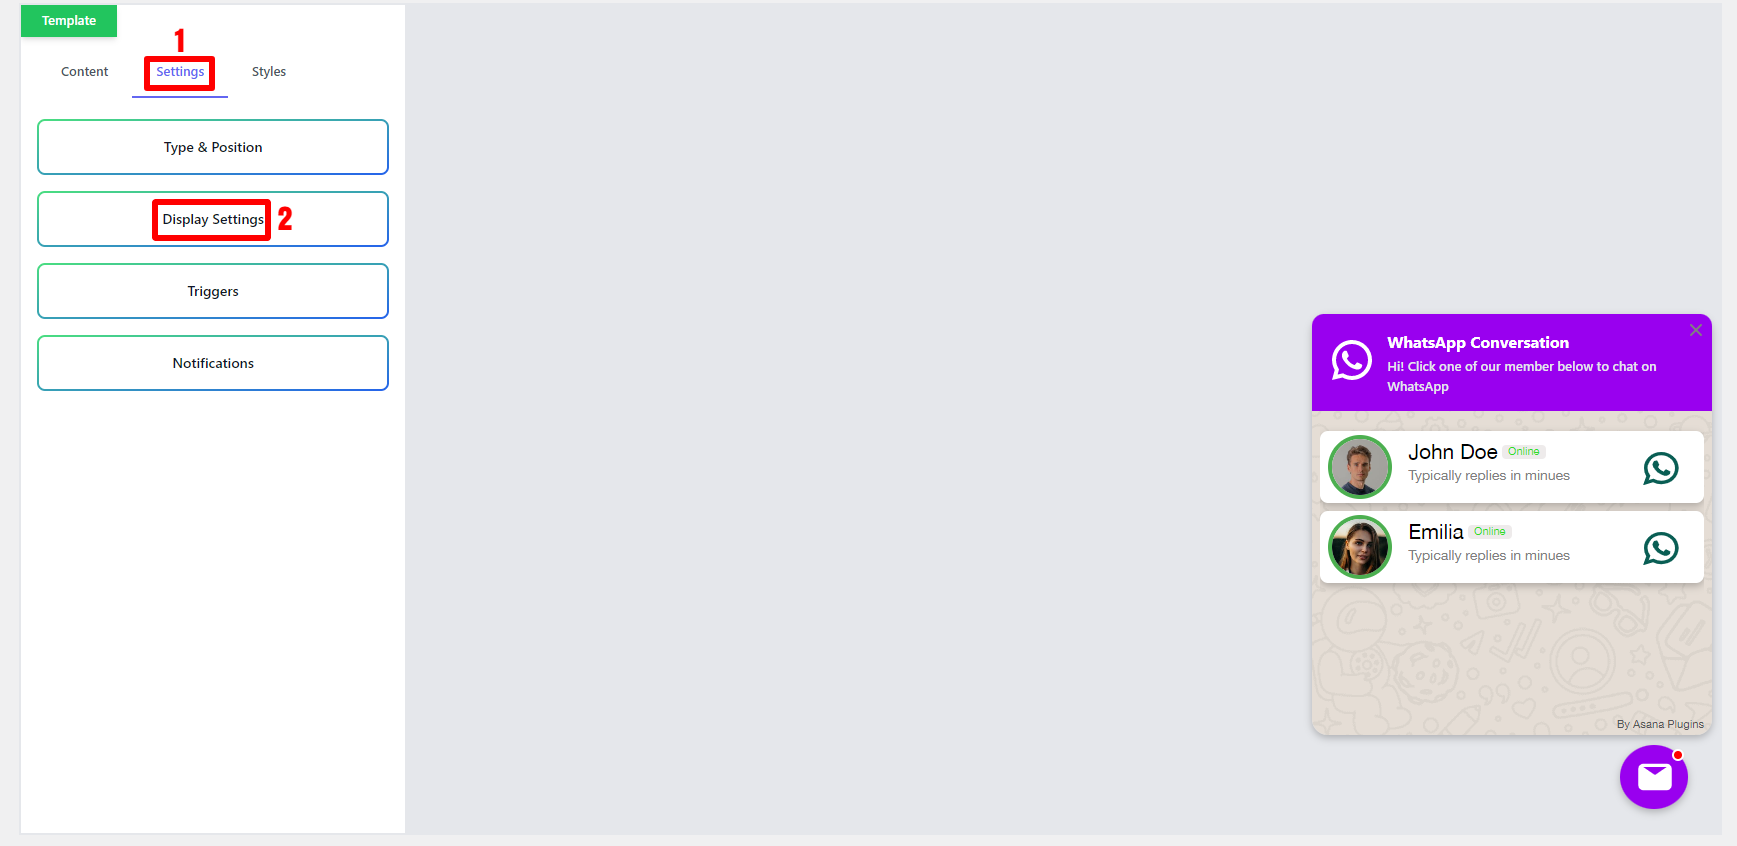
Select Products
Navigate to the Settings tab on the WhatsApp details page.
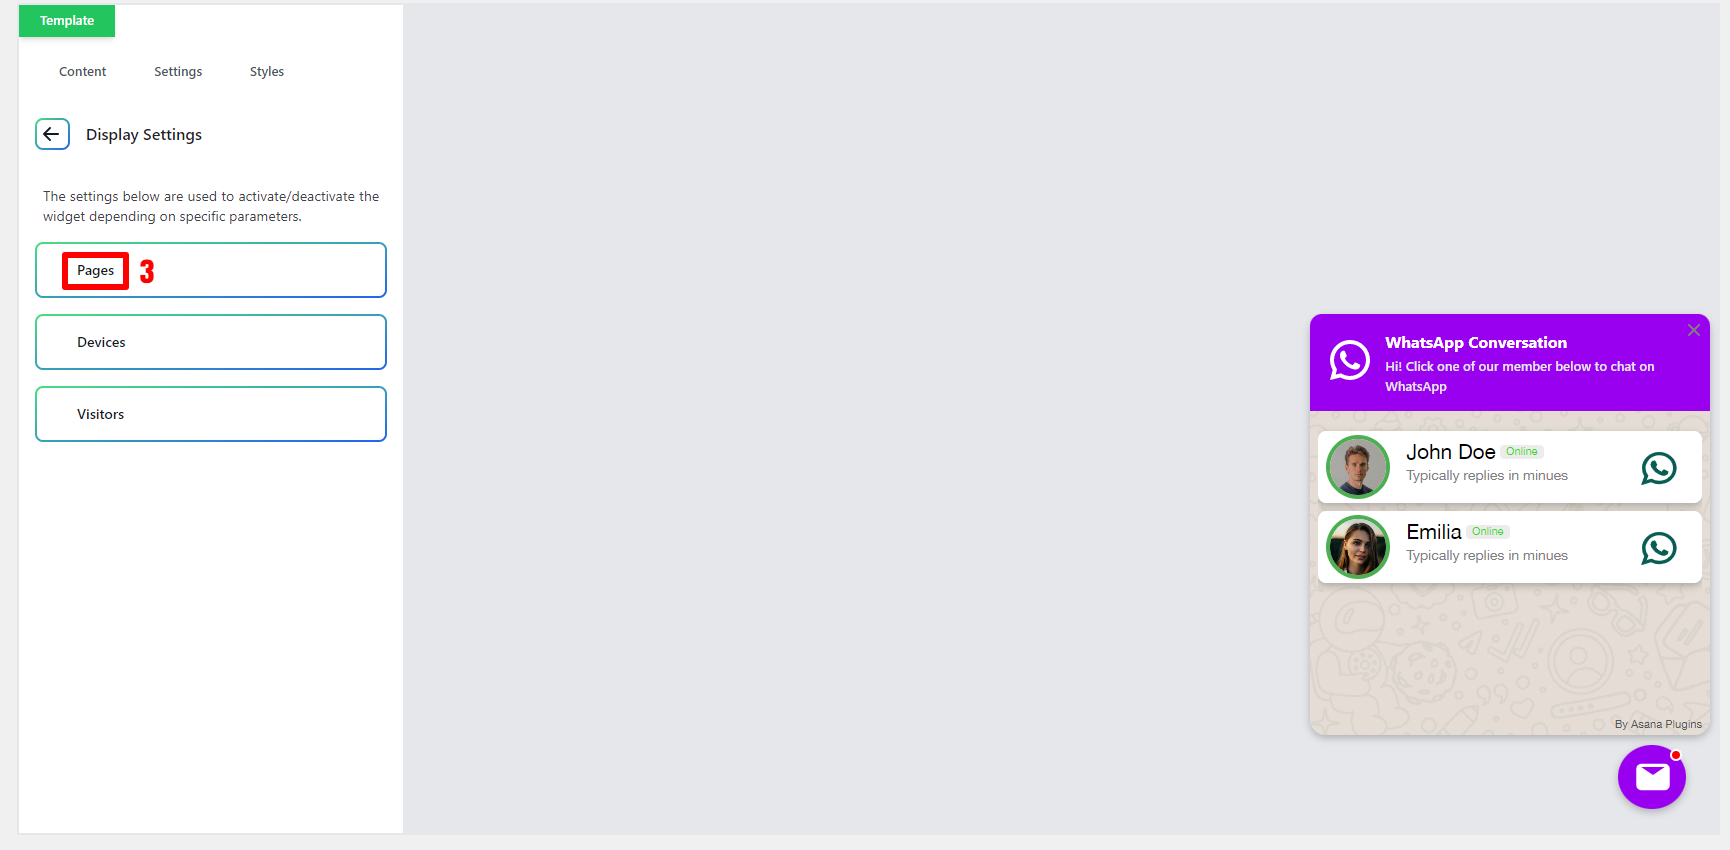
Open Display Settings
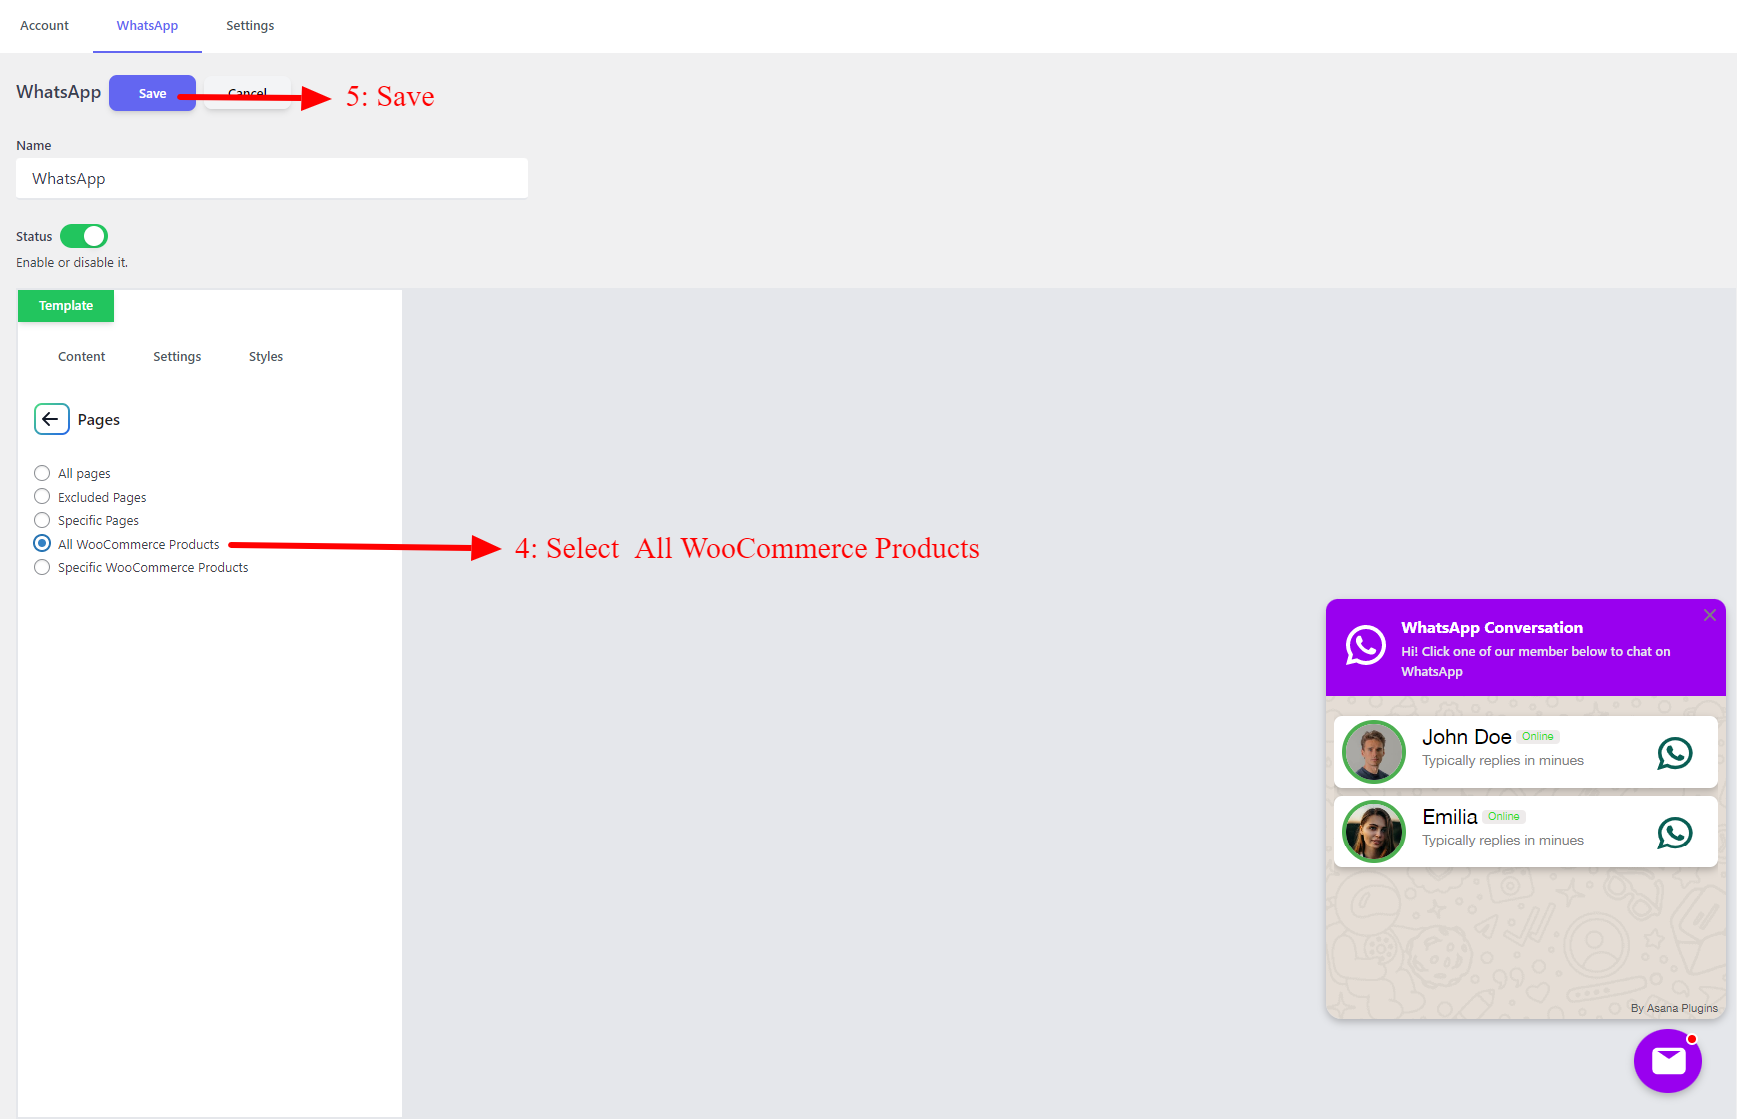
Open Pages
Select All WooCommerce Products to add the WhatsApp chat button to all of WooCommerce products
Select Specific WooCommerce Products: to add WhatsApp chat to specific products, categories or tags.
Settings tab
Display settings
Now, your multi-account WhatsApp Chat Support is ready to use and you can Save it.
WooCommerce product options
Because we have selected All WooCommerce Products so the chat button will appear on all of WooCommerce products. To add WhatsApp chat to specific products read the following section.
Multi-agent WhatsApp on WooCommerce product
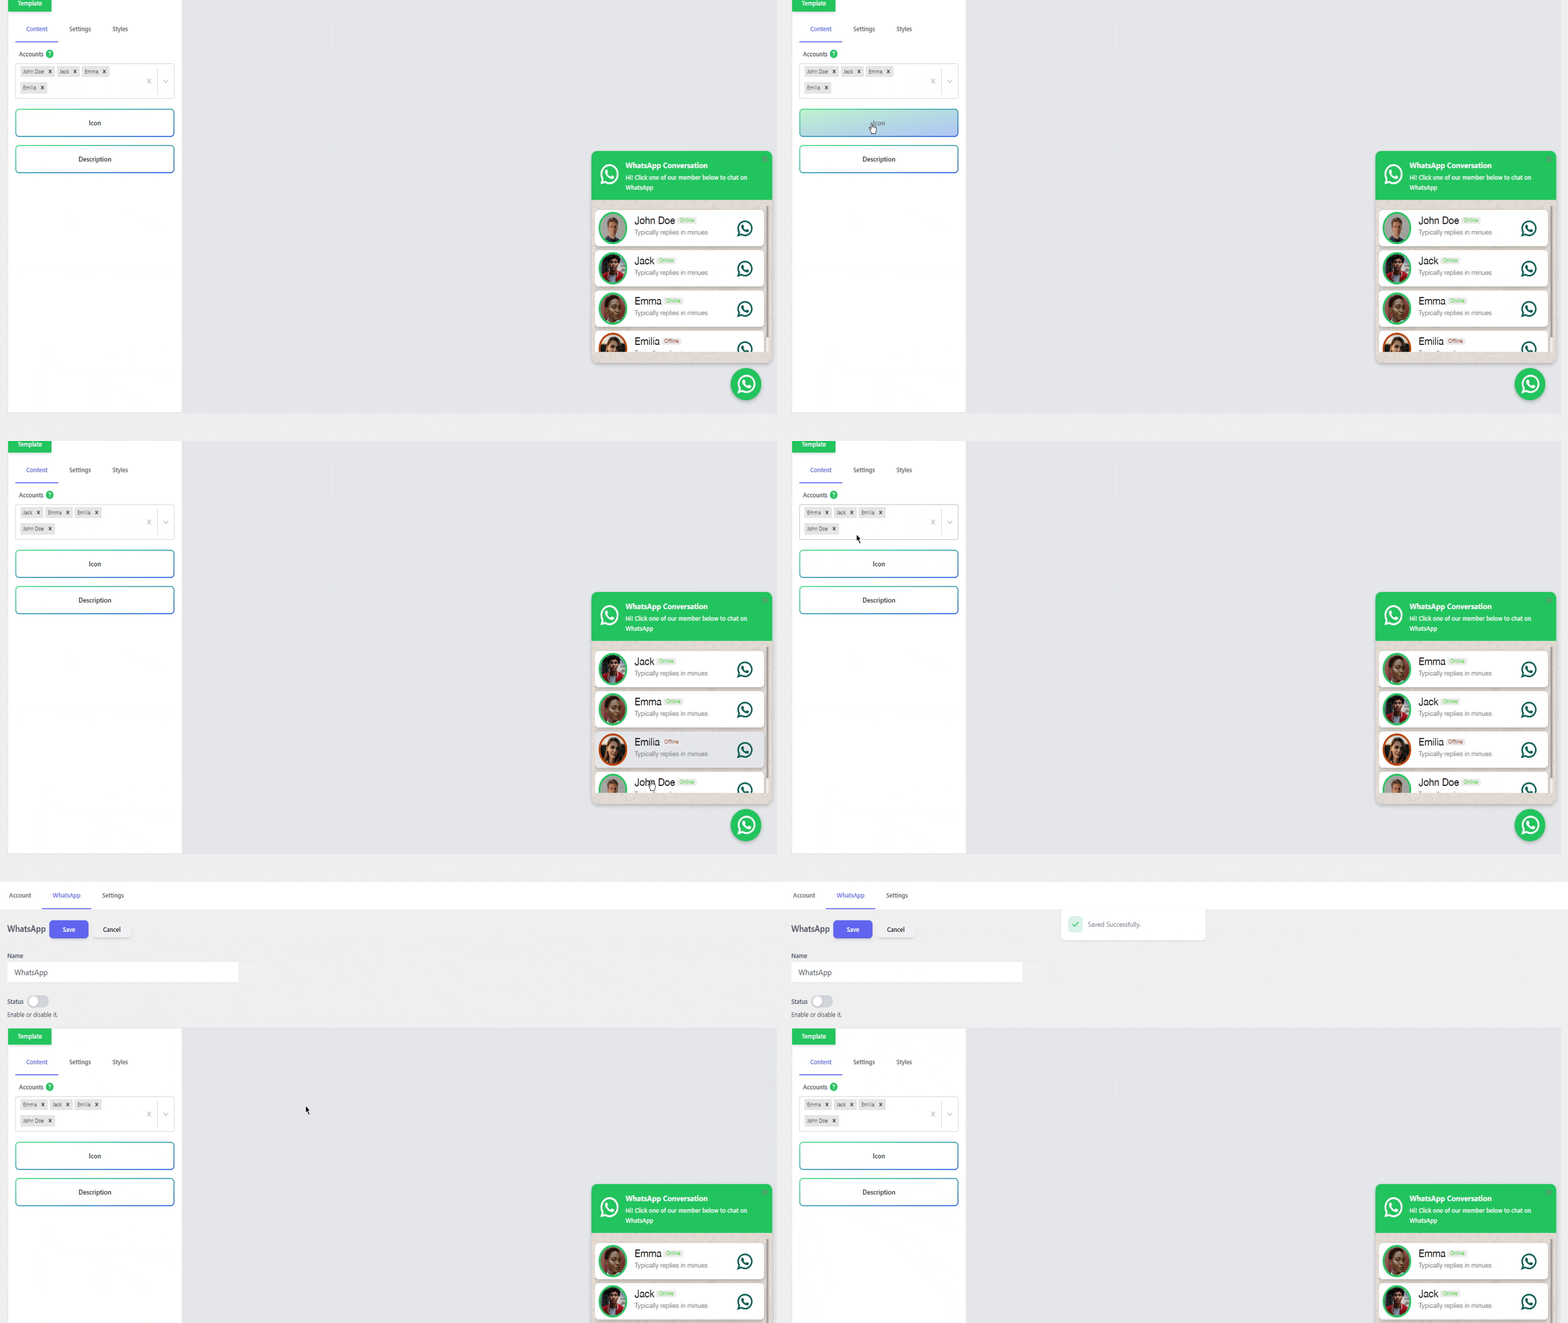
Change Accounts Ordering
You can change accounts’ ordering by dragging and dropping them to the right position inside the multi-select field.
Change Accounts Ordering
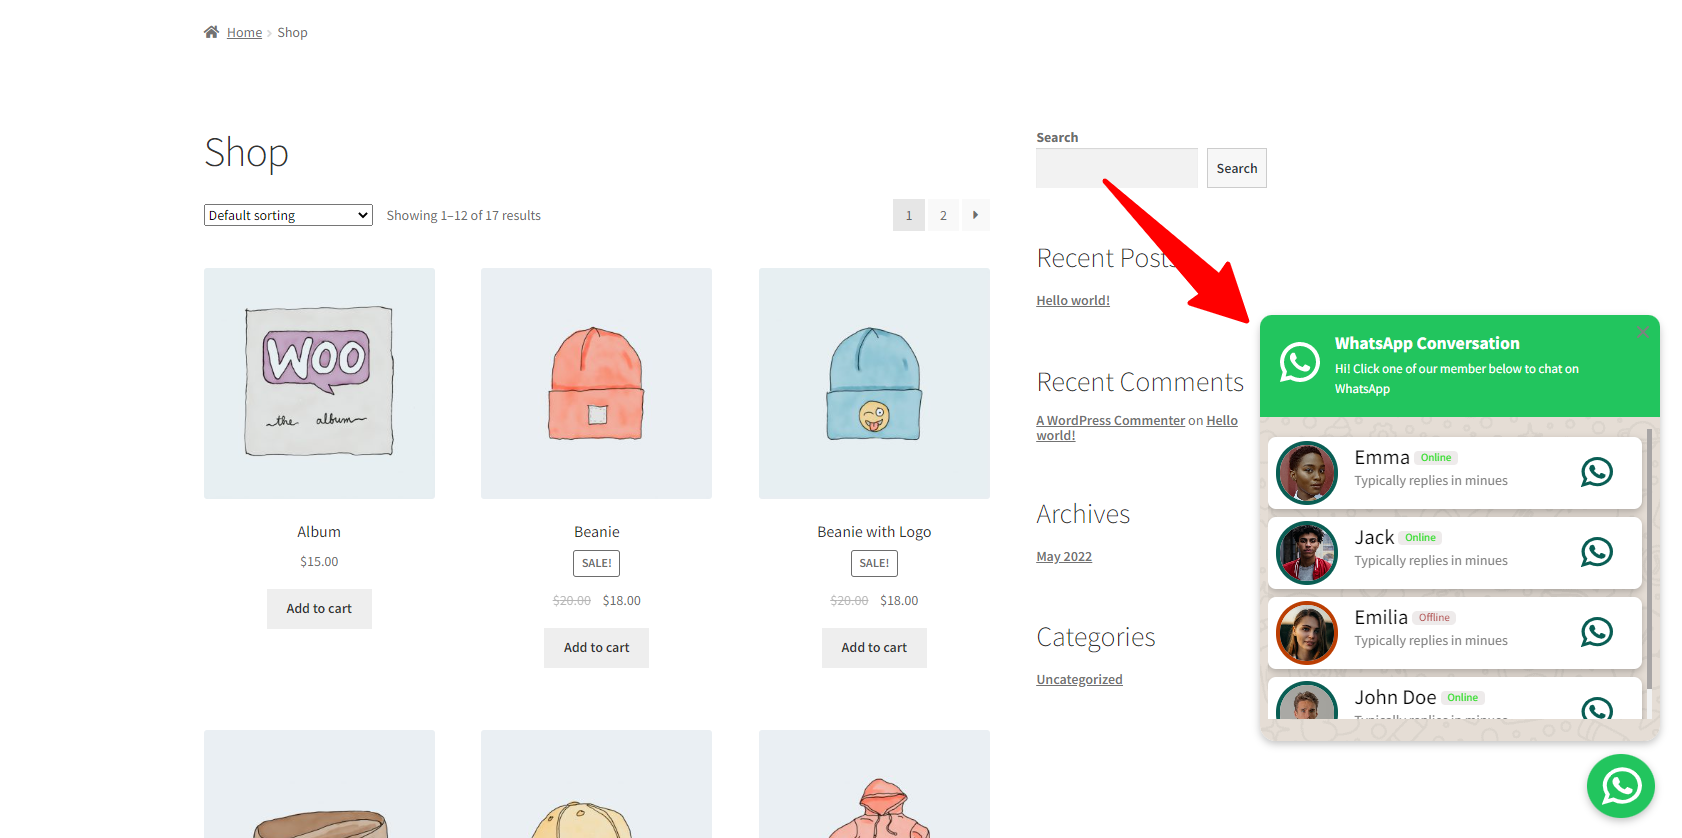
Now you will see the floating WhatsApp Chat button on your website as in the below image.
Multi-Accounts
Add WhatsApp Live Chat Support to WooCommerce Products
You can add WhatsApp Live Chat Support to WooCommerce products by following the below instructions.
First, create a WhatsApp Live Chat support as we explained in the tutorial.
Navigate to the Settings tab on the WhatsApp details page.
Open Display Settings
Open Pages
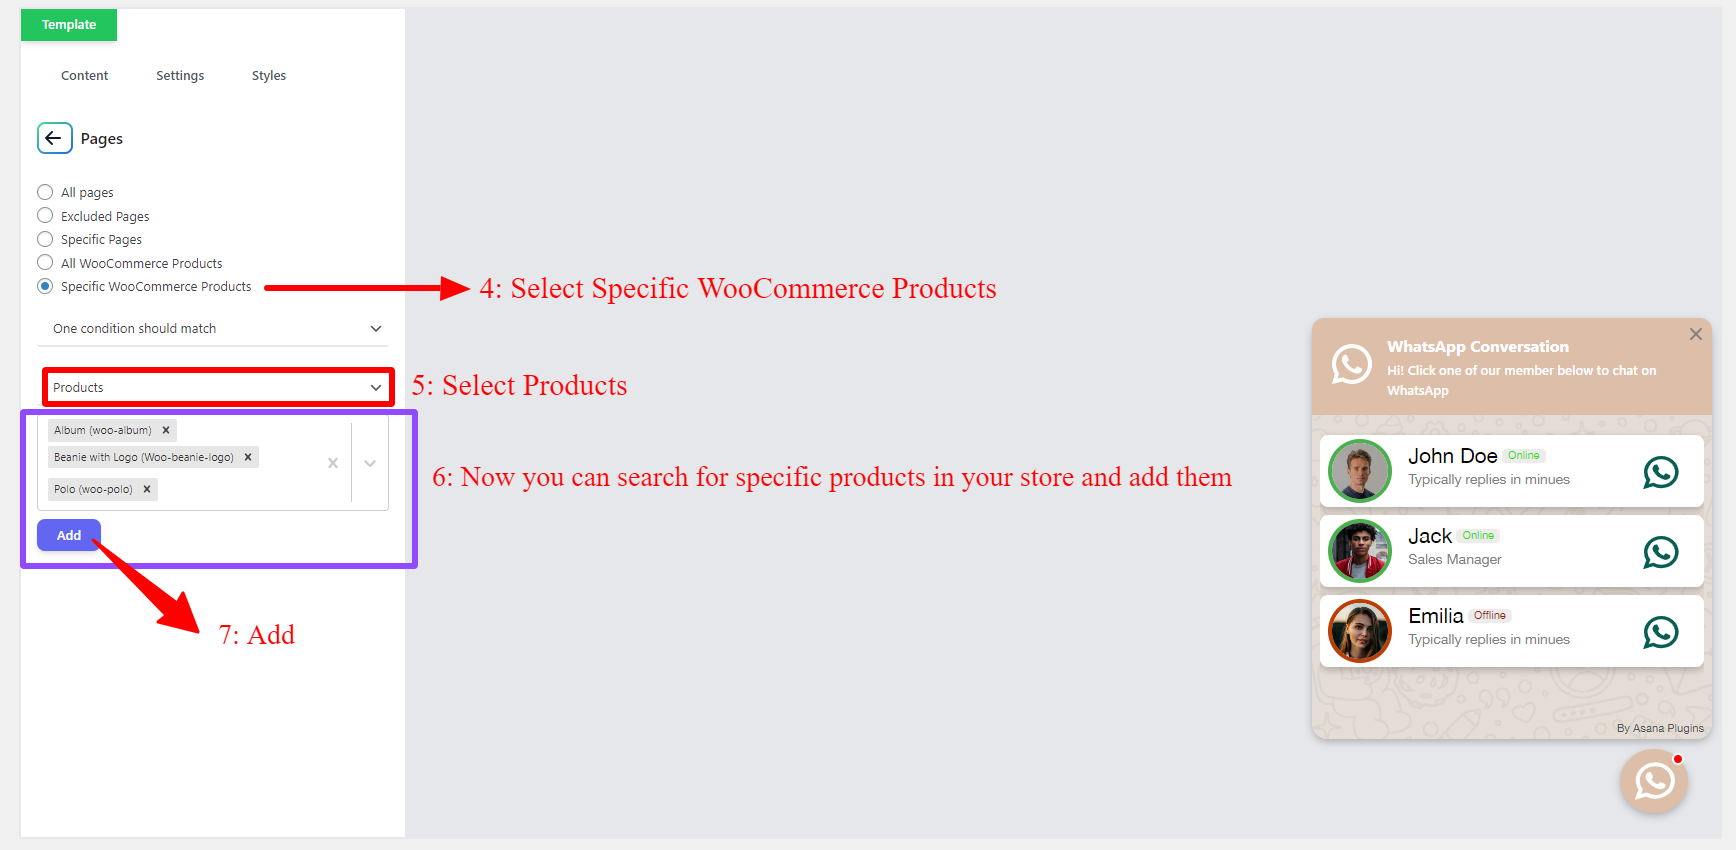
Select Specific WooCommerce Products: to add WhatsApp chat to specific products, categories, or tags.
Settings tab
Display settings
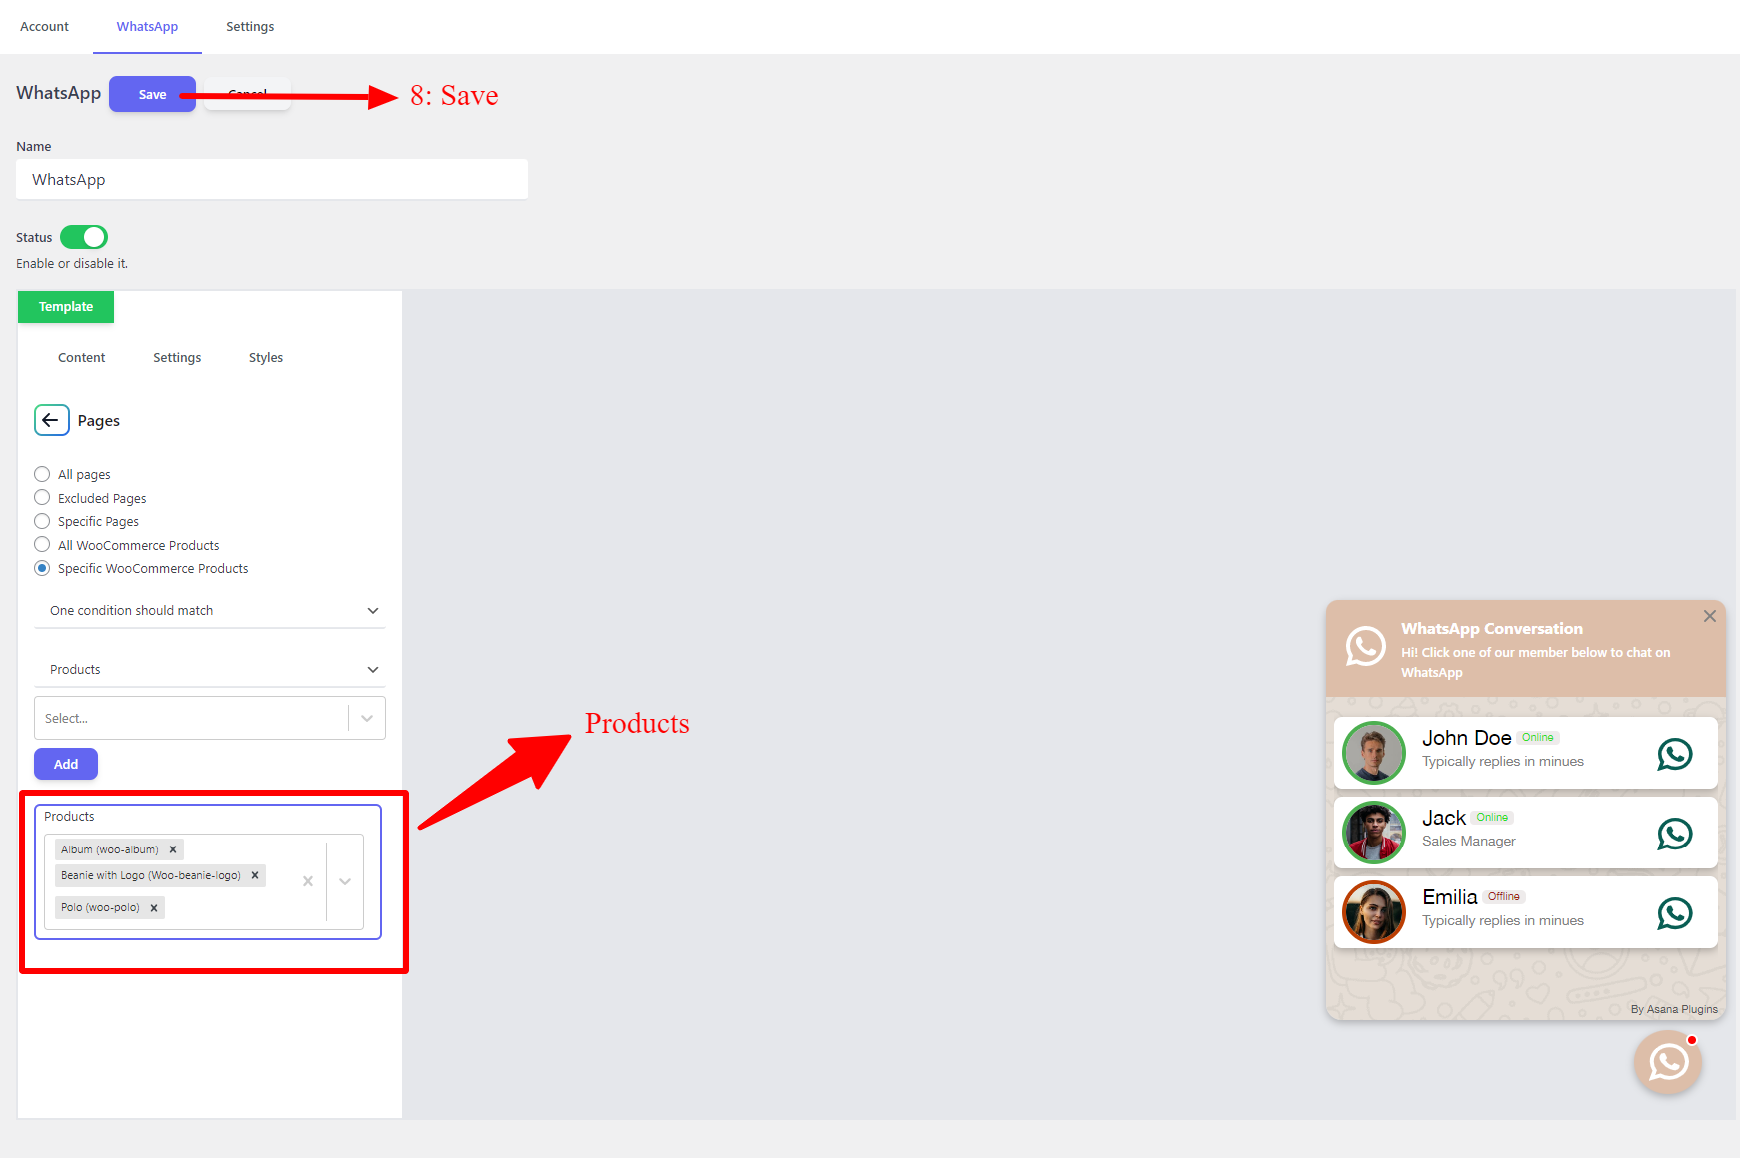
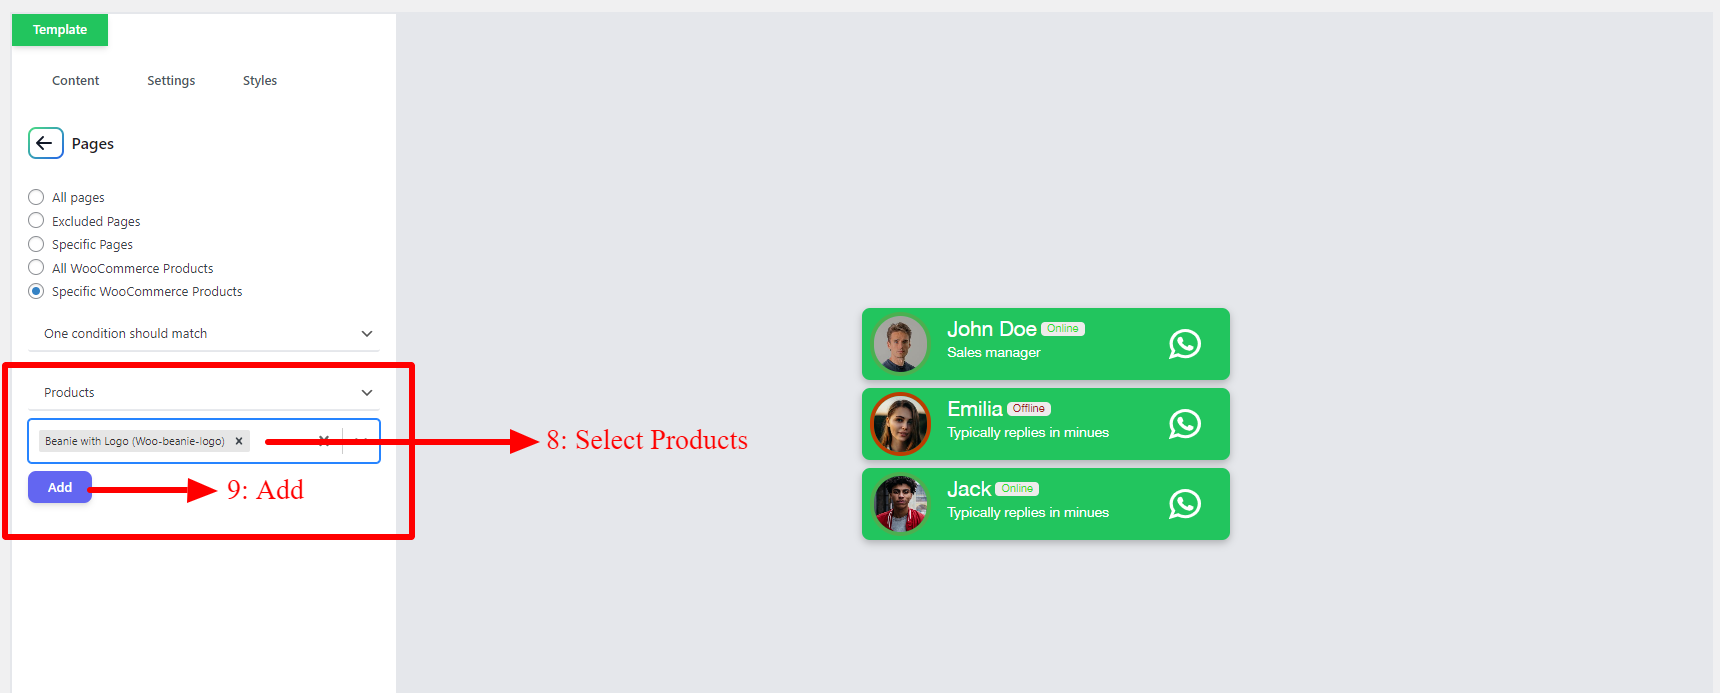
Now you can search for specific products in your store and add them like the below image. After selecting specific products, Save the changes.
Specific products select
Selected products
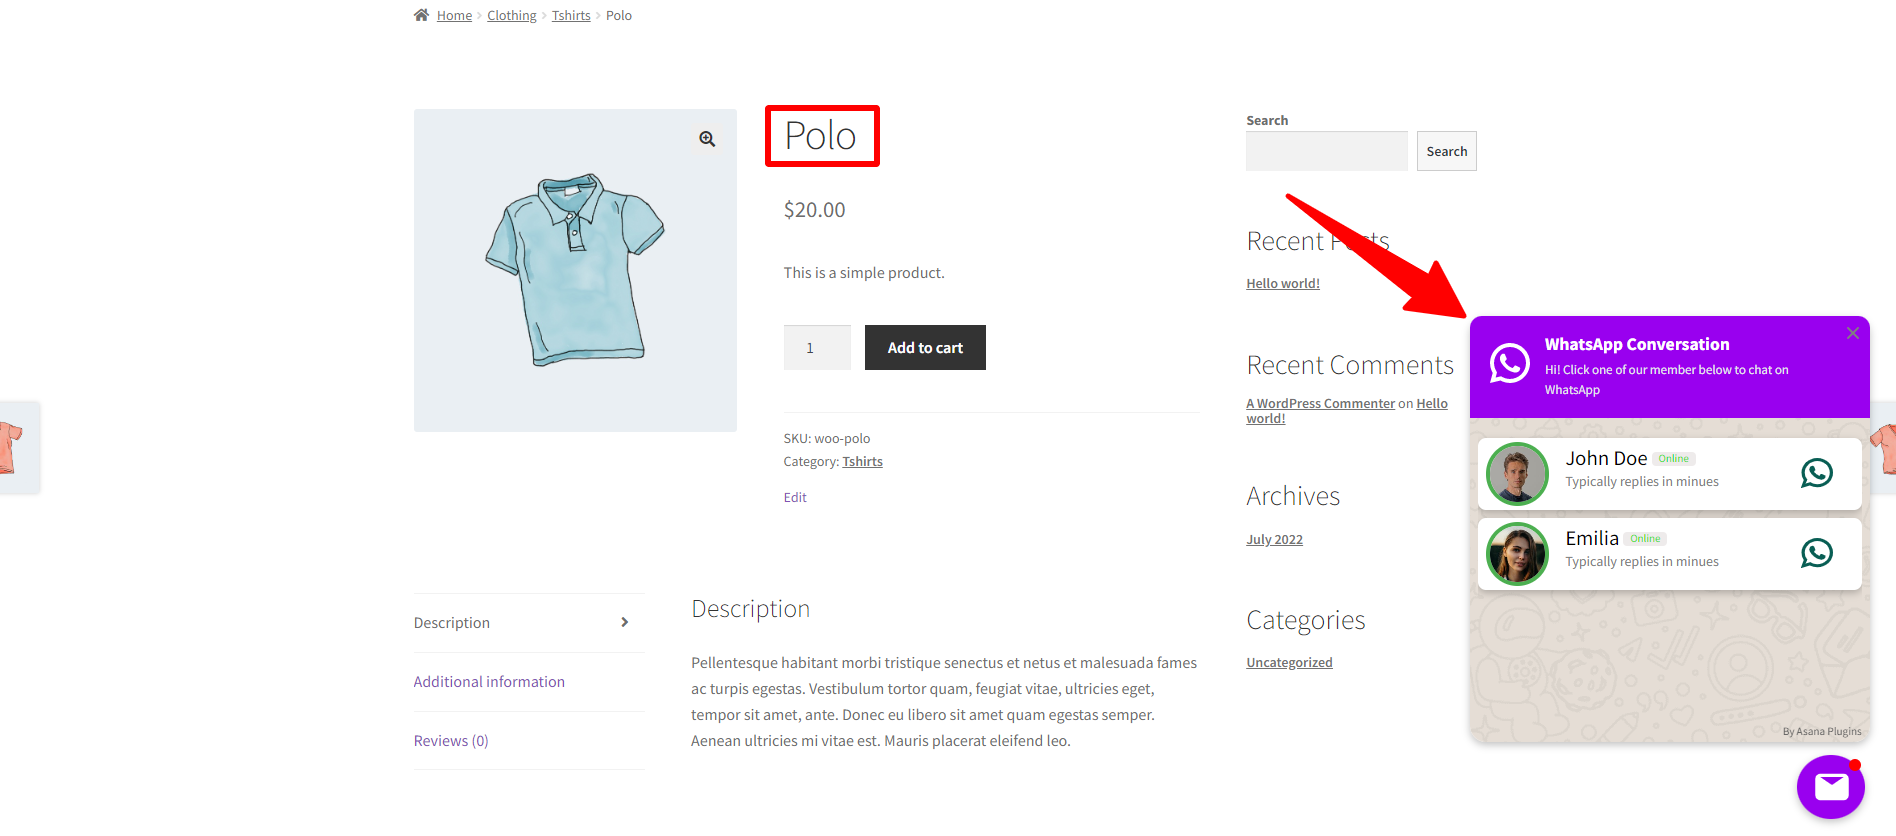
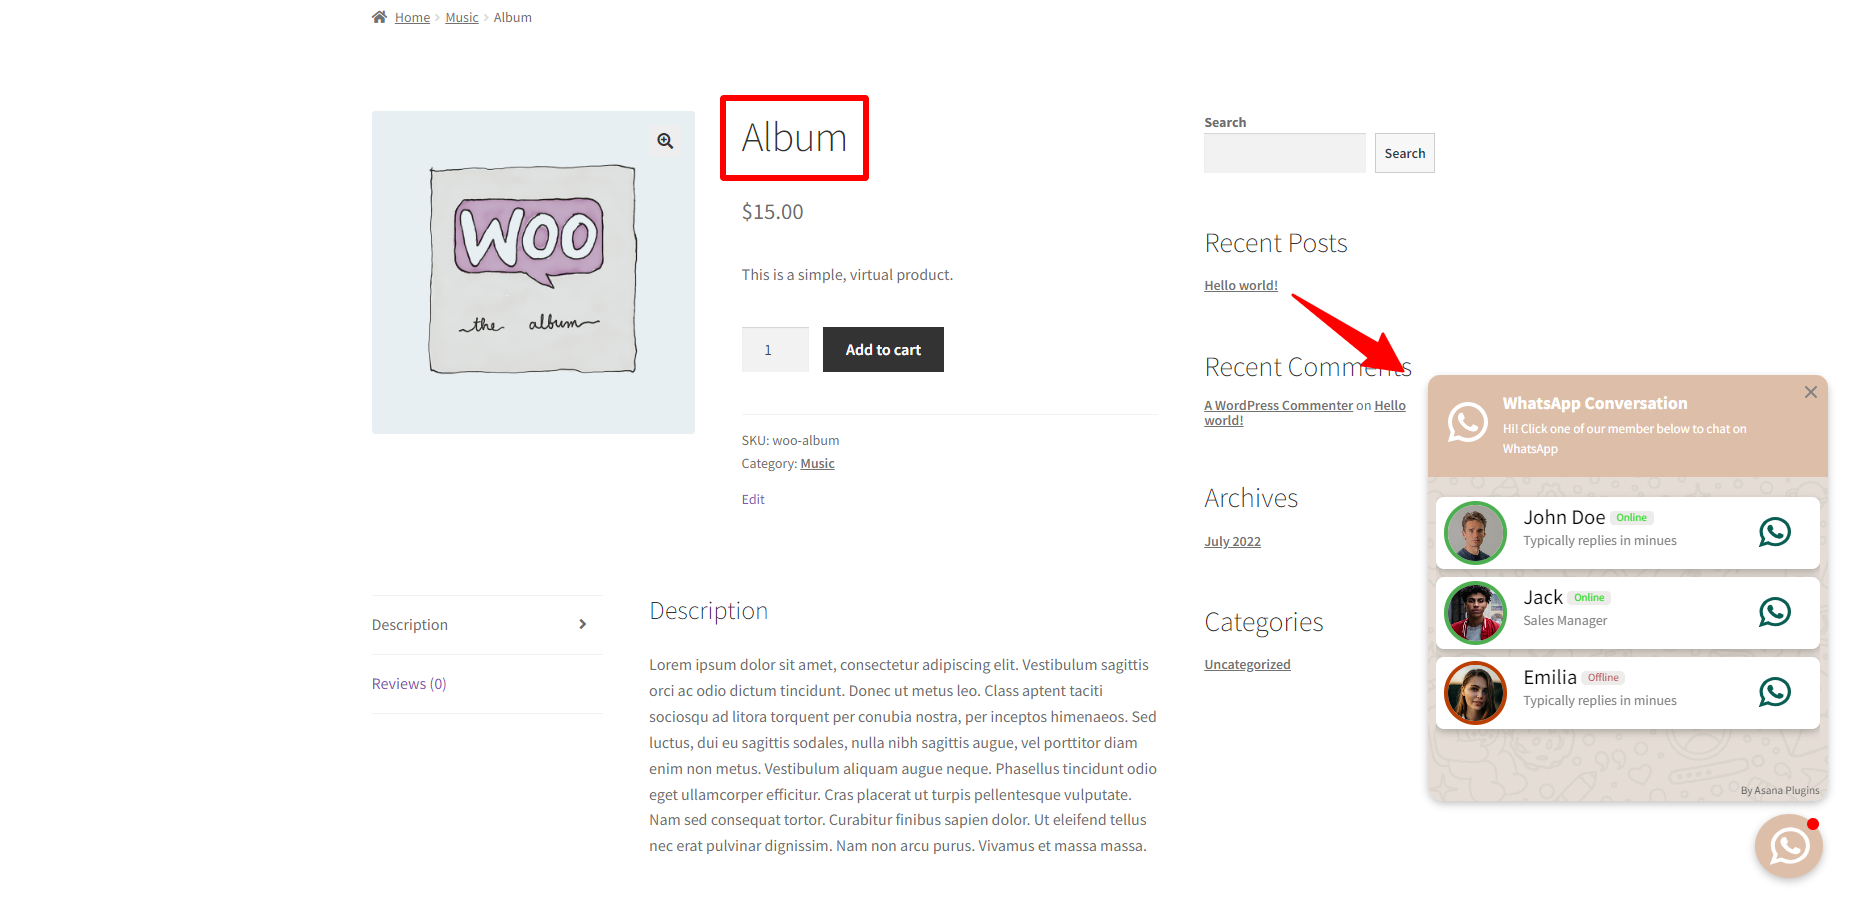
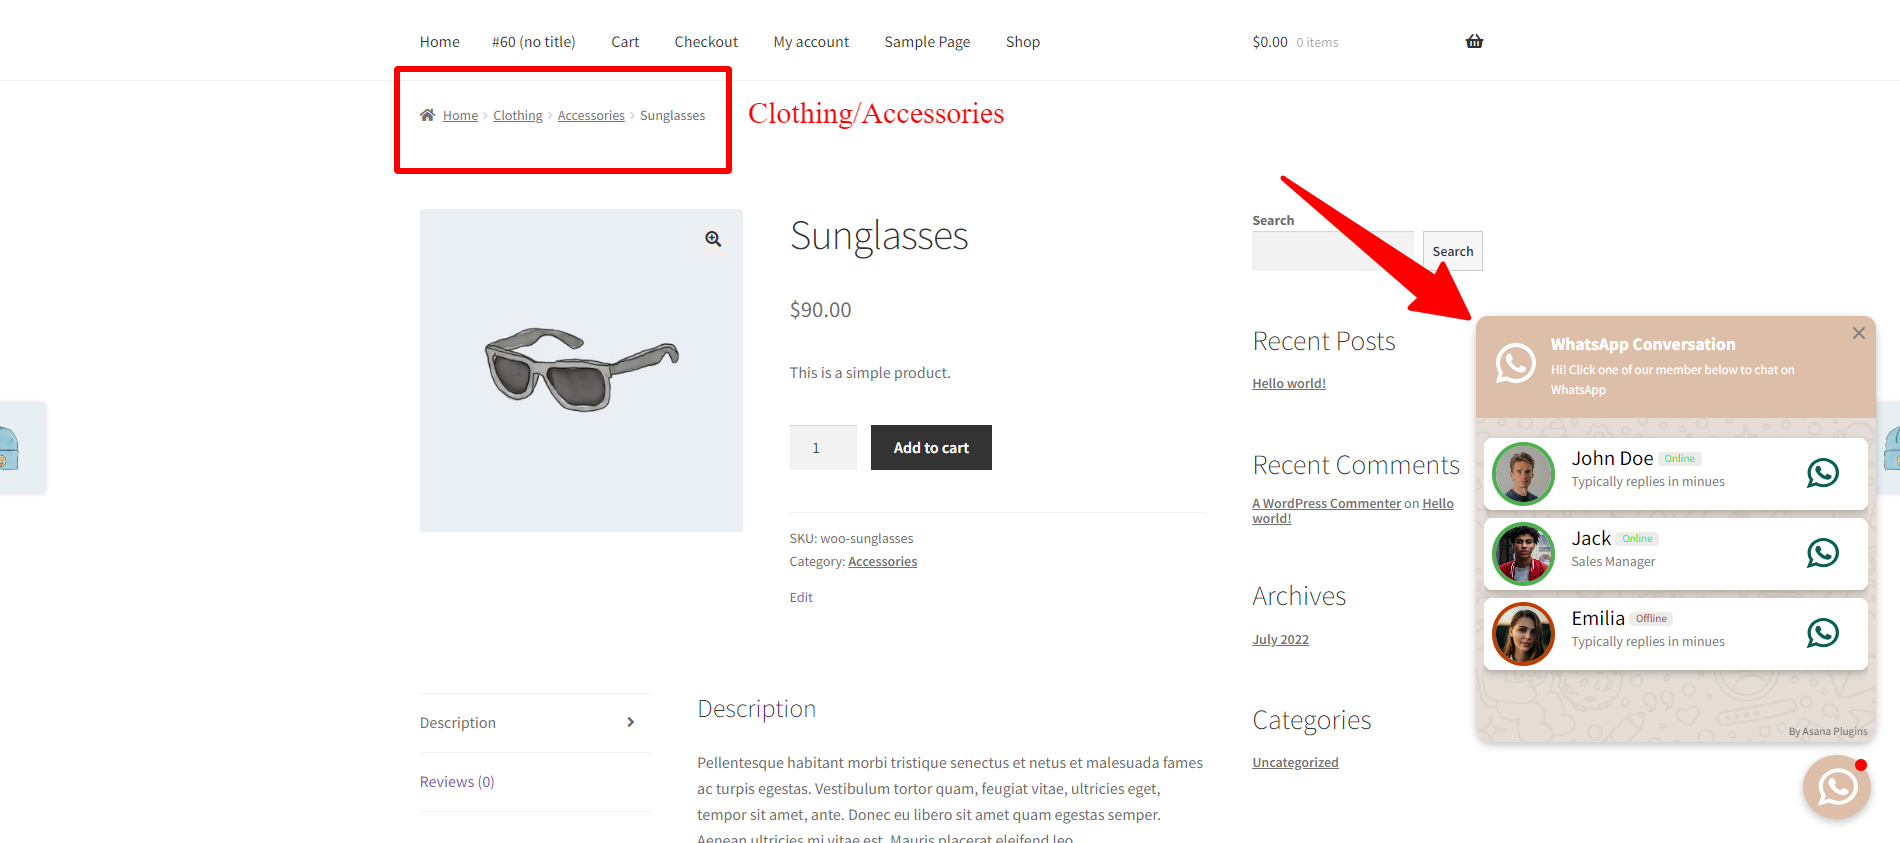
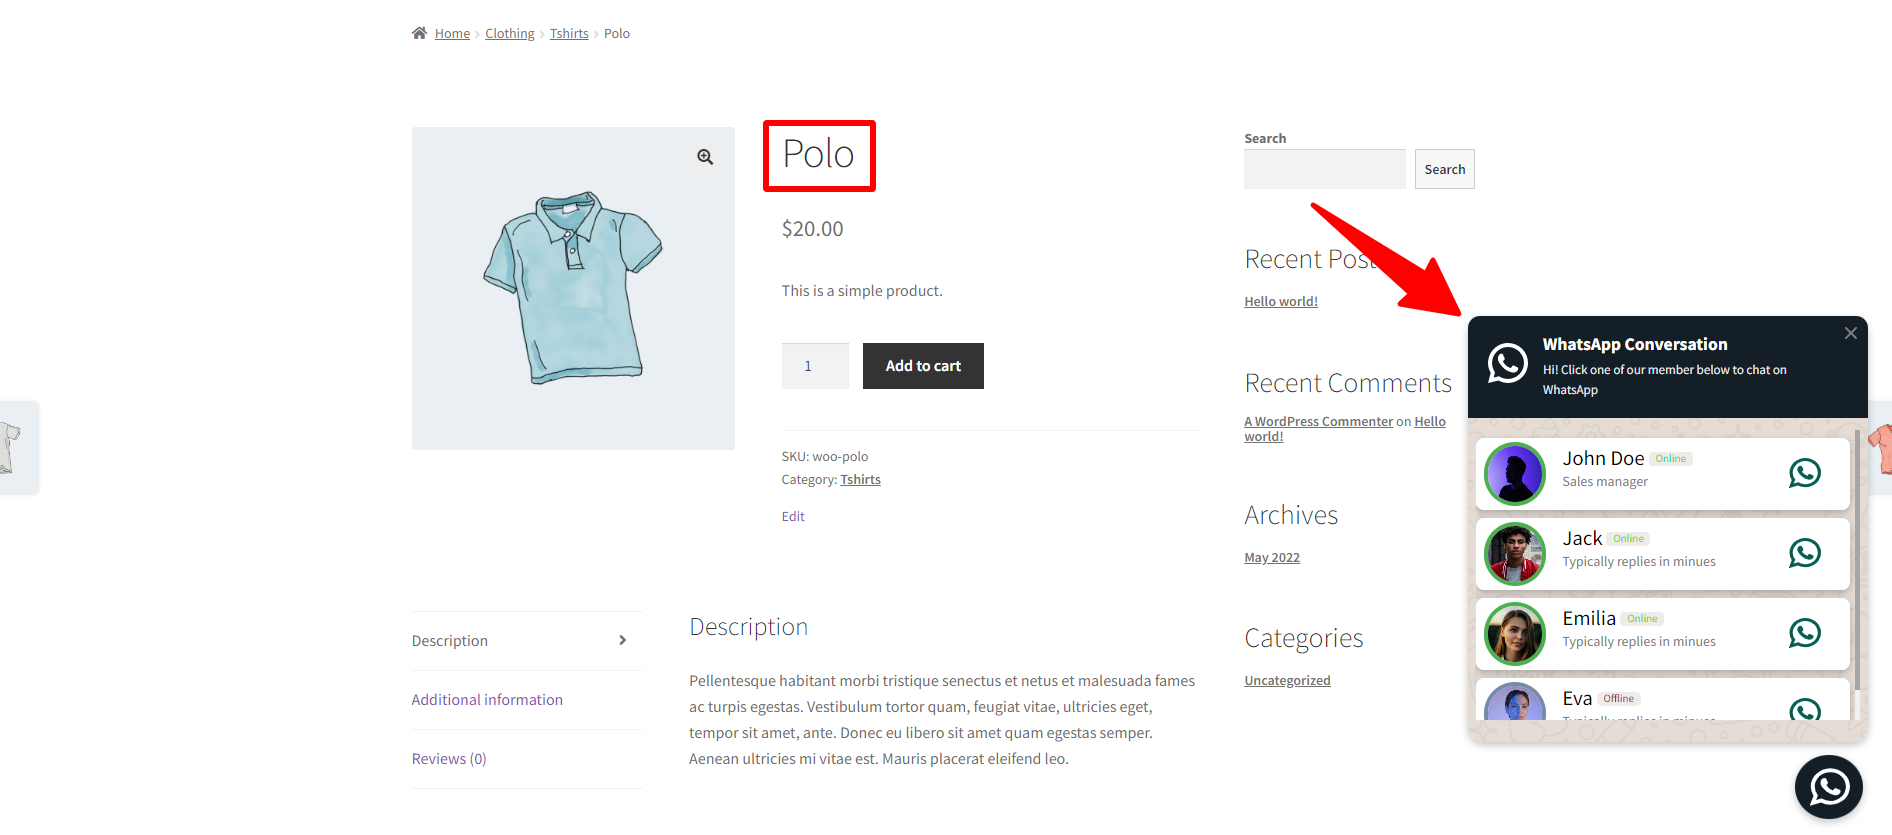
Navigate to the product page that you have added to WhatsApp to see the WhatsApp Chat Support Button on it like the below image.
WhatsApp Live Chat Button on Product
Add WhatsApp Live Chat Support to WooCommerce Categories
To add WhatsApp Live Chate Support to WooCommerce categories follow the below instructions.
First, create a WhatsApp Live Chat support as we explained in the tutorial.
Navigate to the Settings tab on the WhatsApp details page.
Open Display Settings
Open Pages
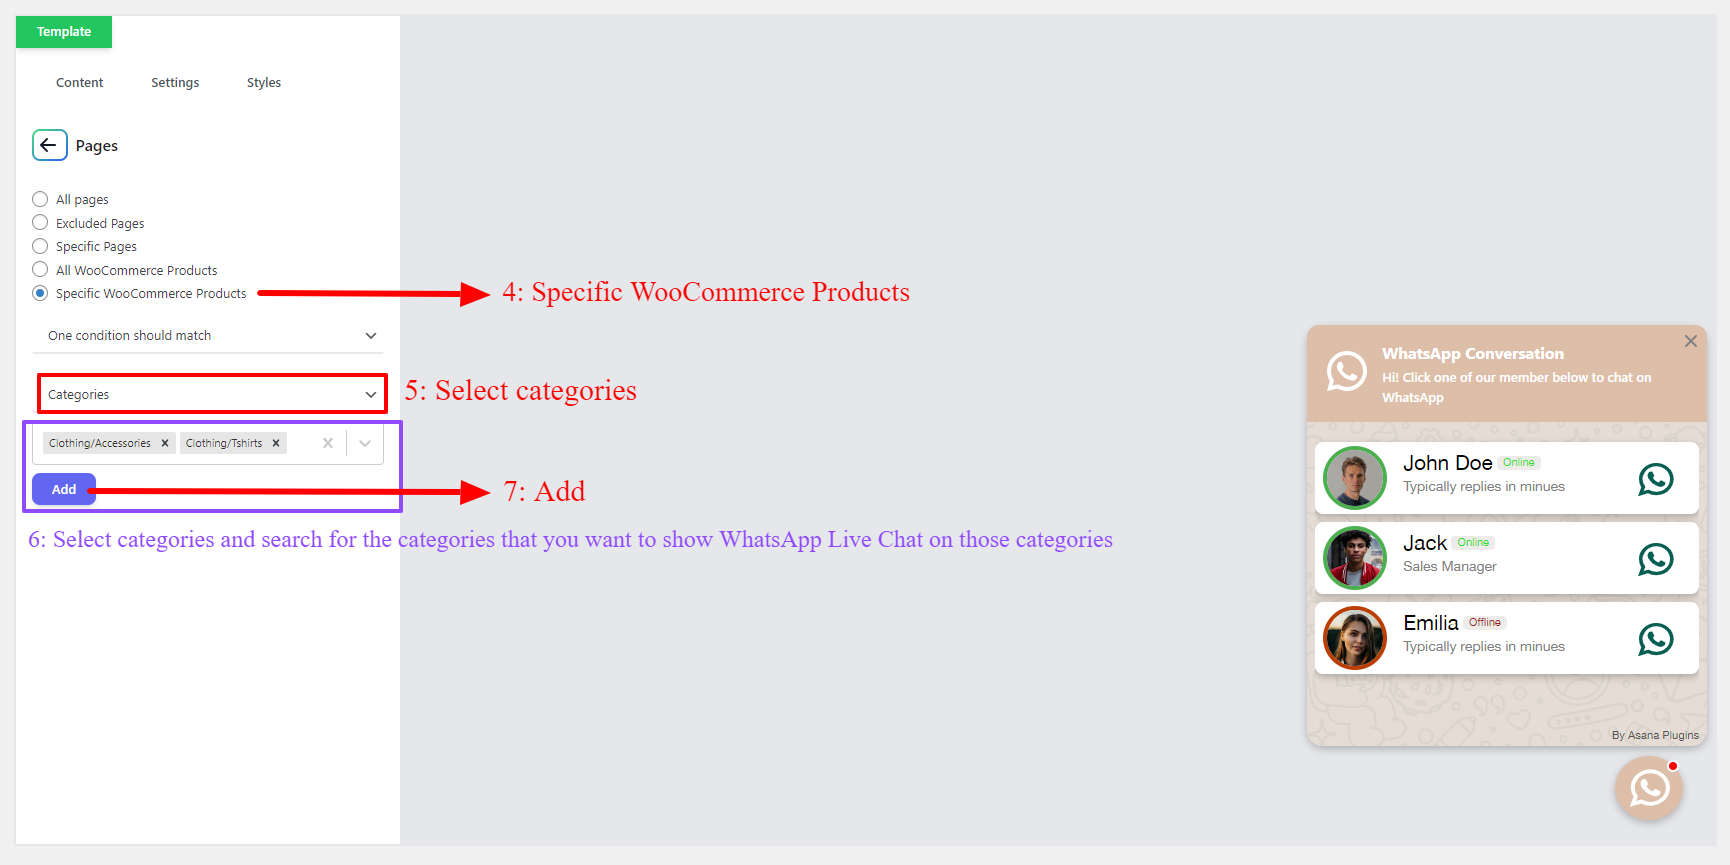
Select Specific WooCommerce Products: to add WhatsApp chat to specific products, categories or tags.
Settings tab
Display settings
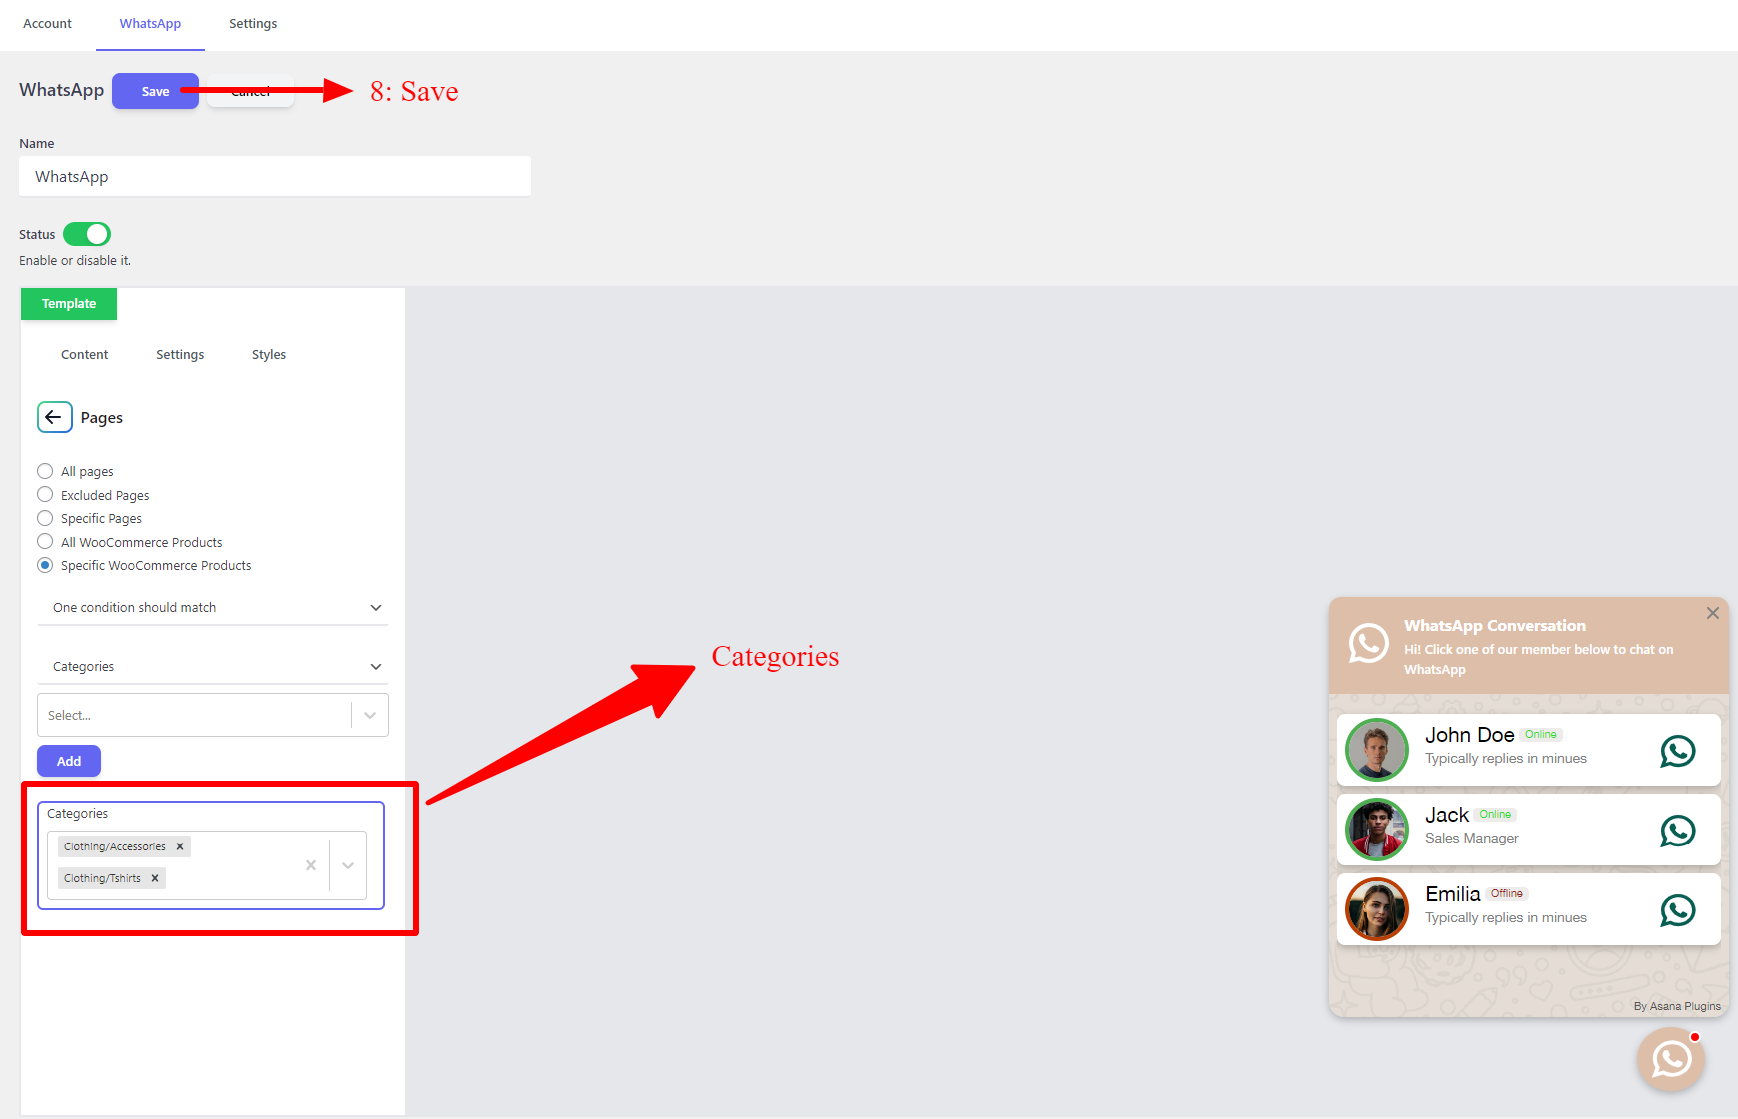
Select categories and search for the categories that you want to show WhatsApp Live Chat on those categories like the below image.
Select categories
Selected WooCommerce categories
Open a selected category product page to see the WhatsApp Live Chat support on its page like the below image.
Live Chat Button on WooCommerce categories
Add WhatsApp Live Chat Support to WooCommerce Tags
To add WhatsApp Live Chat Support to WooCommerce tags, follow the below instructions.
First, create a WhatsApp Live Chat support as we explained in the tutorial.
Navigate to the Settings tab on the WhatsApp details page.
Open Display Settings
Open Pages
Select Specific WooCommerce Products: to add WhatsApp chat to specific products, categories or tags.
Settings tab
Display Settings
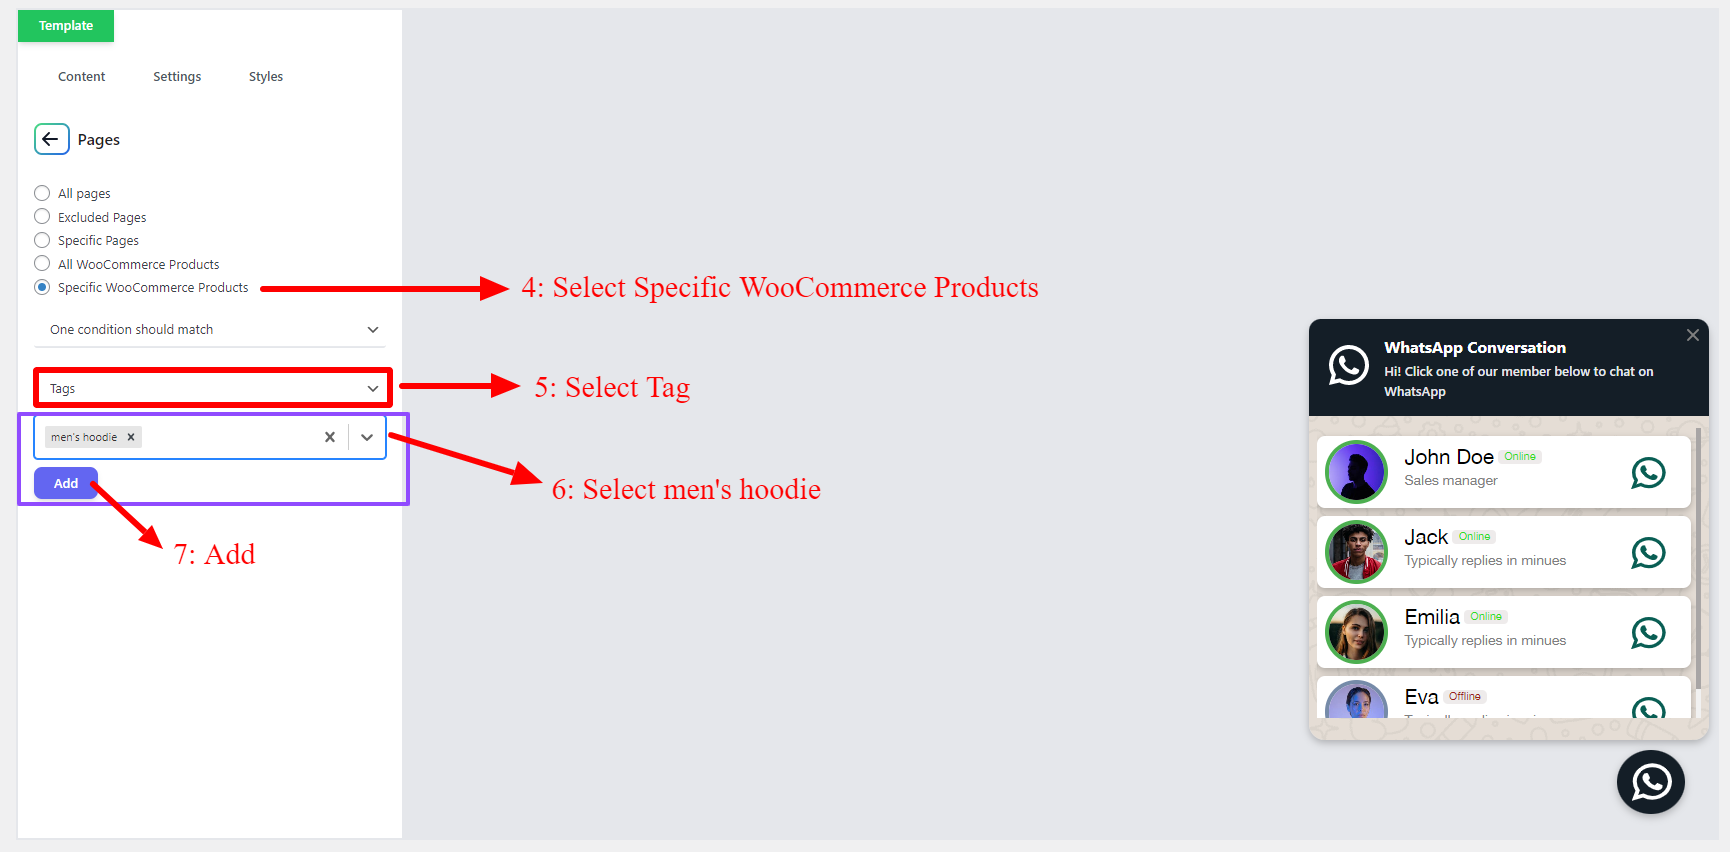
Select tags and search for the tags that you want to show WhatsApp Live Chat on those tags like the below image.
Select WooCommerce tags
Selected WooCommerce tags
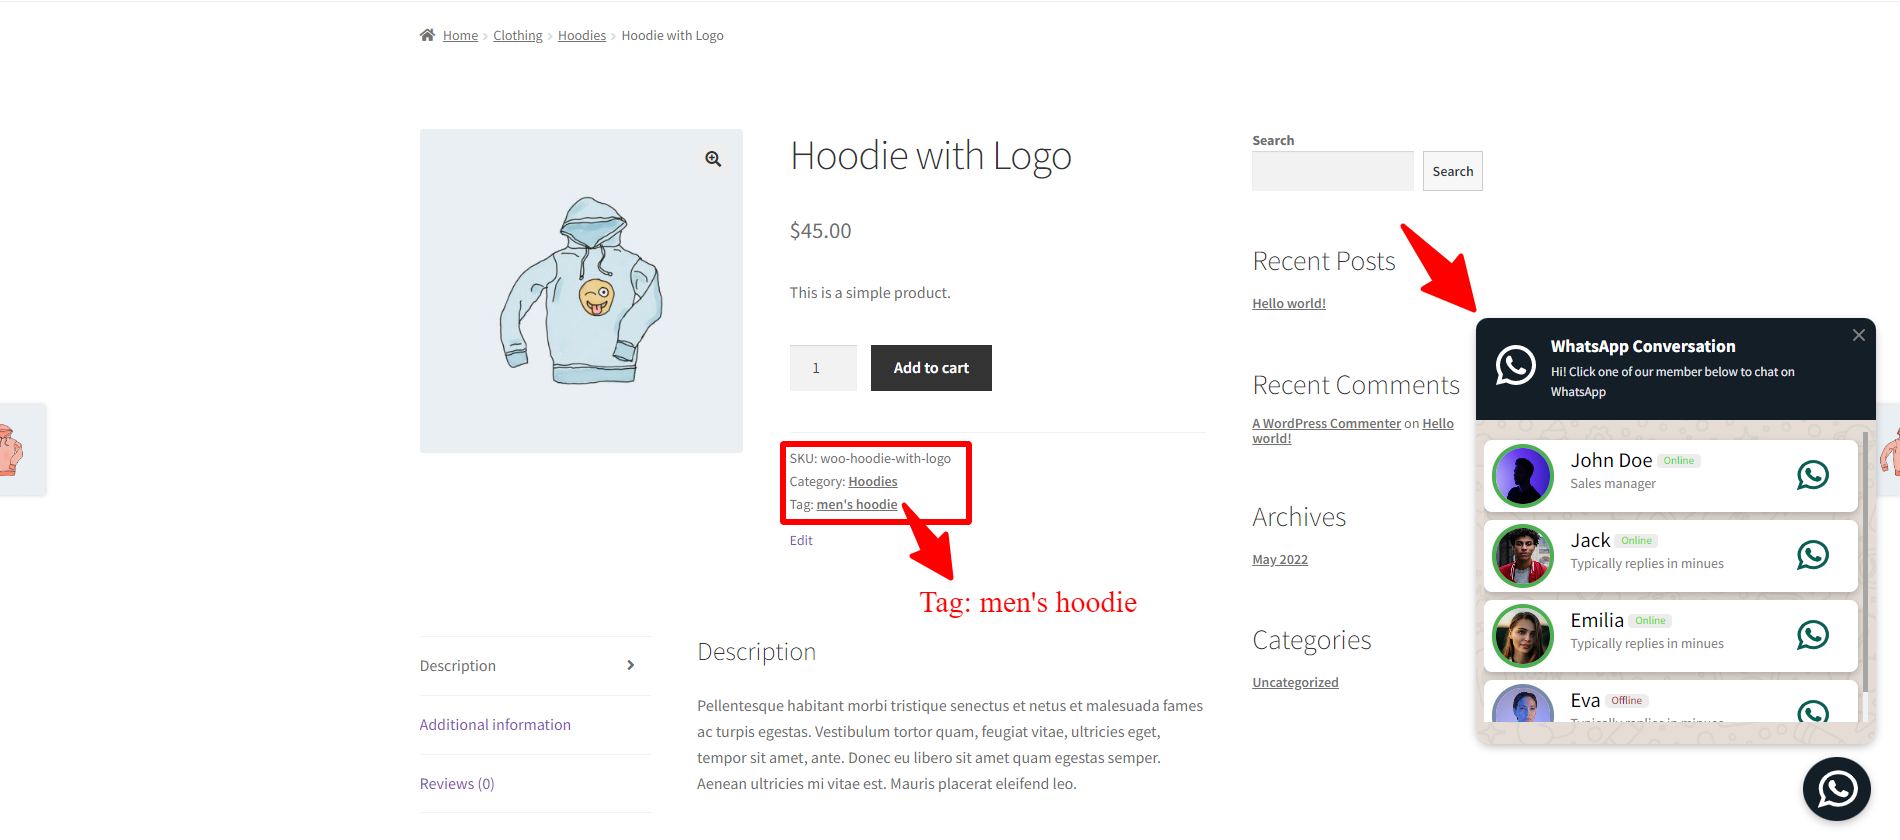
Open a selected tag product page to see the WhatsApp Live Chat support on its page like the below image.
Live Chat Button on WooCommerce tags
Live Chat Button for WooCommerce Products, Categories and Tags
You can add a WhatsApp Live Chat to a combination of products, categories, and tags. To do it follow the below instructions.
Navigate to the Settings tab on the WhatsApp details page.
Open Display Settings
Open Pages
Select Specific WooCommerce Products: to add WhatsApp chat to specific products, categories, or tags.
Select “One Condition Should Math” for the products condition like the below image.
Add a combination of products, categories, and tags like the below image.
Settings tab
Display settings
Selected products, categories and tags
Now if you open a selected product, a selected category product, or a selected tag product you will see the WhatsApp Chat Button on its page.
Live Chat Button on Product page
Add WhatsApp Chat Single Button to WooCommerce Products
Single Button WhatsApp Chat is just a Button and when a customer clicks on it, he will be redirected to WhatsApp to start a chat with you. You can add it to the WooCommerce products page after or before the Add to Cart button or one of the listed available positions in the plugin settings.
To create a Single Button WhatsApp Chat, follow the below instructions.
Navigate to the WhatsApp tab.
Click on the Add New button to add a new WhatsApp chat.
Set a name for WhatsApp.
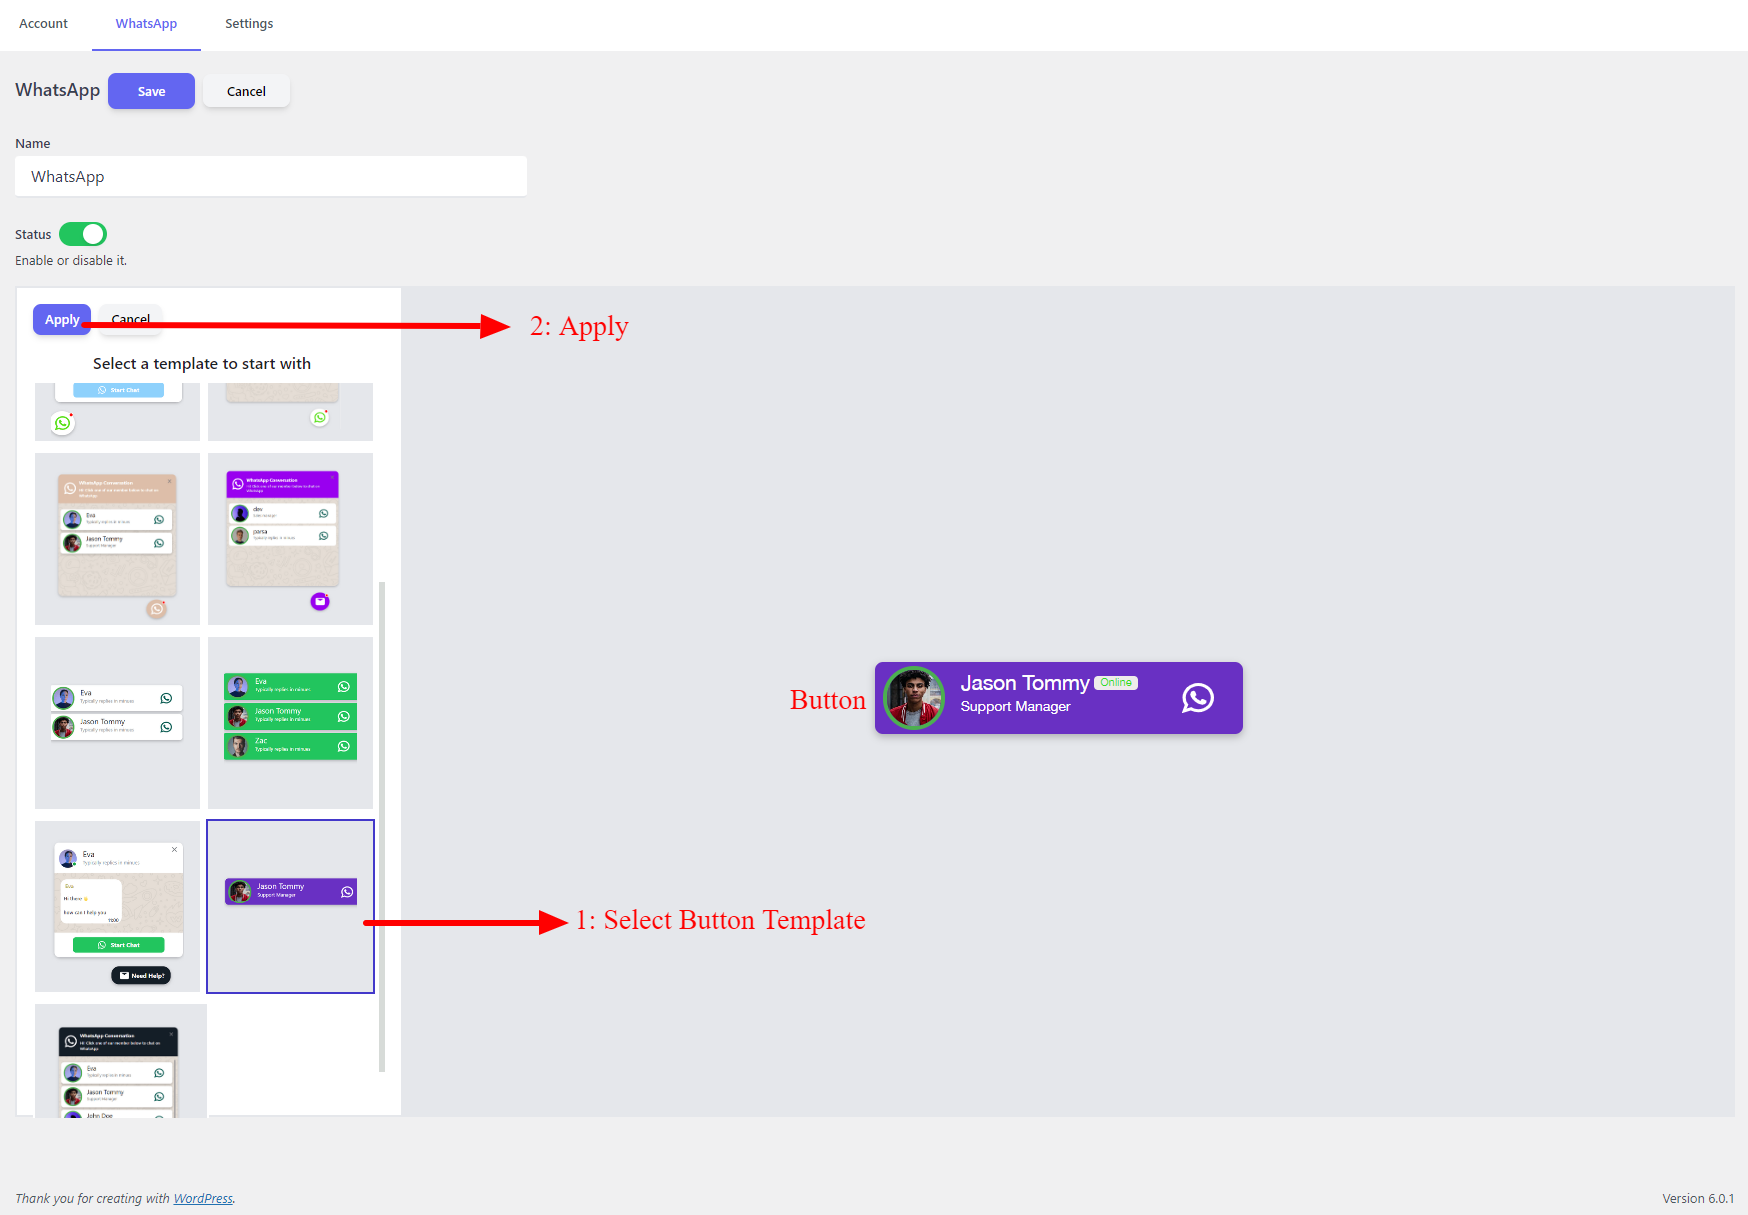
From the templates section, select a single button template like the below image.
You will see the selected single-button WhatsApp template on the right side.
Click on the Apply button to start using the selected template.
Add new WhatsApp
Select Single Button
Now, in the Accounts field search for the account that you would like to show in the Single Button WhatsApp. You have created the account in the Create Account section of the article.
After selecting an account in the Accounts field, you will see the preview of the account in the Single Button WhatsApp chat.
Add An Account
Select Products
Navigate to the Settings tab on the WhatsApp details page.
Open Display Settings
Open Pages
Select All WooCommerce Products to add a chat button to all of WooCommerce products
Select Specific WooCommerce Products: to add WhatsApp chat to specific products, categories, or tags.
Settings tab
Display Settings
If you want to show the WhatsApp chat button on specific products, select the Specific WooCommerce Products and add some products, categories, or tags as we explained in the previous sections.
Or select the All WooCommerce Products to add it to all of WooCommerce products.
All WooCommerce Products
Save the WhatsApp, and open one of the selected product pages to see the WhatsApp button on it.
Single Chat Button
If you don’t see the WhatsApp button on the product page, maybe your theme does not support the button position. To change the button position please read the Change Button Position section of the article.
Add WhatsApp Chat Multi Button to WooCommerce Products
Multi-button WhatsApp Chat helps you to add multiple chat buttons to WooCommerce products. If you have multiple agents like Support Manager, Sales Manager and etc, then multi-button is a great choice for you.
Follow the below instructions to create a multi-button WhatsApp Chat.
First, make sure that you have created accounts in the accounts tab. It is explained in the Create Account section of the article.
Navigate to the WhatsApp tab and click on the Add New button to create a WhatsApp.
Set a name for WhatsApp
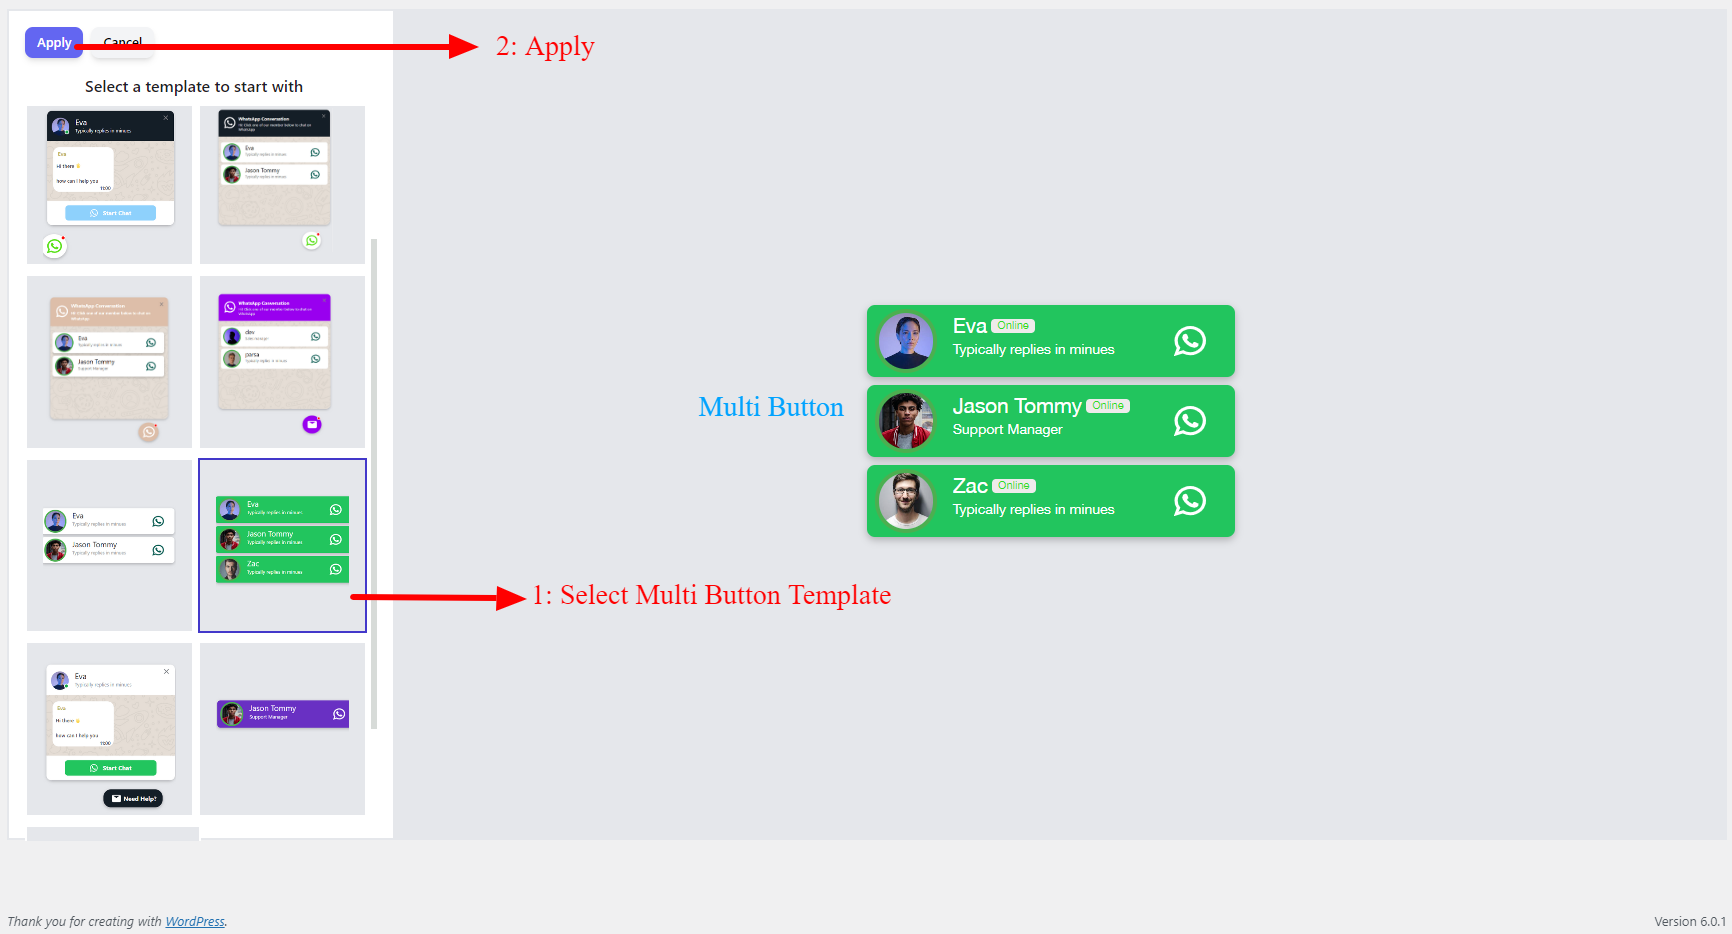
From the templates section, select a multi-button template like the below image.
You will see the selected multi-button WhatsApp template on the right side.
Click on the Apply button to start using the selected template.
Accounts
Add new WhatsApp
Multi Button Template
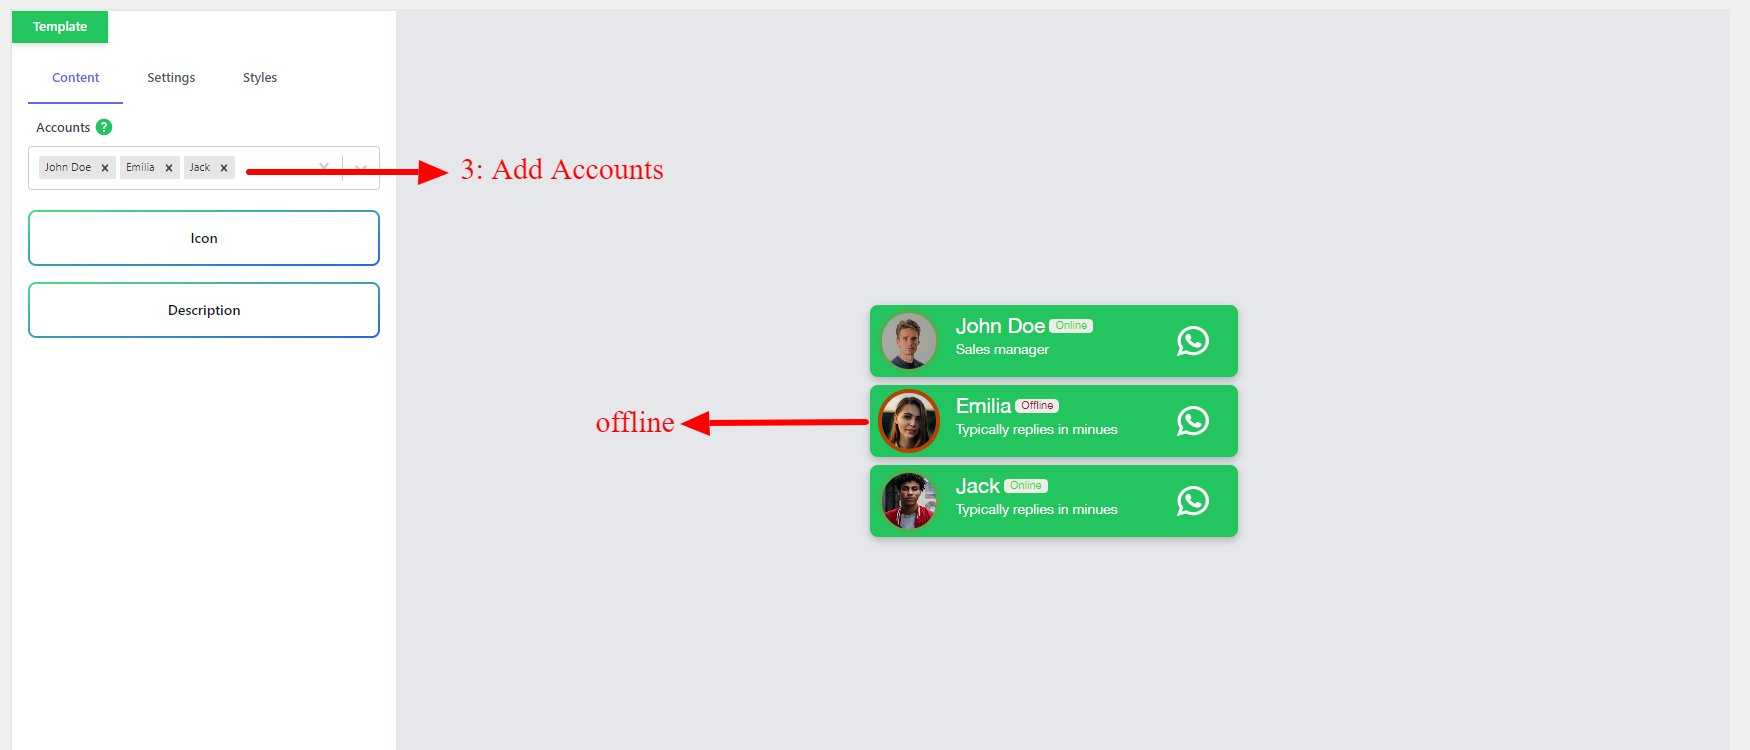
Now you should add some accounts to the Accounts field. Search for the accounts and select them.
After selecting accounts in the Accounts field, you will seeapreview of the accounts as WhatsApp buttons like the below image.
Multi Button accounts
Select Products
Navigate to the Settings tab on the WhatsApp details page.
Open Display Settings
Open Pages
Select All WooCommerce Products to add the chat button to all of WooCommerce products
Select Specific WooCommerce Products: to add WhatsApp chat to specific products, categories, or tags.
Settings tab
Display Settings
If you want to show the WhatsApp chat button on specific products, select the Specific WooCommerce Products and add some products, categories, or tags as we explained in the previous sections.
Or select the All WooCommerce Products to add it to all of WooCommerce products.
Pages settings
Select a product
Selected product
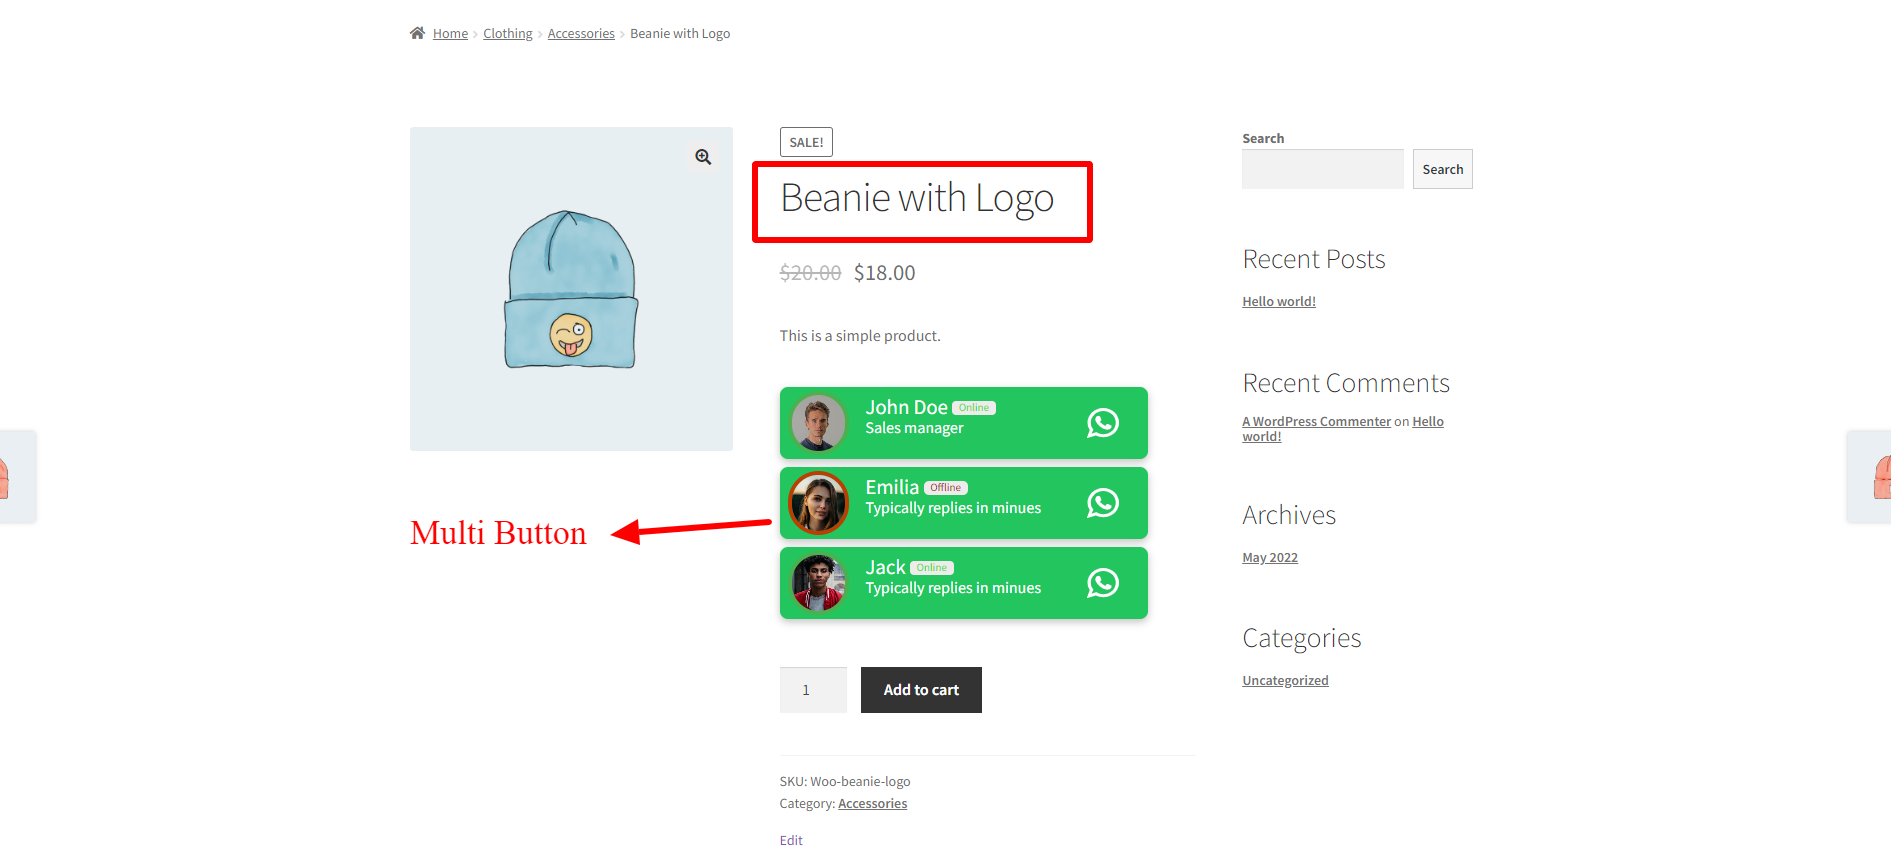
Save the WhatsApp, and open one of the selected product pages to see the WhatsApp button on it.
Multi Chat Button in product page
If you don’t see the WhatsApp button on the product page, maybe your theme does not support the button position. To change the button position please read the Change Button Position section of the article.
Change Button Position
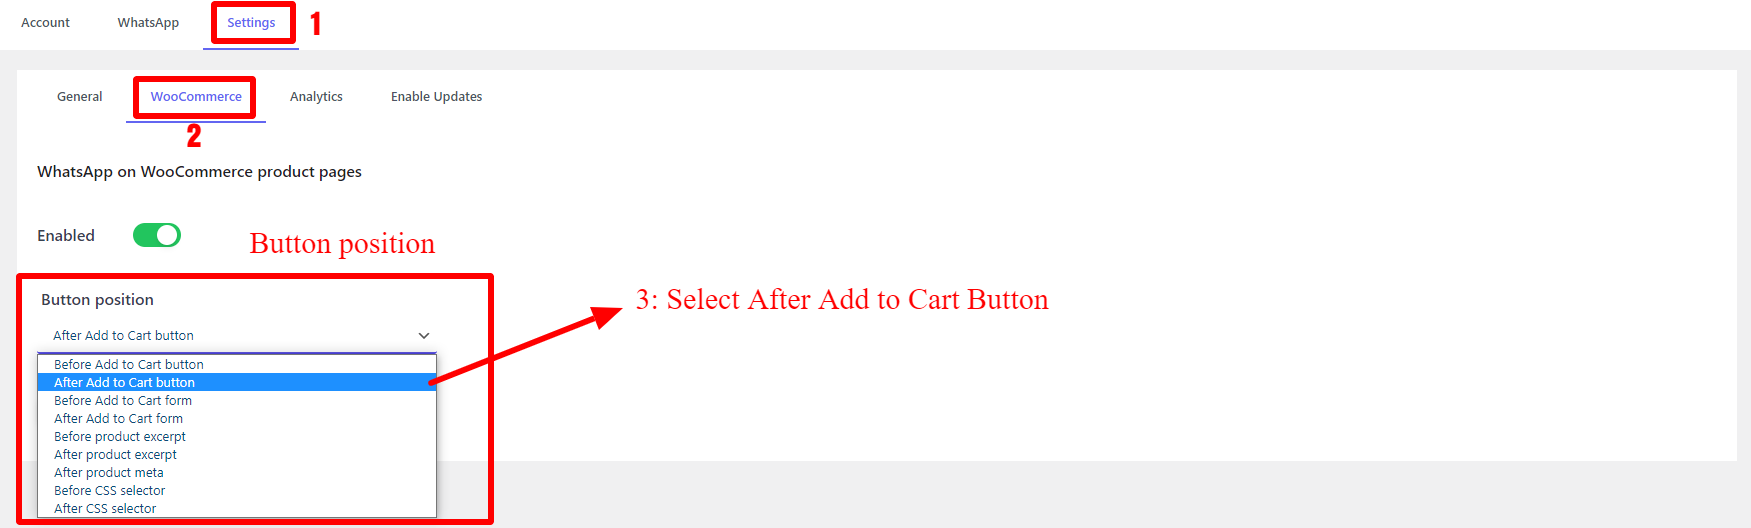
To change the button position on the products page follow the below steps.
Navigate to the plugin Settings tab
Open WooCommerce tab
Select one of the listed positions
Available positions for WhatsApp Chat Button in WooCommerce Are:
Before add to cart button
After add to cart button
Before add to cart form
After add to cart form
Before product excerpt
After product excerpt
After product meta
Before CSS selector
After CSS selector
WooCommerce settings
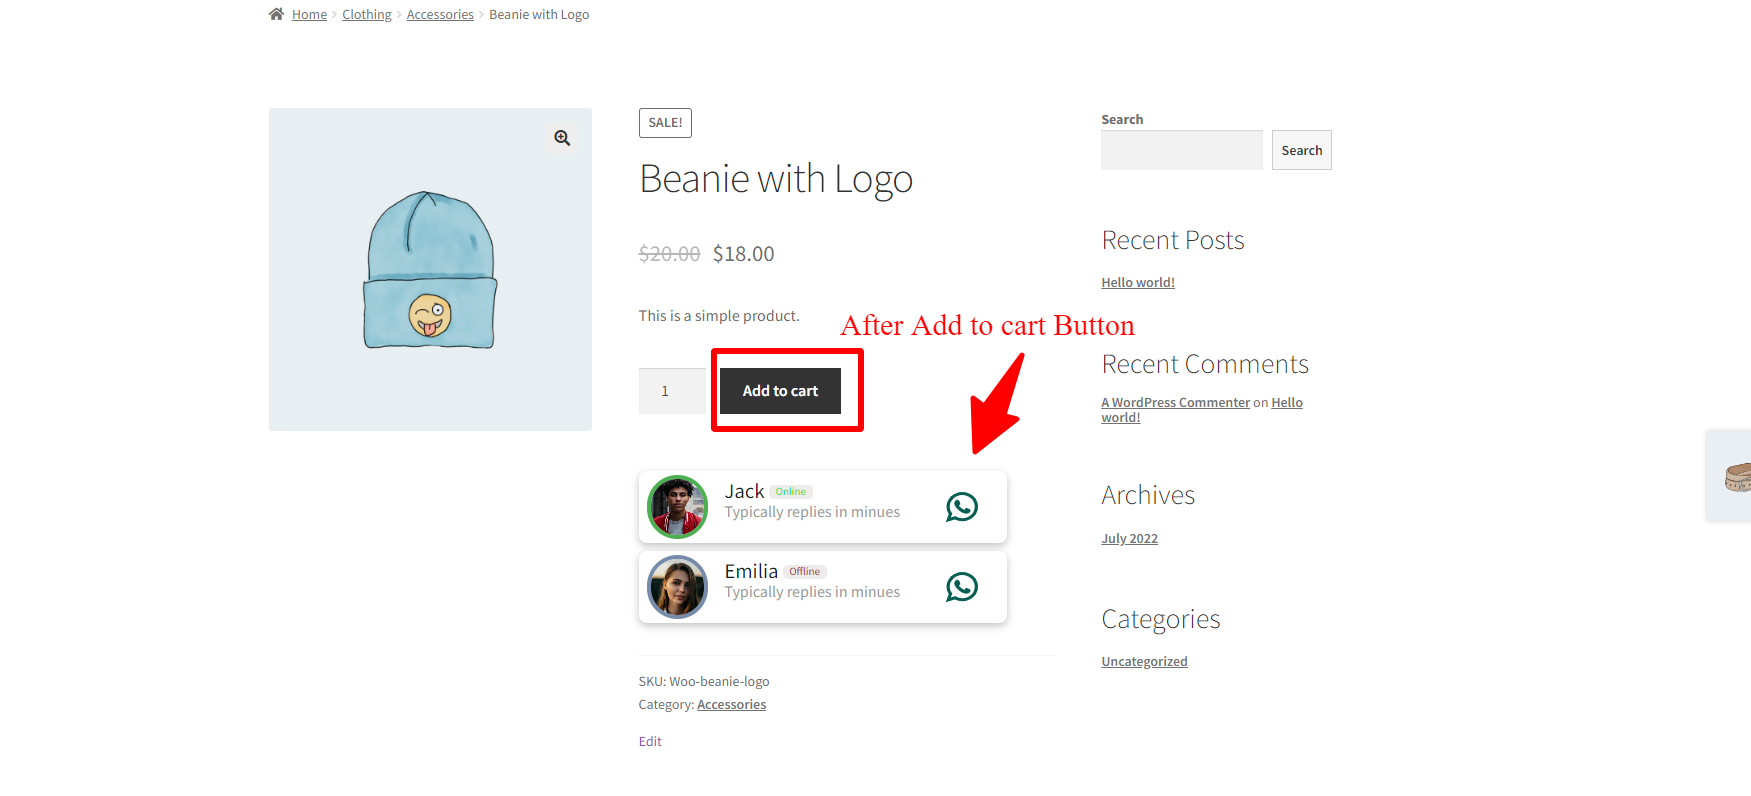
If your theme supports the selected position then you will see the WhatsApp chat button on the products page like the below image.
After add to cart button
Use CSS Selector
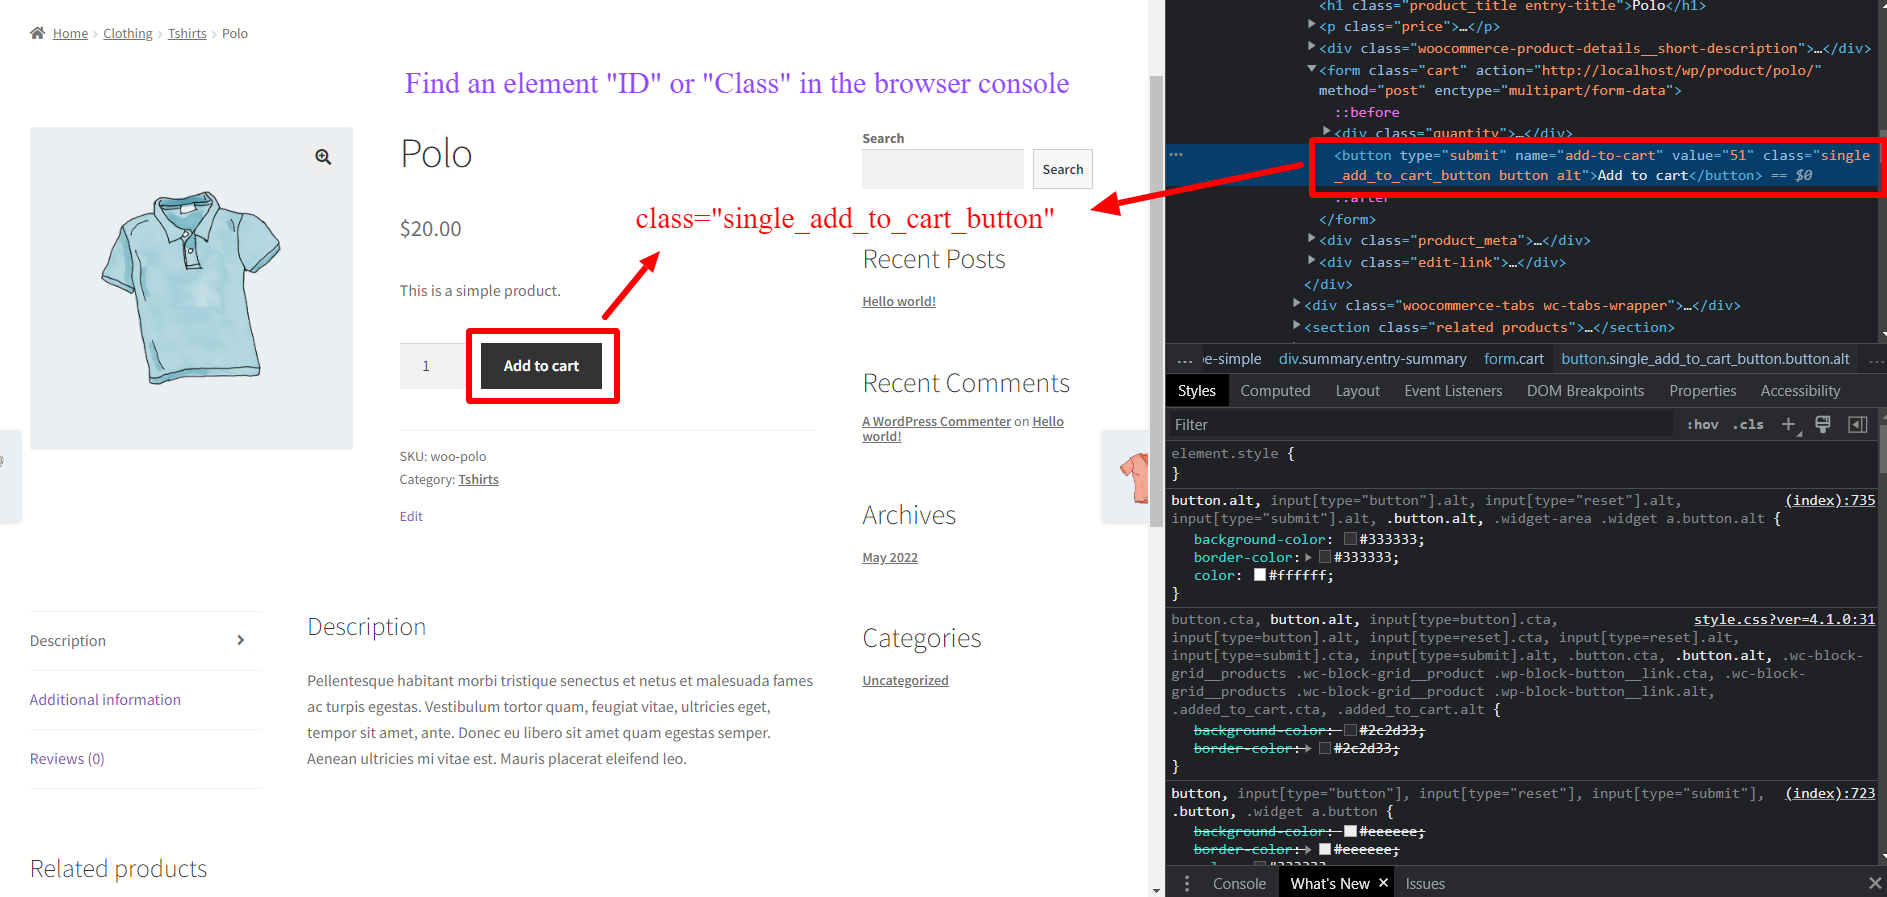
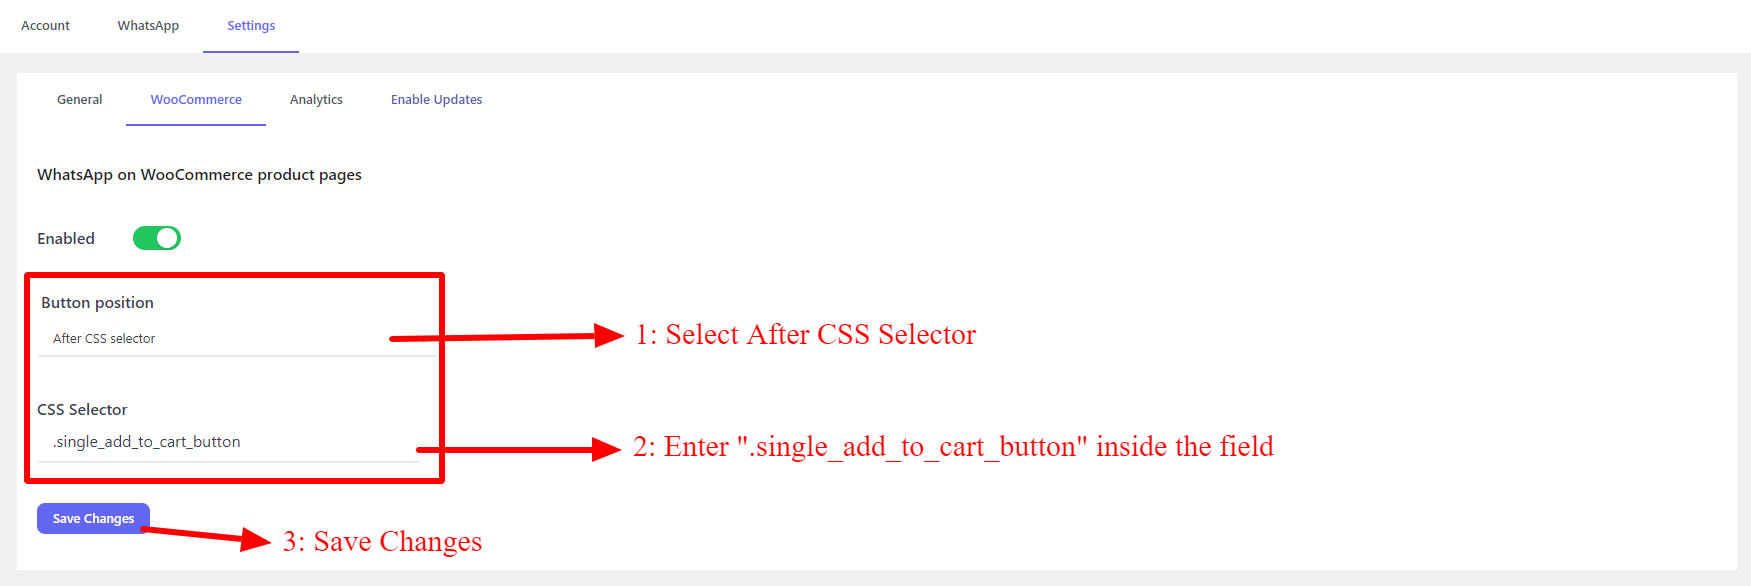
If your theme does not support any of the positions, then you can use the “Before CSS selector” or “After CSS selector” options.
Find an element “ID” or “Class” in the browser console like the below image.
Enter a CSS selector in the CSS Selector field to select that element.
If you want to select an element with an id=”cart” then enter “#cart” inside the field.
If you want to select an element with a class=”add-to-cart” then enter “.add-to-cart” inside the field.
Save settings
Find an element class or id
Set before or after CSS selector
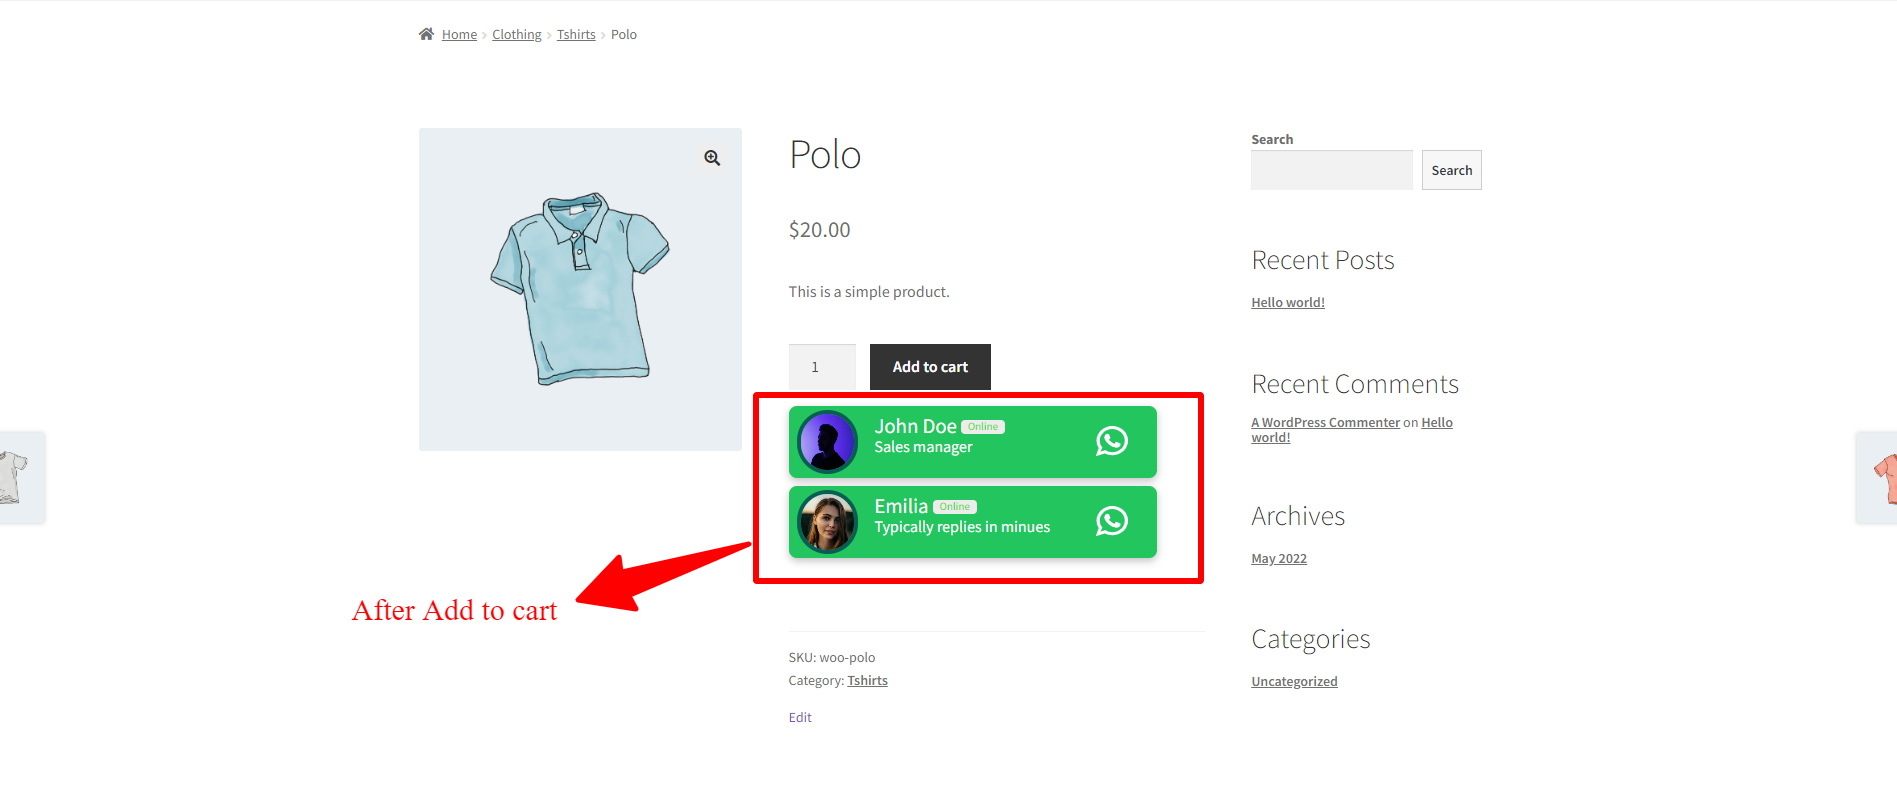
If you enter a valid CSS selector to select a specific element then you will see the WhatsApp Chat Button before or after that element on your website.
Added after Add to Cart button
Change Colors
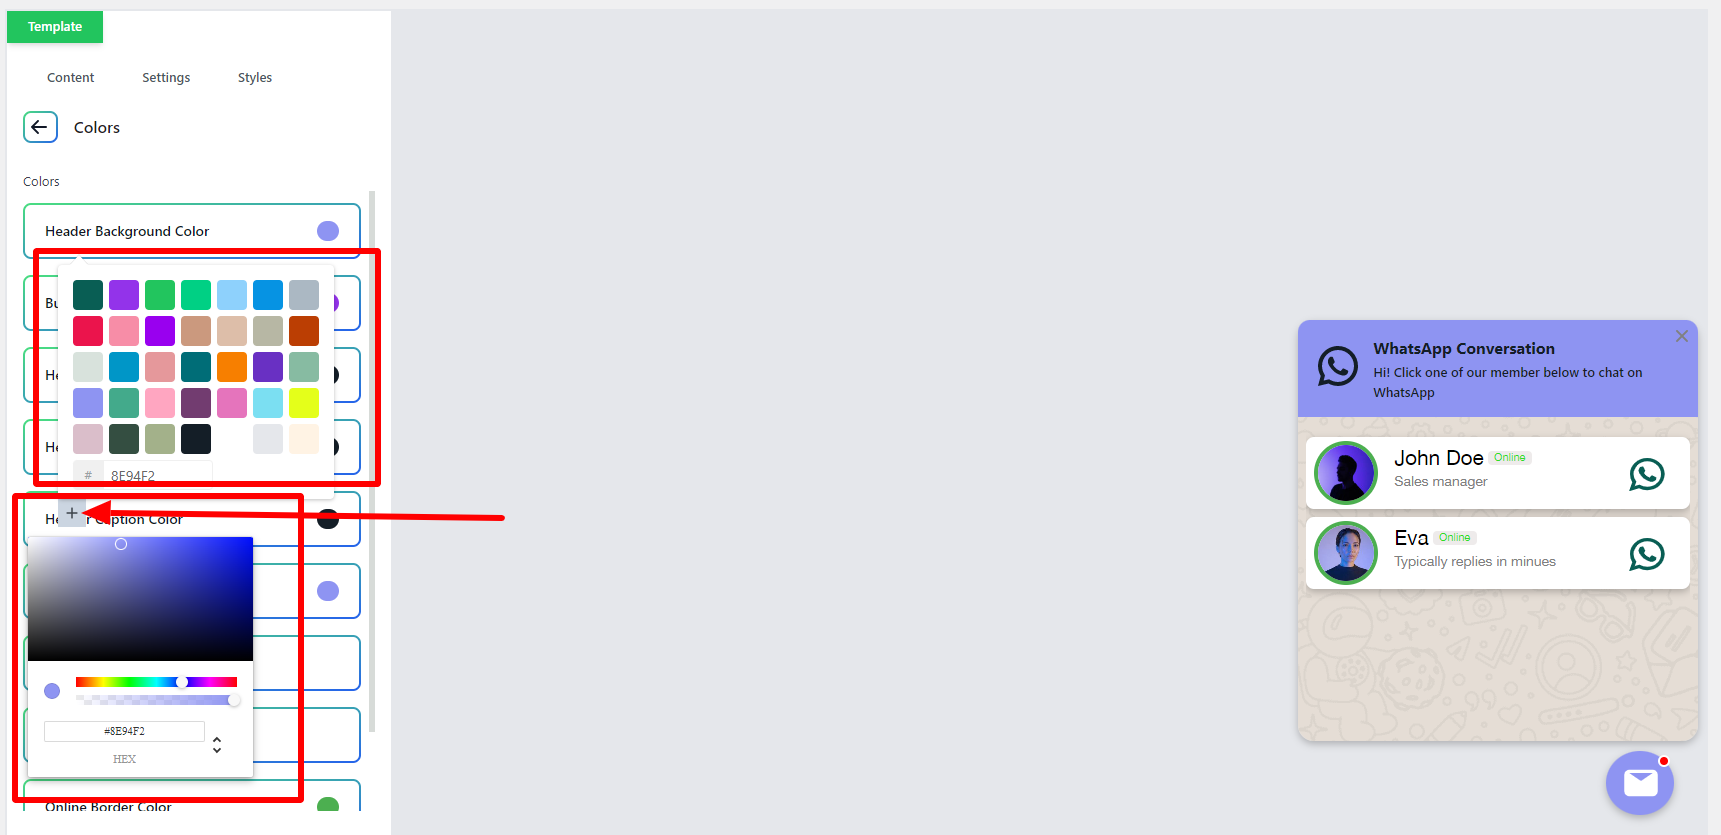
After selecting the template, if you are not satisfied with the color of the chat menu, you can change it and choose your favorite colors
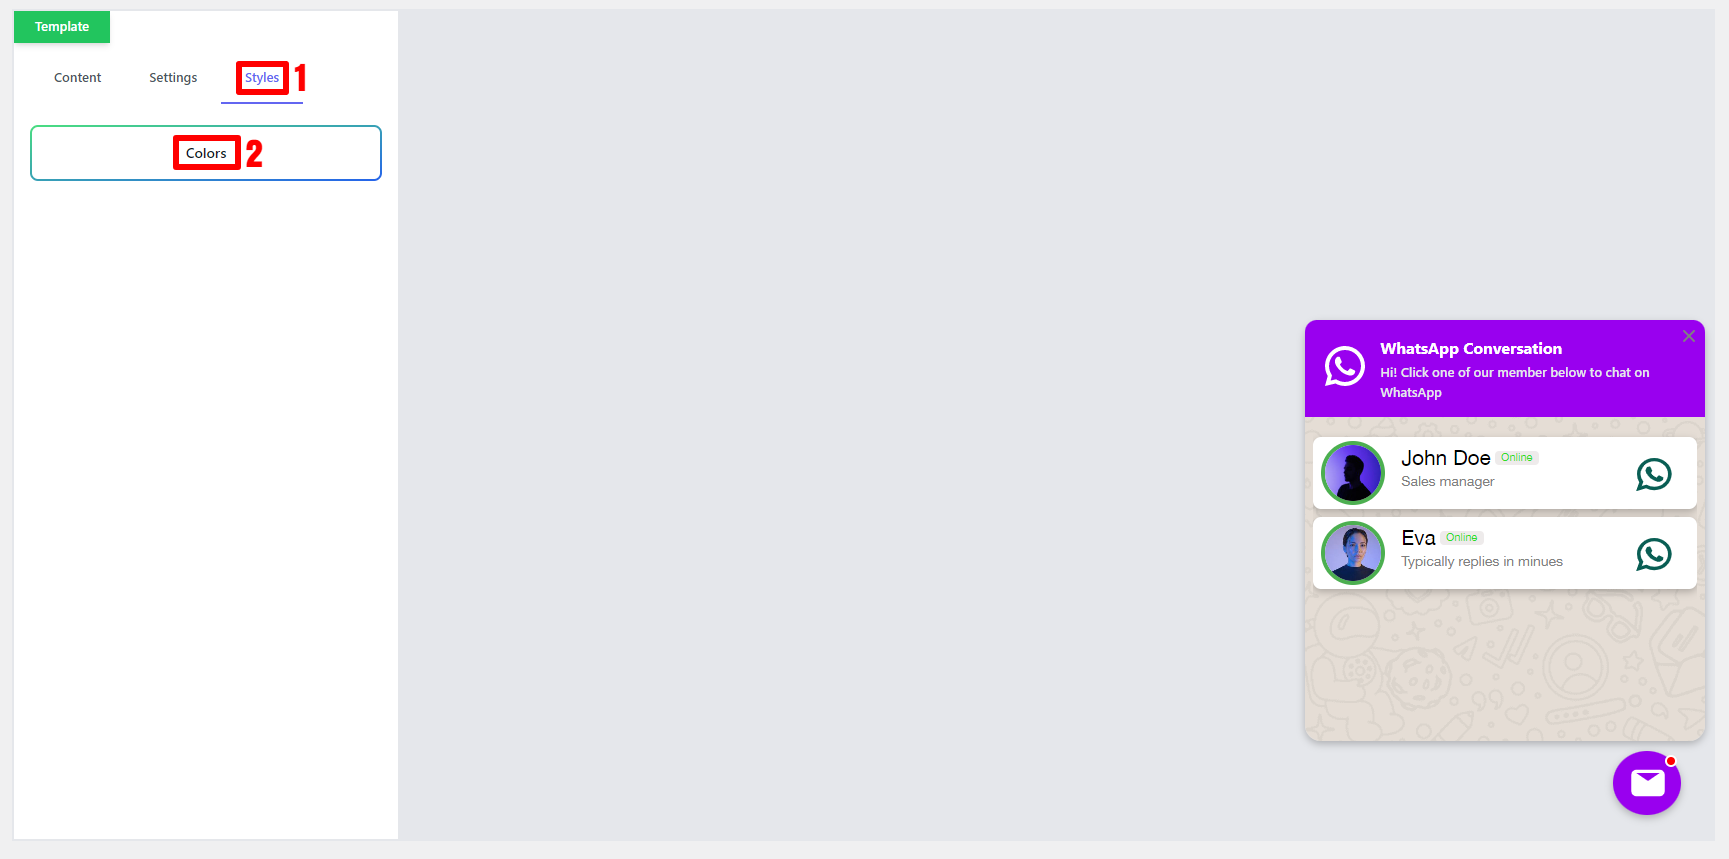
To change colors, follow the below instructions.
Open the WhatsApp that you would like to change its colors.
Navigate to the Styles tab on the WhatsApp details page.
Open the Colors section.
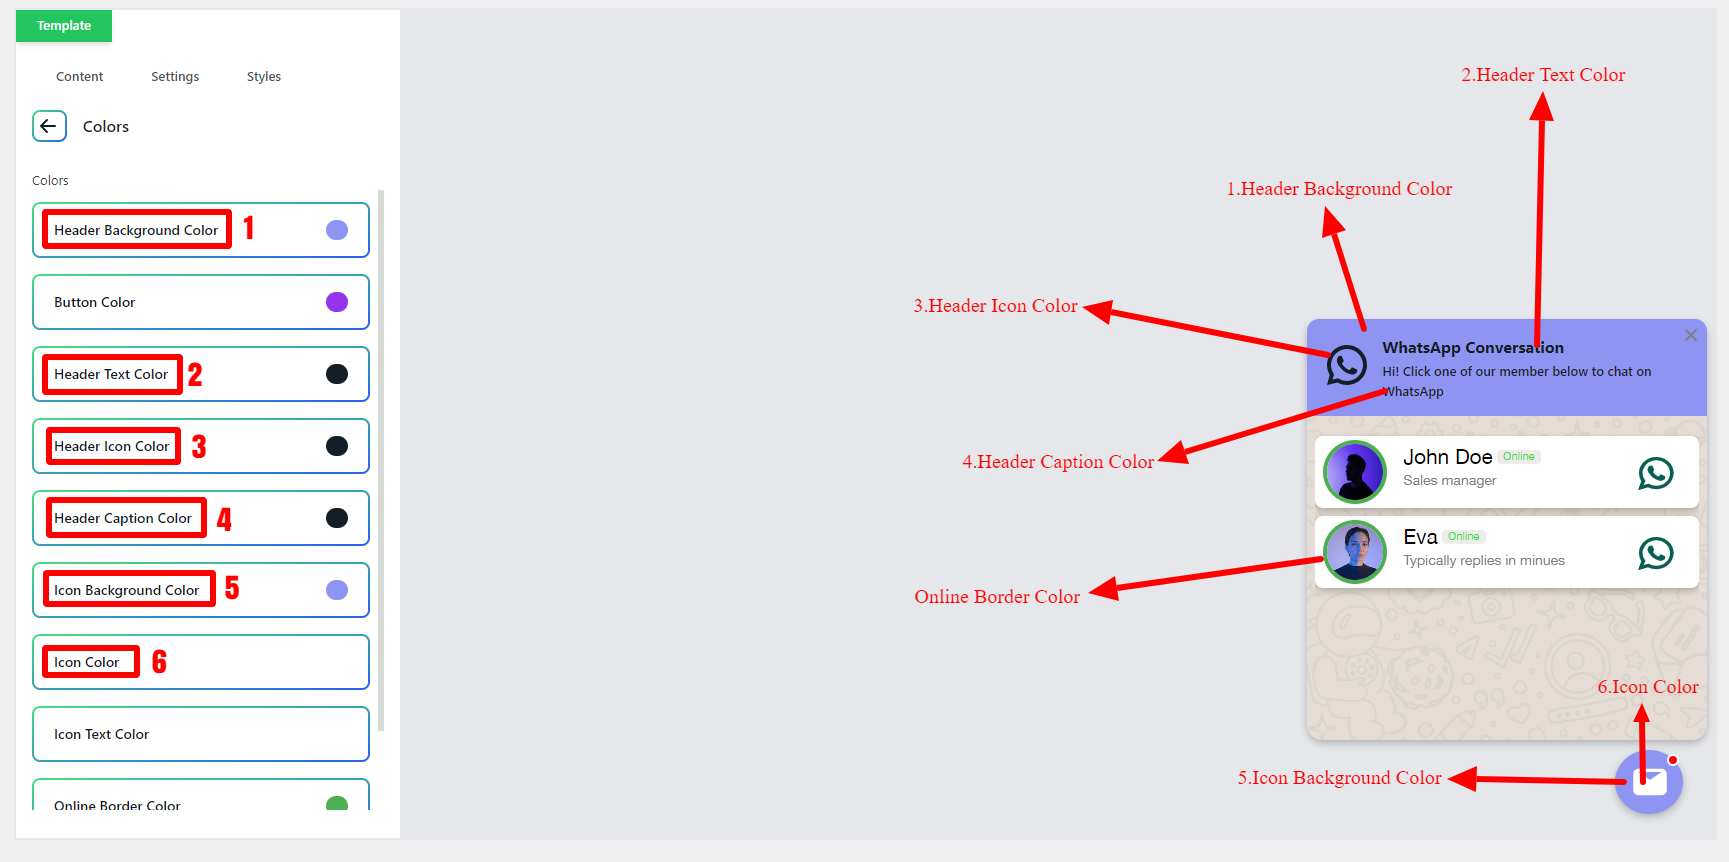
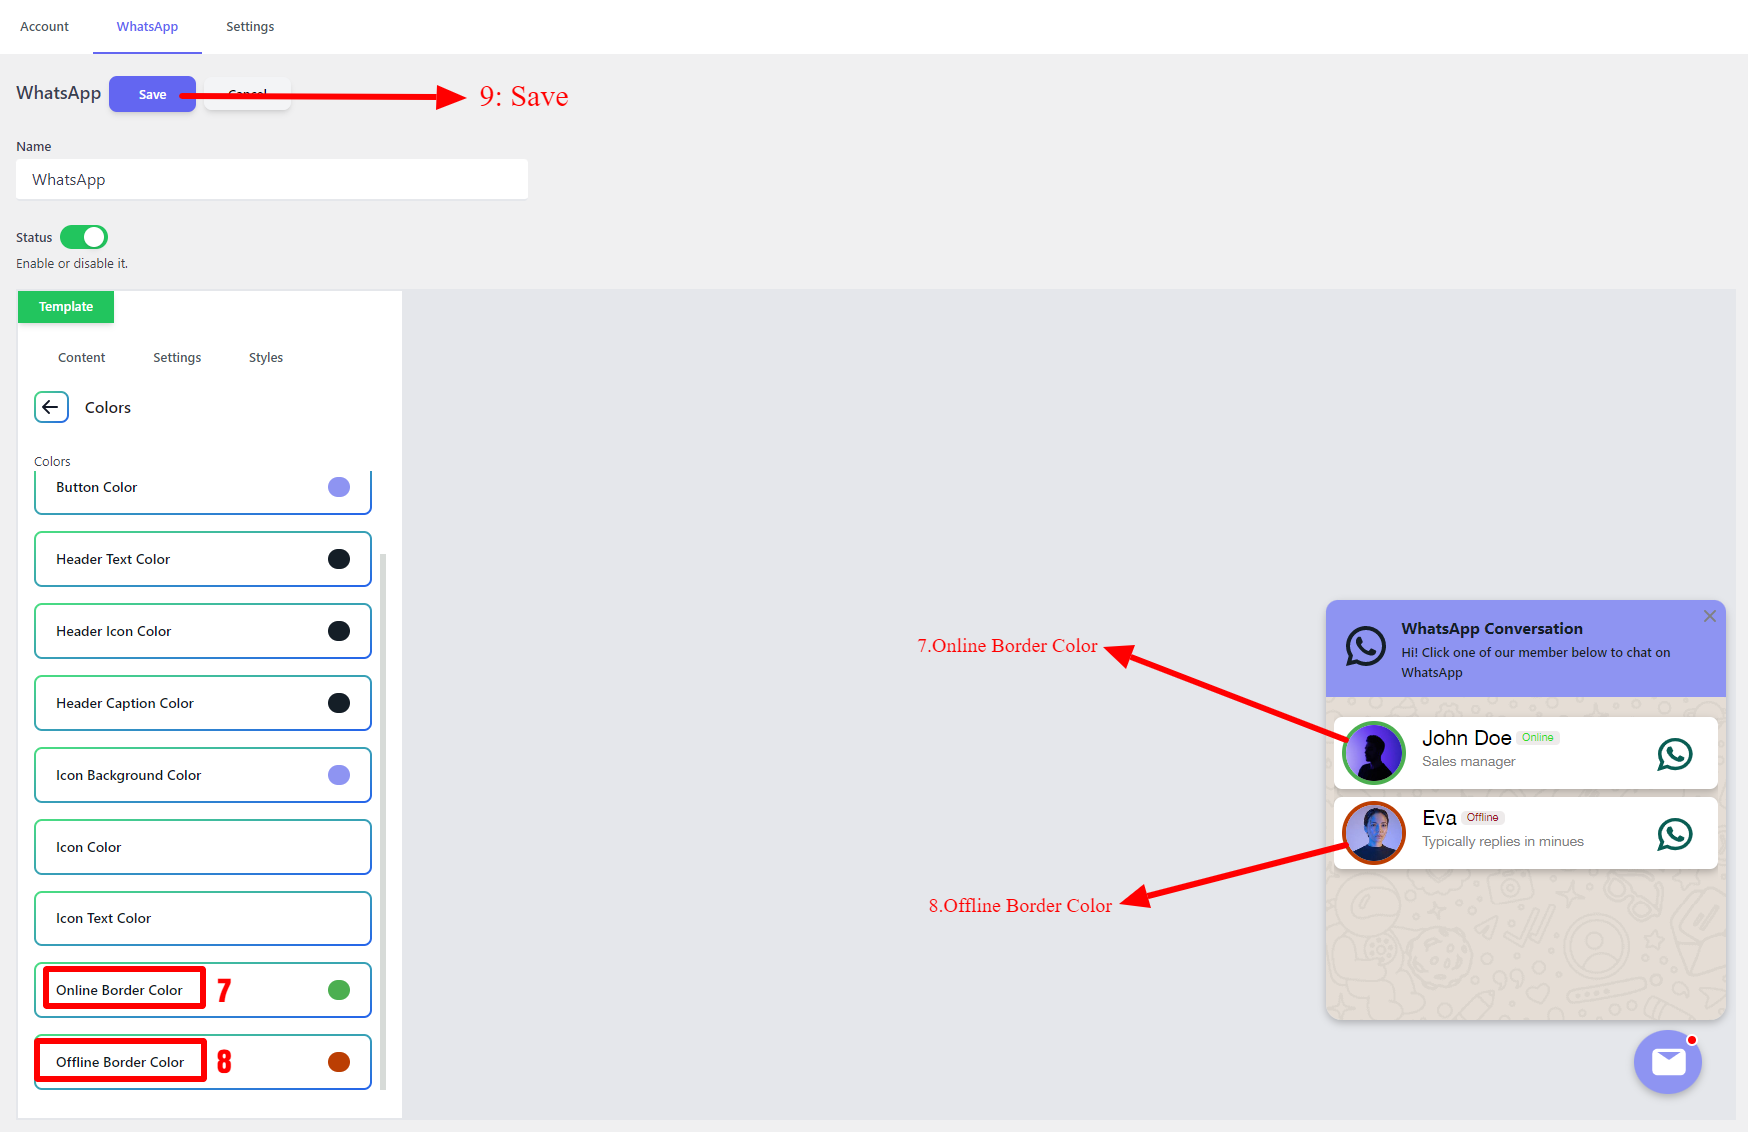
In the Colors section, you can change listed parts of the WhatsApp Chat Support like “Header Background Color”, “Button Color”, “Header Text Color”, “Header Icon Color”, “Header Caption Color”, “Icon Background Color”, “Icon Color”, “Icon Text Color”, “Online Border Color” and “Offline Border Color”.
Styles
Change colors
Colors description
After changing colors, click on the Save button to save changes.
Online and offline colors
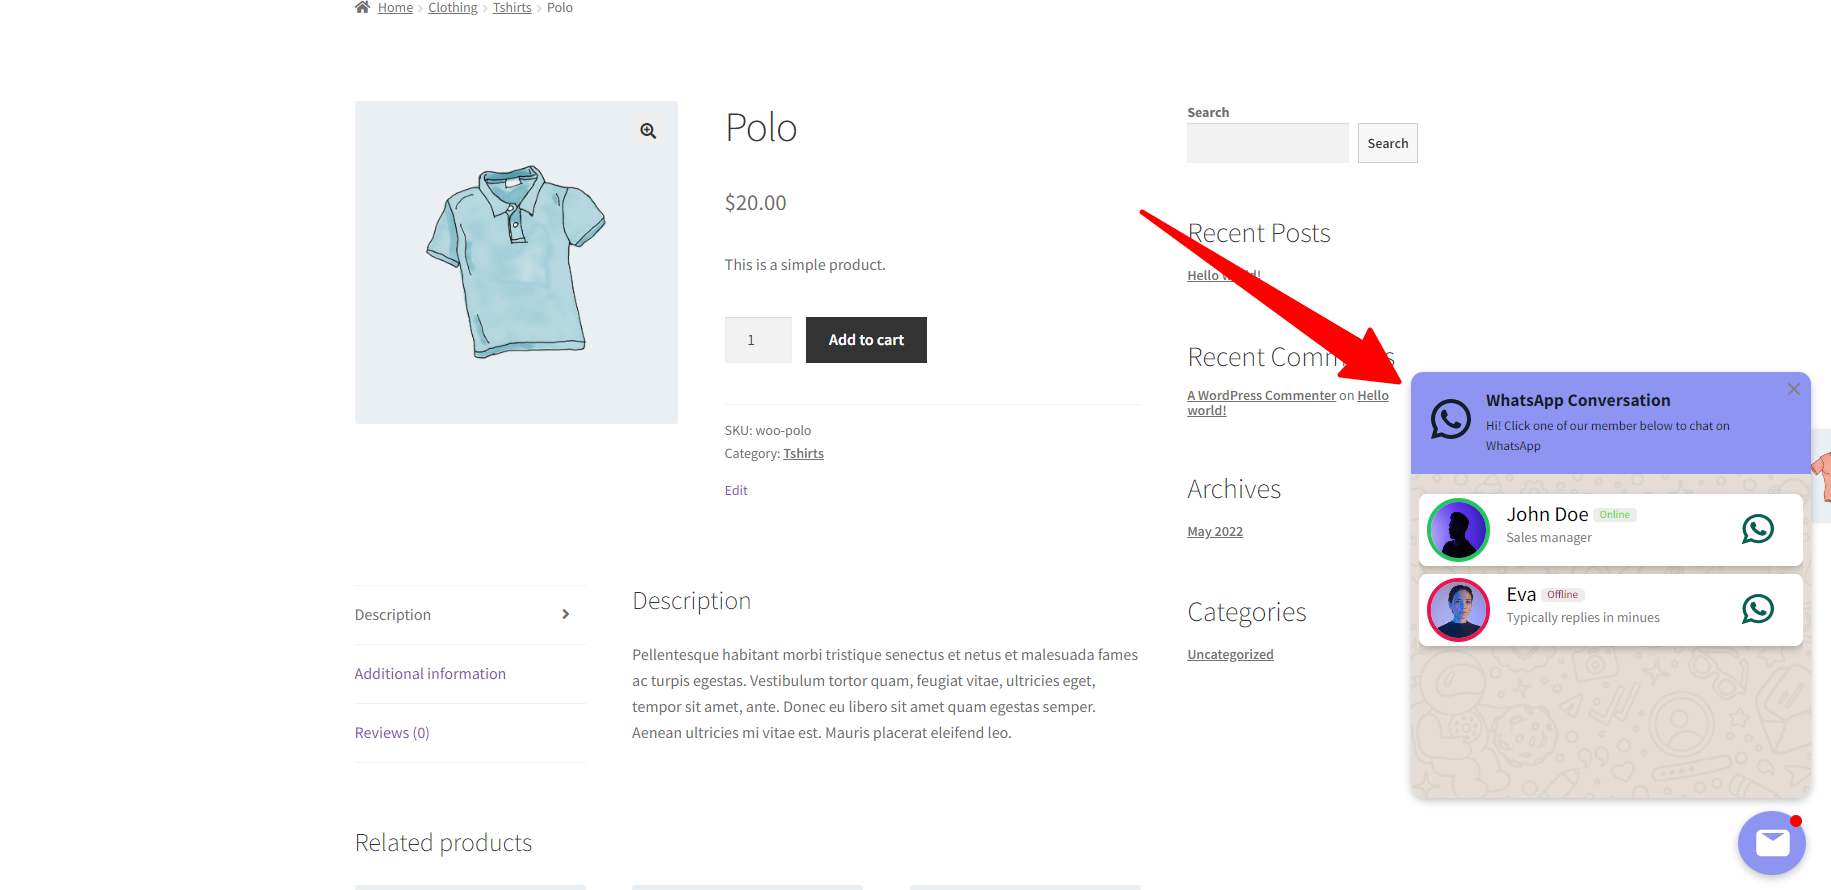
Applied changed colors
Pro Options
Here is a list of the Pro version options that can help more to create better WhatsApp Chat support for your website and store.
Define custom availability and working hours for each account
Define custom availability timezone for each account
Google Analytics
Facebook Pixel Analytics
Add WhatsApp Chat to specific WooCommerce categories or tags
Exclude WhatsApp Chat from specific WooCommerce products
Display WhatsApp Chat to logged-in users or guest users
Scrollbar for multi-agent WhatsApp chat when you have more agents
Discover the power of bundle discounts in WooCommerce, which allows you to entice customers with exclusive pricing on grouped products or sets. With bundle discounts, you can create irresistible offers like “Any 4 t-shirts for 120$”. By implementing these attractive deals, you can boost sales and enhance your overall sales strategy. Read on to learn how to create bundle discounts in WooCommerce and start maximizing your revenue today.
What is a WooCommerce bundle discount?
If you’re looking to create bundled product offerings and offer them at a discounted price compared to their original prices, WooCommerce bundle discounts are the solution you need. With this powerful feature, you can easily apply discounts to a curated group of products, effectively creating attractive bundles for your customers. By leveraging WooCommerce product bundles, you can effortlessly run promotions and marketing campaigns centered around product groups, opening up exciting opportunities to boost your store’s revenue and customer engagement.
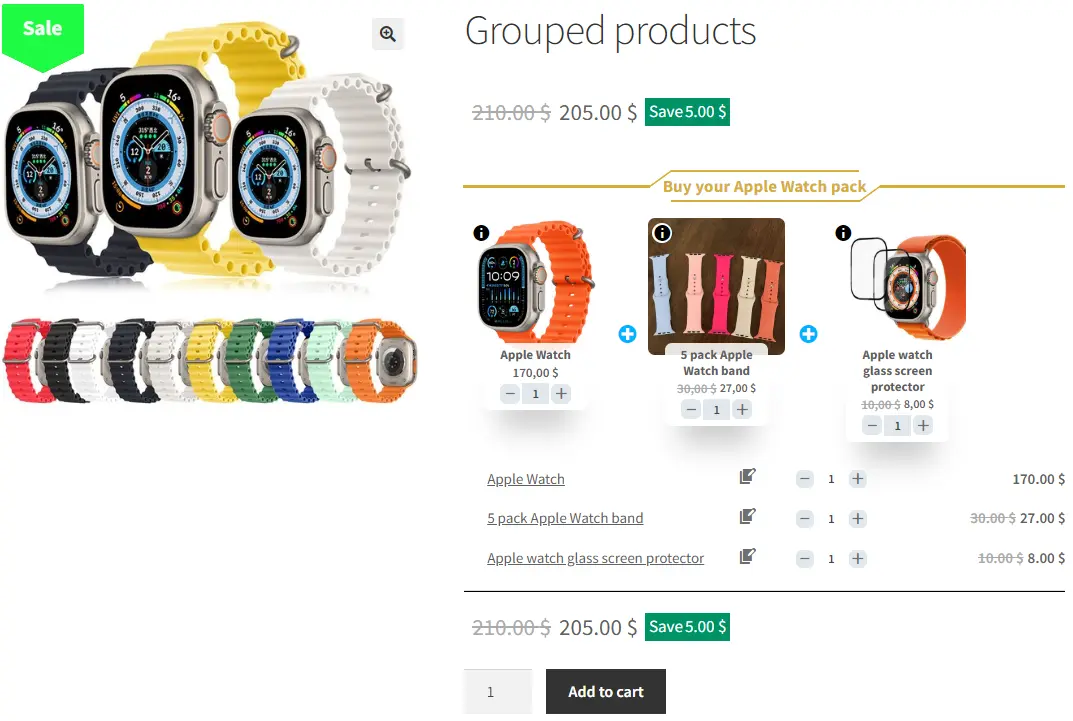
Grouped products are a valuable feature included in the core functionality of WooCommerce. They provide a seamless way for customers to add multiple similar products to their shopping cart all at once. By utilizing grouped products, you can enhance the shopping experience and streamline the purchasing process for your customers. To learn more about how to add and manage grouped products, refer to the comprehensive WooCommerce documentation.
What is Mix and Match products in WooCommerce?
A Mix and Match products for WooCommerce is a strategy that allows customers to create a custom bundle from products in your store that will be available with a discount.
For example, any 4 t-shirts from the t-shirts category for 100$, then the customer can build a custom bundle from the t-shirt category which has 4 items, and will get them for 100$. Or, any 3 products from the Hoodie category with a 30% discount.
Why use a WooCommerce bundle discount?
WooCommerce bundle discounts offer numerous benefits for your store, boosting both your profits and revenue. Here are some compelling reasons to utilize WooCommerce bundle discounts:
Advantages:
Strategic Product Bundling: With WooCommerce bundle discounts, you can pair lesser-known products with your best sellers and sell them together as a bundled package. This strategic approach enables you to showcase lesser-known items and increase their visibility while leveraging the popularity of your best sellers to drive sales.
Profit Maximization: Implementing bundle discounts can significantly impact your profits. By offering a bundled price that is lower than the sum of the individual product prices, you create an attractive value proposition for customers. This incentivizes them to purchase the bundle, resulting in increased order values and higher profitability for your store.
Inventory Clearance: WooCommerce bundle discounts provide an effective solution for clearing out excess inventory. By bundling slow-moving or surplus items with popular products, you can encourage customers to purchase the bundle, ultimately reducing inventory levels and freeing up valuable storage space.
Enhanced Customer Satisfaction: Bundling products at a discounted price not only benefits your store but also enhances the overall shopping experience for customers. They can enjoy the convenience of purchasing complementary items together while saving money. This positive customer experience can lead to increased customer loyalty and repeat business.
Competitive Advantage: Utilizing WooCommerce bundle discounts sets your store apart from the competition. By offering unique bundled packages at attractive prices, you can stand out in the market and attract customers who are seeking value and convenience. This competitive advantage can help you capture a larger share of the market and drive sustainable growth.
By leveraging WooCommerce bundle discounts, you can tap into new sales opportunities, increase profits, clear out inventory, and provide exceptional value to your customers. Embrace this powerful pricing strategy to elevate your store’s success and stay ahead in the dynamic world of ecommerce.
Creating a bundle discounts in WooCommerce
In this article, we will dive deep into bundle discounts in WooCommerce and will learn more about them.
In this article, we will create the below variations of bundle discounts in WooCommerce
Storewide bundle discounts e.g: Buy any 4 products for 100$
Category based bundle discounts e.g: Buy 2 products from category A or B for 50$
Product-specific bundle discounts e.g: Any 3 quantity of product A or product B for 60$
Different products bundle discounts or combination of products e.g: Buy 2 of product A and 2 of product B for 40$
Video Tutorial
Creating Storewide bundle discounts in WooCommerce
If you want to offer discounts like any 4 products in the store for 100$ then you can use a storewide bundle discount rule. When a customer buys 4 quantities of the same product or different products then he will get them all for a 100$.
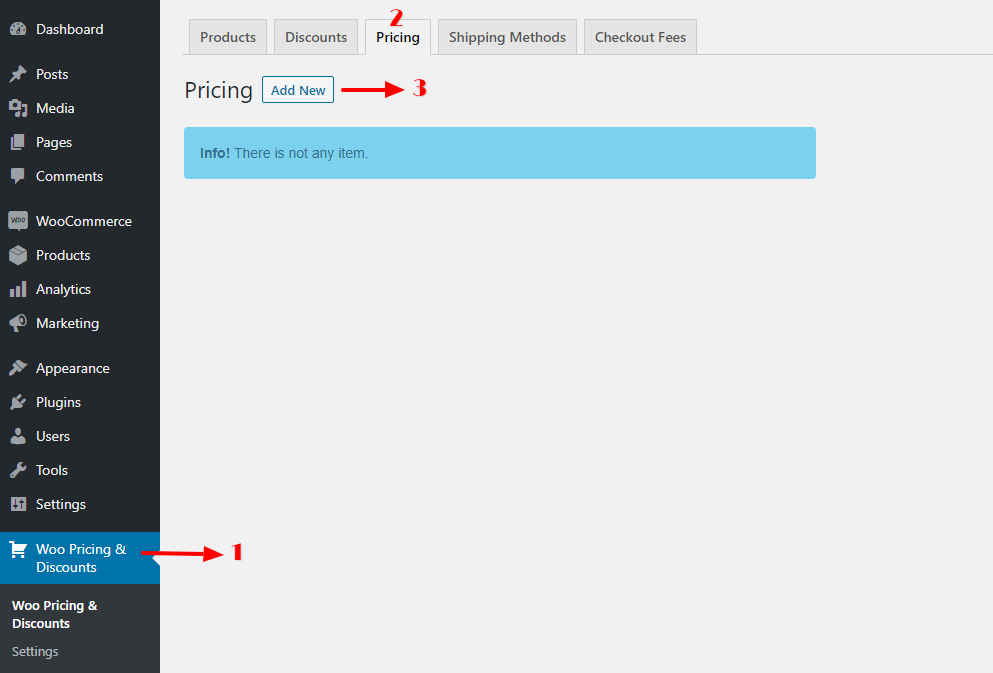
To create a storewide bundle discounts in WooCommerce go to the Woo Pricing & Discounts >> Pricing tab and add a new pricing rule like the below image.
Create WooCommerce Pricing Rule
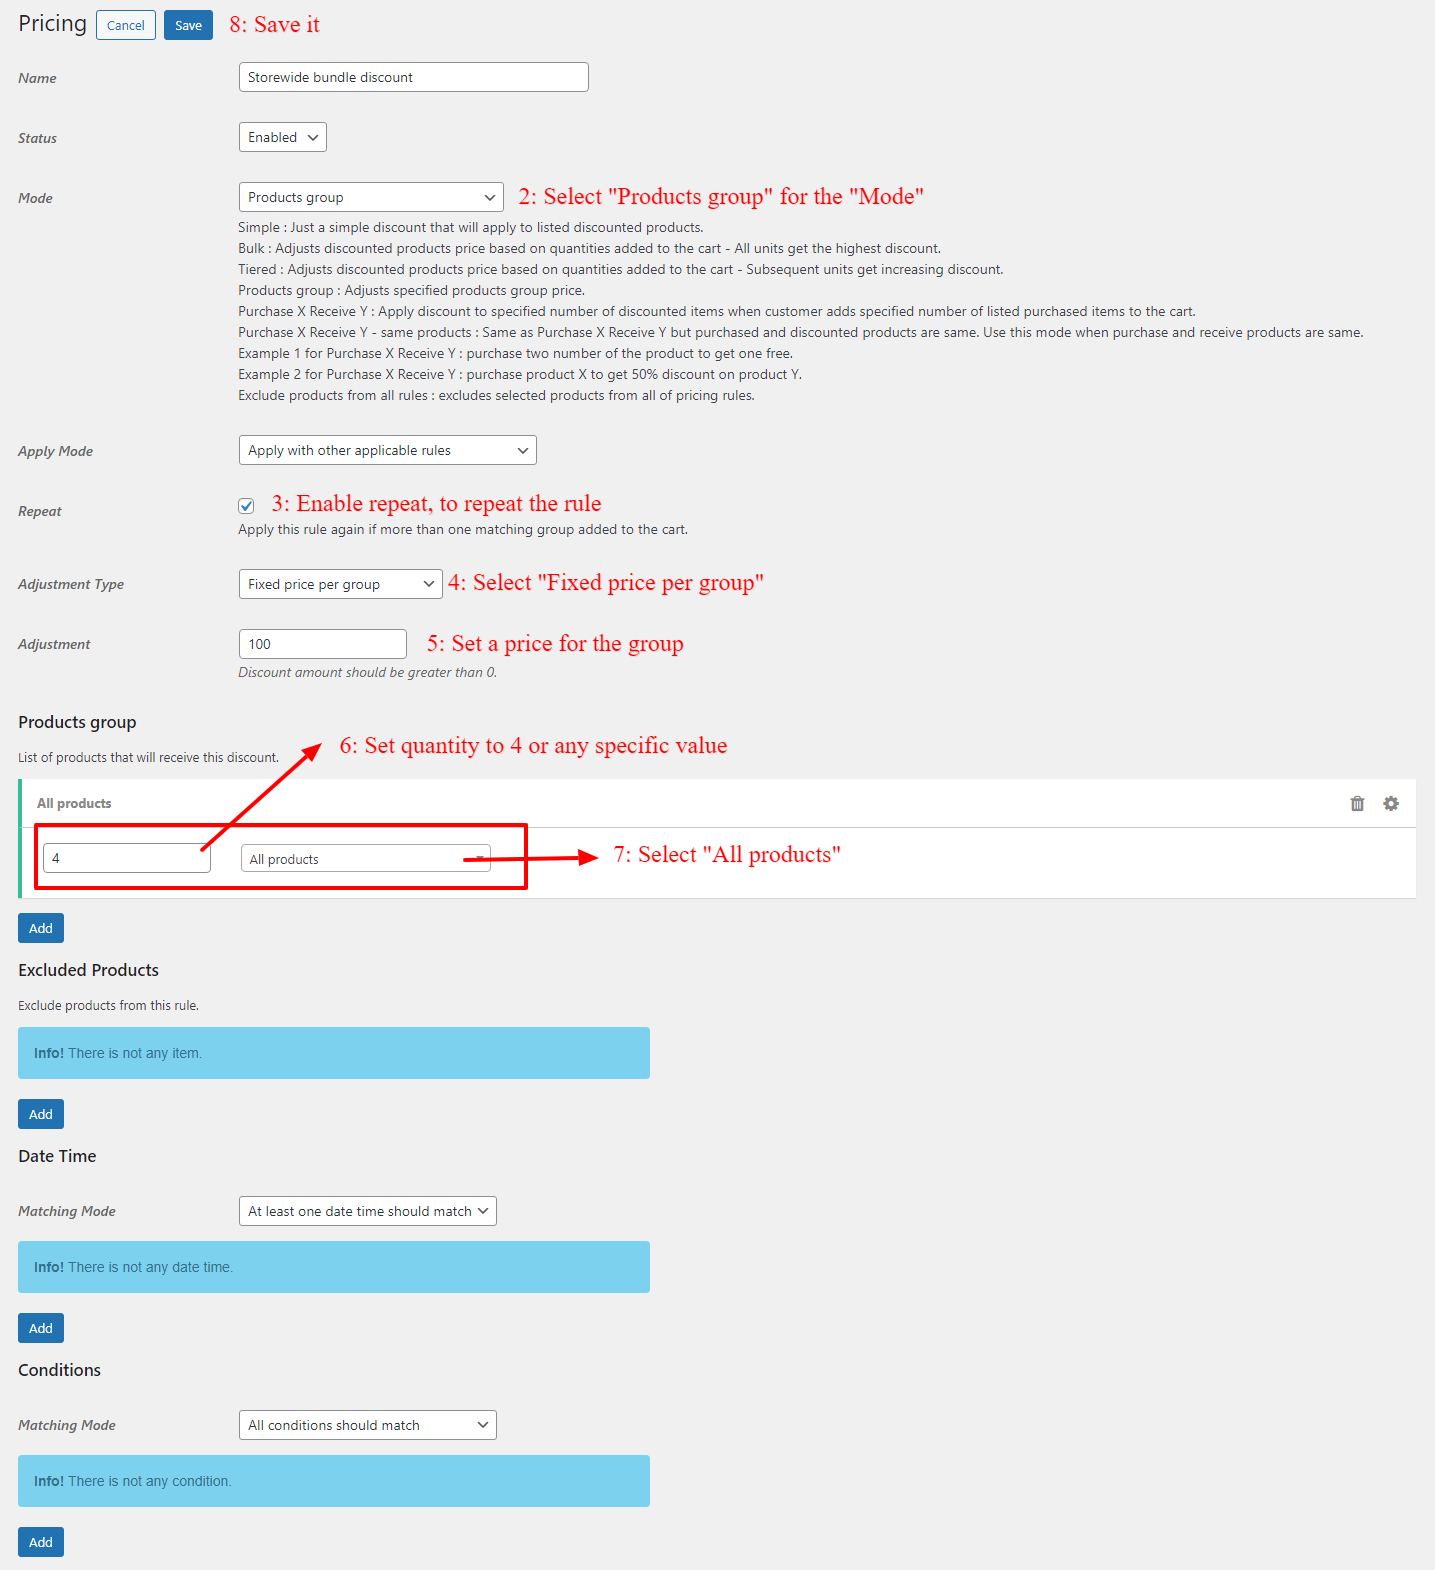
Now create a pricing rule like the below image. By using this rule customer will get any 4 products for 100$.
storewide bundle discount rule in WooCommerce
In the above rule, we set the “Adjustment type” to the “Fixed price per group” and then set the “Adjustment” value to “100”, so if there is a group of 4 items their price will be 100$. There are other “Adjustment type” values and you can use them based on your requirements.
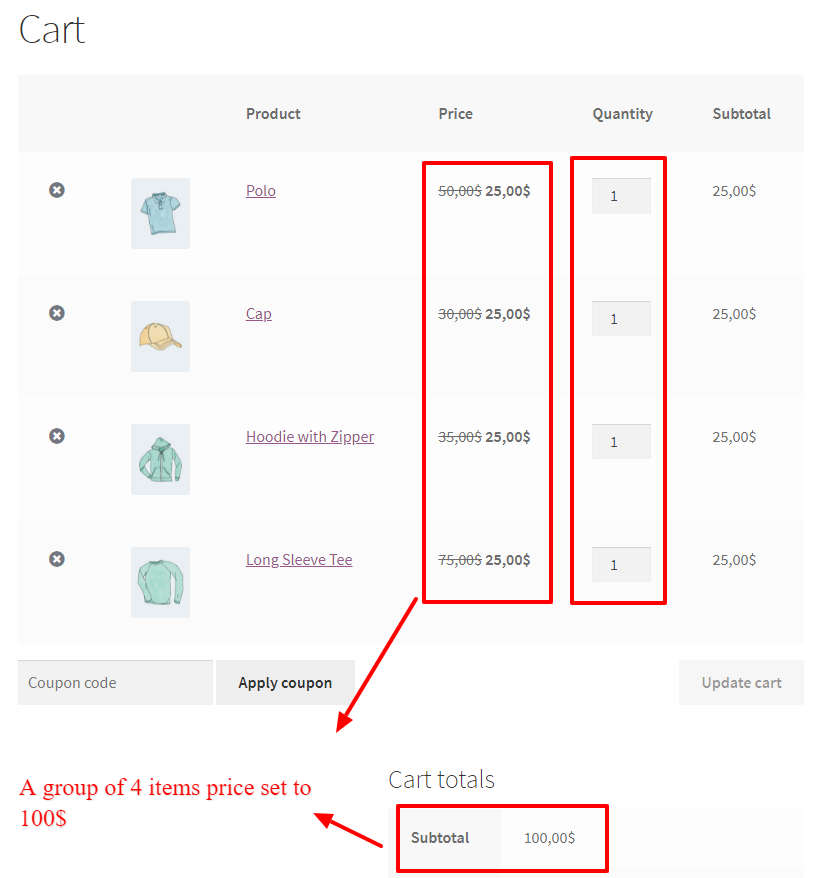
Now, if you add at least 4 items to the cart from your store, then a WooCommerce product bundle discount will apply on them like the below image.
Product bundle discounts in WooCommerce
As you can see in the above image, there are 4 items in the cart then the cart subtotal will be 100$ because a WooCommerce product bundle discount is applied to the cart.
Creating category based bundle discounts in WooCommerce
Category based bundle discounts in WooCommerce helps customers to create custom bundles in a category to get them with a discount. This strategy can help you to increase a specific category sales.
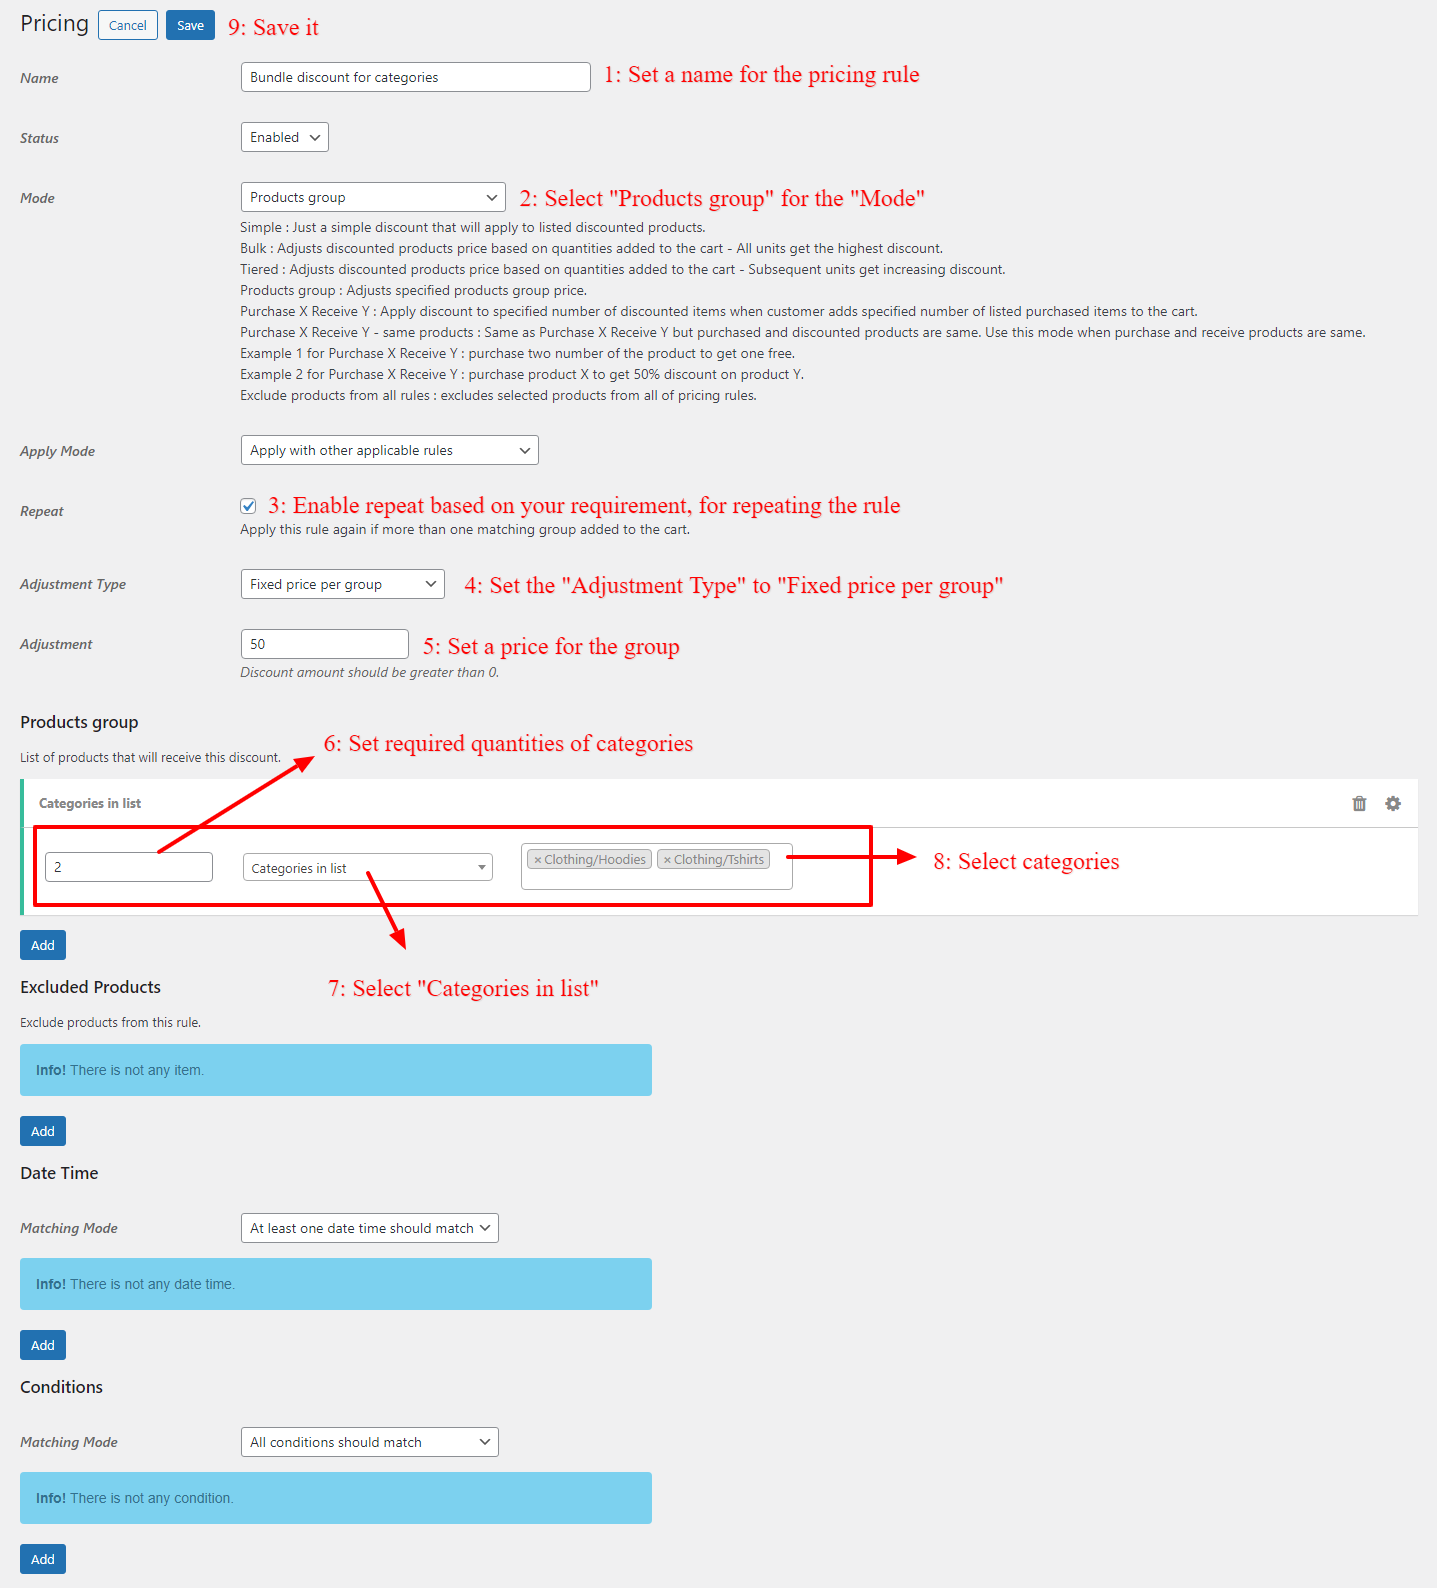
In this section of the article we will create a bundle discount for categories in WooCommerce. The bundle contains two products from category A or B for 50$.
To create a category-based bundle discount in WooCommerce, go to the Woo Pricing & Discounts >> Pricing tab and add a new pricing rule like the below image.
Category bundle price rule in WooCommerce
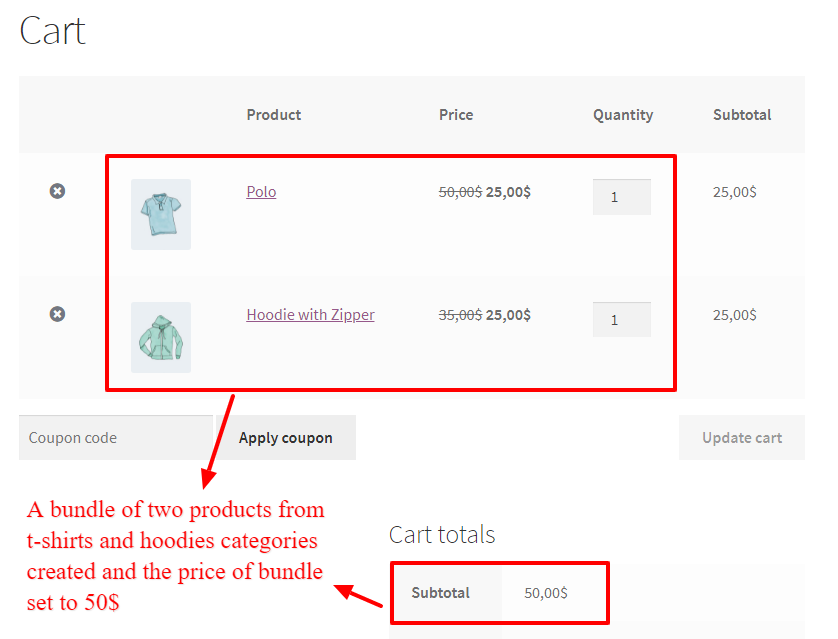
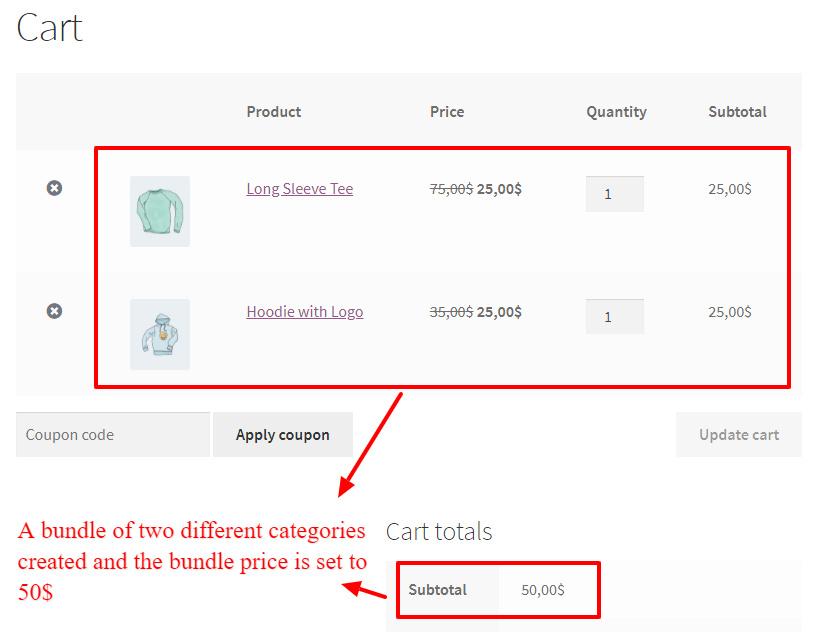
If customer adds 2 items from category A or B then a bundle will be created and its price will be 50$.
Category based bundle discount in WooCommerce
In the above image, because there are 2 quantities from category “t-shirts” and “hoodies” then the bundle price set to 50$.
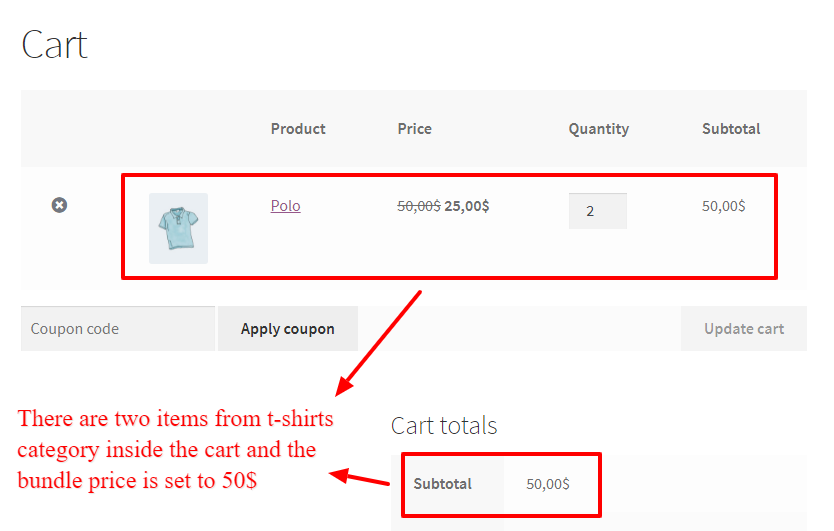
Category bundle discount in WooCommerce
In the above image, because there are 2 items from the “t-shirts” category in the cart, then bundle created and its price set to 50$.
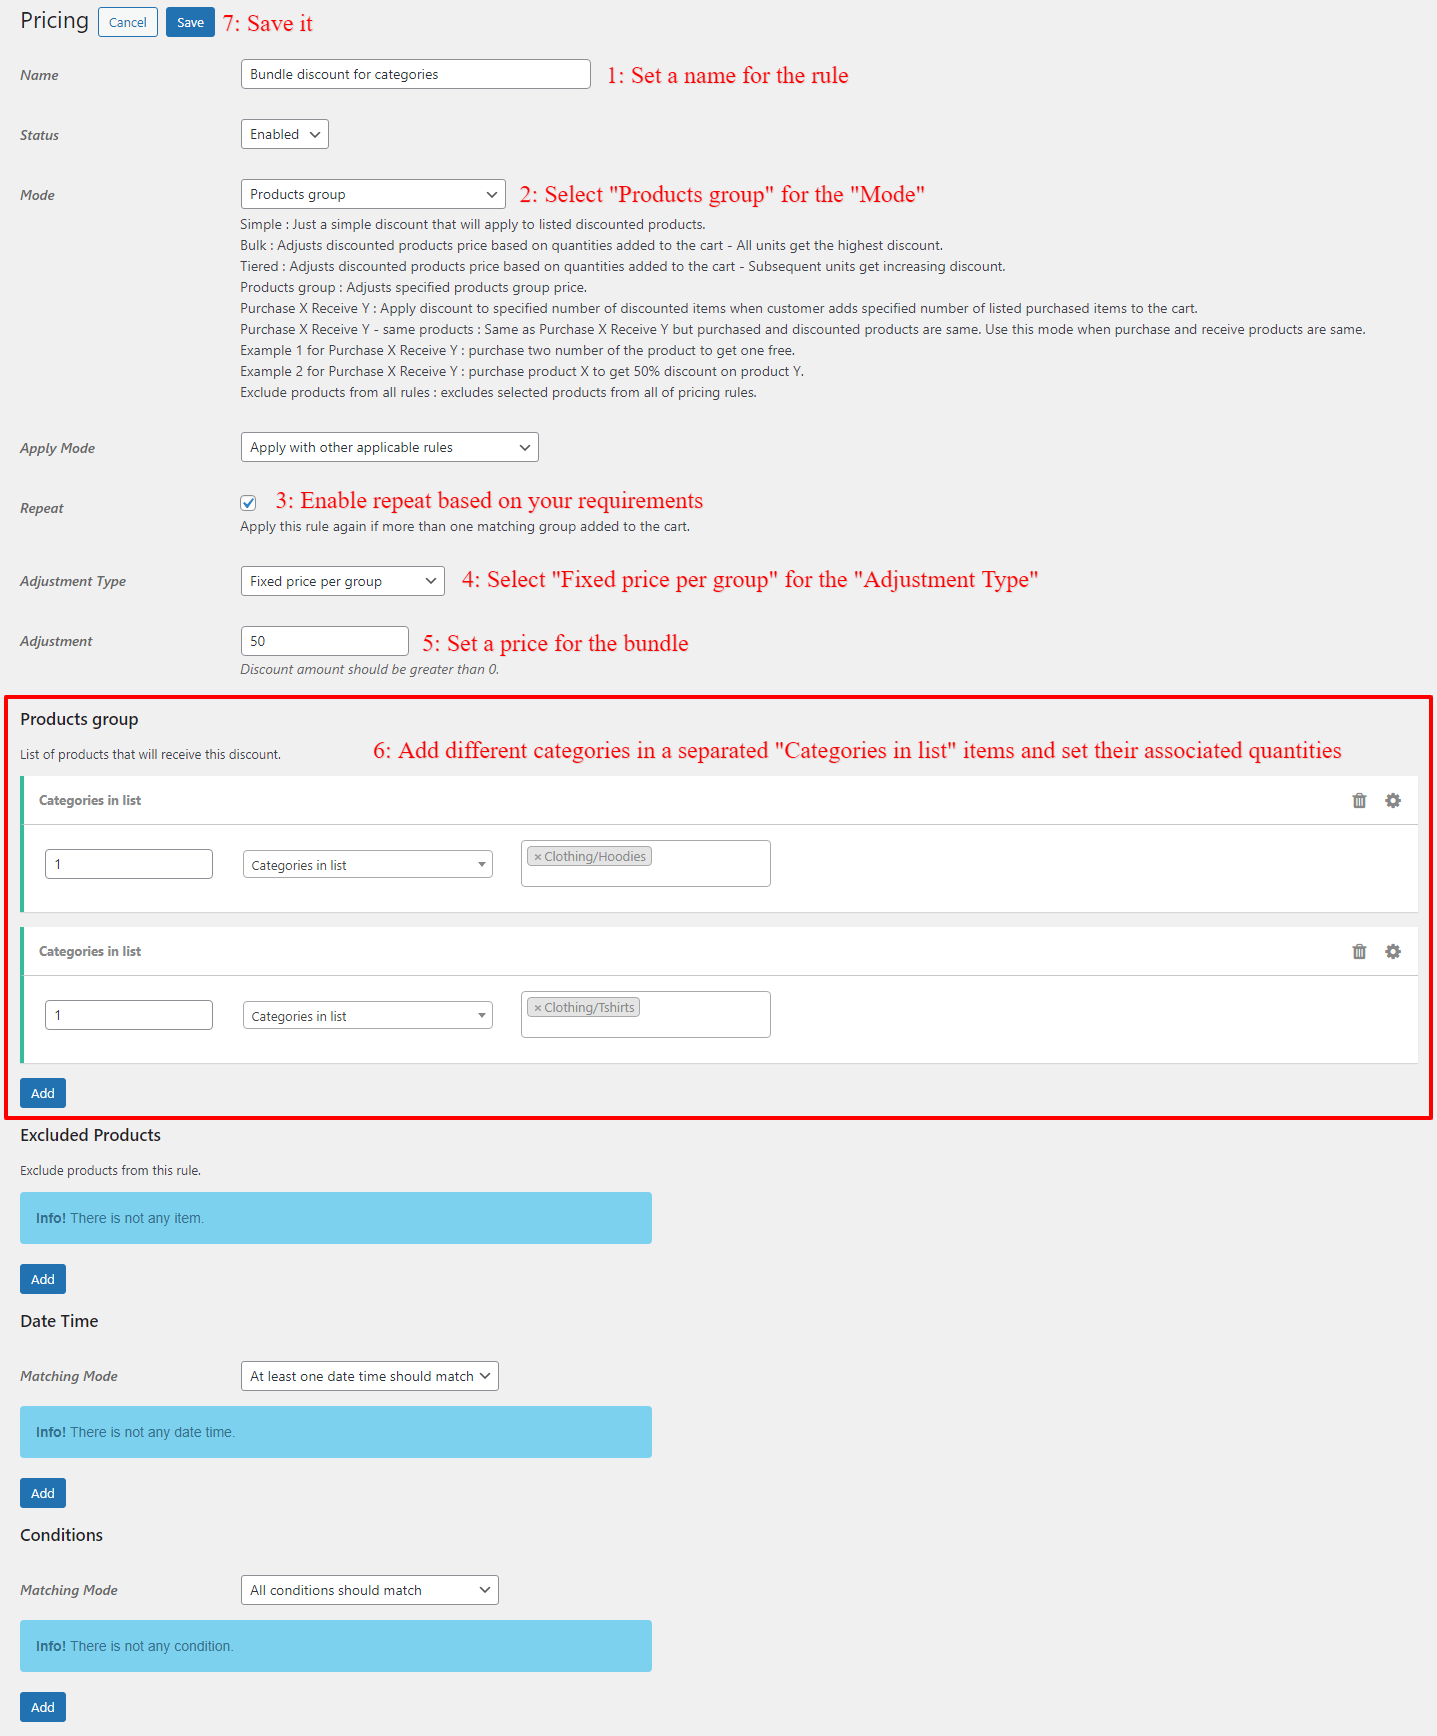
If you would like to create a bundle based on different categories, you can use a rule like the below image. In this rule customer should have at least 1 product from category A and 1 product from category B to create a product bundle in WooCommerce.
Bundle of different categories rule in WooCommerce
When a customer has at least 1 quantity of “t-shirts” category and 1 quantity of “hoodies” category in the cart, then a bundle will be created.
Different categories bundle in WooComerce
Creating product specific bundle discounts in WooCommerce
Product specific bundle discounts in WooCommerce helps you to sell less know products with best seller products.
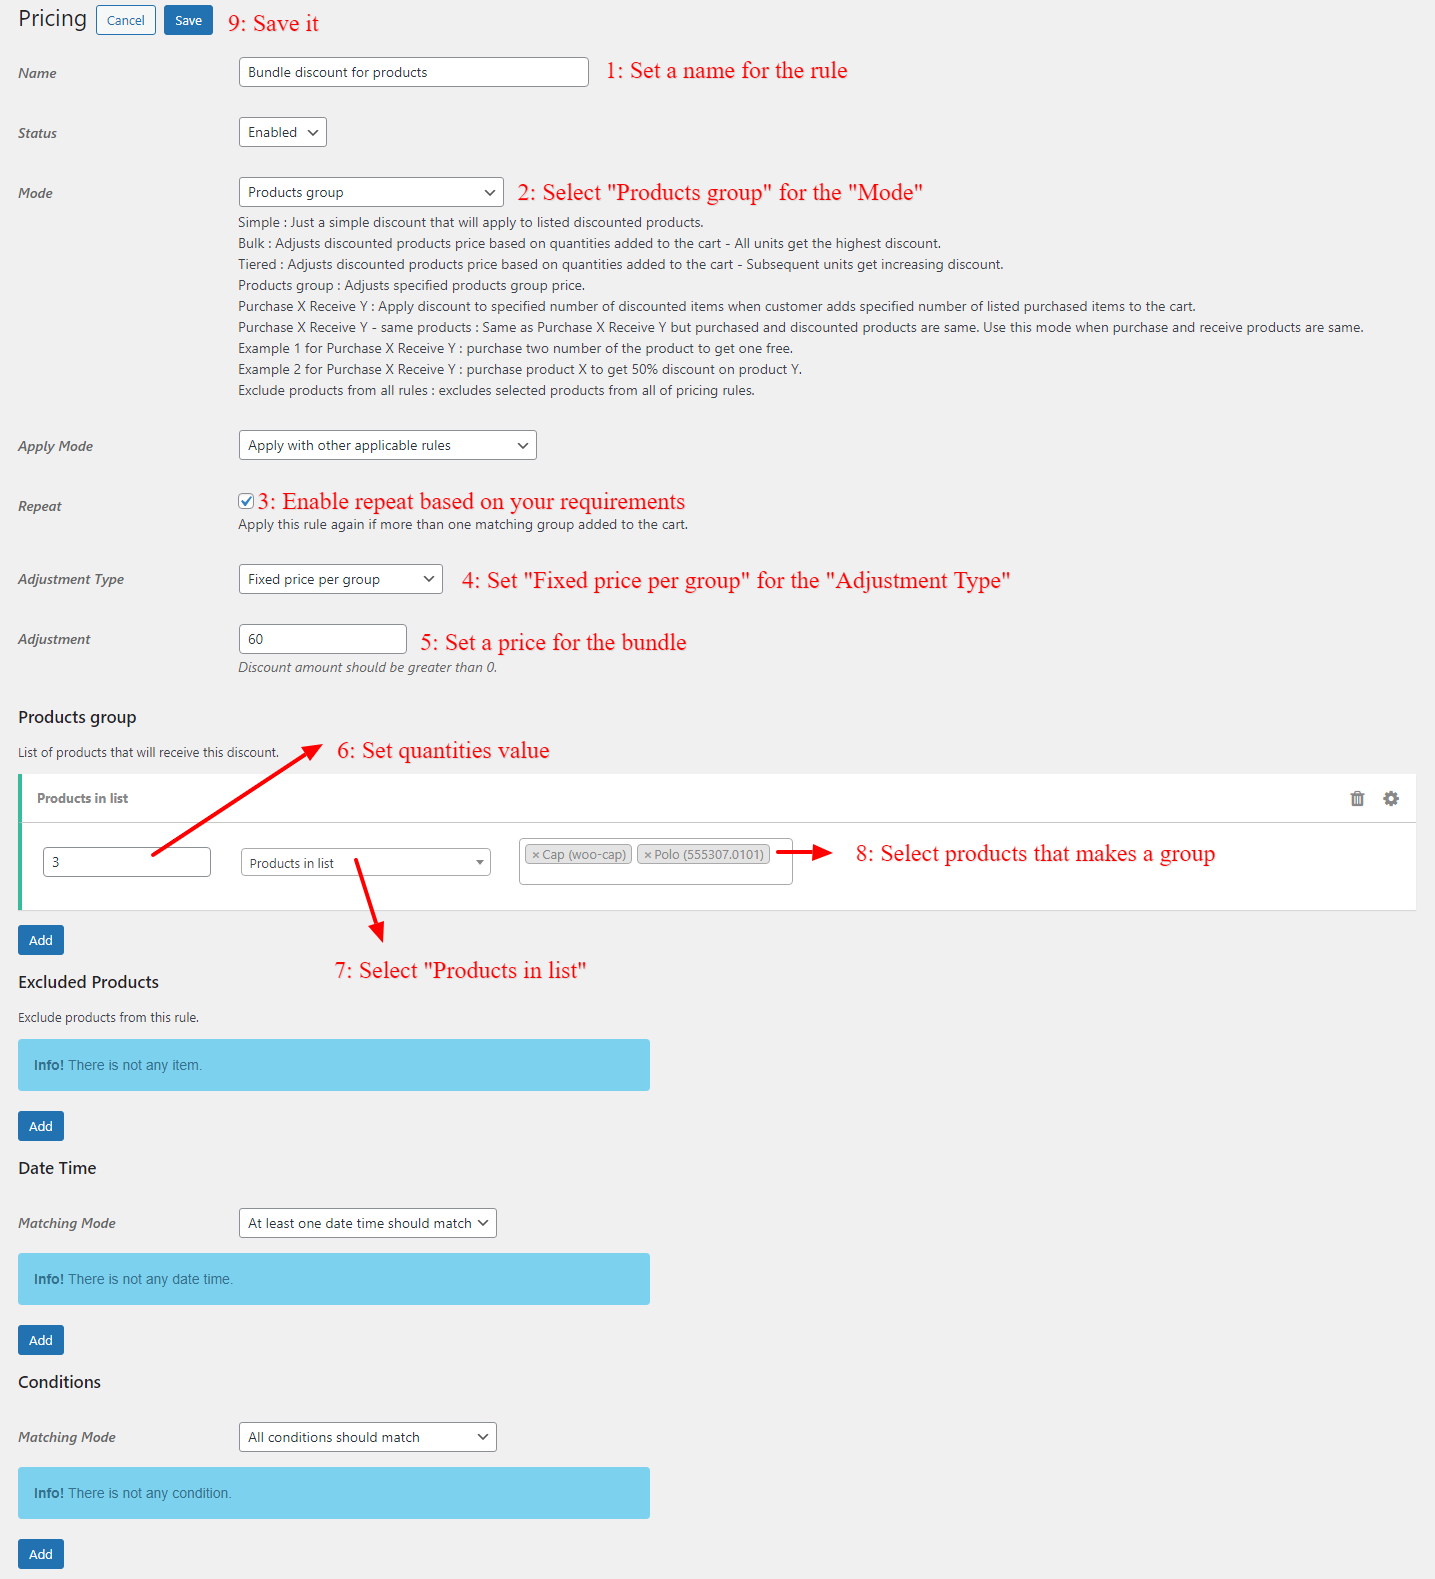
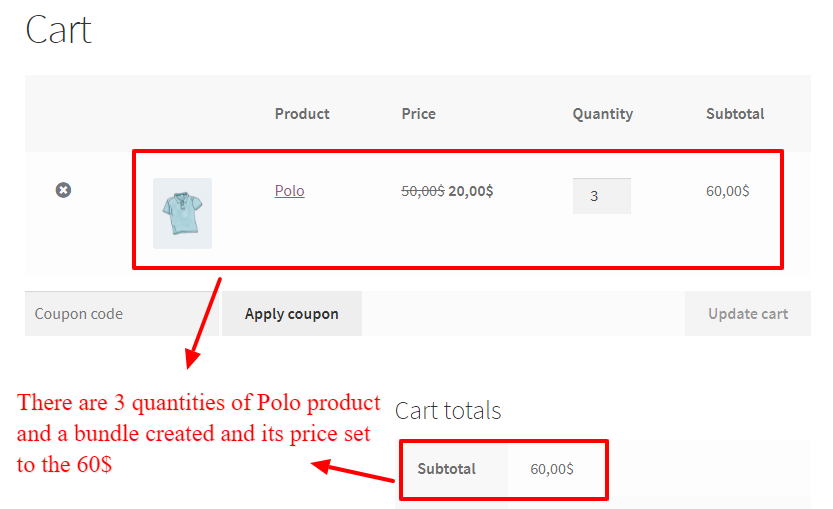
We will create a rule to sell 3 items from product A or product B for 15$. When a customer purchases 3 quantities from product A or product B or a combination of them, then the bundle price will be 60$.
To create a product-specific bundle discount in WooCommerce, navigate to the Woo Pricing & Discounts >> Pricing tab and add a pricing rule like the below image.
Product specific bundle discount rule
Now if a customer adds 3 items from the “Polo” or “Cap” or combination of them to the cart, then bundle price will be 60$.
Bundle discount for combination of products
Creating different products bundle discount in WooCommerce
If you would like to create a bundle that have different products in it, and customer should buy those products to create a bundle then you need a different products bundle discount in WooCommerce.
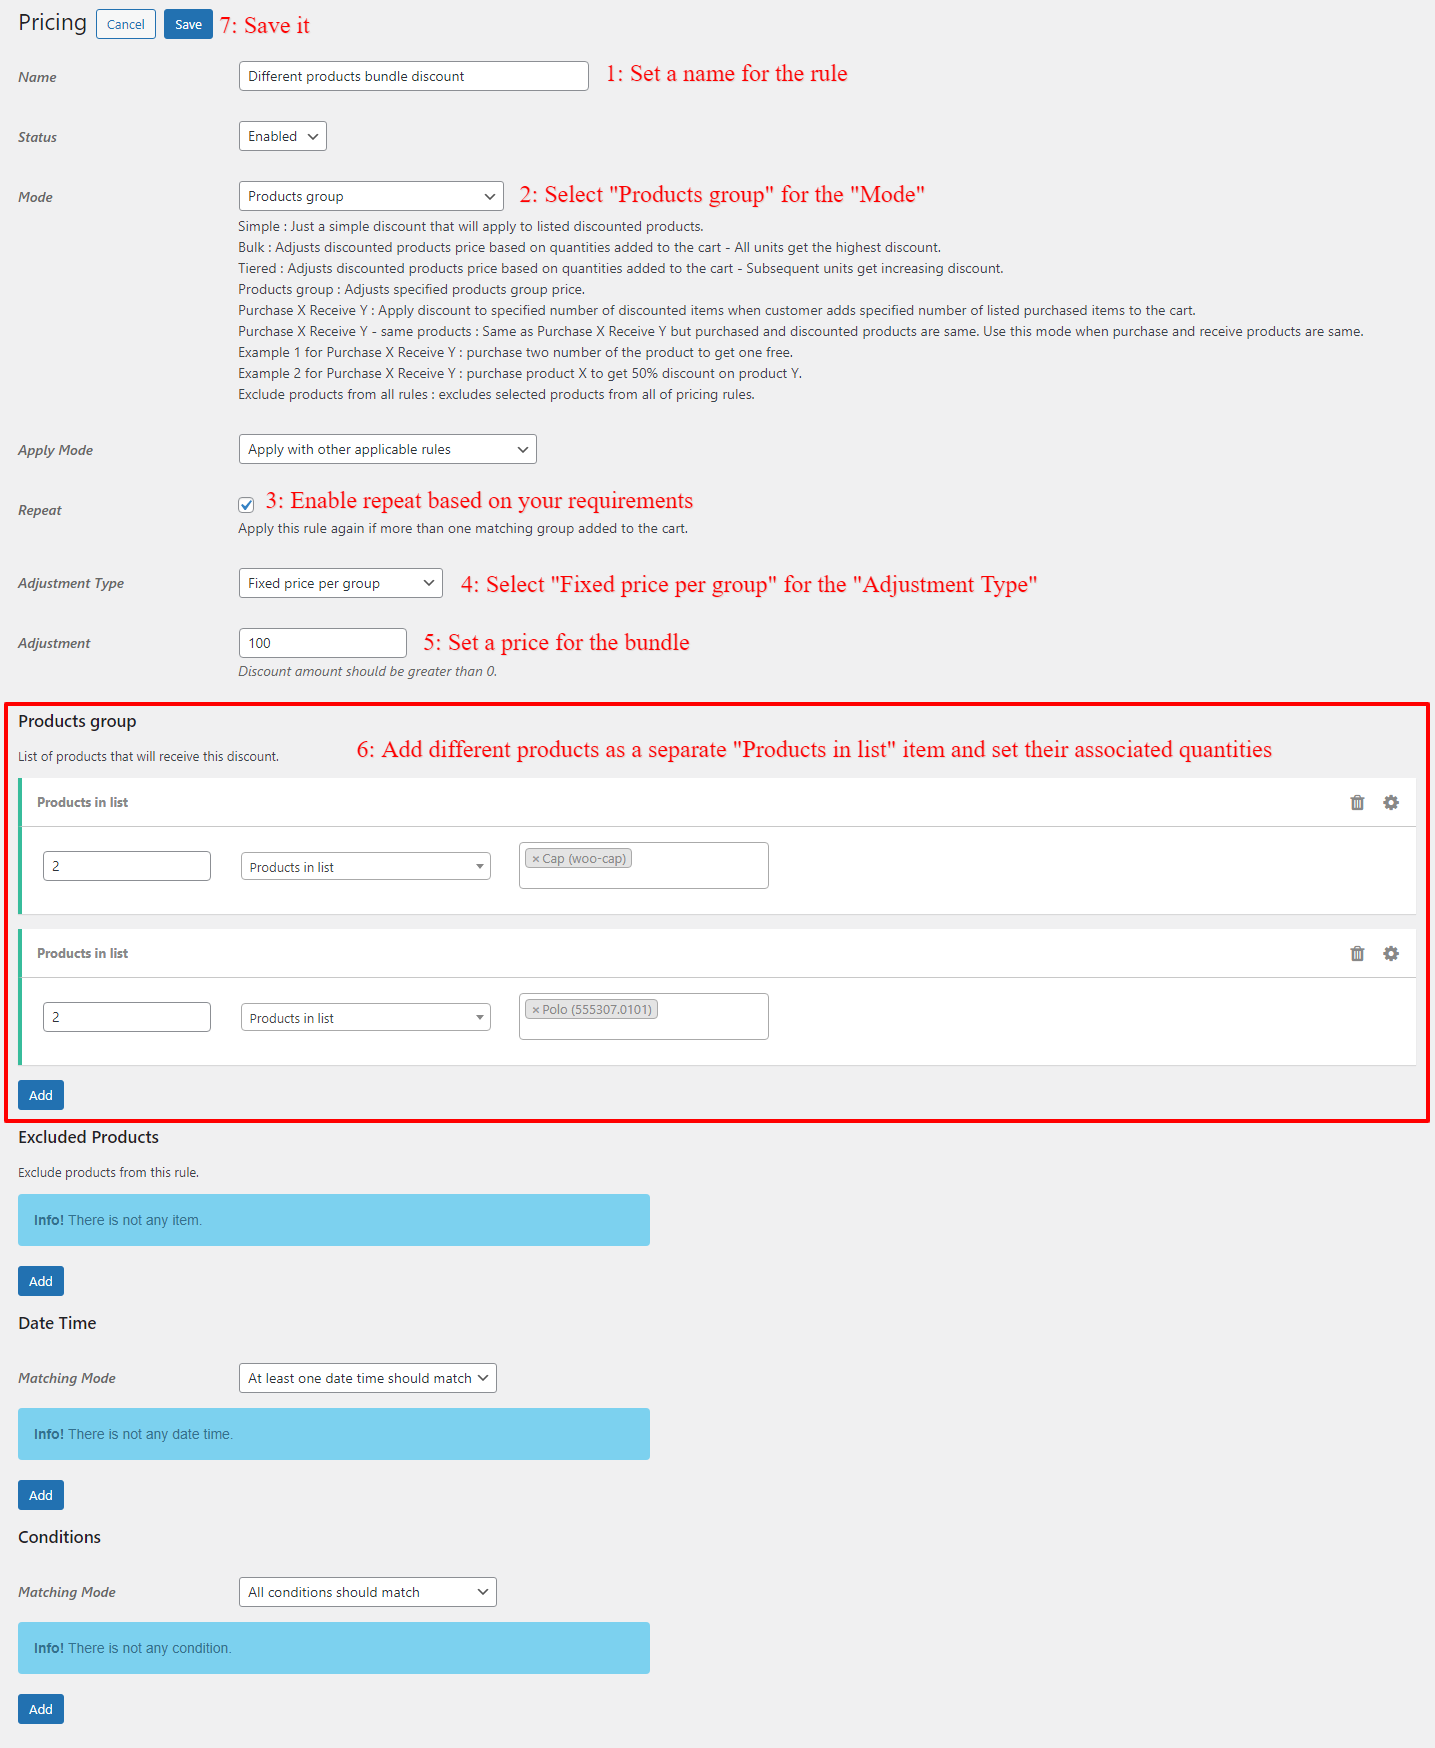
Create different products bundle discount in WooCommerce by navigating to the Woo Pricing & Discounts >> Pricing tab and adding a new pricing rule like the below image.
Different products bundle discount rule
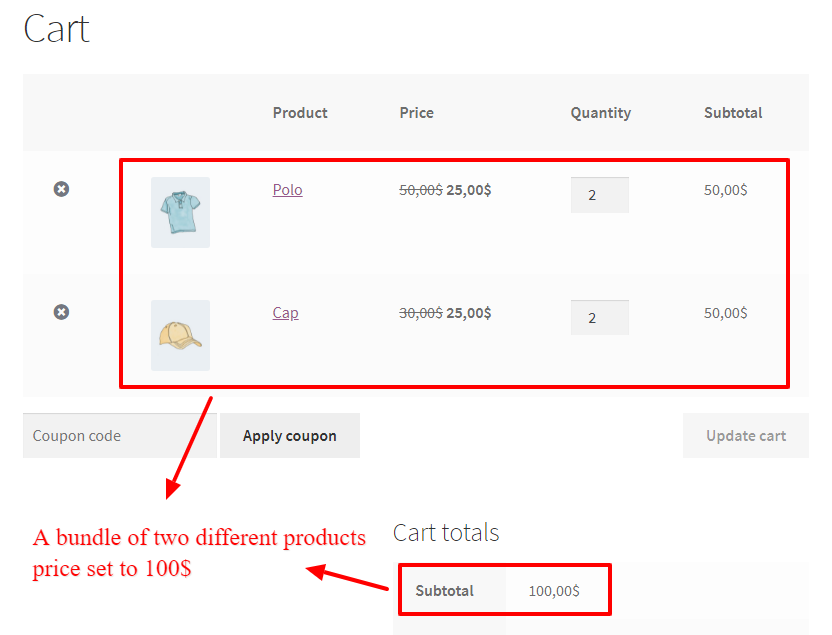
Now if the customer has 2 quantities of “Polo” product and 2 quantities of the “Cap” product in the cart then, a product bundle in WooCommerce created and price will be set to 100$.
Product bundle price in WooCommerce
How do I add a bundle discount in WooCommerce?
Offering customers the ability to create customized product bundles with attractive discounts has emerged as a highly effective strategy for boosting sales and increasing customer satisfaction. By providing the option for shoppers to curate their own bundles, tailored to their unique preferences, you tap into their desire for personalization and create a more engaging shopping experience.
The concept is simple yet compelling: customers can select multiple products from your inventory and combine them into a bundle, all while enjoying a discounted price. This approach not only incentivizes customers to purchase more items but also empowers them to feel a sense of ownership over their buying decisions. By granting them the freedom to mix and match products according to their preferences, you create a sense of exclusivity and cater to their individual tastes.
To create dynamic bundles, we will use the WooCommerce Product Bundle Builder plugin, which is a professional tool to create a product bundle with a discount in WooCommerce.
To begin the installation and activation process, access your WordPress admin dashboard and sign in. Once signed in, navigate to the “Plugins” tab and click on “Add New” From there, locate and click on the “Upload Plugin” button to proceed.
After selecting the “Upload Plugin” button, you will be prompted to choose the plugin ZIP file that you have recently downloaded. Simply locate the file on your computer and click on it. Next, click on the “Install Now” button to initiate the installation process. Once the installation is complete, click on the “Activate” button to activate the plugin and start using it.
2: Create a product bundle
Navigate to WooCommerce Products >> Add New to create a new product.
Set a name for the bundle product, for instance, “Mobile Bundle”.
Click on “Add Media” and select an image for your product bundle.
Now navigate to the Product data panel, and select “Product bundle” as the product type.
3: Set a discount for the product bundle
In the “General” tab, you can set a “Regular price” and “Sale price” of the bundle product.
Navigate to the “Product Bundles” tab .
Enable the “Fixed price” field to use the prices that you set in the “General” tab as the product bundle price.
4: Add product bundle items
Click on the “Add Bundle” button to add a new bundle item to the product bundle.
Inside the item, use the “Default Product” field and set a default product for the item.
Use “Products“, “Categories“, or “tags” fields to list more products for this item. Users will be able to select a product from a list of products.
You can use the “Discount” field to set a discount for this item.
Repeat the above steps, to add more items to the bundle.
Publish the product.
5. Final Result
You have created a product bundle discount in WooCommerce successfully.
Refer to the product page, to see the bundle with a discount like the below image.
WooCommerce Products Bundles FAQ
What is WooCommerce Product Bundles?
WooCommerce product bundles, which are instrumental tools or rules, allow you to create groups of products and sell them together, leading to increased sales and revenue. By utilizing this feature, you can strategically combine related products into enticing bundles, leveraging the power of convenience and value to entice customers.
What is product bundle pricing?
Product bundle pricing is bundling products or services in a single package and sell them at a discounted price. While it decreases the prices, but it can help to bring more sales and increase your revenue.
How do you do product bundling?
There are some strategies for product bundling in WooCommerce, like bundling different products together, bundling different categories products and etc. Bundles work well when you combine products that are often purchased together.
How to offer bundle discounts in WooCommerce?
Install the Discount Rules and Dynamic Pricing for WooCommerce plugin and then navigate to the Woo Pricing & Discounts >> Pricing to create a bundle discount rule based on products, categories, often purchased products and etc.
How to Mix and Match products in WooCommerce?
A Mix and Match products for WooCommerce is a strategy that allows customers to create a custom bundle from products in your store that will be available with a discount. You can use the Discount Rules and Dynamic Pricing for WooCommerce plugin to create Mix and Match products in WooCommerce.
Can you bundle products on WooCommerce?
Absolutely! With WooCommerce, you have the ability to create bundled products effortlessly. By installing the Product Bundle Builder for WooCommerce plugin, you can easily create simple to advanced bundles. What’s more, you can empower your customers to personalize their own product bundles, adding a unique touch to their shopping experience. Explore the flexibility and creativity of bundled products with WooCommerce today.
Finding the best WooCommerce discount plugins can help you increase sales, encourage larger orders, and run promotional campaigns without manually changing product prices. Whether you want to offer bulk discounts, create Buy One Get One Free (BOGO) deals, reward loyal customers, or automate seasonal promotions, the right WooCommerce discount plugin makes managing these offers much easier.
WooCommerce includes basic coupon functionality, but it doesn’t provide every pricing strategy that growing stores need. Creating advanced quantity discounts, tiered pricing, automatic BOGO offers, customer-specific discounts, and conditional cart promotions usually requires an additional plugin.
In this guide, we’ll compare 10 WooCommerce discount plugins in 2026, including free and premium options. We’ll examine their features, pricing, advantages, and limitations to help you choose the right solution for your store.
We’ll also look at how product badges, countdown timers, and promotional notifications can make your discounts more visible to shoppers.
Whether you need a WooCommerce dynamic pricing plugin, a bulk discount solution, a BOGO plugin, or a tool for coupon automation, you’ll find suitable options below.
Quick Comparison of the Best WooCommerce Discount Plugins
Here is a quick overview of the best WooCommerce discount plugins and what makes each one useful.
Plugin
Free version
Dynamic pricing
BOGO
Bulk discounts
Best for
Discount Rules & Dynamic Pricing (AsanaPlugins)
Yes
Yes
Yes
Yes
All-around discount campaigns
Discount Rules for WooCommerce (Flycart)
Yes
Yes
Pro
Yes
Advanced discount rules
Advanced Dynamic Pricing (AlgolPlus)
Yes
Yes
Pro
Yes
Complex pricing conditions
WooCommerce Discount Manager (Barn2)
No
Yes
Yes
Yes
Discount creation and display
Dynamic Pricing With Discount Rules (Acowebs)
Yes
Yes
Pro
Yes
Flexible product pricing
Advanced Coupons
Yes
Limited
Pro
Limited
Advanced coupon campaigns
YayPricing
Yes
Yes
Yes
Yes
Dynamic promotions
YITH Dynamic Pricing & Discounts
No
Yes
Yes
Yes
Advanced promotional rules
ELEX Dynamic Pricing & Discounts
Yes
Yes
Pro
Yes
Weight- and quantity-based pricing
Smart Coupons (WebToffee)
Yes
Coupon-based
Yes
Limited
Coupon management
Important: The availability of specific features depends on the plugin version and license. Some free versions offer basic functionality while reserving advanced conditions and promotional options for Pro.
Which WooCommerce Discount Plugin Is Best for Your Store?
If you don’t have time to read all ten reviews, here are our recommendations by use case.
Your requirement
Recommended plugin
Best all-around discount plugin
Discount Rules and Dynamic Pricing
Best free discount solution
Discount Rules and Dynamic Pricing
Advanced rule-based discounts
Flycart Discount Rules
Complex dynamic pricing conditions
Advanced Dynamic Pricing
Discount tables and storefront displays
Barn2 Discount Manager
Flexible product and quantity pricing
Acowebs Dynamic Pricing
Coupon marketing and store credit
Advanced Coupons
Modern dynamic pricing and promotions
YayPricing
Advanced BOGO and gift campaigns
YITH Dynamic Pricing
Weight-based and quantity discounts
ELEX Dynamic Pricing
Coupon automation
WebToffee Smart Coupons
How We Evaluated These WooCommerce Discount Plugins
There are many WooCommerce discount plugins, but not all of them solve the same problem.
Some are designed to create dynamic product prices, while others specialize in coupon marketing, BOGO promotions, or customer-specific pricing.
To make this comparison useful, we considered the following criteria:
1. Discount types
We considered whether each plugin supports percentage discounts, fixed discounts, BOGO offers, quantity discounts, tiered pricing, cart discounts, and other common promotions.
2. Rule flexibility
We looked at the ability to target specific products, categories, customers, user roles, and cart conditions.
3. Automation
We considered automatic discount application, scheduled promotions, and coupon automation.
4. Ease of use
A discount plugin should make it easy to create and manage promotional rules without requiring custom code.
5. Frontend discount presentation
Customers should be able to understand available discounts. We considered product-page messages, pricing tables, discounted prices, and savings displays.
6. Free and Pro functionality
We compared the functionality available in free versions against premium upgrades.
7. Pricing, maintenance, and support
We considered official license pricing where publicly available, documentation, update activity, and customer feedback.
Disclosure: AsanaPlugins develops the first plugin in this comparison. We’ve identified that relationship and included competing products with their own advantages and limitations to help store owners make informed decisions.
1. Discount Rules and Dynamic Pricing for WooCommerce (AsanaPlugins)
Best for: Store owners who want a comprehensive discount solution with BOGO deals, bulk pricing, automatic coupons, and advanced dynamic pricing.
Free version: Available on WordPress.org.
Pro version: €39–€99, depending on the selected license.
It allows store owners to create promotional rules without manually editing product prices or requiring customers to enter coupon codes for every offer.
One of its biggest advantages is its free version, which already supports many of the discount types that WooCommerce store owners commonly need.
Main Features
Product and category discounts
Create percentage-based and fixed-amount discounts for individual products, selected categories, or your entire store.
For example:
Apply 20% off to an entire product category.
Give customers $10 off selected products.
Run a storewide percentage discount during Black Friday.
Schedule a promotion for a specific date range.
You can also exclude selected products from discount rules when some items should remain at their regular prices.
WooCommerce Bulk and Quantity Discounts
Encourage customers to purchase more by offering lower prices when they buy larger quantities.
For example:
Quantity
Discount
1–4 items
Regular price
5–9 items
10% off
10–19 items
15% off
20+ items
20% off
Basic quantity-based discount tiers are available in the free version. Pro adds more advanced tiered pricing conditions and customer-specific pricing.
The plugin can also display a quantity pricing table on the product page so customers can see how much they save when purchasing more.
WooCommerce BOGO Deals and Buy One Get One Free Offers
Create different BOGO promotions, including:
Buy 1 Get 1 Free.
Buy 2 Get 1 Free.
Buy 3 Get 1 Free.
Buy X Get Y.
Buy X and receive Y at a discounted price.
Buy products from selected categories and receive additional products.
For example, you can allow customers to purchase two units of a product and receive a third unit for free.
The free version supports common BOGO scenarios for simple and variable products. Advanced category-based and variation-specific BOGO conditions are available in Pro.
Automatic WooCommerce Discounts and Manual Coupons
Create automatic coupons that apply when customers meet specific conditions, or use traditional coupon codes for targeted promotions.
For example, automatically apply a 10% discount when the cart subtotal reaches $100.
Cart and order discounts
Create discounts based on cart value, product quantities, and other conditions.
Examples include:
Spend $100 and receive 10% off.
Spend $200 and receive 15% off.
Apply a discount when a minimum number of products is added to the cart.
Run a storewide cart promotion during a seasonal sale.
Shipping promotions
Create free-shipping methods based on cart total, product weight, and other conditions.
The plugin also supports scheduled shipping methods and rules for showing or hiding shipping options. Advanced shipping conditions and the dedicated shipping-discount functionality are available through the relevant Pro features and add-on.
Advanced WooCommerce Discount Rules and Customer Targeting
The Pro version provides more advanced options, including:
User-role and wholesale pricing.
Purchase-history conditions.
First-order discounts.
Customer-specific pricing.
Advanced tiered pricing.
Live product-page price updates.
Product bundle discounts.
Mix-and-match pricing.
Conditional checkout fees.
URL coupons.
Recurring discounts for WooCommerce Subscriptions.
Advanced shipping discounts.
These capabilities are useful when you want to create different offers for wholesale customers, returning customers, or shoppers who meet particular cart conditions.
Free vs. Pro Comparison
Feature
Free
Pro
Product discounts
Yes
Yes
Category discounts
Yes
Yes
Storewide discounts
Yes
Yes
Basic quantity discounts
Yes
Yes
Advanced tiered pricing
Limited
Yes
BOGO deals
Yes
Yes
Category-based BOGO
No
Yes
Variation-specific BOGO
Limited
Yes
Automatic coupons
Yes
Yes
Manual coupons
Yes
Yes
Cart-total discounts
Yes
Yes
Basic free-shipping conditions
Yes
Yes
Advanced shipping conditions
No
Yes
Advanced user-role pricing
No
Yes
Purchase-history conditions
No
Yes
Live product-price display
No
Yes
Product bundle discounts
No
Yes
Mix-and-match discounts
No
Yes
Conditional checkout fees
No
Yes
URL coupons
No
Yes
Pros
Generous free version with several useful discount types.
Supports multiple BOGO scenarios.
Offers bulk and quantity-based pricing.
Automatically applies eligible discounts.
Supports scheduled promotional rules.
Displays quantity pricing tables and product-page messages.
Provides cart and checkout savings information.
Advanced conditions support more targeted campaigns.
Detailed documentation and video tutorials.
Cons
Advanced pricing rules can take some time to learn.
Sophisticated customer-targeting and pricing scenarios require Pro.
Stores using multiple discount extensions should test rule interactions and checkout compatibility.
Pricing
The official product page displays Pro license options ranging from €39 to €99, depending on the selected license.
The free version is available through WordPress.org.
You can start with the free version and upgrade when you need advanced pricing conditions, customer-specific discounts, or additional promotional capabilities.
Verdict: Discount Rules and Dynamic Pricing is an excellent starting point for stores that need more than basic WooCommerce coupons. Its combination of free BOGO, quantity discounts, cart promotions, and advanced Pro functionality makes it a strong all-around choice.
Best for: Stores that need a flexible discount-rule engine and advanced promotional conditions.
Free version: Available.
Pro version: Single-site pricing is listed at $255 for three years, equivalent to $85 per year at regular pricing. Promotional offers may reduce the total.
Discount Rules for WooCommerce by Flycart is one of the established options in the WooCommerce dynamic pricing category.
It allows store owners to configure discounts based on products, quantities, cart totals, customer roles, and other conditions.
The plugin is particularly useful for stores that need more control over how discounts are calculated.
Main Features
Percentage-based discounts.
Fixed-price discounts.
Storewide promotions.
Product-specific discounts.
Category-based discount rules.
Bulk and tiered pricing.
Quantity-based discounts.
Cart subtotal discounts.
User-role-based pricing.
Purchase-history conditions.
Product variation discounts.
BOGO promotions.
Free-product offers.
Scheduled promotions.
Product and cart discount messages.
Multiple discount-rule conditions.
For example, you can offer 10% off when customers purchase five products, or create a special discount for wholesale customers.
The Pro version provides more advanced promotions, including BOGO, product bundles, customer-specific conditions, and additional targeting options.
Pros
Established plugin with a large installed base.
Extensive discount-rule functionality.
Supports bulk and tiered pricing.
Advanced customer conditions.
Multiple promotional strategies.
Detailed documentation.
Cons
Several advanced promotional features require Pro.
Advanced rule configurations may be complicated for beginners.
The feature set may be excessive for stores that only need basic discounts.
Pricing
The official pricing page lists the single-site Pro license at $255 for three years, equivalent to $85 per year at regular pricing.
Five-site and 25-site licenses are also available.
Check the official pricing page for active promotional offers and renewal terms.
Verdict: Flycart is a strong option for stores that need an established discount engine with advanced rules. It is particularly worth considering when you need complex targeting and are comfortable purchasing a premium license.
Advanced Dynamic Pricing for WooCommerce by AlgolPlus provides a rule-based system for configuring product and cart discounts.
It is useful for stores that need more control over discount calculations, customer conditions, and combinations of products.
Main Features
Product-specific discounts.
Category-based pricing rules.
Bulk and quantity discounts.
Cart discounts.
Product-combination conditions.
Customer and user-role conditions.
Purchase-history conditions.
BOGO promotions in Pro.
Gift-product promotions.
Scheduled promotional rules.
Dynamic frontend pricing.
Shipping-method conditions.
Payment-method conditions.
Discounts based on exact time periods.
For example, a store can offer a special discount to customers placing their first order, or create promotions based on the total weight of products in the cart.
The Pro version also supports updating prices dynamically when customers change quantities on product pages.
Pros
Flexible discount calculations.
Supports advanced cart conditions.
Useful for stores with complex pricing requirements.
Dynamic frontend pricing.
Multiple license options.
Cons
The number of settings can be overwhelming for beginners.
The official website lists the following Pro licenses:
License
Annual price
1 website
$60
3 websites
$120
5 websites
$180
10 websites
$250
The license includes one year of updates and support.
Verdict: Advanced Dynamic Pricing is worth considering if your store relies on complex pricing conditions, product combinations, and customer-specific offers.
WooCommerce Discount Manager by Barn2 focuses on making it easier to create discounts and communicate promotional offers to shoppers.
One of its main strengths is its attention to how discounts are presented on the storefront.
This is important because customers need to understand available offers before deciding to add more products to their carts.
Main Features
Percentage and fixed-price discounts.
Total-spend discounts.
Product and category promotions.
Storewide sales.
BOGO and free-product offers.
Buy X products for a fixed price.
Quantity-based discount tiers.
Bulk pricing.
Volume bundles.
User-role-based pricing.
Customer-specific pricing.
Scheduled promotions.
Product-page discount messages.
Quantity pricing tables.
Cart savings displays.
For example, you can offer five products for $100 or give customers a percentage discount when they purchase a minimum quantity.
The plugin also allows store owners to display promotional messages and pricing tables that help customers understand how much they can save.
Pros
Strong focus on discount presentation.
Multiple discount types in one plugin.
Quantity pricing tables.
Scheduled promotional rules.
Customer and role targeting.
Guided setup and support.
Cons
No standalone free version is listed.
Licensing may be less attractive for stores looking for a low-cost single-purpose plugin.
Stores needing advanced coupon marketing may need an additional coupon plugin.
Some discount display configurations require additional setup.
Pricing
Barn2 offers individual plugin licensing and bundle options. Its current official product page also promotes an All Access Pass.
Because the available licensing and bundle offers can change, check the current purchase options before selecting a plan.
Verdict: Barn2 is a good option if your priority is creating straightforward promotions and displaying them clearly on product and cart pages. It is particularly attractive to store owners who prefer a guided setup process.
Acowebs Dynamic Pricing with Discount Rules is designed to help WooCommerce store owners create conditional pricing rules and promotional campaigns.
It provides options for applying discounts based on products, quantities, users, and cart conditions.
Main Features
Product-based discount rules.
Category-based pricing.
Percentage and fixed-price discounts.
Quantity discounts.
Bulk pricing.
Cart-based discounts.
BOGO promotions in Pro.
Gift-product offers in Pro.
User-role restrictions.
Individual customer targeting.
Purchase-history conditions.
Usage limits.
Scheduled discounts.
Product-page pricing tables.
Active-discount shortcodes.
For example, you can configure a promotion that gives customers a discount when purchasing multiple quantities of a product.
The Pro version also supports gifting products when customers meet certain conditions, such as purchasing from a selected category or reaching a minimum cart value.
Pros
Offers a range of discount types.
Supports quantity-based pricing.
Provides customer and role restrictions.
Includes scheduling and usage-limit options.
Offers product-page pricing tables.
Supports multilingual websites.
Cons
Advanced features require the Pro version.
The number of configuration options may require some learning.
Its free version uses virtual coupons, so WooCommerce coupon functionality must remain enabled.
The frontend experience should be tested with your active theme.
Pricing
The vendor’s listed pricing includes:
License
Annual
Lifetime
1 website
$49
$119
Up to 5 websites
$119
$249
Check the official pricing page for the current license options.
Verdict: Acowebs is worth considering if you need conditional discount rules, product pricing tables, and scheduled promotions in one plugin.
Advanced Coupons takes a different approach from traditional dynamic-pricing plugins.
Instead of focusing primarily on changing product prices according to quantities, it expands WooCommerce’s coupon functionality.
This makes it especially useful for stores that use coupons as part of their marketing strategy.
Main Features
Advanced coupon conditions.
BOGO coupon offers.
Automatic coupon application.
Coupon scheduling.
URL coupons.
Store credit.
Advanced shipping discounts.
Payment-method restrictions.
User-role restrictions.
Cashback coupons.
Subscription-related coupon functionality.
Cart discount conditions.
Coupon usage restrictions.
For example, you can create a coupon that gives customers a free product when they purchase a qualifying item.
You can also share coupon links through email campaigns or social media, allowing customers to activate promotions without manually entering a coupon code.
Pros
Strong coupon-management functionality.
Useful for marketing campaigns.
BOGO coupon support.
URL coupons and automatic application.
Store-credit functionality.
Free version available.
Established product with extensive documentation.
Cons
Not a complete replacement for every dynamic-pricing plugin.
Some advanced coupon functionality requires Pro.
Premium licensing may be expensive for stores that only need basic discounts.
Multiple coupon conditions can take time to configure.
Pricing
Advanced Coupons provides free and premium plans. Its Growth plan has been advertised with an introductory price of $99.50/year compared with a regular listed price of $199/year.
These are promotional figures and should be checked at the official checkout before publication.
Verdict: Advanced Coupons is a particularly good choice if your promotional strategy revolves around coupon codes, store credit, and targeted coupon campaigns rather than extensive dynamic product pricing.
YayPricing is a dynamic-pricing plugin designed to simplify the creation of promotional campaigns in WooCommerce.
It provides a visual approach to creating pricing rules and supports multiple promotional strategies, including BOGO offers, bulk pricing, and product bundles.
Main Features
Product discounts.
Cart discounts.
Bulk pricing.
Tiered pricing.
Buy X Get Y promotions.
BOGO offers.
Product bundle discounts.
Category-based rules.
User-role conditions.
Cart conditions.
Scheduled promotions.
Discount usage limits.
Checkout fees.
Discount messages and pricing tables.
Product and cart promotional displays.
For example, you can offer a percentage discount when customers purchase a minimum quantity, or create a Buy X Get Y campaign for selected products.
The plugin also supports different conditions for determining when a promotional rule should apply.
Pros
Modern administration interface.
Multiple dynamic pricing strategies.
BOGO and bulk pricing support.
Product bundle promotions.
Flexible discount conditions.
Regular feature development.
Free version available.
Cons
Some advanced features require Pro.
Smaller installed base than some established competitors.
Complex campaigns still require testing.
The free version has limited premium functionality and support.
Pricing
The WooCommerce marketplace lists the Premium one-year plan at $99. A two-year option is also available.
The free version can be downloaded from WordPress.org.
Verdict: YayPricing is worth considering if you prefer a modern interface and want to create different types of dynamic pricing campaigns without manually changing product prices.
YITH WooCommerce Dynamic Pricing and Discounts is a premium solution for creating different promotional rules and pricing strategies.
It supports a variety of promotional scenarios, including quantity discounts, BOGO deals, cart discounts, and free gifts.
Main Features
Buy One Get One promotions.
Buy 2 Get 1 Free and 3-for-2 offers.
Product-specific discounts.
Category discounts.
Storewide promotions.
Quantity-based pricing.
Product and cart discount rules.
Gift products.
Free-shipping conditions.
Customer and user-role targeting.
Purchase-history conditions.
Scheduled promotions.
Dynamic product and cart messages.
Countdown-based promotional offers.
Quantity pricing tables.
One useful feature is the ability to give shoppers free products when they meet certain conditions.
For example, you can offer a free gift when customers spend more than $100 or purchase a particular product.
YITH also allows store owners to control how different promotional rules interact.
Pros
Extensive promotional options.
Supports multiple BOGO and gift scenarios.
Quantity pricing tables.
Customer and role targeting.
Scheduled campaigns.
Integrates with other YITH extensions.
Detailed documentation.
Cons
No standalone free version is listed.
Premium pricing may be excessive for small stores.
Some integrations require additional YITH extensions.
The number of options may be unnecessary for stores with basic discount requirements.
Pricing
YITH offers a premium license with updates and technical support. Check the current official product page for the exact license price and renewal terms.
Verdict: YITH is a good choice for store owners who want an extensive promotional system and already use other products in the YITH ecosystem.
ELEX WooCommerce Dynamic Pricing and Discounts provides rule-based pricing for products and categories.
One of its distinguishing features is the ability to calculate discounts using different parameters, including quantity, product weight, price, and total units.
This makes it particularly useful for stores selling products where weight and quantity are important pricing factors.
Main Features
The free version supports:
Product-specific discounts.
Category discounts.
Quantity-based pricing.
Weight-based discounts.
Price-based rules.
Total-unit conditions.
Percentage discounts.
Fixed-amount discounts.
Fixed product pricing.
Discount expiry dates.
User-role conditions.
Product-page pricing tables.
Maximum discount limits.
The Pro version adds additional capabilities, including:
BOGO promotions.
Tag-based discount rules.
Advanced category and cart rules.
Product-combination discounts.
Customer restrictions.
Purchase-history conditions.
Multi-product pricing rules.
Advanced promotional conditions.
For example, you can offer a 20% discount when customers purchase a specific number of products, or configure a pricing rule based on the combined weight of items in the cart.
Pros
Supports weight-based discount rules.
Offers several pricing conditions.
Allows maximum discount limits.
Includes a free version.
Useful for stores with quantity- or weight-based products.
Supports product pricing tables.
Cons
The free version does not include every advanced promotion.
Some advanced features require Pro.
Smaller WordPress.org user base than several established competitors.
Some complex rule combinations require careful configuration.
Pricing
The free plugin is available through WordPress.org. Check the ELEX website for current Pro license options and pricing.
Verdict: ELEX is worth considering if you sell products by weight or need pricing rules based on several different product and cart parameters.
Smart Coupons for WooCommerce by WebToffee is a coupon-focused plugin that expands the promotional capabilities of the default WooCommerce coupon system.
It allows store owners to create different coupon types and apply restrictions based on products, categories, customers, and checkout conditions.
Main Features
BOGO coupon offers.
Automatic coupon application.
Coupon restrictions.
Product and category restrictions.
Quantity-based conditions.
Subtotal-based discounts.
Shipping-method restrictions.
Payment-method restrictions.
User-role restrictions.
Giveaway coupons.
Coupon URLs.
Coupon categorization.
Coupon customization.
Displaying available coupons to shoppers.
For example, you can create a coupon that automatically applies when a customer purchases a specific product or meets a minimum order quantity.
You can also create promotional coupons for selected products and categories.
Pros
Useful free coupon functionality.
Supports BOGO offers.
Automatic coupon application.
Product and category restrictions.
Coupon URLs.
Large WordPress.org user base.
Good option for coupon-based promotions.
Cons
Primarily focused on coupons rather than a complete dynamic-pricing engine.
Advanced coupon workflows may require additional premium products.
Not the ideal choice if you mainly need complex product-level pricing tables and tiered pricing.
Pricing
The WordPress.org plugin is available for free. WebToffee offers additional premium coupon products and extensions, with pricing depending on the selected product and license.
Check the official website for current options.
Verdict: Smart Coupons is a good option for stores that want to expand their coupon marketing capabilities without replacing WooCommerce’s existing coupon system.
Bonus: Sale Booster – Product Badges, Countdown Timers, and Promotional Tools for WooCommerce
Best for: Store owners who want to highlight discounts, create promotional urgency, and make special offers more visible throughout their WooCommerce store.
Free version: Available.
Pro version: €39–€99, depending on the selected license.
Creating an attractive discount is important, but customers also need to notice it.
A promotional campaign can be difficult to communicate if shoppers cannot easily see which products are discounted, how much they can save, or when an offer expires.
This is where Sale Booster by AsanaPlugins comes in.
Unlike dynamic-pricing plugins, Sale Booster is not designed to calculate and apply discount rules. Instead, it focuses on displaying promotions and making products more attractive through customizable badges, countdown timers, notifications, and promotional bars.
It complements discount plugins by helping store owners communicate their offers more effectively.
1. Custom WooCommerce Product Badges and Labels
Sale Booster allows you to create custom product badges and labels to highlight special offers and product information.
For example, you can display:
20% OFF.
50% OFF.
Black Friday Sale.
Cyber Monday Deal.
Buy 2 Get 1 Free.
New Arrival.
Best Seller.
Limited-Time Offer.
Free Shipping.
Sold Out.
You can customize label colors, text, font sizes, positions, and other design options.
The plugin also supports CSS labels, image labels, and multiple badge styles.
2. Dynamic Discount Badges
Instead of manually creating a different badge for every product, use dynamic placeholders to display information such as:
Discount percentage.
Amount saved.
Regular price.
Sale price.
Product quantity.
SKU.
Sale end date.
For example, a product with a regular price of $100 and a sale price of $80 can display:
“20% OFF – SAVE $20”
This makes it easier for customers to understand the value of an offer.
3. WooCommerce Countdown Timers
Countdown timers are useful for limited-time promotions.
Sale Booster allows store owners to display countdown timers for scheduled sales and promotional campaigns.
You can use them for:
Black Friday sales.
Cyber Monday promotions.
Flash sales.
Seasonal discounts.
Product launches.
Limited-time offers.
The Pro version also provides additional timer designs, animations, and display options.
4. Schedule Product Badges
You can schedule badges to appear and disappear automatically.
For example, you can create a Black Friday badge that appears on November 27 and expires at the end of the promotional campaign.
You can also target particular products, categories, and tags.
This is useful when you want to prepare promotional labels in advance rather than manually enabling and disabling them.
5. Quick View for WooCommerce Products
Sale Booster includes a Quick View feature that allows customers to view product details from the shop page without opening the individual product page.
The Pro version provides additional Quick View themes and customization options.
This can make browsing easier, particularly in stores with large product catalogs.
6. Sticky Add to Cart
The Pro version provides a sticky Add to Cart bar on product pages.
It can display:
Product name.
Price.
Quantity selector.
Variation selector.
Add to Cart button.
The bar can be customized with different designs, animations, and desktop/mobile display settings.
This helps keep the purchase option accessible while customers scroll through product information.
7. Sales Popups and Discount Notifications
Use promotional popups to highlight special offers and campaigns.
The Pro version includes Sales Popups, Discount Popups, and Notification Bars.
You can use these elements to communicate seasonal promotions, limited-time offers, and other important announcements.
8. Free Shipping Progress Bar
The Pro version includes a Free Shipping Bar that shows shoppers how much more they need to spend to qualify for free shipping.
For example:
“Spend $20 more to unlock FREE SHIPPING!”
Once the customer reaches the required cart value, the message can change to confirm that free shipping has been unlocked.
This is particularly useful when you want to encourage customers to add another product to their cart.
9. Trust Badges, Payment Icons, and Promotional Banners
Sale Booster Pro also provides additional promotional elements, including:
Trust badges.
Payment icons.
Social media icons.
Announcement bars.
Countdown banners.
Multiple promotional bars.
Sales notifications.
Seasonal promotional designs.
These features help store owners communicate important information and highlight campaigns without creating every promotional element manually.
Free vs. Pro Comparison
Feature
Free
Pro
Custom product labels
Yes
Yes
CSS label templates
Yes
Yes
Image labels
Yes
Yes
Dynamic discount placeholders
Yes
Yes
Scheduled badges
Yes
Yes
Product and category targeting
Yes
Yes
Countdown timer
Yes
Yes
Quick View
Yes
Advanced themes
Sticky Add to Cart
No
Yes
Discount Popup
No
Yes
Sales Popup
No
Yes
Notification Bar
No
Yes
Free Shipping Bar
No
Yes
Trust Badges
No
Yes
Payment Icons
No
Yes
Social Media Icons
No
Yes
Countdown Banner
No
Yes
Advanced promotional embeds
No
Yes
Advanced badge conditions
Limited
Yes
Pros
Customizable product badges and labels.
Dynamic discount placeholders.
Scheduled product badges.
Countdown timer functionality.
Multiple CSS and image label designs.
Quick View functionality.
Sticky Add to Cart in Pro.
Free shipping and notification bars in Pro.
Supports Elementor and WPML.
Compatible with Discount Rules and Dynamic Pricing.
Cons
It does not calculate or apply dynamic discount rules by itself.
Advanced promotional displays require Pro.
Some features may require styling adjustments depending on the active theme.
Store owners should avoid displaying too many badges, popups, and countdown timers simultaneously.
Pricing
Sale Booster offers a free version through WordPress.org.
The Pro product page currently displays license options ranging from €39 to €99, depending on the selected license.
Discount Rules and Sale Booster serve different purposes, which makes them useful together.
Discount Rules calculates and applies the promotion, while Sale Booster helps customers notice and understand it.
For example, imagine that you want to run a 30% Black Friday promotion.
You can use Discount Rules to:
Create a 30% discount for selected products.
Schedule the discount to start and end automatically.
Apply the discount to eligible customers.
Display the discounted price and savings.
Then use Sale Booster to:
Display a Black Friday badge on qualifying products.
Show a countdown timer.
Add a promotional notification bar.
Highlight the free-shipping offer.
The result is a promotion that is both functional and clearly communicated to shoppers.
Verdict: Sale Booster is a useful complementary plugin for stores that want to make their discounts more visible. If you already use a discount plugin, Sale Booster adds product badges, countdown timers, promotional notifications, and other storefront marketing tools.
How WooCommerce Discounts Can Increase Sales and Average Order Value
Discounts are not just about reducing product prices. When planned properly, they can help improve several important ecommerce metrics.
Let’s look at some ways discounts can benefit your store.
1. Increase Average Order Value with Bulk Discounts
Bulk discounts encourage customers to purchase larger quantities to receive a better price.
For example:
Quantity
Price per item
Total
1 item
$20
$20
5 items
$18
$90
10 items
$16
$160
Customers receive a lower unit price when purchasing more products, while the store increases the total value of each order.
This strategy is particularly useful for wholesale stores, cosmetics, clothing, accessories, and products customers regularly purchase.
2. Encourage More Purchases with BOGO Deals
Buy One Get One Free promotions give customers an additional reason to purchase.
For example, instead of buying one product for $30, customers can receive two products for the same price.
You can also create variations such as:
Buy 2 Get 1 Free.
Buy 3 Get 1 Free.
Buy Product A and Get Product B Free.
Buy One Get One 50% Off.
These offers can help move inventory and increase the number of items sold per order.
However, calculate your product costs carefully before offering free products.
3. Encourage Customers to Spend More with Cart Discounts
Minimum-spend promotions encourage customers to increase their cart value.
For example:
“Spend $100 and get 15% off your order.”
A customer with $85 worth of products may decide to add another product to qualify for the discount.
This strategy is useful when the additional purchase increases the order’s profitability.
4. Attract New Customers with First-Order Discounts
A first-order discount can encourage visitors who have never purchased from your store to complete their first transaction.
For example:
“Get 10% off your first purchase.”
You can also create targeted discounts for newsletter subscribers, registered users, or specific customer groups.
5. Encourage Repeat Purchases with Customer-Specific Discounts
Reward loyal customers with special offers based on their purchase history.
For example:
Give VIP customers 15% off.
Reward customers after five completed orders.
Offer returning customers a special coupon.
Give wholesale customers different pricing.
These strategies can help build customer loyalty and encourage repeat purchases.
How Much More Revenue Can a WooCommerce Store Generate with Discounts?
Let’s look at a simplified example.
Suppose your WooCommerce store receives 1,000 visitors every month.
Assume that your original conversion rate is 2%, with an average order value of $50.
Now imagine that a promotional campaign increases the conversion rate to 2.5% and average order value to $55.
Metric
Before promotion
After promotion
Monthly visitors
1,000
1,000
Conversion rate
2%
2.5%
Orders
20
25
Average order value
$50
$55
Monthly revenue
$1,000
$1,375
In this hypothetical example, monthly revenue increases by $375, or 37.5%.
Important: These numbers are illustrative, not measured results or a guarantee that discounts will produce the same improvement in your store. Actual profitability depends on product margins, discount costs, shipping, payment fees, and other expenses.
The lesson is that a well-planned discount strategy should focus on profitable orders, not simply increasing the number of discounts offered.
Not all promotions influence shoppers in the same way.
Consider these two offers:
Offer A: Get $5 off when you spend $25.
Offer B: Get 20% off, up to a maximum discount of $5.
Both can provide a maximum saving of $5, but they communicate different incentives.
Offer A encourages customers to reach a minimum spending threshold. Offer B focuses on a percentage discount with a spending cap.
A 2026 academic study published in the Journal of Consumer Research examined threshold promotions and capped discounts across seven preregistered studies, including a field study. It found that lower-trigger threshold promotions could increase purchase intentions and conversion rates compared with economically equivalent capped discounts, although purchase amounts could be lower.
This illustrates an important point: the structure of a promotion can matter as much as its discount value.
How to Choose the Right WooCommerce Dynamic Pricing Plugin
Choosing a discount plugin depends on your promotional strategy and the type of products you sell.
Here are some important things to consider before installing one.
1. Identify the Discount Types You Need
Start by deciding which promotional strategies you want to implement.
Do you need:
Percentage and fixed discounts?
BOGO promotions?
Bulk and quantity discounts?
Cart-total discounts?
Automatic coupons?
Customer-specific pricing?
Free-shipping promotions?
Scheduled campaigns?
Product bundle discounts?
Not every plugin supports all these features in its free version.
Choose one that supports your current requirements and can accommodate your future promotional strategies.
2. Check the Free and Pro Versions
Many WooCommerce discount plugins offer free versions, but advanced features may require a premium license.
Compare the features before purchasing.
If you only need basic percentage discounts and coupons, a free plugin may be sufficient.
However, if you need advanced pricing rules, customer-specific discounts, or complex BOGO campaigns, consider a premium solution.
3. Check Compatibility with WooCommerce
Make sure the plugin supports your WordPress and WooCommerce versions.
You should also test compatibility with:
Your active WordPress theme.
Cart and checkout extensions.
Subscription plugins, if applicable.
Multi-currency plugins.
Product bundle extensions.
Other pricing and coupon plugins.
Pay particular attention to how multiple discount rules interact.
4. Consider How Discounts Appear to Customers
A discount should be easy to understand.
Look for features such as:
Crossed-out original prices.
Discounted product prices.
Quantity pricing tables.
Promotional messages.
Savings information in the cart.
Sale badges.
Countdown timers.
A discount that customers cannot see or understand may not achieve its intended purpose.
5. Compare Pricing and Support
Don’t choose a plugin based only on its initial price.
Consider:
Number of websites included.
Annual renewal costs.
Technical support.
Documentation.
Update frequency.
A well-maintained plugin with good documentation can save considerable time when configuring complex discount campaigns.
Frequently Asked Questions
What is the best free WooCommerce discount plugin?
Discount Rules and Dynamic Pricing for WooCommerce is a strong free option for stores that need bulk discounts, BOGO offers, category discounts, cart promotions, and automatic coupons.
Its free version covers several common promotional scenarios, while the Pro version adds more advanced pricing conditions and customer-targeting capabilities.
What is the best WooCommerce dynamic pricing plugin?
The best option depends on your requirements.
Discount Rules by AsanaPlugins, Flycart Discount Rules, and Advanced Dynamic Pricing by AlgolPlus are worth considering for stores that need dynamic product pricing and flexible discount conditions.
Compare their free and premium features before making a decision.
How do I automatically apply discounts in WooCommerce?
WooCommerce discount plugins can automatically apply eligible discounts when customers meet predefined conditions.
For example, you can configure a rule that applies a 10% discount when the cart reaches $100.
Plugins such as Discount Rules and Dynamic Pricing and Advanced Coupons support automatic discount or coupon functionality.
Can I create Buy One Get One Free offers in WooCommerce?
Yes. You can use a WooCommerce BOGO plugin to create promotions such as:
Buy 1 Get 1 Free.
Buy 2 Get 1 Free.
Buy X Get Y Free.
Buy one product and receive another product at a discount.
The available BOGO options depend on the plugin and its license.
Can I create bulk discounts in WooCommerce?
Yes. Bulk discount plugins allow you to reduce product prices based on the quantity purchased.
For example, you can offer 10% off when customers purchase five products and 20% off when they purchase ten.
Some plugins also display quantity pricing tables on product pages.
Can I schedule WooCommerce discounts?
Yes. Several WooCommerce discount plugins support scheduled promotions.
You can configure start and end dates for campaigns such as Black Friday, Cyber Monday, Christmas, and seasonal sales.
Some plugins also support specific times and recurring schedules.
Do WooCommerce discount plugins slow down a website?
A well-developed discount plugin should be designed to calculate pricing efficiently. However, performance can depend on the number of active rules, product catalog size, cart complexity, and other installed extensions.
To minimize performance problems:
Avoid creating unnecessary discount rules.
Test complex conditions.
Use compatible caching configurations.
Keep plugins updated.
Monitor cart and checkout performance.
Always test discount calculations on a staging site before launching large promotional campaigns.
Can I use multiple WooCommerce discount plugins together?
You can install multiple discount plugins, but that does not mean their rules will always work together correctly.
For example, two plugins may attempt to modify the same product price or apply different discounts to the same cart.
Before using multiple discount extensions, test:
Discount priorities.
Coupon stacking.
Product sale prices.
Cart totals.
Tax calculations.
Checkout behavior.
Whenever possible, use one primary discount engine to manage your pricing rules.
What is the difference between a discount plugin and a sale badge plugin?
A discount plugin calculates and applies promotional prices based on rules and conditions.
A sale badge plugin displays promotional information to shoppers.
For example, Discount Rules can apply a 20% discount to selected products, while Sale Booster can display a 20% OFF badge and a countdown timer on those products.
The two plugins have different purposes and can complement each other.
Final Verdict: Choosing the Best WooCommerce Discount Plugin
The best WooCommerce discount plugin depends on the type of promotions you want to run.
Here are our recommendations:
Requirement
Recommended plugin
Best all-around discount solution
Discount Rules and Dynamic Pricing
Best free discount solution
Discount Rules and Dynamic Pricing
Advanced discount rules
Flycart Discount Rules
Complex pricing conditions
Advanced Dynamic Pricing
Discount creation and presentation
Barn2 Discount Manager
Flexible product pricing
Acowebs Dynamic Pricing
Advanced coupon campaigns
Advanced Coupons
Modern dynamic promotions
YayPricing
Advanced gift and BOGO campaigns
YITH Dynamic Pricing
Weight-based and quantity discounts
ELEX Dynamic Pricing
Coupon automation
WebToffee Smart Coupons
If you want a flexible discount solution with a generous free version, Discount Rules and Dynamic Pricing for WooCommerce is a great place to start.
You can create product and category discounts, bulk pricing, BOGO deals, cart promotions, and automatic coupons without purchasing a premium license.
When your store needs more advanced pricing conditions and customer-specific offers, you can upgrade to Pro.
And if you want to make your promotional campaigns more visible, combine your discount rules with Sale Booster to display product badges, countdown timers, sales notifications, and free-shipping progress bars.
The important thing is to choose a discount strategy that encourages customers to purchase more while keeping your store profitable.