Do you want to add WhatsApp Chat to WordPress? WhatsApp messaging or simply WhatsApp is internationally available software that allows users to send text and voice messages. WhatsApp is the most popular instant messaging application in the world. It is used by more than 2 billion people worldwide. It means that most of your customers are using WhatsApp so to provide better support to them, you need to add WhatsApp chat support to your website.
In this article, you will learn how to add a WhatsApp chat to your website in less than 2 minutes.
Why Add WhatsApp Chat to WordPress?
One of the best ways to provide better support for your customers is to add a WhatsApp Chat Button to your website.
By Adding WhatsApp Chat Button to your website you will allow your customers to communicate with you when they have questions or issues.
Also, on WooCommerce stores it can help you to increase sales by answering and communicating with your customers.
The best strategy in online marketing is to communicate with your clients and answer their questions and help them. Adding WhatsApp Chat Support helps you to communicate actively with your clients and help them. When you help your customers they will buy your products or services happily and it is great for your company and helps to increase customer loyalty.
How to add a WhatsApp Live Chat plugin to your WordPress website
In this article, we will provide you with a detailed guide to adding WhatsApp Live Chat Plugin to your website easily.
Also, we will explain to you how to add WhatsApp Live Chat Button to WooCommerce products and categories.
Are you ready? Let’s dive in.
What you can do with WhatsApp Chat support?
The WhatsApp Chat Support plugin for WordPress has listed powerful features and helps you to add WhatsApp Chat support to your website easily.
- Add single agent WhatsApp chat
- Add multi-agent WhatsApp chat
- Add a floating WhatsApp chat button to your website
- Add a floating WhatsApp chat button to specific pages
- Display WhatsApp chat support for “All Visitors”, “New Visitors”, “Returning Visitors”, “Logged in users”, and “Guest Users”
- Add a WhatsApp chat button to specific WooCommerce products, categories, or tags
- Add WhatsApp chat support to specific WooCommerce Categories
- Add WhatsApp chat support to specific pages by URL.
- Exclude WhatsApp chat support from specific pages by URL.
- Display a single account or multi-account chat window in the floating WhatsApp chat button
- Create multiple WhatsApp accounts with specific avatars or predefined avatars
- Predefined templates to create WhatsApp chat easily and in a minute
- Different styles and positions for Mobile and Desktop
- Preview the WhatsApp chat in the admin when designing it
- Custom colors, greetings, icons, and avatars
- Define custom availability and working hours for each account
- Define custom availability timezone for each account
- Keep communicating directly from your WhatsApp account
- 4 types of WhatsApp chat “Floating Bubble”, “Embed Bubble”, “Embed Chat Window”, “Button”
- WPML Ready
- Google Analytics and Facebook Pixel Analytics
Installing WhatsApp Chat Button Plugin in WordPress
The Live Chat Button for WhatsApp is an easy-to-use WhatsApp plugin for WordPress and WooCommerce. It will help you to add a single account or multi-account floating WhatsApp chat to the website in less than 2 minutes. It provides built-in templates for WhatsApp chat that speed up the workflow of adding WhatsApp Support to the website.
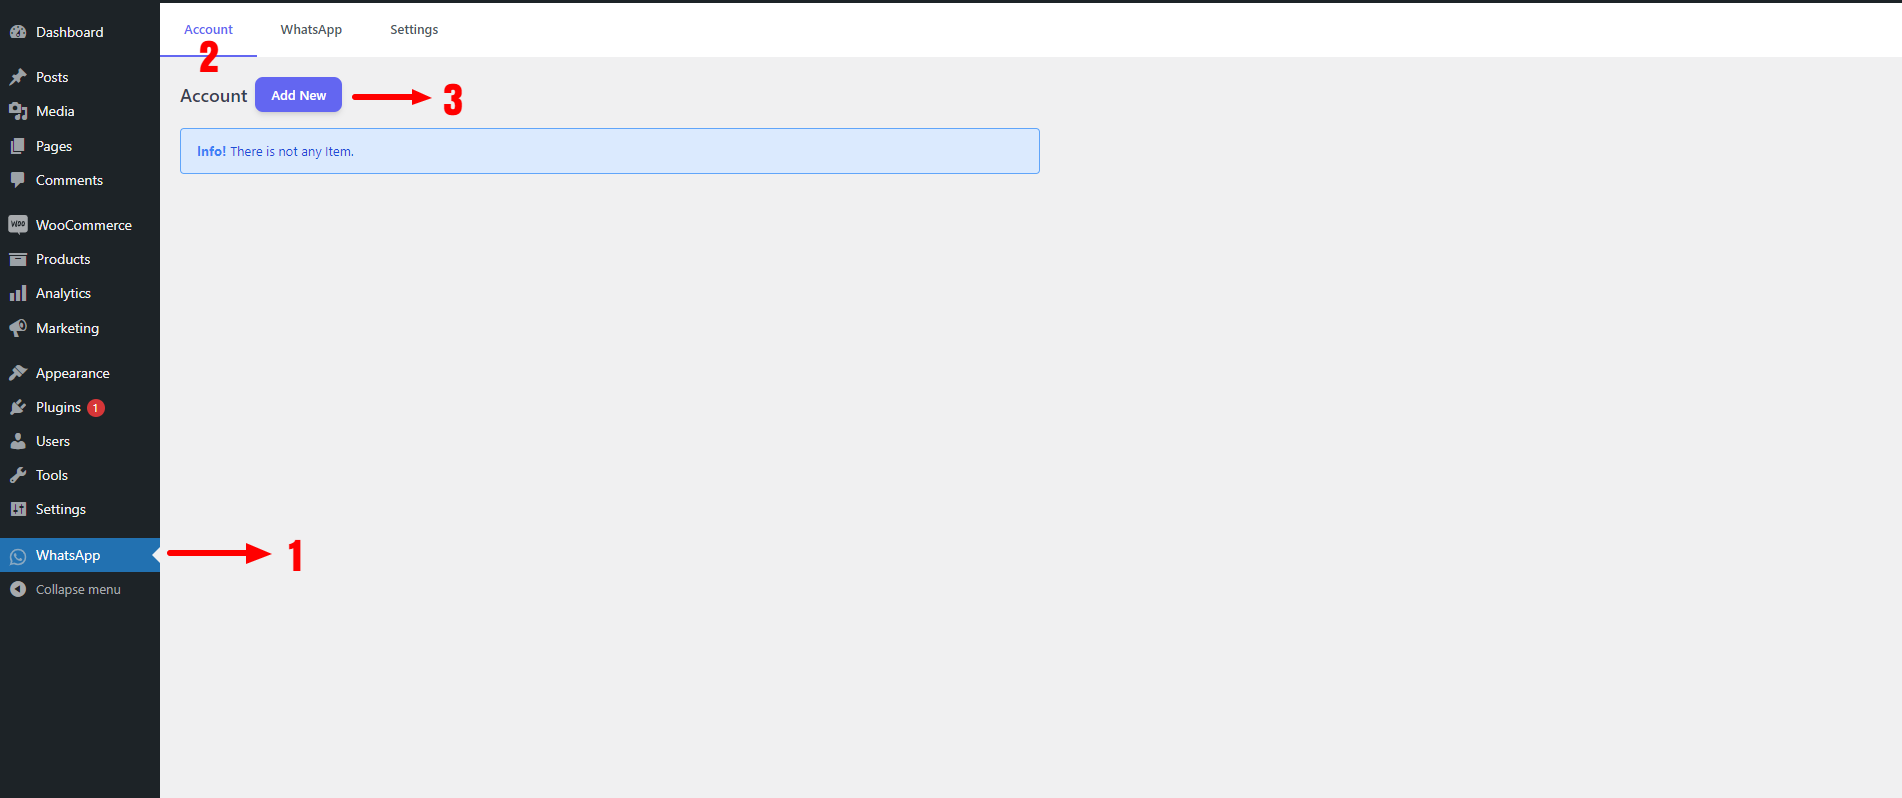
Create Account
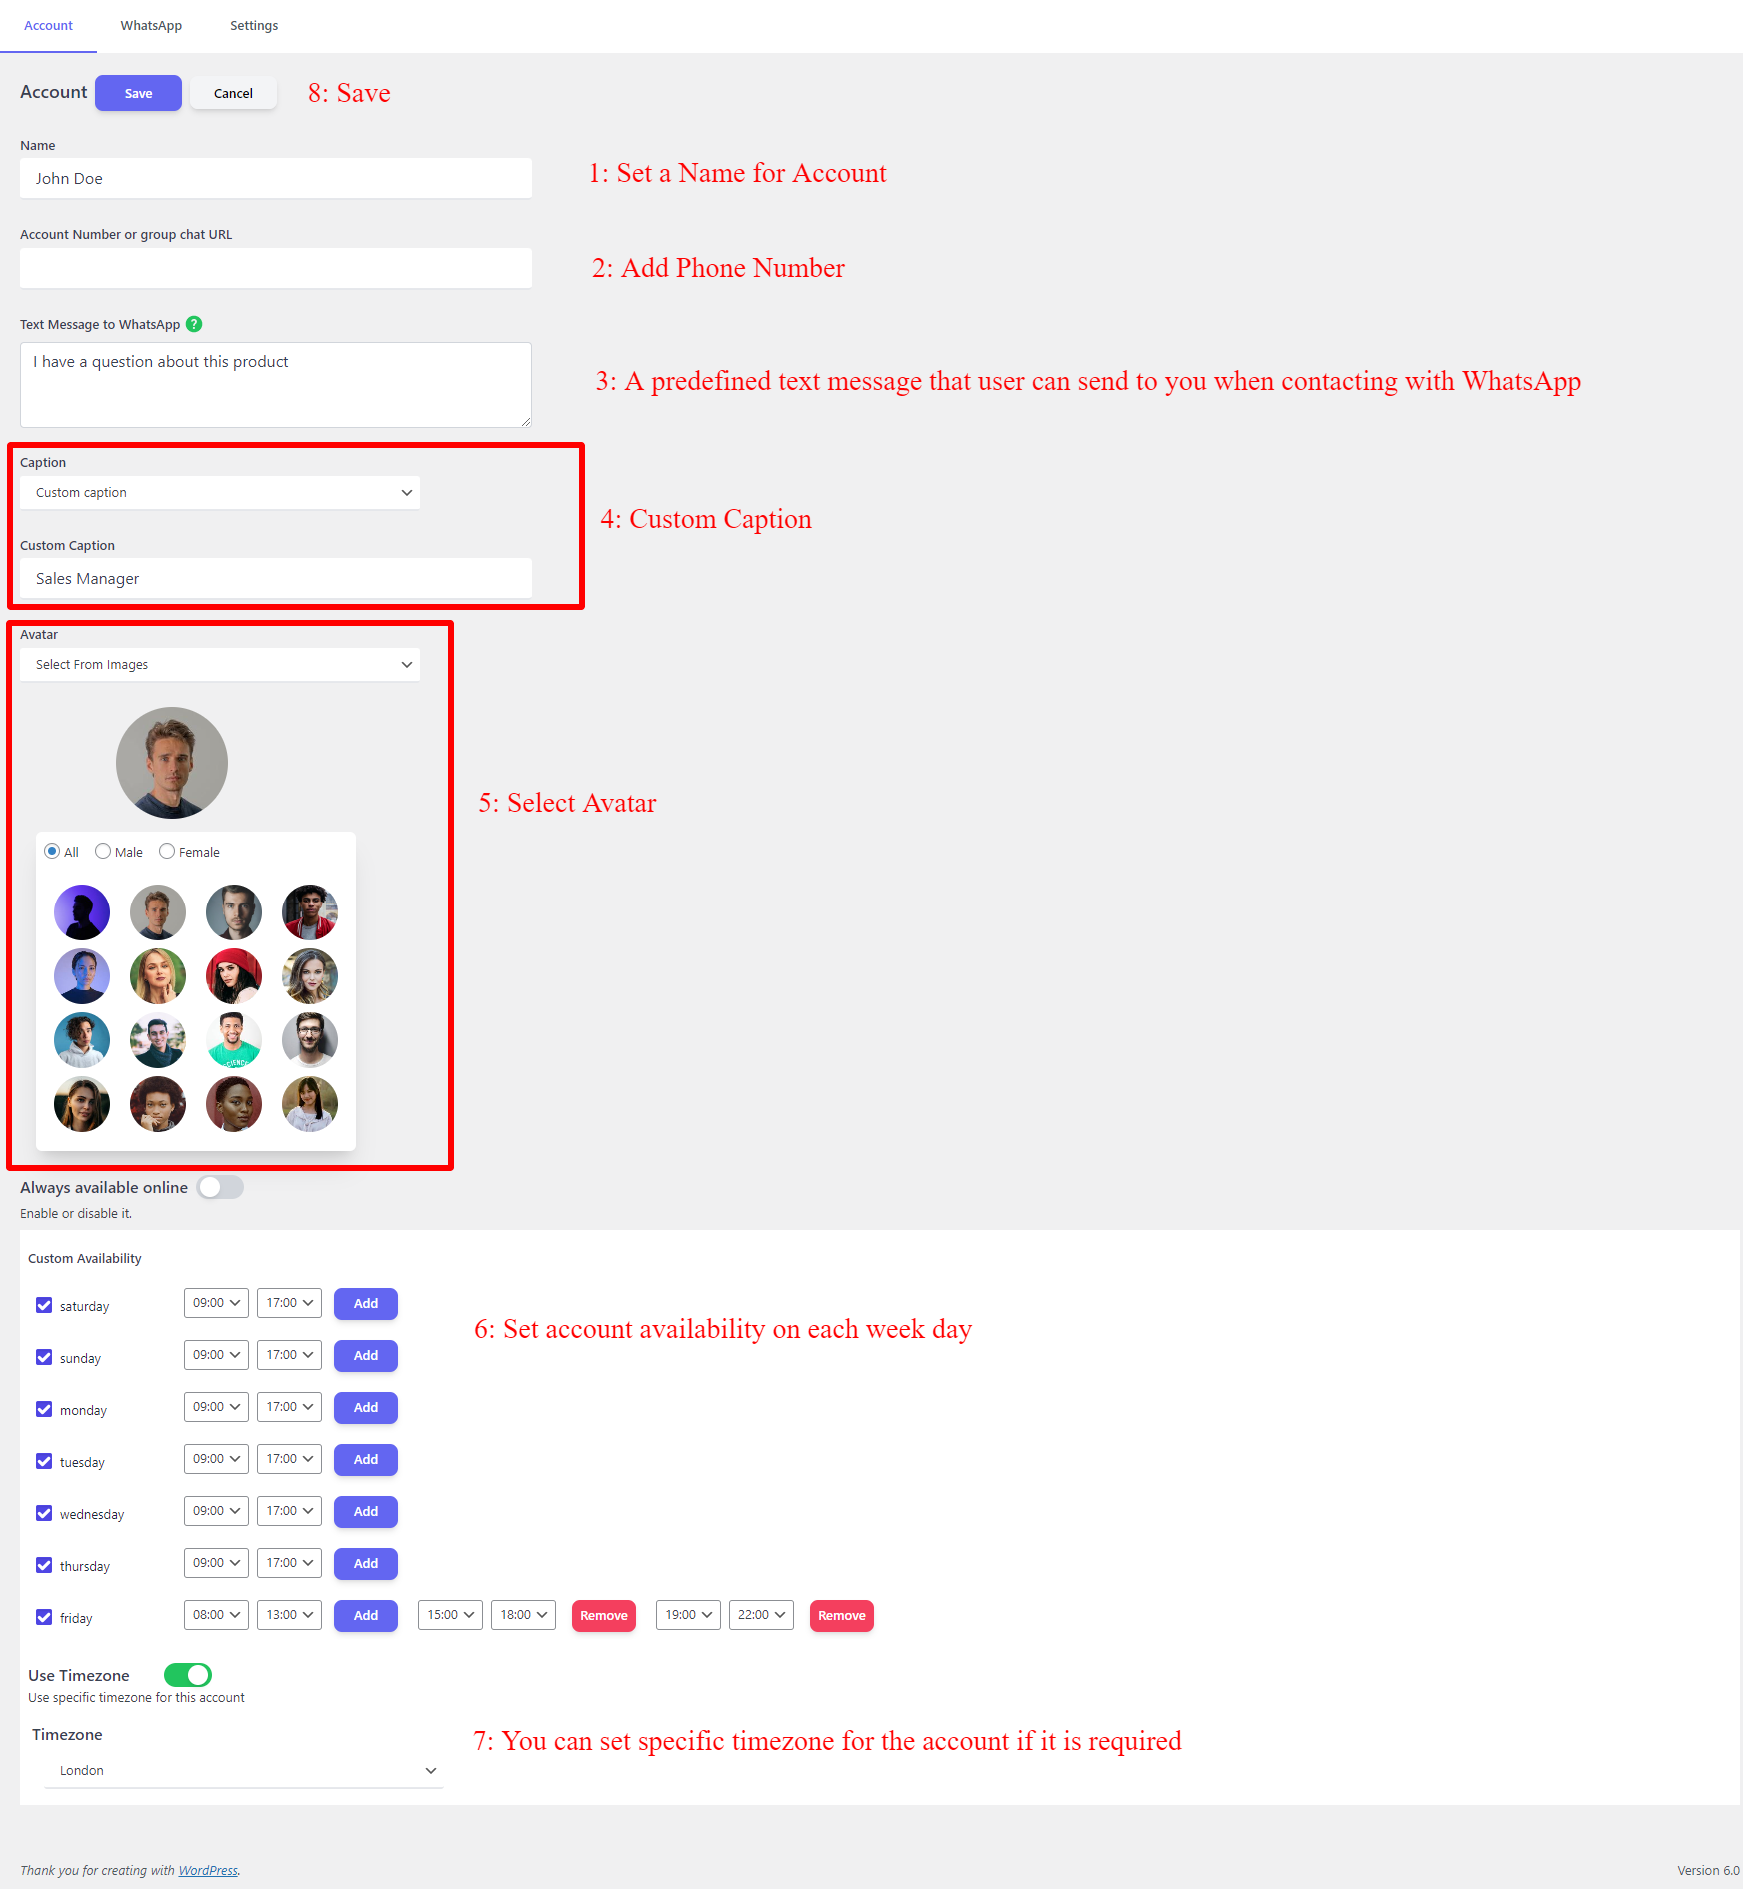
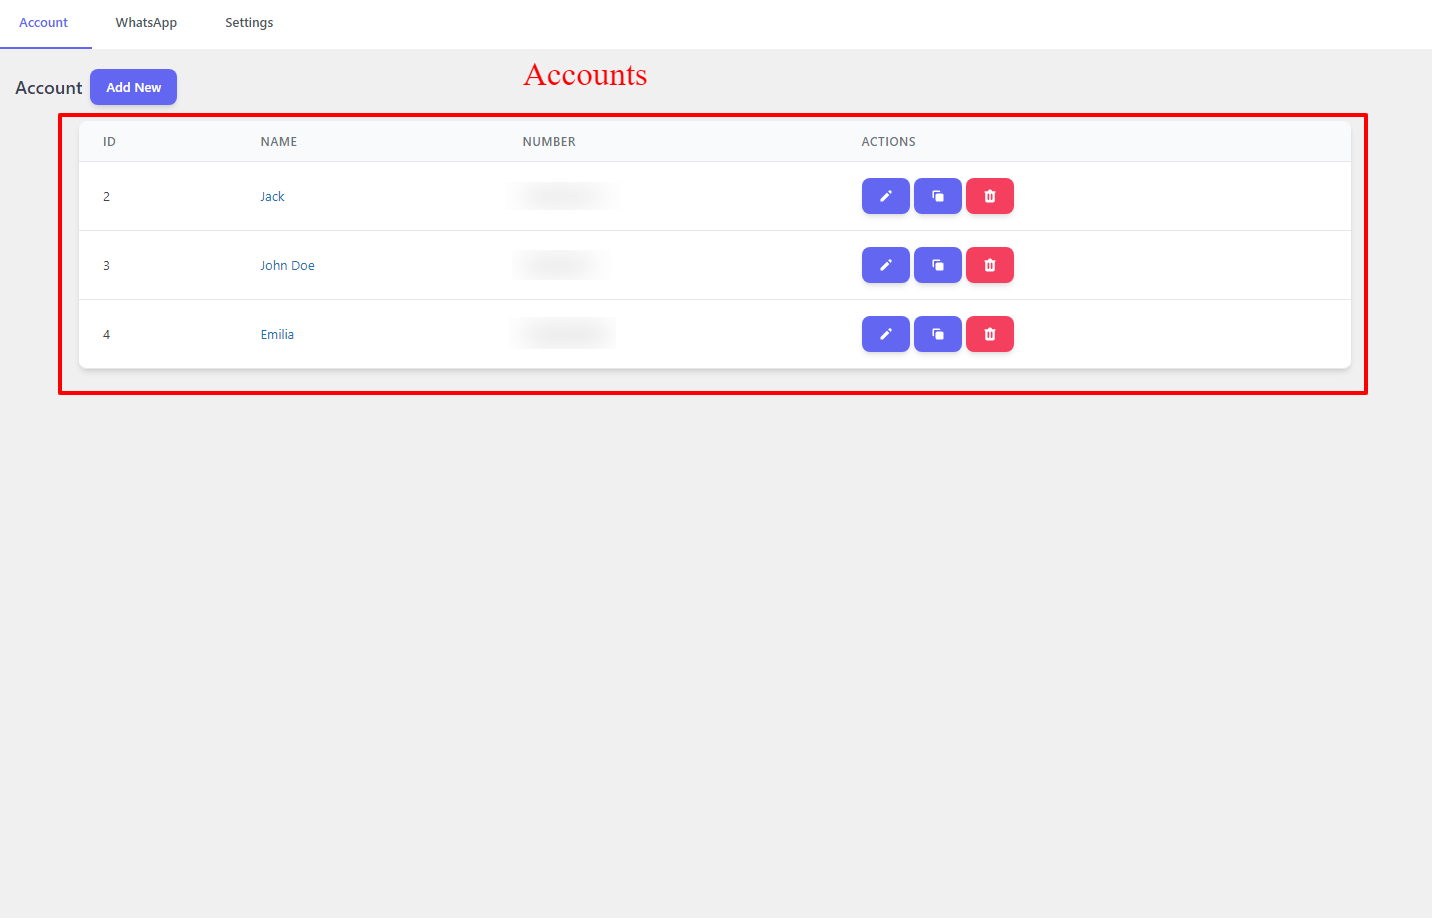
After installing the WhatsApp Chat plugin, you must create an account for Whatsapp chat
To create an account, navigate to the WhatsApp >> Account tab and create an account like the below image.
Now fill the required field of the account like “Name”, and ‘Phone number” and set an avatar to the account. You can set the account availability to “Always available” or add custom availability for it. Adding custom availability is available in the pro version of the plugin. Also, you can set a custom timezone for each account that you create, it can help when you have a worldwide team.
Save the account and go to the next step.
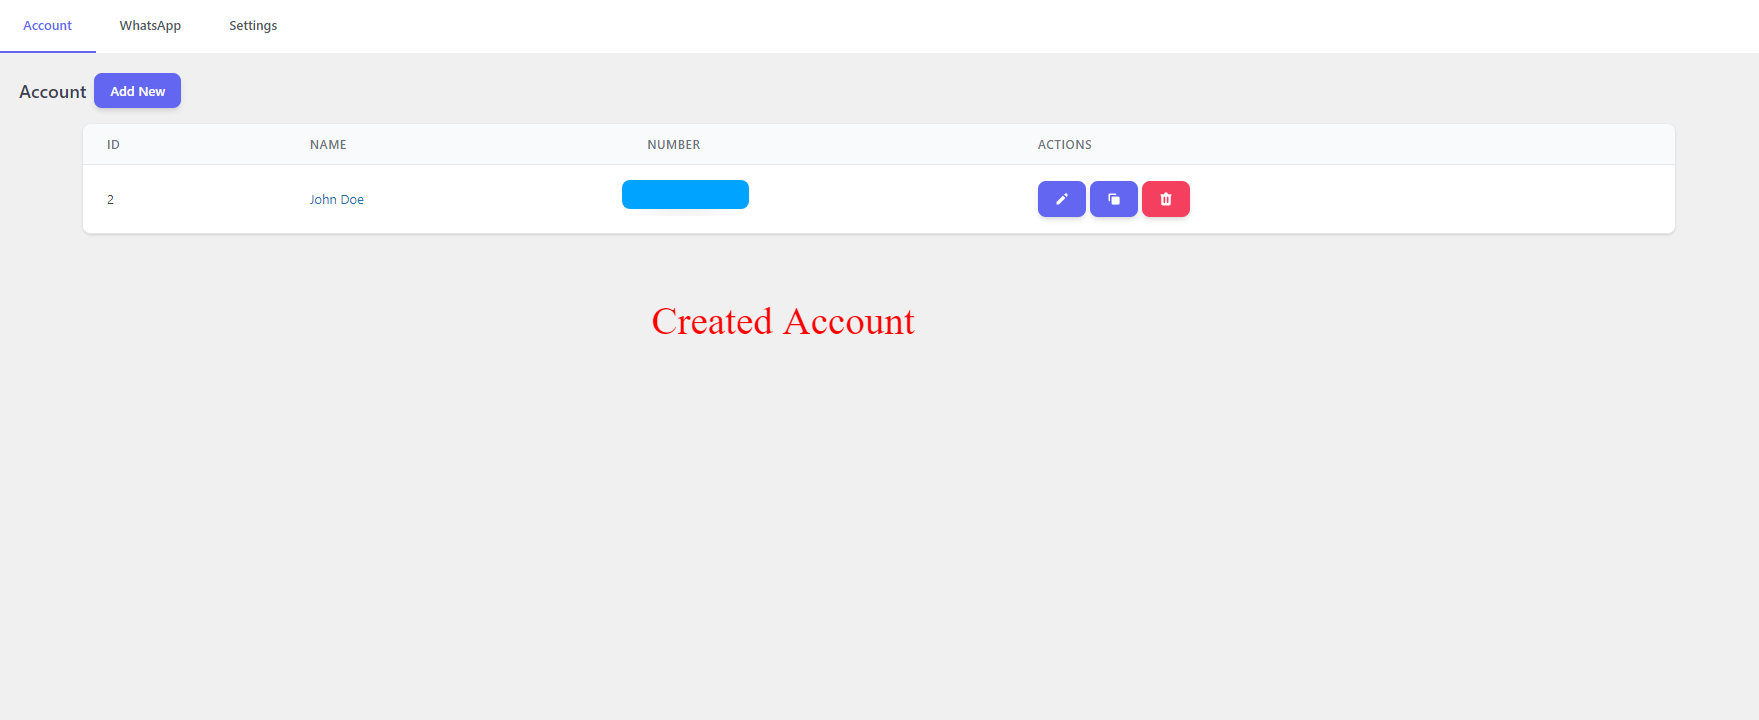
After you create the account it will be listed in the Accounts list like the below image.
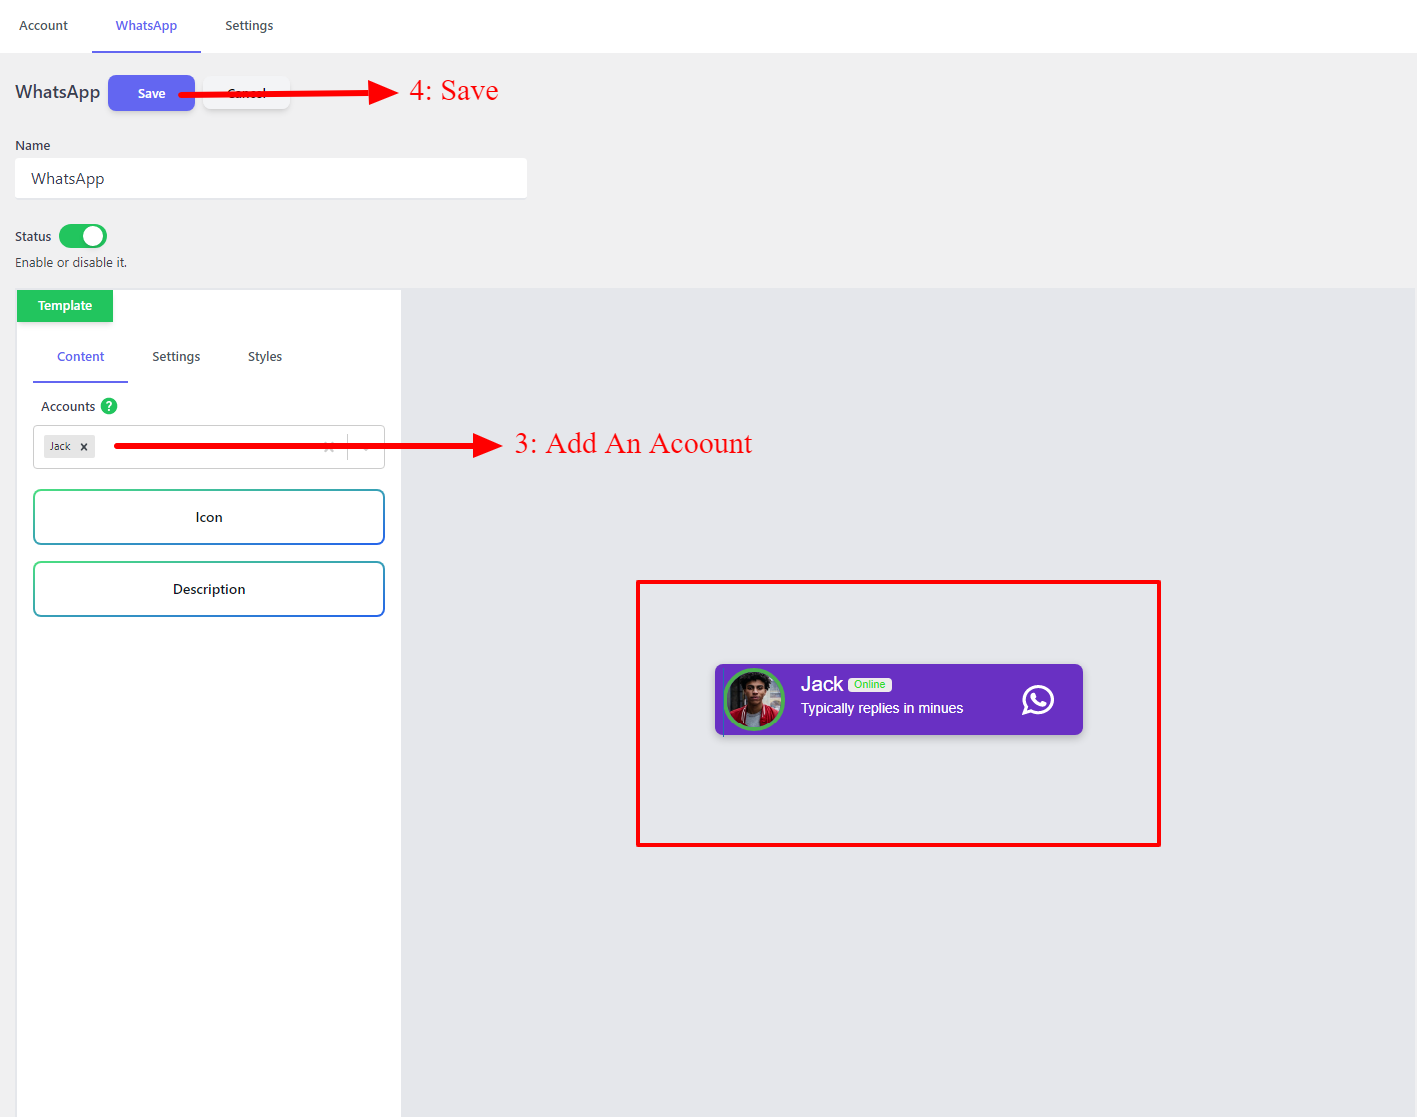
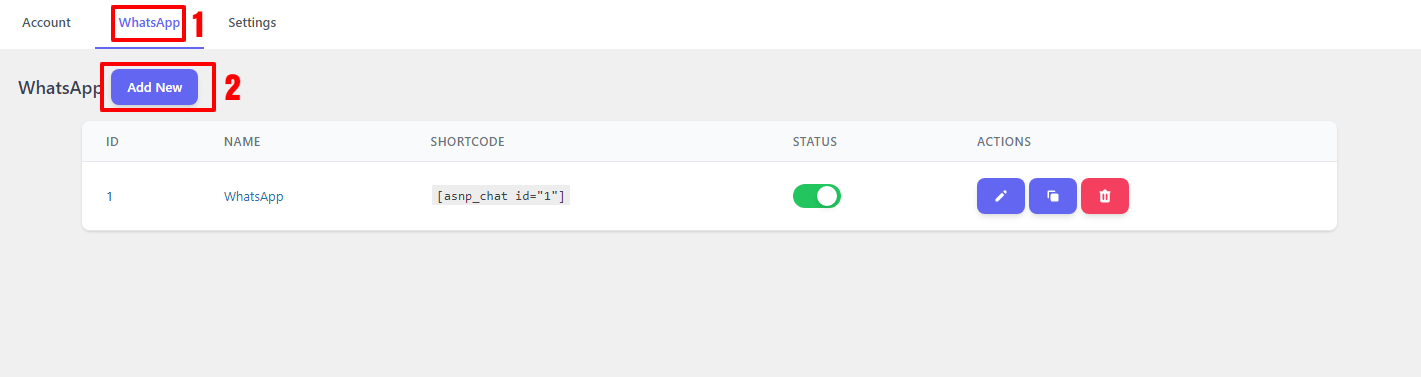
Create Single Account WhatsApp Chat
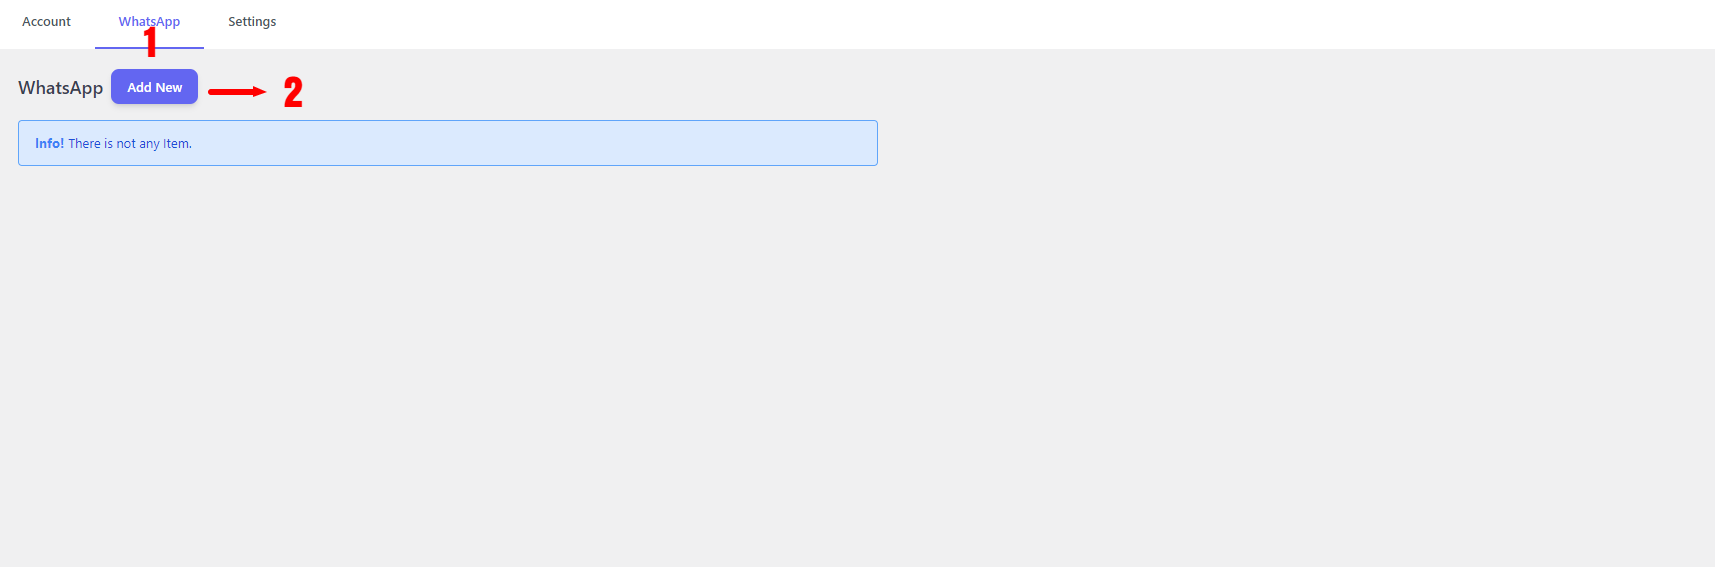
After creating an account in the previous step, navigate to the WhatsApp tab and click on Add New button to create a WhatsApp chat.
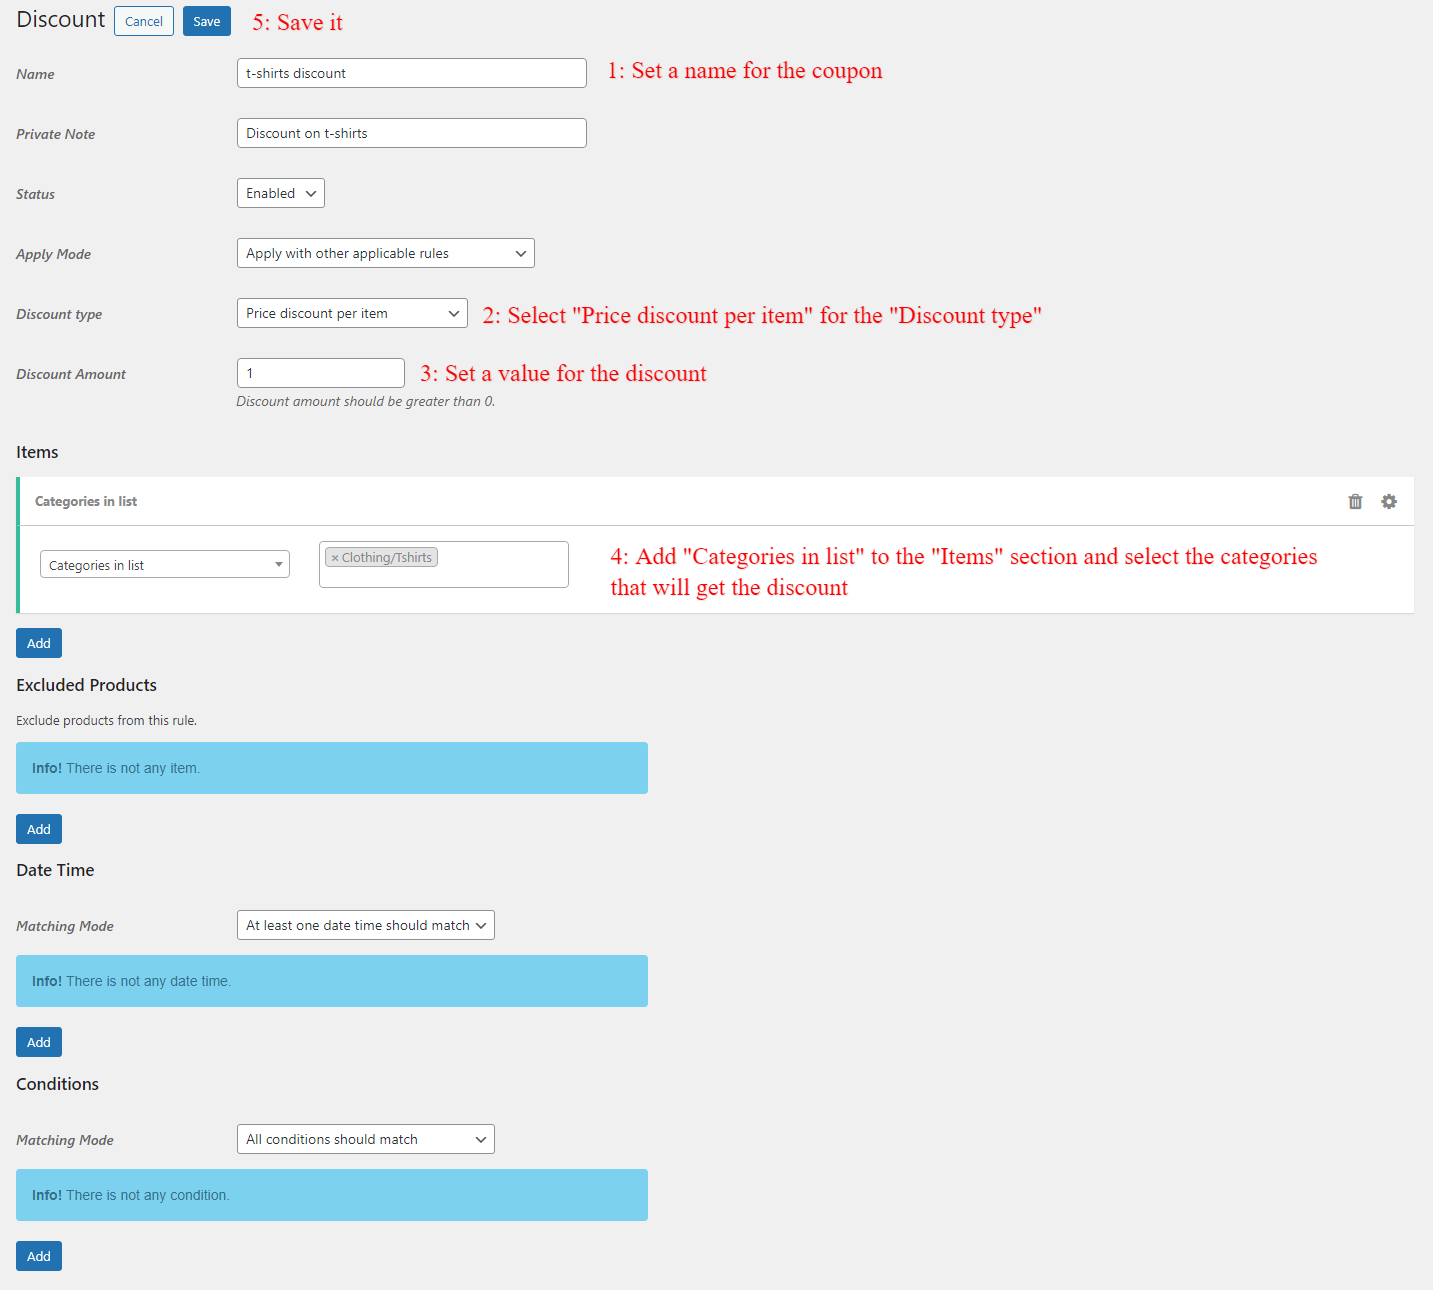
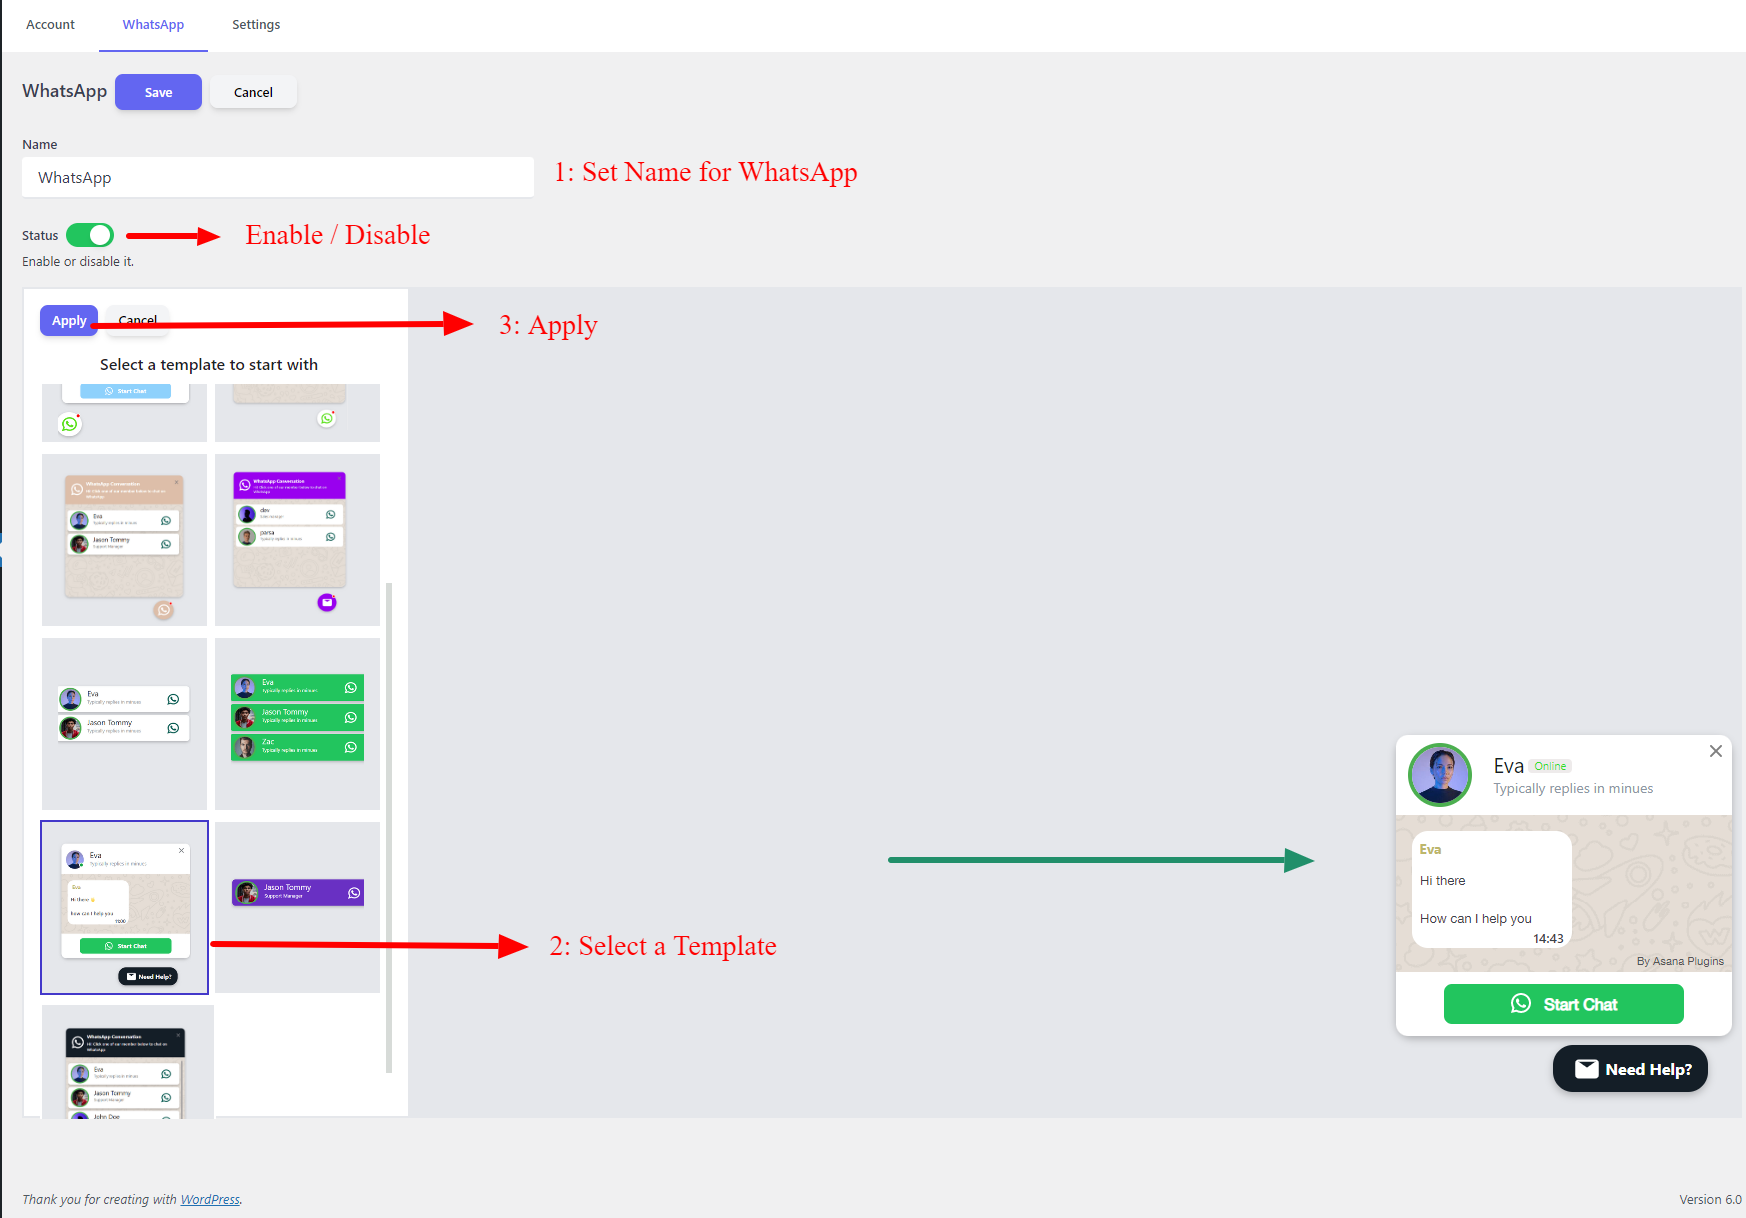
- Set a name for WhatsApp.
- Select a template from the predefined templates list.
- A preview of the selected template will be shown on the right side.
- Click on the Apply button to start using the selected template.
Now in the Accounts field, you should search for the account name that you have created in the previous step. Search for the created account and select it to add it to the WhatsApp Chat Button.
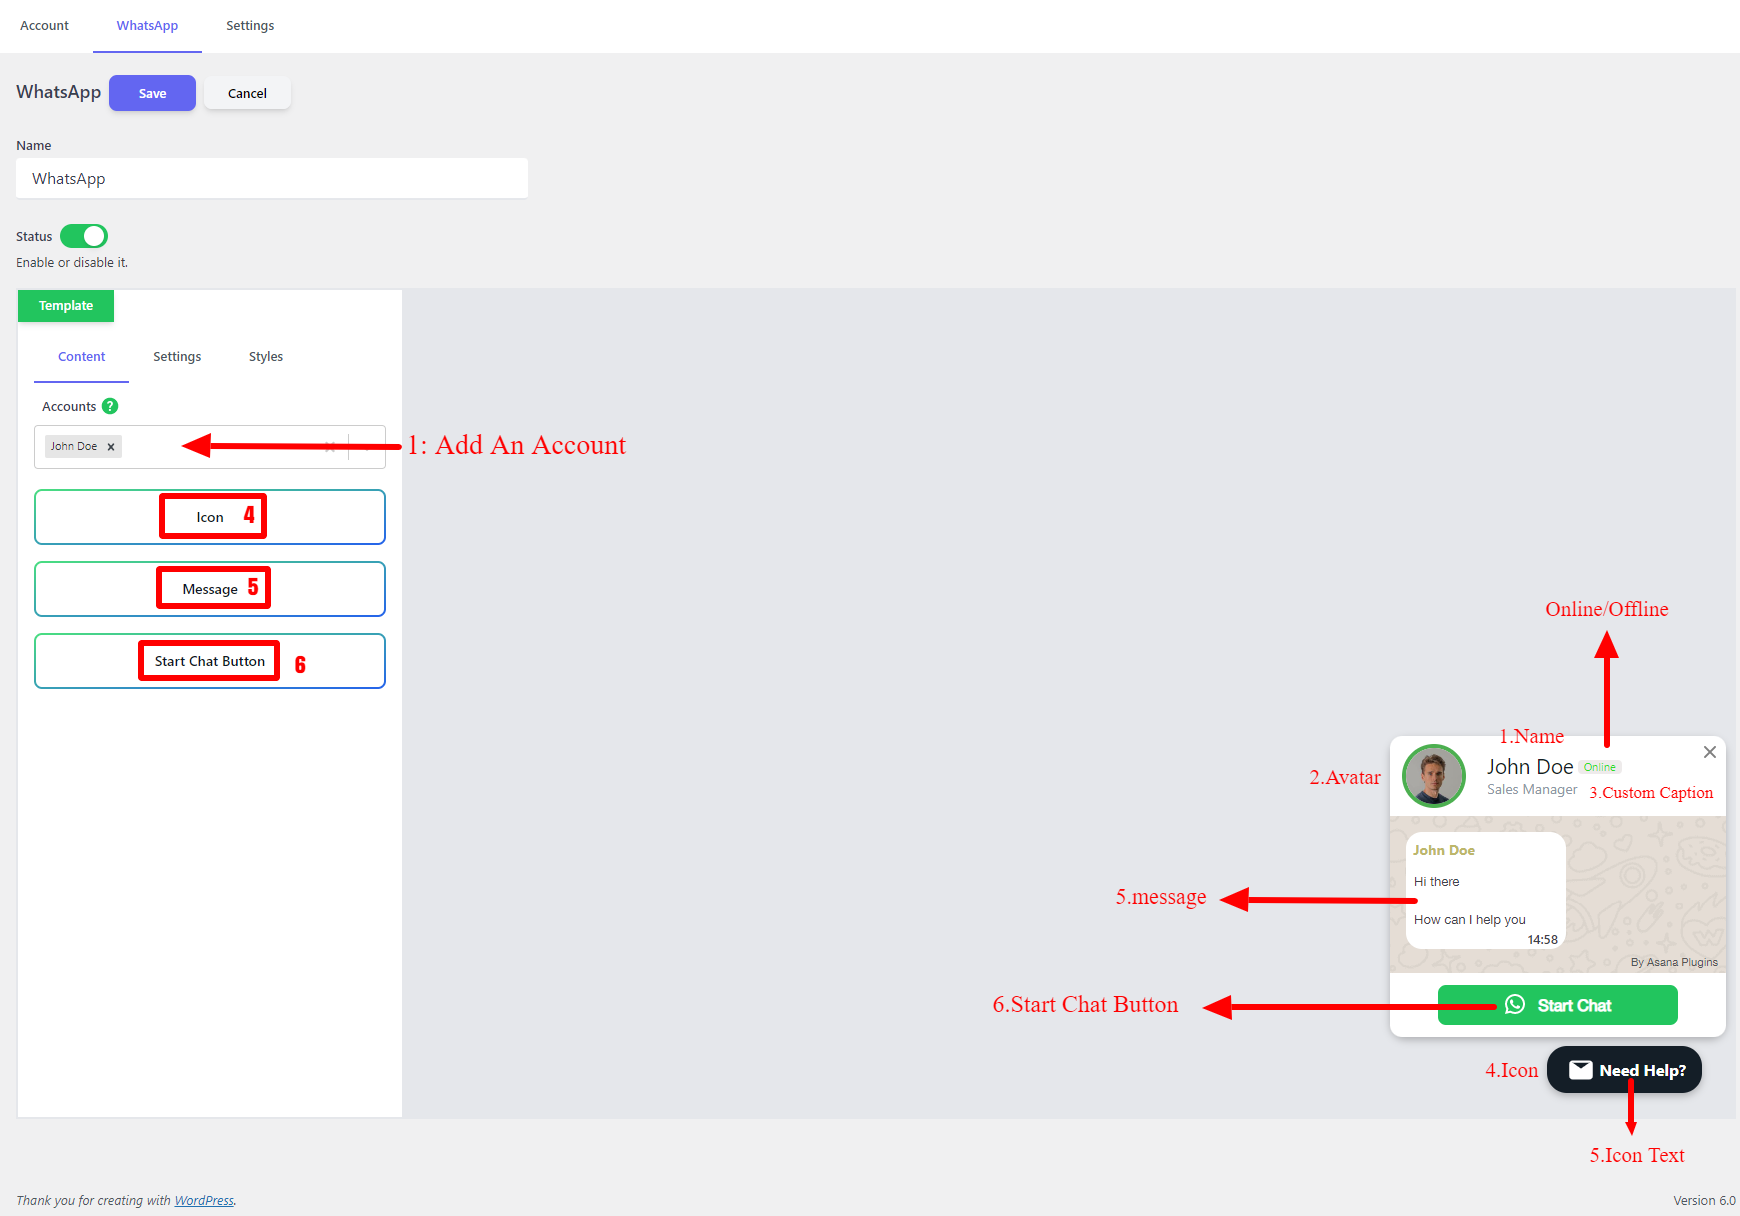
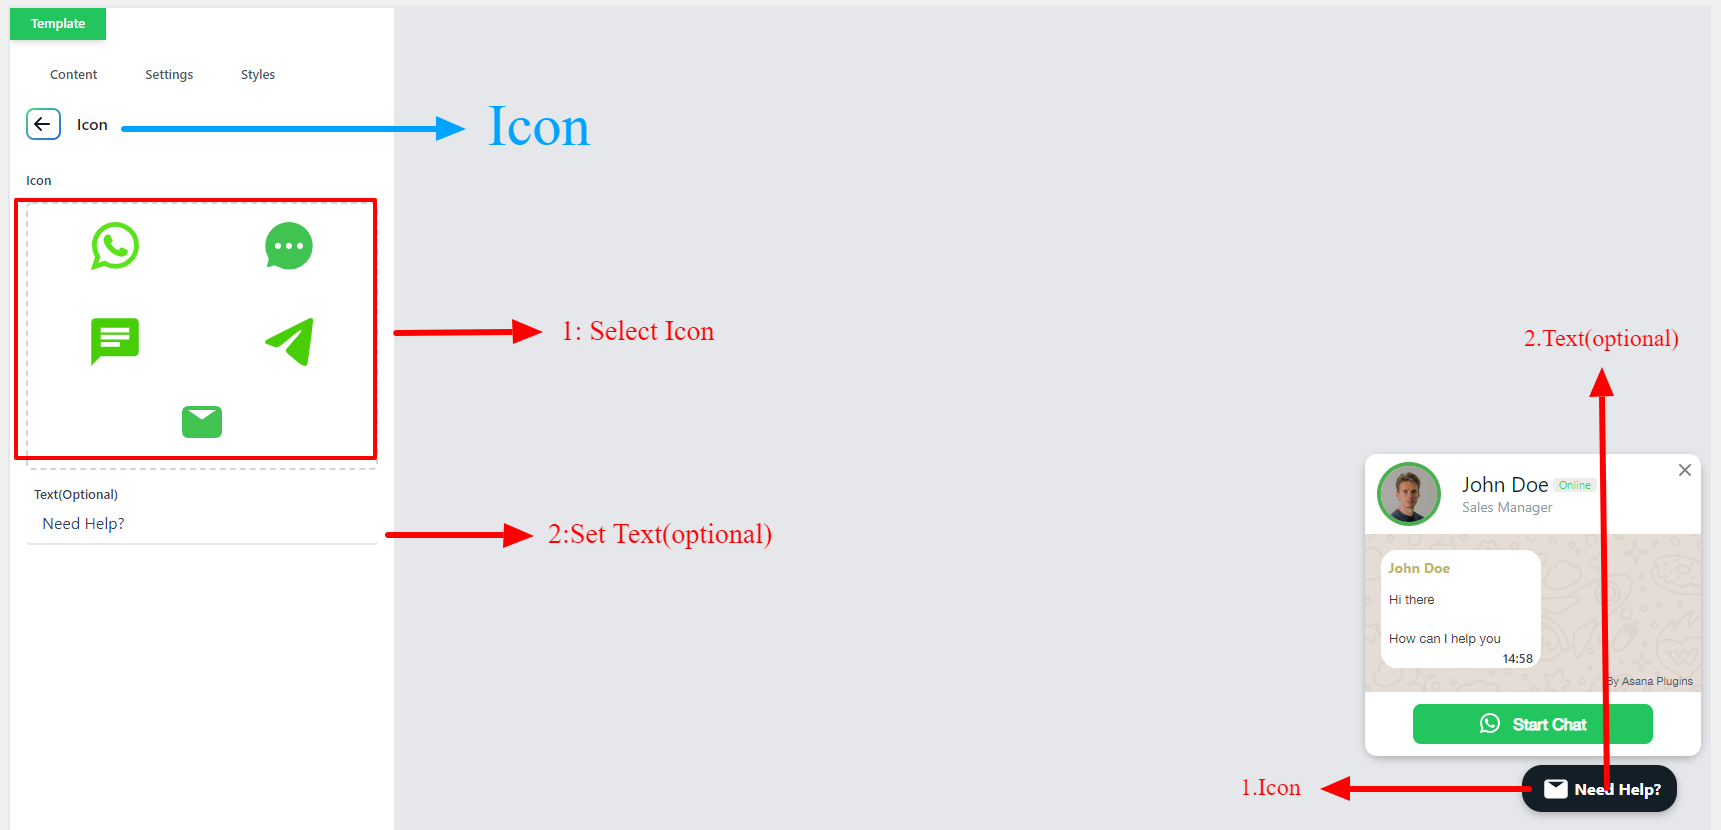
From the Icon section, you can change the button icon and set a text beside the icon.
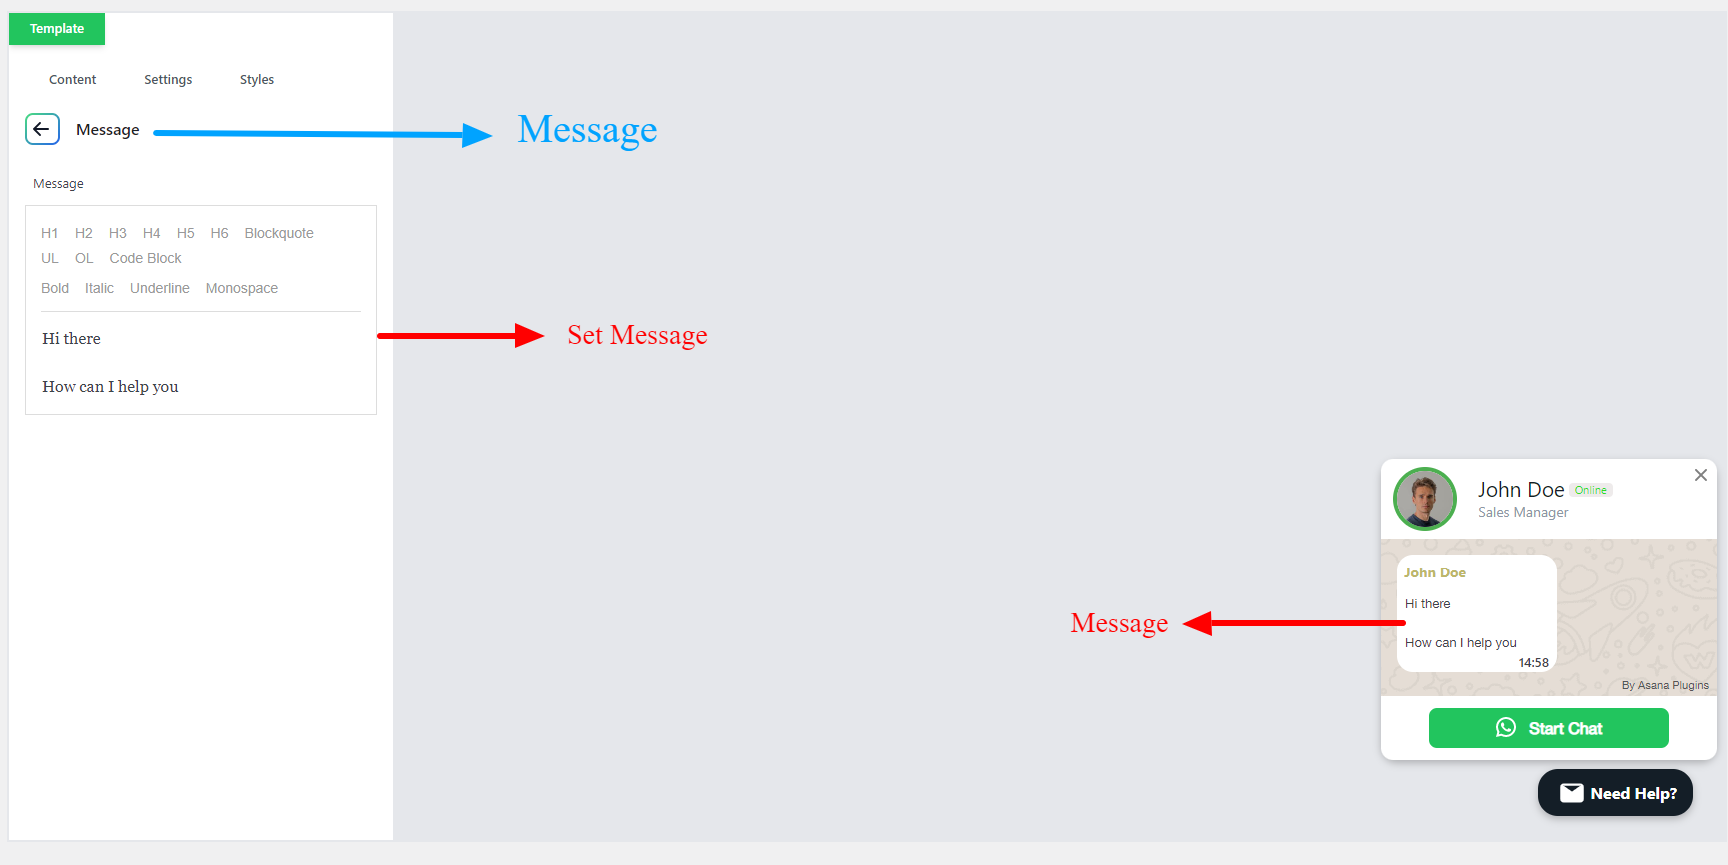
Also, you can change the WhatsApp Button message from the Message section.
You can change the “Start Chat” button text and icon from the “Start Chat Button” section as like the below image.

After applying the required changes on the WhatsApp Chat button, click on the Save button to save the changes.
Now you will see the floating WhatsApp Chat button on your website as in the below image.
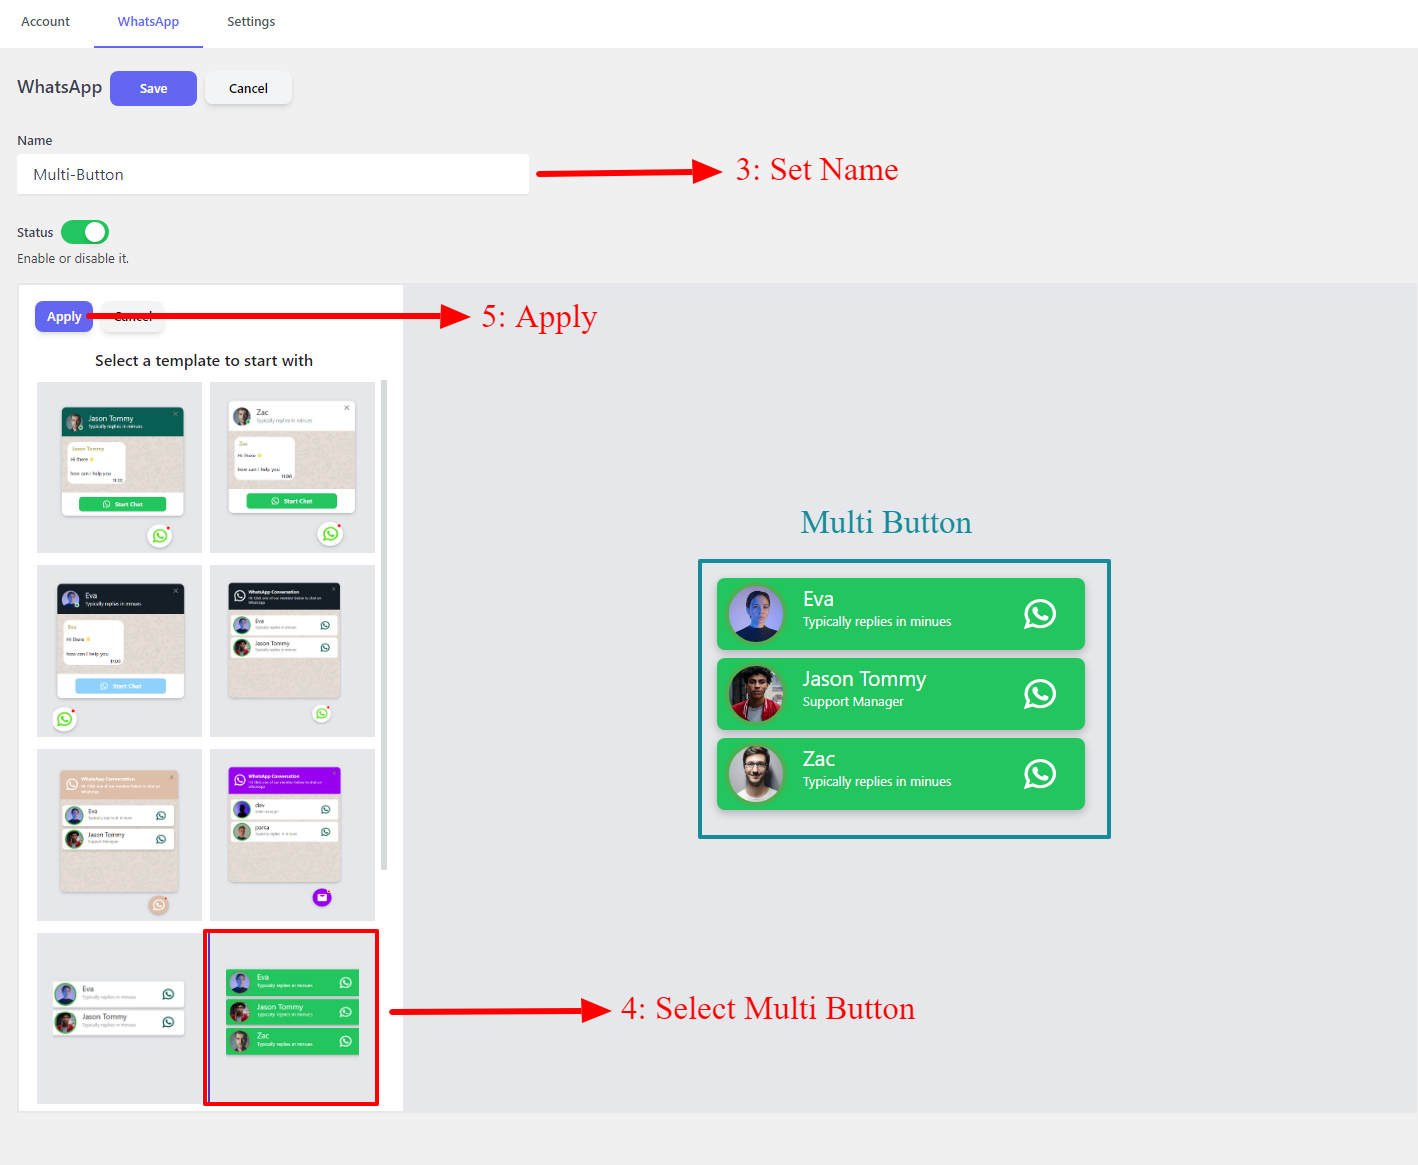
Create Multi Account WhatsApp Chat Button
To create a multi-account WhatsApp Chat Button, you should create at least two accounts that we explained it in the Create Account section.
After creating at least two accounts, navigate to the WhatsApp tab and click on the Add New button to create a new multi-account WhatsApp Chat Support.
- Set a name for the multi-account WhatsApp
- Select a multi-account template from the predefined templates list.
- A preview of the selected template will be shown on the right side.
- Click on the Apply button to start using the selected template.

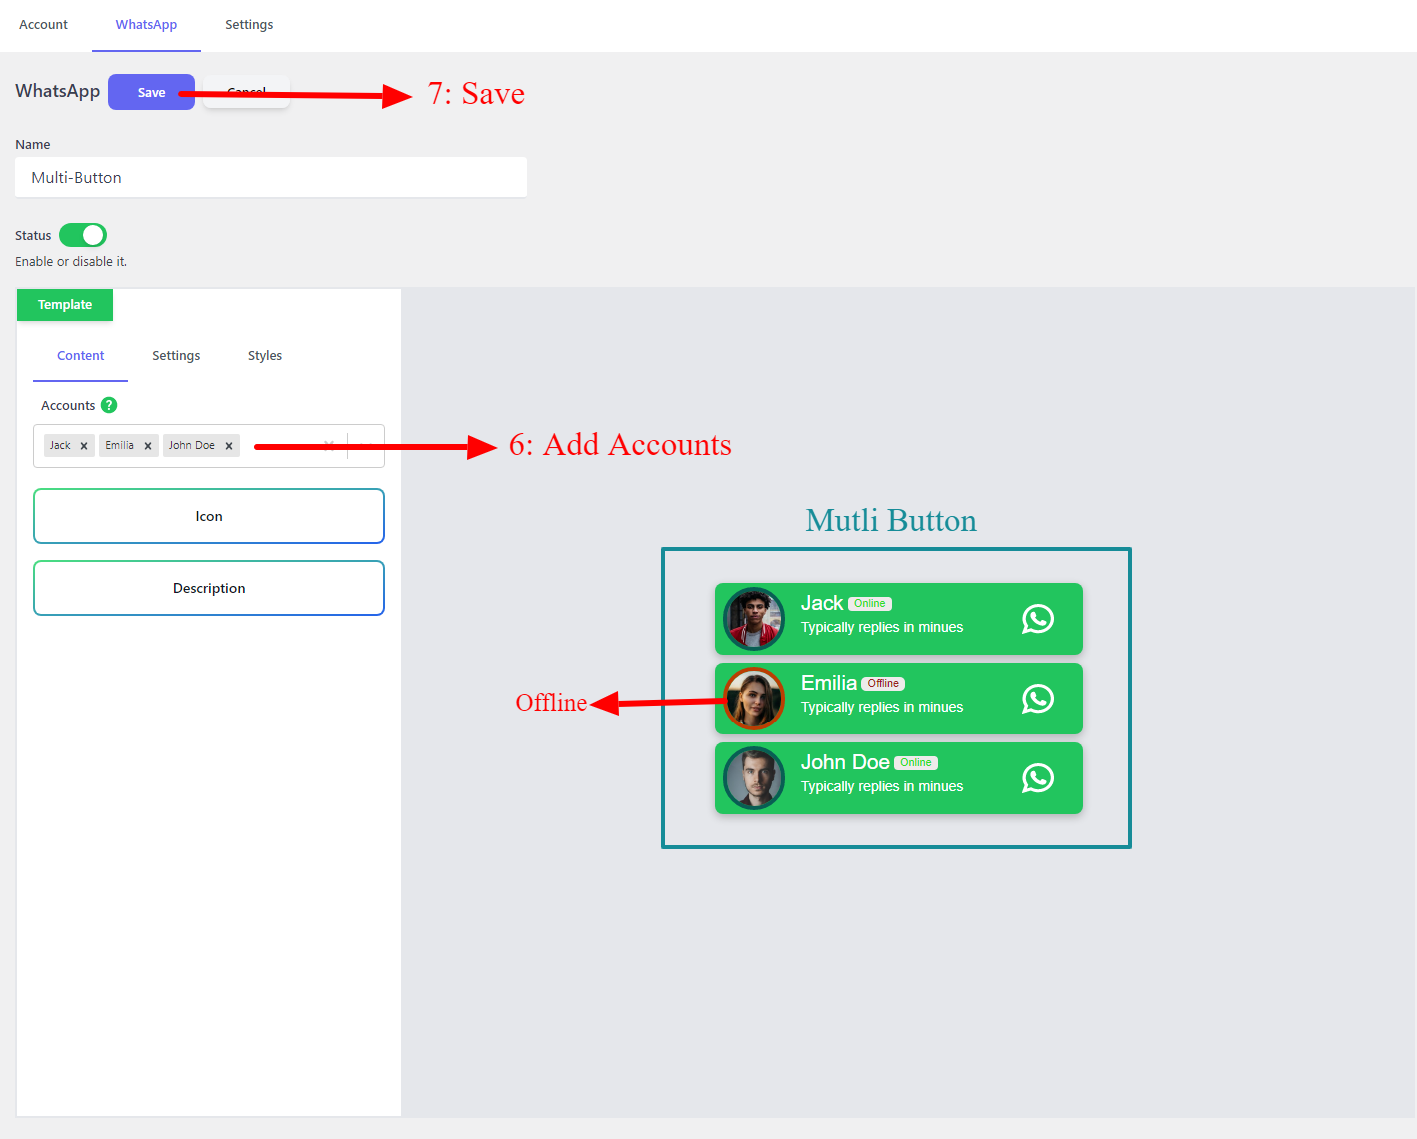
After selecting a template, you need to add at least two accounts to WhatsApp. Search for the accounts that you have created and select them in the Accounts field.
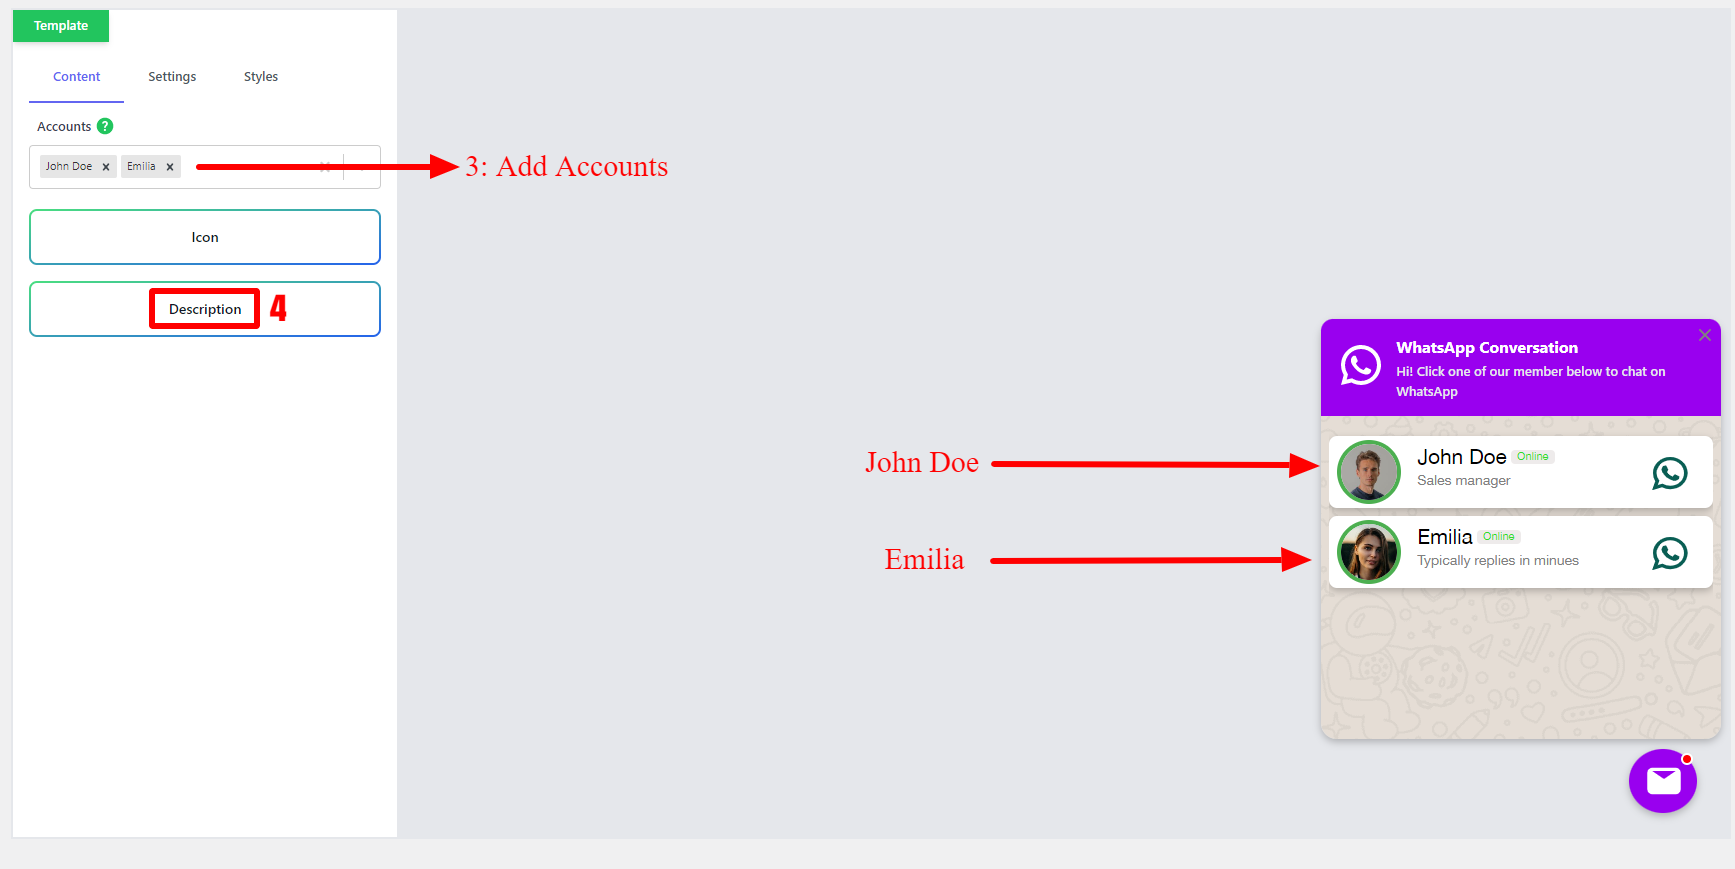
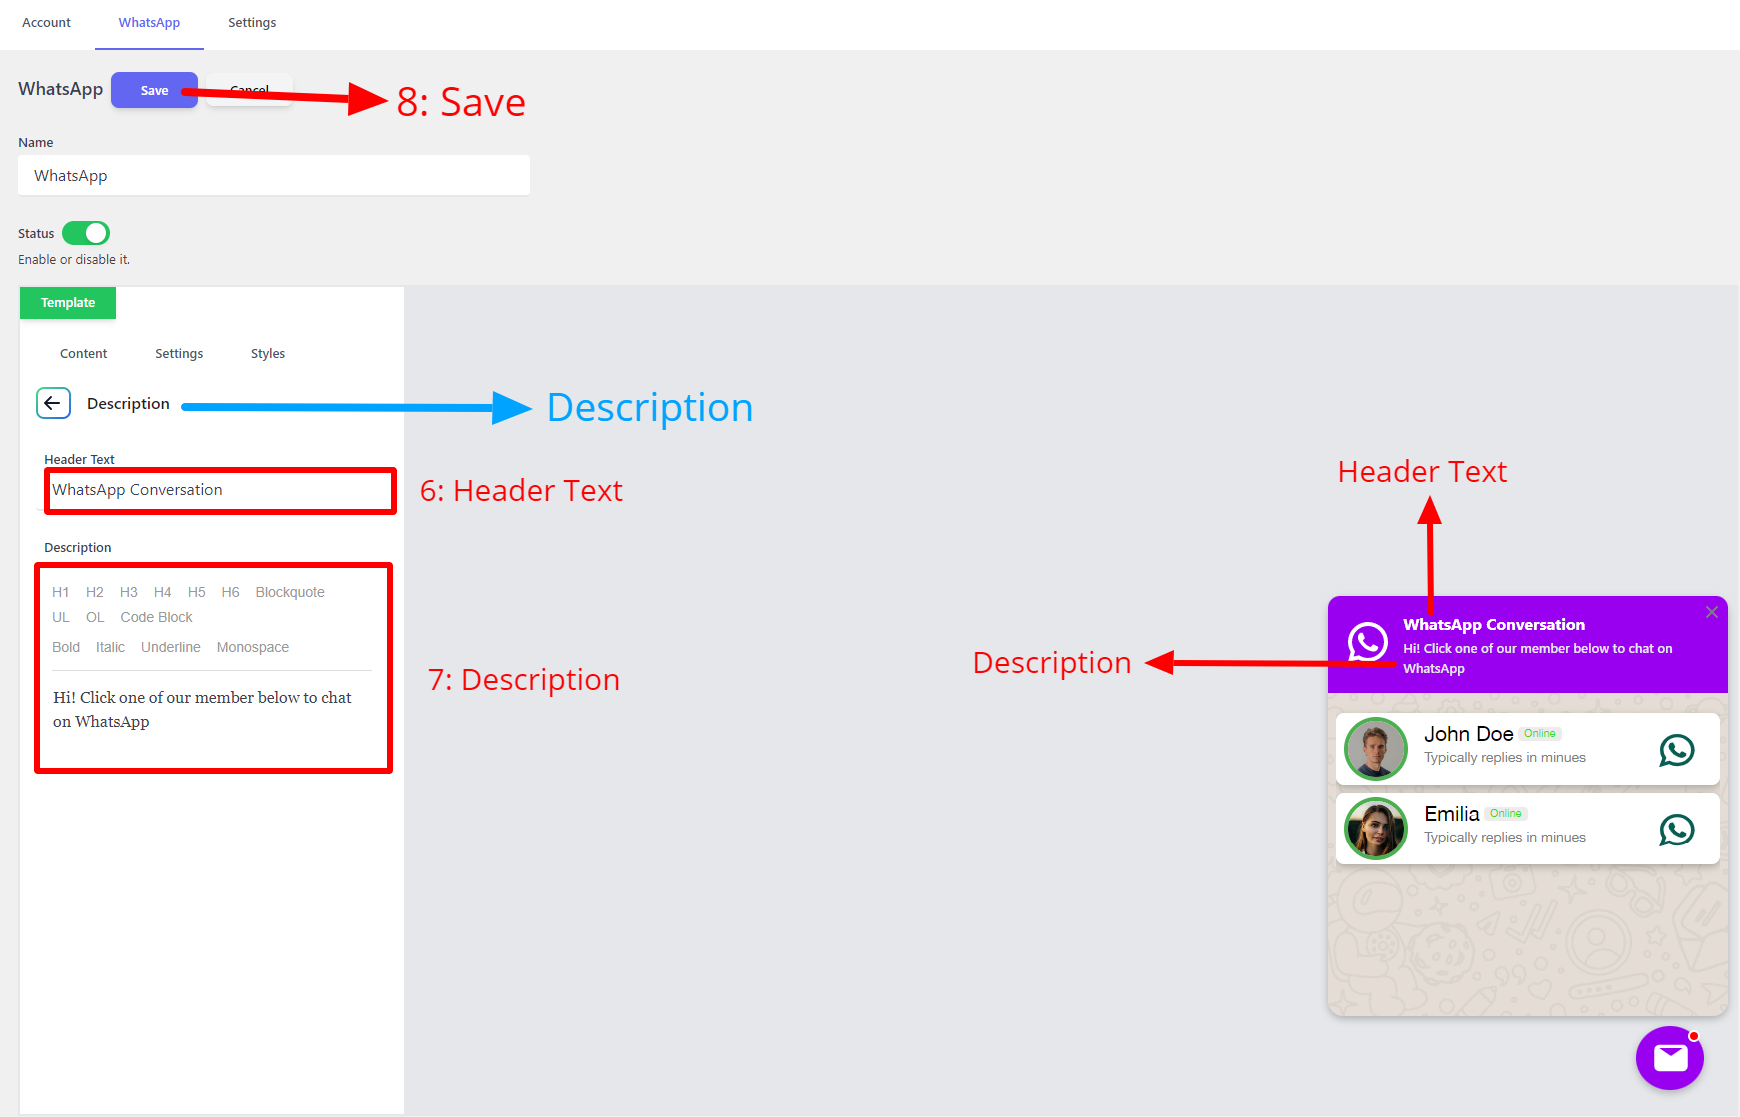
You can change the Header Text and Description from the Description section like the below image.
Now, your multi-account WhatsApp Chat Support is ready to use and you can Save it.
This multi-account WhatsApp Chat Button will appear on all of your pages. If you want to add it to specific pages read the below section of the article.
Change Accounts Ordering
You can change accounts’ ordering by dragging and dropping them to the right position inside the multi-select field.
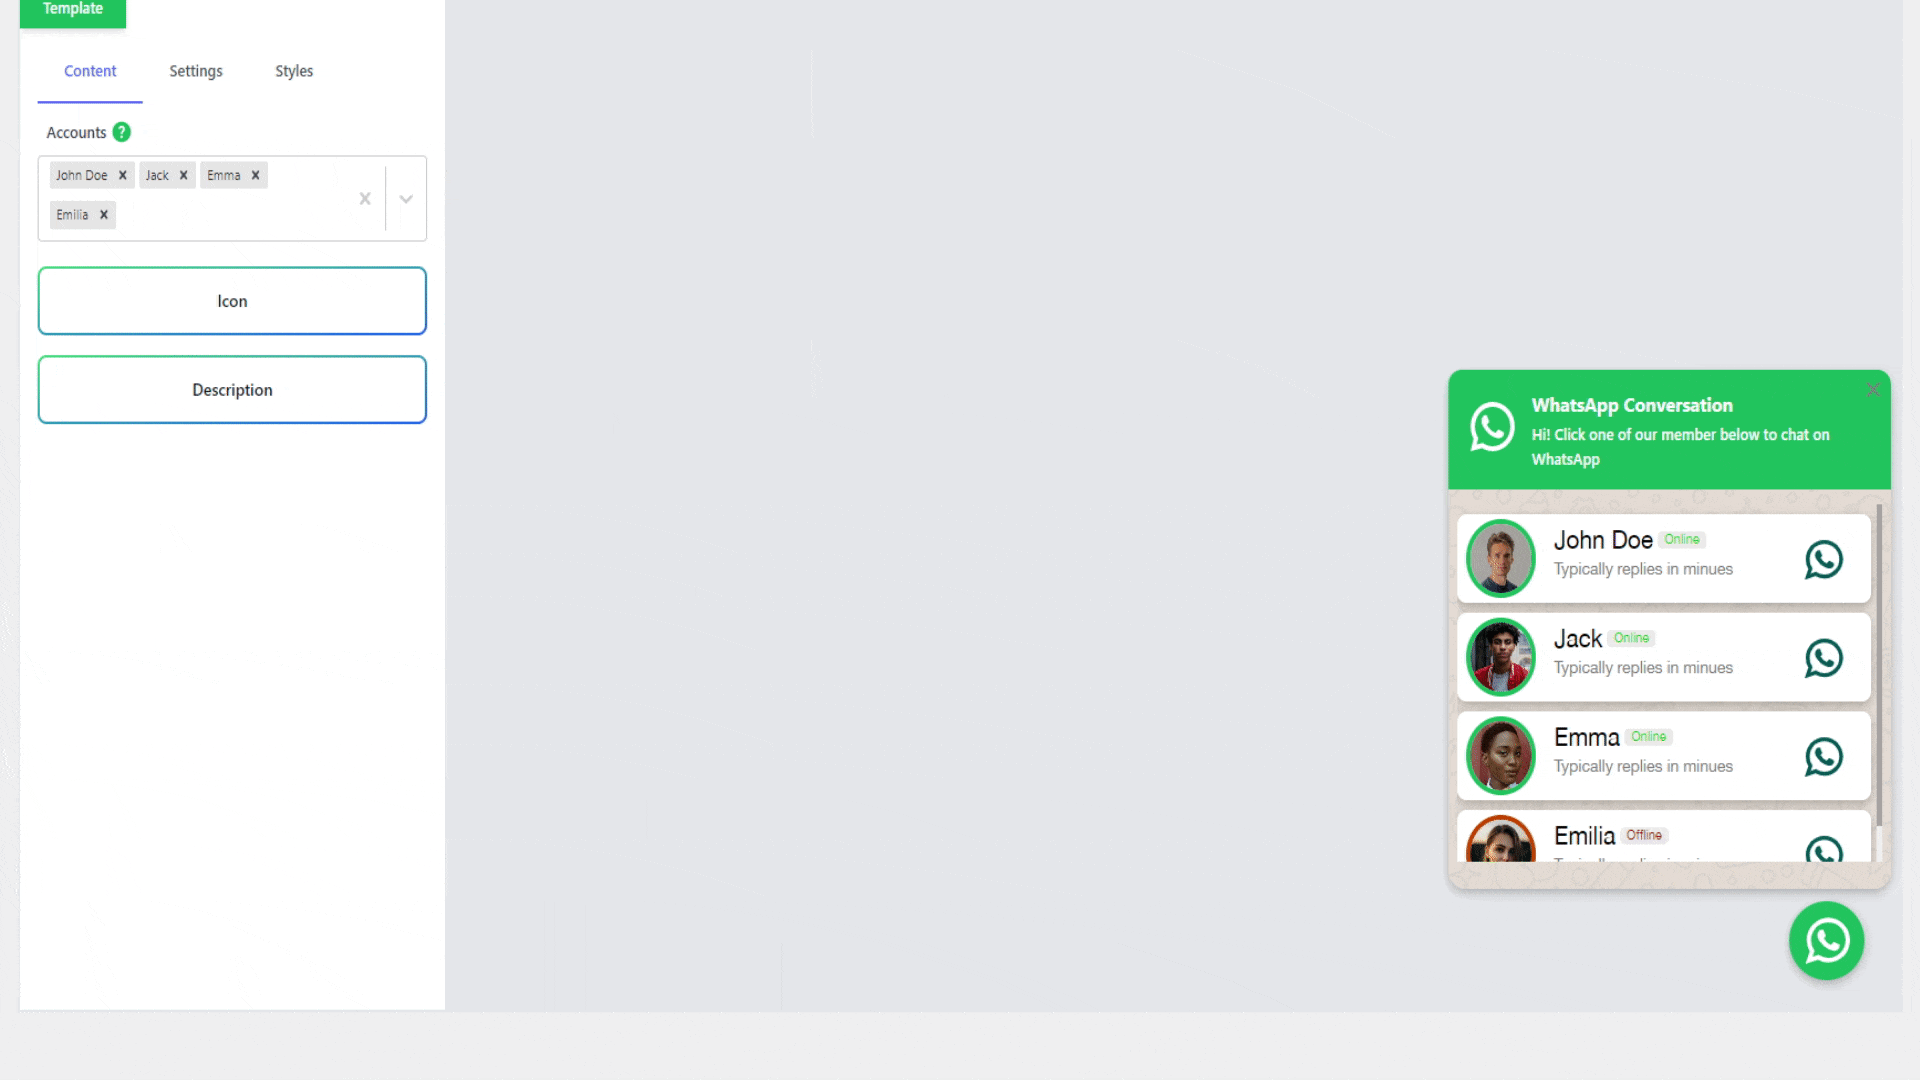
Now you will see the floating WhatsApp Chat button on your website as in the below image.
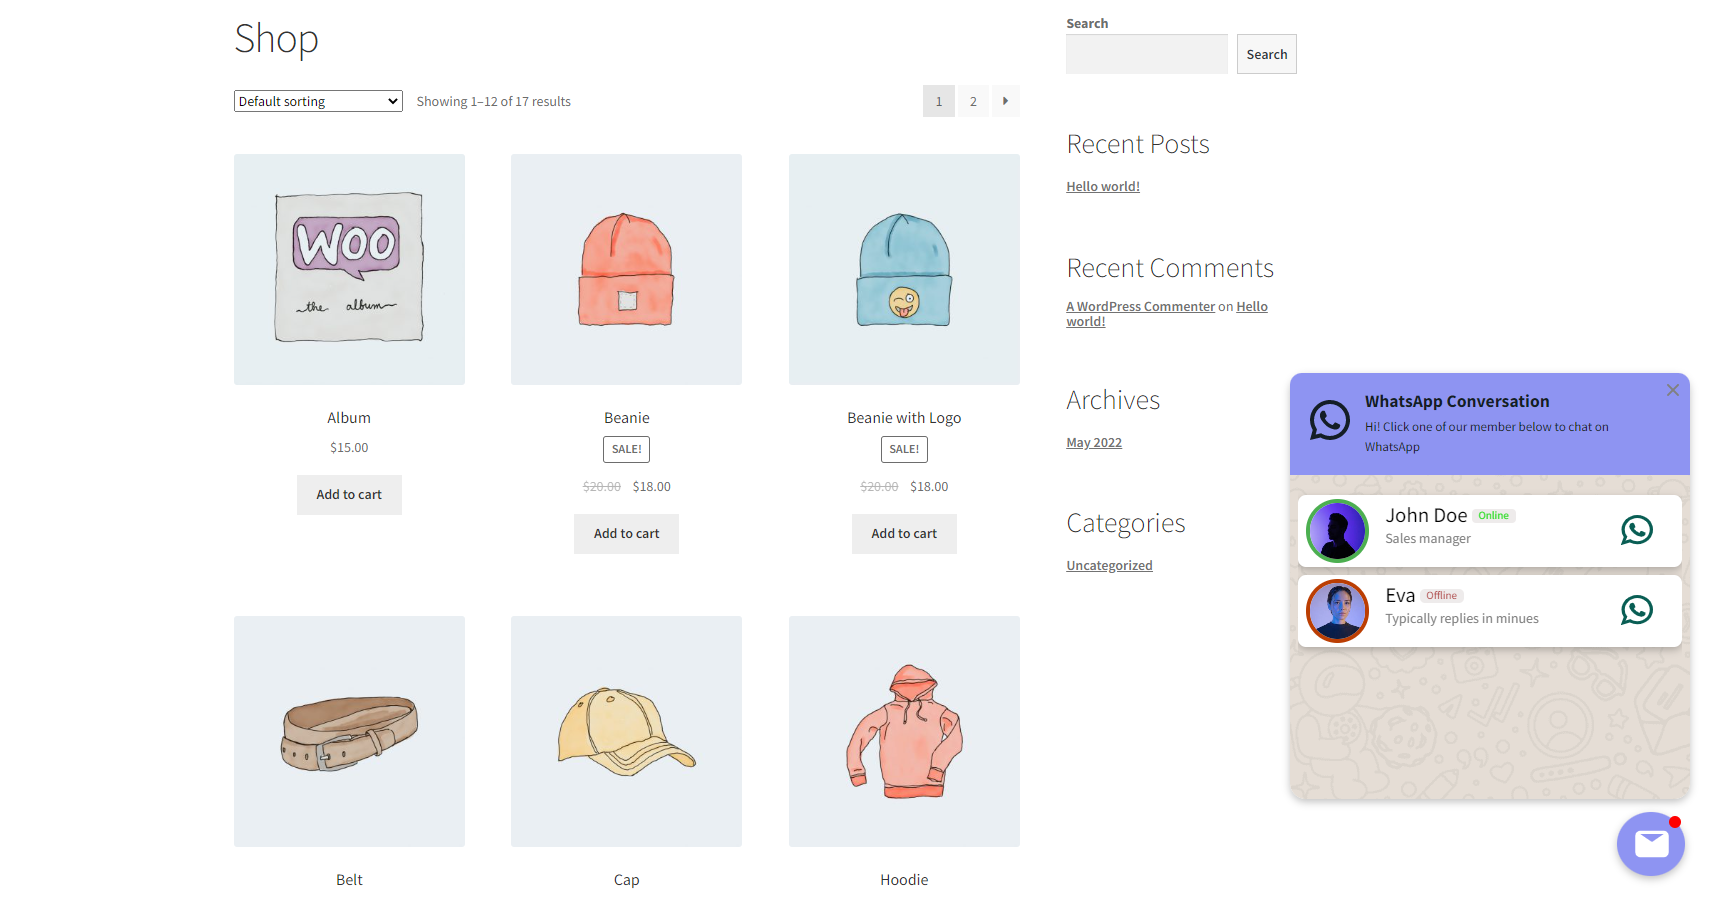
Add WhatsApp Chat Support to Specific Pages
If you would like to add WhatsApp Chat Support to specific pages, after creating a WhatsApp in the previous steps follow the below instructions.
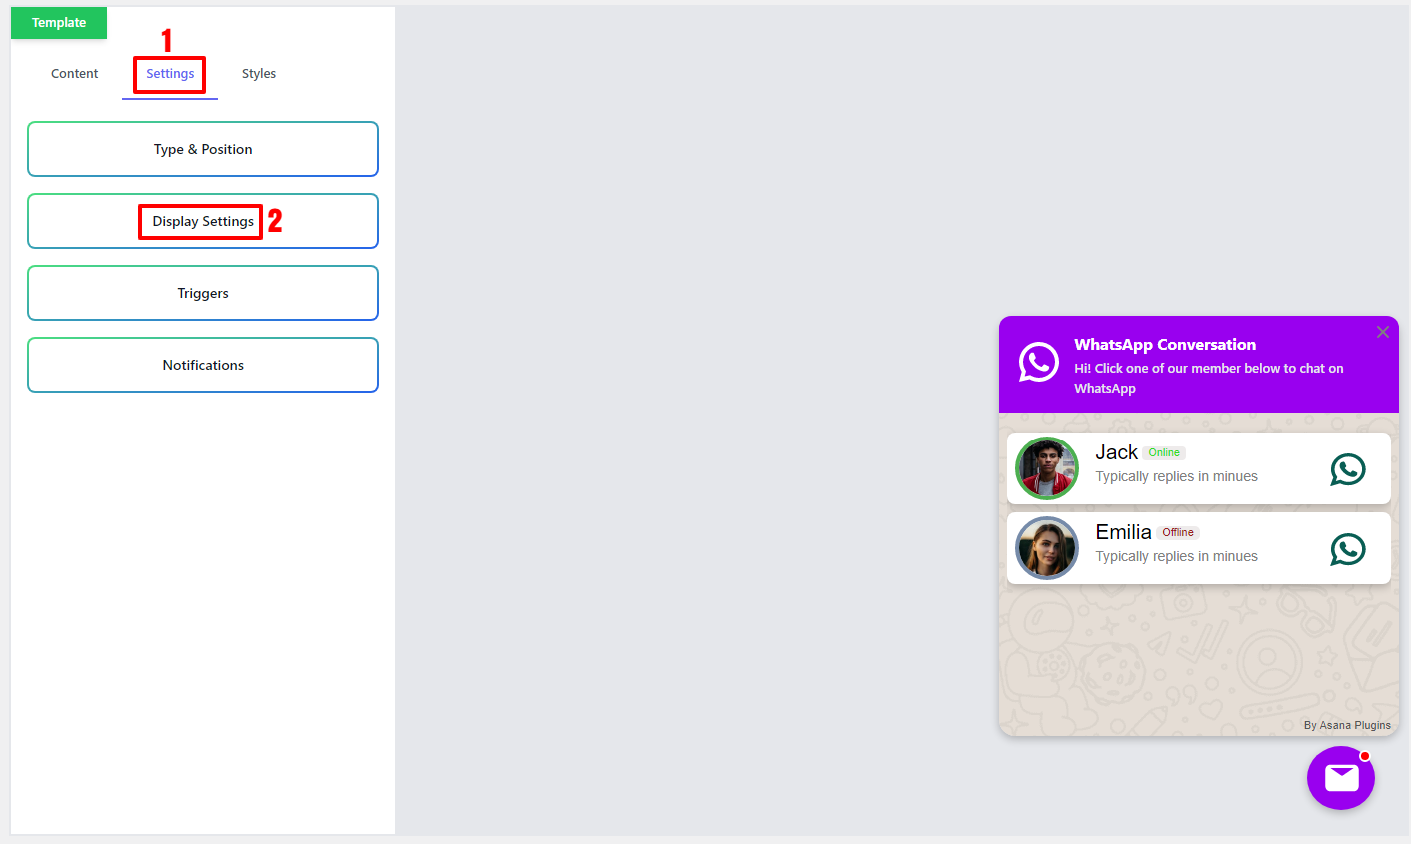
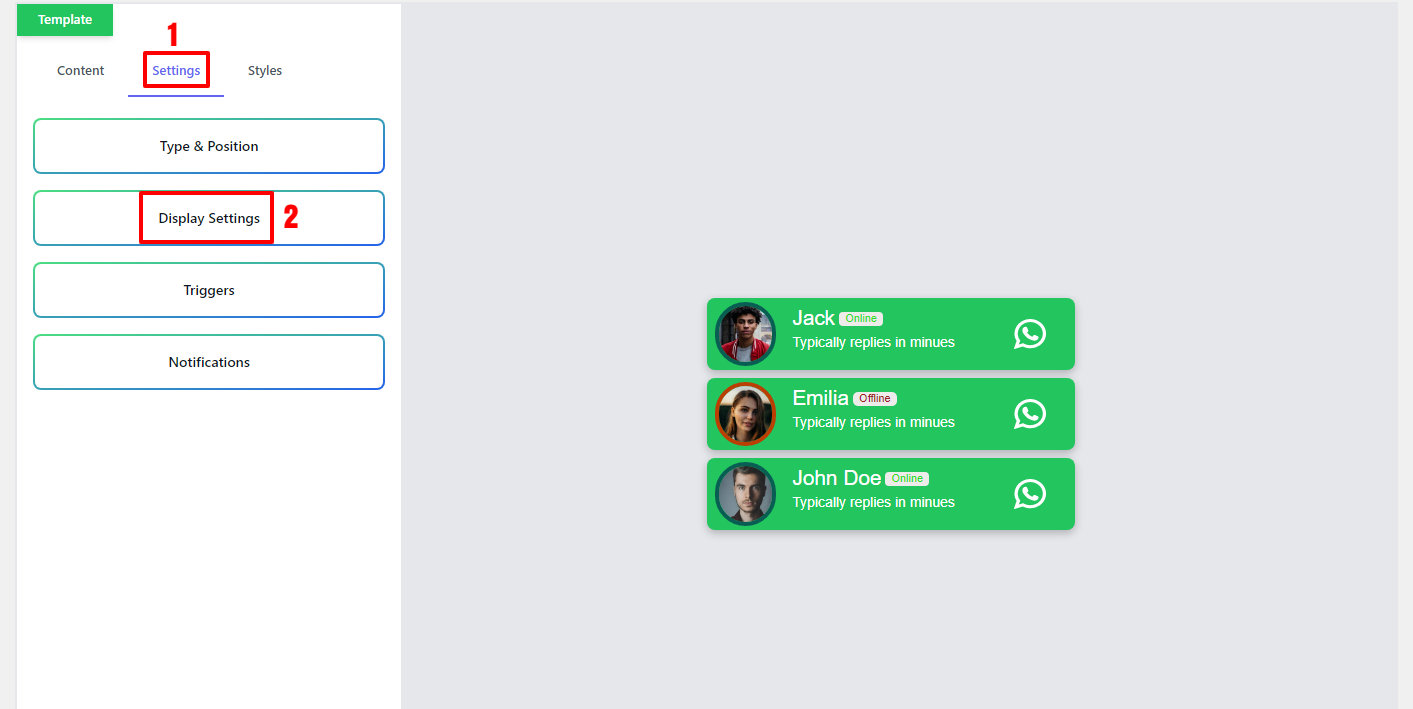
- Navigate to the Settings tab on the WhatsApp details page.
- Go to the Display Settings section.
- Now navigate to the Pages section.
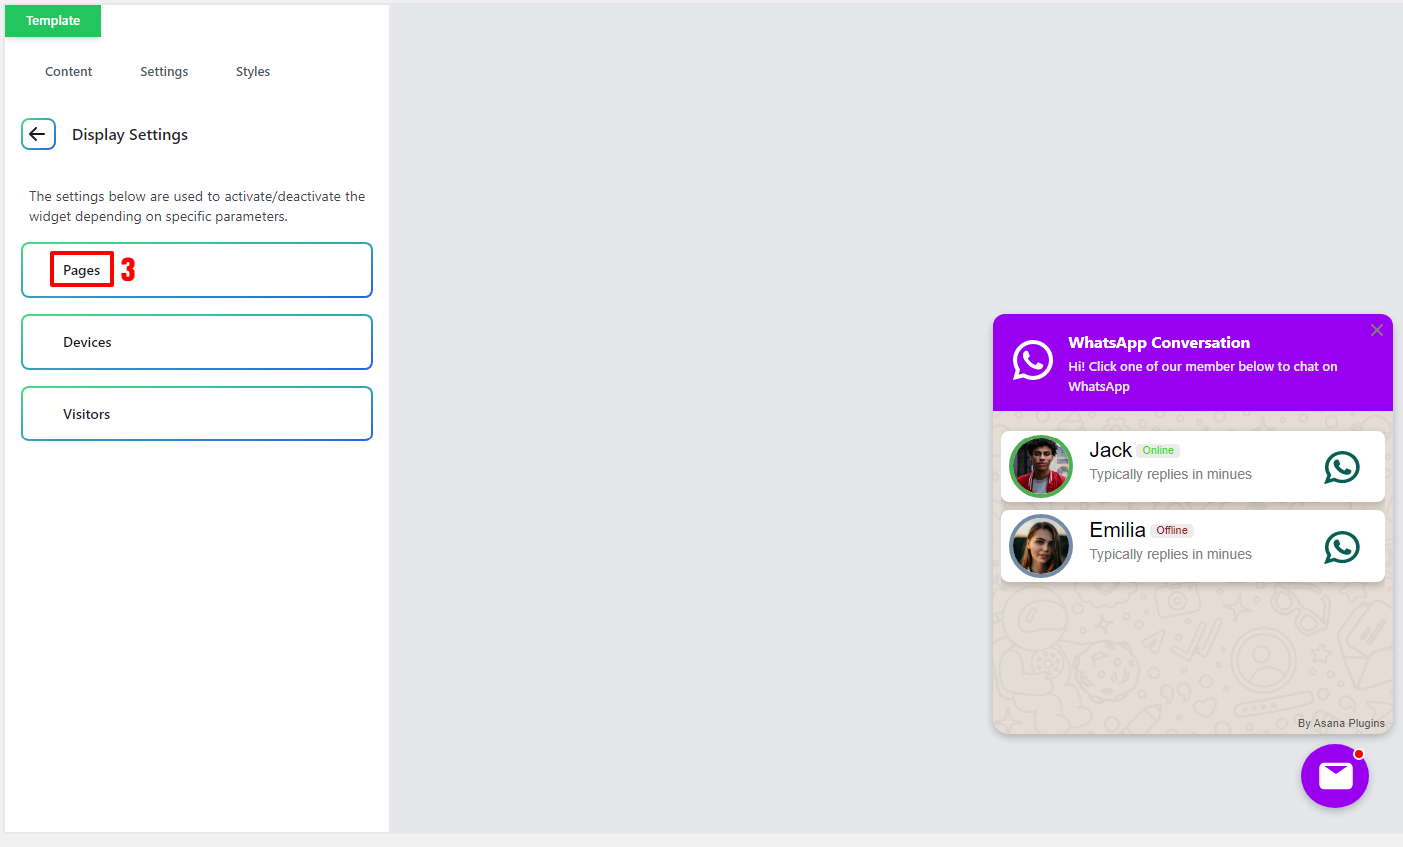
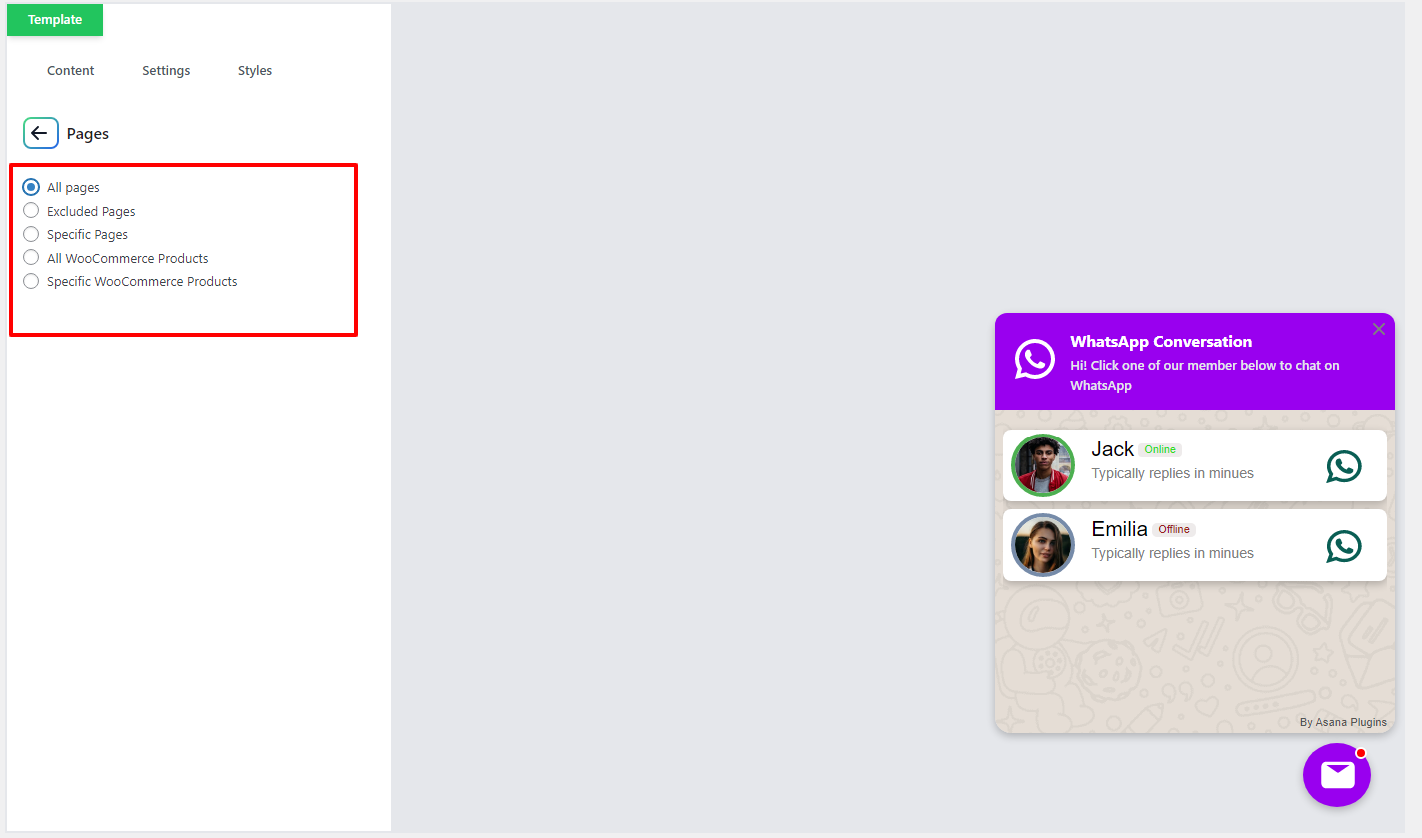
In the Pages section, you have the below options that you can use it.
- All Pages (Adds WhatsApp Chat to all of the pages on your website)
- Excluded Pages (Adds WhatsApp Chat to all of the pages excluding listed pages in the Excluded Pages)
- Specific Pages (Adds WhatsApp Chat to the listed pages)
- All WooCommerce Products (Adds WhatsApp Chat to all of WooCommerce products)
- Specific WooCommerce Products (Adds WhatsApp Chat to specific WooCommerce products, categories or tags
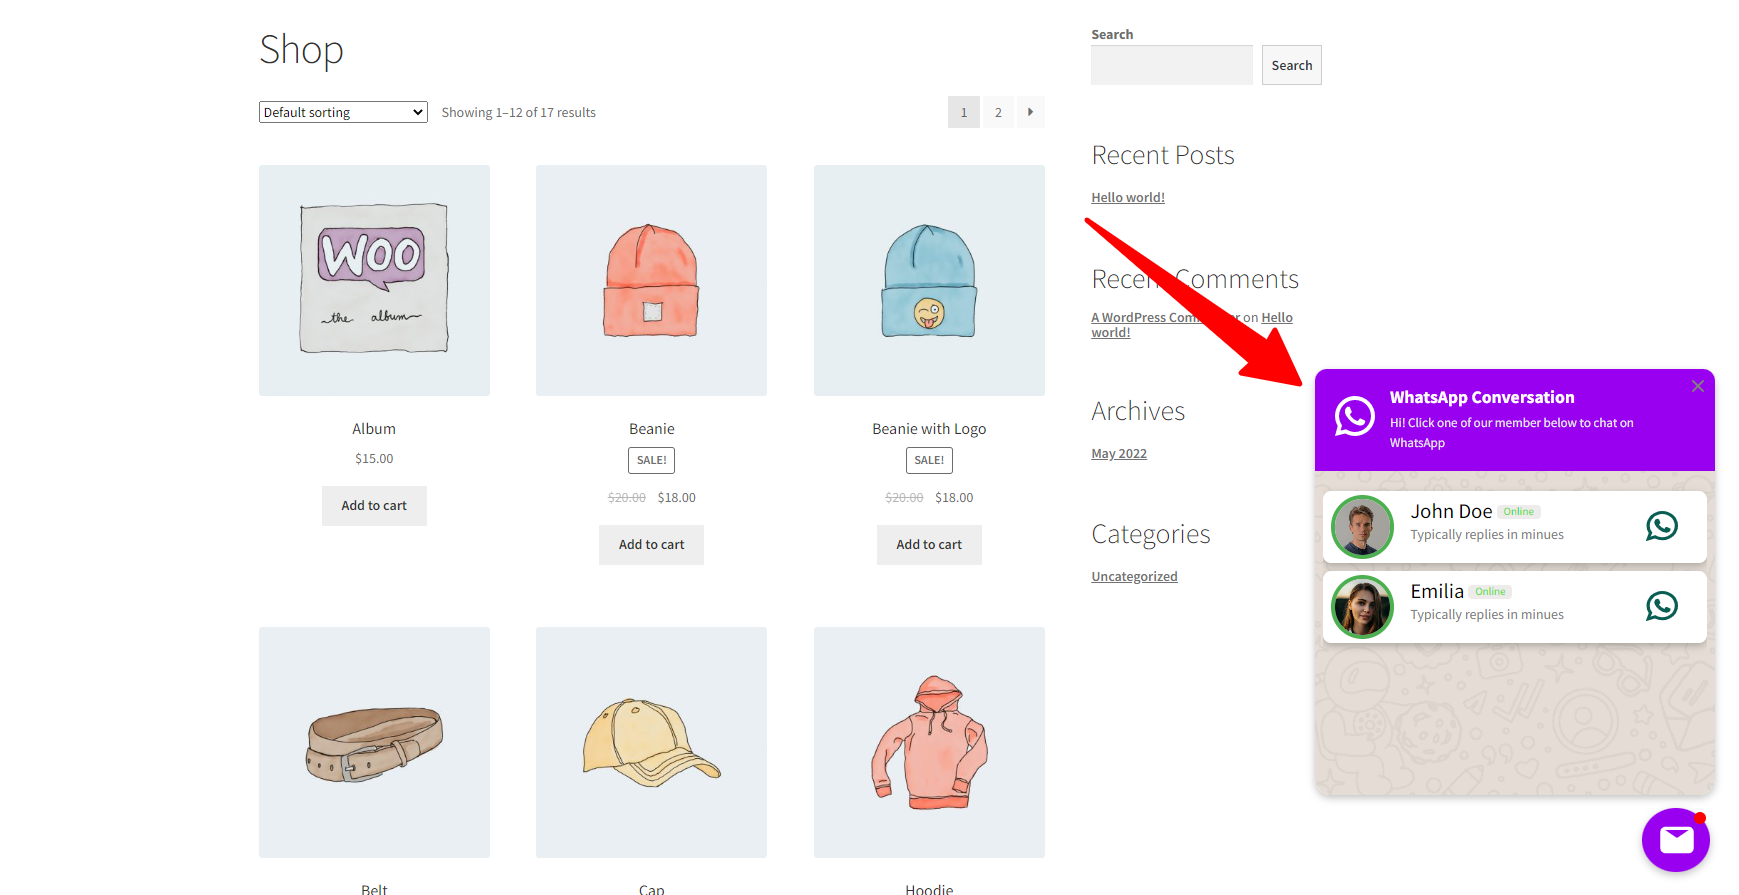
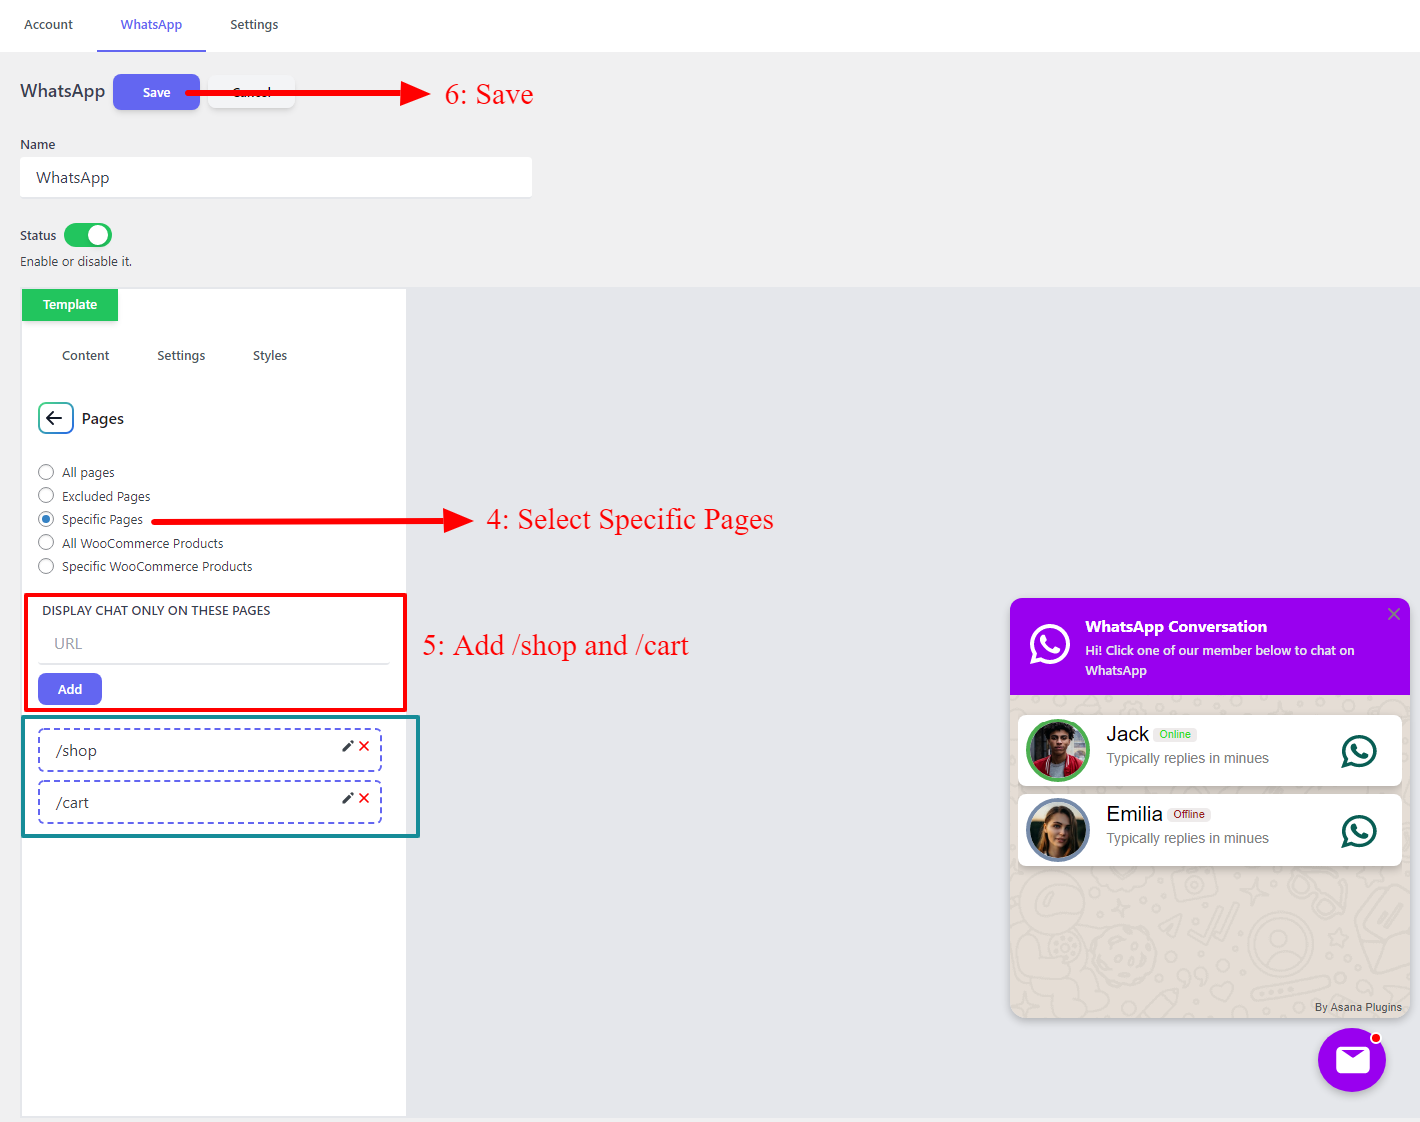
If you would like to add WhatsApp Chat Support to specific pages then follow the below instructions
- Select Specific Pages from the list.
- Add the URL of the pages that you would like to show WhatsApp Chat on them. (You can add the full URL of the page like “www.asanaplugins.com/shop” or ignore your site name part and just use “/shop”
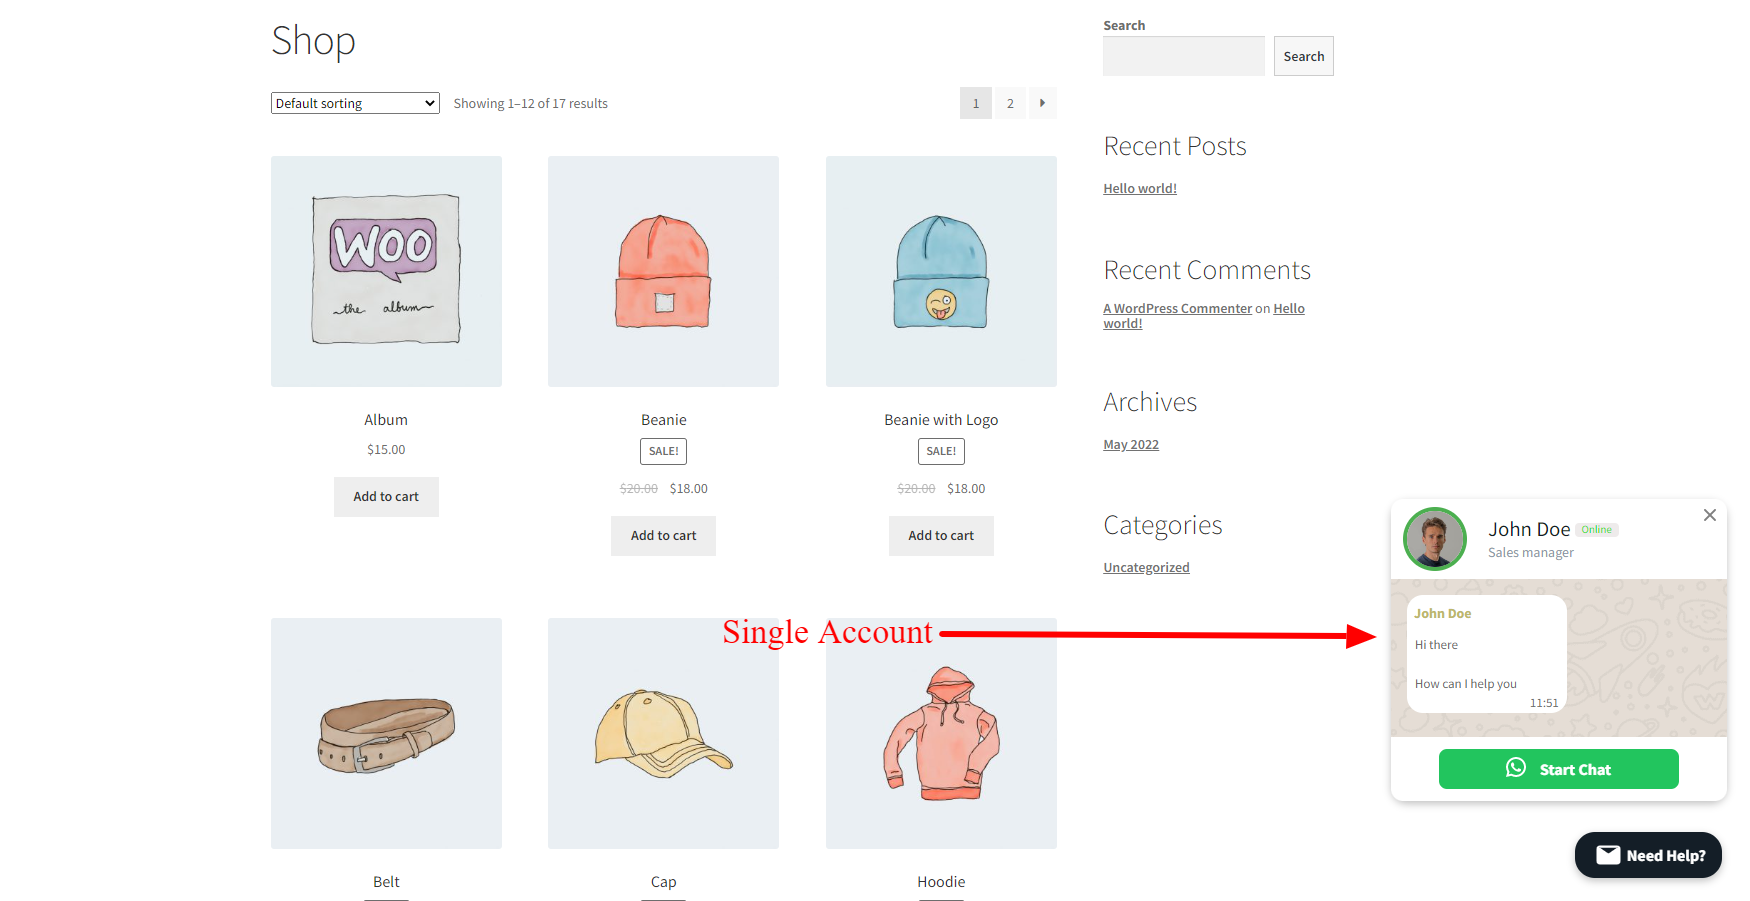
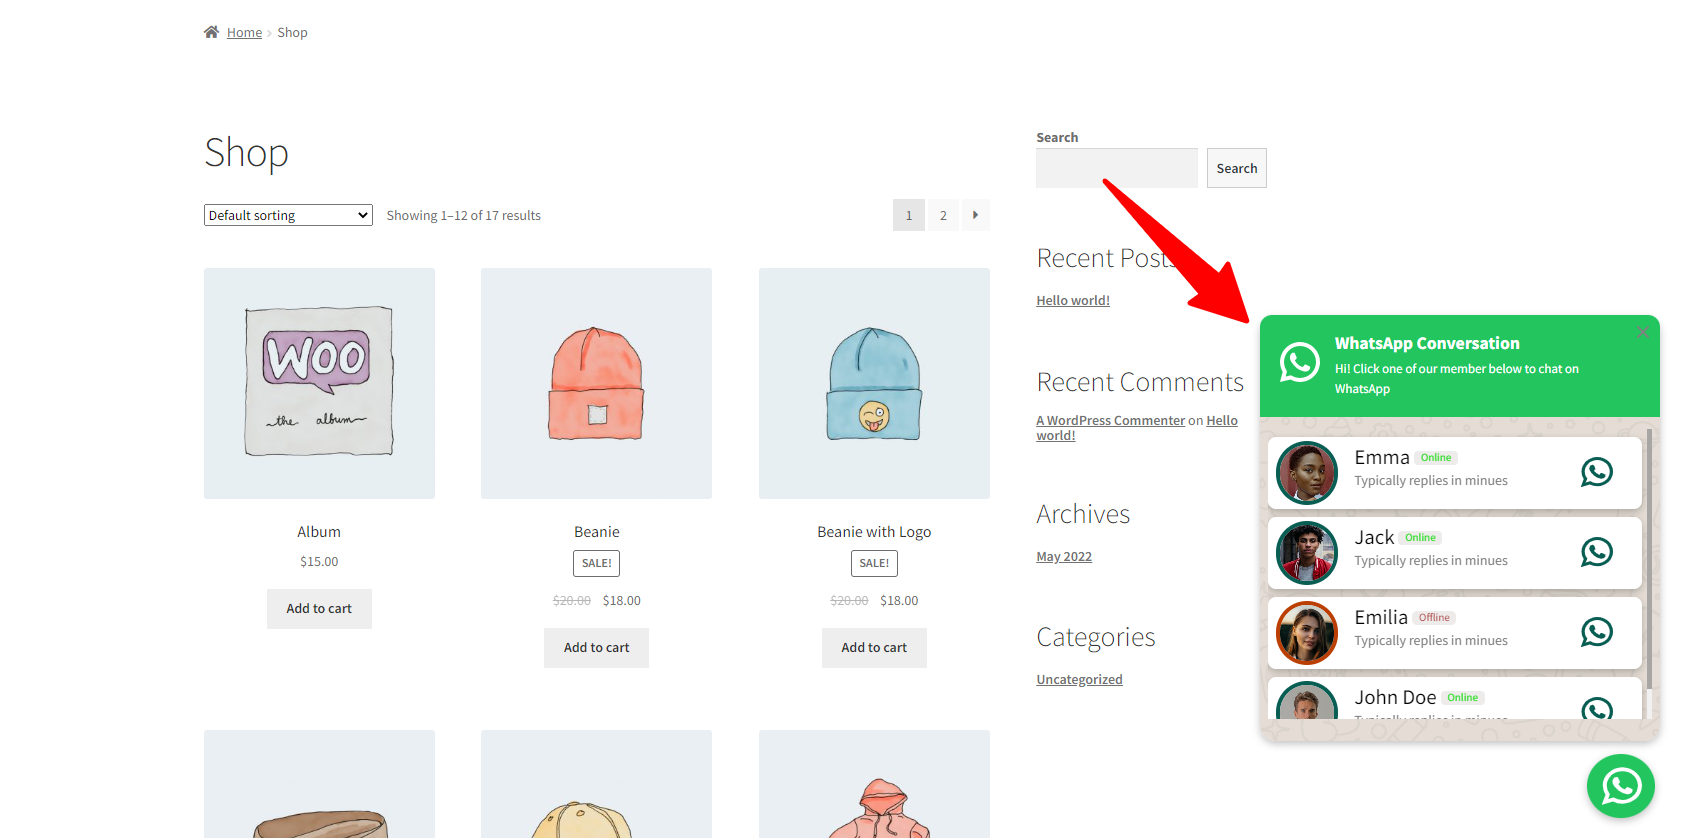
In the below image we have added “/shop” and “/cart” URLs, so WhatsApp will be shown on these pages.
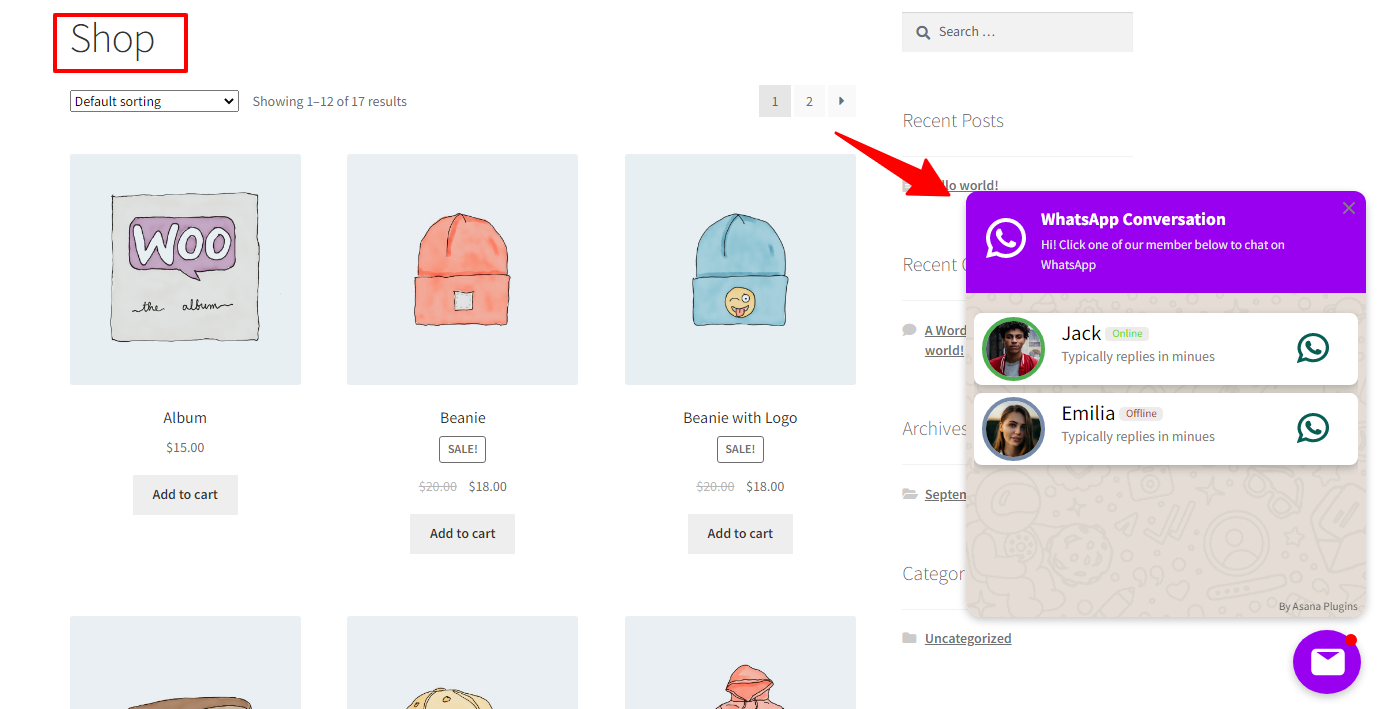
As you can see from the below image, WhatsApp Chat Support is appear on the “shop” page of the website.
Add WhatsApp Chat to WooCommerce
The WhatsApp Chat plugin helps you to add the WhatsApp Chat button to WooCommerce products, categories, and tags. Also, you can exclude specific products, categories, or tags.
You can read this detailed guide to adding WhatsApp Chat support to WooCommerce.
Create Single Button WhatsApp Chat
Single Button WhatsApp Chat is just a Button and when a customer clicks on it, he will be redirected to WhatsApp to start a chat with you. You can add it to posts or pages with the [asnp_chat id=”id_of_chat_in_list”] shortcode.
To create a Single Button WhatsApp Chat, follow the below instructions.
- Navigate to the WhatsApp tab.
- Click on the Add New button to add a new WhatsApp chat.
- Set a name for WhatsApp.
- From the templates section, select a single button template like the below image.
- You will see the selected single-button WhatsApp template on the right side.
- Click on the Apply button to start using the selected template.
Now, in the Accounts field search for the account that you would like to show in the Single Button WhatsApp. You have created the account in the Create Account section of the article.
After selecting an account in the Accounts field, you will see the preview of the account in the Single Button WhatsApp chat.
Now, click on the Save button to save WhatsApp.
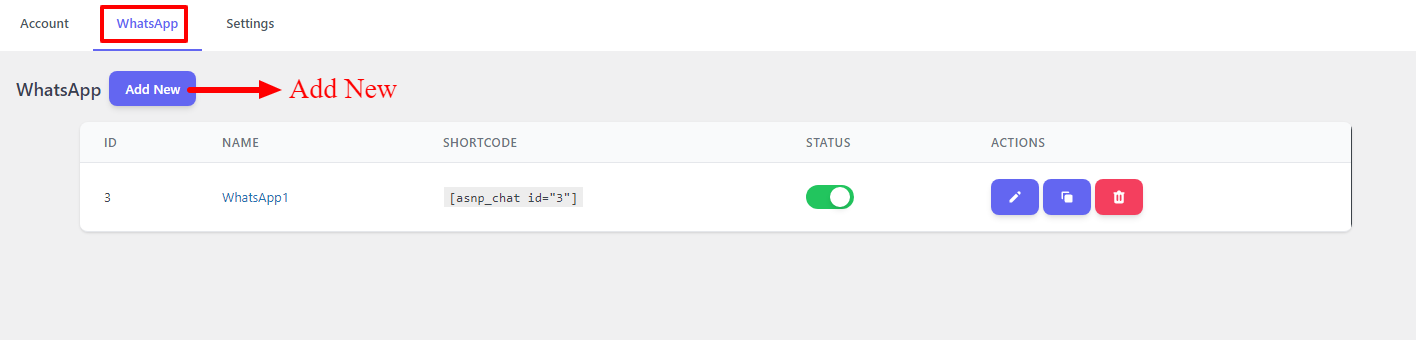
Navigate to the WhatsApp tab, to see created WhatsApp list. In the list, you will see the shortcode of the Single Button WhatsApp that you have created. You can use this shortcode to show the button on posts or pages.
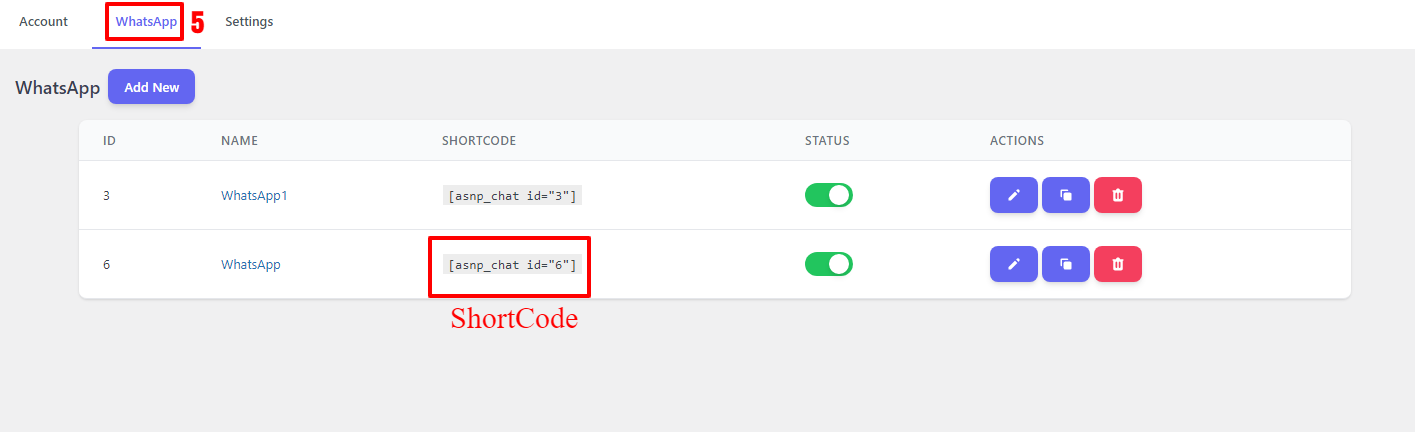
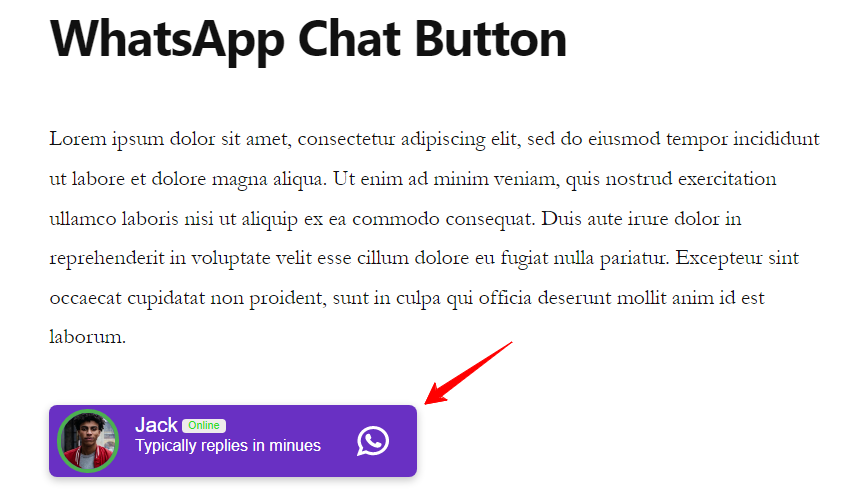
Copy the shortcode of WhatsApp and add it to a page like the below image.

After adding the shortcode to a page update it, then you will see the Single WhatsApp Chat button on the page like the below image.
Create Multi Button WhatsApp Chat
If you would like to list multiple WhatsApp accounts as WhatsApp Chat Buttons, you can use multi-button WhatsApp chat support. It is useful when you have multiple agents like “Support Manager” and “Sale Manager” or anything else.
To create a Multi Button WhatsApp Chat Support in WordPress follow the below instructions.
- First, make sure that you have created accounts in the accounts tab. It is explained in the Create Account section of the article.
- Navigate to the WhatsApp tab and click on the Add New button to create a WhatsApp.
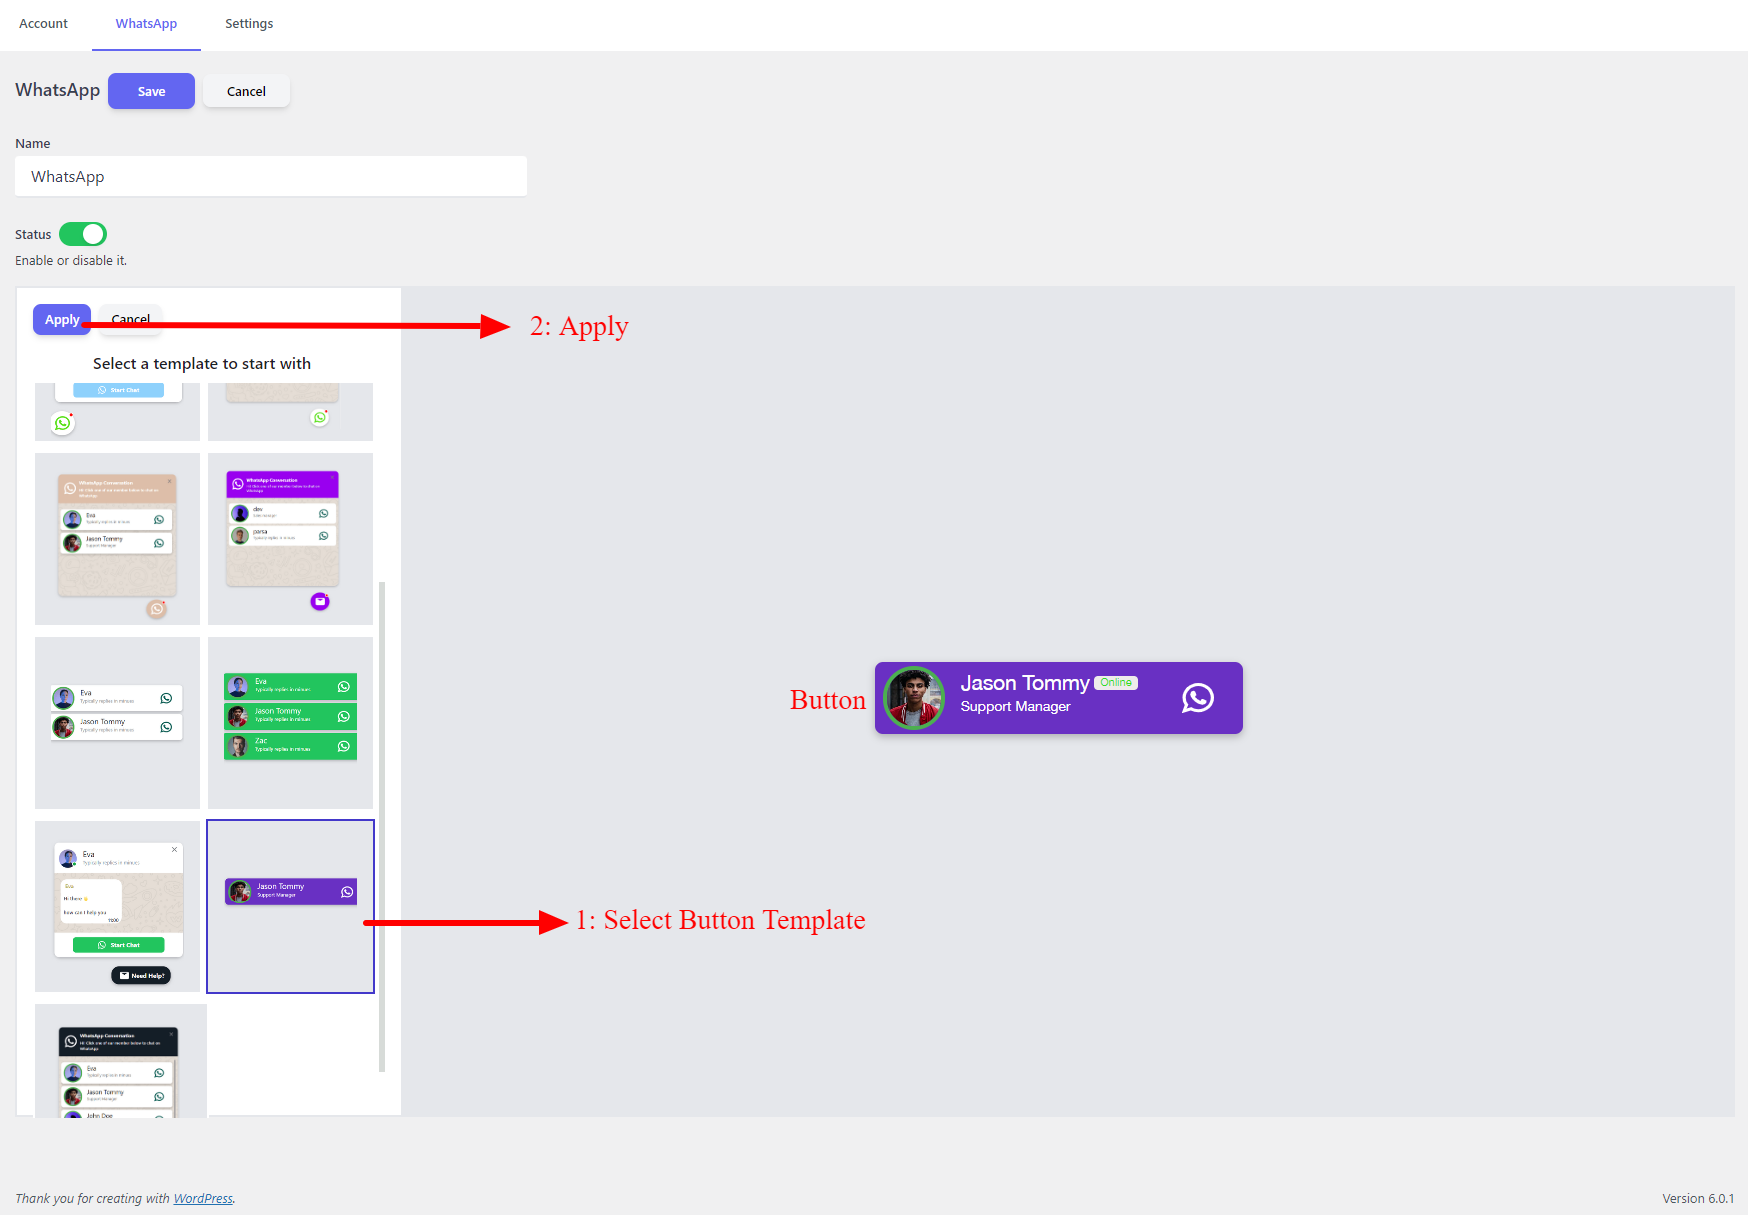
- Set a name for WhatsApp
- From the templates section, select a multi-button template like the below image.
- You will see the selected multi-button WhatsApp template on the right side.
- Click on the Apply button to start using the selected template.
Now you should add some accounts to the Accounts field. Search for the accounts and select them.
After selecting accounts in the Accounts field, you will see a preview of the accounts as WhatsApp buttons like the below image.
Now, click on the Save button to save WhatsApp.
Navigate to the WhatsApp tab, to see created WhatsApp list. In the list, you will see the shortcode of the Multi Button WhatsApp that you have created. You can use this shortcode to show the button on posts or pages.
Now you can copy the shortcode and paste it into a page or post that you would like to show multi-button WhatsApp chat.
Display to Specific users
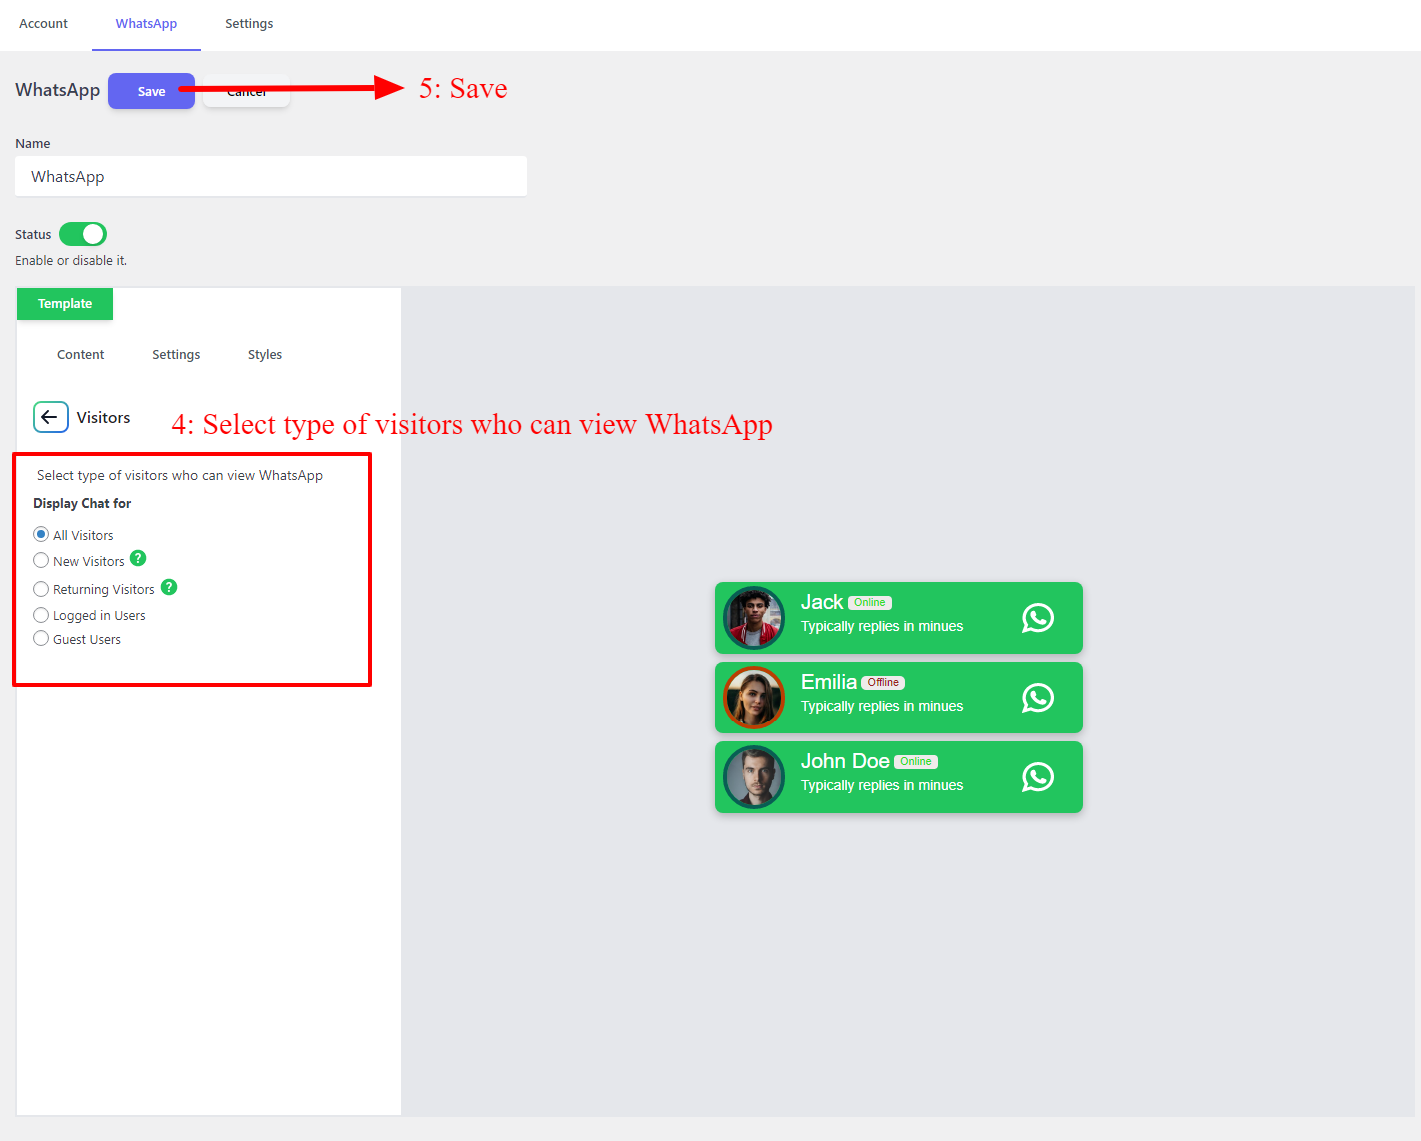
To display WhatsApp chat support to specific users and visitors you can follow the below instruction.
- Open one of the WhatsApps that you have created and would like to show it to specific visitors.
- Navigate to the Settings tab on the WhatsApp details page.
- Open Display Settings and then open the Visitors section.
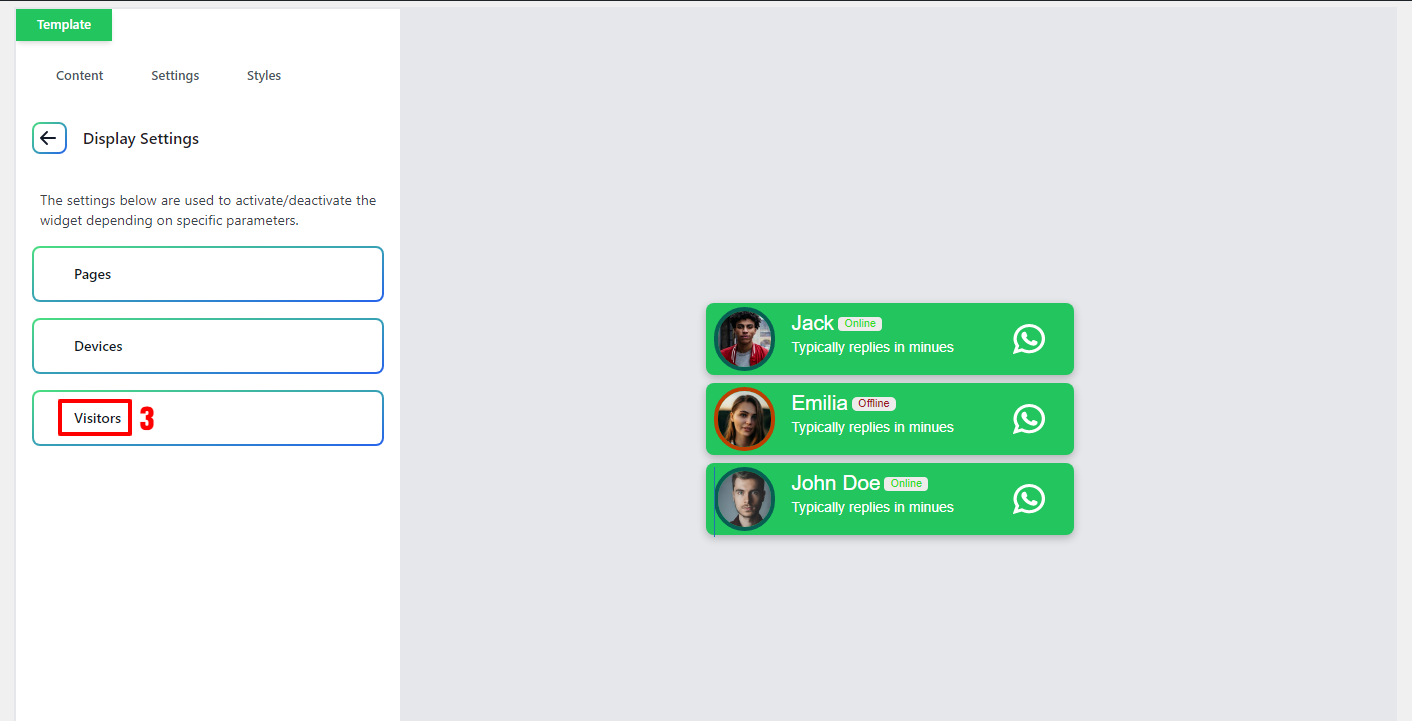
In the Visitors section, there are below available options.
- All Visitors (Displays WhatsApp to all visitors of your website)
- New Visitors (Displays WhatsApp to users who come to your website for the first time)
- Returning Visitors (Displays WhatsApp to users who had been on your Website before)
- Logged-in Users (Displays WhatsApp to logged-in users)
- Guest Users (Displays WhatsApp to guest users)
After selecting the type of visitors that you would like to show the WhatsApp to them, Save the changes.
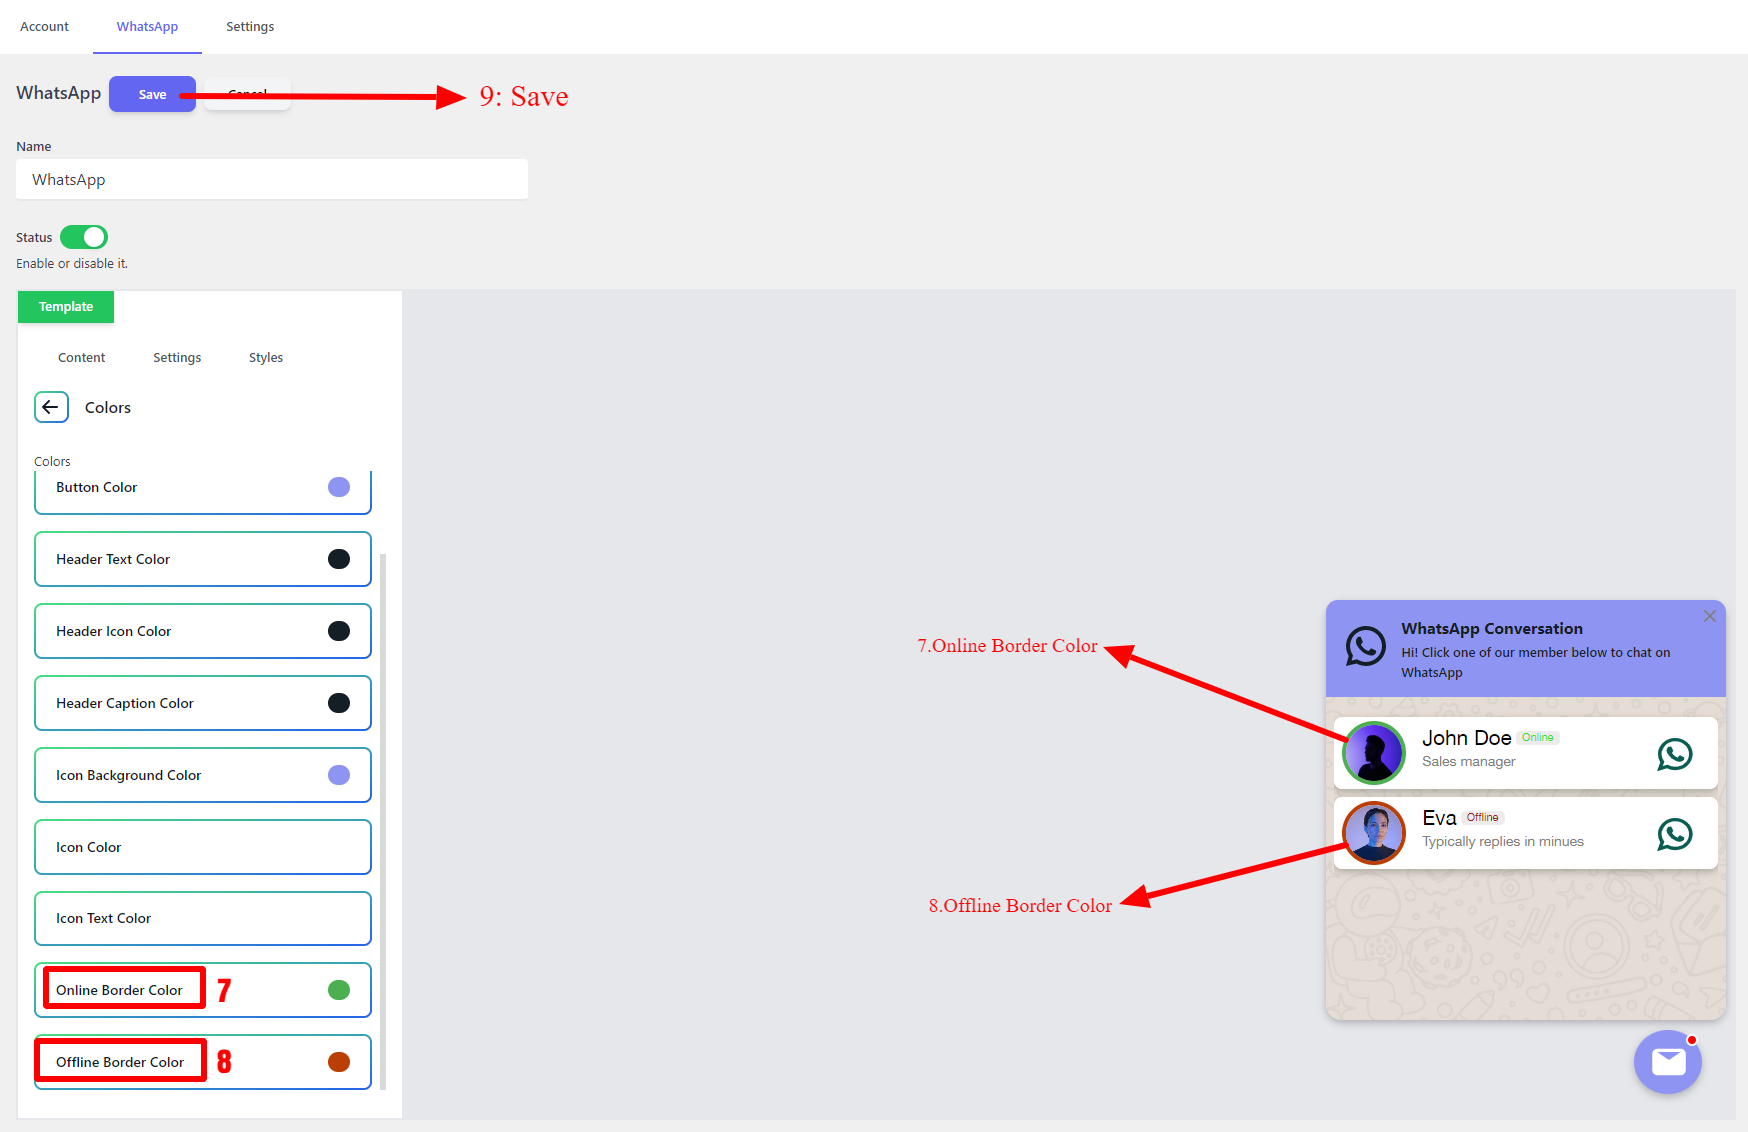
Change Colors
After selecting the template, if you are not satisfied with the color of the chat menu, you can change it and choose your favorite colors
To change colors, follow the below instructions.
- Open the WhatsApp that you would like to change its colors.
- Navigate to the Styles tab on the WhatsApp details page.
- Open the Colors section.
In the Colors section, you can change listed parts of the WhatsApp Chat Support like “Header Background Color”, “Button Color”, “Header Text Color”, “Header Icon Color”, “Header Caption Color”, “Icon Background Color”, “Icon Color”, “Icon Text Color”, “Online Border Color” and “Offline Border Color”.

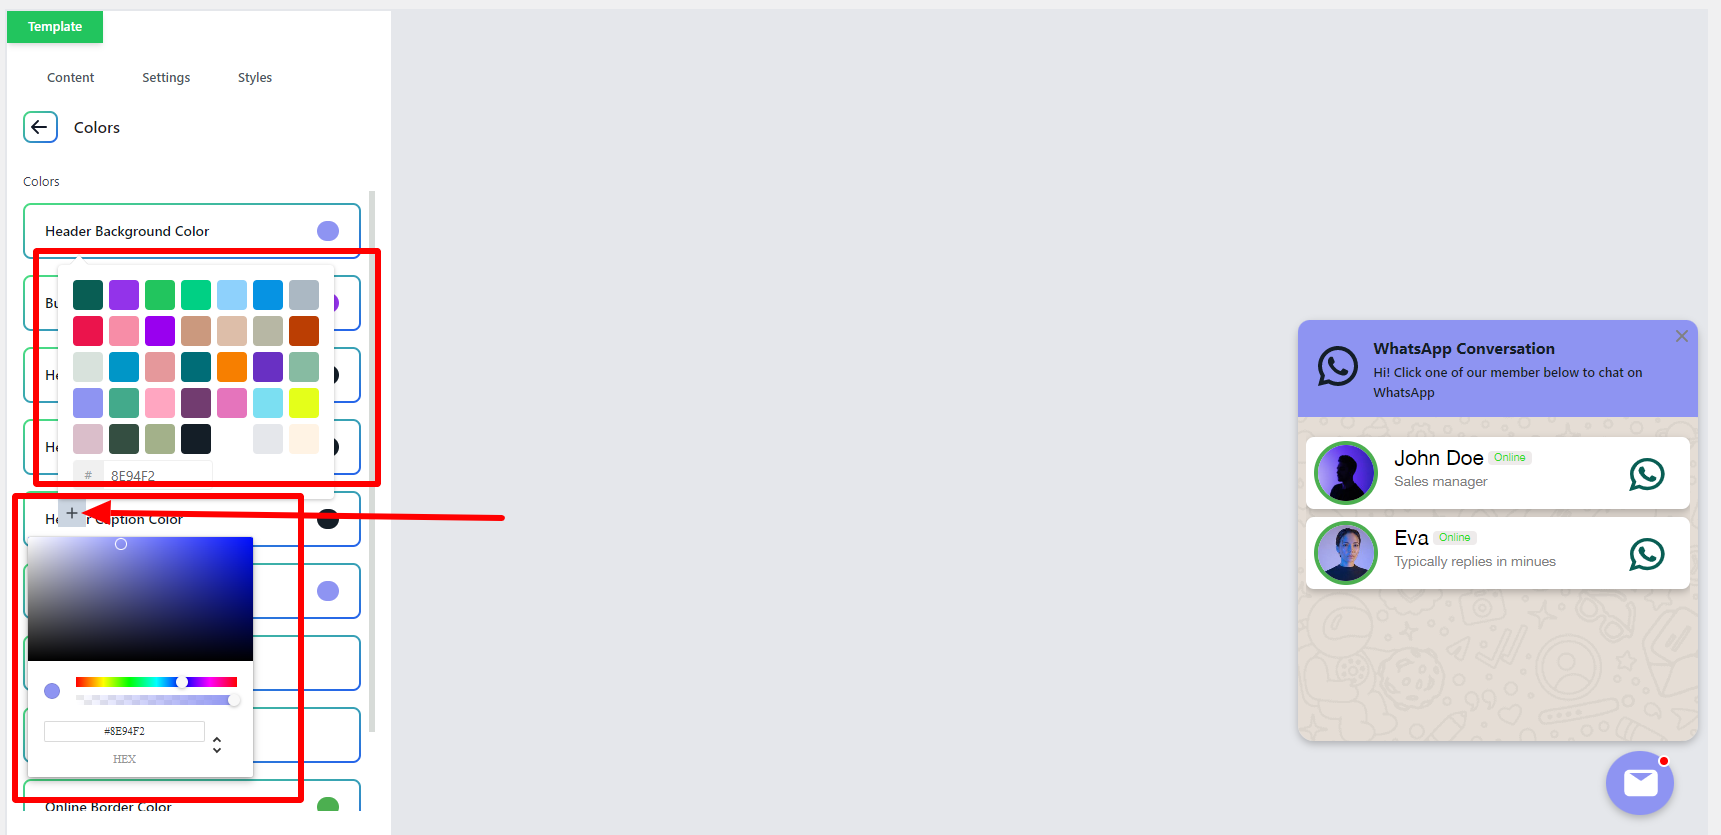
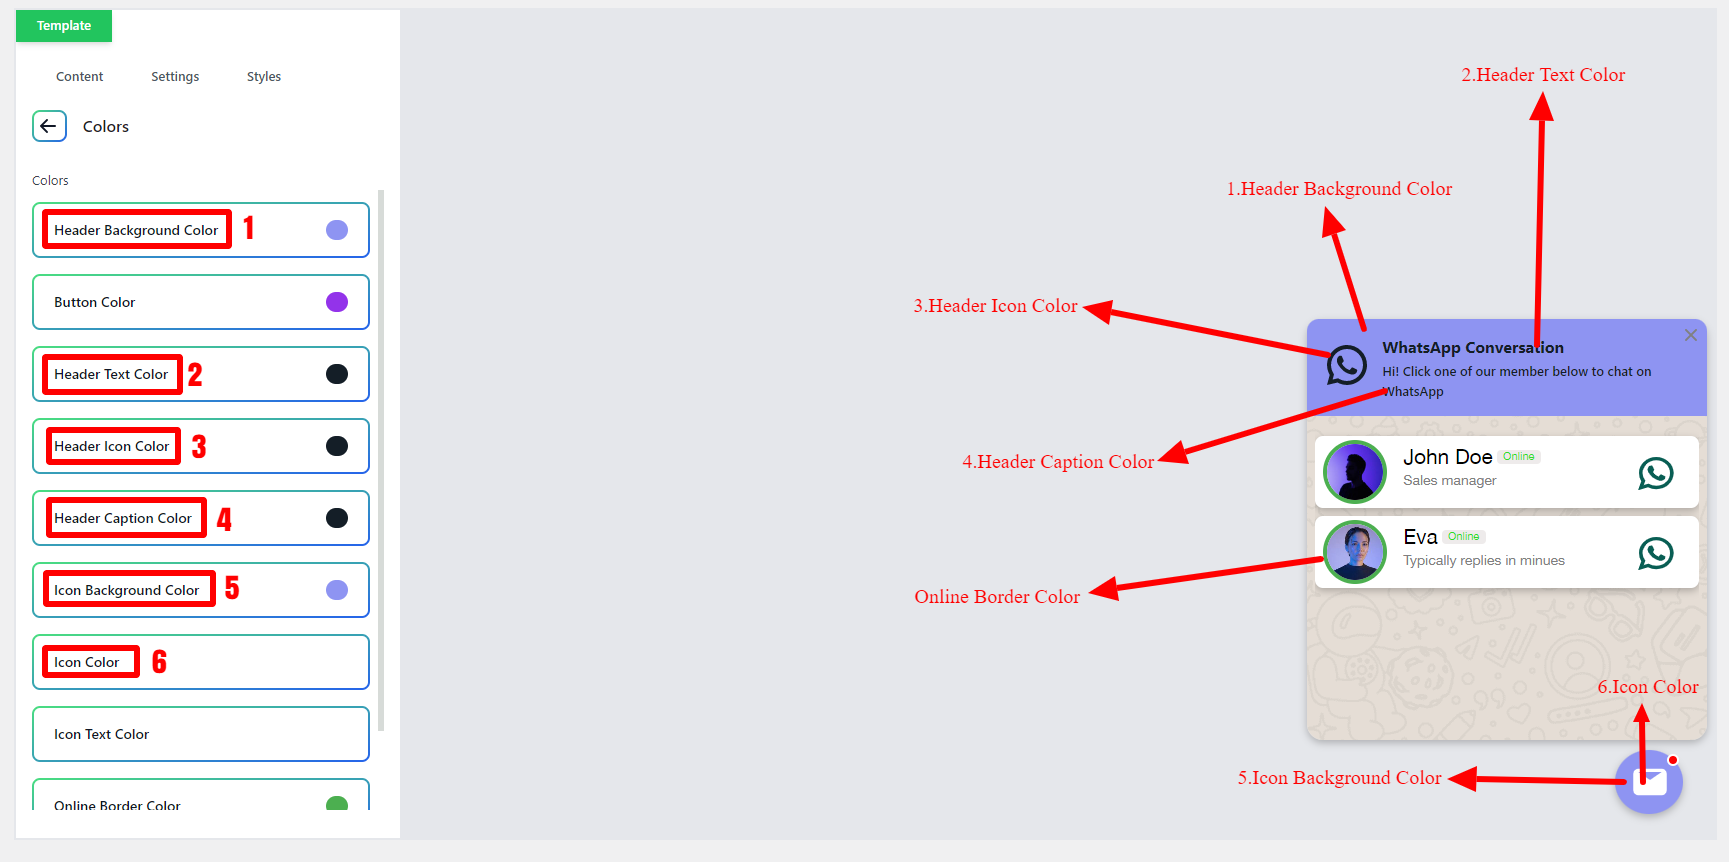
After changing colors, click on the Save button to save changes.
Pro Options
Here is a list of the Pro version options that can help more to create better WhatsApp Chat support for your website and store.
- Define custom availability and working hours for each account
- Define custom availability timezone for each account
- Google Analytics
- Facebook Pixel Analytics
- Add WhatsApp Chat to specific WooCommerce categories or tags
- Exclude WhatsApp Chat from specific WooCommerce products
- Display WhatsApp Chat to logged-in users or guest users
- Scrollbar for multi-agent WhatsApp chat when you have more agents