Back in Stock
Overview
A Back in Stock campaign captures demand on out-of-stock products. Instead of a dead "Out of stock" page, the buy button is replaced with a themed "Notify me" button that opens a sign-up form. When you restock the product, everyone on the waitlist is emailed automatically.
How it works
- A shopper visits an out-of-stock product matched by your campaign.
- They click Notify me and a pop-up form opens for their email + consent.
- They're added to that product's waitlist.
- When you restock the product, the plugin emails every waitlisted customer and marks them notified — batched, and never twice.
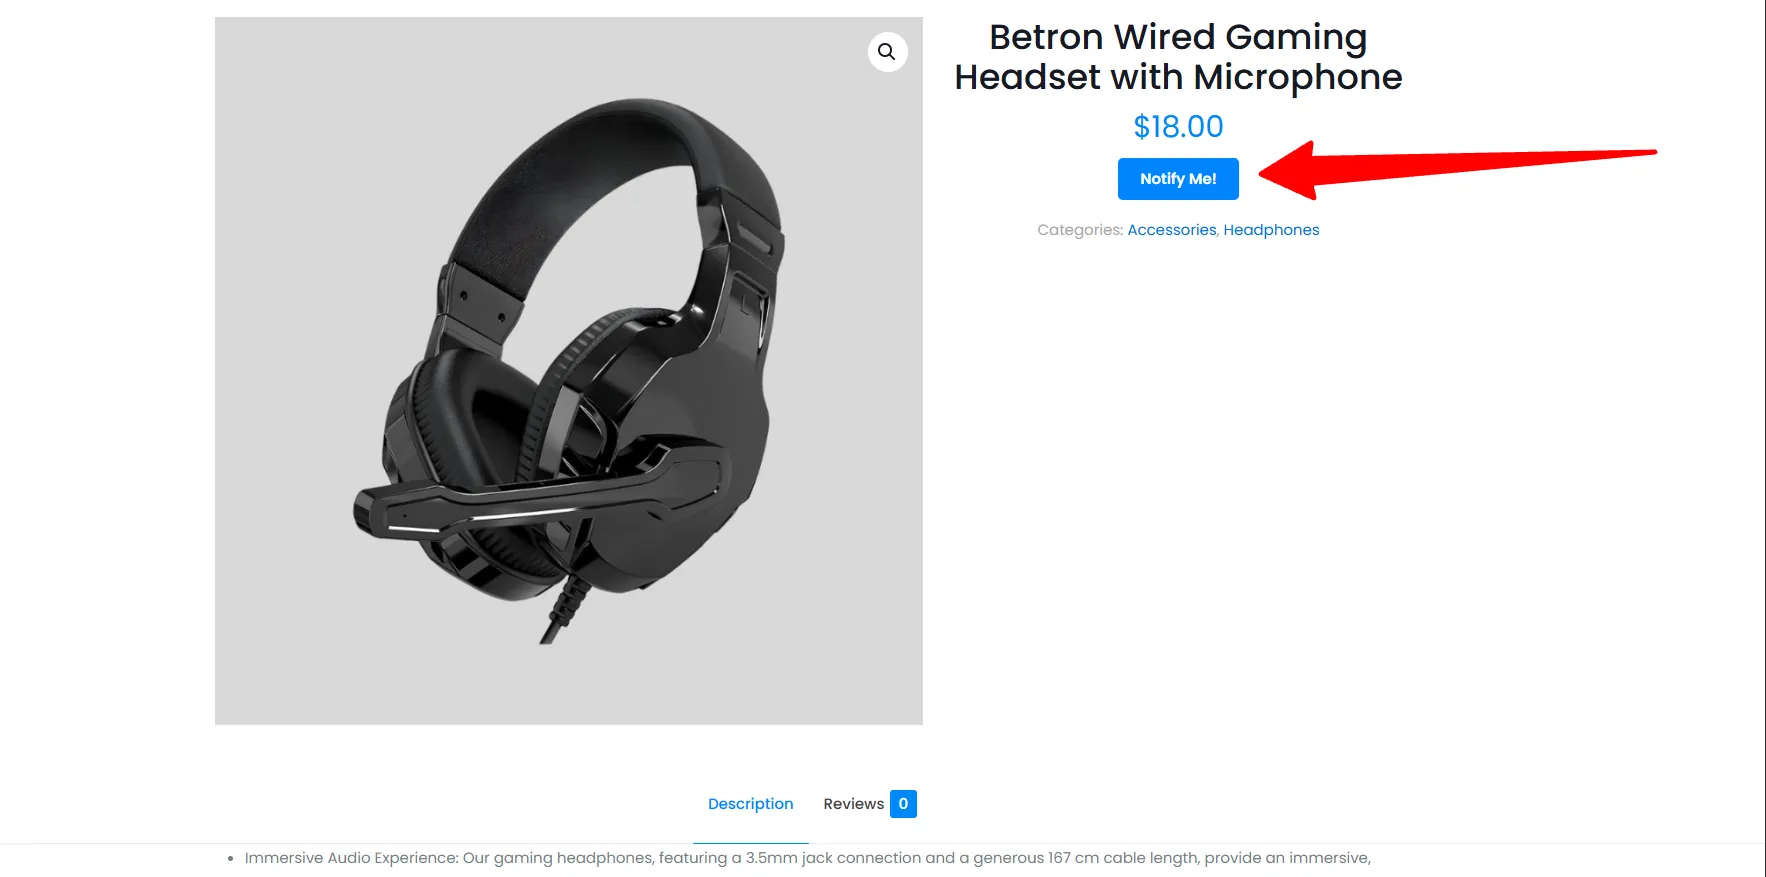
An out-of-stock product showing the Notify Me! button where Add to Cart would normally be.
Step-by-step setup
A Back in Stock campaign uses four of the editor's tabs: Content, Signup Form, Email Notification and Targeting.
1. Name it, pick the type, and set up the button
Open Preorders → Campaigns → Add New, name the campaign, and choose Back in Stock as the type. The Content tab then controls the button itself:
- Button text — the label, e.g.
Notify Me!. - If the product is also a preorder —
Show Notify me together with the preorder button, orShow only the preorder button. Choosing together reveals a Notify button position field for placing it before or after Add to Cart. - Visibility — the button always shows on the product page; tick Shop / archive page to add it to shop and category listings too.
- Styling — border radius, text colour and background for the button.
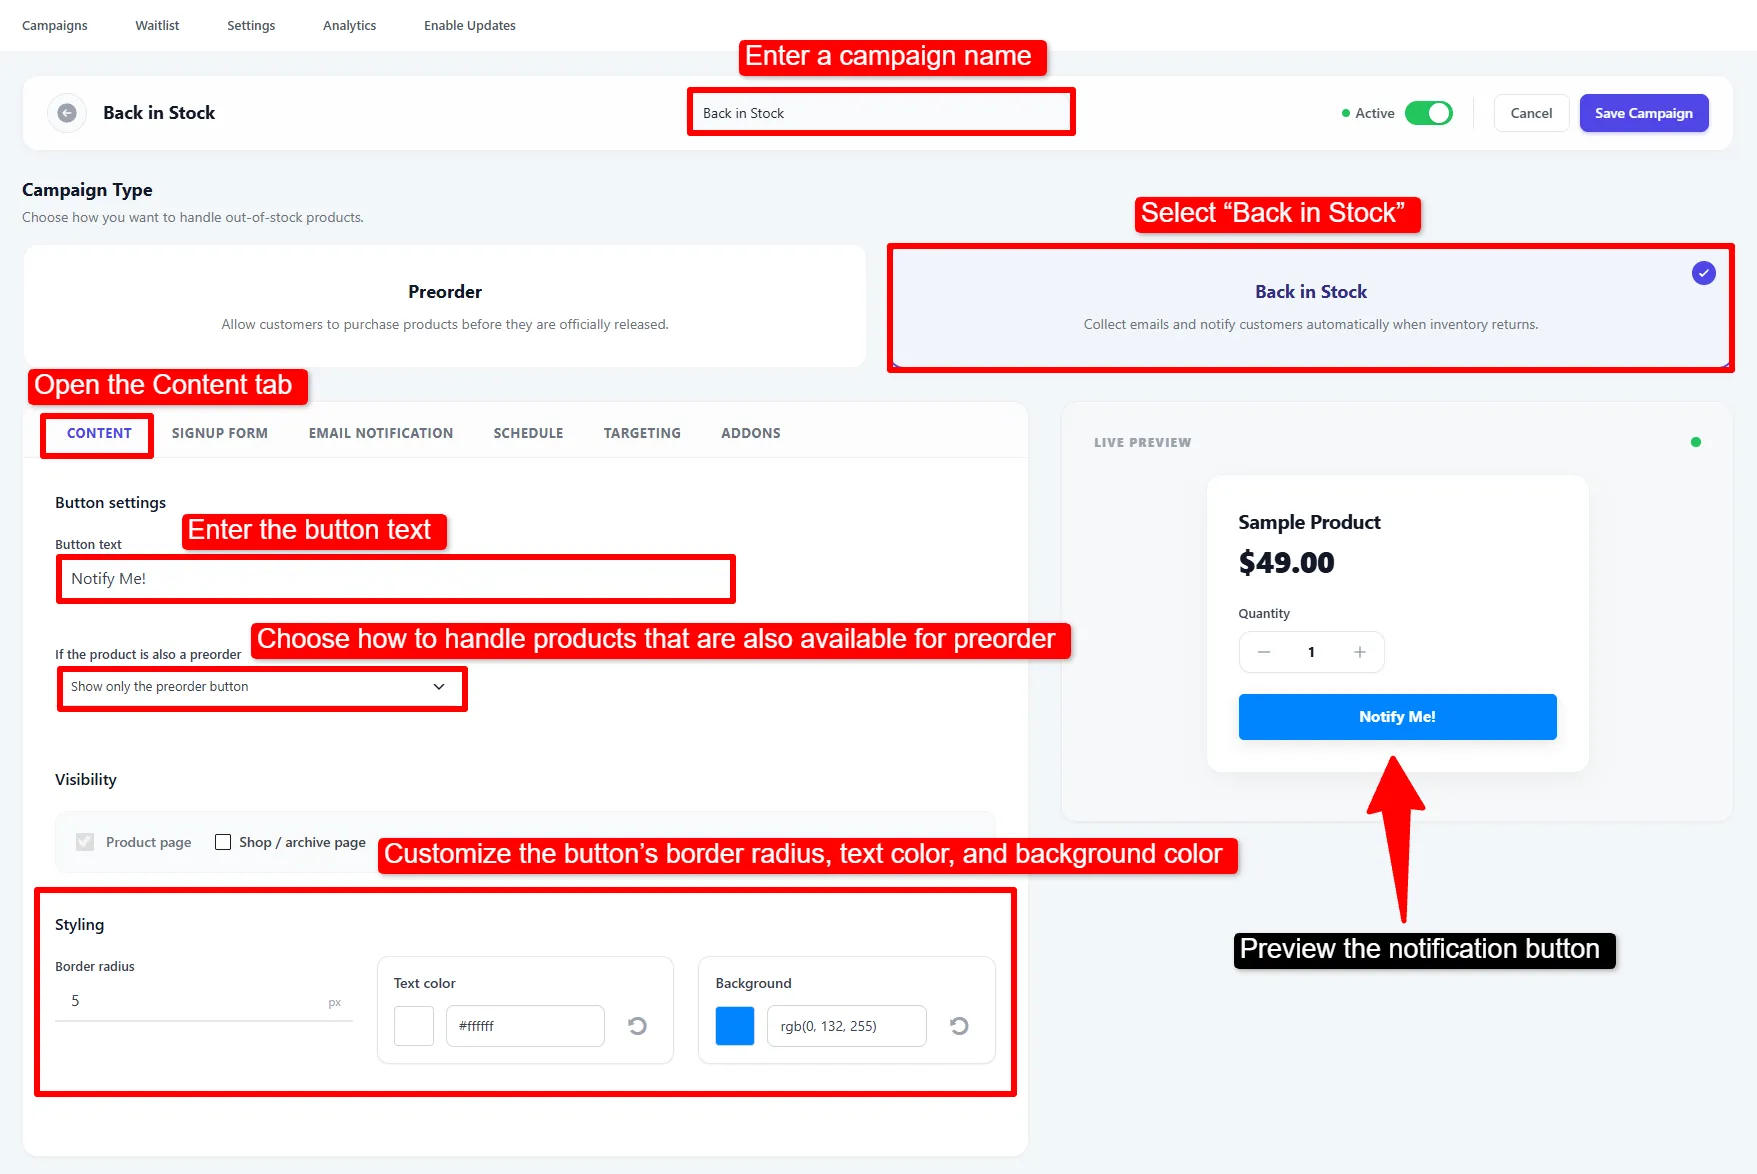
Name the campaign, select Back in Stock, then set the button text, preorder behaviour, visibility and styling on the Content tab.
2. Style the sign-up form
The Signup Form tab controls the pop-up. Every string is editable, and the live preview on the right redraws as you type.
- Form content — Header, Description, Email placeholder, Email error, Button text, Terms message.
- Confirmation message — the Header and Description shown after a successful sign-up.
- Styling — radius, text and background for the form, the textbox and the button, independently.
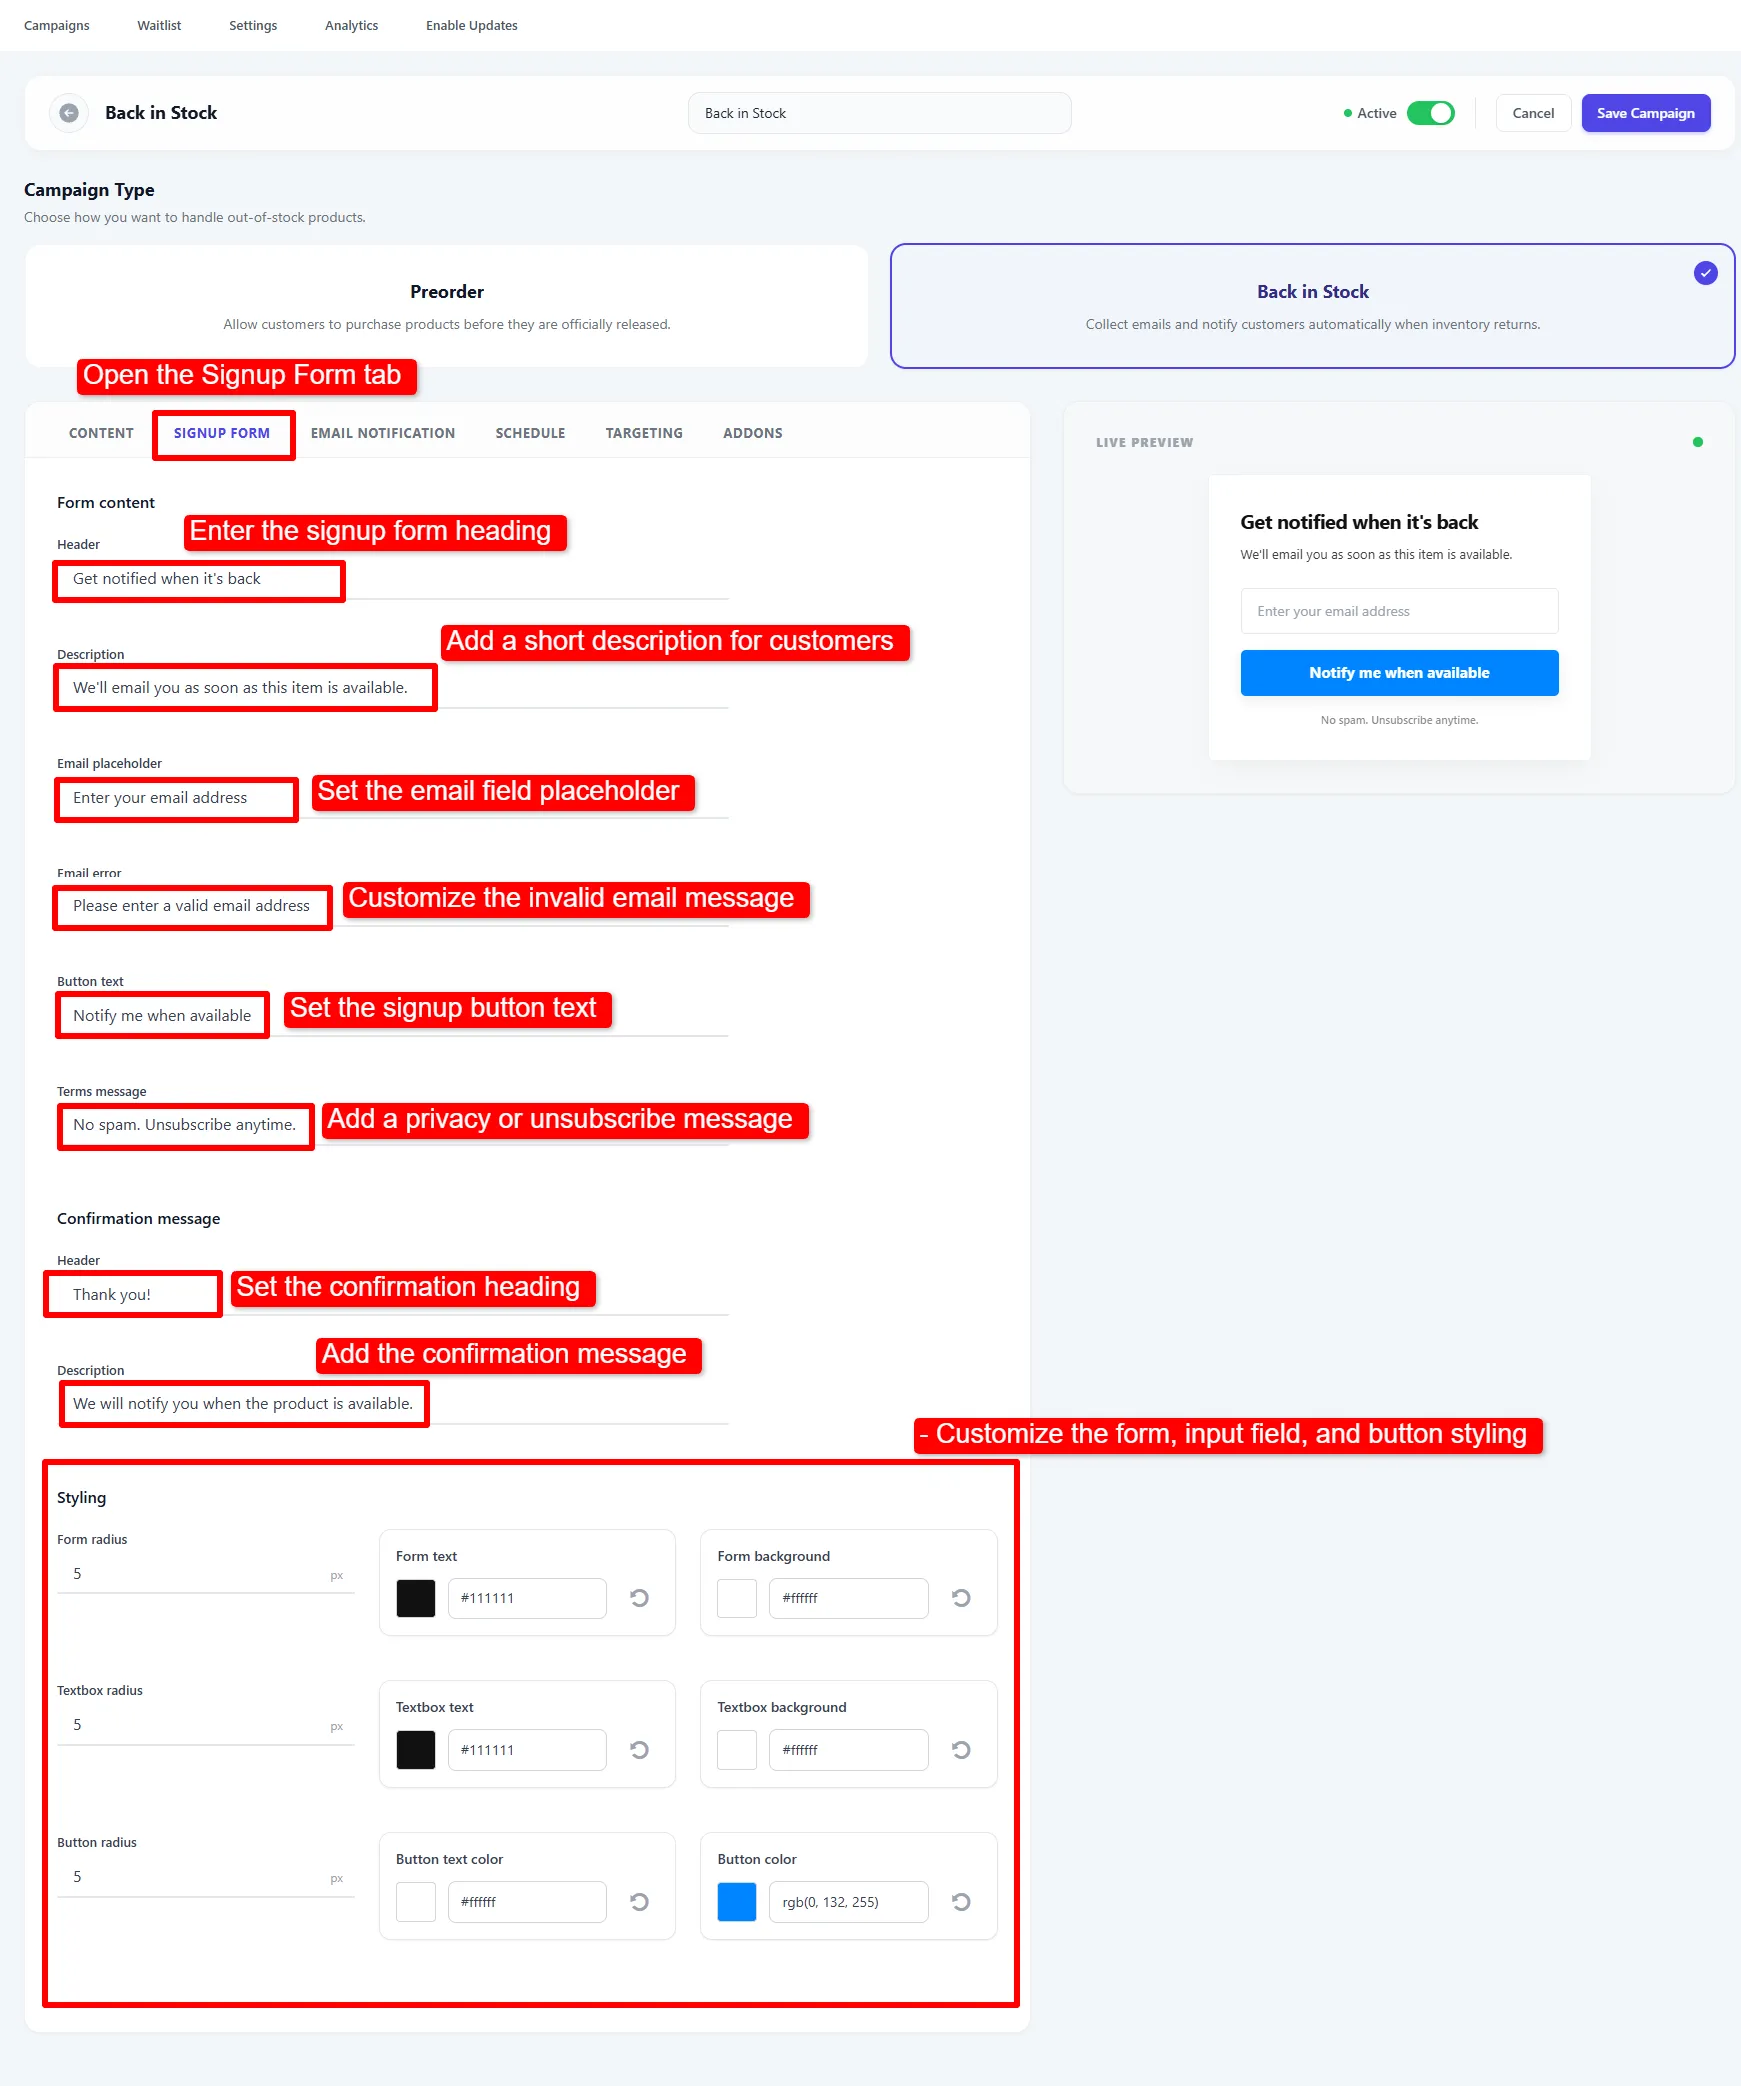
The Signup Form tab. The live preview shows the exact pop-up your shoppers will see.
3. Design the notification email
The Email Notification tab is the email that goes out when stock returns. Choose Branded template to style it entirely from these options, or WooCommerce template to inherit your store's existing email design.
- Show product image and a Layout — Centered, Hero, Split or Minimal.
- Sender — name and address. Leave both blank to use your WooCommerce defaults.
- Content — subject & heading (use
{product_name}for the product title), description, button text, unsubscribe text.
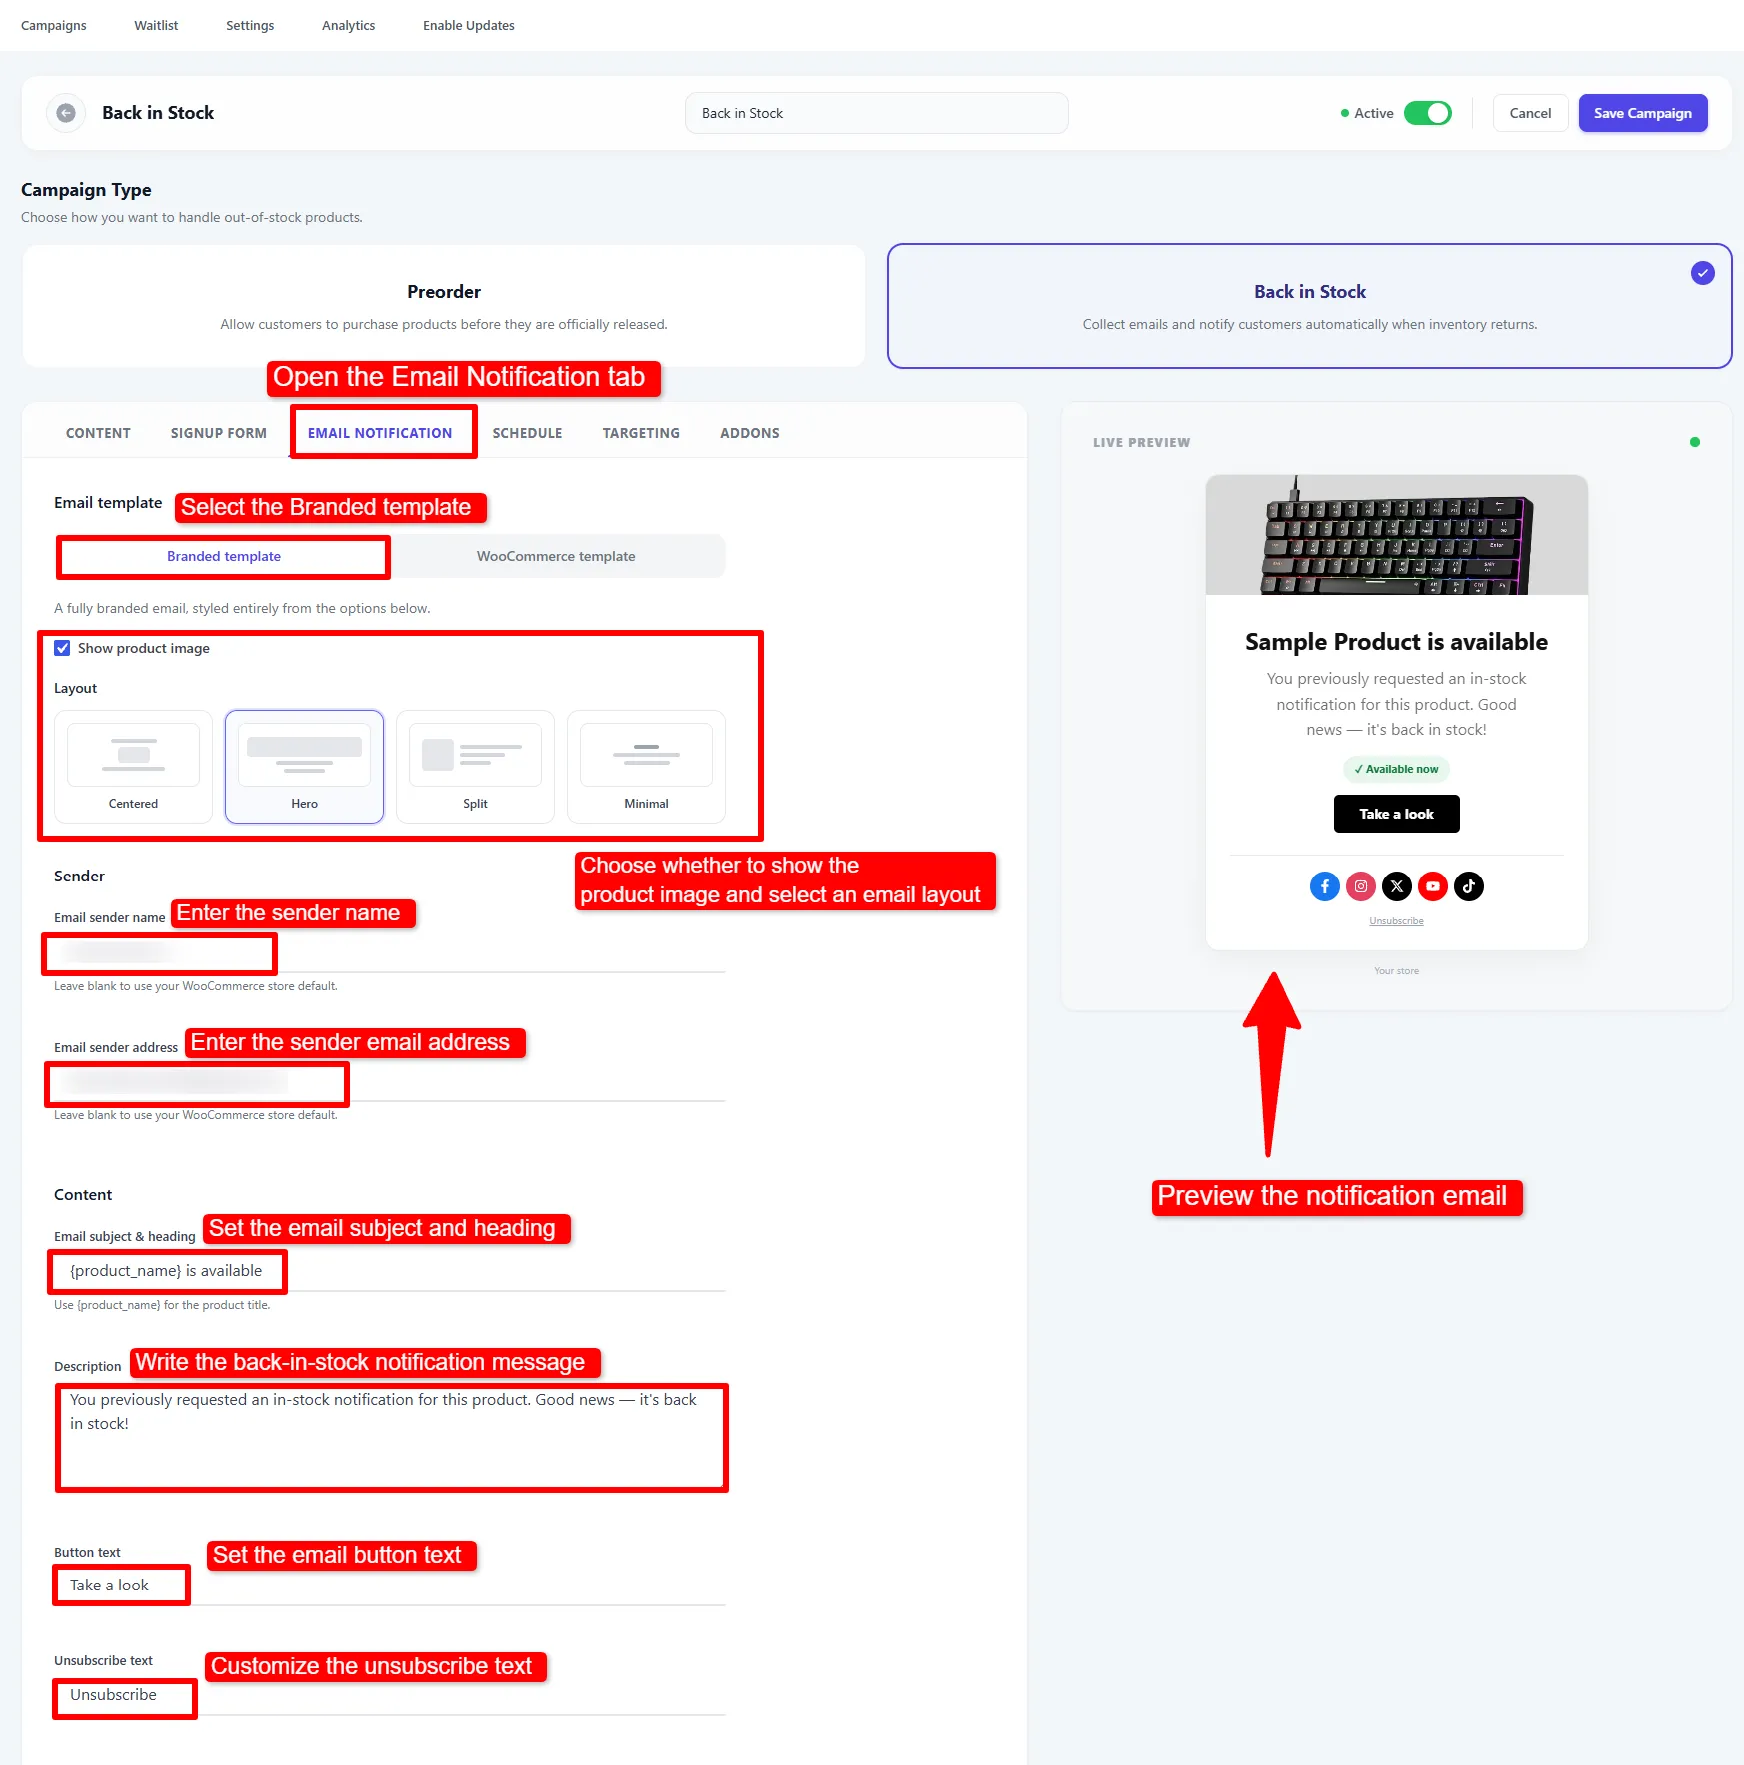
Pick the template and layout, set the sender, and write the email copy.
Scrolling further down the same tab gives you branding, a footer and type sizing:
- Branding — branding text, a logo URL and logo width. The text is used only when no logo is set.
- Footer — a message plus Facebook, Instagram, X, YouTube and TikTok links. Leave everything blank to hide the footer entirely.
- Styling — heading and description sizes, button radius, and the email, text and button colours.
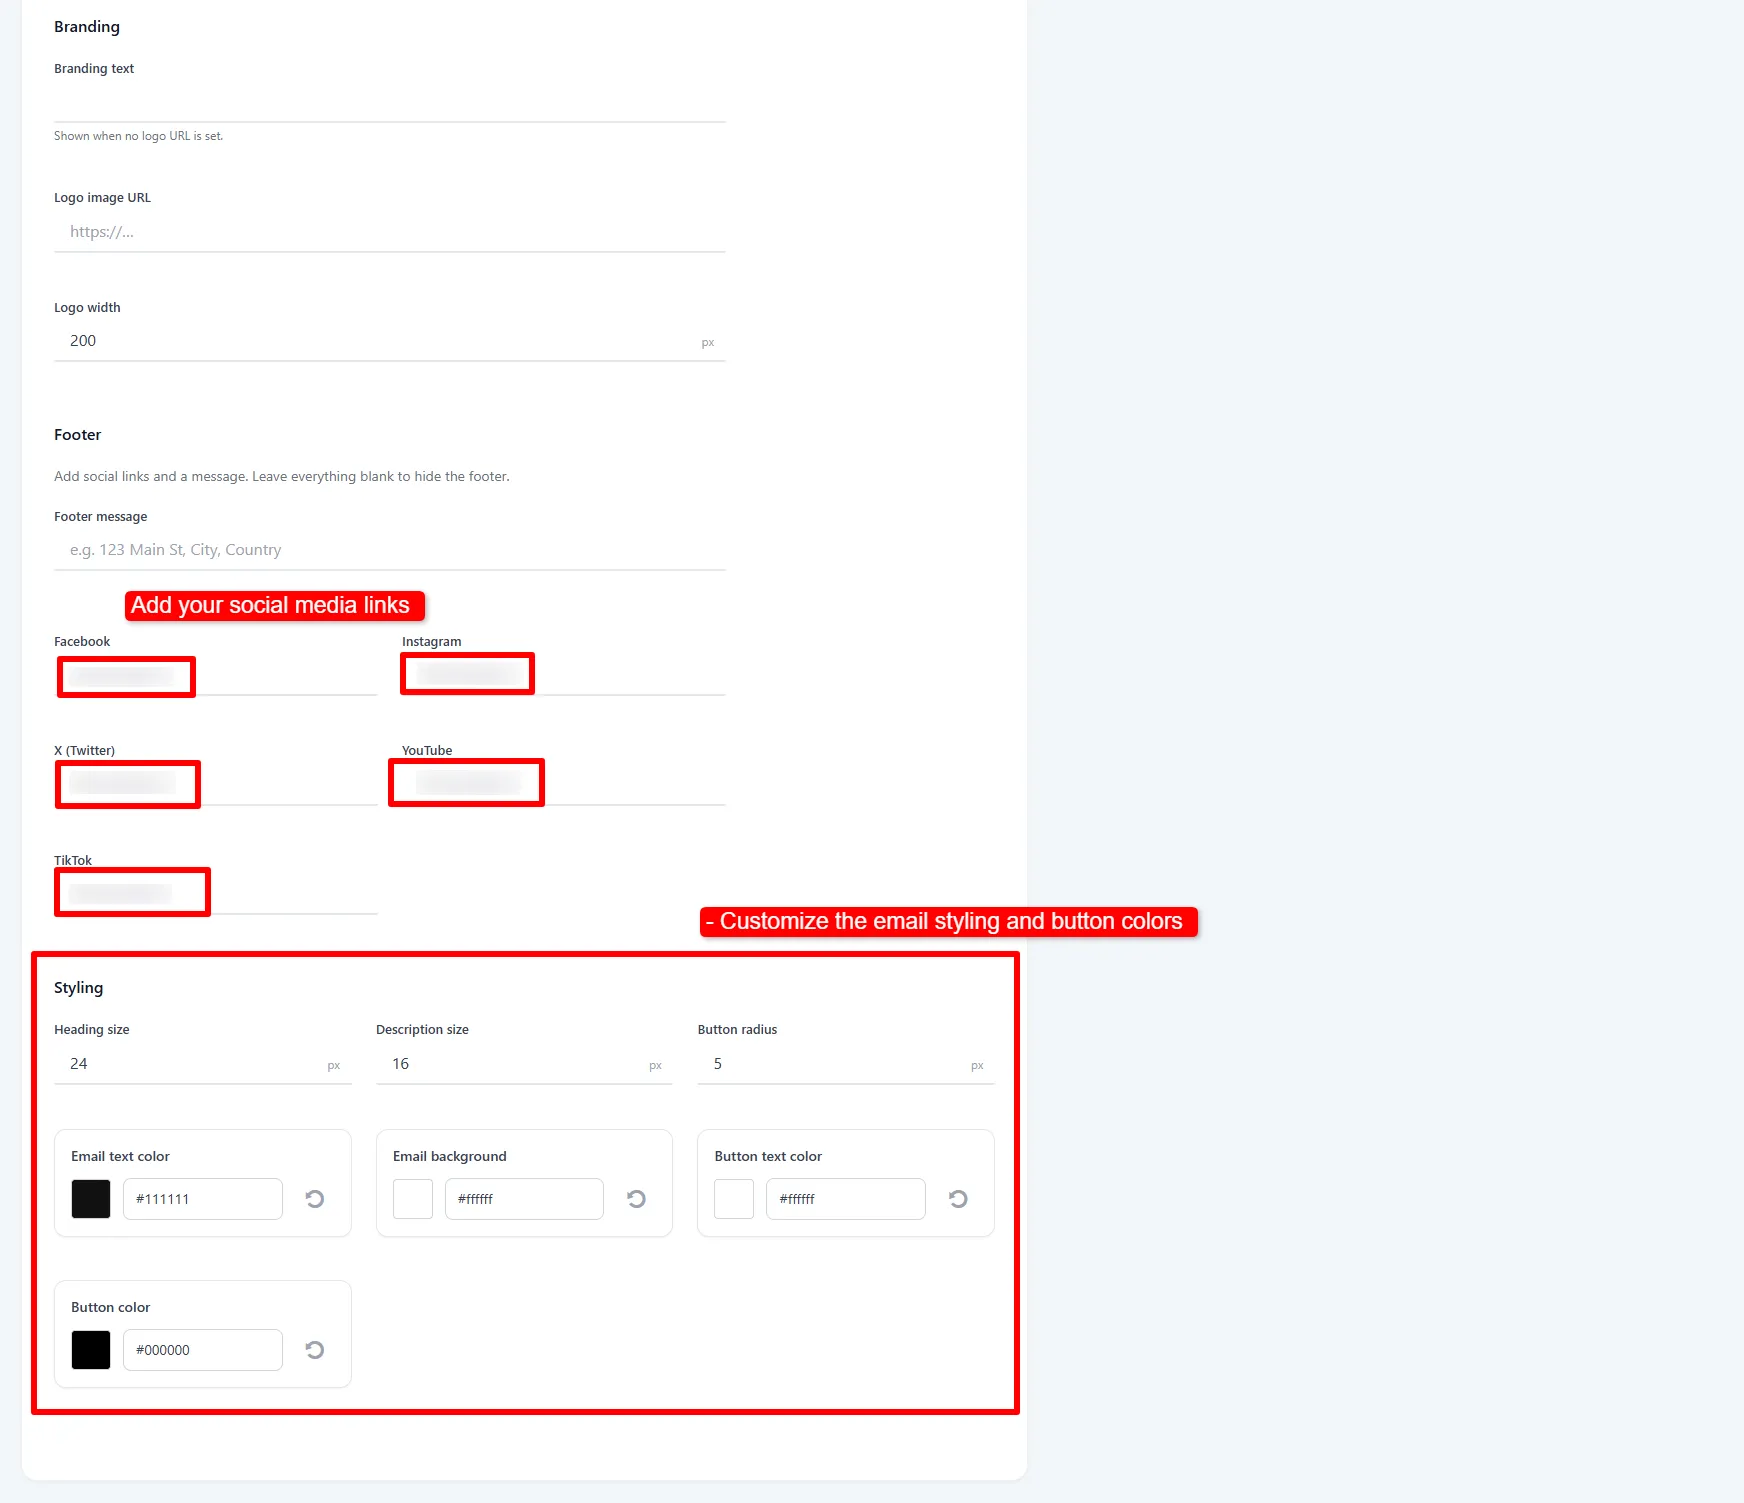
Branding, social footer and styling for the branded template.
The Free plugin renders the Centered layout. Hero, Split and Minimal come from the Pro add-on — the options are visible either way, but only Centered renders without Pro installed.
4. Choose when it applies, target products, and save
The Targeting tab decides when the button appears and which products are covered.
- When product is out of stock — the normal choice for a waitlist.
- Show Always / When product is in stock — for unusual cases.
- Apply to —
All Productsis the right starting point for most stores. Narrow it with product or category conditions, and use + Or Group for a second set.
Then toggle Active and click Save Campaign.
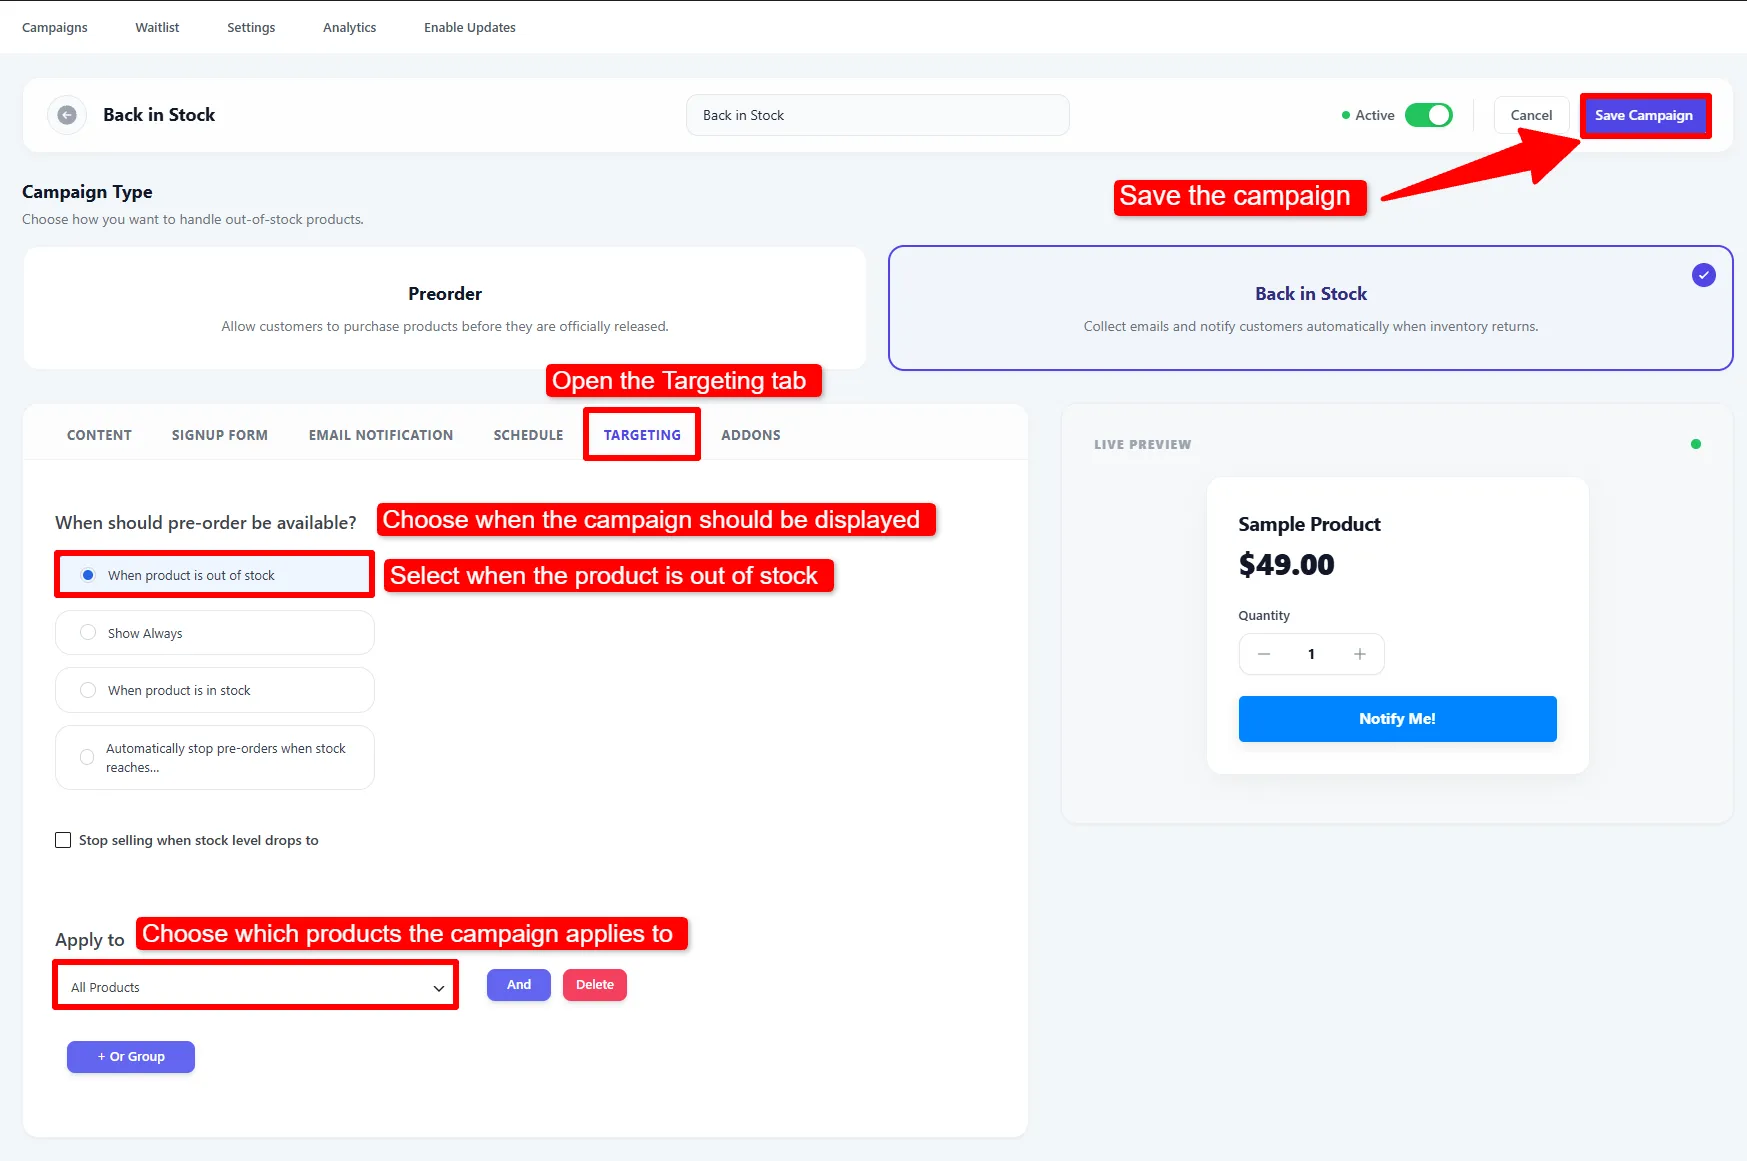
Choose when the campaign applies, target the products, then save.
The Targeting tab reads "When should pre-order be available?" even on a Back in Stock campaign — the two types share this control. On a Back in Stock campaign it decides when the Notify me button appears.
Options explained
Content tab
| Setting | What it does |
|---|---|
| Button text | The Notify me label. |
| If the product is also a preorder | Show Notify me alongside the preorder button, or show the preorder button only. |
| Notify button position | Before or after the Add to Cart button. Only appears when the setting above is "together". |
| Visibility → Shop / archive page | Also show the button on shop and category pages. |
| Styling | Border radius, text colour and background for the button. |
Signup Form tab
| Setting | What it does |
|---|---|
| Header / Description | The heading and intro text inside the pop-up. |
| Email placeholder | Placeholder text in the email field. |
| Email error | Shown when the address fails validation. |
| Button text | The submit button inside the form. |
| Terms message | The consent line next to the required checkbox. |
| Confirmation header / description | What the shopper sees after signing up. |
| Styling | Radius, text and background for the form, textbox and button. |
Email Notification tab
| Setting | What it does |
|---|---|
| Email template | Branded (styled here) or WooCommerce (inherits your store's template). |
| Show product image / Layout | Include the product image, and pick Centered, Hero, Split or Minimal (the last three are Pro). |
| Sender name / address | Overrides the WooCommerce defaults. Blank uses the store setting. |
| Subject & heading | Supports {product_name}. |
| Description / Button text / Unsubscribe text | Email body copy. |
| Branding | Branding text, logo URL, logo width. |
| Footer | Footer message and five social links. Blank hides the footer. |
| Styling | Heading and description size, button radius, email/text/button colours. |
Targeting tab
| Setting | What it does |
|---|---|
| When should it be available? | Out of stock (default), always, or only in stock. |
| Apply to | Which products the campaign covers. All products and specific products are Free; Categories and Tags are Pro. |
🧪 Example configuration
The setup shown in the screenshots above:
| Setting | Value |
|---|---|
| Name | Back in Stock |
| Type | Back in Stock |
| Button text | Notify Me! |
| If also a preorder | Show only the preorder button |
| Button styling | Radius 5px · text #ffffff · background rgb(0, 132, 255) |
| Form header | Get notified when it's back |
| Form description | We'll email you as soon as this item is available. |
| Form button | Notify me when available |
| Terms message | No spam. Unsubscribe anytime. |
| Confirmation | Thank you! · We will notify you when the product is available. |
| Email subject | {product_name} is available |
| Email button | Take a look |
| Availability | When product is out of stock |
| Apply to | All Products |
| Status | Active |
What customers see
The shopper clicks Notify Me!, fills in one field, ticks consent, and is done.
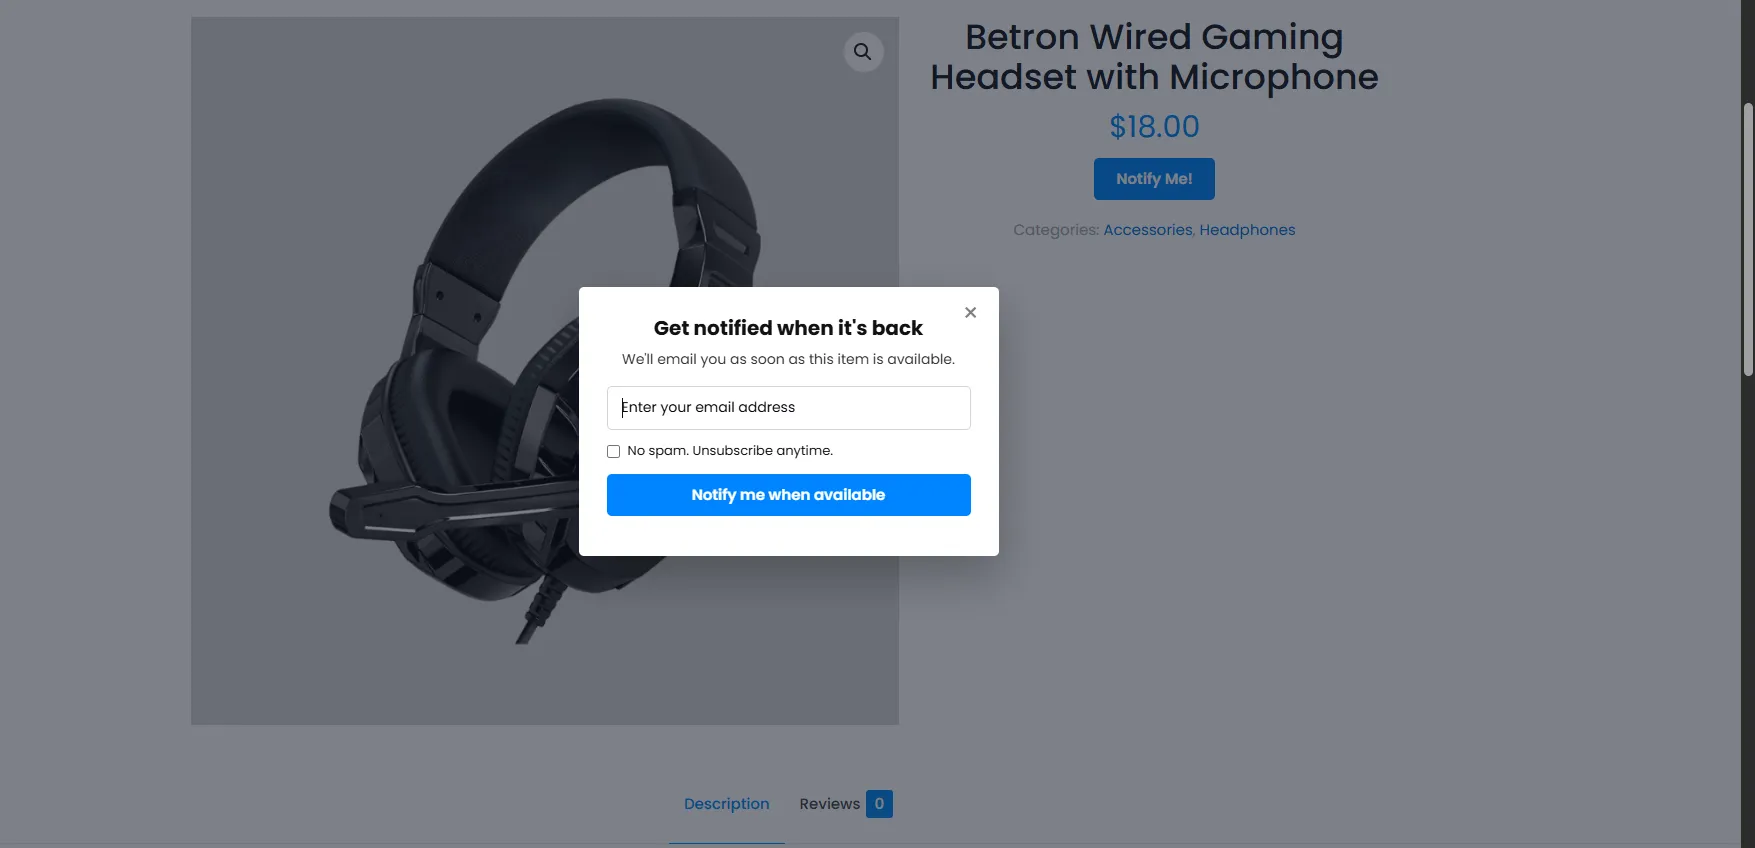
The sign-up form pop-up, styled entirely from your Signup Form settings.
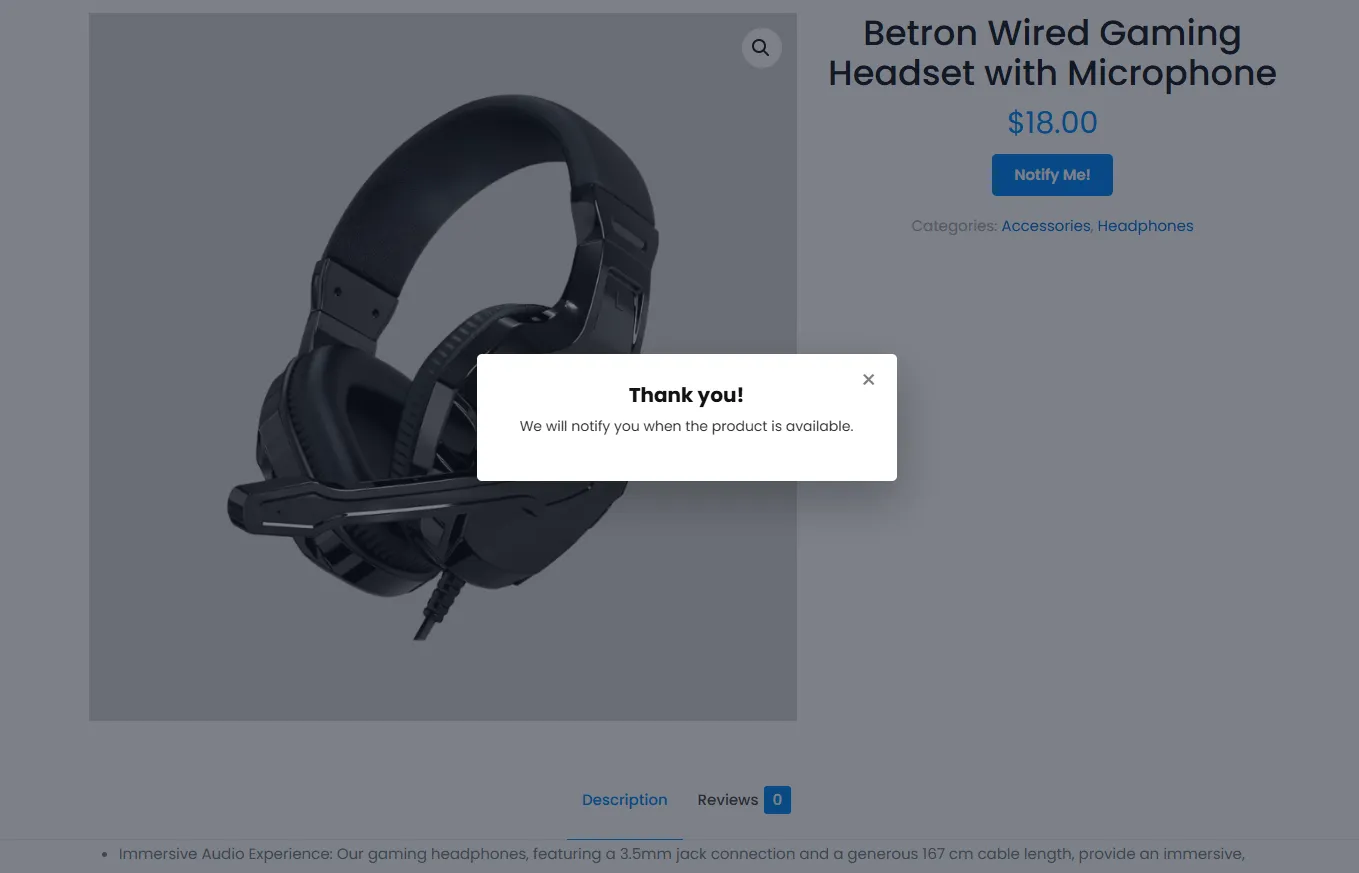
The confirmation message, also configurable per campaign.
Every sign-up is protected by a nonce, a honeypot field, per-IP rate limiting, email validation, a required consent checkbox, and duplicate suppression. Logged-in customers get their email prefilled. Every email includes a one-click unsubscribe link, and waitlist data is included in WordPress personal-data export and erasure.
Who signed up
Every sign-up lands on Preorders → Waitlist, filterable by product and status and searchable by email. A row stays pending until the restock email goes out, at which point it becomes notified.
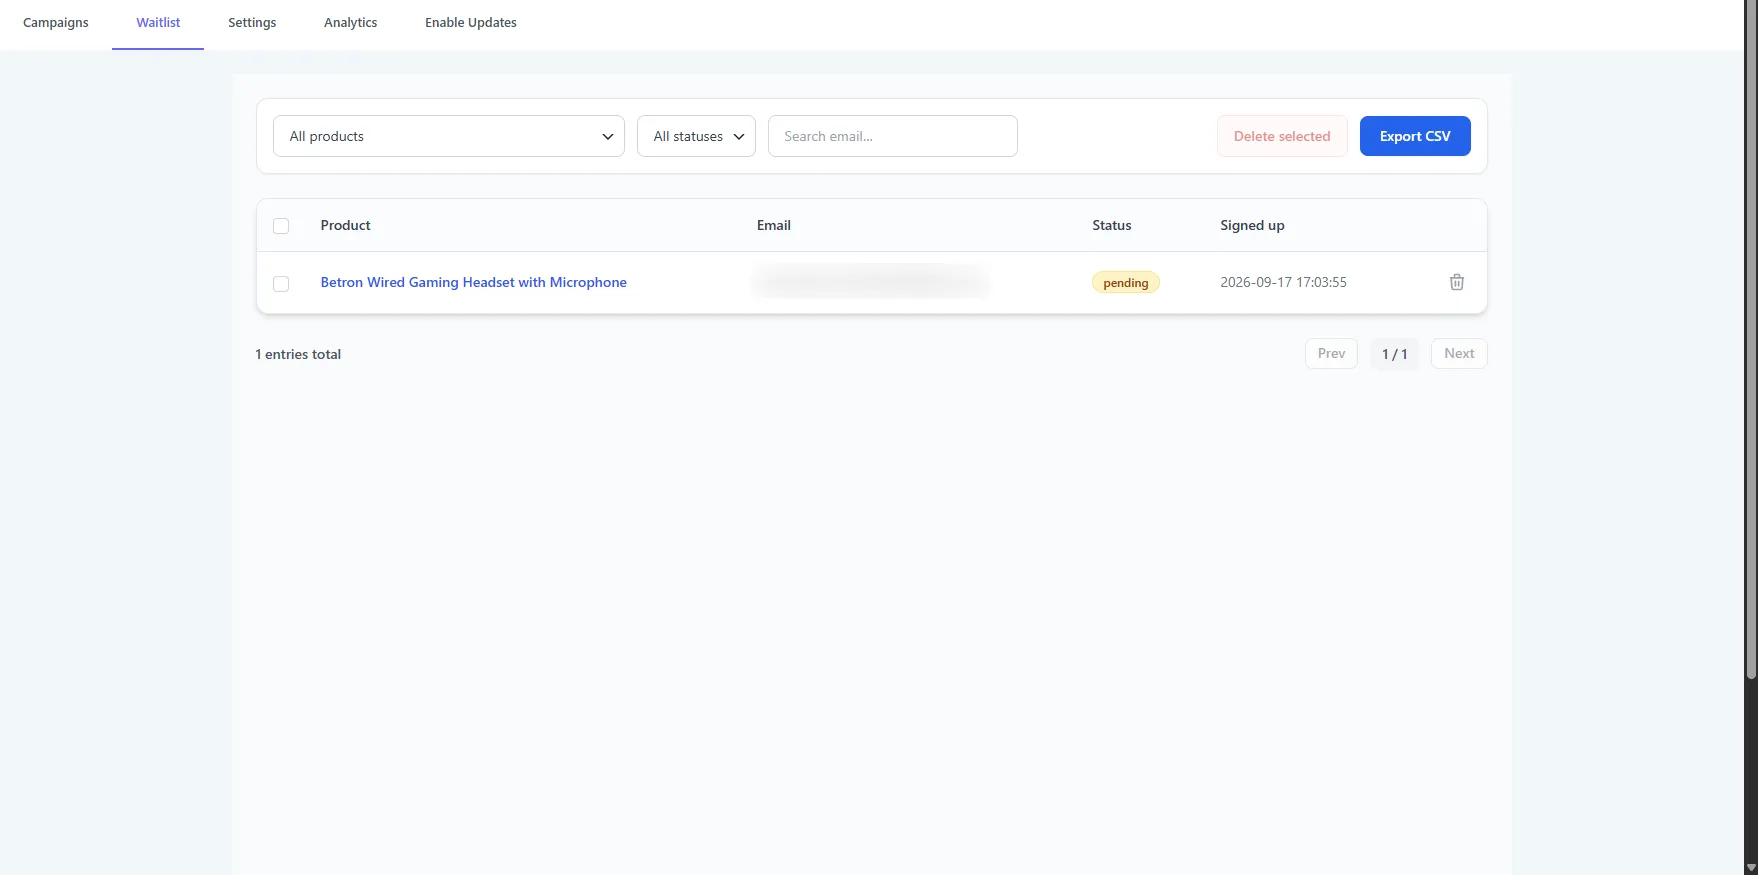
The waitlist: filter by product or status, search by email, and remove rows you no longer need.
Export CSV is a Pro feature. See Waitlist for manual alerts and bulk actions.
What triggers the notification?
The plugin watches WooCommerce's stock system. When a product with pending sign-ups becomes purchasable again — a manual stock edit, the WooCommerce REST API, or an order refund/cancellation that restores stock — it queues the notifications in the background through Action Scheduler.
A processing lock and a per-row notified status mean a customer is never emailed twice for the same restock, even if stock is saved several times in a row.
If you restock via raw SQL or an import tool that bypasses WooCommerce's stock functions, those hooks never fire. Use the manual Send back-in-stock alerts row or bulk action on the Products list — see Waitlist.
Place the form anywhere
Use the shortcode to render a Notify Me form outside the product page:
[asnp_wepo_notify_form]                 (current product)
[asnp_wepo_notify_form product_id="123"]
There is also a Notify Me (Back in Stock) Gutenberg block with an optional Product ID, for block themes and page builders.
Next Steps
- Emails — the store-wide email settings and templates.
- Waitlist — manage sign-ups and send manual alerts.
- Preorders — sell products before they are released.
Frequently asked questions
How do I add back in stock notifications to WooCommerce?
Create a Back in Stock campaign, set the button text on the Content tab, target All Products on the Targeting tab, and activate it. Every out-of-stock product that matches immediately shows a Notify me button, and restocking a product emails everyone waiting for it.
Does the waitlist work per variation?
Yes. The variation ID is stored with each sign-up, so a customer waiting on a specific size or colour is only emailed when that variation is restocked.
Can a customer sign up twice for the same product?
No. Duplicate sign-ups for the same email and product are suppressed, so one person on a waitlist means one email.
Can shoppers unsubscribe?
Yes. Every back-in-stock email contains a one-click unsubscribe link, signed with a token and verified before the row is updated. Customers can also manage their sign-ups from My Account → Preorders.
Does the Notify me button show on shop and category pages?
It can. Tick Shop / archive page under Visibility on the campaign's Content tab.
Can I use my own email design?
Yes. Set Email template to WooCommerce template on the Email Notification tab and the notification inherits your store's existing WooCommerce email header, footer and colours instead of the branded layout.