Create a Storewide Fixed Price Cart Discount
This guide will walk you through creating a storewide fixed price discount that applies automatically to the customer's cart. A fixed price discount applies a specific dollar amount off the cart subtotal. For example, a "$20 Off" discount will reduce a $100 cart total by $20.
This is one of the most effective ways to encourage larger purchases, boost sales, and reduce cart abandonment.
📋 Table of Contents
- Before You Begin: Enable WooCommerce Coupons
- Step-by-Step: Create a Storewide Fixed Price Cart Discount
- Next Steps
🚀 Before You Begin: Enable WooCommerce Coupons
This plugin works with WooCommerce's built-in coupon system. Please ensure it is enabled first.
- Go to your WordPress Admin Dashboard.
- Navigate to WooCommerce > Settings.
- Click on the General tab.
- Check the box for Enable coupons.
- Save your changes.
Now you are ready to create your first automatic coupon rule under the Woo Pricing & Discounts > Discounts tab.
Scenario: Create a "Flat Amount $20 Off" Automatic Coupon
In this tutorial, we will create an automatic coupon named "Flat Amount $20 Off" that applies a fixed $20 discount to the entire cart. This is an unscheduled campaign, meaning it will be active immediately and run indefinitely until you disable or delete it.
We will build this rule step-by-step, from choosing a template to seeing it applied in the cart.
Step 1: Access Discounts and Choose a Template
- In your WordPress admin, go to the Woo Pricing & Discounts menu.
- Open the Discounts tab.
- Click on the Add from Template button to quickly start a new rule.
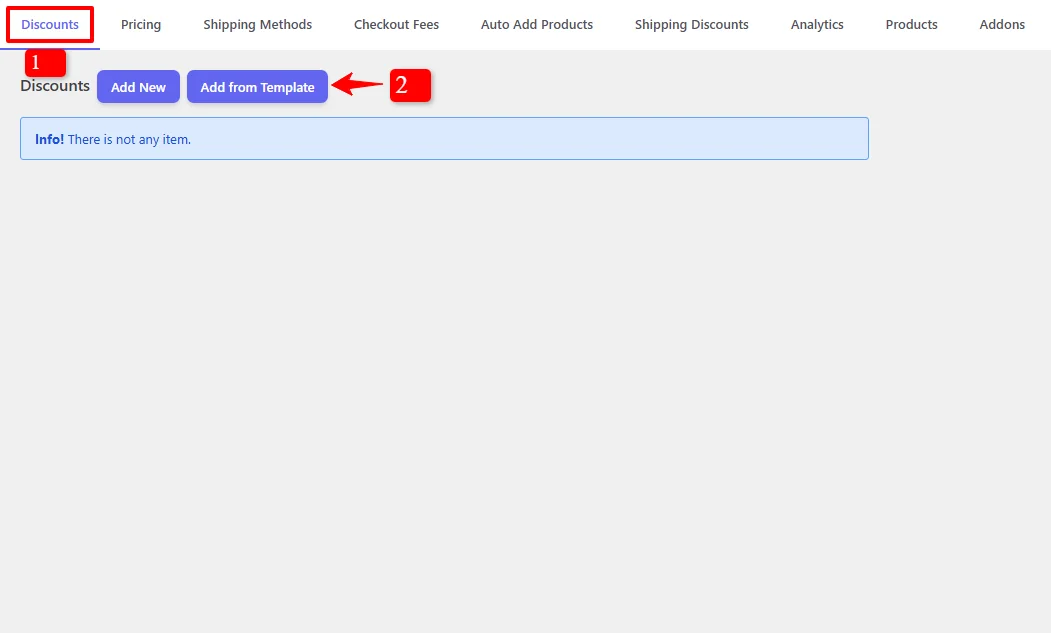
This will open a modal window where you can select a pre-configured campaign.
Step 2: Select the "Flat Amount $20 Off" Template
- In the "Choose your desired campaign" modal, you can search for templates.
- Under the Automatic Coupons section, find and select the "Flat Amount $20 Off" template.
- Click the "Add Campaign" button.
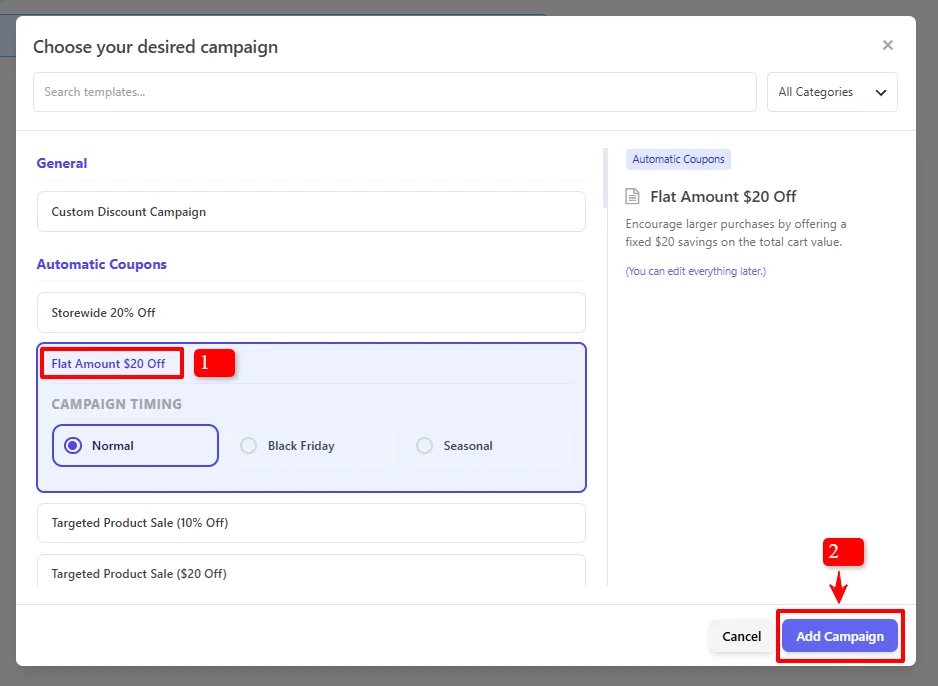
This will pre-fill the discount rule with the basic settings for a storewide fixed price discount.
Step 3: Configure the Discount Rule
In the discount rule editor, you will see several fields to customize your coupon.
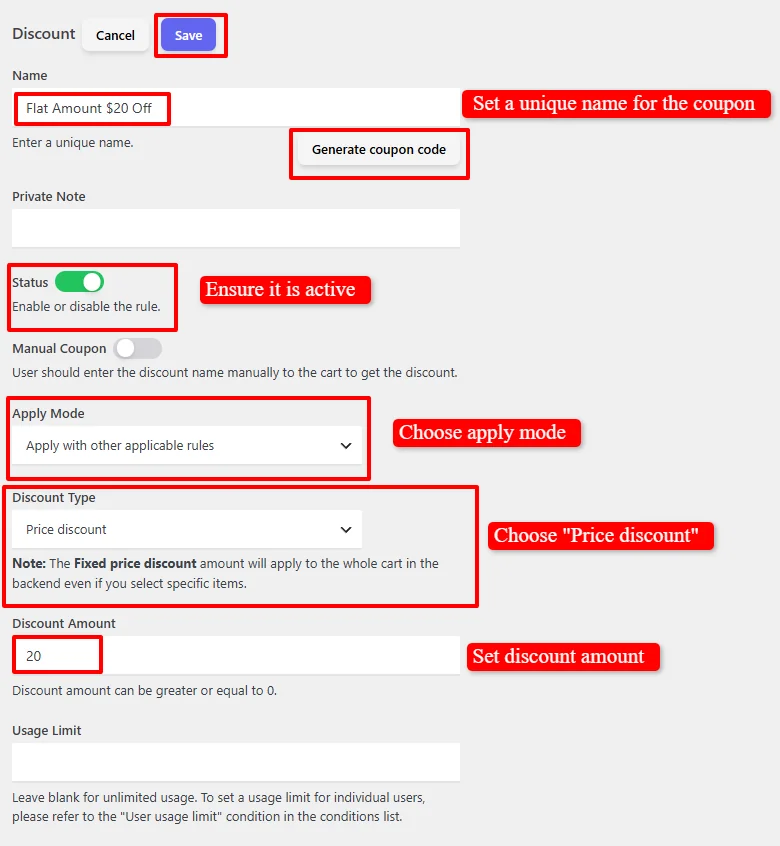
- Name: The template has already filled this in as "Flat Amount $20 Off". You can change it to anything unique, like "Summer Sale 2026". You can also use the "Generate coupon code" button to create a unique code.
- Private Note: Add internal notes for your reference. These notes are not visible to customers.
- Status: Ensure this is set to Enable so the rule is active.
- Manual Coupon: Leave this unchecked. This is the key to making it an automatic coupon. When this is unchecked, the discount applies without the customer needing to enter a code.
- Apply Mode: This setting determines how this rule interacts with other active discount rules. Choose the option that best fits your store's strategy. See the detailed explanation below.

- Apply with other applicable rules (Non-Exclusive): This is the default mode. The discount will be applied alongside any other applicable rules. For example, a storewide $20 discount and a 10% product-specific discount would both be applied to the cart.
- Exclusive: When selected, this rule will be applied, and all other applicable discount rules will be disregarded (ignored). This is useful for creating a "best offer" or a special promotion that should override all others.
- Apply if other rules are not applicable: The discount will only be applied if no other discount rules are applicable to the cart. This ensures this rule acts as a fallback or default offer.
- Discount Type: Select "Price discount" from the dropdown.
- Discount Amount: Enter the fixed dollar amount you want to discount. For a $20 discount, enter
20. - Usage Limit: Leave this blank to allow unlimited uses. You can set a limit if you want to restrict the total number of times this coupon can be used.
Step 4: Schedule the Coupon (Optional)
In our scenario, this is an unscheduled campaign, meaning it will run immediately. You can leave this section empty.

However, you have powerful scheduling options to control exactly when your discount is active. Under the "Date Time" section, you can set up one or multiple scheduling conditions to match your promotional strategy.

The Date Time section allows you to create flexible schedules using the following options:
- Date Range: Define a start and end date to run a promotion over a period. For example, you could set a start date of
2026-07-20and an end date of2026-07-31for a limited-time summer sale. - Date Time Range: Set a precise start and end date and time for flash sales or hour-specific promotions. For example, run a discount from
2026-07-22 09:00to2026-07-22 17:00. - Specific Date: Set a specific single date for the discount to be active. For example, apply a discount only on
2026-07-22. - Days: Select specific days of the week for recurring weekly promotions. For example, apply a weekend discount by selecting only Saturday and Sunday. [cite: from the article, "Cart discount for weekends"]
- Time: Set a specific time range that repeats daily. For example, offer a "happy hour" discount between
14:00and16:00every day.
You can combine multiple scheduling conditions using the "And New Rule" button to create complex schedules. For example, you could set a discount to apply only on weekends (Days: Saturday, Sunday) AND only during a specific time (Time: 10:00 - 18:00).
You can also create alternative schedules using the "OR New Group" button. For instance, apply a discount if the date is within a specific range (Date Range: 2026-07-20 to 2026-07-31) OR on a specific day (Days: Friday). The discount will be applied if any of the OR conditions are met.
To remove an existing schedule, simply click the "Remove" icon (the trash can) next to the condition you wish to delete.
For a deep dive into timezone setup, recurring schedules, and multi-tier scheduling logic, read our comprehensive Scheduling & Date-Time Guide.
Step 5: Save the Rule
Once you have configured all the settings, click the Save button at the top of the page.

Step 6: See it in Action!
Your automatic coupon is now live. Let's see how it works for a customer.
- Visit your store as a customer and add products to the cart. In this example, we have added a Shirt - Cream ($25.00) and a Sweater ($30.00) , making a subtotal of $80.00.
- Go to the cart page.
- You will see the "Flat Amount $20 Off" discount has been applied automatically.
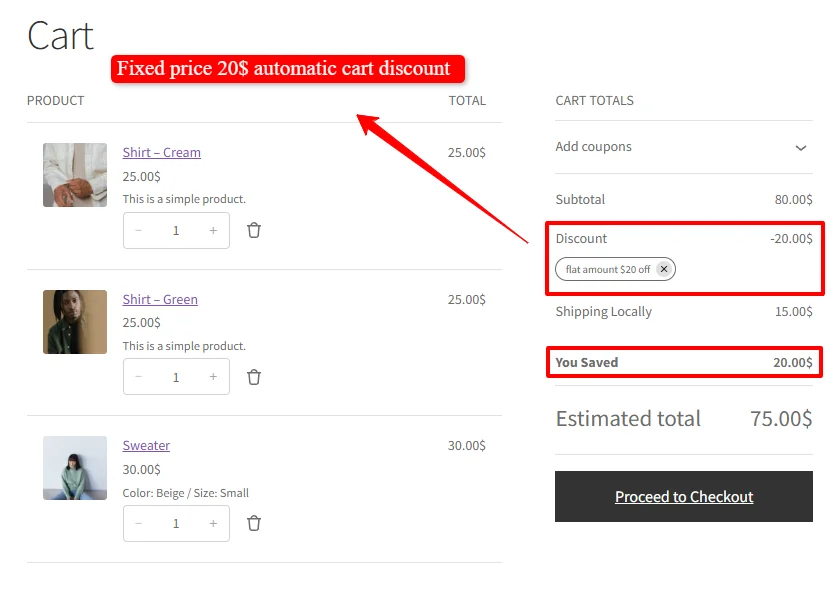
- The Subtotal is $80.00.
- The Discount is -$20.00 (fixed amount off the entire cart).
🎉 Success!
You have successfully created a storewide fixed price automatic coupon. The discount was applied seamlessly, with no need for the customer to find or enter a coupon code. This removes friction from the checkout process and can significantly increase conversion rates.
Experience all discount rules and pricing strategies in action on our Live Demo Website.
Upgrade to Discount Rules and Dynamic Pricing for WooCommerce PRO to unlock advanced conditions, user role pricing, recurring schedules, tiered variations, and priority support.
📚 Next Steps
Now that you've mastered fixed price cart discounts, explore other discount configurations:
- Storewide Percentage Cart Discounts — Switch to percentage-based cart discounts.
- Minimum Spend Cart Discounts — Require a minimum cart subtotal to unlock fixed price discounts.
- Category-Specific Cart Discounts — Apply fixed price discounts to specific product categories.
- User Role Discounts — Give exclusive fixed price discounts to VIP or wholesale members.
- Manual Coupons — Create coupon codes for fixed amount discounts.