
A WooCommerce Black Friday sale is not a discount—it is a system. When Black Friday 2026 lands on November 27 and Cyber Monday follows on November 30, the stores that win are not the ones with the deepest cuts. They are the ones with the cleanest, most automated WooCommerce Black Friday sale setup. This guide walks you through the entire stack using three AsanaPlugins tools: Discount Rules and Dynamic Pricing for pricing logic, Sale Booster Product Badges for visual urgency, and Product Bundle Builder for high-AOV gift packages. By the end, you will have a WooCommerce Black Friday sale with storewide percentages, category-scoped deals, BOGO logic, curated bundles, dynamic badges, countdown timers, and automatic expiry—so your store is not still discounting in December.
Table of Contents
- Why Most WooCommerce Black Friday Sale Setups Fail
- Quick Summary: The Complete WooCommerce Black Friday Sale Tech Stack
- Step 1: Align Your Store Timezone for the WooCommerce Black Friday Sale
- Video Tutorial
- Step 2: Create the Scheduled Storewide Percentage Deal
- Step 3: Category Deals Without the Stack
- Step 4: BOGO – Buy 2 Get 1 Free
- Step 5: Scale Average Order Value with Holiday Bundles
- Step 6: Dynamic Sale Badges That Stop the Scroll
- Step 7: Countdown Timers for Urgency
- Step 8: Auto-Expiry and Seamless Cyber Monday Rollover
- Step 9: Critical Caching and Performance Configurations
- The Complete 2026 WooCommerce Black Friday Sale Launch Checklist
- Frequently Asked Questions
- Can I run a WooCommerce Black Friday sale without manual coupon codes?
- How do dynamic badges calculate percentage savings automatically?
- Will dynamic pricing rules slow down my WooCommerce checkout?
- What happens when a countdown timer reaches 00:00:00?
- How do I stop the WooCommerce Black Friday sale from running past Black Friday?
- What if I want different sales on different days?
- Conclusion: Turn Your Store into an Autonomous WooCommerce Black Friday Sale Engine
- Get the Plugins
Why Most WooCommerce Black Friday Sale Setups Fail
Three things kill WooCommerce Black Friday sale profitability:
- The Manual Discount Trap. Forcing shoppers to hunt for discounts or manually updating prices creates friction and errors. A WooCommerce Black Friday sale that requires effort is a sale that does not convert.
- The Midnight Scramble. Manually updating product prices late on Thanksgiving night, only to revert them on Monday morning. This is how stores accidentally run 30% off through mid-December.
- The Caching Conflict. Serving cached regular prices while the WooCommerce Black Friday sale only reveals itself in the cart. Shoppers see full price, assume there is no sale, and leave.
The fix is one rule engine for pricing, one badge engine for display, and one bundle engine for order value—all scheduled to the minute.
Quick Summary: The Complete WooCommerce Black Friday Sale Tech Stack
| Sales Strategy | Plugin | Key Feature |
|---|---|---|
| Storewide & Category Deals | Discount Rules and Dynamic Pricing | Scheduled percentage rules with auto-expiry |
| BOGO (Buy X Get Y) | Discount Rules and Dynamic Pricing | Automatic cart injection of free product |
| Holiday Gift Bundles | Product Bundle Builder | Fixed or auto-calculated pricing with discounts |
| Dynamic Sale Badges | Sale Booster Product Badges | Dynamic percentage tags ({saved_percent}%) |
| Urgency Countdown | Sale Booster Product Badges | Live ticking clocks with auto-hide |
Step 1: Align Your Store Timezone for the WooCommerce Black Friday Sale
Before creating a single WooCommerce Black Friday sale rule, synchronize WordPress with your target market. If your server is in Frankfurt (UTC+1) but your customers are in New York (EST/UTC-5), your WooCommerce Black Friday sale will trigger six hours too early.
- Go to Settings → General in your WordPress admin.
- Scroll to the Timezone dropdown.
- Select your target customer city (e.g., America/New_York, Europe/London). Avoid static UTC offsets like
UTC-5; city-based options account for Daylight Savings. - Verify Local Time matches your clock, then click Save Changes.
Video Tutorial
Step 2: Create the Scheduled Storewide Percentage Deal
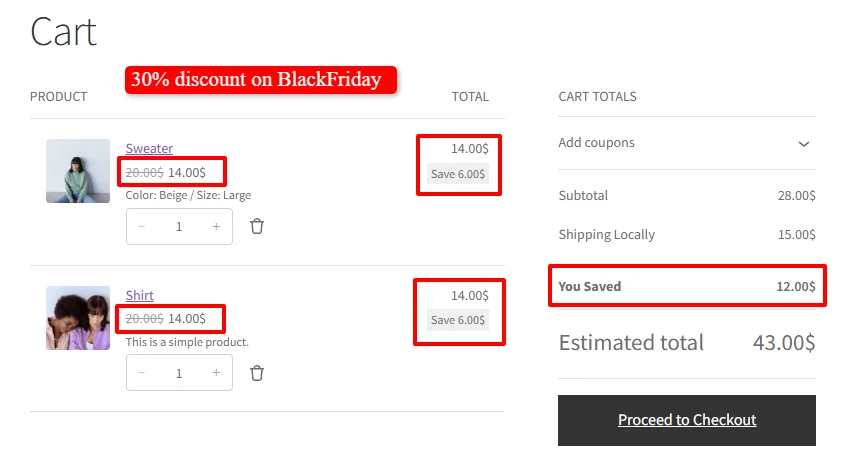
This is your headline WooCommerce Black Friday sale offer: a flat percentage off the entire cart, applied automatically, active only during your sale window.
Scenario: 30% off storewide, active November 27, 2026, from 00:00 to 23:59.
To create this rule, we used the Discount Rules and Dynamic Pricing free plugin.
2.1 Access Pricing and Choose a Template
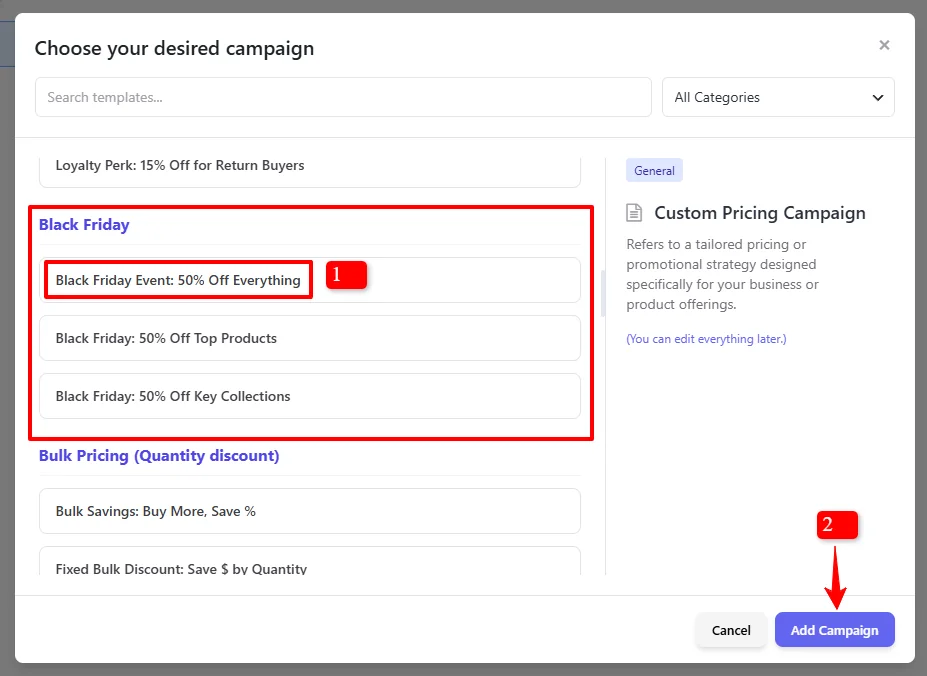
- In your WordPress dashboard, go to Woo Pricing & Discounts → Pricing tab.
- Click Add from Template.
- In the template browser, search for Black Friday.
- Select “Black Friday Event: 50% Off Everything” and click Add Campaign.
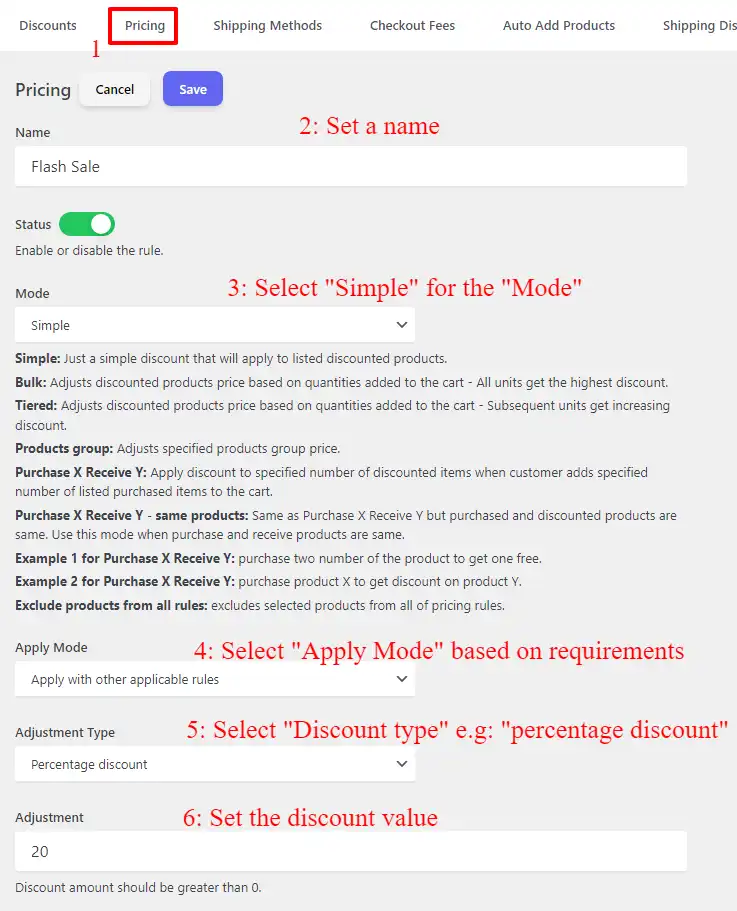
2.2 Configure the Core Discount Settings
| Field | Value |
|---|---|
| Name | BF2026 – Storewide 30% Off |
| Status | Enable (checked) |
| Mode | Simple |
| Apply Mode | Apply this rule and disregard other rules – Exclusive |
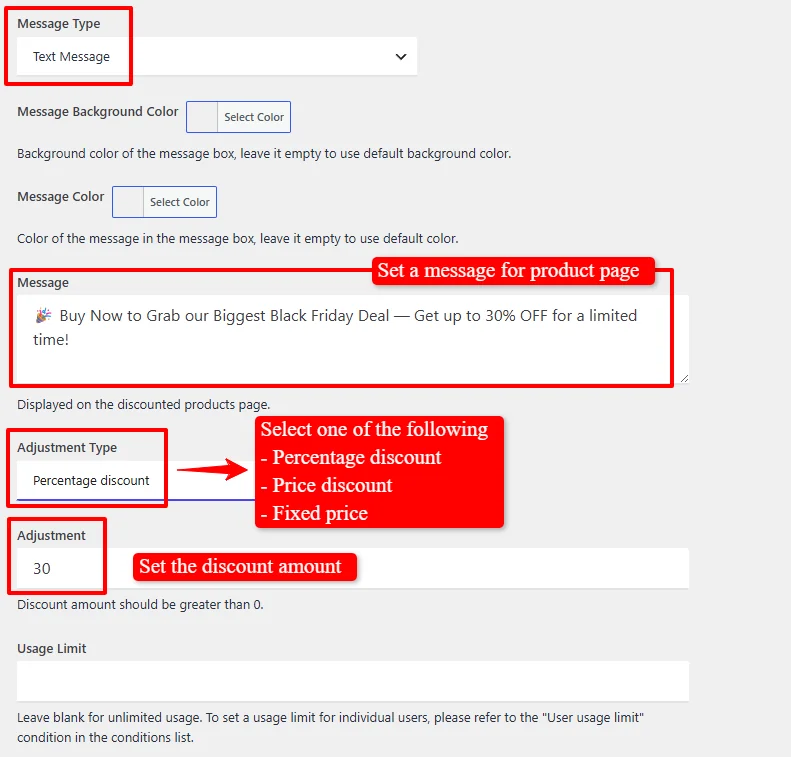
| Adjustment Type | Percentage discount |
| Adjustment | 30 |
Critical: Apply Mode. The Exclusive setting disregards all other applicable rules, preventing a customer with a loyalty discount or category deal from stacking discounts and destroying your margin.
2.3 Select Discounted Products
Under Discounted products, add an “All products” condition to apply the discount storewide.
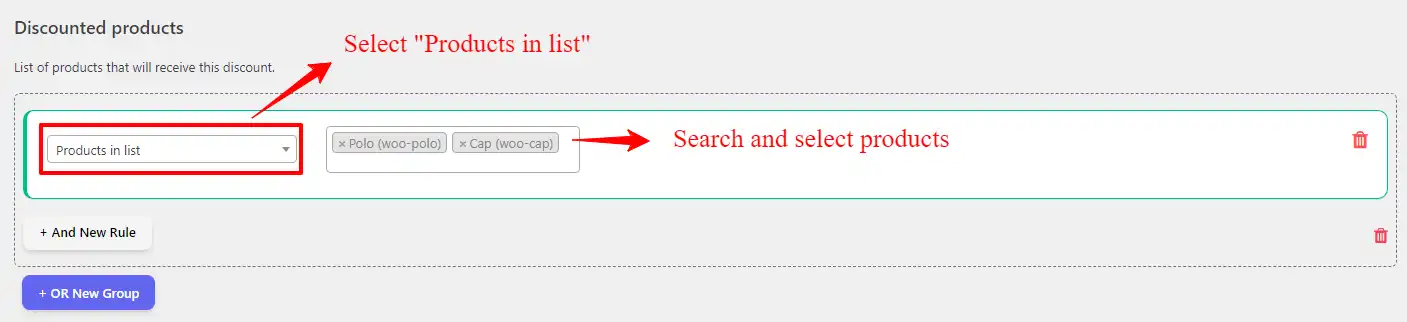
2.4 Add Exclusions (Recommended)
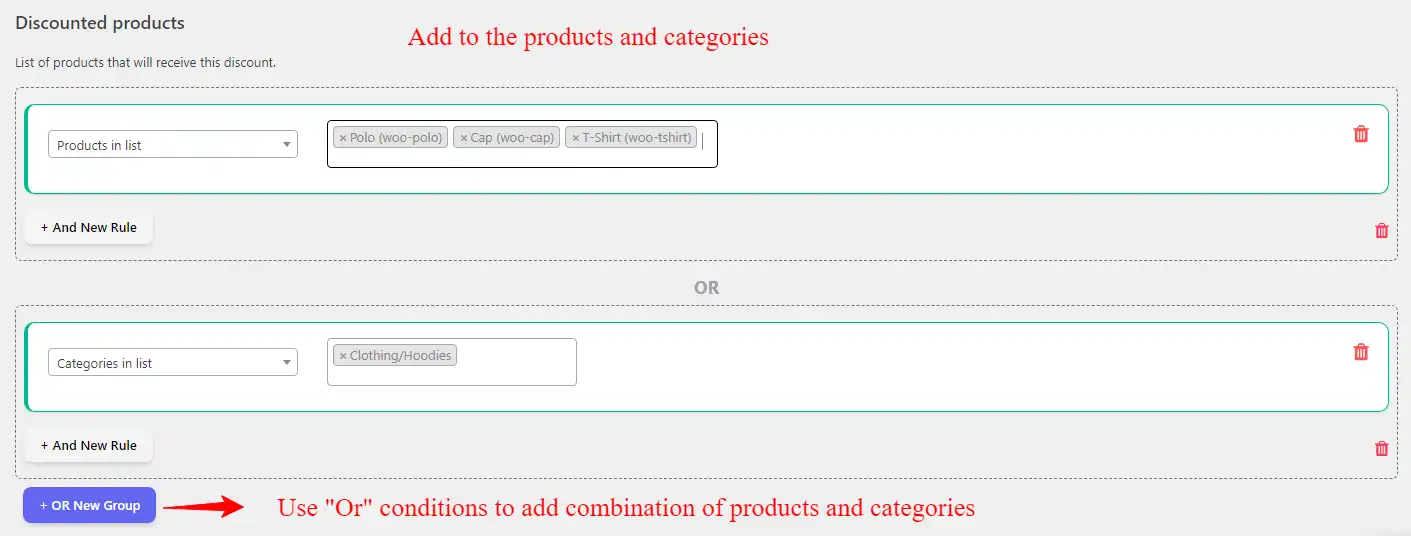
Under Excluded Products, add a “Products in list” condition and select products you cannot discount (gift cards, new arrivals, low-margin items). This prevents margin bleed.
Note: In this example, we will exclude the “Accessories” category because we will create a 40% discount for this category in the next step.
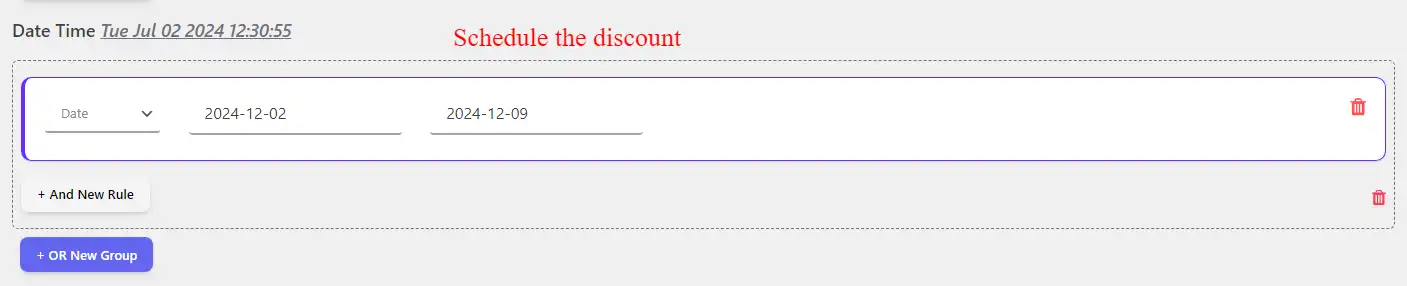
2.5 Schedule the Discount (Auto-Expiry)
Scroll to the Date Time section—this is where you solve the forgotten-sale problem permanently.
- Schedule Type: Date Time Range
- Start:
2026-11-27 00:00 - End:
2026-11-27 23:59
Click Save. The rule is dormant until midnight on November 27, then deactivates automatically at 11:59 PM. You do not need to be awake for either transition.

Step 3: Category Deals Without the Stack
Not every product should get the doorbuster. Category deals let you run a deeper WooCommerce Black Friday sale discount on a specific vertical while keeping the rest of the store at the storewide rate.
Scenario: 40% off the “Accessories” category—no stacking with the storewide 30%.
To create this rule, we used the Discount Rules and Dynamic Pricing free plugin.
3.1 Create the Category Rule
- Go to Pricing → Add from Template.
- Click Add from Template.
- In the template browser, search for Black Friday.
- Select “Black Friday: 50% Off Key Collections“ and click Add Campaign.
| Field | Value |
|---|---|
| Name | BF2026 – Accessories 40% Off |
| Mode | Simple |
| Apply Mode | Apply this rule and disregard other rules – Exclusive |
| Adjustment Type | Percentage discount |
| Adjustment | 40 |
3.2 Scope to the Category
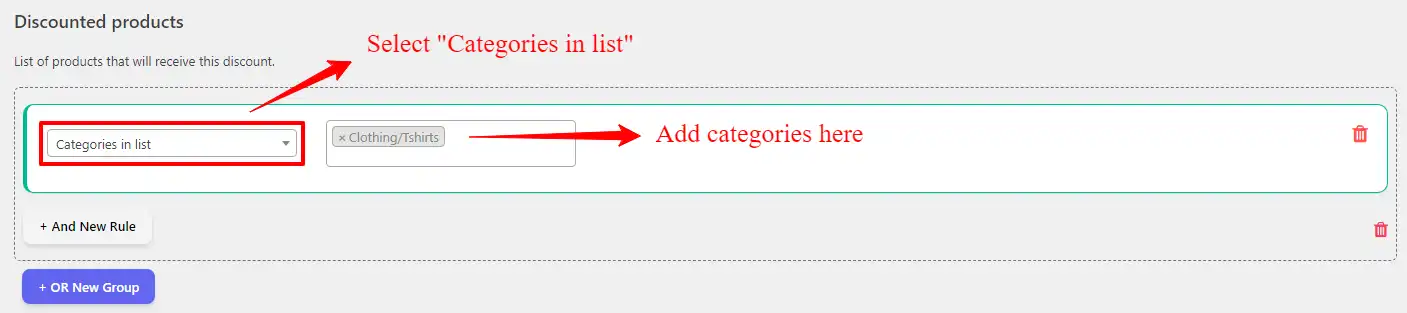
Under Discounted products, add Categories in list → Accessories. This automatically includes all existing and future products in that category.
3.3 Exclude category from storewide discount
Important: Go to the storewide rule’s Excluded Products condition (see Step 2.4) and add the Accessories category to the exclude list.
Step 4: BOGO – Buy 2 Get 1 Free
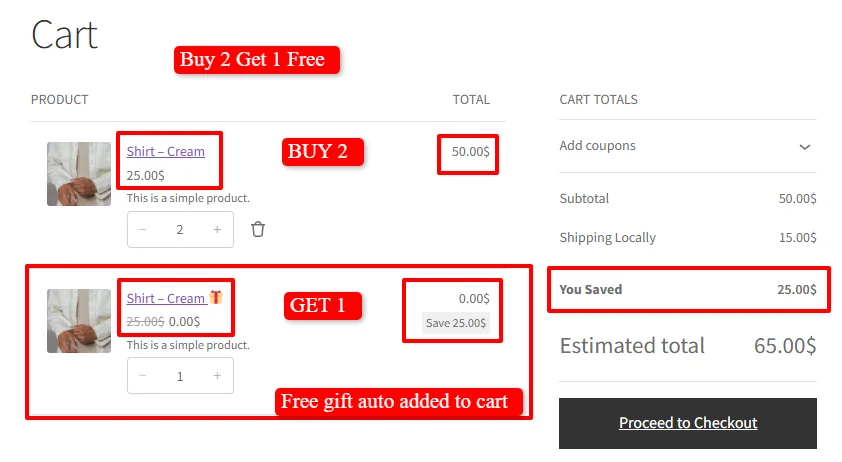
Shoppers respond better to “FREE” than to an equivalent numerical discount. The AsanaPlugins engine handles BOGO with one critical advantage: automatic cart injection.
Scenario: Buy 2 “Shirt Cream” products, get 1 free.
To create this rule, we used the Discount Rules and Dynamic Pricing free plugin.
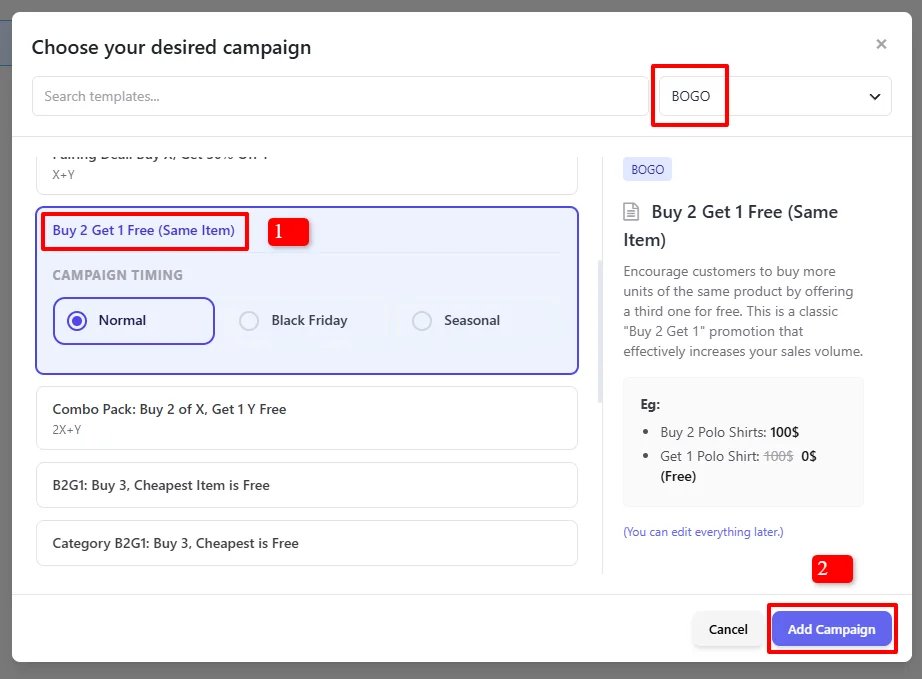
4.1 Access Pricing and Choose the BOGO Template
- Go to Woo Pricing & Discounts → Pricing tab.
- Click Add from Template.
- Under BOGO, select “Buy 2 Get 1 Free (Same Item)”.
- Click Add Campaign.
4.2 Configure the BOGO Rule
| Field | Value |
|---|---|
| Name | BF2026 – BOGO Basic Shirt Cream |
| Status | Enable |
| Mode | Buy x Get x – same product |
| Apply Mode | Apply this rule and disregard other rules – Exclusive |
4.3 Configure the Purchase Rule
| Field | Value |
|---|---|
| Purchase | 2 |
| Receive | 1 |
| Discount Type | Percentage discount |
| Discount Amount | 100 (100% off the free item) |
4.4 Control Repeat Behavior
Repeat: Enable/Disable this option based on your requirements
- Repeat means that this discount will be applied more than once when possible
- For example, if a customer buys 4 items with Repeat enabled, they get 2 free
- With Repeat disabled, they would only get 1 free regardless of quantity
For your WooCommerce Black Friday sale, disable Repeat unless you have deep margins.
4.5 Exclude BOGO products
Running a storewide discount and a BOGO deal at the same time? Exclude the BOGO product from the storewide rule so the offers don’t stack.
Important: Go to the storewide rule’s Excluded Products condition (see Step 2.4) and add Shirt Green. The BOGO discount now applies exclusively to that product.
Step 5: Scale Average Order Value with Holiday Bundles
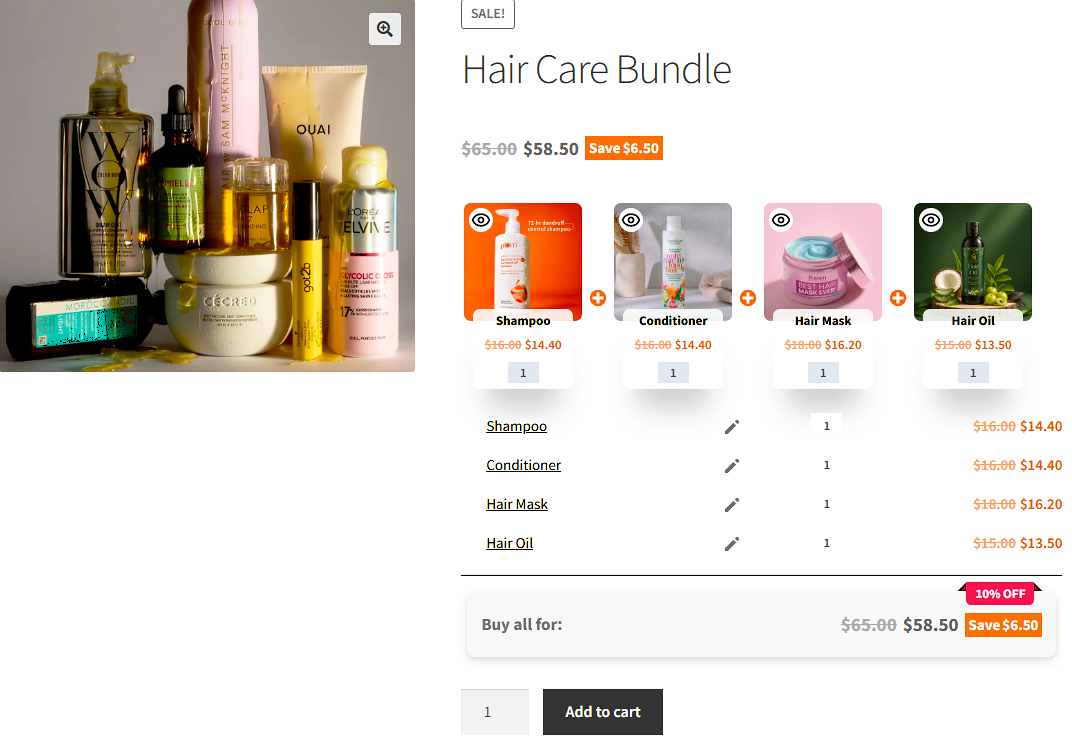
Packaging complementary products into high-value bundles is how top e-commerce brands maximize Average Order Value (AOV) during a WooCommerce Black Friday sale.
Scenario: A “Winter Essentials Kit” bundle with a 20% package discount.
To create this bundle, we used the free Product Bundle Builder for WooCommerce plugin.
5.1 Create the Bundle Product
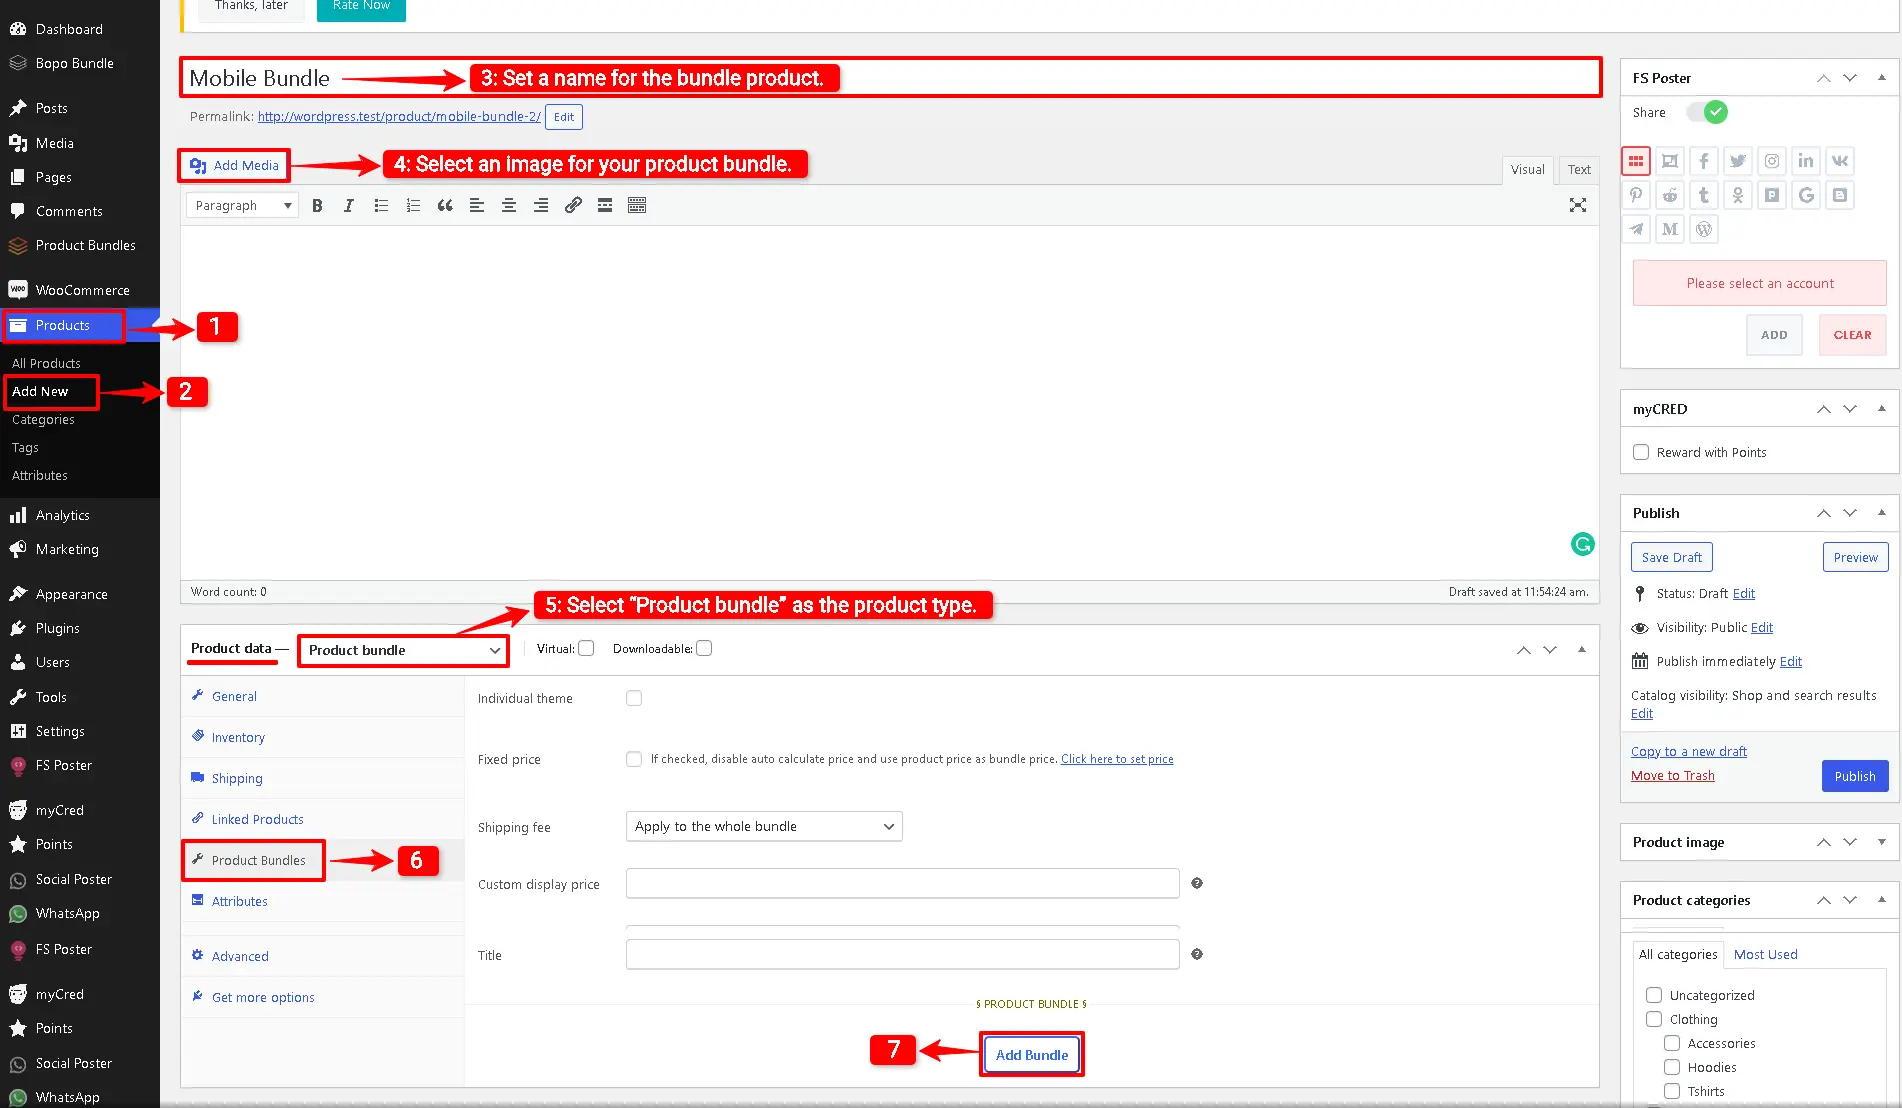
- Go to WooCommerce → Products → Add New.
- Enter a title: “The Ultimate Winter Essentials Kit (Holiday Bundle)”.
- Set a featured image.
- In the Product data dropdown, select “Product bundle”.
- The Product Bundles tab appears. Click Add Item.
5.2 Add and Configure Bundle Items
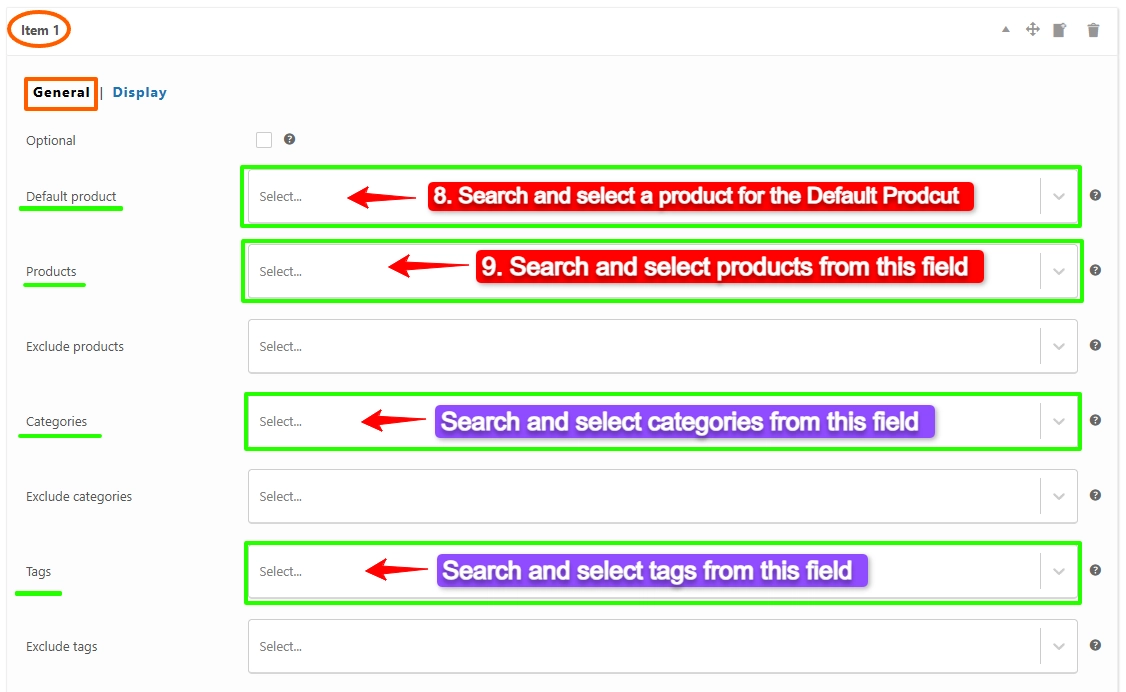
For each product:
- In the Default Product field, search and select a default product for the bundle item (e.g., Thermal Winter Parka).
- In the Products field, search and select the product (e.g., Thermal Winter Parka).
- Set the Quantity (e.g., 1).
- Click Add Item to add the next product (e.g., Merino Wool Beanie).
5.3 Add an Optional Upsell
- Add a third product (e.g., Cashmere Scarf).
- Check Optional Item and set Min Quantity: 0.
Shoppers can check or uncheck this item, turning it into a one-click add-on.
5.4 Configure Bundle Pricing
Option A: Fixed Price — Set a flat promotional price (e.g., $189.00 for a bundle worth $250).
Option B: Automatically Calculated Price with Package Discount — Uncheck the Fixed Price option, then in the Total Discount field, apply a 10% Bundle Discount. As customers select variations or toggle add-ons, the discounted package price updates live.
For a WooCommerce Black Friday sale, Option B makes savings visible and dynamic as the customer customizes their bundle.
5.5 Publish and Test
Click Publish, then verify bundle items display correctly, variation selectors work, the price updates as options change, and the bundle adds to the cart successfully.
Step 6: Dynamic Sale Badges That Stop the Scroll
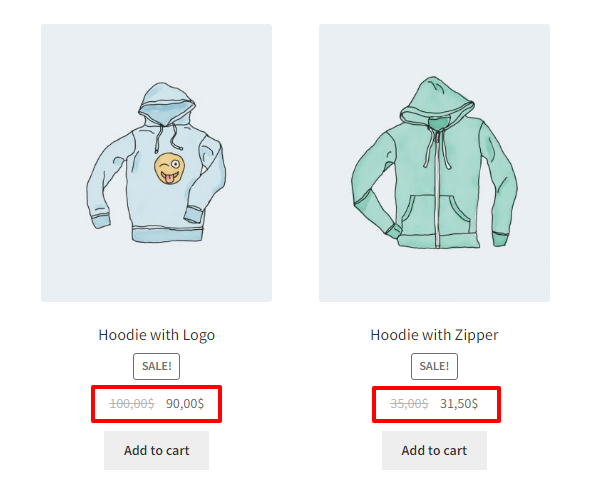
A WooCommerce Black Friday sale discount that nobody notices does not convert. During Black Friday, shoppers browse dozens of stores. If your products show the default tiny “Sale!” bubble, your offers blend into the background.
To create sale badges, we used the Product Badge, Label, Countdown Timer for WooCommerce – Sale Booster Free plugin
6.1 Create a Percentage Badge
- Go to Sale Booster → Badges → Add New.
- Title: “Black Friday Dynamic Savings Badge”.
- Badge Type: Select CSS Label or Modern Badge.
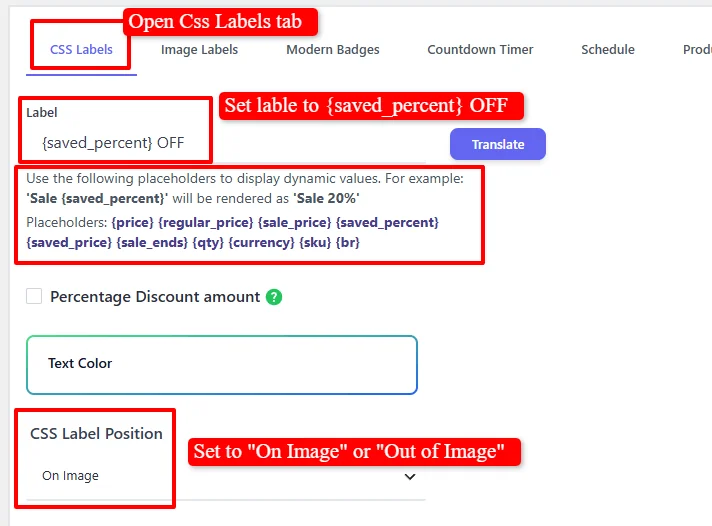
6.2 Configure Dynamic Tag Interpolation
In the Badge Label field, enter:
{saved_percent} OFF
6.3 Style and Position
| Setting | Recommended Value |
|---|---|
| Background Color | Crimson Red (#E50914) or Luxury Gold (#D4AF37) |
| Text Color | #FFFFFF |
| Position | Top-Right or Top-Left over the product thumbnail |
| Badge Shape | Angled ribbon, curved pill, or rectangular banner with subtle drop-shadow |
6.4 Set Targeting Conditions
Under Products & Conditions, add a rule: Is on sale → Yes. This ensures the badge only appears on discounted products, and the percentage shown is accurate.
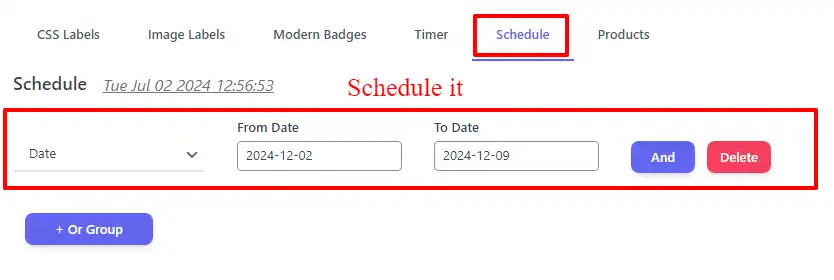
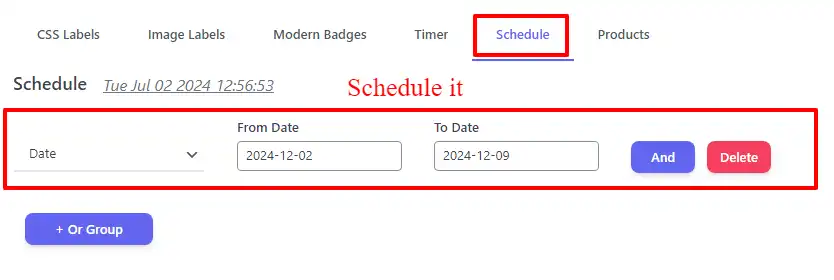
6.5 Schedule the Badge (Auto-Hide)
Go to the Schedule tab and click Add Schedule:
- Type: Date Time
- From:
2026-11-27 00:00 - To:
2026-11-27 23:59
Outside this window, the badge hides itself automatically—no manual switch-off, no lingering sale badge after the event.
6.6 Repeat for BOGO Badges
Create separate badges for the BOGO deal. Use different colors or text (“BOGO” in purple), so shoppers distinguish offers at a glance.
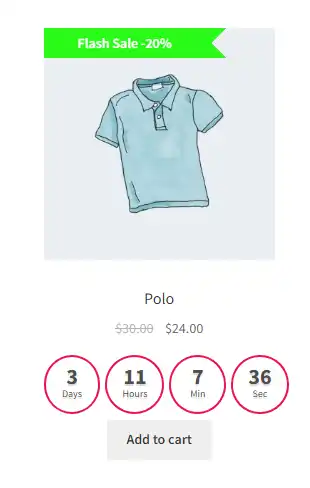
Step 7: Countdown Timers for Urgency
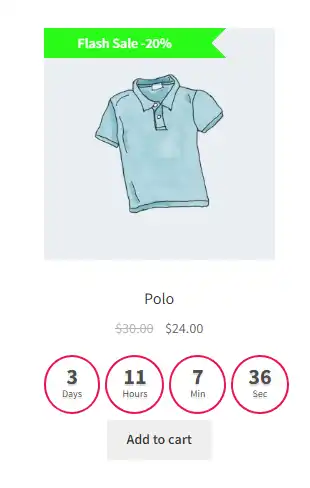
Loss aversion proves that the pain of missing an expiring discount is twice as powerful as the satisfaction of acquiring it. A live countdown timer creates authentic urgency for your WooCommerce Black Friday sale.
There are two ways to add a timer. Important: The countdown timer built into the Discount Rules plugin is a PRO-only feature and is not available in the free version. The free Sale Booster plugin, however, includes a standalone countdown timer with start/end date support—perfect for Black Friday.
7.1 Method 1: Built-In Timer in Discount Rules (PRO Only)
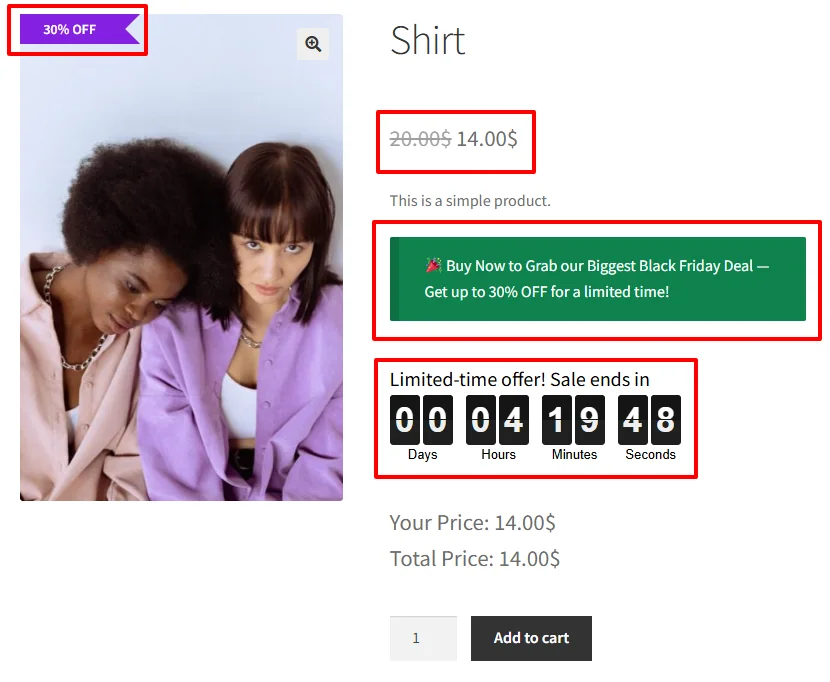
The Discount Rules plugin includes a built-in countdown timer that appears automatically on product pages when a scheduled pricing rule is active. This feature requires the PRO version of the Discount Rules and Dynamic Pricing for WooCommerce plugin.
If you have the PRO version:
- Confirm the rule is scheduled. The timer only shows if the pricing rule has an end date and is currently within its schedule. Your storewide and category rules from Steps 2 and 3 already qualify.
- Go to Woo Pricing & Discounts → Settings → Promotion → Countdown Timer.
- Set Display Countdown Timer to “Yes – When a discount available”.
- Set Threshold Time Type to “No limit” so the timer displays for the full duration of the sale.
- Customize the Title (e.g., “Black Friday Sale Ends In:”), the Days/Hours/Minutes/Seconds labels, and the Heading and Rotor Colors.
- Choose the Countdown Timer Position — Before “Add to cart” button is the default and highest-converting spot.
- Click Save Changes, then open a product page with an active discount to confirm the timer appears.
If the timer does not appear in your theme’s default positions, set Countdown Timer Position to None and place the shortcode [wccs_countdown_timer] in your product template.
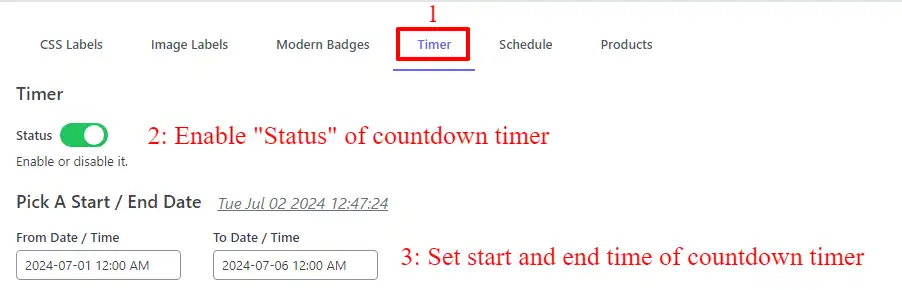
7.2 Method 2: Standalone Timer in Sale Booster (Free)
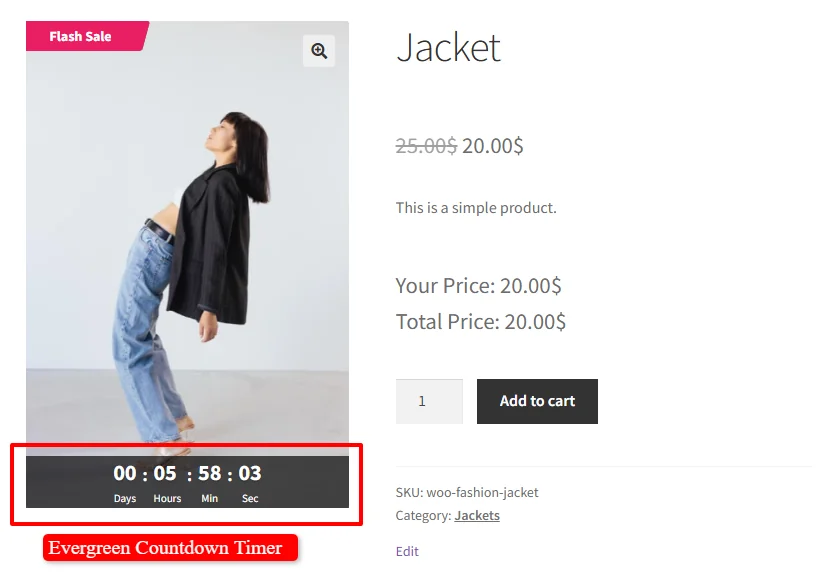
The free version of Sale Booster also creates countdown timers with a start and end date—perfect for Black Friday. It gives you more visual control than the built-in timer, and it does not require the PRO version of Discount Rules.
- Go to Sale Booster → Badges → Add New.
- Enter a Name (e.g., “Black Friday Flash Timer”) and set Status to Enable.
- Check Display on Archive Page and Display on Product Page.
- Switch to the Countdown Timer tab.
- Set Countdown Timer Position to On Image or Out of Image.
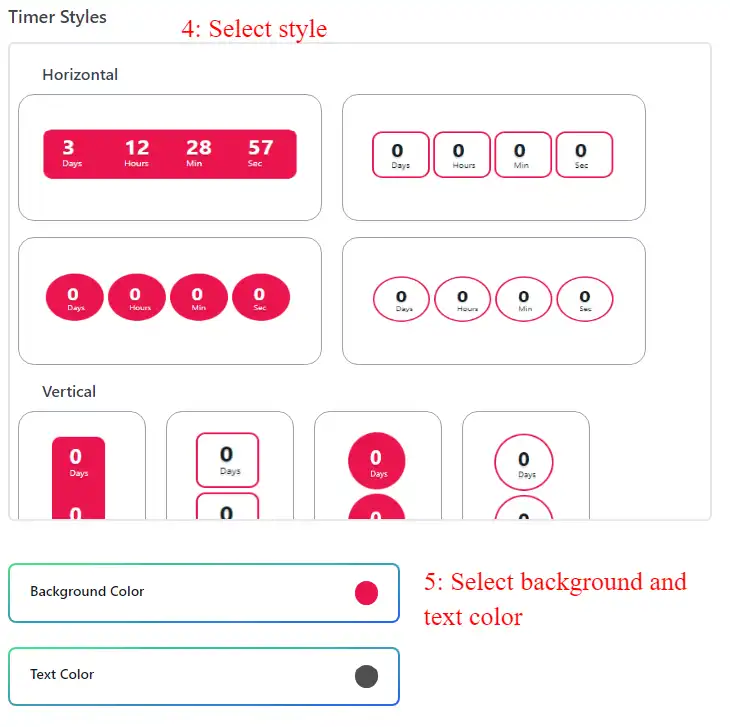
- Choose a Timer Style (horizontal, compact, or a color theme).
- Set Countdown Timer Mode to “Pick A Start / End Date”.
- Set From Date/Time to
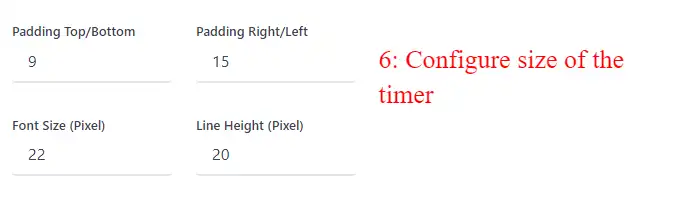
2026-11-27 00:00and To Date/Time to2026-11-27 23:59. - Customize Background Color, Text Color, Font Size, and optional animation.
- Switch to Products & Conditions and choose where the timer appears:
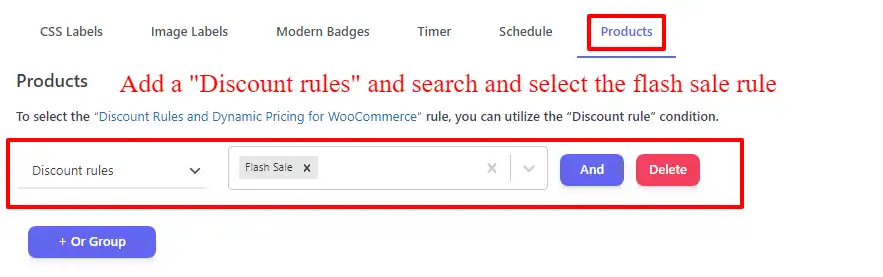
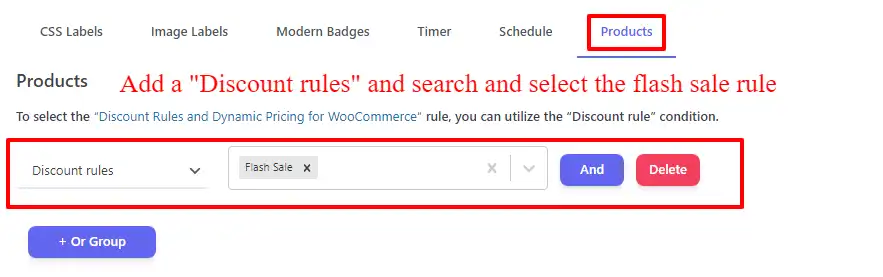
- Is on sale → Yes to show it on every discounted product, or
- Discount rules to attach it to your BF2026 rules, or
- Categories / Products to target specific items.
- Click Save, then visit a product page to confirm the timer is ticking.
Free vs. PRO: The free version supports fixed start/end date timers, which is exactly what a Black Friday sale needs. The PRO version adds Evergreen timers (each visitor sees a fresh countdown) and extra styling and placement options—useful for ongoing promotions, but not required for BFCM.
7.3 Troubleshooting: Timer Not Appearing
Method 1 (Discount Rules PRO):
- Verify the pricing rule has an End Date and is currently active.
- Check Woo Pricing & Discounts → Settings → Promotion → Countdown Timer is enabled.
- Try different Countdown Timer Position options.
- For variable products, set a default variation with an active scheduled discount.
- Use the shortcode
[wccs_countdown_timer]if your theme blocks the default hooks. - Clear any caching plugin.
Method 2 (Sale Booster):
- Confirm the timer’s start and end dates cover the current time.
- Test the On Image and Out of Image positions separately.
- Use the Archive Loop / Single Product Custom Hooks fields if your theme’s default positions fail.
- Clear your site cache.
Step 8: Auto-Expiry and Seamless Cyber Monday Rollover
Do not stay awake until midnight to toggle off your WooCommerce Black Friday sale manually. By matching start and end timestamps across pricing rules, badges, and countdown timers, your campaign launches and terminates autonomously.
The only thing you need to do: Confirm every rule and badge has a schedule with an End value. If the End field is blank, the rule runs indefinitely.
How to Rollover from Black Friday to Cyber Monday
- Navigate to Woo Pricing & Discounts → Pricing.
- Locate your active rule:
BF2026 – Storewide 30% Off. - Click Duplicate.
- Rename:
Cyber Monday 2026 – 25% Off Tech. - Update Date & Time: From
2026-11-30 00:00:00, To2026-11-30 23:59:59. - Adjust target items, then save.
Your Cyber Monday sale takes over the instant Black Friday concludes.
Step 9: Critical Caching and Performance Configurations
The most common cause of panic during a WooCommerce Black Friday sale is aggressive caching serving stale regular prices. Follow these four rules:
- Exclude Core Cart & Checkout Pages: Ensure your caching plugin strictly excludes
/cart/,/checkout/, and/my-account/. - Honor WooCommerce Session Cookies: Dynamic cart calculations rely on the
wp_woocommerce_session_*cookie. Bypass cache when it is present. - Purge Cache at Sale Launch: Trigger a full CDN and page cache purge at go-live so category pages immediately show strikethrough prices.
- Enable Persistent Object Caching: Redis or Memcached lets WooCommerce query dynamic pricing rules in milliseconds.
The Complete 2026 WooCommerce Black Friday Sale Launch Checklist
| Timeline | Action Item | Status |
|---|---|---|
| T-Minus 4 Weeks | Verify WooCommerce HPOS compatibility; perform off-site backup; request temporary server scaling. | [ ] |
| T-Minus 3 Weeks | Initiate code and plugin update freeze. No new non-essential plugins or theme changes. | [ ] |
| T-Minus 2 Weeks | Stage pricing rules in Woo Pricing & Discounts; configure BOGO; create bundles; build dynamic badges. | [ ] |
| T-Minus 48 Hours | End-to-end checkout test in test mode; verify transactional emails; warm server cache. | [ ] |
| Launch Morning (00:01) | Check store in incognito on mobile; verify strikethroughs and countdowns; monitor CPU/RAM load. | [ ] |
| Cyber Monday & Post-Sale | Verify rollover to Cyber Monday rules; trigger post-purchase thank-you sequences. | [ ] |
Frequently Asked Questions
Can I run a WooCommerce Black Friday sale without manual coupon codes?
Yes. Using Discount Rules and Dynamic Pricing, discounts apply automatically on the product page and in the cart as soon as qualifying conditions are met. Shoppers never copy or paste codes, which substantially increases checkout conversion.
How do dynamic badges calculate percentage savings automatically?
Sale Booster includes dynamic tags like {saved_percent} and {saved_price}. It calculates the exact difference between each product’s regular and sale price, displaying precise labels like -25% OFF without manual configuration per item.
Will dynamic pricing rules slow down my WooCommerce checkout?
No, provided you keep rules clean and use persistent object caching (Redis or Memcached). Combined with WooCommerce High-Performance Order Storage (HPOS), dynamic pricing rules execute in single-digit milliseconds.
What happens when a countdown timer reaches 00:00:00?
In Sale Booster PRO, the “Hide Timer When Expired” setting makes the countdown disappear the second the campaign concludes, preventing customer confusion after the sale.
How do I stop the WooCommerce Black Friday sale from running past Black Friday?
Every rule needs a Date Time Range with an End date. If no schedule is configured, the rule runs continuously. Once you set the end time, it deactivates automatically.
What if I want different sales on different days?
Create two separate rules with non-overlapping schedules. The Cyber Monday rule starts after the Black Friday rule ends (BF ends November 27 23:59, CM starts November 30 00:00). The scheduling engine supports exact minute precision.
Conclusion: Turn Your Store into an Autonomous WooCommerce Black Friday Sale Engine
A record-breaking WooCommerce Black Friday sale in 2026 does not require working around the clock. By combining automated dynamic pricing, frictionless BOGO promotions, high-AOV product bundles, eye-catching dynamic badges, and urgency-driven countdown timers, you prepare the entire campaign in advance and focus on fulfillment.
You now have the full build:
- Storewide 30%, scheduled to the minute with auto-expiry.
- Category 40%, exclusive, overriding the storewide rate.
- BOGO with automatic cart injection and controlled repeat behavior.
- Product Bundles with fixed or calculated pricing and optional upsells.
- Badges showing the right percentage on the right product, auto-hiding on schedule.
- Countdown timers with troubleshooting steps if they do not appear.
- A launch checklist that catches errors before customers do.
Get the Plugins
Ready to build your WooCommerce Black Friday sale? Start with the free versions, then upgrade to PRO when you need advanced rules, advanced bundle types, or variation-level badge targeting.
Discount Rules and Dynamic Pricing
Sale Booster Product Badges
Product Bundle Builder
All three plugins work together to handle pricing logic, visual urgency, and order value optimization—no custom code required.