

Here’s how to add a side cart to WooCommerce without code: install Side Cart & Upsell for WooCommerce, enable the drawer and AJAX updates, and choose how shoppers open it. Then customize its buttons, icon, and colors from the plugin settings. You can complete the basic setup with the free version.
A side cart is a panel that slides over the current page. As a result, customers can review items and head to checkout while keeping the shop in view. This guide follows the settings in the screenshots below, with optional product offers after the main setup.
Key takeaways
- First, enable the side cart, AJAX updates, and automatic opening.
- Next, choose the drawer layout and a cart icon that shoppers can easily reach.
- Use the built-in color controls so you can style the cart without editing your theme.
- Finally, test the drawer on your storefront before adding optional upsell rules.
About this guide: AsanaPlugins develops the plugin used here. The supplied screenshots show both free and Pro controls; paid options are identified beside the relevant steps. The admin preview uses sample products, so test your actual products on the storefront.
Before you add a side cart
You need an active WooCommerce store, permission to install plugins, and at least one purchasable product. First, confirm that your usual Cart and Checkout pages work. Also disable any other automatic cart drawer while testing, because two drawers can respond to the same button.
If you are still choosing a plugin, compare the options in our free WooCommerce side cart plugin comparison. This tutorial uses the free Side Cart & Upsell plugin, with settings you can change directly in WordPress.
1. Install a WooCommerce side cart plugin
Choose your version: Get the free Side Cart & Upsell plugin for the no-code drawer, AJAX cart updates, and basic styling used in this guide. Explore Side Cart & Upsell Pro if you want the additional Pro controls mentioned below. Pro is optional for this setup and requires the free plugin to be installed and active first.
In your WordPress dashboard, open Plugins → Add New Plugin. Search for Side Cart & Upsell for WooCommerce by AsanaPlugins. Next, click Install Now, followed by Activate.
After activation, open Side Cart & Upsell → Side Cart. You will find the General, Side Cart, Icon, Styles, and Addons tabs. A live preview sits beside the controls, so you can inspect changes before saving.
You do not need a page builder for this method. In addition, you can keep your existing theme and standard WooCommerce Cart page.
2. Enable the WooCommerce side cart without code
Start in the General tab. When learning how to add a side cart to WooCommerce without code, the first switch to check is Display Side Cart. Turn it on to enable the drawer. Then enable Ajax Add To Cart so supported Add to cart actions update the basket without a full page reload.
Also enable Auto Open Side Cart if the drawer should appear after a customer adds an item. Alternatively, leave automatic opening off and let customers open it through a cart icon.
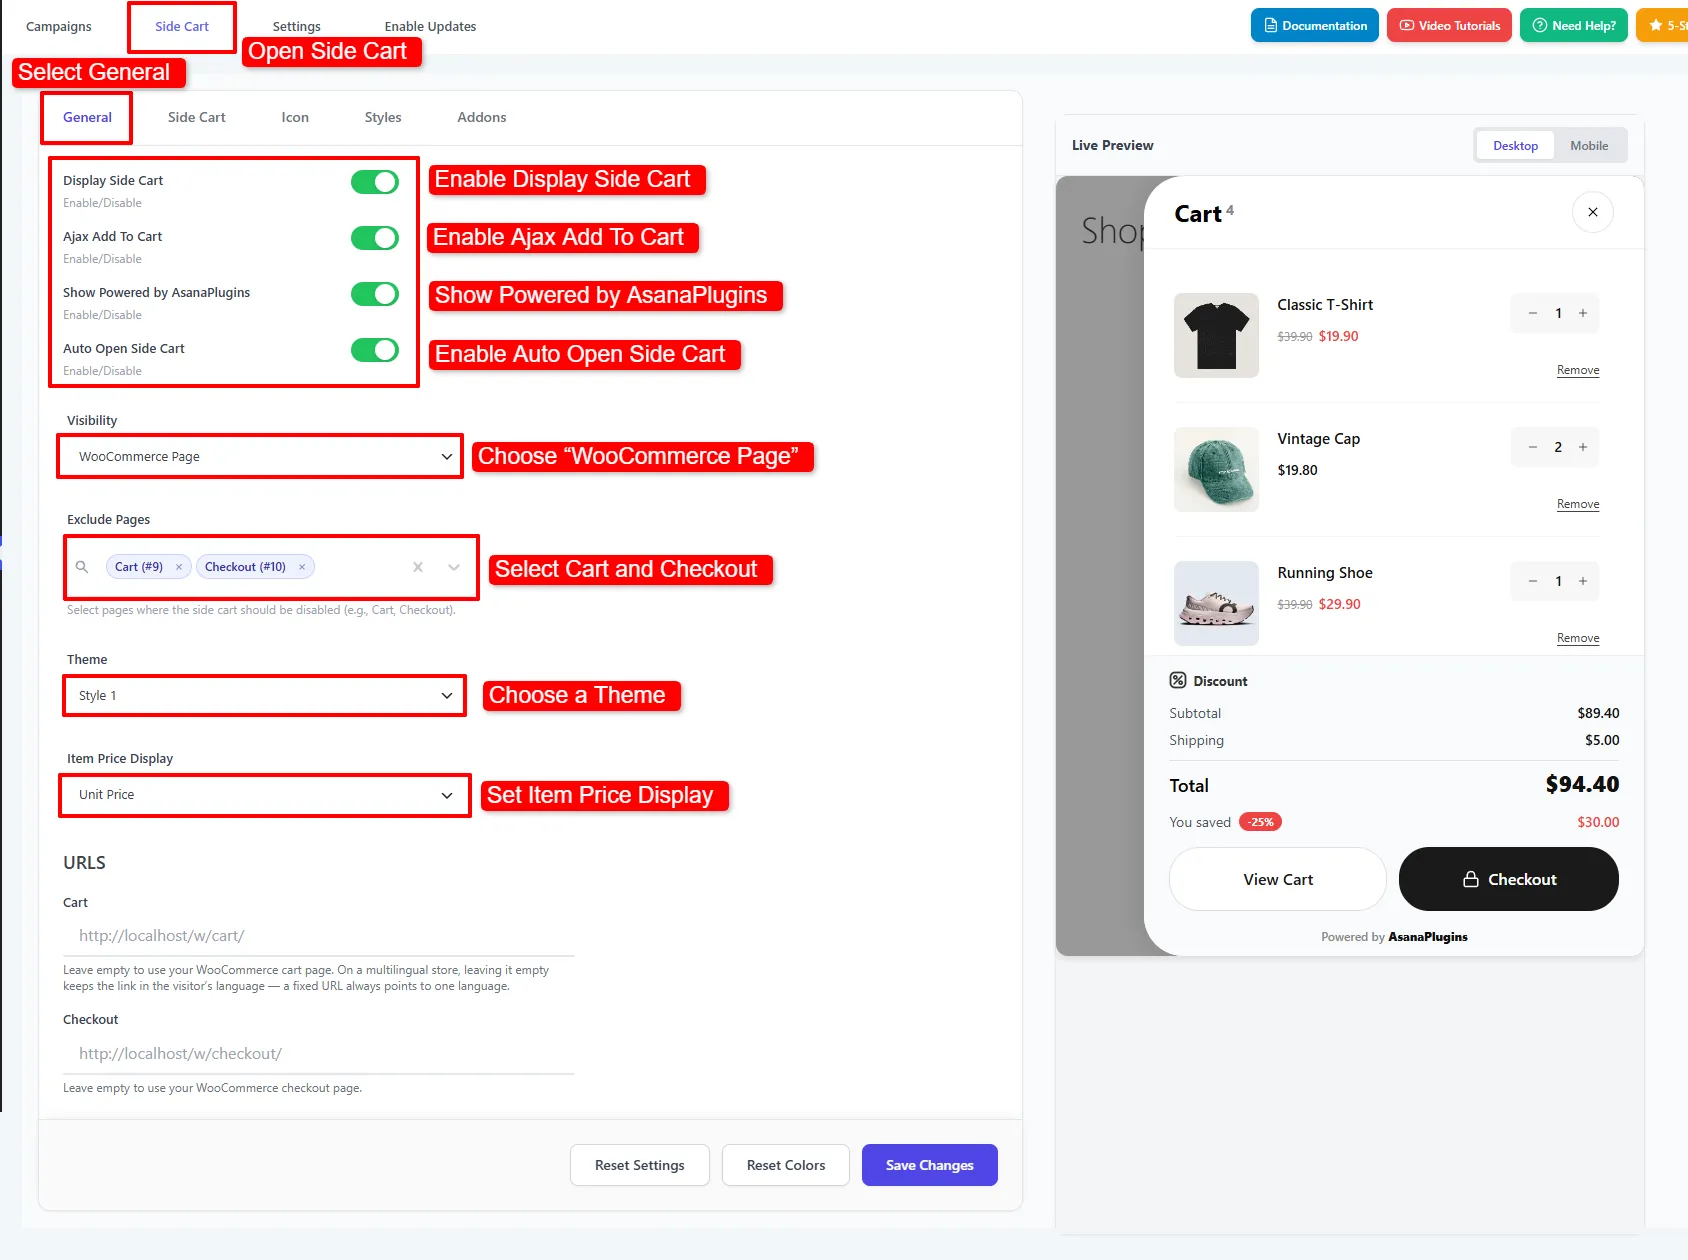
For the setup shown above, choose WooCommerce Page under Visibility. Then add the Cart and Checkout pages under Exclude Pages if you want those pages to handle their own flow. Choose Entire Website instead if shoppers should access the drawer from other pages too.
Select Style 1 for the free drawer and Unit Price for the item price display. The screenshot also shows the Powered by AsanaPlugins control; changing that setting requires Pro. You can leave it at its default while following this tutorial.
Leave the Cart and Checkout URL fields empty to use WooCommerce’s assigned pages. This also avoids hard-coding a language-specific link on a multilingual store. Finally, click Save Changes.
3. Set up the WooCommerce side cart layout
Open the inner Side Cart tab to choose what the drawer contains. For example, set Side Cart Position to Right and New Item Position to Bottom of cart to follow the screenshot.
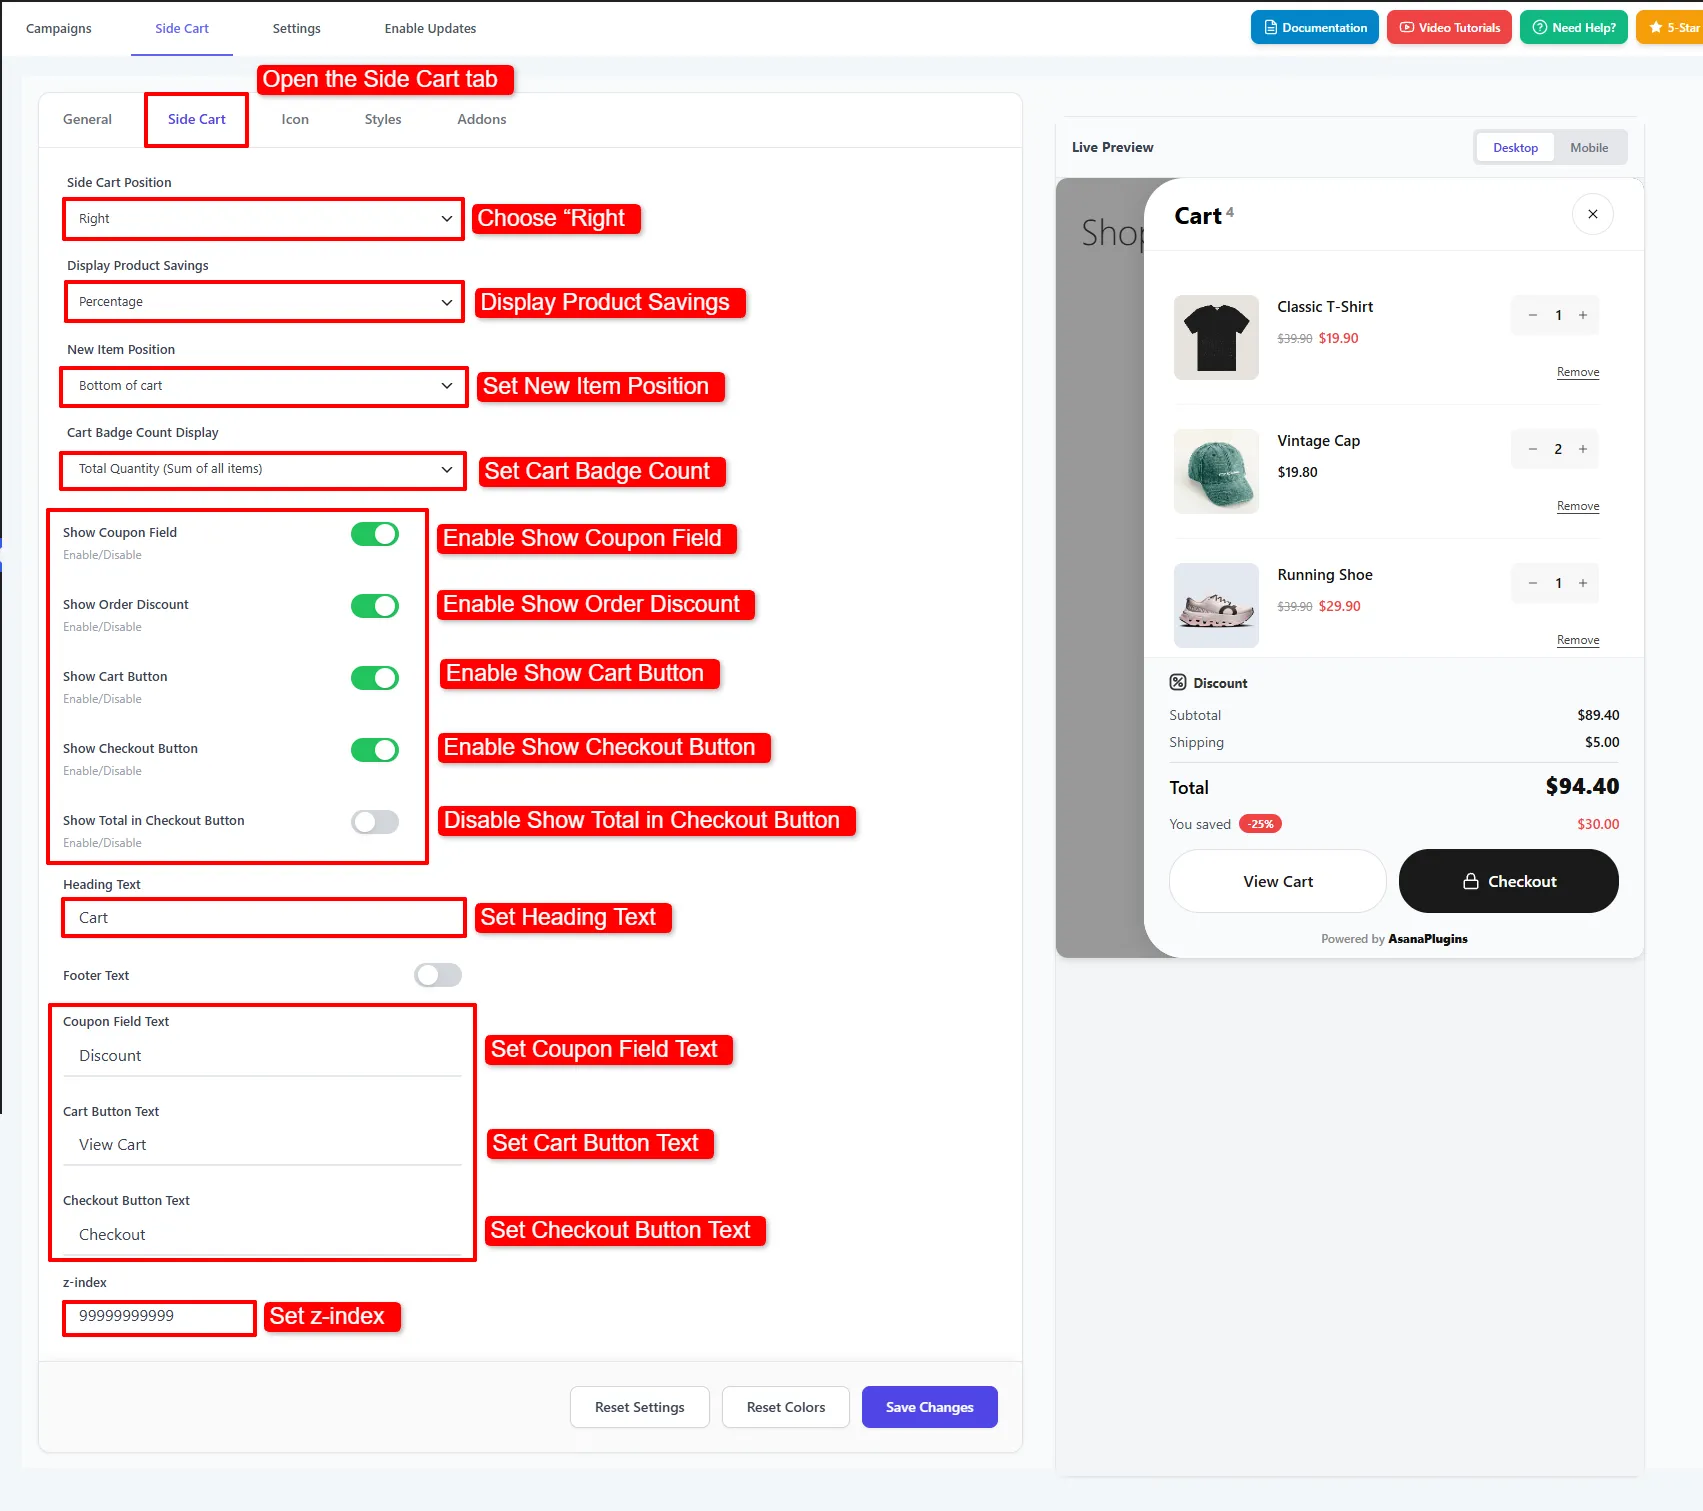
Choose whether the cart badge shows total quantity or unique line items. With total quantity, two units of one product count as two. In contrast, a line-item count treats that product row as one.
Enable Show Cart Button and Show Checkout Button so shoppers can reach both pages. You can also show the coupon field and order discount. However, displaying a coupon field does not create a coupon; you still need a valid WooCommerce coupon.
Next, use clear labels such as Cart, View Cart, and Checkout. The screenshot leaves Show Total in Checkout Button off, but that choice is optional. Keep the default z-index unless another element covers the drawer; the large sample value is not a requirement.
Save the layout, then reopen the storefront. If you are learning how to add a side cart to WooCommerce without code, test both buttons now so you catch a wrong destination before styling the rest of the drawer.
4. Add a WooCommerce side cart icon
The Icon tab controls how shoppers reopen a closed drawer. For the simplest setup, enable Enable Floating Cart Icon and choose a position such as Bottom Right. Then check that it does not cover a chat widget or mobile navigation.
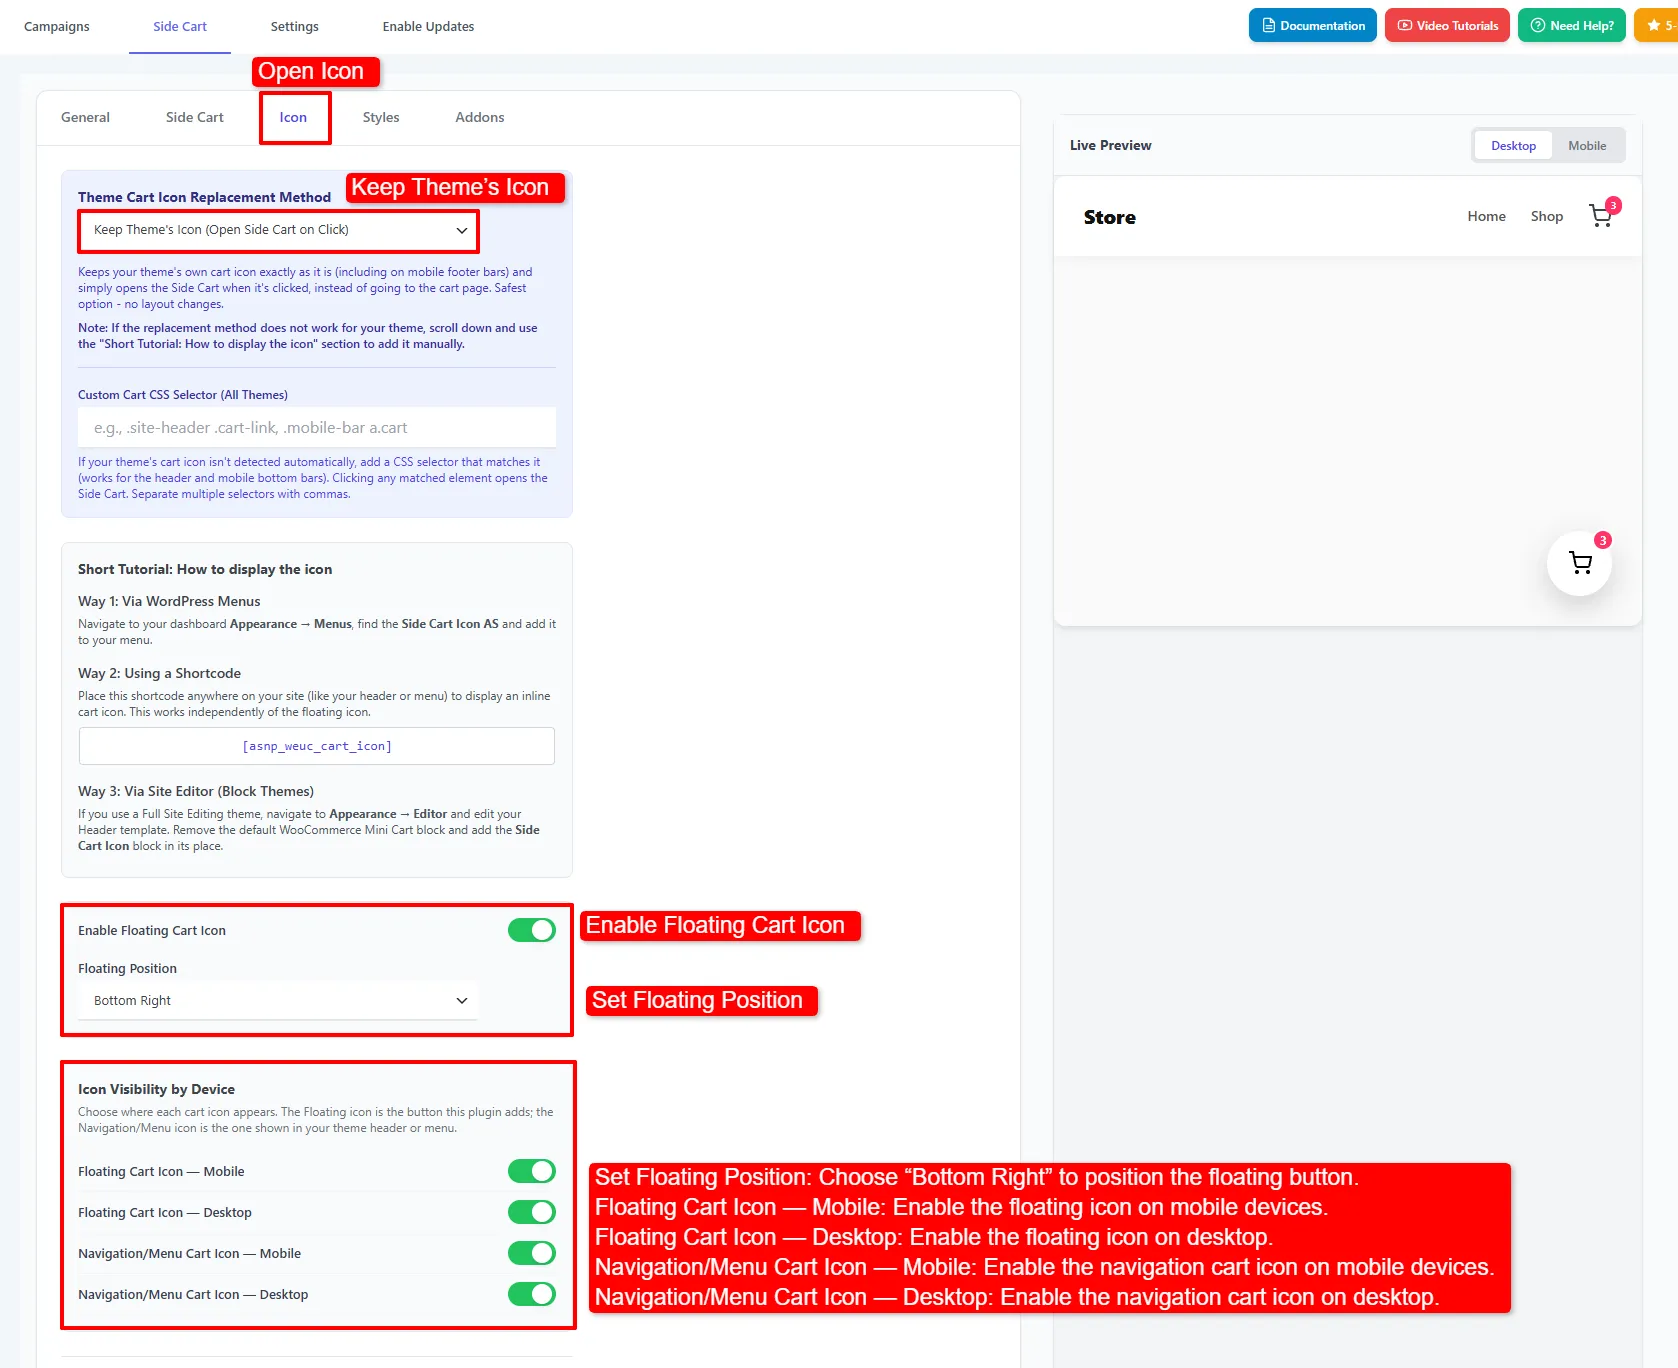
If your theme already has a cart icon, try Keep Theme’s Icon (Open Side Cart on Click). This preserves the theme’s icon while changing what happens when shoppers click it. However, a custom theme trigger may need additional configuration. You can use the floating icon to complete this no-code tutorial without entering a CSS selector.
Pro control in this screenshot: separate mobile and desktop visibility switches for floating and navigation icons require Pro. They are optional; the basic floating icon is available in the free plugin.
Next, choose Standard Icon, turn on Display Cart Count Badge, and select a preset under Quick Select. Because presets are built in, you can leave the Custom SVG Icon Code field empty.
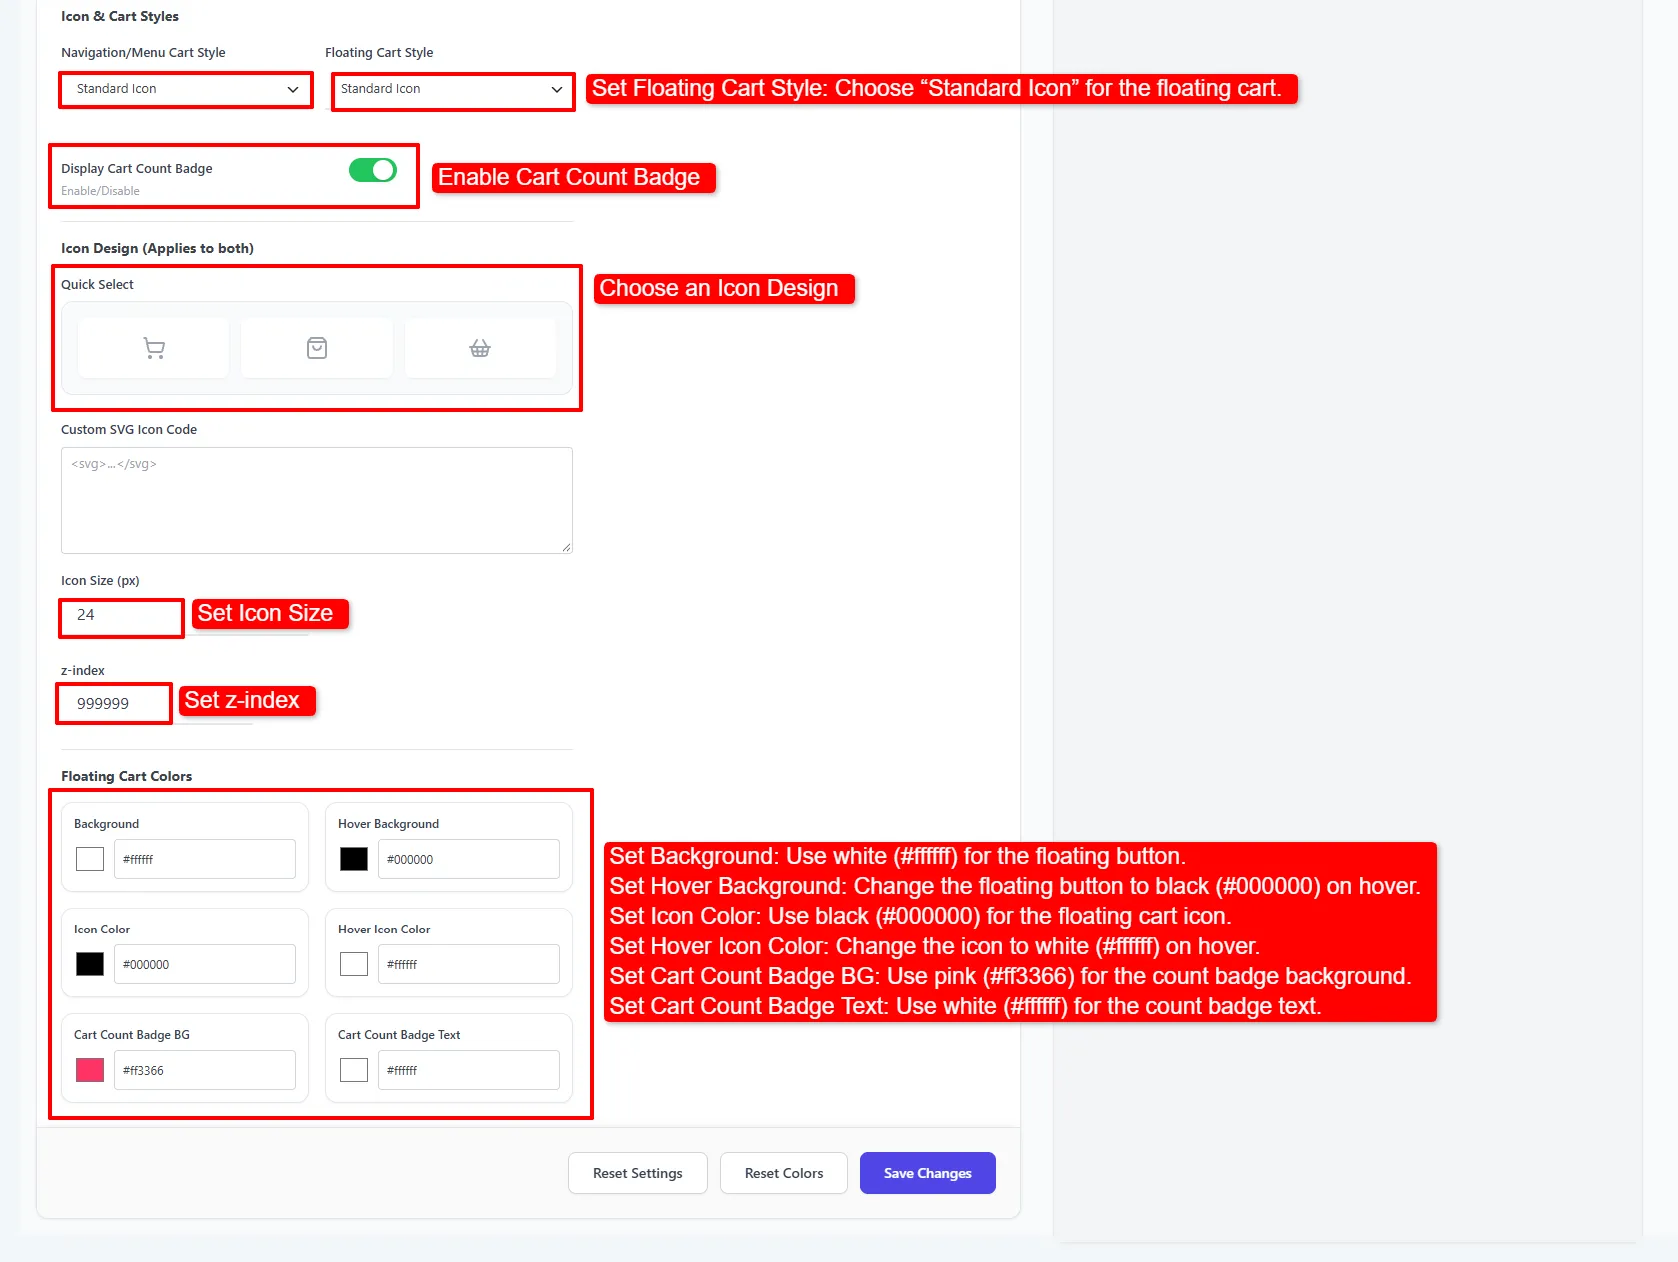
For example, the screenshot pairs a white icon background with a black cart symbol and a pink count badge. You can choose your own colors instead. Also check the hover colors so the icon stays visible when a customer points at it. Click Save Changes after adjusting the size and colors.
5. Style the WooCommerce side cart without code
Open Styles to change the drawer background, heading, prices, and buttons. Start with your store’s normal text and background colors. Then give Checkout enough contrast to stand out from View Cart.

Use the color pickers or enter hex values in the settings; neither method requires editing a theme file. Also review the hover states and close icon. Finally, compare Desktop and Mobile in the live preview, then save your changes.
At this point, you have learned how to add a side cart to WooCommerce without code and style the basic drawer. The next section is optional. You can skip ahead to testing if you only need the cart panel.
6. Add optional WooCommerce side cart upsells
Once you know how to add a side cart to WooCommerce without code, product offers are an optional next step. Open Addons → Upsells and switch on Enable Upsells. The free edition supports up to three side-cart upsell rules. Therefore, start with one clear recommendation before adding more conditions.
Create an offer from a product category
In General, choose All matched rules (Combine applicable products) to combine offers from eligible rules. Alternatively, choose First match wins when you want one matching rule to take priority.
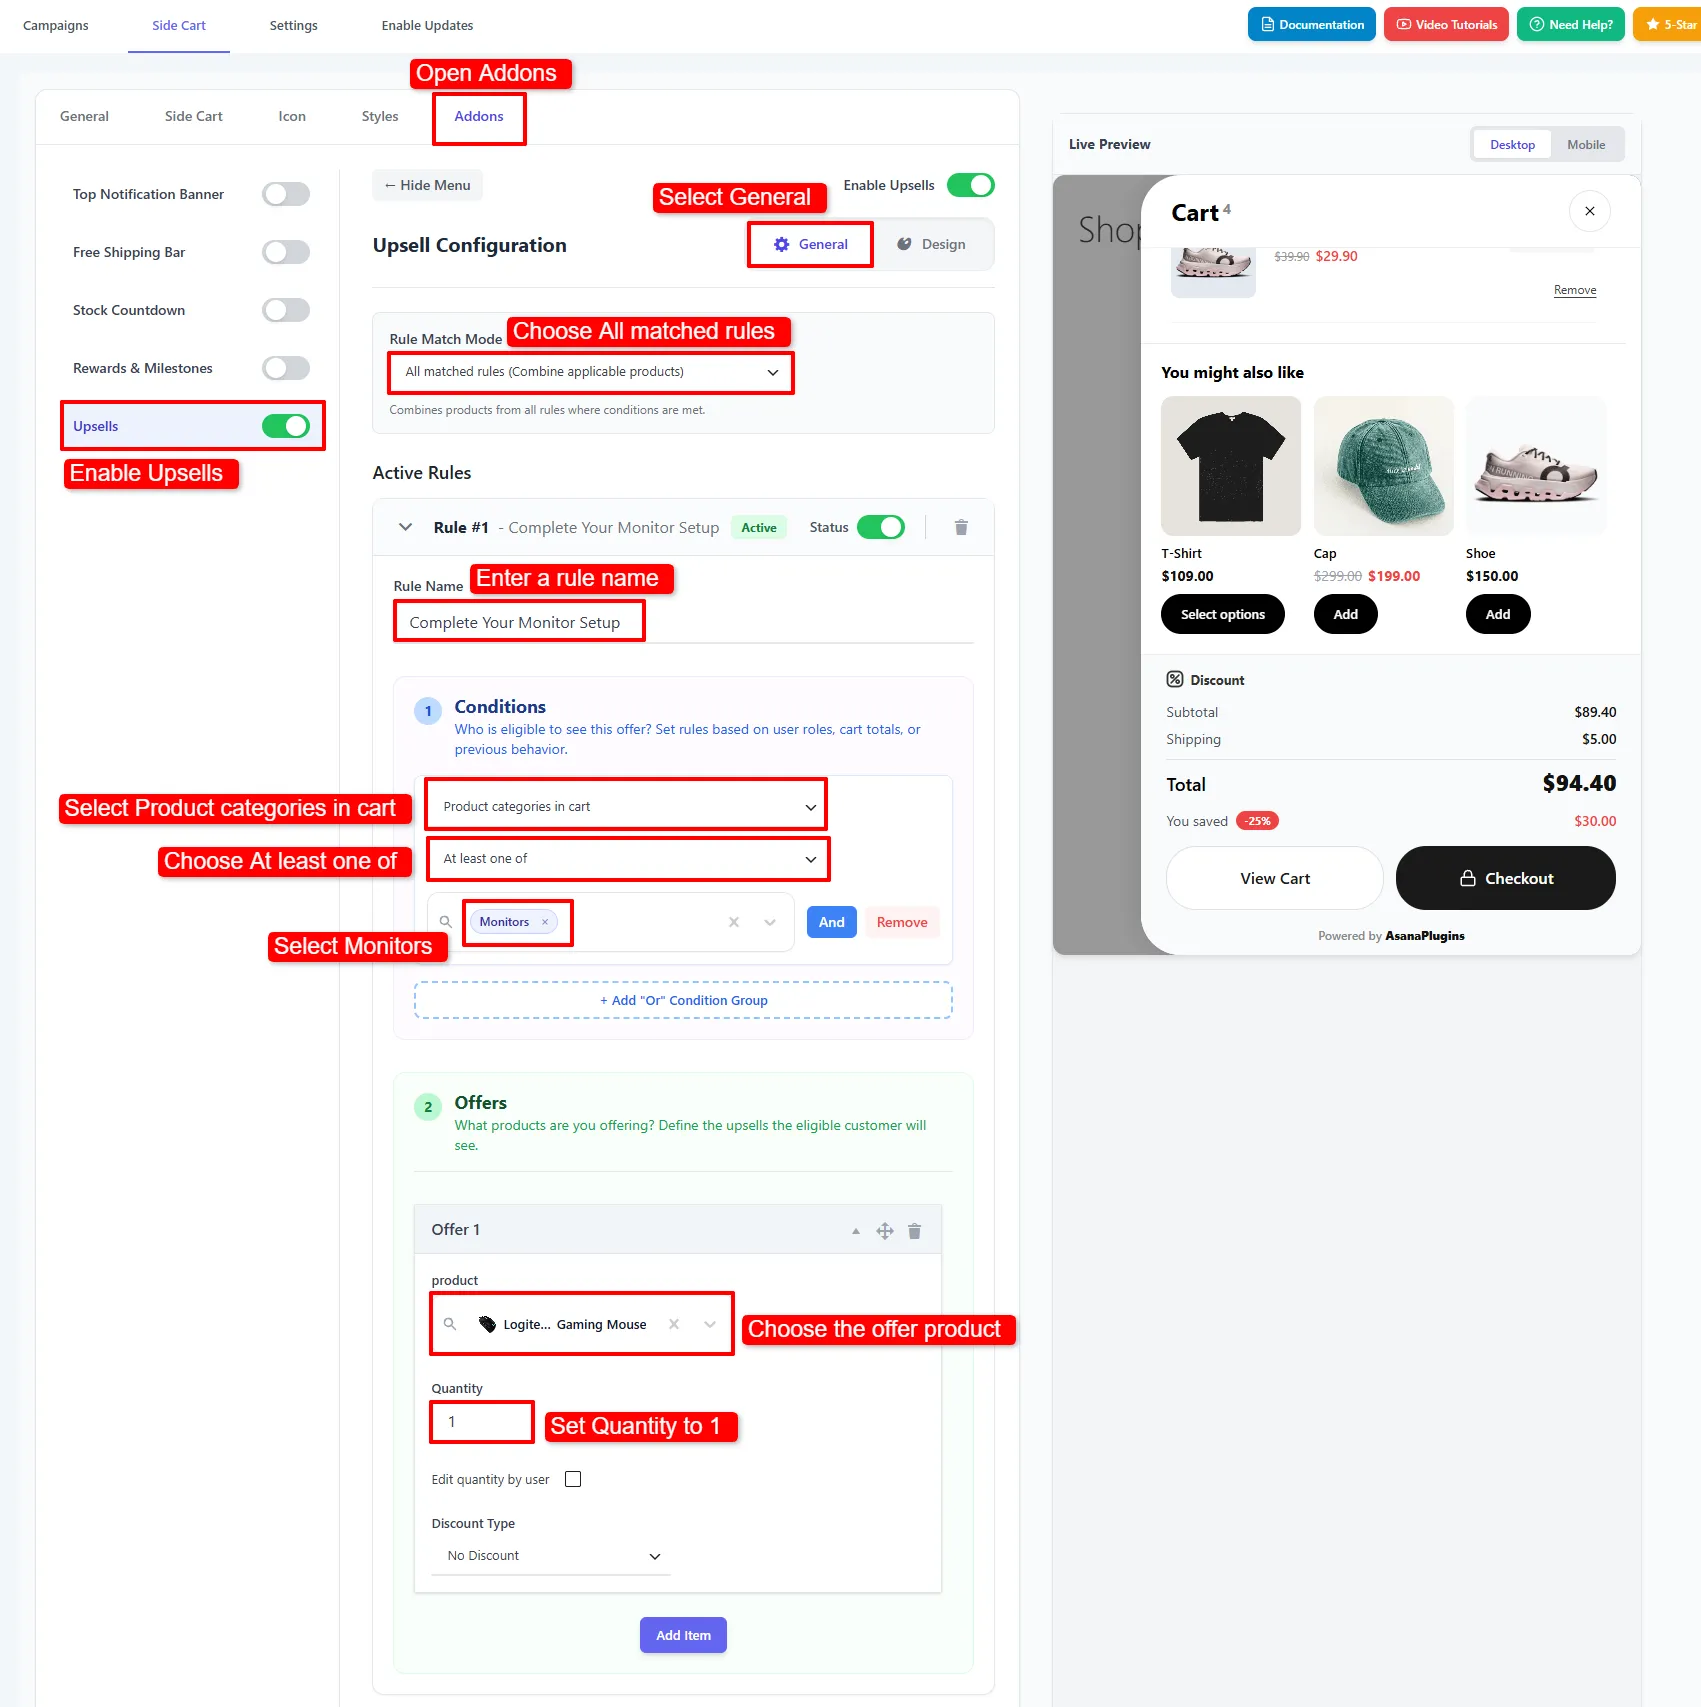
Name your first rule Complete Your Monitor Setup. Then choose Product categories in cart → At least one of → Monitors. Under Offers, select a mouse, set Quantity to 1, and keep No Discount if you want to charge its normal price.
The mouse is a complementary product, so this is a cross-sell even though the settings group it under Upsells. Replace Monitors and the example mouse with a category and product from your own store. Also leave the rule’s Status switch enabled.
Use cart totals for more offers
The next screenshots show two more examples. First, the $100 Cart Bonus – Headset rule uses Subtotal excluding tax → Greater equal to → 100. It offers two headsets at 10% off and a controller at 3% off.
In contrast, Premium Monitor Setup requires a Monitors item and a subtotal greater than 150. Its keyboard offer has a 5% discount. Because these are example thresholds, adjust them to your store currency and margins.

Use the gallery arrows to compare the rules, or open the subtotal rule screenshot and combined-conditions screenshot at full size.

Keep the difference between the operators in mind: Greater equal to includes the threshold itself, while Greater than does not. Also use the subtotal excluding tax when testing these examples; the final checkout total may include shipping and tax.
Choose fallback products and style offers
Under Default Upsell Rule, select Products and choose fallback items. These appear when no active rule matches. However, they are still optional, so leave the selection empty if you want recommendations only for matched rules.
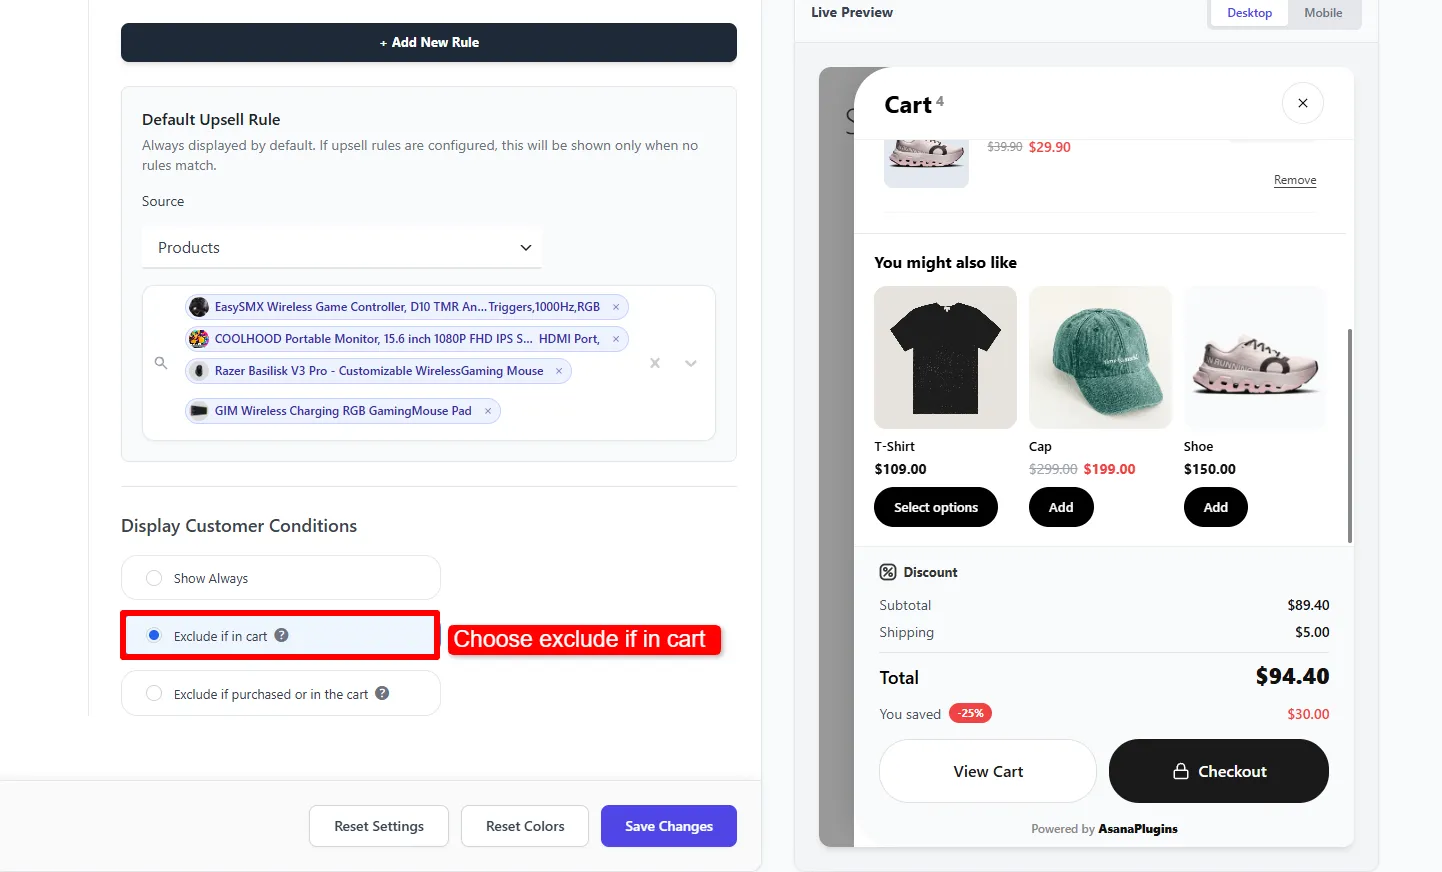
Pro control in this screenshot: Display Customer Conditions, including Exclude if in cart, requires Pro. You can configure the free rules without enabling that control. For the exact rule limits, see the side-cart upsell documentation.
Next, open Design. Use a clear title such as You might also like, set Button action to Add to cart, and choose a short label such as Add. The screenshot uses Theme 3 (Grid carousel) with three products per row; phones show two.
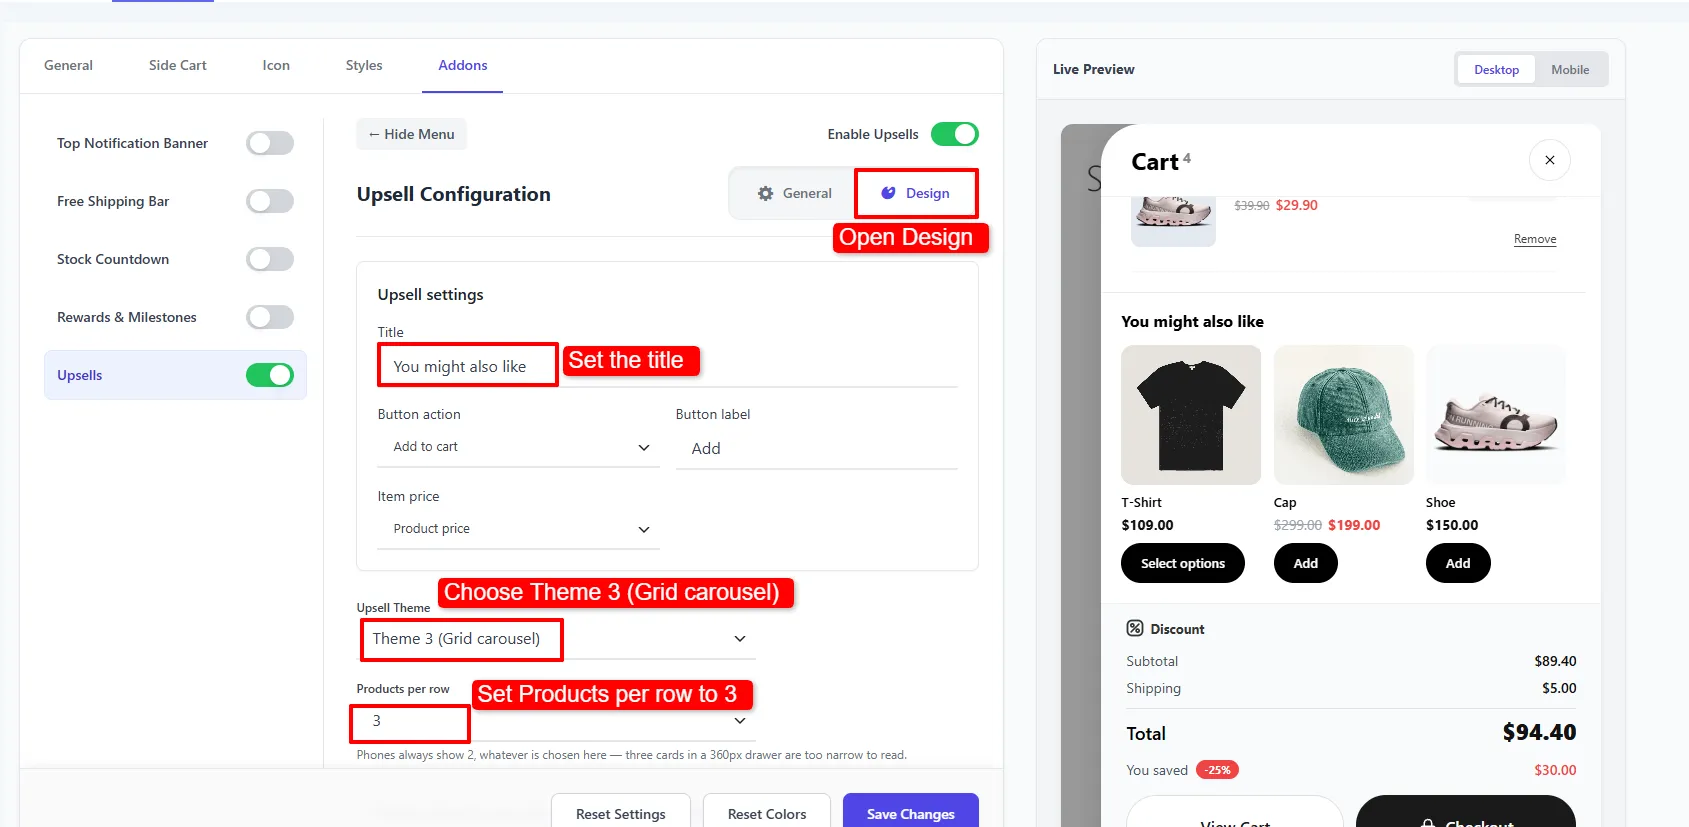
Finally, match the offer colors to the drawer and click Save Changes. These recommendation layouts are separate from the main drawer’s Style 1 and Style 2 choices. The premium drawer theme, free-shipping progress bar, rewards, banner, and countdown are not required for this setup. You can return to offer styling later if you only need to know how to add a side cart to WooCommerce.

7. Test the side cart on your storefront
Open your store in a logged-out or private browsing window. First, add a simple product and check that the drawer opens. Then change its quantity, remove it, and add it again. The item count and totals should follow each action.

Next, test a variable product after choosing its options. Also try a valid coupon if you enabled the coupon field. Finally, follow View Cart and Checkout to confirm that the drawer leads to your assigned pages.
If you added offers, test a matching category and a cart that does not match. Then test values below, at, and above each subtotal threshold. Because the rule uses the subtotal excluding tax, compare the same amount when checking eligibility.
Repeat the checks at phone width. In particular, confirm that you can scroll the drawer, close it, and reach Checkout. The admin preview is useful, but your live theme, products, and other plugins determine the final result.
Fix common setup problems
Why does the side cart not open?
First, check Display Side Cart and Auto Open Side Cart. Then check Visibility and Exclude Pages. If the floating icon works but the theme icon does not, revisit the Icon tab or keep using the floating trigger.
Why does the drawer show old items?
Confirm that AJAX updates are enabled, then clear any site and browser caches. Next, retest with script delay or combination temporarily disabled on a staging copy. If that resolves the issue, narrow down the conflicting optimization before changing your live settings.
Why are offers missing?
Check Enable Upsells, the rule Status, and whether the basket meets every condition in the group. Also confirm that the offer product is available to buy. Finally, check the fallback products if no rule should match.
Common questions
Can I add a side cart to WooCommerce for free?
Yes. The free plugin includes the basic drawer, floating cart icon, and up to three side-cart upsell rules. However, the premium drawer theme and several extra controls shown in the screenshots require Pro.
Does this replace the Cart page?
No. It adds a quick basket view while leaving the normal Cart page available. Therefore, keep your Cart and Checkout pages assigned and test their links after setup.
Do I need to edit my theme or add code?
No code is needed for the floating-icon setup in this guide. Use the preset icon, color controls, and built-in buttons. If your custom header icon needs a selector, you can use the floating icon instead.
Your next step
You now know how to add a side cart to WooCommerce without code, from enabling the drawer to checking checkout links. Start with the basic cart and then add one relevant offer. For more settings, use the complete side-cart setup documentation, or revisit our free plugin comparison before choosing your preferred tool.