

WooCommerce daily deals can bring your Black Friday offers into one panel that shoppers open from a visible store button. They can compare selected products, see the savings, and add an item to their cart without searching the catalog. This guide builds that panel with Side Cart & Upsell Pro and four real products from a demo store.
Key takeaways
- Create a WooCommerce daily deals panel, choose products manually, and set a discount for each one.
- Use Percentage for a percent off and Fixed price for the final price shoppers pay.
- Choose where the panel appears, configure its desktop and mobile buttons, and test the storefront after saving.
- The countdown resets at the time you choose. It does not change the products or end the campaign; check the offer’s Schedule for your Black Friday dates.
Before you start
You need WooCommerce, the Side Cart & Upsell plugin, and its Pro version, which includes Daily Offer. If you are new to the plugin, follow its installation and setup guide first. Then add the products you want to promote. This example uses a monitor, keyboard, mouse, and mouse pad. Choose products that fit your store and your margins.
WooCommerce can also schedule a sale price on an individual product. The method below adds a shopper-opened panel that groups several offers in one place. Use the product sale settings and the panel only in ways that match your intended prices.
1. Create a WooCommerce daily deals panel
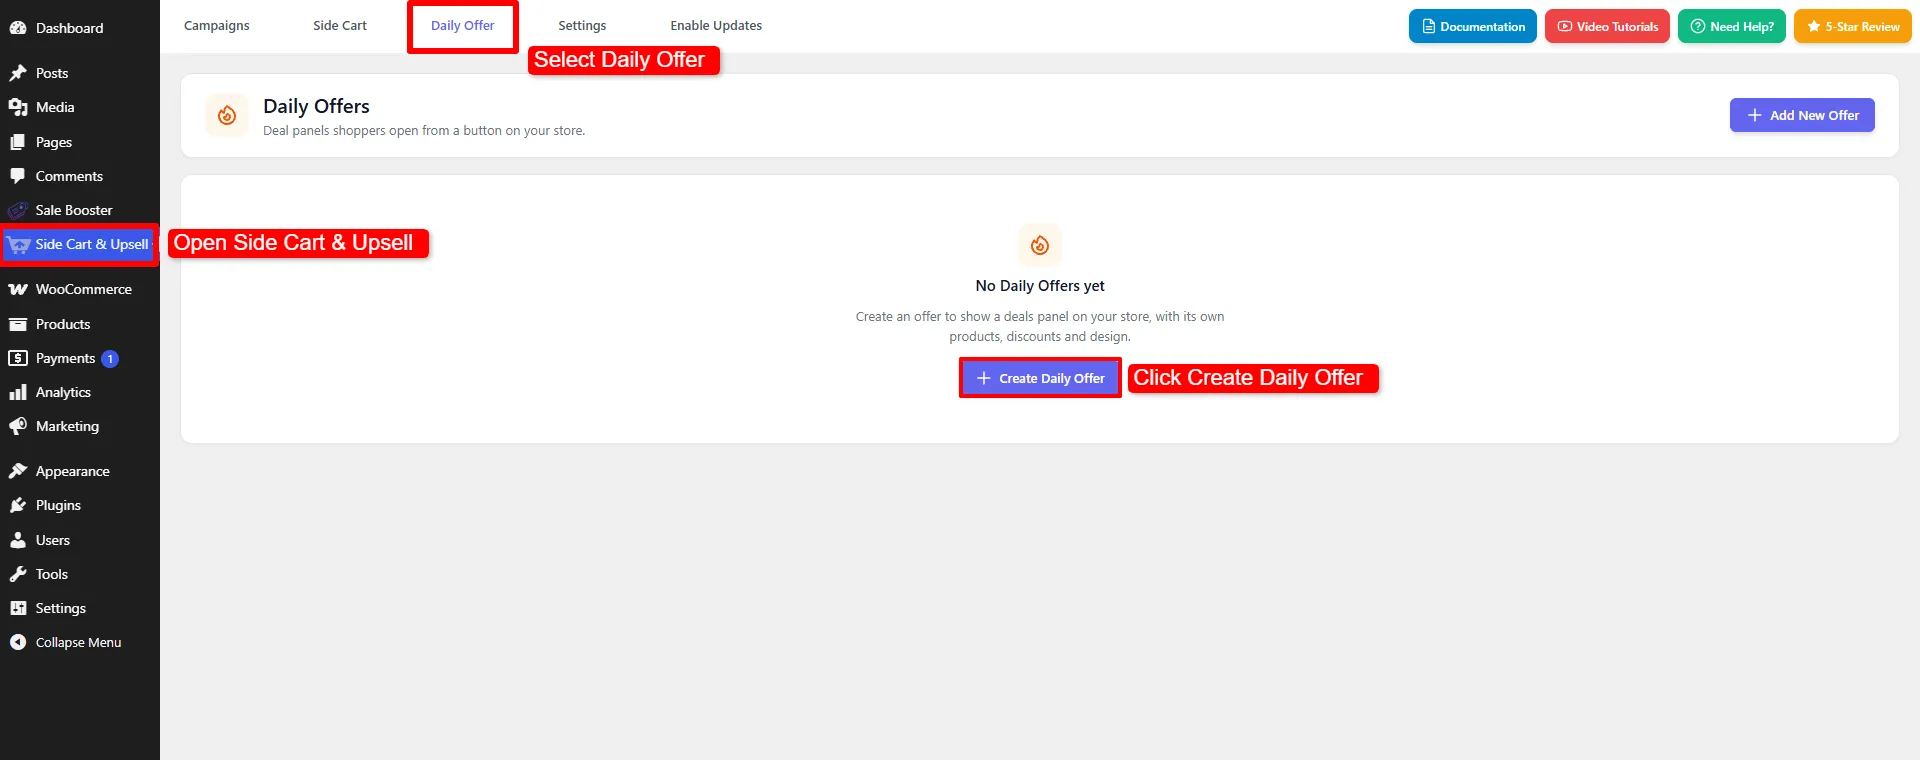
In your WordPress dashboard, open Side Cart & Upsell → Daily Offer. Click Create Daily Offer and give it an internal name, such as Daily Offer Black Friday. You will use that name to find the offer later. The customer-facing panel heading is a separate setting.
2. Select products for WooCommerce daily deals
Under Offers → Products, set Product Source to Manual Selection. Choose the first product, select its discount type, enter the amount, and set the quantity. Click Add Another Product to build the rest of the list. In this example, each row has a quantity of one.
| Product | Discount type | Amount | Example offer price |
|---|---|---|---|
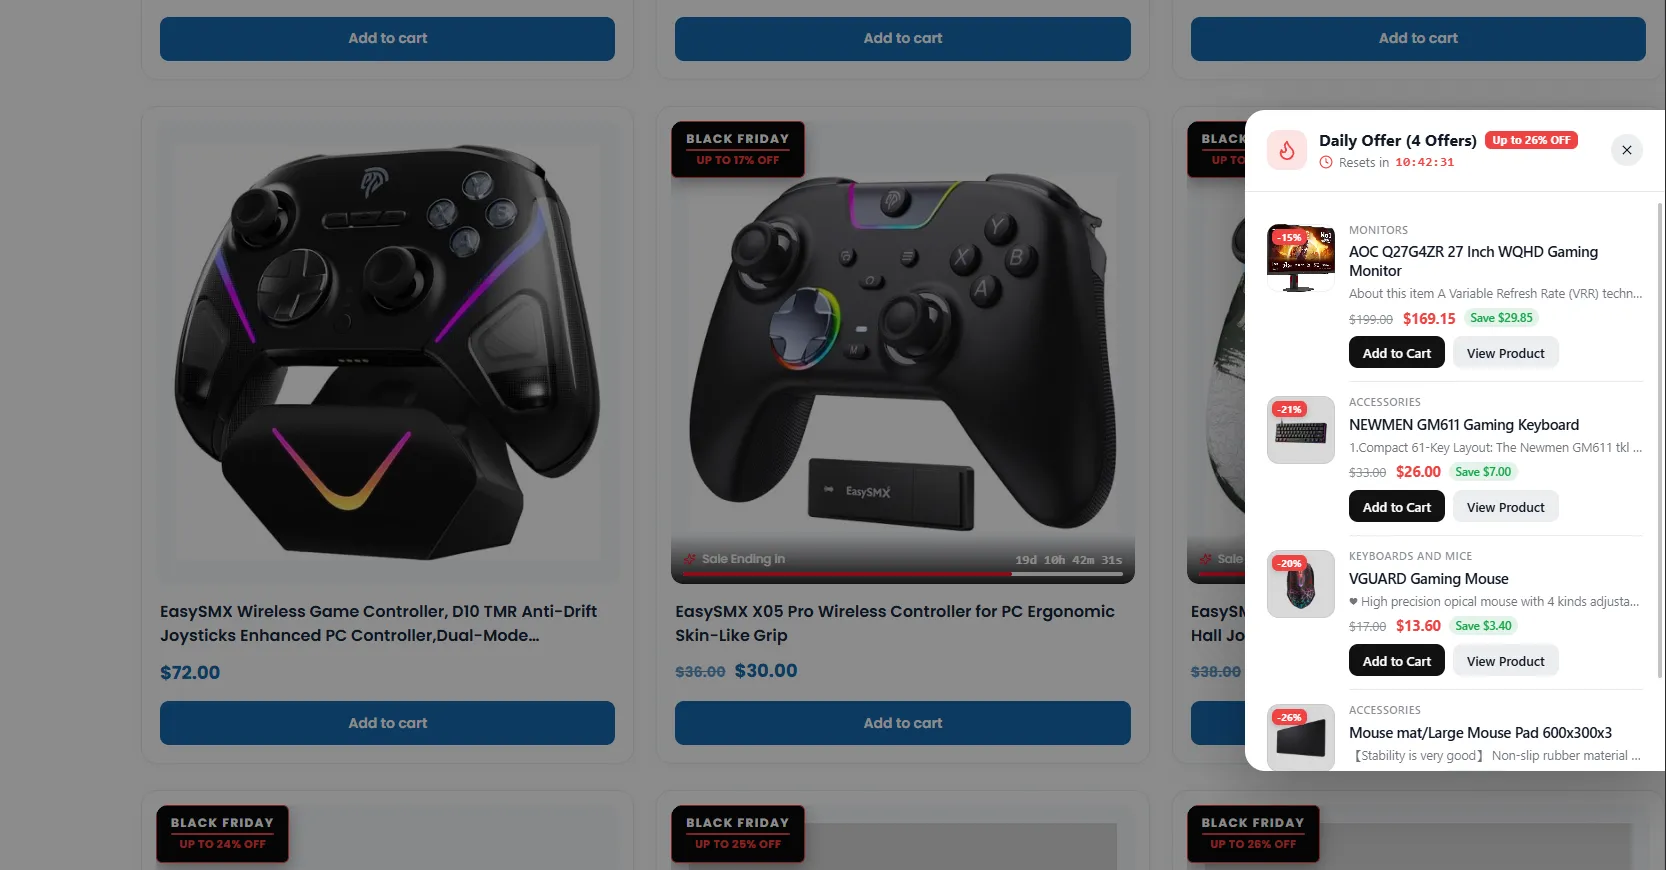
| AOC Q27G4ZR 27 Inch WQHD Gaming Monitor | Percentage | 15% | $169.15 from $199.00 |
| NEWMEN GM611 Gaming Keyboard | Fixed price | $26.00 | $26.00 from $33.00 |
| VGUARD Gaming Mouse | Percentage | 20% | $13.60 from $17.00 |
| Mouse mat/Large Mouse Pad 600x300x3 | Fixed price | $8.00 | $8.00 from $10.77 |
Important: Fixed price means the final selling price, not the amount to subtract. For the keyboard, entering 26 sets its offer price to $26.00. The mouse pad uses the same discount type with a final price of $8.00. The screenshot sets Max Products to six, leaving room for more products, but four are selected here. For a comparison with other pricing methods, read our guide to WooCommerce discounts.

3. Choose where the offer appears
Open Offers → Show On and select All Pages if you want visitors to find the Black Friday panel throughout the store. If you have a more targeted campaign, choose only the relevant pages instead. Review Conditions and Schedule before launch so the offer appears to the right shoppers during your intended campaign window. These settings control when and where shoppers can open your WooCommerce daily deals.

4. Configure the WooCommerce daily deals panel
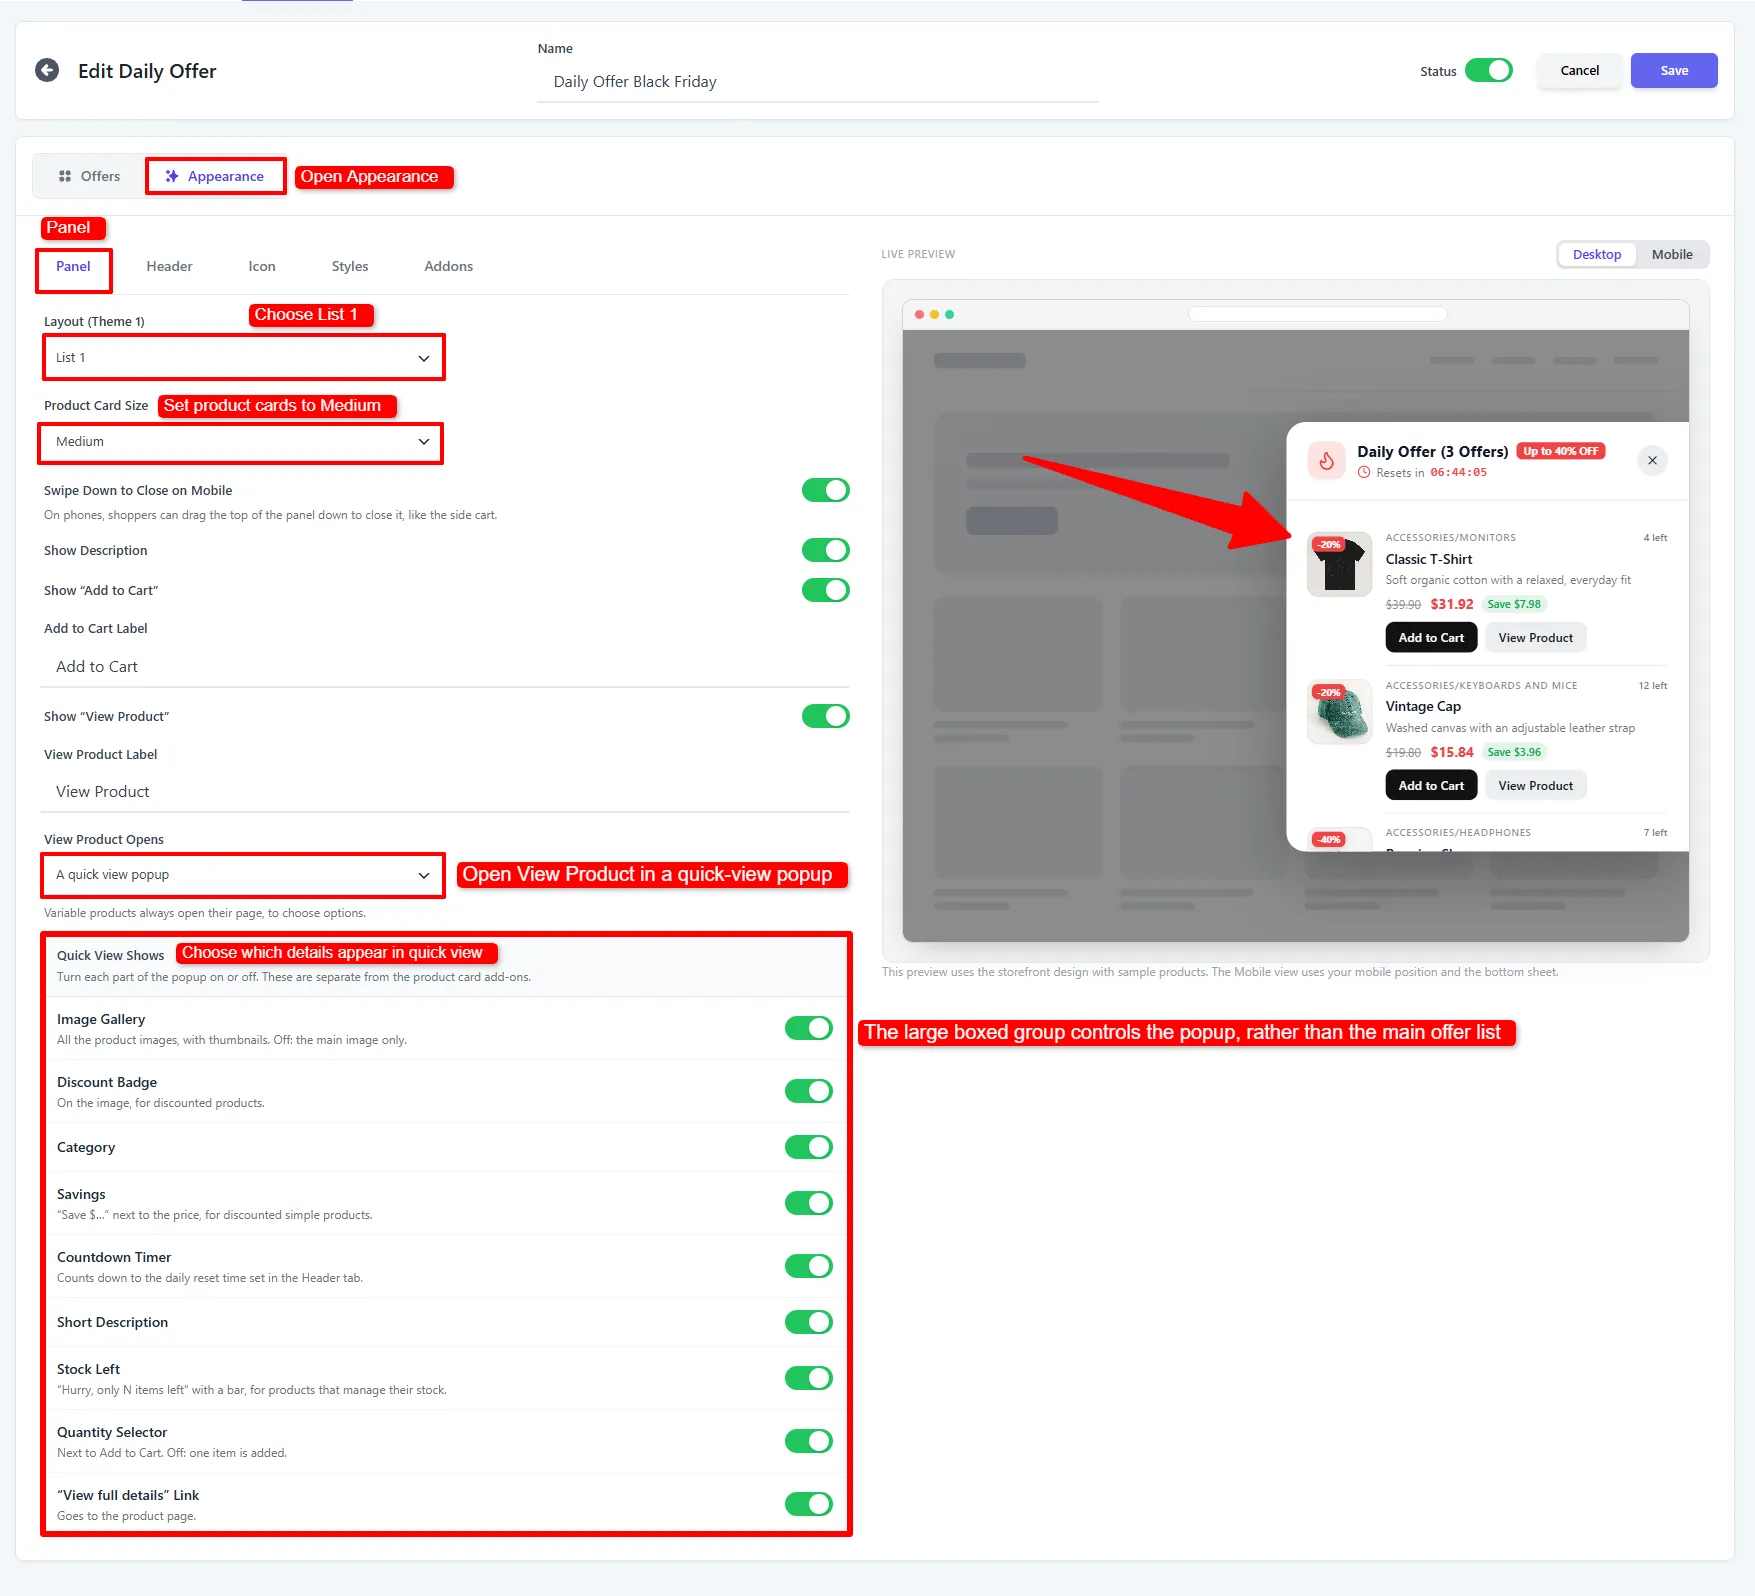
Open Appearance → Panel. The WooCommerce daily deals panel in this example uses the List 1 layout and Medium product cards. You can show short descriptions, Add to Cart, and View Product to help shoppers assess each deal. Set View Product Opens to A quick view popup if you want product details to open without sending shoppers away from the current page.
The Quick View Shows controls let you decide whether to display the image gallery, discount badge, category, savings, countdown, short description, stock left, quantity selector, and full-details link. Turn on only the information that helps customers decide; then test the popup with your actual products. Variable products open their product page for option selection.
5. Add a countdown to your WooCommerce daily deals
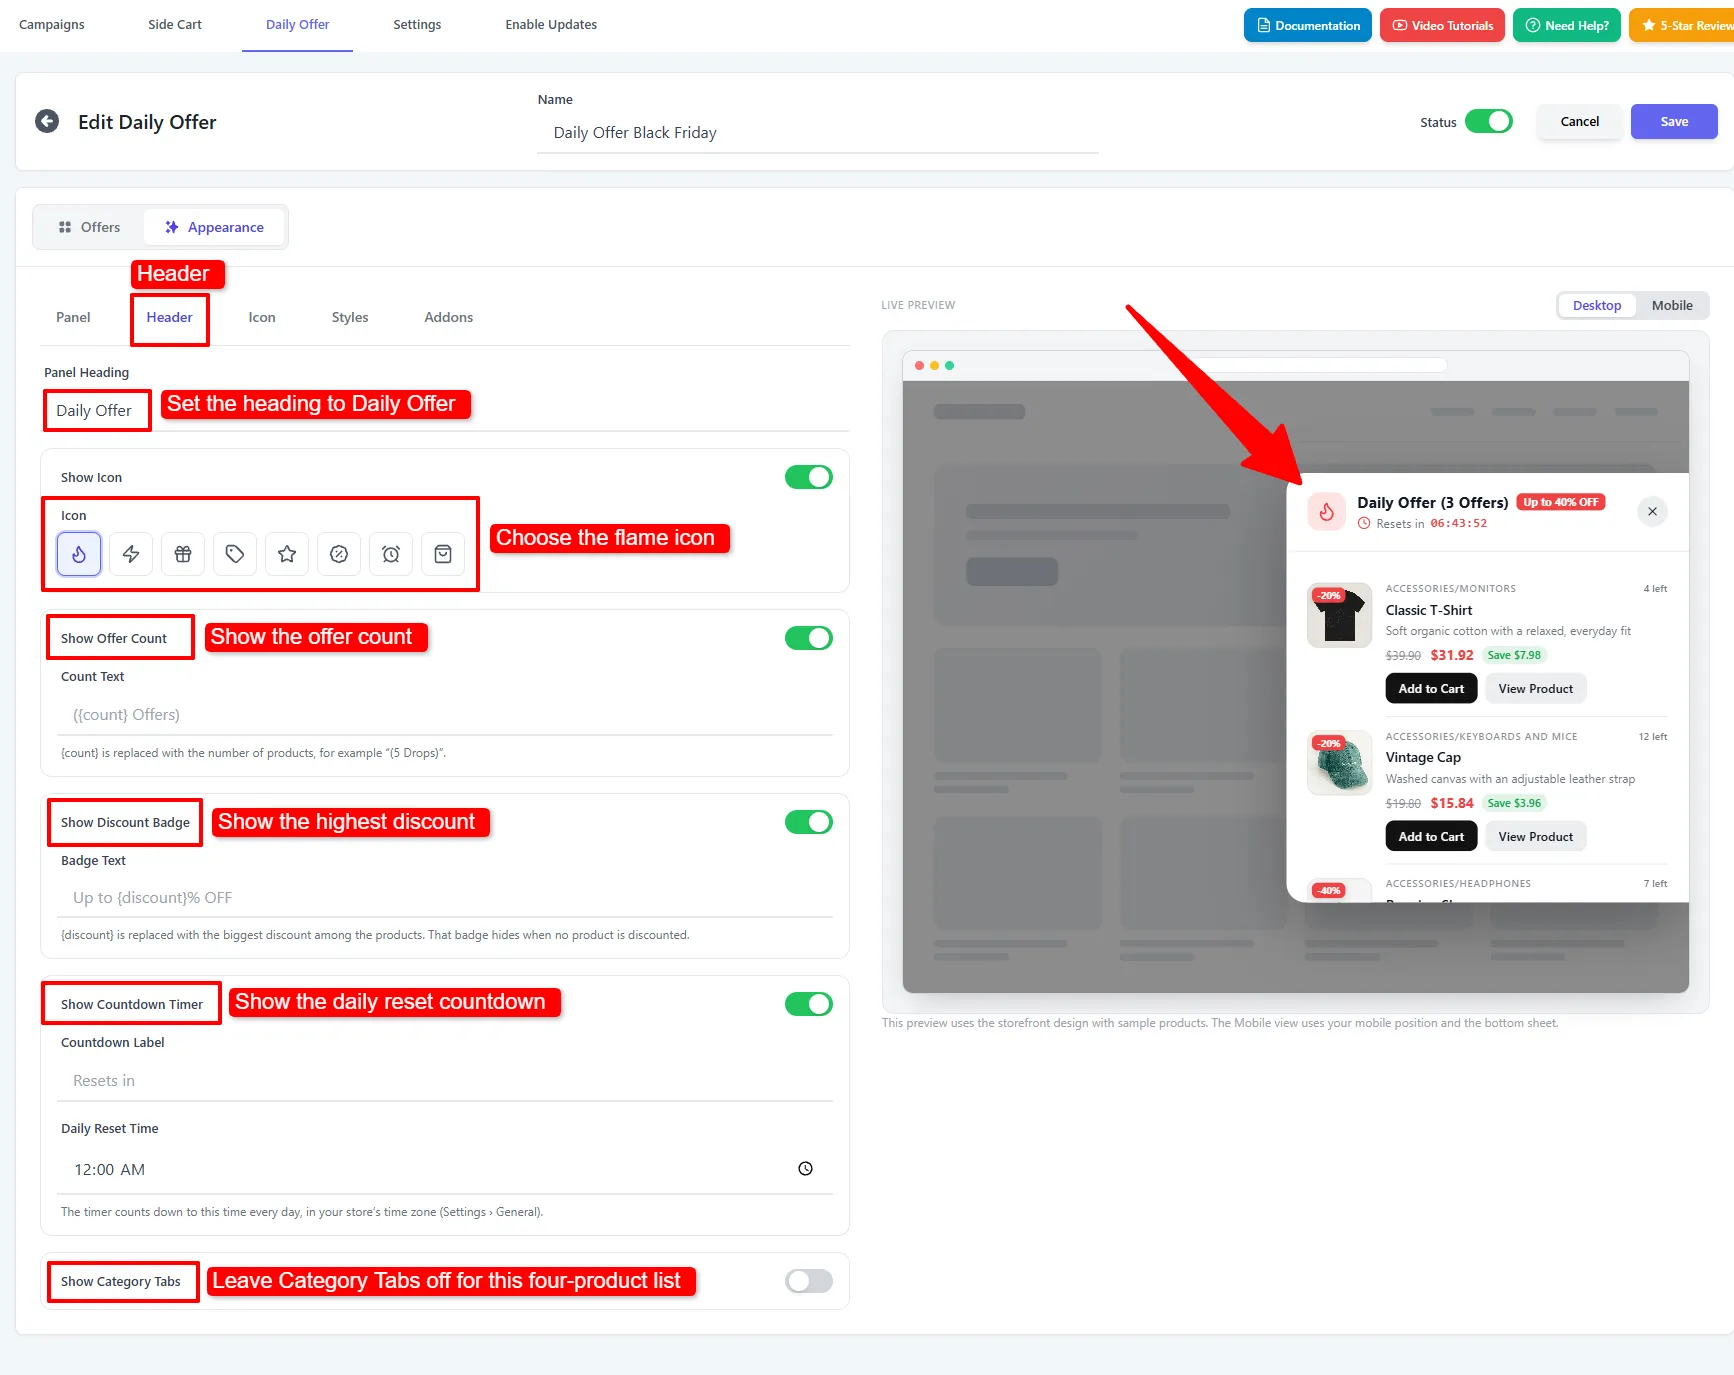
Under Appearance → Header, set the customer-facing heading to Daily Offer. This example shows a flame icon, offer count, discount badge, and countdown timer. Set Daily Reset Time for your store. The screenshot uses 12:00 AM in the store’s WordPress time zone. Category tabs are off because this list has only four products.
The countdown tells shoppers when the daily timer resets. It does not set the Black Friday campaign’s start or end date. Review the offer’s Schedule for that. For a promotion with a scheduled end time, see our WooCommerce flash sale guide. Also, the editor preview uses sample products. Its “3 Offers” and “Up to 40% Off” labels may differ from the saved offer on your storefront.
6. Show WooCommerce daily deals on desktop and mobile
Under Appearance → Icon, enable the button for desktop and mobile. On desktop, this example uses a black Icon Tab at the right center with a lightning icon. On mobile, it uses a black Icon Tab at the left center with a flame icon. The offer-count badge shows that deals are available. Set a descriptive Button Label even for icon-only styles; the label also serves as a tooltip and helps screen-reader users.
Use the Styles tab to match button and panel colors to your store while keeping the launcher easy to see against product images.

7. Choose useful product details
Open Appearance → Addons to control the details shown with your WooCommerce daily deals. The screenshot enables the discount badge, category, savings amount, and stock-left label. Stock-left information applies to products that manage stock. If you use a low-stock message, enter a threshold that reflects real inventory instead of showing urgency on every product.

8. Save and test your WooCommerce daily deals
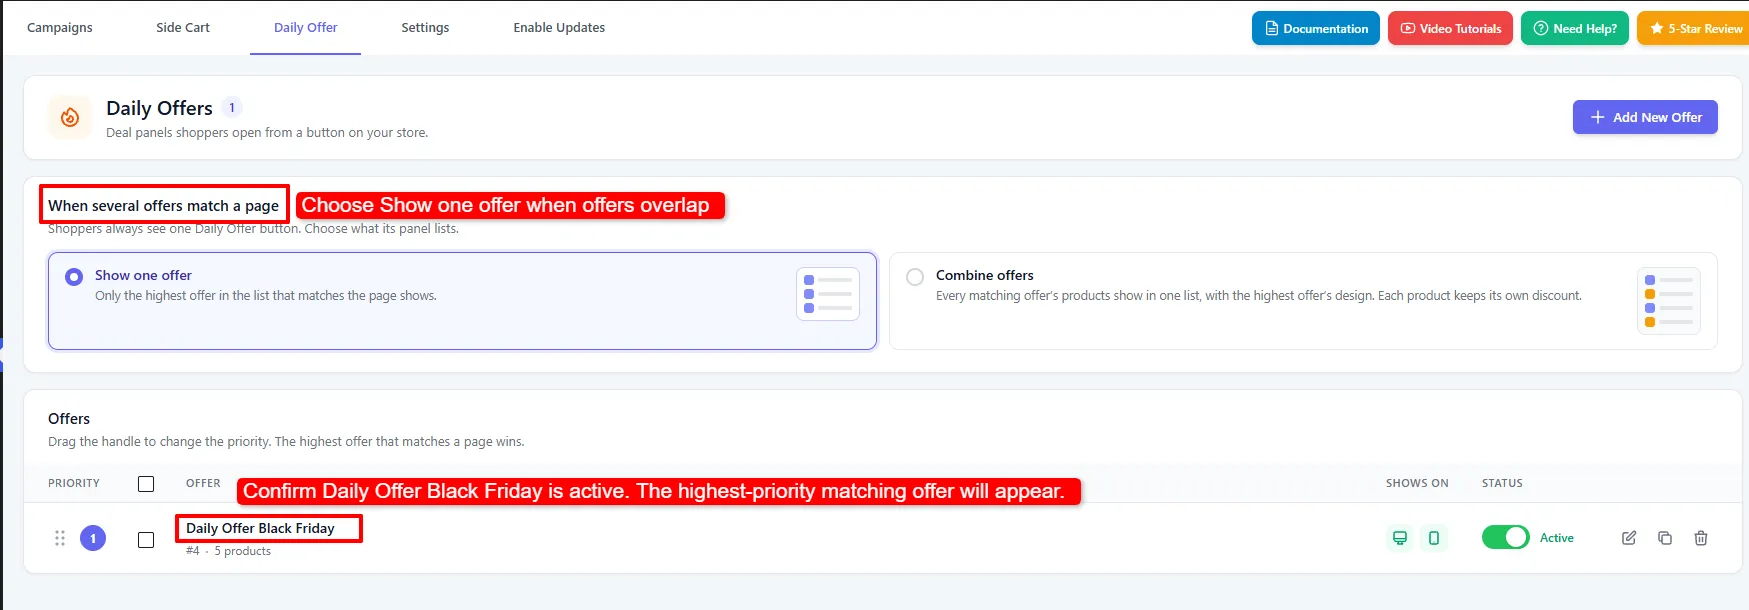
Switch the offer’s Status on and click Save. Back on the Daily Offers screen, confirm that Daily Offer Black Friday appears in the list and is active. If several offers match a page, choose whether the button shows the highest-priority matching offer or combines the matching offers. Check the saved product count and priority before you launch.
What shoppers see in the daily deals panel
On desktop, a black icon tab sits at the right edge of the product grid. Its red count badge makes the four available offers visible without covering the products.

When a visitor clicks the icon, the panel opens over the store. This example shows all four products with their discounted prices, savings, and Add to Cart buttons.
On mobile, the same WooCommerce daily deals open as a bottom sheet. Check that the heading, countdown, prices, and buttons remain readable at phone width.

Frequently asked questions
What is the difference between Percentage and Fixed price?
Percentage reduces the product’s price by the entered percentage. Fixed price sets the final offer price. A $33 keyboard with a fixed price of $26 sells for $26 in this example.
Does the countdown end the Black Friday offer?
No. The Header countdown resets at your chosen daily time. Use the offer’s Schedule to control the campaign window.
Why does the editor preview show different products or discounts?
The Appearance preview uses sample products to demonstrate the design. Check your storefront after saving to verify the real offer products and prices.
Do WooCommerce daily deals change products automatically?
No. In this manual-selection example, the timer resets each day, but the chosen products stay in the panel until you edit the offer. Update the product list when you want to promote different deals.
WooCommerce daily deals work best when shoppers can understand the price, deadline, and next action at a glance. Explore Side Cart & Upsell Pro to build the panel, then test every offer on desktop and mobile before your Black Friday campaign begins.