This article provides a clear and practical guide on How to Create WooCommerce Composite Products in 2026 using the free and powerful Easy WooCommerce Product Bundles plugin. You’ll learn how to build flexible, customizable composite products in WooCommerce that allow customers to mix and match components based on their preferences. The guide walks you through configuring product components, setting dynamic or fixed pricing, managing stock for individual items, and optimizing the overall shopping experience. Whether you’re selling build-your-own kits, customizable bundles, or personalized product packages, this step-by-step guide will help you create high-converting composite product offers in WooCommerce.
Table of Contents
- What are WooCommerce Composite Products?
- Benefits of WooCommerce Composite Products
- Example of composite products
- How to Create WooCommerce Composite Products
- 🎥Video Tutorial
- Step1: Installing the Product Bundle Builder for WooCommerce
- Step2: Creating WooCommerce Composite Products
- Step 3: Customising WooCommerce composite product Bundle
- Step4: Pricing for WooCommerce Composite Products
- Step 5: Configure the Plugin Settings
- Final Result of WooCommerce Composite Products
- How to Create a WooCommerce Composite Product with Variable Products
- Shortcodes
- Other Article
What are WooCommerce Composite Products?
WooCommerce composite products allow customers to build and purchase fully customizable products by selecting from predefined components or options. Instead of buying a fixed item, shoppers can assemble a product that fits their exact needs.
For example, with a “Build Your Own PC” composite product, customers can choose the case, motherboard, graphics card, and other components to create a personalized computer. Another popular example is a “Build Your Pet Basket,” where customers select toys, treats, grooming products, and more to create a custom gift basket. As different options are selected, the total price updates dynamically based on the chosen items.
Composite products give customers flexibility while keeping the buying process structured and easy. By offering tailored product combinations, you can improve the shopping experience and increase conversions in your WooCommerce store. This means more visitors complete their purchases instead of leaving the site, helping you generate higher sales from the same amount of traffic.
Benefits of WooCommerce Composite Products
WooCommerce composite products offer powerful advantages for online stores that want to sell smarter, not just more.
- Customization: Customers can build products that match their exact needs. This creates a more personal shopping experience and increases satisfaction.
- Flexibility: Composite products work for many business models—such as build-your-own kits, product bundles, subscription boxes, or configurable packages.
- Higher Sales Potential: When customers select components themselves, they often add more items than they originally planned. This naturally increases average order value (AOV).
- Built-in Upselling and Cross-Selling: During the configuration process, you can suggest related items or premium upgrades, encouraging customers to enhance their purchase.
- Stronger Competitive Position: Offering customizable products helps your store stand out. Unique product experiences are harder for competitors to copy.
- Better Customer Engagement: Interactive product building keeps customers involved longer, which builds trust and increases the likelihood of completing the purchase.
- Smarter Marketing Opportunities: You can promote personalized bundles, seasonal kits, or targeted offers based on customer preferences.
- Valuable Data Insights: By analyzing which components customers choose most often, you gain insights into buying behavior. This helps you optimize inventory, pricing, and future product strategies.
In short, composite products don’t just improve the shopping experience—they turn your WooCommerce store into a more strategic and data-driven business.
Example of composite products
Here are some examples of composite products that are created using the Easy WooCommerce Product Bundles plugin:
- Gift Baskets: Snacks, Beverages, Gourmet Items, Personalized Messages, Gift Wrapping.
- Custom Computers: CPUs, Motherboards, RAM, Storage, Graphics Cards, Power Supplies, Cases
- Furniture Sets: Sofa, Chairs, Coffee Tables, Lamps, Rugs, Cushions
- Home Theater Systems: TVs, Soundbars, Speakers, Blu-ray Players, Streaming Devices
- Custom Jewelry: Chains, Pendants, Charms, Stones, Engravings
- Meal Kits: Main Ingredients, Side Dishes, Sauces, Spices, Cooking Instructions
- Custom Apparel: T-Shirts, Hoodies, Pants, Hats, Custom Prints
- Beauty and Skincare Sets: Cleansers, Toners, Moisturizers, Serums, Masks
How to Create WooCommerce Composite Products
🎥Video Tutorial
Step1: Installing the Product Bundle Builder for WooCommerce
The Easy WooCommerce Product Bundles free plugin is one of the best WooCommerce plugins for creating composite products in your online store, so Follow the steps below to install this plugin :
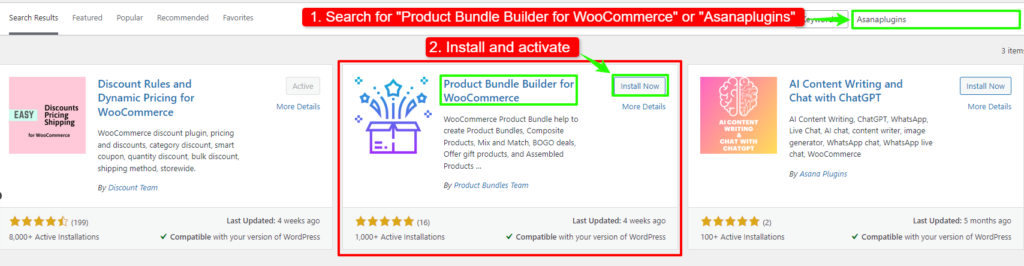
1. Navigate to the Plugins >> Add New menu on your WordPress website
2. Then search for “Easy Product Bundles for WooCommerce“
3. Find the “Bundles – WooCommerce Product Bundles” by “Asana Plugins“
4. Install the plugin and activate it.
Some examples that you can create with the Easy WooCommerce Product Bundles plugin:
- Simple or Pure product bundles
- Advanced and Dynamic product bundles
- Assembled products bundle
- Mix-and-Match products bundle
- Frequently bought together products bundle
- Create BOGO deals
- Give gift products
- Create Personalized Boxes
- Recommend addons and essentials
- Optional products in WooCommerce Product Bundles
Step2: Creating WooCommerce Composite Products
Therefore after installing the Easy WooCommerce Product Bundles free plugin, you can create composite products in WooCommerce.
Here we will create composite products from Pet Supplies:
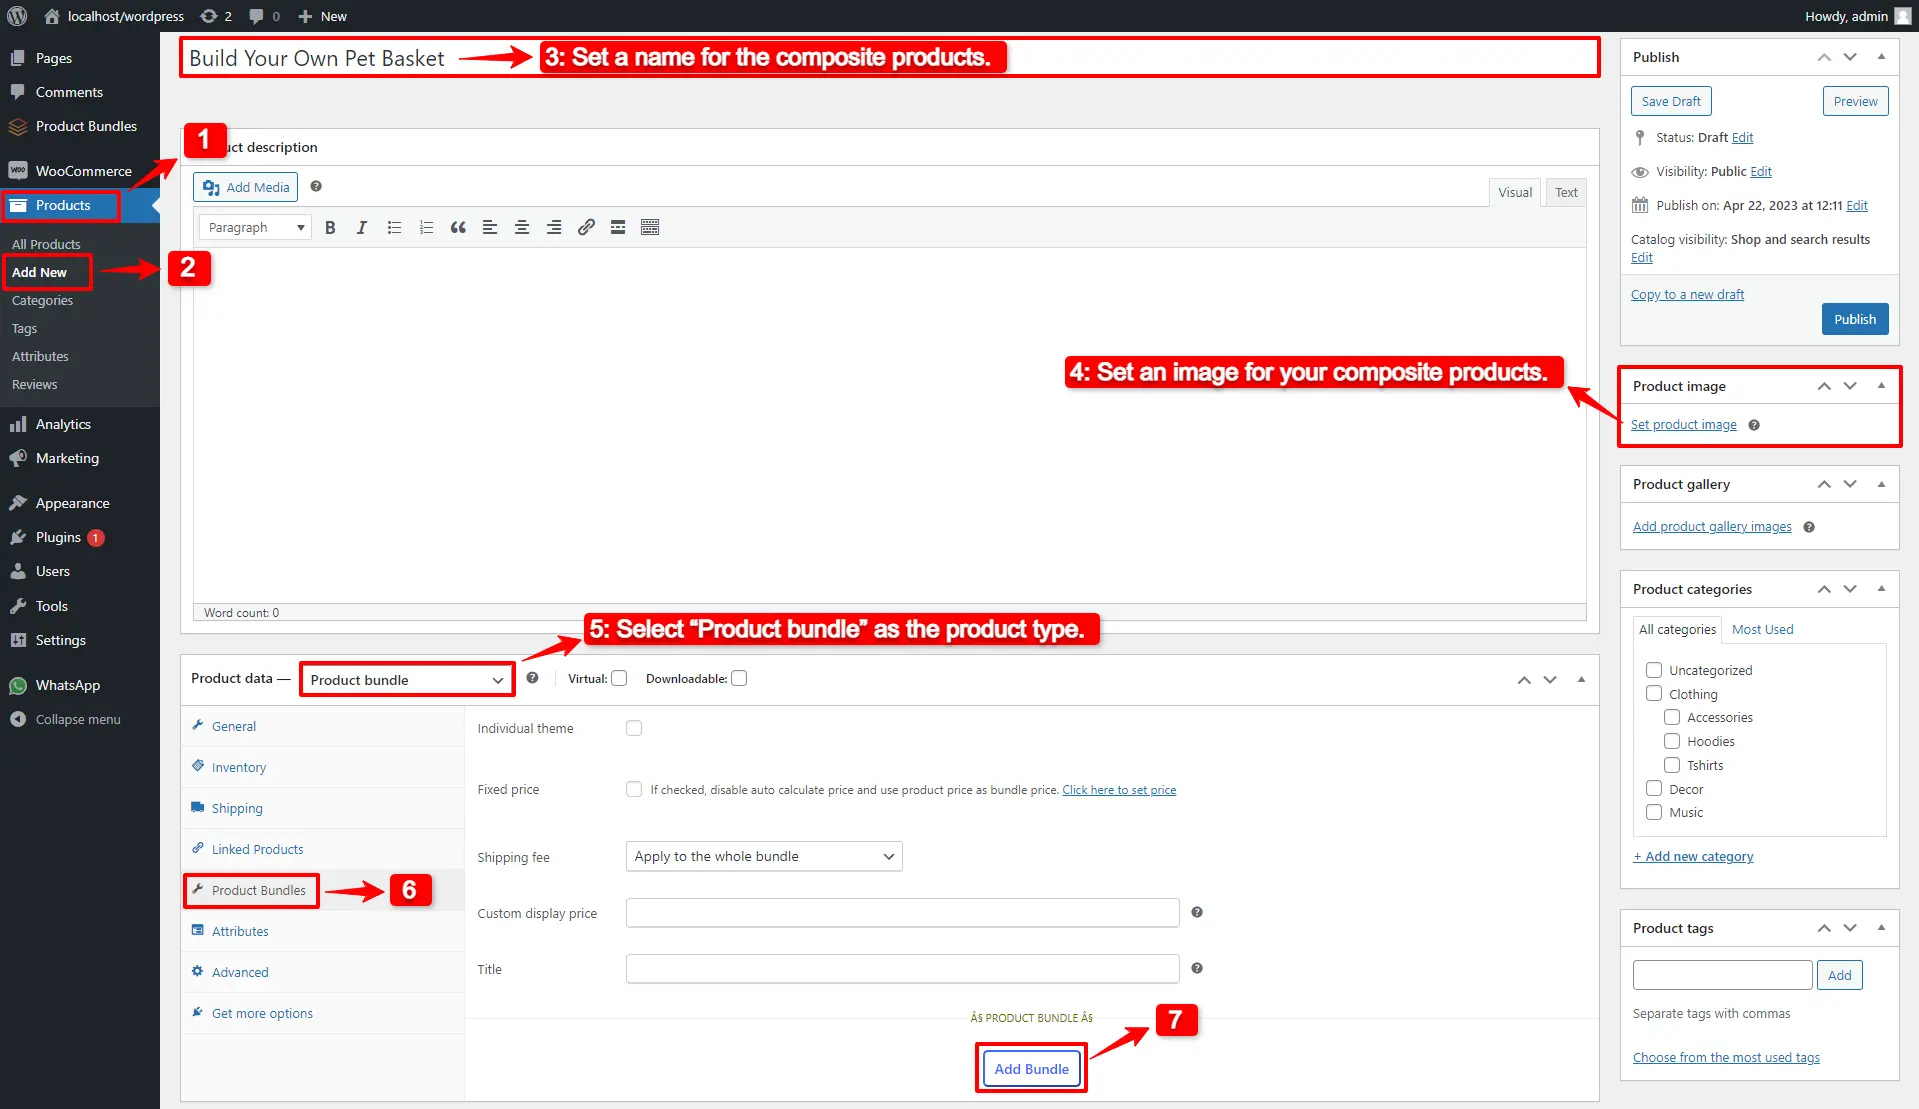
1. Navigate to WooCommerce “Products”.
2. Click on “Add New” to create a new product.
3. Set a name for the composite products, for instance, “Build Your Own Pet Basket”.
4. Click on “Set product image” from the right sidebar and select an image for your composite products.
5. Now navigate to the Product data panel, and select “Product bundle” as the product type.
6. After selecting “Product bundle” as the product type the “Product Bundles” tab will appear in the product data panel.
7. Navigate to the “Product Bundles” tab and click on the “Add Item” button to add a new bundle item to the composite products.
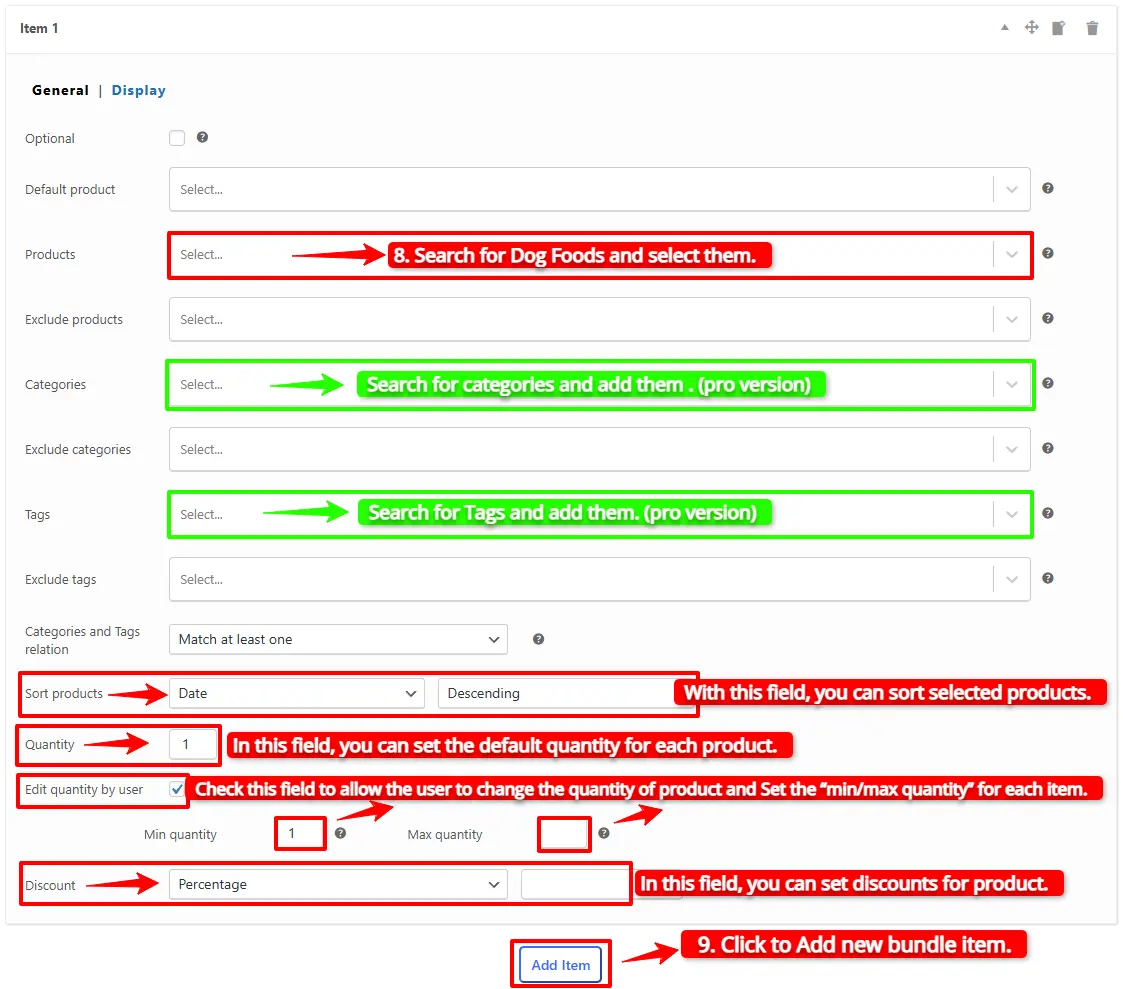
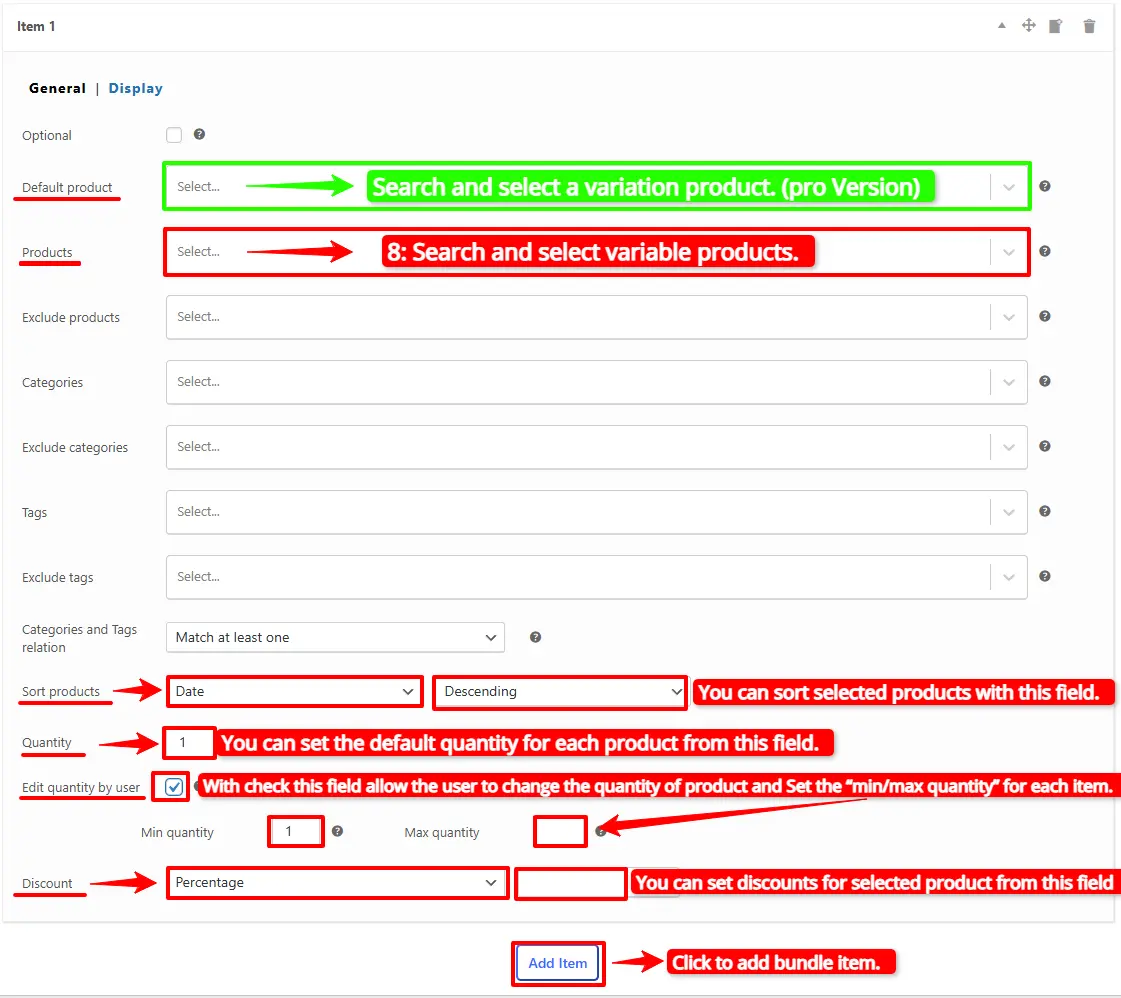
8. Now, in the “Products” field, search for Dog Foods and select them.
- Or Likewise, if you would like to include products from a category, you can do it with the “Categories” field of the item. therefore you can search for categories and add them to the “Categories” field. (pro version)
- in addition, you can do the same for the product tags and include them in the “Tags” field. (pro version)
Step 3: Customising WooCommerce composite product Bundle
You can also configure the below settings to your WooCommerce Product Bundle in the item field:
- Sort products: With this field, you can sort selected products by “ID”, “Title”, “Menu order”,” Date”, “Price”, “popularity” and“Rating”.
- Quantity: In this field, you can set the default quantity for each product.
- Edit quantity by user: Check this field to allow the user to change the quantity of product and Set the “min/max quantity” for each item.
- Discount: In this field, you can set discounts for product bundles by percentage, price or fixed price.
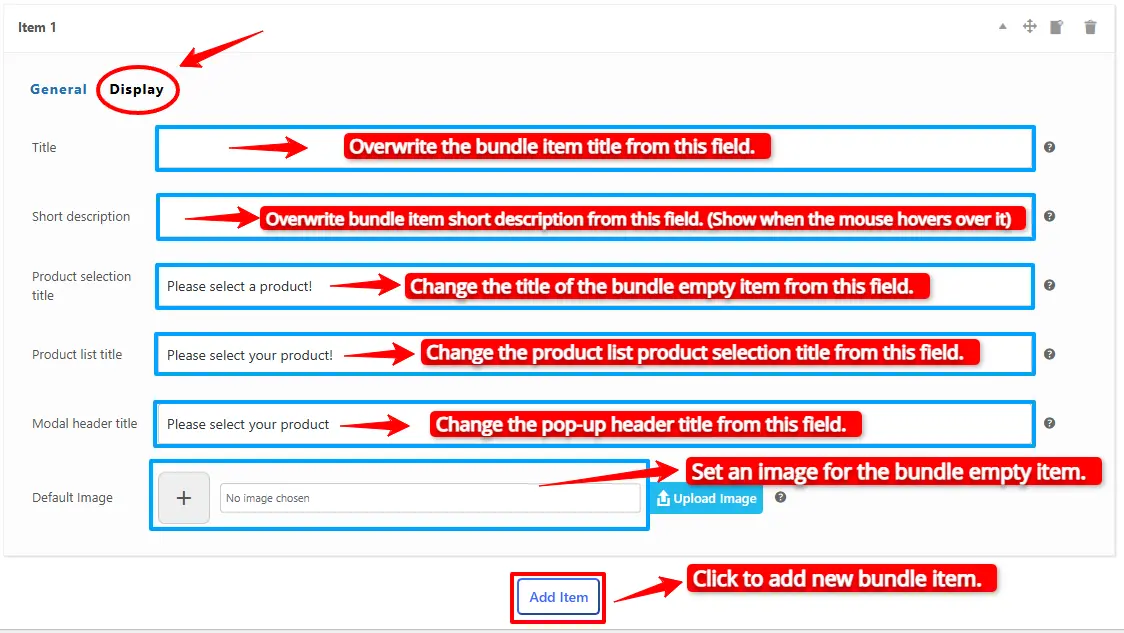
Now you can go to the “display” tab of the item and configure the following sections:
- Overwrite bundle item title.
- Overwrite bundle item short description. (Show when the mouse hovers over it)
- Change the title of the bundle empty item.
- Change the product list product selection title.
- Change the pop-up header title.
- Set an image for the empty item.
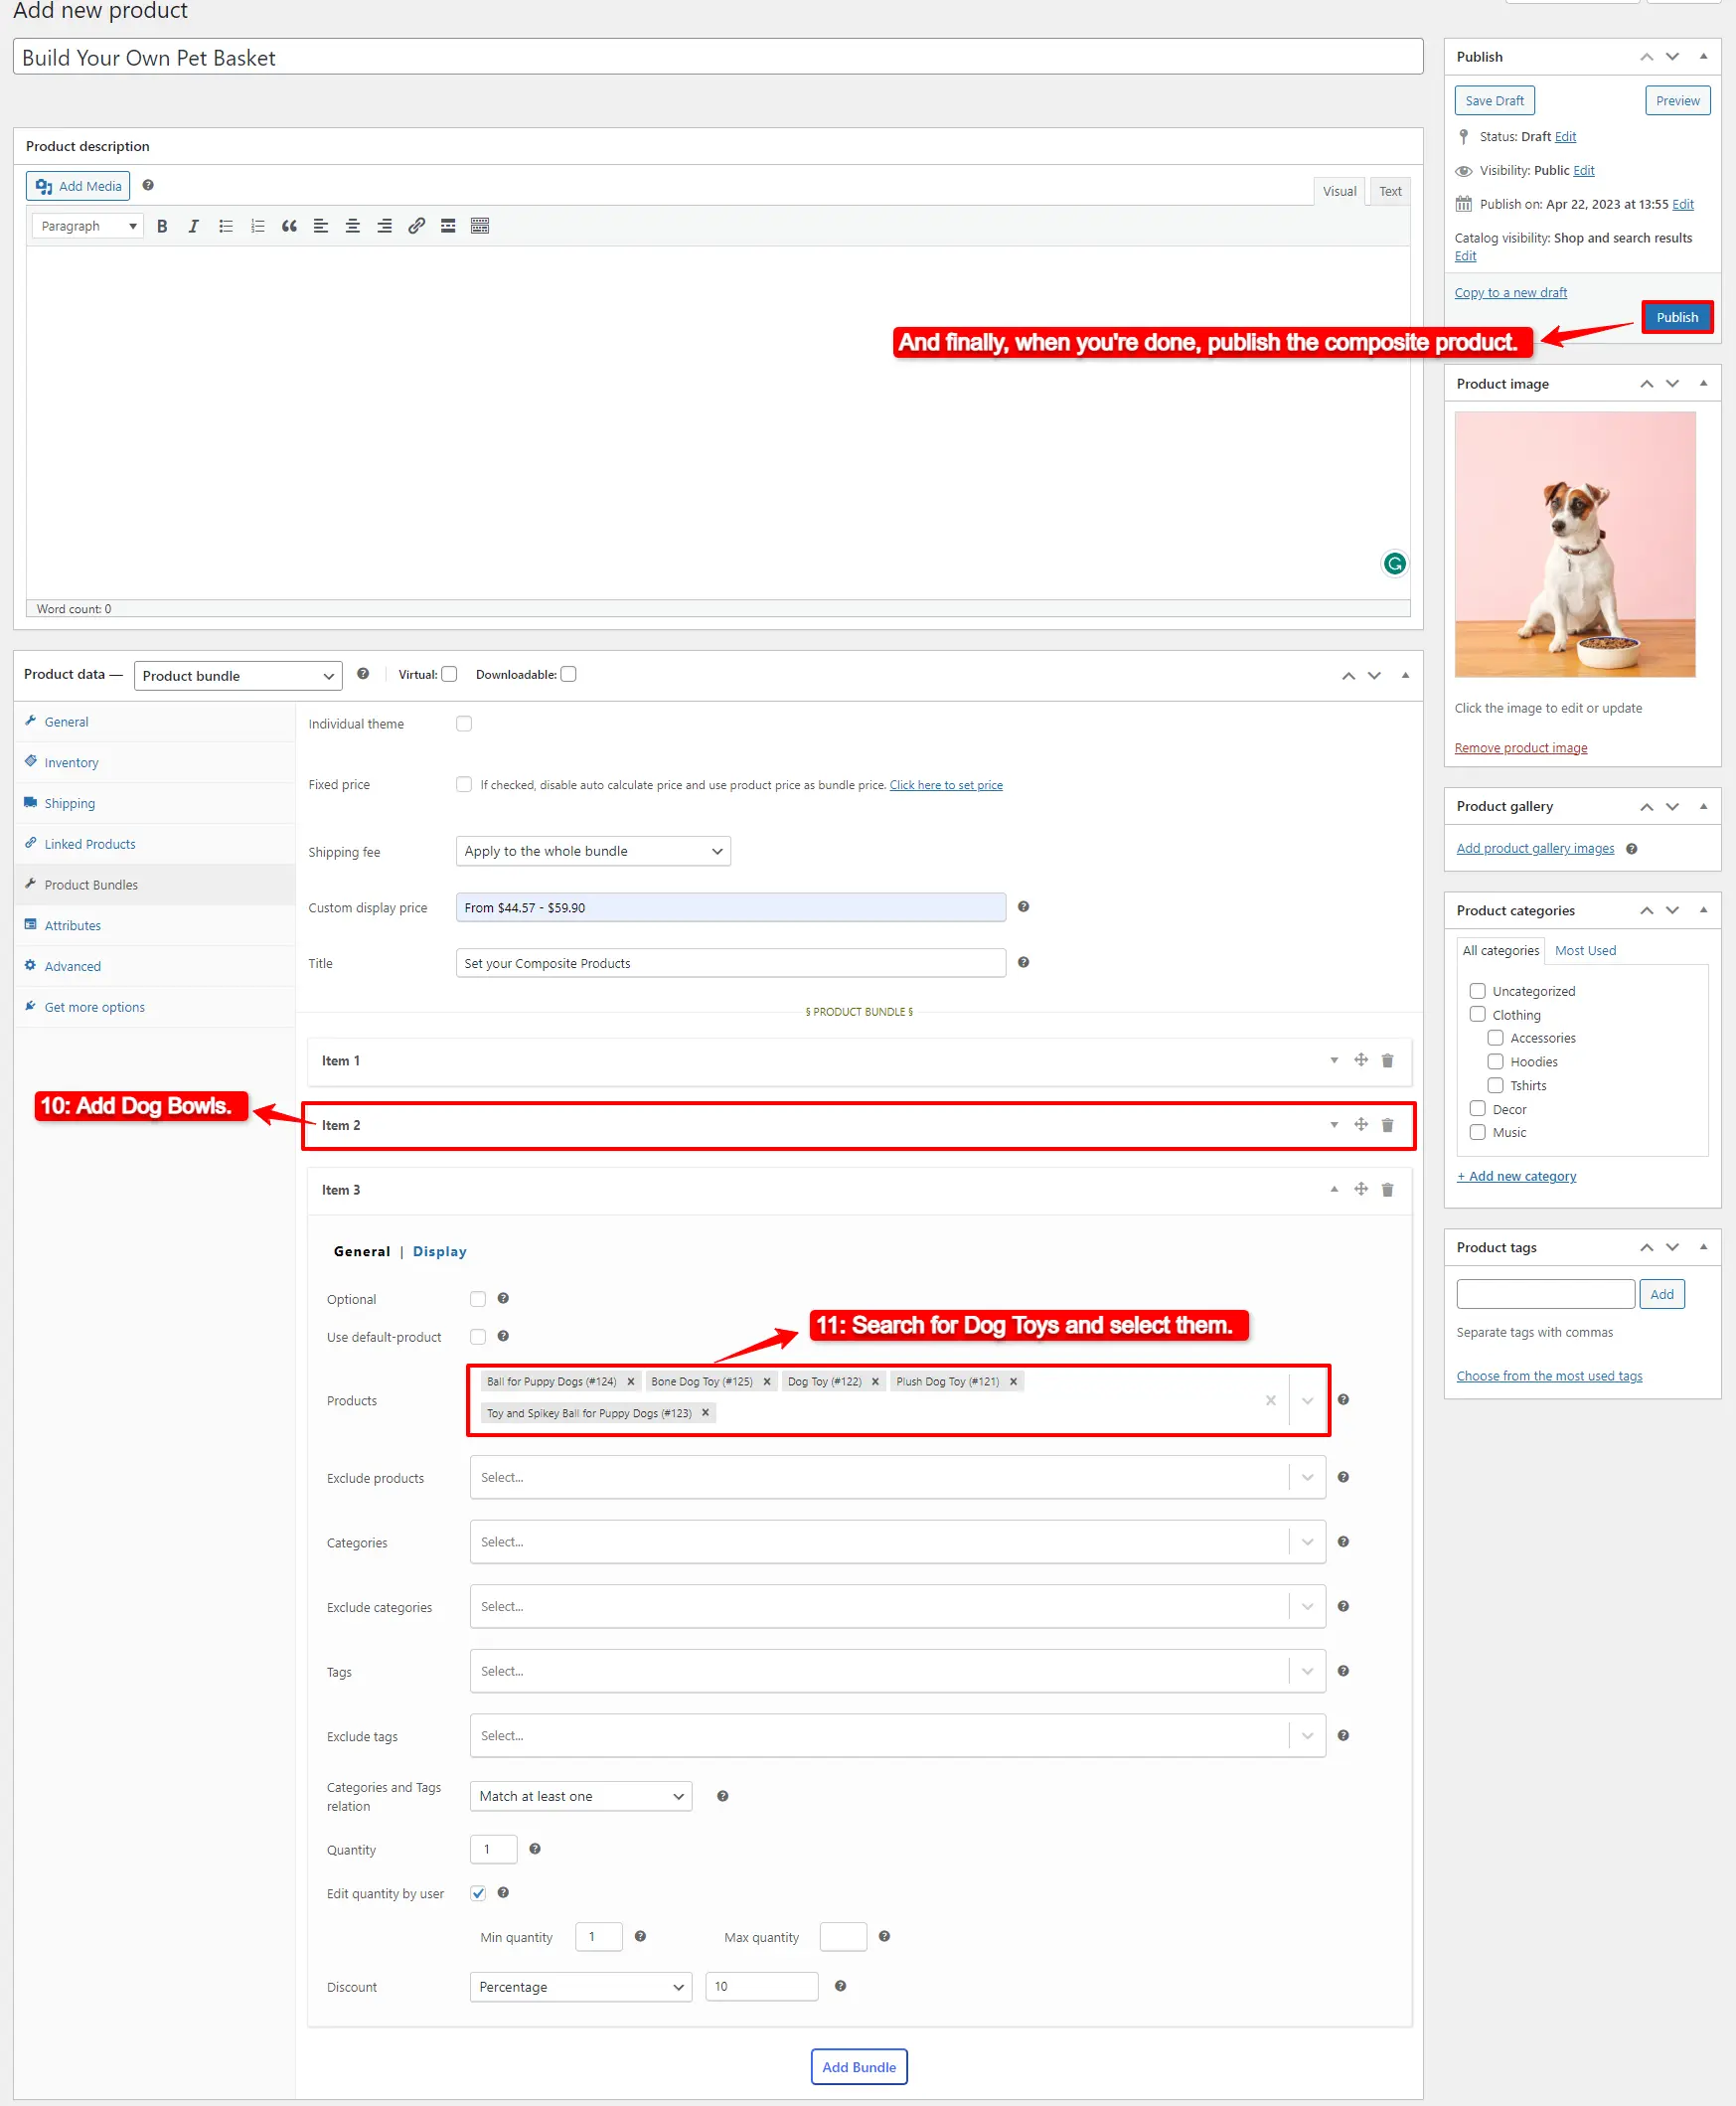
9. Then click on the “Add Item” button to add a new bundle item for the Dog Bowls.
10. Now in Item 2 in the “Products” field, search for Dog Bowls and select them.
11. Click on the “Add Bundle” button to add a new bundle item for the Dog Toys. Then in the “Products” field search for Dog Toys and select them.
Step4: Pricing for WooCommerce Composite Products
After adding products you can choose how want to price your composite product.
The Easy WooCommerce Product Bundles free plugin offers two pricing strategies:
- Fixed Price: Sets a fixed price for the whole composite products
- Auto Calculate Bundle Price: Allow the plugin to calculate the composite product price using the selected products for the bundle items.
If you want to set a fixed price for the composite product, enable the “Fixed price” option then navigate to the “General tab”, and set a price for the “Regular price” field. You can set a “Sale price” too.
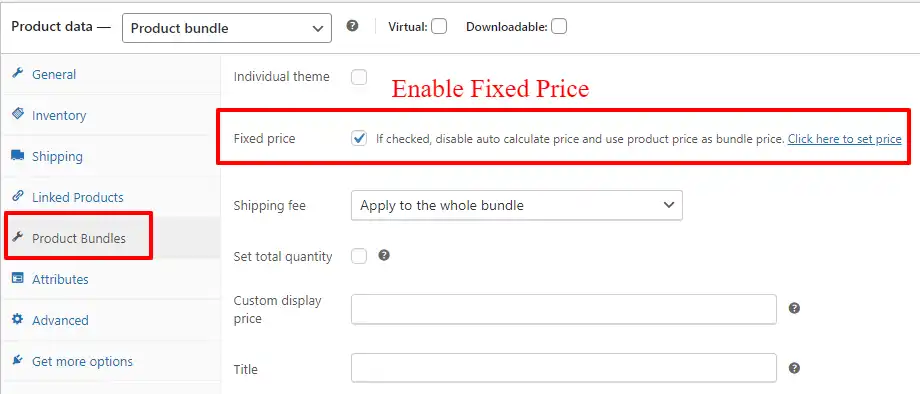
To use the “Auto Calculate Bundle Price” disable the “Fixed price” option.
12. Now you can publish the composite products on your website.
Step 5: Configure the Plugin Settings
All the plugin settings you need can be found on the “Product Bundles” tab in the WordPress dashboard.
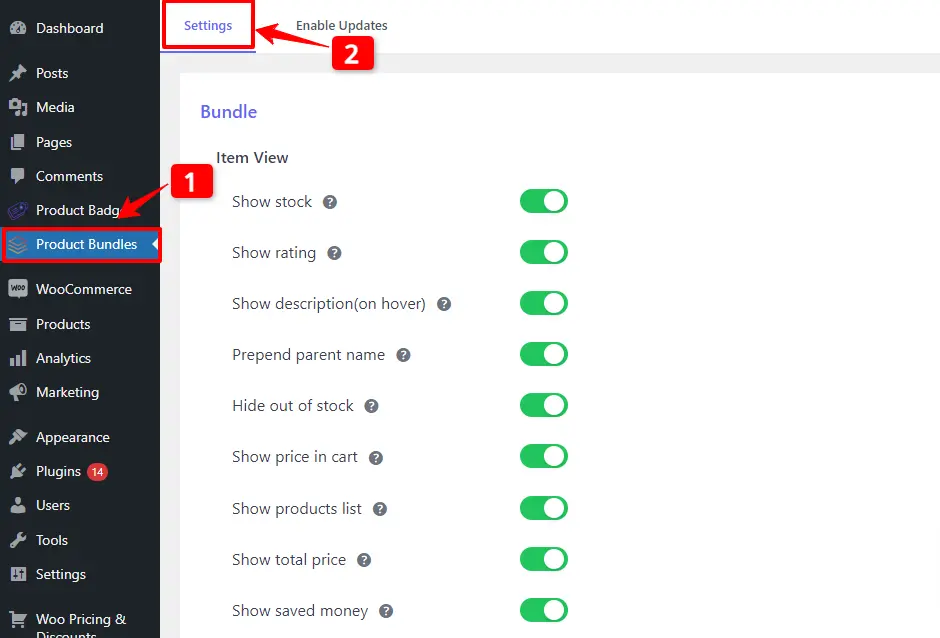
Settings and customization are available on this page:
Item View: In this section, you can configure various settings, such as displaying stock availability, showing product ratings and descriptions, adding a quantity field on item pages, displaying a plus icon for items, setting the theme and size options, positioning product bundles on the product page, defining custom CSS selectors, specifying the product price selector, and many other customizable options.
Change product popup: In this section, you can configure popup settings.
Styles: In this section, you can customize the colours of different parts of your bundle and set the product image object-fit CSS.
Final Result of WooCommerce Composite Products
As a result, the WooCommerce composite products are like the image below.
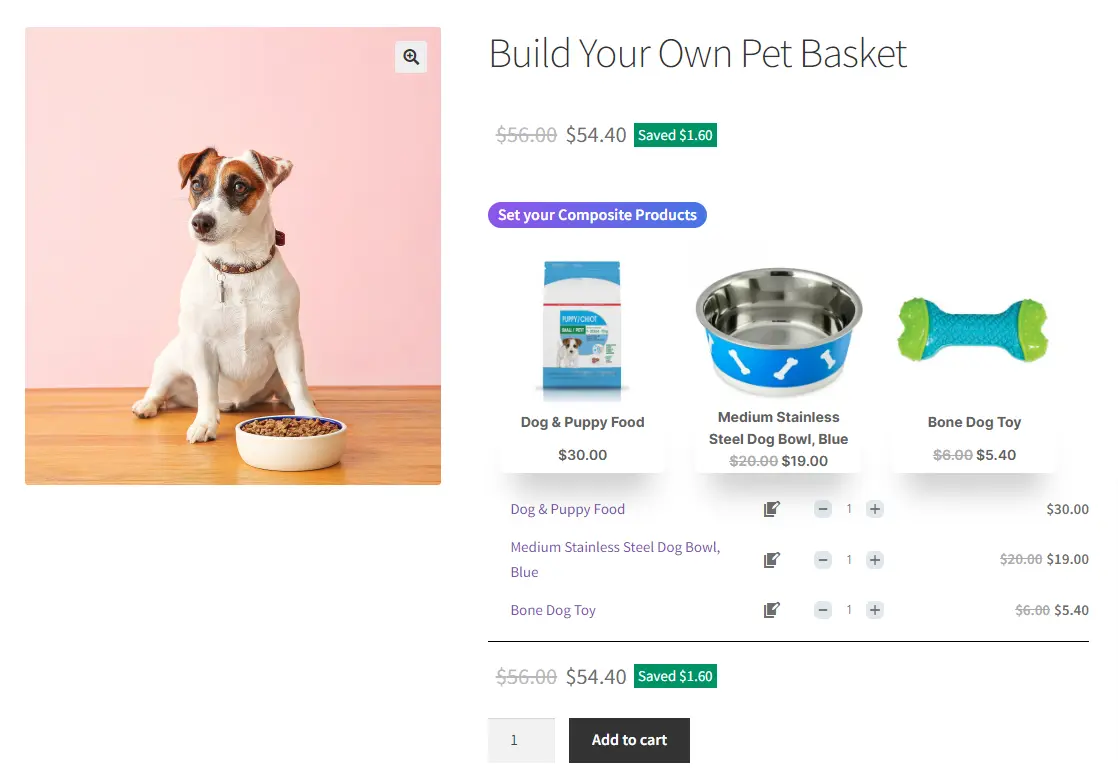
And the customer can choose other available products from the popup.
How to Create a WooCommerce Composite Product with Variable Products
Creating WooCommerce composite products with flexible variable options allows you to deliver a more interactive and personalized shopping experience in 2026. Customers can easily build product bundles that match their exact needs—whether that means choosing size, color, model, or technical specifications—all from a single product page.
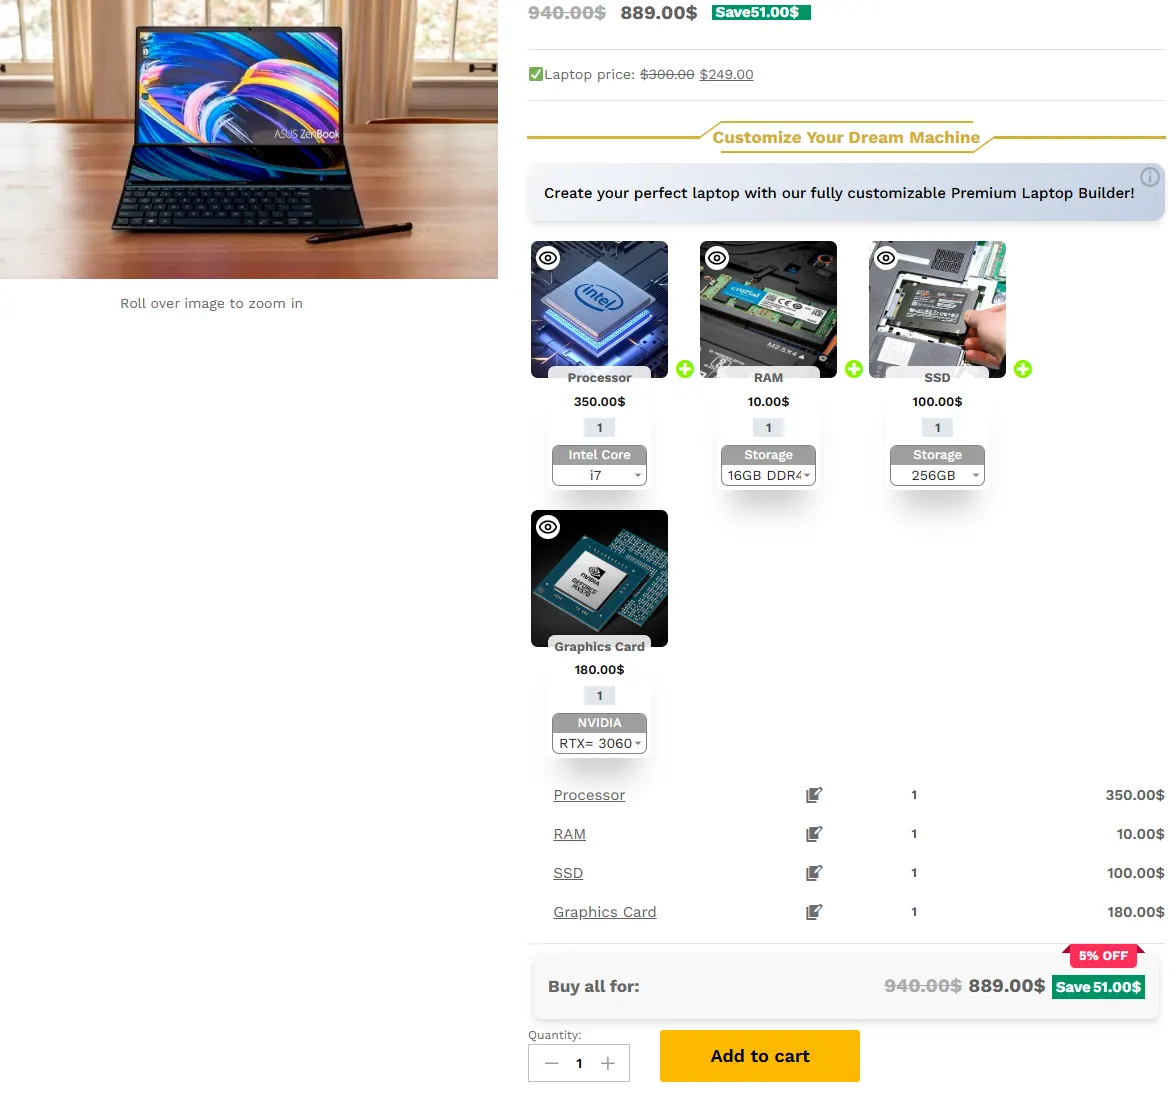
For example, you can create a custom laptop builder where users select their processor, RAM, storage, graphics card, and accessories step by step. The price updates dynamically as options change, giving customers full transparency before checkout.
This structured customization improves confidence, reduces cart abandonment, and increases average order value. At the same time, you maintain better inventory control by managing each component individually. The result is a smoother buying journey for customers and a more scalable, professional system for your WooCommerce store.
🎥Tutorial
Step 1: Create Variable Products in WooCommerce
First, you should create Variable products in WooCommerce.
To create variable product in WooCommerce read this article create variable products to create a variable product.
Step 2: Creating WooCommerce Composite Products
1. Navigate to WooCommerce “Products”.
2. Click on “Add new product” to create a new product.
3. Set a name for the composite products.
4. Click on “Set product image” from the right sidebar and select an image for your composite products.
5. Now navigate to the “Product data” panel, and select “Product bundle” as the product type.
6. After selecting “Product bundle” as the product type the “Product Bundles” tab will appear in the product data panel.
7. Navigate to the “Product Bundles” tab and click on the “Add Item” button to add a new bundle item to the composite products.
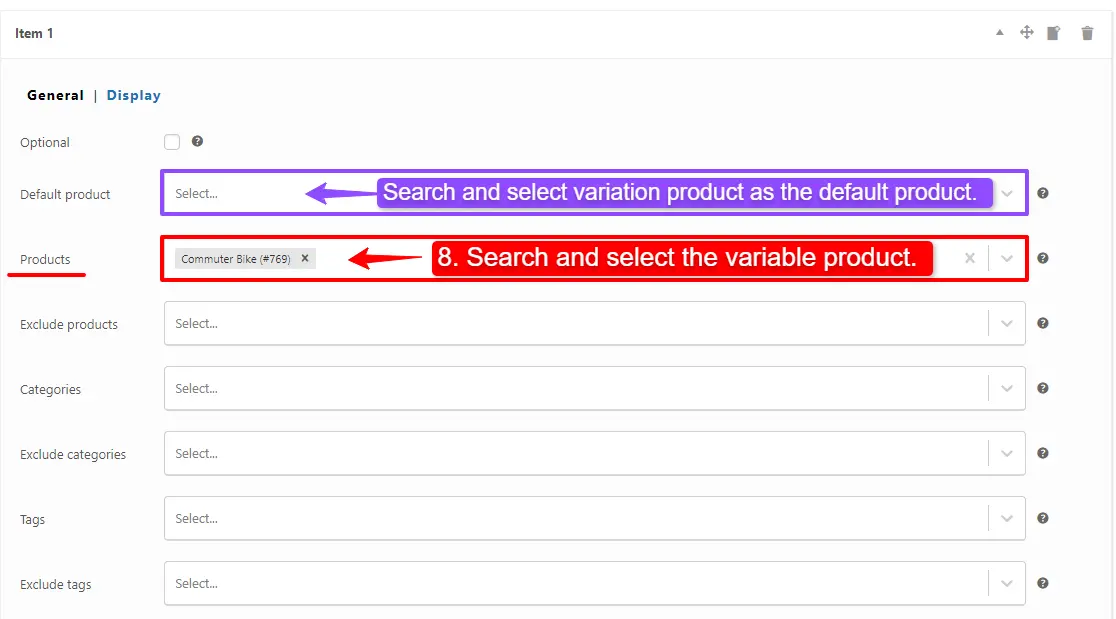
8. Now scroll down to the item field, and in the “Products” field of the item Search and select the Variable products you want.
you can also set the default variation product for this item in the default product field. (PRO VERSION)
Step 3: Customising WooCommerce composite products
For customising the composite product, please read this section of the article for more information.
9. Then click on “Add Item” to add a new item to the composite products with Variable product and configure it as in the previous steps. We have created 2 other bundle items.
Step 4: Pricing for composite Products with Variable Products
For customising the composite product, please read this section of the article for more information.
10. Now you can publish the composite products with variables on your website.
Step 5: Configure the Plugin Settings
To configure the Plugin Settings, you can just read this section of the article for more information.
Final Result
Now open the product page on the front end.
As a result, after selecting a variation product, for all of the bundle items, the WooCommerce composite products with variable will be shown in the image below.
Shortcodes
[asnp_wepb_product] Use it on the product page to show the bundles.
- [asnp_wepb_product show_add_to_cart="1"] Use it on the product page to show the bundles + add to cart button.
Other Article
To delve deeper into the realm of the Product Bundle plugin and its applications, we invite you to explore the array of informative resources we’ve compiled in the list below, Furthermore, these resources promise to expand your understanding and proficiency in leveraging the full potential of this plugin:
- Create Assembled Products in WooCommerce(2024)
- How to Create WooCommerce Combo Offers (2024)
- WooCommerce Product Bundles Free Plugin
- WooCommerce Product Bundle with Variations (Free Plugin)
- WooCommerce Mix and Match Free Plugin
- Create Custom Bundles with Categories in WooCommerce Product Bundle Plugin
- WooCommerce Product Bundle: How to Create Dynamic and Flexible Bundles
- Gift a Product in WooCommerce with Product Bundles
- WooCommerce Bundled Products
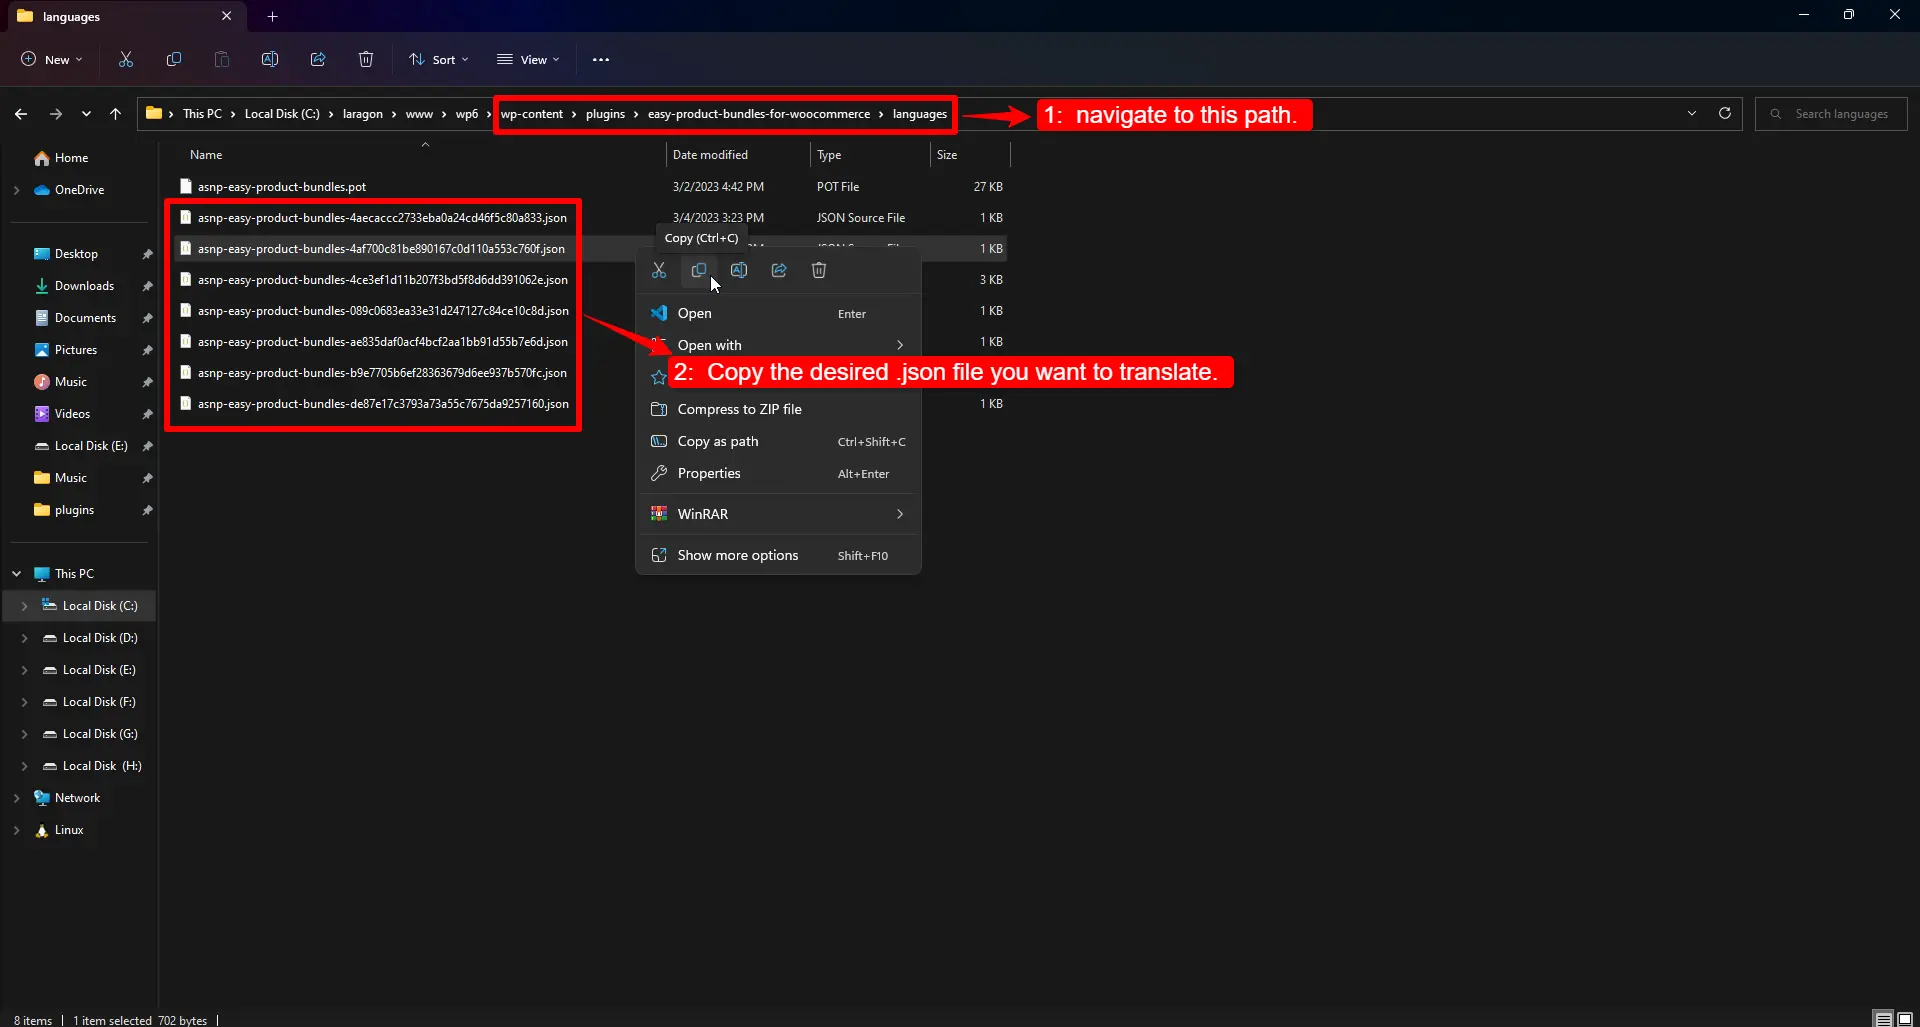
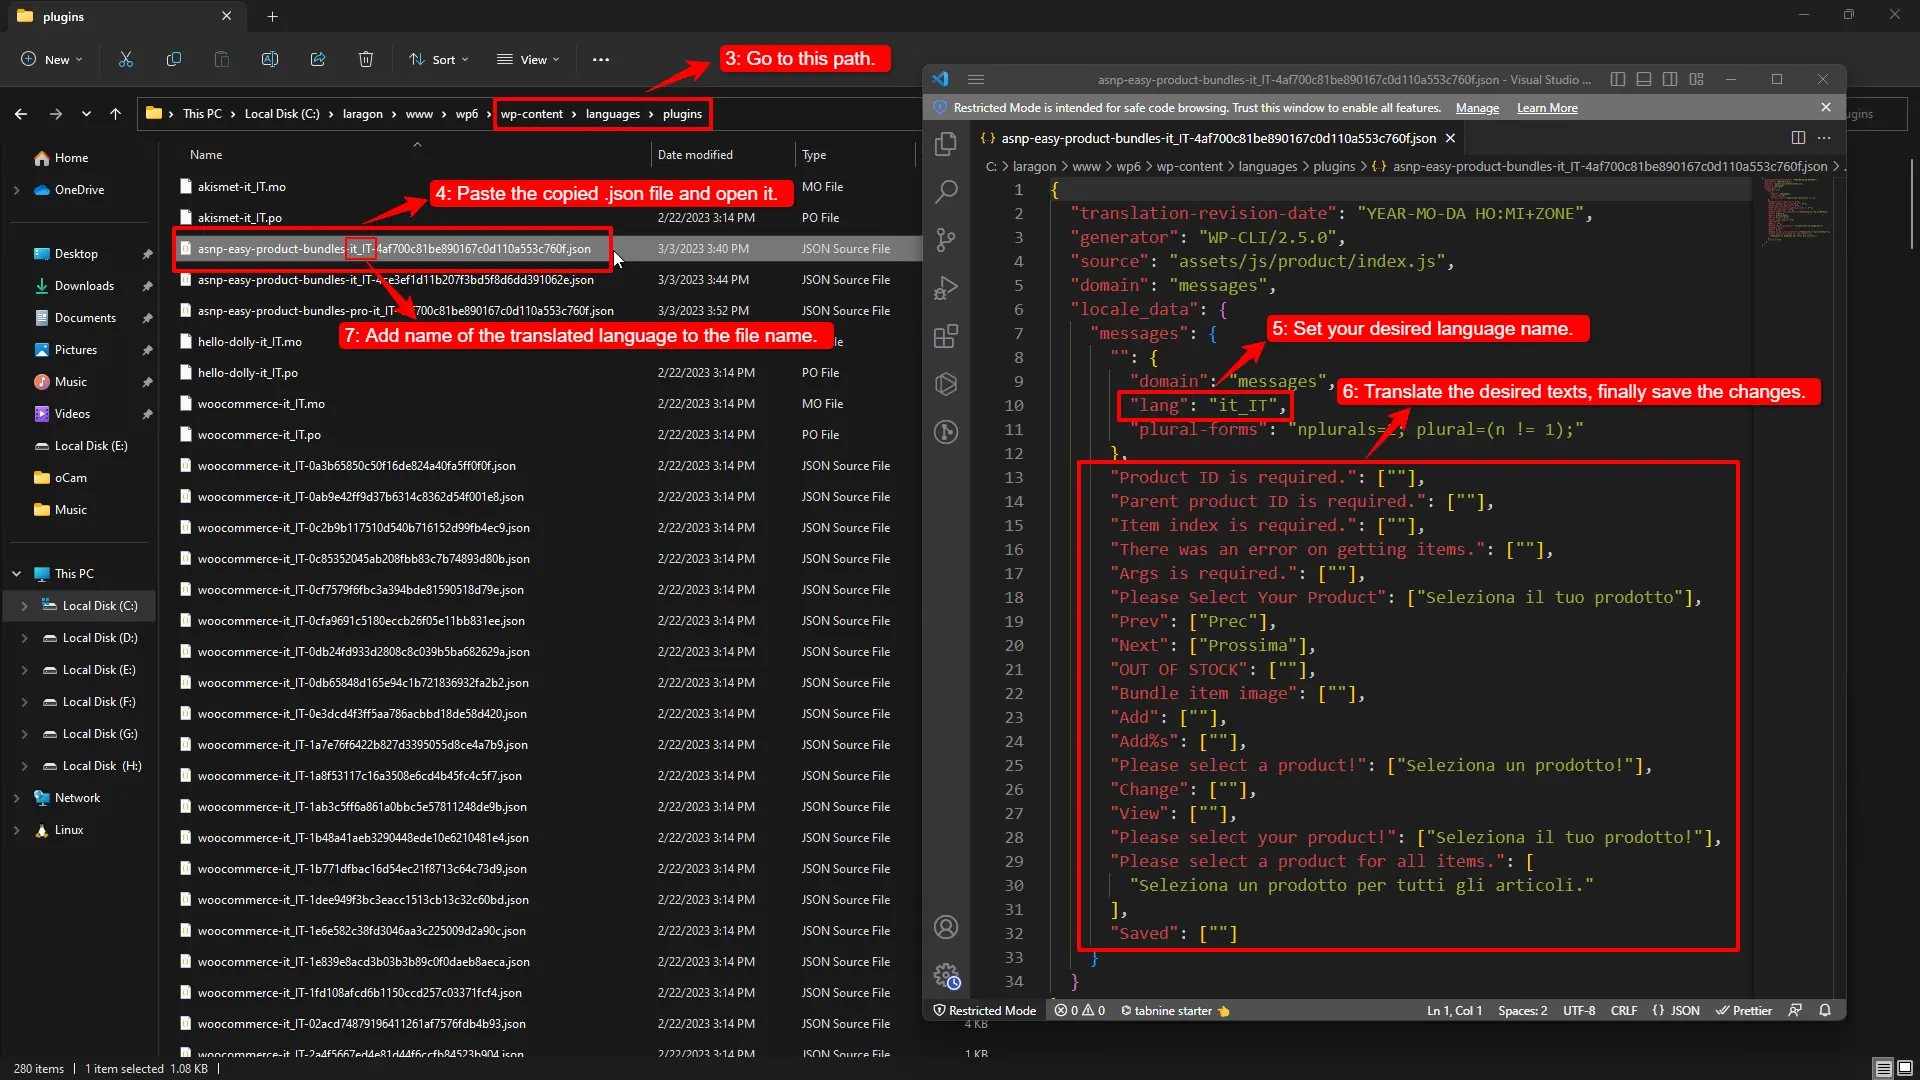
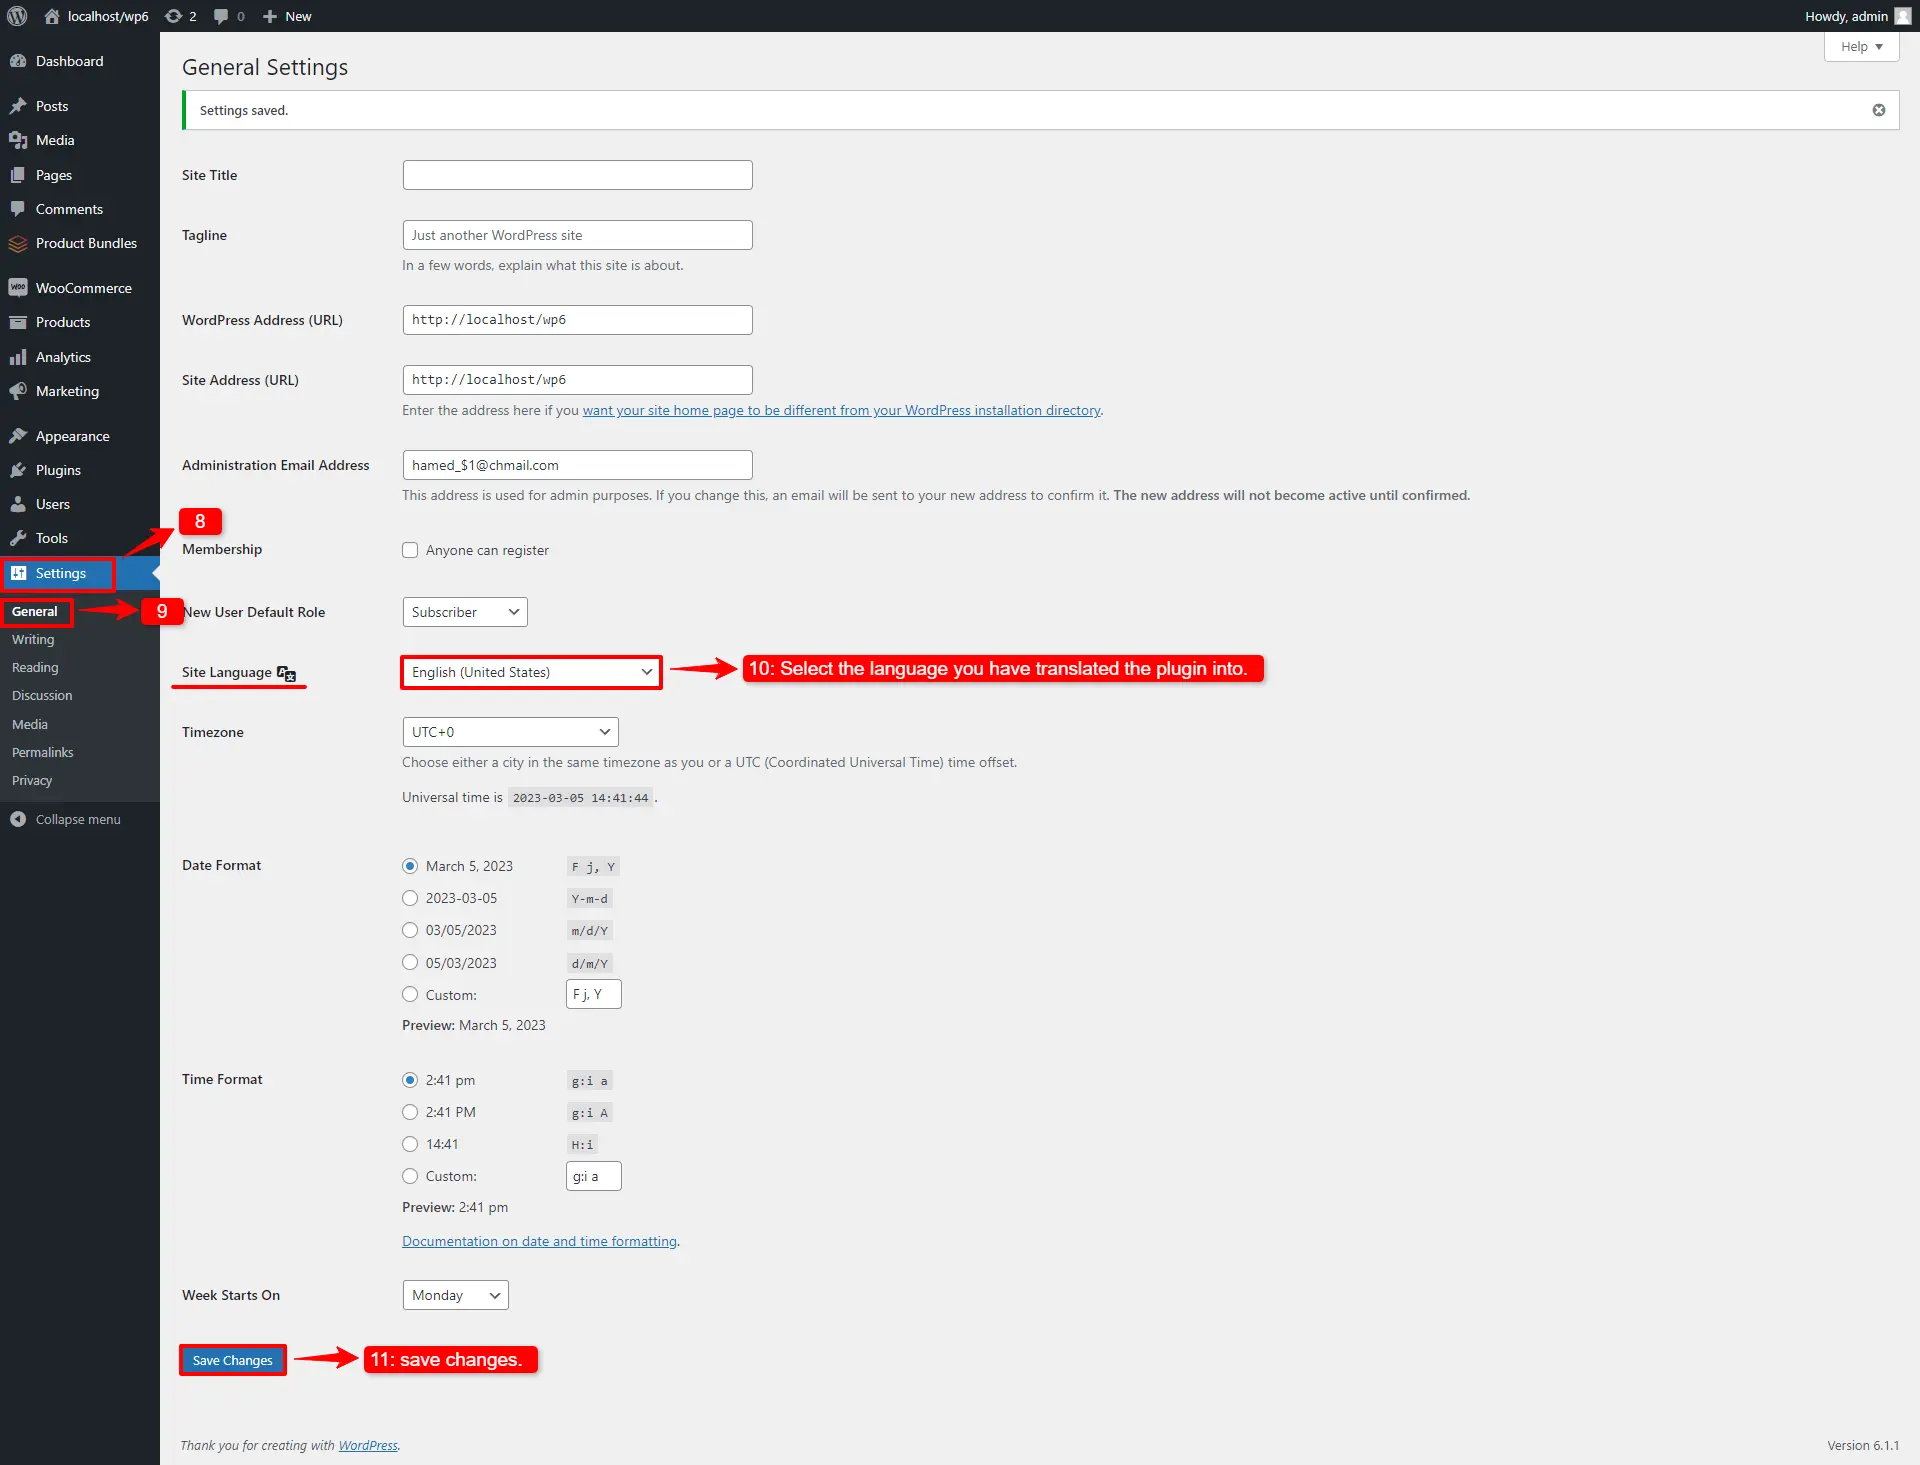
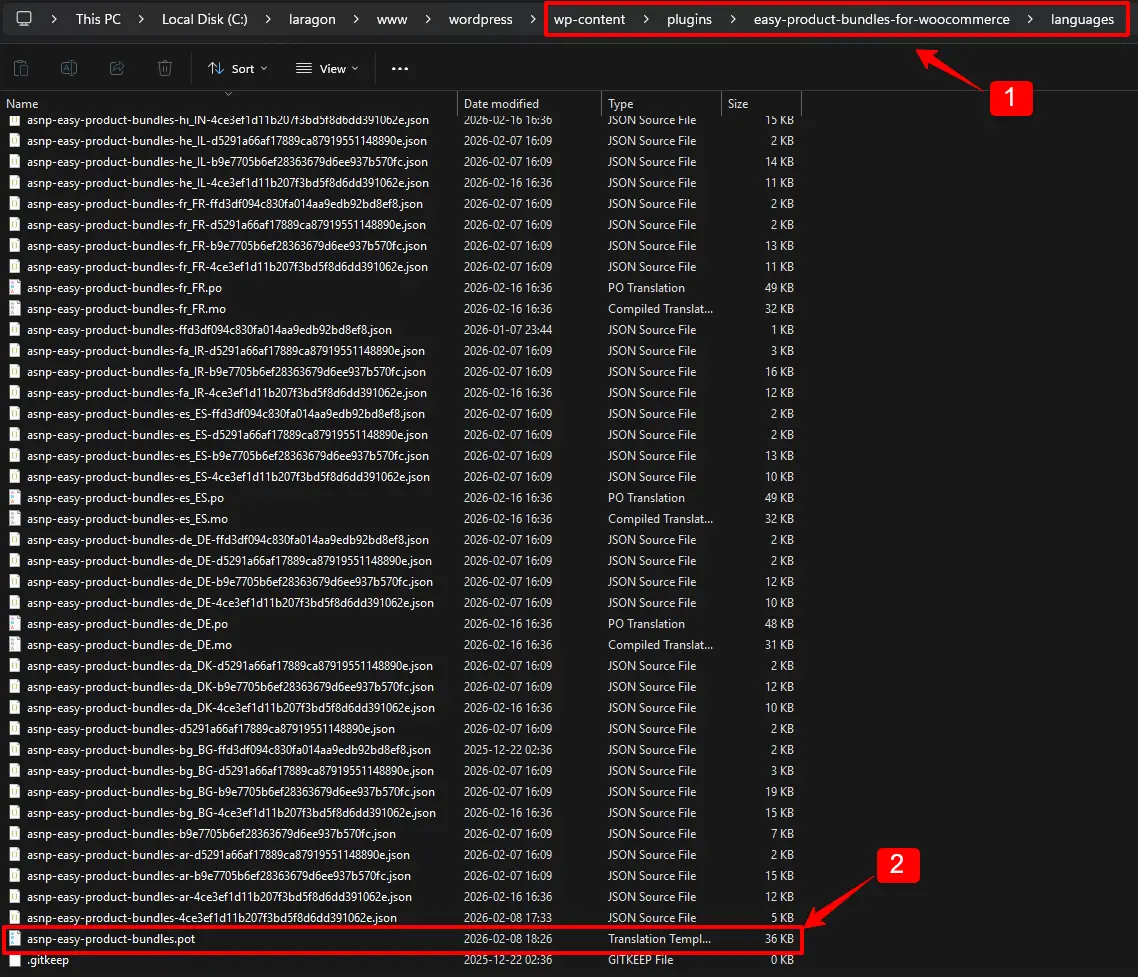
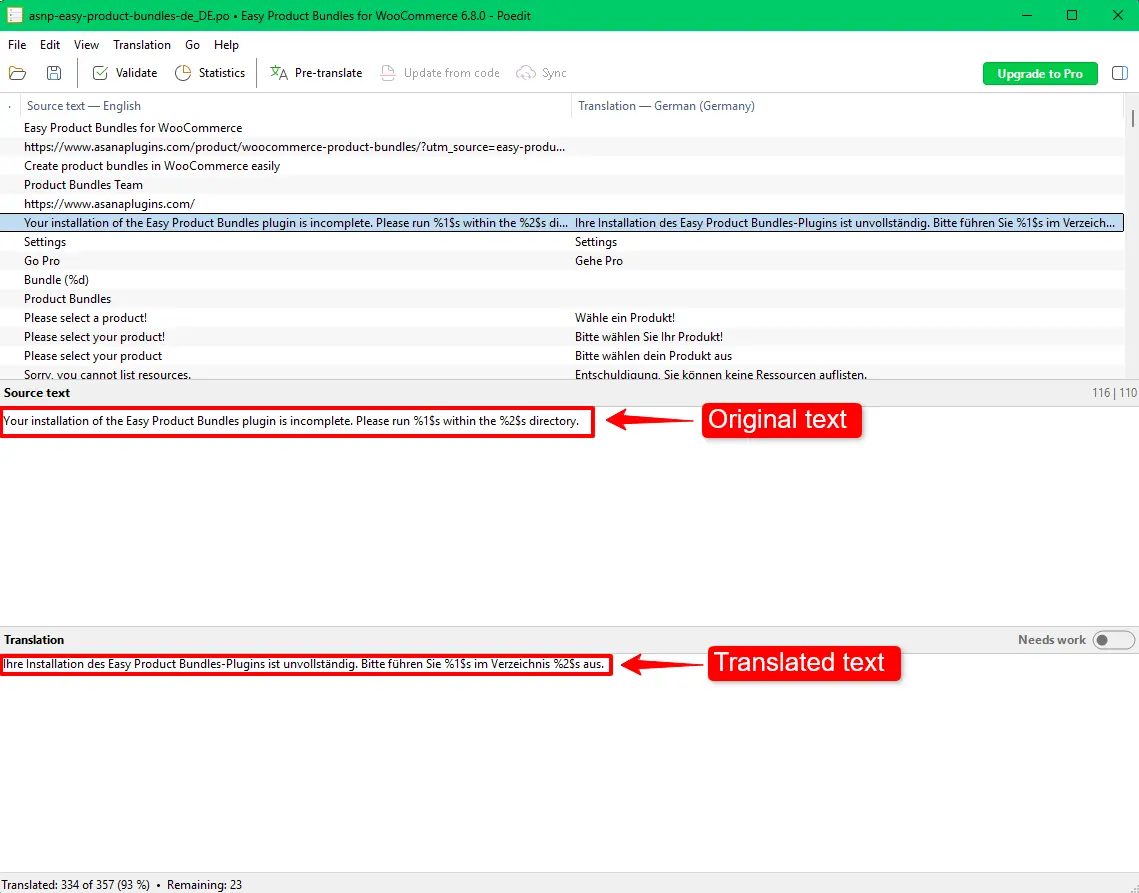
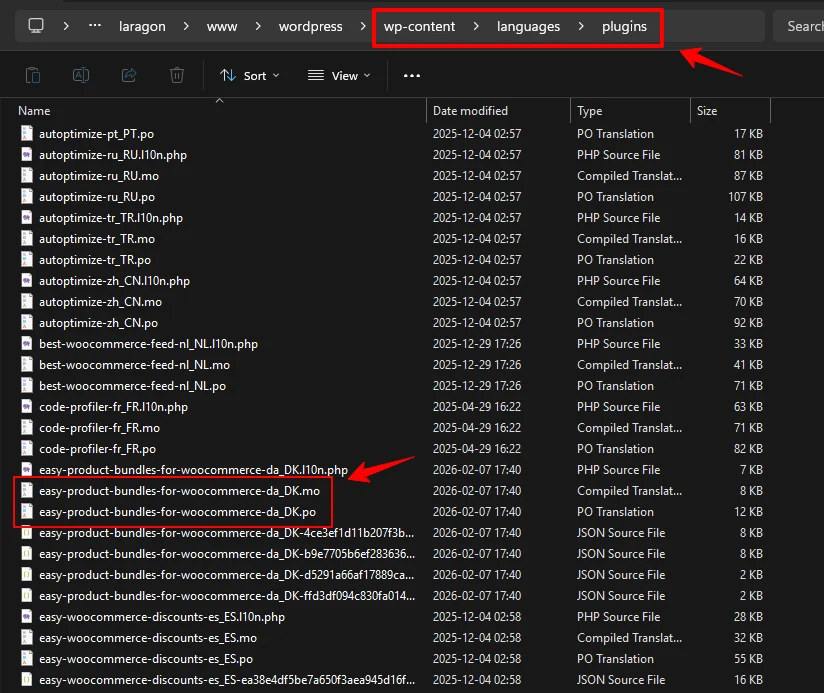
- How to translate the WooCommerce product bundle