
Posted on — Leave a comment

Easy Product Bundles for WooCommerce: Step-by-Step Setup & Review

One of the fastest ways to grow your eCommerce revenue isn’t just getting more traffic—it’s increasing your Average Order Value (AOV). When customers buy multiple related items together instead of a single product, your profit margins increase while shipping and acquisition costs stay low.

However, the default grouped product feature in WooCommerce is basic and lacks the flexibility to run modern promotional strategies. If you want to create dynamic packages, mix-and-match kits, or BOGO deals without writing a single line of code, you need a dedicated solution.

In this guide, we will explore how to create easy product bundles for WooCommerce using the popular Product Bundle Builder for WooCommerce plugin. You will learn its key features, a step-by-step setup tutorial, and practical tips to maximize your store’s sales

Why Product Bundling Matters (And Where Default WooCommerce Falls Short)

Product bundling is a classic retail strategy made famous by brands like McDonald’s (value meals) and Amazon (“Frequently Bought Together”). By combining complementary items into a single purchase, you solve two major problems: customer decision fatigue and low order values.

Offering bundles delivers three key advantages:

  • Higher Average Order Value (AOV): Encourages shoppers to add more items to their carts in a single checkout.
  • Faster Inventory Turnover: Pairs slower-moving products with your top bestsellers.
  • Perceived Customer Value: Discounts make shoppers feel they are securing an exclusive deal.

The Problem with Default WooCommerce “Grouped Products”

While WooCommerce comes with a built-in Grouped Product type, it is far too rigid for serious marketing campaigns:

  • It does not allow dynamic pricing or dedicated bundle-level discounts.
  • It cannot enforce minimum or maximum item requirements.
  • It lacks support for custom deals like BOGO (Buy One Get One) or Mix-and-Match kits.

To unlock advanced deals and create intuitive shopping experiences, a specialized tool is essential. That is where Product Bundle Builder for WooCommerce (developed by AsanaPlugins under the slug easy-product-bundles-for-woocommerce) comes into play.

Core Features: What Makes This Plugin an Easy Choice?

The Product Bundle Builder for WooCommerce plugin stands out because it combines simplicity with advanced promotional capabilities. Instead of relying on multiple disjointed extensions, it handles several popular sales mechanics in a single lightweight package.

Here is what you can build using the plugin:

  • Simple & Dynamic Bundles: Combine fixed sets of items or let customers assemble custom kits with automatic price recalculation.
  • Mix-and-Match Products: Perfect for gift boxes, custom skincare sets, or pastry boxes where customers choose a set quantity from a curated selection.
  • BOGO & Tiered Promotions: Easily run Buy One Get One or Buy 2 Get 1 Free campaigns to drive fast inventory movement.
  • Composite & Assembled Goods: Build complex products made up of individual components (for example, custom PC builds, bike setups, or modular furniture).
  • Gift With Purchase (GWP): Offer free or discounted promotional items directly on the product page when target conditions are met.
  • Granular Inventory & Cart Control: Choose whether to count the bundle as a single item or multiple separate line items in the cart, and decide whether shipping fees apply per item or across the whole bundle.

How to Create Product Bundles in WooCommerce (Step-by-Step Tutorial)

Step 1. Install Product Bundle Builder for WooCommerce

Before creating your first product bundle, install the Product Bundle Builder for WooCommerce plugin on your WordPress website.

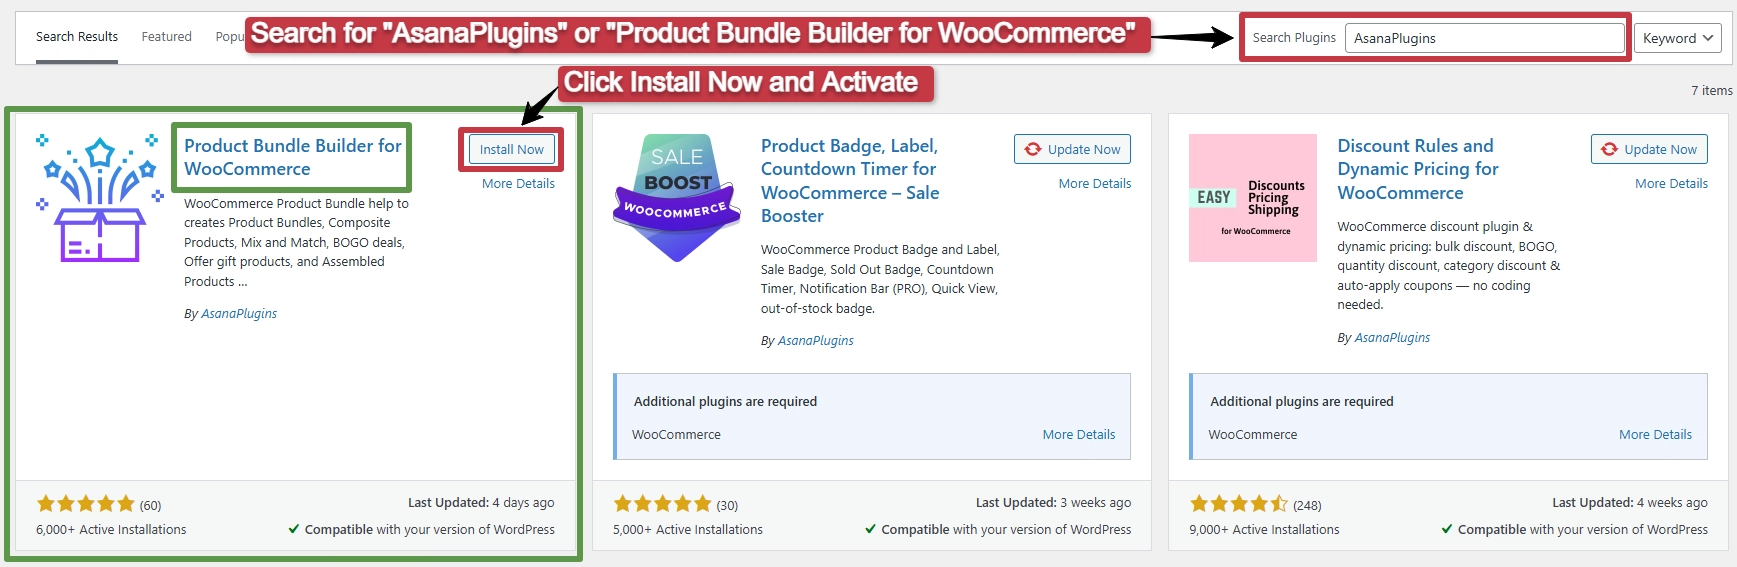
  1. Go to Plugins → Add New Plugin in your WordPress dashboard.
  2. Search for Product Bundle Builder for WooCommerce. Find the plugin by AsanaPlugins
  3. Then click Install Now and Activate.
Install product bundles for woocommerce

You can also download the free version from the WordPress Plugin Directory.

Once the plugin is activated, you can create your first bundle directly from the WooCommerce product editor.

Step 2. Create a WooCommerce Product Bundle

Once Product Bundle Builder for WooCommerce is installed and activated, you can create your first bundle from the standard WooCommerce product editor.

Follow these steps:

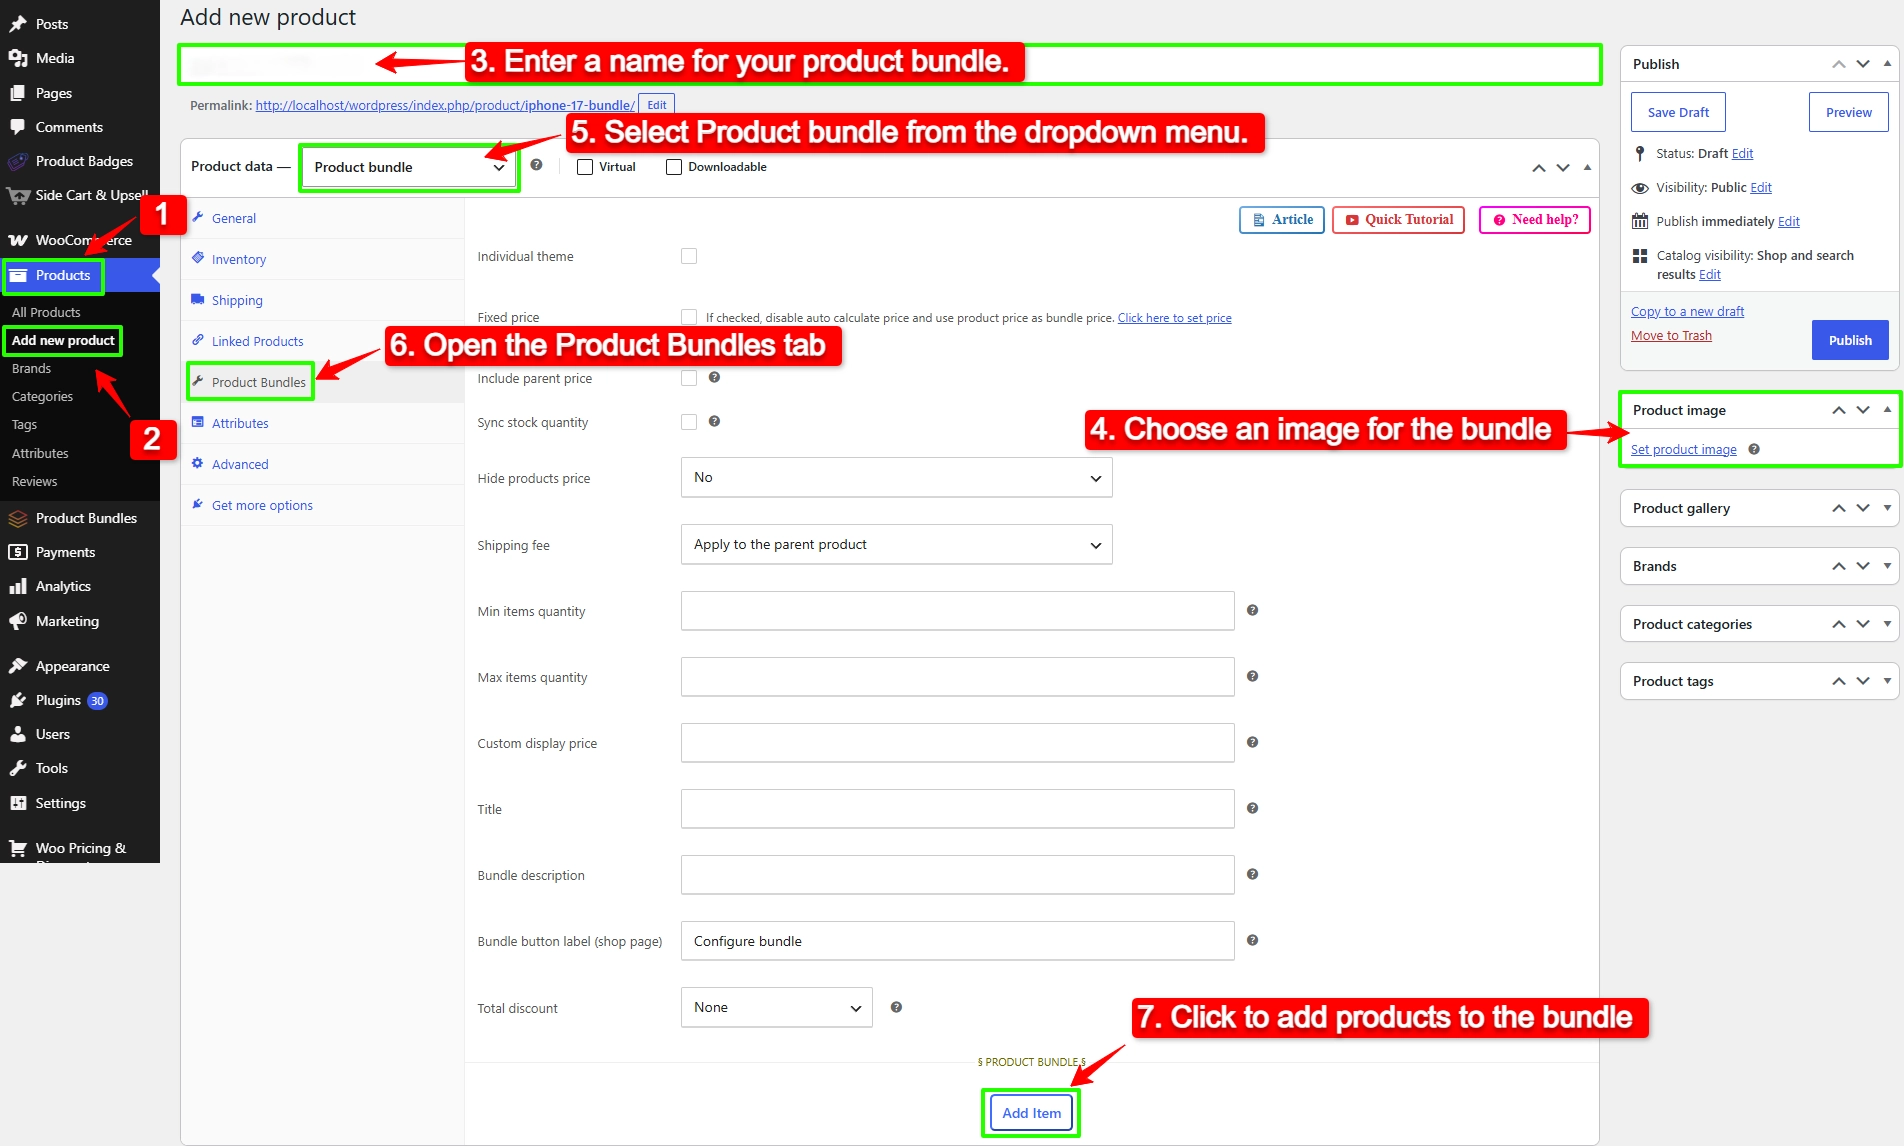
  1. Go to Products → Add New in your WordPress dashboard.
  2. Enter a name for your bundle and add a product description if needed.
  3. Set a product image for your bundle from the right-hand sidebar.
  4. Scroll down to the Product data section.
  5. Open the product type dropdown and select Product bundle.
  6. A new Product Bundles tab will appear in the product data panel.
  7. Open the Product Bundles tab and click Add Item to create your first bundle item.
Create easy product bundles for woocommerce

Each bundle item represents a product selection area within your bundle. You can create multiple items and configure each one separately.

Step 3. Add Products to Your Bundle

After adding a bundle item, scroll down to the item settings.

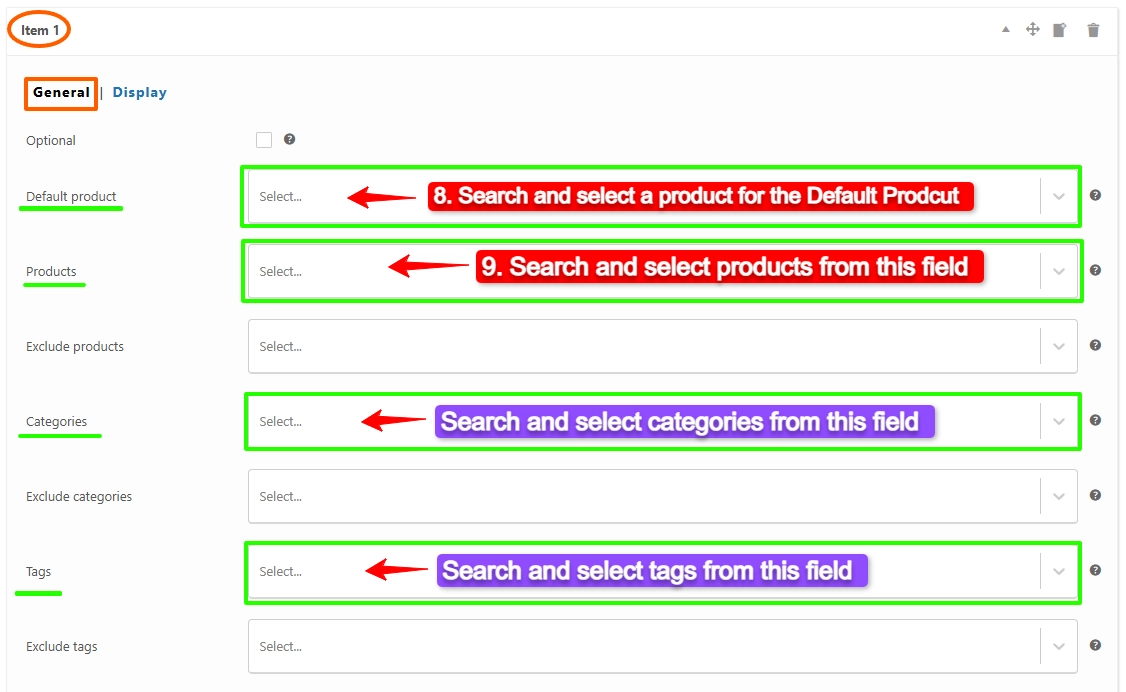
  1. In the Default Product field, search for and select the product you want to use as the default for the item.
  2. In the Products field, search for and select the products customers can choose from.

If you are using the Pro version, you can also use options such as Categories and Tags to dynamically define which products are available for a bundle item.
 Add Products to Your Bundle

Step 4. Configure Bundle Items

Each bundle item can be configured independently based on how you want customers to build or purchase the bundle.

You can configure options such as:

  • Use regular prices only: By checking this field use only the regular price of selected products.
  • Sort products: With this field, you can sort selected subscription products by “ID”, “Title”, “Menu order”, “Date”, “Price”, “popularity”, and “Rating”.
  • Quantity: Set the default quantity for the selected product.
  • Edit Quantity by User: Allow customers to change the quantity and define minimum and maximum quantities.
  • Discount: Apply a percentage, fixed-price, or price-based discount to the item.
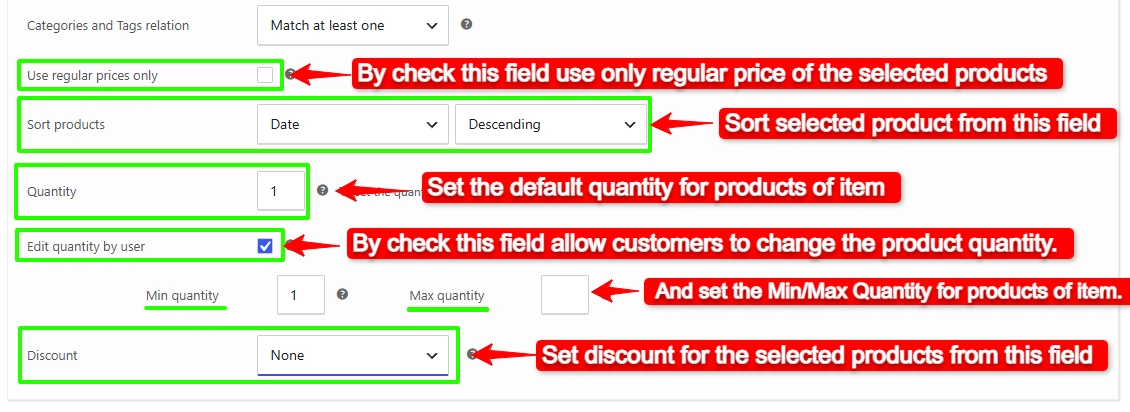
Configure Bundle Items

Customize the Bundle Item Display

You can also use the Display settings to configure the settings below:

  • Title: Use this field to overwrite the title of the selected product in the bundle item.
  • Short Description: Use this field to overwrite the short description of the selected product in the bundle item.
  • Product Selection Title: Use this field to change the title displayed when customers need to select a product for the bundle item.
  • Product List Title: Use this field to change the title displayed for the product list.
  • Modal Header Title: Use this field to customize the title displayed in the product selection pop-up.
  • Default Image: Use this field to set an image for the bundle item when no product has been selected.
  • This image is displayed for the empty bundle item.
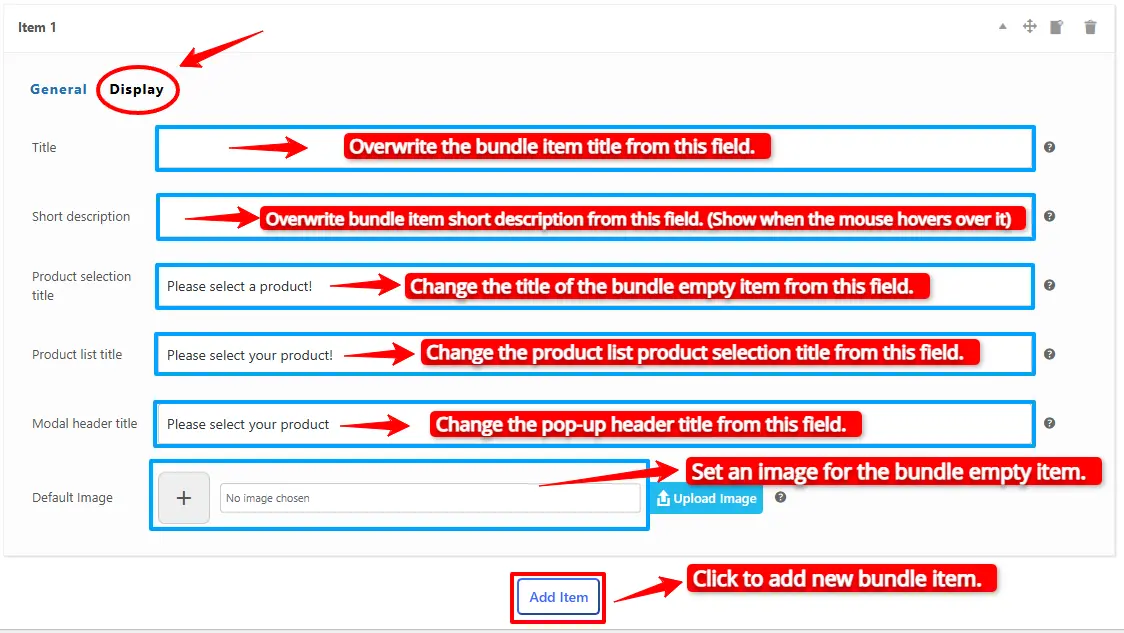
Display tab of product bundle item

You can click Add Item again to create additional bundle items and configure the products available in each one.

For example, if you are creating a Hair Care Bundle, you could create separate items for a Shampoo, Conditioner, Hair Mask, and Hair Oil, like this:

  • Item 1: Shampoo
  • Item 2: Conditioner
  • Item 3: Hair Mask
  • Item 4: Hair Oil

Step5. Set the Bundle Price

Product Bundle Builder for WooCommerce supports two main pricing methods:

  • Fixed Price: Set one price for the entire bundle.
  • Auto Calculate Price: Automatically calculate the bundle price based on the products selected for each bundle item.

For a fixed-price bundle:

  1. Enable Fixed Price
  2. Enter the bundle’s price in the General tab.
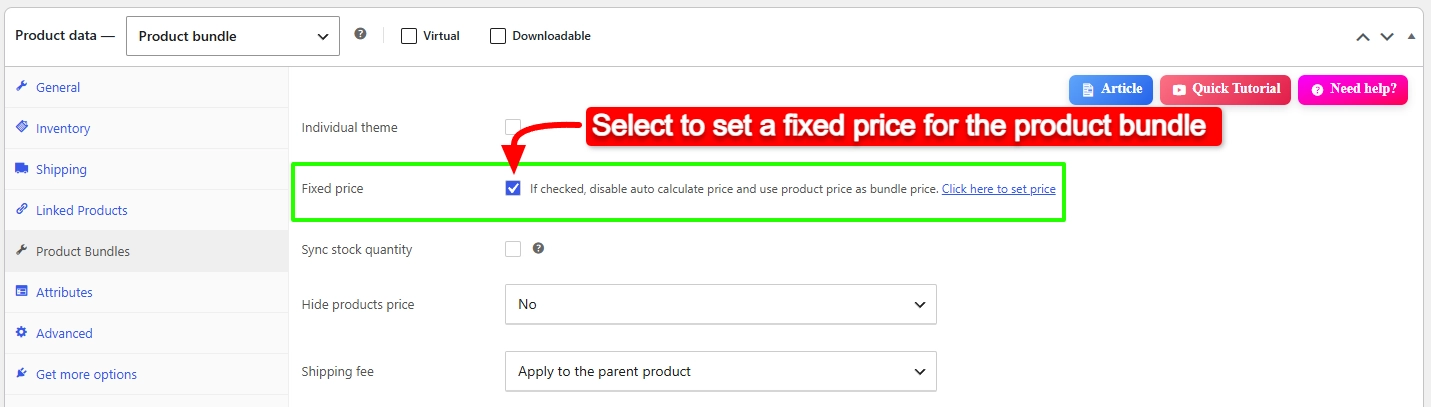
Set fixed price to the Bundle

For a dynamically calculated bundle, leave Fixed Price disabled. The bundle price will then be calculated from the products selected in the bundle items.

After configuring the bundle, click Publish to make it available in your store.

Step 6. Publish Your Product Bundle

After configuring the bundle items and setting the bundle price, publish the product to make it available on your WooCommerce store.

Before publishing, review the bundle settings and make sure the selected products, item quantities, and pricing are configured correctly.

Once published, customers can open the bundle product page, select their preferred products, and add the completed bundle to their cart.
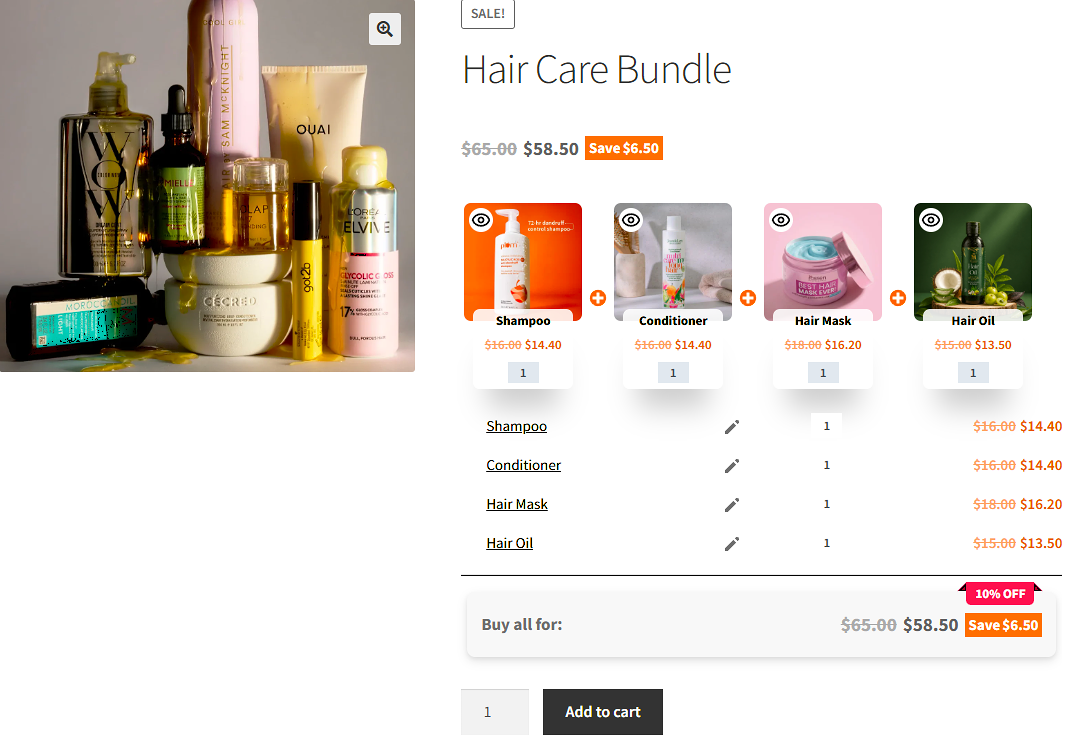
Hair Care Bundle

Step 7. Test Your Product Bundle

Open the bundle product page on your store and test the customer experience.

Select different products for each bundle item and make sure that:

  • Customers can select the products you added to each item.
  • The quantity rules work as expected.
  • The bundle price is displayed correctly.
  • The selected products are added to the cart correctly.
  • The bundle information is displayed correctly in the cart and checkout.

This helps ensure that your bundle works as expected before customers start purchasing it.

Create More Advanced Bundles

Once you have created your first bundle, you can customize it further using the available bundle and item settings.

You can configure options such as optional items, product categories, tags, discounts, item quantities, product display layouts, quick view, and more depending on your needs and plugin version.

How to Create Different Types of WooCommerce Product Bundles

With Product Bundle Builder for WooCommerce, you can create different types of product bundles depending on how you want customers to select products and how you want to calculate the bundle price.

Here are some practical examples of WooCommerce product bundles you can create.

Create a Build-Your-Own Bundle

A build-your-own bundle allows customers to choose a product for each bundle item from a predefined selection.

For example, you can create a skincare bundle with three items:

  • Item 1: Cleanser
  • Item 2: Moisturizer
  • Item 3: Serum

Add the available products to each item and let customers choose their preferred product for each part of the bundle.

To create this type of bundle, add multiple bundle items and select the products that customers can choose from in each item. Customers can then select one product for each item when building their bundle.

This is useful when you want to create a personalized bundle while controlling which products customers can choose.

Add Variable Products and Let Customers Choose a Variation

You can add variable products to a bundle item and allow customers to select the variation they want.

For example, if you are creating a clothing bundle, you can add a variable T-shirt product to an item. When customers select the T-shirt, they can choose the available variation options, such as size and color, before adding it to their bundle.

To do this, add the variable product to the bundle item’s Products field. When a customer selects the product, the available variation attributes are displayed so they can choose their preferred variation.
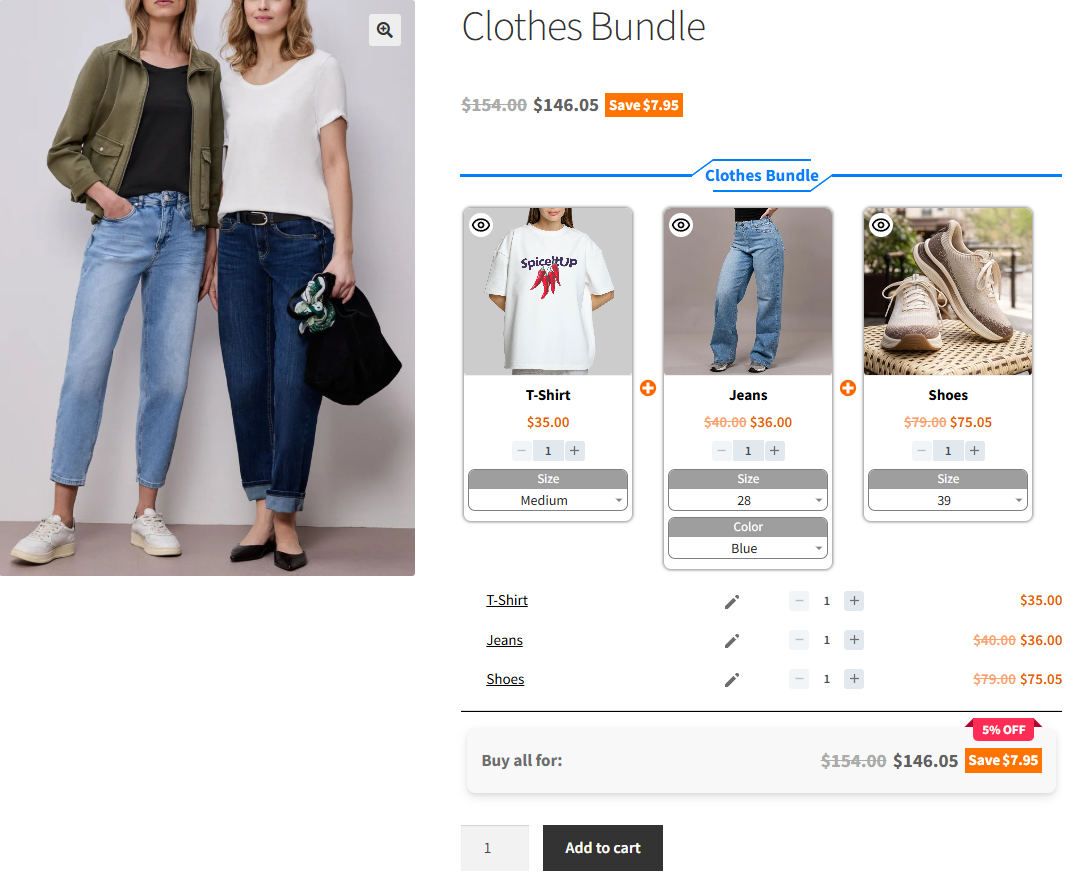
Variable Product Bundle

This is useful for products such as clothing, shoes, and other products that have multiple variations.

Create a Bundle with Optional Items

You can make individual bundle items optional, allowing customers to decide whether they want to include them in the bundle.

For example, you could create a skincare bundle with:

  • Cleanser — Required
  • Moisturizer — Required
  • Serum — Optional

To make an item optional, open its settings and enable the Optional option.
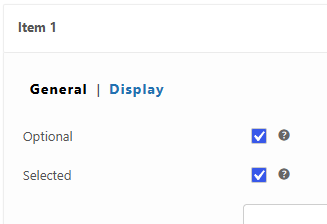
optional item of easy product bundles for woocommerce

Customers can then select a cleanser and moisturizer while deciding whether or not to include the serum.
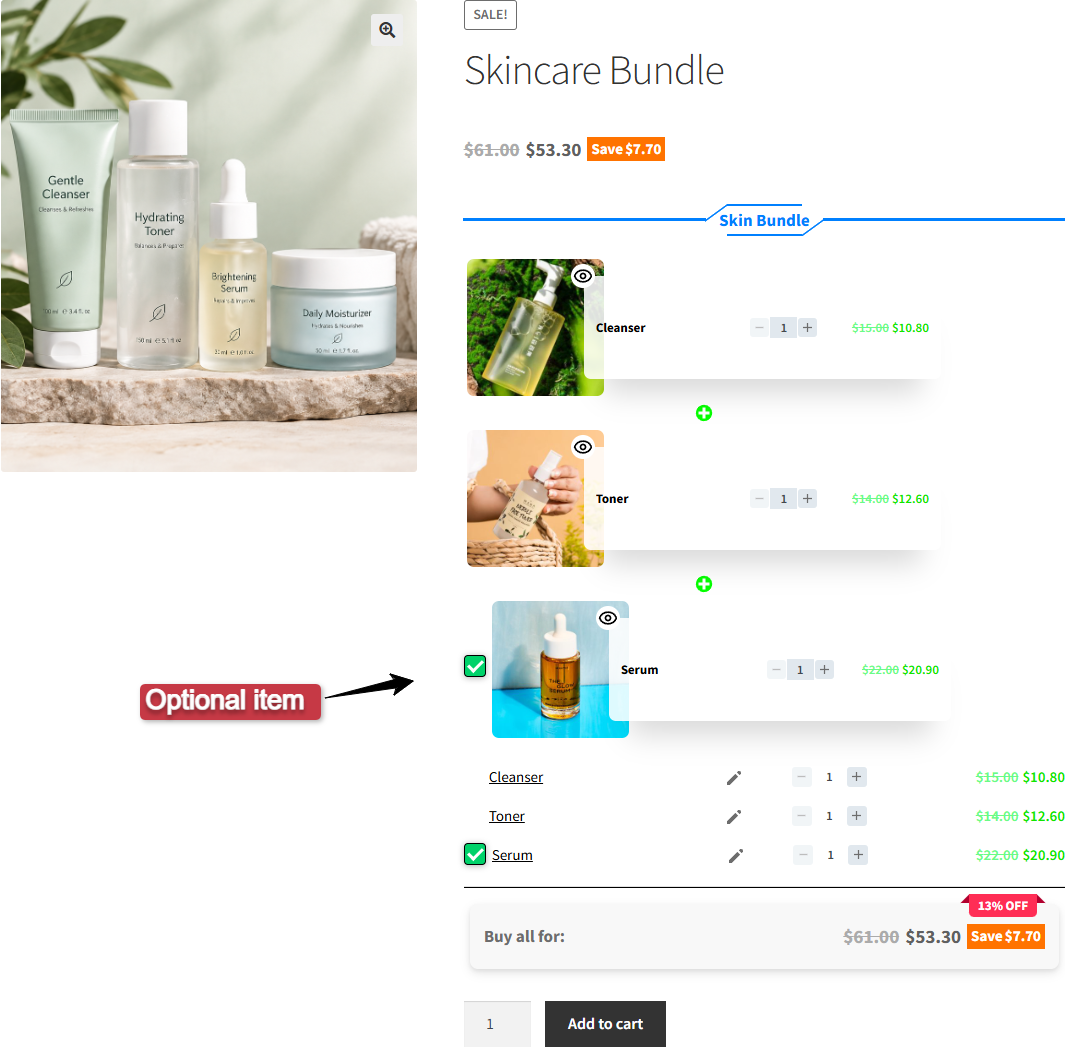
Optional product bundle

This gives customers more flexibility without requiring every item in the bundle to be selected.

Set Minimum and Maximum Total Quantity

You can control the total number of products included in a bundle using Min and Max Total Quantity.

The total quantity is calculated across all bundle items. This allows you to define the minimum and maximum number of products customers can select in total.

For example, you could set the minimum total quantity to 3 and the maximum total quantity to 5. Customers must then select at least 3 products and cannot select more than 5 products across the bundle.

To configure this, set the Min and Max Total Quantity values in the bundle settings.

Minimum and Maximum Total Quantity for easy product bundles

This is useful when you want to give customers flexibility while keeping the total number of products within a specific range.

Apply a Total Discount

You can apply a discount to the total price of the bundle.

For example, if the selected products have a combined price of $100, you can apply a total discount to reduce the final bundle price.

To configure this, set the Total Discount in the bundle settings and enter the discount amount or percentage you want to apply.
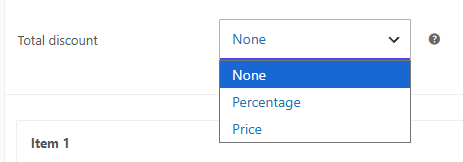
Total Discount of easy product bundles for woocommerce

The discount is calculated based on the total price of the selected products.

This is useful when you want to offer a special price when customers purchase multiple products together.

Apply a Discount to a Bundle Item

You can also apply a discount to individual bundle items. Open the bundle item’s settings and use the Discount dropdown menu to select the discount type you want to apply.

Depending on the selected discount type, you can configure the corresponding discount value for that item.

For example, you can apply a discount to a specific item while using different pricing or discount settings for the other items in the bundle.

Set a Fixed Price for Bundle Items

You can assign a fixed price to individual bundle items instead of using the selected product’s regular price.

For example, you could create a skincare bundle with:

  • Cleanser: $15
  • Moisturizer: $20
  • Serum: $25

To set a fixed price for an item, open the bundle item’s settings and select Fixed Price from the Discount dropdown menu. Then, enter the fixed price you want to apply to that item.
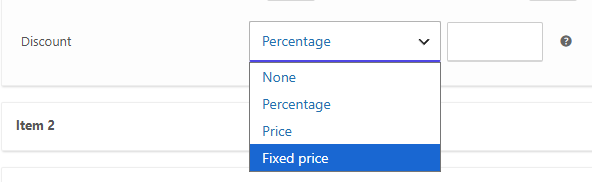
Set a Fixed Price for easy product bundles for woocommerce items

When customers select a product for that item, the configured fixed price is used instead of the selected product’s regular price.

This is useful when you want all products available within a particular bundle item to have the same bundle price.

Customize the Bundle Item Display

You can customize how bundle items and their products are displayed to customers. When a customer clicks a bundle item, a pop-up opens where they can browse the available products and select the one they want.

Choose a Bundle Item Theme

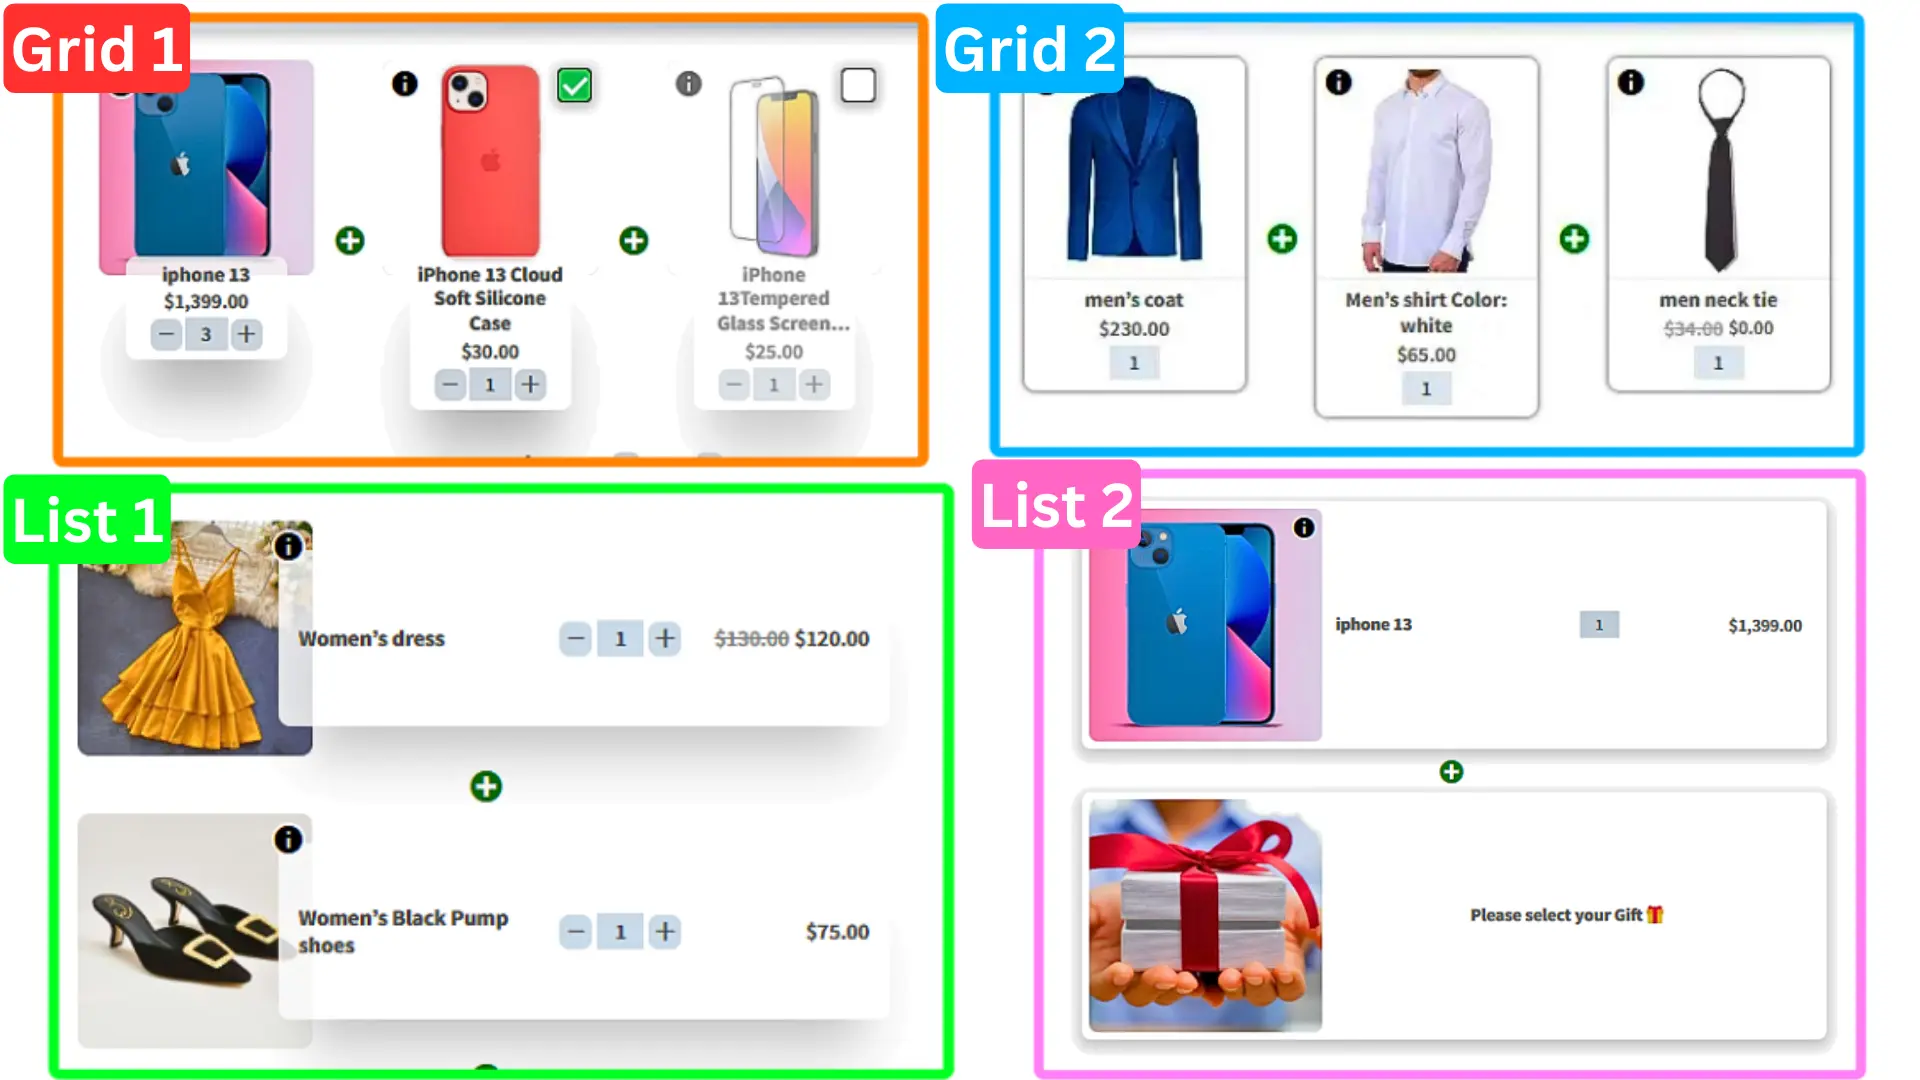
Product Bundle Builder for WooCommerce includes four different themes for displaying bundle items:

  • Two Grid layouts
  • Two List layouts
Product Bundle Themes

You can choose the theme that best fits the design of your store and how you want customers to browse the products available for each bundle item.

When customers click a bundle item, the selected theme is used to display the available products inside the pop-up.

Use Product Quick View

With the Pro version, Product Quick View is available for bundle items.

Each product displayed in the bundle item pop-up includes a Quick View button. When customers click it, a pop-up opens and displays information about that product without requiring them to leave the bundle selection process.

This allows customers to check product details before selecting a product for the bundle.

View Additional Product Images

The bundle item pop-up also supports product images.

If a product has multiple images, customers can click the Images button on the product to view its additional images. This makes it easier for customers to see the product from different angles before selecting it.

These options give customers more information while choosing products for each bundle item, without taking them away from the bundle page.
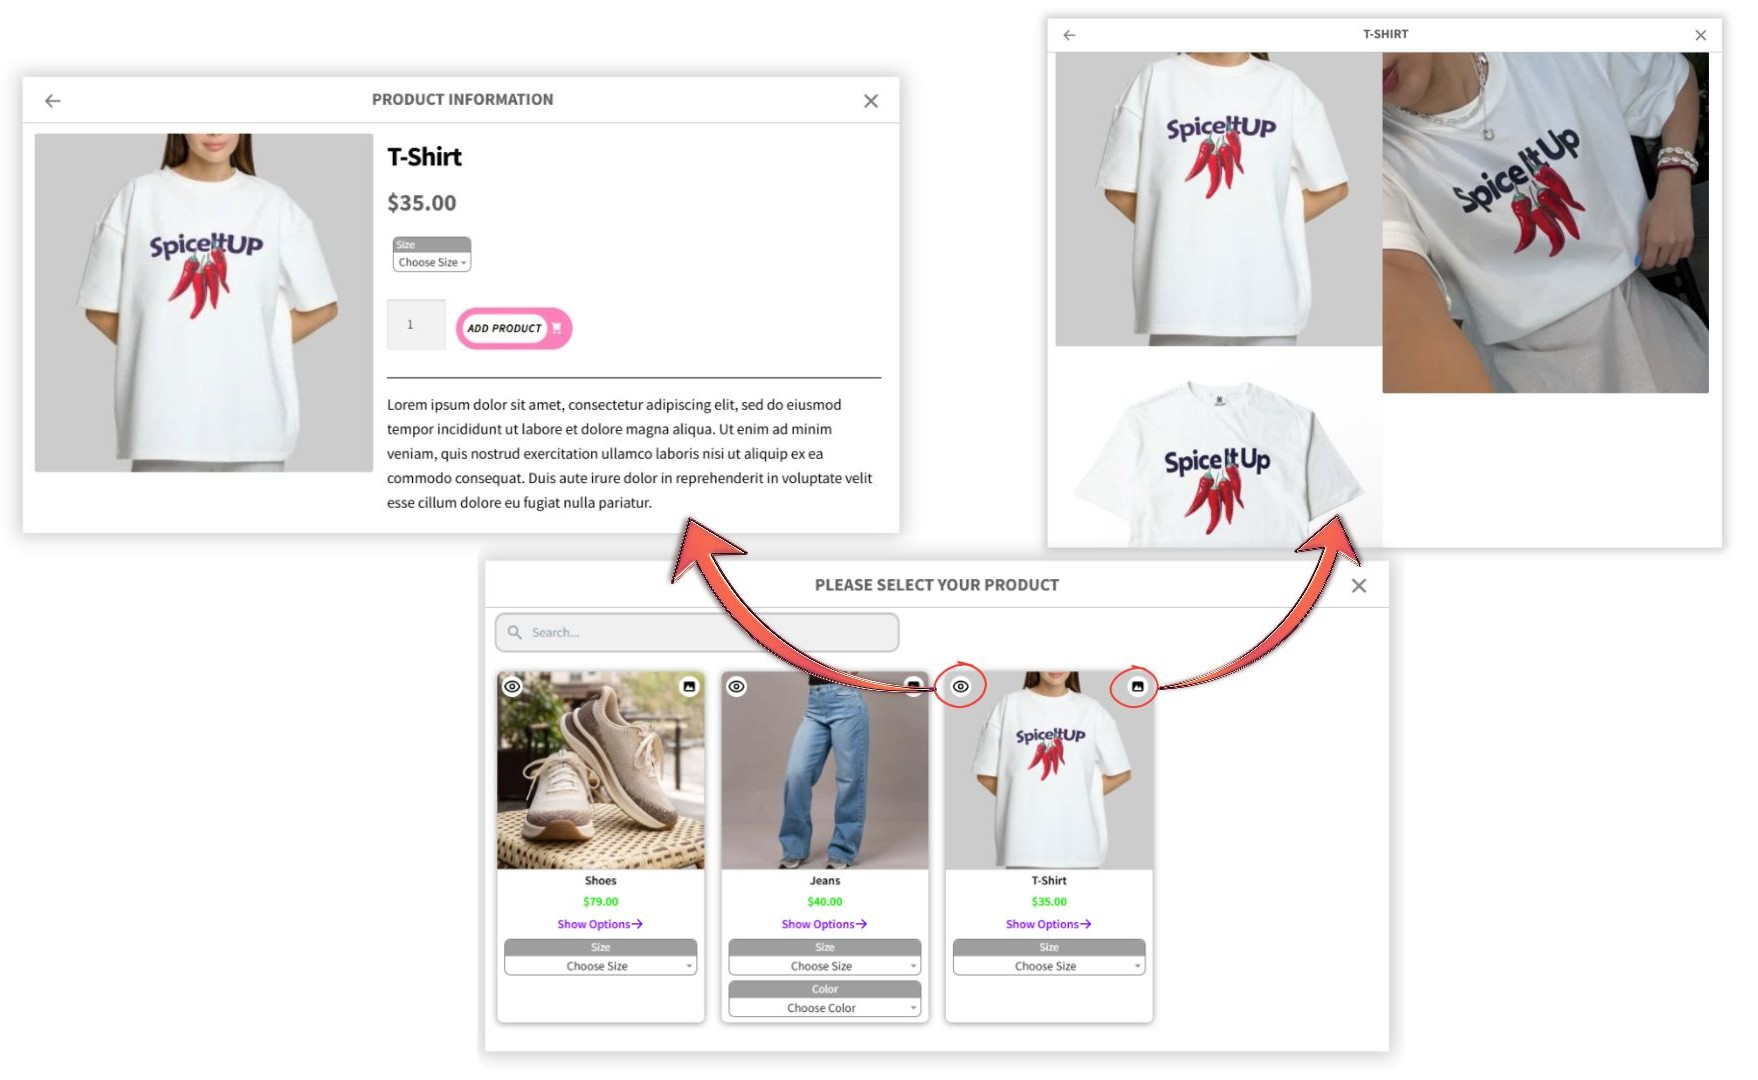
product bundle Product Quick View

How to Create WooCommerce Bundle Deals

Product Bundle Builder for WooCommerce can be used to create different types of promotional bundle deals by applying discounts to individual bundle items. For example, you can create offers such as:

  • Buy One, Get One Free (BOGO): Give customers a free product when they purchase another product.
  • Buy One, Get One 50% Off: Offer a second product at a 50% discount when customers purchase the first product.
  • Free Gift with Purchase: Include a free product as a gift when customers purchase another product.
  • Discounted Add-On Products: Offer additional products at a reduced price as part of a bundle.

The discount can be configured separately for each bundle item, giving you flexibility to create different promotional offers.

Create a Buy One, Get One Free (BOGO) Deal

A Buy One, Get One Free (BOGO) deal allows customers to purchase one product and receive another product for free. With Product Bundle Builder for WooCommerce, you can create this type of promotion by applying a 100% discount to one of the bundle items.

For example, you can offer a free cap when a customer purchases a T-shirt:

  • Item 1: T-Shirt
  • Item 2: Cap — 100% discount

Step 1: Add the Products

Create two bundle items and add the T-Shirt to the first item and the Cap to the second item.

Step 2: Set the Discount

Open the settings for the Cap item and find the Discount option.

Select the appropriate discount type and set the discount to 100%. The Cap will then be included in the bundle at no additional cost.
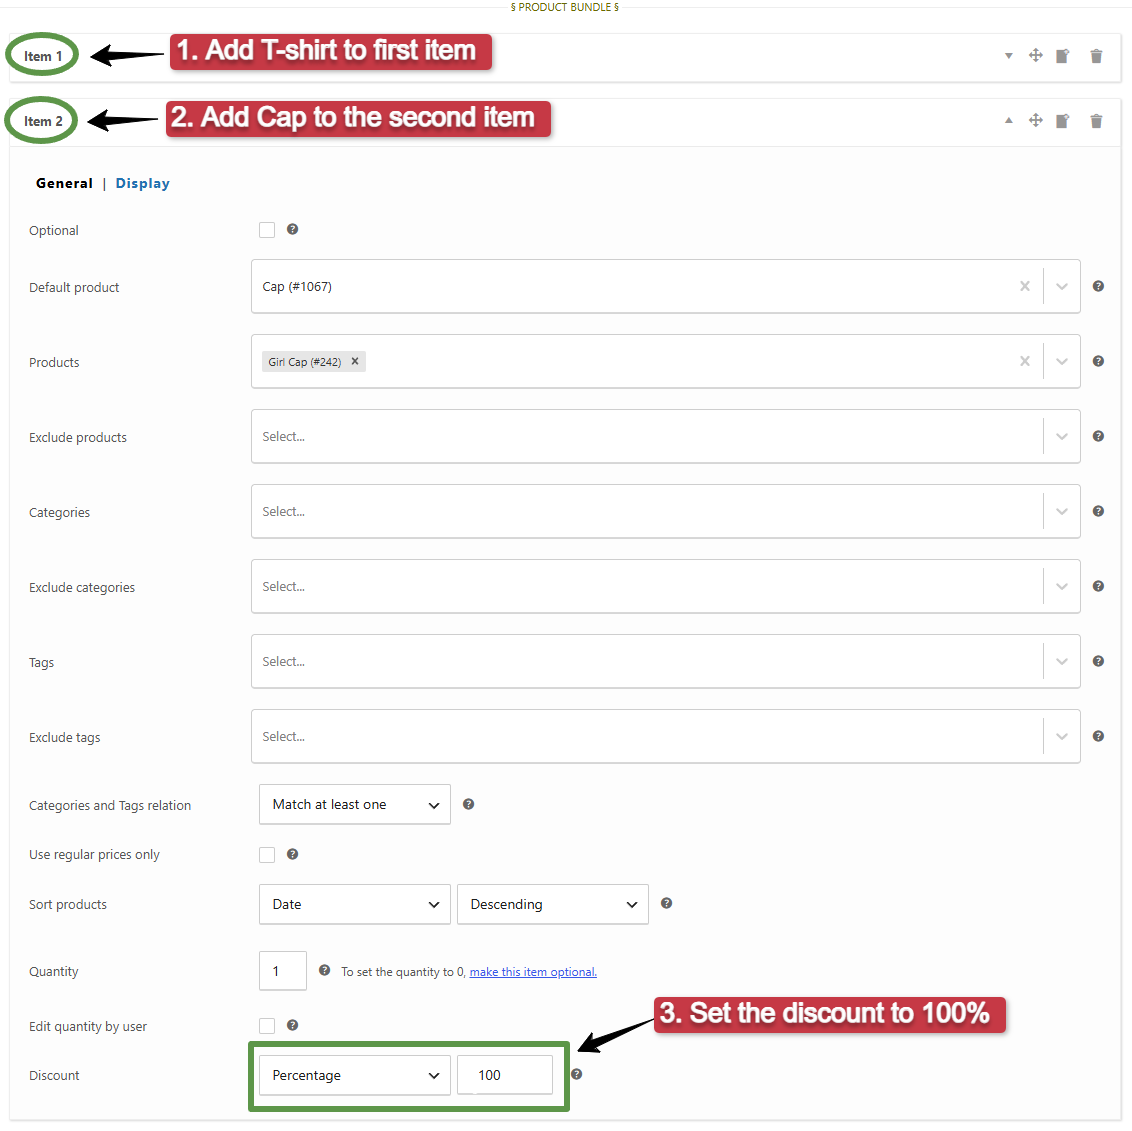
Create a Buy One, Get One

Step 3: Publish the Bundle

Complete the remaining bundle settings and publish the product.

When a customer selects the T-Shirt and Cap, they pay for the T-Shirt while the Cap is included for free.
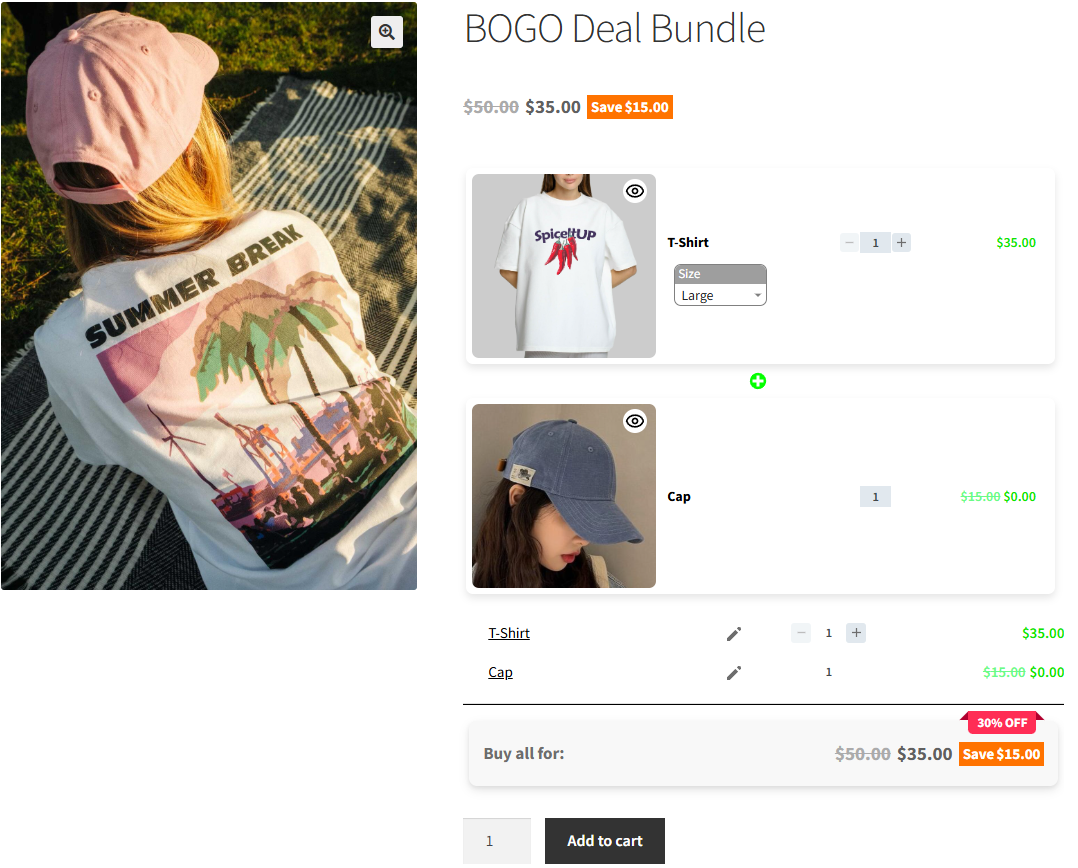
BOGO Deal

You can also add multiple products to the second item, allowing customers to choose their free product from a predefined selection.

More WooCommerce Product Bundle Ideas

You can create product bundles for almost any type of WooCommerce store. Here are a few examples to inspire your own bundle ideas:

  • Gaming Bundle: Gaming Mouse + Mechanical Keyboard + Mouse Pad
  • Coffee Bundle: Coffee Beans + Mug + French Press
  • Travel Bundle: Backpack + Water Bottle + Travel Organizer
  • Fitness Bundle: Resistance Bands + Workout Gloves + Water Bottle
  • Gift Bundle: Candle + Greeting Card + Gift Box
  • Office Bundle: Notebook + Pen Set + Desk Organizer
  • Pet Care Bundle: Pet Shampoo + Grooming Brush + Pet Toy
  • Electronics Bundle: Wireless Charger + Phone Stand + USB Cable

WooCommerce Product Bundles FAQs

What Is a WooCommerce Product Bundle?

A WooCommerce product bundle combines multiple products into a single bundle, allowing customers to purchase related products together. Depending on the bundle settings, customers can select products, choose variations, and receive discounts as part of the bundle.

Can Customers Choose Products in a WooCommerce Bundle?

Yes. You can add multiple products to each bundle item and let customers choose one product from the available options.

Can I Add Variable Products to a WooCommerce Bundle?

Yes. You can add variable products to bundle items. When customers select a variable product, they can choose from its available variations, such as size or color.

How Is the Bundle Price Calculated?

You can use Auto Calculate to calculate the price based on the selected products, or Fixed Price to set a specific price for the entire bundle.

Can I Offer Discounts on Individual Bundle Items?

Yes. You can apply a discount to individual bundle items using the Discount option in the item settings.

Can I Make a Bundle Item Optional?

Yes. You can make individual bundle items optional. Customers can then choose whether they want to include the optional product in their bundle.

Can I Set a Fixed Price for a Bundle Item?

Yes. Select Fixed Price from the Discount dropdown in the bundle item’s settings and enter the price you want to charge for that item.

Can I Set a Minimum or Maximum Quantity for a Bundle?

Yes. You can set Min and Max Total Quantity to control the total number of products customers can select across the bundle items.

Can I Apply a Discount to the Entire Bundle?

Yes. You can use Total Discount to apply a discount to the bundle’s total price.

Conclusion

Creating WooCommerce product bundles can help you combine related products, give customers more purchasing options, and create flexible promotional offers.

With Product Bundle Builder for WooCommerce, you can create bundles that fit different products, store types, and customer needs. You can let customers choose products and variations, customize bundle items, set pricing, apply discounts, and control how products are displayed.

Whether you want to group complementary products, let customers build their own bundle, offer promotional deals, or create a completely different bundle concept for your store, you can customize the bundle to suit your needs.

Ready to create your first WooCommerce product bundle?

Try Product Bundle Builder for WooCommerce and start creating customizable product bundles for your store.

Related Resources

Want to learn more about WooCommerce product bundles and related strategies? Explore these helpful guides:

🌐SOCIAL MEDIA LINKS

Posted on — Leave a comment

Comprehensive Guide to WooCommerce Discounts: BOGO, Bulk, and Tiered Pricing

WooCommerce Discounts BOGO, Bulk, Tiered

In the competitive world of eCommerce, offering attractive discounts can significantly boost your sales and customer loyalty. WooCommerce, one of the leading eCommerce platforms, provides a versatile and powerful toolkit to manage various types of discounts. From “Buy One Get One Free” (BOGO) deals to bulk and tiered pricing, WooCommerce allows store owners to implement creative and effective pricing strategies that cater to a wide range of customer preferences.

This comprehensive guide delves into the myriad discount options available in WooCommerce, providing step-by-step instructions on setting up BOGO deals, bulk discounts, tiered pricing, and more. Whether you’re looking to increase the average order value with tiered discounts or encourage repeat purchases with automatic coupons, this article will equip you with the knowledge and tools to optimize your WooCommerce store for maximum profitability.

We’ll explore not only the basic setup of these discount types but also advanced strategies like shipping discounts, checkout fees, and product variation discounts. By the end of this guide, you’ll have a thorough understanding of how to leverage WooCommerce’s discount capabilities to create compelling offers that drive sales and enhance the shopping experience for your customers.

The Impact of Discounts on Sales: A Detailed Analysis

Discounts play a crucial role in boosting sales and enhancing customer activity. Offering discounts can attract new customers, incentivize larger purchases, and encourage repeat business. According to HubSpot, various discount strategies like loyalty programs, seasonal discounts, and quantity discounts are commonly used to drive sales and retain customers. For instance, loyalty-based discounts can significantly increase customer spending and frequency of visits, as evidenced by Square’s findings that loyalty program members spend 53% more and visit 40% more often.

Implementing discounts requires a strategic approach. A study by Business Victoria highlighted that even a small discount can require a significant increase in sales to maintain profit margins. For example, a 15% discount necessitates a 300% increase in sales if the current gross profit margin is 20%. Therefore, businesses need to carefully analyze historical sales data and set realistic discount percentages that align with their sales targets.

By leveraging analytical tools and carefully planning discount strategies, businesses can maximize the benefits of discounts while maintaining healthy profit margins. This approach not only boosts sales but also enhances the overall effectiveness of marketing initiatives.

Types of Discounts:

BOGO Discounts:
Learn how to set up a Buy One Get One Free offer to boost sales by rewarding customers with free products.

Bulk Discounts:
Discover the benefits of offering price reductions for bulk purchases and how to implement them in WooCommerce.

Tiered Pricing:
Understand tiered pricing strategies to provide greater discounts for higher purchase quantities and set them up effectively.

Percentage Discounts:
Offer customers a percentage reduction on product prices, encouraging higher sales volume by making items more affordable.

Grouped Product Discounts:
Provide discounts when customers purchase a specific set of products together, promoting bundled sales and increasing average order value.

Advanced Discount Strategies:

Automatic Coupons:
Explore how to create automatic discounts that apply based on cart conditions, enhancing customer experience.

Shipping Discounts:
Find out how to offer free or discounted shipping to encourage larger orders and increase customer satisfaction.

Checkout Fees:
Learn to implement checkout fees for specific payment methods to manage transaction costs effectively.

Best WooCommerce Discounts Plugin

For those seeking to enhance their WooCommerce store with robust discount capabilities, “Discount Rules and Dynamic Pricing for WooCommerce” from AsanaPlugins stands out as a top choice. This plugin offers a comprehensive suite of features to create a wide variety of discount rules, including percentage discounts, fixed amount discounts, and advanced BOGO deals. It allows you to set up dynamic pricing based on cart total, product quantity, user roles, and more, providing a highly customizable and user-friendly experience. The intuitive interface ensures that even those with minimal technical expertise can easily configure complex discount strategies, helping to boost sales and improve customer satisfaction. Whether you’re looking to implement simple bulk discounts or intricate pricing tiers, Discount Rules and Dynamic Pricing for WooCommerce solutions ensure your WooCommerce store can meet the demands of a competitive market.

Setting Up BOGO discounts in WooCommerce

Creating Buy One Get One (BOGO) discounts in WooCommerce is a highly effective way to drive sales and increase customer satisfaction. With BOGO deals, customers receive an additional product free or at a discounted price when they purchase a specified quantity. This promotional strategy not only boosts average order values but also helps in clearing out inventory and attracting new customers. Setting up BOGO WooCommerce discounts is straightforward, thanks to the platform’s flexible discount rules and extensive plugin ecosystem.

By effectively setting up BOGO discounts in WooCommerce, you can leverage this powerful promotional tool to enhance your store’s performance and provide added value to your customers.

To create a BOGO WooCommerce discount, we will use the Discount Rules and Dynamic Pricing plugin, an advanced discount manager plugin.

1: Install Plugin

The process of installing and activating the plugin is like any other plugin:

  1. Purchase the Discount Rules and Dynamic Pricing plugin and download the zip file from your account.
  2. To begin the installation and activation process, access your WordPress admin dashboard and sign in. Once signed in, navigate to the “Plugins” tab and click on “Add New” From there, locate and click on the “Upload Plugin” button to proceed.
  3. After selecting the “Upload Plugin” button, you will be prompted to choose the plugin ZIP file that you have recently downloaded. Simply locate the file on your computer and click on it. Next, click on the “Install Now” button to initiate the installation process. Once the installation is complete, click on the “Activate” button to activate the plugin and start using it.

Creating BOGO WooCommerce discounts

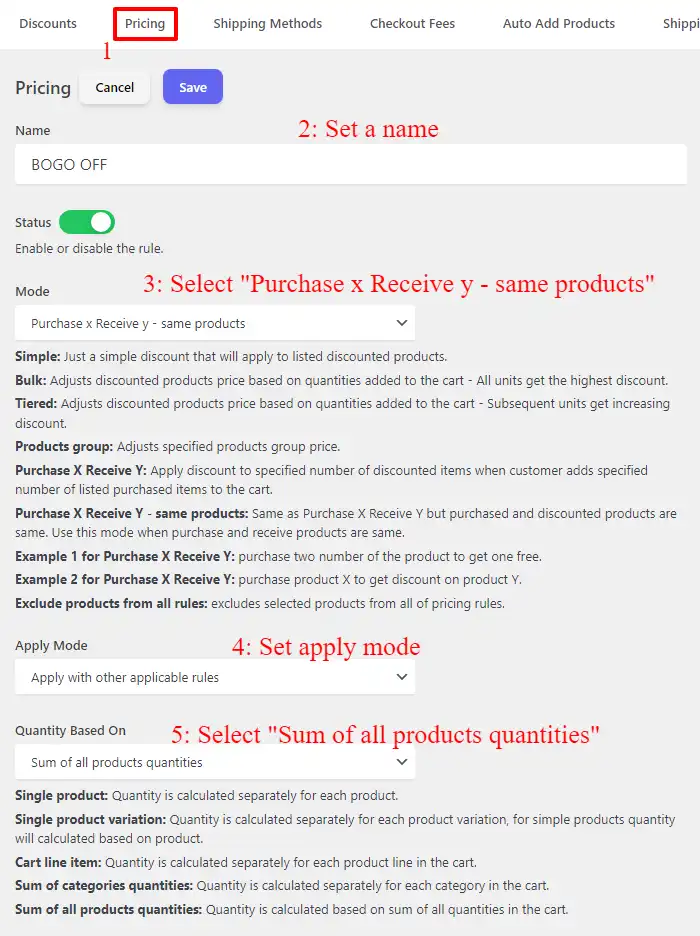
  1. Navigate to the “Woo Pricing & Discounts” menu, then open the “Pricing” tab.
  2. Click on the Add New button to create a new pricing rule.
  3. Set a name for the rule. e.g: BOGO OFF
  4. Select “Purchase x Receive y – same products” as the “Mode“.
  5. Set “Apply mode” to “Apply with other applicable rules” or based on your requirements.
  6. Set “Quantity based on” to “Sum of all products quantities”.
BOGO WooCommerce discount setup
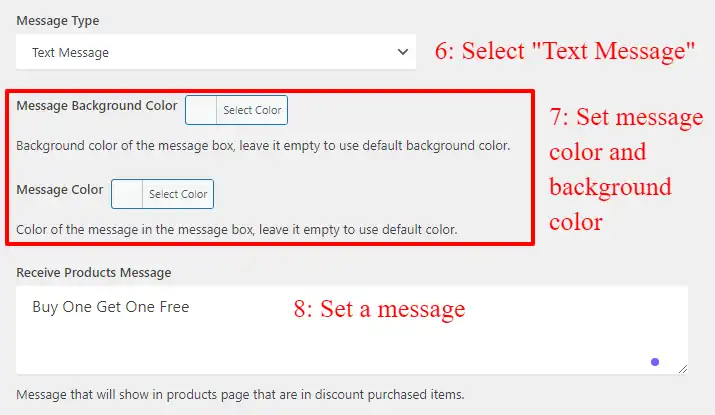
  1. Select “Text message” as the “Message type”.
  2. Set message background and text message colors.
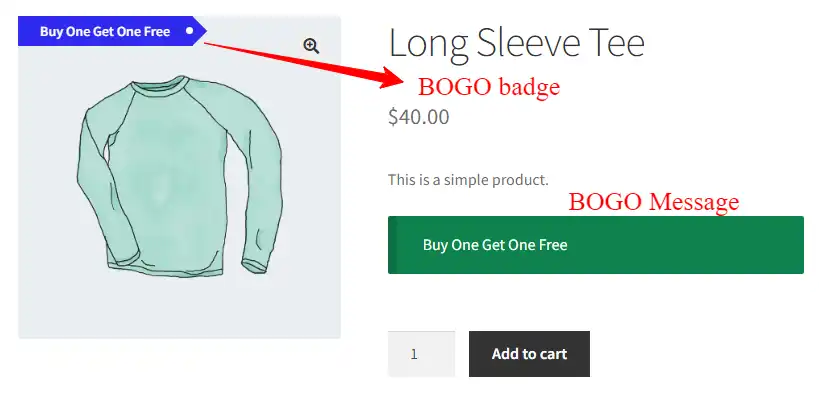
  3. Set a message like “Buy One Get One Free” under the “Receive Products Message“. You’ll see this message on the product page.
BOGO WooCommerce discounts message
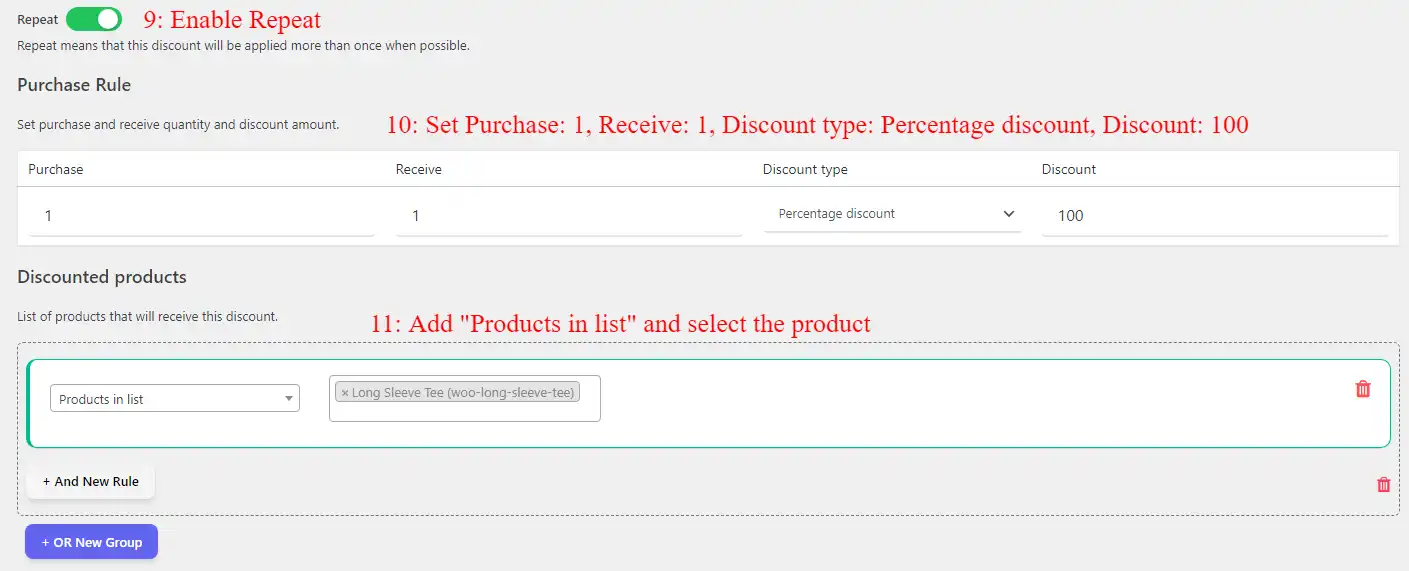
  1. Enable the “Repeat” field, to repeat this rule for each buy-one-get-one group.
  2. Under “Purchase rule” set the Purchase: 1, Receive: 1, Discount type: Percentage discount, Discount: 100
  3. Under “Discounted products” select the products that will get this discount.
WooCommerce BOGO discount setup products
  1. Under the “Date Time” you can schedule the rule for specific times like Black Friday or Cyber Monday deals.
  2. Save the rule.

Result

It is done and you have created a BOGO WooCommerce discount easily in a few steps.

As a result, now refer to the product page to find the BOGO deal message, like the below image.

BOGO WooCommerce discount

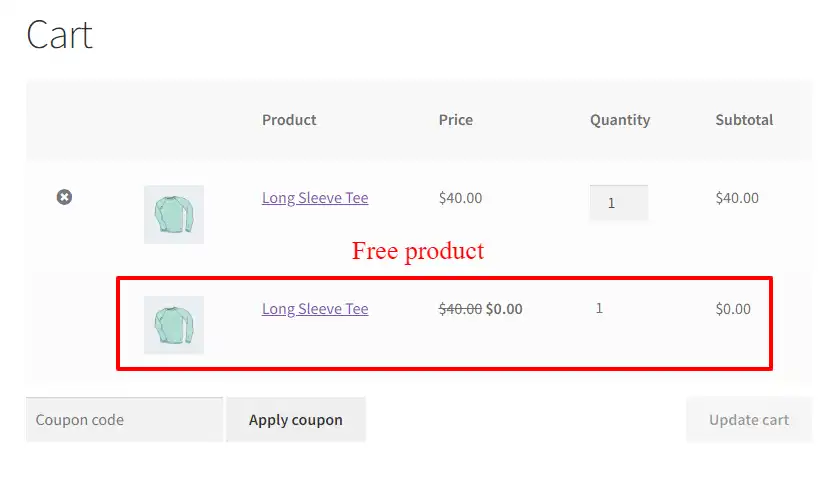
When a user buys a quantity of the product the free product will be automatically added to the cart.

WooCommerce BOGO free product auto added to the cart

Promoting BOGO Discounts in WooCommerce

Effectively promoting BOGO (Buy One Get One) discounts in WooCommerce can significantly increase your sales and attract new customers. Utilize marketing channels such as email newsletters, social media, and on-site banners to highlight these offers. By clearly communicating the value of your BOGO deals and using targeted promotions, you can drive traffic to your store and boost conversions. Implementing these strategies ensures that your BOGO discounts gain maximum visibility and engagement, leading to enhanced customer loyalty and higher revenue.

You can use the Badge and Product Lable for WooCommerce plugin to add banners to your site and promote the BOGO deals.

Also, you can create badges for BOGO deals and promote products. Let us create a badge for BOGO deal products.

Create a BOGO discount badge

After downloading and installing the Badge and Product Label for WooCommerce plugin to create a BOGO discount badge, follow the steps below.

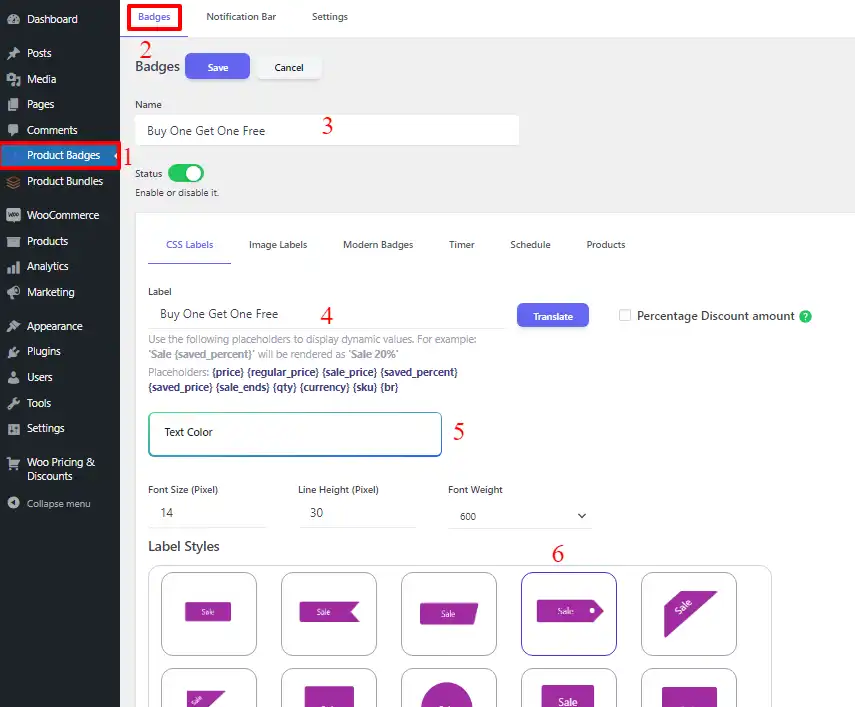
  1. Navigate to the “Product Badges” menu, then open the “Badges” tab.
  2. Click on the Add New button to create a new product badge.
  3. Set a name for the product badge like the “WooCommerce Buy One Get One Free” badge.
  4. Under the “CSS Labels” tab, use the “Label” field to set a label for the badge like “Buy One Get One Free”.
  5. Use the “Text color” field to set the product label text color.
  6. Under “label styles”, select the label that you want like the below image.
  7. Use the “Label color” field to set the label color. You can set a gradient color too.
  8. Navigate to the “Products” tab.
  9. Under “Products” add a “Products” condition and select the products that this badge should be added to.
  10. Save the badge.
BOGO badge

It is done successfully. If you open the products list page or the product page a “Buy One Get One Free” message will be shown on the product images.

BOGO WooCommerce discount

Maximizing Sales with Bulk Discounts in WooCommerce

Bulk discounts are an excellent strategy for encouraging customers to purchase larger quantities of products by offering them a reduced price per unit as they buy more. In WooCommerce, setting up bulk discounts can help you move inventory faster, increase your average order value, and provide better value to your customers. By using plugins like “WooCommerce Dynamic Pricing & Discounts” you can easily create bulk pricing rules that automatically adjust prices based on the quantity added to the cart. This approach not only simplifies the purchasing process but also makes your offers more attractive to price-sensitive shoppers.

How to create bulk discounts in WooCommerce

Creating bulk discounts in WooCommerce is a straightforward process that can significantly boost sales by incentivizing customers to purchase larger quantities. Start by installing a plugin like “Discount Rules and Dynamic Pricing for WooCommerce” from AsanaPlugins, which provides extensive options for setting up bulk pricing. Once the plugin is installed, navigate to the pricing rules section and create a new rule specifying the product or category for which you want to offer bulk discounts. Set the conditions based on the quantity purchased, such as “Buy 5-10 items, get 10% off” or “Buy 11-20 items, get 20% off.” Customize additional settings as needed, such as customer eligibility or other conditions, then save and test the rule to ensure it works correctly at checkout. This dynamic pricing strategy helps increase average order values and encourages customers to buy more.

Creating bulk discounts in WooCommerce

To create bulk discounts in WooCommerce, follow the below steps:

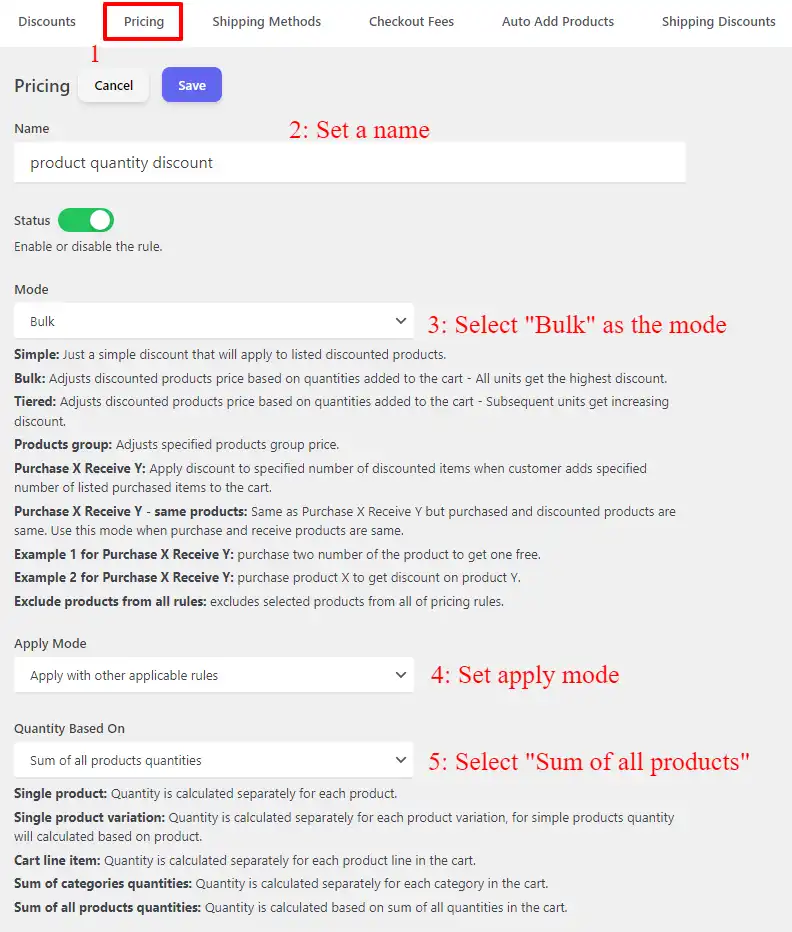
  1. Navigate to the “Woo Pricing & Discounts” menu, then open the “Pricing” tab.
  2. Click on the Add New button to create a new pricing rule.
  3. Set a name for the rule. e.g: product quantity discount
  4. Select “Bulk” as the “Mode“.
  5. Set “Apply mode” to “Apply with other applicable rules” or based on your requirements.
  6. Set “Quantity based on” to “Sum of all products quantities”.
Bulk discounts WooCommerce configuration
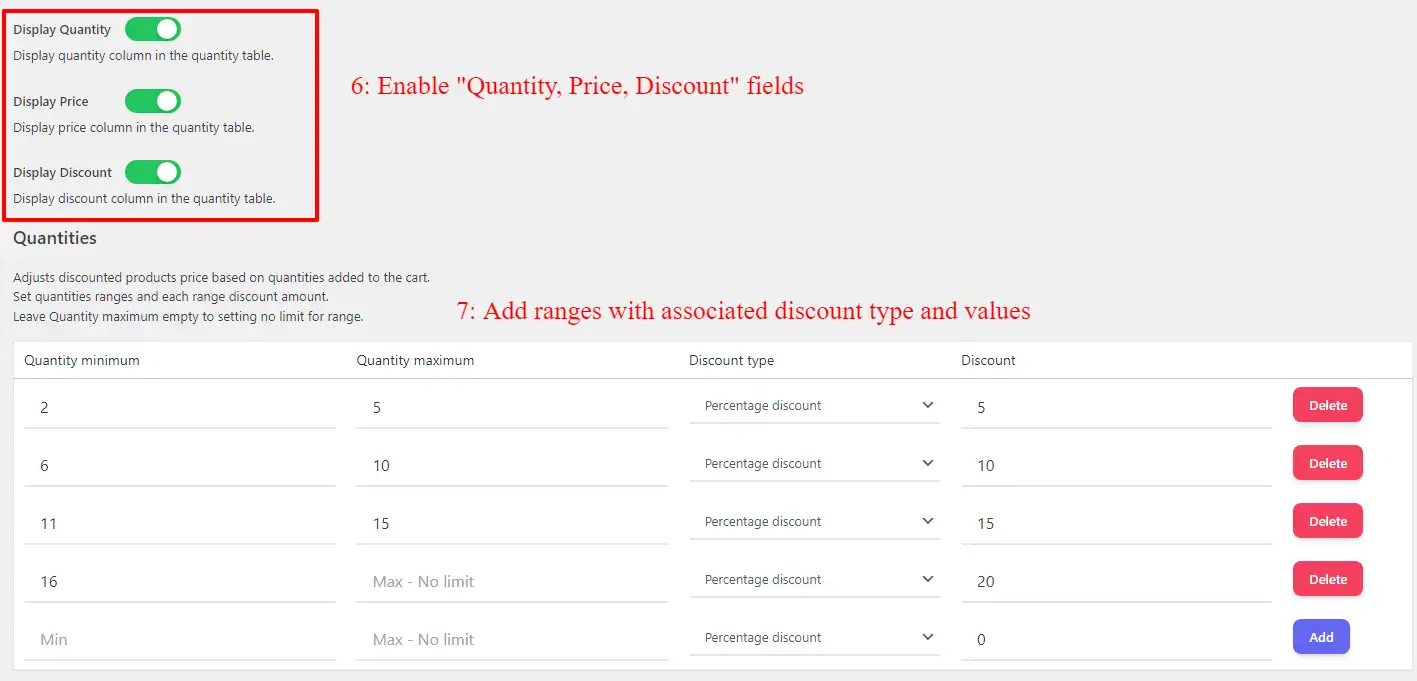
  1. Enable display “Quantity, Price, Discount” fields.
  2. Set quantity ranges and associated discount amounts in percentage or price.
Bulk discounts in WooCommerce quantity ranges

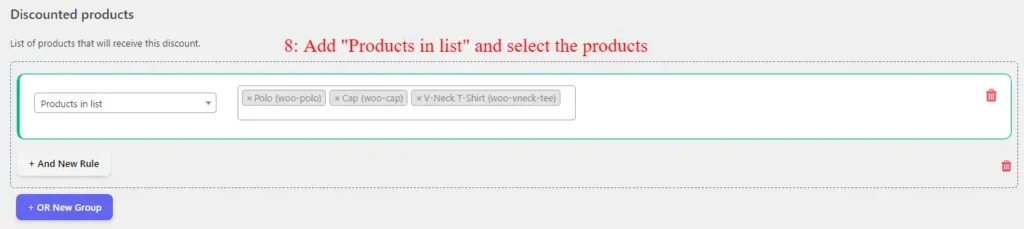
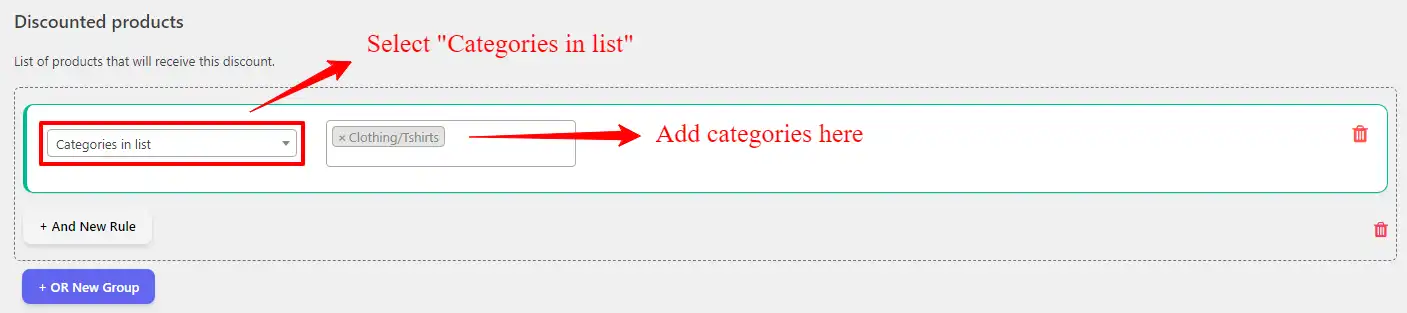
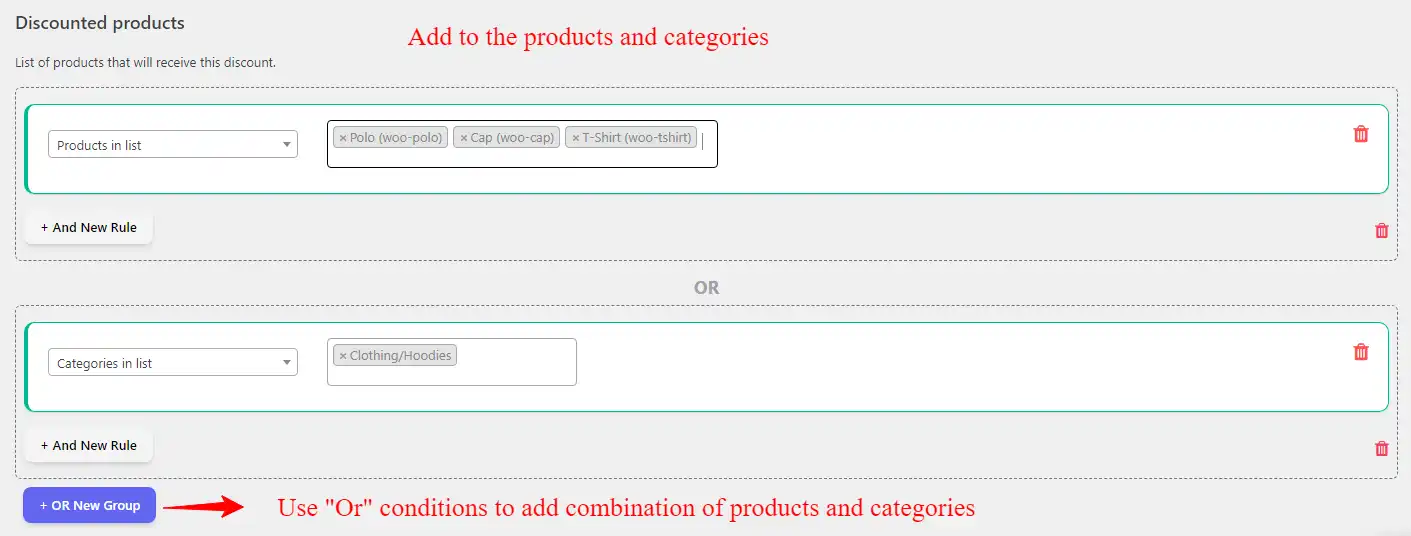
Under the discounted products section, you can use products, categories, product variation conditions, or combinations to apply the discount on the appropriate products.

  • Apply bulk discounts on products
WooCommerce bulk discounts for prdoucts
  • Apply bulk discounts on categories
Category Bulk discounts WooCommerce
  • Apply bulk discounts on products and categories
product and cateory bulk discounts WooCommerce

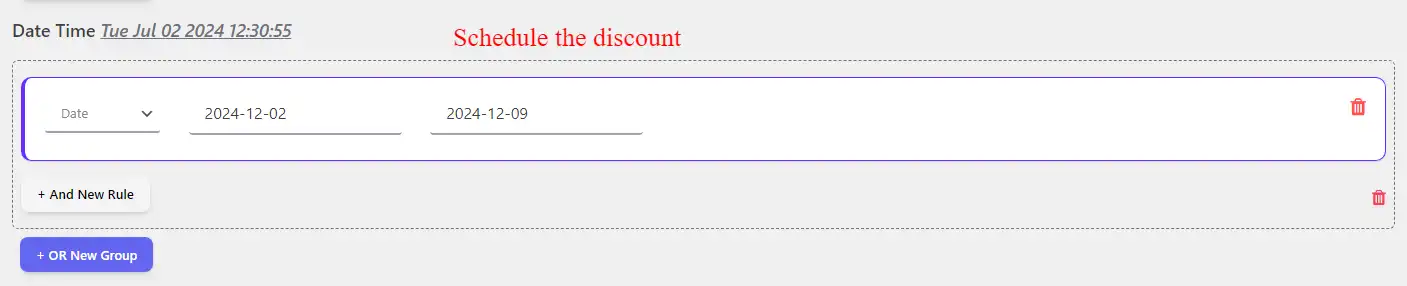
Under the “Date time” section, you can schedule sale flash to specific dates, days, date times, weekends, Black Friday, and Cyber Monday.

Schedule bulk discounts WooCommerce

After configuring the discount rule, hit the save button to save the changes.

Result

It is done successfully. You have created bulk discounts WooCommerce for a product in a few steps.

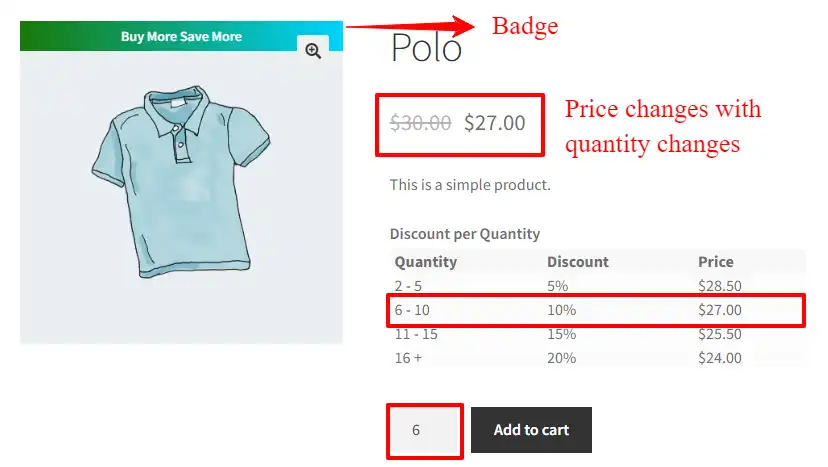
If you refer to the product page, you will see a quantity table with associated discounts.

When the user changes the product quantity, the product price changes based on the associated discount.

Bulk discounts WooCommerce

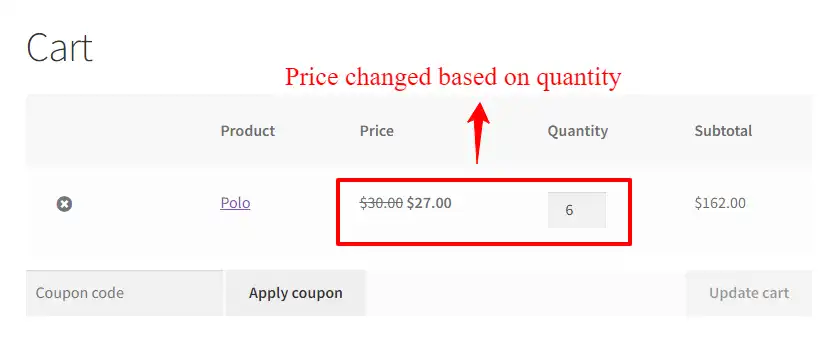
The product price in the cart is discounted based on the selected quantity.

Bulk discounts WooCommerce in the cart

Unlocking revenue potential with tiered pricing in WooCommerce

Tiered pricing is a powerful strategy in WooCommerce that incentivizes customers to purchase more by offering increasing discounts based on the quantity bought. This approach not only helps in boosting sales but also enhances customer satisfaction by providing better value for larger orders. To set up tiered pricing, you can use a versatile plugin like “Discount Rules and Dynamic Pricing for WooCommerce” from AsanaPlugins.

Begin by defining your pricing tiers, such as “Buy 1-10 items, get 5% off” and “Buy 11-20 items, get 10% off.” These tiers can be customized to suit your inventory and sales goals. By configuring these rules within the plugin, you ensure that discounts are automatically applied at checkout based on the quantity purchased. This seamless integration not only simplifies the buying process for your customers but also drives higher average order values. By leveraging tiered pricing in WooCommerce, you can create a more dynamic and appealing pricing structure that encourages larger purchases and improves overall revenue.

Example:

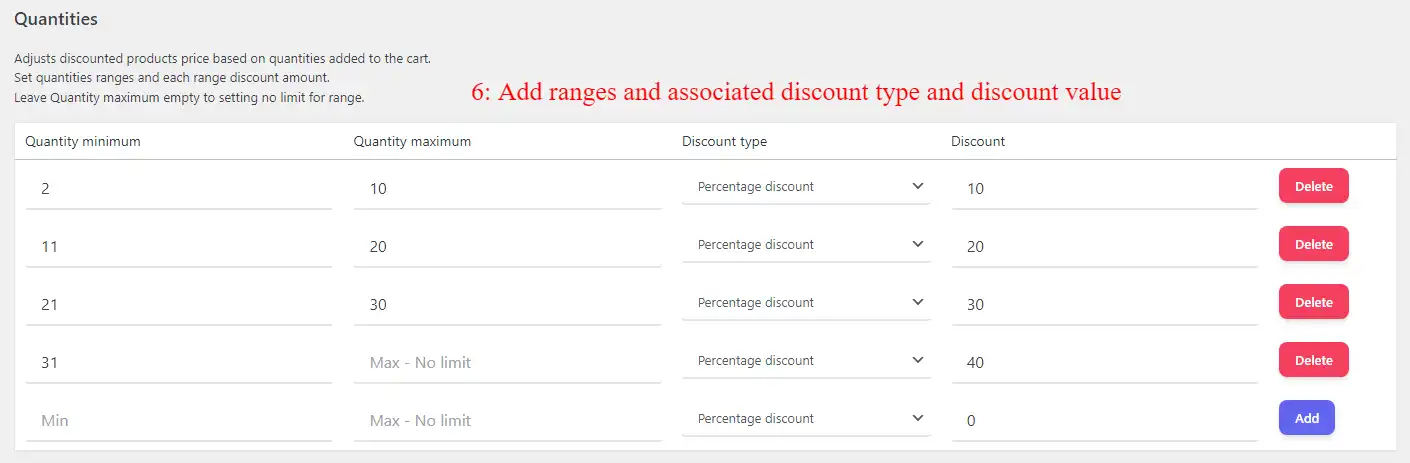
  • Buy quantities between 2 – 10 and get a 10% percentage discount on the product.
  • Buy quantities between 11 – 20 and get a 20% percentage discount on the product.
  • Buy quantities between 21 – 30 and get a 30% percentage discount on the product.
  • Buy 31 or more quantities of the product and get a 40% percentage discount on the product.

The above example can be done in two ways.

If a customer buys 22 quantities of the product its regular price is 30$

1. Using different prices for different tiers

Because the 22 quantities are inside different ranges and each range has a different price.

  • 1 quantity is inside the 1-1 range.
  • 9 quantities are inside the 2 – 10 range.
  • 10 quantities are inside the 11 – 20 range.
  • 2 quantities are inside the 21 – 30 range.

(1 * 30$) + (9 * 27$) + (10 * 24$) + (2 * 21$) = 555$

To create a tiered discount in WooCommerce follow the below steps.

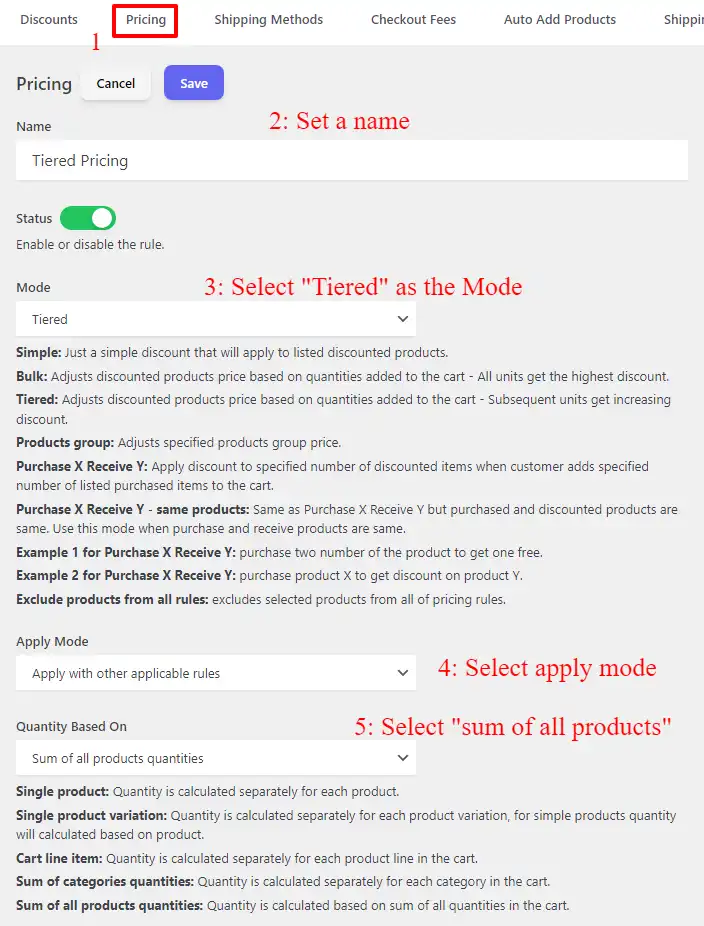
Creating tiered pricing in WooCommerce

  1. Navigate to the “Woo Pricing & Discounts” menu, then open the “Pricing” tab.
  2. Click on the Add New button to create a new pricing rule.
  3. Set a name for the rule. e.g: product quantity discount
  4. Select “Tiered” as the “Mode“.
  5. Set “Apply mode” to “Apply with other applicable rules” or based on your requirements.
  6. Set “Quantity based on” to “Sum of all products quantities”.
Tiered pricing WooCommerce config
  1. Set quantity ranges and associated discount amounts in percentage or price.
Tiered pricing ranges in WooCommerce

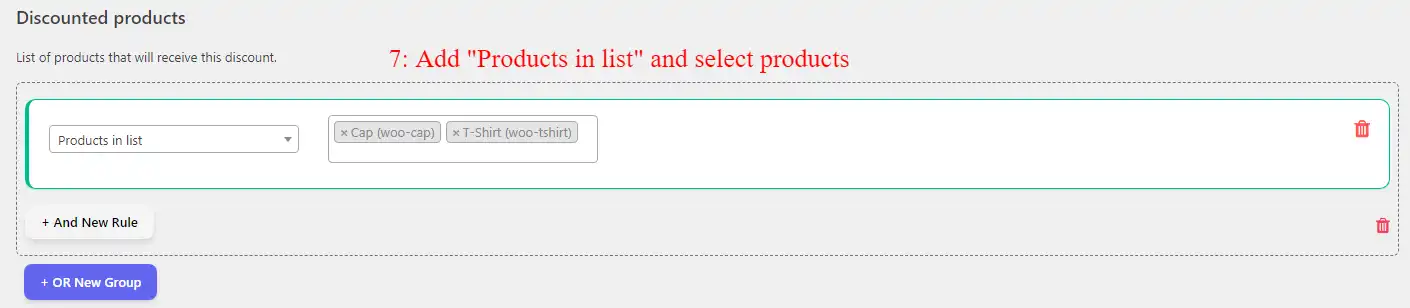
Under the discounted products section, you can use products, categories, product variation conditions, or combinations to apply the discount on the appropriate products.

  1. Add a “Products in list” condition and select the products.
  2. Save the rule.
Select products condition in Discount Rules and Dynamic Pricing for WooCommerce

Result

The tiered discount rule is created successfully.

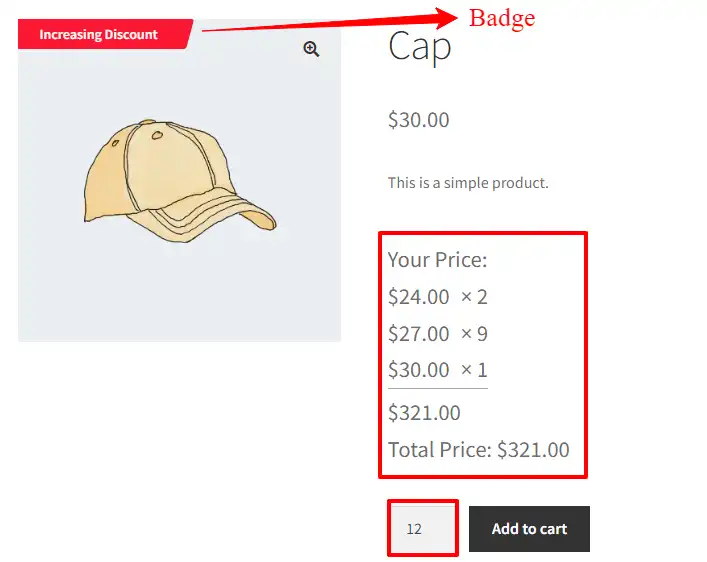
As a result, if you add 12 quantities of the product to the cart, it will get the discount like the below image.

As you can see at the below image, each quantity range has a different discount amount.

Tiered pricing WooCommerce

2. Using the same price for the range

Because 22 quantities are inside the 21 – 30 range each quantity will get a 30% discount and the price will be 22 * 21$ = 462$.

We should use a bulk discount rule to achieve this type of discount. The bulk discount rules are thoroughly explained in this article; furthermore, you can refer to the detailed bulk discount rules guide.

Boosting sales with percentage discounts in WooCommerce

Percentage discounts are a versatile and effective promotional strategy that offers customers a specific percentage off the original price of products. This type of discount is particularly appealing because it provides a clear, straightforward savings incentive, making items more affordable and encouraging higher sales volumes. By implementing percentage discounts in WooCommerce, you can attract price-sensitive shoppers, clear out old inventory, and stimulate overall sales growth. Using plugins like “Discount Rules and Dynamic Pricing for WooCommerce”, you can easily configure percentage discounts across various products or categories, tailoring the offers to match your marketing goals and customer preferences.

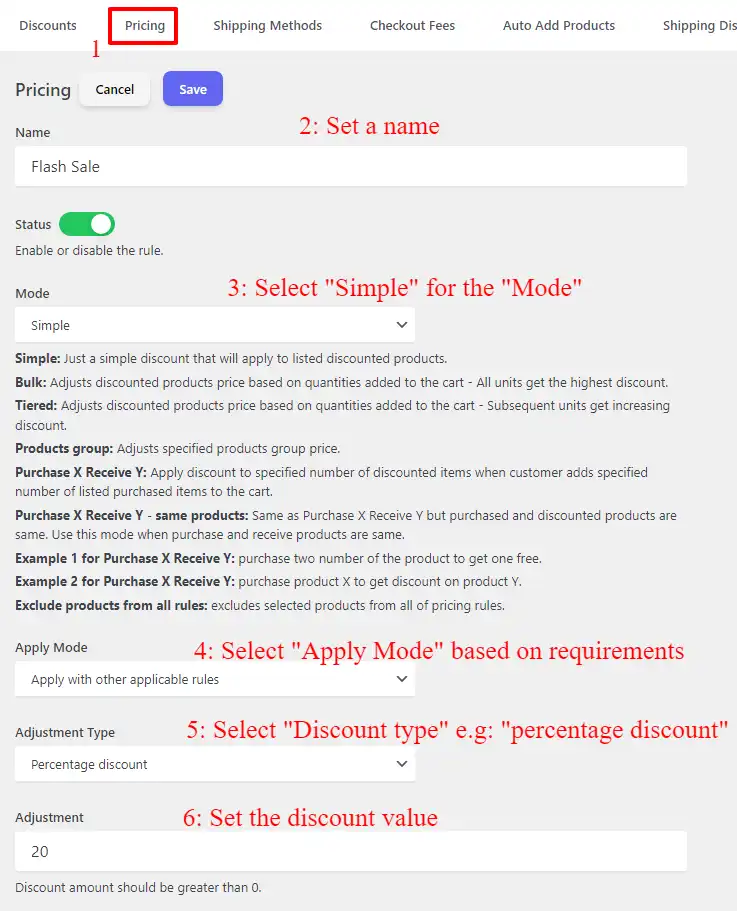
Creating percentage discounts in WooCommerce

Creating percentage discounts in WooCommerce is a straightforward process that can significantly enhance your promotional efforts. By using plugins like “Discount Rules and Dynamic Pricing for WooCommerce“, you can easily set up discounts that offer a percentage off the regular price of products. Simply navigate to the Woo Pricing & Discounts menu, create a new pricing rule, and specify the percentage you wish to discount. You can apply these discounts to individual products, entire categories, or even across your entire store. This flexible and effective strategy helps attract customers, boost sales, and clear out inventory efficiently.

  1. Navigate to the “Woo Pricing & Discounts” menu, then open the “Pricing” tab.
  2. Click on the Add New button to create a new pricing rule.
  3. Set a name for the rule. e.g: WooCommerce flash sale
  4. Select “Simple” for the “Mode”
  5. Select the appropriate discount type. e.g. Percentage discount
  6. Set the discount amount
WooCommerce percentage discount setup
  • You can offer a storewide sale flash by selecting all products under the “Discounted Products” section.
  • Give a percentage discount on specific products.
  • Apply percentage discount on categories.
  • Or apply a WooCommerce percentage discount on a combination of products and categories.
Category percentage coupon

Under the “Date time” section, you can schedule percentage discount in WooCommerce.

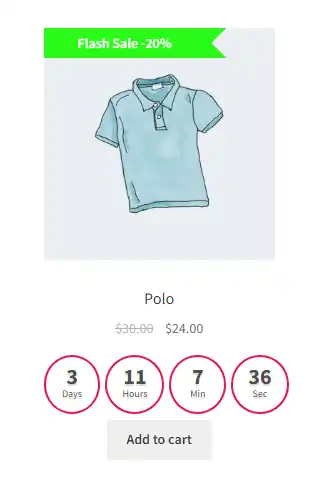
Final result

As a result WooCommerce percentage discount applies to the specified products like the below image.

WooCommerce percentage discount

Maximizing sales with grouped product discounts in WooCommerce

Grouped product discounts in WooCommerce allow you to offer special pricing when customers purchase a set of related products together. This strategy not only encourages higher order values but also promotes the sale of complementary items, enhancing the overall shopping experience. By using plugins like “Discount Rules and Dynamic Pricing for WooCommerce”, you can easily create bundled offers that provide a discount when specific products are bought together. This approach helps to increase sales, clear out inventory, and provide added value to your customers, making it a win-win for both your store and your shoppers.

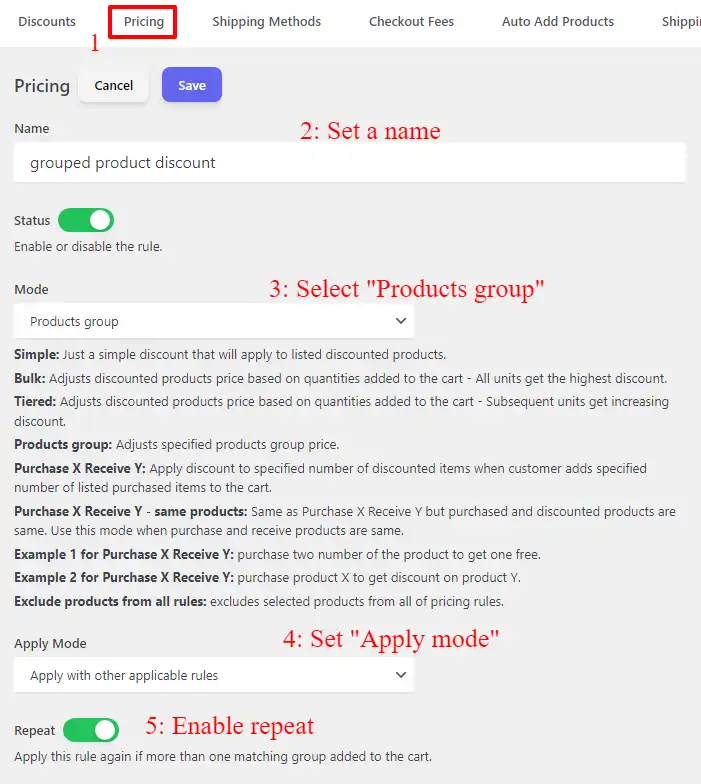
Creating grouped product discounts in WooCommerce

Creating grouped product discounts in WooCommerce can be done easily in a few steps:

  1. Navigate to the “Woo Pricing & Discounts” menu, then open the “Pricing” tab.
  2. Click on the Add New button to create a new pricing rule.
  3. Set a name for the rule. e.g: grouped product discount
  4. Select “Product group” as the “Mode“.
  5. Set “Apply mode” to “Apply with other applicable rules” or based on your requirements.
  6. Enable the repeat field.
grouped prdocuts setup
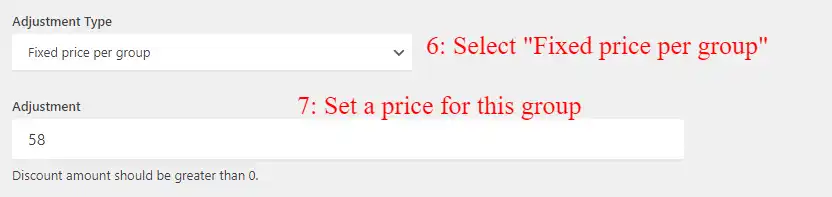
  1. Set “Adjustment Type” to the “Fixed price per group“.
  2. Set the group price in the “Adjustment” field.
Adjustment type
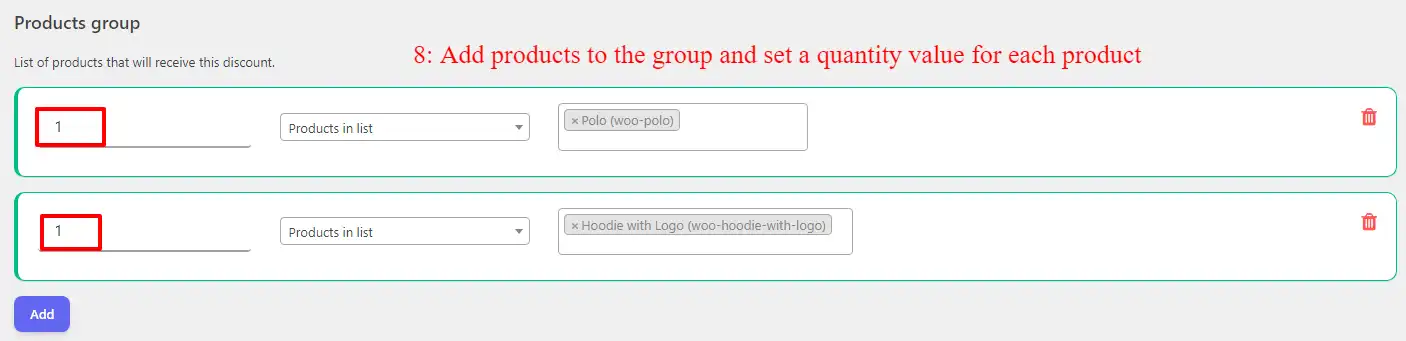
  1. Under the “Products group” add a condition for product A and another condition for product B.
  2. Set the required quantity of products A and B in each condition.
  3. Save the rule.
Grouping products

Final result

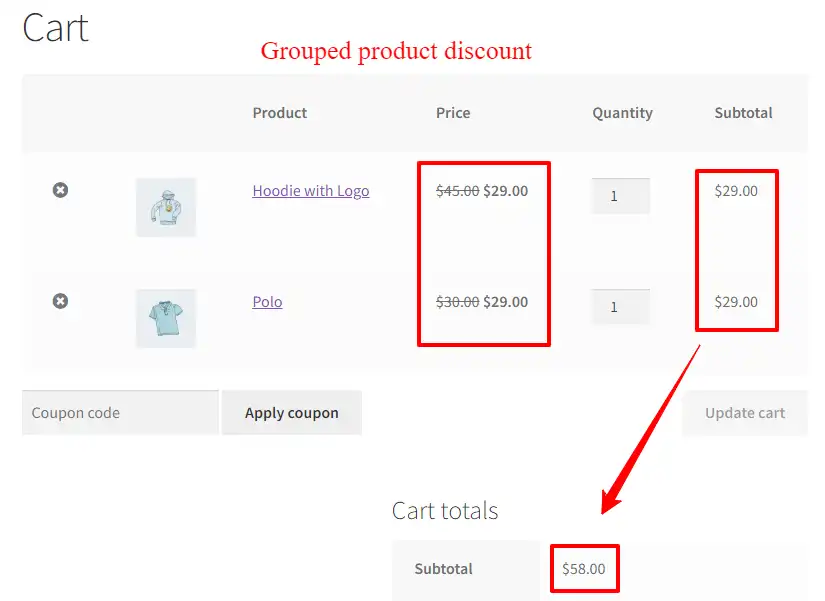
A grouped product discount is created successfully.

As a result, add 2 quantities of product A and 2 quantities of product B to the cart, to see the discount.

grouped product coupon

Streamlining discounts with Automatic Coupons in WooCommerce

Automatic coupons in WooCommerce provide a seamless way to offer discounts without requiring customers to manually enter a coupon code at checkout. This feature enhances the shopping experience by automatically applying eligible discounts based on predefined conditions, such as cart value, product purchase, or customer role. By using plugins like “Discount Rules and Dynamic Pricing for WooCommerce“, you can easily configure automatic coupons that trigger discounts automatically, simplifying the checkout process and encouraging higher sales. This approach not only boosts customer satisfaction but also helps increase conversion rates by removing the extra step of entering coupon codes.

Creating an automatic coupon in WooCommerce

To create an automatic coupon in WooCommerce follow the below steps.

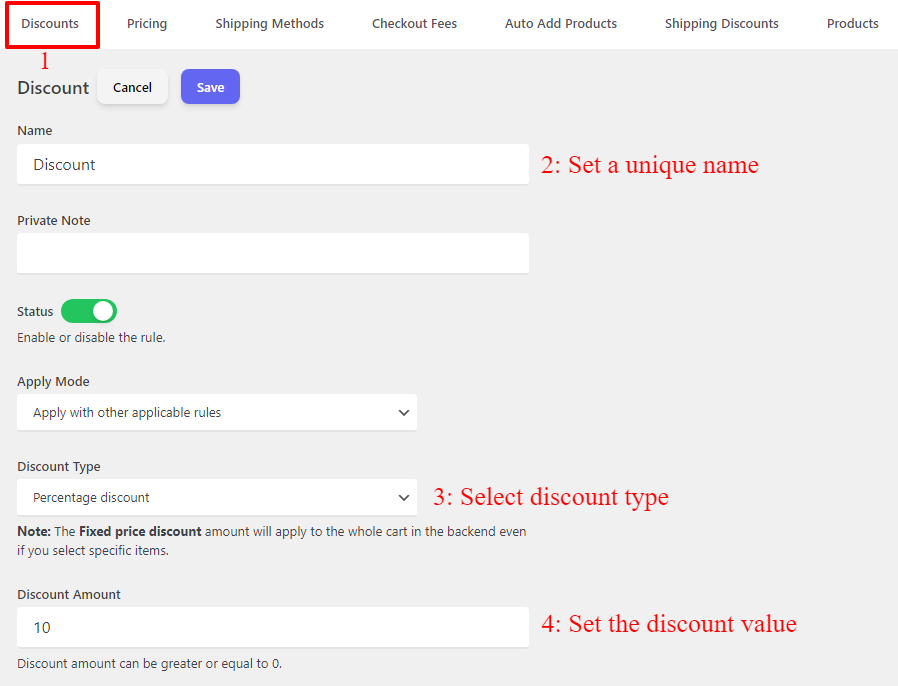
  1. Navigate to the “Woo Pricing & Discounts” menu, then open the “Discounts” tab.
  2. Click on the Add New button to create a new WooCommerce discount rule.
  3. Set a unique name for the rule, e.g. “Discount”. It will be shown as the coupon name.
  4. Select the “Discount type” based on your requirements. We selected “Percentage Discount”.
  5. Set a value for the discount. e.g. 10 to provide a 10% discount.
Automatic coupons

If you want to schedule the automatic coupon, refer to the “Date Time” section then add a date condition to plan it.

Scheduling

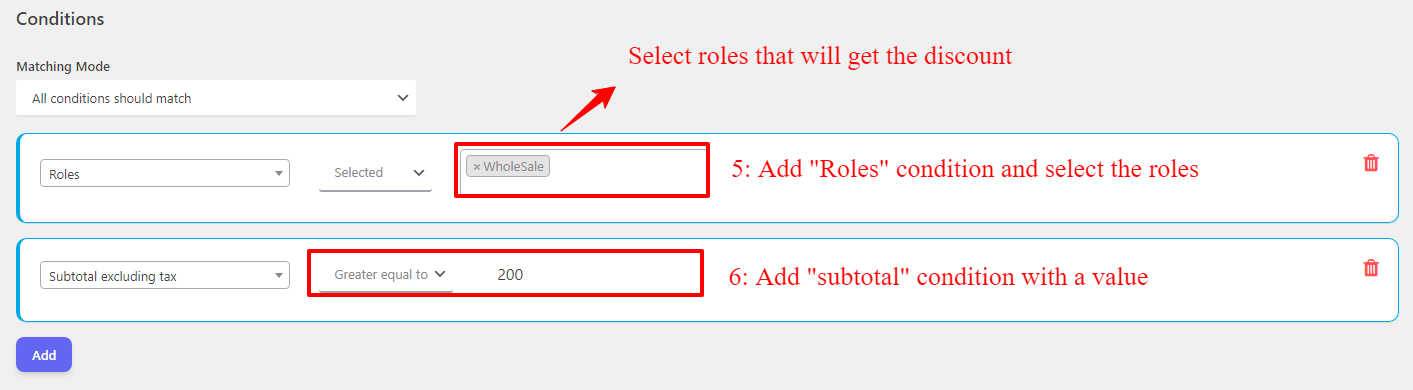
Under the “Conditions” section, you can apply discounts to specific user roles, users, cart subtotal threshold, etc.

In the below example, we give a discount to wholesale users who spent at least 200$.

wholesale users

Result

Creating automatic discounts in WooCommerce was done successfully.

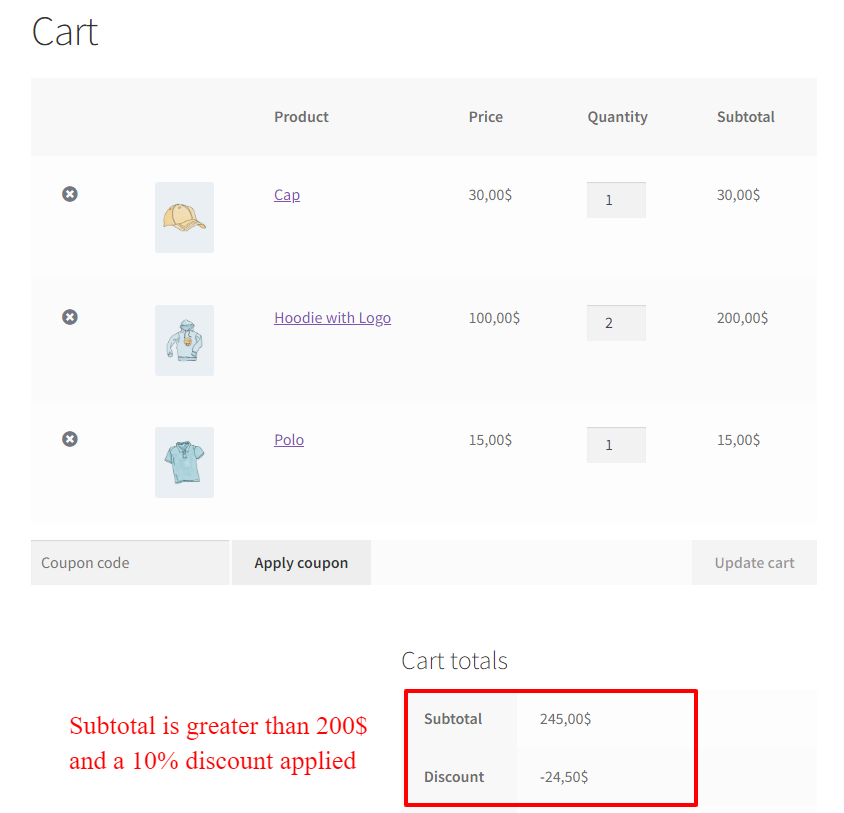
As you can see in the below image, the automatic coupon was applied to the cart properly.

Automatic coupon WooCommerce

Enhancing customer satisfaction with WooCommerce shipping discounts

WooCommerce shipping discounts are a powerful tool for improving customer satisfaction and encouraging larger orders. By offering free or discounted shipping based on specific conditions such as cart value, membership status, or promotional periods, you can reduce cart abandonment and increase sales. Using plugins like “Shipping Discounts for WooCommerce” from AsanaPlugins, you can easily set up and manage various shipping discount rules, ensuring a flexible and dynamic shopping experience. This strategy not only boosts your store’s competitiveness but also enhances customer loyalty by providing added value through cost-effective shipping options.

Creating WooCommerce shipping discounts

You can create WooCommerce shipping discounts easily and effortlessly by following the below steps.

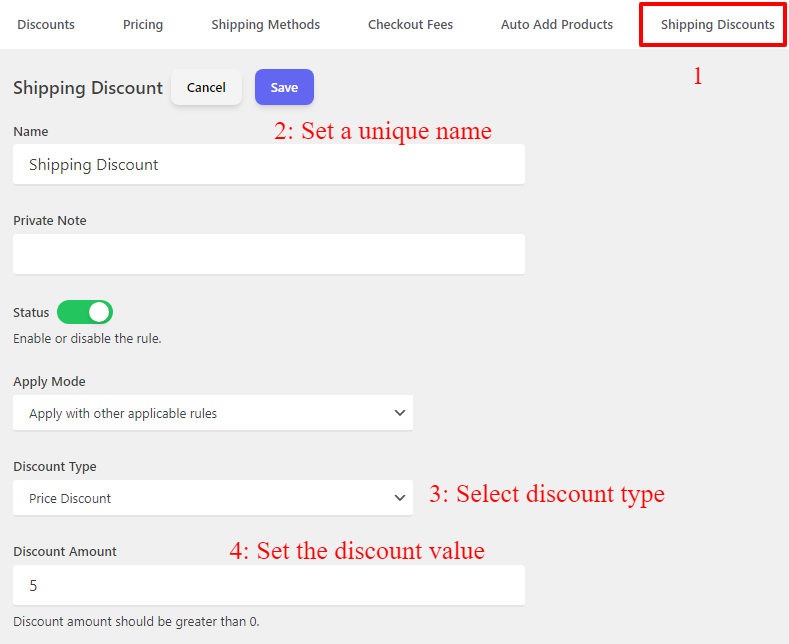
  1. Navigate to the “Woo Pricing & Discounts” menu, then open the “Shipping Discounts” tab.
  2. Click on the Add New button to create a new WooCommerce shipping discount rule.
  3. Set a unique name for the shipping discount.
  4. Select the “Discount type” based on your requirements. e.g.: “Price Discount”.
  5. Set a value for the discount. e.g. 5 to provide a 5$ discount.
Shipping coupon configuration

Under the “Shipping Methods” section, you can specify which shipping methods the discount will apply to, or leave it blank to apply the discount to all available shipping methods.

Shipping methods applicable for shipping coupon

Under the “Conditions” section, you can add conditions to the rule like user roles, users, cart subtotal threshold, money spent history, or more.

After configuring the rules, hit the save button to save the WooCommerce shipping discount rule.

Result

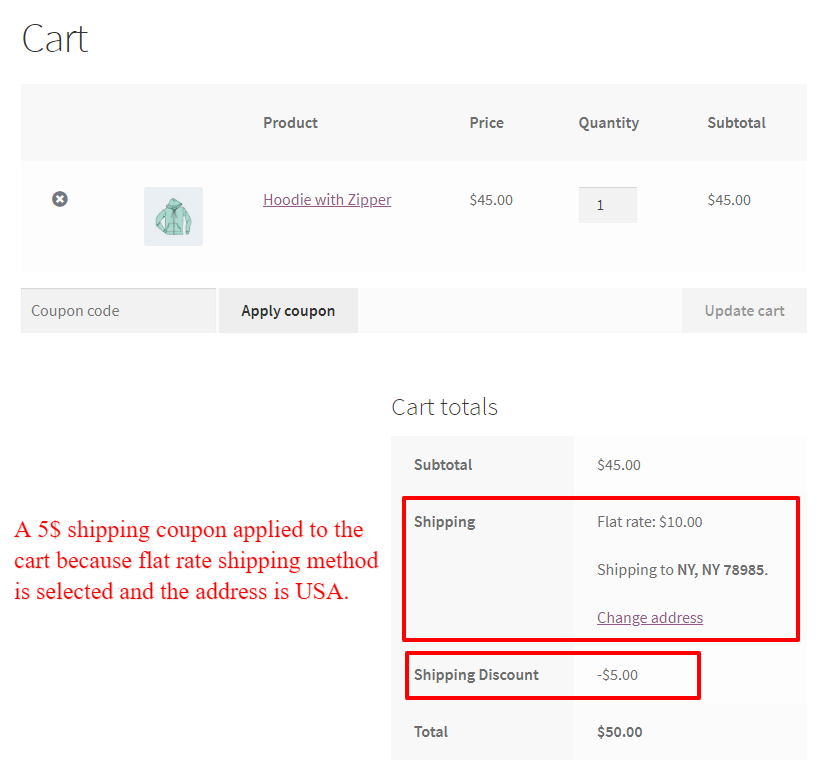
WooCommerce shipping discount created successfully and applied to the cart accordingly.

coupon for specific shipping method

Optimizing costs with WooCommerce checkout fees

WooCommerce checkout fees allow you to manage additional costs associated with specific payment methods or services during checkout. By implementing checkout fees, you can offset transaction costs or encourage customers to use preferred payment options. Using plugins like “Discount Rules and Dynamic Pricing for WooCommerce”, you can easily configure checkout fees based on various criteria such as payment method, order value, or customer location. This strategy helps streamline your cost management, ensuring your store remains profitable while providing customers with clear and transparent pricing.

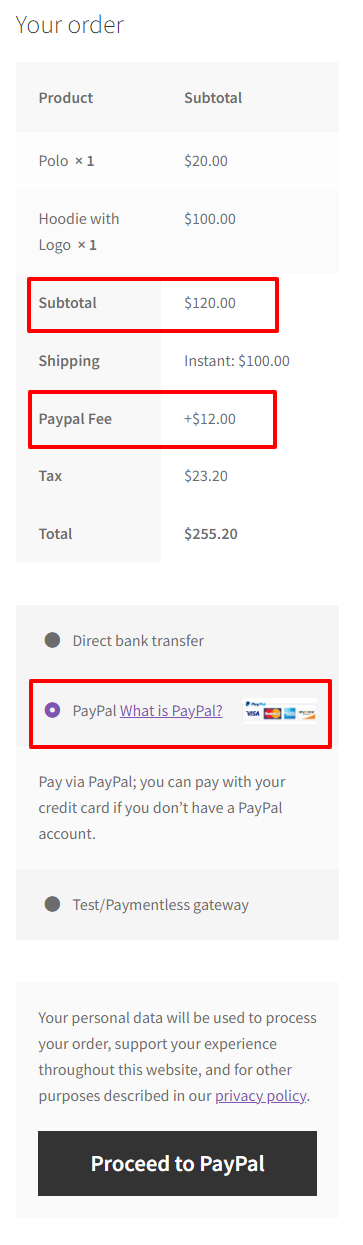
WooCommerce PayPal checkout fee

To create a PayPal checkout fee in WooCommerce follow the below steps.

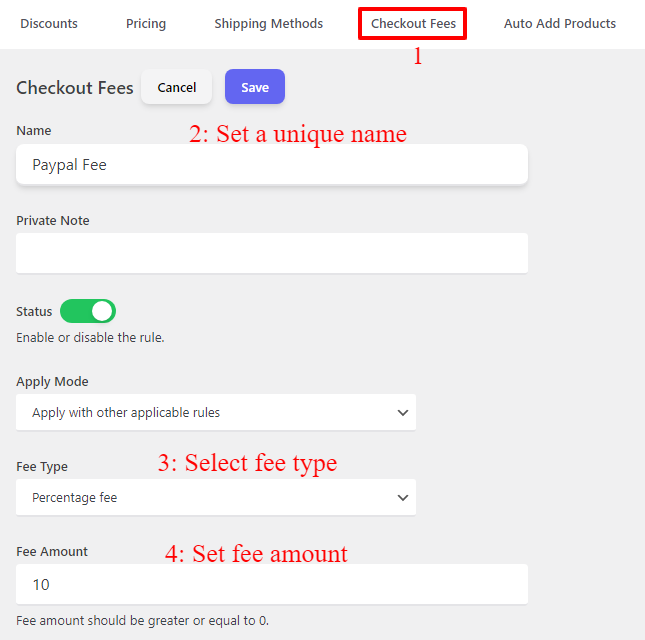
  1. Navigate to the “Woo Pricing & Discounts” menu, then open the “Checkout Fees” tab.
  2. Click on the Add New button to create a new WooCommerce checkout fee rule.
  3. Set a unique name for the rule, e.g. “Paypal Fee”. It will be shown as the fee name.
  4. Select the fee type. e.g. Percentage fee.
  5. Set a value for the fee. e.g. 10 to provide a 10% fee.
WooCommerce checkout fee for paypal config

Under “Conditions” add a “Payment Method” condition and select the PayPal payment gateway.

WooCommerce payment gateway fees methods

Result

Creating WooCommerce checkout fee for PayPal is done successfully.

The checkout fee applies to the cart when choosing PayPal as a payment gateway.

WooCommerce paypal fee

Effective WooCommerce coupon strategies to boost sales

Implementing effective coupon strategies in WooCommerce can significantly enhance your marketing efforts, attract new customers, and increase sales. In this article, we covered various powerful strategies including BOGO (Buy One Get One) offers, bulk discounts, tiered pricing, percentage discounts, grouped product discounts, automatic discounts, shipping discounts, and checkout fees. By utilizing plugins like “Discount Rules and Dynamic Pricing for WooCommerce“, you can seamlessly set up and manage these diverse discount rules. These strategies help you maximize the impact of your promotions, improve customer retention, and drive more conversions, ultimately leading to higher revenue and growth for your WooCommerce store.

Updated on — Leave a comment

WooCommerce Weight Based Shipping Method

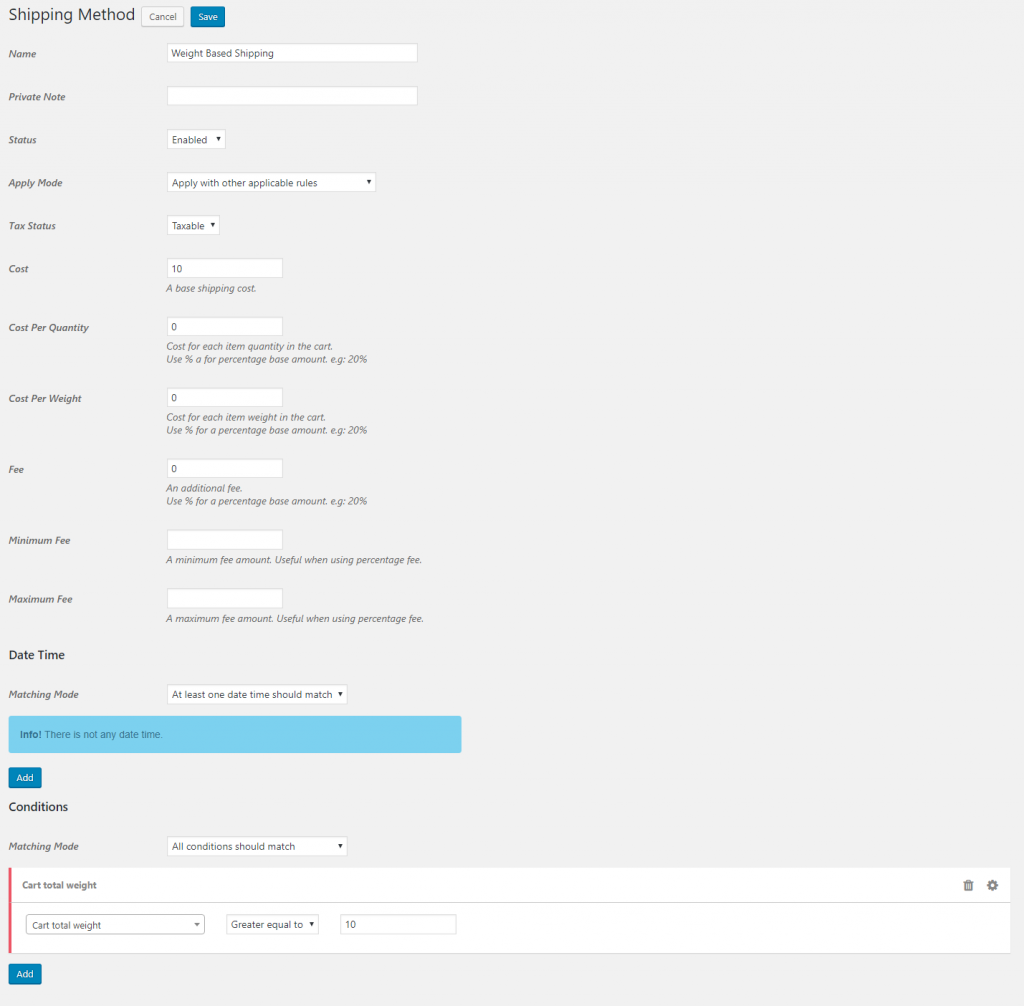
How to create a weight-based shipping method in WooCommerce?

In this video tutorial, we are going to create weight-based shipping in WooCommerce using Easy WooCommerce Discounts Pro – WooCommerce Dynamic Pricing & Shipping plugin.

Add 10$ shipping method when weight is greater or equal to 10, the product weight is 5

You can find the WooCommerce weight-based shipping method rule at the attached image.

WooCommerce weight-based shipping method rule
Posted on — 2 Comments

Automatically add free products to cart

In this video, we describe how to enable automatically add free products to cart for “Purchase X Receive Y” rules.

Notice: Please note that this feature will work when pricing rule applies on only one product or one variation as like as the video shows it.


Posted on — Leave a comment

20% discount on specific dates

In this video, we will add 20% discount on specific dates on specific products.

Posted on — Leave a comment

Any 4 tshirts for 60$ Discount

This video describes how to sell any 4 t-shirts for 60$

Posted on — Leave a comment

Buy 3 to get 1 free Discount

Buy 3 quantities of a product to get 1 for free.

Posted on — Leave a comment

Buy Product X get Product Y discounted

Buy product X to get product Y discounted.

Posted on — Leave a comment

Checkout Fee on Specific Date and Date Period

Adding Checkout Fee on a specific date or date period.