WooCommerce is already a powerful platform for online stores, but sometimes you want to offer more flexibility and creativity. With the WooCommerce Product Bundle Plugin, you can create custom bundles that combine multiple products into one smart, convenient package. Even better, you can now use product categories inside your bundles. That means customers can choose from a group of related items instead of being limited to specific products. In this tutorial, you’ll learn how to easily create category-based product bundles in WooCommerce and give shoppers a more dynamic buying experience.
Table of Contents
- Unleash the Power of Custom Bundles
- Boost Your Sales with Custom Bundles in WooCommerce
- The Power of WooCommerce Categories Product Bundles
- Video Tutorial
- How to Create Custom Bundles with Categories in WooCommerce
- Step1: Installing the Product Bundle Builder for WooCommerce
- Step 2: Create a Category Product Bundle in WooCommerce
- Step 3: Add items to the WooCommerce categories product bundle
- Step 4: Customising WooCommerce Product Bundle
- Step 5: WooCommerce Categories product bundle Price
- Step 6: Configure the Plugin Settings
- Final Result of Category Product Bundles
- Create Unique Product Bundles with Different Categories in WooCommerce
- The Ultimate Guide to Creating Product Bundles with Categories in WooCommerce
- Articles
Unleash the Power of Custom Bundles
Custom bundles are a smart way to boost sales while giving customers more flexibility and value. Instead of selling products one by one, you can combine related items into a single, attractive offer. With the WooCommerce Product Bundle Plugin, creating these bundles takes just a few steps, allowing you to build unique product packages that stand out in your store.
By using product categories inside your bundles, you make things even more powerful. Customers can choose from a group of related products rather than being limited to fixed items. This creates a more personalized shopping experience and helps you design bundles that better match different needs and preferences.
Boost Your Sales with Custom Bundles in WooCommerce
Growing an online store means finding smart ways to increase both sales and customer satisfaction. One proven strategy is to offer custom product bundles that let customers buy multiple related items together—often at a better overall price. Bundles not only increase average order value, but they also make shopping easier and more convenient.
With the WooCommerce Product Bundle Plugin, you can quickly create flexible, attractive bundles tailored to your audience. Whether you want to offer discounted sets, mix-and-match packages, or category-based selections, custom bundles give your customers more choice while helping you generate more revenue.
The Power of WooCommerce Categories Product Bundles
One of the most powerful features of the WooCommerce Product Bundle Plugin is the ability to use product categories inside your bundles. Instead of selecting products one by one, you can add an entire category and let customers choose from related items within that group.
Categories help organize products clearly and logically. This makes it easier for customers to browse, compare options, and build bundles that match their needs. By allowing shoppers to select items from specific categories, you create a smoother, more flexible shopping experience—one that naturally encourages higher engagement and increases the likelihood of completing a purchase.
Video Tutorial
How to Create Custom Bundles with Categories in WooCommerce
Creating custom bundles with categories in WooCommerce is a straightforward process. First, you’ll need to install the WooCommerce Product Bundle Plugin and configure the settings to suit your needs. Next, you can create a product bundle in WooCommerce and add categories for each item. You can set discounts and pricing for each bundle item that makes the bundle attractive to customers and profitable for your business. Follow the below steps to create a product bundle with categories in WooCommerce.
Step1: Installing the Product Bundle Builder for WooCommerce
The Easy WooCommerce Product Bundles free plugin is one of the best WooCommerce plugins for creating product bundles in your online store so Follow the steps below to install this plugin :
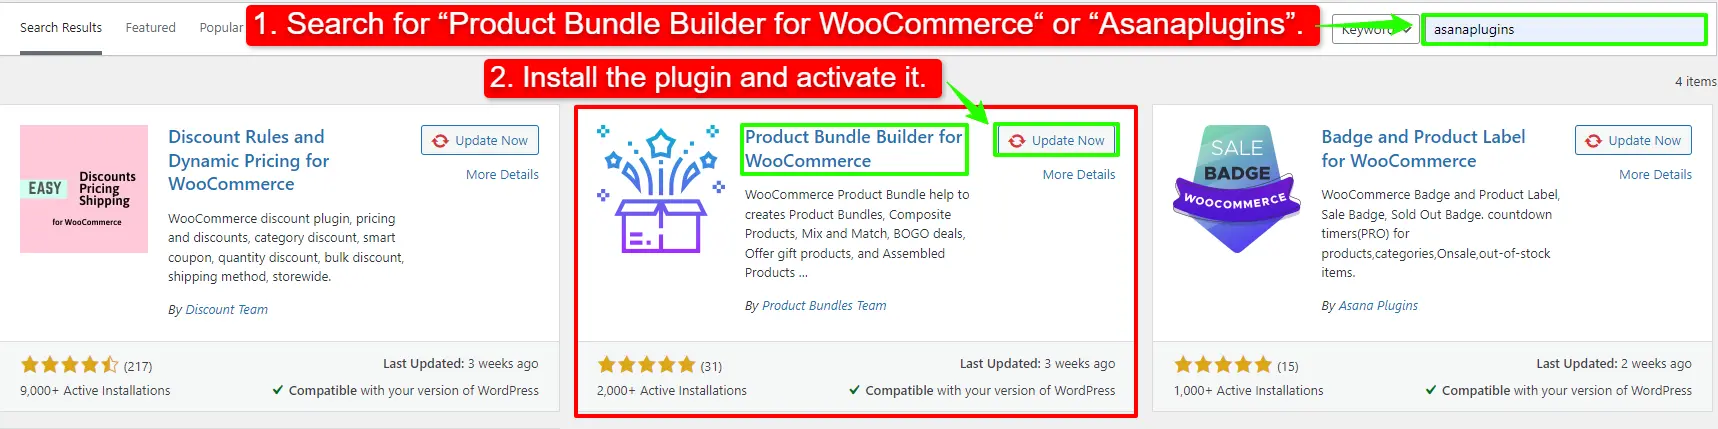
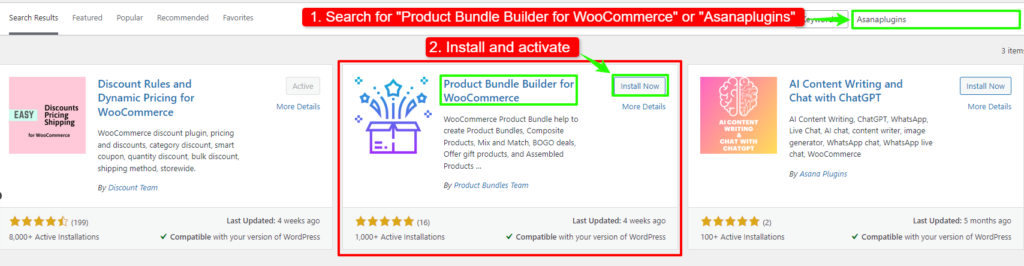
1. Navigate to the Plugins >> Add New menu on your WordPress website
2. Then search for “Easy Product Bundles for WooCommerce“ or “AsanaPlugins“
3. Find the “Product Bundle Builder for WooCommerce” by “Asana Plugins“
4. Install and activate the plugin.
Step 2: Create a Category Product Bundle in WooCommerce
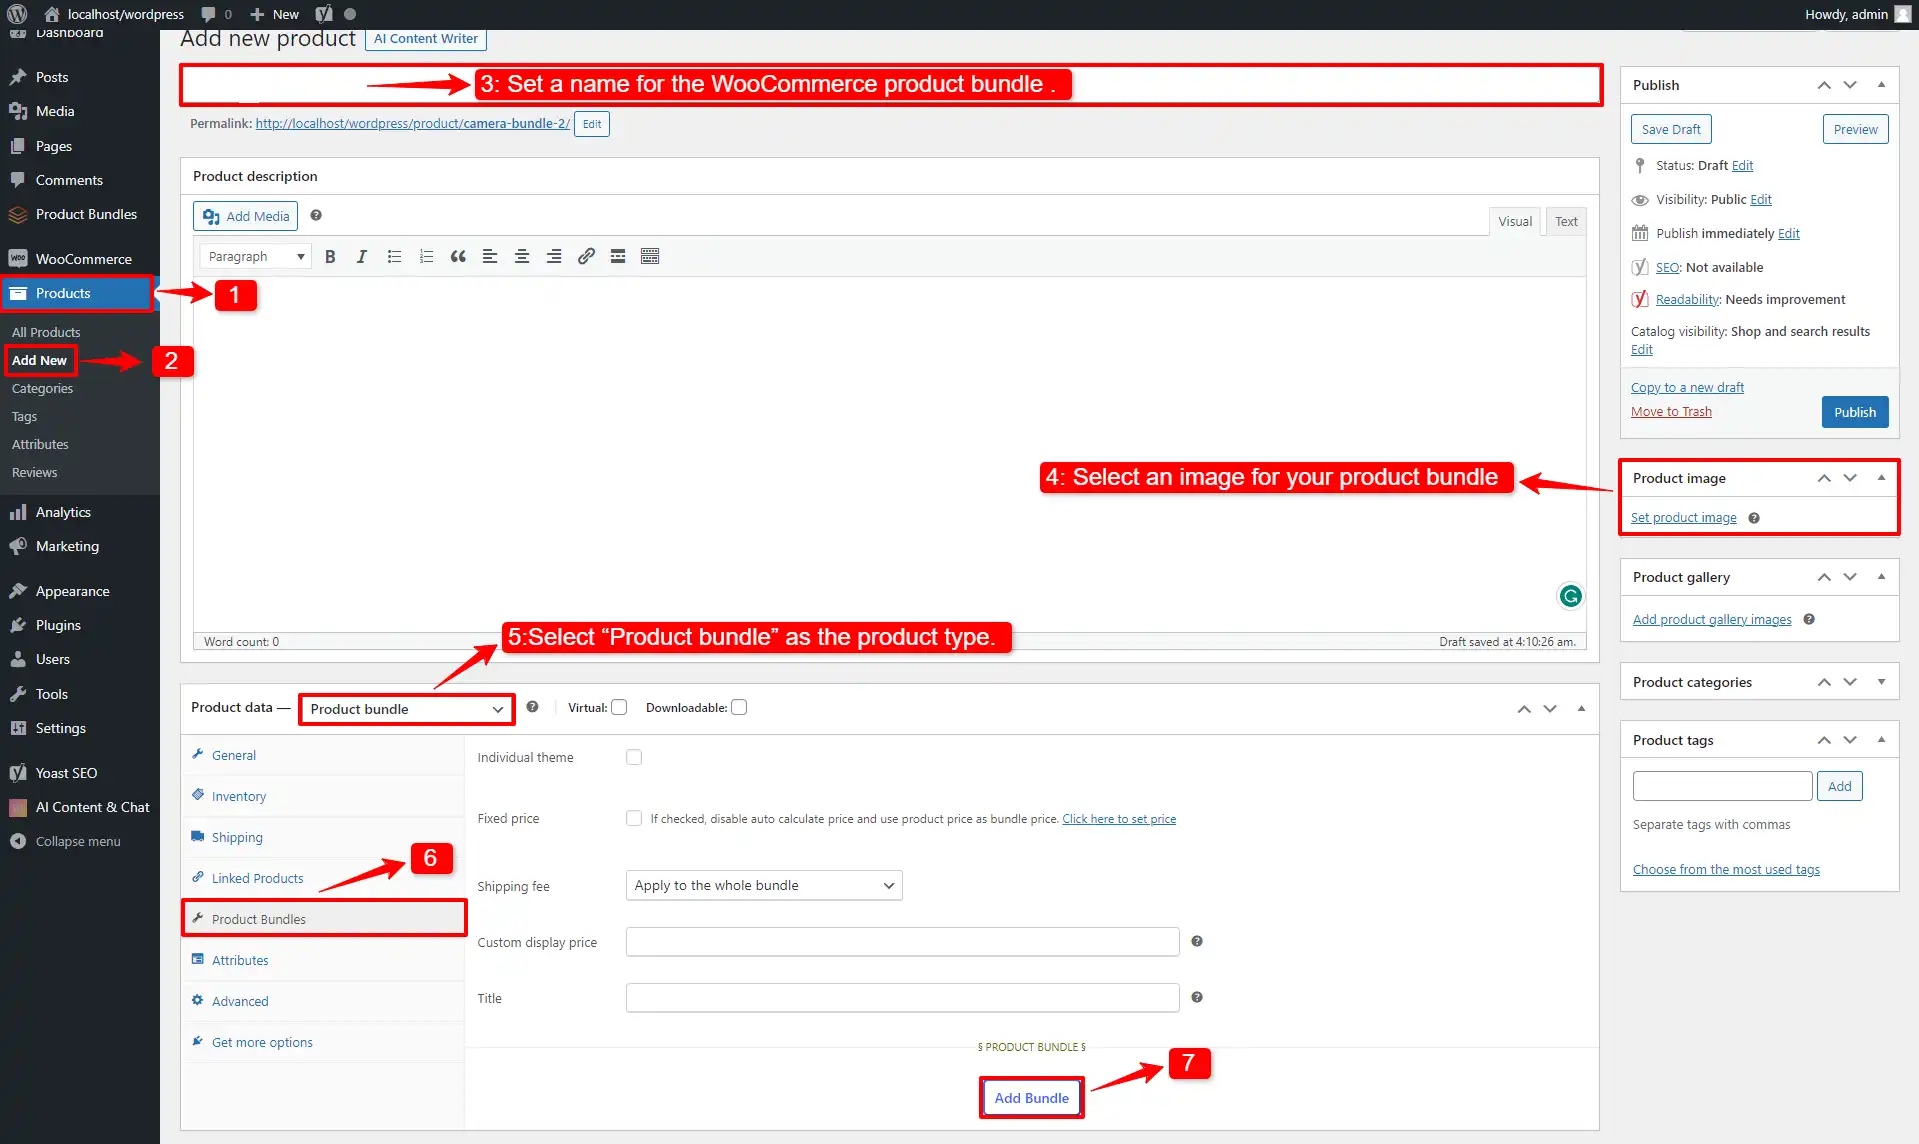
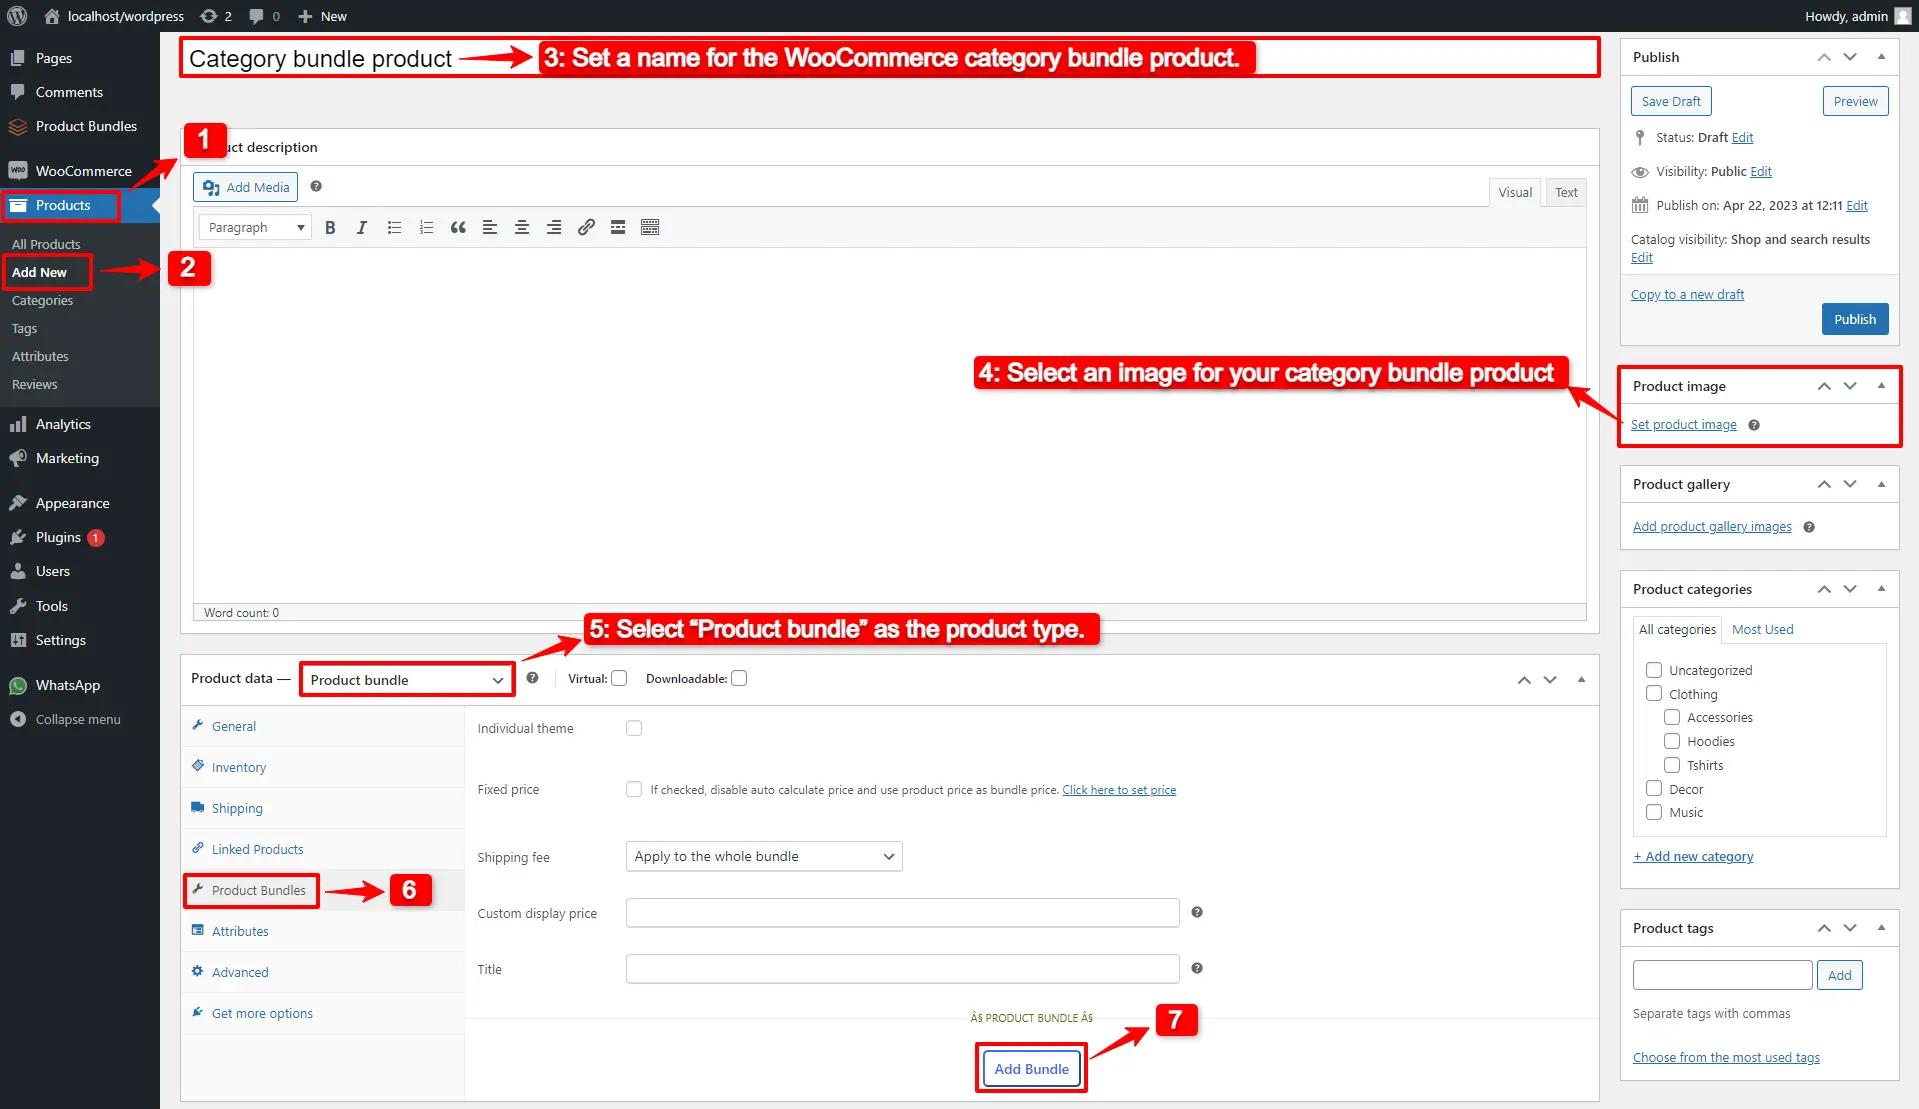
1. Navigate to the WooCommerce “Products” field in the WordPress dashboard.
2. Click on “Add New” to create a new product.
3. Set a name for the WooCommerce category bundle product.
4. Click on “Set product image” from the right sidebar and select an image for your category bundle product.
5. Now navigate to the Product data panel, and select “Product bundle” as the product type.
6. After selecting “Product bundle” as the product type, the “Product Bundles” tab will appear in the product data panel.
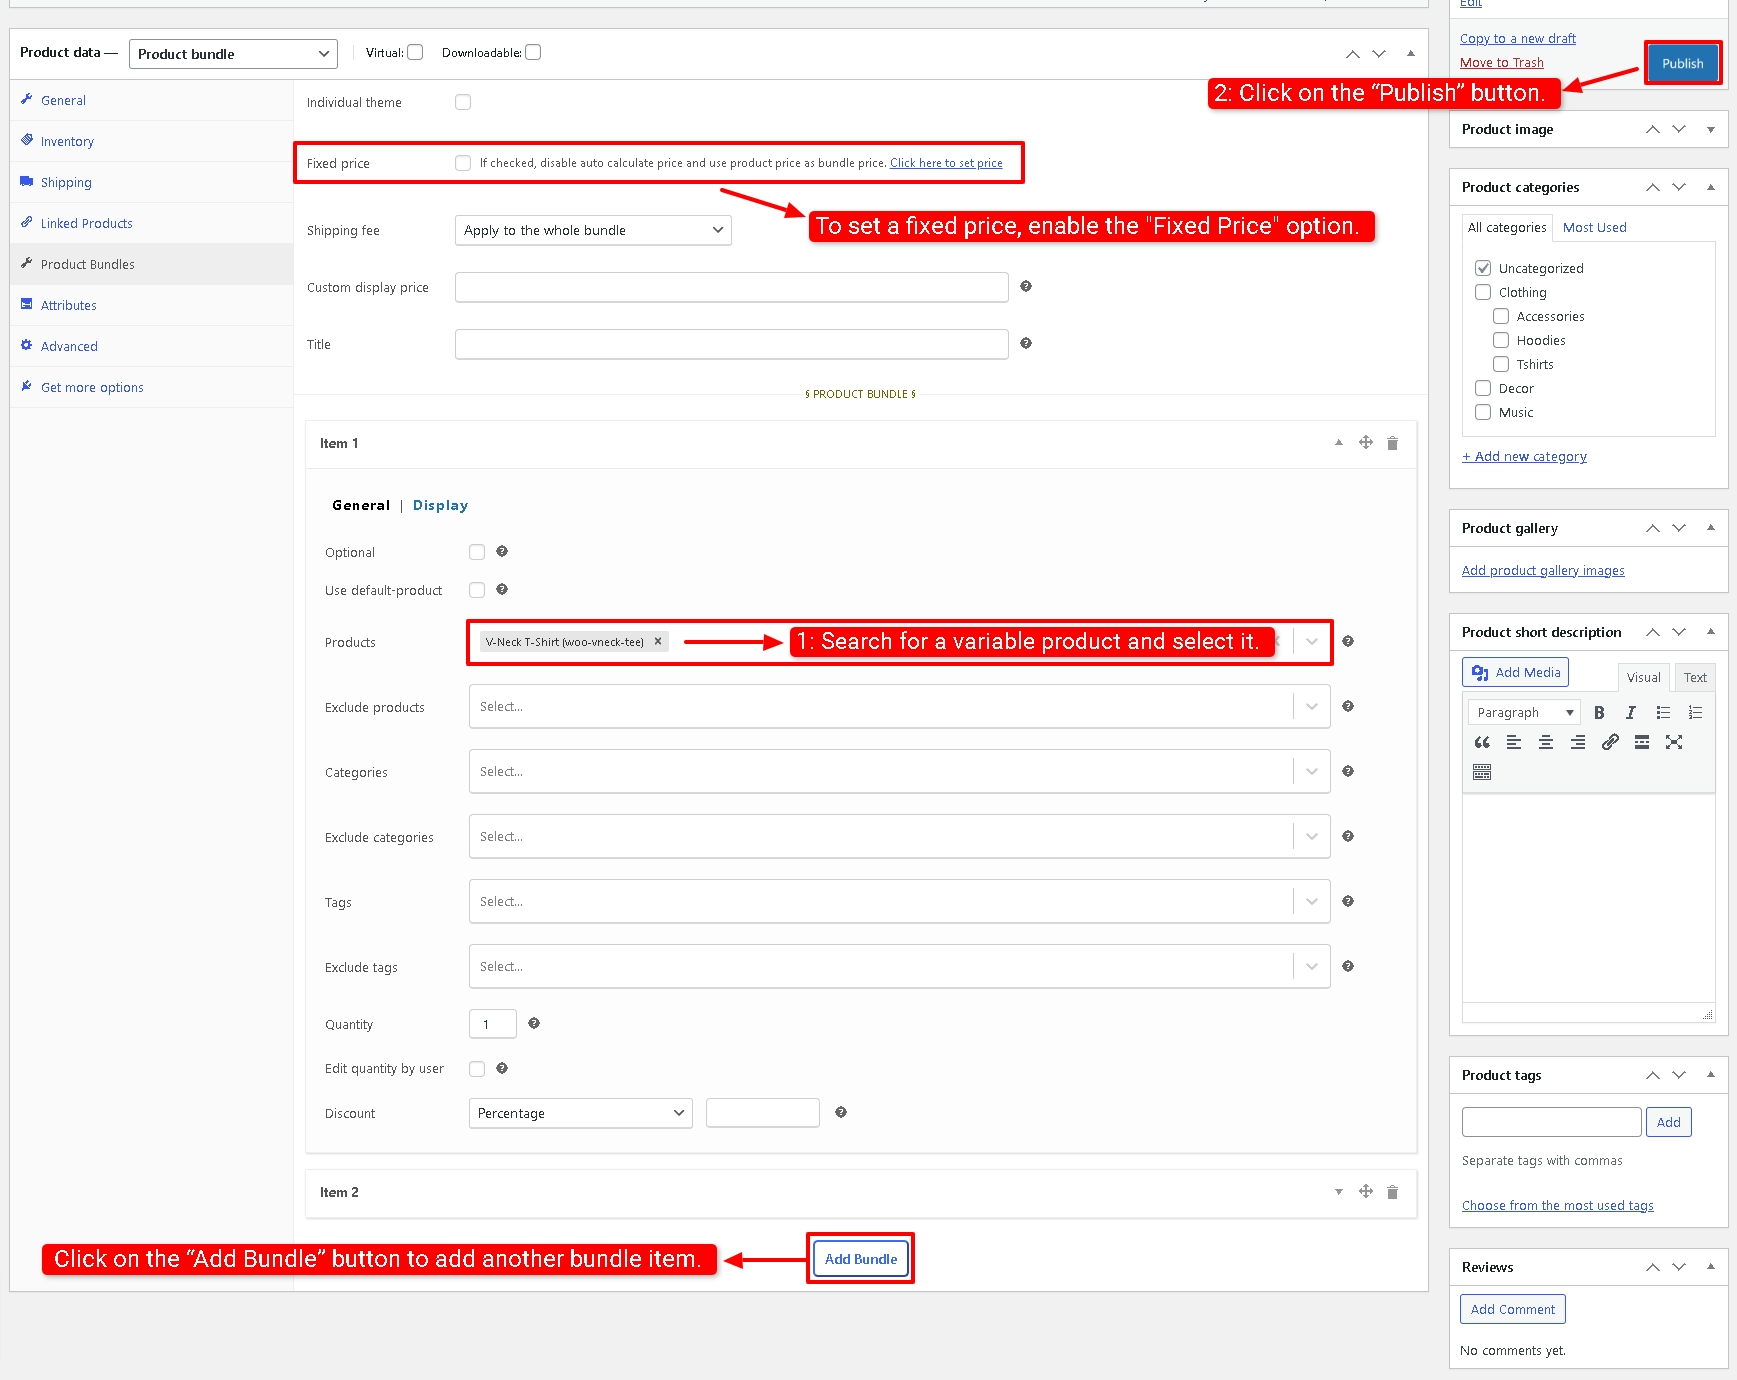
7. Navigate to the “Product Bundles” tab and click on the “Add Bundle” button to add a new bundle item.
Step 3: Add items to the WooCommerce categories product bundle
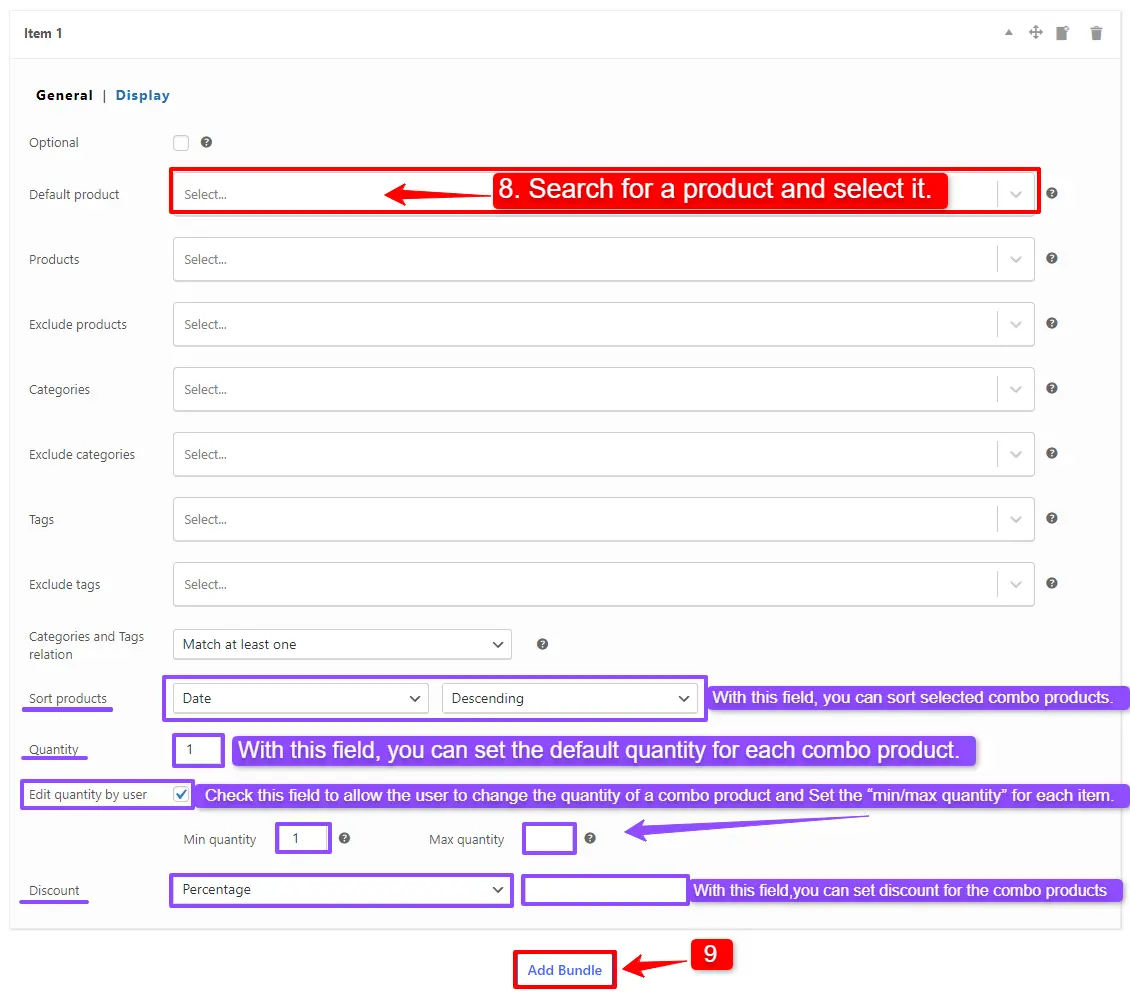
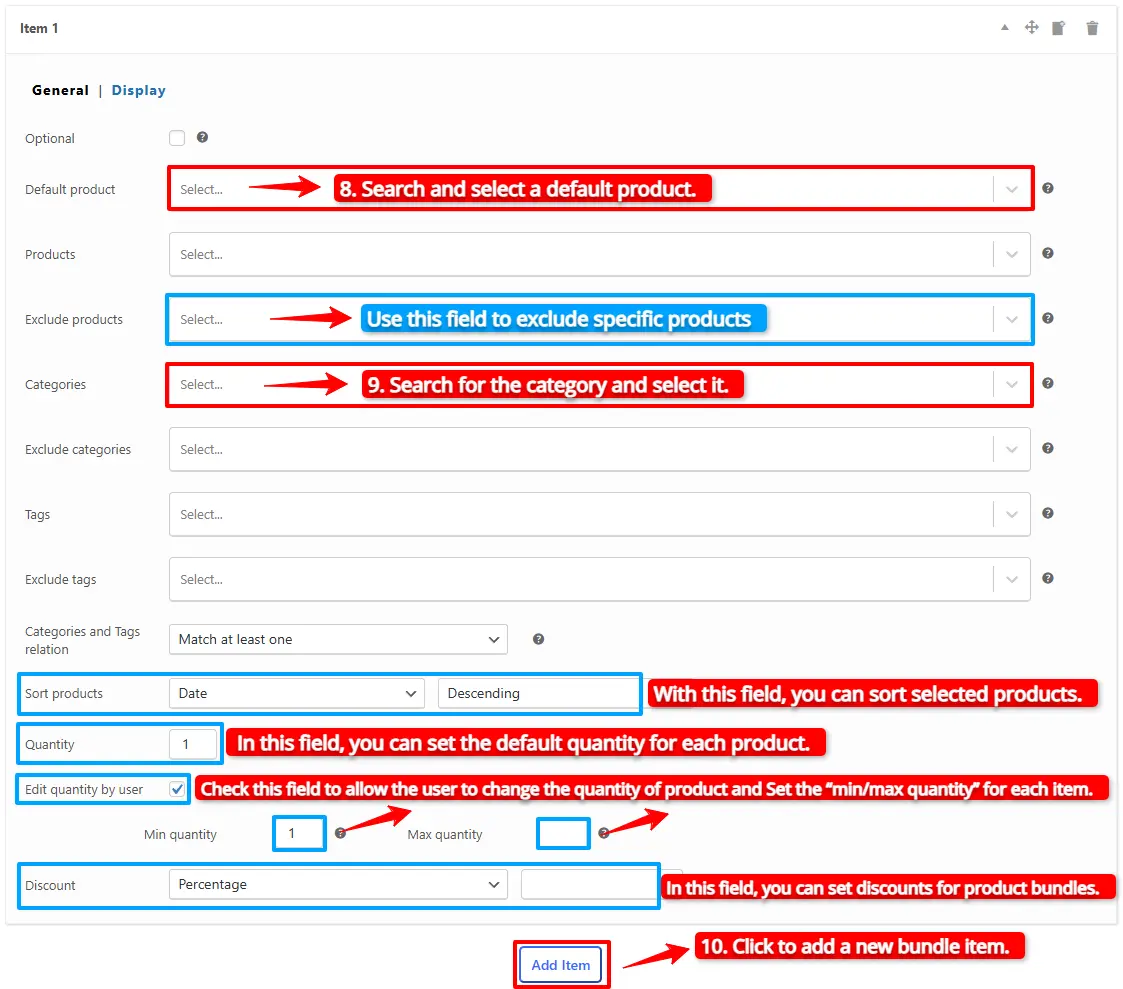
8. You can set a “Default Product” for the bundle item by selecting a product in the “Default product” field.
9. In the “Categories” field, you can include as many categories as you want. It will load products from the selected categories.
Note: If you would like to exclude some of the category products, then you can use the “Exclude products” field and specify products that should be excluded.
Step 4: Customising WooCommerce Product Bundle
You can also configure the settings below for your WooCommerce Product Bundle in the item field:
- Sort products: With this field, you can sort selected products by “ID”, “Title”, “Menu order”,” Date”, “Price”, “popularity”, and“Rating”.
- Quantity: In this field, you can set the default quantity for each product.
- Edit quantity by user: Check this field to allow the user to change the quantity of product and Set the “min/max quantity” for each item.
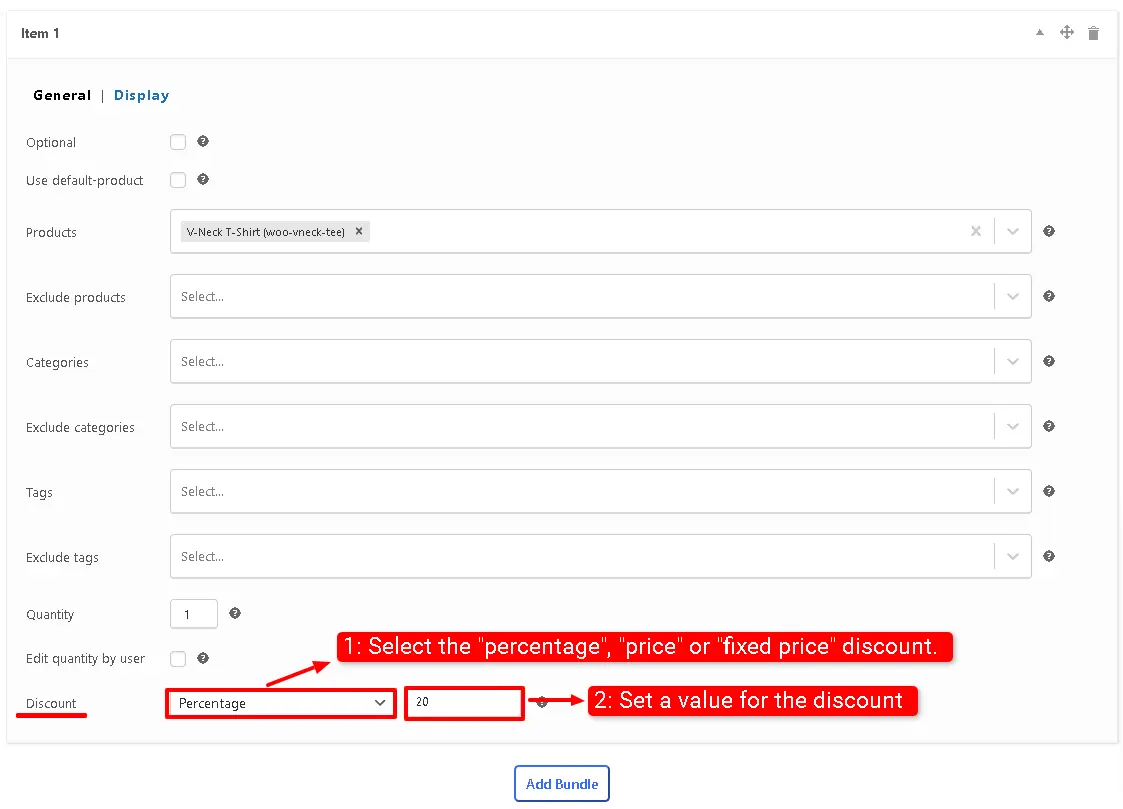
- Discount: In this field, you can set discounts for product bundles by percentage, price, or fixed price.
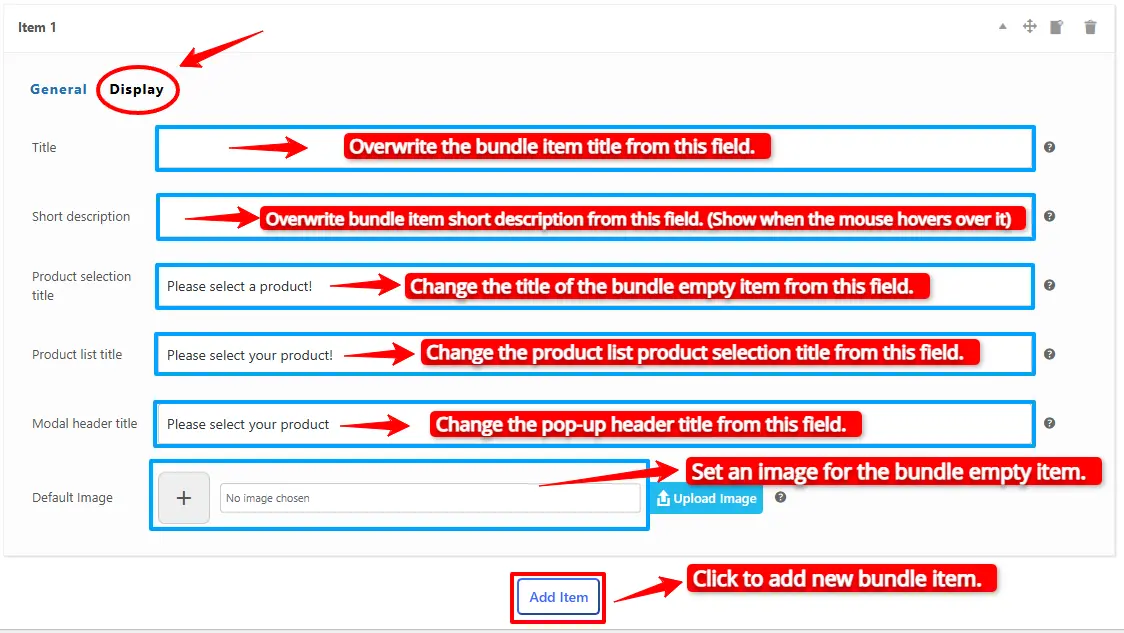
Now you can go to the “display” tab of the item and configure the following sections:
- Overwrite bundle item title.
- Overwrite bundle item short description. (Show when the mouse hovers over it)
- Change the title of the bundle’s empty item.
- Change the product list product selection title.
- Change the pop-up header title.
- Set an image for the empty item.
10. Then click on “Add Item” to add a new item to the bundle and select the category for it. We repeated the rule and added two items to the bundle: one for the hoodies category and another for the pants category.
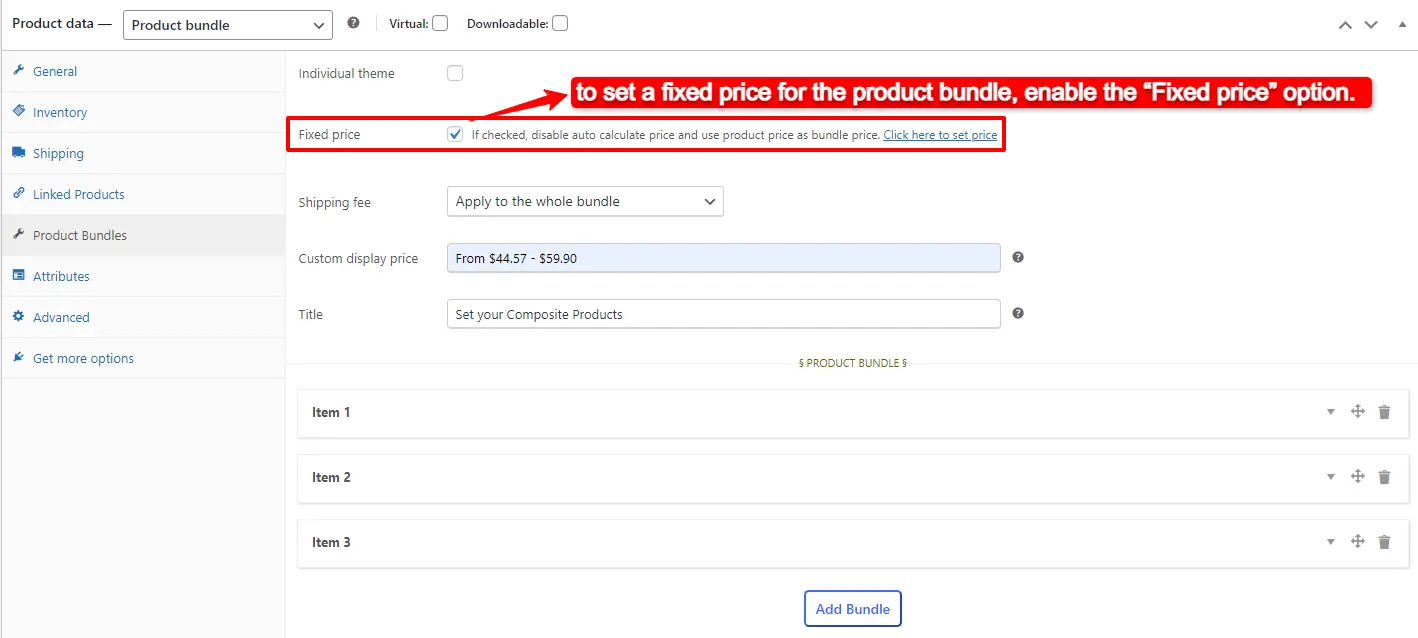
Step 5: WooCommerce Categories product bundle Price
The WooComerce Product Bundle plugin offers two pricing strategies.
- A fixed price for the whole bundle product
- Auto-calculate the price based on selected products
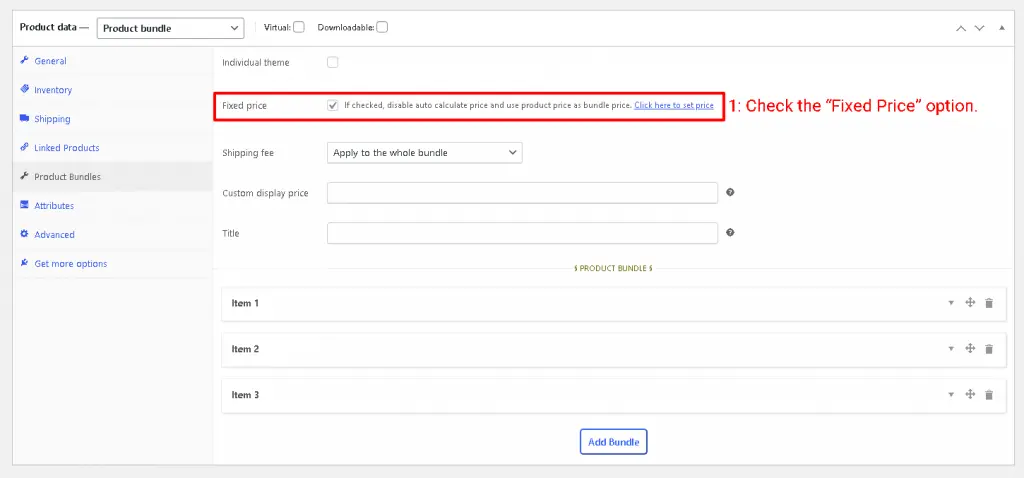
1. Fixed Price
If you would like to set a fixed price for the whole bundle product, then check the “Fixed Price” option.
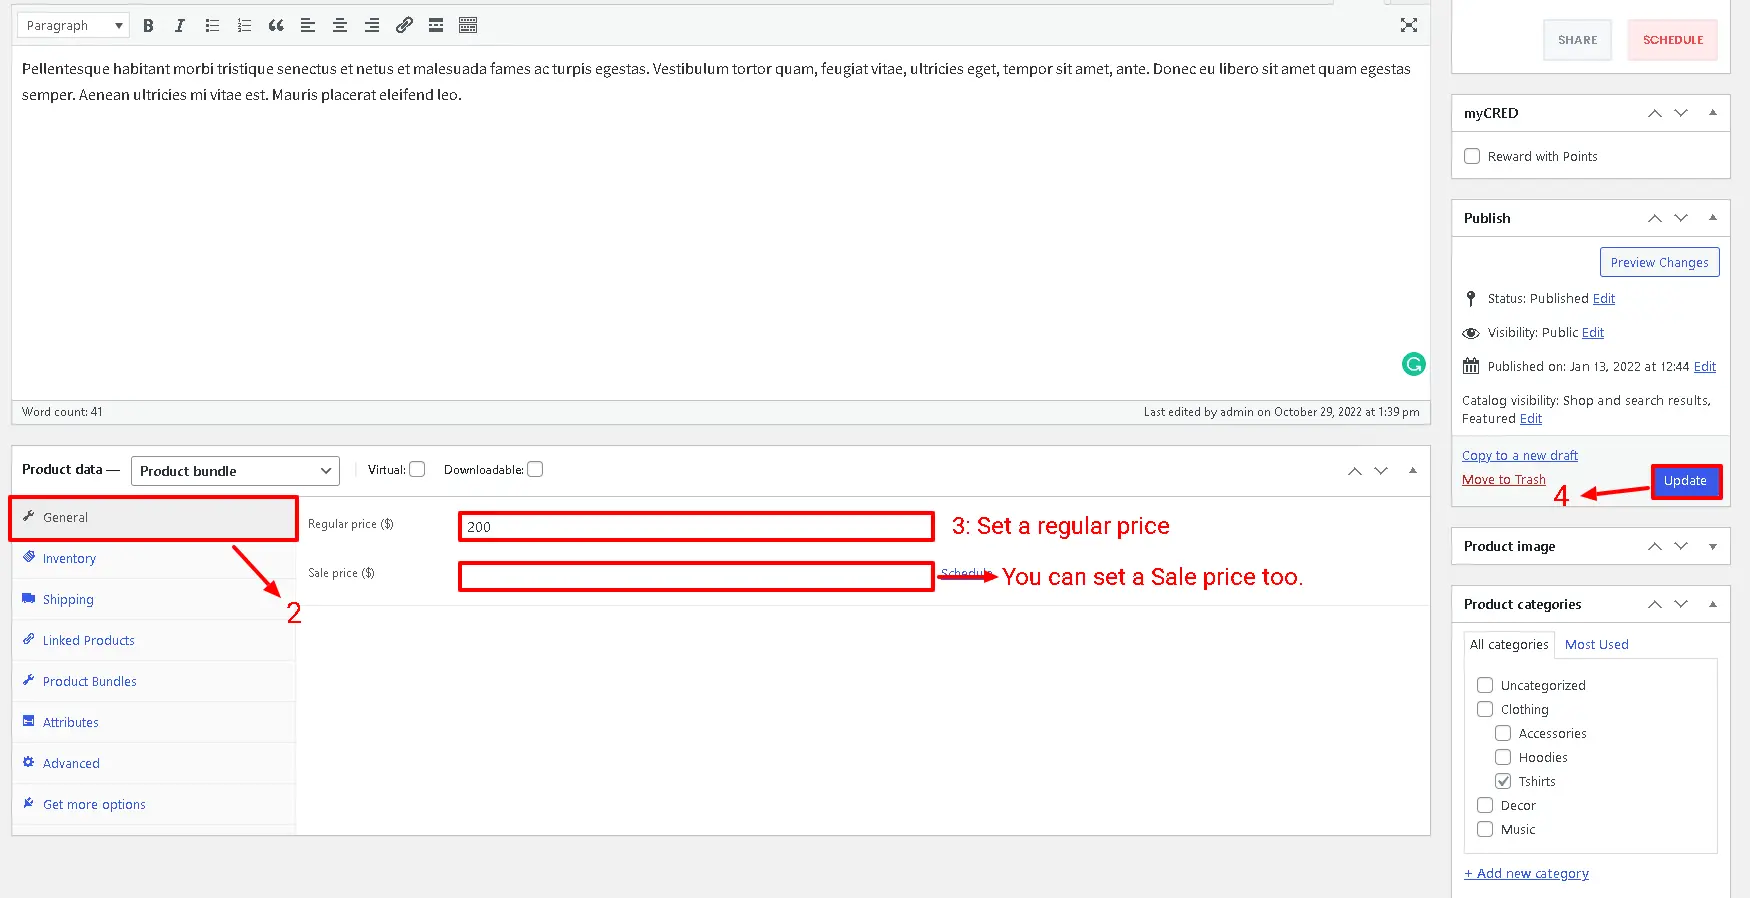
Navigate to the “General” tab and set a regular price for the Product. You can set a Sale price too.
After setting a price, update the product.
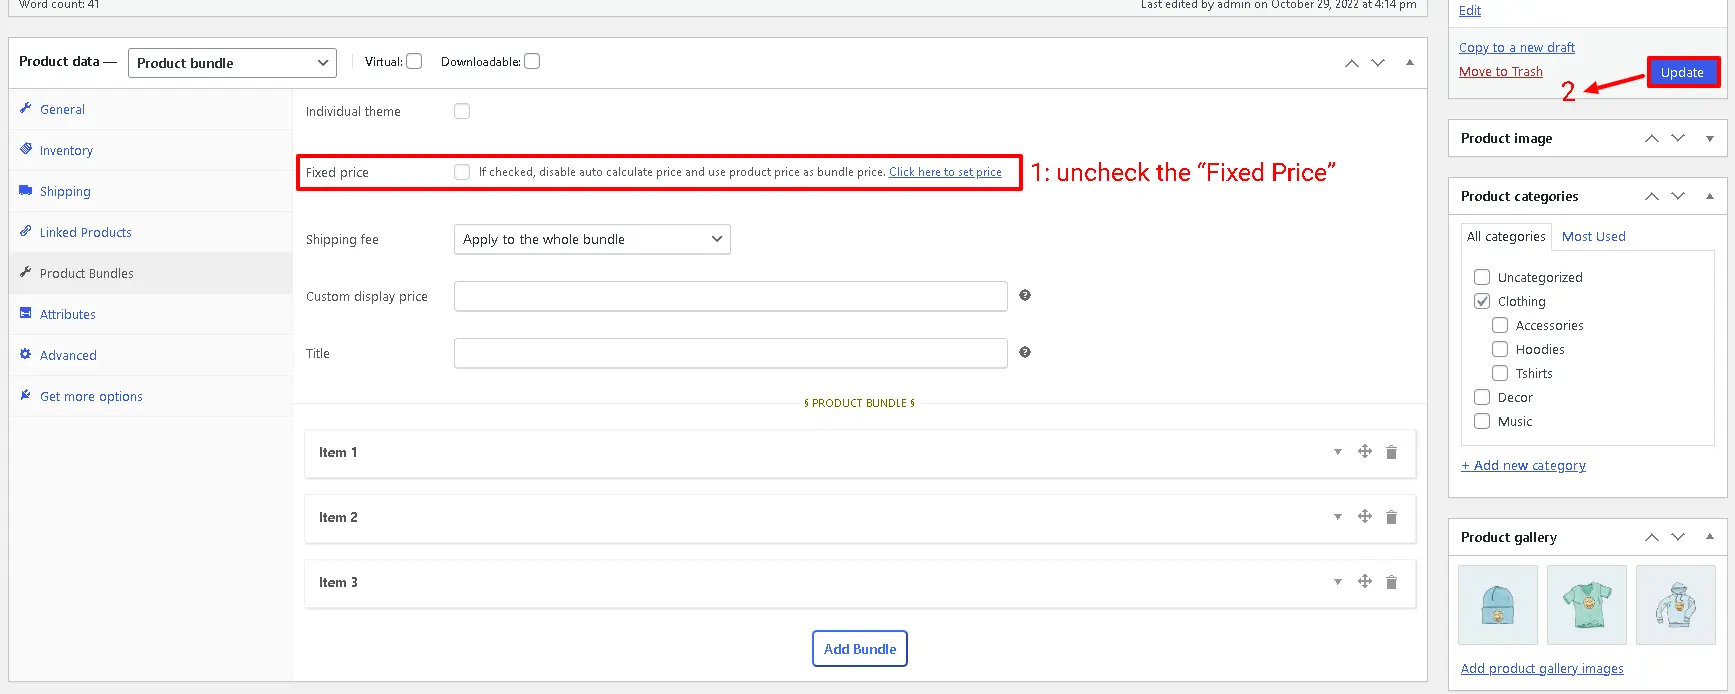
2. Auto Calculate Price
Auto calculates price helps to set a dynamic price for the product bundle based on selected items for the bundle.
To use the auto-calculate price feature, uncheck the “Fixed Price” option and update the product.
10. At the end, publish the product bundle on your website.
Step 6: Configure the Plugin Settings
All the plugin settings you need can be found on the “Product Bundles” tab in the WordPress dashboard.
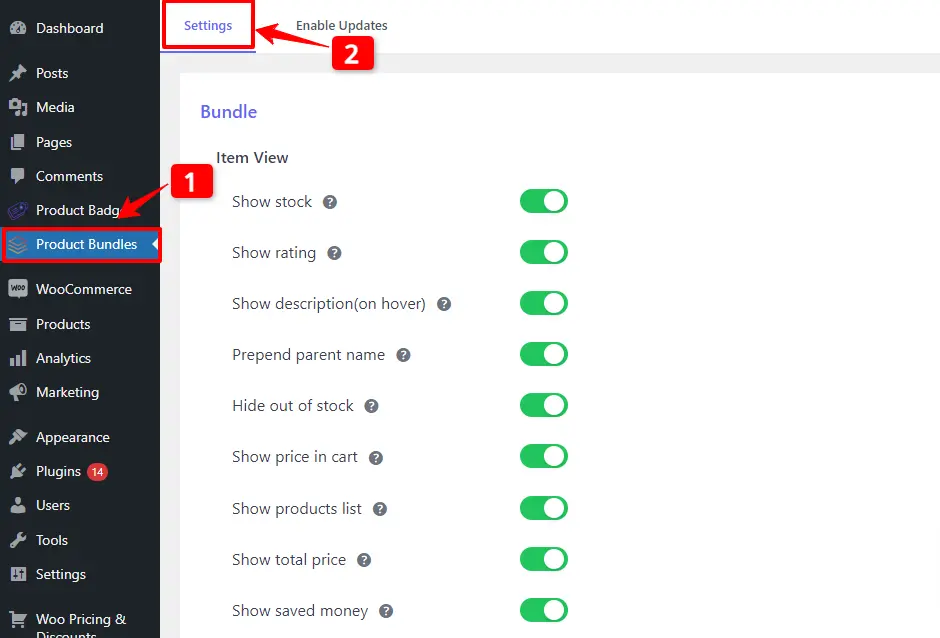
Settings and customization are available on this page:
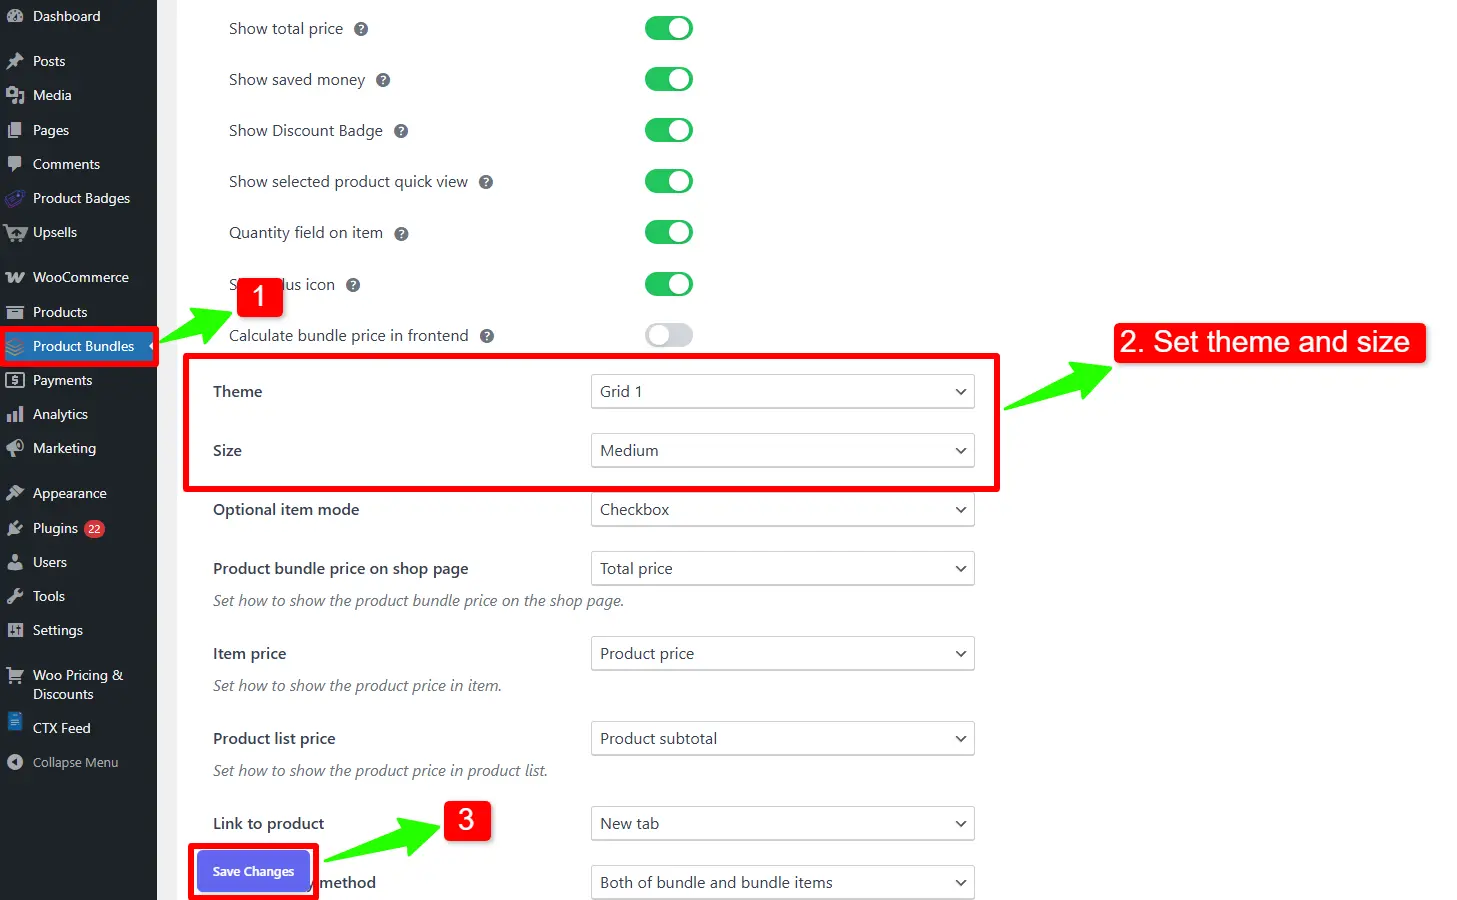
- Item View: In this section, you can configure various settings, such as displaying stock availability, showing product ratings and descriptions, adding a quantity field on item pages, displaying a plus icon for items, setting the theme and size options, positioning product bundles on the product page, defining custom CSS selectors, specifying the product price selector, and many other customizable options.
- Change product popup: In this section, you can configure popup settings.
- Styles: In this section, you can customize the colours of different parts of your bundle and set the product image object-fit CSS.
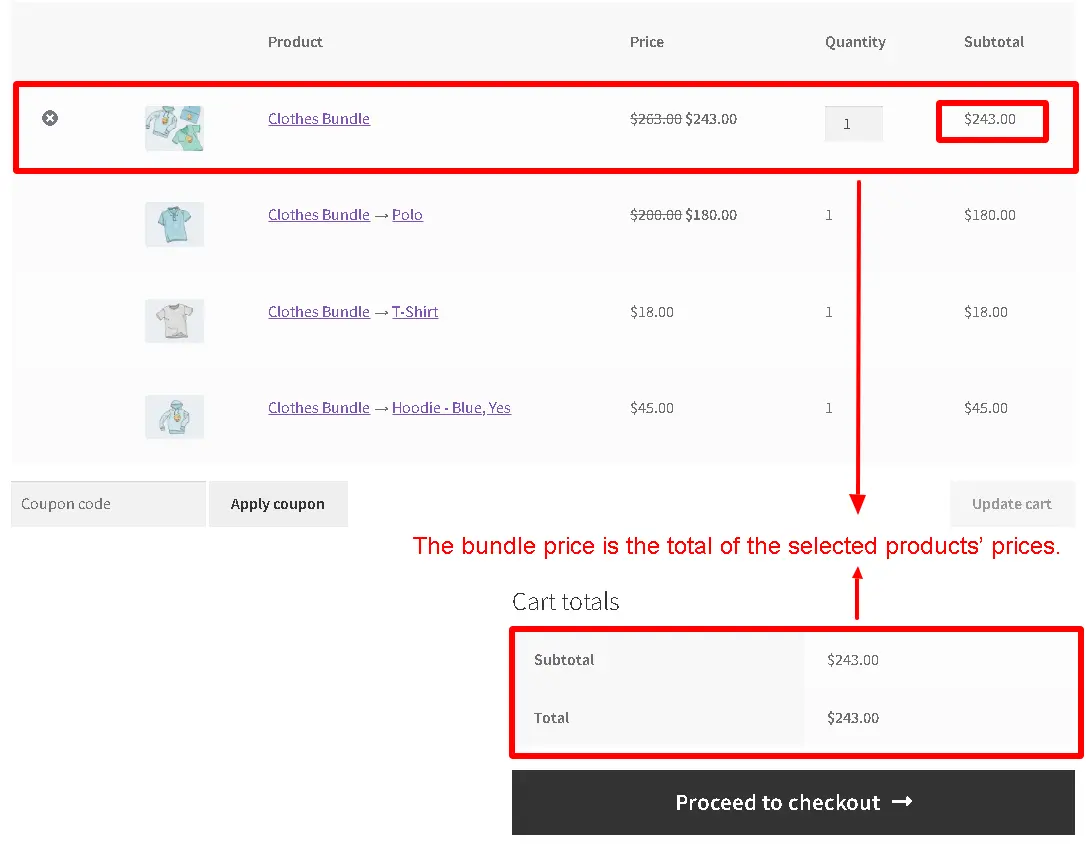
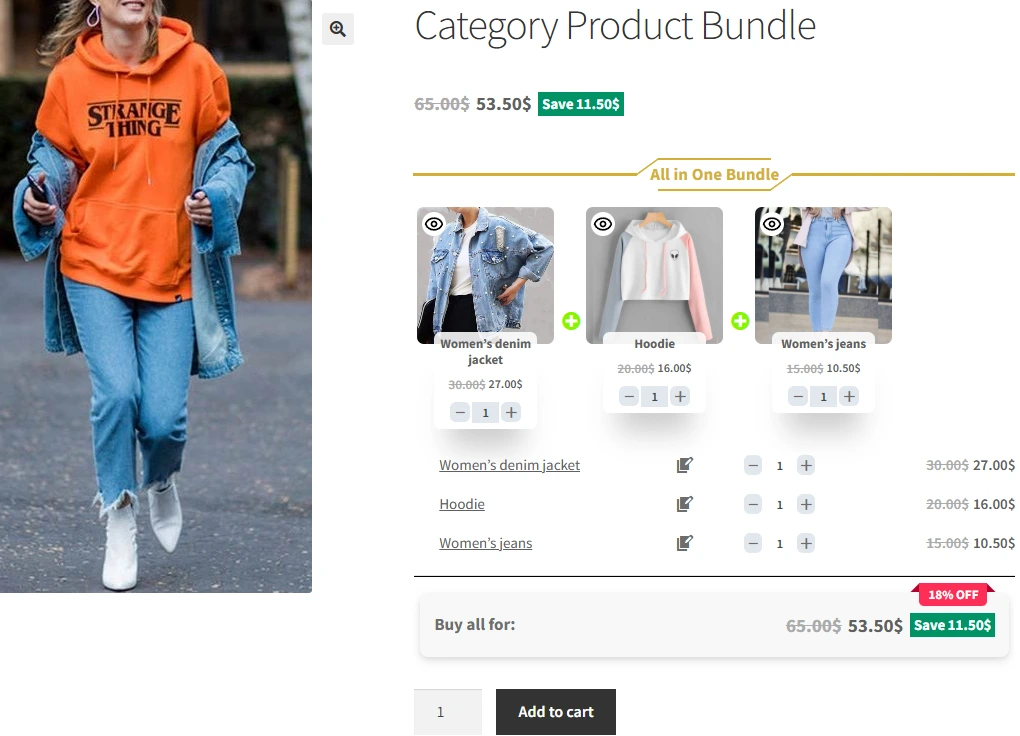
Final Result of Category Product Bundles
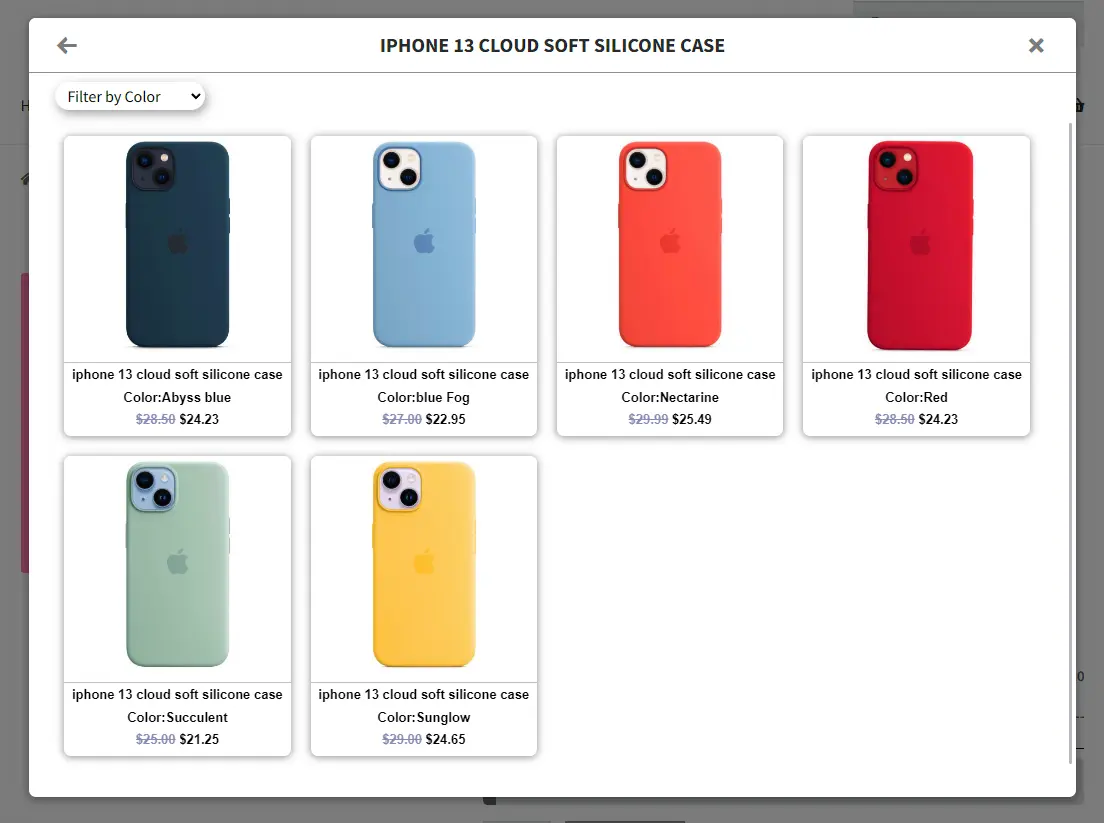
After creating and publishing the category product bundle in WooCommerce, navigate to the product page and select a product for each item from popup, then add it to the cart.
Create Unique Product Bundles with Different Categories in WooCommerce
One of the most powerful aspects of the WooCommerce Product Bundle Plugin is the ability to create unique bundles that include products from different categories. This allows you to offer customers a more personalized shopping experience and increase the likelihood of a sale. For example, you could create a bundle that includes a shirt, pants, and shoes from different categories, and offer a discount on the total price. By offering these types of bundles, you can differentiate yourself from competitors and drive more sales to your store.
If you want to force users to select products from different categories, then you should add an item for each category.
For example, we want to force users to select a hoodie and a pant. We should add 2 items to the bundle.
Step 1: Create a New Bundle
- Go to WooCommerce → Products → Add New.
- Add a name and image for Product Bundle.
- Choose Product Bundle as the product type.
- After selecting “Product bundle” as the product type, the “Product Bundles” tab will appear in the product data panel.
- Navigate to the “Product Bundles” tab and click on the “Add item” button to add a new bundle item.
Tip: Choose a clear, catchy name for your bundle that highlights the value or theme (e.g., “Casual Hoodie & Pant Set”).
Step 2: Configure Each Item
- Select the hoodie category for the item in the category field (e.g., Hoodie).
- Set Default Quantity, Min/Max Quantity, and Discount.
- Now, click on the” Add Item” button to add item 2 to the bundle.
- Repeat the top steps for the second item (e.g., Pant).
Tip: Offering a small discount encourages customers to buy the full bundle instead of individual products.
Step 3: Publish and Test
- Review your bundle and make sure each category is set correctly.
- At the end, publish the bundle.
Pro Tip: Highlight the flexibility of the bundle in your product description. Phrases like “Mix & Match your favorite Hoodie and Pant” make the offer more appealing.
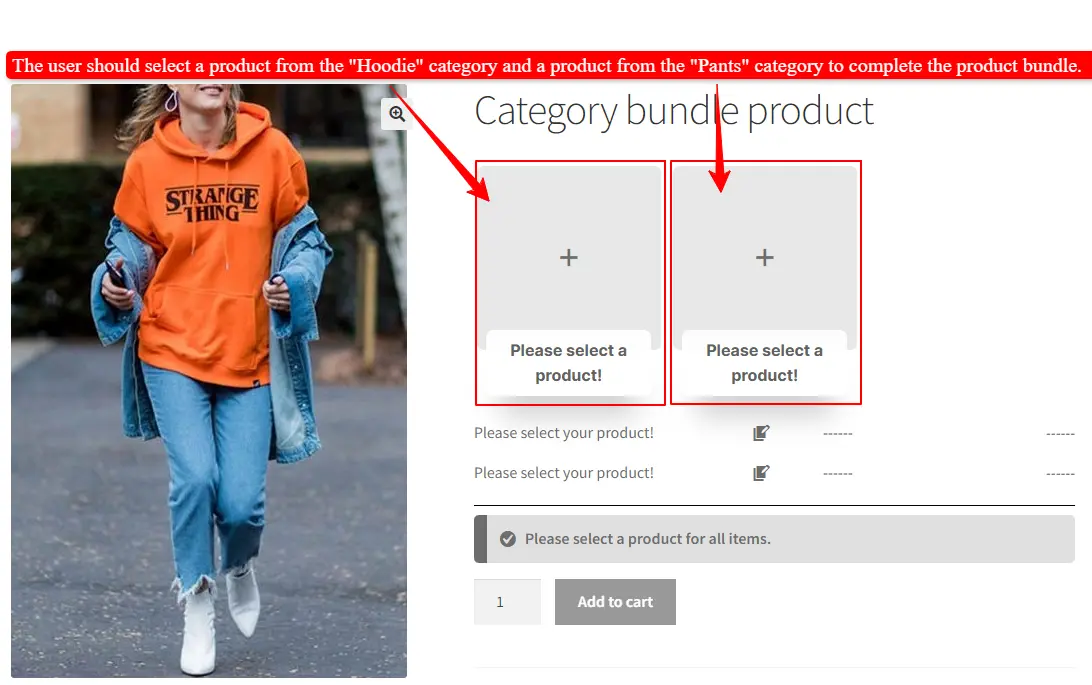
Customers must now choose one product from each category in the bundle.
As you can see in the image below, the user should select a product from the “Hoodie” category and a product from the “Pant” category to complete the product bundle.
Using category-based bundles helps you increase average order value, improve customer satisfaction, and differentiate your store from competitors.
The Ultimate Guide to Creating Product Bundles with Categories in WooCommerce
In conclusion, the WooCommerce Product Bundle Plugin is a powerful tool for online retailers looking to boost sales and offer a more personalized shopping experience to customers. By using categories in your bundles, you can organize products in a way that makes sense for your customers and create bundles that are both attractive and profitable. Whether you’re just starting with custom bundles or looking to take your existing bundles to the next level, the WooCommerce Product Bundle Plugin is a must-have tool for any online retailer.
Articles
To delve deeper into the realm of Product Bundle plugin and its applications, we invite you to explore the array of informative resources we’ve compiled in the list below. These resources promise to expand your understanding and proficiency in leveraging the potential of this plugin to the fullest:
- WooCommerce Product Bundles Free Plugin
- Create Assembled Products in WooCommerce(2024)
- How to Create WooCommerce Combo Offers (2024)
- WooCommerce Product Bundle with Variations (Free Plugin)
- WooCommerce Mix and Match Free Plugin
- Create Custom Bundles with Categories in WooCommerce Product Bundle Plugin
- How to Create WooCommerce Composite Products?
- WooCommerce Product Bundle: How to Create Dynamic and Flexible Bundles
- Gift a Product in WooCommerce with Product Bundles
- How to translate WooCommerce product bundle