

A WooCommerce Cyber Monday sale is a great way to attract shoppers with limited-time discounts without manually activating and deactivating promotions. With the free Discount Rules and Dynamic Pricing for WooCommerce plugin by Asana Plugins, you can schedule discounts to start automatically on Cyber Monday and expire when your promotion ends.
You can also use the free Sale Booster plugin to display promotional badges and countdown timers on selected products, helping customers identify your deals and see how much time remains.
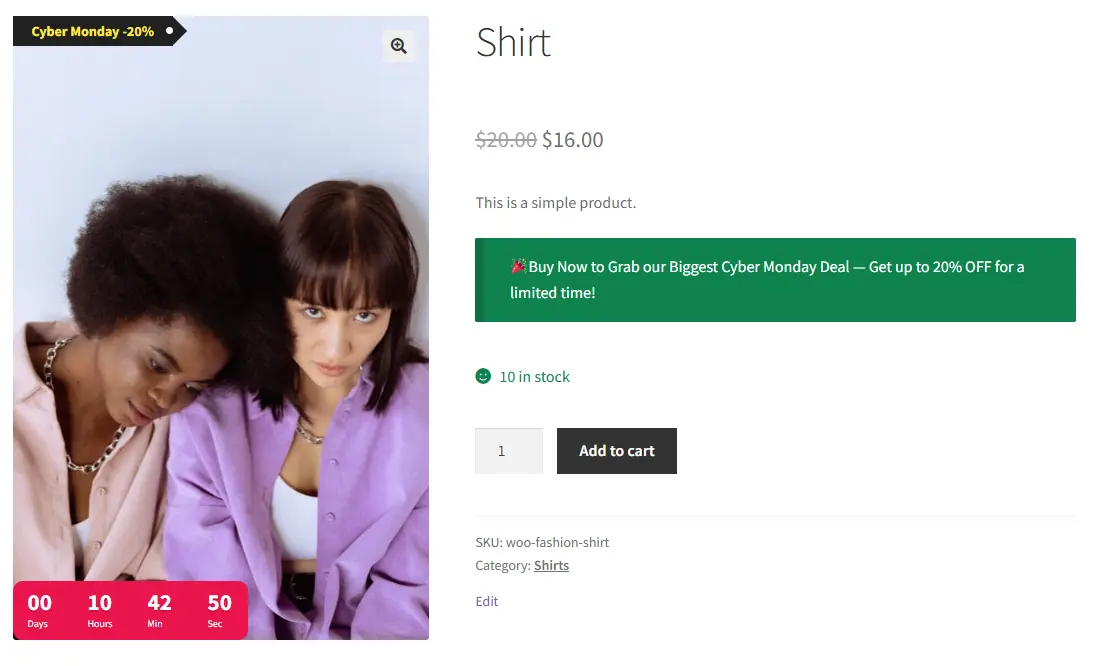
In this tutorial, you’ll learn how to:
- Create automatic Cyber Monday discounts in WooCommerce.
- Schedule discount start and expiration dates.
- Display promotional sale badges on products.
- Schedule product countdown timers using the free Sale Booster plugin.
- Target badges and countdown timers to specific products and categories.
- Test your scheduled promotion before launch.
Whether you want to offer a storewide discount, promote selected products, or create special category deals, you can prepare your campaign in advance. By preparing your WooCommerce Cyber Monday sale in advance, you can coordinate discounts, promotional badges, and countdown timers to create a consistent shopping experience. Once everything is scheduled, your campaign can run automatically without requiring you to manually update your products on Cyber Monday.
Table of Contents
- When Is the WooCommerce Cyber Monday Sale in 2026?
- Step 1: Install the Free WooCommerce Discount Plugin
- Step 2: Create a Cyber Monday Discount Rule
- Step 3: Schedule Automatic Discount Start and Expiration
- Step 4: Add and Schedule Badges for Your WooCommerce Cyber Monday Sale
- Step 5: Add a Free Countdown Timer for Your WooCommerce Cyber Monday Sale
- Step 6: Create Product Bundles and Upsell Offers
- Step 7: Test Your Scheduled WooCommerce Cyber Monday Sale
- Common Mistakes to Avoid
- Frequently Asked Questions
- Can I schedule a Cyber Monday sale in WooCommerce for free?
- Can WooCommerce automatically start and stop discounts?
- Can I schedule discounts for specific products or categories?
- Can I add a countdown timer to WooCommerce products for free?
- Can I schedule sale badges and countdown timers?
- Does Sale Booster require PRO for countdown timers?
- Do customers need a coupon code to receive Cyber Monday discounts?
- Can I schedule a WooCommerce discount for multiple days?
- What happens when a scheduled discount expires?
- Final Thoughts
When Is the WooCommerce Cyber Monday Sale in 2026?
Cyber Monday 2026 takes place on Monday, November 30, 2026, immediately after Black Friday weekend.
If you’re preparing a seasonal promotion, it’s best to configure your discounts before the event. This gives you time to test your rules, check your product prices, and prepare your promotional messages.
For example, you could schedule your promotion as follows:
| Setting | Example |
|---|---|
| Promotion | Cyber Monday Sale |
| Start date | November 30, 2026 |
| Start time | 12:00 AM |
| End date | November 30, 2026 |
| End time | 11:59 PM |
| Discount | 20% off |
| Products | All eligible products |
You can change these dates and times to match your own campaign. You could also start your promotion earlier or extend it beyond Cyber Monday.
Step 1: Install the Free WooCommerce Discount Plugin
To schedule your Cyber Monday discounts, we’ll use Discount Rules and Dynamic Pricing for WooCommerce by Asana Plugins.
The free version lets you create several types of automatic discounts, including:
- Storewide percentage discounts.
- Fixed-amount product discounts.
- Product-specific discounts.
- Category discounts.
- Quantity-based discounts.
- Cart-total discounts.
- Scheduled discounts with start and end dates.
You don’t need to create a coupon code for every promotion. You can configure automatic pricing rules that apply when customers meet your conditions.
Install the free plugin:
Download Discount Rules and Dynamic Pricing for WooCommerce
After installation, activate the plugin from your WordPress dashboard.
Step 2: Create a Cyber Monday Discount Rule
Now let’s create a discount that automatically reduces product prices during your promotion.
- Open Woo Pricing & Discounts in your WordPress dashboard.
- Navigate to the Pricing tab.
- Click Add from Template.
- Select a suitable discount template, such as a storewide or product discount.
- Configure the discount amount and eligible products.
For this example, let’s create a 20% discount for selected products.
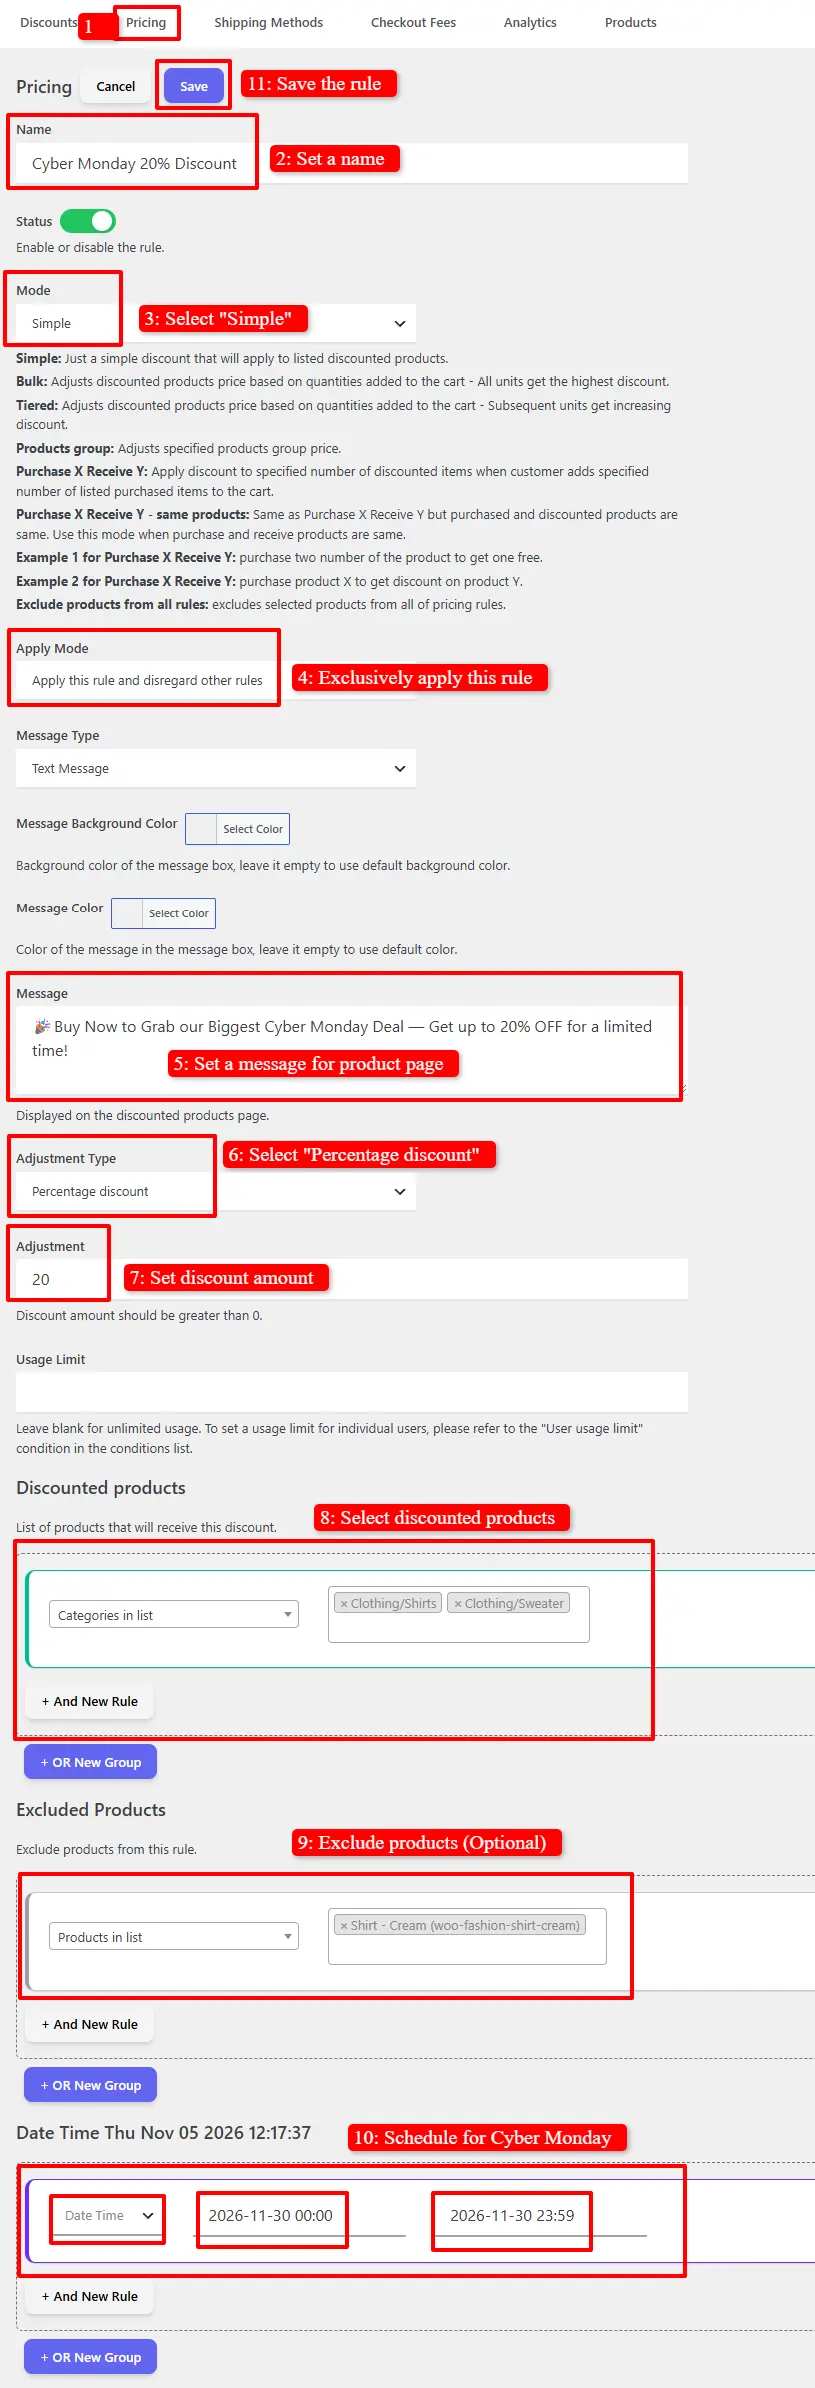
Configure the rule with these settings:
| Setting | Value |
|---|---|
| Rule name | Cyber Monday 20% Discount |
| Discount type | Percentage discount |
| Discount amount | 20% |
| Products | All products or selected products |
| Status | Enabled |
You can also exclude products that shouldn’t participate in the promotion.
For example, you might exclude already discounted products, specific categories, or products with low profit margins.
Once you’ve configured the rule, save it.
Important: Keep the rule enabled. The scheduling conditions will determine when the discount becomes active. If you disable the rule, the scheduled promotion won’t run.
Step 3: Schedule Automatic Discount Start and Expiration
This is the most important step. Instead of manually launching your Cyber Monday promotion, you can configure its start and end dates in advance.
- Open your discount rule.
- Find its Conditions section.
- Add a date-based scheduling condition.
- Depending on your campaign, choose a date range or a date-and-time range.
- Set the start and end dates and save the rule.
For our example, use these values:
| Field | Example value |
|---|---|
| Start date | 2026-11-30 |
| Start time | 00:00 |
| End date | 2026-11-30 |
| End time | 23:59 |
Your WooCommerce Cyber Monday sale will now start and expire automatically according to the configured schedule.
You can also schedule a longer promotion. For example, if you want to run your Cyber Monday deals throughout the week, simply choose a later end date.
For more details, see the WooCommerce scheduled discount conditions documentation.
Check Your WordPress Timezone
Before scheduling a promotion, make sure your WordPress timezone is correct.
Go to:
Settings → General → Timezone
Choose your city or the appropriate timezone instead of relying on a manually entered UTC offset.
Your scheduled discount conditions use the WordPress site’s timezone. If the timezone is incorrect, your discounts may start or expire earlier or later than expected.
Step 4: Add and Schedule Badges for Your WooCommerce Cyber Monday Sale
Discounted prices are important, but customers also need to notice your promotion.
Adding promotional badges to product images makes your Cyber Monday deals easier to identify while shoppers browse your store.
You can use Product Badges and Countdown Timer for WooCommerce (Sale Booster) to create promotional labels such as:
- CYBER MONDAY
- 20% OFF
- LIMITED-TIME DEAL
- CYBER SALE
- SPECIAL OFFER
1. Create a New Sale Badge
First, install and activate the free Sale Booster plugin.
Then follow these steps:
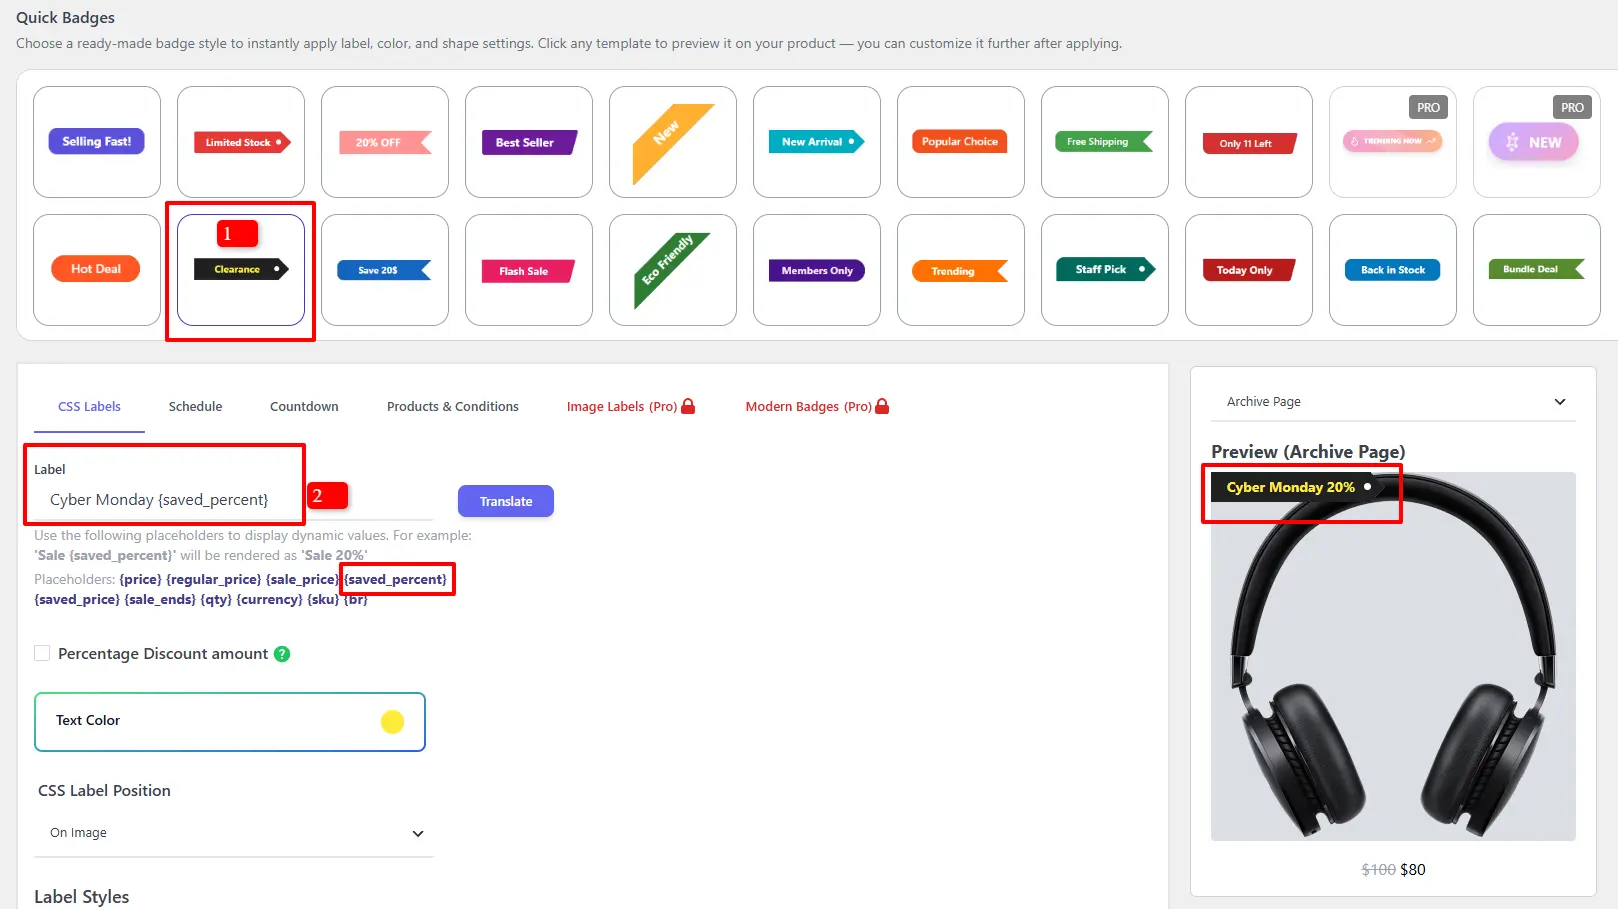
- Open Sale Booster → Badges.
- Click Add New.
- Choose a badge design.
- Enter your promotional text, such as
CYBER MONDAY – 20% OFF. - Select the products or categories where the badge should appear.
- Customize the badge’s appearance and placement.
You can explore different badge designs, colors, and positions to match your store’s branding.
2. Schedule the Badge for Cyber Monday
You don’t need to publish your Cyber Monday badge immediately. Sale Booster includes a Schedule tab that lets you control when the badge becomes visible.
Open the Schedule tab and configure the following settings:
| Schedule setting | Value |
|---|---|
| Schedule type | Date Time |
| Start | 2026-11-30 12:00 AM |
| End | 2026-11-30 11:59 PM |
With these settings, the badge will automatically become visible at the beginning of Cyber Monday and stop displaying when the scheduled period ends.
This means you can prepare your promotional badges in advance without manually enabling or disabling them on the day of the sale.
Finally, save your badge.
Tip: Make sure the badge is assigned to the same products included in your Cyber Monday discount rule. This helps prevent customers from seeing promotional labels on products that aren’t actually discounted.
Explore the Sale Booster documentation.
Step 5: Add a Free Countdown Timer for Your WooCommerce Cyber Monday Sale
A countdown timer helps customers understand how much time remains before a promotion ends. It can make a limited-time offer more noticeable and encourage shoppers to complete their purchases before the deadline.
You can create product countdown timers using the free version of Sale Booster. You don’t need Sale Booster PRO to add a standard fixed-date countdown timer to your products.
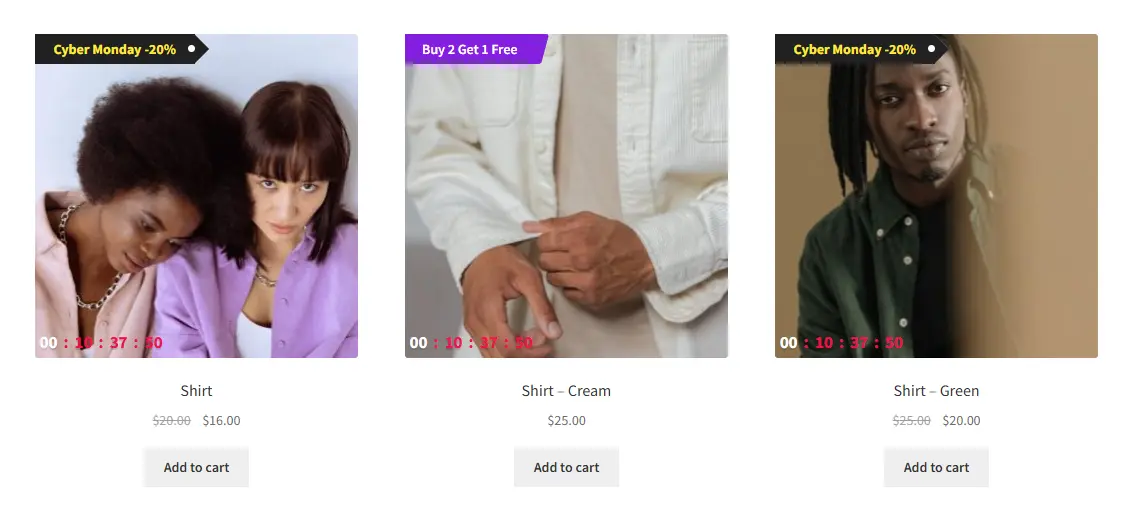
For example, a product page could display:
Cyber Monday Sale Ends In: 05:24:18
Here’s how to create and schedule one.
1. Create a New Countdown Timer
In your WordPress dashboard:
- Open Sale Booster → Badges.
- Click Add New.
- Enter a name for your timer, such as
Cyber Monday Countdown. - Make sure the timer is enabled.
2. Schedule When the Countdown Timer Appears
Before configuring the countdown itself, decide when the timer should be visible on your website.
Open the Schedule tab and configure the following settings:
| Schedule setting | Value |
|---|---|
| Schedule type | Date Time |
| Start | 2026-11-30 12:00 AM |
| End | 2026-11-30 11:59 PM |
These settings control the visibility period of the countdown timer. In this example, the timer will appear on your selected products during Cyber Monday and stop displaying when the scheduled period ends.
Important: The Schedule tab controls when the countdown timer is displayed. It does not define the actual deadline that the timer counts down to. You’ll configure that in the next step.
3. Configure the Countdown Timer
Now open the Countdown Timer tab.
Here you can configure the actual countdown period and customize how the timer looks on your products.
For a Cyber Monday campaign, select the fixed-date countdown mode:
Pick a Start / End Date
Then configure the countdown dates and times:
| Countdown setting | Value |
|---|---|
| From date/time | 2026-11-30 12:00 AM |
| To date/time | 2026-11-30 11:59 PM |
The countdown will use these dates to calculate the remaining time until the promotion ends.
You can also customize the timer’s appearance and placement. Depending on your design preferences, you can choose options such as:
- Displaying the timer on the product image.
- Displaying the timer outside the product image.
- Selecting a timer style.
- Customizing the timer’s colors and appearance.
Choose a design that is easy to read and fits your store’s theme.
4. Choose Which Products Display the Timer
Next, open the Products & Conditions tab.
You can decide where the countdown timer appears. For example:
- All sale products: Use the
Is on salecondition to display the timer on products with a sale price. - Specific products: Select the products participating in your Cyber Monday campaign.
- Specific categories: Display the timer on products belonging to selected categories.
- Discount rules: Target products associated with your scheduled Discount Rules pricing rules.
You can also combine conditions when you need more specific targeting.
For example, you could display the countdown timer only on products included in your Cyber Monday discount rule.
5. Save and Test the Countdown Timer
Save your timer and visit a product page that matches your conditions.
Check that:
- The timer appears during the scheduled visibility period.
- The timer is displayed on the correct products.
- The countdown shows the correct remaining time.
- The countdown uses the configured start and end dates.
- The timer stops displaying when its schedule expires.
That’s it! Your products can now display a scheduled Cyber Monday countdown timer using the free Sale Booster plugin.
Free vs. PRO: The standard fixed-date product countdown timer described above is available in Sale Booster’s free version. Sale Booster PRO adds advanced functionality, including evergreen countdown timers that can run separately for individual visitors. The countdown timer built into Discount Rules is also a separate PRO feature.
Step 6: Create Product Bundles and Upsell Offers
A seasonal promotion is also a good opportunity to increase your average order value.
Instead of offering only individual product discounts, consider creating special product combinations.
For example:
- Buy a laptop and get a discounted accessory.
- Create a bundle of complementary products.
- Offer a special price for customers purchasing multiple items.
- Recommend related products on the cart page.
You can create product bundles with Easy Product Bundles for WooCommerce.
For additional recommendations and cross-sell offers, explore Easy Upsells for WooCommerce.
These offers can complement your main Cyber Monday discounts and encourage customers to add more products to their carts.
Step 7: Test Your Scheduled WooCommerce Cyber Monday Sale
Before launching your WooCommerce Cyber Monday sale, take a few minutes to check that your scheduled discounts, product badges, and countdown timers work together correctly. This final test helps prevent incorrect prices or promotional messages from appearing when customers visit your store.
Here is a checklist to help you avoid common problems:
- Check that the discount rule is enabled.
- Verify the discount start date and end date.
- Confirm your WordPress timezone.
- Check that the correct products are included.
- Test the discounted price on product pages.
- Add products to the cart and verify the discount.
- Check whether sale badges appear on the correct products.
- Verify that countdown timers appear on the intended products.
- Confirm that badges and timers use the correct schedule.
- Verify that excluded products do not receive the discount.
- Test your store’s caching setup.
- Confirm that the promotion expires when expected.
If you use a caching plugin or CDN, clear the relevant caches after making changes. Also test the promotion in a private browser window to avoid seeing cached pages or an outdated cart session.
One important detail: a scheduled discount and a cached product page are separate things. Your pricing rules may be working correctly even if a cached page temporarily displays an old price.
Common Mistakes to Avoid
1. Using the Wrong WordPress Timezone
A timezone mismatch can cause your promotion to start or expire at the wrong time. Always check your WordPress timezone before scheduling discounts.
2. Forgetting to Enable the Discount Rule
Creating a schedule isn’t enough if the rule itself is disabled. Make sure the rule is enabled so the scheduling conditions can control its active period.
3. Forgetting to Test Product and Cart Prices
A discount may appear correctly on a product page but behave differently in the cart due to other pricing rules, coupons, or exclusions. Test the complete purchase flow.
4. Showing Promotional Badges on the Wrong Products
Make sure your badges match the products included in your campaign. Otherwise, customers may expect discounts that aren’t actually available.
5. Using Different Schedules for Discounts, Badges, and Timers
Your discount, badge, and countdown timer should use matching start and end times. Otherwise, a badge or timer might appear when the discount isn’t active, or remain visible after the offer has ended.
6. Forgetting About Caching
Page caching and CDN caching can sometimes cause outdated prices or promotional content to appear. Clear caches and test your campaign before launch.
Frequently Asked Questions
Can I schedule a Cyber Monday sale in WooCommerce for free?
Yes. You can use the free Discount Rules and Dynamic Pricing for WooCommerce plugin to create automatic discounts and configure their start and end dates. You can also use the free Sale Booster plugin to display promotional badges and fixed-date product countdown timers.
Can WooCommerce automatically start and stop discounts?
WooCommerce supports scheduled sale prices for individual products. For more flexible campaigns involving multiple products, categories, and discount conditions, you can use a discount rules plugin with scheduling functionality.
Can I schedule discounts for specific products or categories?
Yes. You can configure a discount rule for selected products or categories and define when the promotion should become active and expire.
Can I add a countdown timer to WooCommerce products for free?
Yes. The free version of Sale Booster lets you create fixed-date countdown timers and display them on selected products or categories. You can also target products using conditions, including products associated with discount rules.
Can I schedule sale badges and countdown timers?
Yes. Sale Booster includes a Schedule tab for both badges and countdown timers. Choose Date Time as the schedule type and enter the start and end dates to control when each promotion element is displayed.
Does Sale Booster require PRO for countdown timers?
No. Standard fixed-date product countdown timers are available in the free version. Sale Booster PRO adds advanced features such as evergreen countdown timers that can reset separately for individual visitors.
Do customers need a coupon code to receive Cyber Monday discounts?
No. You can create automatic pricing rules that apply discounts without requiring customers to enter a coupon code.
Can I schedule a WooCommerce discount for multiple days?
Yes. Set the desired start and end dates in your discount rule. The promotion can run for a single day or across a longer promotional period.
What happens when a scheduled discount expires?
When the configured end date and time are reached, the scheduling condition no longer allows the discount to apply. Your regular product pricing can then take effect, assuming no other active discount rules or sale prices apply.
Final Thoughts
Preparing your WooCommerce Cyber Monday sale in advance makes it easier to run a seasonal promotion without manually changing prices on launch day.
With the free Discount Rules and Dynamic Pricing for WooCommerce plugin, you can create automatic discounts and schedule their start and expiration dates.
You can also use the free Sale Booster plugin to schedule promotional badges and countdown timers, helping shoppers identify your deals and see how much time remains.
Finally, consider adding product bundles and upsell offers to make your Cyber Monday campaign more effective.
Ready to schedule your next promotion?
Download Discount Rules and Dynamic Pricing for WooCommerce for free.