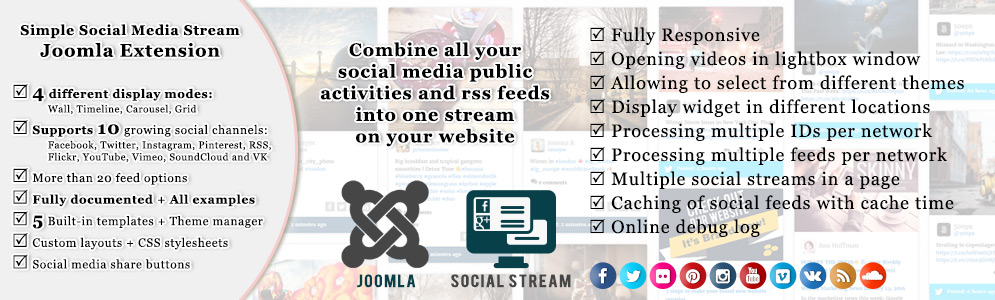
Simple Social Media Stream Joomla Extension
Congratulations and thank you for choosing Simple Social Media Stream!
Simple Social Media Stream extension is the best choice for those who are looking for an easy way to combine all of their social networking activities into one single social stream and display on their website.
With this extension you can create a stylish fascinating social media feed including multiple social media pages/groups/accounts with multiple feed options, and can display them in 3 different layouts including Wall, Carousel, Timeline. You can add as many as public Facebook pages, Twitter accounts or Instagram accounts managed by you or any other publisher.
It supports 10 and growing social networks and includes about 29 feed options.
Your visitors will be able to share your posts on their social accounts or reply, retweet or favorite the Twitter posts from your Social Stream. They can even filter your Social Stream by social networks or using a search phrase.
You can also change the style of your Social Stream using the theme manager and/or custom CSS stylesheets, and make it unique to your website.
![]()
Simple Social Media Stream Joomla Extension
Created By:
Asana Plugins
If you have any questions or suggestions concerning to Simple Social Media Stream extension, please contact us via our website at https://www.asanaplugins.com
Product Showcase
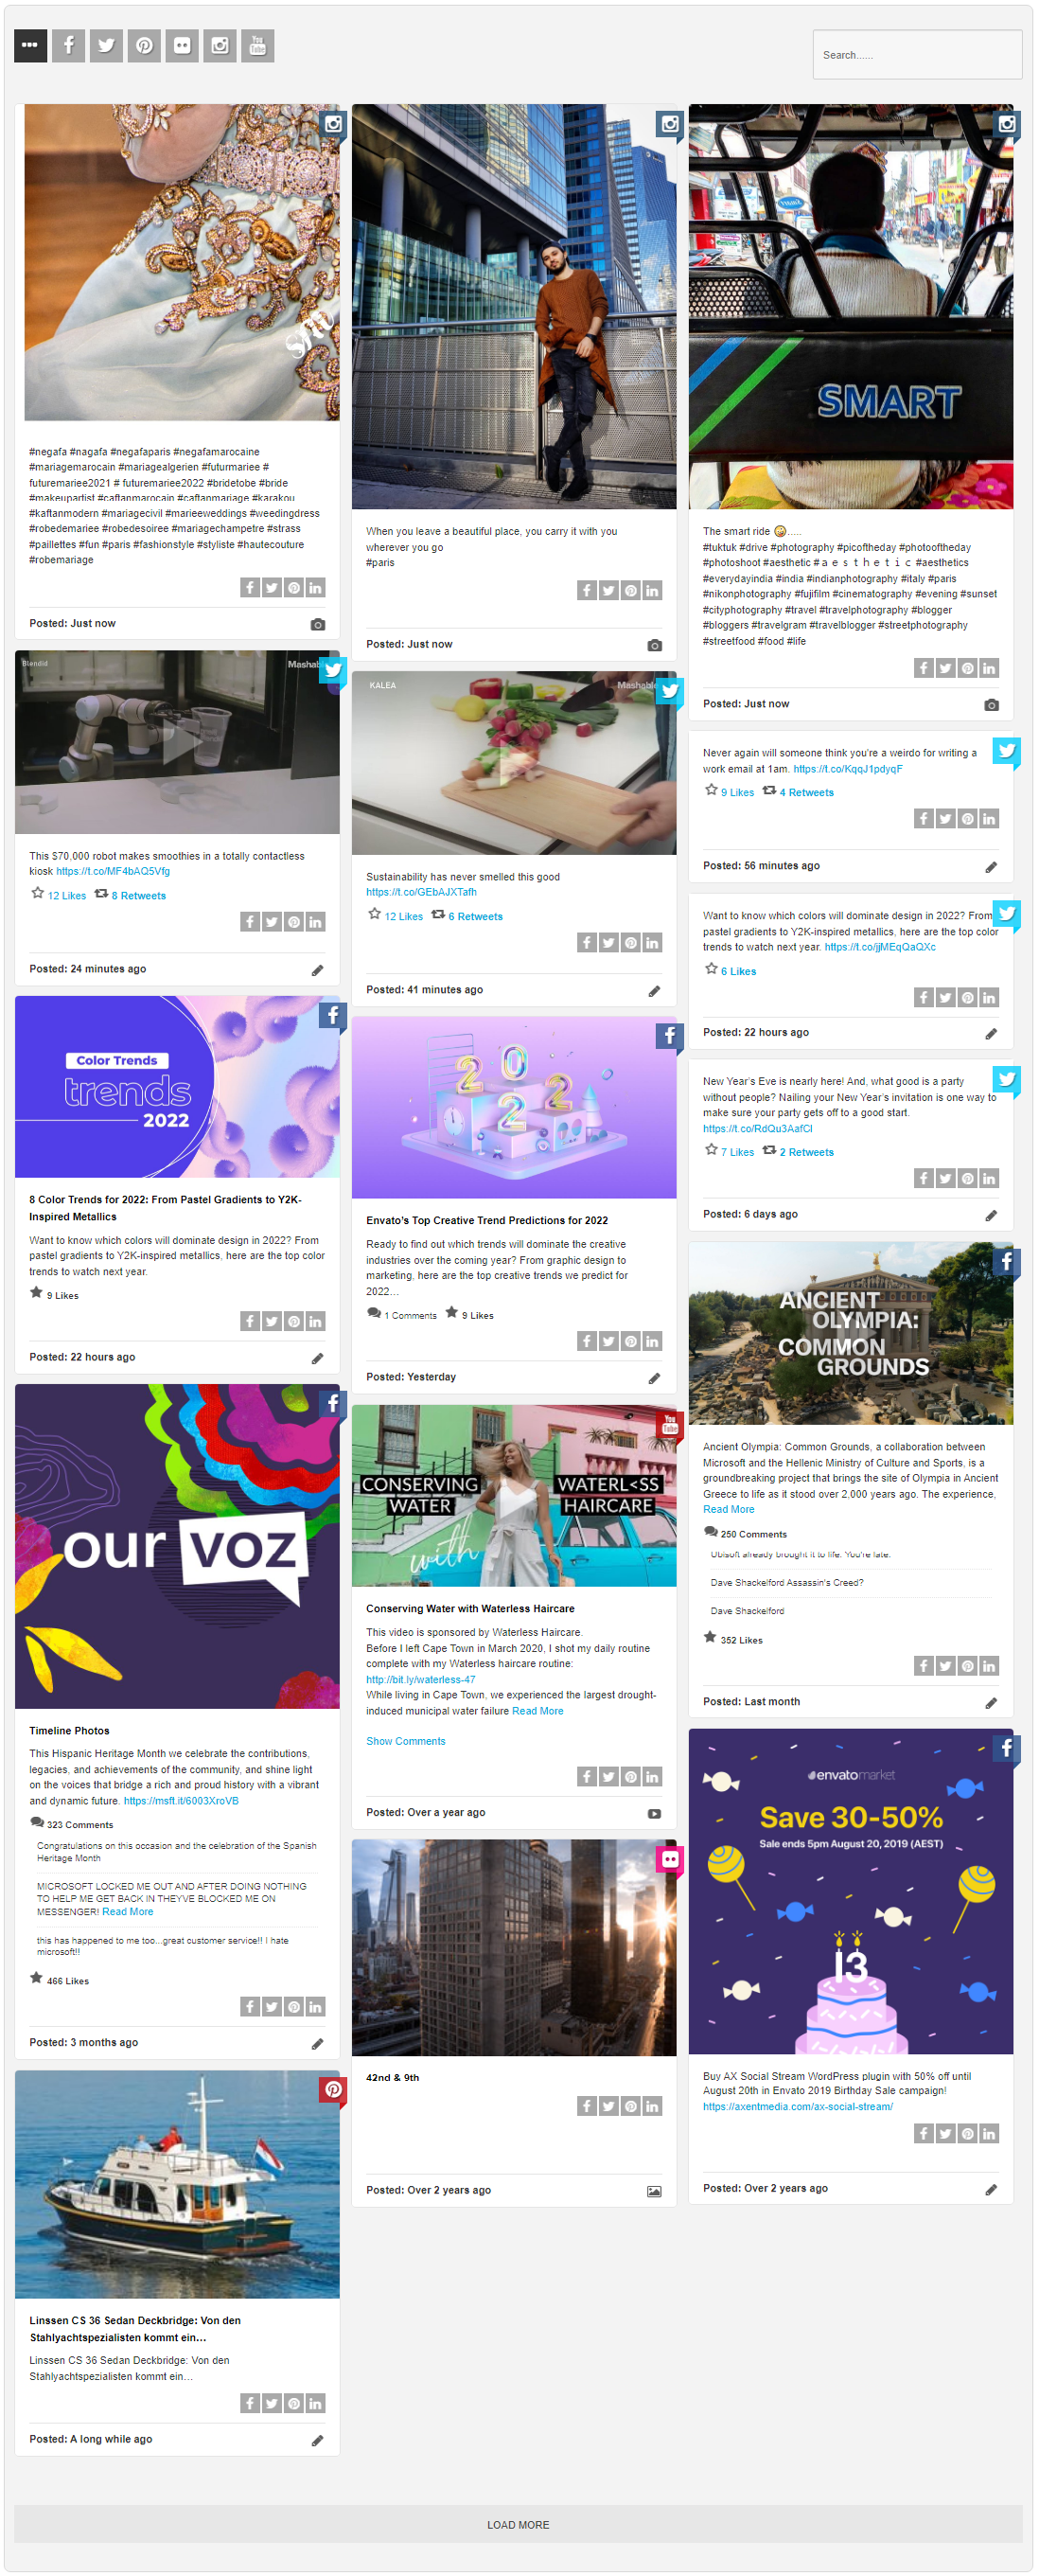
Wall
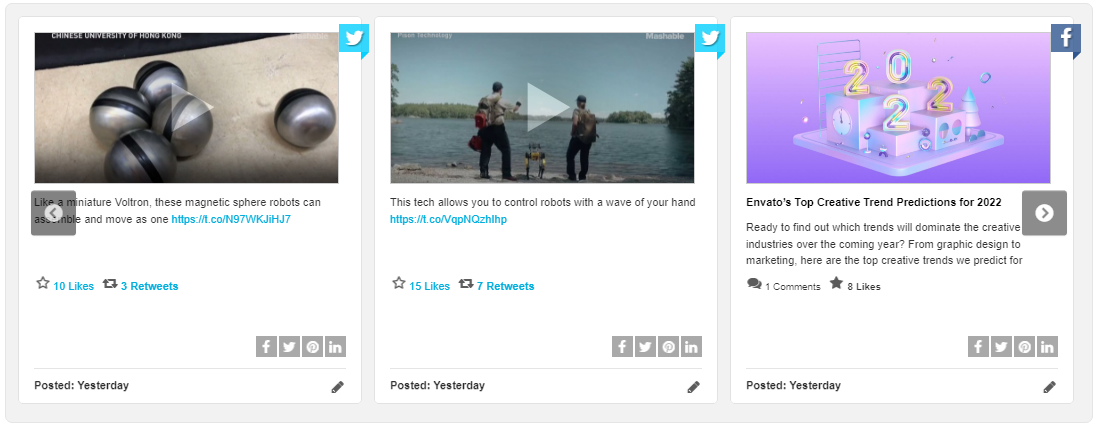
Carousel
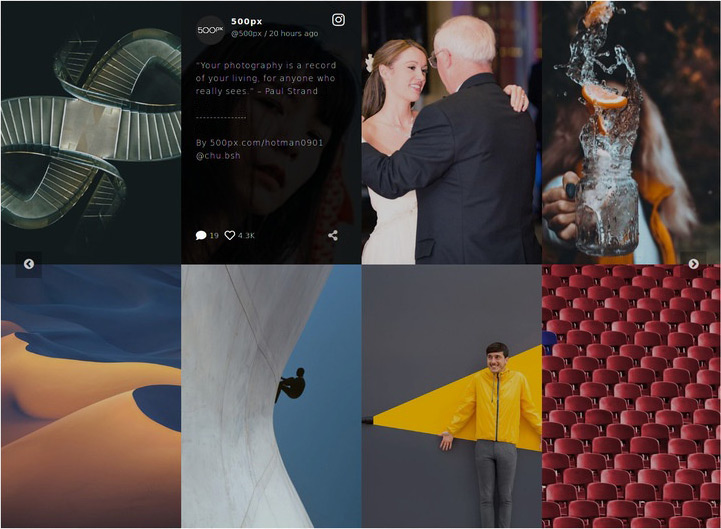
Grid
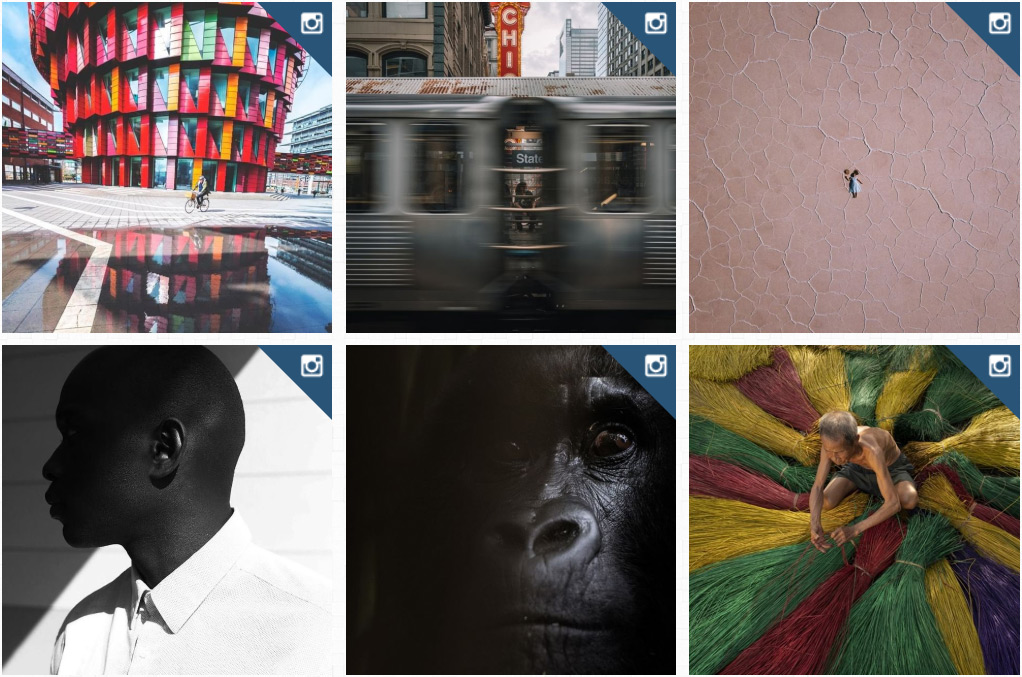
Timeline
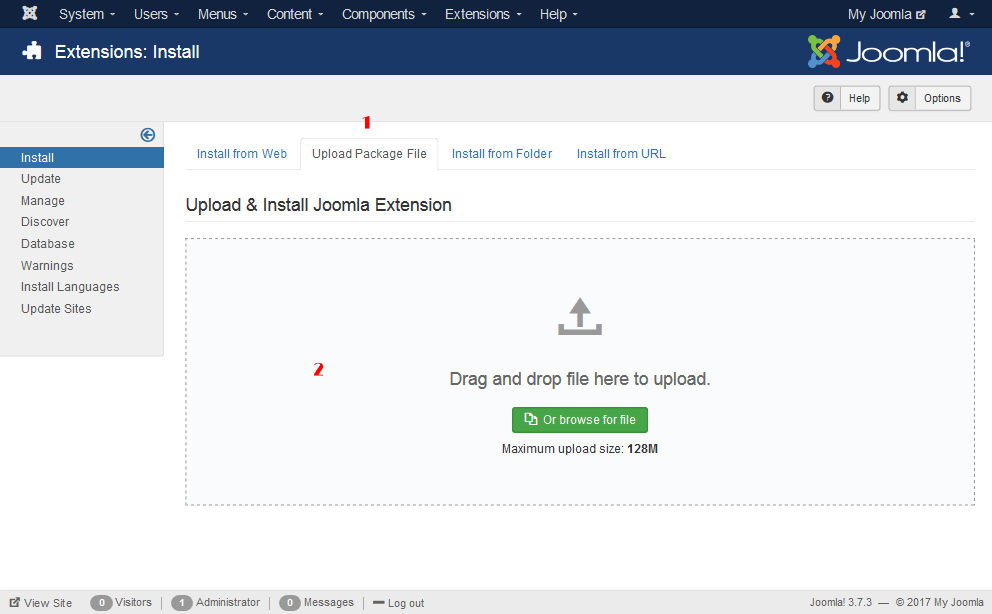
Installation
This is by far the easiest way of installing a Joomla extension.
-
Go to your Joomla control panel and from the top menu, click
on
Extensions » Manage » Install.
-
Go to the
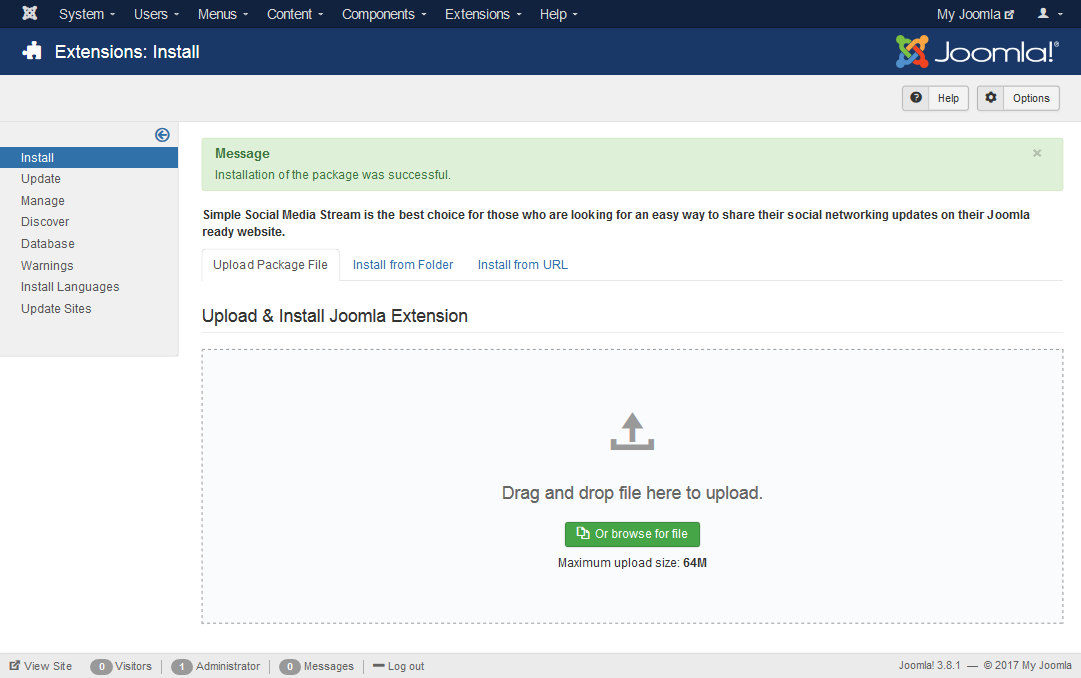
Upload Package Filetab, select the extension file (zip files only) e.g.pkg_simplesocialmediastream.zipfrom your hard drive and upload it. - You will get the successful installation message according to the image below.
-
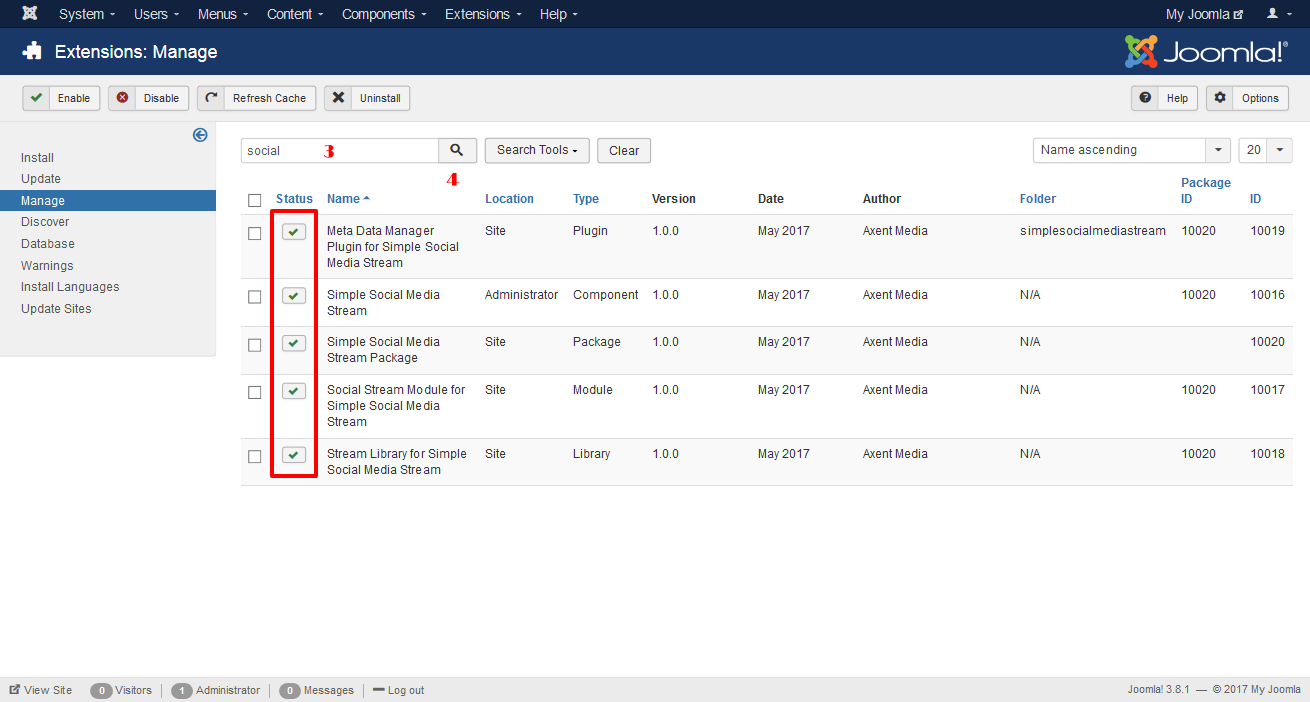
From the top menu, click on
Extensions » Manage » Manage. - In the extensions management page search the "social" word and make sure all the Simple Social Media Stream extensions are in enabled status.
Now, you have installed the Simple Social Media Stream extension. You would have to read the quick start guide, create your Social Stream, add your Social Stream on your website and configure the settings to fit your needs.
Requirements
- The extension requires PHP version 7.2.5 or higher.
- The extension requires the Joomla version 3.0.0 or higher.
- This extension requires both PHP's multibyte string extension AND iconv extension (enabled by default on most servers).
- PHP's XML extension is required (enabled by default on most servers).
- PHP's cURL extension is recommended (required for Facebook & Twitter feeds)
Quick Start Guide
After installation, you would have to create your Social Stream. Here we will show you how to create different form of feeds on your website.
Create a Wall
In this topic we create a Facebook wall on our website.
Note: Facebook requires
authentication to provide the feed's data.
Read this topic for more details.
-
From the top menu, click on
Components » Simple Social Media Stream »
                    Social Streams
. -
On the Social Streams page, click the
1. Newbutton.
-
Fill out the form as follows and go to the
3. Social Networkstab.
-
Fill out the Social Networks section as
follows and click the
5. Savebutton.
-
In this step, you need to set the Facebook API Credentials
settings in
Components » Simple Social Media Stream »
                    Settings
page. Read this topic for more details. -
From the top menu, click on
Menus » Main Menuand in the "Menus: Items" page, click the6. Newbutton.
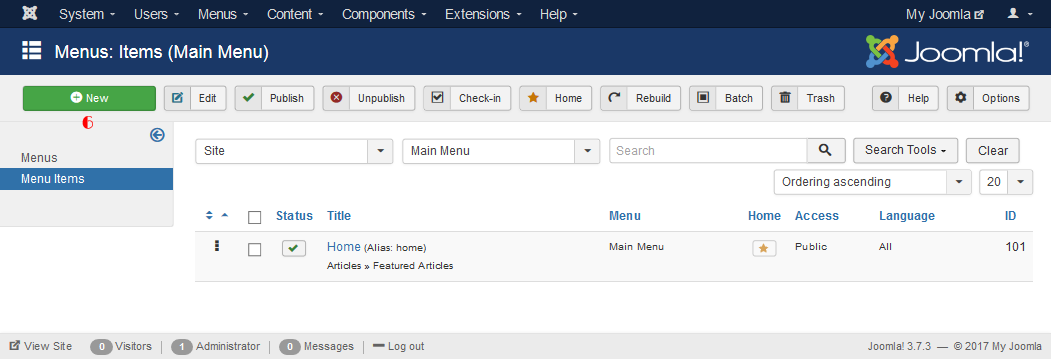
-
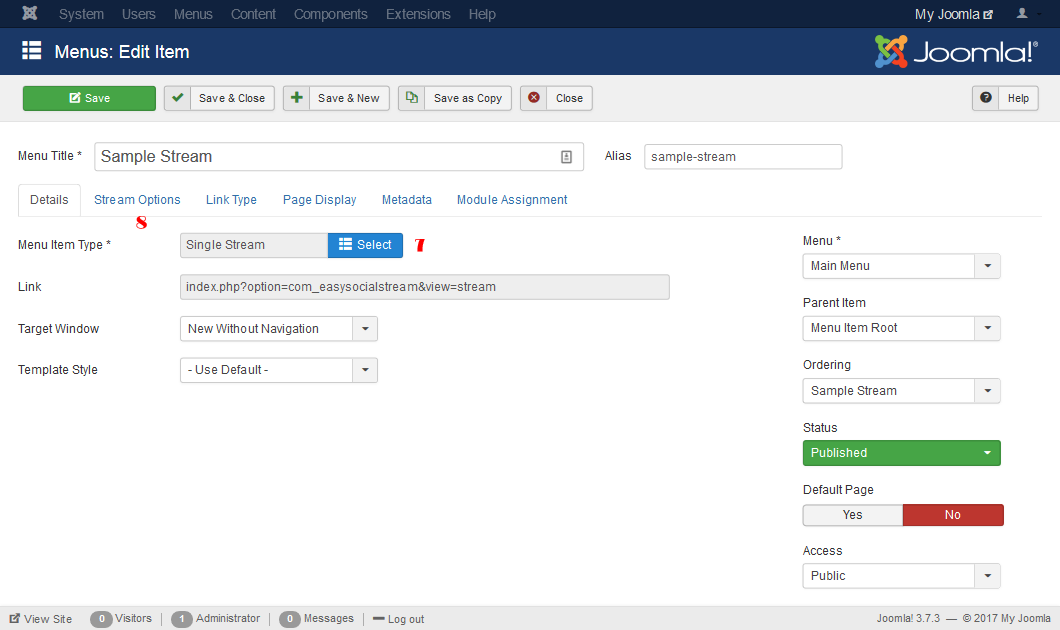
On the "Menus: New Item" page, click the
7. Selectbutton on front of the "Menu Item Type" and in the new opening window, select the8. Simple Social Media Stream > Single Stream.

-
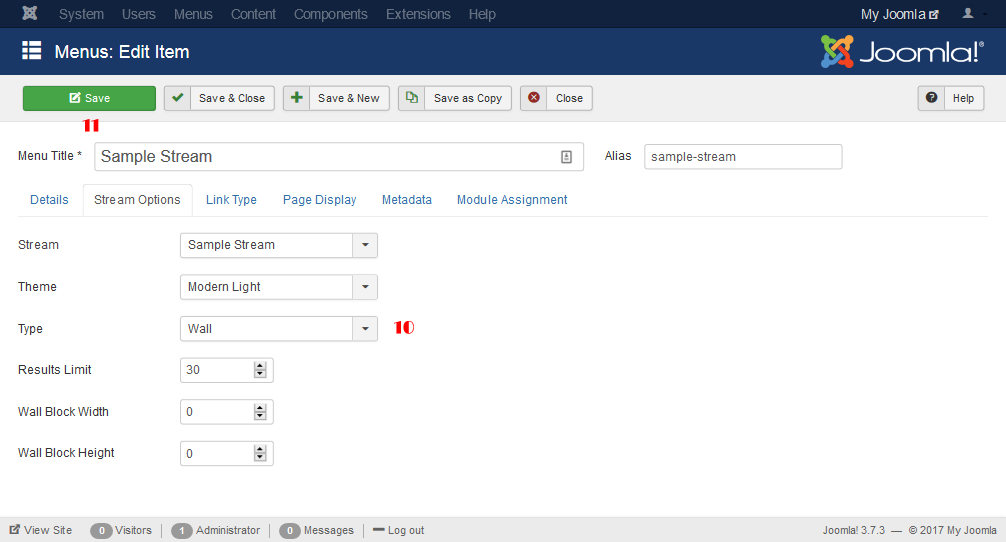
Go to the
Stream Optionstab and make sure the Wall is selected as Type and finaly, click the11. Savebutton.
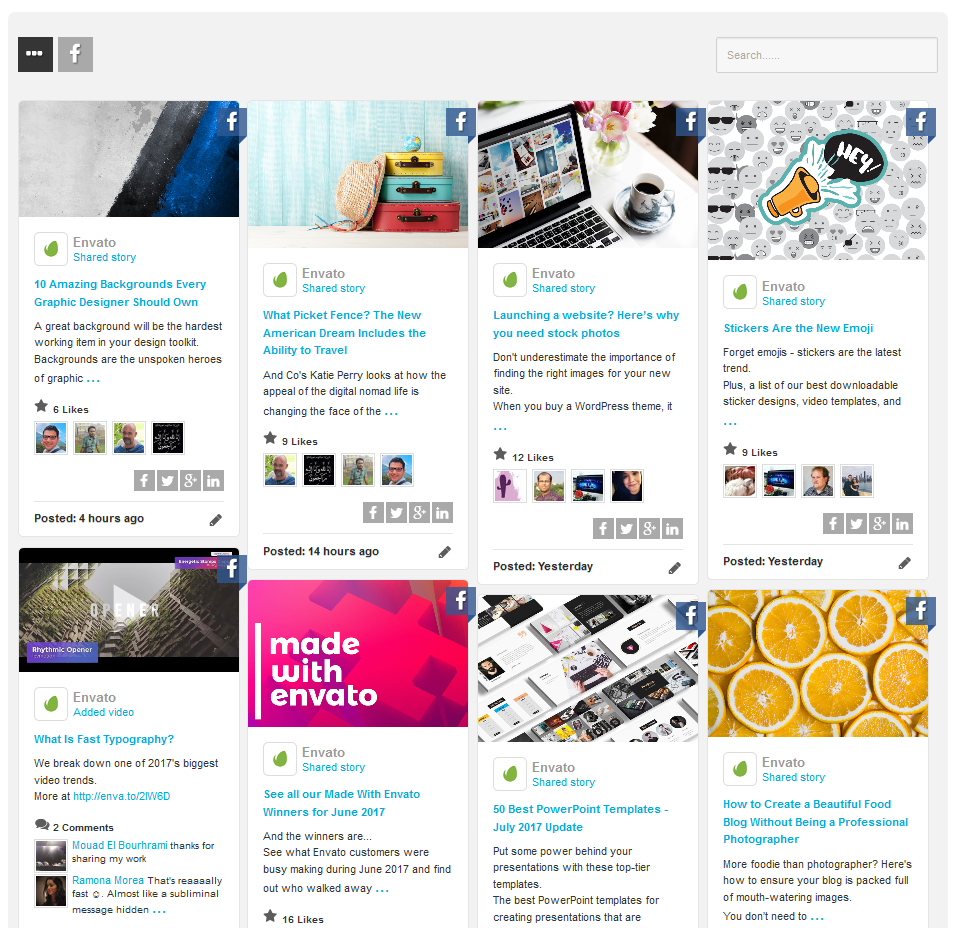
Your social wall is ready now. Browse to your created page on
your website to see the wall. Your social wall will look
something like the following picture.
For more information about creating/editing a Social Stream
click here.
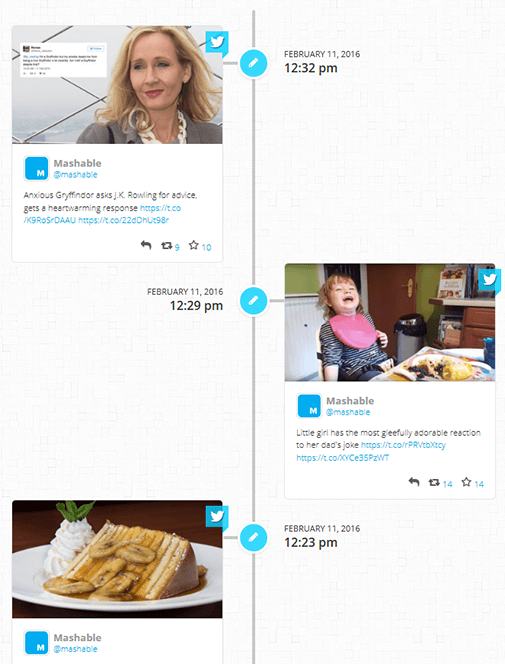
Create a Timeline
In this topic we create a Facebook timeline on our website.
Note: Facebook requires
authentication to provide the feed's data.
Read this topic for more details.
- Follow the same steps 1 - 7 that you did for the Wall.
-
Go to the
Stream Optionstab and select Timeline as Type and finaly, click the2. Savebutton.
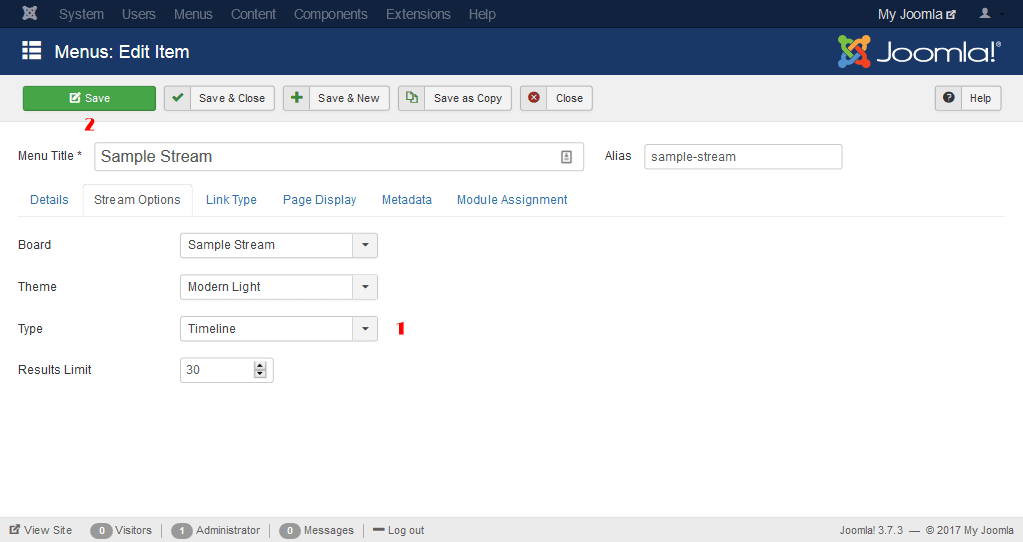
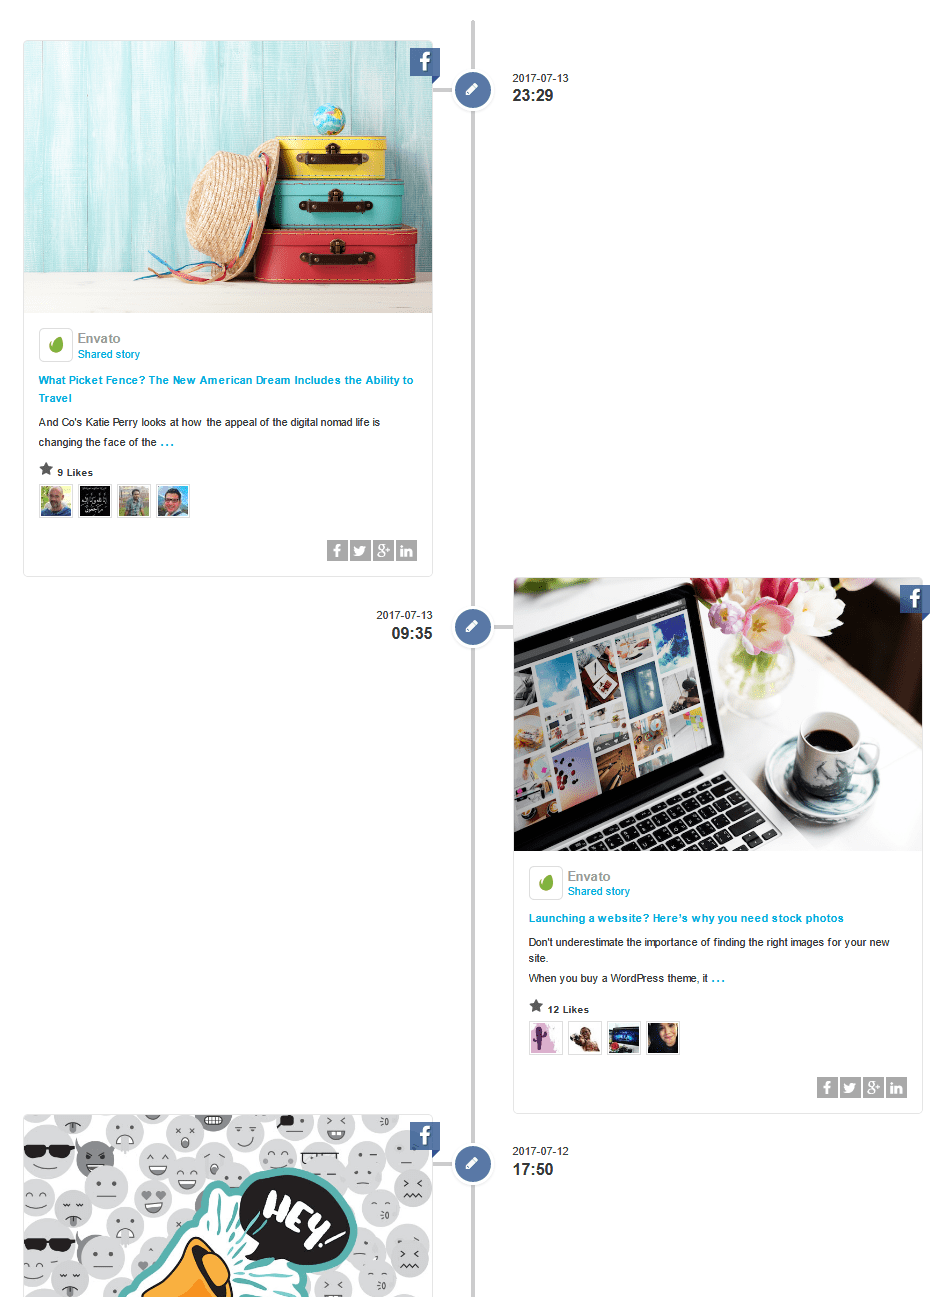
Your social timeline is ready now. Go to your created page on your website to see the timeline. Your social timeline will look something like the following picture.
Create a Carousel
In this topic we create a Facebook + Twitter carousel on our
website.
Note: Facebook
and Twitter require authentication to provide the feed's data.
Read this topic for more details.
- Follow the same steps 1 - 7 that you did for the Wall.
-
Go to the
Stream Optionstab and select Carousel as Type and finaly, click the2. Savebutton.
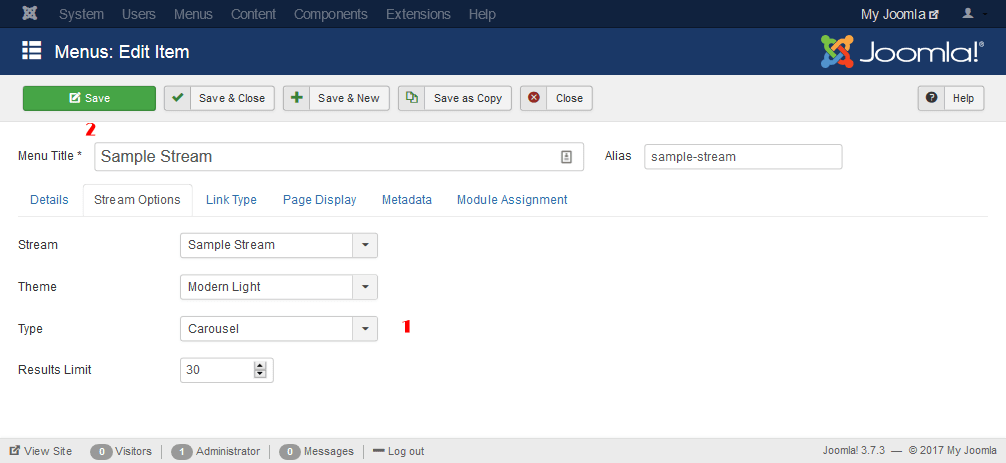
- Switch to Twitter tab.
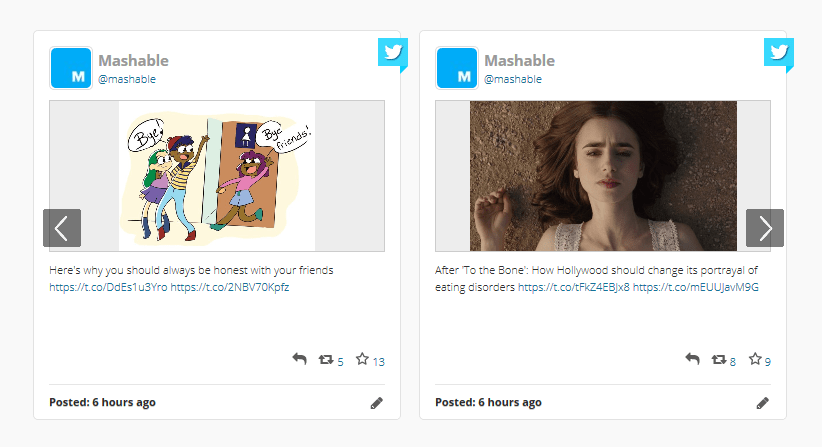
Your social carousel feed is ready now. Go to your created page on your website to see the carousel.
Managing Social Streams
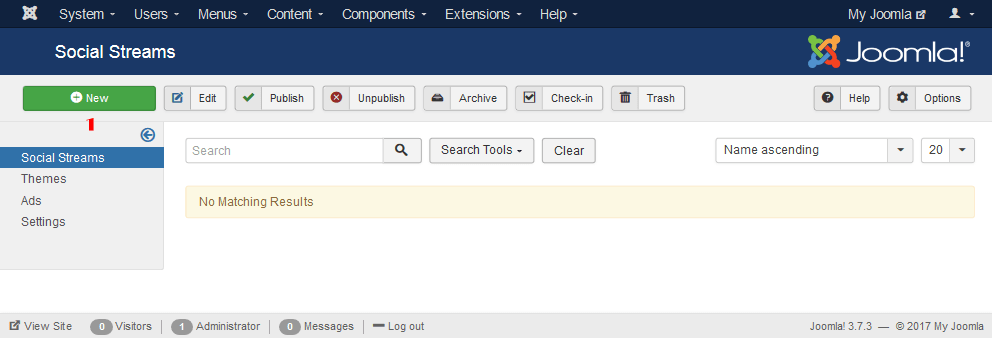
To access the Social Streams management page, go to
Joomla admin panel » Components » Simple Social
                  Media Stream » Social Streams
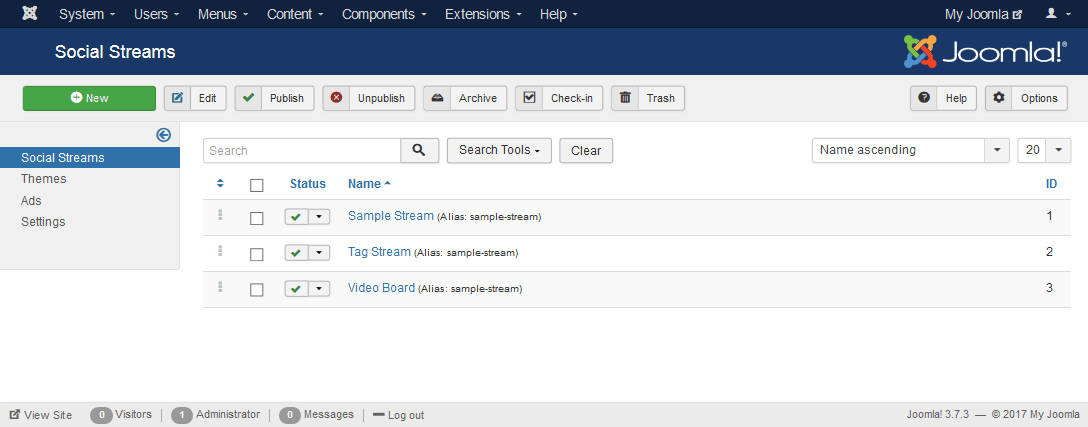
This section lists all of your previously added Social Streams.
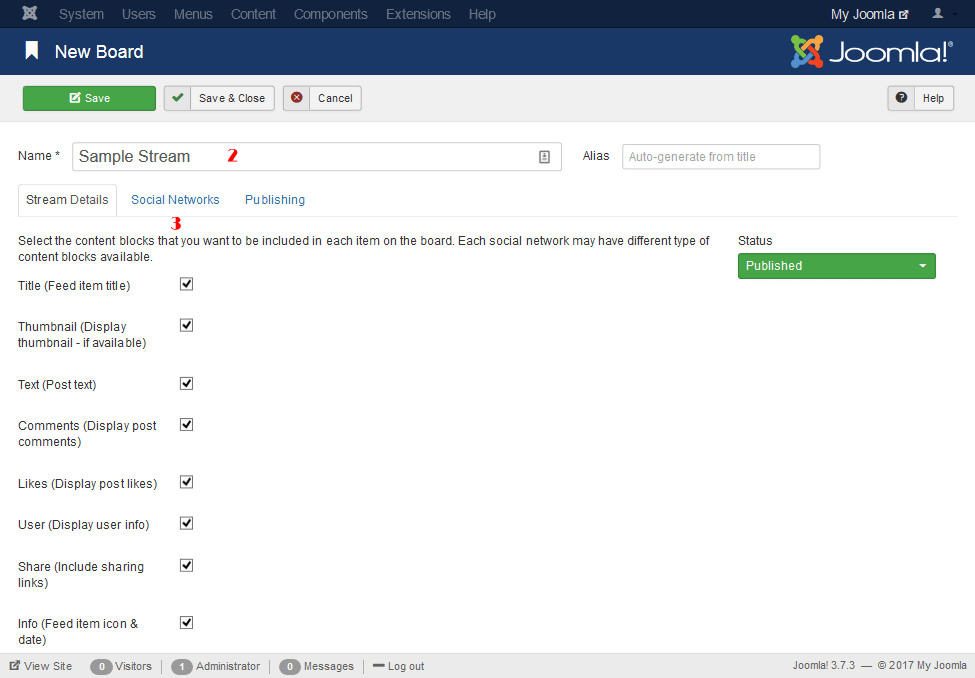
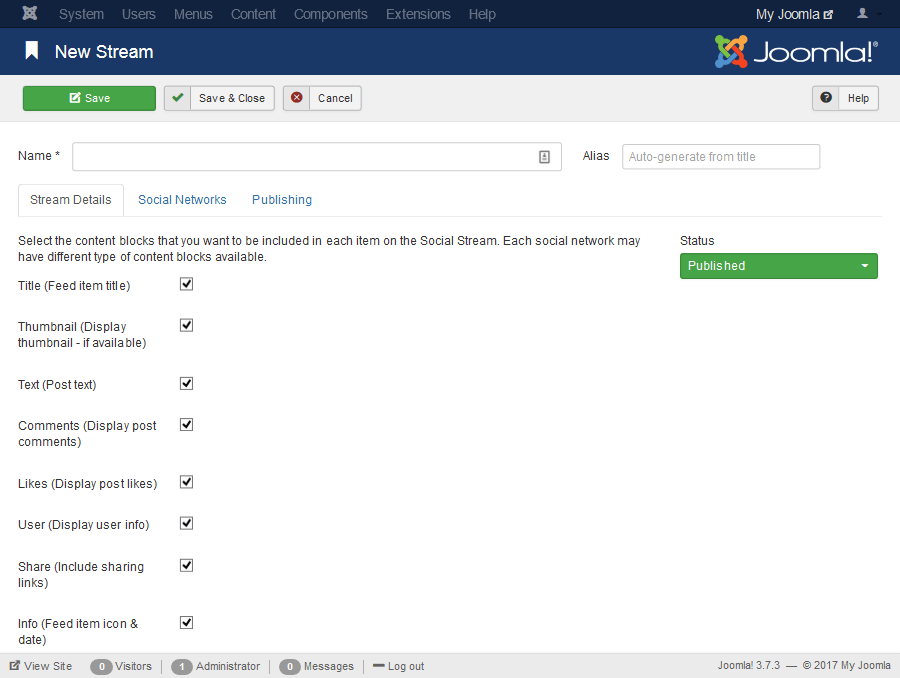
Creating a New Social Stream
To add a new Social Stream, in the Social Streams page, click
the New button.
Here we will explain various parts of Add/Edit Social Stream form and all the relevant social network tabs.
Name
Enter a name that describes your Social Stream. This name is for your reference only.
Stream Details
Select the content blocks you want to be included in each item on the Social Stream. Each social network may have different type of content blocks available.
Social Networks
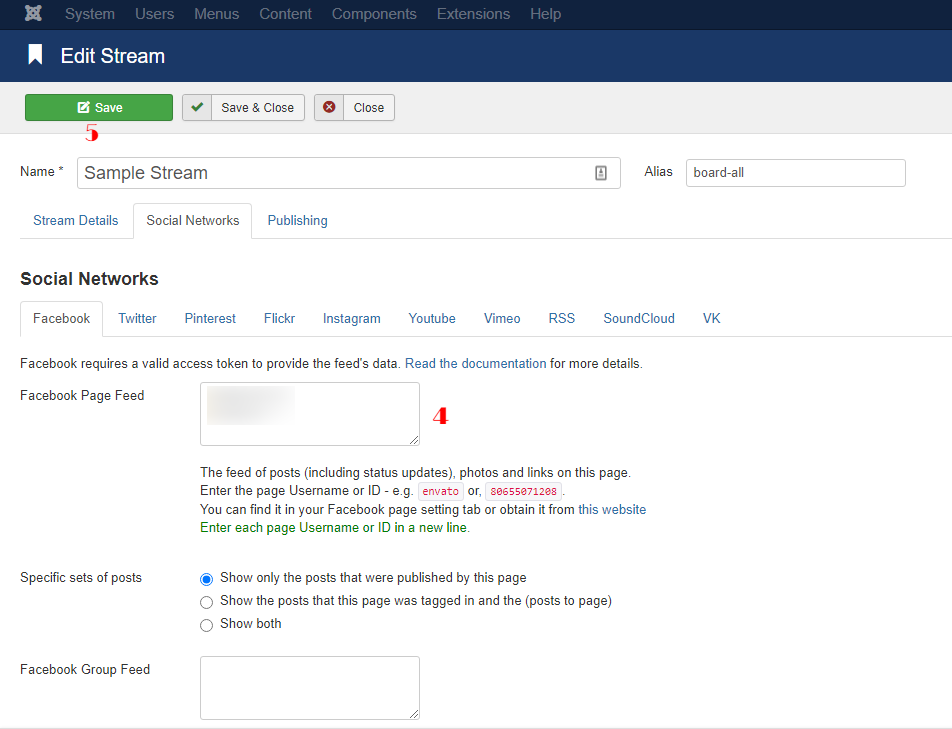
This section allow you to set up the networks you want to include in your Social Stream. To add a social network to your Social Stream, go to its tab and fill out its configuration form.
To add a specific social network feed to your Social Stream, you need to declare it using an option (ID, username, search term, etc) depending on type of the network. Some social networks have multiple type of feeds available. You are required to use at least one of the options available for the social network feed to make it available in your Social Stream output.
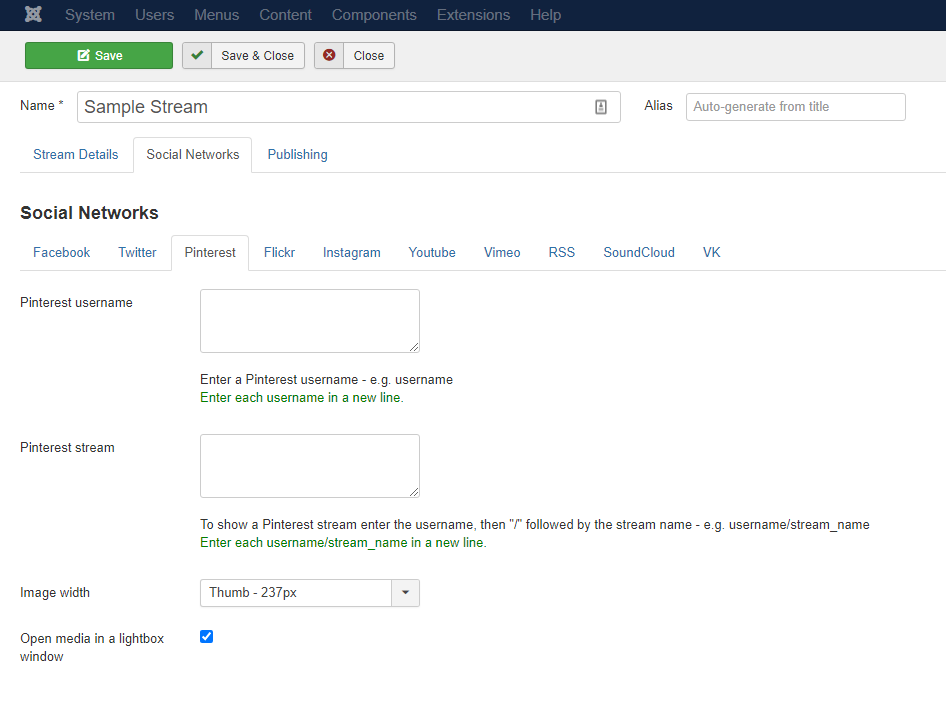
Below is a summary of the options available for each network:
Facebook requires authentication to provide the feed's data. Click here for more details.
Facebook provides 2 different feed options:
1. Facebook Page FeedThe feed of posts (including status updates), photos and links on this page.
Specific sets of postsYou can set here to get sets of posts published by this page, or by others, or by both on this page.
2. Facebook Group FeedThe feed of posts (including status updates), photos and links on this group.
3. Facebook Album/Page Photos
Shows all photos this page is tagged in. Enter the page Username
or ID - e.g. 182472465104731 to get all the albums
photos or, the page Username or ID then "/" followed by the
album ID - e.g. 182472465104731/947092091976094 to
get a specific album of a page.
Read the documentation
on how to find a Facebook album ID.
Browse to your Facebook photos page and click on Albums - e.g.
https://www.facebook.com/envatomarket/photos_stream?tab=photos_albums
Select an album - e.g.
https://www.facebook.com/media/set/?set=a.676459932448951.1073741828.624290390999239&type=3
The album ID is the first set of numbers - in the example above,
the album ID would be - 676459932448951
Shows all videos this page is tagged in. Enter the page Username
or ID - e.g. envato or, 80655071208.
Read the documentation
on how to find a Facebook page ID.
Get posts in a certain date/time from Facebook feed.
Twitter requires authentication to provide the feed's data. Click here for more details.
Twitter provides 3 different feed options:
1. Twitter UsernameEnter a Twitter username without “@”.
Browse to your Twitter page - e.g.
https://twitter.com/axentmedia
The Twitter username is the last word in the URL - in the
example above, that would be - axentmedia
To use a Twitter list use one of the following methods:
Method 1:
Enter the list ID - e.g. 123456
Method 2:
Browse to the Twitter list - e.g.
https://twitter.com/mashable/lists/social-media
Enter the owner screen name, then “/” followed by the list slug
- using the example above, that would be - e.g.
mashable/social-media
To search enter the search terms/hashtag - e.g.
socialmedia
Get posts in a certain ID range from Twitter feed.
Since ID: Returns results with an ID greater than (that
is, more recent than) the specified ID.
Max ID: Returns results with an ID less than (that is, older than) or
equal to the specified ID.
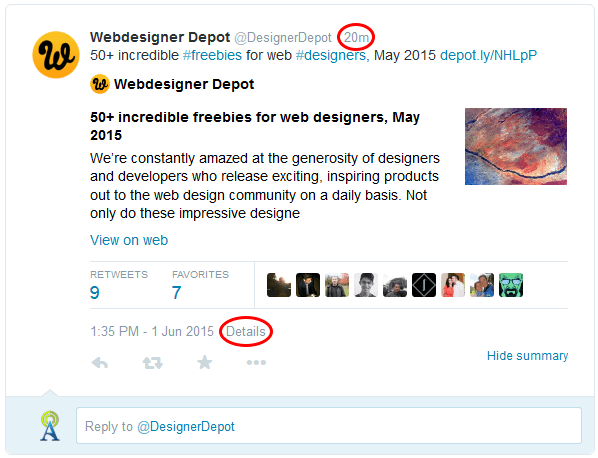
How to find a specific tweet ID?
- Go to the Twitter home page at https://www.twitter.com/. If you are already logged in, you will be redirected to your Twitter page. Otherwise, login to your twitter account, which will also take you to your Twitter page.
- In the list of all tweets, find the specific tweet for which you wish to grab the ID.
- There is a date/time stamp underneath each tweet as pictured above. Click that date/time stamp.
-
This will take you to the page for the single tweet. The URL
displayed at the top of your browser will look something like
this:
https://twitter.com/DesignerDepot/status/605472728351707136 -
The tweet ID is the last set of numbers in the URL - in the
example above, that would be -
605472728351707136
Pinterest provides 2 different feed options:
1. Pinterest username
To get a Pinterest username, browse to your Pinterest page -
e.g. https://www.pinterest.com/2013TopPins/
The Pinterest Username is the last word in the URL - in the
example above, that would be - 2013TopPins
To show a Pinterest board enter the username, then "/" followed
by the board name.
Browse to a Pinterest board - e.g.
http://www.pinterest.com/2013TopPins/techology-trends/
In the example above, you would select -
2013TopPins/techology-trends
Flickr
Flickr requires an API Key to display feed data. Click here for more details.
Flickr provides 2 different feed options:
1. Flickr User IDTo get your Flickr User ID:
- Find your Flickr photostream page URL - e.g: https://www.flickr.com/photos/ryanbudhu/
- Browse to this website: http://idgettr.com/
-
Replace your Flickr photostream URL in the box and click Find
and get your ID is result - using the example above, you will
get -
46221135@N04
To get a Flickr group ID:
- Find your desired Flickr group page URL - e.g: https://www.flickr.com/groups/spectacular_landscapes/
-
Follow the same steps that you did for the Flickr User ID but,
use the Flickr Group URL instead - using the example above,
you will get -
78842177@N00
Instagram requires your API Access Token to provide the feed's data. Click here for more details.
Instagram provides 3 different feed options:
1. Instagram User Feed
Without authentication:
Enter the User Numerical ID, e.g.
4018952 to get the feed from any Instagram account.
(only public accounts) -
How to Find an Instagram User ID?
With authentication:
Enter the User ID, e.g.
17841401237552411 or Username, e.g.
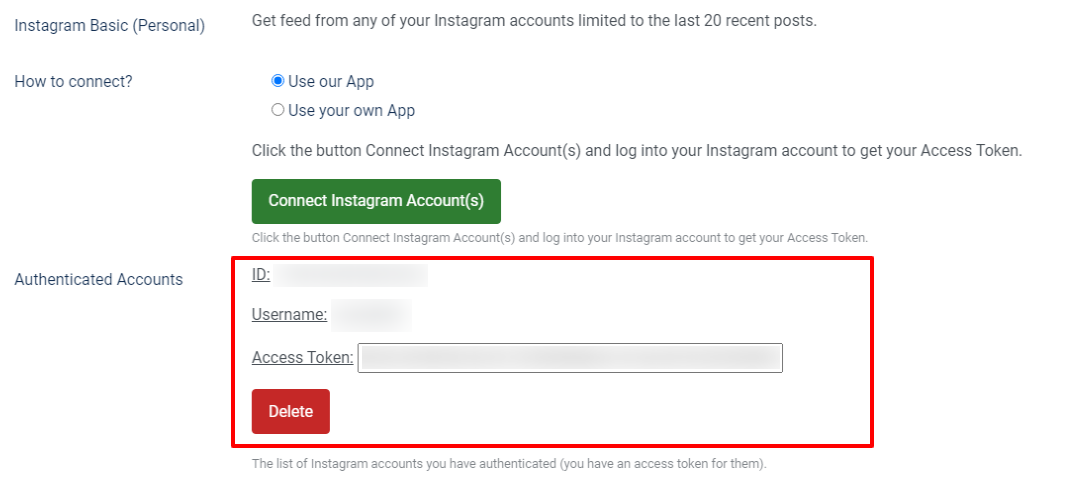
axentmedia grabbed from
Authenticated Accounts section in the plugin settings page
to get the feed from Instagram accounts which you already have
it connected to the plugin. (public/private)
To search by tag enter the tag name - e.g. joomla
To show the latest posts by a location, enter the location ID.
4. Instagram geographical location
To search by geographical location start with the latitude,
longitude and distance in meters (up to a maximum of 5000) all
separated by a "," - e.g. 48.858844,2.294351,2000
- Browse to this URL: http://www.gps-coordinates.net/
- Enter your location in the "Address" field.
- Click on "Get GPS Coordinates" button.
- You will get the Latitude and Longitude of the entered location on the map.
Youtube
Youtube requires an API Key to display feed data. Click here for more details.
Youtube provides 2 different feed options:
1. Youtube username
To get a Youtube username, browse to the desired Youtube profile
page - e.g: https://www.youtube.com/user/envatopsd
The Youtube username is the last word in the URL - in the
example above, that would be - envatopsd
To get a Youtube playlist ID, on the desired Youtube profile
page click on the Playlists tab, select and browse to a playlist
- e.g:
https://www.youtube.com/watch?v=z4icxr8B7ik&list=PLsBcifUwsKVXunQPoySupBM6QCcWliTKi
The playlist ID is the last set of characters in the URL - in
the example above, that would be -
PLsBcifUwsKVXunQPoySupBM6QCcWliTKi
To search enter the search terms - e.g. Joomla
Vimeo
Vimeo provides 1 feed option:
Vimeo username
To get a Vimeo username, browse to the Vimeo profile - e.g:
http://vimeo.com/bvanpeski
Your Vimeo username is the last name in the Vimeo profile URL -
in the example above, that would be - bvanpeski
RSS Feed
RSS Feeds have 1 feed option:
RSS feed URL
Enter the RSS feed URL - e.g.
http://feeds.bbci.co.uk/news/world/europe/rss.xml
Select Snippet for displaying a summary of the post or select Full Text to include any links or images in the feed - if available.
SoundCloud
SoundCloud requires an Access Token to provide the feed's data. Click here for more details.
SoundCloud provides 3 feed options:
1. SoundCloud User Tracks
The list of tracks of the user. Enter the SoundCloud Username -
e.g. matas
Browse to your SoundCloud page - e.g.
https://soundcloud.com/matas
Your SoundCloud Username is the last set of characters in the
URL - in the example above, that would be - matas
The list of tracks under a playlist. Enter the SoundCloud
Username then "/" followed by the Playlist Slug - e.g.
matas/matas-live-dj
Browse to the SoundCloud Playlist page - e.g.
https://soundcloud.com/matas/sets/matas-live-dj
Your SoundCloud Playlist Slug is the last set of characters in
the URL - in the example above, that would be -
matas-live-dj
Performs a track search based on a query. Enter a search term -
e.g. paris
VK
VK provides 2 different feed options:
1. VK Wall Domain
Returns a list of posts on a user wall or community wall.
Enter
the user or community short address - e.g.
wphelpme or, ID of the user or community that owns
the wall - e.g. id999999999.
Returns a list of posts on a user wall or community wall.
Enter
the ID of the user or community that owns the wall. By default,
current user ID - e.g. 99999999. Use a negative
value - to designate a community ID - e.g.
-99999999.
Edit a Social Stream
To edit a Social Stream, click on the name of the Social Stream to display the Social Stream configurations in a new page. Make your desired changes and click the "Save" button to save the new configurations.
Delete a Social Stream
To delete a Social Stream, click on the left down button beside the Social Stream name and click on "Trash". This will move the Social Stream to the Trash folder but, if you are going to remove it permanently from the Joomla system, remove it from Trash.
Translation
Let's say you would like to translate the component to Spanish, these are the steps you should follow:
- First of all, set your desired Default Language in Joomla. Read this article for more details.
-
Copy the file
/language/en-GB/en-GB.com_simplesocialmediastream.iniinto the/language/es-ES/folder using an FTP client. -
Rename the file as
/language/es-ES/es-ES.com_simplesocialmediastream.iniin the folder. -
Open the file
es-ES.com_simplesocialmediastream.iniand translate all the English definitions into Spanish. - Save the changes.
Find out more information on Joomla Official Translations Documentation.
Social Stream Settings
To access the Social Stream Settings page, go to
Components » Simple Social Media Stream »
                  Settings
In this section you will be able to configure the settings for your Social Streams. The setting page is splitted into 4 section tabs:
Tab 1 - Display Settings
This tab is splitted into 4 sections including General Settings, Wall, Timeline and Carousel settings.
General Settings
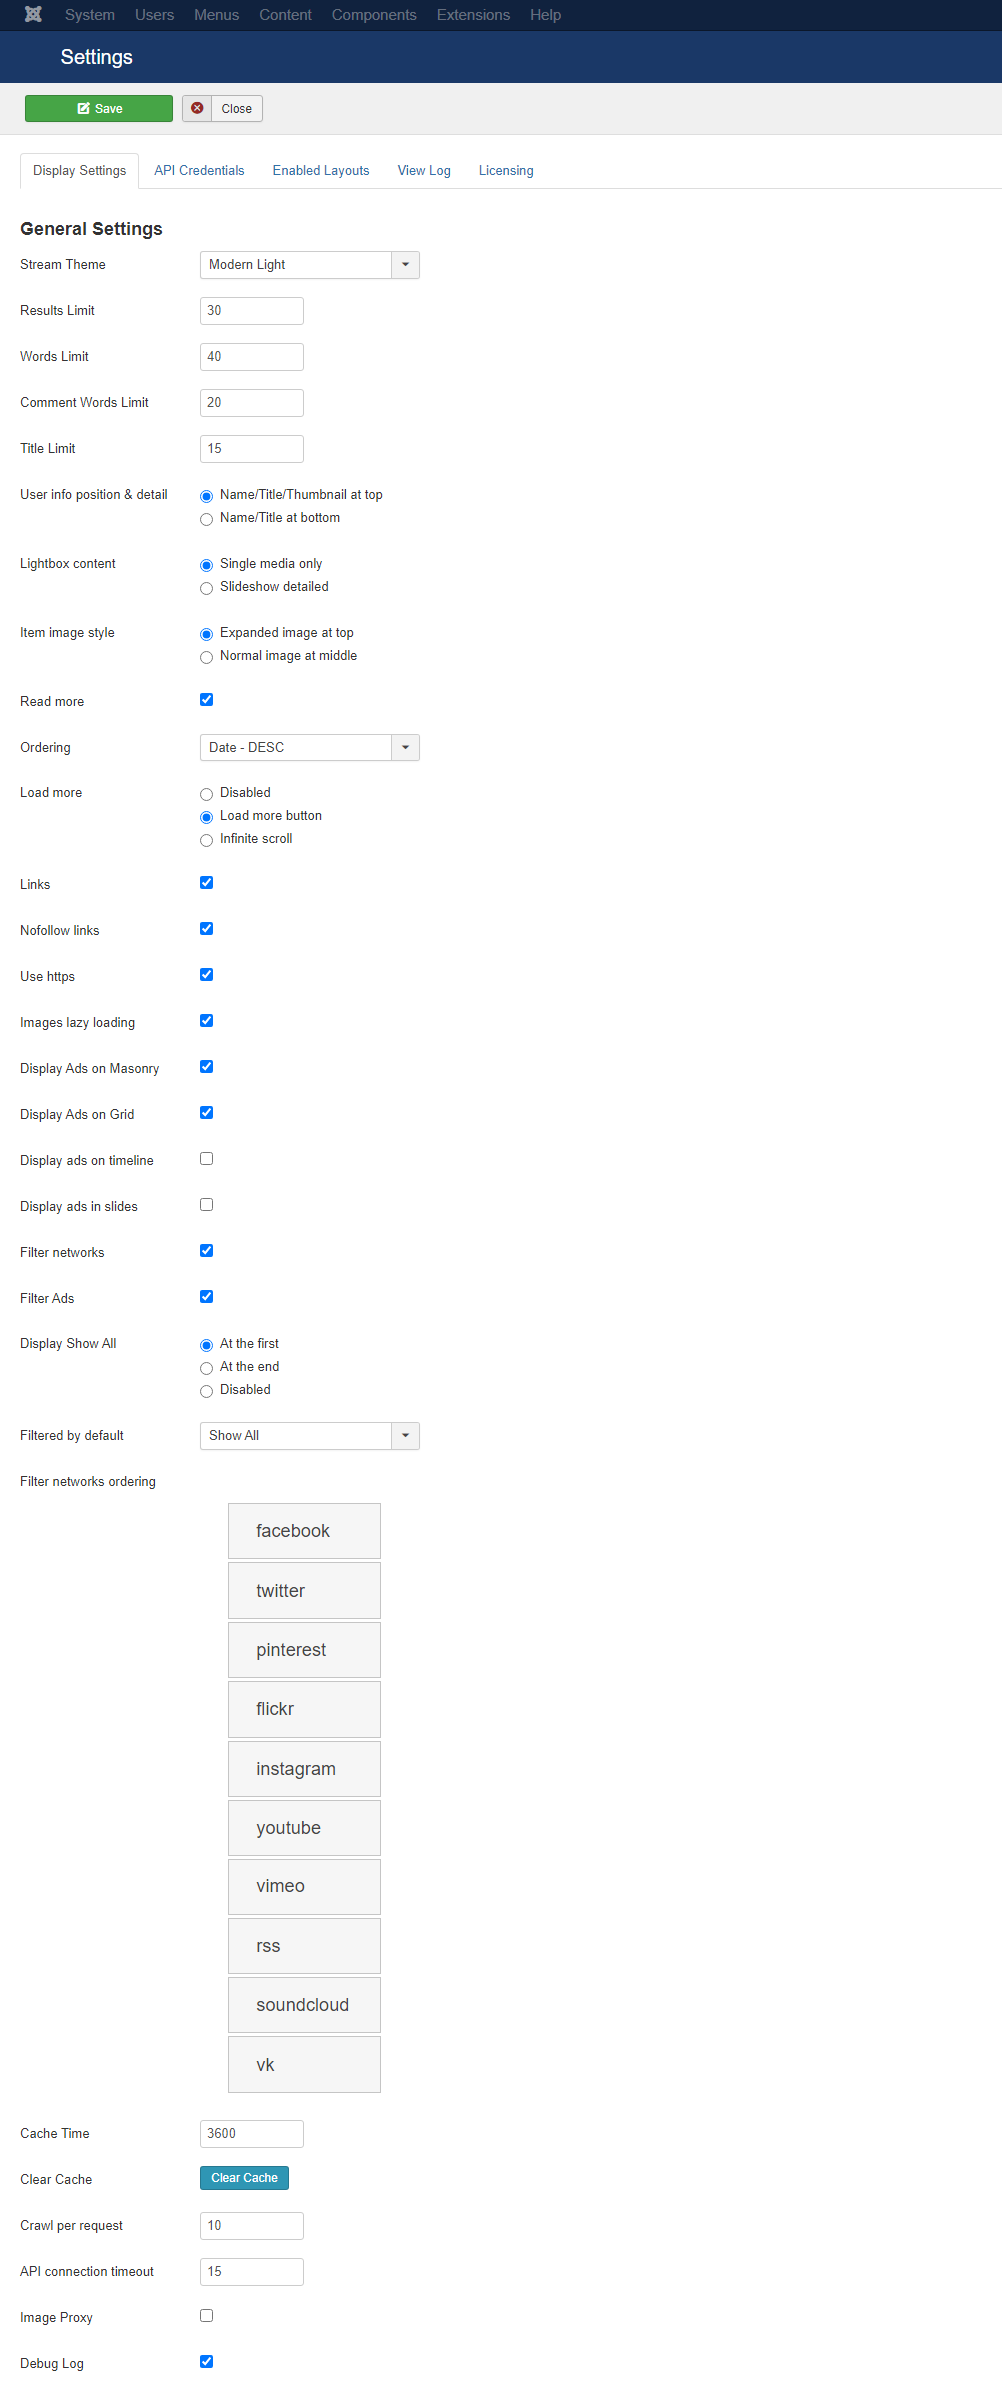
The style of your Social Stream.
Results LimitLimiting the maximum number of results to display on the stream.
Words LimitLimiting the description words count to display for each item on the stream - Leave empty for no limit.
Comment Words LimitLimiting the comment words count to display for each item - Leave empty for no limit.
Title LimitLimit of the title words count to display for each item on the stream - Leave empty for no limit.
User info position & detailThis will define, how to display the user info for each item on the Social Stream.
Lightbox contentThis will define, how to display the Social Stream item information in lightbox window.
Item image styleThis will define, how to display the image for each item on the Social Stream.
Read moreIf checked, the (…) character at the bottom of each feed item will be linked to the rest of the content.
OrderingSelect whether to order the results depending on date of each item or randomly.
Load moreIf checked, a load more bar will appear at the bottom of the social network wall and loads more social items if clicked.
LinksIf checked, all links will open in a new window else they will be open in the parent window.
Nofollow linksIf checked, all links will have the status of nofollow.
Use httpsIf checked, all links and images will be getting over https.
Displaying AdsIf any of these items is checked, the ads (from Manage Ads) will be displayed on it.
Filter networksIf checked, a navigation bar of all active network icons will appear at the bottom of the rotating feed or above the social network wall. These icons will allow the user to filter the social stream items.
Display Show AllShow All button will appear at the first or end of the social network filtering navigation bar.
Filtered by defaultWhich filtering button to be selected by default.
Filter networks orderingOrder of the filtering navigation bar that appear at the bottom of the rotating feed or above the social network wall. Do not forget to save the changes.
Stream Auto UpdateIf enabled, the Social Stream will get updated automatically without the need to refresh the page - If enabled, the "Cache Time" value will be ignored and considered as 0.
Auto update intervalThe time delay for updating the Social Streams (in minutes). Considering that there are some limits on social networks about the number of requests sent to their API, the minimum allowed value is 1.
Cache Time
The time delay for caching of Social Streams (in minutes) -
reduces up download time. 0 Zero value means no caching.
NOTE: Make sure the
`media/com_simplesocialmediastream/cache` path is writable by
the server (depending on your web hosting server, permissions
set to 755, 775, or 777).
Number of feed crawls per each request. 0 Zero value means to crawl all at once. (depending on your web hosting server resources, some servers can not read a lot of feeds at the same time).
API connection timeoutSocial API request connection timeout (in seconds). (depending on your web hosting server resources, some servers can not wait to process very long time).
Debug Log
If checked, all social APIs errors will be logged in a file in
"administrator/logs/com_simplesocialmediastream.log" path. You
can find all the problems that may occurs during the feed
crawling process.
NOTE: Make sure the
`com_simplesocialmediastream.log` file inside the
`administrator/logs` folder is existed and writable by the
server (depending on your web hosting server, permissions set to
644, 655, or 666).
Wall Display Settings
These options only apply to the wall display mode.
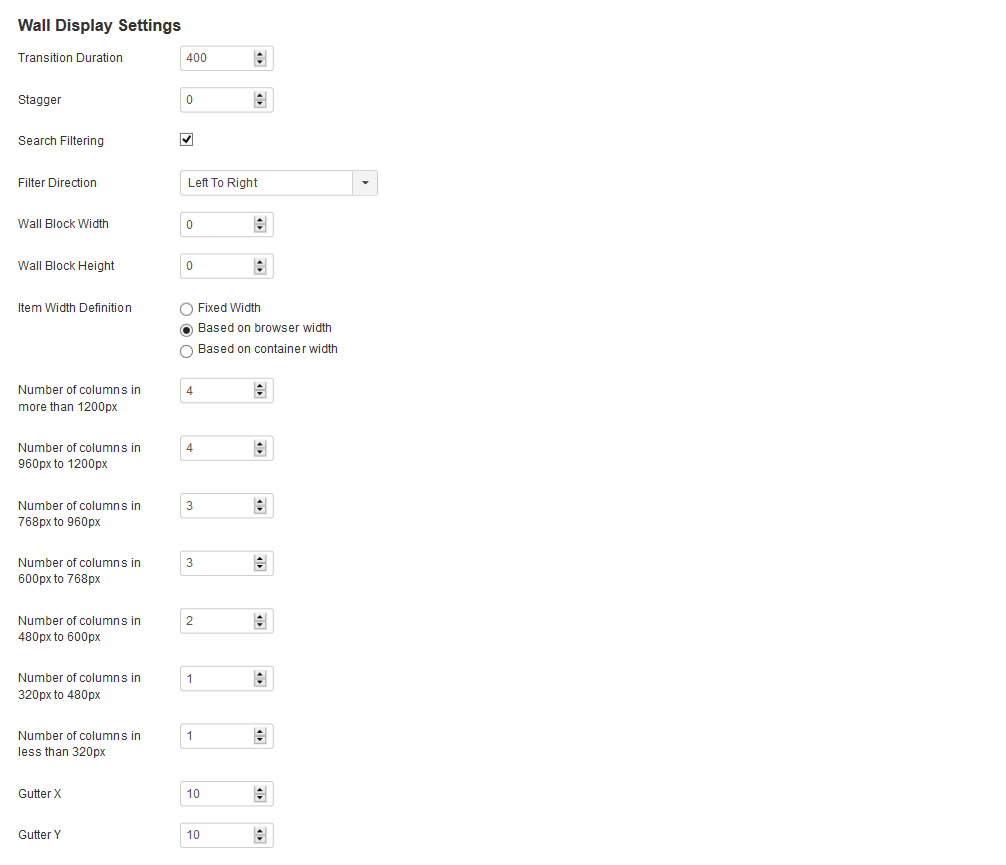
Duration of the transition when items change position or appearance - in milliseconds - 0 means no transitions.
StaggerStaggers item transitions, so items transition incrementally after one another - in milliseconds - Leave empty to disable it.
Search FilteringIf checked, a search box will appear above the social network wall allowing the user to filter the social stream items using a search phrase.
Filter DirectionLet layout to start render from left to right or, right to left.
Re-layout wall based onIf "Page scroll" is enabled, the wall gaps will get filled when the visitor scroll the page but, if "Images load" is enabled, the wall gaps will get filled when a new image on the wall is loaded.
Wall Block WidthWidth of wall block (px) - Leave empty for full width.
Wall Block HeightHeight of wall block (px) - Leave empty for infinite height.
Item Width Definition
If "Fixed Width" is enabled, the "Item Width" value will be
applied to each wall item - Responsive Breakpoints will be
ignored.
If "Based on browser width" is enabled, the "Responsive
Breakpoints" sets will be applied to wall items based on browser
width.
If "Based on container width" is enabled, the "Responsive
Breakpoints" sets will be applied to wall items based on wall
container block width.
Defines the number of items (columns) shwoing on each row for different viewport/container sizes - Requires "Fixed Width" to be disabled.
Gutter XThe horizontal space between item elements - in pixels. This may changes automatically when "Fixed Width" is disabled.
Gutter YThe vertical space between row elements - in pixels. This may changes automatically when "Fixed Width" is disabled.
Carousel Display Settings
These options only apply to the carousel display mode.
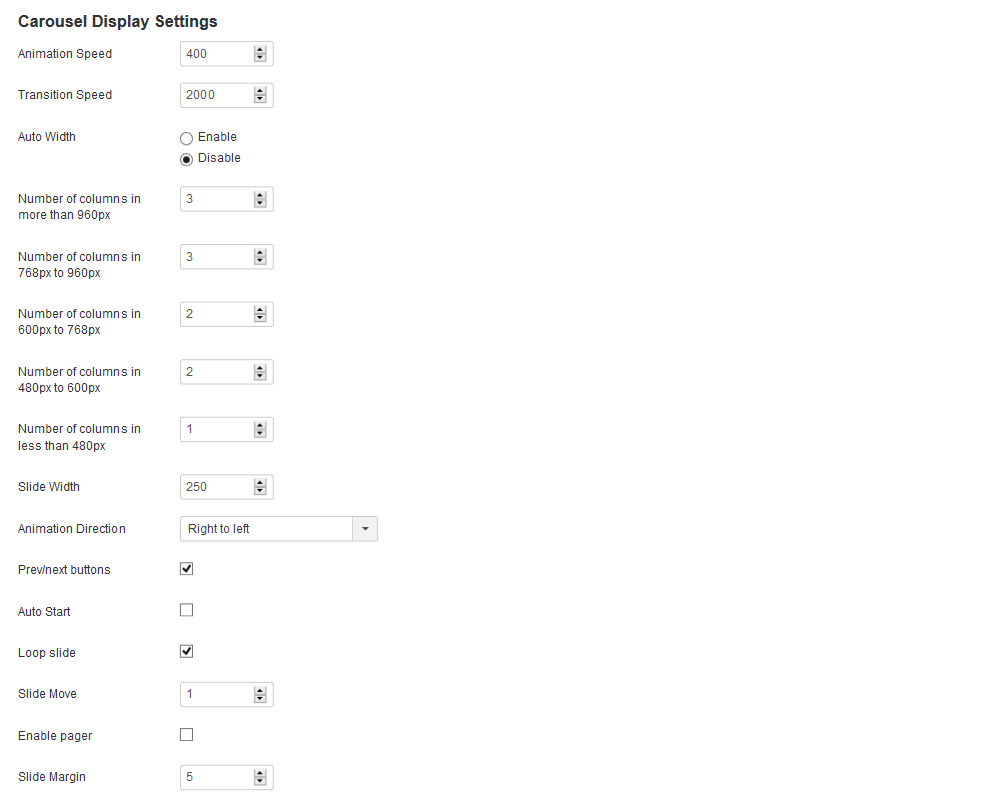
Defines the animation speed (in ms) of the rows moving left or right.
Transition SpeedThe time (in ms) between each auto transition.
Auto WidthIf enabled, the "Slide Width" value will be applied to each slide - Number of items will be ignored.
Number of itemsDefines the number of items shwoing in each slide for different viewport sizes - Requires Auto Width to be OFF.
Slide WidthWidth of slide item (px) - Do not leave empty!
Animation DirectionSets the direction of carousel feed movement to either "right" or "left".
ControlsIf checked, prev/next buttons will be displayed.
Auto StartIf checked, the Slider will automatically start to play.
Loop slideIf checked, will enable the ability to loop back to the beginning of the slide when on the last element - Slide Move will be ignored.
Slide MoveNumber of slides to be moved at a time - Requires Loop slide to be OFF.
Enable pagerEnable/disable pager option.
Slide MarginSpacing between each slide.
Timeline Display Settings
These options only apply to the timeline display mode.

To display timeline in one column or based on browser screen width.
Tab 2 - API Credentials
Some networks require authentication to provide feed data.
Note:
Before doing API credentials setup, please make sure you have
already set your license key within the component settings -
licensing tab.
Check this section for more information.

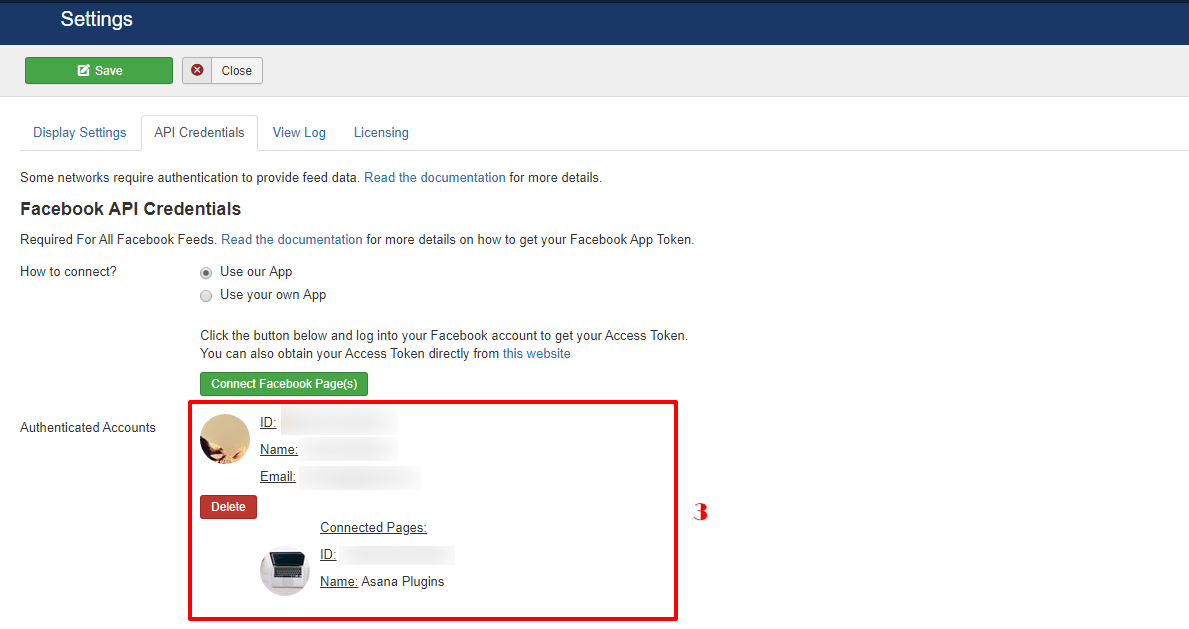
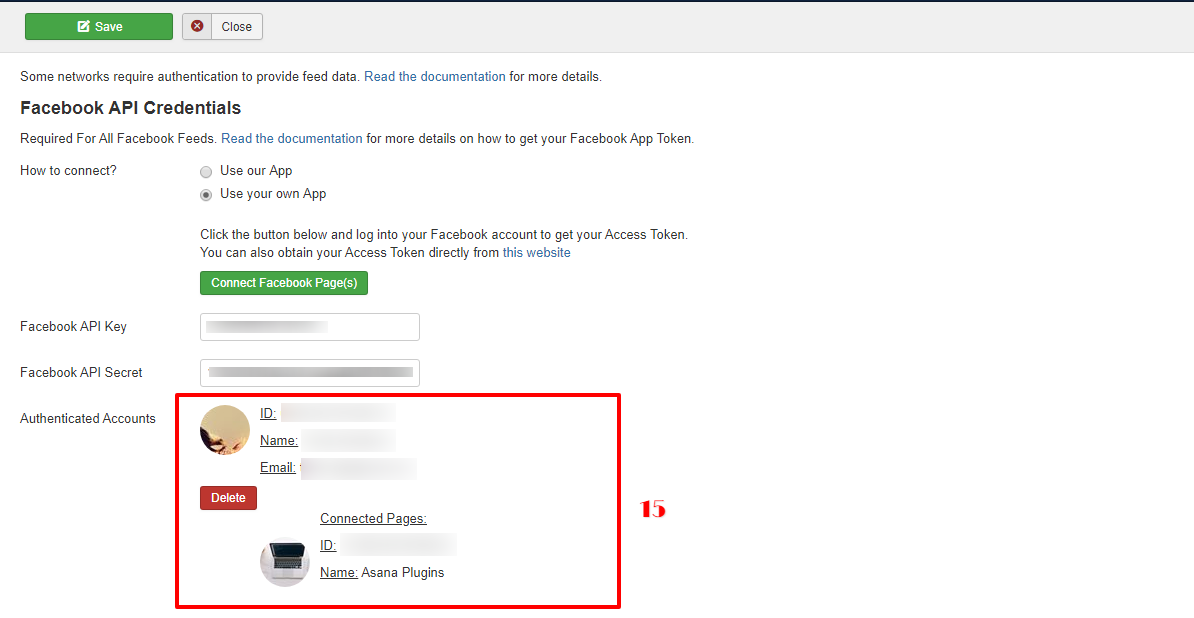
Facebook API Credentials
For the component to be able to retrieve your feed data from
Facebook, you need to connect your Facebook accounts/pages to
the component.
You will be able to get the feed from any
Facebook accounts/pages you have listed under Authenticated
Accounts section
within the component.
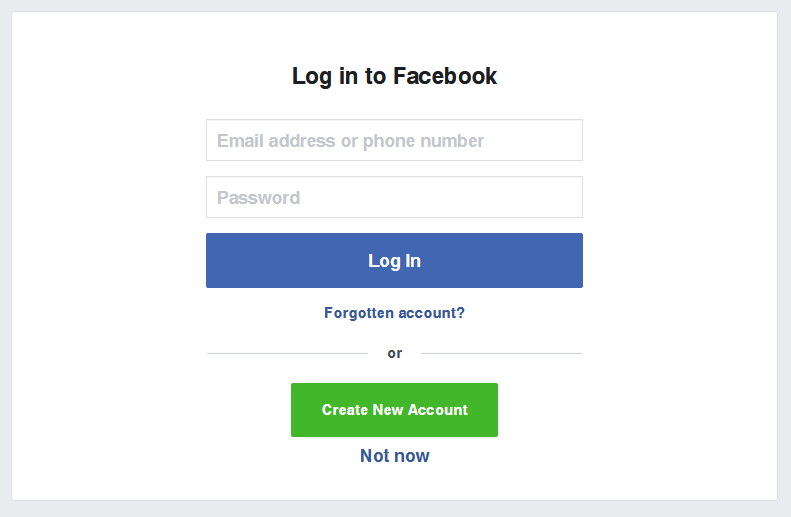
To connect a Facebook account to the component, use one of the following methods:
Using our Facebook App:
Note: Please consider, you can only get the feed of Facebook Pages you have under management within the Facebook account you are authenticating our Facebook app with or, your Facebook account has a role in that Facebook Page. Check this article on how to manage roles for your Facebook Page.
In cases you want to get feed from your customers Facebook
Pages, you can do any of these:
- You ask your customer to
give you a role like Moderator in the Page(s) you want to get
feed from and you do the connection process using your own
Facebook account.
- Your customer will do the connection
process directly using their own Facebook account.
- From Joomla admin panel, go to component Settings.
- On the Settings page, switch to API Credentials tab and scroll to the Facebook API Credentials section.
- Choose Use our App radio option.
- Click on Connect Facebook Page(s) button.
- You will need to login to your Facebook account and authorize our Facebook App.
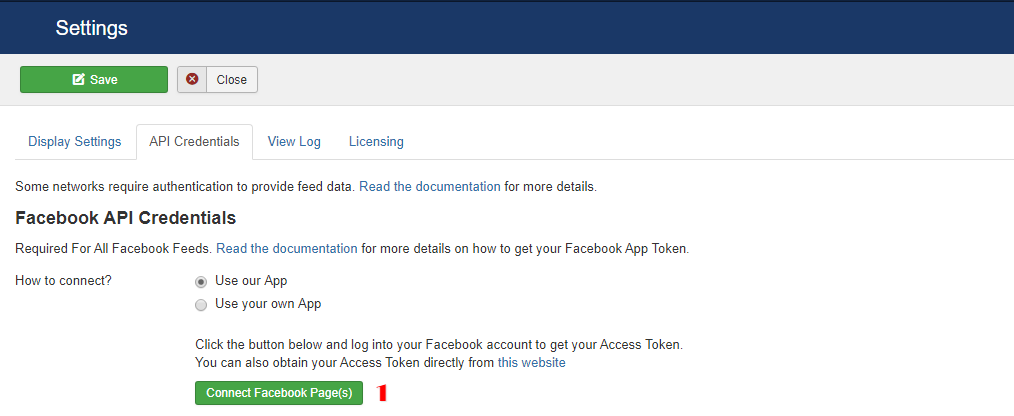
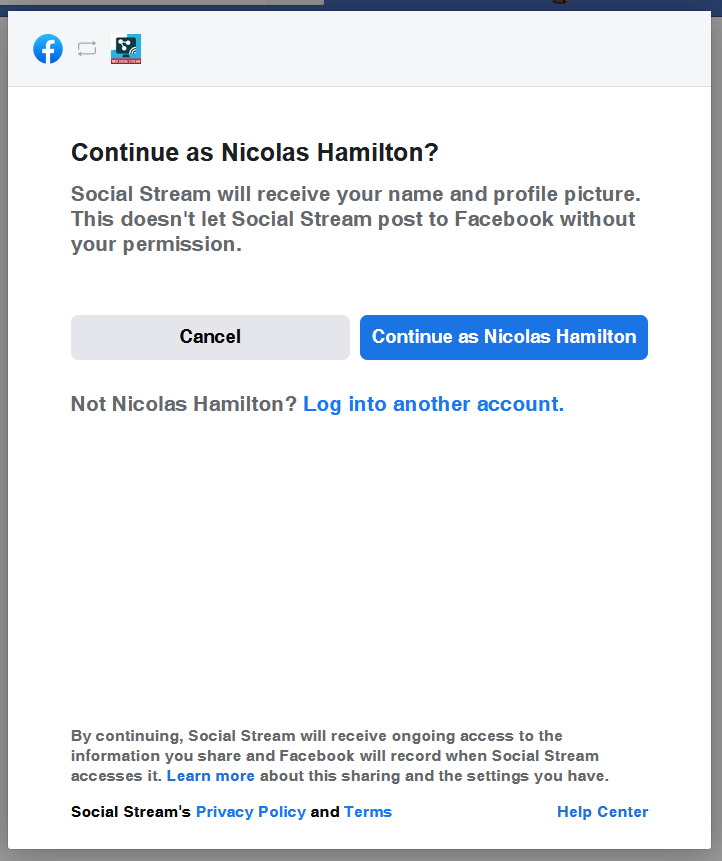
- You need to select the pages you want to connect to the component.
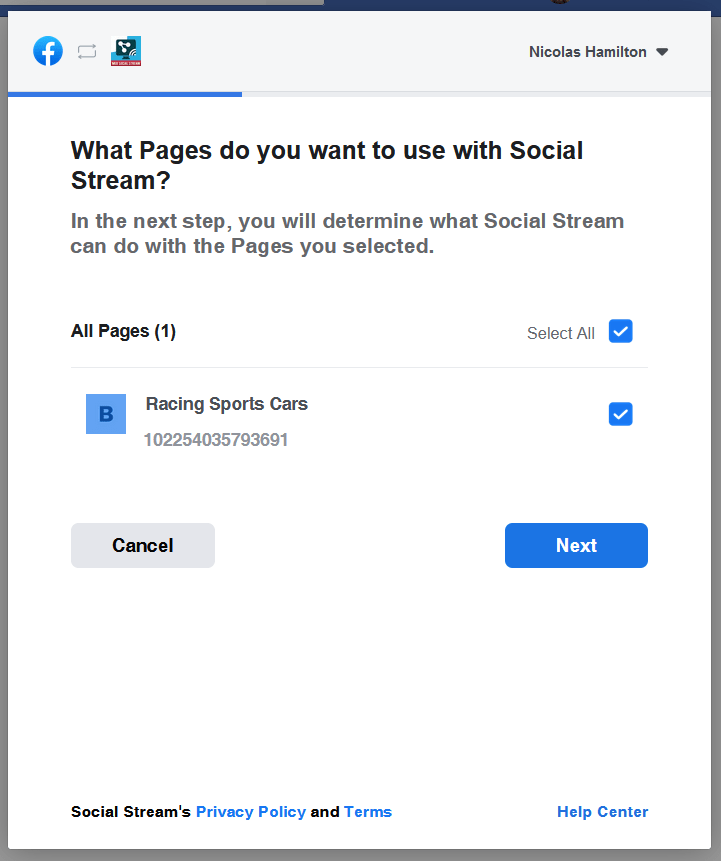
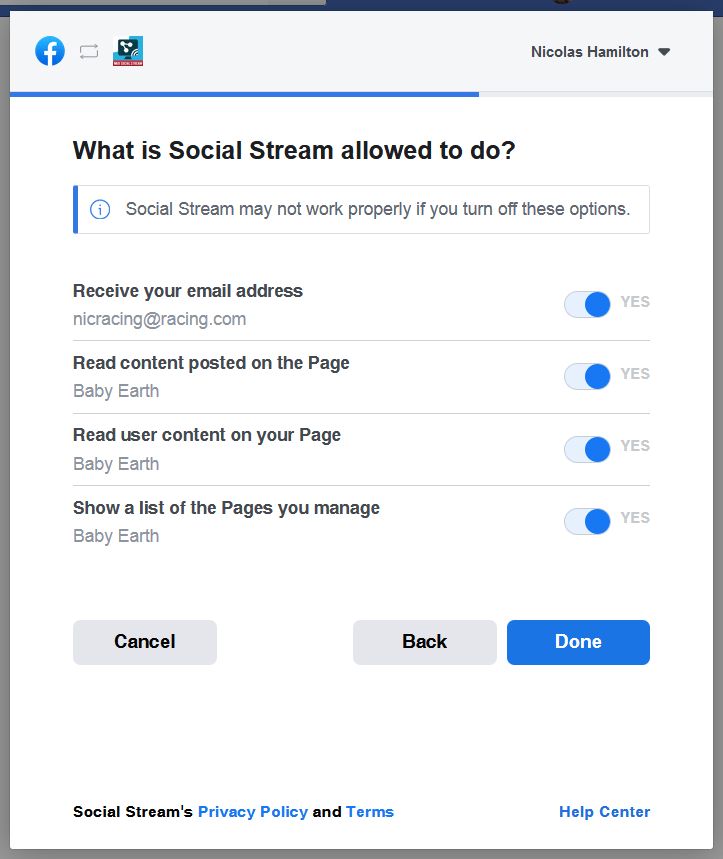
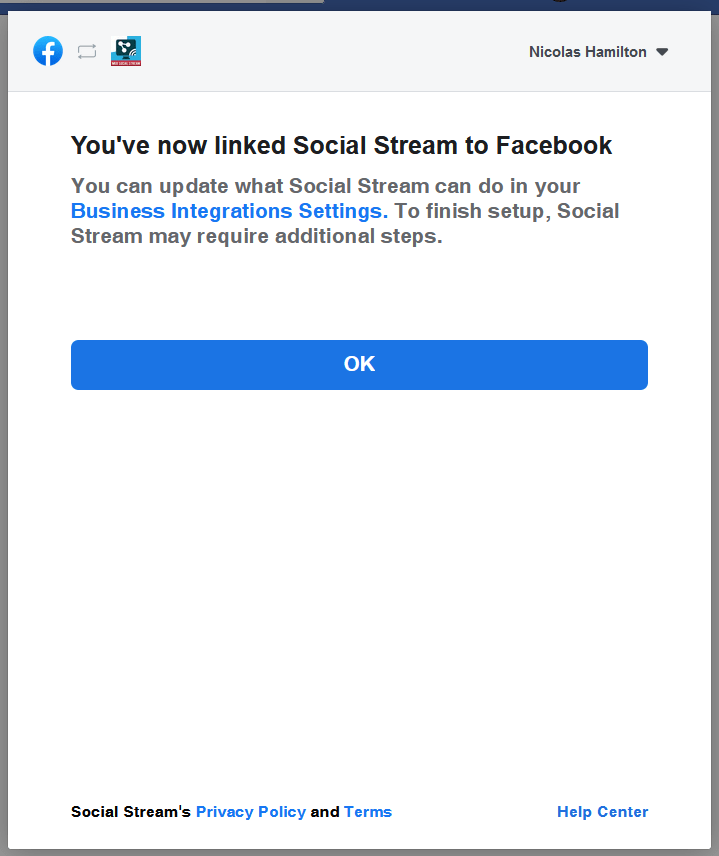
- You will be redirected back to the API Credentials page again with your Facebook account listed in Authenticated Accounts section.
- On top of settings page click on Save only if you have changed the connect method.
Using your own Facebook App:
Note: Please
consider, you can only get the feed of
Facebook Pages you have under management within
the Facebook account you are authenticating your Facebook app
with or, your Facebook account has a role in
that Facebook Page. Check this article on
how to manage roles for your Facebook Page.
Note:
Please also make sure your Facebook App is in
Development
mode.
In cases you want to get feed from your customers Facebook
Pages, you can do any of these:
- You create the Facebook App,
you ask your customer to give you a role like Moderator in the
Page(s) you want to get feed from and finally you do the
connection process.
- You create the Facebook App, you add
your customer's Facebook account to your App as a Tester or
Developer and ask your customer to do the connection process.
- Your customer will create the Facebook App and do the
connection process as well.
- Login to your Facebook account and browse to the Facebook for Developers page.
-
If you have not registered to become a Facebook developer, you
should do that now by pressing the
Get Started button on the page. It's a quick
and easy process to get signed up.
Check the following video or read the article on how to register for Facebook developer?
- Now you need to create a Facebook App. Check the following video or follow the steps below to create your Facebook App.
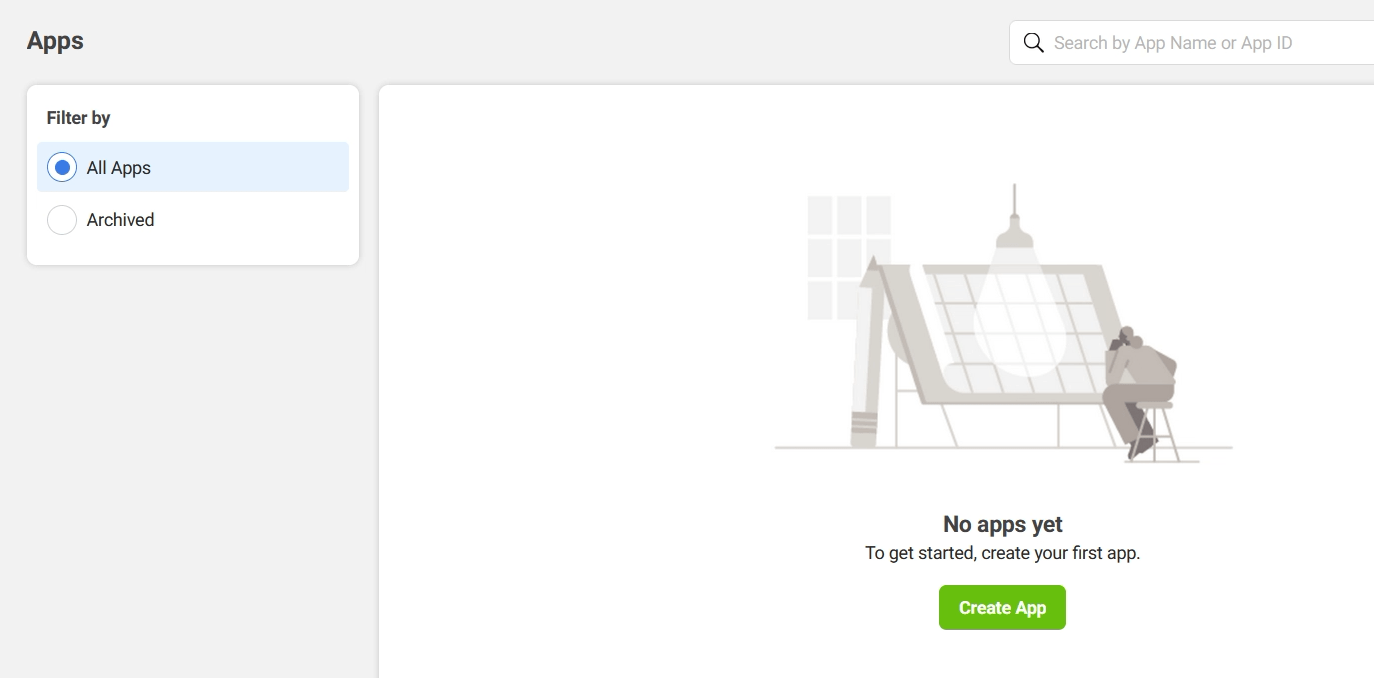
- Within the Apps page, click the, Create App button
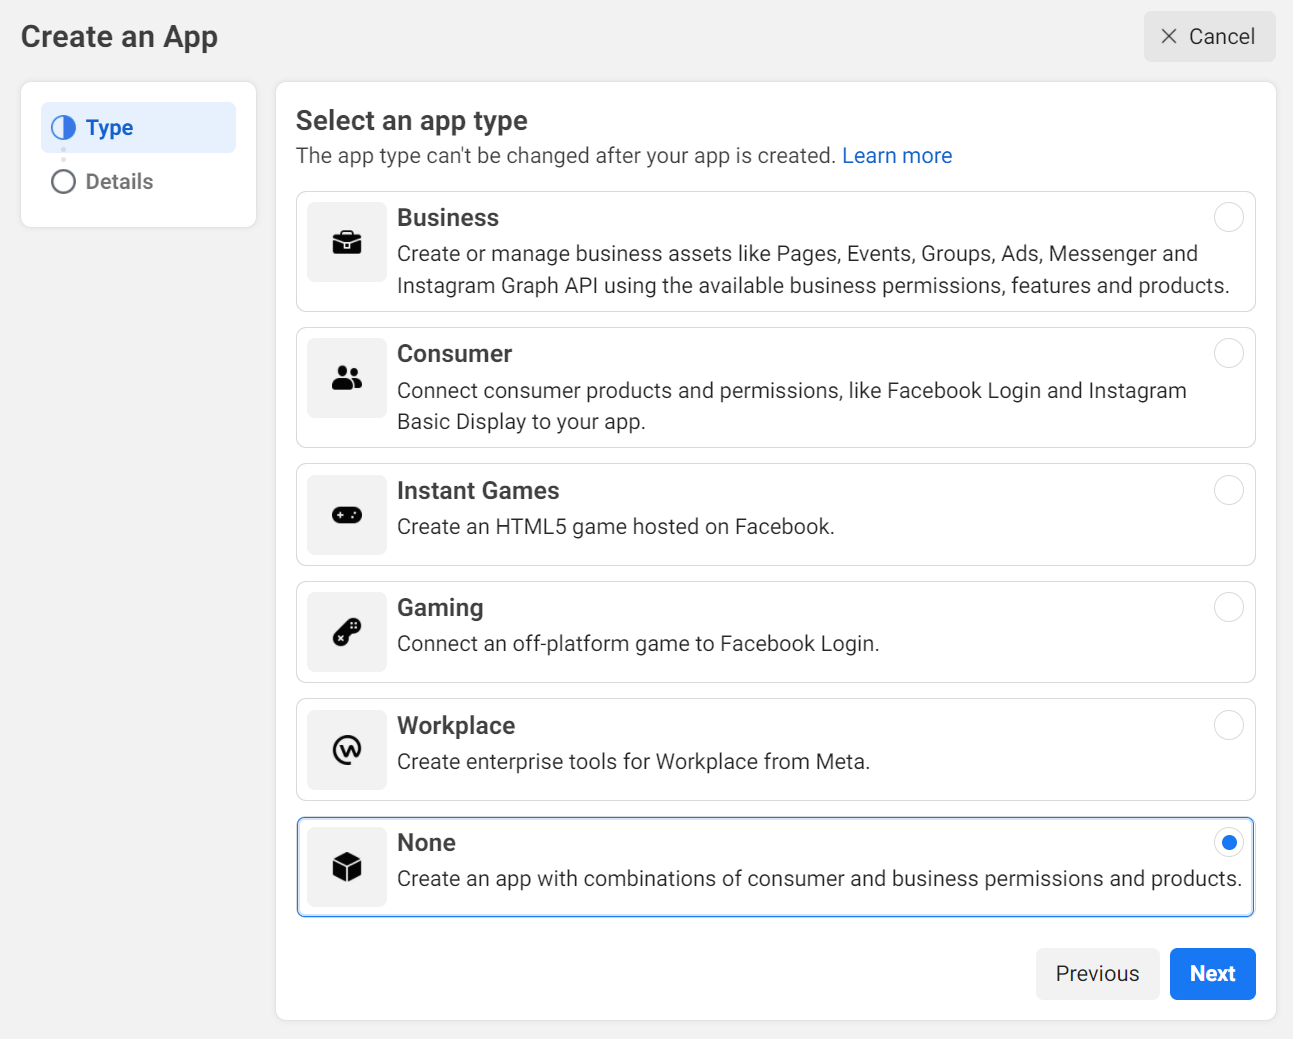
- The Create an App page will be opened. Select None as an app type.
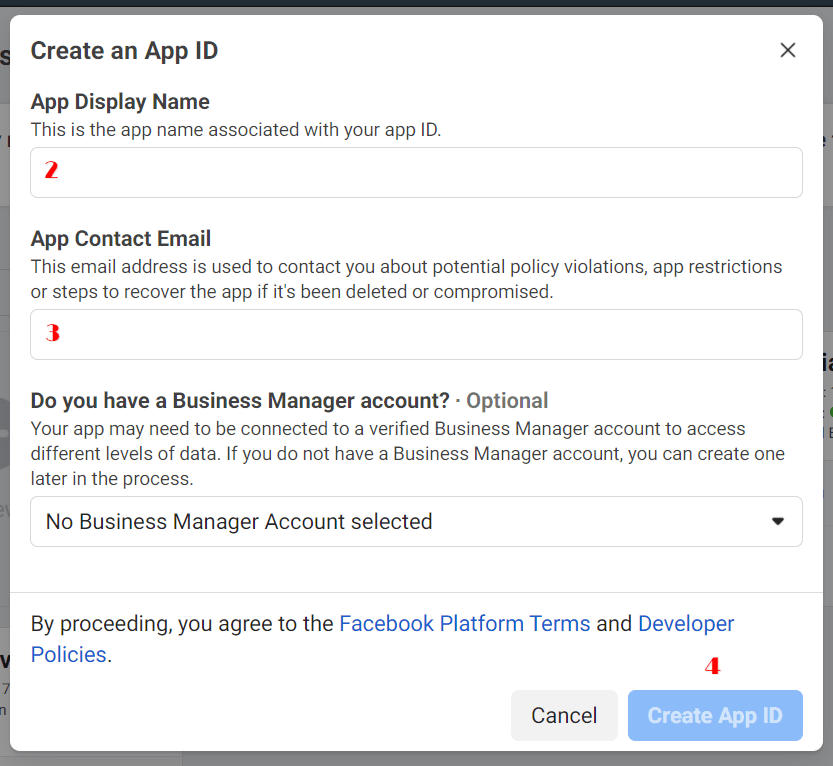
- Enter a custom name in the Display Name input, enter your email address as Contact Email and click Create App ID button.
- Your App is created. Now you need to setup and connect via your Facebook App. Check the following video or follow the steps to create your Facebook App.
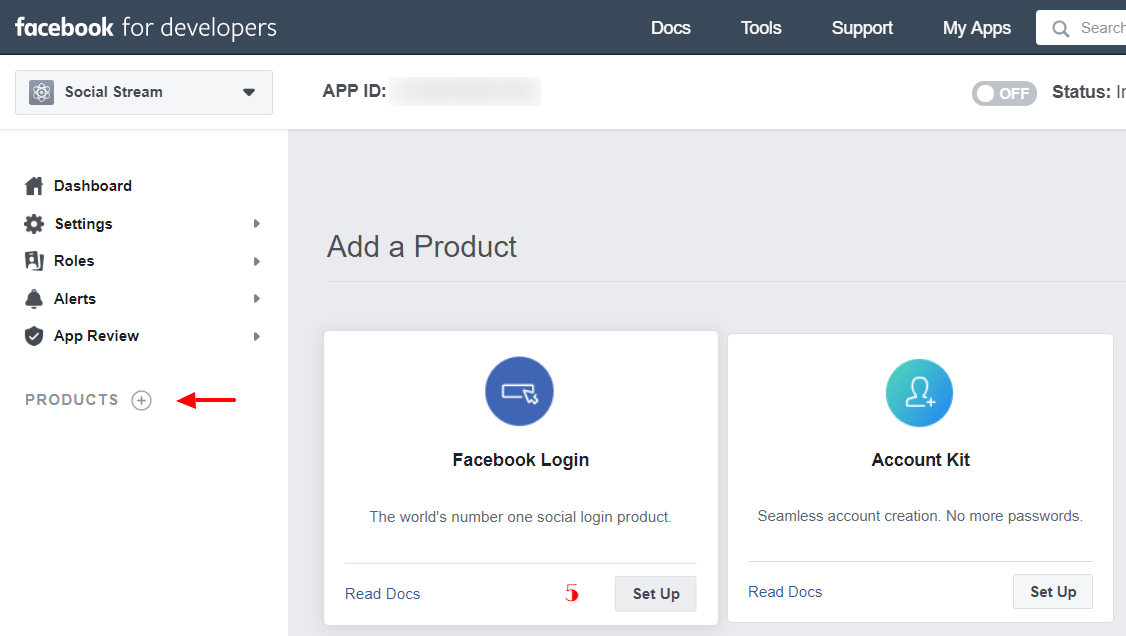
- Browse to your app dashboard page and make sure your Facebook App is in Development mode.
- Click on the Add Product link on the left side and in the Add a Product page, click the Set Up button right in the Facebook Login block.
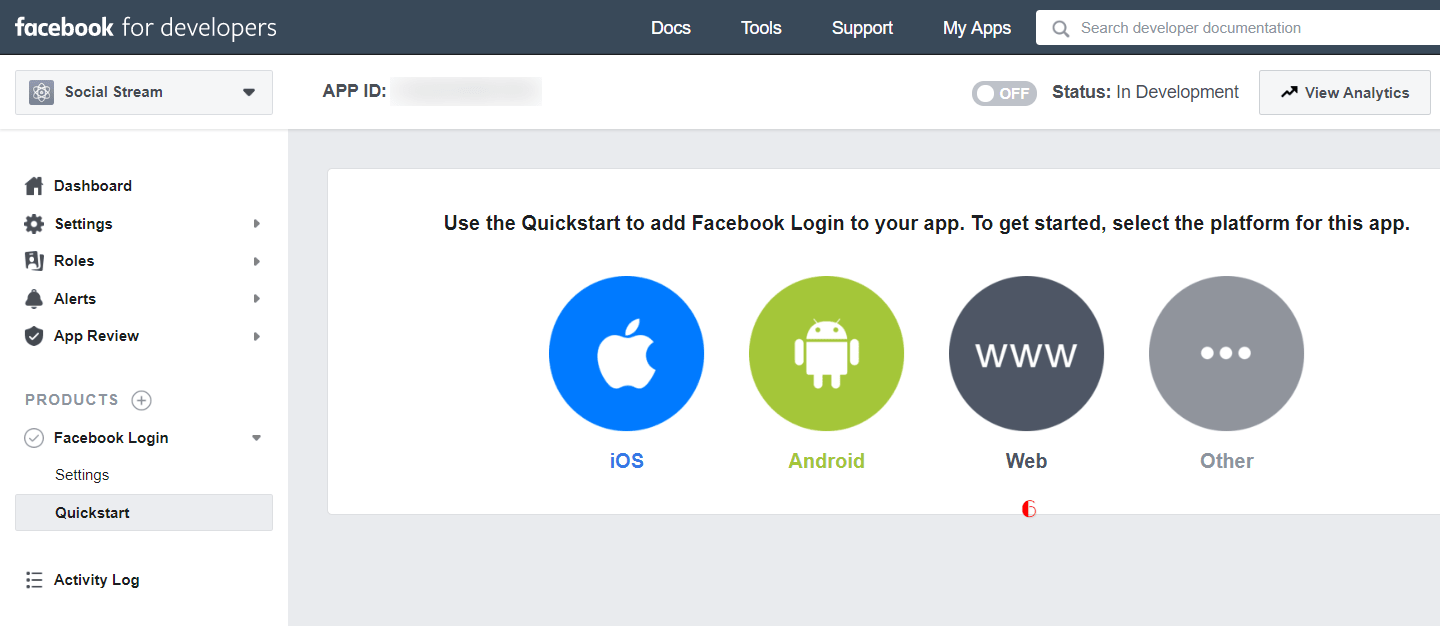
- Select Web as the app platform, enter your Site URL and Save.
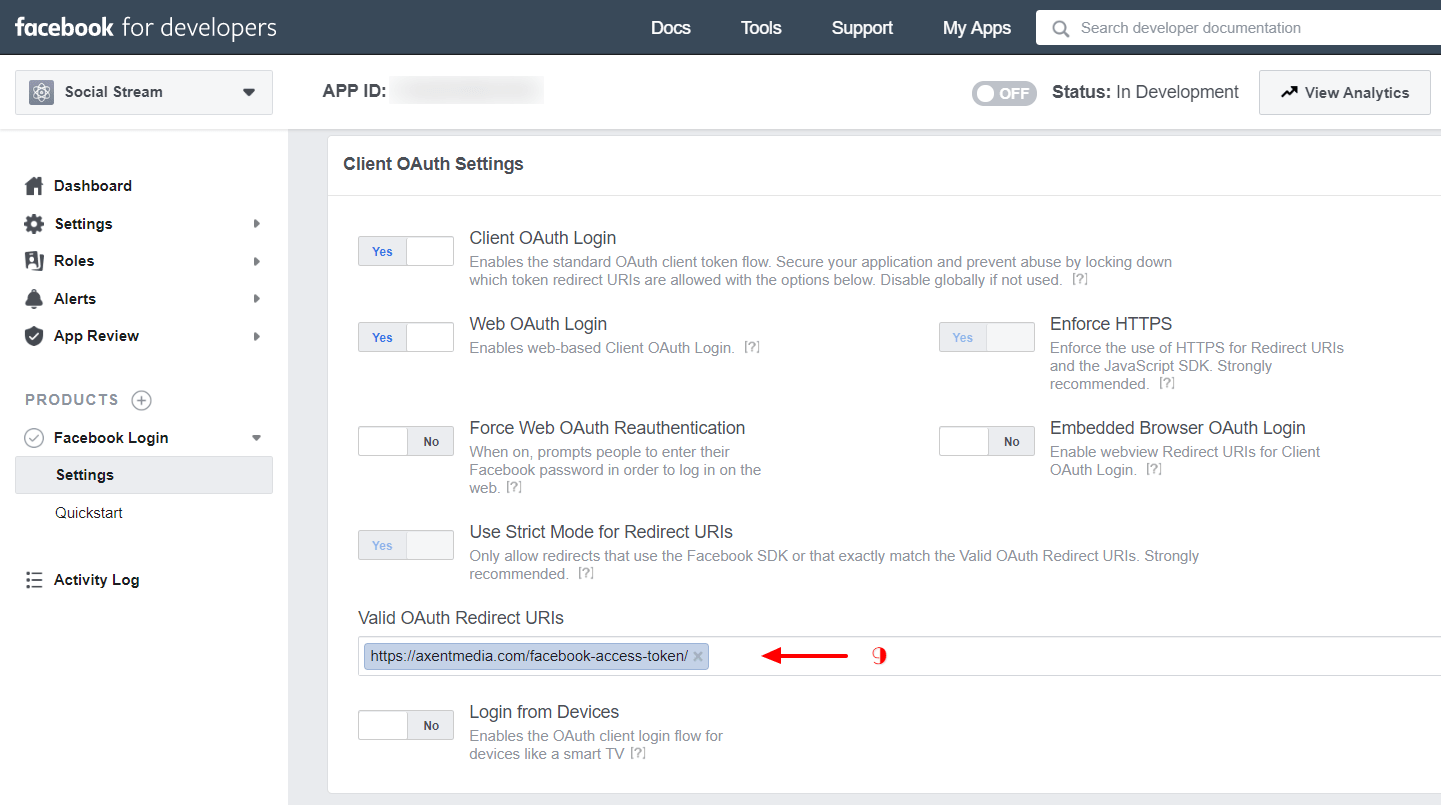
- On the left sidebar, from the Facebook Login section click on the Settings and scroll to the Client OAuth Settings section.
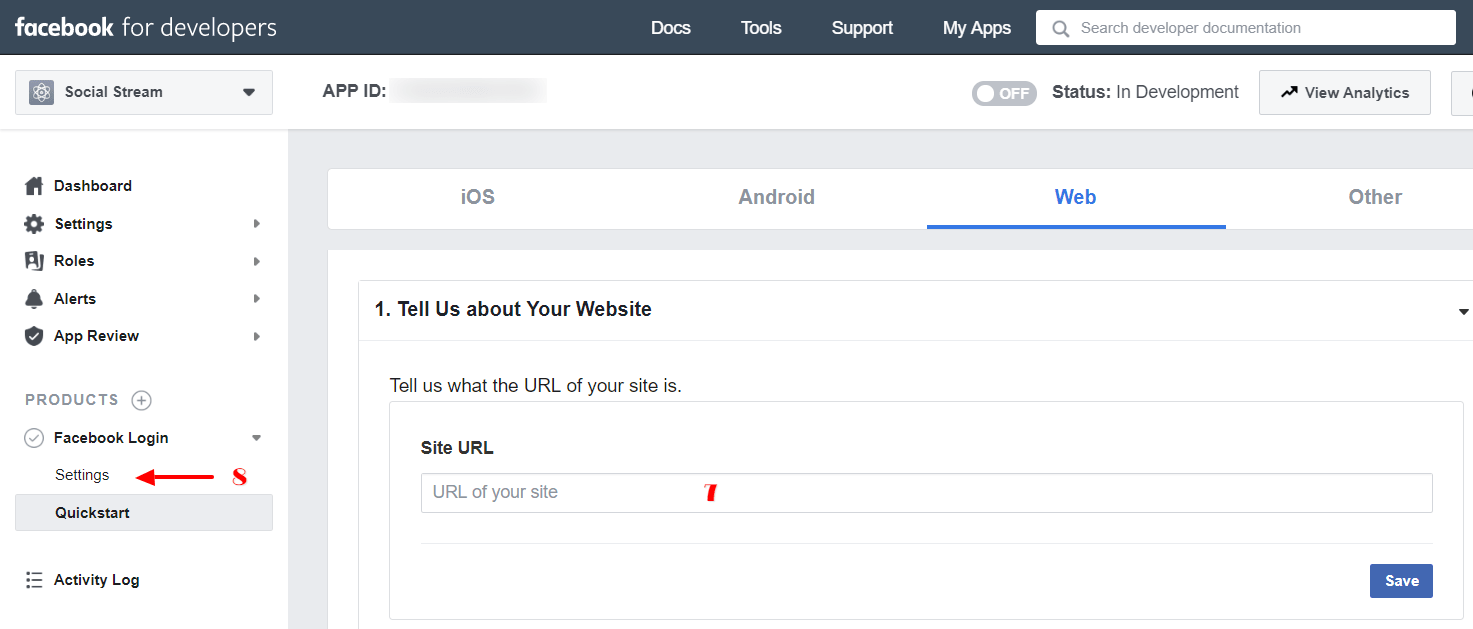
-
Exactly add the following URL into the
Valid OAuth Redirect URLs section and save
the settings.
https://axentmedia.com/facebook-access-token/
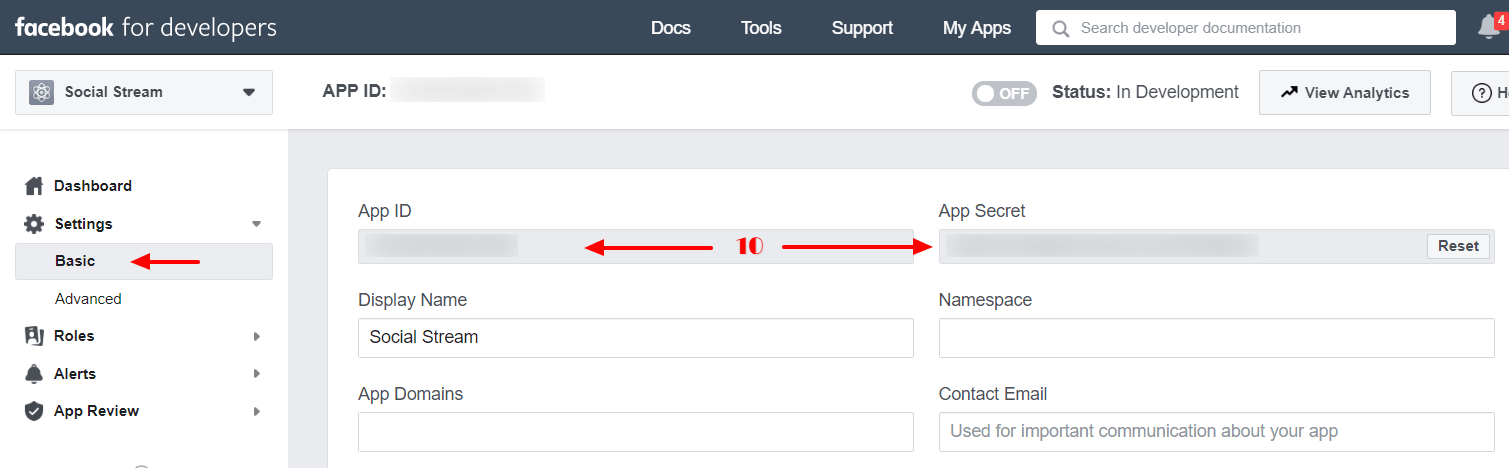
- From the left sidebar, click on the Settings > Basic.
- Copy the App ID and App Secret values from this page.
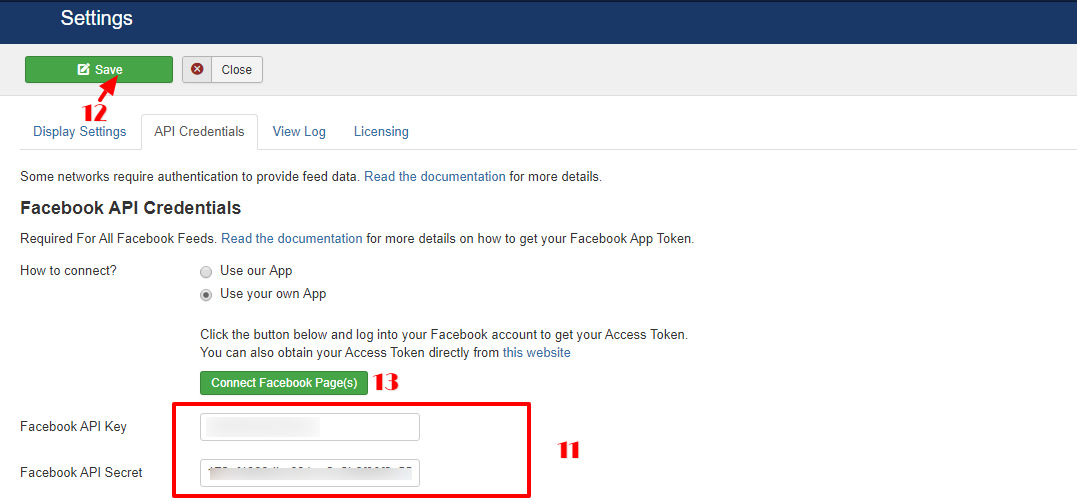
- From the Joomla panel, go to the component Settings.
- On the Settings page, switch to API Credentials tab and scroll to the Facebook API Credentials section.
- Choose Use your own App as "How to connect?" radio option.
- Paste the App ID and App Secret values in their appropriate places.
- Click on Connect Facebook Page(s) button.
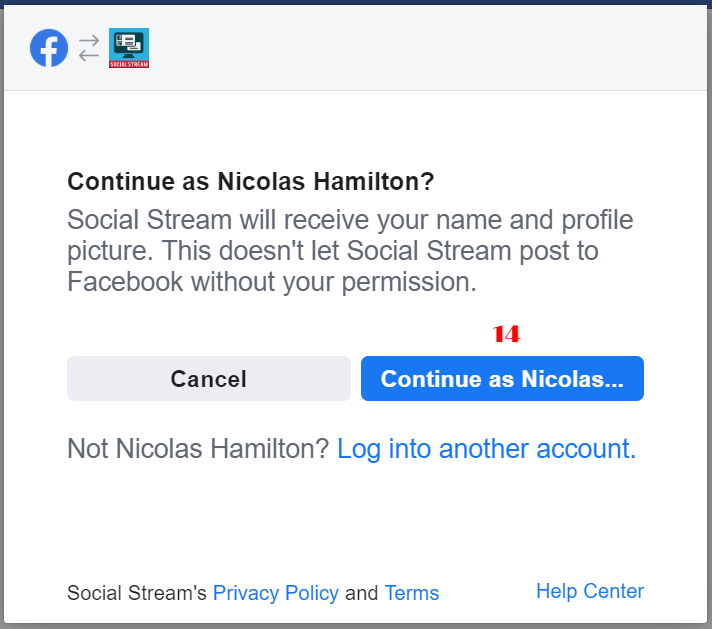
- You will need to login to your Facebook account and authorize your Facebook App.
- You will be redirected back to the API Credentials page again with your Facebook account listed in Authenticated Accounts section.
- On top of settings page click on Save only if you have changed the connect method.
Twitter API Credentials
Required For All Twitter Feeds.
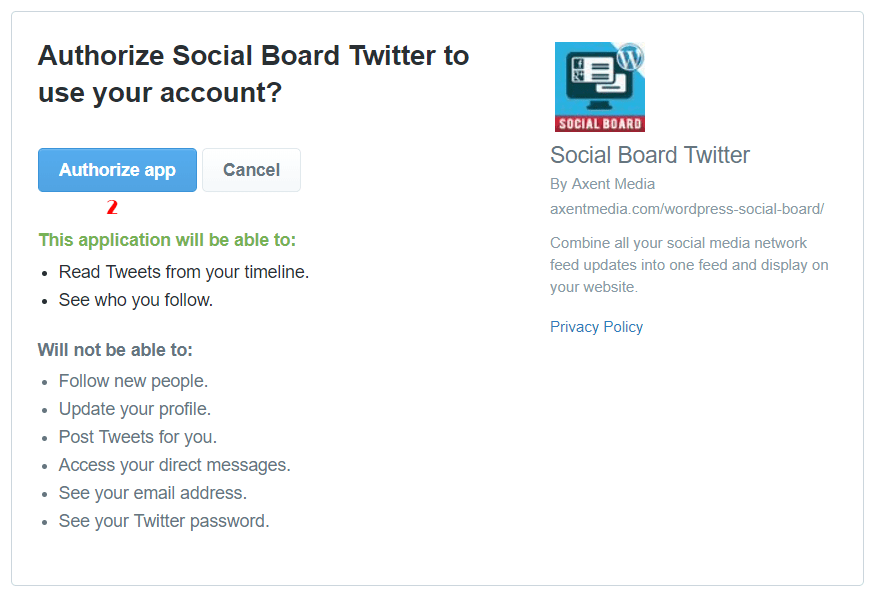
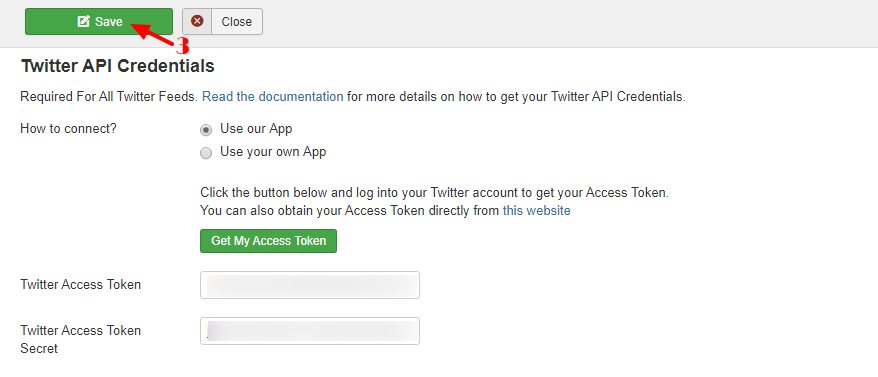
Method 1 (Using our inbuilt App):
- From Joomla Administrator, go to Components » Simple Social Media Stream » Settings.
- On the Stream Settings page, switch to API Credentials tab and scroll to the Twitter API Credentials section.
- Click on Get my Access Token button.
- You will need to login to your Twitter account and authorize our Twitter App.
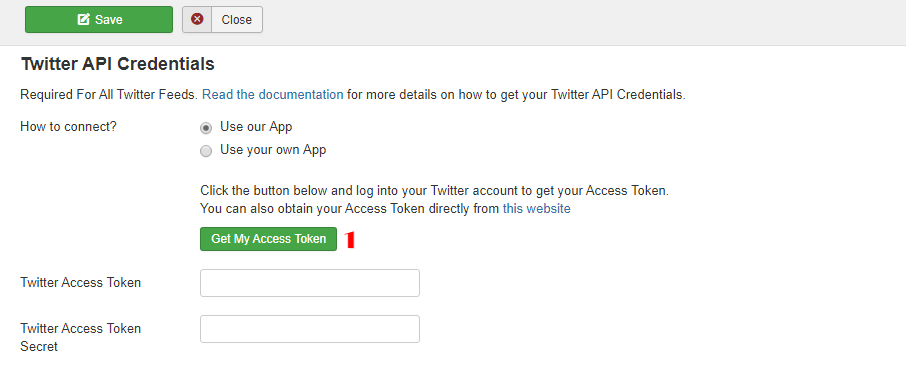
- You will be redirected back to this page again with Access Token field filled with your token.
- Click Save to save changes.
Method 2 (Using your own App):
Attention: If you are going to use this method, you need to apply for a Twitter developer account and get approved.
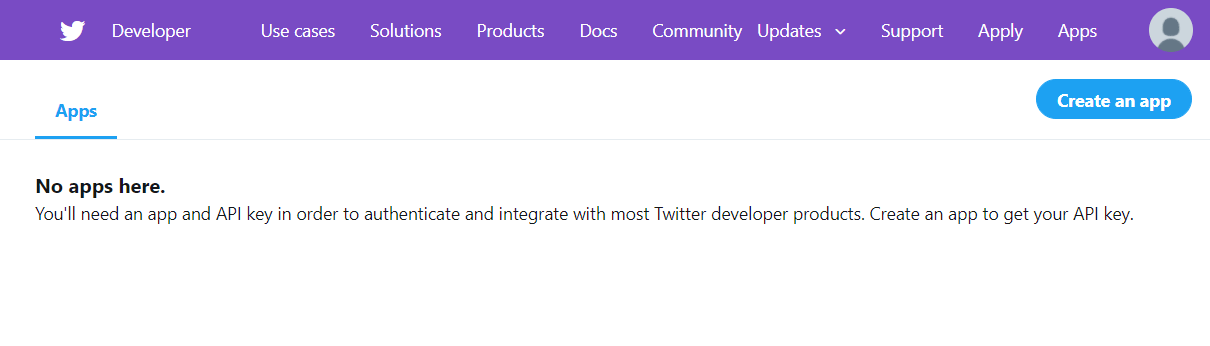
- Browse to https://developer.twitter.com/en/apps and sign in with your Twitter Account.
- You will be redirected to your Twitter Application Management area. Then click on "Create New App" button.
- To create Twitter applications and get access to the API you have to apply for a Twitter developer account.
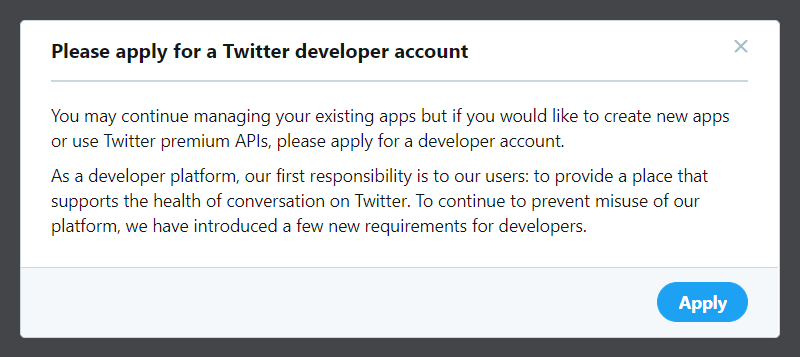
- If you are already granted for a Twitter developer access you will be prompted with the app creation form.
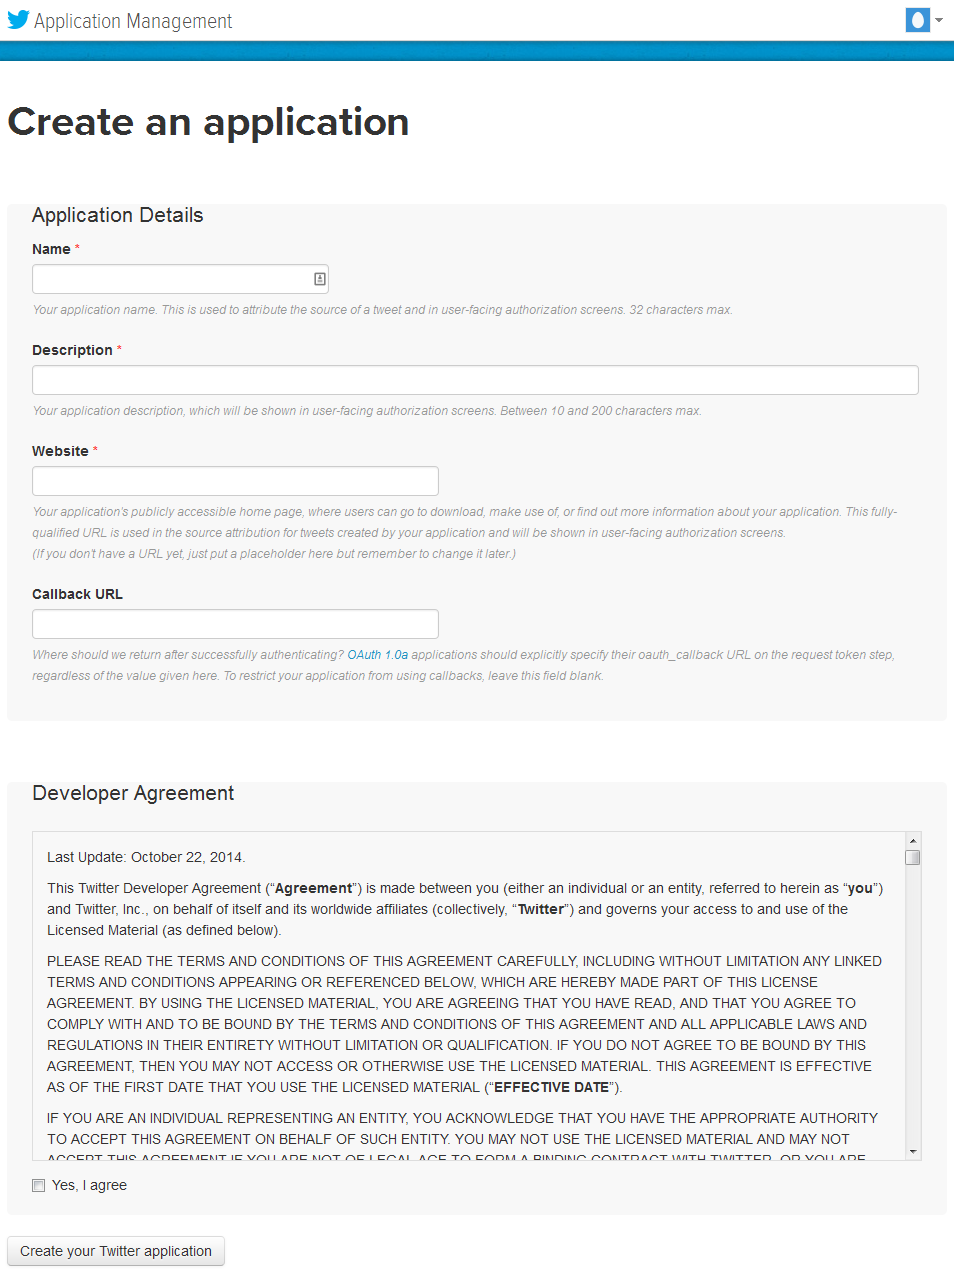
- Fill out the Name, Description & Website fields.
- Read the "Developer Agreement" and check the "Yes I agree" box.
- Click "Create Your Twitter Application" button.
After creating the Application, the Application Details page opens.
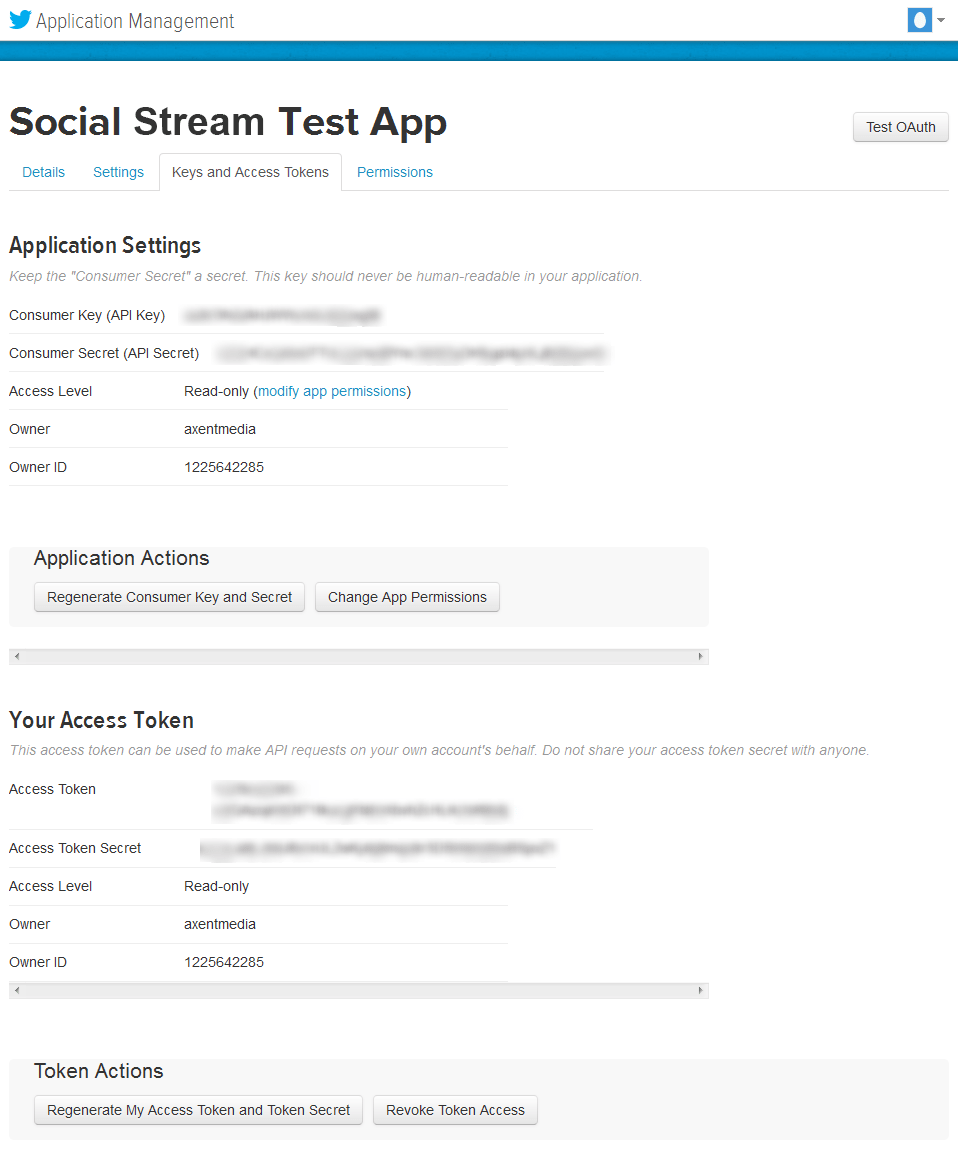
- Go to "Keys and Access Tokens" tab.
- Click on the "Generate Consumer Key and Secret" button.
- Click on the "Generate My Access Token and Token Secret" button.
Copy the API Key, API Secret, Access Token and Access Token Secret values and paste into the "Twitter API Credentials" form in "Simple Social Media Stream Component Settings" page and the component should now have access to your Twitter feed data.
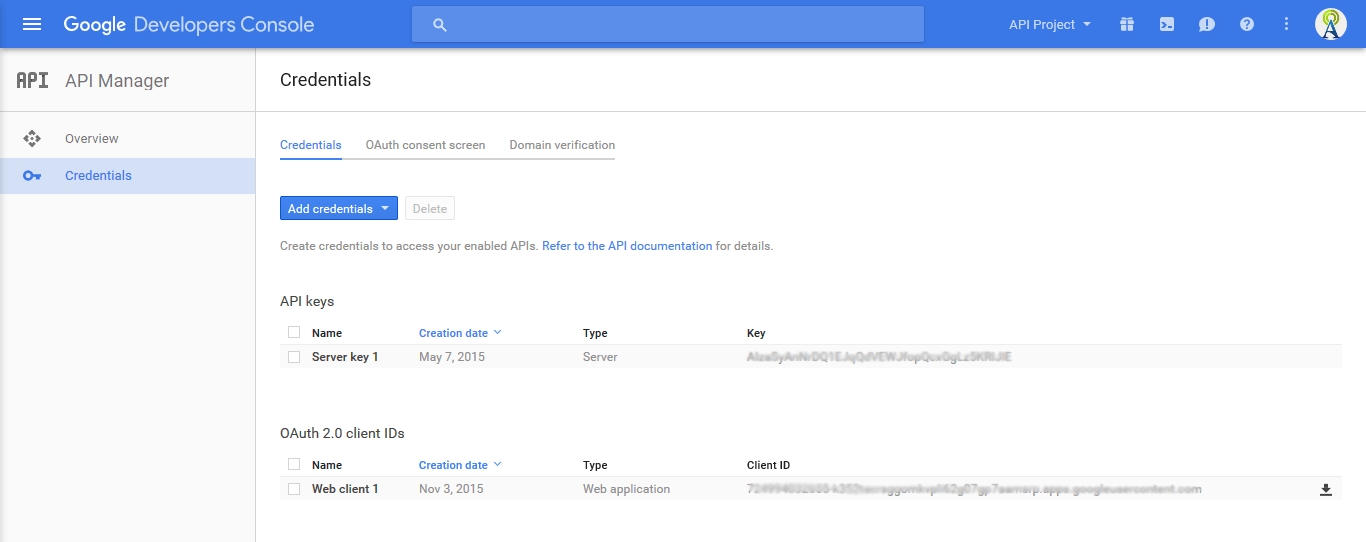
Google/YouTube API Credentials
To create and obtain your own Google API Key:

- Browse to your: Google Developers Console and sign-in with your Google account.
- A default project called "API Project" is created for you when you first login to the Developers Console. You can use that project, or create a new one by clicking the "Create Project" button at the top of the window.
- Select one of the projects in the list - e.g. "API Project"
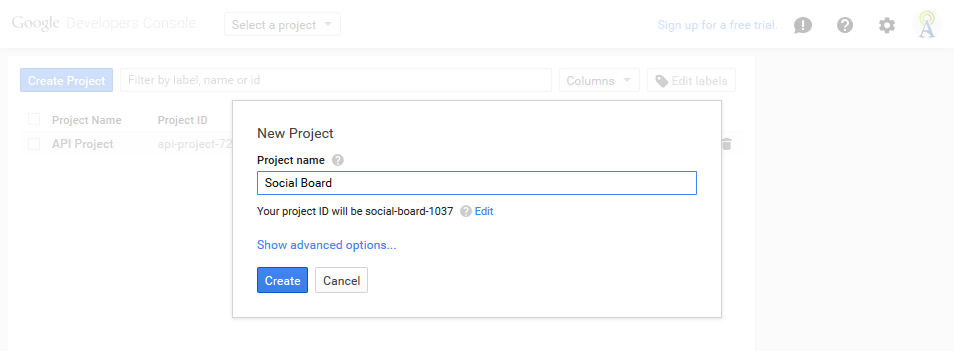
- If you select the previously created "API Project" for the first time, a popup opens asking you to set a Project ID. Click OK and continue.
-
Click the
 bars button
and select APIs & Services from the left
sidebar.
bars button
and select APIs & Services from the left
sidebar.
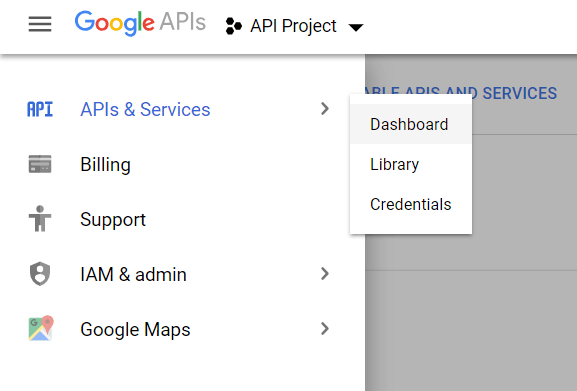
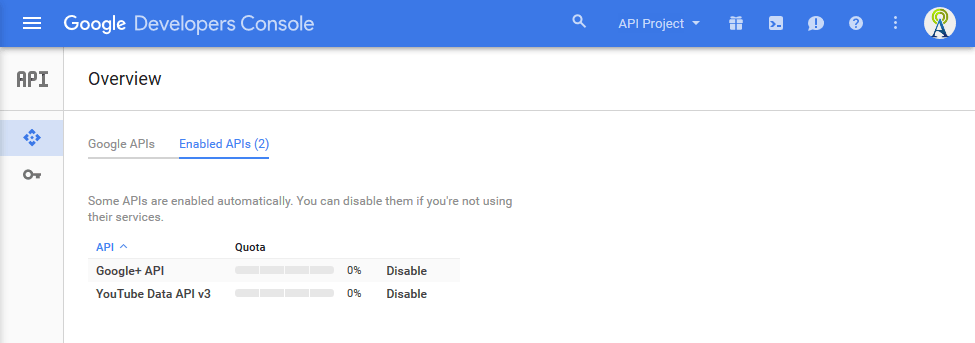
- Under Google APIs, search and click on "YouTube Data API v3".
- Click the "Enable API" button on top of the "YouTube Data API v3" page to turn it on.

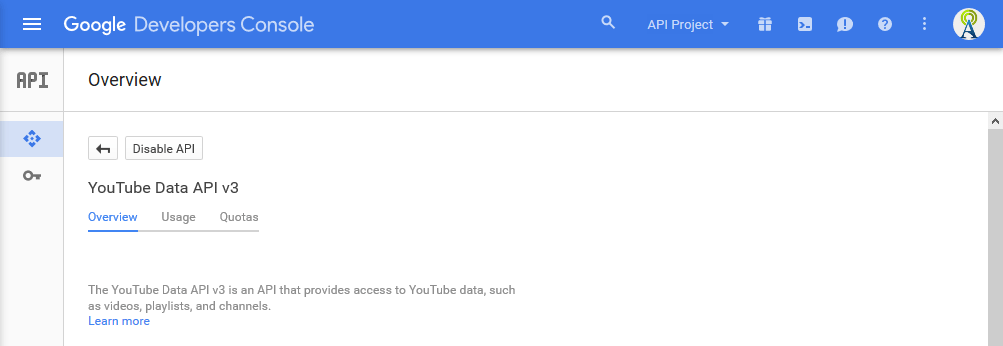
- Click back and you will have "YouTube Data API v3" under API Library tab.
- Click Credentials on the left sidebar, under Public API access, click "Create new key" button.
- Copy your API KEY and paste into your Social Stream configuration form.
Instagram API Credentials
For the component to be able to retrieve your feed data from
Instagram, you need to connect your Instagram account(s) to the
component.
You will be able to get the feed from any
Instagram accounts you have listed under Authenticated
Accounts section
within the component.
To connect an Instagram account to the component, use one of the following methods:
-
Get feed data from your Instagram business accounts without a
result limit and get feed data from any hashtag limited to posts
published within the last 24 hours.
- Instagram Business - Using our App
- Instagram Business - Using your own App
-
Get feed data from any of your Instagram accounts limited to the
last 20 recent posts.
- Instagram Basic - Using our App
- Instagram Basic - Using your own App
Instagram Basic - Using our App:
-
From the Joomla admin panel, go to
the component Settings. -
On the Stream Settings page, switch to
API Credentialstab and scroll to the Instagram API Credentials » Instagram Basic (Personal) section. - Choose Use our App radio option.
- Click on Connect Instagram Account(s) button.
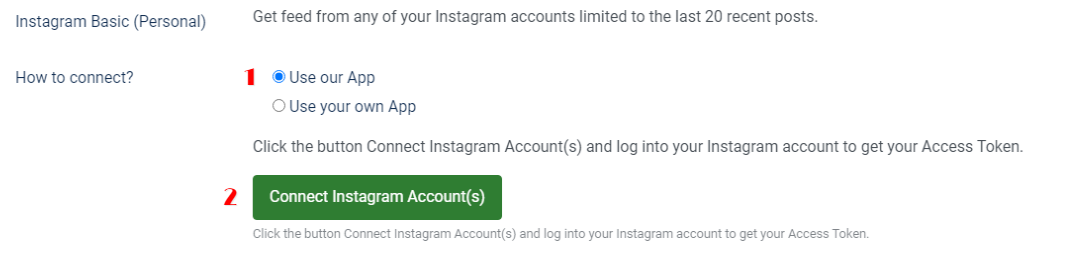
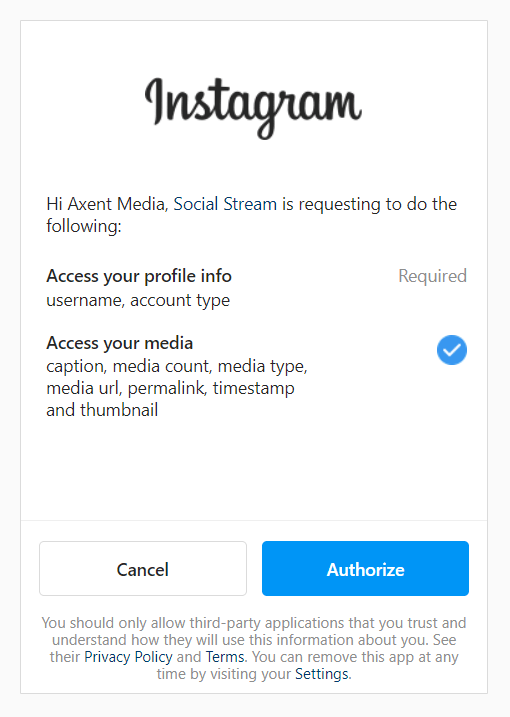
- You will need to login to your Instagram account if required.
- Authorize our Instagram App and you will be redirected back to this page again with your Instagram account listed in Authenticated Accounts section.
- Following the steps above, you can connect as many as Instagram accounts you like to the plugin.
- On top of settings page click on Save only if you have changed the connect method.
Instagram Basic - Using your own App:
Note: Please
consider, you can only get the feed of Instagram accounts you
have listed under the Instagram Testers section
in your Facebook App and you can connect with them to the App.
In the following tutorial, we will show you how to create
your Instagram App via Facebook and add your Instagram accounts
into Instagram Testers section.
In cases you want to get feed from your customers Instagram
accounts, you can do any of these:
- You create the Facebook App,
you add your customer's Instagram account to your App as a
Tester and ask your customer to do the connection process.
- Your customer will create the Facebook App and do the
connection process as well.
- Login to your Facebook account and browse to the Facebook for Developers page.
-
If you have not registered to become a Facebook developer, you
should do that now by pressing the
Get Started button on the page. It's a quick
and easy process to get signed up.
Check this video or read the article on how to register for Facebook developer? - Now you need to create a Facebook App. Check this video or follow the steps below to create your Facebook App.
- Within the Apps page, click the, Create App button
- The Create an App page will be opened. Select None as an app type.
- Enter a custom name in the Display Name input, enter your email address as Contact Email and click Create App ID button.
- Your App is created. Now you need to setup and connect your Instagram account(s) via your Facebook App.
- Browse to your app dashboard page and make sure your Facebook App is in Development mode.
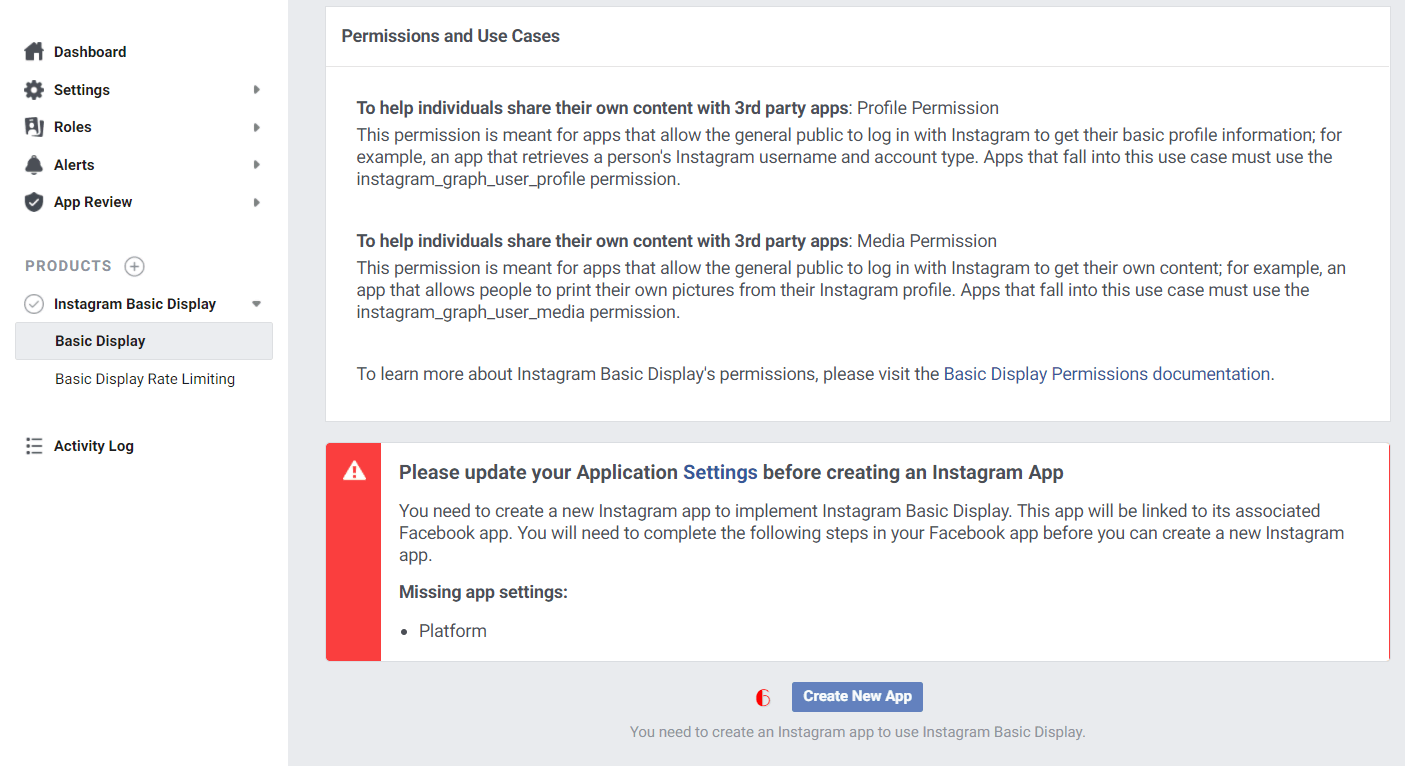
- Click on the Add Product link on the left side and in the Add a Product page, click the Set Up button right in the Instagram Basic Display block.
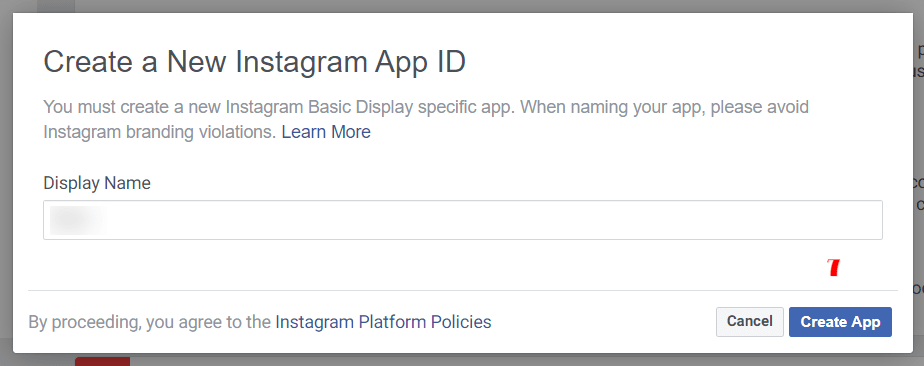
- On the next page opening, scroll down and click the Create New App button.
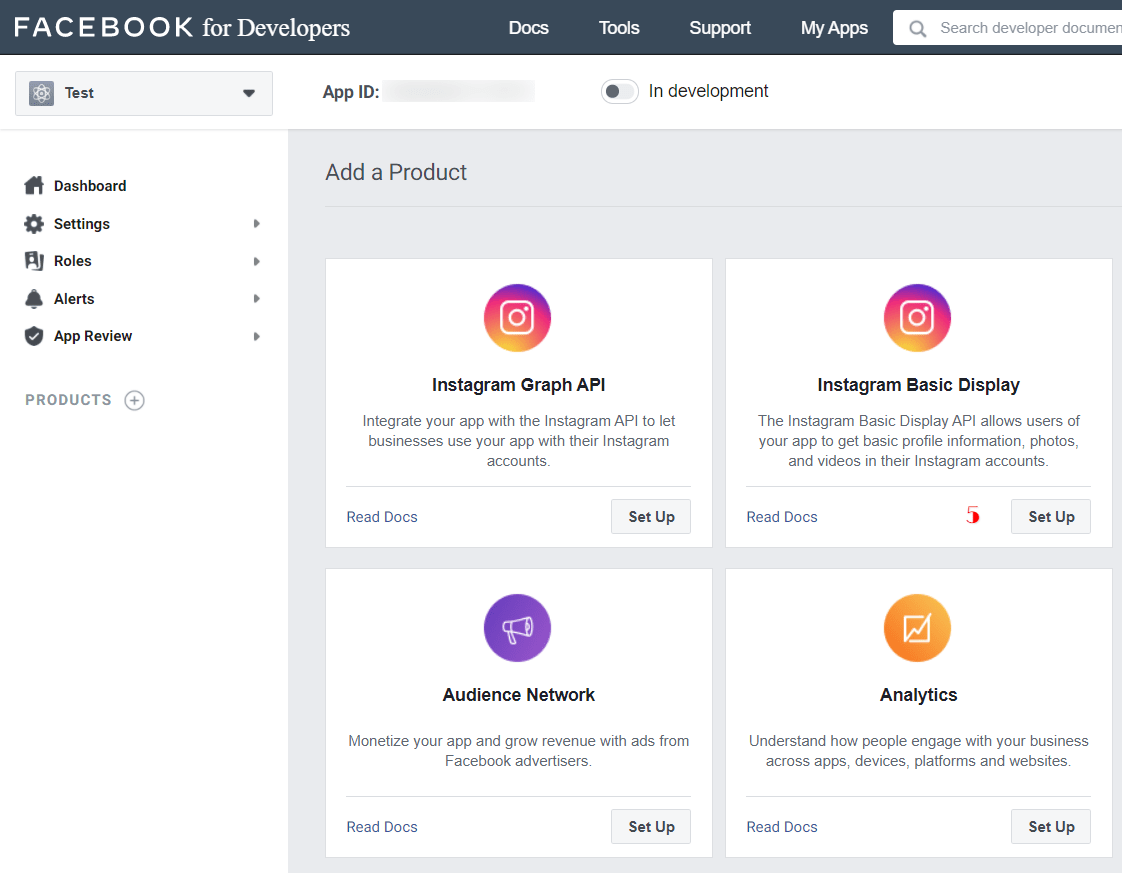
- Enter a name for your Instagram app and click the Create App button.
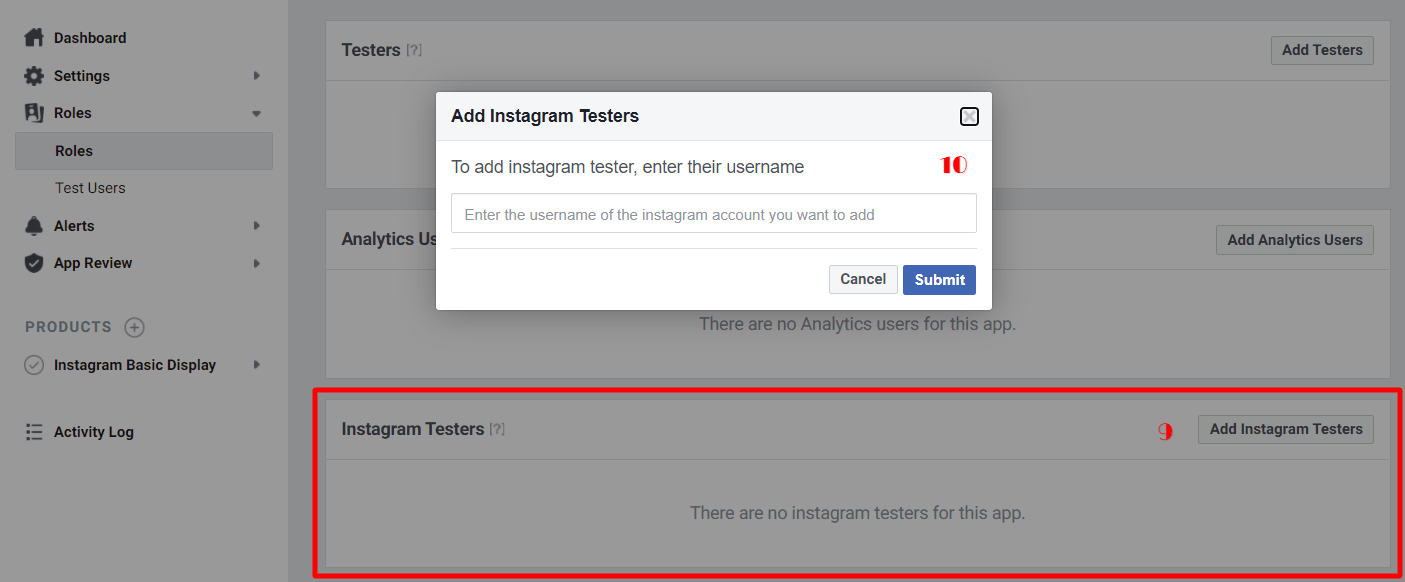
- Within the Basic Display page, scroll to the User Token Generator section and click Add or Remove Instagram Testers button.

- Within the Roles page, scroll to the Instagram Testers section and add any Instagram user you want to get its feed. The Instagram users should also accept your invitation from Settings > Apps and Websites > TESTER INVITES section in their Instagram mobile applications or via https://www.instagram.com/accounts/manage_access/ via Instagram website.
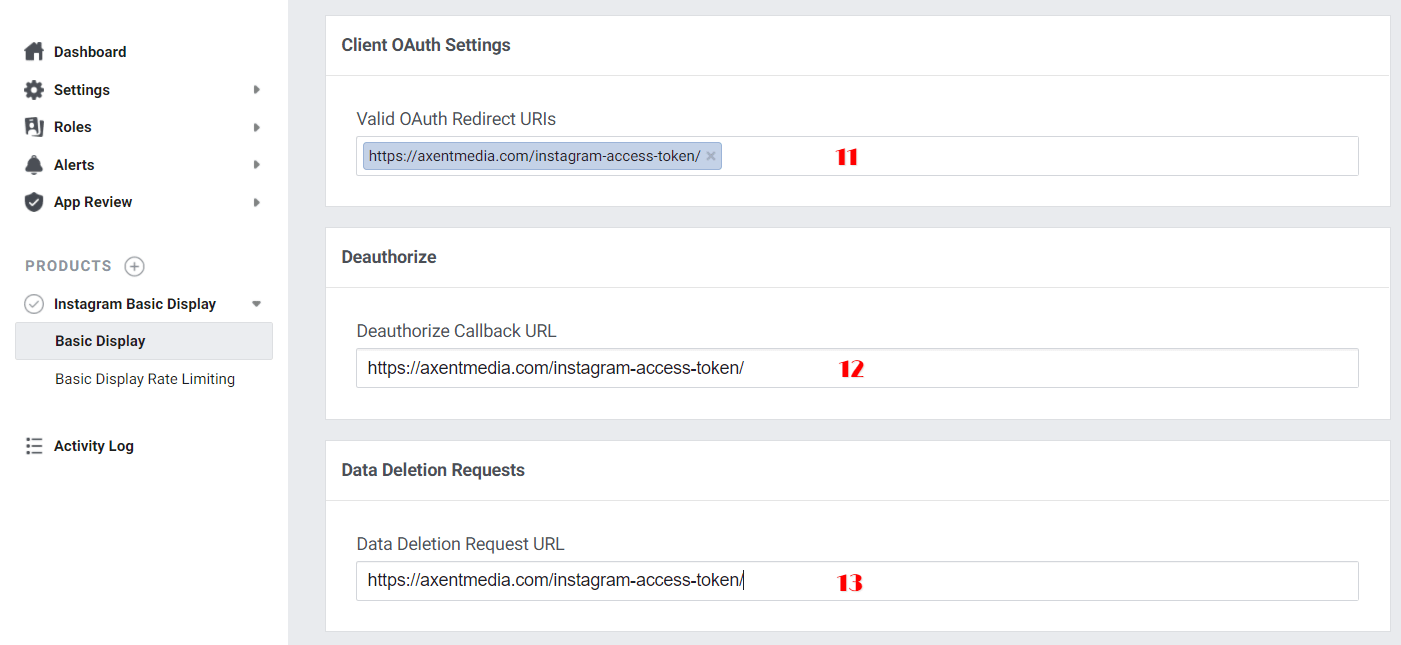
- Go back to the Basic Display page and scroll to the Client OAuth Settings section.
-
Exactly add the following URL into the
Valid OAuth Redirect URLs,
Deauthorize Callback URL and
Data Deletion Request URL sections and save
the settings.
https://axentmedia.com/instagram-access-token/
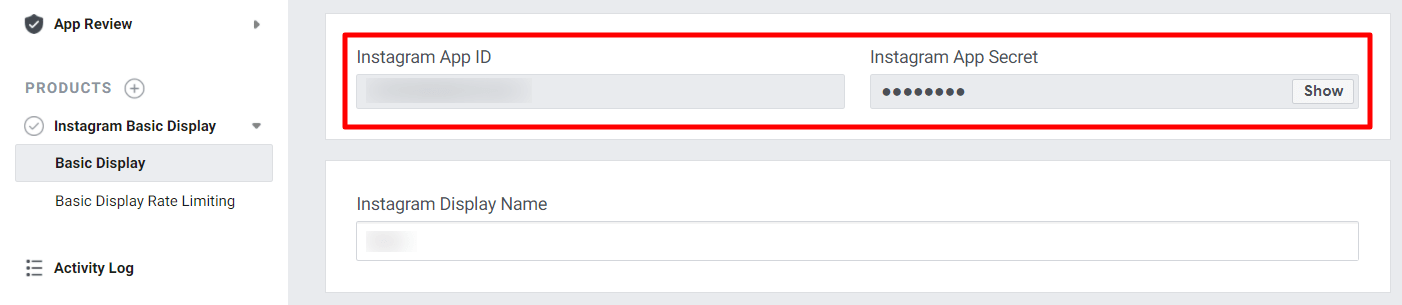
- On the same page scroll a little to top, and copy the App ID and App Secret values from this page.
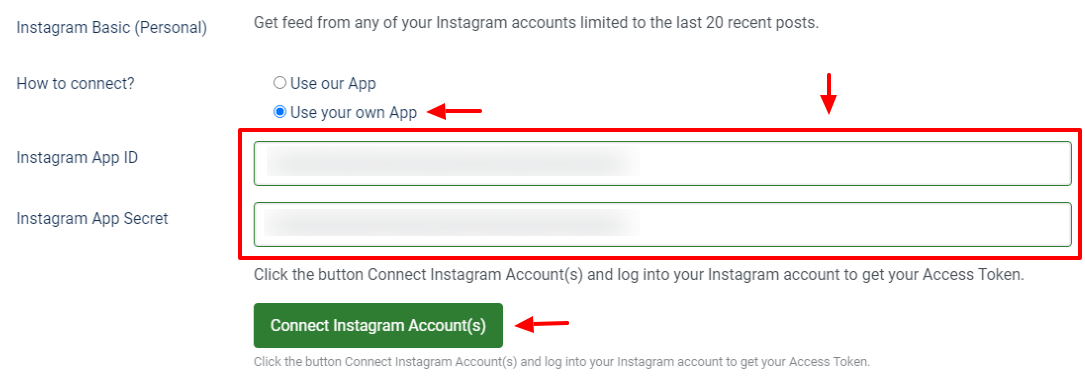
- From Joomla administrator, go to Simple Social Media Stream » Settings.
- On the Settings page, switch to API Credentials tab and scroll to the Instagram API Credentials section.
- Choose Use your own App as "How to connect?" radio option.
- Paste the App ID and App Secret values in their appropriate places.
- Click on Connect Instagram Account(s) button.
- You will need to login to your Instagram account and authorize the Instagram App connection request.
- You need to do the same process steps 21 - 22 and connect to the plugin any other Instagram account you want to get its feed.
- You will be redirected back to the API Credentials page again with your Instagram account listed in Authenticated Accounts section.
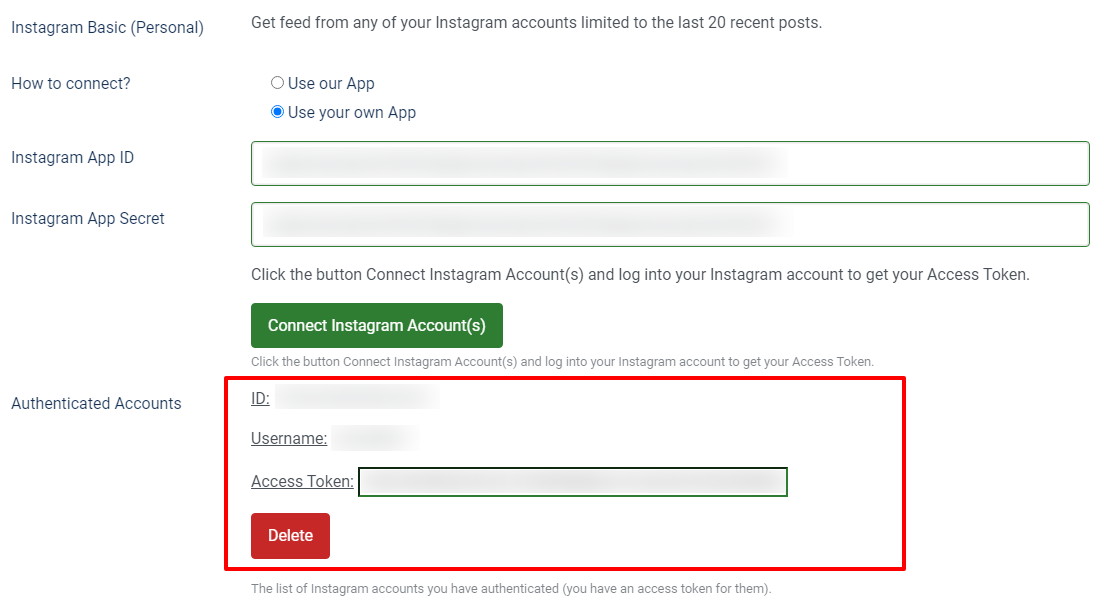
- On top of settings page click on Save only if you have changed the connect method.
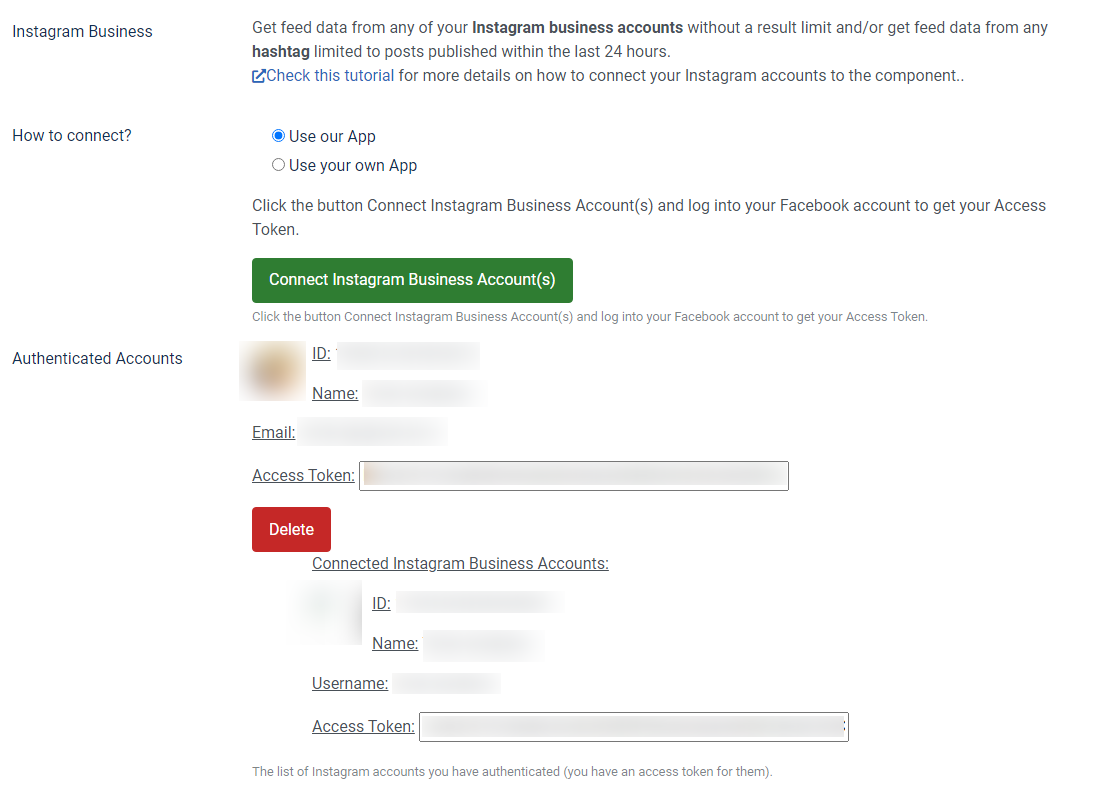
Instagram Business - Using our App:
Note: Please
consider, you can only get the feed of Instagram business
accounts you have them
connected to their corresponding Facebook Pages you have
under management
within the Facebook account you are authenticating our Facebook
app with or,
your Facebook account has a role in that
corresponding Facebook Page.
Check this article on
how to manage roles for your Facebook Page.
Learn more on
how to connect your Facebook page to your Instagram business
account.
In cases you want to get feed from your customers Instagram
business accounts, you can do any of these:
- You ask your customer to
give you a role like Moderator in the corresponding Facebook
Page(s) you want to get feed from and you do the Instagram
business account connection process.
- Your customer will
directly do the Instagram business account connection process.
- From the Joomla admin panel, go to the component Settings.
- On the Settings page, switch to API Credentials tab and scroll to the Instagram API Credentials » Instagram Business section.
- Choose Use our App as "How to connect?" radio option.
- Click on Connect Instagram Business Account(s) button.
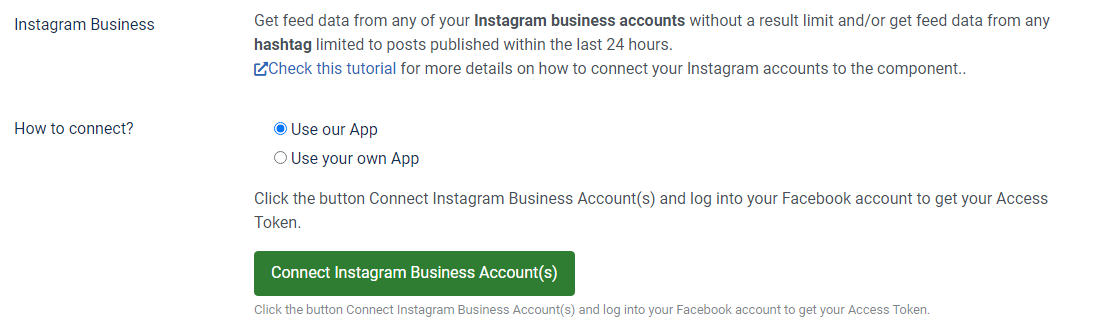
- You will need to login to your Facebook account and authorize our Facebook App.

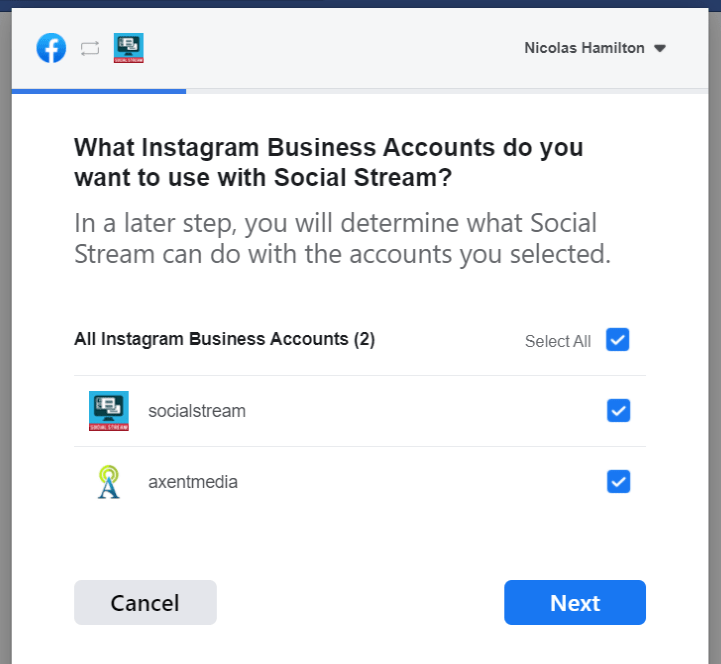
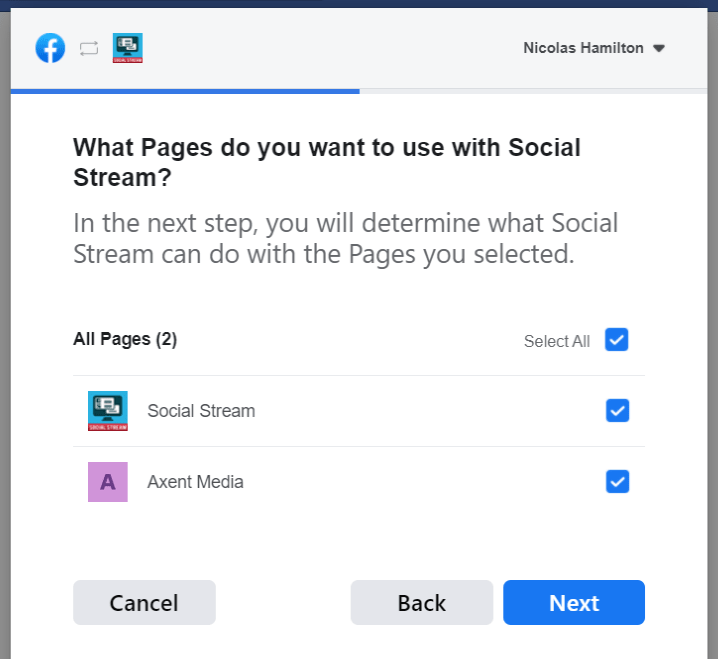
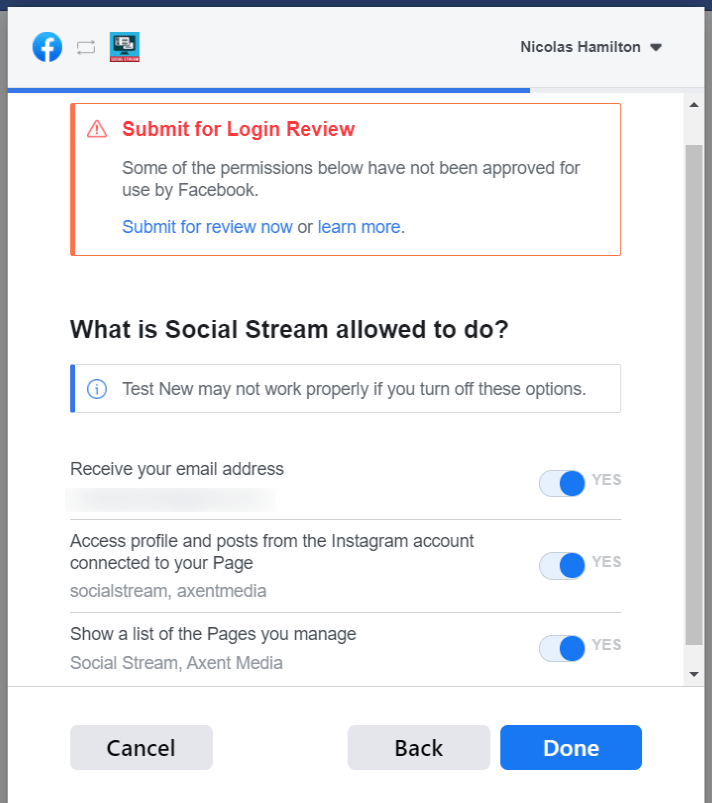
- You will be redirected back to the API Credentials page again with your Instagram Business Account(s) listed in Authenticated Accounts section.
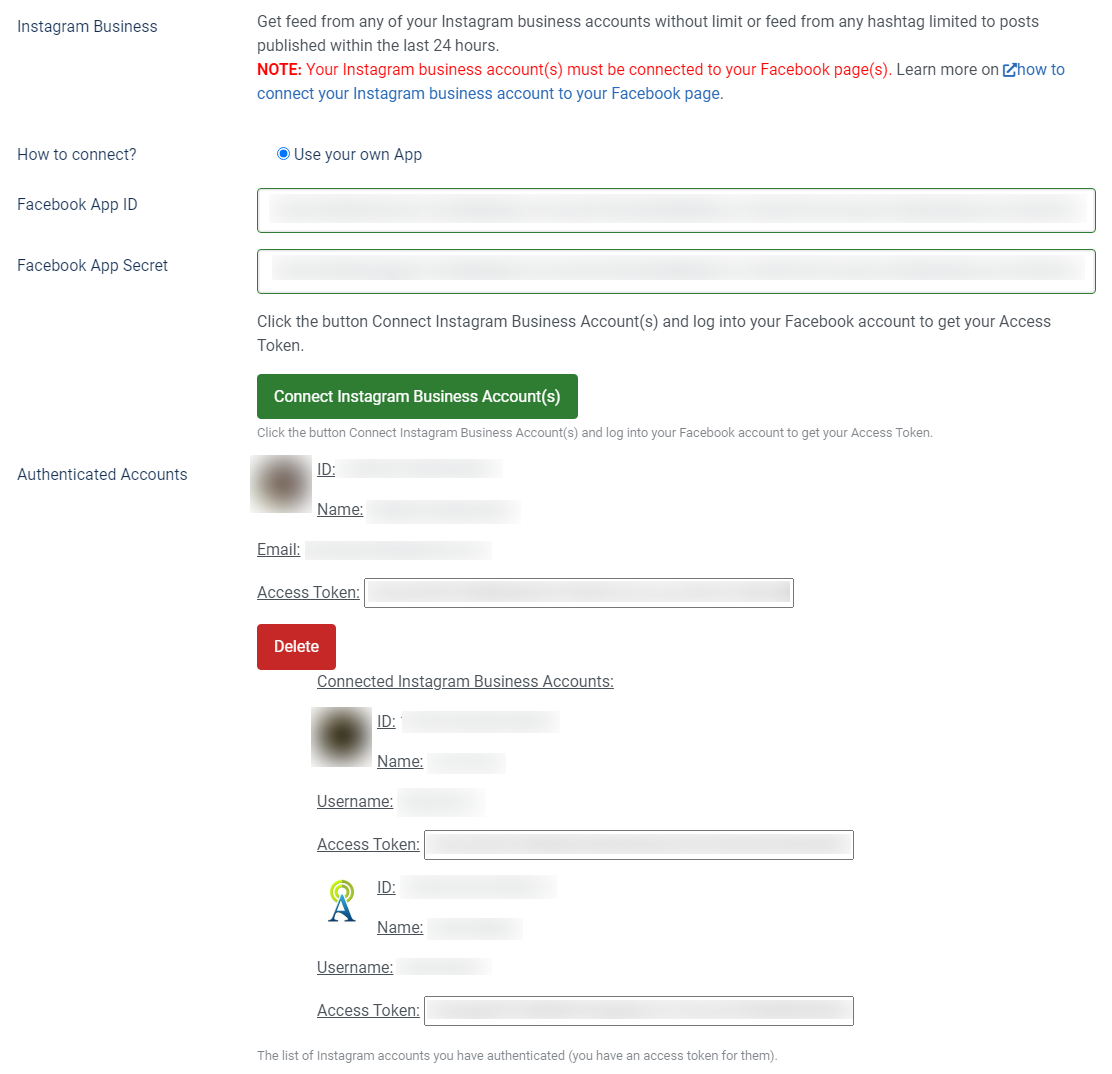
Instagram Business - Using your own App:
Note: Please
consider, you can only get the feed of Instagram business
accounts you have them
connected to their corresponding Facebook Pages you have
under management
within the Facebook account you are authenticating your Facebook
app with or,
your Facebook account has a role in that
corresponding Facebook Page.
Check this article on
how to manage roles for your Facebook Page.
Learn more on
how to connect your Facebook page to your Instagram business
account.
In cases you want to get feed from your customers Instagram
business accounts, you can do any of these:
- You create the Facebook App,
you ask your customer to give you a role like Moderator in the
corresponding Facebook Page(s) you want to get feed from and
finally you do the connection process.
- You create the
Facebook App, you add your customer's Facebook account to your
App as a Tester or Developer and ask your customer to do the
connection process.
- Your customer will create the
Facebook App and do the connection process as well.
- Follow the steps 1 - 7 from this topic to create a Facebook App.
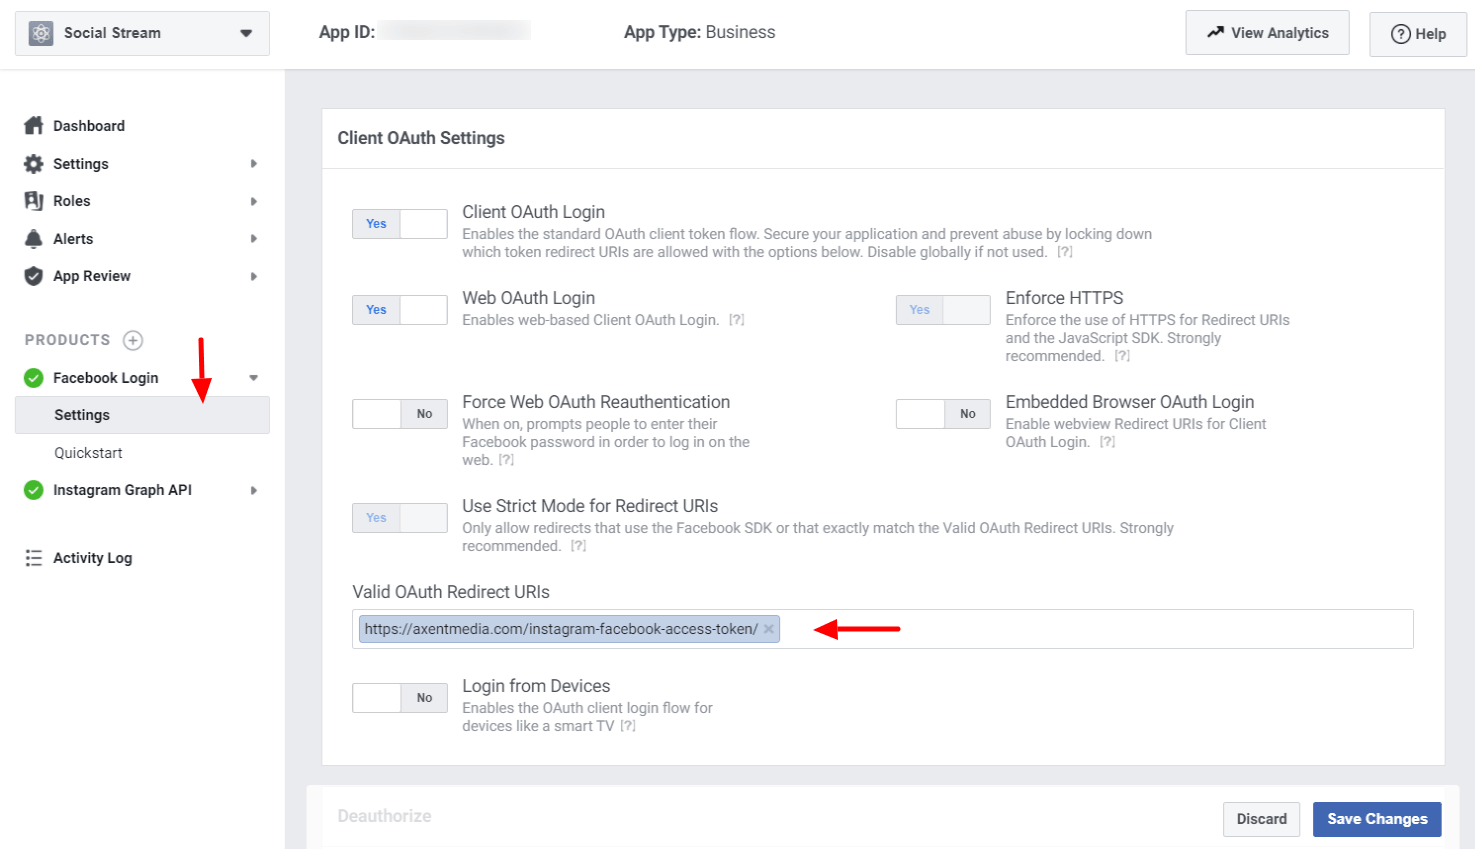
-
In the Client OAuth Settings section, exactly
add the following URL into the
Valid OAuth Redirect URLs section and save
the settings.
https://axentmedia.com/instagram-facebook-access-token/
- From the left sidebar, click on the Settings » Basic.
- Copy the App ID and App Secret values from this page.

- From Joomla administrator, go to Simple Social Media Stream » Settings.
-
On the Settings page, switch to
API Credentialstab and scroll to the Instagram API Credentials » Instagram Business section. - Choose Use your own App as "How to connect?" radio option.
- Paste the App ID and App Secret values in their appropriate places.
- Click on Connect Instagram Business Account(s) button.
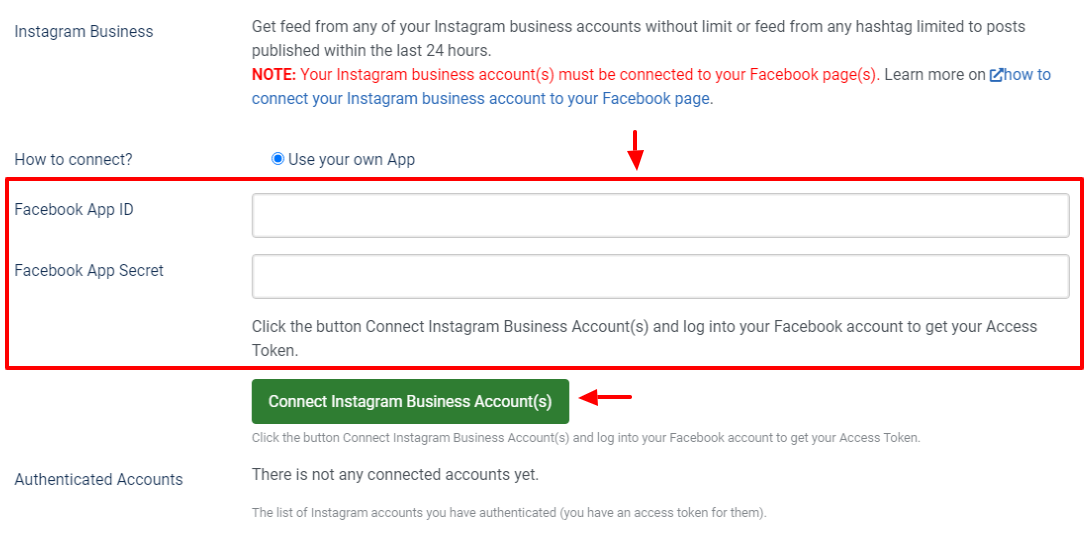
- You will need to login to your Facebook account and authorize your own Facebook App.
- You will be redirected back to the API Credentials page again with your Instagram Business Account(s) listed in Authenticated Accounts section.
Flickr API Credentials
To create and obtain your Flickr API Key:- Browse to this page: https://www.flickr.com/services/apps/create/noncommercial/. You will be redirected to "Login" page if you are not login to your account.
- Fill out the form as highlighted below and click on SUBMIT button to complete.
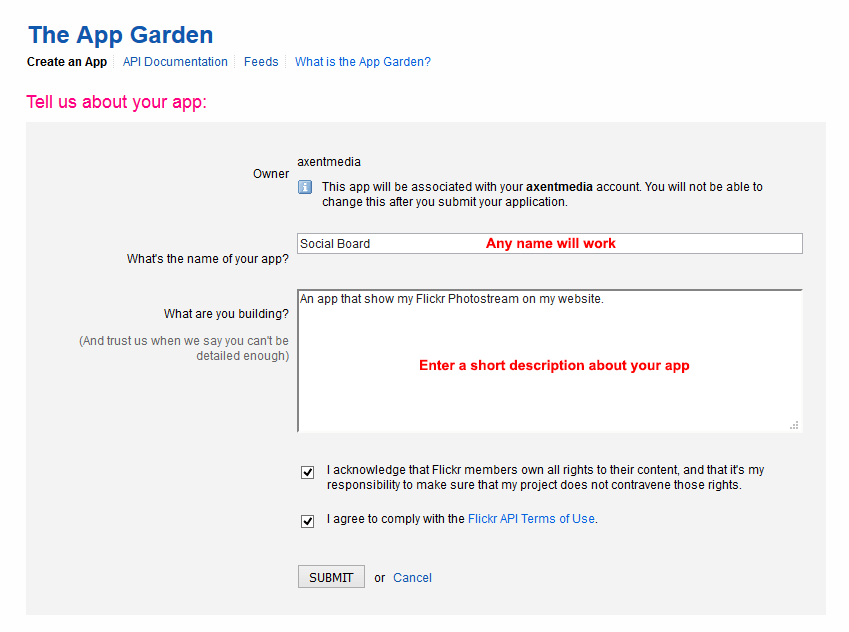
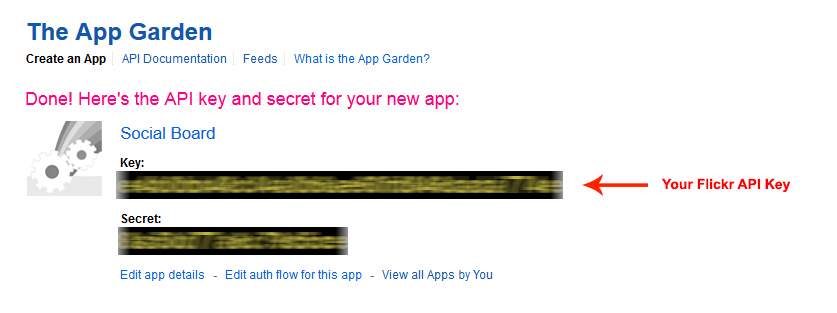
- In the next page, you will be provided with an API Key and Secret Key. Copy the "Key" string and paste into "Flickr API Key" text box in the Flickr section of API Credentials tab in "Simple Social Media Stream Component" Settings page.
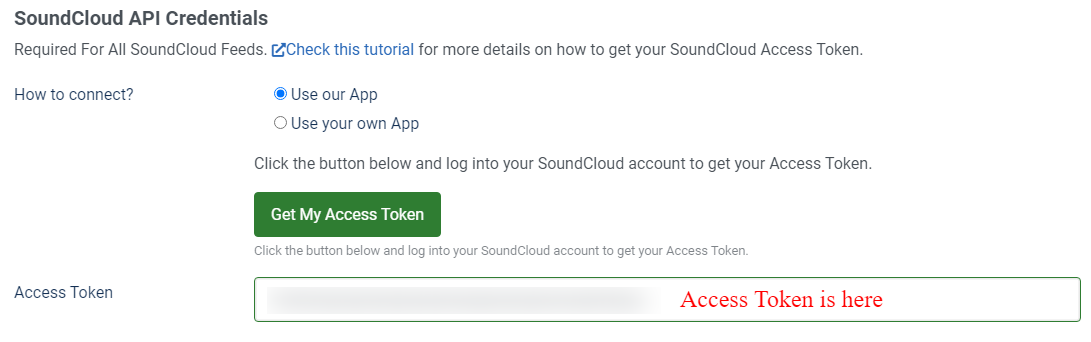
SoundCloud API Credentials
For the plugin to be able to retrieve your tracks feed data from
SoundCloud, you need to connect your SoundCloud account to the
plugin.
You will be able to get the tracks feed from any
SoundCloud accounts, playlist or using a search term.
- From Joomla admin panel, go to component Settings.
- On the component Settings page, switch to API Credentials tab and scroll to the SoundCloud API Credentials section.
- Click on Get my Access Token button.
- You will need to login to your SoundCloud account and authorize our SoundCloud App.
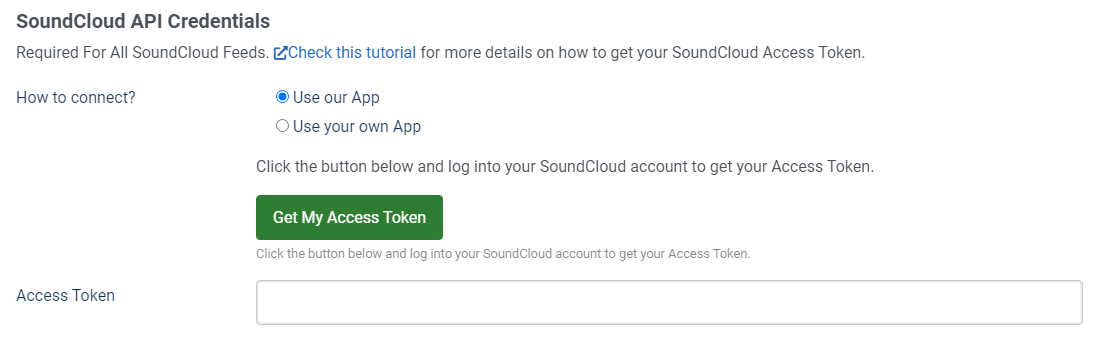
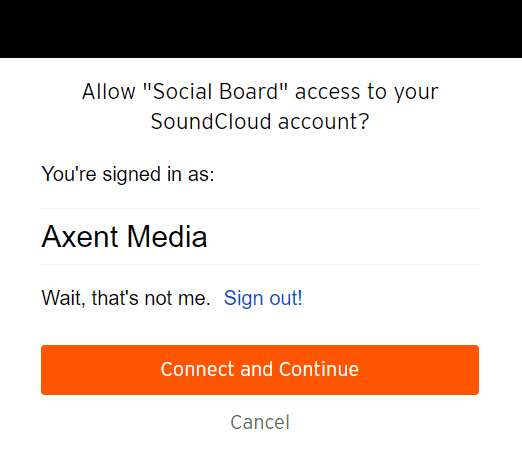
- You will be redirected back to this page again with Access Token field filled with your token.
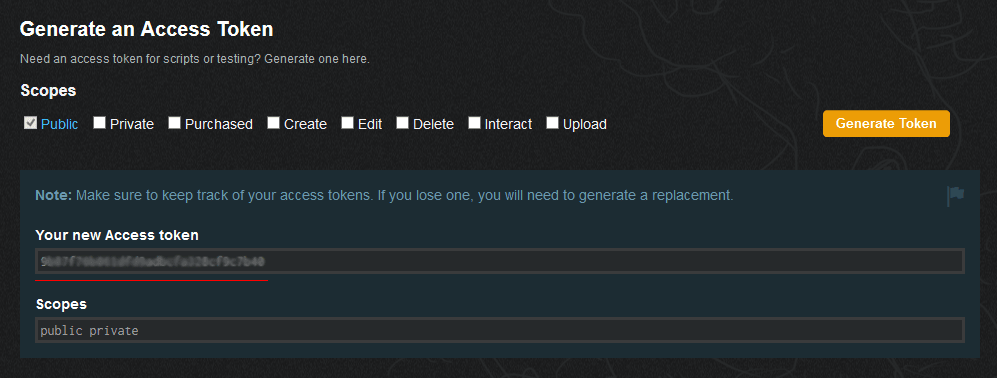
Vimeo API Credentials
To create and obtain your Vimeo Access Token:- Browse to this page: https://developer.vimeo.com/apps/new. You will be redirected to "Sign in" page if you are not login to your account.
- Fill out the form as highlighted below and click on "Create app" button to complete.
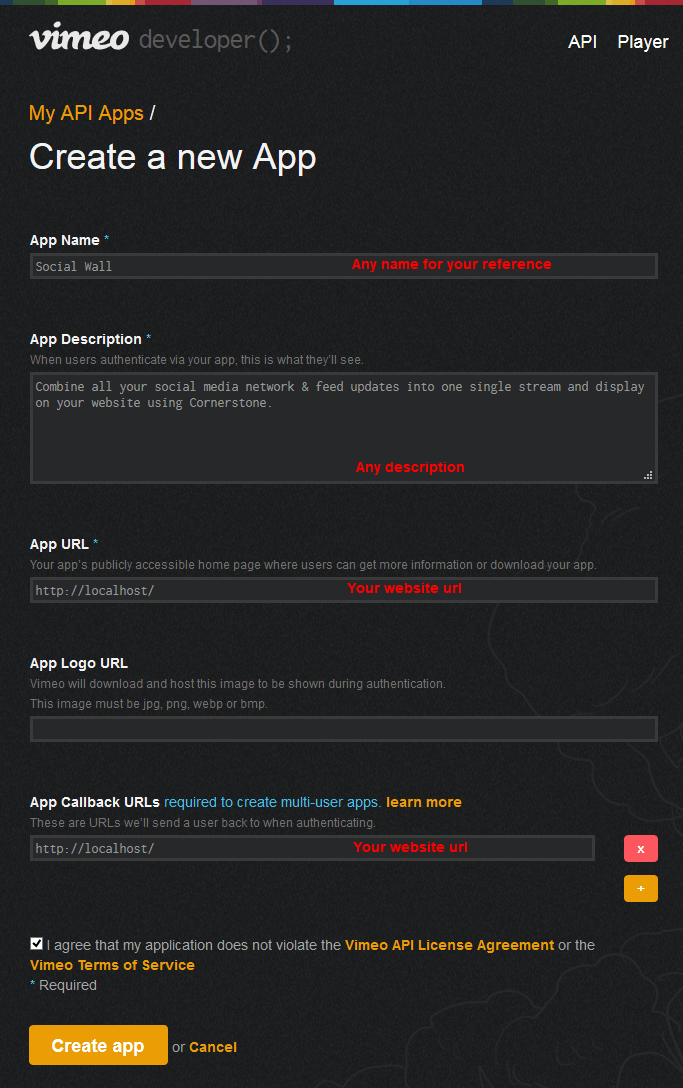
- In the next page, scroll to the "Generate a new Acceess Token" section at the end of the page.
- Make sure to uncheck the "Private" from the Scopes.
- Click on the "Generate Token" button and copy the "Your new Access token" string and paste into "Vimeo Access Token" text box in API Credentials section.

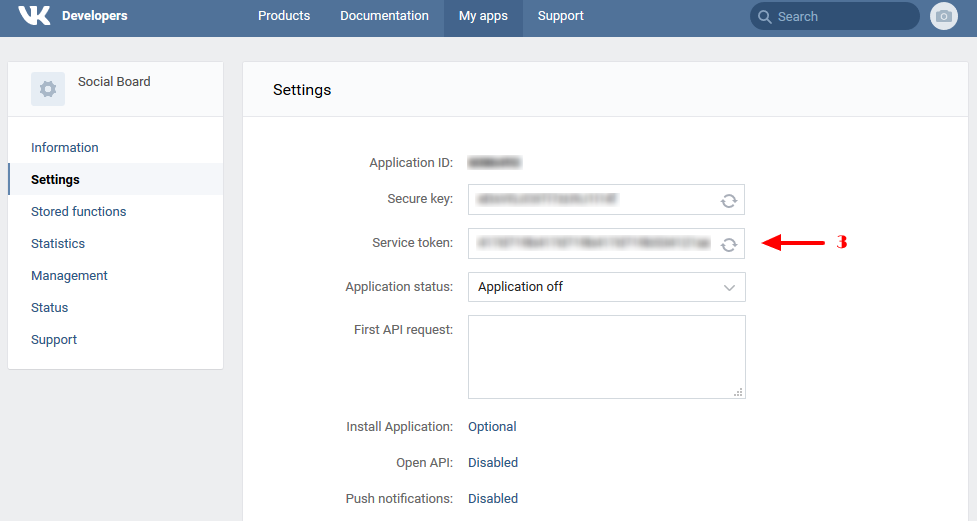
VK API Credentials
To create and obtain your VK Service Token:- Browse to this page: https://vk.com/editapp?act=create. You will be redirected to "Sign in" page if you are not login to your account.
- Enter a name for the App in the Title input as highlighted below and click on "Connect Application" button to complete.
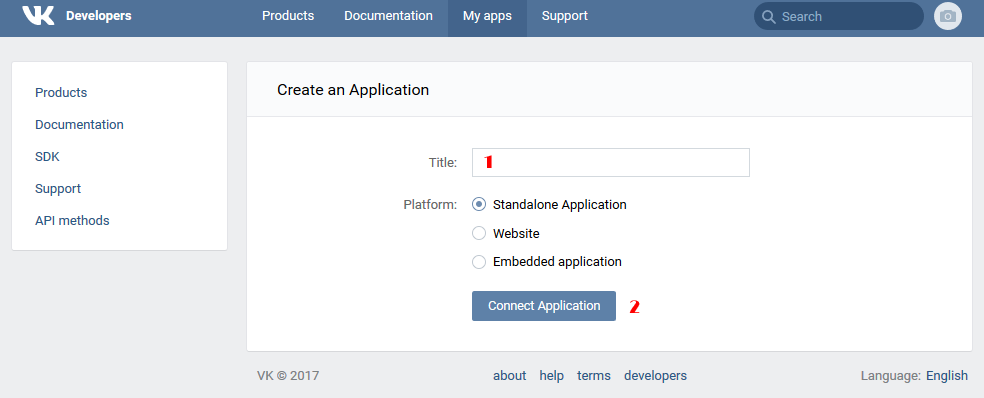
- On the next page, in App Settings tab, copy the "Service token" string and paste into "VK Service Token" text box in API Credentials section.
Displaying Social Streams
You can add your Social Stream on your website in 2 different ways:
Add Social Stream on a page
-
From the top menu, click on
Menus » Main Menuand in the "Menus: Items" page, click the1. Newbutton.

-
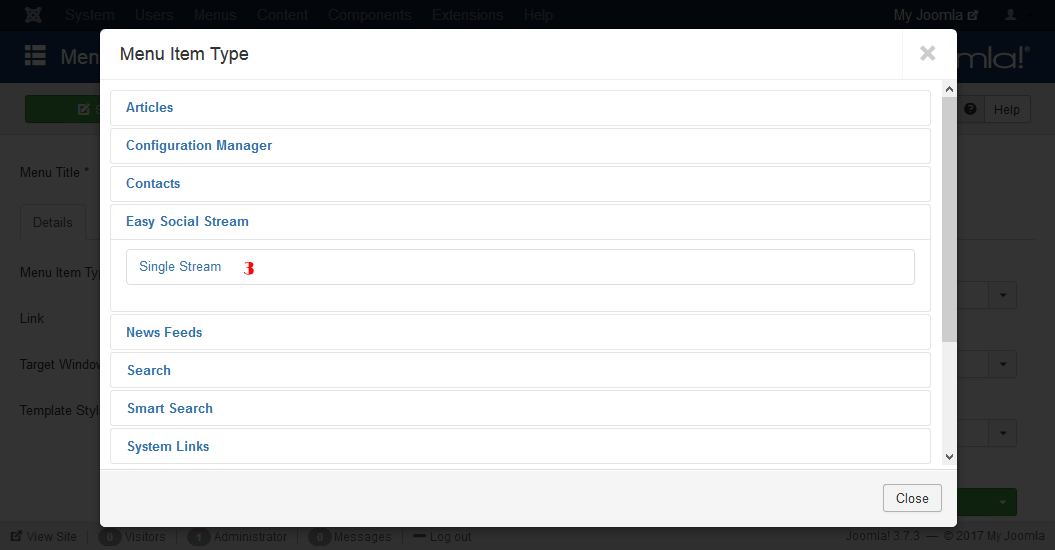
On the "Menus: New Item" page, click the
2. Selectbutton on front of the "Menu Item Type" and in the new opening window, select the3. Simple Social Media Stream > Single Stream. - Finaly, click the
Savebutton.

Browse to your created page on your website to see the social stream.
Add Social Stream as a Module
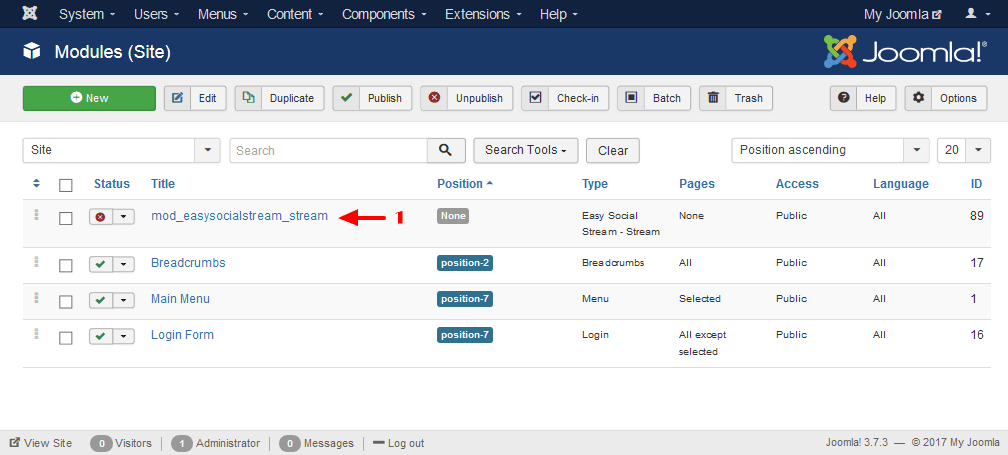
-
From the Joomla admin panel, go to
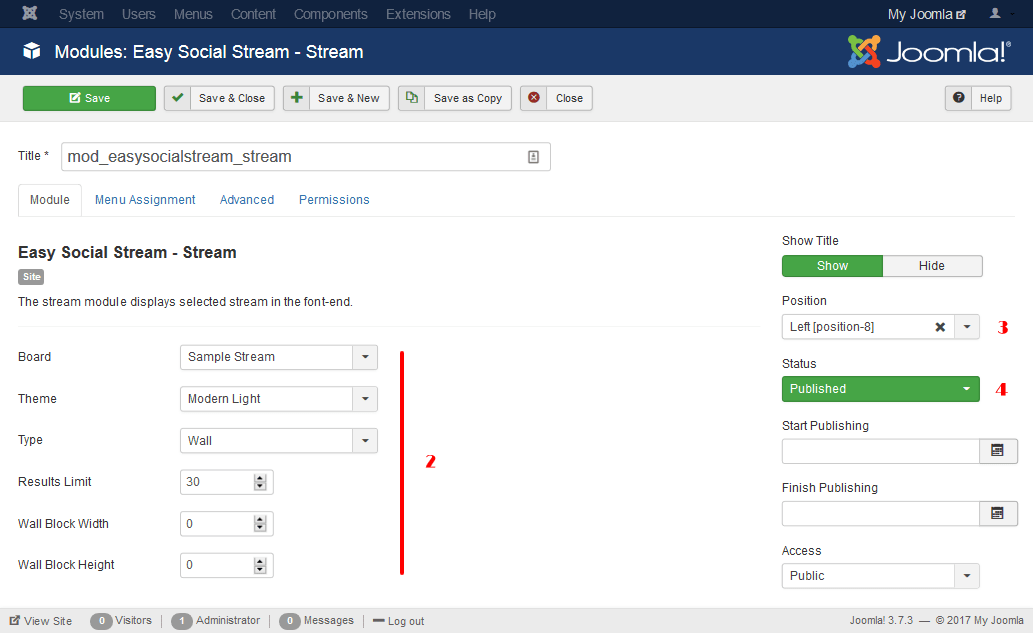
Extensions » Modules. - Edit the "mod_simplesocialmediastream_stream" predefined module or you can create a new module by clicking the New button and selecting "Simple Social Media Stream - Stream as module type.
-
2.Set your Social Stream requirements,3.set a position for displaying the Social Stream on your website and finally,4.set the module status to Published. -
Go to the
Menu Assignmenttab and assign the module to your desired pages and6. Save.
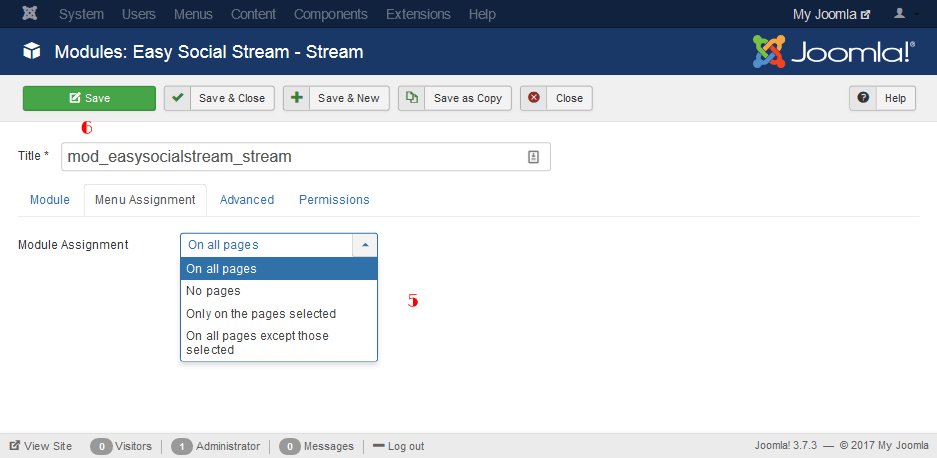
Browse to the pages on your website you have assigned the module, to see the social stream.
Managing Themes
To access the Themes management page, from Joomla admin panel go
to
Components » Simple Social Media Stream »
                  Themes
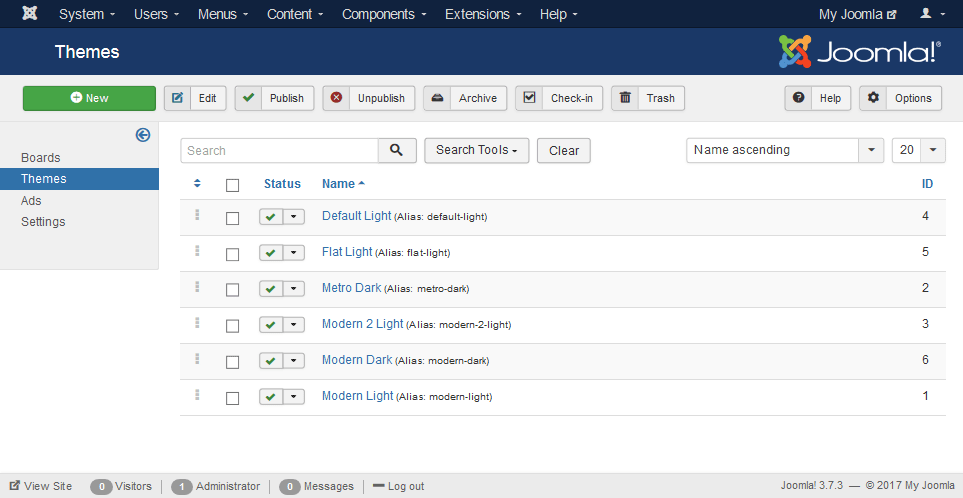
This section lists all of your previously added Themes.
Edit a Theme
To edit a Theme, click on the name of the Theme to display the Theme configurations in a new page. Make your desired changes and click the "Save" button to save the new configurations.
Delete a Theme
To delete a Theme, click on the left down button beside the name of the Theme and click on "Trash". This will move the Theme to the Trash folder but, if you are going to remove it permanently from the Joomla system, delete it from Trash.
Creating a new Theme
To create a Theme, click the New button in the
Themes management page.
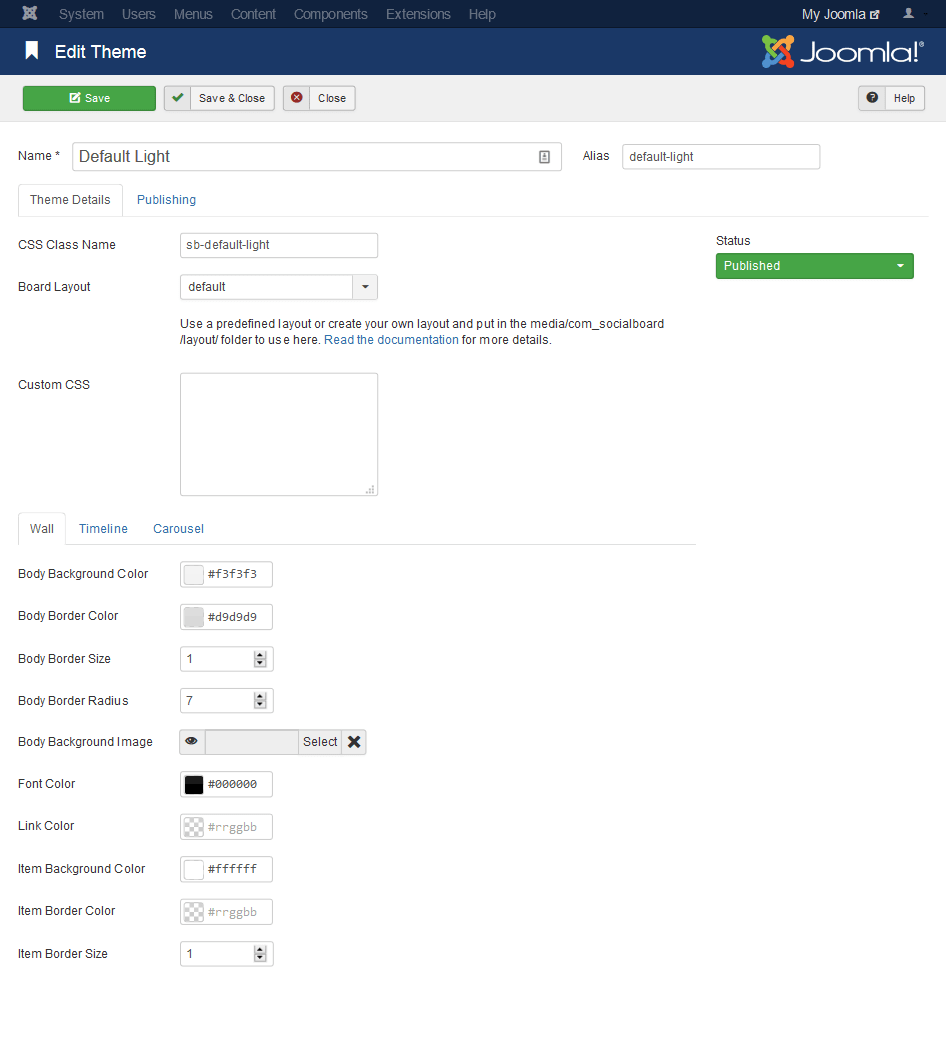
General Theme Setting
CSS Class NameSelect a name for the theme CSS class selector (without dot).
Stream Layout
The stream layout is the main displaying structure of the output
feed items. We have created 5 different layouts for this
extension. You can create your own layout and put in the
media/com_simplesocialmediastream/layout/ folder to
use here.
To create your own custom layout:
-
Edit this file:
media/com_simplesocialmediastream/css/styles.csslocated in your Joomla directory using an FTP client, add your own css at the end of the file and minify the file to styles.min.css again. -
Browse to this directory:
media/com_simplesocialmediastream/layoutand create a new .php file with your own layout name - e.g. mylayout.php - Your new layout will be available here in add/edit Theme page.
Custom CSS for styling the Social Stream can be entered into
this text area. Any CSS rules included in this text area will
automatically be inserted into the page.
As an example you can write your CSS code something like
this:
.sboard.<class-name> .sb-item { font-family: Arial,
                  sans-serif; }
Replace <class-name> with the "CSS Class Name" in the
current theme.
Dedicated Theme Settings
Each type of stream has it's dedicated options in a separate tab.
Body Background ColorThis color applies to your Social Stream background. Select the new background color of the and click elsewhere on the screen to close the colorpicker widget.
Body Border ColorSelect the new border color of the Social Stream and then click elsewhere on the screen to close the colorpicker widget.
Body Border SizeIn order to set a border size (in px) for the Social Stream.
Body Background ImageIn order to set a background image for the Social Stream.
Font ColorSelect the new font color for the feed item and then click elsewhere on the screen to close the colorpicker widget.
Item Background ColorSelect the new background color for the feed item and then click elsewhere on the screen to close the colorpicker widget.
Item Border ColorSelect the new border color for the feed item and then click elsewhere on the screen to close the colorpicker widget.
Item Border SizeIn order to set a border size (in px) for the feed item.
Licensing
To receive the product automatic updates you need to register your extension.-
From Joomla admin panel, go to
Components » Simple Social Media Stream »
                    Settings
. - On the Settings page, switch to Licensing tab.
-
Enter your purchase key in the
License/PurchaseKey text box and Save.
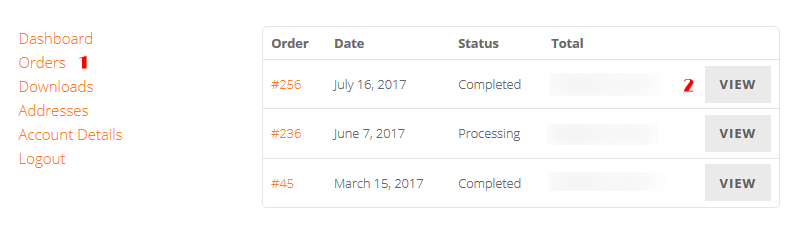
Where Is My Purchase Code?
If you have made your purchase directly on our website:
- Log into your account on our website.
- In your account Dashboard, click Orders, from the left navigation.
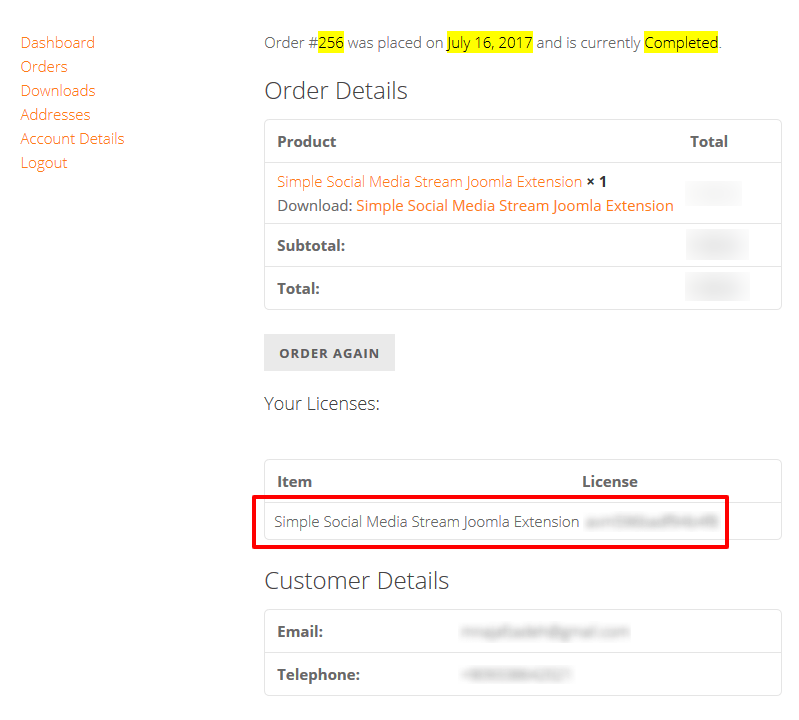
- In Orders page click ‘VIEW’ on front of your purchased item according to the picture below.
- Your license key is right in the "Your Licenses" section.
If you have made your purchase on CodeCanyon:
- Log into your Envato Market (CodeCanyon) account.
- Hover the mouse over your username at the top of the screen and click.
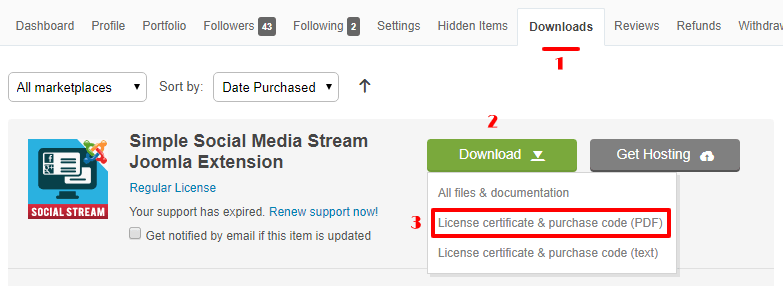
- 1. Click ‘Downloads’ from the user menu items according to the picture.
- 2. Click the ‘Download’ green button and 3. click ‘License certificate & purchase code’ (available as PDF or text file) from the drop down list.
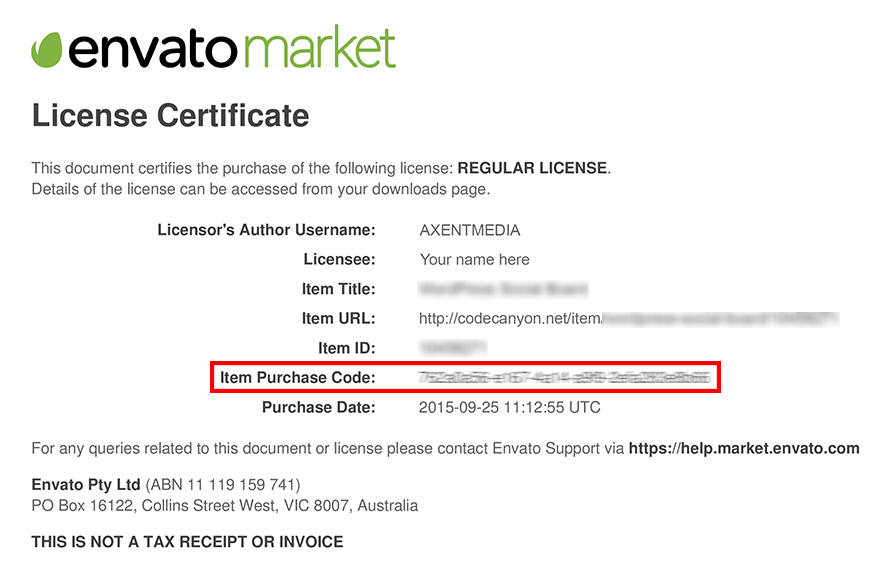
- Below is an example of a PDF License certificate and purchase code.
FAQ
Does the extension work with Joomla v2.x?
Yes, this extension works with Joomla v2.x.
The only limitation is that you can not update the extension via
Joomla Automatic Updates.
There is no feed to show or there is a connectivity problem!
This message is usually caused for one of the following reasons:
- You have not declared any social network ID in your Social Stream. Read about Social Stream configuration.
- API Credentials setup is not correctly set or is not valid. Read this topic for details about API Credentials setup.
- Your website can not access the social API server for any reason.
After fixing the problem, try cleaning the cache from
Social Stream » Stream Settings.
The social items appear on the website but, some other functionalities are not working!
Social Stream is conflicting with an another extension installed
on your website or an another script that is making a problem
for Social Stream scripts.
Please,
contact our support desk
and provide us with your website URL and other required
information.
The Social Stream is working but, some networks do not appear on the stream.
- Network account is new and there isn't anything found in its feed or there is no public activity to show on the public feed.
-
Something is incorrectly cached. Try cleaning the cache from
Social Stream » Stream Settings. - API Credentials setup is not correctly set or is not valid for some networks. Read this topic for details about API Credentials setup.
Facebook feed is not showing
There could be one the following reasons that your Facebook feed may not work:
- Make sure that you have set up your Facebook API Credentials correctly. Read this topic for details about Facebook API Credentials configuration.
- Your Facebook page, personal account ID or Username or album ID is incorrect. Read this topic on how to find your Facebook IDs.
- Your Facebook settings restrict the user that may view your page. You have to remove any age/profanity restrictions from your Facebook page.
Twitter feed is not showing
- Make sure that you have set up your Twitter API Credentials correctly. Read this topic for details about Twitter API Credentials configuration.
- If your Twitter API credentials is valid, this may be due to the Twitter API limits that is 180 calls per 15 minutes.
Tweets older than a week for a hashtag or search term does not display on my social stream
Unfortunately, this is Twitter API limitations for hashtags or
any search that is made via its API platform and we can't change
this rule. The Search API is not complete index of all Tweets,
but instead an index of recent Tweets.
Please check
Twitter Search API Documentation
for your reference.
Instagram feed is not showing
- Instagram Username is incorrect.
- Your website server IP is banned on Instagram for any reason like traced as bot. In this case, you need to connect your Instagram account to the plugin. Read this topic to find that how to set Instagram API Access Token.
Why do I need to create API credentials?
Without creating apps and adding API tokens and keys, your website will not be able to connect to the Social Networking servers. The token authentication makes a secure channel via Social Network server and your website to get the permission to access your social profile and fetch your social feed.
How many sites can I use Simple Social Media Stream on?
You need to purchase one license for each site you want to use
Simple Social Media Stream on.
1 site = 1 license, 2 sites = 2 licenses, 3 sites = 3 licenses
and so on.
It doesn’t matter if they are all in use by the same company, on
the same server, by the same developer, etc. The license terms
are single use – one license per site.
Is there a developer/multi-use license for this pruduct?
If you require a developer license, simply contact our support desk.